Peugeot 208 (2017 year). Manual - part 4
 

  Index      Peugeot     Peugeot 208 - service manual 2017 year in english


Search            


Content   ..  2  3  4  5   ..


Peugeot 208 (2017 year). Manual - part 4


3

47

Ease of use and comfort

Electric adjustments

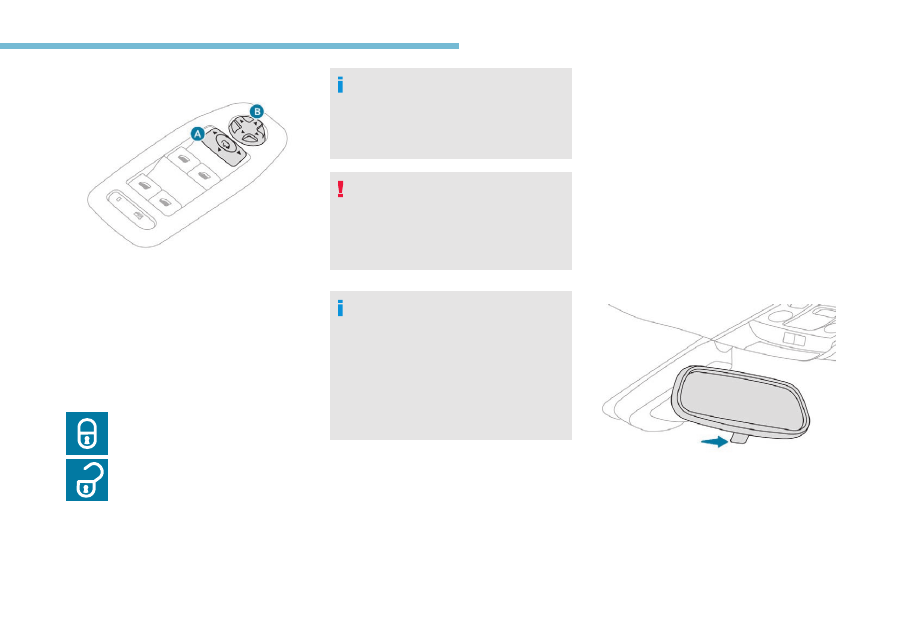
F  Move control A to the right or to the left to 

select the corresponding mirror.

F  Move control B in any of the four directions 

to adjust.

F  Return control to its home position 

(centre).

Folding / unfolding

When locking the vehicle, the mirrors 
fold automatically.

When unlocking the vehicle, the 
mirrors unfold automatically.

F  With the ignition on, pull control A 

rearwards to fold the mirrors.

F  Pull it again to unfold them.

If the mirrors are folded using control A
they will not unfold when the vehicle is 
unlocked. Pull again on control A.

Objects seen in the mirror are in reality 
closer than they appear.
Take this into account when assessing 
the distance of vehicles approaching from 
behind.

The folding and unfolding of the door 
mirrors using the remote control can be 
deactivated by a PEUGEOT dealer or a 
qualified workshop.
Fold the mirrors when putting your vehicle 
through an automatic car wash.
If necessary, the mirrors can be folded 
manually.

Rear view mirror

Equipped with an anti-dazzle system, which 
darkens the mirror glass and reduces the 
nuisance to the driver caused by the sun, 
headlamps from other vehicles, etc.

Manual model

Adjustment
F  Adjust the mirror so that the mirror is 

directed correctly in the "day" position.

Day / night position

F  Pull the lever to change to the "night" anti-

dazzle position.

F  Push the lever to change to the normal 

"day" position.

48

Ease of use and comfort

Automatic "electrochrome" model

In order to ensure optimum visibility during 
your manoeuvres, the mirror lightens 
automatically when reverse gear is 
engaged.

This system automatically and progressively 
changes between day and night use by means 
of a sensor measuring the light coming from the 
rear of the vehicle.

Front seats

Before moving the seat backwards, 
ensure that there is no object or person in 
the way, preventing full travel of the seat.
There is a risk of trapping or pinching 
passengers if present in the rear seats 
or jamming the seat if large objects are 
placed on the floor behind the seat.

Standard seats

Longitudinal adjustment

F  Raise the control and slide the seat 

forwards or backwards.

3

49

Ease of use and comfort

Height adjustment

F  Pull the control upwards to raise or push 

it downwards to lower, as many times as 
necessary to obtain the position required.

Backrest angle

F  Push the control backwards.

Head restraints

F  To raise a head restraint, pull it upwards.
F  To remove the head restraint, press the lug 

A and pull the head restraint upwards.

F  To put it back in place, engage the head 

restraint rods in the apertures keeping them 
in line with the seat backrest.

F  To lower it, press on the lug A and on the 

head restraint at the same time.

50

Ease of use and comfort

The head restraint has support rods with 
notches which prevent it from lowering; 
this is a safety device in case of impact.
The adjustment is correct when the 
upper edge of the head restraint is 
level with the top of the head.
Never drive with the head restraints 
removed; they must be fitted and correctly 
adjusted.

F  Raise the control and slide the seat 

forwards or backwards.

Height adjustment

F  Pull the control upwards to raise or push 

it downwards to lower, as many times as 
necessary to obtain the position required.

Bucket seats

Longitudinal adjustment

3

51

Ease of use and comfort

Backrest angle

F  Push the handle towards the rear and move 

the seat backrest forwards or backwards.

Heated seats

With the engine running, the front seats can be 
heated separately.

F  Use the adjustment wheel, select the level 

of heating required:

0:

Off.

1:

Low.

2:

Medium.

3:

High.

Do not use the function when the seat is 
not occupied.
Reduce the intensity of the heating as 
soon as possible.
When the seat and passenger 
compartment have reached an adequate 
temperature, you can stop the function; 
reducing the consumption of electrical 
current reduces fuel consumption.

Prolonged use at the highest setting is 
not recommended for those with sensitive 
skin.
There is a risk of burns for people whose 
perception of heat is impaired (illness, 
taking medication, etc.).
There is a risk of overheating the system if 
material with insulating properties is used, 
such as cushions or seat covers.
Do not use the system:
-  if wearing damp clothing,
-  if child seats are fitted.
To avoid breaking the heating element in 
the seat:
-  do not place heavy objects on the seat,
-  do not kneel or stand on the seat,
-  do not place sharp objects on the seat,
-  do not spill liquids onto the seat.
To avoid the risk of short-circuit:
-  do not use liquid products for cleaning 

the seat,

-  never use the heating function when 

the seat is damp.

52

Ease of use and comfort

Armrest

Comfort and storage system for the driver and 
front passenger.

Cover with opening lever

F  Lift the lever to raise the lid.

Storage space in the console

F  Pull the armrest fully up.

Access to rear seats 
(3-door)

Folding the front seat forward

Standard model

F Pull only this control upwards to fold the 

backrest and slide the whole seat forward.

The front seat returns to its original position 
when straightening the backrest.

Sport model

F Pull only this control forward to fold the seat 

backrest and move the whole seat forward.

The front seat returns to its original position 
when straightening the backrest.

Ensure that no object or person might 
prevent the seat runners returning to their 
original position; the return to this position 
is necessary to secure the seat.
Ensure that the seat belt has reeled in 
correctly so as to not impede passengers' 
access to the rear seats.

3

53

Ease of use and comfort

One-piece rear bench

Bench seat with fixed one-piece cushion and 
folding one-piece backrest.

Folding the backrest

F  Move the front seats forward if necessary.

F  Position the outer seat belts on the backrest 

and buckle them.

F  Lower the head restraints to the lowest 

position.

F  Release the seat backrest 2 by pressing 

controls 1 simultaneously.

F  Fold the seat backrest 2 on to the fixed 

cushion.

Raising the seat backrest

F  Raise the seat backrest 2.
F  Latch the backrest in place, the red 

indicators on each control 1 are no longer 
visible.

F  Unbuckle and return the outer seat belts to 

their normal positions ready for use.

2/3 – 1/3 split rear bench 
seat

Bench seat with fixed one-piece cushion and 
split backrest (left-hand 2/3, right-hand 1/3) 
which can be folded individually to adapt the 
load space in the boot.

Folding the backrest

F  Move the corresponding front seat forwards 

if necessary.

F  Position the corresponding outer seat belt 

against the backrest and buckle it.

F  Fully lower or remove the head restraint.

54

Ease of use and comfort

F  Release the backrest by pressing control 1 

of backrest 2.

F  Fold the seat backrest 2 on to the fixed 

cushion.

The rear cushion is not removable.

Returning the backrest to 
the normal position

F  Raise the seat backrest 2.
F  Secure it, the red indicator in the control 1 is 

no longer visible.

F  Unbuckle and reposition the seat belts 

ready for use.

F  Refit the head restraint(s).

When folding the seat, the centre seat belt 
should not be fastened but laid out flat 
along the seat.

When repositioning the seat backrest, 
take care not to trap the seat belts.

The rear seat cushion does not fold, only 
the seat backrest can be folded in order to 
increase the boot loading space.

Head restraints

These have one position for use (up) and a 
stowed position (down).

They can be removed and are interchangeable 
side to side.

F  pull the head restraint fully upwards,
F  then, press the lug A.

Never drive with the head restraints 
removed; they must be fitted and correctly 
adjusted.

To remove a head restraint:

3

55

Ease of use and comfort

Recommendations for ventilation and air conditioning

In order for these systems to be fully effective, 
follow the operation and maintenance 
guidelines below:
F  To ensure that the air is distributed evenly, 

keep the external air intake grilles at the 
base of the windscreen, the nozzles, the 
vents, the air outlets and the air extractor 
in the boot free from obstructions.

F  Do not cover the sunshine sensor, 

located on the dashboard; this is used for 
regulation of the automatic air conditioning 
system.

F  Operate the air conditioning system for 

at least 5 to 10 minutes, once or twice a 
month to keep it in perfect working order.

F  Ensure that the passenger compartment 

filter is in good condition and replace 
the filter elements periodically. We 
recommend the use of a combined 
passenger compartment filter. Thanks to 
its special active additive, it helps both to 
purify the air breathed by the occupants 
and to keep the passenger compartment 
clean (reduction of allergic symptoms, bad 
odours and greasy deposits).

F  To ensure correct operation of the 

air conditioning system, you are also 
advised to have it checked regularly 
as recommended in the Warranty and 
Maintenance Record.

F  If the system does not produce cold air, 

switch it off and contact a PEUGEOT 
dealer or a qualified workshop.

When towing the maximum load on a steep 
gradient in high temperatures, switching off 
the air conditioning increases the available 
engine power and so improves the towing 
ability.
To avoid the windows misting up and 
deterioration in the quality of the air:
-  do not drive for too long with the 

ventilation switched off.

-  do not keep air recirculation set for an 

extended period.

If after an extended stop in sunshine, 
the interior temperature is very high, first 
ventilate the passenger compartment for 
a few moments.
Put the air flow control at a setting high 
enough to quickly change the air in the 
passenger compartment.

The condensation created by the air 
conditioning results in a discharge of 
water under the vehicle which is perfectly 
normal.

Stop & Start
The heating and air conditioning systems 
only work when the engine is running.
To maintain a comfortable temperature 
in the passenger compartment, you may 
temporarily deactivate the Stop & Start 
system.
For more information on Stop & Start
refer to the corresponding section.

56

Ease of use and comfort

Heating

Manual air conditioning

Temperature

F  Turn the knob from blue 

(cold) to red (hot) to adjust the 
temperature to your wishes.

Air flow

F  Turn the knob from position 

1 to position 6, to obtain 
the desired air flow for your 
comfort.

If you place the air flow control at position 
0 (off), the temperature in the vehicle will 
no longer be maintained. A slight flow 
of air can still be felt, resulting from the 
forward movement of the vehicle.

Adjusting the air 
distribution

Windscreen and side windows.

Windscreen, side windows and 
footwells.

Footwells.

Central and side air vents.

The air distribution can be 
modulated by placing the knob at an 
intermediate position.

Temperature

F  Turn the knob from blue 

(cold) to red (hot) to adjust the 
temperature to your wishes.

Air flow

F  Turn the knob from position 

1 to position 6, to obtain 
the desired air flow for your 
comfort.

1.

Adjusting the temperature.

2.

Adjusting the air flow.

3.

Adjusting the air distribution.

1.

Temperature adjustment.

2.

Air flow adjustment.

3.

Air distribution adjustment.

4.

Air conditioning on/off.

3

57

Ease of use and comfort

Dual-zone automatic air 
conditioning

Adjusting the air 
distribution

Windscreen and side windows.

Windscreen, side windows and 
footwells.

Footwells.

Central and side air vents.

The air distribution can be 
modulated by placing the knob at an 
intermediate position.

Air conditioning On/Off

The air conditioning is designed to operate 
effectively in all seasons, with the windows 
closed.
It enables you to:
-  in summer, to lower the temperature,
-  increase the effectiveness of the demisting 

in winter, above 3°C.

Switching on

F  Press the "A/C" button, the 

button's indicator lamp comes 
on.

The air conditioning does not operate 
when the air flow adjustment control is in 
position "0".

To obtain cool air more quickly, you can 
use recirculation of the interior air for a few 
moments. Then return to the intake of exterior 
air.

Switching off

F  Press the "A/C" button again, 

the button's indicator lamp goes 
off.

Switching the system off could result in 
discomfort (humidity, condensation).

AUTO mode

F  Press the "AUTO" button 

successively. The indicator lamp 
comes on at the first press; the 
activated mode appears in the 
digital air conditioning screen:

Provides soft and quiet operation by 
limiting air flow.

Offers the best compromise 
between a comfortable temperature 
and quiet operation.

Provides strong and effective air 
flow.

If you place the air flow control at position 
0 (off), the temperature in the vehicle will 
no longer be maintained. A slight flow 
of air can still be felt, resulting from the 
forward movement of the vehicle.

1.

Temperature adjustment for left/right 
side.

2.

Automatic comfort program.

3.

Air conditioning on/off.

4.

Air distribution adjustment.

5.

Air flow adjustment.

58

Ease of use and comfort

Switching off

F  Press the "empty fan" air flow 

button until the fan symbol 
disappears.

When the engine is cold, the air flow will 
only reach its optimum level gradually 
to prevent too much cold air being 
distributed.
In cold weather, it favours the distribution 
of warm air to the windscreen, the side 
windows and the footwells only.

Temperature

The driver and front passenger can each set 
the temperature to suit their requirements.
The value shown on the display is a level 
of comfort, not a temperature in Celsius or 
Fahrenheit.

F  Push the button down (blue) to 

reduce the value or up (red) to 
increase it.

A setting of around 21 provides optimum 
comfort. Depending on your requirements, a 
setting between 18 and 24 is normal.
In addition, it is recommended that you avoid a 
left/right setting difference of more than 3.

For maximum cooling or heating of the 
passenger compartment, it is possible 
to exceed the minimum value 14 or the 
maximum value 28.

F  Push the button down until 

"LO" is displayed or up until 
"HI" is displayed.

On entering the vehicle, if the interior 
temperature is much colder or warmer 
than the comfort value setting, there is no 
need to alter the value displayed in order 
to reach the required level of comfort. The 
system compensates automatically and 
corrects the temperature difference as 
quickly as possible.

Air conditioning

The air conditioning is designed to operate 
efficiently in all seasons, with the windows 
closed.
It allows you:
-  in summer, to lower the temperature,
-  in winter, above 3°C, to improve demisting.

Switching on

F  Press the "A/C" button, the 

associated indicator lamp 
comes on.

The air conditioning cannot operate when the 
air flow is set to off.

Switching off

F  Press the "A/C" button again; 

the associated indicator lamp 
goes off.

Switching off the air conditioning may 
result in some discomfort (humidity, 
misting).

3

59

Ease of use and comfort

Air distribution

F  Press this button successively 

to direct the air flow alternatively 
towards:

-  windscreen, side windows and foot wells,
-  windscreen and side windows (demisting or 

defrosting),

-  the centre and side vents,
-  the central vents, the side vents and the 

footwells,

-  the footwells.

Air flow

F  Press this "full fan" button to 

increase the air flow.

The air flow symbol (a fan) appears in the 
screen. It is filled in progressively in relation to 
the value required.

F  Press this "empty fan" button to 

reduce the air flow.

Manual mode

If desired, you can choose settings different 
to those offered by the system, by adjusting a 
setting manually. The other functions are still 
managed automatically.
When you modify a setting, the indicator lamp 
in the "AUTO" button goes off.

F  Press the "AUTO" button again 

to return to the automatic 
comfort programme.

Deactivating the system

F  Press the "empty fan" air flow 

button until the fan symbol 
disappears and "---" appears.

This action deactivates all functions of the air 
conditioning system.
Temperature is no longer regulated. A slight air 
flow can still be felt however, resulting from the 
forward movement of the vehicle.

Avoid driving for too long with the system 
switched off (risk of misting and of 
deterioration of the air quality).

Pressing the "full fan" button 
reactivates the system with the 
values in use at the time it was 
switched off.

60

Ease of use and comfort

With automatic dual-zone 
air conditioning

Visibility programme

Switching on

F  Press the "visibility" button to 

demist or defrost the windscreen 
and side windows as quickly as 
possible.

The system automatically manages the air 
conditioning, air flow and air intake, and 
provides optimum distribution towards the 
windscreen and side windows.

Switching off

F  Press the "visibility" button 

again or "AUTO"; the indicator 
lamp in the button goes off and 
the indicator lamp in the "AUTO
button comes on.

The system reverts to the previous settings.

With Stop & Start, when demisting - 
defrosting has been activated, STOP 
mode is not available.

Recirculation of the 
interior air

The intake of exterior air prevents the formation 
of condensation on the windscreen and side 
windows.
The recirculation of interior air isolates the 
passenger compartment from exterior odours 
and smoke.

This allows hot or cold air to be delivered 
quickly when required.

F  Press this button to recirculate 

the interior air; the symbol 
appears or its indicator lamp 
comes on (depending on 
version).

F  Press this button again to allow 

exterior air into the passenger 
compartment. The symbol 
disappears or the indicator lamp 
goes off (depending on version).

Avoid prolonged use of air recirculation – 
Risk of condensation and deterioration of 
air quality!

Front demisting – 
defrosting

With Heating

Put the air flow, temperature 
and distribution controls to the 
appropriately marked position.

With manual air 
conditioning

Switching on

F  Put the air flow, temperature 

and distribution controls to the 
appropriately marked position.

Switching off

F  Press the A/C button again, the 

button's indicator lamp goes off.

F  Press the A/C button for air 

conditioning; the indicator lamp 
in the button comes on.

3

61

Ease of use and comfort

Rear screen demist – 
defrost

The control button is located on the air 
conditioning or heating system control panel.
Rear screen demisting – defrosting can only be 
operated when the engine is running.

Switching on

F  Press this button to demist/

defrost the rear screen and, 
depending on version, the 
electric door mirrors. The 
indicator lamp associated with 
the button comes on.

Switching off

Demisting / defrosting switches off automatically 
to prevent excessive electrical consumption.

F  It is possible to stop the 

demisting/defrosting operation 
before it is switched off 
automatically by pressing the 
button again. The indicator lamp 
associated with the button goes 
off.

Courtesy lamp

To demist or defrost the electric door 
mirrors, with the engine running 
press the heated rear window 
switch.

Switch off the demisting/defrosting of 
the rear screen and electric door mirrors 
as soon as appropriate, as lower current 
consumption results in reduced fuel 
consumption.

1.

Courtesy lamp

2.

Map reading lamps

In this position, the light comes 
on gradually:

-  when you unlock the vehicle,
-  when the key is removed from the ignition,
-  when opening a door,
-  when unlocking remotely.

62

Ease of use and comfort

It switches off gradually:
-  when the vehicle is locked,
-  when the ignition is switched on,
-  30 seconds after the last door is closed.

Permanently off.

Permanent lighting.

In "permanent lighting" mode, the lighting 
time varies according to the circumstances:
-  when the ignition is off, approximately 

ten minutes,

-  in energy economy mode, 

approximately 30 seconds,

with the engine running, unlimited.

Map reading lamps

F  With the ignition on, press the 

corresponding switch.

Take care not to put anything in contact 
with the courtesy lamp.

Interior ambient lighting

Switching on

At night, panoramic sunroof light-emitting 
diodes (LEDs) come on automatically when the 
sidelamps are switched on.

Switching off

The interior ambient lighting switches off 
automatically when the sidelamps are switched 
off.

The guide-me-home lighting can be 
configured in the menu Driving / 
Vehicle
.


Content   ..  2  3  4  5   ..