Nissan Qashqai (2007-2010). Manual - part 1311


  Index      Nissan     Nissan Qashqai - service and repair manual 2007 - 2010 year


Search            copyright infringement  


Content   ..  1309  1310  1311  1312   ..


Nissan Qashqai (2007-2010). Manual - part 1311
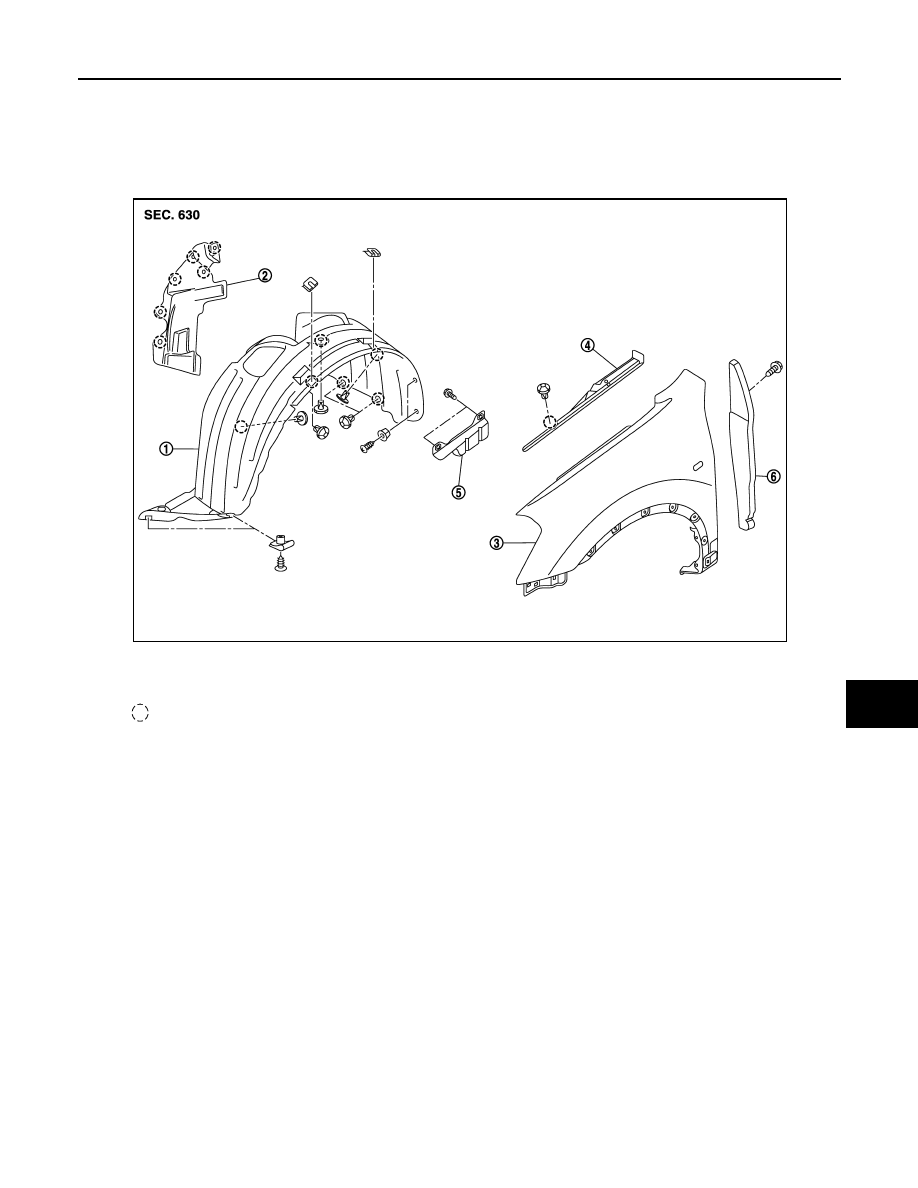


FENDER PROTECTOR

EXT-21

< ON-VEHICLE REPAIR >

C

D

E

F

G

H

I

J

L

M

A

B

EXT

N

O

P

FENDER PROTECTOR

Exploded View

INFOID:0000000001093652

FENDER PROTECTOR 

REAR WHEEL HOUSE PROTECTOR 

1.

Front fender protector

2.

Hoodledge splashguard

3.

Front fender

4.

Front fender cover

5.

Front fender bracket

6.

Front fender seal

Clip

E1KIA0005ZZ

EXT-22

< ON-VEHICLE REPAIR >

FENDER PROTECTOR

Removal and Installation

INFOID:0000000001093653

REMOVAL

FRONT FENDER PROTECTOR

1.

Remove front fender protector fixing screw and fixing bolt.

2.

Remove hoodledge splashguard fixing clips (A). Remove hoo-
dledge splashguard.

3.

Remove front fender protector fixing clips.

4.

Remove front fender protector fixing screws.

5.

Release front fender protector upper fixing clip from under, then remove front fender protector.

REAR WHEEL HOUSE PROTECTOR

1.

Remove rear wheel house protector lower fixing screw.

2.

Remove rear wheel house protector fixing clips.

3.

Remove rear wheel house protector.

INSTALLATION

Install in the reverse order of removal.

1.

Rear fender protector

2.

Wind deflector

Clip

E1KIA0031GB

E1KIA0023ZZ

FILLET MOLDING

EXT-23

< ON-VEHICLE REPAIR >

C

D

E

F

G

H

I

J

L

M

A

B

EXT

N

O

P

FILLET MOLDING

Exploded View

INFOID:0000000001093656

Removal and Installation

INFOID:0000000001093657

REMOVAL

FRONT FILLET MOLDING

1.

Remove front fillet molding fixing screw.

2.

Release front fillet molding clips A.

3.

Pull front fillet molding forwards to release clips B.

4.

Remove front fillet molding.

REAR FILLET MOLDING

1.

Remove rear fillet molding fixing screw.

2.

Release rear fillet molding clips A.

3.

Pull rear fillet molding rearwards to release clips B.

4.

Remove rear fillet molding.

INSTALLATION

Install in the reverse order of removal.

1.

Front fillet molding

2.

Rear fillet molding

A.

Clips A

B.

Clips B

E1KIA0057GB

EXT-24

< ON-VEHICLE REPAIR >

ROOF SIDE MOLDING

ROOF SIDE MOLDING

Exploded View

INFOID:0000000001093658

Removal and Installation

INFOID:0000000001093659

REMOVAL

1.

Open trunk lid. 

2.

Using suitable tool, release roof side molding fixing clips from
rear to front, then remove roof side molding.

CAUTION:

Always use shop cloth to avoid damaging the vehicle.

INSTALLATION

Install in the reverse order of removal.

1.

Roof side molding

2.

Roof side molding clip

3.

Roof side molding fastener

E1KIA0007ZZ

E1KIA0024ZZ


Content   ..  1309  1310  1311  1312   ..