Lexus RX (2023 year). Manual in english - page 16
 

  Index      Manuals     Lexus RX (2023 year). Manual in english


Search            copyright infringement  


Content      ..     14      15      16      17     ..


Lexus RX (2023 year). Manual in english - page 16


509

6

6-3. Do-it-yourself maintenance

Ma
inte
na

nc

e and care

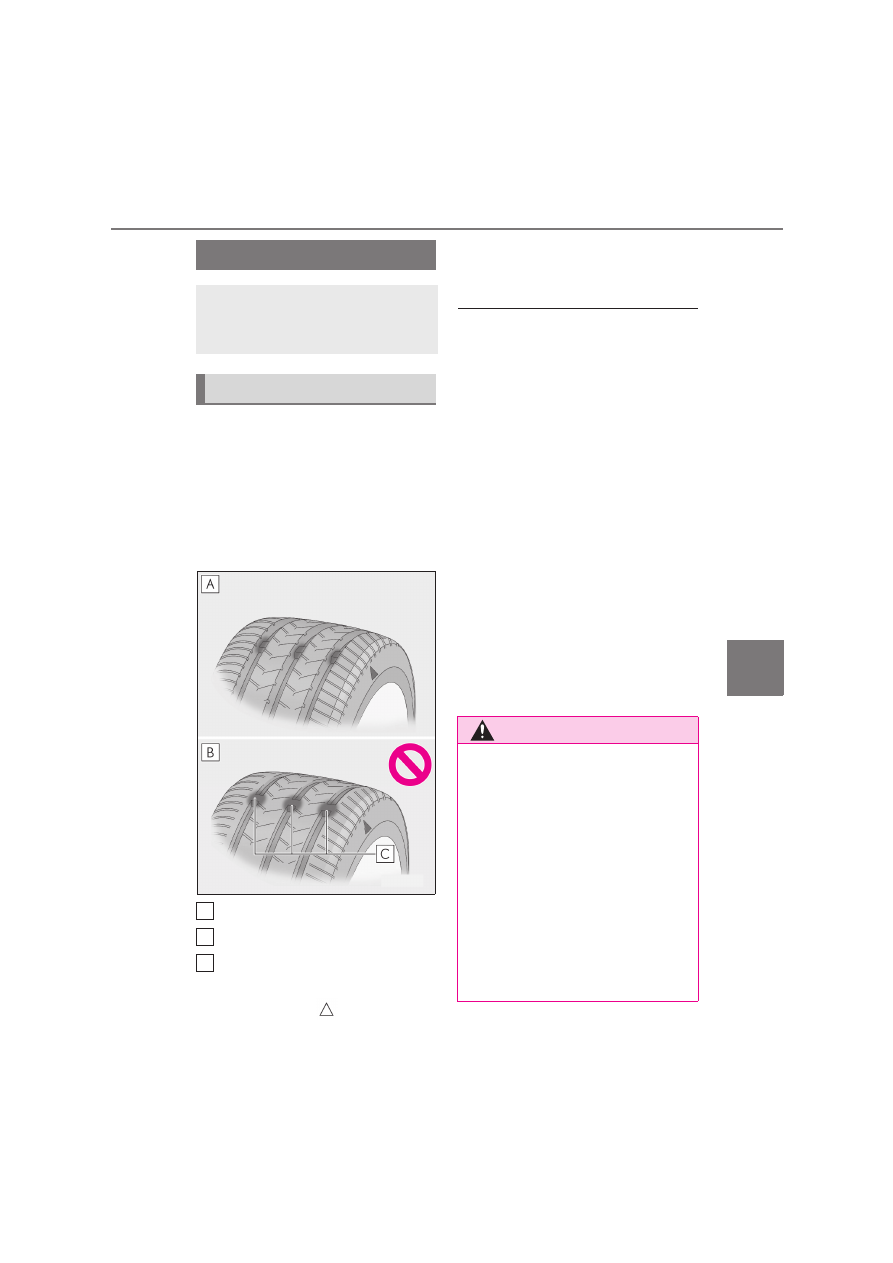
Check if the treadwear indicators are 
showing on the tires. Also check the 
tires for uneven wear, such as excessive 
wear on one side of the tread.
Vehicles with a spare tire: Check the 
spare tire condition and pressure if not 
rotated.

New tread
Worn tread
Treadwear indicator

The location of treadwear indicators is 
shown by a “TWI” or “

” mark, etc., 

molded into the sidewall of each tire.
Replace the tires if the treadwear indica-
tors are showing on a tire.

When to replace your vehicle’s tires

Tires should be replaced if:

The treadwear indicators are showing on 

a tire.

You have tire damage such as cuts, splits, 

cracks deep enough to expose the fabric, 

and bulges indicating internal damage.

A tire goes flat repeatedly or cannot be 

properly repaired due to the size or loca-

tion of a cut or other damage.

If you are not sure, consult with any author-

ized Lexus retailer or Lexus authorized 

repairer, or any reliable repairer.

Tire life

Any tire over 6 years old must be checked 

by a qualified technician even if it has sel-

dom or never been used or damage is not 

obvious.

If the tread on snow tires wears down 

below 4 mm (0.16 in.)

The effectiveness of the tires as snow tires is 

lost.

Tires

Replace or rotate tires in accord-
ance with maintenance schedules 
and treadwear.

Checking tires

A
B
C

WARNING

When inspecting or replacing tires

Observe the following precautions to 

prevent accidents.

Failure to do so may cause damage to 

parts of the drive train as well as danger-

ous handling characteristics, which may 

lead to an accident resulting in death or 

serious injury.

Do not mix tires of different makes, 

models or tread patterns.

Also, do not mix tires of remarkably 

different treadwear.

Do not use tire sizes other than those 

recommended by Lexus.

510

6-3. Do-it-yourself maintenance

Rotate the tires in the order shown.

To equalize tire wear and help extend tire 
life, Lexus recommends that tire rotation is 
carried out approximately every 5000 km 
(3000 miles).
Make sure to perform wheel position reg-
istration procedure after rotating the tires. 
(

P.512)

Your vehicle is equipped with a tire 
pressure warning system that uses tire 
pressure warning valves and transmit-
ters to detect low tire inflation pressure 
before serious problems arise.
The tire pressure warning system of 
this vehicle adopts a 2-type warning 
system. (

P.548)

Multi-information display (vehicles 
without a head-up display)

WARNING

Do not mix differently constructed 

tires (radial, bias-belted or bias-ply 

tires).

Do not mix summer, all season and 

snow tires.

Do not use tires that have been used 

on another vehicle.

Do not use tires if you do not know 

how they were used previously.

Vehicles with a spare tire: Do not tow if 

your vehicle has a spare tire installed.

Vehicles with an emergency tire punc-

ture repair kit: Do not tow anything if a 

tire that has been repaired using the 

emergency tire puncture repair kit is 

installed. The load on the tire may 

cause unexpected damage to the tire.

NOTICE

Driving on rough roads

Take particular care when driving on 

roads with loose surfaces or potholes.

These conditions may cause losses in tire 

inflation pressure, reducing the cushion-

ing ability of the tires. In addition, driving 

on rough roads may cause damage to 

the tires themselves, as well as the vehi-

cle’s wheels and body.

If tire inflation pressure of each tire 

becomes low while driving

Do not continue driving, or your tires 

and/or wheels may be ruined.

Tire rotation

Tire pressure warning system

511

6

6-3. Do-it-yourself maintenance

Ma
inte
na

nc

e and care

Multi-information display (vehicles 
with a head-up display)

Center display

When “Adjust Pressure” is dis-
played on the multi-information dis-
play (Normal Warning)

A warning with the tire pressure warning 
light and warning buzzer when there is an 
unknown level of low tire pressure with the 
appearance of the tire due to natural air 
leakage as well as the pressure lowering 
due to changes in the pressure according 
to the outside temperature.

When “Immediately Check tyre 
when Safe” is displayed on the 
multi-information display (Emer-
gency Warning)

A warning with the tire pressure warning 
light and warning buzzer when there is a 
known level of low tire pressure with the 
appearance of the tire due to pressure sud-
denly lowering.

However, the system may not be able to 
detect sudden tire ruptures (bursting, etc.).

The tire pressure detected by the 
tire pressure warning system can be 
displayed on the center display. 
(

P.132)

Routine tire inflation pressure checks

The tire pressure warning system does not 

replace routine tire inflation pressure 

checks. Make sure to check tire inflation 

pressure as part of your routine of daily 

vehicle checks.

Tire inflation pressure

It may take a few minutes to display the 

tire inflation pressure after the power 

switch is turned to ON. It may also take a 

few minutes to display the tire inflation 

pressure after inflation pressure has been 

adjusted.

Tire inflation pressure changes with tem-

perature. The displayed values may also 

be different from the values measured 

using a tire pressure gauge.

Situations in which the tire pressure 

warning system may not operate prop-

erly

In the following cases, the tire pressure 

warning system may not operate prop-

erly.

• If non-genuine Lexus wheels are used.

• A tire has been replaced with a tire that is 

not an OE (Original Equipment) tire.

• A tire has been replaced with a tire that is 

not of the specified size.

• Tire chains, etc. are equipped.

• If a window tint that affects the radio wave 

signals is installed.

• If there is a lot of snow or ice on the vehi-

cle, particularly around the wheels or 

wheel housings.

• If the tire inflation pressure is extremely 

higher than the specified level.

• If tires not equipped with tire pressure 

warning valves and transmitters are used.

• If the ID code on the tire pressure warn-

ing valves and transmitters is not regis-

512

6-3. Do-it-yourself maintenance

tered in the tire pressure warning 

computer.

Performance may be affected in the fol-

lowing situations.

• Near a TV tower, electric power plant, 

gas station, radio station, large display, 

airport or other facility that generates 

strong radio waves or electrical noise

• When carrying a portable radio, cellular 

phone, cordless phone or other wireless 

communication device

If tire position information is not correctly 

displayed due to the radio wave condi-

tions, the display may be corrected by 

changing the location of the vehicle as 

the radio wave conditions may change.

When the vehicle is parked, the time 

taken for the warning to start or go off 

could be extended.

When tire inflation pressure declines rap-

idly for example when a tire has burst, the 

warning may not operate.

When replacing tires or wheels, tire 
pressure warning valves and transmit-
ters must also be installed.
When new tire pressure warning 
valves and transmitters are installed, 
new ID codes must be registered in the 
tire pressure warning computer. 
(

P.515)

Replacing tires and wheels

If the ID code of the tire pressure warning 

valve and transmitter is not registered, the 

tire pressure warning system will not work 

properly. In this case, after driving for about 

10 minutes, the tire pressure warning light 

blinks for 1 minute and stays on to indicate a 

system malfunction.

When to register the position of 
each wheel

It is necessary to register the position 
of each wheel after performing a tire 
rotation.

Installing tire pressure warning 
valves and transmitters

NOTICE

Repairing or replacing tires, wheels, 

tire pressure warning valves, trans-

mitters and tire valve caps

When removing or fitting the wheels, 

tires or the tire pressure warning 

valves and transmitters, contact any 

authorized Lexus retailer or Lexus 

authorized repairer, or any reliable 

repairer as the tire pressure warning 

valves and transmitters may be dam-

aged if not handled correctly.

Make sure to install the tire valve caps. 

If the tire valve caps are not installed, 

water could enter the tire pressure 

warning valves, corrode the valve, and 

cause sticking and air leaks.

When replacing tire valve caps, do not 

use tire valve caps other than those 

specified. The cap may become stuck.

To avoid damage to the tire pressure 

warning valves and transmitters 

(vehicles with an emergency tire 

puncture repair kit)

When a tire is repaired with liquid seal-

ants, the tire pressure warning valve and 

transmitter may not operate properly. If a 

liquid sealant is used, contact any author-

ized Lexus retailer or Lexus authorized 

repairer, or any reliable repairer or other 

qualified service shop as soon as possi-

ble. Make sure to replace the tire pres-

sure warning valve and transmitter when 

replacing the tire. (

P.512)

Registering the position of each 
wheel

513

6

6-3. Do-it-yourself maintenance

Ma
inte
na

nc

e and care

Wheel position registration can be 
performed by oneself. Wheel position 
registration is performed by driving 
forward with moderate left and right 
turns. However, depending on the driv-
ing conditions and driving environ-
ment, registration may take some time 
to complete.

Registering the position of each 
wheel

1

Park the vehicle in a safe place, turn 
the power switch off and wait 15 
minutes or more.

2

Start the hybrid system.

The wheel position registration procedure 

cannot be performed while the vehicle is 

moving.

3

Select 

 on the center display.

4

Select “Vehicle customise”.

5

Select “Tyre pressure”.

6

Select “Tyre rotation”.

7

Select “Continue”.

A message indicating that wheel position 

registration is being performed will be dis-

played on the multi-information display. 

“---” will be displayed for the tire inflation 

pressure of each tire and wheel position 

registration will begin.

8

Drive straight (with occasional left 
and right turns) at approximately 
40 km/h (25 mph) or more for 
approximately 10 to 30 minutes.

When wheel position registration is com-

plete, a message indicating that registra-

tion has been completed and the inflation 

pressure of each tire will be displayed on 

the multi-information display.
Even if it is not possible to drive continu-

ously at approximately 40 km/h (25 mph) 

or more, registration can be completed by 

driving for a long time. However, if registra-

tion does not complete after driving for 1 

hour or more, park the vehicle in a safe 

place and leave it with the power switch in 

ON for approximately 15 minutes or more, 

and then perform the driving procedure 

again.

When performing wheel position regis-

tration

Normally, wheel position registration can 

be completed within approximately 30 

minutes.

Wheel position registration is performed 

while driving at a vehicle speed of 

approximately 40 km/h (25 mph) or 

more.

Wheel position registration procedure

If the power switch is turned off while reg-

istering the wheel position, the next time 

the power switch is turned to ON, the 

wheel position registration will resume 

and it will not be necessary to restart the 

procedure.

While the position of each wheel is being 

determined and the inflation pressures 

are not being displayed, if the inflation 

pressure of a tire drops, the tire pressure 

warning light will come on.

If the wheel position cannot be regis-

tered easily

In the following situations, wheel position 

registration may take longer than usual to 

be completed or may not be possible.

• Vehicle is not driven at approximately 40 

km/h (25 mph) or more

• Vehicle is driven on unpaved roads

If wheel position registration does not 

complete after driving for 1 hour or more, 

park the vehicle in a safe place for 

approximately 15 minutes and then drive 

the vehicle again.

If the vehicle is reversed during wheel 

position registration, all data collected 

until then will be cleared. Perform driving 

again.

514

6-3. Do-it-yourself maintenance

When you need to setting the tire 
pressure

In the following situations, it will be nec-
essary to perform the tire inflation 
pressure setting procedure of the tire 
pressure warning system.

When the specified tire inflation 
pressure has changed, such as due 
to carried load, etc.

When the tire inflation pressure is 
changed such as when the tire size 
is changed.

If the tire inflation pressure has been 
adjusted to the specified level, perform 
the tire inflation setting procedure by 
selecting specified inflation pressure 
on the center display. (

P.514)

When the tire inflation pressure is to be 
other than specified, such as when tires 
other than the specified size are used, 
etc., set the tire inflation pressure using 
the current pressure. Make sure to 
adjust the tire inflation pressure of each 
tire to the appropriate level before per-
forming tire pressure setting. The tire 
pressure warning system operates 
based on this tire inflation pressure. 
(

P.514)

Setting by selecting a specified tire 
inflation pressure

1

Start the hybrid system.

The tire inflation pressure cannot be set 

while the vehicle is moving.

2

Select 

 on the center display.

3

Select “Vehicle customise”.

4

Select “Tyre pressure”.

5

Select “Set indicated air pressure” 
and then select the desired front 
and rear tire pressures.

6

Select “OK”.

The tire pressure warning light will slowly 

blink 3 times.
After setting the tire inflation pressure, a 

message indicating that setting has been 

completed will be displayed on the 

multi-information display.

Setting using the current tire infla-
tion pressure

1

Adjust the tire inflation pressure of 
each tire to the appropriate level.

Make sure to adjust the tire inflation pres-

sure with the tires cold.

2

Start the hybrid system.

The tire inflation pressure cannot be set 

while the vehicle is moving.

3

Select 

 on the center display.

4

Select “Vehicle customise”.

5

Select “Tyre pressure”.

6

Select “Set current air pressure”.

7

Select “Continue”.

The tire pressure warning light will slowly 

blink 3 times and a message indicating that 

tire inflation pressure is being set will be 

Setting the tire pressure

515

6

6-3. Do-it-yourself maintenance

Ma
inte
na

nc

e and care

displayed on the multi-information display.
After setting the tire inflation pressure, a 

message indicating that setting has been 

completed will be displayed on the 

multi-information display.

Warning performance of the tire pres-

sure warning system (Setting using the 

current tire inflation pressure)

When performing the tire pressure set-

ting using the current tire inflation pres-

sure, the warning timing of the tire 

pressure warning system will vary 

according to the conditions under which 

tire pressure setting was performed. 

Therefore, a warning may be output even 

if the tire inflation pressure drops slightly 

or if the tire inflation pressure increases 

above that when the tire inflation pres-

sure was set.

Make sure to perform the tire pressure 

setting procedure after adjusting the tire 

inflation pressure. Also, make sure the 

tires are cold before performing the tire 

pressure setting procedure or adjusting 

the tire inflation pressure.

Tire inflation pressure setting proce-

dure (Setting using the current tire infla-

tion pressure)

If the power switch is turned off while set-

ting the tire inflation pressure, the next 

time the power switch is turned to ON, 

the setting procedure will resume and it 

will not be necessary to restart the proce-

dure.

If the tire inflation pressure setting proce-

dure is started unnecessarily, adjust the 

tire inflation pressure to the specified 

level with the tires cold and then perform 

setting by selecting a specified tire infla-

tion pressure, or perform the tire inflation 

pressure setting procedure with the cur-

rent tire inflation pressure.

If the tire inflation pressure cannot be 

set easily

Normally, it takes approximately 3 min-

utes to complete the setting procedure to 

the current tire inflation pressure.

If the tire pressure warning light does not 

blink 3 times when starting the tire infla-

tion pressure setting procedure, the pro-

cedure may not have started. Perform the 

procedure again from the beginning.

If tire inflation pressure setting procedure 

cannot be completed after performing 

the above procedure, contact any 

authorized Lexus retailer or Lexus 

authorized repairer, or any reliable 

repairer.

When to register ID codes

The tire pressure warning valve and 
transmitter is equipped with a unique 
ID code. When new tire pressure 
warning valves and transmitters are 
installed, new ID codes must be regis-
tered in the tire pressure warning com-
puter.

WARNING

When setting using the current tire 

inflation pressure

Make sure to adjust the tire inflation 

pressure of each tire to the appropriate 

level before performing tire pressure set-

ting. Otherwise, the tire pressure warn-

ing light may not illuminate even if the tire 

inflation pressure drops or may illuminate 

even though the tire inflation pressure is 

normal.

Registering ID codes

516

6-3. Do-it-yourself maintenance

How to registration ID code

Before performing ID code registra-
tion, make sure that no wheels with tire 
pressure warning valve and transmit-
ters installed are near the vehicle.

1

Park the vehicle in a safe place, turn 
the power switch off and wait 15 
minutes or more.

2

Start the hybrid system.

The ID code registration procedure cannot 

be performed while the vehicle is moving.

3

Select 

 on the center display.

4

Select “Vehicle customise”.

5

Select “Tyre pressure”.

6

Check if the desired wheel set (“Set 
1” or “Set 2”) is displayed.

ID codes will be registered to the displayed 

wheel set.

To change the wheel set to be registered, 

select the displayed set, and then select the 

wheel set you wish to register.
If ID codes have already been registered 

for that wheel set, the tire pressure warning 

light will slowly blink 3 times, and a mes-

sage indicating that change is occurring 

will be displayed on the multi-information 

display.

7

Select “New tyre registration”.

8

Select “Continue”.

The tire pressure warning light will slowly 

blink 3 times and a message indicating that 

ID code registration is being performed 

will be displayed on the multi-information 

display. Wheel set changing will be 

canceled and registration will begin.
When registration is being performed, the 

tire pressure warning light will blink for 

approximately 1 minute then illuminate and 

“---” will be displayed for the inflation pres-

sure of each tire on the multi-information 

display.

9

Drive straight (with occasional left 
and right turns) at approximately 
40 km/h (25 mph) or more for 
approximately 10 to 30 minutes.

When registration is complete, the tire 

pressure warning light will turn off and a 

message indicating that registration has 

been completed will be displayed on the 

multi-information display.
Registration may take longer than normal 

to complete if the vehicle speed cannot be 

maintained at approximately 40 km/h (25 

mph) or more. If registration cannot be 

completed after driving for 1 hour or more, 

perform the registration procedure again 

from the beginning.

10

If the tire inflation pressure of the 
wheel set installed differs from that 
of the previous set, it will be neces-
sary to perform the tire inflation 
pressure setting procedure of the 
tire pressure warning system. 
(

P.514)

If the specified tire inflation pressure is the 

517

6

6-3. Do-it-yourself maintenance

Ma
inte
na

nc

e and care

same, it will not be necessary to perform 

the tire inflation pressure setting proce-

dure.

When registering ID codes

Normally, wheel position registration can 

be completed within approximately 30 

minutes.

ID code registration is performed while 

driving at a vehicle speed of approxi-

mately 40 km/h (25 mph) or more.

ID codes can be registered by yourself, 

but depending on the driving conditions 

and driving environment, registration 

may take some time to complete.

When using a wheel set which all of the 

ID codes have already been registered, 

the wheel set can be changed in a short 

amount of time. (

P.517)

If ID codes are not registered easily

In the following situations, ID code regis-

tration may take longer than usual to be 

completed or may not be possible.

• When the vehicle has not been parked 

for approximately 15 minutes or more 

before being driven

• Vehicle is not driven at approximately 40 

km/h (25 mph) or more

• Vehicle is driven on unpaved roads

• Vehicle is driven near other vehicles and 

system cannot recognize tire pressure 

warning valve and transmitters of your 

vehicle over those of other vehicles

• Wheel with tire pressure warning valve 

and transmitter installed is inside or near 

the vehicle

If the vehicle is reversed during registra-

tion, all data collected until then will be 

cleared. Perform driving again.

If registration does not complete after 

driving for 1 hour or more, perform the ID 

code registration procedure again from 

the beginning.

If the tire pressure warning light does not 

blink 3 times when starting ID code reg-

istration procedure, the procedure may 

not have started. Perform the procedure 

again from the beginning.

If the ID codes cannot be registered even 

when performing the above procedure, 

contact any authorized Lexus retailer or 

Lexus authorized repairer, or any reliable 

repairer.

To cancel ID code registration after it 
has been started, select “New tyre reg-
istration” again on the center display.

If ID code registration has been canceled, 
the tire pressure warning light will turn off.
If the warning light does not turn off, ID 
code registration may not have been can-
celled correctly. To cancel registration, 
select “New tyre registration” again on the 
center display.

Your vehicle is equipped with a tire 
pressure warning system with a func-
tion to register two sets of ID codes. 
This allows for registration of a second 
wheel set, for example a winter set.

The wheel set can be changed only 
if a second wheel set has been regis-
tered to the system. If a second 
wheel set has not been registered, 
“Set 2 (Unregistered)” will be dis-
played and it will not be possible to 
change to the selected wheel set.

ID codes can be registered by yourself. 
(

P.515)

Only a change between both regis-
tered wheel set is possible, mixing 
between these wheel sets is not sup-
ported.

While registering ID codes, it may 

Canceling ID code registration

Selecting wheel set

518

6-3. Do-it-yourself maintenance

not be possible to change between 
wheel sets normally. Cancel regis-
tration before changing between 
wheel sets.

Changing ID codes between dif-
ferent wheel sets

1

Install the desired wheel set.

2

Select 

 on the center display.

3

Select “Vehicle customise”.

4

Select “Tyre pressure”.

5

Select the wheel set (“Set 1” or “Set 
2”) displayed for the set selection 
setting.

6

Select the wheel set you wish to 
register, and then select “OK”.

The tire pressure warning light will slowly 

blink 3 times, a message indicating that 

change is occurring will be displayed, and 

the wheel set change will begin.
Wheel set change will begin and the tire 

pressure warning light will blink for 1 min-

ute and then illuminate. Also, while the 

change is being performed, “---” will be 

displayed for the tire inflation pressure of 

each tire on the multi-information display.
After approximately 2 minutes, the wheel 

set change will complete, the tire pressure 

warning light will turn off, and a completion 

message will be displayed on the 

multi-information display.
If changing does not complete after 

approximately 4 minutes, a message indi-

cating that the change could not be com-

pleted will be displayed.

Check which wheel set is installed and per-

form the change procedure again from the 

beginning.

7

If the specified tire inflation pres-
sure of the wheel set installed dif-
fers from that of the previous set, it 
will be necessary to perform the 
tire inflation pressure setting proce-
dure of the tire pressure warning 
system. (

P.514)

If the specified tire inflation pressure is the 

same, it will not be necessary to perform 

the tire inflation pressure setting proce-

dure.

8

Register the position of each wheel. 
(

P.512)

519

6

6-3. Do-it-yourself maintenance

Ma
inte
na

nc

e and care

Effects of incorrect tire inflation pres-

sure

Driving with incorrect tire inflation pressure 

may result in the following:

Reduced fuel economy

Reduced driving comfort and poor han-

dling

Reduced tire life due to wear

Reduced safety

Damage to the drive train

If a tire needs frequent inflating, have it 

checked by any authorized Lexus retailer or 

Lexus authorized repairer, or any reliable 

repairer.

Instructions for checking tire inflation 

pressure

When checking tire inflation pressure, 

observe the following:

Check only when the tires are cold.

If your vehicle has been parked for at 

least 3 hours or has not been driven for 

more than 1.5 km or 1 mile, you will get an 

accurate cold tire inflation pressure read-

ing.

Always use a tire pressure gauge.

It is difficult to judge if a tire is properly 

inflated based only on its appearance.

It is normal for the tire inflation pressure 

to be higher after driving as heat is gen-

erated in the tire. Do not reduce tire infla-

tion pressure after driving.

Passengers and luggage weight should 

be placed so that the vehicle is balanced.

Tire inflation pressure

Make sure to maintain proper tire 
inflation pressure. Tire inflation 
pressure should be checked at least 
once per month. However, Lexus 
recommends that tire inflation 
pressure be checked once every 
two weeks.

WARNING

Proper inflation is critical to save tire 

performance

Keep your tires properly inflated.

If the tires are not properly inflated, the 

following conditions may occur which 

could lead to an accident resulting in 

death or serious injury:

Excessive wear

Uneven wear

Poor handling

Possibility of blowouts resulting from 

overheated tires

Air leaking from between tire and 

wheel

Wheel deformation and/or tire dam-

age

Greater possibility of tire damage 

while driving (due to road hazards, 

expansion joints, sharp edges in the 

road, etc.)

NOTICE

When inspecting and adjusting tire 

inflation pressure

Be sure to put the tire valve caps back on.

If a valve cap is not installed, dirt or mois-

ture may get into the valve and cause an 

air leak, resulting in decreased tire infla-

tion pressure.

520

6-3. Do-it-yourself maintenance

When replacing wheels, care should 
be taken to ensure that they are equiv-
alent to those removed in load capac-
ity, diameter, rim width and inset

*

.

Replacement wheels are available at 
any authorized Lexus retailer or Lexus 
authorized repairer, or any reliable 
repairer.

*

: Conventionally referred to as offset.

Lexus does not recommend using the 
following:

Wheels of different sizes or types

Used wheels

Bent wheels that have been straight-
ened

When replacing wheels

The wheels of your vehicle are equipped 

with tire pressure warning valves and trans-

mitters that allow the tire pressure warning 

system to provide advance warning in the 

event of a loss in tire inflation pressure. 

Whenever wheels are replaced, tire pres-

sure warning valves and transmitters must 

be installed. (

P.512)

Wheels

If a wheel is bent, cracked or heavily 
corroded, it should be replaced. 
Otherwise, the tire may separate 
from the wheel or cause a loss of 
handling control.

Wheel selection

WARNING

When replacing wheels

Do not use wheels that are a different 

size from those recommended in the 

Owner’s Manual, as this may result in a 

loss of handling control.

Never use an inner tube in a leaking 

wheel which is designed for a tubeless 

tire.

Doing so may result in an accident, 

causing death or serious injury.

Use the correct wheel bolts for the 

wheels to be installed. For details, con-

tact any authorized Lexus retailer or 

Lexus authorized repairer, or any relia-

ble repairer.

Wheel bolts

Observe the following precautions to 

reduce the risk of death or serious injury:

Do not over tighten.

Never use oil or grease on the wheel 

bolts. Oil and grease may cause the 

wheel bolts to be excessively tight-

ened, leading to bolt or disc wheel 

damage. In addition, the oil or grease 

can cause the wheel bolts to loosen 

and the wheel may fall off, causing a 

serious accident. Remove any oil or 

grease from the wheel bolts.

If there are any cracks or deformations 

in the wheel bolts, or if the surface 

treatment becomes worn, have the 

wheel bolts replaced at any authorized 

Lexus retailer or Lexus authorized 

repairer, or any reliable repairer. Fail-

ure to follow these precautions could 

cause the wheel bolts to loosen and 

the tire to fall off, resulting in death or 

serious injury.

521

6

6-3. Do-it-yourself maintenance

Ma
inte
na

nc

e and care

Use only Lexus wheel bolts and 
wrenches designed for use with 
your aluminum wheels.

When rotating, repairing or chang-
ing your tires, check that the wheel 
bolts are still tight after driving 1000 
km (621 miles).

Be careful not to damage the alumi-
num wheels when using tire chains.

Use only Lexus genuine balance 
weights or equivalent and a plastic 

or rubber hammer when balancing 
your wheels.

WARNING

Use of defective wheels prohibited

Do not use cracked or deformed wheels. 

Doing so could cause the tire to leak air 

during driving, possibly causing an acci-

dent.

NOTICE

Replacing tire pressure warning 

valves and transmitters

Because tire repair or replacement 

may affect the tire pressure warning 

valves and transmitters, make sure to 

have tires serviced by any authorized 

Lexus retailer or Lexus authorized 

repairer, or any reliable repairer or 

other qualified service shop. In addi-

tion, make sure to purchase your tire 

pressure warning valves and transmit-

ters at any authorized Lexus retailer or 

Lexus authorized repairer, or any relia-

ble repairer.

Ensure that only genuine Lexus wheels 

are used on your vehicle.

Tire pressure warning valves and trans-

mitters may not work properly with 

non-genuine wheels.

Aluminum wheel precautions

522

6-3. Do-it-yourself maintenance

1

Turn the power switch off.

2

Open the glove box. Slide off the 
damper.

3

Push in the glove box on the vehi-
cle’s outer side to disconnect the 
claws. Then pull out the glove box 
and disconnect the lower claws.

4

Unlock the filter cover ( ), pull the 
filter cover out of the claws ( ), 
and remove the filter cover.

5

Remove the filter case.

There may be foreign objects on top of the 

air conditioning filter.

6

Remove the air conditioning filter 
from the filter case and replace it 
with a new one.

The “

UP” marks shown on the filter 

and the filter case should be pointing up.

Air conditioning filter

The air conditioning filter must be 
changed regularly to maintain air 
conditioning efficiency.

Removing the air conditioning 
filter

A

B

523

6

6-3. Do-it-yourself maintenance

Ma
inte
na

nc

e and care

Checking interval

Inspect and replace the air conditioning fil-

ter according to the maintenance schedule. 

In dusty areas or areas with heavy traffic 

flow, early replacement may be required. 

(Except for Armenia, Azerbaijan and India: 

For scheduled maintenance information, 

please refer to the “Lexus Service Booklet” 

or “Lexus Warranty Booklet”.)

If air flow from the vents decreases dra-

matically

The filter may be clogged. Check the filter 

and replace if necessary.

Air conditioning filter with deodorizing 

function

When fragrances are placed in your vehi-

cle, the deodorizing effect may become 

significantly weakened in a short period.

When an air conditioning odor comes out 

continuously, replace the air conditioning 

filter.

Scheduled maintenance of the air 

intake vent is necessary when

In some situations such as when the vehicle 

is used frequently or in heavy traffic or dusty 

areas, the air intake vent may need to be 

cleaned more regularly.
Except for Azerbaijan and  India: For 

details, refer to the “Lexus Service Booklet” 

or “Lexus Warranty Booklet”.
For Azerbaijan and India: For details, refer 

to the maintenance schedule. (

P.490)

Cleaning the air intake vent

Improper handling of the air intake vent 

cover and filter may result in damage to 

them. If you have any concerns about clean-

ing the filter, contact any authorized Lexus 

retailer or Lexus authorized repairer, or any 

reliable repairer.

NOTICE

When using the air conditioning sys-

tem

Make sure that a filter is always installed.

Using the air conditioning system without 

a filter may cause damage to the system.

To prevent damage to the filter cover

When moving the filter cover in the 

direction of arrow to release the fitting, 

pay attention not to apply excessive force 

to the claws. Otherwise, the claws may 

be damaged.

Cleaning the hybrid battery 
(traction battery) air intake 
vents

To prevent the fuel economy from 
being affected, visually inspect the 
hybrid battery (traction battery) air 
intake vents periodically for dust 
and clogs.

If it is dusty or clogged or if “Main-
tenance Required for Traction Bat-
tery Cooling Parts See Owner’s 
Manual” is displayed on the 
multi-information display, clean the 
air intake vent using the following 
procedures:

524

6-3. Do-it-yourself maintenance

1

Turn the power switch off.

2

Using a Phillips screwdriver, 
remove the clip.

3

Remove the air intake vent cover.

Pull the cover as shown in the illus-
tration to disengage the 6 claws, 
starting from the claw in the upper 
right corner.

Pull the cover toward the front of 
the vehicle to remove it.

4

Remove the filter from the air intake 
vent cover.

If dust has accumulated on the air intake 

vent cover, remove the dust with a vacuum 

cleaner, etc.

Disengage the 6 claws as shown in 
the illustration.
Remove the filter from the cover.

5

Remove the dust and sand from the 
filter.

Using a vacuum cleaner, etc., absorb dust 

and sand from the filter by profiling the 

nozzle lightly along the fold.

6

Hold the filter to the light and check 
if it is not clogged.

If the dust or sand cannot be removed 

completely, contact any authorized Lexus 

retailer or Lexus authorized repairer, or 

NOTICE

If “Maintenance Required for Trac-

tion Battery Cooling Parts See 

Owner’s Manual” is displayed on the 

multi-information display

Clean the air intake vent immediately.

If the vehicle is continuously driven with 

the warning message displayed, it may 

cause a malfunction or output restriction 

of the hybrid battery (traction battery).

Cleaning procedure

A

B

A

B

525

6

6-3. Do-it-yourself maintenance

Ma
inte
na

nc

e and care

any reliable repairer.

7

Reinstall the filter to the cover.

Install the filter to the cover.
Engage the filter to the 6 claws as 
shown in the illustration.

Make sure that the filter is not crooked or 
deformed when installing it.

8

Install the air intake vent cover.

Insert the tab of the cover as shown 
in the illustration.
Push the cover to engage the 6 
claws.

9

Install the clip.

If “Maintenance Required for Trac-
tion Battery Cooling Parts See 
Owner’s Manual” was displayed on 
the multi-information display

10

Start the hybrid system and check 
that the warning message is no 
longer displayed.

It may be necessary to drive the vehicle for 

approximately 20 minutes before the 

warning message is displayed again then 

disappears.
If the warning message does not disappear 

after some time, have the vehicle inspected 

by any authorized Lexus retailer or Lexus 

authorized repairer, or any reliable 

repairer.

If the dust or sand on the filter cannot be 

removed

It is recommended to use a vacuum cleaner 

with plastic brushes.

A
B

A

B

WARNING

When cleaning the air intake vent

Do not use water or other liquids to 

clean the air intake vent. If water is 

applied to the hybrid battery (traction 

battery) or other components, a mal-

function or fire may occur.

Before cleaning the air intake vents, 

make sure to turn the power switch off 

to stop the hybrid system.

526

6-3. Do-it-yourself maintenance

WARNING

Do not put a hand or leg in the air 

intake vent. If it is caught in a cooling 

fan, or if it touches a high voltage part 

that results in an electric shock, death 

or serious injuries may result.

NOTICE

When cleaning the air intake vent

Do not use an air blow gun, etc.

Dust may be blown out, possibly causing 

a malfunction or output restriction of the 

hybrid battery (traction battery).

To prevent damage to the vehicle

Observe the following precautions:

Do not allow liquid or foreign matter to 

enter the air intake vent.

Make sure to reinstall the filter and 

cover to their original positions after 

cleaning.

Do not install anything to the air intake 

vent other than the exclusive filter for 

this vehicle or use the vehicle without 

the filter installed.

To prevent damage to the filter

Observe the following precautions.

If the filter is damaged, have it replaced 

with a new filter by any authorized Lexus 

retailer or Lexus authorized repairer, or 

any reliable repairer.

Do not use an air blow gun, etc.

Do not press hard a vacuum cleaner, 

etc. against the filter.

Do not use a hard brush, such as a 

metal brush.

Do not break the fold of the filter.

527

6

6-3. Do-it-yourself maintenance

Ma
inte
na

nc

e and care

If the electronic key battery is depleted

The following symptoms may occur:

The smart entry & start system and wire-

less remote control will not function 

properly.

The operational range will be reduced.

When the card key battery needs to be 

replaced (if equipped)

The battery for the card key is available only 

at any authorized Lexus retailer or Lexus 

authorized repairer, or any reliable repairer. 

Your Lexus retailer or Lexus authorized 

repairer, or any reliable repairer can 

replace the battery for you.

Flathead screwdriver

Small flathead screwdriver

Lithium battery

• CR2032
• CR2450

Use a CR2032 and CR2450 lithium 

battery

Batteries can be purchased at any 

authorized Lexus retailer or Lexus 

authorized repairer, or any reliable 

repairer, local electrical appliance shops 

or camera stores.

Replace only with the same or equivalent 

type recommended by the manufacturer.

Dispose of used batteries according to 

the local laws.

1

Take out the mechanical key.

2

Remove the cover.

3

Remove the battery cover.

4

Remove the depleted battery.

Electronic key battery

Replace the battery with a new one 
if it is depleted.
As the key may be damaged if the 
following procedure is not per-
formed properly, it is recom-
mended that key battery 
replacement be performed by any 
authorized Lexus retailer or Lexus 
authorized repairer, or any reliable 
repairer.

You will need the following items:

Replacing the battery

528

6-3. Do-it-yourself maintenance

Insert a new battery with the “+” terminal 

facing up.

WARNING

Battery precautions

Observe the following precautions.

Failure to do so may result in death or 

serious injury.

Do not swallow the battery. Doing so 

may cause chemical burns.

A coin battery or button battery is 

used in the electronic key. If a battery is 

swallowed, it may cause severe chemi-

cal burns in as little as 2 hours and may 

result in death or serious injury.

Keep away new and removed batteries 

from children.

If the cover cannot be firmly closed, 

stop using the electronic key and stow 

the key in the place where children 

cannot reach, and then contact any 

authorized Lexus retailer or Lexus 

authorized repairer, or any reliable 

repairer.

If you accidentally swallow a battery or 

put a battery into a part of your body, 

get emergency medical attention 

immediately.

To prevent battery explosion or leak-

age of flammable liquid or gas

Replace the battery with a new battery 

of the same type. If a wrong type of 

battery is used, it may explode.

Do not expose batteries to extremely 

low pressure due to high altitude or 

extremely high temperatures.

Do not burn, break or cut a battery.

Certification for the smart entry & 

start system

CAUTION

RISK OF EXPLOSION IF BATTERY IS 

REPLACED BY AN INCORRECT 

TYPE.

DISPOSE OF USED BATTERIES 

ACCORDING TO THE INSTRUC-

TIONS

NOTICE

When replacing the battery

Use a flathead screwdriver of appropri-

ate size. Applying excessive force may 

deform or damage the cover.

For normal operation after replacing 

the battery

Observe the following precautions to 

prevent accidents:

Always work with dry hands.

Moisture may cause the battery to 

rust.

Do not touch or move any other com-

ponent inside the remote control.

Do not bend either of the battery ter-

minals.

529

6

6-3. Do-it-yourself maintenance

Ma
inte
na

nc

e and care

1

Turn the power switch off.

2

Open the fuse box cover.

Engine compartment

Push in the claw and remove the lid.
• Type  A

• Type  B

Left side instrument panel (left-hand 
drive vehicles)

Remove the lid.

Left side instrument panel 
(right-hand drive vehicles)

Remove the foot cover and remove the 
fuse box cover.

Luggage compartment

Secure the deck board using the hook. 
(

P.466)

Remove the side board and cover.

Checking and replacing 
fuses

If any of the electrical components 
do not operate, a fuse may have 
blown. If this happens, check and 
replace the fuses as necessary.

Checking and replacing fuses

530

6-3. Do-it-yourself maintenance

Push in the claw and remove the lid.

3

Remove the fuse with the pullout 
tool.
Only some fuses can be removed 
using the pullout tool.

4

Check if the fuse is blown.

Normal fuse
Blown fuse

Replace the blown fuse with a new fuse of 
an appropriate amperage rating. The 
amperage rating can be found on the fuse 
box lid.
Many types of fuse are used on this vehicle. 
This illustration shows a common type of 
fuse used on this vehicle.

After a fuse is replaced

If the lights do not turn on even after the 

fuse has been replaced, a bulb may need 

replacement. (

P.531)

If the replaced fuse blows again, have the 

vehicle inspected by any authorized 

Lexus retailer or Lexus authorized 

repairer, or any reliable repairer.

If there is an overload in a circuit

The fuses are designed to blow, protecting 

the wiring harness from damage.

When replacing light bulbs

Lexus recommends that you use genuine 

Lexus products designed for this vehicle. 

Because certain bulbs are connected to cir-

cuits designed to prevent overload, 

non-genuine parts or parts not designed for 

this vehicle may be unusable.

A
B

531

6

6-3. Do-it-yourself maintenance

Ma
inte
na

nc

e and care

Check the wattage of the light bulb to 
be replaced. (

P.621)

P.159

WARNING

To prevent system breakdowns and 

vehicle fire

Observe the following precautions.

Failure to do so may cause damage to 

the vehicle, and possibly a fire or injury.

Never use a fuse of a higher amperage 

rating than that indicated, or use any 

other object in place of a fuse.

Always use a genuine Lexus fuse or 

equivalent.

Never replace a fuse with a wire, even 

as a temporary fix.

Do not modify the fuses or fuse boxes.

Fuse box near the power control unit

Never check or replace the fuses as 

there are high voltage parts and wiring 

near the fuse box.

Doing so may cause electric shock, 

resulting in death or serious injury.

NOTICE

Before replacing fuses

Have the cause of electrical overload 

determined and repaired by any author-

ized Lexus retailer or Lexus authorized 

repairer, or any reliable repairer as soon 

as possible.

Light bulbs

You may replace the following bulbs 
by yourself. The difficulty level of 
replacement varies depending on 
the bulb. As there is a danger that 
components may be damaged, we 
recommend that replacement is 
carried out by any authorized Lexus 
retailer or Lexus authorized 
repairer, or any reliable repairer.

Preparing for light bulb replace-
ment

Canceling the power back door 
system

532

6-3. Do-it-yourself maintenance

Front

Front turn signal light (bulb type)

Replacing the following bulbs

If any of the lights listed below has 
burnt out, have it replaced by any 
authorized Lexus retailer or Lexus 
authorized repairer, or any reliable 
repairer.

Headlight

Front position lights and daytime 
running lights

Front turn signal lights (LED type)

Front fog lights

Cornering lights (if equipped)

Side turn signal lights

Stop/tail lights

Back-up lights

Rear turn signal light

Rear fog lights

Rear side marker lights

High mounted stoplight

License plate lights

Outer foot lights

LED Lights

The lights other than the front turn signal 

lights (bulb type) each consist of a number 

of LEDs. If any of the LEDs has burned out, 

take your vehicle to any authorized Lexus 

retailer or Lexus authorized repairer, or any 

reliable repairer to have the light replaced.

Condensation build-up on the inside of 

the lens

Temporary condensation build-up on the 

inside of the headlight lens does not indi-

cate a malfunction. Contact any authorized 

Lexus retailer or Lexus authorized repairer, 

or any reliable repairer for more informa-

tion in the following situations:

Large drops of water have built up on the 

inside of the lens.

Water has built up inside the headlight.

When replacing light bulbs

P.530

Bulb locations

A

533

6

6-3. Do-it-yourself maintenance

Ma
inte
na

nc

e and care

Front turn signal lights (bulb type)

1

Turn the bulb base 
counterclockwise and remove it.

2

Remove the light bulb.

3

Install a new light bulb and then 
install the bulb base to the light unit 
by inserting it and turning it clock-
wise.

After installing the bulb base, wiggle it 

lightly to make sure it is securely installed 

and turn the lights on to visually check that 

there is no light leaking from between the 

bulb base and light unit.

Replacing light bulbs

WARNING

To prevent injury

Before performing any light bulb 

replacement procedure, be sure to turn 

the power switch off. Failure to do so may 

result in burns from hot components or a 

part of your body may get caught on an 

operating component, possibly causing 

serious injury.

Replacing light bulbs

Turn off the lights. Do not attempt to 

replace the bulb immediately after 

turning off the lights.

The bulbs become very hot and may 

cause burns.

Do not touch the glass portion of the 

light bulb with bare hands. When it is 

unavoidable to hold the glass portion, 

use and hold with a clean dry cloth to 

avoid getting moisture and oils on the 

bulb.

Also, if the bulb is scratched or 

dropped, it may blow out or crack.

Fully install light bulbs and any parts 

used to secure them. Failure to do so 

may result in heat damage, fire, or 

water entering the headlight unit. This 

may damage the headlights or cause 

condensation to build up on the lens.

534

6-3. Do-it-yourself maintenance

WARNING

Do not attempt to repair or disassem-

ble the light bulbs, connectors, electric 

circuits or component parts.

Doing so may result in death or serious 

injury due to electric shock.

To prevent damage or fire

Make sure bulbs are fully seated and 

locked.

Check the wattage of the bulb before 

installing to prevent heat damage.

7

535

7

When trouble

 ar

ises

When trouble arises

.

7-1. Essential information

Emergency flashers .................

536

If your vehicle has to be stopped in 

an emergency..........................

536

If the vehicle is submerged or 

water on the road is rising ..

537

7-2. Steps to take in an emergency

If your vehicle needs to be towed

........................................................

539

If you think something is wrong

........................................................

543

If a warning light turns on or a 

warning buzzer sounds .......

544

If a warning message is displayed

........................................................

554

If you have a flat tire (vehicles with 

an emergency tire puncture 
repair kit) ...................................

569

If you have a flat tire (vehicles with 

a spare tire)...............................

579

If the hybrid system will not start

........................................................

588

If you lose your keys.................

590

If the electronic key does not 

operate properly ....................

590

If a door cannot be opened using 

the door opener switch .......

593

If the 12-volt battery is discharged

........................................................

595

If your vehicle overheats........

602

If the vehicle becomes stuck

........................................................

607

536

7-1. Essential information

7-1.Essential information

Press the switch.

All the turn signal lights will flash. To turn 
them off, press the switch once again.

Emergency flashers

If the emergency flashers are used for a 

long time while the hybrid system is not 

operating (while the “READY” indicator 

is not illuminated), the 12-volt battery may 

discharge.

If any of the SRS airbags deploy (inflate) 

or in the event of a strong rear impact, the 

emergency flashers will turn on automati-

cally.

The emergency flashers will turn off auto-

matically after operating for approxi-

mately 20 minutes. To manually turn the 

emergency flashersoff, press the switch 

twice. (The emergency flashers may not 

turn on automatically depending on the 

force of the impact and conditions of the 

collision.)

1

Steadily step on the brake pedal 
with both feet and firmly depress it.

Do not pump the brake pedal repeatedly 

as this will increase the effort required to 

slow the vehicle.

2

Shift the shift position to N.

If the shift position is shifted to N

3

After slowing down, stop the vehi-
cle in a safe place by the road.

4

Stop the hybrid system.

If the shift position cannot be shifted 
to N

3

Keep depressing the brake pedal 
with both feet to reduce vehicle 
speed as much as possible.

4

To stop the hybrid system, press 
and hold the power switch for 2 
consecutive seconds or more, or 

Emergency flashers

The emergency flashers are used to 
warn other drivers when the vehicle 
has to be stopped on the road due 
to a breakdown, etc.

Operating instructions

If your vehicle has to be 
stopped in an emergency

Only in an emergency, such as if it 
becomes impossible to stop the 
vehicle in the normal way, stop the 
vehicle using the following proce-
dure:

Stopping the vehicle

537

7

7-1. Essential information

When trouble

 ar

ises

press it briefly 3 times or more in 
succession.

5

Stop the vehicle in a safe place by 
the road.

If the door can be opened, open the 
door and exit the vehicle.

If the door can not be opened, open 
the window using the power window 
switch and ensure an escape route.

If the window can be opened, exit 
the vehicle through the window.

If the door and window cannot be 
opened due to the rising water, 
remain calm, wait until the water 
level inside the vehicle rises to the 
point that the water pressure inside 
of the vehicle equals the water pres-
sure outside of the vehicle and then 
open the door after waiting for the 
rising water to enter the vehicle, and 
exit the vehicle. When the outside 
water level exceeds half the height 
of the door, the door cannot be 
opened from the inside due to water 
pressure.

Water level exceeds the floor

When the water level exceeds the floor and 

WARNING

If the hybrid system has to be turned 

off while driving

Power assist for the steering wheel will 

be lost, making the steering wheel heav-

ier to turn. Decelerate as much as possi-

ble before turning off the hybrid system.

If the vehicle is submerged 
or water on the road is rising

This vehicle is not designed to be 
able to drive on roads that are 
deeply flooded with water. Do not 
drive on roads where the roads may 
be submerged or the water may be 
rising. It is dangerous to remain in 
the vehicle, if it anticipated that the 
vehicle will be flooded or set a drift. 
Remain calm and follow the follow-
ing.

538

7-1. Essential information

time has passed, the electrical equipment 

will get damaged, the power windows will 

not operate, the engine and motor stop, and 

the vehicle may not be able to get moving.

Using an emergency escape hammer

*1

Laminated glass

*2

 is used in the windshield 

and the windows on this vehicle.
Laminated glass cannot be shattered with 
an emergency hammer

*1

.

*1

: Contact your Lexus dealer or 

aftermarket accessory manufacturer 
for further information about an emer-
gency hammer.

*2

: If equipped

How to distinguish laminated glass

When looking from the cross-sectional 

view point, laminated glass is two sheets of 

glass pasted together.

Laminated glass
Tempered glass

WARNING

Caution while driving

Do not drive on roads where the roads 

may be submerged or the water may be 

rising. Otherwise the vehicle may be 

damaged and cannot move, as well as 

become flooded and set a drift, which 

may lead to death.

A
B

539

7

7-2. Steps to take in an emergency

When trouble

 ar

ises

7-2.Steps to take in an emergency

In the following situations, it is not pos-
sible to be towed by another vehicle 
using cables or chains, as the front 
wheels may be locked due to the park-
ing lock. Contact any authorized Lexus 
retailer or Lexus authorized repairer, 
or any reliable repairer or commercial 
towing service.

There is a malfunction in the shift 
control system. (

P.228, 555)

There is a malfunction in the immo-
bilizer system. (

P.100)

There is a malfunction in the smart 
entry & start system. (

P.590)

The 12-volt battery is discharged. 
(

P.595)

The following may indicate a problem 
with your transmission. Contact any 
authorized Lexus retailer or Lexus 
authorized repairer, or any reliable 
repairer or commercial towing service 
before towing.

The hybrid system warning message 
is shown on the multi-information 
display and the vehicle does not 
move.

The vehicle makes an abnormal 
sound.

From the front

Use a towing dolly under the rear 
wheels.

If your vehicle needs to be 
towed

If towing is necessary, we recom-
mend having your vehicle towed by 
any authorized Lexus retailer or 
Lexus authorized repairer, or any 
reliable repairer or commercial 
towing service, using a wheel-lift 
type truck or flatbed truck.

Use a safety chain system for all 
towing, and abide by all state/pro-
vincial and local laws.

Situations when it is not possible 
to be towed by another vehicle

Situations when it is necessary to 
contact dealers before towing

Towing with a wheel-lift type 
truck

540

7-2. Steps to take in an emergency

From the rear

Use a towing dolly under the front 
wheels.

When using a flat-bed truck to trans-
port the vehicle, use tire strapping 
belts. Refer to the owner’s manual of 
the flat-bed truck for the tire strapping 
method.
In order to suppress vehicle movement 
during transportation, set the parking 
brake and turn the power switch off.

If a tow truck is not available in an 

WARNING

Observe the following precautions. Fail-

ure to do so may result in death or seri-

ous injury.

When towing the vehicle

Be sure to transport the vehicle with all 

four wheels raised off the ground. If the 

vehicle is towed with the tires contacting 

the ground, the drivetrain or related 

parts may be damaged, the vehicle may 

fly off the truck, or electricity generated 

by the operation of the motor may cause 

a fire to occur depending on the nature 

of the damage or malfunction.

NOTICE

To prevent damage to the vehicle 

when towing using a wheel-lift type 

truck

Do not tow the vehicle from the rear 

when the power switch is off. The 

steering lock mechanism is not strong 

enough to hold the front wheels 

straight.

When raising the vehicle, ensure ade-

quate ground clearance for towing at 

the opposite end of the raised vehicle. 

Without adequate clearance, the vehi-

cle could be damaged while being 

towed.

Towing with a sling-type truck

Do not tow with a sling-type truck to pre-

vent body damage.

Using a flatbed truck

Emergency towing


Content      ..     14      15      16      17     ..