Lexus RX (2023 year). Manual in english - page 14
 

  Index      Manuals     Lexus RX (2023 year). Manual in english


Search            copyright infringement  


Content      ..     12      13      14      15     ..


Lexus RX (2023 year). Manual in english - page 14


445

5

5-2. Using the air conditioning system and defogger

In

te

rior f
ea

ture
s

side will be able to be adjusted.
If the “A/C” indicator is turned off, the sys-
tem will blow ambient temperature air or 
heated air.
When the front passenger’s side and the 
rear seats side temperature adjustment 
switch is operated, adjust the temperature 
for the driver, front passenger and rear 
seats separately.  (“3-ZONE” mode)

Setting the fan speed

To increase the fan speed, select the 
“+” fan speed adjustment switch or 
slide the icon of the fan speed adjust-
ment switch right. To decrease the fan 
speed, select the “-” fan speed adjust-
ment switch or slide the icon of the fan 
speed adjustment switch left.

Select the “OFF” switch to turn the fan off.
The fan can also be stopped by touching 
and holding the “-” fan speed adjustment 
switch or sliding the icon of the fan speed 
adjustment switch to the leftmost position 
and holding it.

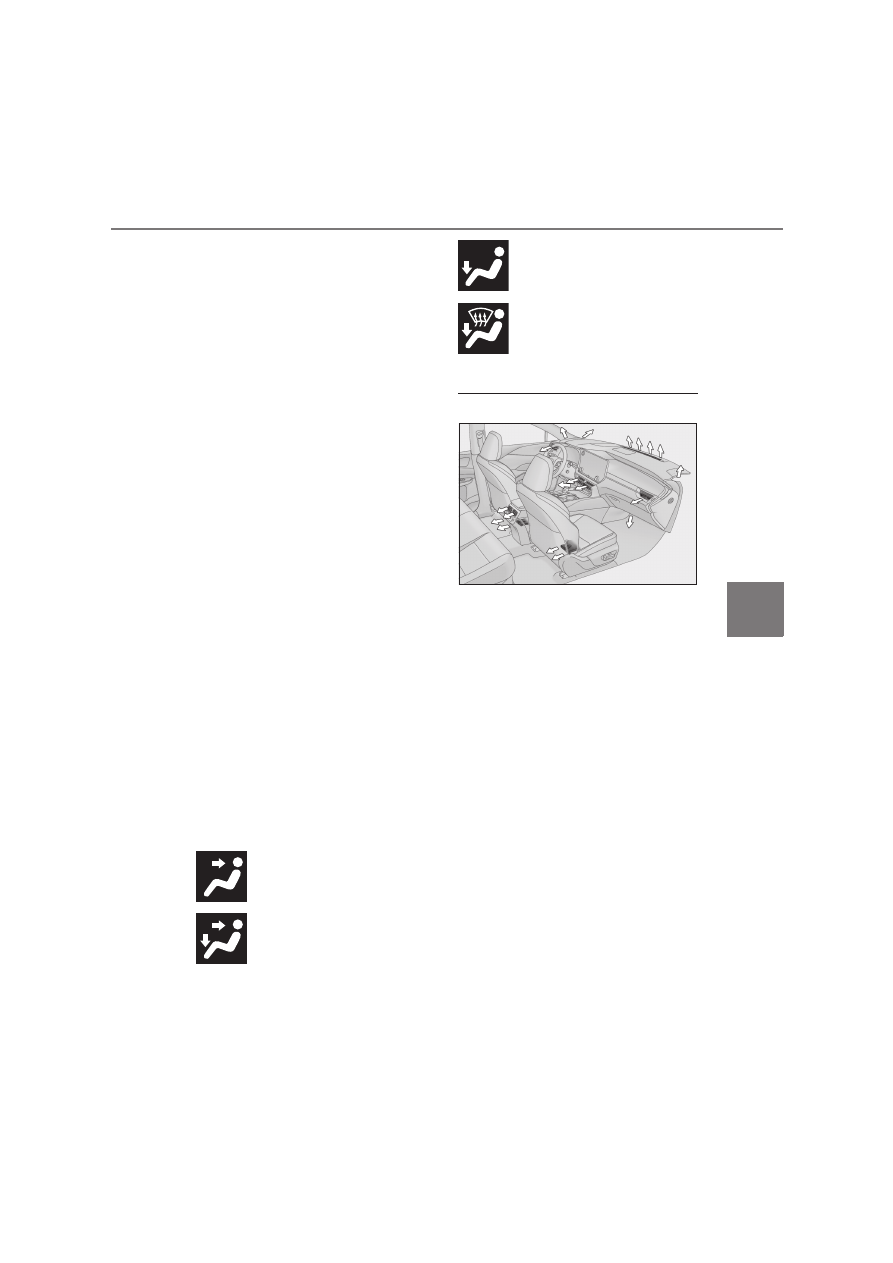
Changing the air flow mode

Select the airflow mode control switch.

The airflow mode changes each time the 
switch is selected.
The air outlets and air volume changes 
according to the selected air flow mode.

 : Air flows to the upper body

 : Air flows to the upper body 

and feet

 : Air flows to the feet

 : Air flows to the feet and the 

windshield defogger operates

Location of air outlets

Switching between outside air and 
recirculated air modes

Temporarily changing the air mode to 
recirculated air mode is recommended 
to prevent dirty air from entering the 
vehicle, such as when in a tunnel or 
heavy traffic, and to help cool the inte-
rior when the outside air temperature 
is high.
Select the outside/recirculated air 
mode switch.

The air mode changes between outside air 
mode and recirculated air mode each time 
the switch is selected. When recirculated 
air mode is selected, the indicator will illu-
minate.
The air mode may change automatically 
depending on the temperature setting, 
temperature inside the vehicle, etc.

446

5-2. Using the air conditioning system and defogger

When the outside temperature exceeds 

24°C (75°F) and the air conditioning 

system is on

In order to reduce the air conditioning 

power consumption, the air conditioning 

system may switch to recirculated air 

mode automatically. This may also 

reduce fuel consumption.

Recirculated air mode is selected as a 

default mode when the power switch is 

turned to ON.

It is possible to switch to outside air mode 

at any time by pressing the outside/recir-

culated air mode switch.

Front seat concentrated airflow 
mode (S-Flow)

This function automatically controls the 
airflow of the air conditioning system to 
prioritize airflow to the front seats. Fuel 
economy can be enhanced by reduc-
ing unnecessary cooling
Front seat concentrated airflow mode 
operates in the following situations.

No passengers are detected in the 
rear seats

The windshield defogger is not 
operating

The S-Flow switch is 

 (ON) on 

the option screen.
In front seat concentrated airflow mode, 
directing airflow to the front seats only and 
to all seats can be switched via switch 
operation. When the mode has been 
switched manually, automatic airflow con-
trol stops operating.

1

Select the option screen switch. 
(

P.443)

2

Select the “S-Flow” switch.

Indicator illuminated: Airflow to the 
front seats only

Indicator off: Airflow to all the seats

Operation of automatic airflow control

In order to maintain a comfortable inte-

rior, airflow may be directed to seats 

without passengers immediately after the 

hybrid system is started and at other 

times depending on the outside tempera-

ture.

After the hybrid system is started, if pas-

sengers move around inside or enter/exit 

the vehicle, the system cannot accurately 

detect the presence of passengers and 

automatic airflow control will not oper-

ate.

Operation of manual airflow control

Even if the function is manually switched to 

directing airflow to only the front seats, 

when a rear seat is occupied, it may auto-

matically direct airflow to all seats.

To return to automatic airflow control

1

With the indicator off, turn the power 

switch off.

2

After 60 minutes or more elapse, turn 

the power switch to ON.

Setting the fan speed in auto mode

When the “AUTO” switch is on, the 
automatically adjusted fan speed can 
beadjusted to suit your preference.

1

Select the option screen switch. 
(

P.443)

2

Select the “FAST/ECO” switch.

“FAST”: Use when the effects of the 
air conditioning system want to be 
felt quickly

“NORMAL”: Normal control

“ECO”: Use to enhance fuel econ-
omy during air conditioning system 

447

5

5-2. Using the air conditioning system and defogger

In

te

rior f
ea

ture
s

operation

Warming the interior quickly (Max 
heat)

When “MAX heat” is turned on, in 
order to warm the interior quickly, the 
settings ofthe air conditioning system 
will be changed immediately.

1

Select the shortcut screen switch. 
(

P.443)

2

Select the “MAX heat” switch.

The temperature setting of the air 
conditioning system will be set to 
“Hi” and the “AUTO” switch will be 
turned on.

Seat heaters will be set to Hi. (vehi-
cles with seat heaters)

Heated steering wheel will be set to 
Hi. (vehicles with heated steering 
wheel)

In the following situations, the front 
passenger’s side seat heater/seat 
ventilator will be set to “AUTO”.

• When “Climate concierge” is on
• When the system determines that a pas-

senger is in the front passenger seat

When the indicator on the “SYNC” 
switch is illuminated, the tempera-
ture setting for the front passenger’s 
side and the rear seats side will also 
be set to “Hi”.

Cooling the interior quickly (Max 
cool)

When “MAX cool” is turned on, in 
order to cool the interior quickly, the 
settings ofthe air conditioning system 
will be changed immediately.

1

Select the shortcut screen switch. 
(

P.443)

2

Select the “MAX cool” switch.

The temperature setting of the air 
conditioning system will be set to 
“Lo” and the “AUTO” switch will be 
turned on.

Seat ventilators will be set to Hi. 
(vehicles with seat ventilators)

In the following situation, the heated 
steering wheel will be set to 
“AUTO”. (vehicles with heated 
steering wheel)

• When “Climate concierge” is on

In the following situations, the front 
passenger’s side seat heater/seat 
ventilator will be set to “AUTO”. 
(vehicles with seat heaters)

• When “Climate concierge” is on
• When the system determines that a pas-

senger is in the front passenger seat

When the indicator on the “SYNC” 
switch is illuminated, the tempera-
ture setting for the front passenger’s 
side and the rear seats side will also 
be set to “Lo”.

nanoe™ X system

*1

 (if equipped)

The air conditioning system adopts 
nanoe™ generator technology. This 
helps to fill the cabin with refreshing air 
by emitting slightly acidic nanoe™ 
coated with water particles through 
the window side air outlet of the 
driver’s seat

*2

.

1

Select the option screen switch. 
(

P.443)

448

5-2. Using the air conditioning system and defogger

2

Select the “nanoe™X” switch.

When the fan is turned on and 
“nanoe™X” on the option control 
screen is selected, the nanoe™ X 
system is activated.

When the fan is operated in the fol-
lowing conditions, system perfor-
mance will be maximized. If the 
following conditions are not met, 
performance will be limited.

• The upper body, upper body and feet or 

feet air outlets are being used.

• The window side air outlet of the driver’s 

seat is open.

When nanoe™ X is generated, a 
small amount of ozone is emitted 
and may be faintly smelled in some 
situations. However, this is approxi-
mately the same as the amount that 
already exists in nature, such as in 
forests, and it has no affect on the 
human body.

A slight noise may be heard during 
operation. This is not a malfunction.

*1

: nanoe™ and the nanoe™ mark are 

trademarks of Panasonic Corporation.

*2

: According to temperature and humidity 

conditions, fan speed and direction of 
the air flow, the nanoe™ X system may 
not operate at full capacity.

Defogging the windshield

Defoggers are used to defog the wind-
shield and front side windows.
Press the windshield defogger switch.

The dehumidification function will operate 
and the air flow will increase.
Set the outside/recirculated air mode but-
ton to outside air mode if the recirculated 
air mode is used. (It may switch automati-
cally.)
To defog the windshield and the side win-
dows early, turn the air flow and tempera-
ture up.
To return to the previous mode, press the 
windshield defogger switch again when the 
windshield is defogged.

Defogging the rear window and 
outside rear view mirrors

Defoggers are used to defog the rear 
window, and to remove raindrops, dew 
and frost from the outside rear view 
mirrors.
Press the rear window and outside rear 
view mirror defoggers switch.

The rear window defogger and outside 

449

5

5-2. Using the air conditioning system and defogger

In

te

rior f
ea

ture
s

rear view mirror defoggers will operate 
and defog the rear window and outside 
rear view mirrors.
The defoggers will automatically turn off 
after a period of time.

Windshield wiper de-icer (if 
equipped)

Use the windshield wiper de-icer to 
help prevent the windshield wiper 
blades from freezing to the windshield.

1

Select the option screen switch. 
(

P.443)

2

Select the “Deicer” switch.

The windshield wiper de-icer will automati-
cally turn off after a period of time.

When driving on dusty roads

Close all windows. If dust thrown up by the 

vehicle is still drawn into the vehicle after 

closing the windows, it is recommended 

that the air intake mode be set to outside air 

mode and the fan speed to any setting 

except off.

When the outside temperature is low

The dehumidification function may not 

operate even when “A/C” is selected.

Ventilation and air conditioning odors

To let fresh air in, set the air conditioning 

system to the outside air mode.

During use, various odors from inside and 

outside the vehicle may enter into and 

accumulate in the air conditioning sys-

tem. This may then cause odor to be 

emitted from the vents.

To reduce potential odors from occur-

ring:

• It is recommended that the air condition-

ing system be set to outside air mode 

prior to turning the vehicle off.

• The start timing of the blower may be 

delayed for a short period of time imme-

diately after the air conditioning system is 

started in automatic mode.

When parking, the system automatically 

switches to outside air mode to encour-

age better air circulation throughout the 

vehicle, helping to reduce odors that 

occur when starting the vehicle.

“MAX heat”

The “MAX heat” switch cannot be used 

to turn the setting off.

After the “MAX heat” switch has been 

operated, the temperature setting can be 

adjusted using the temperature control 

switches of the air conditioning system.

When “Climate concierge” is on, if the 

“AUTO” switch is turned on, the seat 
heaters

*

 and seat ventilators

*

 of the front 

seats, and the heated steering wheel

*

 will 

be operated automatically according to 

the temperature setting.

Each function can also be adjusted to the 

desired setting.

*

: If equipped

“MAX cool”

The “MAX cool” switch cannot be used 

to turn the setting off.

After the “MAX cool” switch has been 

operated, the temperature setting can be 

adjusted using the temperature control 

switches of the air conditioning system.

When “Climate concierge” is on, if the 

“AUTO” switch is turned on, the seat 
heaters

*

 and seat ventilators

*

 of the front 

seats, and the heated steering wheel

*

 will 

be operated automatically according to 

the temperature setting.

Each function can also be adjusted to the 

desired setting.

*

: If equipped

nanoe™ X system

This vehicle incorporates a biocidal prod-

uct.
Ionised air generated by a device incorpo-

rated in the vehicle purifies the air in the 

cabin by suppressing bacteria.
Active substance: Free radicals generated 

450

5-2. Using the air conditioning system and defogger

in situ from ambient air or water
nanoe™ helps to provide purified air by 

emitting electrically charged water parti-

clesthrough the front center vent on the 

driver’s side. 

P.447

Fogging up of the windows

The windows will easily fog up when the 

humidity in the vehicle is high. Selecting 

“A/C” on will dehumidify the air from the 

outlets and defog the windshield effectively.

If you turn “A/C” off, the windows may fog 

up more easily.

The windows may fog up if the recircu-

lated air mode is used.

Using the voice control system

Air conditioning system can be operated 

using voice controls. For details, refer to the 

“MULTIMEDIA OWNER’S MANUAL”.

Customization

Functions that are linked to automatic mode 

(when the “AUTO” switch is on) can be set 

through “Vehicle customise” on the center 

display. Exhaust gas sensor sensitivity set-

tings can also be changed. (

P.623)

WARNING

nanoe™ X generator

Do not disassemble or repair the genera-

tor because it contains high voltage 

parts. Contact any authorized Lexus 

retailer or Lexus authorized repairer, or 

any reliable repairer if the generator 

needs repair.

To prevent the windshield defogger 

from operating improperly

Do not use the windshield defogger in 

extremely humid areas when the air 

conditioning system is set to a low tem-

perature. The difference between the 

temperature of the outside air and that 

of the windshield can cause the outer 

surface of the windshield to fog up, 

blocking your vision.

Do not place anything on the instru-

ment panel which may cover the air 

outlets. Otherwise, air flow may be 

obstructed, preventing the windshield 

defoggers from defogging.

When the outside rear view mirror 

defoggers are operating

Do not touch the surface of the outside 

rear view mirrors when the rear windowd 

efogger and outside rear view mirror 

defoggers are operating, as the surface 

of the mirrors will become extremely hot 

and may cause burns.

To prevent the windshield from fog-

ging up

Do not touch the lower part of the wind-

shield or parts along the front pillars 

when the windshield wiper de-icer is on, 

as they will be hot and may cause burns.

NOTICE

To prevent 12-volt battery discharge

Do not leave the air conditioning system 

on longer than necessary when the 

hybrid system is off.

To prevent damage to the nanoe™ X

Do not insert anything into the driver’s 

side vent, attach anything to it, or use 

sprays around the driver’s side vent. 

These things may cause the generator 

not to work properly.

451

5

5-2. Using the air conditioning system and defogger

In

te

rior f
ea

ture
s

Adjusting the position of and open-
ing and closing the air outlets

To adjust the position of and opening 
and closing the air outlets, perform the 
following operations:

Front center

1

Direct air flow to the left or right, up 
or down

2

Turn the knob to open or close the 
vent

Front side

1

Direct air flow to the left or right, up 
or down

2

Turn the knob to open or close the 
vent

Rear

1

Direct air flow to the left or right, up 
or down

2

Turn the knob to open or close the 
vent

Air outlet layout and operations

452

5-2. Using the air conditioning system and defogger

Center display

14-inch center display model

Rear seats temperature control switch

Turn temperature control dial clockwise to increases the temperature and turn the dial 
counterclockwise to decreases the temperature.

Close the rear air conditioning control screen

9.8-inch center display model

Rear seats temperature control switch

Turn temperature control dial clockwise to increases the temperature and turn the dial 
counterclockwise to decreases the temperature.

Close the rear air conditioning control screen

Rear air conditioning system

The rear air conditioning system can be operated selecting “Rear” switch on 
the center display and rear air conditioning system control panel.

Rear air conditioning control operation

A

B

A

B

453

5

5-2. Using the air conditioning system and defogger

In

te

rior f
ea

ture
s

Rear air conditioning system con-
trol panel

Adjust the rear seats temperature set-
ting

Press 

 to increase the temperature 

and 

 to decrease the temperature.

The temperature setting of the rear 
seats can be adjusted using the follow-
ing methods:

When the “SYNC” indicator is on: 
Adjust the driver’s seat temperature.

Adjust the temperature setting of each 
rear seat using the center display or rear 
air conditioning system control panel.

Adjust the temperature setting of 
rear seats using the center display 
(rear air conditioning control 
screen) or rear air conditioning sys-
tem control panel.

P.451

Adjusting the temperature set-
ting of the rear seats

Air outlets

NOTICE

To prevent 12-volt battery discharge

Do not leave the air conditioning system 

on longer than necessary when the 

hybrid system is off.

454

5-2. Using the air conditioning system and defogger

*

: If  equipped

Select 

 on the center display.

Each time the switch is selected, the opera-
tion condition changes as follows.
AUTO

Hi (2 segments lit)

Lo (1 seg-

ment lit)

Off

The level indicator (red) lights up during 
operation. “AUTO” indicator lights up dur-
ing automatic operation.

Operation condition

The power switch is in ON.

Customization

The temperature setting of the heated 

steering wheel can be set through “Vehicle 

customise” on the center display. (

P.623)

Front seats

*

Select 

 or 

 on the center display.

Each time the switch is selected, the opera-
tion condition changes as follows.
AUTO

Hi (3 segments lit)

Mid (2 seg-

ments lit)

Lo (1 segment lit)

Off

Vehicles without seat ventilators

The level indicator (red) lights up dur-
ing operation. “AUTO” indicator lights 
up during automatic operation.

Vehicles with seat ventilators

The level indicator (yellow) lights up 
during operation.

Heated steering wheel

*

/seat 

heaters

*

/seat ventilators

*

Heated steering wheel

Warms up the grip of the steering 
wheel

Seat heaters

Warm up the seat upholstery

Seat ventilators

Maintain good ventilation using a fan 
built into the seat

WARNING

To prevent minor burn injuries

Care should be taken if anyone in the fol-

lowing categories comes in contact with 

the steering wheel or seats when the 

heater is on:

Babies, small children, the elderly, the 

sick and the physically challenged

Persons with sensitive skin

Persons who are fatigued

Persons who have taken alcohol or 

drugs that induce sleep (sleeping 

drugs, cold remedies, etc.)

NOTICE

To prevent damage to the seat heat-

ers

Do not put heavy objects that have an 

uneven surface on the seat and do not 

stick sharp objects (needles, nails, etc.) 

into the seat.

To prevent 12-volt battery discharge

Do not use the functions when the hybrid 

system is off.

Heated steering wheel

Seat heaters

455

5

5-2. Using the air conditioning system and defogger

In

te

rior f
ea

ture
s

Rear seats

*

Press the switch.

Each time the switch is selected, the opera-
tion condition changes as follows.
Hi (3 segments lit)

Mid (2 segments 

lit)

Lo (1 segment lit)

Off

The level indicators (yellow) light up during 
operation.

Vehicles without seat ventilators

Vehicles with seat ventilators

*

: If  equipped

Operation condition

The power switch is in ON.

Customization

The temperature setting of the seat heaters 

of the front seats can be set through “Vehi-

cle customise” on the center display. 

(

P.623)

Front seats

*

Select 

 or 

 on the center dis-

play.

Each time the switch is pressed, the opera-
tion condition changes as follows.
AUTO

Hi (3 segments lit)

Mid (2 seg-

ments lit)

Lo (1 segment lit)

Off

The level indicator (blue) lights up during 
operation. “AUTO” indicator lights up dur-
ing automatic operation.

Rear seats

*

Press the switch.

Each time the switch is pressed, the opera-
tion condition changes as follows.
Hi (3 segments lit)

Mid (2 segments 

lit)

Lo (1 segment lit)

Off

The level indicators (yellow green) light up 
during operation.

WARNING

To prevent overheating and minor 

burn injuries

Observe the following precautions when 

using the seat heaters.

Do not cover the seat with a blanket or 

cushion when using the seat heater.

Do not use seat heater more than nec-

essary.

Seat ventilators

456

5-2. Using the air conditioning system and defogger

*

: If  equipped

Operation condition

The power switch is in ON.

Air conditioning system-linked control 

mode

When a seat ventilator is set to Hi, the fan 

speed of the seat ventilator may increase 

according to the fan speed of the air condi-

tioning system.

Customization

The temperature setting of the seat ventila-

tors of the front seats can be set through 

“Vehicle customise” on the center display. 

(

P.623)

457

5

5-3. Using the interior lights

In

te

rior f
ea

ture
s

5-3.Using the interior lights

Outer foot lights
Shift lever light
Interior lights (

P.458)

Front personal lights (

P.458)

Door trim ornament lights

*1, 2

Inside door handle lights

*1

Rear personal lights (

P.458)

Door courtesy lights
Footwell lights

Instrument panel ornament lights

*1

*1

: The illumination color can also be changed.

*2

Refer to the “MULTIMEDIA OWNER’S MANUAL” to change the settings.

*2

: If equipped

Interior lights list

Location of the interior lights

A
B
C
D

E
F

G

H

I

J

458

5-3. Using the interior lights

Turning the interior lights on/off

Touch the light

Turning the door position on

Press the door-linked interior light 
switch

The lights are turned on and off according 
to whether the doors are opened/closed.
When the door position is on, the indicator 

 illuminates.

Turning the front personal lights 
on/off

Touch the light

Turning the rear personal lights 
on/off

Touch the light

The rear interior lights turn on/off together 
the front interior lights.
When a door is opened while the door 
position is on, the lights turn on.

Illuminated entry system

The lights automatically turn on/off accord-

ing to the power switch mode, the presence 

of the electronic key, whether the doors are 

locked/unlocked, and whether the doors 

are opened/closed. Also, the brightness of 

the lights is automatically adjusted linked 

with the shift operation.

To prevent the 12-volt battery from 

being discharged

If the interior lights remain on when the 

power switch is turned off, the lights will go 

off automatically after 20 minutes.

When interior light or personal lights do 

not respond as normal

In the following cases, the interior lights and 

Operating the interior lights

Operating the personal lights

A

459

5

5-3. Using the interior lights

In

te

rior f
ea

ture
s

personal lights may not respond as normal.

When water, dirt, etc., have adhered to 

the lens surface

When operated with a wet hand

When wearing gloves, etc.

The interior lights may turn on automati-

cally when

If any of the SRS airbags deploy (inflate) or 

in the event of a strong rear impact, the inte-

rior lights will turn on automatically.
The interior lights will turn off automatically 

after approximately 20 minutes.
The interior lights can be turned off manu-

ally. However, in order to help prevent fur-

ther collisions, it is recommended that they 

be left on until safety can be ensured.
(The interior lights may not turn on auto-

matically depending on the force of the 

impact and conditions of the collision.)

Using the voice control system

*

*

: If  equipped

The following operations can be performed 

using the voice control system.

Turning interior light on/off

Changing color of each lights

*

For details, refer to the “MULTIMEDIA 

OWNER’S MANUAL”.

*

: If  equipped

Customization

Some functions can be customized. 

(

P.623)

NOTICE

Removing light lenses

Never remove the lens for the interior 

light and personal lights. Otherwise, the 

lights will be damaged. If the lens need to 

remove, contact any authorized Lexus 

retailer or Lexus authorized repairer, or 

any reliable repairer.

To prevent 12-volt battery discharge

Do not leave the lights on longer than 

necessary when the hybrid system is off.

460

5-4. Using the storage features

5-4.Using the storage features

Glove box (

P.461)

Auxiliary boxes (if equipped) (

P.463)

Bottle holders (

P.463)

Door pockets
Cup holders (

P.462)

Console box (

P.461)

Coin box (

P.463)

List of storage features

Location of the storage features

A
B
C
D

E
F

G

WARNING

Items that should not be left in the 

storage spaces

Do not leave glasses, lighters or spray 

cans in the storage spaces, as this may 

cause the following when cabin tempera-

ture becomes high:

Glasses may be deformed by heat or 

cracked if they come into contact with 

other stored items.

Lighters or spray cans may explode. If 

they come into contact with other 

stored items, the lighter may catch fire 

or the spray can may release gas, 

causing a fire hazard.

461

5

5-4. Using the storage features

In

te

rior f
ea

ture
s

1

Open (pull the lever)

2

Lock with the mechanical key

3

Unlock with the mechanical key

Glove box light

The glove box light turns on when the tail 

lights are on.

Type A

Push the lid.

To close, press in and release the lid.

Type B

Press the button, lift up and open the 
lid.

The console box can be opened from 
either side.

Console box light

The console box light turns on when the tail 

lights are on.

Glove box

WARNING

Caution while driving

Keep the glove box closed.

In the event of sudden braking or sudden 

swerving, an accident may occur due to 

an occupant being struck by the open 

glove box or the items stored inside.

Console box

WARNING

Caution while driving

Keep the console box closed.

In the event of sudden braking or sudden 

swerving, an accident may occur due to 

an occupant being struck by the open 

console box or the items stored inside.

462

5-4. Using the storage features

Front

Rear

Pull down the armrest and then press 
down the button.

The depth of the front cup holder can be 

changed.

1

To store a water bottle, push down the 

bottom of the cup holder.

2

To return the bottom to its original posi-

tion, press the button.

Cup holders

WARNING

Items unsuitable for the cup holder

Do not place anything other than cups, 

aluminum cans, or water bottles in the 

cup holders. Other items may be thrown 

out of the holders in the event of an acci-

dent or sudden braking, possibly causing 

injury. If possible, cover hot drinks to pre-

vent burns.

When not in use (rear cup holder)

Keep the cup holders closed.

Injuries may result in the event of an acci-

dent or sudden braking.

NOTICE

To prevent damage to the rear cup 

holder

Stow the rear cup holders before stowing 

the rear armrest.

463

5

5-4. Using the storage features

In

te

rior f
ea

ture
s

Front

Rear

Bottle holders

When storing a bottle, close the cap.

The bottle may not be stored depending 

on its size or shape.

Press in the button.

Instrument panel

Overhead

Press in the lid.

Bottle holders

NOTICE

Items unsuitable for the bottle hold-

ers

Do not place open bottle, glass or paper 

cups containing liquid in the bottle hold-

ers. Otherwise, contained liquid may be 

spilled. Glass cups may break if used in 

the bottle holders.

Coin box

WARNING

Caution while driving

Keep the coin box closed.

In the event of sudden braking or sudden 

swerving, an accident may occur due to 

an occupant being struck by the open 

coin box or the items stored inside.

Auxiliary boxes

464

5-4. Using the storage features

Rear seat (if equipped)

Pull up the lever to release the lock, 
and lift the lid.

Pull down the hook to use.

The cargo hooks are provided for securing 
loose items.

To hang the cargo net, use the cargo 
net hooks and rear cargo hooks.

WARNING

Items unsuitable for storing (Instru-

ment panel)

Do not store items in the box that can 

easily shift or roll out.

In the event of sudden braking, etc., 

stowed items may fly out, possibly lead-

ing to an accident.

Items unsuitable for storing (over-

head)

Do not store items heavier than 200 g 

(0.44 lb.). 

Doing so may cause the auxiliary box to 

open and the items inside may fall out, 

resulting in an accident.

Caution while driving

Keep the auxiliary boxes closed.

In the event of sudden braking or sudden 

swerving, an accident may occur due to 

an occupant being struck by the open 

auxiliary boxes or the items stored inside.

Luggage compartment fea-
tures

Cargo hooks

WARNING

When cargo hooks are not in use

To avoid injury, always return the hooks 

to their stowed positions when not in use.

Cargo net hooks

465

5

5-4. Using the storage features

In

te

rior f
ea

ture
s

To use the grocery bag hook, push it in.

Installing the luggage cover

1

Insert either end of the luggage 
cover into the recess, then com-

press the other end of the luggage 
cover and insert it into the recess.

2

Pull out the luggage cover and 
hook it onto the anchors.

Removing the luggage cover

1

Lift the rear portion of the cover to 
release the left and right anchors 
and allow the cover to retract.

WARNING

When the cargo net is not in use

To avoid injury, always return the hooks 

to their stowed positions when not in use.

Grocery bag hooks

NOTICE

To prevent damage to the grocery 

bag hooks

Do not hang any object heavier than 4 kg 

(8.8 lb.) on the grocery bag hooks.

Luggage cover

466

5-4. Using the storage features

2

Compress the end of the luggage 
cover and lift the luggage cover up.

After removing the luggage cover, place it 

somewhere other than the passenger 

compartment.

Opening the deck board

1

Pull the lever up and fold the flap of 
the deck board.

2

Lift the deck board and disengage 
the hook on the underside of the 
deck board.

3

Attach the hook to the upper edge 
of the back door opening as shown.

When closing, reverse the stepslisted.

WARNING

Luggage cover

Do not place anything on the luggage 

cover. In the event of sudden braking 

or turning, the item may go flying and 

strike an occupant. This could lead to 

an unexpected accident, resulting in 

death or serious injury.

Do not allow children to climb on the 

luggage cover. Climbing on the lug-

gage cover could result in damage to 

the luggage cover, possibly causing 

death or serious injury to the child.

Deck board

467

5

5-4. Using the storage features

In

te

rior f
ea

ture
s

WARNING

If the deck board is folded or 

removed

Return it to its original position before 

driving. In the event of sudden braking, 

an accident may occur due to an occu-

pant being struck by the deck board or 

the items stored in the deck under tray.

NOTICE

When closing the back door

Do not leave the deck board hook 

hooked on the edge of the back door 

opening. The deck board hook may get 

damaged.

Deck under tray (vehicles with 
an emergency tire puncture 
repair kit)

468

5-5. Using the other interior features

5-5.Using the other interior features

The USB charging ports are used to 
supply 3.0 A of electricity at 5 V to 
external devices.
The USB charging ports are for charg-
ing only. They are not designed for data 
transfer or other purposes.
Depending on the external device, it 
may not charge properly. Refer to the 
manual included with the device 
before using a USB charging port.

Using the USB charging ports

On the instrument panel

Inside the console box

On the rear console

The USB charging ports can be used 

when

The power switch is in ACC or ON.

Situations in which the USB charging 

ports may not operate correctly

If a device which consumes more than 

3.0 A at 5 V is connected

If a device designed to communicate with 

a personal computer, such as a USB 

memory device, is connected

If the connected external device is turned 

off (depending on device)

If the temperature inside the vehicle is 

high, such as after the vehicle has been 

parked in the sun

About connected external devices

Depending on the connected external 

device, charging may occasionally be sus-

pended and then start again. This is not a 

malfunction.

Other interior features

USB charging ports

NOTICE

To prevent damage to the USB charg-

ing ports

Do not insert foreign objects into the 

ports.

Do not spill water or other liquids into 

the ports.

Do not apply excessive force to or 

impact the USB charging ports.

469

5

5-5. Using the other interior features

In

te

rior f
ea

ture
s

A portable device, such as a 
smartphone or mobile battery, can be 
charged by just placing it on the charg-
ing area, provided the device is com-
patible with the Qi wireless charging 
standard created by the Wireless 
Power Consortium.
The wireless charger cannot be used 
with a portable device that is larger 
than the charging area. Additionally, 
depending on the portable device, the 
wireless charger may not operate 
properly. Refer to the operation man-
ual of the portable device.

The “Qi” symbol

The “Qi” symbol is a trademark of the 
Wireless Power Consortium.

Name for all parts

Operation indicator light

Charge area

*

Charging tray
Approximately 7 cm (2.8 in.)
Approximately 6 cm (2.4 in.)

*

: Compatible portable devices and the 

wireless charger contain charging coils. 
The charging coil in the wireless charger 
can be moved within the charge area 
near the center of the charging tray.

When the charging coil inside a portable 

device is detected within the charging 
area, the charging coil in the wireless 
charger will move near the other coil 
and charging will begin. If the charging 
coil inside the portable device is moved 
out of the charging area, charging will be 
stopped automatically.

Additionally, if 2 or more portable devices 

are placed on the charging tray at the 
same time, each charging coil may not 
be detected correctly and charging may 
not be possible.

Using the wireless charger

Place the portable device on thewire-

NOTICE

Do not disassemble or modify the USB 

charging ports.

To prevent damage to external 

devices

Do not leave external devices in the 

vehicle. The temperature inside the 

vehicle may become high, resulting in 

damage to an external device.

Do not push down on or apply unnec-

essary force to an external device or 

the cable of an external device while it 

is connected.

To prevent 12-volt battery discharge

Do not use the USB charging ports for a 

long period of time with the hybrid sys-

tem stopped.

Wireless charger (if equipped)

A
B
C
D

E

470

5-5. Using the other interior features

less charger.

Place the charging side of the portable 
device down with the center of the device 
in the center of the charge area.
Depending on the portable device, the 
charging coil may not be located in the 
center of the device. In this case, place the 
portable device so that its charging coil is 
in the center of the wireless charger.
When charging, the operation indica-
torlight (orange) on the wireless charger 
comes on.
If charging is not occurring, try placing the 
portable device as close to the center of 
the charging area as possible.
If charging is not performed, the operation 
indicator light will slowly illuminate in green 
and orange alternatively and a sound of 
charging coil operation may be heard 
repeatedly.
When charging is complete, the operation 
indicator light (green) on the wireless 
charger comes on.

Recharging function

If a certain amount of time has 
elapsed since charging completed 
and the portable device has not 
been moved, the wireless charger 
will restart charging.

If a portable device is moved signifi-
cantly within the charging area, the 
charging coil may disconnect and 
charging may temporarily be 
stopped. However, if a charging coil 
is detected within the charging area, 
the charging coil inside the wireless 
charger will move near the other 
coil and charging will resume.

Rapid charging function

The following portable devices support 
rapid charging.

Portable devices compliant with 
WPC Ver1.2.4 and compatible with 
rapid charging

iPhone’s with an iOS version that 
supports 7.5 W charging (iPhone 8 
and later models)

When a portable device that supports 
rapid charging is charged, charging 
automatically switches to the rapid 
charging function.

Operation indicator light status

Operation indicator light

Conditions

Charging tray

Center display

Turning off

Disappear

When the Wireless charger power supply is off

471

5

5-5. Using the other interior features

In

te

rior f
ea

ture
s

*1

: Charging power will not be output during standby. A metallic object will not be heated, if 

it is placed on the wireless charger in this state.

*2

: Depending on the portable device, there are cases where the operation indicator light 

will continue being lit up orange even after the charging is complete.

When the wireless charger does not operate properly

When the wireless charger does not operate properly, handle the probable cause 
based on the following tables.

Green (comes 

on)

Gray

On Standby (charging possible state)

*1

When charging is complete

*2

Orange (comes 

on)

Blue

When placing the portable device on the charging 
area (detecting the portable device)

Charging

Operation indicator light

Suspected causes/Handling method

Charging tray

Center display

Green (Flashing 
repeatedly once 

every second)

Disappear

Wireless charger and multimedia system communi-
cation failure

If the hybrid system is operating, stop and then 
restart the hybrid system.

If the power switch is in ACC, start the hybrid sys-
tem. (

P.226)

Orange (Flashing 

repeatedly once 

every second)

Gray

Vehicle to wireless charger communication failure

If the hybrid system is operating, stop and then 
restart the hybrid system.

If the power switch is in ACC, start the hybrid sys-
tem. (

P.226)

Green (comes 

on)

Blue

The smart access system with pushbutton start is 
detecting the key.

Wait until the system has completed the auto-
matic selection of AM radio stations. In the 
case that automatic selection cannot be com-
pleted, stop automatic selection.

Operation indicator light

Conditions

Charging tray

Center display

472

5-5. Using the other interior features

The wireless charger can be operated 

when

The power switch is in ACC or ON.

Portable devices that can be charged

Portable devices compatible with the Qi 

wireless charging standard can be 

charged by the wireless charger. How-

ever, compatibility with all devices which 

meet the Qi wireless charging standard is 

not guaranteed.

The wireless charger is designed to sup-

ply low power electricity (5 W or less) to 

a cellular phone, smartphone, or other 

portable device.

However, portable devices, such as the fol-

lowing, can be charged with more than 5 

W.

• 7.5 W charging compatible iPhones can 

be charged at 7.5 W or less.

• Portable devices compliant with EPP out-

put as defined by WPC standard 

Ver1.2.4. can be charged at 10 W or less.

Using the smart entry & start system

During charging, when the smart entry & 

start system searches for an electronic key, 

charging may be temporarily suspended.

If a cover or accessory is attached to the 

portable device

Do not charge a portable device if a cover 

or accessory which is not Qi compatible is 

attached. Depending on the type of cover 

(including the certain genuine manufacture 

parts) and/or accessory attached, it may not 

Orange (Repeat-

edly flashes 3 

times continu-

ously)

Gray

Foreign substance detection:
A metallic foreign substance is in the charge area, 
and so the abnormal heating prevention function of 
the metallic foreign object operated

Remove the foreign substance from the charge 
area.

Portable device misaligned:
The charging coil in the portable device moved out-
side of the charge area, and so the abnormal heat-
ing prevention function operated

Remove the portable device from the wireless 
charger, check that the operation indicator 
light on the wireless charger changes back to 
green, and then place the portable device so 
that it is near the center of the wireless charger. 
Also, if a case or cover is installed to the porta-
ble device, remove it.

Orange (Repeat-

edly flashes 4 

times continu-

ously)

Gray

Safety shutdown resulting when the temperature 
within the wireless charger exceeded the set value

Stop charging, remove the portable device 
from the wireless charger, wait for the temper-
ature to drop, and then start charging again.

Operation indicator light

Suspected causes/Handling method

Charging tray

Center display

473

5

5-5. Using the other interior features

In

te

rior f
ea

ture
s

be possible to charge the portable device. If 

the portable device is placed on the charg-

ing area and does not charge, remove the 

cover and/or accessories.

Charging precautions

While charging, the wireless charger and 

the portable device will become warm. This 

is not a malfunction. If a portable device 

becomes warm while charging and charg-

ing stops due to the protection function of 

the portable device, wait until the portable 

device cools down and charge it again.
Also, to decrease the temperature inside 

the wireless charger, a fan may operate. 

This does not indicate a malfunction.

Sound generated during operation

Operation sounds may be heard when the 

power switch is pressed to change to ACC 

or ON, or when a portable device is being 

detected. This does not indicate a malfunc-

tion.

Cleaning the wireless charger

P.484

Situations in which the wireless charger 

may not operate correctly

In the following situations, the wireless 

charger may not operate correctly:

When a portable device is fully charged

When a portable device is being charged 

by a wired connection

When there is a foreign object between 

the charging area and portable device

When the temperature of a portable 

device becomes high while charging

When the temperature near the charging 

tray is 35°C (95°F) or more due to being 

in direct sunlight, etc.

When a portable device is placed with its 

charging surface facing up

When a portable device is not centered 

on the charging area

When a portable device is larger than the 

charging tray

When a foldable portable device is 

placed outside of the charging area

When the vehicle is near a TV tower, 

electric power plant, fuel station, radio 

station, large display, airport, or other 

facility that generates strong radio waves 

or electrical noise

The electronic key is not inside the vehi-

cle

When the any of the following objects, 

with a thickness of 2 mm (0.08 in.) or 

more, are between the charging surface 

of a portable device and the charging are:

• Thick cases or covers

• A case or cover attached with an uneven 

or tilted surface, so that the charging side 

is not flat

• Thick decorations

• Accessories, such as finger rings, straps, 

etc.

When there is a gap between the charg-

ing side of the portable device and the 

charge area due to a protrusion such as a 

camera on the charging side of the porta-

ble device.

When the portable device is in contact 

with, or is covered by any of the following 

metallic objects:

• Cards covered with metal, such as alumi-

num foil

• Cigarette boxes that have aluminum foil 

inside

• Metallic wallets or bags

• Coins

• Heat  packs

• Recorded media such as CDs and DVDs

• Metallic decorations

• Metallic cases or covers

• Casing which has magnet in it on the 

charging side of the portable device

When wireless keys (that emit radio 

waves) other than those of your vehicle 

are being used nearby

When 2 or more portable devices are 

placed on the charging tray at the same 

time

In situations other than above, if the wire-
less charger does not operate properly or 
the operation indicator light blinks continu-
ously, the wireless charger may be mal-
functioning.

474

5-5. Using the other interior features

Contact any authorized Lexus retailer or 
Lexus authorized repairer, or any reliable 
repairer.

If the smartphone OS has beenupdated

If the smartphone OS has been updated to 

a newer version, its charging specifications 

may have changed significantly. For details, 

check the information on the manufac-

turer’s website.

WARNING

Caution while driving

When charging a portable device while 

driving, for safety reasons, the driver 

should not operate the portable device.

Precautions for when driving

Do not charge small, lightweight porta-

ble devices, such as wireless earbuds, 

while driving. Lightweight devices may fly 

off of the charging tray, possibly leading 

to an accident.

Caution regarding interference with 

electronic devices

People with implantable cardiac pace-

makers, cardiac resynchronization ther-

apy pacemakers or implantable 

cardioverter defibrillators, as well as any 

other electrical medical device, should 

consult their physician about the usage of 

the wireless charger.

Operations of the wireless charger may 

have an affect on medical devices.

To prevent damage or burns

Observe the following precautions.

Failure to do so may result in the possibil-

ity of fire, equipment failure or damage, 

or burns due to heat.

Do not put any metallic objects 

between the charging area and the 

portable device while charging.

Do not attach metallic objects, such as 

aluminum stickers, to the charging 

area.

Do not charge portable devices with 

aluminum stickers or other metallic 

objects attached to the side which 

touches the charging area.

Do not store items on the wireless 

charger instead of in an auxiliary box.

Do not apply force or impact to the 

wireless charger.

Do not disassemble, modify or remove 

the wireless charger.

Do not attempt to charge portable 

devices which are not compatible with 

the Qi wireless charging standard.

Do not allow magnetic objects to 

come near the wireless charger.

Do not perform charging if the charg-

ing area is dirty.

When not using the wireless charger, 

to prevent foreign matter or liquids 

from contacting it, make sure to close 

the lid.

Keep the lid open while charging is 

taking place.

Do not cover the wireless charger with 

a cloth or other object while charging.

NOTICE

To prevent failure or damage to data

Do not place magnetic cards, such as a 

credit card, or magnetic recording 

media, close to the wireless charger 

while charging. Otherwise, data may 

be erased due to the influence of mag-

netism. Additionally, do not bring pre-

cision instruments such as wrist 

watches, close to the wireless charger, 

as such objects may malfunction.

475

5

5-5. Using the other interior features

In

te

rior f
ea

ture
s

Pull the armrest down for use.

An assist grip installed on the ceiling 
can be used to support your body 
while sitting on the seat.

NOTICE

Do not perform charging with a con-

tactless smart card, such as a transpor-

tation system IC card, between the 

charging surface of a portable device 

and the charging area. The IC chip in 

the card may become extremely hot, 

possibly damaging the portable device 

or smart card.

Be extra careful to not charge a porta-

ble device with a case or cover which a 

contactless smart card can be 

inserted.

Do not leave portable devices in the 

cabin. The temperature inside the 

cabin may become high when parked 

in the sun, and cause damage to the 

device.

When the OS of a smartphone has 

been updated

When the OS version of a smartphone 

has been changed, the charging specifi-

cations may have changed. If the WPC 

compatibility version is changed, the 

rapid charging function may no longer 

be able to be used. For details, check for 

information on the website for the 

smartphone manufacturer.

To prevent 12-volt battery discharge

Do not use the wireless charger for a 

long period of time with the hybrid sys-

tem stopped.

Armrest

NOTICE

To prevent damage to the armrest

Do not apply too much load on the arm-

rest.

Assist grips

WARNING

Assist grip

Do not use the assist grip when getting in 

or out of the vehicle or rising from your 

seat.

NOTICE

To prevent damage to the assist grip

Do not hang any heavy object or put a 

heavy load on the assist grip.

476

5-5. Using the other interior features

The coat hooks are provided with the 
rear assist grips.

Please use as a power supply for elec-
tronic goods that use less than 12 
VDC/10 A (power consumption of 
120 W).
When connecting multiple devices, 
make sure that the total power con-
sumption of all the connected devices 
is less than 120 W.

Inside the console box

Open the lid.

In the luggage compartment

Open the lid.

The power outlet can be used when

The power switch is in ACC or ON.

When stopping the hybrid system

Disconnect electrical devices with charging 

functions, such as mobile battery packs.

If such devices are left connected, the 

hybrid system may not stop normally.

Coat hooks

WARNING

Items that must not be hung on the 

hook

Do not hang coat hangers or other hard 

or sharp objects on the hook. If the SRS 

curtain shield airbags deploy, these items 

may become projectiles, causing death 

or serious injury.

Power outlets (12 VDC)

NOTICE

To avoid damaging the power outlet

Install the cap or close the lid when the 

power outlets is not in use.

Foreign objects or liquids that enter the 

power outlet may cause a short circuit.

To prevent 12-volt battery discharge

Do not use the power outlet longer than 

necessary when the hybrid system is not 

running.


Content      ..     12      13      14      15     ..