Lexus LS500h (2023 year). Manual in english - page 5
 

  Index      Manuals     Lexus LS500h (2023 year). Manual in english


Search            copyright infringement  


Content      ..     3      4      5      6     ..


Lexus LS500h (2023 year). Manual in english - page 5


152

3-5. Opening, closing the windows and moon roof

3-5.Opening, closing the windows and moon roof

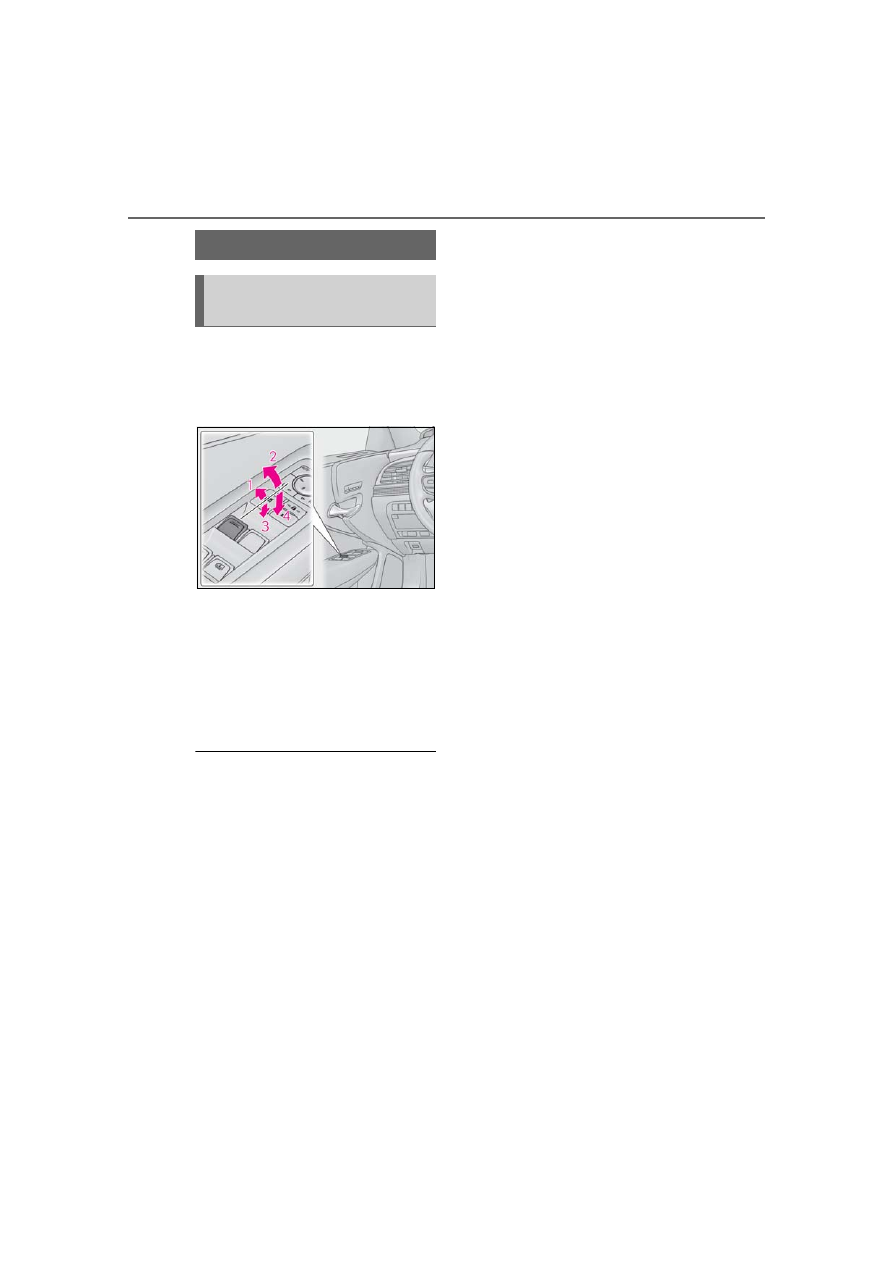
The power windows can be opened 
and closed using the switches.
Operating the switch moves the win-
dows as follows:

1

Closing

2

One-touch closing

*

3

Opening

4

One-touch opening

*

*

: To stop the window partway, operate the 

switch in the opposite direction.

The power windows can be operated 

when

The power switch is in ON mode.

When the driver’s power window switch 

is used to open a rear power window 

(vehicles with rear door sunshades)

If a rear door sunshade is extended or being 

extended when the driver’s power window 

switch is pushed, only the rear door sun-

shade will be retracted. To open the rear 

power window from the driver’s seat, push 

the driver’s power window switch again.

Operating the power windows after 

turning the hybrid system off

The power windows can be operated for 

approximately 45 seconds even after the 

power switch is turned to ACCESSORY 

mode or turned off. They cannot, however, 

be operated once either front door is 

opened.

Jam protection function

If an object becomes jammed between the 

window and the window frame while the 

window is closing, window movement is 

stopped and the window is opened slightly.

Catch protection function

If an object becomes caught between the 

door and window while the window is open-

ing, window movement is stopped.

When the side window cannot be 

opened or closed

When the jam protection function or catch 

protection function operates unusually and 

the side window cannot be opened or 

closed, perform the following operations 

with the power window switch of that door.

Stop the vehicle. With the power switch in 

ON mode, within 4 seconds of the jam 

protection function or catch protection 

function activating, continuously operate 

the power window switch in the 

one-touch closing direction or one-touch 

opening direction so that the side window 

can be opened and closed.

If the side window cannot be opened and 

closed even when performing the above 

operations, perform the following proce-

dure for function initialization.

1

Turn the power switch to ON mode.

2

Pull and hold the power window switch 

in the one-touch closing direction and 

completely close the side window.

3

Release the power window switch for a 

moment, resume pulling the switch in 

the one-touch closing direction, and 

hold it there for approximately 6 sec-

onds or more.

4

Press and hold the power window 

switch in the one-touch opening direc-

tion. After the side window is com-

pletely opened, continue holding the 

switch for an additional 1 second or 

more.

5

Release the power window switch for a 

moment, resume pushing the switch in 

the one-touch opening direction, and 

Power windows

Opening and closing the power 
windows

153

3-5. Opening, closing the windows and moon roof

3

Be

fore
 dri
ving

hold it there for approximately 4 sec-

onds or more.

6

Pull and hold the power window switch 

in the one-touch closing direction 

again. After the side window is com-

pletely closed, continue holding the 

switch for a further 1 second or more.

If you release the switch while the window is 

moving, start again from the beginning.

If the window reverses and cannot be fully 

closed or opened, have the vehicle 

inspected by your Lexus dealer.

Door lock linked window operation

The power windows can be opened and 
closed using the mechanical key.

*


(

P.475)

The power windows can be opened using 
the wireless remote control.

*

 (

P.102)

*

: These settings must be customized at 

your Lexus dealer.

Power windows open warning buzzer

A buzzer sounds and a message is shown 

on the multi-information display in the 

instrument cluster when the power switch is 

turned off and the driver’s door is opened 

with the power windows open.

Customization

Some functions can be customized. 

(

P.509)

WARNING

Observe the following precautions.

Failure to do so may result in death or 

serious injury.

Closing the windows

The driver is responsible for all the 

power window operations, including 

the operation for the passengers. In 

order to prevent accidental operation, 

especially by a child, do not let a child 

operate the power windows. It is possi-

ble for children and other passengers 

to have body parts caught in the power 

window. Also, when riding with a child, 

it is recommended to use the window 

lock switch. (

P.154)

Check to make sure that all passen-

gers do not have any part of their body 

in a position where it could be caught 

when a window is being operated.

When using the wireless remote con-

trol or mechanical key and operating 

the power windows, operate the 

power window after checking to make 

sure that there is no possibility of any 

passenger having any of their body 

parts caught in the window. Also do 

not let a child operate window by the 

wireless remote control or mechanical 

key. It is possible for children and other 

passengers to get caught in the power 

window.

When exiting the vehicle, turn the 

power switch off, carry the key and exit 

the vehicle along with the child. There 

may be accidental operation, due to 

mischief, etc., that may possibly lead to 

an accident.

Jam protection function

Never use any part of your body to 

intentionally activate the jam protec-

tion function.

The jam protection function may not 

work if something gets jammed just 

before the window is fully closed. Be 

careful not to get any part of your body 

jammed in the window.

Catch protection function

Never use any part of your body or 

clothing to intentionally activate the 

catch protection function.

154

3-5. Opening, closing the windows and moon roof

This function can be used to prevent 
children from accidentally opening or 
closing a passenger window.
Press the switch.

The indicator 

 will come on and the pas-

senger windows will be locked.
The passenger windows can still be 
opened and closed using the driver’s 
switch even if the lock switch is on.

The power windows can be operated 

when

The power switch is in ON mode.

When the 12-volt battery is discon-

nected

The window lock switch is disabled. If nec-

essary, press the window lock switch after 

reconnecting the 12-volt battery.

Opening and closing

1

Opens the moon roof

*

The moon roof tilts up and then fully opens.

2

Closes the moon roof

*

*

: Lightly press either side of the moon roof 

switch to stop the moon roof partway.

Tilting up and down

1

Tilts the moon roof up

*

2

Tilts the moon roof down

*

*

: Lightly press either side of the moon roof 

switch to stop the moon roof partway.

WARNING

The catch protection function may not 

work if something gets caught just 

before the window is fully opened. Be 

careful not to get any part of your body 

or clothing caught in the window.

Preventing accidental operation 
(window lock switch)

A

Moon roof

Use the overhead switches to open 
and close the moon roof and tilt it 
up and down.

Operating the moon roof

155

3-5. Opening, closing the windows and moon roof

3

Be

fore
 dri
ving

The moon roof can be operated when

The power switch is in ON mode.

Operating the moon roof after turning 

the hybrid system off

The moon roof can be operated for approx-

imately 45 seconds after the power switch 

is turned to ACCESSORY mode or turned 

off. It cannot, however, be operated once 

either front door is opened.

Jam protection function

If an object is detected between the moon 

roof and the frame while the moon roof is 

closing or tilting down, travel is stopped and 

the moon roof opens slightly.

Sunshade

The sunshade can be opened and closed 

manually. However, the sunshade will open 

automatically when the moon roof is 

opened.

Door lock linked moon roof operation

The moon roof can be opened and 
closed using the mechanical key.

*


(

P.475)

The moon roof can be opened using the 
wireless remote control.

*

 (

P.102)

*

: These settings must be customized at 

your Lexus dealer.

When the moon roof does not close nor-

mally

Perform the following procedure:

1

Stop the vehicle.

2

Press and hold the “CLOSE” switch.

*

The moon roof will close, reopen and pause 

for approximately 10 seconds. Then it will 

close again and stop at the completely 

closed position.

3

Check to make sure that the moon roof 

is completely closed and then release 

the switch.

*

: If the switch is released at the incorrect 

time, the procedure will have to be per-
formed again from the beginning.

If the moon roof does not fully close even 

after performing the above procedure cor-

rectly, have the vehicle inspected by your 

Lexus dealer.

If the moon roof does not move normally

If the moon roof does not open or close 

normally or the automatic opening function 

does not operate, perform the following ini-

tialization procedure.

1

Stop the vehicle.

2

Press and hold the “DOWN” switch.

*

The moon roof will stop at the tilt-up posi-

tion. After that, it will open, close, tilt up, tilt 

down, and stop at the fully closed position.

3

Confirm that the moon roof has com-

pletely stopped and release the switch.

*

: If you release the switch while the moon 

roof is moving, perform the procedure 
again from the beginning.

If, after performing the above procedures 

correctly, the moon roof still does not open 

or close normally or the automatic opening 

function does not operate, have the vehicle 

inspected by your Lexus dealer.

Moon roof open warning buzzer

A buzzer sounds and a message is shown 

on the multi-information display in the 

instrument cluster when the power switch is 

turned off and the driver’s door is opened 

with the moon roof open.

Customization

Some functions can be customized. 

(

P.509)

WARNING

Observe the following precautions.

Failure to do so may cause death or seri-

ous injury.

Opening the moon roof

Do not allow any passengers to put 

their hands or heads outside the vehi-

cle while it is moving.

Do not sit on top of the moon roof.

156

3-5. Opening, closing the windows and moon roof

WARNING

Opening and closing the moon roof

The driver is responsible for moon roof 

opening and closing operations.

In order to prevent accidental opera-

tion, especially by a child, do not let a 

child operate the moon roof. It is possi-

ble for children and other passengers 

to have body parts caught in the moon 

roof.

Check to make sure that all passen-

gers do not have any part of their body 

in a position where it could be caught 

when the moon roof is being operated.

When using the wireless remote con-

trol or mechanical key and operating 

the moon roof, operate the moon roof 

after checking to make sure that there 

is no possibility of any passenger hav-

ing any of their body parts caught in 

the moon roof. Also, do not let a child 

operate moon roof by the wireless 

remote control or mechanical key. It is 

possible for children and other passen-

gers to get caught in the moon roof.

When exiting the vehicle, turn the 

power switch off, carry the key and exit 

the vehicle along with the child. There 

may be accidental operation, due to 

mischief, etc., that may possibly lead to 

an accident.

Jam protection function

Never use any part of your body to 

intentionally activate the jam protec-

tion function.

The jam protection function may not 

work if something gets caught just 

before the moon roof is fully closed. 

Also, the jam protection function is not 

designed to operate while the moon 

roof switch is being pressed. Take care 

so that your fingers, etc. do not get 

caught.

157

4

4

Driving

Driving

.

4-1. Before driving

Driving the vehicle.....................

159

Cargo and luggage...................

165

Vehicle load limits......................

167

Trailer towing...............................

167

Dinghy towing .............................

168

4-2. Driving procedures

Power (ignition) switch ............

169

EV drive mode ............................

173

Hybrid transmission ..................

175

Turn signal lever..........................

182

Parking brake ..............................

183

Brake Hold....................................

185

4-3. Operating the lights and wipers

Headlight switch.........................

187

AHB (Automatic High Beam)

.........................................................

190

Windshield wipers and washer

.........................................................

193

4-4. Refueling

Opening the fuel tank cap......

197

4-5. Using the driving support sys-

tems

Lexus Safety System + A........

200

Lexus Safety System + 2.5....

205

PCS (Pre-Collision System) (vehi-

cles with Lexus Safety System + 
A) ...................................................

210

PCS (Pre-Collision System) (vehi-

cles with Lexus Safety System + 
2.5)...............................................

223

FCTA (Front Cross Traffic Alert)

.......................................................

234

LTA (Lane Tracing Assist) (vehi-

cles with Lexus Safety System + 
A)..................................................

237

LTA (Lane Tracing Assist) (vehi-

cles with Lexus Safety System + 
2.5) ..............................................

250

RSA (Road Sign Assist)..........

259

Dynamic radar cruise control with 

full-speed range......................

262

BSM (Blind Spot Monitor)....

274

PKSA (Parking Support Alert)

.......................................................

279

Intuitive parking assist.............

280

RCTA (Rear Cross Traffic Alert) 

function.......................................

289

RCD (Rear Camera Detection) 

function.......................................

293

PKSB (Parking Support Brake)

.......................................................

297

Parking Support Brake function 

(static objects).........................

302

Parking Support Brake function 

(rear-crossing vehicles) ......

305

Parking Support Brake function 

(rear pedestrians) ..................

306

Lexus Teammate Advanced Park

.......................................................

308

Driving mode select switch ..

332

Electronically modulated air sus-

pension.......................................

334

Driving assist systems..............

337

158


4-6. Driving tips

Hybrid electric vehicle driving tips

.........................................................

341

Winter driving tips ....................

343

159

4-1. Before driving

4

Driving

4-1.Before driving

Starting the hybrid system

P.169

Driving

1

With the brake pedal depressed, 
shift the shift position to D. 
(

P.175)

Check that the shift position indicator 

shows D.

2

If the parking brake is set, release 
the parking brake. (

P.183)

3

Gradually release the brake pedal 
and gently depress the accelerator 
pedal to accelerate the vehicle.

Stopping

1

Depress the brake pedal.

2

If necessary, set the parking brake.

If the vehicle is to be stopped for an 

extended period of time, shift the shift posi-

tion to P. (

P.177)

Parking the vehicle

1

Depress the brake pedal to stop the 
vehicle completely.

2

If the parking brake is released, set 
the parking brake. (

P.183)

3

Shift the shift position to P. 
(

P.177)

Check that the shift position indicator 

shows P and the parking brake indicator is 

illuminated.

4

Press the power switch to stop the 
hybrid system.

5

Slowly release the brake pedal.

6

Lock the door, making sure that you 
have the electronic key on your 
person.

If parking on a hill, block the wheels as 

needed.

Starting off on a steep uphill

1

Firmly depress the brake pedal and 
shift the shift position to D.

The hill-start assist control will be activated.

2

Set the parking brake. (

P.183)

3

Release the brake pedal and gently 
depress the accelerator pedal to 
accelerate the vehicle.

4

Release the parking brake. 
(

P.183)

For fuel-efficient driving

Keep in mind that hybrid electric vehicles 

are similar to conventional vehicles, and it is 

necessary to refrain from activities such as 

sudden acceleration. (

P.341)

Driving in the rain

Drive carefully when it is raining, because 

visibility will be reduced, the windows 

may become fogged-up, and the road 

will be slippery.

Drive carefully when it starts to rain, 

because the road surface will be espe-

cially slippery.

Refrain from high speeds when driving on 

an expressway in the rain, because there 

may be a layer of water between the tires 

and the road surface, preventing the 

steering and brakes from operating prop-

erly.

Engine speed while driving

In the following conditions, the engine 

speed may become high while driving. This 

is due to automatic up-shifting control or 

Driving the vehicle

The following procedures should be 
observed to ensure safe driving:

Driving procedure

160

4-1. Before driving

down-shifting implementation to meet driv-

ing conditions. It does not indicate sudden 

acceleration.

The vehicle is judged to be driving uphill 

or downhill

When the accelerator pedal is released

When the brake pedal is depressed

Restraining the hybrid system output 

(Brake Override System)

When the accelerator and brake pedals 

are depressed at the same time, the 

hybrid system output may be restrained.

A warning message is displayed on the 

multi-information display while the sys-

tem is operating.

Breaking in your new Lexus

To extend the life of the vehicle, observing 

the following precautions is recommended:

For the first 186 miles (300 km):

Avoid sudden stops.

For the first 621 miles (1000 km):

• Do not drive at extremely high speeds.

• Avoid sudden acceleration.

• Do not drive continuously in low gears.

• Do not drive at a constant speed for 

extended periods.

Drum-in-disc type parking brake system

Your vehicle has a drum-in-disc type park-

ing brake system. This type of brake system 

needs bedding-down of the brake shoes 

periodically or whenever the parking brake 

shoes and/or drum are replaced. Have your 

Lexus dealer perform the bedding down 

operation.

Operating your vehicle in a foreign 

country

Comply with the relevant vehicle registra-

tion laws and confirm the availability of the 

correct fuel. (

P.491)

WARNING

Observe the following precautions.

Failure to do so may result in death or 

serious injury.

When starting the vehicle

Always keep your foot on the brake 

pedal while stopped with the “READY” 

indicator is illuminated. This prevents the 

vehicle from creeping.

When driving the vehicle

Do not drive if you are unfamiliar with 

the location of the brake and accelera-

tor pedals to avoid depressing the 

wrong pedal.

• Accidentally depressing the accelera-

tor pedal instead of the brake pedal 

will result in sudden acceleration that 

may lead to an accident.

• When backing up, you may twist your 

body around, leading to a difficulty in 

operating the pedals. Make sure to 

operate the pedals properly.

• Make sure to keep a correct driving 

posture even when moving the vehicle 

only slightly. This allows you to depress 

the brake and accelerator pedals 

properly.

• Depress the brake pedal using your 

right foot. Depressing the brake pedal 

using your left foot may delay 

response in an emergency, resulting in 

an accident.

The driver should pay extra attention 

to pedestrians when the vehicle is 

powered only by the electric motor 

(traction motor). As there is no engine 

noise, the pedestrians may misjudge 

the vehicle’s movement. Even with the 

Acoustic Vehicle Alerting System acti-

vate, drive with care as pedestrians in 

the vicinity may still not notice the vehi-

cle if the surrounding area is noisy.

Do not drive the vehicle over or stop 

the vehicle near flammable materials.

The exhaust system and exhaust gases 

can be extremely hot. These hot parts 

may cause a fire if there is any flamma-

ble material nearby.

161

4-1. Before driving

4

Driving

WARNING

During normal driving, do not turn off 

the hybrid system. Turning the hybrid 

system off while driving will not cause 

loss of steering or braking control, 

however, power assist to the steering 

will be lost. This will make it more diffi-

cult to steer smoothly, so you should 

pull over and stop the vehicle as soon 

as it is safe to do so.

In the event of an emergency, such as if 

it becomes impossible to stop the vehi-

cle in the normal way: 

P.448

Use engine braking (downshift) to 

maintain a safe speed when driving 

down a steep hill.

Using the brakes continuously may 

cause the brakes to overheat and lose 

effectiveness. (

P.175)

Do not adjust the positions of the 

steering wheel, the seat, or the inside 

or outside rear view mirrors while driv-

ing.

Doing so may result in a loss of vehicle 

control.

Always check that all passengers’ 

arms, heads or other parts of their 

body are not outside the vehicle.

Do not drive in excess of the speed 

limit. Even if the legal speed limit per-

mits it, do not drive over 85 mph (140 

km/h) unless your vehicle has 

high-speed capability tires. Driving 

over 85 mph (140 km/h) may result in 

tire failure, loss of control and possible 

injury. Be sure to consult a tire dealer 

to determine whether the tires on your 

vehicle are high-speed capability tires 

or not before driving at such speeds.

When driving on slippery road sur-

faces

Sudden braking, acceleration and 

steering may cause tire slippage and 

reduce your ability to control the vehi-

cle.

Sudden acceleration, engine braking 

due to shifting, or changes in engine 

speed could cause the vehicle to skid.

After driving through a puddle, lightly 

depress the brake pedal to make sure 

that the brakes are functioning prop-

erly. Wet brake pads may prevent the 

brakes from functioning properly. If the 

brakes on only one side are wet and 

not functioning properly, steering con-

trol may be affected.

When shifting the shift position

Do not let the vehicle roll backward 

while a forward driving position is 

selected, or roll forward while the shift 

position is in R.

Doing so may result in an accident or 

damage to the vehicle.

Do not shift the shift position to P while 

the vehicle is moving.

Doing so can damage the transmission 

and may result in a loss of vehicle con-

trol.

Do not shift the shift position to R while 

the vehicle is moving forward.

Doing so can damage the transmission 

and may result in a loss of vehicle con-

trol.

Do not shift the shift position to a driv-

ing position while the vehicle is moving 

backward.

Doing so can damage the transmission 

and may result in a loss of vehicle con-

trol.

Changing the shift position to N while 

the vehicle is moving will disengage 

the hybrid system. Regenerative brak-

ing is not available with the hybrid sys-

tem disengaged.

162

4-1. Before driving

WARNING

Be careful not to change the shift posi-

tion with the accelerator pedal 

depressed. Changing the shift posi-

tion to any positions other than P or N 

may lead to unexpected rapid acceler-

ation of the vehicle that may cause an 

accident and result in death or serious 

injury.

After changing the shift position, make 

sure to confirm the current shift posi-

tion displayed on the shift position indi-

cator inside the meter.

Brake pad wear

If any of the following situations occurs, 

have the brake pads visually checked and 

replaced by your Lexus dealer as soon as 

possible.

If the brake pad wear limit of a brake 

pad is found to have been exceeded 

when visually checking the brake pads 

for each wheel (for the brake pad wear 

limit, refer to P.495)

If a warning message is displayed on 

the multi-information display (only the 

right-side pads can be detected)

Rotor damage may result if the pads are 

not replaced when needed.

It is dangerous to drive the vehicle when 

the wear limits of the brake pads and/or 

those of the brake discs are exceeded.

When the vehicle is stopped

Do not depress the accelerator pedal 

unnecessarily.

If the shift position is in any position 

other than P or N, the vehicle may 

accelerate suddenly and unexpect-

edly, causing an accident.

In order to prevent accidents due to 

the vehicle rolling away, always keep 

depressing the brake pedal while 

stopped with the “READY” indicator is 

illuminated, and apply the parking 

brake as necessary.

If the vehicle is stopped on an incline, 

in order to prevent accidents caused 

by the vehicle rolling forward or back-

ward, always depress the brake pedal 

and securely apply the parking brake 

as needed.

Avoid revving or racing the engine.

Running the engine at high speed 

while the vehicle is stopped may cause 

the exhaust system to overheat, which 

could result in a fire if combustible 

material is nearby.

When the vehicle is parked

Do not leave glasses, cigarette lighters, 

spray cans, or soft drink cans in the 

vehicle when it is in the sun.

Doing so may result in the following:

• Gas may leak from a cigarette lighter 

or spray can, and may lead to a fire.

• The temperature inside the vehicle 

may cause the plastic lenses and plas-

tic material of glasses to deform or 

crack.

• Soft drink cans may fracture, causing 

the contents to spray over the interior 

of the vehicle, and may also cause a 

short circuit in the vehicle’s electrical 

components.

Do not leave cigarette lighters in the 

vehicle. If a cigarette lighter is in a 

place such as the glove box or on the 

floor, it may be lit accidentally when 

luggage is loaded or the seat is 

adjusted, causing a fire.

Do not attach adhesive discs to the 

windshield or windows. Do not place 

containers such as air fresheners on 

the instrument panel or dashboard. 

Adhesive discs or containers may act 

as lenses, causing a fire in the vehicle.

Do not leave a door or window open if 

the curved glass is coated with a met-

allized film such as a silver-colored 

one. Reflected sunlight may cause the 

glass to act as a lens, causing a fire.

163

4-1. Before driving

4

Driving

WARNING

Always apply the parking brake, shift 

the shift position to P, stop the hybrid 

system and lock the vehicle.

Do not leave the vehicle unattended 

while the “READY” indicator is illumi-

nated.

If the vehicle is parked with the shift 

position in P but the parking brake is 

not set, the vehicle may start to move, 

possibly leading to an accident.

Do not touch the exhaust pipes while 

the “READY” indicator is illuminated 

or immediately after turning the hybrid 

system off.

Doing so may cause burns.

When taking a nap in the vehicle

Always turn the hybrid system off. Other-

wise, if you accidentally move the shift 

lever or depress the accelerator pedal, 

this could cause an accident or fire due 

to hybrid system overheating. Addition-

ally, if the vehicle is parked in a poorly 

ventilated area, exhaust gases may col-

lect and enter the vehicle, leading to 

death or a serious health hazard.

When braking

When the brakes are wet, drive more 

cautiously.

Braking distance increases when the 

brakes are wet, and this may cause one 

side of the vehicle to brake differently 

than the other side. Also, the parking 

brake may not securely hold the vehi-

cle.

If the electronically controlled brake 

system does not operate, do not follow 

other vehicles closely and avoid hills or 

sharp turns that require braking.

In this case, braking is still possible, but 

the brake pedal should be depressed 

more firmly than usual. Also, the brak-

ing distance will increase. Have your 

brakes fixed immediately.

The brake system consists of 2 or more 

individual hydraulic systems; if one of 

the systems fails, the other(s) will still 

operate. In this case, the brake pedal 

should be depressed more firmly than 

usual and the braking distance will 

increase. Have your brakes fixed 

immediately.

If the vehicle becomes stuck

Do not spin the wheels excessively when 

a driven wheel is up in the air, or the vehi-

cle is stuck in sand, mud, etc. This may 

damage the driveline components or 

propel the vehicle forward or backward, 

causing an accident.

NOTICE

When driving the vehicle

Do not depress the accelerator and 

brake pedals at the same time during 

driving, as this may restrain the hybrid 

system output.

Do not use the accelerator pedal or 

depress the accelerator and brake 

pedals at the same time to hold the 

vehicle on a hill.

When parking the vehicle

Always set the parking brake, and shift 

the shift position to P. Failure to do so 

may cause the vehicle to move or the 

vehicle may accelerate suddenly if the 

accelerator pedal is accidentally 

depressed.

Avoiding damage to vehicle parts

Do not turn the steering wheel fully in 

either direction and hold it there for an 

extended period of time.

Doing so may damage the power 

steering.

When driving over bumps in the road, 

drive as slowly as possible to avoid 

damaging the wheels, underside of the 

vehicle, etc.

164

4-1. Before driving

When the following unusual operation 
is performed with the accelerator 
pedal depressed, the hybrid system 
output may be restrained.

When the shift lever is shifted to R

*

.

When the shift lever is shifted from P 
or R to forward drive shift positon 
such as D

*

.

When the system operates, a message 
appears on the multi-information display. 
Read the message and follow the instruc-
tion.

*

: Depending on the situation, the shift 

position may not be changed.

Drive-Start Control (DSC)

When the TRAC is turned off (

P.338), 

sudden start restraint control also does not 

operate. If your vehicle have trouble escap-

ing from the mud or fresh snow by operat-

ing sudden start restraint control, 

deactivate TRAC (

P.338) so that the 

vehicle may become able to escape from 

the mud or fresh snow.

NOTICE

If you get a flat tire while driving

A flat or damaged tire may cause the fol-

lowing situations. Hold the steering 

wheel firmly and gradually depress the 

brake pedal to slow down the vehicle.

It may be difficult to control your vehi-

cle.

The vehicle will make abnormal 

sounds or vibrations.

The vehicle will lean abnormally.

Information on what to do in case of a flat 

tire (

P.470)

When encountering flooded roads

Do not drive on a road that has flooded 

after heavy rain etc. Doing so may cause 

the following serious damage to the vehi-

cle:

Engine stalling

Short in electrical components

Engine damage caused by water 

immersion

In the event that you drive on a flooded 

road and the vehicle is flooded, be sure 

to have your Lexus dealer check the fol-

lowing:

Brake function

Changes in quantity and quality of oil 

and fluid used for the engine, hybrid 

transmission, transfer (AWD models), 

differential, etc.

Lubricant condition for the propeller 

shaft, bearings and suspension joints 

(where possible), and the function of 

all joints, bearings, etc.

If the shift control system is damaged by 

flooding, it may not be possible to shift 

the shift position to P, or from P to other 

positions. In this case, contact your Lexus 

dealer.

Sudden start restraint control 
(Drive-Start Control [DSC])

165

4-1. Before driving

4

Driving

Cargo capacity depends on the total 
weight of the occupants.
(Cargo capacity) = (Total load capac-
ity) — (Total weight of occupants)
Steps for Determining Correct Load 
Limit —
(1) Locate the statement “The com-
bined weight of occupants and cargo 
should never exceed XXX kg or XXX 
lbs.” on your vehicle’s placard.
(2) Determine the combined weight of 
the driver and passengers that will be 
riding in your vehicle.
(3) Subtract the combined weight of 
the driver and passengers from XXX 
kg or XXX lbs.
(4) The resulting figure equals the 
available amount of cargo and luggage 
load capacity.
For example, if the “XXX” amount 
equals 1400 lbs. and there will be five 
150 lb passengers in your vehicle, the 
amount of available cargo and luggage 
load capacity is 650 lbs. (1400 

 750 

(5 

 150) = 650 lbs.)

(5) Determine the combined weight of 
luggage and cargo being loaded on 
the vehicle. That weight may not safely 
exceed the available cargo and lug-

gage load capacity calculated in Step 
4.
(6) If your vehicle will be towing a 
trailer, load from your trailer will be 
transferred to your vehicle. Consult 
this manual to determine how this 
reduces the available cargo and lug-
gage load capacity of your vehicle. 
(

P.167)

Lexus does not recommend towing a 
trailer with your vehicle. Your vehicle is not 
designed for trailer towing.

Cargo capacity
Total load capacity (vehicle capac-
ity weight) (

P.490)

When 2 people with the combined 
weight of A lb. (kg) are riding in your 
vehicle, which has a total load capacity 
(vehicle capacity weight) of B lb. (kg), 
the available amount of cargo and lug-
gage load capacity will be C lb. (kg) as 
follows:

B

*2

 lb. (kg) - A

*1

 lb. (kg) = C

*3

 lb. (kg)

*1

: A =Weight of people

*2

: B =Total load capacity

Cargo and luggage

Take notice of the following infor-
mation about storage precautions, 
cargo capacity and load:

Capacity and distribution

Calculation formula for your 
vehicle

A
B

166

4-1. Before driving

*3

: C =Available cargo and luggage load

In this condition, if 3 more passengers with 
the combined weight of D lb. (kg) get on, 
the available cargo and luggage load will 
be reduced E lb. (kg) as follows:

C lb. (kg) - D

*4

 lb. (kg) = E

*5

 lb. (kg)

*4

: D =Additional weight of people

*5

: E =Available cargo and luggage load

As shown in the example above, if the 
number of occupants increases, the 
cargo and luggage load will be 
reduced by an amount that equals the 
increased weight due to the additional 
occupants. In other words, if an 
increase in the number of occupants 
causes an excess of the total load 
capacity (combined weight of occu-
pants plus cargo and luggage load), 
you must reduce the cargo and lug-
gage on your vehicle.

WARNING

Things that must not be carried in the 

trunk

The following things may cause a fire if 

loaded in the trunk:

Receptacles containing gasoline

Aerosol cans

Storage precautions

Observe the following precautions.

Failure to do so may prevent the pedals 

from being depressed properly, may 

block the driver’s vision, or may result in 

items hitting the driver or passengers, 

possibly causing an accident.

Stow cargo and luggage in the trunk 

whenever possible.

Do not place cargo or luggage in or on 

the following locations.

• At the feet of the driver

• On the front passenger or rear seats 

(when stacking items)

• On the package tray

• On the instrument panel

• On the dashboard

• In front of the Center Display

Secure all items in the occupant com-

partment.

Capacity and distribution

Do not exceed the maximum axle 

weight rating or the total vehicle 

weight rating.

Even if the total load of occupant’s 

weight and the cargo load is less than 

the total load capacity, do not apply the 

load unevenly. Improper loading may 

cause deterioration of steering or 

braking control which may cause 

death or serious injury.

167

4-1. Before driving

4

Driving

Total load capacity and seating capacity

These details are also described on the tire 

and loading information label. (

P.432)

Vehicle load limits

Vehicle load limits include total 
load capacity, seating capacity, 
towing capacity and cargo capac-
ity.

Total load capacity (vehicle 
capacity weight): 

P.490

Total load capacity means the com-
bined weight of occupants, cargo 
and luggage.

Seating capacity: 

P.490

Seating capacity means the maxi-
mum number of occupants whose 
estimated average weight is 150 lb. 
(68 kg) per person.

Towing capacity

Lexus does not recommend towing 
a trailer with your vehicle.

Cargo capacity

Cargo capacity may increase or 
decrease depending on the weight 
and the number of occupants.

WARNING

Overloading the vehicle

Do not overload the vehicle.

It may not only cause damage to the tires, 

but also degrade steering and braking 

ability, resulting in an accident.

Trailer towing

Lexus does not recommend towing 
a trailer with your vehicle. Lexus 
also does not recommend the 
installation of a tow hitch or the use 
of a tow hitch carrier for a wheel-
chair, scooter, bicycle, etc. Your 
vehicle is not designed for trailer 
towing or for the use of tow hitch 
mounted carriers.

168

4-1. Before driving

Dinghy towing

Your vehicle is not designed to be 
dinghy towed (with 4 wheels on the 
ground) behind a motor home.

NOTICE

To avoid serious damage to your vehi-

cle

Do not tow your vehicle with the four 

wheels on the ground.

169

4-2. Driving procedures

4

Driving

4-2.Driving procedures

1

Press the parking brake switch to 
check that the parking brake is set. 
(

P.183)

The parking brake indicator will come on.

2

Firmly depress the brake pedal.

 and a message will be displayed on 

the multi-information display. 

If it is not displayed, the hybrid system can-

not be started.
When the shift position is N, the hybrid sys-

tem cannot start. Shift the shift position to P 

when starting the hybrid system. (

P.177)

3

Press the power switch shortly and 
firmly.

When operating the power switch, one 

short, firm press is enough. It is not neces-

sary to press and hold the switch.
If the “READY” indicator turns on, the 

hybrid system will operate normally.
Continue depressing the brake pedal until 

the “READY” indicator is illuminated.
The hybrid system can be started from any 

power switch mode.

4

Check that the “READY” indicator 
is illuminated.

The vehicle cannot be driven if the 

“READY” indicator is off.

Power switch illumination

According to the situation, the power 

switch illumination operates as follows.

When a door is opened, or the power 

switch mode is changed from ACCES-

SORY or ON mode to off, the power 

switch illumination slowly blinks.

When depressing the brake pedal with 

carrying the electronic key on your per-

son, the power switch illumination rapidly 

blinks.

When the power switch is in ACCES-

SORY or ON mode, the power switch 

illumination illuminates.

If the hybrid system does not start

The immobilizer system may not have 

been deactivated. (

P.72) 

Contact your Lexus dealer.

If a message related to start-up is shown 

on the multi-information display, read the 

message and follow the instructions.

When the ambient temperature is low, 

such as during winter driving conditions

When starting the hybrid system, the 

flashing time of the “READY” indicator 

may be long. Leave the vehicle as it is until 

the “READY” indicator is steady on, as 

steady means the vehicle is able to move.

When the hybrid battery (traction bat-

tery) is extremely cold (below approxi-

mately -22°F [-30°C]) under the 

influence of the outside temperature, it 

may not be possible to start the hybrid 

system. In this case, try to start the hybrid 

system again after the temperature of the 

hybrid battery increases due to the out-

side temperature increase etc.

Sounds and vibrations specific to a 

hybrid electric vehicle

P.65

Power (ignition) switch

Performing the following opera-
tions when carrying the electronic 
key on your person starts the hybrid 
system or changes power switch 
modes.

Starting the hybrid system

170

4-2. Driving procedures

If the 12-volt battery is discharged

The hybrid system cannot be started using 

the smart access system with push-button 

start. Refer to P.476to restart the hybrid sys-

tem.

Electronic key battery depletion

P.98

Conditions affecting operation

P.116

Notes for the entry function

P.116

If the “READY” indicator does not come 

on

In the event that the “READY” indicator 

does not come on even after performing 

the proper procedures for starting the vehi-

cle, contact your Lexus dealer immediately.

If the hybrid system is malfunctioning

P.70

When “Check Fuel Cap” is displayed on 

the multi-information display

P.199

Electronic key battery

P.439

Operation of the power switch

If the switch is not pressed shortly and 

firmly, the power switch mode may not 

change or the hybrid system may not 

start.

If attempting to restart the hybrid system 

immediately after turning the power 

switch off, the hybrid system may not start 

in some cases. After turning the power 

switch off, please wait a few seconds 

before restarting the hybrid system.

Customization

If the smart access system with push-button 

start has been deactivated in a customized 

setting, refer to P.474.

1

Stop the vehicle completely.

2

If the parking brake is in manual 
mode, set the parking brake. 
(

P.183)

3

Press the P position switch. 
(

P.177)

Check that the shift position indicator 

shows P and the parking brake indicator is 

illuminated.

4

Press the power switch.

The hybrid system will stop, and the meter 

display will be extinguished (the shift posi-

tion indicator will be extinguished a few 

seconds after the meter display).

5

Release the brake pedal and check 
that “ACCESSORY” or “IGNI-

WARNING

When starting the hybrid system

Always start the hybrid system while sit-

ting in the driver’s seat. Do not depress 

the accelerator pedal while starting the 

hybrid system under any circumstances. 

Doing so may cause an accident result-

ing in death or serious injury.

NOTICE

When starting the hybrid system

If the hybrid system becomes difficult to 

start, have your vehicle checked by your 

Lexus dealer immediately.

Symptoms indicating a malfunction 

with the power switch

If the power switch seems to be operat-

ing somewhat differently than usual, such 

as the switch sticking slightly, there may 

be a malfunction. Contact your Lexus 

dealer immediately.

Stopping the hybrid system

171

4-2. Driving procedures

4

Driving

TION ON” is not shown on the 
meter.

Automatic hybrid system shut off fea-

ture

The vehicle is equipped with a feature 

that automatically shuts off the hybrid sys-

tem when the shift position is in P with the 

hybrid system operating for an extended 

period.

The hybrid system will automatically shut 

off after approximately 1 hour if it has 

been left running while the shift position is 

in P.

The timer for the automatic hybrid system 

shut off feature will reset if the brake 

pedal is depressed or if the shift position 

is in a position other than P.

After the vehicle is parked, if the door is 

locked with the door lock switch 

(

P.104) from the inside or the mechani-

cal key from the outside, the automatic 

hybrid system shut off feature will be dis-

abled. The timer for the automatic hybrid 

system shut off feature will be re-enabled 

if the driver’s door is opened.

Locking the door from outside with the 

hybrid system operating

1

With the driver’s door open, pull the 

driver’s door handle and insert the 

mechanical key.

2

Turn the mechanical key counterclock-

wise.

3

Pull out the mechanical key and close 

the door.

Automatic P position selection function

P.178

WARNING

Stopping the hybrid system in an 

emergency

If you want to stop the hybrid system in 

an emergency while driving the vehi-

cle, press and hold the power switch 

for more than 2 seconds, or press it 

briefly 3 times or more in succession. 

(

P.448)

However, do not touch the power 

switch while driving except in an emer-

gency. Turning the hybrid system off 

while driving will not cause loss of 

steering or braking control, however, 

power assist to the steering will be lost. 

This will make it more difficult to steer 

smoothly, so you should pull over and 

stop the vehicle as soon as it is safe to 

do so.

If the power switch is operated while 

the vehicle is running, a warning mes-

sage will be shown on the multi-infor-

mation display and a buzzer sounds.

When restarting the hybrid system 

after an emergency shutdown, press 

the power switch.

When parking

Exhaust gases include harmful carbon 

monoxide (CO), which is colorless and 

odorless. Observe the following precau-

tions.

172

4-2. Driving procedures

Modes can be changed by pressing 
the power switch with the brake pedal 
released. (The mode changes each 
time the switch is pressed.)

1

Off

The emergency flashers can be used.

2

ACCESSORY mode

Some electrical components such as the 
audio system can be used.
“ACCESSORY” will be displayed on the 
meter.

3

ON mode

All electrical components can be used.
“IGNITION ON” will be displayed on the 
meter.

Auto power off function

If the vehicle is left in ACCESSORY mode 

for more than 20 minutes or ON mode 

(with hybrid system not operating) for more 

than an hour with the shift position in P, the 

power switch will automatically turn off. 

However, this function cannot entirely pre-

vent the 12-volt battery discharge. Do not 

leave the vehicle with the power switch in 

ACCESSORY or ON mode for long peri-

ods of time when the hybrid system is not 

operating.

WARNING

Failure to do so may cause exhaust gases 

to enter the vehicle and may lead to an 

accident caused by light-headedness, or 

may lead to death or a serious health 

hazard.

If the vehicle is in a poorly ventilated 

area or a closed area, such as a 

garage, stop the hybrid system.

Do not leave the vehicle with the 

hybrid system operating for a long 

time. If such a situation cannot be 

avoided, park the vehicle in an open 

space and ensure that exhaust fumes 

do not enter the vehicle interior.

Do not leave the hybrid system operat-

ing in an area with snow build-up, or 

where it is snowing. If snowbanks build 

up around the vehicle while the hybrid 

system is operating, exhaust gases 

may collect and enter the vehicle.

Changing power switch modes

173

4-2. Driving procedures

4

Driving

When the shift control system malfunc-

tions

When attempting to turn the power switch 

off while there is a malfunction in the shift 

control system, the power switch mode may 

change to ACCESSORY mode. In this 

case, ACCESSORY mode may be turned 

off by applying the parking brake and press-

ing the power switch again. If there is a mal-

function in the system, have the vehicle 

inspected by your Lexus dealer immedi-

ately.

Turns EV drive mode on/off

When EV drive mode is turned on, the EV 
drive mode indicator will come on. Press-
ing the switch when in EV drive mode will 
return the vehicle to normal driving (using 
the gasoline engine and electric motor 
[traction motor]).

Situations in which EV drive mode can-

not be turned on

It may not be possible to turn EV drive 

mode on in the following situations. If it can-

not be turned on, a buzzer will sound and a 

message will be shown on the multi-infor-

NOTICE

To prevent 12-volt battery discharge

Do not leave the power switch in 

ACCESSORY or ON mode for long 

periods of time without the hybrid sys-

tem on.

If “ACCESSORY” or “IGNITION 

ON” is displayed on the meter, the 

power switch is not off. Exit the vehicle 

after turning the power switch off.

EV drive mode

In EV drive mode, electric power is 
supplied by the hybrid battery 
(traction battery), and only the 
electric motor (traction motor) is 
used to drive the vehicle.

This mode allows you to drive in res-
idential areas early in the morning 
and late at night, or in indoor park-
ing lots etc. without concern for 
noises and gas emissions.

However, when the Acoustic Vehi-
cle Alerting System is active, the 
vehicle may produce sound.

Operating instructions

174

4-2. Driving procedures

mation display.

The temperature of the hybrid system is 

high.

The vehicle has been left in the sun, 

driven on a hill, driven at high speeds, etc.

The temperature of the hybrid system is 

low.

The vehicle has been left in temperatures 

lower than about 32°F (0°C) for a long 

period of time etc.

The gasoline engine is warming up.

The hybrid battery (traction battery) is 

low.

The remaining battery level indicated in 

the “Energy Monitor” display is low. 

(

P.93)

Vehicle speed is high.

The accelerator pedal is depressed firmly 

or the vehicle is on a hill etc.

The windshield defogger is in use.

When the shift position is in M.

Switching to EV drive mode when the 

gasoline engine is cold

If the hybrid system is started while the gas-

oline engine is cold, the gasoline engine will 

start automatically in order to warm up. In 

this case, you will become unable to switch 

to EV drive mode.
To prevent gasoline engine warm up in 

order to reduce noises, start the hybrid sys-

tem without starting the gasoline engine, 

pressing the power switch with fully 

depressing the brake pedal and pressing 

the EV drive mode switch.

Automatic cancelation of EV drive 

mode

When driving in EV drive mode, the gaso-

line engine may automatically restart in the 

following situations. When EV drive mode 

is canceled, a buzzer will sound and the EV 

drive mode indicator will flash and go off.

The hybrid battery (traction battery) 

becomes low.

The remaining battery level indicated in 

the “Energy Monitor” display is low. 

(

P.93)

Vehicle speed is high.

The accelerator pedal is depressed firmly 

or the vehicle is on a hill etc.

When it is possible to inform the driver of 

automatic cancelation in advance, a prior 

notice screen will appear on the multi-infor-

mation display.

Possible driving distance when driving in 

EV drive mode

EV drive mode’s possible driving distance 

ranges from a few hundred meters to 

approximately 0.6 mile (1 km). However, 

depending on vehicle conditions, there are 

situations when EV drive mode cannot be 

used. 

(The distance that is possible depends on 

the hybrid battery [traction battery] level 

and driving conditions.)

Fuel economy

The hybrid system is designed to achieve 

the best possible fuel economy during nor-

mal driving (using the gasoline engine and 

electric motor [traction motor]). Driving in 

EV drive mode more than necessary may 

lower fuel economy.

If “EV Mode Unavailable” is shown on 

the multi-information display

The EV drive mode is not available. The rea-

son the EV drive mode is not available (the 

vehicle is idling, battery charge is low, vehi-

cle speed is higher than the EV drive mode 

operating speed range or accelerator pedal 

is depressed too much) may be displayed. 

Use the EV drive mode when it becomes 

available.

If “EV Mode Deactivated” is shown on 

the multi-information display

The EV drive mode has been automatically 

canceled. The reason the EV drive mode is 

not available (the battery charge is low, 

vehicle speed is higher than the EV drive 

mode operating speed range or accelera-

175

4-2. Driving procedures

4

Driving

tor pedal is depressed too much) may be 

displayed. Drive the vehicle for a while 

before attempting to turn on the EV drive 

mode again.

*1

: To improve fuel efficiency and reduce 

noise, set the shift position in D for nor-
mal driving. You can choose gear range 
suitable for your driving situation by 
operating the paddle shift switches.

*2

: Any gear range can be fixed when driv-

ing in M mode.

To protect the hybrid transmission

If the transmission fluid temperature is high, 

“Transmission Fluid Temp High See 

Owner’s Manual” will be displayed on the 

multi-information display and the vehicle 

will go into transmission protection mode 

automatically. Have the vehicle inspected 

by your Lexus dealer.

When driving with the dynamic radar 

cruise control with full-speed range 

activated

Even when performing the following 

actions with the intent of enabling engine 

braking, engine braking will not be acti-

vated because the dynamic radar cruise 

WARNING

Caution while driving

When driving in EV drive mode, pay spe-

cial attention to the area around the vehi-

cle. Because there is no engine noise, 

pedestrians, people riding bicycles or 

other people and vehicles in the area 

may not be aware of the vehicle starting 

off or approaching them, so take extra 

care while driving. Therefore, take extra 

care while driving even if the Acoustic 

Vehicle Alerting System is active.

Hybrid transmission

Select the shift position depending 
on your purpose and situation.

Shift position purpose and func-
tions

Shift posi-

tion

Objective or function

P

Parking the vehicle/starting 

the hybrid system

R

Reversing

N

Neutral (Condition in which 

the power is not transmitted)

D

Normal driving

*1

M

M mode driving

*2

 (

P.180)

176

4-2. Driving procedures

control with full-speed range will not be 

canceled.

While driving in the D position, down-

shifting to 9, 8, 7, 6, 5 or 4.

When switching the driving mode to 

sport mode while driving in the D position 

(

P.332)

Sudden start restraint control 

(Drive-Start Control [DSC])

P.164

AI-SHIFT

The AI-SHIFT automatically selects the suit-

able gear according to driver performance 

and driving conditions. 

The AI-SHIFT automatically operates when 

the shift position is in D. (Shifting the shift 

position to the M position cancels the func-

tion.)

If a message about a shift operation is 

shown

To prevent the shift position from being 

selected incorrectly or the vehicle from 

moving unexpectedly, the shift position may 

be changed automatically or operating the 

shift lever may be required. In this case, 

change the shift position following the mes-

sages on the multi-information display.

After recharging/reconnecting the 

12-volt battery

P.418

WARNING

When driving on slippery road sur-

faces

Do not accelerate or shift the shift posi-

tion suddenly. 

Sudden changes in engine braking may 

cause the vehicle to spin or skid, resulting 

in an accident.

NOTICE

Hybrid battery (traction battery) 

charge

If the shift position is in N, the hybrid bat-

tery (traction battery) will not be 

charged. To help prevent the battery 

from discharging, avoid leaving the N 

position selected for an extended period 

of time.

Situations where shift control system 

malfunctions are possible

If any of the following situations occurs, 

shift control system malfunctions are 

possible.

Immediately stop the vehicle in a safe 

place on level ground, apply the parking 

brake, and then contact your Lexus 

dealer.

When the warning message indicating 

the shift control system appears on the 

multi-information display. (

P.467)

The display indicates that no shift posi-

tion is selected for more than a few 

seconds.

177

4-2. Driving procedures

4

Driving

Shift lever

Operate the shift lever gently and securely 
in the direction of the arrow on the shift 
position indicator.
To shift to N, slide the shift lever in the 
direction of the arrow and hold it.
Release the shift lever after each shifting 
operation to allow it to return to its regular 

position (

).

Shifting to M is only possible when the shift 
position is in D.
When shifting from P to N, D or R, from N, 
D, M or R to P, from D or M to R, or from R 
to D, ensure that the brake pedal is being 
depressed and the vehicle is stationary.

Shift position indicator

Meter display:
The current shift position is highlighted.
When any shift position other than D or M 
is selected, the arrow toward M and the M 

position indicator are displayed in gray.
Shift lever display:
The current shift position is illuminated.
When selecting the shift position, make 
sure that the shift position has been 
changed to the desired position by check-
ing the shift position indicator provided on 
the instrument cluster.

P position switch

Fully stop the vehicle and set the parking 
brake, and then press the P position switch.
When the shift position is changed to P, the 
switch illuminates.
Check that the shift position indicator 
shows P.

Changing the shift position in power 

switch mode

The shift position cannot be changed 

when the power switch is in ACCES-

SORY mode or off.

When the power switch is in ON mode, if 

the “READY” indicator is not illuminated, 

the shift position can only be changed to 

N.

When the “READY” indicator is illumi-

nated, the shift position can be changed 

from P to D, N, or R.

When the “READY” indicator is flashing, 

the shift position cannot be changed from 

P to any other position, even if the shift 

lever is operated. Operate the shift lever 

again after the “READY” indicator 

changes from flashing to illuminated.

Shifting the shift position from P to other 

positions

While depressing the brake pedal firmly, 

operate the shift lever. If the shift lever is 

operated without depressing the brake 

pedal, the buzzer will sound and the shift-

ing operation will be disabled.

When selecting the shift position, make 

sure that the shift position has been 

changed to the desired position by 

checking the shift position indicator pro-

vided on the instrument cluster.

Shift position display and how to 
change the shift position

A

B

C

178

4-2. Driving procedures

The shift position cannot be changed 

from P to M directly.

The shift position cannot be changed 

when

In the following situations, a buzzer will 

sound to inform you that the shift position 

cannot be changed. Use the appropriate 

operation to attempt to change the shift 

position again.

When attempting to change the shift 

position from P with the brake pedal not 

depressed

When attempting to change the shift 

position from P with the accelerator 

pedal depressed

When attempting to change the shift 

position from N while stopped or driving 

at an extremely low speed with the brake 

pedal not depressed

When attempting to change the shift 

position from N while stopped or driving 

at an extremely low speed with the accel-

erator pedal depressed

When attempting to change the shift 

position from P or N to M

When the P position switch is pressed 

while driving

When driving at an extremely low speed, 

the shift position may change to P.

The shift position automatically changes 

to N when

In the following situations, a buzzer will 

sound to inform you that the shift position 

has been changed to N. Use the appropri-

ate operation to attempt to change the shift 

position again.

When attempting to change the shift 

position to R while the vehicle is moving 

forward

When driving at a low speed, the shift posi-
tion may change to R.

When attempting to change the shift 

position to D while the vehicle is moving 

backward

When driving at a low speed, the shift posi-
tion may change to D.

When attempting to change the shift 

position from R to M

If the N shift position is selected while 

driving

If the shift lever is moved to N while driving 

above a certain speed, the shift position will 

change to N without holding the shift lever 

in the N position. In this situation, a buzzer 

will sound and a message will be displayed 

on the multi-information display to inform 

you that the shift position has been changed 

to N.

Automatic P position selection function

In the following situations, the shift position 

is automatically changed to P.

When pressing the power switch with the 

vehicle stopped while the power switch is 

in ON mode and the shift position is in a 

position other than P (after the shift posi-

tion has changed to P, the power switch 
will turn off)

*

If the driver’s door is opened and all of the 

following conditions are met, while the 

shift position is in a position other than P

• The power switch is in ON mode.

• The driver is not wearing the seat belt.

• The brake pedal is not depressed.
To start off the vehicle after the shift posi-
tion is changed to P, operate the shift lever 
again.

When the vehicle is stopped after the 

hybrid system has been stopped in an 

emergency while driving.

When voltage of the 12-volt battery 

drops while the shift position is in a posi-

tion other than P.

*

: When the power switch is pressed while 

driving at extremely slow speeds, such 
as immediately before stopping the vehi-
cle, the shift position may automatically 
change to P. Make sure that the vehicle 
is completely stopped before pressing 
the power switch.

If the shift position cannot be shifted 

from P

There is a possibility that the 12-volt battery 

is discharged. Check the 12-volt battery in 

this situation. (

P.477)

179

4-2. Driving procedures

4

Driving

Customization

Some functions can be customized. 

(

P.509)

Driving mode

P.332

Snow mode

Snow mode can be selected to suit the 
conditions when driving on slippery 
road surfaces, such as on snow.
Turn the snow mode switch backward.

The snow mode indicator illuminates.
Turn the snow mode switch backward 
again to return to normal mode.

Snow mode automatic deactivation

Snow mode is automatically deactivated if 

the power switch is turned off after driving 

in snow mode.

To drive using temporary shift range 
selection, operate the “-” or “+” paddle 
shift switch. 

WARNING

For the shift lever

Do not remove the shift lever knob or 

use anything but a genuine Lexus shift 

lever knob. Also, do not hang anything 

on the shift lever.

Doing so could prevent the shift lever 

from returning to position, causing 

unexpected accidents to occur when 

the vehicle is in motion.

In order to prevent the shift position 

from accidentally being changed, do 

not touch the shift lever when not using 

them.

P position switch

Do not press the P position switch 

while the vehicle is moving.

If the P position switch is pressed when 

driving at very low speeds (for example, 

directly before stopping the vehicle), the 

vehicle may stop suddenly when the shift 

position switches to P, which could lead 

to an accident.

In order to prevent the shift position 

from accidentally being changed, do 

not touch the P position switch when 

not using them.

NOTICE

Notes regarding shift lever and P 

position switch operation

Avoid repeatedly operating the shift 

lever and P position switch in quick suc-

cession.

The system protection function may acti-

vate and it will not be temporarily possi-

ble to shift the shift position other than P. 

If this happens, please wait for a while 

before attempting to change the shift 

position again.

When exiting the vehicle (driver’s 

seat only)

Check that the shift position indicator 

shows P and that the parking brake indi-

cator is illuminated before opening the 

door and exiting the vehicle.

Selecting the driving mode

Selecting shift ranges in the D 
position

180

4-2. Driving procedures

When the “-” paddle shift switch is 
operated, the shift range switches to a 
range that enables engine braking 
force that is suitable to driving condi-
tions. When the “+” paddle shift switch 
is operated, the shift range switches to 
a range that is one range higher than 
the current range. 
Changing the shift range allows 
restriction of the highest gear, prevent-
ing unnecessary upshifting and 
enabling the level of engine braking 
force to be selected.

1

Upshifting

2

Downshifting

The selected shift range, from D1 to D10, 
will be displayed on the meter.
To return to normal D position driving, the 
“+” paddle shift switch must be held down 
for a period of time.

A lower shift range will provide greater 

engine braking forces than a higher shift 
range.

Automatic deactivation of shift range 

selection in the D position

Shift range selection in the D position will 

be deactivated in the following situations:

When the vehicle comes to a stop

If the accelerator pedal is depressed for 

more than a certain period of time

When the shift position is shifted to a 

position other than D.

When the “+” paddle shift switch is 

pressed and held

Downshifting restriction warning 

buzzer

To help ensure safety and driving perfor-

mance, downshifting operation may some-

times be restricted. In some circumstances, 

downshifting may not be possible even 

when the paddle shift switch is operated. (A 

buzzer will sound twice.)

To enter M mode, shift the shift position 
to M. Gears can be selected by oper-
ating the paddle shift switches, allowing 
you to drive in the gear of your choos-
ing.

1

Upshifting

2

Downshifting

The gear changes once every time the 
paddle shift switch is operated.

Meter dis-

play

Function

D2 - D10

A gear in the range between 

D1 and the selected shift 

range is automatically cho-

sen depending on vehicle 

speed and driving condi-

tions

D1

Setting the shift range at D1

Selecting gears in the M position

181

4-2. Driving procedures

4

Driving

The selected gear, from M1 to M10, will be 
fixed and displayed on the meter.

When in the M position, the gear will 
not change unless the paddle shift 
switches are operated.
However, even when in the M position, 
the gears will be automatically 
changed in the following situations:

When vehicle speed drops (down-
shift only).

When vehicle speed increases 
(upshift only).

When the accelerator pedal is firmly 
depressed.

When it is necessary to protect the 
transmission when the transmission 
fluid temperature is high or low, or 
other reasons.

Also, the gear will not shift when the 
vehicle speed is low, even if an upshift 
operation is performed.

Downshifting restrictions warning 

buzzer

To help ensure safety and driving perfor-

mance, downshifting operation may some-

times be restricted. In some circumstances, 

downshifting may not be possible even 

when the paddle shift switch is operated. (A 

buzzer will sound twice.)

Performing the following opera-
tions allows the power switch to be 
set to ACCESSORY mode with the 
shift position held in N.

1

Operate the shift lever and change 
the shift position to N when the 
hybrid system is operating.

2

Return the shift lever to its regular 

position (

).

3

Operate the shift lever to N and 
hold it there until the buzzer 
sounds.

4

Press the power switch within 5 
seconds after the buzzer sounds.

The power switch will be set to ACCES-
SORY mode with the shift position in N.

*

Make sure to check that the buzzer 
sounds and “Holding N Push P Switch 
When Done” is displayed on the 
multi-information display.

To change to a shift position other 
than N, press the P position switch. 
The shift position will be changed to 
P.

Even if the hybrid system is not 
operating, by operating the shift 
lever and the power switch, the 
power switch may be changed to 
ACCESSORY mode with the shift 
position held in N. Make sure that 
the hybrid system is operating 
before performing the operation.

*

: To keep this state, do not operate the 

power switch. If the power switch is 
operated repeatedly, the power switch 
will turn off after the shift position has 
automatically changed to P.

When the power switch is 
changed to ACCESSORY mode 
with the shift position held in N

182

4-2. Driving procedures

1

Right turn

2

Lane change to the right (move the 
lever partway and release it)

The right hand signals will flash 3 times.

3

Lane change to the left (move the 
lever partway and release it)

The left hand signals will flash 3 times.

4

Left turn

Turn signals can be operated when

The power switch is in ON mode.

If the indicator flashes faster than usual

Check that a light bulb in the front or rear 

turn signal lights has not burned out.

If the turn signals stop flashing before a 

lane change has been performed

Operate the lever again.

Customization

Some functions can be customized. 

(

P.509)

Turn signal lever

Operating instructions

183

4-2. Driving procedures

4

Driving

Using the manual mode

The parking brake can be set and 
released manually.

U.S.A.
Canada

1

Push the switch to set the parking 
brake

The parking brake indicator light will turn 
on.
Press and hold the parking brake switch if 
an emergency occurs and it is necessary to 
operate the parking brake while driving.

2

Pull the switch to release the park-
ing brake

• Operate the parking brake switch while 

depressing the brake pedal.

• Using the parking brake automatic 

release function, the parking brake can 
be released by depressing the accelera-
tor pedal. When using this function, 
slowly depress the accelerator pedal.

Make sure that the parking brake indicator 
light turn off.

Turns automatic mode on

While the vehicle is stopped, press and 
hold the parking brake switch until a 
message is shown on the multi-infor-
mation display.

When the automatic mode is turned 
on, the parking brake operates as fol-
lows.

When the shift position is shifted 
from P, the parking brake will be 
released, and the parking brake 
indicator light will turn off.

When the shift position is shifted to 
P, the parking brake will be set, and 
the parking brake indicator light will 
turn on.

Operate the shift lever and P position 
switch with the vehicle stopped and the 
brake pedal depressed.

Parking brake

The parking brake can be set or 
released automatically or manually.

In automatic mode, the parking 
brake can be set or released auto-
matically according to the shift 
lever operation. Also, even in auto-
matic mode, the parking brake can 
be set or released manually.

Operating instructions

A
B


Content      ..     3      4      5      6     ..