Lexus GX460 (2023 year). Manual in english - page 11
 

  Index      Manuals     Lexus GX460 (2023 year). Manual in english


Search            copyright infringement  


Content      ..     9      10      11      12     ..


Lexus GX460 (2023 year). Manual in english - page 11


GX460_OM_OM60R43U_(U)

345

4-5. Using the driving support systems

4

Dr

iving

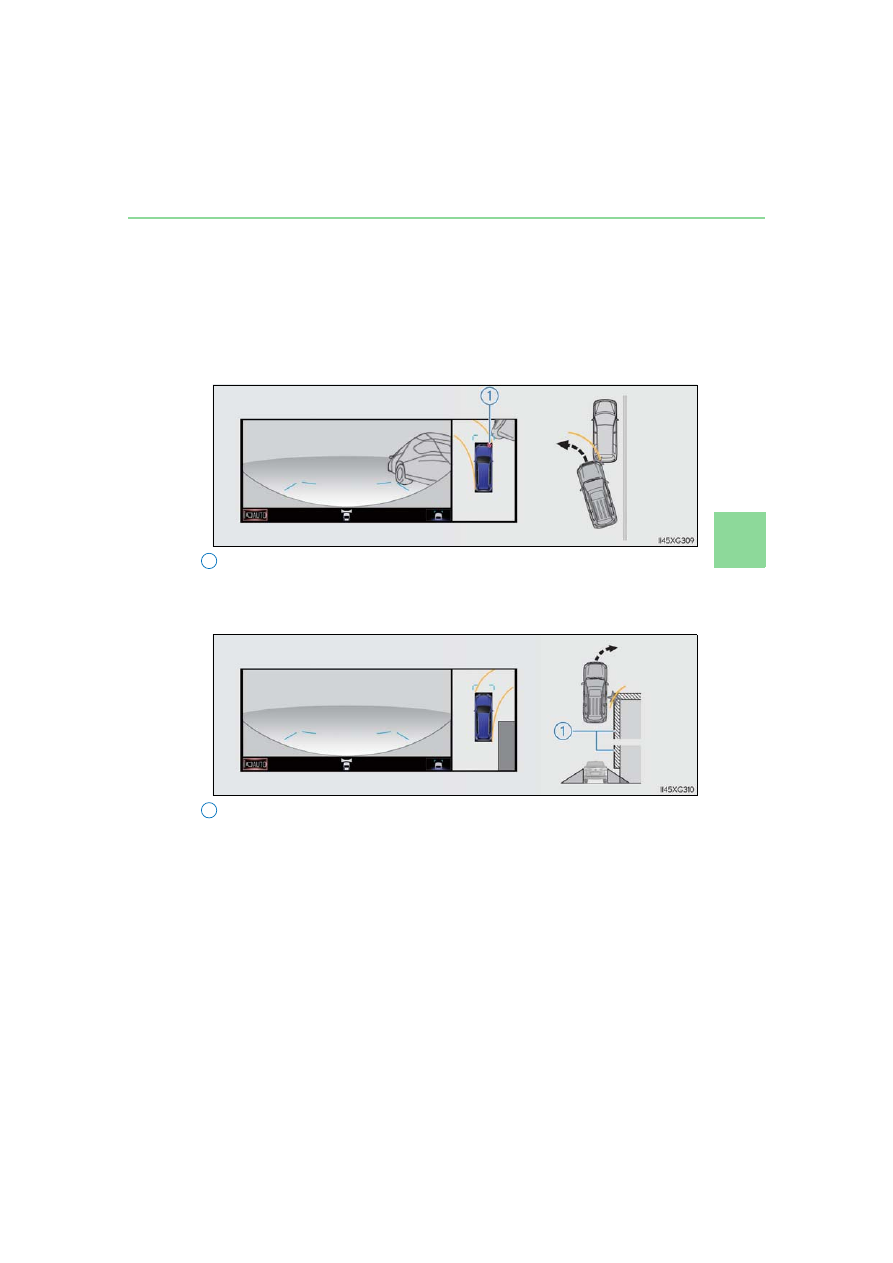
Estimated course lines
Estimated course lines are displayed under the assumption that the vehicle
is on a flat road surface. Therefore, the position of three-dimensional
objects higher than the road surface (such as a vehicle bumper) cannot be
determined. Even if it seems that an obstacle is outside of the estimated
course lines and a collision will not occur according to the screen, an
obstacle may actually be in the vehicle course, resulting in a collision.

Estimated course lines

Three-dimensional objects in high positions (such as walls with protrusions or the

loading areas of trucks) may not be displayed on the screen. Confirm the safety of

your surroundings directly.

Protrusion of a wall

1

1

346

GX460_OM_OM60R43U_(U)

4-5. Using the driving support systems

Differences between the rear view or wide rear view and actual roads

The guide lines on the screen are intended for flat surfaces (such as the road).
Be aware of the following points when three-dimensional objects with protru-
sions (obstacles such as the cargo bed of a truck) are nearby.

Estimated course lines
Guide lines are displayed in reference to a level road surface and cannot
be used to determine the location of three-dimensional objects. Confirm
the safety of your surroundings directly. Even if it seems that the cargo bed
of a truck is outside the estimated course lines and a collision will not occur
according to the screen, it may actually be in the vehicle course, resulting in
a collision.

Estimated course lines

1

GX460_OM_OM60R43U_(U)

347

4-5. Using the driving support systems

4

Dr

iving

Differences between the panoramic view, rear view and wide rear view and
actual roads

Distance guide lines
Guide lines are displayed in reference to the road surface and cannot be
used to determine the distance of three-dimensional objects from the vehi-
cle. Confirm the safety of your surroundings directly. On the screen, it
appears that a truck is parking at point 

 according to the distance guide

lines. However, in reality if you back up to point 

, you will hit the truck.

On the screen, it appears that 

 is closest and 

 is farthest away. How-

ever, in reality, the distance to 

 and 

 is same, and 

 is farther than 

and .

Under vehicle terrain view
The tire position indicator lines and vehicle position indicator lines may dif-
fer from actual vehicle positions depending on the number of passengers,
weight of the load, road grade, road surface conditions, brightness of the
surrounding environment, etc. Always drive the vehicle while directly con-
firming the safety of your surroundings.

2

1

1

3

1

3

2

1

3

348

GX460_OM_OM60R43U_(U)

4-5. Using the driving support systems

Using under vehicle terrain view

The images displayed were previously taken behind the current vehicle position.

Therefore, actual conditions may differ from those shown on the screen in the following

situations.
• When conditions changed such as when an object moved or entered the frame after

the image was taken.

• Loose material like sand or snow has crumbled or shifted

• An obstacle has moved

• There is a puddle, tract of mud, etc., within the display range

• The vehicle slips

In the following situations, actual tire positions and vehicle position may differ from

those indicated by the tire position indicator lines and vehicle position indicator lines.
• Tires have been replaced

• Optional equipment has been installed

WARNING

Guide lines

The displayed guide lines are composed with the image that was previously taken and

may differ from the actual state.
Always drive the vehicle while confirming your surroundings.

GX460_OM_OM60R43U_(U)

349

4-5. Using the driving support systems

4

Dr

iving

If you notice any symptoms

If you notice any of the following symptoms, refer to the likely cause and the
solution, and re-check.
If the symptom is not resolved by the solution, have the vehicle inspected by
your Lexus dealer.

Likely cause

Solution

The image is difficult to see

• The vehicle is in a dark area

• The temperature around the lens is

either high or low

• The outside temperature is low

• There are water droplets on the cam-

era

• It is raining or humid

• Foreign matter (mud etc.) is adhering to

the camera

• Sunlight or headlights are shining

directly into the camera

• The  vehicle  is  under fluorescent lights,

sodium lights, mercury lights, etc.

Drive while visually checking the vehicle’s

surroundings. (Use the Multi-terrain

Monitor again once conditions have been

improved.)

The procedure for adjusting the picture

quality of the Multi-terrain Monitor is

same as the procedure for adjusting the

navigation screen. Refer to the

“NAVIGATION SYSTEM OWNER’S

MANUAL”.

The image is blurry

Dirt or foreign matter (such as water

droplets, snow, mud, etc.) is adhering to

the camera

Flush the camera with a large quantity of

water and wipe the camera  lens  with  a

soft and wet cloth.

The image is out of alignment

The camera or surrounding area has

received a strong impact

Have the vehicle inspected by your Lexus

dealer.

The guide lines are very far out of alignment

The camera position is out of alignment

Have the vehicle inspected at your Lexus

dealer.

• The vehicle is tilted (there is a heavy

load on the vehicle, tire pressure is low

due to a tire puncture, etc.)

• The vehicle is used on an incline

If this happens due to these causes, it

does not indicate a malfunction.

Drive while visually checking the vehicle’s

surroundings.

350

GX460_OM_OM60R43U_(U)

4-5. Using the driving support systems

The projected course lines move even though the steering wheel is straight (vehi-

cle width extension guide lines and projected course lines are not aligned)

There is a malfunction in the signals being

output by the steering sensor

Have the vehicle inspected by your Lexus

dealer.

Guide lines are not displayed

The back door is open

Close the back door.

If this does not resolve the symptom, have

the vehicle inspected by your Lexus

dealer.

“!” is displayed

• Battery has been reinstalled.

• The steering wheel has been moved

while the battery was being reinstalled.

• Battery power is low.

• The steering sensor has been rein-

stalled.

• There is a malfunction in the signals

being output by the steering sensor.

Turn the steering wheel fully to right and

left.

If this does not resolve the symptom, have

the vehicle inspected by your Lexus

dealer.

The panoramic view display cannot be magnified

The See-through view/Moving view cannot be displayed

The intuitive parking assist may be mal-

functioning or dirty.

Follow the correction procedures for mal-

functions of the intuitive parking assist.

Likely cause

Solution

GX460_OM_OM60R43U_(U)

351

4-5. Using the driving support systems

4

Dr

iving

Product license

NOTICE

How to use the camera

The Multi-terrain Monitor system may not operate properly in the following cases.
• If the front or the rear of the vehicle or the outside rear view mirror has been hit,

the camera’s position and mounting angle may have changed. 

• As  the  camera  has  a  water  proof  construction,  do  not  detach,  disassemble  or

modify it. This may cause incorrect operation.

• When cleaning the camera lens, flush the camera with a large quantity of water

and wipe it with a soft and wet cloth. Strongly rubbing the camera lens may cause

the camera lens to be scratched and unable to transmit a clear image.

• Do not allow organic solvent, car wax, window cleaner or glass coat to adhere to

the camera. If this happens, wipe it off as soon as possible.

• If the temperature changes rapidly, such as when hot water is poured on the vehi-

cle in cold weather, the system may not operate normally.

• When washing the vehicle, do not apply intensive bursts of water to the camera or

camera area. Doing so may result in the camera malfunctioning.

• When the camera is used under fluorescent lights, sodium light or mercury light

etc., the lights and the illuminated areas may appear to flicker.

• The camera can be damaged by flying rocks and other debris.

Do not expose the camera to strong impact as this could cause a malfunction. If this

happens, have the vehicle inspected by your Lexus dealer as soon as possible.

352

GX460_OM_OM60R43U_(U)

4-5. Using the driving support systems

Rear height control air suspension

Height control switch
Height control OFF switch

Operating the switch changes vehicle rear height as follows:

Higher
Lower

Vehicle height can be adjusted only
when the engine is running.
The selected height mode will be
shown on the multi-information display.
The selected mode will flash while the
height mode is being changed.

: If equipped

The rear height control air suspension allows the driver to control vehicle rear
height in order to adjust driving conditions. Select the desired height with the
height control switch.

1

2

Selecting vehicle height

1

2

GX460_OM_OM60R43U_(U)

353

4-5. Using the driving support systems

4

Dr

iving

Height modes

N mode (normal mode): For ordinary driving
Normal height

HI mode (high mode): For driving on bumpy roads
1.6 in. (40 mm) higher than the normal rear height
HI mode cannot be selected when vehicle speed exceeds 18 mph (30
km/h).

LO mode (low mode): For the ease of egress/ingress and loading luggage
0.8 in. (20 mm) lower than the normal rear height
LO mode cannot be selected when vehicle speed exceeds 7 mph (12 km/h).

When the height control OFF switch is
pressed with the vehicle stopped, the
vehicle height is fixed at the current
height.
This status is memorized in the system
even after the engine is stopped.
The height can be adjusted by pressing
the height control OFF switch again.

When vehicle speed exceeds 18 mph (30 km/h), the rear height control air suspen-

sion turns on automatically.

Disabling the height control

354

GX460_OM_OM60R43U_(U)

4-5. Using the driving support systems

When HI mode is selected

The vehicle height will change to N mode when driving at the speeds of 18 mph (30 km/h). 

Even if vehicle speed is then reduced to under 18 mph (30 km/h), height will not return to

HI mode.

When LO mode is selected

The vehicle height will change to N mode when vehicle speed exceeds 7 mph (12 km/h). 

Even if vehicle speed is then reduced to under 7 mph (12 km/h), height will not return to

LO mode.

Automatic leveling function

Regardless of the number of occupants and the luggage load, vehicle height in any mode

is always adjusted to a fixed height by the automatic leveling function.

The rear height control air suspension will not operate in the following cases:

The underbody of the vehicle is touching the surface of the road.

The area around the suspension is covered with ice.

Even if you hear an operating noise

This does not indicate a problem in the rear height control air suspension.

Parking and stopping tips

If you immediately stop the engine after off-road driving, or park the vehicle for a long

time, the vehicle height may gradually lower. When parking, make sure there is nothing

under the vehicle that may come in contact with the underbody. The vehicle will return

to the set height when the engine is started.

The vehicle height may change as the temperature changes when the engine is

stopped. The vehicle will return to the set height when the engine is started.

When lowering the vehicle

In order to prevent the vehicle height from rising as occupants leave the vehicle, lowering

control will occur for a short while after the engine has been stopped.

The rear height control air suspension failure warning

If a malfunction occurs in the rear height control air suspension, N mode is automati-

cally selected. However, the system may not switch to N mode depending on the loca-

tion of the malfunction.

The “CHECK AIR SUSPENSION SYSTEM”/“Check air suspension system” is dis-

played on the multi-information display, and the rear height control air suspension can-

not be activated until the malfunction is corrected.

Stop the engine and start it again. If the warning message turns off, the system is operat-

ing correctly. If the warning message continues to be displayed, have your vehicle

inspected by your Lexus dealer as soon as possible.

GX460_OM_OM60R43U_(U)

355

4-5. Using the driving support systems

4

Dr

iving

WARNING

The rear height control air suspension must be turned off

Be sure to observe the following precautions. Otherwise, the automatic leveling func-

tion may cause vehicle height to change, and you may catch part of your body in the

vehicle, resulting in an accident:

When jacking up the vehicle, installing tire chains or tying the vehicle with chains/

wires for transportation via flatbed truck, turn off the rear height control air suspen-

sion and stop the engine.

When the vehicle must be towed or disconnecting a trailer, put the vehicle height in N

mode and turn off the rear height control air suspension.

When the vehicle is stuck, turn off the rear height control air suspension.

Selecting the correct height mode

HI mode should only be used when driving on rough roads, for example when driving

off-road.

Because the vehicle’s center of gravity will become higher when in the mode, the

vehicle may become unstable when turning abruptly, resulting in an accident.

Do not select HI mode when loading cargo on the roof luggage carrier. 

Because the vehicle’s center of gravity will become higher when in the mode, the

vehicle may become unstable when turning abruptly, resulting in an accident.

Before lowering vehicle height, check that there is no one under the vehicle.

NOTICE

Be careful in any place where overhead space is limited

The vehicle height will rise when a higher mode is selected or cargo is unloaded. This

may cause damage to the vehicle.

Do not select LO mode when driving on bumpy roads

If the underbody of the vehicle touches a rugged road surface, the vehicle may be

damaged.

Changing vehicle height

Do not change vehicle height frequently.

The compressor may overheat and stop operation.

When on the extremely uneven roads with rocks

Sometimes the vehicle height is not adjusted because it is judged as uneven road driv-

ing.

356

GX460_OM_OM60R43U_(U)

4-5. Using the driving support systems

AVS (Adaptive Variable Suspension System)

Sport mode

For winding mountain road driving or

high speed driving.
When in Sport mode, the “SPORT” indi-

cator comes on in the multi-information

display.
While in sport mode, press the COMF

switch to change the driving mode to

normal mode.

Normal mode

For normal driving.
While in normal mode, press the

SPORT switch to change the driving

mode to sports mode.
While in normal mode, press the COMF switch to change the driving mode to com-

fort mode.

Comfort mode

When compared to normal mode, ride comfort is improved.
When in Comfort mode, the “COMFORT” indicator comes on in the multi-informa-

tion display.
While in comfort mode, press the SPORT switch to change the driving mode to nor-

mal mode.

Driving mode

Mode   is suitable for heavy load or driving on a unpaved road.

With the four-wheel drive control switch at L4, the damping effect suitable for off-road

driving will be provided, regardless of the position of the AVS switch.

: If equipped

The driving modes can be selected to suit driving condition.

1

2

3

1

357

GX460_OM_OM60R43U_(U)

4-5. Using the driving support systems

4

Dr

iving

Four-wheel drive system

H4 (high speed position)

Normal driving on all types of roads.

L4 (low speed position)

Driving requiring maximum power and

traction such as climbing or descending

steep hills, off-road driving, and hard

pulling in sand or mud, etc.
The low speed four-wheel drive indica-

tor will come on.

Use the four-wheel drive control switch and center differential lock/unlock
switch to select the following transfer and center differential modes.

Four-wheel drive control switch

1

2

358

GX460_OM_OM60R43U_(U)

4-5. Using the driving support systems

Lock the center differential when your
vehicle’s wheels get stuck in a ditch or
when driving on a slippery or bumpy
surface.

The center differential lock indicator will

come on.
Unlock the center differential after the

wheels have been freed, or after moving

to a flat, non-slippery surface.
To unlock the center differential, push the switch again.

Shifting from H4 to L4

Stop the vehicle completely with brake pedal held down.
Shift the shift lever to N.
Push and shift the four-wheel drive control switch to L4.

Maintain this condition until the low speed four-wheel drive indicator turns on.

Shifting from L4 to H4

Stop the vehicle completely with brake pedal held down.
Shift the shift lever to N.
Push and shift the four-wheel drive control switch to H4.

Maintain this condition until the low speed four-wheel drive indicator turns off.

Center differential lock/unlock switch

Shifting between H4 and L4

1

2
3

1

2
3

GX460_OM_OM60R43U_(U)

359

4-5. Using the driving support systems

4

Dr

iving

When the four-wheel drive control switch can be operated

The engine switch is in IGNITION ON mode.

The shift lever is in the N position.

The vehicle is stopped completely.

The low speed four-wheel drive indicator

The indicator blinks while switching between H4 and L4.

If the low speed four-wheel drive indicator continues to blink when you operate the

four-wheel drive control switch to the H4 or L4 position, stop the vehicle completely,

shift the shift lever securely into N and then operate the switch again.

If the shift lever is moved before the low speed four-wheel drive indicator turns on/off,

the transfer mode may not be shifted completely. The transfer mode disengages both

the front and rear drive shafts from the powertrain and allows the vehicle to move

regardless of the shift position. (At this time, the indicator blinks and the buzzer sounds.) 

Therefore, the vehicle is free to roll even if the shift lever is in P. You or someone else

could be seriously injured. You must complete the shifting of the transfer mode and

confirm that the indicator has turned off (H4) or turned on (L4).

If the engine coolant temperature is too low, the four-wheel drive control system may

not be able to shift. When the engine is warmer operate the switch again.

If the indicator continue to blink even if doing so, have the vehicle inspected by your

Lexus dealer as soon as possible. There may be a trouble in the four-wheel drive system.

When the transfer mode is switched to L4

VSC is automatically turned off. (The VSC OFF indicator will come on.)

When the center differential lock/unlock switch can be operated

The engine switch is in IGNITION ON mode.

The center differential lock indicator

The indicator blinks while locking/unlocking the center differential.

If the center differential lock indicator blinks and the buzzer sounds when the center

differential is locked, stop the slipping or spinning and push the switch again.

If the indicator continue to blink even if doing so, have the vehicle inspected by your

Lexus dealer as soon as possible. There may be a trouble in the four-wheel drive system.

Locking/unlocking the center differential

If the operation is not completed, the center differential lock indicator blinks. If the indi-

cator does not turn off when unlocking the center differential, drive straight ahead

while accelerating or decelerating, or drive in reverse.

Avoid turning suddenly while the center differential is locked. If you do turn suddenly,

the difference in turning speeds between the front and rear wheels may have a similar

effect to braking, thus making driving difficult.

360

GX460_OM_OM60R43U_(U)

4-5. Using the driving support systems

WARNING

While driving

Observe the following precautions. Failure to do so may cause an accident resulting in

death or serious injury.

Never move the four-wheel drive control switch if the wheels have lost traction.

Do not operate the center differential lock/unlock when the vehicle is turning or

when its wheels are spinning freely off the ground.

NOTICE

To prevent damage to the center differential

For normal driving on dry and hard surface roads, unlock the center differential.

Unlock the center differential after the wheels are out of the ditch or off the slippery

or bumpy surface.

361

GX460_OM_OM60R43U_(U)

4-5. Using the driving support systems

4

Dr

iving

Crawl Control

Crawl Control ON/OFF switch

The indicator light on the switch comes

on when operating.

Crawl Control speed selector dial
Crawl Control indicators

The Crawl Control indicator is lit and

the slip indicator flashes when operat-

ing.

Multi-information display

The selected multi-terrain select mode

will be displayed on the multi-informa-

tion display.

: If equipped

Allows travel on extremely rough off-road surfaces at a fixed low speed with-
out pressing the accelerator or brake pedal. Minimizes loss of traction or
vehicle slip when driving on slippery road surfaces, helping for stable driving.

Crawl Control switch/indicators

1

2
3

4

362

GX460_OM_OM60R43U_(U)

4-5. Using the driving support systems

The following table shows some typical terrains and the recommended speed
modes.

Lo
Lo-Med
Med
Med-Hi
Hi

*

: Depending on the road surface, it may not be the most effective.

Operate the Crawl Control speed
selector dial during Crawl Control to
select a mode.

Speed modes

1

2
3
4
5

Mode

Road condition

Lo

Rock, mogul (downhill) and gravel (downhill)

*

Lo-Med

Mogul (uphill)

*

Med

Snow, mud, gravel (uphill), sand, dirt, mogul (uphill) and
grass

*

Med-Hi

Hi

Switching modes

1

2

3

4

5

GX460_OM_OM60R43U_(U)

363

4-5. Using the driving support systems

4

Dr

iving

The Crawl Control can be operated when

The shift lever is in any gear other than P or N.

The four-wheel drive control switch is in L4.

The driver’s door is closed.

Automatic system cancelation

In the following situations, the system is canceled automatically:

At that time, the buzzer will sound, the slip indicator turns off, and the Crawl Control indi-

cator flashes.

A notification will be displayed on the multi-information display for several seconds. 

(

P. 544)

When the shift lever is moved to P or N.

When the four-wheel drive control switch is in H4.

When the driver’s door is opened.

When turning off Crawl Control while traveling, stop the vehicle before the Crawl Con-

trol indicator turns off, or drive extremely carefully.

Function limit

In the following situations, you will be able to use brake control to drive downhill at a

fixed low speed, but you will be unable to use engine control to drive uphill at a fixed low

speed.
• When the driving mode is set to second start mode.

• When the vehicle speed is higher than 6 mph (10 km/h).

When the vehicle speed is higher than 15 mph (25 km/h), engine control and brake

control will stop temporarily. At that time, the Crawl Control indicator flashes.

364

GX460_OM_OM60R43U_(U)

4-5. Using the driving support systems

When the Crawl Control system is operated continuously

This may cause the brake actuator to overheat. In this case, the Crawl Control system will

stop operating, a buzzer will sound, the Crawl Control indicator will turn off after flashing

and the “TRAC OFF” indicator will come on. In this case, quickly stop the vehicle in a safe

place and give the actuator adequate time to cool off. Refrain from using the system until

the “TRAC OFF” indicator turns off. (The vehicle can be driven normally during this

time.)

When depressing the accelerator pedal while the Crawl Control is operating

Multi-terrain Select operates in AUTO mode. (

P. 292)

If the automatic transmission system overheats

The system will cease operation, a buzzer will sound and a warning message will be dis-

played to alert the driver. Stop the vehicle in a safe place until the warning message turns

off. (

P. 545)

Sounds and vibrations caused by the Crawl Control system

A sound may be heard from the engine compartment when the engine is started or just

after the vehicle begins to move. This sound does not indicate that a malfunction has

occurred in Crawl Control system.

Either of the following conditions may occur when the Crawl Control system is operat-

ing. None of these are indicators that a malfunction has occurred.
• Vibrations may be felt through the vehicle body and steering. 

• A motor sound may be heard after the vehicle comes to a stop.

If the slip indicator comes on...

It may indicate a malfunction in the system. Consult your Lexus dealer.

WARNING

When using Crawl Control

Do not rely solely on the Crawl Control. This function does not extend the vehicle’s

performance limitations. Always thoroughly check the road conditions, and drive

safely.

These conditions may cause the system not to operate properly

When driving on the following surfaces, the system may not be able to maintain a fixed

low speed, which may result in an accident:

Extremely steep inclines.

Extremely uneven surfaces.

Snow-covered roads, or other slippery surfaces.

365

GX460_OM_OM60R43U_(U)

4-5. Using the driving support systems

4

Dr

iving

Downhill assist control system

Shift the “DAC” switch to ON. The
downhill assist control system indicator
will comes on and the system will oper-
ate. 

When the system is in operation, the slip

indicator will flash, and the stop lights/

high mounted stop lights will be lit. A

sound may also occur during the opera-

tion. This does not indicated a malfunc-

tion.

Shift the “DAC” switch to OFF while the system is in operation. The downhill
assist control system indicator will flash as the system gradually ceases operation,
and will turn off when the system is fully off.
Shift the “DAC” switch to ON while the downhill assist control system indicator is
flashing to start the system again.

: If equipped

The downhill assist control system helps to prevent excessive speed on steep
downhill slopes. 
The system will operate when the vehicle is traveling under 15 mph (25 km/h)
with the accelerator and brake pedals released and the transfer mode is in L4.

System operation

Turning off the system

366

GX460_OM_OM60R43U_(U)

4-5. Using the driving support systems

Operating tips

The system will operate when the shift lever is in a position other than P, however to make

effective use of the system it is recommended to select a lower shift range.

The system will not operate when

The transfer mode is in H4.

If the downhill assist control system indicator flashes

In the following situations, the indicator flashes and the system will not operate:
• The transfer mode is not in L4.

• The shift lever is in P.

• The accelerator or brake pedal is depressed.

• The vehicle speed exceeds approximately 15 mph (25 km/h).

• The brake system overheats.

In the following situations, the indicator flashes to alert the driver, but the system will

operate:
• The shift lever is in N.

• The “DAC” switch is turned off while the system is operating.

The system will gradually ceases operation. The indicator will flash during operation,

and then go off when the system is fully off.

When the downhill assist control system is operated continuously

This may cause the brake actuator to overheat. In this case, the downhill assist control

system will stop operating, a buzzer will sound and the downhill assist control system

indicator will start flashing, and the “TRAC OFF” indicator light will come on. Refrain

from using the system until the downhill assist control system indicator stays on and

“TRAC OFF” indicator light turns off. (The vehicle can be driven normally during this

time.)

Sounds and vibrations caused by the downhill assist control system

A sound may be heard from the engine compartment when the engine is started or just

after the vehicle begins to move. This sound does not indicate that a malfunction has

occurred in downhill assist control system.

Either of the following conditions may occur when the downhill assist control system is

operating. None of these are indicators that a malfunction has occurred.
• Vibrations may be felt through the vehicle body and steering.

• A motor sound may be heard after the vehicle comes to a stop.

System malfunction

In the following cases, have your vehicle checked by your Lexus dealer.

The downhill assist control system indicator does not come on when the engine switch

is turned to IGNITION ON mode.

The downhill assist control system indicator does not come on when the “DAC” switch

is shifted to ON.

The slip indicator comes on.

GX460_OM_OM60R43U_(U)

367

4-5. Using the driving support systems

4

Dr

iving

WARNING

When using downhill assist control system

Do not rely overmuch on the downhill assist control system. This function does not

extend the vehicle’s performance limitations. Always thoroughly check the road condi-

tions, and drive safely.

The system may not operate on the following surfaces, which may lead to an accident

causing death or serious injury

Slippery surfaces such as wet or muddy roads

Icy surface

Unpaved roads

368

GX460_OM_OM60R43U_(U)

4-5. Using the driving support systems

Driving assist systems

ABS (Anti-lock Brake System)

Helps to prevent wheel lock when the brakes are applied suddenly, or if the brakes are

applied while driving on a slippery road surface

Multi Terrain ABS (Anti-lock Brake System)

Helps to prevent wheel lock when the brakes are applied suddenly, or if the brakes are

applied while driving on a slippery road surface, or in off-road conditions (such as

rough roads, sand and mud)
Vehicles with Multi-terrain Select system: The Multi Terrain ABS operates in synchro-

nization with the Multi-terrain Select

Brake assist

Generates an increased level of braking force after the brake pedal is depressed

when the system detects a panic stop situation

VSC (Vehicle Stability Control)

Helps the driver to control skidding when swerving suddenly or turning on slippery

road surfaces

TRAC (Traction Control) for H4 position

Helps to maintain drive power and prevent the drive wheels from spinning when start-

ing the vehicle or accelerating on slippery roads

To keep driving safety and performance, the following systems operate auto-
matically in response to various driving situations. Be aware, however, that
these systems are supplementary and should not be relied upon too heavily
when operating the vehicle.

GX460_OM_OM60R43U_(U)

369

4-5. Using the driving support systems

4

Dr

iving

Active TRAC (Traction Control) for L4 position

*

Helps to maintain drive power and prevent the 4 wheels from spinning when starting

the vehicle or accelerating on slippery roads, or in off-road conditions

*

: The function only works in vehicles with Multi-terrain Select when Multi-terrain

Select is switched on

Hill-start assist control

Helps to prevent the vehicle from rolling backward when starting on an incline or slip-

pery slope

KDSS (Kinetic Dynamic Suspension System)

KDSS helps to enhance ride comfort and handling response by using a hydraulic con-

trol system to control the suspension stabilizer bars in response to road surface and

driving conditions during cornering or off-road driving

Trailer Sway Control

Helps the driver to control trailer sway by selectively applying brake pressure for indi-

vidual wheels and reducing driving torque when trailer sway is detected.

The slip indicator light will flash while
the TRAC/Active TRAC/VSC/ABS/
Multi Terrain ABS/Trailer Sway Control
systems are operating.

When the TRAC/Active TRAC/VSC/ABS/Multi Terrain ABS/Trailer
Sway Control systems are operating

370

GX460_OM_OM60R43U_(U)

4-5. Using the driving support systems

If the vehicle gets stuck in mud, dirt or snow, the TRAC/Active TRAC system may

reduce power from the engine to the wheels. Pressing 

 to turn the system off

may make it easier for you to rock the vehicle in order to free it.
To turn the TRAC/Active TRAC system

off, quickly press and release 

.

The “TRAC OFF” indicator light will

come on.

Press 

 again to turn the system

back on.

Turning off TRAC/Active TRAC, VSC and Trailer Sway Control systems

To turn the TRAC/Active TRAC, VSC and Trailer Sway Control systems off, press and
hold 

 for more than 3 seconds while the vehicle is stopped.

The “TRAC OFF” indicator light and the VSC OFF indicator light will come on

*

.

Press 

 again to turn the systems back on.

*

: Pre-collision brake assist and pre-collision braking will also be disabled. The PCS

warning light will come on and the message will be shown on the multi-information dis-
play. (

P. 246)

When the “TRAC OFF” indicator light comes on even if 

 has not been pressed

TRAC/Active TRAC is temporary deactivated. If the indicator light continues to remain

on, contact your Lexus dealer.

Hill-start assist control operation conditions

The shift lever is in D or S.

The brake pedal is not depressed.

Disabling the TRAC/Active TRAC system

GX460_OM_OM60R43U_(U)

371

4-5. Using the driving support systems

4

Dr

iving

Sounds and vibrations caused by the ABS/Multi Terrain ABS, brake assist, VSC, Trailer

Sway Control, TRAC/Active TRAC and hill-start assist control systems

A sound may be heard from the engine compartment when the brake pedal is

depressed repeatedly, when the engine is started or just after the vehicle begins to

move. This sound does not indicate that a malfunction has occurred in any of these sys-

tems.

Any of the following conditions may occur when the above systems are operating.

None of these indicates that a malfunction has occurred. 
• Vibrations may be felt through the vehicle body and steering.

• A motor sound may be heard also after the vehicle comes to a stop.

• The brake pedal may pulsate slightly after the ABS/Multi Terrain ABS is activated.

• The brake pedal may move down slightly after the ABS/Multi Terrain ABS is acti-

vated.

Automatic reactivation of TRAC/Active TRAC, Trailer Sway Control and VSC systems

After turning the TRAC/Active TRAC, Trailer Sway Control and VSC systems off, the

systems will be automatically re-enabled in the following situations:

When the engine switch is turned off

If only the TRAC/Active TRAC system is turned off, the TRAC/Active TRAC will turn

on when vehicle speed increases

If both the TRAC/Active TRAC and VSC systems are turned off, automatic re-enabling

will not occur when vehicle speed increases.

When the brake system operates continuously

The brake actuator may overheat. In this case, the TRAC/Active TRAC and hill-start

assist control systems will stop operating, a buzzer will sound and the “TRAC OFF” indi-

cator will come on. Refrain from using the system until the message goes off. (There is no

problem with continuing normal driving.)

If the slip indicator comes on...

It may indicate a malfunction in the TRAC/Active TRAC, VSC/Trailer Sway Control or

hill-start assist control system. Consult your Lexus dealer.

KDSS

Some difference of vehicle height between left and right side can appear. This does not

indicate a malfunction in the KDSS system. For more information, contact your Lexus

dealer.

372

GX460_OM_OM60R43U_(U)

4-5. Using the driving support systems

WARNING

The ABS/Multi Terrain ABS does not operate effectively when

The limits of tire gripping performance have been exceeded (such as excessively

worn tires on a snow covered road).

The vehicle hydroplanes while driving at high speed on wet or slick roads.

Stopping distance when the ABS/Multi Terrain ABS is operating may exceed that of

normal conditions

The ABS/Multi Terrain ABS is not designed to shorten the vehicle’s stopping distance.

Always maintain a safe distance from the vehicle in front of you, especially in the follow-

ing situations:

When driving on dirt, gravel or snow-covered roads

When driving with tire chains

When driving over bumps in the road

When driving over roads with potholes or uneven surfaces

TRAC/Active TRAC/VSC may not operate effectively when

Directional control and power may not be achievable while driving on slippery road

surfaces, even if the TRAC/Active TRAC/VSC system is operating.
Drive the vehicle carefully in conditions where stability and power may be lost.

Hill-start assist control does not operate effectively when

Do not overly rely on the hill-start assist control. The hill-start assist control may not

operate effectively on steep inclines and roads covered with ice.

When the TRAC/Active TRAC/VSC/Trailer Sway Control is activated

The slip indicator light flashes. Always drive carefully.

Reckless driving may cause an accident. Exercise particular care when the indicator

light flashes.

When the TRAC/Active TRAC/VSC/Trailer Sway Control systems are turned off

Be especially careful and drive at a speed appropriate to the road conditions. As these

are the systems to help ensure vehicle stability and driving force, do not turn the

TRAC/Active TRAC/VSC/Trailer Sway Control systems off unless necessary.
Trailer Sway Control is part of the VSC system and will not operate if VSC is turned off

or experiences a malfunction.

GX460_OM_OM60R43U_(U)

373

4-5. Using the driving support systems

4

Dr

iving

WARNING

Replacing tires

Make sure that all tires are of the specified size, brand, tread pattern and total load

capacity. In addition, make sure that the tires are inflated to the recommended tire infla-

tion pressure level.
The ABS/Multi Terrain ABS, TRAC/Active TRAC, Trailer Sway Control and VSC sys-

tems will not function correctly if different tires are installed on the vehicle.

Contact your Lexus dealer for further information when replacing tires or wheels.

Handling of tires and the suspension

Using tires with any kind of problem or modifying the suspension will affect the driving

assist systems, and may cause a system to malfunction.

Trailer Sway Control precaution

The Trailer Sway Control system is not able to reduce trailer sway in all situations.

Depending on many factors such as the conditions of the vehicle, trailer, road surface

and driving environment, the Trailer Sway Control system may not be effective. Refer to

your trailer owner’s manual for information on how to tow your trailer properly.

If trailer sway occurs

Observe the following precautions.

Failing to do so may cause death or serious injury.

Firmly grip the steering wheel. Steer straight ahead.

Do not try to control trailer sway by turning the steering wheel.

Begin releasing the accelerator pedal immediately but very gradually to reduce

speed.

Do not increase speed. Do not apply vehicle brakes.

If you make no extreme correction with the steering or brakes, your vehicle and trailer

should stabilize. (

P. 195)

374

GX460_OM_OM60R43U_(U)

4-5. Using the driving support systems

BSM (Blind Spot Monitor)

The Blind Spot Monitor is a system that has 2 functions;

The Blind Spot Monitor function 
Assists the driver in making the decision when changing lanes

The Rear Cross Traffic Alert function 
Assists the driver when backing up

These functions use same sensors.

Summary of the Blind Spot Monitor

GX460_OM_OM60R43U_(U)

375

4-5. Using the driving support systems

4

Dr

iving

The Blind Spot Monitor on/off screen and indicator

The Blind Spot Monitor system can be turned on/off on the multi-information display.

When the system is set to on, the indicator illuminates in the meter and the buzzer

sounds. The Blind Spot Monitor function and the Rear Cross Traffic Alert function are

turned on/off simultaneously.

Outside rear view mirror indicator

The Blind Spot Monitor function: 

When a vehicle is detected in the blind spot, the outside rear view mirror indicator

comes on while the turn signal lever is not operated. If the turn signal lever is operated

toward the detected side, the outside rear view mirror indicator flashes.
The Rear Cross Traffic Alert function: 

When a vehicle approaching from the right or left rear of the vehicle is detected, the

outside rear view mirror indicators flash.

Monitor screen display (The Rear Cross Traffic Alert function only)

If a vehicle approaching from the right or left at the rear of the vehicle is detected, the

Rear Cross Traffic Alert icon (

P. 381) for the detected side will be displayed on the

monitor screen.
This illustration shows an example of a vehicle approaching from the left at the rear of

the vehicle.

The Rear Cross Traffic Alert buzzer (The Rear Cross Traffic Alert function
only)

When a vehicle approaching from the right or left rear of the vehicle is detected, a

buzzer sounds from behind the rear seat.

Press 

 or 

 of the meter control switches and select 

 on the multi-

information display.

Press 

 or 

 of the meter control switches and select 

, and then

press .

Each pressing of the switch turns the Blind Spot Monitor on and off.

Turning the Blind Spot Monitor system on/off

1

2

3

4

1

2

376

GX460_OM_OM60R43U_(U)

4-5. Using the driving support systems

The outside rear view mirror indicators visibility

When under strong sunlight, the outside rear view mirror indicator may be difficult to

see.

The Rear Cross Traffic Alert buzzer hearing

The Rear Cross Traffic Alert buzzer may be difficult to hear over loud noises such as high

audio volume.

When “BSM NOT AVAILABLE”/“BSM not available” is shown on the multi-informa-

tion display

The sensor voltage has become abnormal, water, snow mud, etc., may be built up in the

vicinity of the sensor area of bumper (

P. 376). Removing the water, snow, mud, etc.,

from the vicinity of the sensor area bumper should return it to normal. Also, the sensor

may not function normally when used in extremely hot or cold weather.

When “CHECK BSM SYSTEM”/“Check BSM system” is shown on the multi-informa-

tion display

There may be a sensor malfunction or misaligned. Have the vehicle inspected by your

Lexus dealer.

WARNING

To ensure the system can operate properly

One Blind Spot Monitor sensor is installed inside the left and right side of the vehicle

rear bumper respectively. Observe the following to ensure the Blind Spot Monitor can

function correctly.

Do not subject a sensor or its surrounding area on the rear bumper to a strong

impact.

If a sensor is moved even slightly off position, the system may malfunction and vehi-

cles may not be detected correctly.

In the following situations, have your vehicle inspected by your Lexus dealer.
• A sensor or its surrounding area is subject to a strong impact.

• If  the  surrounding  area  of  a  sensor  is  scratched or dented, or part of them has

become disconnected.

Do not disassemble the sensor.

Do not attach accessories or stickers to the sensor or surrounding area on the

bumper.

Do not modify the sensor or surrounding area on the bumper.

Do not paint the rear bumper any color other than an official Lexus color.

Keep the sensor and its surrounding area on

the bumper clean at all times.


Content      ..     9      10      11      12     ..