Lexus GX460 (2023 year). Manual in english - page 9
 

  Index      Manuals     Lexus GX460 (2023 year). Manual in english


Search            copyright infringement  


Content      ..     7      8      9      10     ..


Lexus GX460 (2023 year). Manual in english - page 9


GX460_OM_OM60R43U_(U)

281

4-5. Using the driving support systems

4

Dr

iving

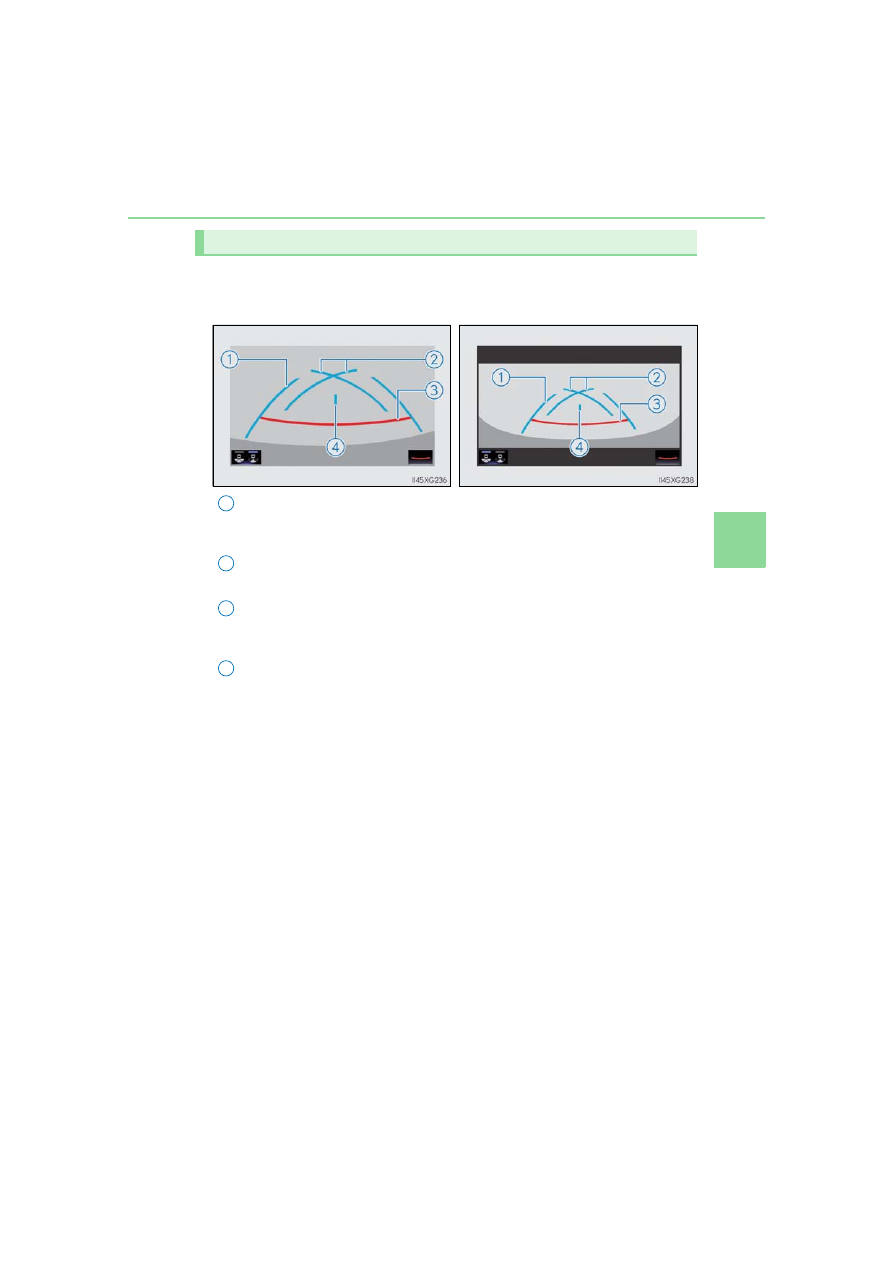
Screen description

Vehicle width guide lines
Displays a guide path when the vehicle is being backed straight up.

• The displayed width is wider than the actual vehicle width.

Parking assist guide lines
Show the path of the smallest turn possible behind the vehicle.
Distance guide line
Shows distance behind the vehicle.

• Displays points approximately 1.5 ft. (0.5 m) (red) from the edge of the bumper.

Vehicle center guide line
Indicates the estimated vehicle center on the ground.

Parking assist guide line display mode

Rear view

Wide Rear view

1

2

3

4

282

GX460_OM_OM60R43U_(U)

4-5. Using the driving support systems

Screen description

Distance guide line
Shows distance behind the vehicle.

• Displays points approximately 1.5 ft. (0.5 m) (red) from the edge of the bumper.

Distance guide line display mode

Rear view

Wide Rear view

1

GX460_OM_OM60R43U_(U)

283

4-5. Using the driving support systems

4

Dr

iving

Area displayed on screen

The parking assist monitor displays an image of the view from the bumper of
the rear area of the vehicle.

The area around both corners of the bumper will not be displayed.

• The image on the rear view monitor system screen can be adjusted, refer to the

“NAVIGATION SYSTEM OWNER’S MANUAL”.

• The area displayed on the screen may vary according to vehicle orientation condi-

tions.

• Objects which are close to either corner of the bumper or under the bumper can-

not be seen on the screen.

• The camera uses a special lens. The distance of the image that appears on the

screen differs from the actual distance.

• Items which are located higher than the camera may not be displayed on the mon-

itor.

• If your vehicle is equipped with a backlit license plate, it may interfere with the dis-

play.

Lexus parking assist monitor precautions

Rear view

Wide Rear view

Corners of bumper

Corners of bumper

284

GX460_OM_OM60R43U_(U)

4-5. Using the driving support systems

Lexus parking assist monitor camera

The camera for the parking assist
monitor is located above the license
plate.

Using the camera
If dirt or foreign matter (such as water droplets, snow, mud etc.) is adhering
to the camera, it cannot transmit a clear image. In this case, flush it with a
large quantity of water and wipe the camera lens clean with a soft and wet
cloth.

Differences between the screen and the actual road

The distance guide lines and the vehicle width extension guide lines may not
actually be parallel with the dividing lines of the parking space, even when
they appear to be so. Be sure to check visually.
The distances between the vehicle width extension guide lines and the left and
right dividing lines of the parking space may not be equal, even when they
appear to be so. Be sure to check visually.
The distance guide lines give a distance guide for flat road surfaces. In any of
the following situations, there is a margin of error between the guide lines on
the screen and the actual distance/course on the road.

GX460_OM_OM60R43U_(U)

285

4-5. Using the driving support systems

4

Dr

iving

When the ground behind the vehicle slopes up sharply

The distance guide lines will
appear to be closer to the vehicle
than the actual distance. Because
of this, objects will appear to be
farther away than they actually
are. In the same way, there will be
a margin of error between the
guidelines and the actual dis-
tance/course on the road.

When the ground behind the vehicle slopes down sharply
The distance guide lines will
appear to be further from the
vehicle than the actual distance.
Because of this, objects will
appear to be closer than they
actually are. In the same way,
there will be a margin of error
between the guidelines and the
actual distance/course on the
road.

286

GX460_OM_OM60R43U_(U)

4-5. Using the driving support systems

When any part of the vehicle sags
When any part of the vehicle sags
due to the number of passengers
or the distribution of the load,
there is a margin of error between
the guide lines on the screen and
the actual distance/course on the
road.

When approaching three-dimensional objects

The estimated course lines target a flat surfaced objects (such as the road). It
is not possible to determine the position of three-dimensional objects (such as
vehicles) using the estimated course lines and distance guide lines. When
approaching a three-dimensional object that extends outward (such as the
flatbed of a truck), be careful of the following.

Estimated course lines
Visually check the surroundings
and the area behind the vehicle.
In the case shown in the illustra-
tion, the truck appears to be out-
side of the estimated course lines
and the vehicle does not look as if
it will hits the truck. However, the
rear body of the truck may actu-
ally cross over the estimated
course lines. In reality if you back
up as guided by the estimated
course lines, the vehicle may hit
the truck.

A margin of error

GX460_OM_OM60R43U_(U)

287

4-5. Using the driving support systems

4

Dr

iving

Distance guidelines
Visually check the surroundings
and the area behind the vehicle.
On the screen, it appears that a
truck is parking at point 

. How-

ever, in reality if you back up to
point 

, you will hit the truck.

On the screen, it appears that 
is closest and 

 is farthest away.

However, in reality, the distance to

 and 

 is the same and 

 is

farther than 

 and 

.

2

1

1

3

1

3

2

1

3

288

GX460_OM_OM60R43U_(U)

4-5. Using the driving support systems

If you notice any symptoms

If you notice any of the following symptoms, refer to the likely cause and the
solution, and re-check.
If the symptom is not resolved by the solution, have the vehicle inspected by
your Lexus dealer.

Things you should know

Likely cause

Solution

The image is difficult to see

• The vehicle is in a dark area

• The temperature around the lens is

either high or low

• The outside temperature is low

• There are water droplets on the cam-

era

• It is raining or humid

• Foreign matter (mud etc.) is adhering to

the camera

• There are scratches on the camera

• Sunlight or headlights are shining

directly into the camera

• The  vehicle  is  under fluorescent lights,

sodium lights, mercury lights etc.

If this happens due to these causes, it

does not indicate a malfunction.

Back up while visually checking the

vehicle’s surroundings. (Use the monitor

again once conditions have been

improved.) 

The image on the rear view monitor

system screen can be adjusted, refer to

the “NAVIGATION SYSTEM

OWNER’S MANUAL”.

The image is blurry

Dirt or foreign matter (such as water

droplets, snow, mud etc.) is adhering to

the camera.

Flush the camera with a large quantity of

water and wipe the camera lens clean

with a soft and wet cloth.

The image is out of alignment

The camera or surrounding area has

received a strong impact.

Have the vehicle inspected by your Lexus

dealer.

GX460_OM_OM60R43U_(U)

289

4-5. Using the driving support systems

4

Dr

iving

The guide lines are very far out of alignment

The camera position is out of alignment.

Have the vehicle inspected by your Lexus

dealer.

• The vehicle is tilted (there is a heavy

load on the vehicle, tire pressure is low

due to a tire puncture, etc.)

• The vehicle is used on an incline.

If this happens due to these causes, it

does not indicate a malfunction.

Back up while visually checking the vehi-

cle’s surroundings.

The estimated course lines move even though the steering wheel is straight

There is a malfunction in the signals being

output by the steering sensor.

Have the vehicle inspected by your Lexus

dealer.

Guide lines are not displayed

The back door is open.

Close the back door.

If this does not resolve the symptom, have

the vehicle inspected by your Lexus

dealer.

“!” is displayed

• The battery has been reinstalled.

• The steering wheel has been moved

while the battery was being reinstalled.

• Battery power is low.

• The steering sensor has been rein-

stalled.

• There is a malfunction in the signals

being output by the steering sensor.

Stop the vehicle, and turn the steering

wheel as far as it will go to the left and

right. (Selecting “?” on the screen displays

the operating procedure above.)

If this does not resolve the symptom, have

the vehicle inspected by your Lexus

dealer.

Likely cause

Solution

290

GX460_OM_OM60R43U_(U)

4-5. Using the driving support systems

WARNING

When using the Lexus parking assist monitor system

The parking assist monitor is a supplemental device intended to assist the driver when

backing up. When backing up, be sure to check visually behind and all around the vehi-

cle before proceeding.
Observe the following precautions to avoid an accident that could result in death or

serious injuries.

Never depend on the parking assist monitor entirely when backing up. The image

and the position of the guide lines displayed on the screen may differ from the actual

state.

Use caution, just as you would when backing up any vehicle.

Be sure to back up slowly, depressing the brake pedal to control vehicle speed.

If you seem likely to hit nearby vehicles, obstacles, people or mount the shoulder,

depress the brake pedal to stop the vehicle.

The instructions given are only guidelines.

When and how much to turn the steering wheel will vary according to traffic condi-

tions, road surface conditions, vehicle condition, etc. when parking. It is necessary to

be fully aware of this before using the parking assist system. 

When parking, be sure to check that the parking space will accommodate your vehi-

cle before maneuvering into it.

Do not use the parking assist monitor in the following cases:
• On icy or slick road surfaces, or in snow

• When using tire chains

• When the back door is not closed completely

• On roads that are not flat or straight, such as curves or slopes.

• If  the  suspension  has  been  modified or tires of a size other than specified are

installed

In low temperatures, the screen may darken or the image may become faint. The

image could distort when the vehicle is moving, or you may become unable to see the

image on the screen. Be sure to check direct visually and with the mirrors all around

the vehicle before proceeding.

If the tire sizes are changed, the position of the guide lines displayed on the screen

may change.

The camera uses a special lens. The distances between objects and pedestrians that

appear in the image displayed on the screen will differ from the actual distances. 

(

P. 284)

As the Rear Cross Traffic Alert display is displayed over the camera view, it may be

difficult to see the Rear Cross Traffic Alert display depending on the color and bright-

ness of the surrounding area.

If the steering wheel is straight and the vehicle width guide lines and the estimated

course lines are not in alignment, have the vehicle inspected by your Lexus dealer.

GX460_OM_OM60R43U_(U)

291

4-5. Using the driving support systems

4

Dr

iving

NOTICE

How to use the camera

The parking assist monitor may not operate properly in the following cases.
• If the back of the vehicle is hit, the position and mounting angle of the camera may

change.

• As  the  camera  has  a  water  proof  construction,  do  not  detach,  disassemble  or

modify it. This may cause incorrect operation.

• When cleaning the camera lens, flush the camera with a large quantity of water

and wipe it with a soft and wet cloth. Strongly rubbing the camera lens may cause

the camera lens to be scratched and unable to transmit a clear image.

• Do not allow organic solvent, car wax, window cleaner or glass coat to adhere to

the camera. If this happens, wipe it off as soon as possible.

• If the temperature changes rapidly, such as when hot water is poured on the vehi-

cle in cold weather, the system may not operate normally.

• When washing the vehicle, do not apply intensive bursts of water to the camera or

camera area. Doing so may result in the camera malfunctioning.

Do not expose the camera to strong impact as this could cause a malfunction. 

If this happens, have the vehicle inspected by your Lexus dealer as soon as possible.

292

GX460_OM_OM60R43U_(U)

4-5. Using the driving support systems

Multi-terrain Select

When the Crawl Control is turned off

Select a mode that most closely matches the type of terrain on which you are
driving from among 5 modes. 
Brake control can be optimized in accordance with the selected mode.

When the Crawl Control is turned on

A mode which matches the road conditions is automatically selected by
depressing the accelerator pedal (AUTO mode).

Multi-information display

The selected Multi-terrain Select mode

will be displayed on the multi-informa-

tion display.

Multi-terrain Select mode selector
dial
Multi-terrain Select indicator

: If equipped

Multi-terrain Select is a system that helps drivability in off-road situations.

Multi-terrain Select dial/indicators

1

2

3

GX460_OM_OM60R43U_(U)

293

4-5. Using the driving support systems

4

Dr

iving

When the Crawl Control is turned off

A mode which matches the road condi-
tions can be selected from among the
following 5 modes.

: MUD & SAND mode

Suitable for muddy roads, sandy roads,

snow-covered roads, dirt trails and

other slippery or dirty conditions. The

MUD&SAND mode indicator illumi-

nates on the multi-information display.

: LOOSE & ROCK mode

Suitable for slippery conditions consisting of mixtures of earth and loose rock. The

LOOSE & ROCK mode indicator illuminates on the multi-information display.

: MOGUL mode

Suitable for very bumpy road conditions, such as mogul roads. MOGUL mode indi-

cator illuminates on the multi-information display.

: ROCK & DIRT mode

Suitable for very bumpy road conditions, such as mogul or rocky roads. ROCK

&DIRT mode indicator illuminates on the multi-information display.

: ROCK mode

Suitable for rocky roads. ROCK mode indicator illuminates on the multi-information

display.

When the Crawl Control is turned on

: MTS AUTO mode

The most suitable mode is automatically selected according to the selected Crawl

Control mode. MTS AUTO indicator illuminates on the multi-information display.

Selectable modes

1

2

3

4

5

294

GX460_OM_OM60R43U_(U)

4-5. Using the driving support systems

When all of the following conditions are satisfied, the Multi-terrain Select indica-
tor will come on, the mode select screen will be displayed on the multi-informa-
tion display, and Multi-terrain Select control will begin.

The four-wheel drive control switch is in “L4”.

Both Active TRAC and VSC are not off.

Operate the Multi-terrain Select mode
selector dial during Multi-terrain Select
control to select a mode.

Once the mode is confirmed, the mode

name will be displayed and the control

will switch.

Automatic system cancelation

In the following situations, the Multi-terrain Select indicator will go off, and Multi-terrain

Select will be canceled automatically.

When the four-wheel drive control switch is in H4.

When Active TRAC and VSC are off.

When it is difficult to generate traction

MUD & SAND mode provides the largest amount of tire slippage, followed by LOOSE

ROCK, MOGUL, ROCK & DIRT and ROCK mode. 

Drivability can be improved by selecting a mode which provides a smaller amount of tire

slippage than the current mode when the amount of tire slippage is large, or conversely

selecting a mode which provides a larger amount of tire slippage than the current mode

when the amount of tire slippage is small.

When the vehicle is stuck

Switching the transfer and differential 

For the operation of the following functions, refer to the following pages.

Four-wheel drive system (

P. 357)

Center differential lock (

P. 358)

When the brake system operates continuously

The brake system may overheat. In this case, a buzzer will sound, the TRAC OFF indica-

tor will flash, and Multi-terrain Select will be temporarily inoperable. In this event, stop

the vehicle immediately in a safe place, and allow the brake system to cool down suffi-

ciently. (There is no problem with continuing normal driving.) 

After a short time, the TRAC OFF indicator will go off, and you will be able to use Multi-

terrain Select.

Multi-terrain Select control starting conditions

Switching modes

GX460_OM_OM60R43U_(U)

295

4-5. Using the driving support systems

4

Dr

iving

When there is a malfunction in the system

The slip indicator light will come on. Have the vehicle inspected by your Lexus dealer

immediately.

WARNING

When using the Multi-terrain Select

Observe the following precautions to avoid an accident that could result in death or

serious injuries:

There is a chance that the selected mode may not be the most appropriate in terms of

road conditions such as pitch, slipperiness, undulation, etc. (

P. 293)

Multi-terrain Select is not intended to expand the limits of the vehicle. Check the road

conditions thoroughly beforehand, and drive safely and carefully.

NOTICE

Precaution for use

The Multi-terrain Select is intended for use during off-road driving. Do not use the sys-

tem at any other time.

296

GX460_OM_OM60R43U_(U)

4-5. Using the driving support systems

Multi-terrain Monitor

The following screens can be selected according to driving conditions.

• Screens that can be selected vary depending on conditions such as shift posi-

tion and vehicle speed. (

P. 304)

• Depending on the displayed screen, the display can be switched from normal

to wide view display.

: If equipped

The Multi-terrain Monitor helps the driver to check the vehicle surroundings.
It assists in determining the conditions around the driver in a variety of situa-
tions, such as when judging conditions during off-road driving or checking for
obstacles when parking.

The screen illustrations used in this text are intended as examples, and may dif-
fer from the image that is actually displayed on the screen.

WARNING

When using the Multi-terrain Monitor system

Observe the following precautions to avoid an accident that could result in death or

serious injuries.

Never rely solely on the Multi-terrain Monitor. As with unequipped vehicles, drive

carefully while directly confirming the safety of your surroundings and the area to the

rear of the vehicle. Take particular care to avoid parked cars and other obstacles.

Due to the characteristics of the camera lens, the actual position and distance of peo-

ple and other obstacles will differ from those shown on the Multi-terrain Monitor

screen. Directly confirm the safety of your surroundings before driving.

Do not drive while only looking at the screen. When driving, make sure to directly

confirm the safety of your surroundings, such as by visually checking the area and

using the vehicle’s mirrors.

In low temperatures, the screen may darken or the images may become faint.

Images of moving objects in particular may distort or disappear from the screen.

Therefore, make sure to drive carefully while directly visually confirming the safety of

your surroundings.

Multi-terrain Monitor screens

GX460_OM_OM60R43U_(U)

297

4-5. Using the driving support systems

4

Dr

iving

Screens when the four-wheel drive control switch is in L4

When checking the area to the front and sides of the vehicle

When checking the condition of the road surface under the vehicle

Front view & dual side views

Front view (magnified)

P. 308

P. 308

Under vehicle terrain view & dual
side views

Under vehicle terrain view (magni-
fied)

P. 311

P. 311

Under vehicle terrain view (rear
wheel) & dual side views

Under vehicle terrain view (rear
wheel) (magnified)

P. 314

P. 314

298

GX460_OM_OM60R43U_(U)

4-5. Using the driving support systems

When checking the area to the rear of the vehicle

Screens when the four-wheel drive control switch is in H4

When checking the area to the around of the vehicle

Rear view & dual side views

Wide rear view & dual side views

P. 317

P. 317

Moving view

See-through view

P. 319

P. 319

GX460_OM_OM60R43U_(U)

299

4-5. Using the driving support systems

4

Dr

iving

When checking the area to the front of the vehicle (panoramic view & wide
front view)

P. 320

When checking the area to the sides of the vehicle (panoramic view & side
views)

P. 323

300

GX460_OM_OM60R43U_(U)

4-5. Using the driving support systems

When checking the area to the rear of the vehicle

When checking the area to the sides, front and rear of the vehicle (with out-
side rear view mirrors retracted)

Panoramic view & rear view

Panoramic view & wide rear view

P. 326

P. 326

Wide front view & dual side views

Rear view & dual side views

P. 332

P. 332

Wide rear view & dual side views

P. 332

GX460_OM_OM60R43U_(U)

301

4-5. Using the driving support systems

4

Dr

iving

Displaying the Multi-terrain Monitor screen

The Multi-terrain Monitor screen will be displayed when the VIEW switch is
pressed while the engine switch is in IGNITION ON mode.

When the vehicle speed exceeds a certain value for a specific amount of time, the

display returns to the navigation or information display screen.
The amount of time that the Multi-terrain Monitor is displayed differs depending

on conditions such as the vehicle speed. (

P. 308)

VIEW switch
Display

Using the Multi-terrain Monitor screen

1

2

302

GX460_OM_OM60R43U_(U)

4-5. Using the driving support systems

Switch operations

On some screens, the display mode or display settings can be changed using
the switches.

Automatic display mode switch
When automatic display mode is turned on, the Multi-terrain Monitor
screen is displayed in the following conditions, even if the VIEW switch has
not been operated.

• The shift lever is shifted to D or N
• While driving, the vehicle speed drops to approximately 6 mph (10 km/h)

or less (except when the shift lever is in R)

The automatic display mode
switches between on and off each

time 

 is selected.

When automatic display mode is
on, an indicator illuminates on the
icon.
Even when automatic display
mode is on, the display can still be
switched by pressing the VIEW
switch.

Indicator

GX460_OM_OM60R43U_(U)

303

4-5. Using the driving support systems

4

Dr

iving

Display selection switches
The following switches can be pressed or selected to switch the Multi-ter-
rain Monitor display screen and to switch from normal to wide view display.

Switch

Switch Function

VIEW switch

Changing a display (

P. 304)

Angle mode

selection switch

Switches between the wide rear view and

wide view display (

P. 317, 326)

Under vehicle ter-

rain view selection

switch

Switch the under vehicle terrain view (rear

wheel) & dual side views (

P. 314)

Return switch

Return to the previous screen

Display mode

selection switch

Switches between the moving view and see-

through view (

P. 319)

304

GX460_OM_OM60R43U_(U)

4-5. Using the driving support systems

The screen display can be switched by operating the switches as follows while
the Multi-terrain Monitor screen is displayed. (Screens that can be displayed will
vary depending on the positions of the shift lever and four-wheel drive control
switch)

The monitor displays various views of the position of the vehicle. (The following is an

example)

Screens when the four-wheel drive control switch is in L4

When the shift lever is in the P, D or N position

: Press 

: Select 

: Select 

: Select the Multi-terrain Monitor screen

Changing the Multi-terrain Monitor screen

GX460_OM_OM60R43U_(U)

305

4-5. Using the driving support systems

4

Dr

iving

Audio screen, etc.
Front view & dual side views: 

P. 308

Under vehicle terrain view & dual
side views: 

P. 311

Front view (magnified): 

P. 308

Under vehicle terrain view (magni-
fied): 

P. 311

Under vehicle terrain view (rear
wheel) & dual side views: 

P. 314

Under vehicle terrain view (rear
wheel) (magnified): 

P. 314

1

2

3

4

5

6

7

306

GX460_OM_OM60R43U_(U)

4-5. Using the driving support systems

When the shift lever is in the R position

: Select 

Screens when the four-wheel drive control switch is in H4

When the shift lever is in the P position

: Press 

: Select 

Rear view & dual side views: 

P. 317

Wide rear view & dual side views:

P. 317

1

2

Audio screen, etc.
Moving view: 

P. 319

See-through view: 

P. 319

1

2

3

GX460_OM_OM60R43U_(U)

307

4-5. Using the driving support systems

4

Dr

iving

When the shift lever is in the D or N position

: Press 

When the shift lever is in the R position

: Select 

Audio screen, etc.
Panoramic view & wide front view: 

P. 320

Panoramic view & side views: 

P. 323

1

2

3

Panoramic view & rear view: 

P. 326

Panoramic view & wide rear view: 

P. 326

1

2

308

GX460_OM_OM60R43U_(U)

4-5. Using the driving support systems

Multi-terrain Monitor screen display

The amount of time that the Multi-terrain Monitor screen is displayed changes as follows

according to the vehicle speed at the time the VIEW switch was pressed.
The Multi-terrain Monitor screen is displayed if the vehicle speed is approximately 7 mph

(12 km/h) or less when the camera switch is pressed.
If the vehicle speed exceeds approximately 7 mph (12 km/h), the Multi-terrain Monitor

display is canceled.

When the four-wheel drive control switch is in L4, the various screens display
information to support several different driving situations, such as when checking
for obstacles when moving forward or in reverse, or when judging road surface
conditions during off-road driving.

Front view & dual side views

Front view & dual side views can be used to check the area around the front of
the vehicle.
To display the screen, press the VIEW switch when the shift lever is in the P, D
or N position.

• In addition to an image of the front of the vehicle, guide lines are displayed

in a composite view to provide reference for when deciding a direction to
move forward in.

• If the front view display is selected while the screen is displayed, the screen

switches from normal to magnified display. (Selecting the display again
returns the screen to the normal display)

• If the steering wheel is turned 270

 or more, guide lines and other features

to support turning are automatically displayed.

Screen display and functions

GX460_OM_OM60R43U_(U)

309

4-5. Using the driving support systems

4

Dr

iving

Screen description

Automatic display mode selection
switch

P. 302

Under vehicle terrain view (rear
wheel) selection switch

Switch the under vehicle terrain view

(rear wheel) & dual side views. 

(

P. 314

)

Tilt meter

Displays the vehicle’s estimated degree

of incline. (

P. 310)

Intuitive parking assist/slip display

Displayed if an obstacle is detected

while the intuitive parking assist is

turned on.

1.5 ft. (0.5 m) distance guide line
(red)
3 ft. (1 m) distance guide line (blue)
6 ft. (2 m) distance guide line (blue)

Items  

to  

indicate 

the 

estimated

distance from the front end of the vehi-

cle.

Front tire course line (yellow)

Indicates the estimated course of the

front tires according to steering wheel

position.

Vehicle width lines (blue)

Indicate the width of the vehicle

including the outside rear view mirror.

Front tire contact line (blue)
Rear tire contact line (blue)

Items  

and  

indicate 

estimated 

tire

positions on the image.

Forward movement guide line
(blue)

Indicates the estimated tire course of

the tightest possible turn.

Rear tire course line (yellow)

Indicates the estimated course of the

rear tires.

1

2

3

4

5

6
7

5

7

8

9

10

11

10

11

12

13

310

GX460_OM_OM60R43U_(U)

4-5. Using the driving support systems

Tilt meter
Tilt meter displays the vehicle
inclination to the front, rear, left
and right within a range of 0

 to

approximately 40

.

Degree markers of incline to
the left and right

Indicates the vehicle inclination in

degrees in the left and right direc-

tions.

Degree markers of incline to the front and rear

Indicates the vehicle inclination in degrees in the front and rear directions.

Pointer

Indicates the degree of the vehicle inclination in comparison to a parallel line.

Slip display
When tire slippage is detected,
the tilt meter display area is auto-
matically switched to the slip dis-
play.

Tire display

Indicates the position of freely

spinning tires in amber if the tire

spins. (During Crawl Control is

operating, all of the tires are indi-

cated in amber.)

Pop-up display of the intuitive parking assist

Displayed if an obstacle is detected while the intuitive parking assist is turned

on.

Front view & dual side views display

The screen can be displayed when the shift lever is in P, D or N.

Tilt meter display

The display indicates the incline of the vehicle in degrees shown by the movement of

the pointer and the rotation of the vehicle image.

The color of the degree markers of incline to the front, rear, left and right changes

according to the current incline of the vehicle.

After the engine switch is turned to IGNITION ON mode, the degree of incline is not

displayed until such information is determined.

The degree of incline showed on the tilt meter is only an approximate indication, and

may differ from the degree of incline measured using other equipment.

1

2

3

1

2

GX460_OM_OM60R43U_(U)

311

4-5. Using the driving support systems

4

Dr

iving

Under vehicle terrain view & dual side views

Lines indicating current vehicle and tire position are displayed in a composite
view on an image taken behind the current vehicle position and assists the
driver to check conditions underneath the vehicle or determine the position of
the front tires.
To display the screen, press the VIEW switch when the shift lever is in the P, D
or N position.

• If the under vehicle terrain view display is selected while the screen is dis-

played, the screen switches from normal to magnified display. (Selecting
the display again returns the screen to the normal display)

Current vehicle position
Image displayed in the under vehicle terrain view (image taken behind the
current vehicle position)

Switches the screen to under vehicle terrain view (magnified) display when you touch

the display.

Vehicle position at the time the image was taken (behind the current vehicle
position)

1

2

3

312

GX460_OM_OM60R43U_(U)

4-5. Using the driving support systems

Screen description

Tire position indicator lines (black, white)

Indicates the estimated position of the front tires.

Vehicle position indicator lines (blue)

Indicates the estimated position of the vehicle.

1

2


Content      ..     7      8      9      10     ..