Lexus GX460 (2023 year). Manual in english - page 12
 

  Index      Manuals     Lexus GX460 (2023 year). Manual in english


Search            copyright infringement  


Content      ..     10      11      12      13     ..


Lexus GX460 (2023 year). Manual in english - page 12


GX460_OM_OM60R43U_(U)

377

4-5. Using the driving support systems

4

Dr

iving

The Blind Spot Monitor function uses radar sensors to detect vehicles that are
traveling in an adjacent lane in the area that is not reflected in the outside rear
view mirror (the blind spot), and advises the driver of the vehicle’s existence via
the outside rear view mirror indicator.

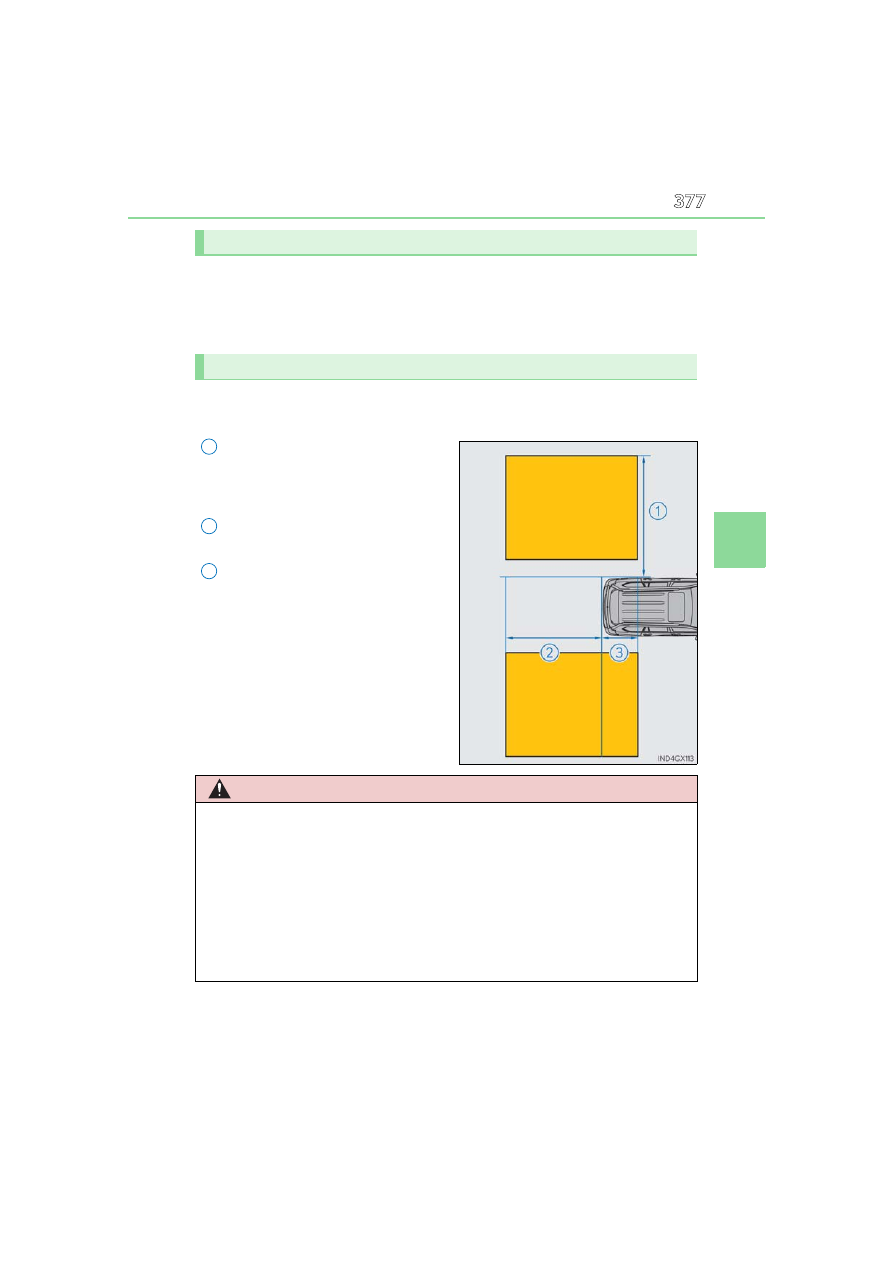
The areas that vehicles can be detected in are outlined below.
The range of the detection area extends to:

Approximately 11.5 ft. (3.5 m) from
the side of the vehicle

The first 1.6 ft. (0.5 m) from the side of

the vehicle is not in the detection area

Approximately 9.8 ft. (3 m) from the
rear bumper
Approximately 3.3 ft. (1 m) forward
of the rear bumper

The Blind Spot Monitor function

The Blind Spot Monitor function detection areas

1

2

3

WARNING

Cautions regarding the use of the system

The driver is solely responsible for safe driving. Always drive safely, taking care to

observe your surroundings.
The Blind Spot Monitor function is a supplementary function which alerts the driver

that a vehicle is present in the blind spot. Do not overly rely on the Blind Spot Monitor

function. The function cannot judge if it is safe to change lanes, therefore over reliance

could cause an accident resulting in death or serious injury.
According to conditions, the system may not function correctly. Therefore the driver’s

own visual confirmation of safety is necessary.

378

GX460_OM_OM60R43U_(U)

4-5. Using the driving support systems

The Blind Spot Monitor function is operational when

The Blind Spot Monitor system turned on.

Vehicle speed is greater than approximately 10 mph (16 km/h).

The Blind Spot Monitor function will detect a vehicle when

A vehicle in an adjacent lane overtakes your vehicle.

You overtake a vehicle in adjacent lane slowly.

Another vehicle enters the detection area when it changes lanes.

Conditions under which the system will not detect a vehicle

The Blind Spot Monitor function is not designed to detect the following types of vehicles

and/or objects:

Small motorcycles, bicycles, pedestrians etc.

*

Vehicles traveling in the opposite direction

Guardrails, walls, signs, parked vehicles and similar stationary objects

*

Following vehicles that are in the same lane

*

Vehicles driving 2 lanes across from your vehicle

*

Vehicles which are being overtaken rapidly by your vehicle

*

*

: Depending on conditions, detection of a vehicle and/or object may occur.

GX460_OM_OM60R43U_(U)

379

4-5. Using the driving support systems

4

Dr

iving

Conditions under which the system may not function correctly

The Blind Spot Monitor function may not detect vehicles correctly in the following situ-

ations:
• When the sensor is misaligned due to a strong impact to the sensor or its surround-

ing area

• When mud, snow, ice, a sticker, etc. is covering the sensor or surrounding area on

the rear bumper

• When driving on a road surface that is wet with standing water during bad weather,

such as heavy rain, snow, or fog

• When multiple vehicles are approaching with only a small gap between each vehicle

• When the distance between your vehicle and a following vehicle is short

• When there is a significant difference in speed between your vehicle and the vehicle

that enters the detection area

• When the difference in speed between your vehicle and another vehicle is changing

• When a vehicle enters a detection area traveling at about the same speed as your

vehicle

• As your vehicle starts from a stop, a vehicle remains in the detection area

• When driving up and down consecutive steep inclines, such as hills, dips in the road,

etc.

• When driving on roads with sharp bends, consecutive curves, or uneven surfaces

• When vehicle lanes are wide, or when driving on the edge of a lane, and the vehicle

in an adjacent lane is far away from your vehicle

• When your vehicle is towing a trailer (with towing hitch)

• When a bicycle carrier or other accessory is installed to the rear of the vehicle

• When there is a significant difference in height between your vehicle and the vehicle

that enters the detection area

• Immediately after the Blind Spot Monitor function is turned on

Instances of the Blind Spot Monitor function unnecessarily detecting a vehicle and/or

object may increase in the following situations:
• When the sensor is misaligned due to a strong impact to the sensor or its surround-

ing area

• When the distance between your vehicle and a guardrail, wall, etc. that enters the

detection area is short

• When driving up and down consecutive steep inclines, such as hills, dips in the road,

etc.

• When vehicle lanes are narrow, or when driving on the edge of a lane, and a vehicle

traveling in a lane other than the adjacent lanes enters the detection area

• When driving on roads with sharp bends, consecutive curves, or uneven surfaces

• When the tires are slipping or spinning

• When the distance between your vehicle and a following vehicle is short

• When a bicycle carrier or other accessory is installed to the rear of the vehicle

380

GX460_OM_OM60R43U_(U)

4-5. Using the driving support systems

The Rear Cross Traffic Alert functions when your vehicle is in reverse. It can
detect other vehicles approaching from the right or left rear of the vehicle. It uses
radar sensors to alert the driver of the other vehicle’s existence through flashing
the outside rear view mirror indicators and sounding a buzzer.

The Rear Cross Traffic Alert function

Approaching vehicles

Detection areas

1

2

GX460_OM_OM60R43U_(U)

381

4-5. Using the driving support systems

4

Dr

iving

The Rear Cross Traffic Alert icon display

When a vehicle approaching from the right or left at the rear of the vehicle is
detected, the following will be displayed on the monitor screen

When the Lexus parking assist mon-
itor (if equipped) is displayed

When the panoramic view monitor
(if equipped) is displayed

WARNING

Cautions regarding the use of the system

There is a limit to the degree of recognition accuracy and control performance that this

system can provide, do not overly rely on this system. The driver is always responsible

for paying attention to the vehicle’s surroundings and driving safely. (

P. 377)

To ensure the system can operate properly

P. 376

382

GX460_OM_OM60R43U_(U)

4-5. Using the driving support systems

The areas that vehicles can be detected in are outlined below.

To give the driver a more consistent time to react, the buzzer can alert for faster
vehicles from farther away.
Example:

The Rear Cross Traffic Alert function is operational when

The Blind Spot Monitor system turned on.

The shift lever is in R.

Vehicle speed is less than approximately 5 mph (8 km/h).

Approaching vehicle speed is between approximately 5 mph (8 km/h) and 18 mph (28

km/h).

The Rear Cross Traffic Alert function detection areas

Approaching vehicle

Speed

Approximate 

alert distance

Fast

18 mph (28 km/h)

65 ft. (20 m)

Slow

5 mph (8 km/h)

18 ft. (5.5 m)

1

GX460_OM_OM60R43U_(U)

383

4-5. Using the driving support systems

4

Dr

iving

Conditions under which the system will not detect a vehicle

The Rear Cross Traffic Alert function is not designed to detect the following types of

vehicles and/or objects:

Vehicles approaching from directly behind

Vehicles backing up in a parking space next to your vehicle

Guardrails, walls, signs, parked vehicles and similar stationary objects

*

Small motorcycles, bicycles, pedestrians, etc.

*

Vehicles moving away from your vehicle

Vehicles approaching from the parking spaces next to your vehicle

*

The distance between the sensor and approaching vehicle gets too close

*

: Depending on the conditions, detection of a vehicle and/or object may occur.

Situations in which the system may not operate properly

The Rear Cross Traffic Alert function may not detect vehicles correctly in the following

situations:

When the sensor is misaligned due to a strong impact to the sensor or its surrounding

area

When mud, snow, ice, a sticker, etc. is covering the sensor or surrounding area on the

rear bumper

When driving on a road surface that is wet with standing water during bad weather,

such as heavy rain, snow, or fog

When multiple vehicles are approaching with only a small gap between each vehicle

When a vehicle is approaching at high speed

When equipment that may obstruct a sensor is installed, such as a towing eyelet,

bumper protector (an additional trim strip, etc.), bicycle carrier, or snow plow

Vehicles that the sensors cannot detect due to

obstructions

384

GX460_OM_OM60R43U_(U)

4-5. Using the driving support systems

When towing a trailer

When there is a significant difference in height between your vehicle and the vehicle

that enters the detection area

When a sensor or the area around a sensor is extremely hot or cold

If the suspension has been modified or tires of a size other than specified are installed

If the front of the vehicle is raised or lowered due to the carried load

When backing up on a slope with a sharp

change in grade

When backing out of a sharp angle parking

spot

When turning while backing up

When a vehicle turns into the detection area

GX460_OM_OM60R43U_(U)

385

4-5. Using the driving support systems

4

Dr

iving

Situations in which the system may operate even if there is no possibility of a collision

Instances of the Rear Cross Traffic Alert function unnecessarily detecting a vehicle and/

or object may increase in the following situations:

When equipment that may obstruct a sensor is installed, such as a towing eyelet,

bumper protector (an additional trim strip, etc.), bicycle carrier, or snow plow

When the parking space faces a street and

vehicles are being driven on the street

When the distance between your vehicle and

metal objects, such as a guardrail, wall, sign, or

parked vehicle, which may reflect electrical

waves toward the rear of the vehicle, is short

When a vehicle passes by the side of your

vehicle

When a detected vehicle turns while

approaching the vehicle

386

GX460_OM_OM60R43U_(U)

4-5. Using the driving support systems

When there are spinning objects near your vehicle such as the fan of an air conditioning

unit

When water is splashed or sprayed toward the rear bumper, such as from a sprinkler

Moving objects (flags, exhaust fumes, large rain droplets or snowflakes, rain water on

the road surface, etc.)

When the distance between your vehicle and a guardrail, wall, etc., that enters the

detection area is short

Gratings and gutters

When a sensor or the area around a sensor is extremely hot or cold

If the suspension has been modified or tires of a size other than specified are installed

If the front of the vehicle is raised or lowered due to the carried load

387

GX460_OM_OM60R43U_(U)

4-6. Driving tips

4

Dr

iving

Winter driving tips

Use fluids that are appropriate to the prevailing outside temperatures.

• Engine  oil
• Engine coolant
• Washer fluid

Have a service technician inspect the condition of the battery.

Have the vehicle fitted with four snow tires or purchase a set of tire chains for
the rear tires.

Ensure that all tires are the same size and brand, and that chains match the size of the

tires.

Perform the following according to the driving conditions:

Do not try to forcibly open a window or move a wiper that is frozen. Pour
warm water over the frozen area to melt the ice. Wipe away the water imme-
diately to prevent it from freezing.

To ensure proper operation of the climate control system fan, remove any
snow that has accumulated on the air inlet vents in front of the windshield.

Check for and remove any excess ice or snow that may have accumulated on
the exterior lights, vehicle’s roof, chassis, around the tires or on the brakes.

Remove any snow or mud from the bottom of your shoes before getting in the
vehicle.

Carry out the necessary preparations and inspections before driving the vehi-
cle in winter. Always drive the vehicle in a manner appropriate to the prevail-
ing weather conditions.

Pre-winter preparations

Before driving the vehicle

388

GX460_OM_OM60R43U_(U)

4-6. Driving tips

Accelerate the vehicle slowly, keep a safe distance between you and the vehicle
ahead, and drive at a reduced speed suitable to road conditions.

Park the vehicle and move the shift lever to P without setting the parking
brake. The parking brake may freeze up, preventing it from being released. If
the vehicle is parked without setting the parking brake, make sure to block the
wheels.
Failure to do so may be dangerous because it may cause the vehicle to move
unexpectedly, possibly leading to an accident.

If the vehicle is parked without setting the parking brake, confirm that the shift
lever cannot be moved out of P

*

.

*

: The shift lever will be locked if it is attempted to be shifted from P to any other position

without depressing the brake pedal. If the shift lever can be shifted from P, there may
be a problem with the shift lock system. Have the vehicle inspected by your Lexus
dealer immediately.

Use the correct tire chain size when mounting the tire chains. 
Chain size is regulated for each tire size.

Side chain
(0.20 in. [5 mm] in diameter)
Cross chain
(0.25 in. [6.3 mm] in diameter)

Regulations regarding the use of tire chains vary depending on location and type
of road. Always check local regulations before installing chains.

When driving the vehicle

When parking the vehicle

Selecting tire chains

1

2

Regulations on the use of tire chains

GX460_OM_OM60R43U_(U)

389

4-6. Driving tips

4

Dr

iving

Tire chain installation

Observe the following precautions when installing and removing chains:

Install and remove tire chains in a safe location.

Install tire chains on the rear tires. Do not install tire chains on the front tires.

Install tire chains on rear tires as tightly as possible. Retighten chains after driving 1/4 -

1/2 mile (0.5 - 1.0 km).

Install tire chains following the instructions provided with the tire chains.

WARNING

Driving with snow tires

Observe the following precautions to reduce the risk of accidents.

Failure to do so may result in a loss of vehicle control and cause death or serious injury.

Use tires of the specified size.

Maintain the recommended level of air pressure.

Do not drive in excess of 75 mph (120 km/h), regardless of the type of snow tires

being used.

Use snow tires on all, not just some wheels.

Do not use LDA (Lane Departure Alert) system.

Driving with tire chains

Observe the following precautions to reduce the risk of accidents.

Failing to do so may result in the vehicle being unable to be driven safely, and may

cause death or serious injury.

Do not drive in excess of the speed limit specified for the tire chains being used, or 30

mph (50 km/h), whichever is lower.

Avoid driving on bumpy road surfaces or over potholes.

Avoid sudden acceleration, abrupt steering, sudden braking and shifting operations

that cause sudden engine braking.

Slow down sufficiently before entering a curve to ensure that vehicle control is main-

tained.

Do not use LDA (Lane Departure Alert) system.

NOTICE

Repairing or replacing snow tires

Request repairs or replacement of snow tires from Lexus dealers or legitimate tire

retailers.
This is because the removal and attachment of snow tires affects the operation of the

tire pressure warning valves and transmitters.

Fitting tire chains

The tire pressure warning valves and transmitters may not function correctly when tire

chains are fitted.

390

GX460_OM_OM60R43U_(U)

4-6. Driving tips

Off-road precautions

Specific design characteristics give it a higher center of gravity than ordinary
passenger cars. This vehicle design feature causes this type of vehicle to be
more likely to rollover. And, utility vehicles have a significantly higher rollover
rate than other types of vehicles.

An advantage of the higher ground clearance is a better view of the road
allowing you to anticipate problems.

It is not designed for cornering at the same speeds as ordinary passenger cars
any more than low-slung sports cars are designed to perform satisfactorily
under off-road conditions. Therefore, sharp turns at excessive speeds may
cause the vehicle to rollover.

This vehicle belongs to the utility vehicle class, which has higher ground clear-
ance and narrower tread in relation to the height of its center of gravity to
make it capable of performing in a wide variety of off-road applications.

Off-road vehicle features

GX460_OM_OM60R43U_(U)

391

4-6. Driving tips

4

Dr

iving

WARNING

Off-road vehicle precautions

Always observe the following precautions to minimize the risk of death, serious injury

or damage to your vehicle:

In a rollover crash, an unbelted person is significantly more likely to die than a person

wearing a seat belt. Therefore, the driver and all passengers should always fasten

their seat belts.

Avoid sharp turns or abrupt maneuvers, if at all possible. 

Failure to operate this vehicle correctly may result in loss of control or vehicle rollover

causing death or serious injury.

Loading cargo on the roof luggage carrier will make the center of the vehicle gravity

higher. Avoid high speeds, sudden starts, sharp turns, sudden braking or abrupt

maneuvers, otherwise it may result in loss of control or vehicle rollover due to failure

to operate this vehicle correctly.

Always slow down in gusty crosswinds. Because of its profile and higher center of

gravity, your vehicle is more sensitive to side winds than an ordinary passenger car.

Slowing down will allow you to have better control.

Do not drive horizontally across steep slopes. Driving straight up or straight down is

preferred. Your vehicle (or any similar off-road vehicle) can tip over sideways much

more easily than forward or backward.

392

GX460_OM_OM60R43U_(U)

4-6. Driving tips

When driving your vehicle off-road, please observe the following precautions to
ensure your driving enjoyment and to help prevent the closure of areas to off-
road vehicles:

Drive your vehicle only in areas where off-road vehicles are permitted to
travel.

Respect private property. Get owner’s permission before entering private
property.

Do not enter areas that are closed. Honor gates, barriers and signs that
restrict travel.

Stay on established roads. When conditions are wet, driving techniques
should be changed or travel delayed to prevent damage to roads.

Additional information for off-road driving

For owners in U.S. mainland, Hawaii and Puerto Rico:

To obtain additional information pertaining to driving your vehicle off-road, consult the

following organizations:

State and Local Parks and Recreation Departments

State Motor Vehicle Bureau

Recreational Vehicle Clubs

U.S. Forest Service and Bureau of Land Management

Off-road driving

GX460_OM_OM60R43U_(U)

393

4-6. Driving tips

4

Dr

iving

WARNING

Off-road driving precautions

Always observe the following precautions to minimize the risk of death, serious injury

or damage to your vehicle:

Drive carefully when off the road. Do not take unnecessary risks by driving in danger-

ous places.

Do not grip the steering wheel spokes when driving off-road. A bad bump could jerk

the wheel and injure your hands. Keep both hands and especially your thumbs on the

outside of the rim.

Always check your brakes for effectiveness immediately after driving in sand, mud,

water or snow.

After driving through tall grass, mud, rock, sand, rivers, etc., check that there is no

grass, bush, paper, rags, stone, sand, etc. adhering or trapped on the underbody.

Clear off any such matter from the underbody. If the vehicle is used with these materi-

als trapped or adhering to the underbody, a breakdown or fire could occur.

When driving off-road or in rugged terrain, do not drive at excessive speeds, jump,

make sharp turns, strike objects, etc. This may cause loss of control or vehicle rollover

causing death or serious injury. You are also risking expensive damage to your vehi-

cle’s suspension and chassis.

394

GX460_OM_OM60R43U_(U)

4-6. Driving tips

NOTICE

To prevent the water damage

Take all necessary safety measures to ensure that water damage to the engine or other

components does not occur.

Water entering the engine air intake will cause severe engine damage. 

Water entering the automatic transmission will cause deterioration in shift quality,

locking up of your transmission accompanied by vibration, and ultimately damage.

Water can wash the grease from wheel bearings, causing rusting and premature fail-

ure, and may also enter the differentials, transmission and transfer case, reducing the

gear oil’s lubricating qualities.

When you drive through water

If driving through water, such as when crossing shallow streams, first check the depth of

the water and the bottom of the riverbed for firmness. Drive slowly and avoid deep

water.

Inspection after off-road driving

Sand and mud that has accumulated in brake drums and around brake discs may

affect braking efficiency and may damage brake system components.

Always perform a maintenance inspection after each day of off-road driving that has

taken you through rough terrain, sand, mud, or water. For scheduled maintenance

information, refer to the “Warranty and Services Guide”, “Owner’s Manual Supple-

ment” or “Scheduled Maintenance”.

395

GX460_OM_OM60R43U_(U)

5

Interior features

5-1. Remote Touch/Display

Remote Touch.............................396
Center display.............................399

5-2. Using the air conditioning 

system and defogger

Front automatic air 

conditioning system ...............402

Rear air conditioning 

system ........................................... 414

Heated steering wheel/seat 

heaters/seat ventilators......... 417

5-3. Using the interior lights

Interior lights list .........................420

• Personal/interior lights 

main switch...............................421

• Personal/interior lights........421

5-4. Using the storage features

List of storage features ............423

• Glove box ...............................424
• Console box...........................424
• Coin holder ............................425
• Cup  holders/bottle 

holders/door pockets........426

• Auxiliary boxes .....................429

Luggage compartment 

features ........................................ 431

5-5. Using the other interior 

features

Other interior features ............438

• Cool box..................................438
• Sun visors ................................440
• Vanity mirror..........................440
• Conversation mirror ............441
• Clock ..........................................441
• Power outlets.........................442
• USB charging ports............446
• Armrest....................................448
• Coat hooks.............................449
• Assist grips..............................449

Garage door opener ...............450

396

GX460_OM_OM60R43U_(U)

5-1. Remote Touch/Display

Remote Touch

Switches

“MAP” button

Press this button to display the cur-

rent location.

“MENU” button

Press this button to display the menu

screen.

Back button

Press this button to display the previ-

ous screen.

Touchpad

Slide your finger on the touchpad and move the pointer to select a function, letter

and screen button.
Press the touchpad to enter the selected function, letter or screen button. Certain

finger movements on the touchpad can perform functions, such as changing map

scalings and scrolling list screens.

Sub function button

When 

 is displayed on the screen, a function screen assigned to the screen

can be displayed.

Using the touchpad

Select: Touch the touchpad to
select the desired button on the
screen.
Enter: The buttons on the screen
can be selected by either
depressing or double tapping on
the touchpad. Once a button has
been selected, the screen will
change.

The Remote Touch can be used to operate the Center Display.
For details on the Remote touch, refer to the “NAVIGATION SYSTEM
OWNER’S MANUAL”.

Remote Touch operation

1

2

3

4

5

1

2

GX460_OM_OM60R43U_(U)

397

5-1. Remote Touch/Display

5

Inte
rior fe

ature

s

Touch operation

Operations are performed by touching the touchpad with your finger.

Trace

Trace the pad surface while maintain-

ing contact with the touchpad. Mov-

ing the cursor and the pointer.

Double tap

Tap the touchpad twice, quickly.

Select the button on the screen.

Flick

Quick and long movement along the

touchpad with your finger. Move the

list screen.

Pinch in/Pinch out

Slide fingers toward each other or

apart on the touchpad. Change the

scale of the map.

398

5-1. Remote Touch/Display

GX460_OM_OM60R43U_(U)

NOTICE

To prevent damage to the Remote Touch

Observe the following precautions. Failure to do so may cause damage to the

Remote Touch.

Do not allow the Remote Touch to come into contact with food, liquid, stickers or lit

cigarettes.

Do not subject the Remote Touch to excessive pressure or strong impact.

Do not push the touchpad with a strong force or use a sharp pointed object to oper-

ate the pad.

399

GX460_OM_OM60R43U_(U)

5-1. Remote Touch/Display

5

Inte
rior fe

ature

s

Center Display

Menu screen

Press the “MENU” button on the
Remote Touch to display the menu
screen.
This system can also be operated by
the touch screen.
For details, refer to “NAVIGATION
SYSTEM OWNER’S MANUAL”.
The displays shown in the illustra-
tions are used for example only and
may differ from the actual vehicle.

Center Display overview

400

5-1. Remote Touch/Display

GX460_OM_OM60R43U_(U)

*

1

: If equipped

*

2

: Refer to the “NAVIGATION SYSTEM OWNER’S MANUAL”.

*

3

: This function is not made available in some countries or areas.

Switch

Function

Select to display the destination screen.

*

1, 2

Select to display the audio control screen.

*

2

Select to display the hands-free control screen.

*

2

Select to display the “Apps” screen.

*

2, 3

/

/

When an Apple CarPlay/Android Auto connection

is established and this button displays “Apple Car-

Play”/“Android Auto”, select to display the home
screen of Apple CarPlay/Android Auto.

*

2, 3

Select to display the information screen.

*

2


(

P.88, 91)

Select to display the general settings screen.

*

2

Select to display the air conditioning control screen.

(

P.403)

GX460_OM_OM60R43U_(U)

401

5-1. Remote Touch/Display

5

Inte
rior fe

ature

s

Split-screen display

Different information can be displayed on the left and right of the screen. For
example, air conditioning system screen can be displayed and operated while
the fuel consumption information screen is being displayed. The large screen
on the left of the display is called the main display, and the small screen to the
right is called the side display.

Main display

For details about the functions and operation of the main display, refer to the
respective section and “NAVIGATION SYSTEM OWNER’S MANUAL”.

Side display

The following functions can be displayed and operated on the side display.
Select 

 or 

 to display the desired screen.

Navigation system

*

Audio

*

Vehicle information (

P.99)

Air conditioning system
(

P.403)

Show/hide the side display

*

: Refer to the “NAVIGATION SYS-

TEM OWNER’S MANUAL”.

Screen display during low temperatures

When the ambient temperature is extremely low, screen response may be delayed even

if the Remote Touch is operated.

1

2
3
4

5

402

GX460_OM_OM60R43U_(U)

5-2. Using the air conditioning system and defogger

Front automatic air conditioning system

Left-hand side temperature control switch
Automatic mode switch
OFF switch
Fan speed decrease switch
Fan speed increase switch
Airflow mode control switch
Windshield defogger switch
Rear window defogger and outside rear view mirror defoggers switch
REAR switch
Outside/recirculated air mode switch
Right-hand side temperature control switch
DUAL switch

Air outlets and fan speed are automatically adjusted according to the tem-
perature setting.
Press the “MENU” button on the Remote Touch, then select “Climate” to dis-
play the air conditioning control screen. (

P. 396)

The air conditioning system can be displayed and operated on the side display.

Control panel

1

2
3
4
5
6
7
8
9

10

11

12

GX460_OM_OM60R43U_(U)

403

5-2. Using the air conditioning system and defogger

5

Inte
rior fe

ature

s

Main control screen

Using the touchpad of the Remote Touch, select the button on the screen.
This system can also be operated by the touch screen.

Sub menu

Selecting the sub menu item to

switch the main screen.

: Display the air conditioning

control screen

: Display the rear air conditioning

control screen (vehicles with “3-

ZONE” mode) (

P. 405)

: Display the option control screen

Adjust the left-hand side temperature setting
Adjust the fan speed setting
Select the air flow mode

: Air flows to the upper body

: Air flows to the upper body and feet

: Air flows to the feet

: Air flows to the feet and the windshield defogger operates

Adjust the right-hand side temperature setting
Function on/off indicators

When the function is on, the indicator illuminates on the control screen.

Sub function menu

When the sub function button on the Remote Touch is pressed, the following func-

tions can be switched on and off.
“AUTO”: Set automatic mode on/off (

P. 406)

“Off”: Turn the fan off
“A/C”: Set cooling and dehumidification function
“DUAL” (if equipped): Adjust the temperature for driver and front passenger seats

separately (“DUAL” mode) (

P. 407)

“3-ZONE” (if equipped): Adjust the temperature for the driver, front passenger

and rear seats separately (“3-ZONE” mode) (

P. 407)

Control screen

1

2
3
4

5
6

7

404

5-2. Using the air conditioning system and defogger

GX460_OM_OM60R43U_(U)

Option control screen

Select 

 on the sub menu to display the option control screen.

The functions can be switched on and off.
When the function is on, the indicator illuminates on the screen.

Adjust the temperature for the
driver and front passenger seats
separately

• “DUAL” (if equipped) 

(

P. 407

• “3-ZONE” (if equipped) 

(

P. 407

)

Cooling and dehumidification
function
Prevent ice from building up on the windshield and wiper blades (Wind-
shield wiper de-icer) (if equipped)
Removing pollen from the air (Micro dust and pollen filter)

Side display

Adjust the left-hand side tem-
perature setting
Adjust the fan speed setting
Adjust the right-hand side tem-
perature setting
Set cooling and dehumidification
function on/off
Adjust the temperature for the
driver’s and front passenger’s
seats separately

• “DUAL” (if equipped) 

(

P. 407

• “3-ZONE” (if equipped) 

(

P. 407

)

Select the air flow mode

1

2

3

4

1

2
3

4

5

6

GX460_OM_OM60R43U_(U)

405

5-2. Using the air conditioning system and defogger

5

Inte
rior fe

ature

s

Rear air conditioning control screen (if equipped)

Using the touchpad of the Remote Touch, select the button on the screen. This
system can also be operated by the touch screen.

Sub menu

Selecting the sub menu item to

switch the main screen.

: Display the air conditioning

control screen

: Display the rear air conditioning

control screen

: Display the option control

screen

Adjust the fan speed setting
Select the air flow mode

: Air flows to the upper body

: Air flows to the upper body and feet

: Air flows to the feet

Adjust the temperature setting
Function on/off indicators

When the function is on, the indicator illuminates on the control screen.

Sub function menu

When the sub function button on the Remote Touch is pressed, the following func-

tions can be switched on and off.
“Rear AUTO”: Set automatic mode on/off
“Rear Off”: Turn the fan off

: Disables operation of the rear air conditioning system using the Rear air

conditioning system control panel.

1

2
3

4
5

6

406

5-2. Using the air conditioning system and defogger

GX460_OM_OM60R43U_(U)

Adjusting the temperature setting

Operate the temperature control switch upwards to increase the temperature
and downwards to decrease the temperature.

If the “A/C” indicator is turned off, the system will blow ambient temperature air or

heated air.

Adjusting the fan speed setting

Operate the fan speed increase switch to increase the fan speed and the fan
speed decrease switch to decrease the fan speed.
Press the OFF switch to turn the fan off.

Changing the air flow mode

Press the airflow mode control switch.
The mode changes as follows each time the switch is pressed. 
(

P. 402, 403)

Press 

 to operate the voice com-

mand system. (Refer to the
“NAVIGATION SYSTEM OWNER’S
MANUAL”.)

Press the automatic mode switch or select “AUTO” on the sub function menu.
(

P. 402, 403)

Press the outside/recirculated air mode switch to switch to automatic air
intake mode. (if equipped)

The air conditioning system automatically switches between outside air and recircu-

lated air modes.

Adjust the temperature setting.
To stop the operation, press the OFF switch or select “Off” on the sub function
menu. (

P. 402, 403)

If the fan speed setting or air flow modes are operated, the automatic mode indicator

goes off. However, automatic mode for functions other than that operated is main-

tained.

Air conditioning controls

Using the voice command system

Using automatic mode

1

2

3
4

GX460_OM_OM60R43U_(U)

407

5-2. Using the air conditioning system and defogger

5

Inte
rior fe

ature

s

Adjusting the temperature for driver and passenger seats separately

Vehicles with “DUAL” mode

Adjust the temperature for driver and passenger seats separately.
While in “DUAL” mode, the temperature of the rear air outlets is set at the
passenger’s side temperature setting.
To turn on the “DUAL” mode, perform any of the following procedures:

Press the DUAL switch. (

P. 402)

Select “DUAL” on the sub function menu. (

P. 403)

Select “DUAL” on the option control screen. (

P. 404)

Select “DUAL” on the side display. (

P. 404)

Adjust the front passenger’s side temperature setting.

The indicator on the main control screen comes on when the “DUAL” mode is on.

Vehicles with “3-ZONE” mode

Adjust the temperature for the driver, front passenger and rear passenger
seats separately.
To turn on the “3-ZONE” mode, perform any of the following procedures:

Select “3-ZONE” on the sub function menu. (

P. 403)

Select “3-ZONE” on the option control screen. (

P. 404)

Select “3-ZONE” on the side display. (

P. 404)

Adjust any passenger seat temperature.

The indicator on the main control screen comes on when the “3-ZONE” mode is

on.

Other functions

408

5-2. Using the air conditioning system and defogger

GX460_OM_OM60R43U_(U)

Adjusting the temperature for rear seats (vehicles with rear air condition-
ing system)

Adjusting the temperature for rear seats, perform of the following proce-
dures:

Press the REAR switch.
Adjust the rear seats temperature setting on the rear air conditioning con-
trol screen. (

P. 405)

Switching between outside air and recirculated air modes

Press the outside/recirculated air mode switch.

The mode changes as follows each time the switch is pressed.

 (recirculated air mode) 

 automatic mode

*

 (if equipped) 


 (outside air mode) 


 (recirculated air mode)

When the system is switched to automatic mode, the air conditioning system oper-

ates automatically.

*

: This item cannot be selected when the air conditioning is off.

Defogging the windshield

Defoggers are used to defog the windshield and front side windows.
Press the windshield defogger switch.

Set the outside/recirculated air mode button to outside air mode if the recirculated

air mode is used. (It may switch automatically.)
To defog the windshield and the side windows early, turn the air flow and tempera-

ture up.
To return to the previous mode, press the windshield defogger switch again when

the windshield is defogged.

1

2


Content      ..     10      11      12      13     ..