Ford Orion. Manual - part 64
A
Cap
B Circlip
C Special washer
(1.8 mm)
D Special washer
(0.15 mm)
E
Bush
F
Wave washer
G Pivot shaft
16 Windscreen wiper motor and
linkage - removal and refitting
2
Removal
Wiper motor
1 Operate the wiper motor, then switch it off
so that it returns to its rest position.
2 Disconnect the battery negative (earth) lead
(refer to Chapter 5, Section 1).
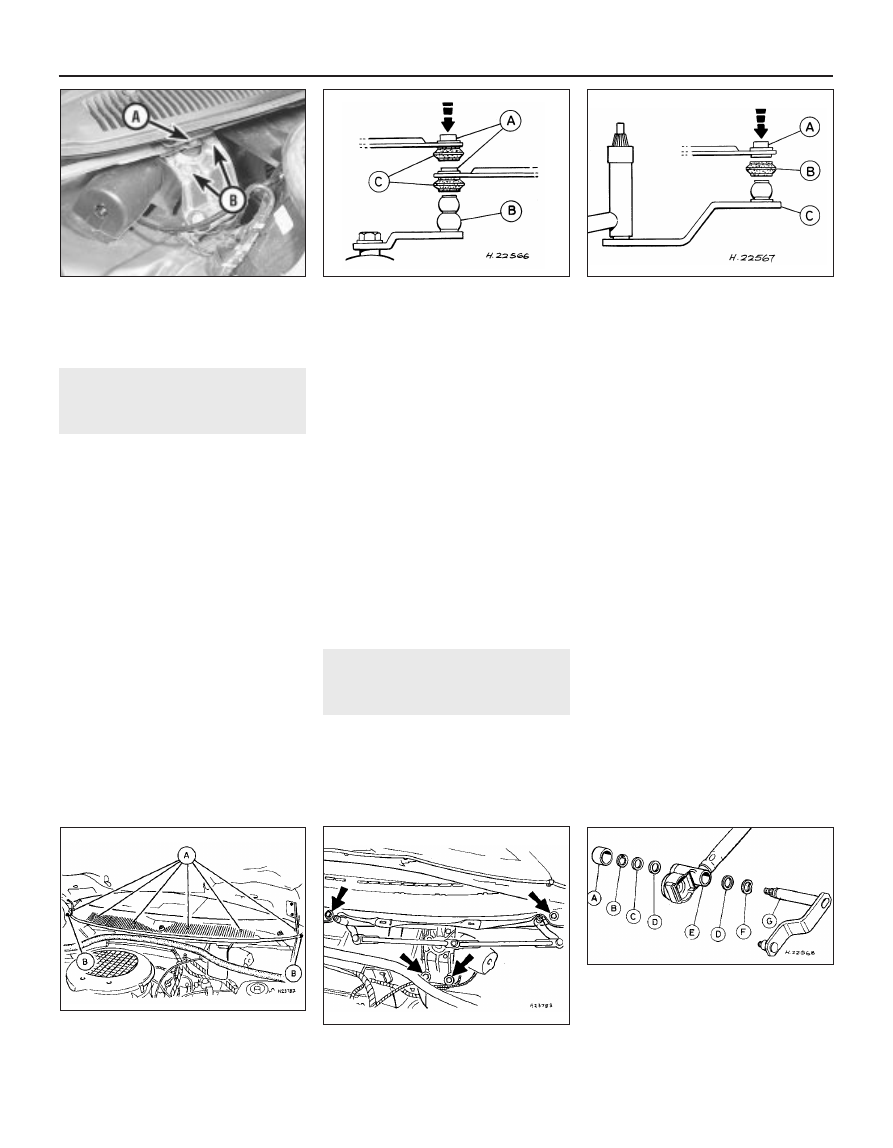
3 Unscrew and remove the link arm-to-motor
spindle retaining nut (see illustration).
Disengage the arm from the spindle.
4 Undo the three wiper motor retaining bolts,
then move the wiper motor sideways from its
mounting bracket.
5 Detach the wiper motor wiring multi-plug,
withdraw the wiper motor and remove its
insulating cover.
Linkage
6 Remove the windscreen wiper arms (and
blades) from the pivots as described in
Section 15.
7 Disconnect the battery negative (earth) lead
(refer to Chapter 5, Section 1). Move the wiper
linkage to the required position for access to
the linkage balljoints, then carefully prise free
the linkages from their ball pins using a
suitable open-ended spanner as a lever (see
illustrations).
8 Remove the rubber seal from the pivot
bushes. Where the surfaces of the ball pins
are damaged, the pivot shaft and/or motor
must be renewed. The rubber seals which are
located over the edge of the pivot bushes
must be renewed during refitting.
Refitting
9 Refitting is a reversal of removal. Lubricate
the pivot bushes and the rubber seals during
reassembly. When reconnecting the link arm
on the motor spindle, ensure that the arm lug
engages in the slot in the taper of the motor
spindle. Check for satisfactory operation on
completion.
17 Windscreen wiper pivot
shaft - removal and refitting
2
Removal
1 Operate the wiper motor, then switch it off
so that it returns to its rest position.
2 Disconnect the battery negative (earth) lead
(refer to Chapter 5, Section 1).
3 Remove the windscreen wiper arms as
described in Section 15.
4 Detach and remove the cowl grille. This is
secured by six plastic screws and two cross-
head screws located under plastic caps (see
illustration).
5 Unscrew and remove the four wiper motor
bracket retaining bolts, then remove the wiper
motor bracket assembly (see illustration).
Disconnect the wiring multi-plug as the motor
bracket assembly is withdrawn.
6 Prise free the wiper linkage from the pivot
shaft using a suitable open-ended spanner.
7 Pull free the pivot shaft cap from the
housing, release the circlip, withdraw the two
special washers and remove the pivot shaft.
The special washer and spring washer can
then be removed from the shaft (see
illustration).
Refitting
8 Refitting is a reversal of removal. Lubricate
the pivot shaft, bushes and rubber seals
during reassembly. When reconnecting the
link arm on the motor spindle, ensure that the
arm lug engages in the slot in the taper of the
motor spindle. Check for satisfactory
operation on completion.
12•14 Body electrical system
17.7 Wiper pivot shaft components
17.5 Wiper motor bracket retaining bolt
locations
17.4 Remove the plastic screws (A) and
the cross-head screws (B) to remove the
cowl grille
16.7B Windscreen wiper linkage-to-pivot
shaft connection
16.7A Windscreen wiper linkage to motor
balljoint connection
A
Pivot bush
B Wiper motor arm
C Rubber seal
A
Pivot bush
B Rubber seal
C Pivot shaft
16.3 Windscreen wiper motor showing link
arm-to-spindle connection (A) and two of
the wiper motor-to-mounting retaining
bolts (B)