Ford Orion. Manual - part 65
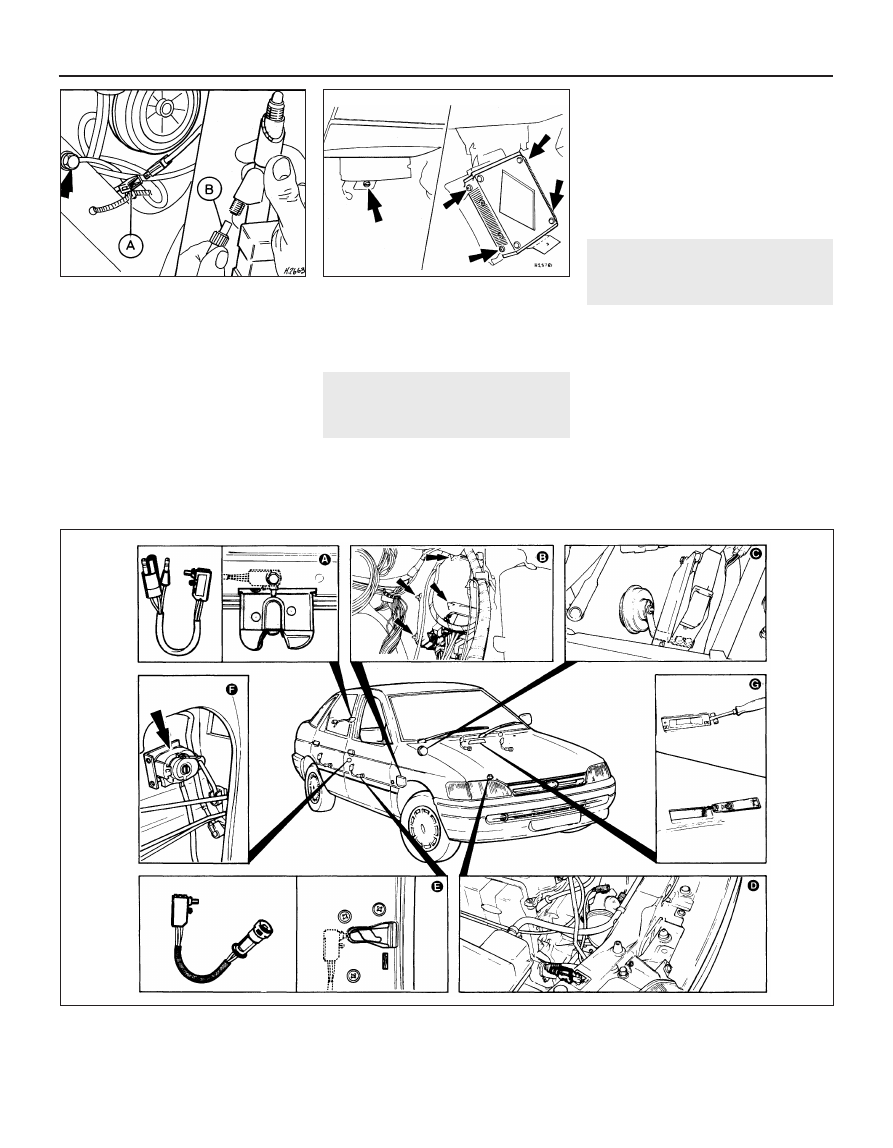
7 Unscrew the aerial upper retaining nut, then
remove the bezel and the seal washer.
8 Working from the luggage area side,
unscrew and remove the self-tapping screw
securing the aerial bottom bracket to the
apron.
9 Unscrew the knurled type nut to detach the
aerial from the base of the unit, then detach
the wiring and aerial lead at their connections,
and withdraw the aerial from the vehicle (see
illustration).
Refitting
10 Refitting is a reversal of removal. Ensure
that the contact surfaces of both the body
panel and the aerial are clean before fitting the
aerial into position.
24 Power amplifier -
removal and refitting
1
Removal
1 This is fitted to models equipped with the
Premium Sound System, and is located in the
area between the glovebox and the bulkhead.
2 To remove the amplifier, undo the retaining
screw, lower the unit complete with its
support bracket, and detach the wiring multi-
plug connectors (see illustration). If required,
the bracket and the amplifier can be
separated by unscrewing the four Torx
screws.
Refitting
3 Refit in the reverse order of removal.
25 Anti-theft systems -
general information
Anti-theft alarm system
1 This system provides an added form of
vehicle security (see illustration). When the
system is activated, the alarm will sound if the
vehicle is broken into through any one of the
doors, the bonnet, boot (or tailgate). The
alarm will also be triggered if the ignition
system is turned on or the radio/cassette
disconnected whilst the system is activated.
2 This system is activated/de-activated
whenever one of the front doors is
locked/unlocked by the key. The system
operates on all doors, the bonnet and boot lid
(or tailgate) whenever each door is individually
12•18 Body electrical system
25.1 Anti-theft alarm system components and their locations
A
Trip switch (luggage
compartment)
B System module
C Alarm horn
D Alarm switch (bonnet)
E
Alarm switch (doors)
F
Activation switches
G Clock
24.2 Power amplifier securing bolts
23.9 Electric aerial wiring (A) and aerial (B)
connections