Ford Orion. Manual - part 26
2 Push the crankshaft fully away from the
gauge, and zero it. Next, lever the crankshaft
towards the gauge as far as possible, and
check the reading obtained. The distance that
the crankshaft moved is its endfloat; if it is
greater than specified, check the crankshaft
thrust surfaces for wear. If no wear is evident,
new thrustwashers should correct the endfloat.
3 If no dial gauge is available, feeler gauges
can be used. Gently lever or push the
crankshaft all the way towards the right-hand
end of the engine. Slip feeler gauges between
the crankshaft and the main bearing
incorporating the thrustwashers to determine
the clearance (see illustration).
HCS engine
4 Check that the main bearing caps have
marks to indicate their respective fitted
positions in the block. They also have arrow
marks pointing towards the timing chain cover
end of the engine to indicate correct
orientation
(see illustration).
5 Unscrew the retaining bolts, and remove the
main bearing caps. If the caps are reluctant to
separate from the block face, lightly tap them
free using a plastic- or copper-faced hammer.
If the bearing shells are likely to be used again,
keep them with their bearing caps for
safekeeping. However, unless the engine is
known to be of low mileage, it is
recommended that they be renewed.
6 Lift the crankshaft out from the crankcase,
then extract the upper bearing shells and side
thrustwashers. Keep them with their
respective caps for correct repositioning if
they are to be used again.
7 Remove the crankshaft oil seals from the
timing cover and the rear oil seal housing.
CVH engine
8 Check that each main bearing cap is
numerically marked for position. Each cap
should also have an arrow marking to indicate
its direction of fitting (arrow points to the
timing belt end).
9 Unscrew the retaining bolts, and remove
the main bearing caps. As they are removed,
keep each bearing shell with its cap (in case
they are to used again). Note that the bearing
shells in the main bearing caps are plain (no
groove). It is recommended that the shells be
renewed, unless the engine is known to be of
low mileage.
10 Lift out the crankshaft from the crankcase.
11 Remove each bearing shell in turn from
the crankcase, and keep them in order of
fitting. Note that the upper shell halves are
grooved. Also remove the semi-circular
thrustwasher from each side of the central
main bearing web, and keep them in their
order of fitting.
Zetec engine
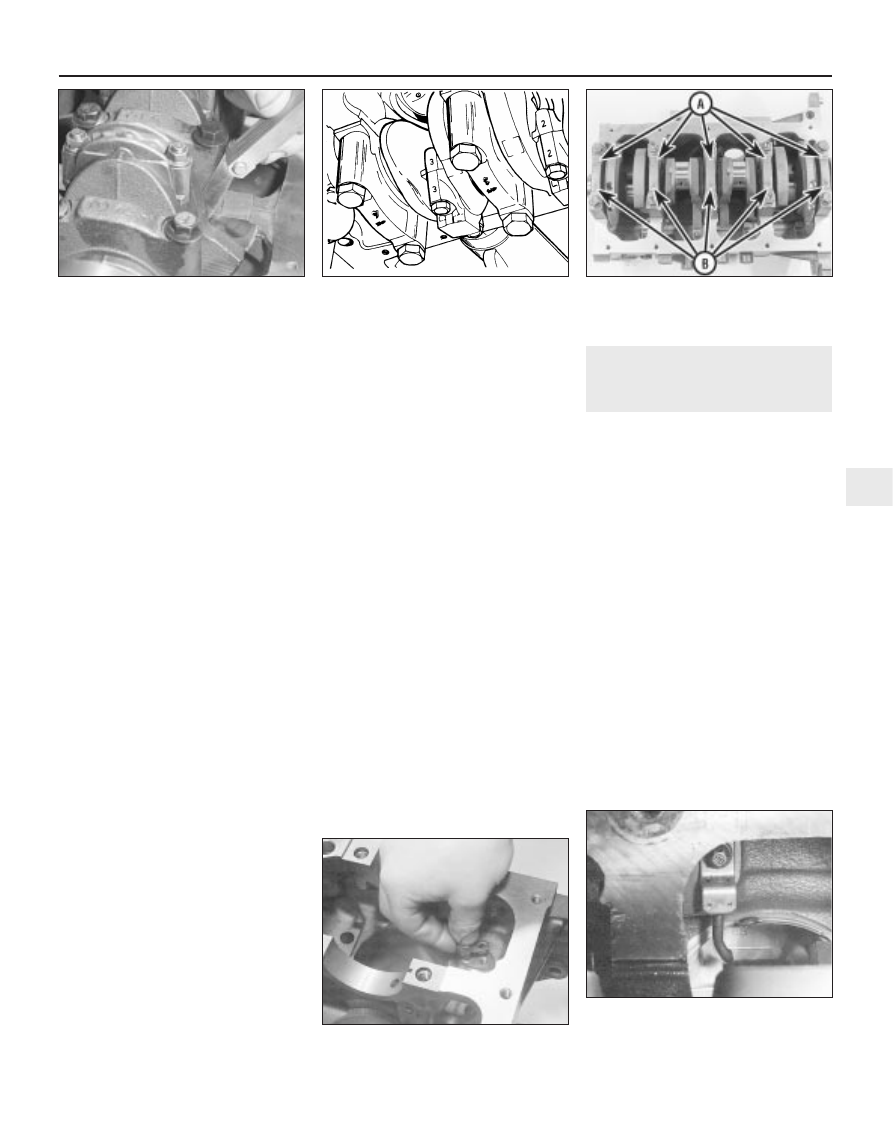
12 Check the main bearing caps, to see if they
are marked to indicate their locations (see
illustration). They should be numbered
consecutively from the timing belt end of the
engine - if not, mark them with number-
stamping dies or a centre-punch. The caps will
also have an embossed arrow pointing to the
timing belt end of the engine. Noting the
different fasteners (for the oil baffle nuts) used on
caps 2 and 4, slacken the cap bolts a
quarter-turn at a time each, starting with the left-
and right-hand end caps and working toward
the centre, until they can be removed by hand.
13 Gently tap the caps with a soft-faced
hammer, then separate them from the cylinder
block/crankcase. If necessary, use the bolts as
levers to remove the caps. Try not to drop the
bearing shells if they come out with the caps.
14 Carefully lift the crankshaft out of the engine.
15 Remove each bearing shell in turn from
the cylinder block/crankcase, and keep them
in order of fitting.
14 Cylinder block/crankcase -
cleaning and inspection
2
Note: Always check first what replacement
parts are available before planning any
overhaul operation; refer to Section 1. A Ford
dealer, or a good engine reconditioning
specialist/automotive parts supplier, may be
able to suggest alternatives which will enable
you to overcome the lack of replacement parts.
Cleaning
1 Prior to cleaning, remove all external
components and senders. On the HCS
engine, make sure that the camshaft and
tappets are removed before carrying out
thorough cleaning of the block (see Sec-
tion 11). On the CVH engine, remove the
engine ventilation cap from the recess in the
rear corner of the cylinder block and if still
fitted, undo the retaining screw and withdraw
the engine speed sensor from the bellhousing
face. On the Zetec engine, unbolt the piston-
cooling oil jets or blanking plugs (as
applicable); note that Ford state that the
piston-cooling oil jets (where fitted) must be
renewed whenever the engine is dismantled
for full overhaul (see illustrations).
2 Remove all oil gallery plugs (where fitted).
The plugs are usually very tight - they may
Engine removal and general engine overhaul procedures 2D•21
13.4 Connecting rod big-end bearing cap
and main bearing cap markings
13.3 Checking crankshaft endfloat with a
feeler gauge
14.1A Unbolt blanking plugs (where fitted)
to clean out oilways . . .
13.12 Before unbolting crankshaft main
bearing caps, note arrows pointing to timing
belt end of engine (A), and bearing
numbers (B) consecutive from timing belt end
2D
14.1B . . . but note that piston-cooling oil
jets (where fitted) must be renewed as a
matter of course whenever engine is
overhauled - Zetec engine