Citroen Jumpy Dispatch (2023 year). Manual in english - page 4
Safety
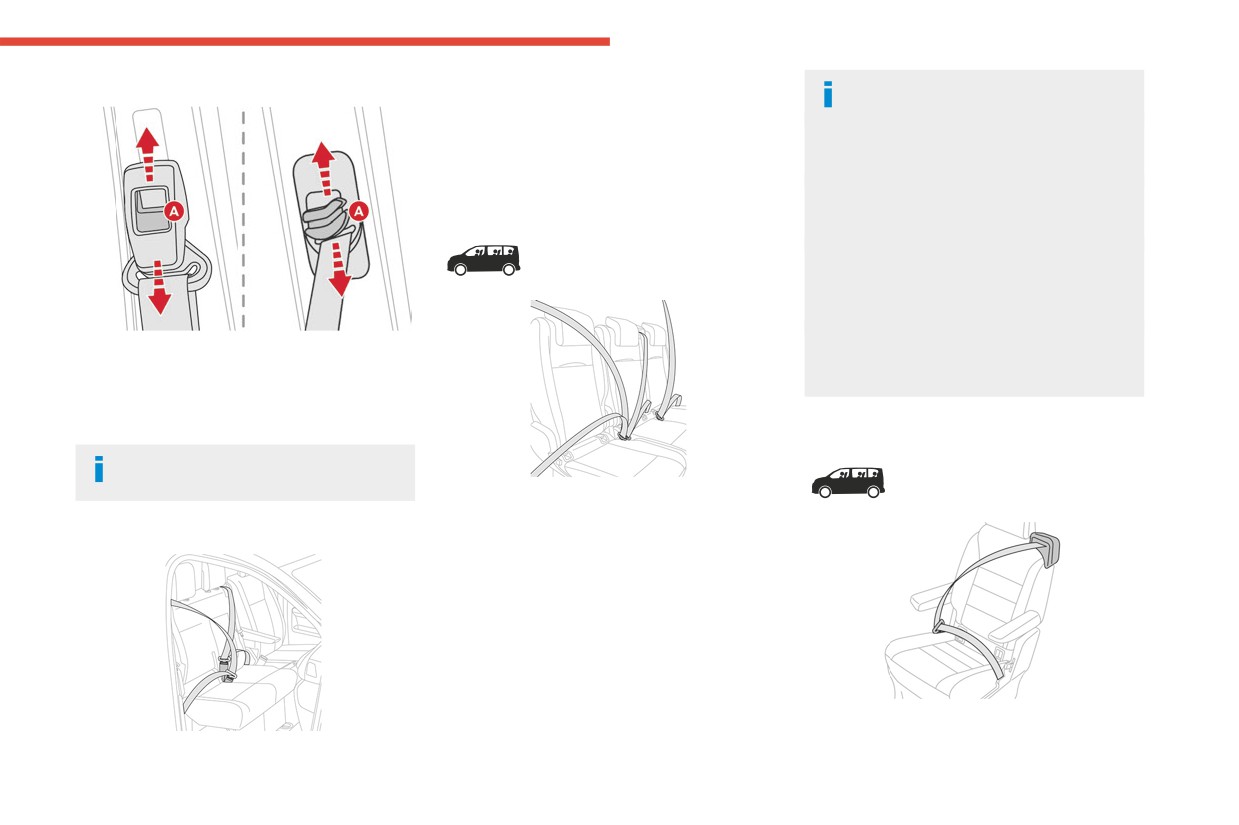
Height adjustment
If the vehicle is fitted with a front bench seat,
For rows 2 and 3, connect each seat belt
5
ensure that each seat belt is used with its correct
to its correct buckle.
buckle.
Do not interchange the belts or buckles for
Do not interchange the driver's seat belt or
the outer seats with the belt or buckle for the
buckle with the centre seat belt or buckle.
centre seat.
When folding the side seats or placing the
Rear seat belts
backrests in the table position, avoid trapping
the belt for the centre seat.
After folding or moving a rear seat or bench
seat, ensure that the seat belt has reeled
in correctly and that the buckle is ready to
receive the belt tongue.
When removing/repositioning the outer seats
► To lower the attachment point, while moving
or when accessing row 3, avoid trapping the
control A downwards, slide the assembly down
centre belt.
to the desired position.
► To raise the attachment point, slide the
assembly up to the desired position.
With individual seats
The upper part of the diagonal strap
Shine, Business Lounge
should lie across the shoulder.
A 3-seat bench seat (one-piece or split 1/3 seat
- 2/3 bench seat) is fitted with three-point seat
Two-seat front bench seat
belts and inertia reels on the outer seats.
The centre seat has a seat belt guide and inertia
reel fitted into the seat backrest.
The seat belt inertia reels for the outer seats in
row 2 are fitted with force limiters.
The seats in row 3 have three-point seat belts
with inertia reels.
They are fitted with three-point seat belts
with guides and belt inertia reels built into the
backrests.
105
CarManuals2.co
Safety
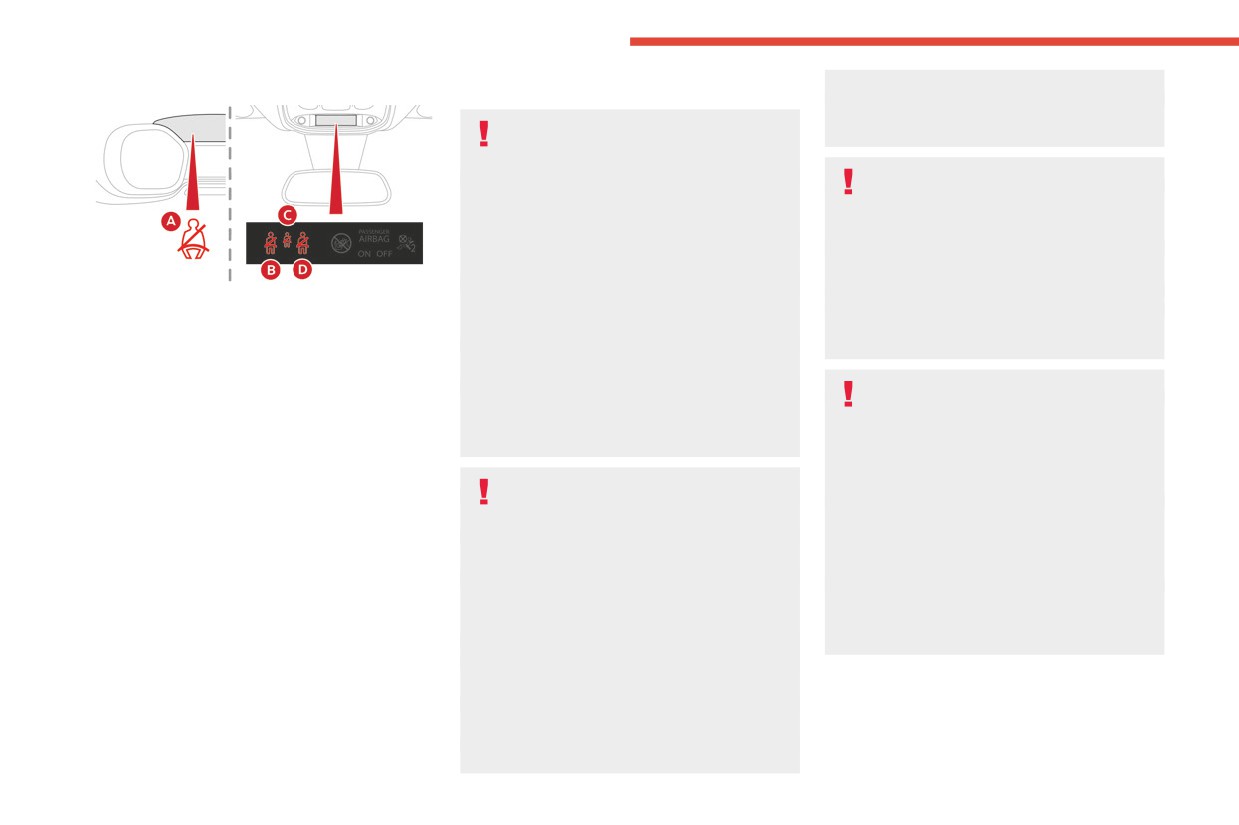
Seat belt(s) warning lamps
Advice
- not show signs of tearing or fraying.
- not be changed or modified, in order to
The driver must ensure that passengers
avoid affecting its performance.
use the seat belts correctly and that they
are all fastened before setting off.
Recommendations for children
Wherever seated in the vehicle, you must
Use a suitable child seat if the passenger
always fasten the seat belt, even for short
is less than 12 years old or shorter than 1.5
journeys.
metres.
Do not invert the seat belt buckles, as they
Never use the same seat belt to secure more
will not fulfil their role properly.
than one child.
To ensure the proper functioning of the belt
A. Front seat belts not fastened/unfastened
Never carry a child on your lap.
buckles, make sure that there are no foreign
warning lamp.
For more information on Child seats, refer to
bodies present (e.g. a coin) before fastening.
B. Left-hand seat belt not fastened/unfastened
the corresponding section.
Before and after use, ensure that the seat belt
warning lamp.
is reeled in correctly.
C. Centre seat belt unfastened warning lamp (if
Maintenance
After folding or moving a seat or rear bench
your vehicle is fitted with a 2-seat front bench
In accordance with current safety
seat, ensure that the seat belt is positioned
seat).
regulations, for all work on your vehicle's
and reeled in correctly.
D. Right-hand seat belt not fastened/unfastened
seat belts, contact a qualified workshop with
warning lamp (if your vehicle is fitted with
the skills and equipment needed, which a
individual front seats).
Installation
CITROËN dealer is able to provide.
Right-hand seat belt unfastened warning
The lower part of the strap must be
Have the seat belts checked regularly by a
lamp (if your vehicle is fitted with a 2-seat
positioned as low as possible over the pelvis.
CITROËN dealer or a qualified workshop,
front bench seat).
The upper part must be positioned in the
particularly if the straps show signs of
hollow of the shoulder.
On switching on the ignition, the warning lamp(s)
damage.
At the front, adjusting the position of the
come(s) on if the corresponding seat belt is not
Clean the seat belt straps with soapy water or
seat belt may require the seat height to be
fastened or is unfastened.
a textile cleaning product, sold by CITROËN
adjusted.
At speeds above approximately 12 mph
dealers.
In order to be effective, a seat belt must:
(20 km/h), the warning lamp(s) flash(es) for 2
- be tightened as close to the body as
minutes, accompanied by an audible signal.
possible.
Once these 2 minutes have elapsed, the warning
- be pulled in front of you with a smooth
lamp(s) remain(s) on until the driver or the
movement, checking that it is not twisted.
passenger fastens their seat belt.
– must only be used to secure one person.
106
CarManuals2.co
Safety
Airbags
subsequent accident), the airbag will not be
Front airbags
5
deployed again.
General information
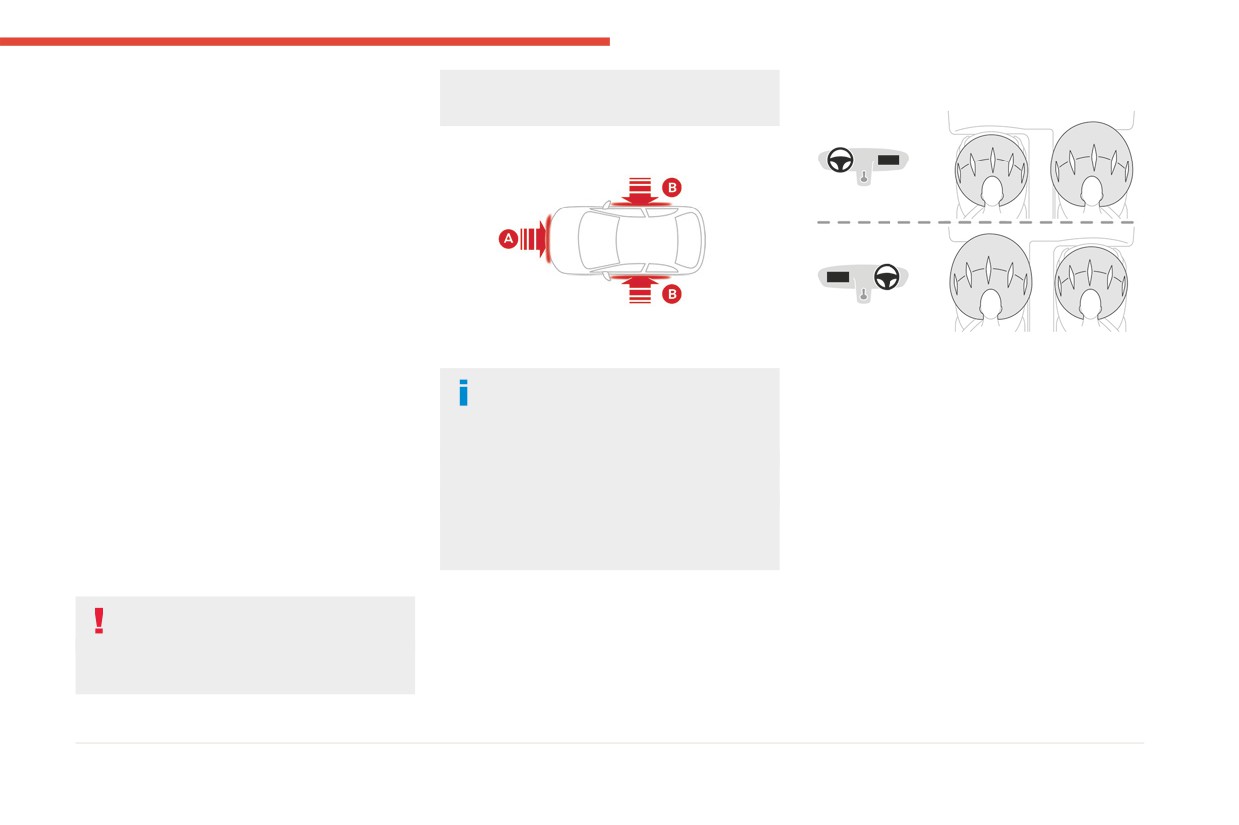
Impact detection zones
This system is designed to improve the safety
of the occupants of the front seats and the rear
outer seats in the event of a violent collision. The
airbags supplement the action of the seat belts
equipped with a force limiting system.
Electronic detectors record and analyse the
front and side impacts sustained in the impact
detection zones:
A. Front impact zone
- In the event of violent impact, the airbags
B. Side impact zone
deploy instantly and help better protect the
This system protects the driver and front
occupants of the vehicle; immediately after the
passenger in the event of a serious front impact,
When one or more airbags are deployed,
impact, the airbags deflate rapidly in order not
limiting the risk of head and chest injury.
the detonation of the pyrotechnic charge
to hinder the visibility or the possible exit of the
The driver's airbag is fitted in the centre of the
incorporated in the system makes a noise and
occupants.
steering wheel; the front passenger airbag is
releases a small quantity of smoke.
- In the event of a slight impact, a rear impact
fitted in the dashboard above the glove box.
This smoke is not harmful, but sensitive
and under certain rollover conditions, the airbags
individuals may experience irritation.
Deployment
may not deploy; only the seat belt helps to
The detonation noise associated with the
protect you in these situations.
They are deployed, except for the front
deployment of one or more airbags may result
The seriousness of the impact depends on the
passenger airbag if it is deactivated*, in the
in a slight loss of hearing for a short time.
nature of the obstacle and the speed of the
event of a violent front impact applied to all or
vehicle at the moment of collision.
part of front impact zone A.
The front airbag inflates between the chest and
The airbags do not operate when the
head of the front occupant of the vehicle and
ignition is switched off.
the steering wheel, on the driver's side, and the
This equipment will only deploy once. If a
dashboard, on the passenger's side, to cushion
second impact occurs (during the same or a
their forward movement.
* For more information on Deactivating the front passenger airbag, refer to the corresponding section.
107
CarManuals2.co
Safety
This system protects the driver and front
Deployment
passenger in the event of a serious side impact,
They are deployed on one side in the event
limiting the risk of injury to the chest, between
of a serious side impact applied to all or part
the hip and the shoulder.
of the side impact zone, perpendicular to the
Each lateral airbag is fitted in the seat backrest
longitudinal centreline of the vehicle on a
frame, on the door side.
horizontal plane and directed from the outside
towards the inside of the vehicle.
Deployment
The curtain airbag inflates between the outer
They are deployed on one side in the event
rear passenger and the windows.
of a serious side impact applied to all or part
of the side impact zone, perpendicular to the
Malfunction
longitudinal centreline of the vehicle on a
In the event of a malfunction, this warning
horizontal plane and directed from the outside
lamp lights up on the instrument panel.
towards the inside of the vehicle.
Contact a CITROËN dealer or a qualified
The lateral airbag inflates between the front
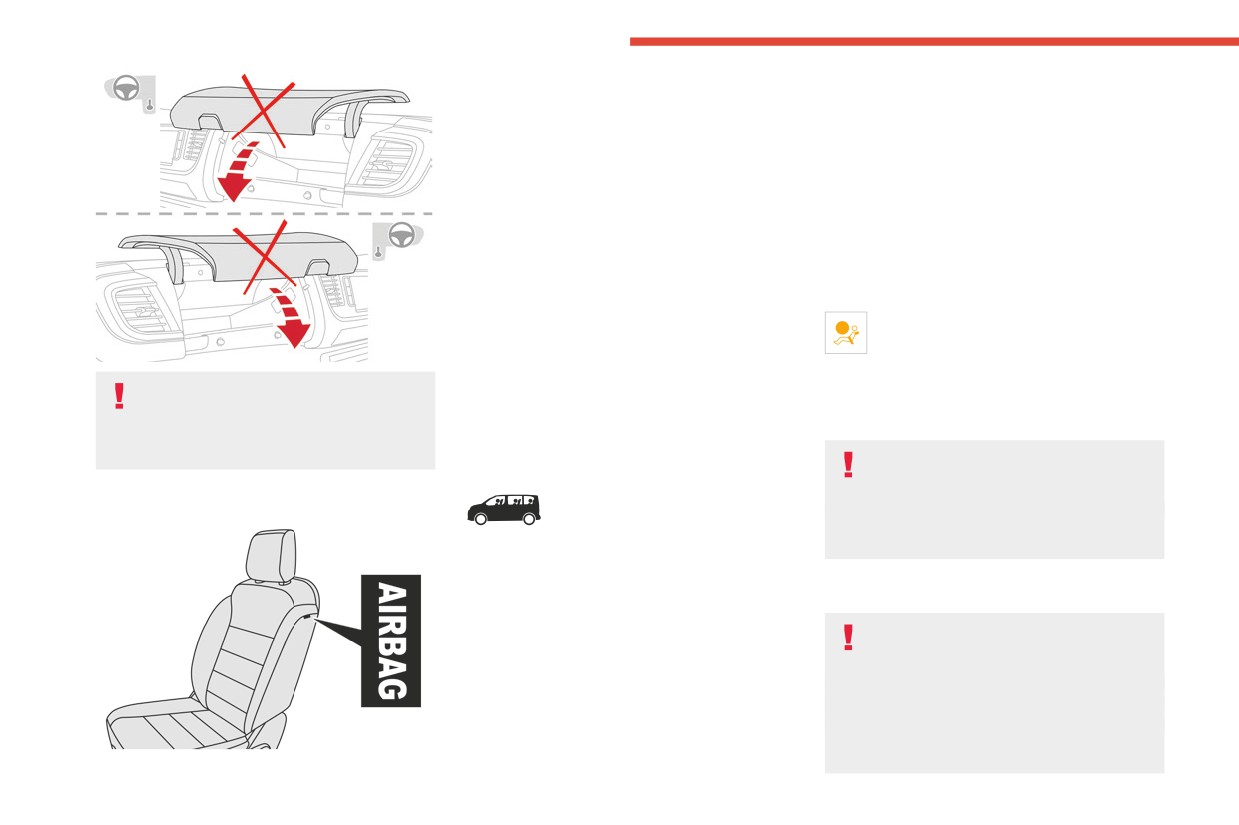
When driving, keep the storage
workshop to have the system checked.
occupant's abdomen and head and the
compartment closed. Otherwise, there is
The airbags may not be deployed in the event of
associated door trim panel.
a risk of injury in the event of an accident or
a serious impact.
sudden braking.
Curtain airbags (Row 2 & 3)
In the event of a minor impact or bump at
the side of the vehicle or if the vehicle
Feel, Shine, Business Lounge
rolls over, the airbags may not be deployed.
Lateral airbags
In the event of a rear or front collision, none of
the lateral airbags are deployed.
If fitted to your vehicle, this is a system that
contributes towards greater protection for
passengers (with the exception of the centre
Advice
seats) in the event of a serious side impact, in
For the airbags to be fully effective,
order to limit the risk of injury to the side of the
observe the safety recommendations
head.
below.
Each curtain airbag is built into the pillars and
Adopt a normal and upright sitting position.
the upper passenger compartment area.
Fasten your seat belt and position it correctly.
Do not place anything between the occupants
and the airbags (e.g. child, animal, object), do
108
CarManuals2.co
Safety
not fix or attach anything near or in the path of
Lateral airbags
Do not remove the grab handles installed on
5
the airbags, as this could cause injuries when
Use only approved seat covers
the roof, as these help to secure the curtain
they are deployed.
compatible with the deployment of these
airbags.
Never modify the original definition of the
airbags. For information on the range of seat
vehicle, particularly in the area directly around
covers suitable for your vehicle, contact a
the airbags.
CITROËN dealer.
Child seats
Even if all of the precautions mentioned are
Do not fix or attach anything to the seat
observed, a risk of injury or of minor burns to
backrests (e.g. clothing) as this could cause
The regulations on carrying children are
the head, chest or arms cannot be ruled out
injuries to the chest or arm when the airbag is
specific to each country. Refer to the
when an airbag is deployed. The bag inflates
deployed.
legislation in force in your country.
almost instantly (within a few milliseconds)
Do not sit with the upper part of the body any
then deflates within the same time,
nearer to the door than necessary.
For maximum safety, please observe the
discharging the hot gas via openings provided
The vehicle's front door panels include side
following recommendations:
for this purpose.
impact sensors.
- In accordance with European regulations,
After an accident or if the vehicle has been
A damaged door or any unauthorised or
all children under the age of 12 or less than
stolen, have the airbag systems checked.
incorrectly executed work (modification or
1.5 metres tall must travel in approved child
All work must be carried out only by a
repair) on the front doors or their interior trim
seats suited to their weight, on seats fitted with
CITROËN dealer or a qualified workshop
could compromise the operation of these
a seat belt or ISOFIX mountings.
sensors - risk of malfunction of the lateral
- Statistically, the safest seats in your
airbags!
vehicle for carrying children are the rear
Front airbags
All work must be carried out only by a
seats.
Do not drive holding the steering wheel
CITROËN dealer or a qualified workshop
- Children weighing less than 9 kg must
by its spokes or resting your hands on the
travel in the "rearward facing" position,
centre part of the wheel.
whether in the front or rear of the vehicle.
Passengers must not place their feet on the
dashboard.
Feel, Shine, Business Lounge
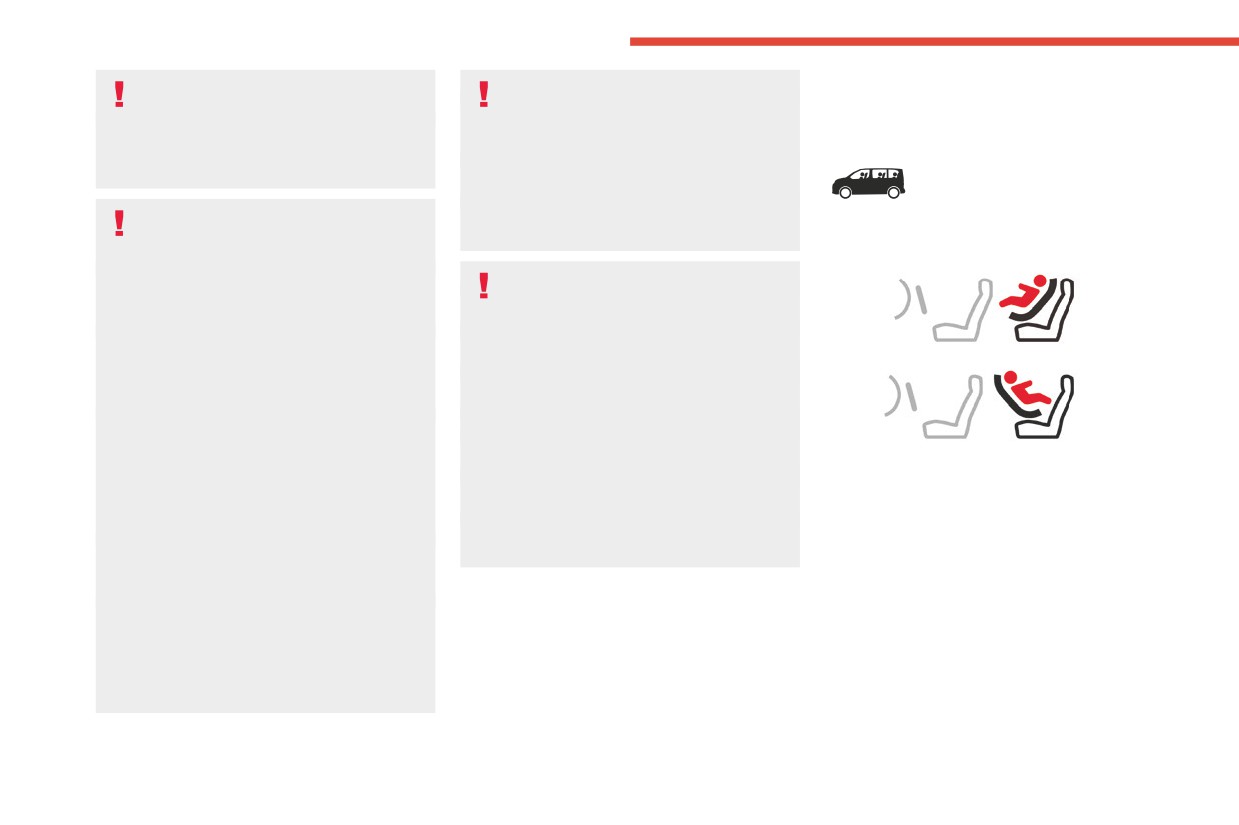
It is recommended that children travel
Do not smoke as deployment of the airbags
on the rear seats of the vehicle:
can cause burns or the risk of injury from a
- "rearward facing" up to the age of 3.
cigarette or pipe.
- "forward facing" over the age of 3.
Curtain airbags
Never remove or pierce the steering wheel or
Do not fix or attach anything to the roof,
hit it violently.
as this could cause head injuries when the
Do not fix or attach anything to the steering
curtain airbag is deployed.
wheel or dashboard, as this could cause
injuries when the airbags are deployed.
109
CarManuals2.co
Safety
Make sure that the seat belt is correctly
Installing a booster seat
Child seat at the rear
positioned and tightened.
The chest part of the seat belt must be
For child seats with a support leg, ensure that
positioned on the child's shoulder without
Row 2
the support leg is in firm and steady contact
touching the neck.
with the floor.
Ensure that the lap part of the seat belt
passes correctly over the child's thighs.
An incorrectly installed child seat in a
Use a booster seat with a backrest, equipped
vehicle compromises the child's safety in
with a belt guide at shoulder level.
Forward-facing or rearward-facing
the event of an accident.
Ensure that there is no seat belt or seat belt
Additional protections
buckle under the child seat, as this could
To prevent accidental opening of the
destabilise it.
doors and rear windows, use the "Child lock".
Remember to fasten the seat belts or the
Take care not to open the rear windows by
child seat harness keeping the slack relative
more than one third.
to the child's body to a minimum, even for
To protect young children from the sun's rays,
short journeys.
fit side blinds on the rear windows.
When installing a child seat using the seat
As a safety measure, do not leave:
belt, ensure that the seat belt is tightened
- A child alone and unsupervised inside a
correctly on the child seat and that it secures
vehicle.
► Move the vehicle's front seat forward and
the child seat firmly on the vehicle seat. If
- A child or an animal in a vehicle which is
straighten the backrest so that the legs of the
the passenger seat is adjustable, move it
exposed to the sun, with the windows closed.
child in the forward-facing or rearward-facing
forwards if necessary.
- The keys within reach of children inside the
child seat itself do not touch the vehicle's front
Remove the head restraint before
vehicle.
seat.
installing a child seat with a backrest on a
► Check that the backrest of the forward-facing
passenger seat.
child seat is as close as possible to the backrest
Ensure that the head restraint is stored or
of the vehicle's rear seat, and ideally in contact
attached securely to prevent it from being
with it.
thrown around the vehicle in the event of
► Adjust the rear seat to the fully back
sharp braking. Refit the head restraint once
longitudinal position, with the backrest
the child seat has been removed.
straightened.
110
CarManuals2.co
Safety
Ensure that the seat belt is correctly
"Forward facing"
5
tensioned.
For child seats with a support leg, ensure
that the support leg is in firm and steady
contact with the floor. If necessary, adjust the
vehicle's front seat.
Row 3
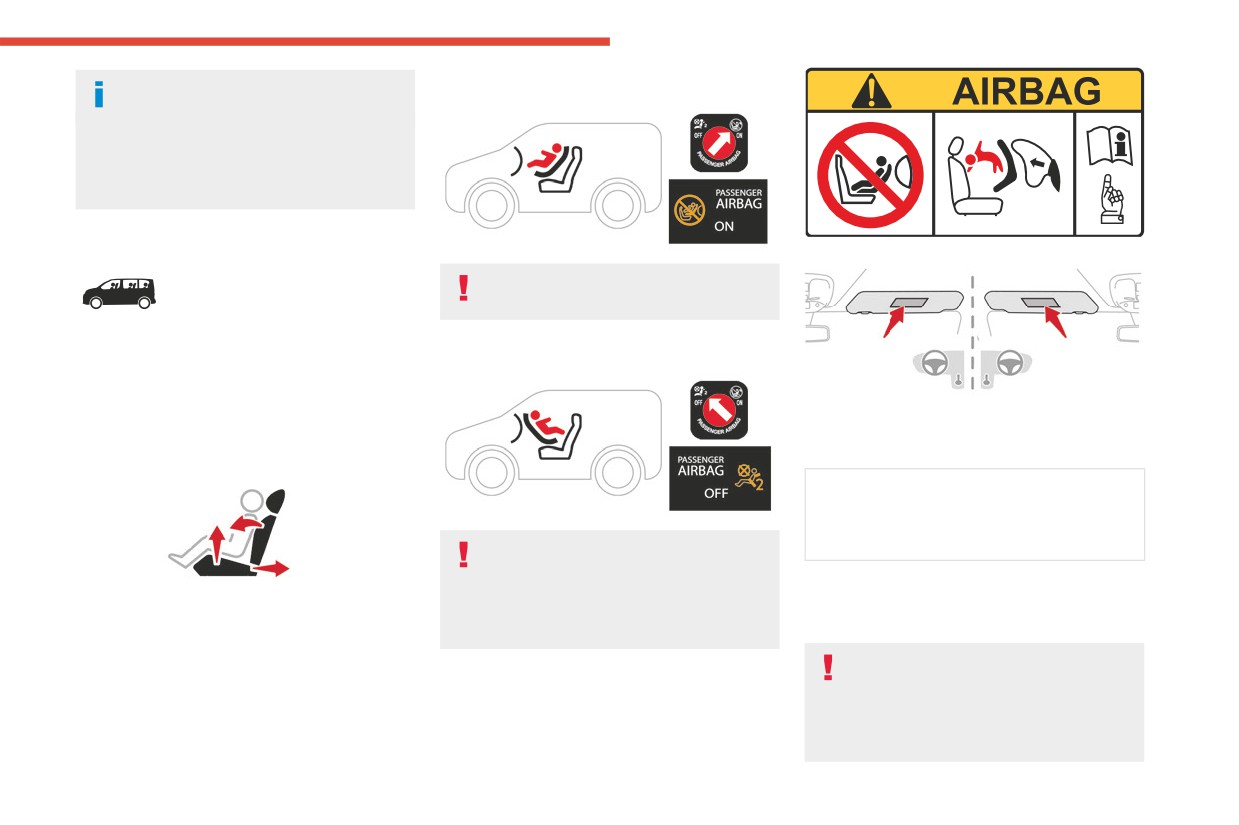
Warning label - Front passenger airbag
You must leave the front passenger
airbag active.
If a child seat is installed on a passenger seat in
"Rearward facing"
the third row, move the seats in the second row
forward and straighten the backrests so that the
child seat and the child's legs do not touch the
You must comply with the following instruction,
seats in the second row.
as reminded by the warning label on both sides
of the passenger sun visor:
Child seat at the front
NEVER use a rearward facing child restraint
on a seat protected by an ACTIVE AIRBAG in
front of it, DEATH or SERIOUS INJURY to the
The front passenger airbag must be
CHILD can occur.
deactivated before installing a rearward
facing child seat. Otherwise, the child risks
Deactivating the front
► Adjust the front passenger seat to the
being seriously injured or killed if the
highest and fully back longitudinal position,
passenger airbag
airbag is deployed.
with the backrest straightened.
To ensure the safety of the child, the front
passenger airbag MUST be deactivated
when a "rearward facing" child seat is
installed on the front passenger seat.
Otherwise, the child risks being seriously
111
CarManuals2.co
Safety
injured or killed in the event of deployment of
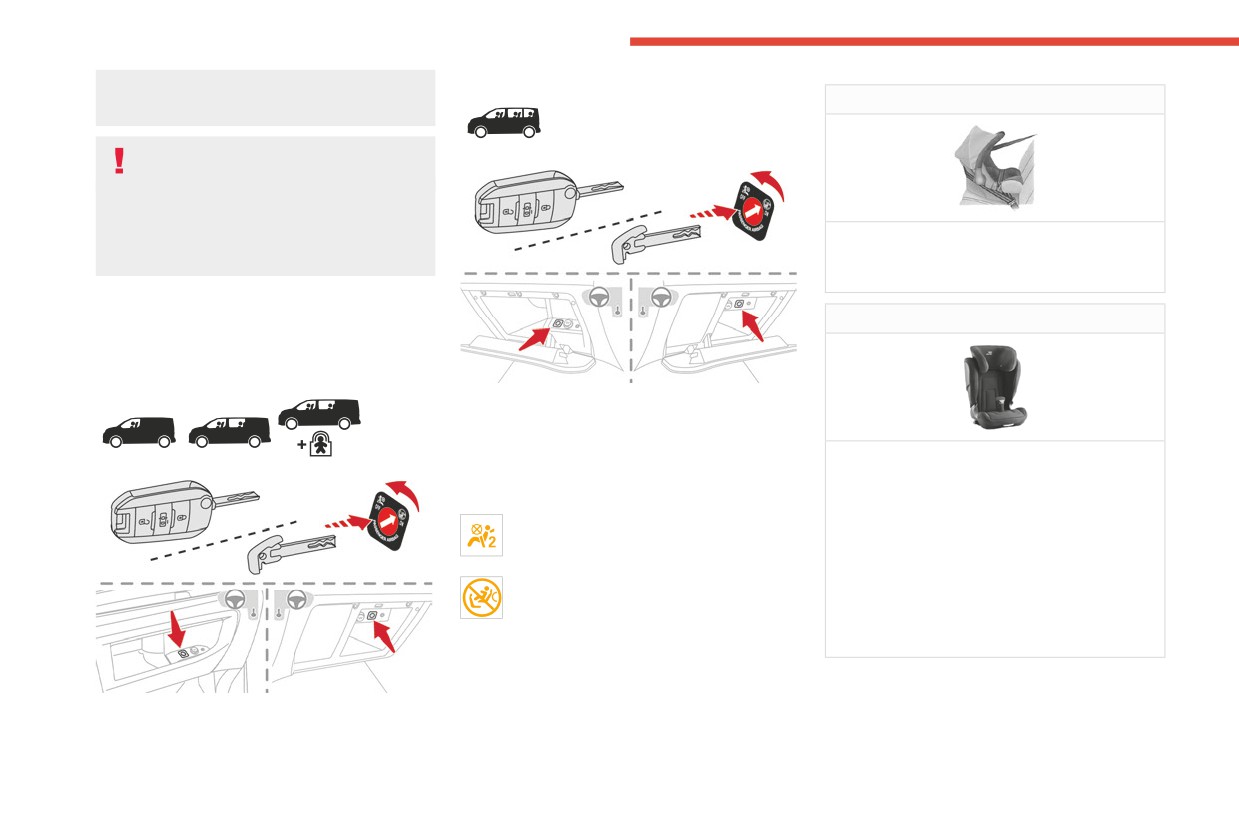
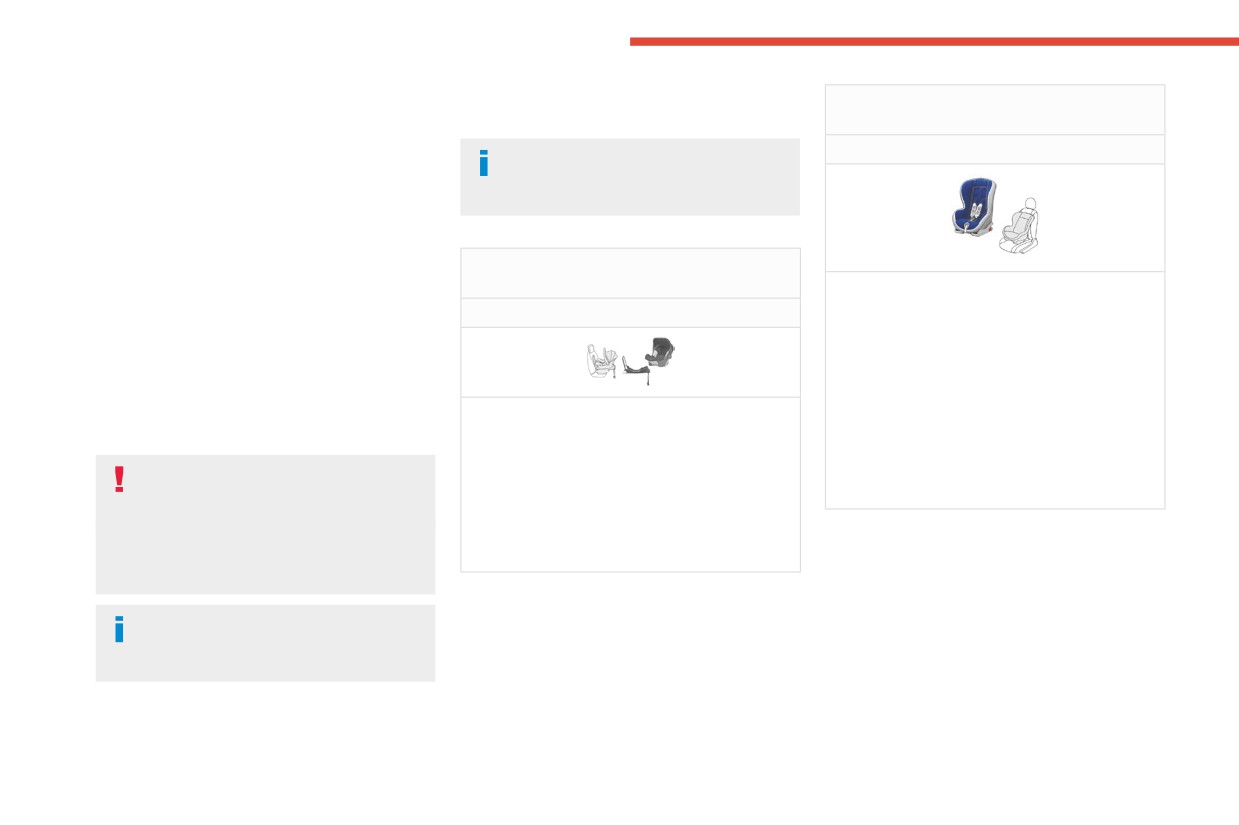
Group 0+: from birth to 13 kg
the airbag.
Vehicles not equipped with a
deactivation/reactivation control
Installing a "rearward facing" child seat on the
front passenger seat or bench seat is strictly
prohibited - risk of death or serious injury in
L1
the event of airbag deployment!
"RÖMER Baby-Safe"
Installed in the "rearward facing" position.
Deactivating/Reactivating the front
Groups 2 and 3: from 15 to 36 kg
passenger airbag
For vehicles on which it is fitted, the switch is
located inside the glove box.
With the ignition off:
► To deactivate the airbag, turn the key in the
switch to the "OFF" position.
L5
► To reactivate it, turn the key to the "ON"
"RÖMER KIDFIX 2R"
position.
Can be fitted to the vehicle's ISOFIX
When the ignition is switched on:
mountings.
This warning lamp comes on and remains
The child is restrained by the seat belt.
lit to signal deactivation.
A version with a removable backrest may be
Or
used for children weighing more than 25 kg.
This warning lamp comes on for about
However, for better protection, use a booster
1 minute to signal activation.
seat with backrest for all children weighing up
Recommended child seats
to 36 kg.
Range of child seats secured using a three-
point seat belt.
112
CarManuals2.co
Safety
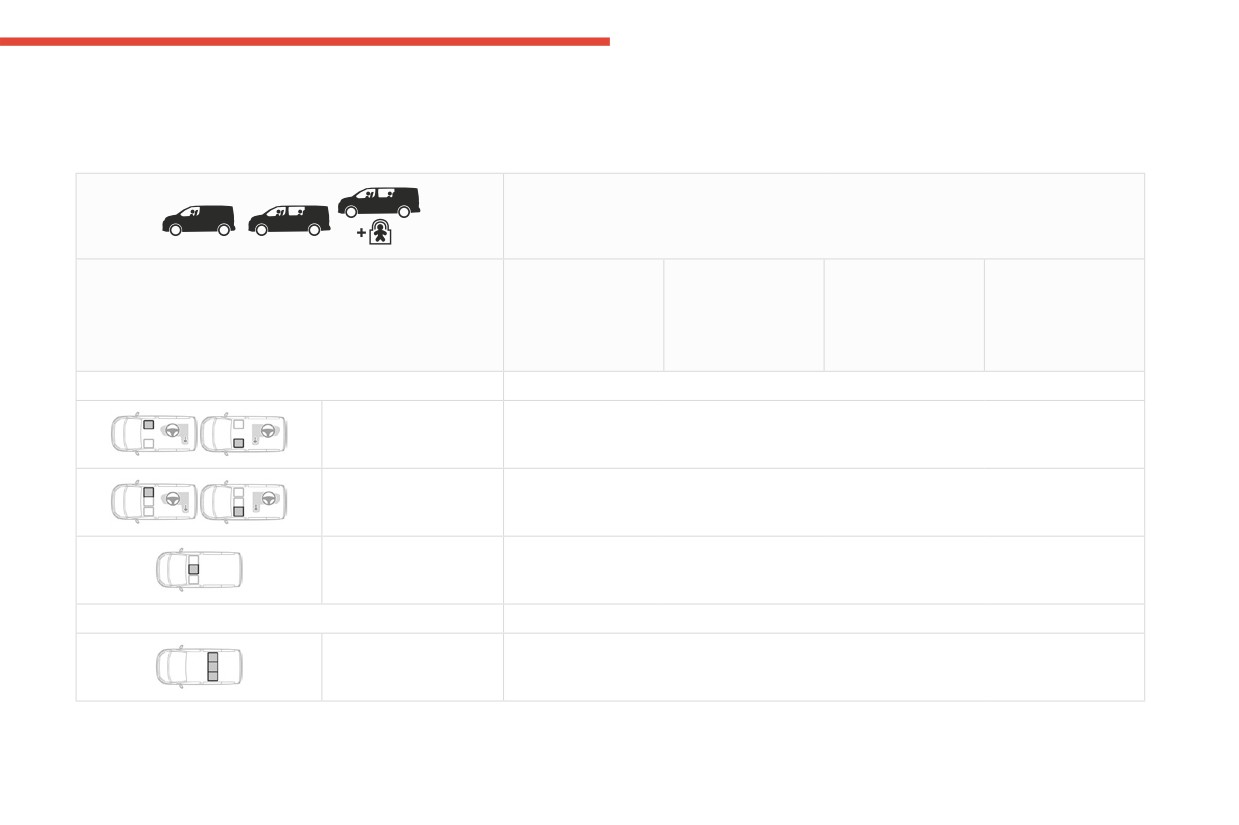
Locations for child seats secured using the seat belt
5
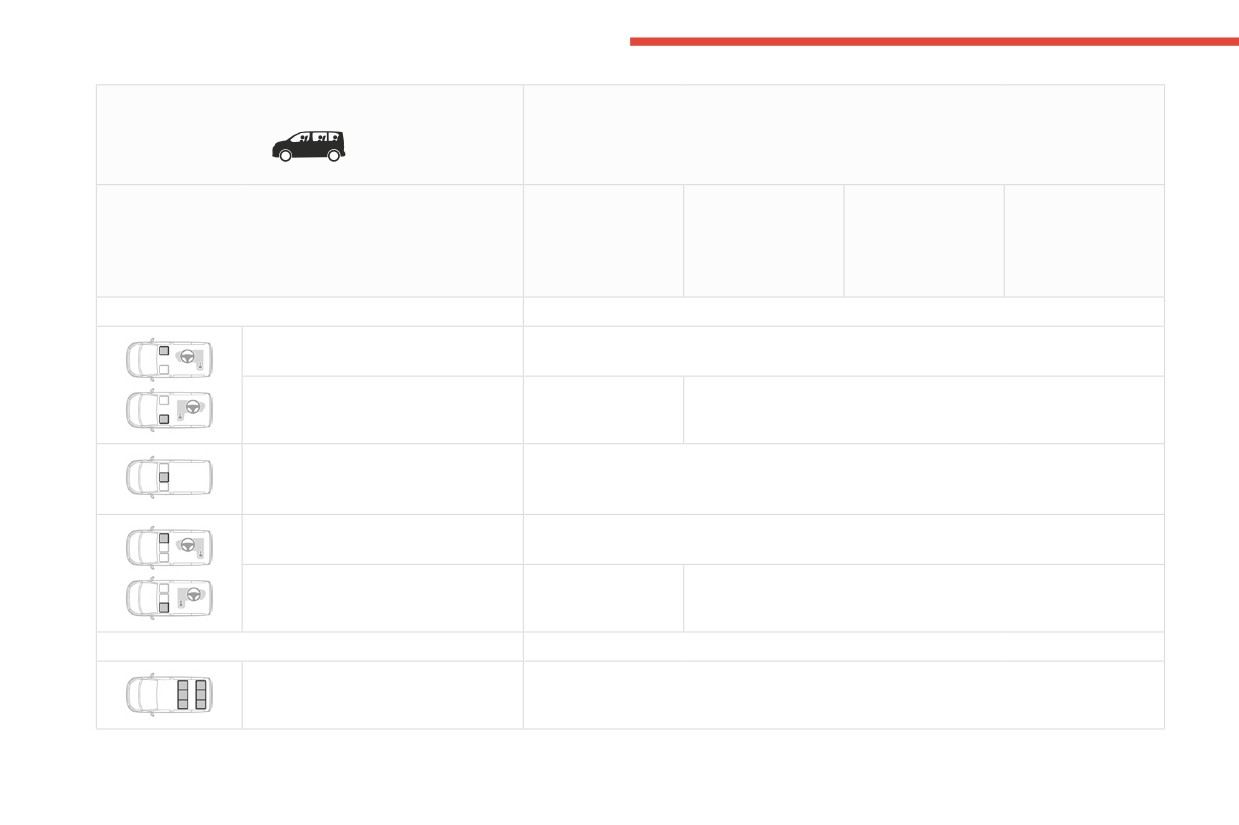
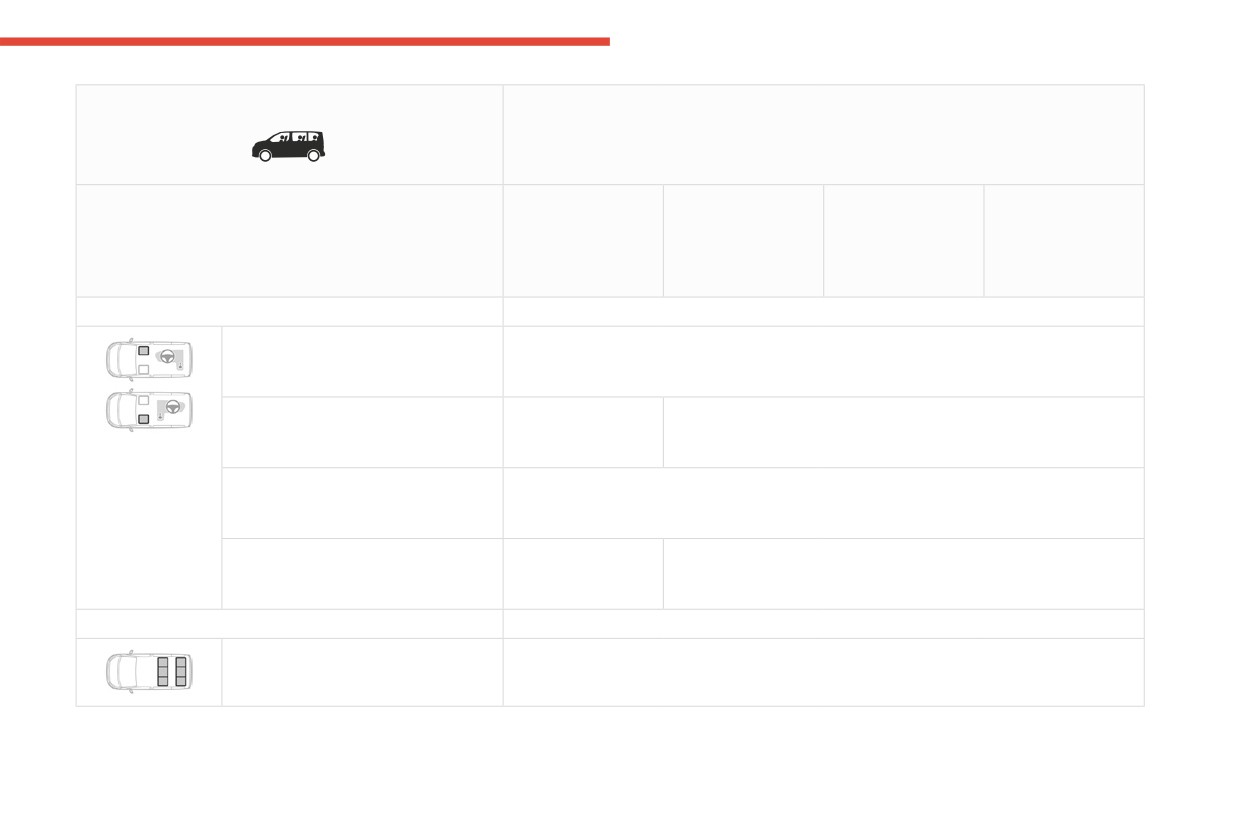
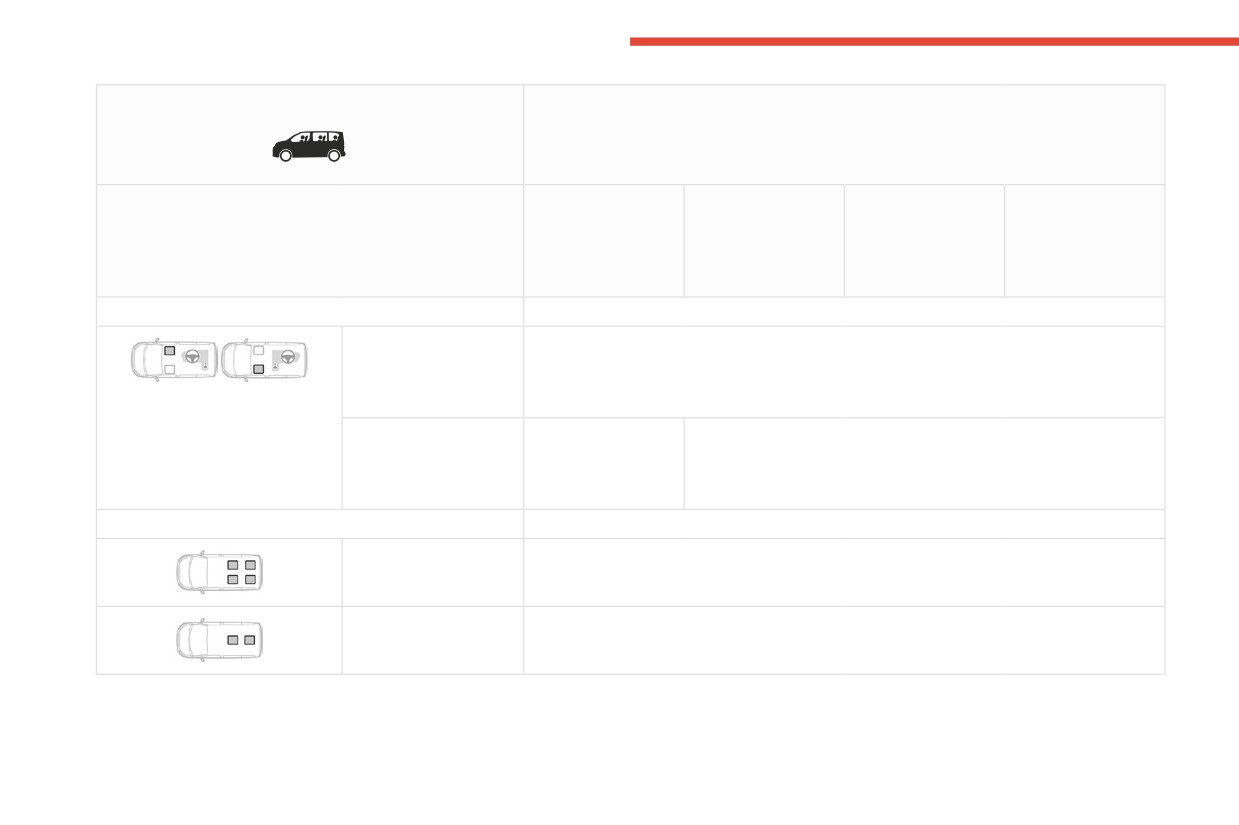
In accordance with European regulations, the table indicates the options for installing child seats secured using a seat belt and universally approved (a)
according to the weight of the child and the seating position in the vehicle.
Weight of the child/indicative age
Seats
Under 13 kg
From 9 to 18 kg
From 15 to 25 kg
From 22 to 36 kg
(groups 0 (b) and
(group 1)
(group 2)
(group 3)
0+)
From about 1 to 3
From about 3 to 6
From about 6 to 10
Up to about 1 year
years old
years old
years old
old
Cab/Row 1 (c) (f)
Individual seat,
U
passenger seat
Bench seat, outer seat
U
Bench seat, centre
X
seat
Row 2 (d) (Fixed and folding bench seat)
Rear seats
U
113
CarManuals2.co
Safety
Combi
Weight of the child/indicative age
Seats
Under 13 kg
From 9 to 18 kg
From 15 to 25 kg
From 22 to 36 kg
(groups 0 (b) and
(group 1)
(group 2)
(group 3)
0+)
From about 1 to 3
From about 3 to 6
From about 6 to 10
Up to about 1 year
years old
years old
years old
old
Row 1 (c)
Individual seat, passenger seat with
UF
passenger airbag deactivated "OFF"
Individual seat, passenger seat with
X
UF
passenger airbag activated "ON"
Bench seat, centre seat with
X
passenger airbag deactivated "OFF"
or activated "ON"
Bench seat, outer seat with
UF
passenger airbag deactivated "OFF"
Bench seat, outer seat with
X
UF
passenger airbag activated "ON"
Row 2 and 3
Rear seats
U
114
CarManuals2.co
Safety
Business, Feel
Weight of the child/indicative age
5
Seats
Under 13 kg
From 9 to 18 kg
From 15 to 25 kg
From 22 to 36 kg
(groups 0 (b) and
(group 1)
(group 2)
(group 3)
0+)
From about 1 to 3
From about 3 to 6
From about 6 to 10
Up to about 1 year
years old
years old
years old
old
Row 1 (c)
Passenger seat (electric
UF
adjustments) with passenger airbag
deactivated "OFF"
Passenger seat (electric
X
U
adjustments) with passenger airbag
activated "ON"
Passenger seat (without height
UF
adjustment) with passenger airbag
deactivated "OFF"
Passenger seat (without height
X
U
adjustment) with passenger airbag
activated "ON"
Row 2 (d) and 3 (d)
Rear seats
U
115
CarManuals2.co
Safety
Shine, Business Lounge
Weight of the child/indicative age
Seats
Under 13 kg
From 9 to 18 kg
From 15 to 25 kg
From 22 to 36 kg
(groups 0 (b) and
(group 1)
(group 2)
(group 3)
0+)
From about 1 to 3
From about 3 to 6
From about 6 to 10
Up to about 1 year
years old
years old
years old
old
Row 1 (c)
Passenger seat
UF
(electric adjustments)
with passenger airbag
deactivated "OFF"
Passenger seat
X
U
(electric adjustments)
with passenger airbag
activated "ON"
Row 2 (d) and 3 (d)
Outer seats
UF
Centre seat (e)
UF
116
CarManuals2.co
Safety
U: Seat position suitable for the installation of
(f) When a "rearward facing" child seat is
Shine, Business Lounge
5
a child seat secured using the seat belt and
installed on the front passenger seat, the
universally approved for "rearward facing"
front passenger airbag must be deactivated.
and/or "forward facing" use.
Otherwise, the child risks being severely
injured or killed if the airbag is deployed.
UF: Seat position suitable for the installation a
child seat secured using the seat belt and
universally approved for "forward facing"
"ISOFIX" mountings and
use.
i-Size
X: Seat position not suitable for the installation
of a child seat for the specified weight group.
(a)
Universal child seat: child seat that can be
installed in all vehicles using the seat belt.
(b)
Group 0: from birth to 10 kg. Carrycots and
The vehicle has been approved in accordance
"car" infant carriers cannot be installed on
with the latest ISOFIX and i-Size regulations.
the front passenger seat(s) or the seats in
If fitted to the vehicle, approved ISOFIX and
row 3.
i-Size fixings can be identified by the labels
(c)
Refer to the current legislation in the country
attached to them.
in which you are driving before placing a
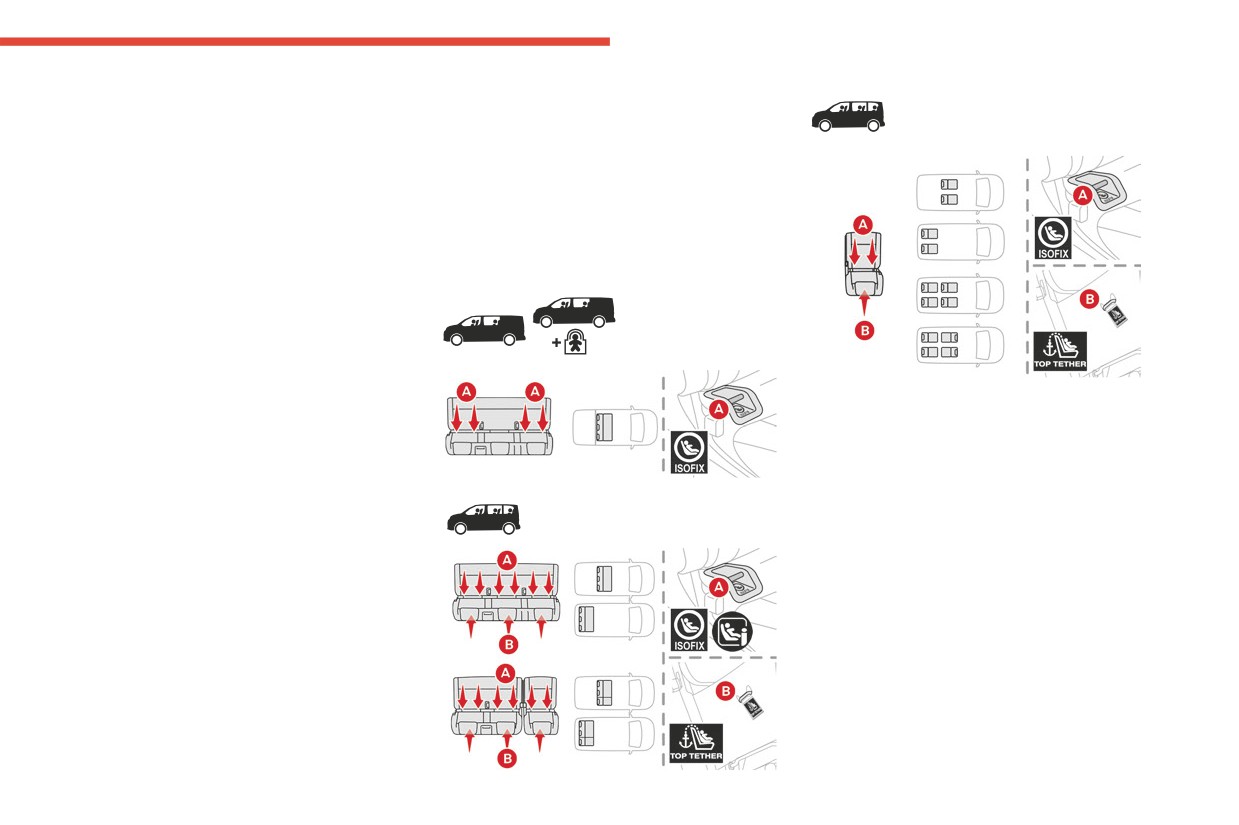
There are three rings for each seat:
Combi, Business, Feel
child in this seat position.
- Two front rings A, located between the vehicle
seat backrest and cushion, indicated by an
(d)
To install a "rearward facing" or "forward
"ISOFIX" or "i-Size" marking,
facing" child seat on a rear seat, move the
- If fitted to your vehicle, a rear ring B, called a
seats in front of it forward, then straighten
Top Tether, is located behind the vehicle's seat
their backrests to allow sufficient room for
and is used to secure the upper strap and is
the child seat and the child's legs.
indicated by a "Top Tether" marking.
(e)
The seat can be installed centrally in the
The Top Tether secures the upper strap of child
vehicle; it then prevents the use of the outer
seats fitted with them. In case of frontal impact,
seats.
this device limits the extent to which the child
seat can tilt forward.
117
CarManuals2.co
Safety
This ISOFIX and i-Size mounting system
Recommended ISOFIX child
"RÖMER Duo Plus ISOFIX"
provides fast, reliable and safe fitting of a child
seats
(size category: B1)
seat inside the vehicle.
ISOFIX and i-Size child seats are fitted with two
Group 1: from 9 to 18 kg
Also consult the user guide from the child
latches which are secured to the two front rings
seat’s manufacturer to find out how to
A.
install and remove the seat.
Some child seats also have an upper strap which
is attached to rear ring B.
To secure the child seat to the Top Tether:
"RÖMER Baby-Safe and its ISOFIX base"
- remove and stow the head restraint before
(size category: E)
Suitable for forward-facing installation only.
installing a child seat on this seat (refit it once
Group 0+: from birth to 13 kg
Attached to rings A and ring B, referred to as
the child seat has been removed),
TOP TETHER, using an upper strap.
- pass the strap of the child seat over the top
Three seat body angles: sitting, reclining,
of the seat backrest, centring it between the
lying down.
openings for the head restraint rods,
This child seat can also be used in seat
- attach the hook of the upper strap to rear ring
Installed "rearward facing" using an ISOFIX
positions not equipped with ISOFIX
B,
base which is attached to rings A.
mountings. In this case, it must be secured to
- tighten the upper strap.
The base has a support leg, height-
the vehicle's seat by the three-point seat belt.
Incorrect installation of a child seat in a
adjustable, which rests on the vehicle's floor.
Adjust the front seat of the vehicle so that the
vehicle can compromise a child's safety
This child seat can also be secured with a
child's feet do not touch the backrest.
in the event of an accident.
seat belt. In this case, only the shell is used
Strictly follow the fitting instructions provided
and attached to the vehicle seat using the
in the installation guide supplied with the child
three-point seat belt.
seat.
For information on the various options for
installing ISOFIX child seats in your
vehicle, refer to the summary table.
118
CarManuals2.co
Safety
Locations for ISOFIX child seats
5
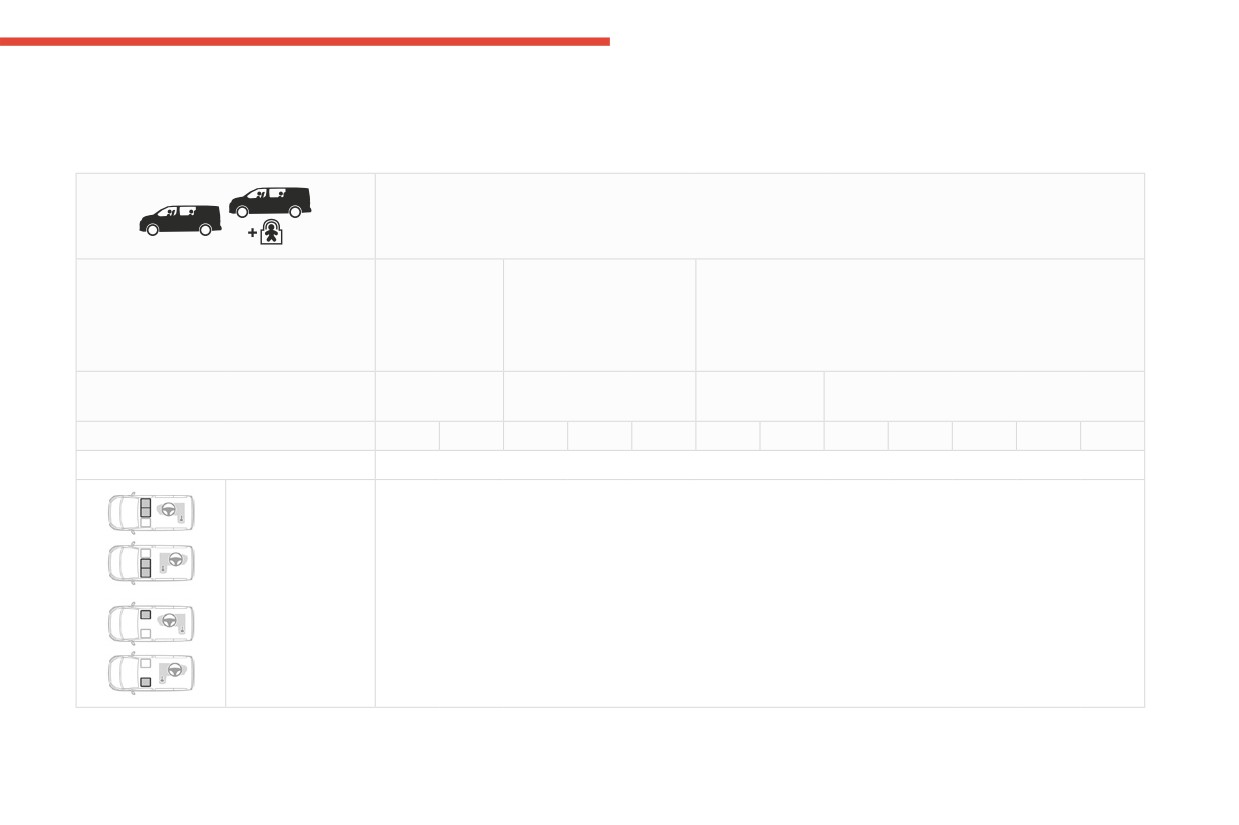
In accordance with European regulations, this table indicates the options for installing ISOFIX child seats on vehicle seats fitted with ISOFIX mountings.
In the case of universal and semi-universal ISOFIX child seats, the ISOFIX size category, determined by a letter from A to G, is indicated on the child seat
next to the ISOFIX logo.
Weight of the child/indicative age
Under 10 kg
Under 10 kg
From 9 to 18 kg (group 1)
(group 0)
(group 0)
From about 1 to 3 years old
Up to about 6
Under 13 kg
months old
(group 0+)
Up to about 1 year old
Type of ISOFIX child seat
Carrycot (1)
rearward facing
rearward
forward facing
facing
F
G
C
D
E
C
D
A
B
B1
B2
B3
ISOFIX size category
Individual
Not ISOFIX
passenger seat or
2-seat bench seat
with passenger
airbag deactivated
"OFF" or activated
"ON"
119
CarManuals2.co
Safety
Weight of the child/indicative age
Under 10 kg
Under 10 kg
From 9 to 18 kg (group 1)
(group 0)
(group 0)
From about 1 to 3 years old
Up to about 6
Under 13 kg
months old
(group 0+)
Up to about 1 year old
Type of ISOFIX child seat
Carrycot (1)
rearward facing
rearward
forward facing
facing
F
G
C
D
E
C
D
A
B
B1
B2
B3
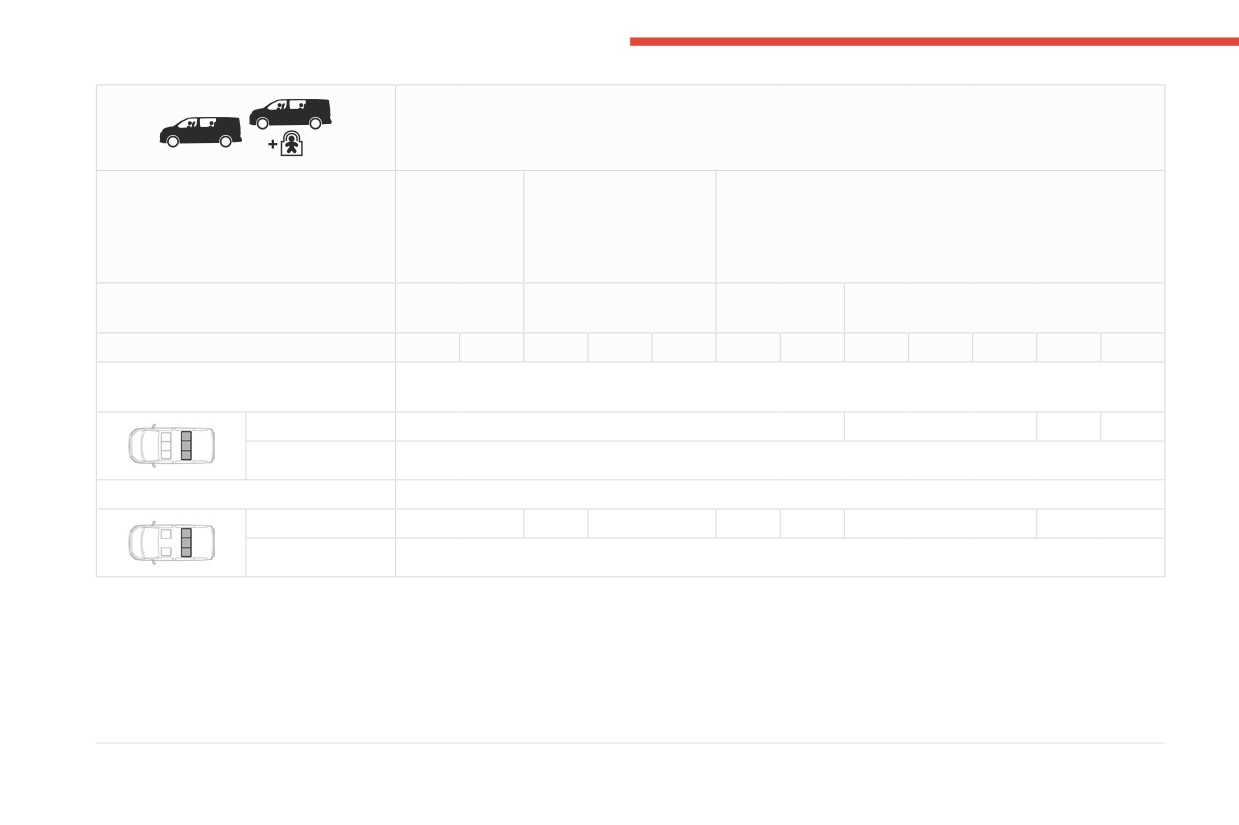
Row 2 with 2-seat bench seat in row
1
Outer seats
X
IUF
IUF*
X
Centre seat
Not ISOFIX
Row 2 with individual seats in row 1
Outer seats
IL
IL (6)
IL
IL (6)
IL
IUF
X
Centre seat
Not ISOFIX
* Fixed bench seat only
120
CarManuals2.co
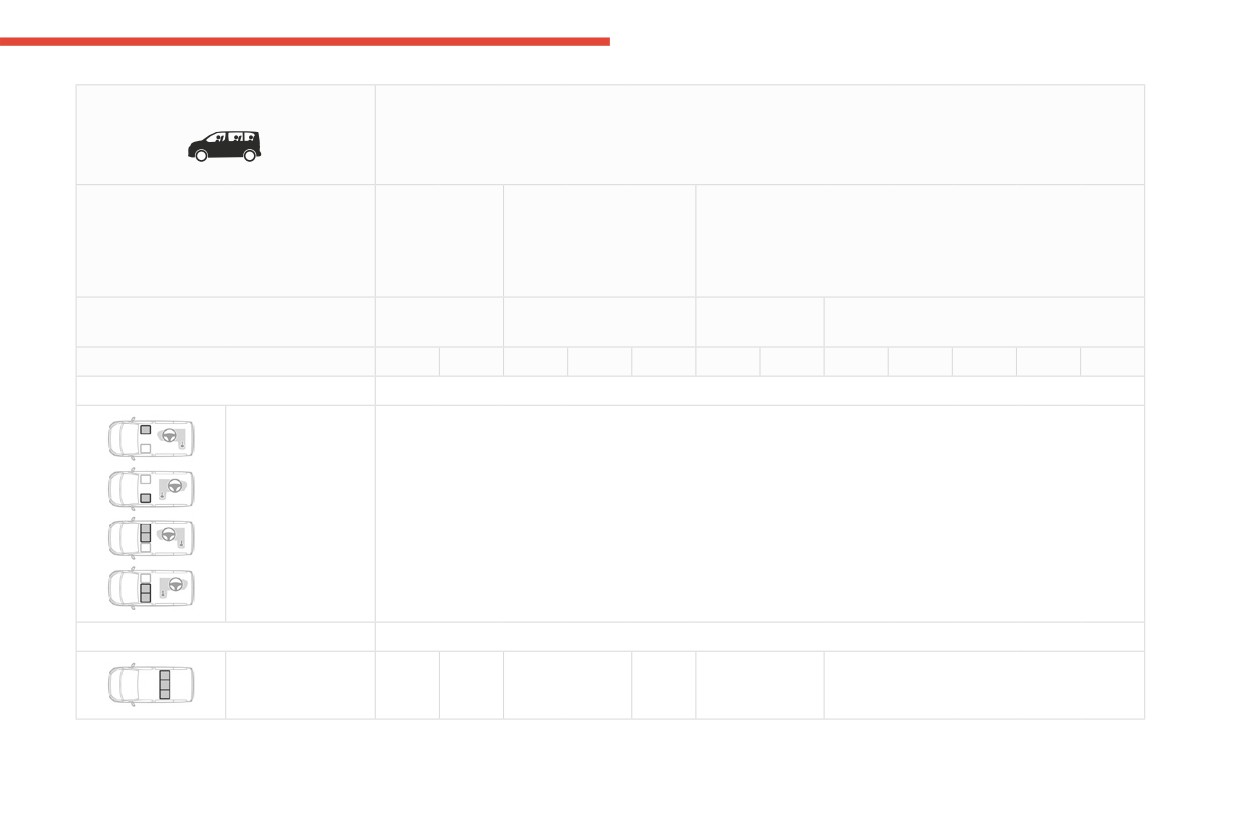
Safety
Combi
Weight of the child/indicative age
5
Under 10 kg
Under 10 kg
From 9 to 18 kg (group 1)
(group 0)
(group 0)
From about 1 to 3 years old
Up to about 6
Under 13 kg
months old
(group 0+)
Up to about 1 year old
Type of ISOFIX child seat
Carrycot (1)
rearward facing
rearward
forward facing
facing
ISOFIX size category
F
G
C
D
E
C
D
A
B
B1
B2
B3
Row 1 (a)
Individual
Not ISOFIX
passenger seat or
2-seat bench seat
with passenger
airbag deactivated
"OFF" or activated
"ON"
Row 2
Outer seats and
X
IL (3)
IL (2)
IL
IL (2)
IUF, IL
centre seat (b)
121
CarManuals2.co
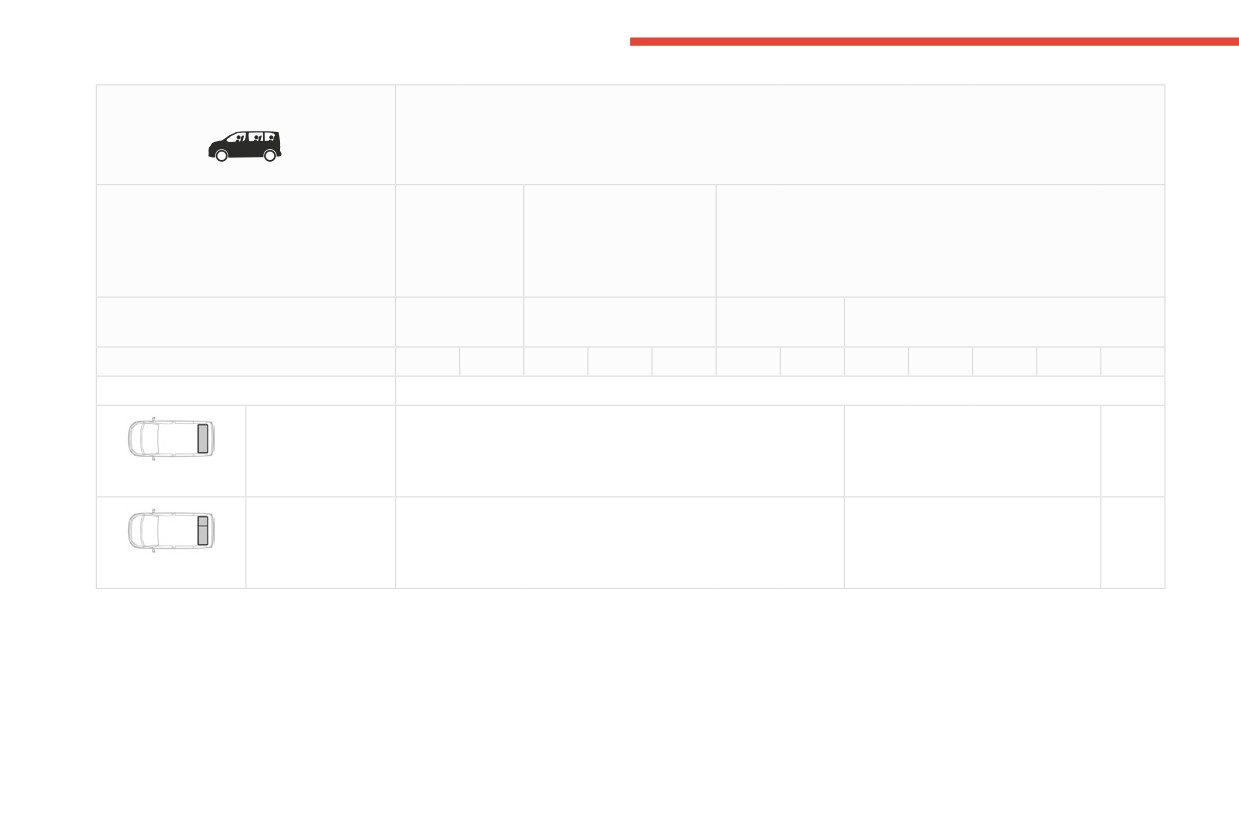
Safety
Combi
Weight of the child/indicative age
Under 10 kg
Under 10 kg
From 9 to 18 kg (group 1)
(group 0)
(group 0)
From about 1 to 3 years old
Up to about 6
Under 13 kg
months old
(group 0+)
Up to about 1 year old
Type of ISOFIX child seat
Carrycot (1)
rearward facing
rearward
forward facing
facing
ISOFIX size category
F
G
C
D
E
C
D
A
B
B1
B2
B3
Row 3
Fixed one-piece
X
IUF, IL
X
bench seat, outer
seats and centre
seat (b)
Seat and fixed
X
IUF, IL
X
rear bench seat,
outer seats and
centre seat (b)
122
CarManuals2.co
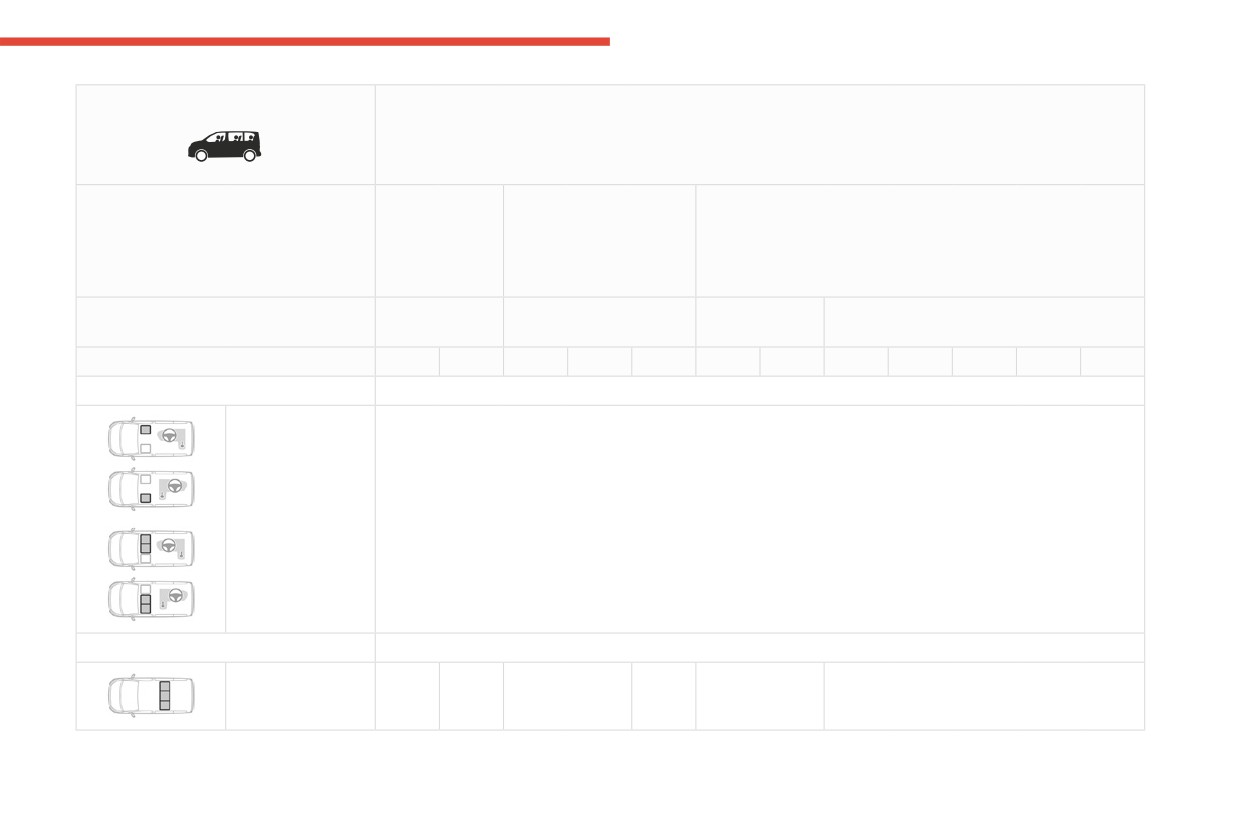
Safety
Business
Weight of the child/indicative age
5
Under 10 kg
Under 10 kg
From 9 to 18 kg (group 1)
(group 0)
(group 0)
From about 1 to 3 years old
Up to about 6
Under 13 kg
months old
(group 0+)
Up to about 1 year old
Type of ISOFIX child seat
Carrycot (1)
rearward facing
rearward
forward facing
facing
ISOFIX size category
F
G
C
D
E
C
D
A
B
B1
B2
B3
Row 1 (a)
Individual
Not ISOFIX
passenger seat or
2-seat bench seat
with passenger
airbag deactivated
"OFF" or activated
"ON"
Row 2
Rear seats
X
IL
IL (2)
IL
IL (2)
IUF, IL
(1-3)
123
CarManuals2.co
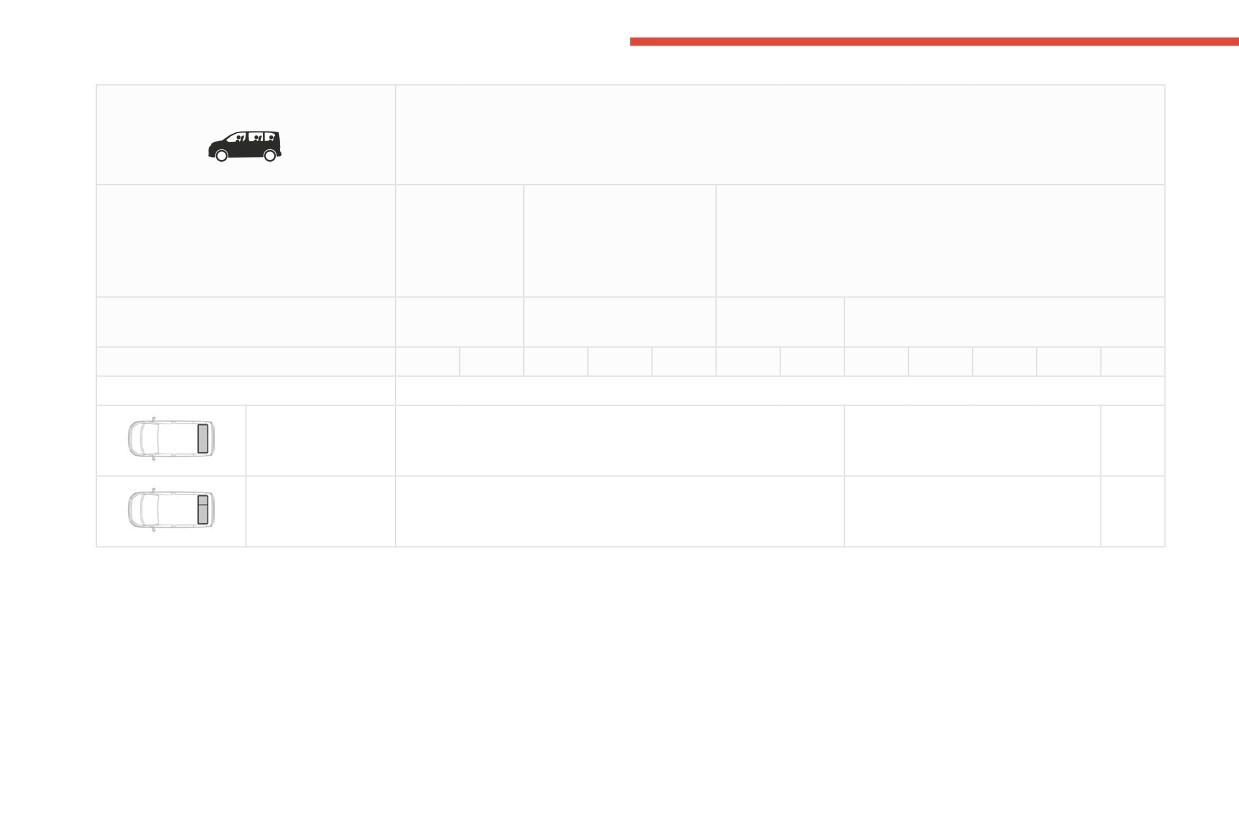
Safety
Business
Weight of the child/indicative age
Under 10 kg
Under 10 kg
From 9 to 18 kg (group 1)
(group 0)
(group 0)
From about 1 to 3 years old
Up to about 6
Under 13 kg
months old
(group 0+)
Up to about 1 year old
Type of ISOFIX child seat
Carrycot (1)
rearward facing
rearward
forward facing
facing
ISOFIX size category
F
G
C
D
E
C
D
A
B
B1
B2
B3
Row 3
Fixed one-piece
X
IUF, IL
X
bench seat, rear
seats
Seat and fixed
X
IUF, IL
X
rear bench seat,
rear seats
124
CarManuals2.co
Safety
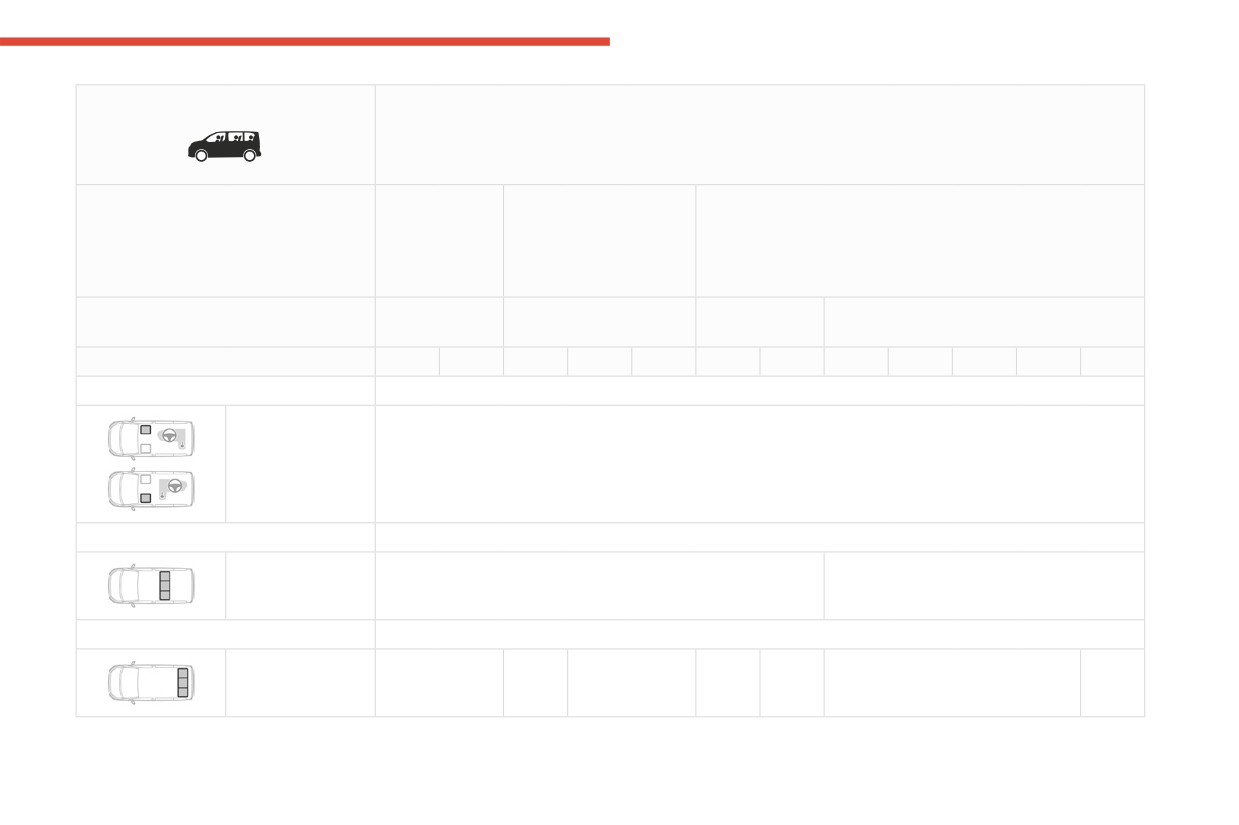
Feel
Weight of the child/indicative age
5
Under 10 kg
Under 10 kg
From 9 to 18 kg (group 1)
(group 0)
(group 0)
From about 1 to 3 years old
Up to about 6
Under 13 kg
months old
(group 0+)
Up to about 1 year old
Type of ISOFIX child seat
Carrycot (1)
rearward facing
rearward
forward facing
facing
ISOFIX size category
F
G
C
D
E
C
D
A
B
B1
B2
B3
Row 1 (a)
Passenger seat
Not ISOFIX
with passenger
airbag deactivated
"OFF" or activated
"ON"
Row 2
Rear seats
IL
IUF, IL
Row 3
Rear seats
IL (1-4)
X
IL (4)
X
IL (4)
IUF, IL
X
125
CarManuals2.co
Safety
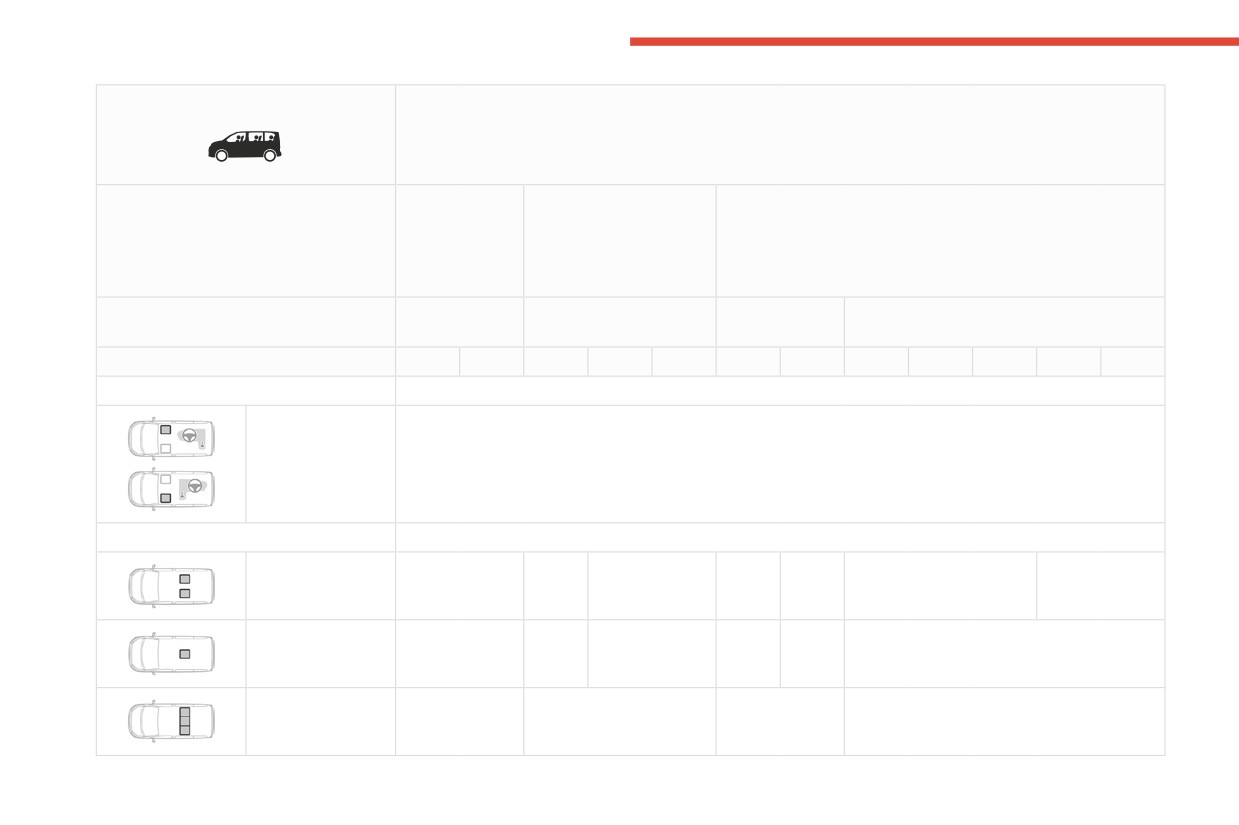
Shine, Business Lounge
Weight of the child/indicative age
Under 10 kg
Under 10 kg
From 9 to 18 kg (group 1)
(group 0)
(group 0)
From about 1 to 3 years old
Up to about 6
Under 13 kg
months old
(group 0+)
Up to about 1 year old
Type of ISOFIX child seat
Carrycot (1)
rearward facing
rearward
forward facing
facing
ISOFIX size category
F
G
C
D
E
C
D
A
B
B1
B2
B3
Row 1 (a)
Passenger seat
Not ISOFIX
with passenger
airbag deactivated
"OFF" or activated
"ON"
Row 2
Seat behind driver
X
IL (5)
IL
IL (5)
IL
IUF, IL
IUF, IL
or front passenger
Centre seat (b)
X
IL (5)
IL
IL (5)
IL
IUF, IL
Rear seats
IL (1-5)
IL
IL
IUF, IL
126
CarManuals2.co
Safety
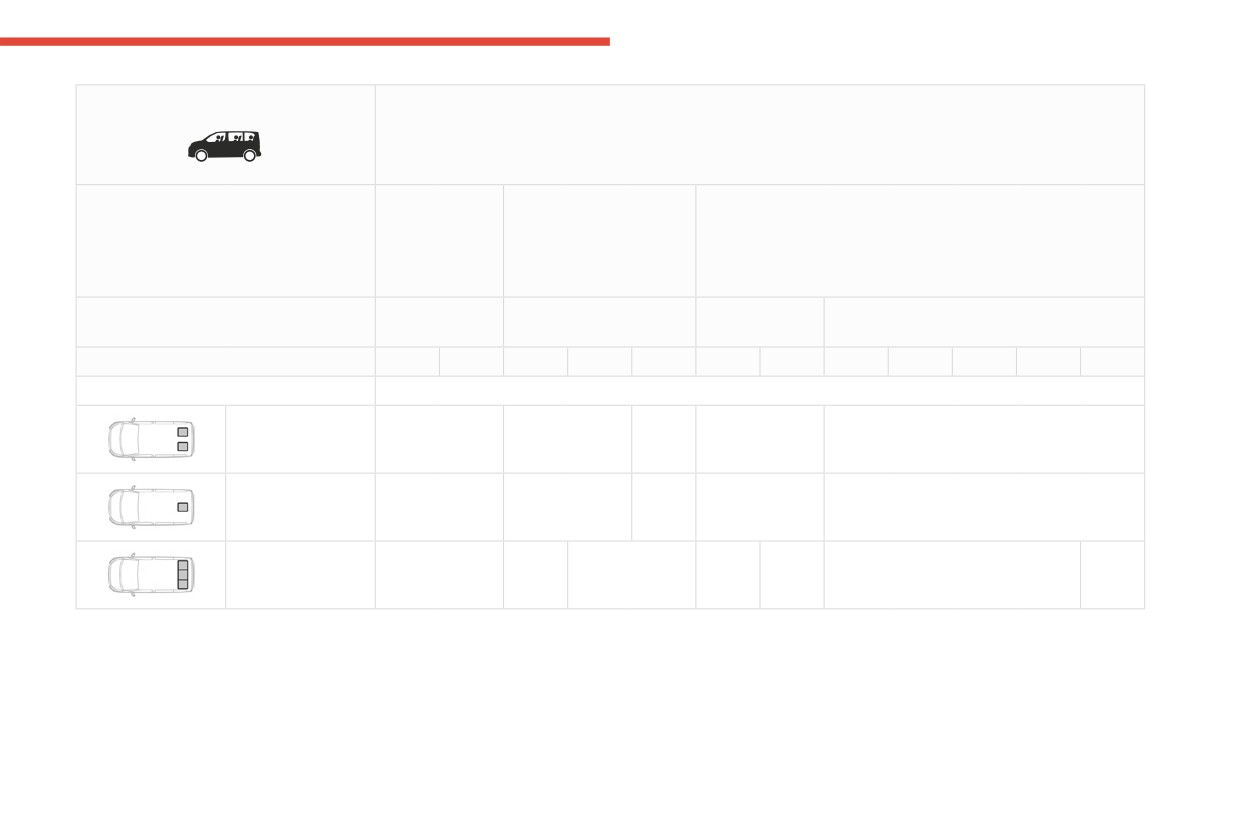
Shine, Business Lounge
Weight of the child/indicative age
5
Under 10 kg
Under 10 kg
From 9 to 18 kg (group 1)
(group 0)
(group 0)
From about 1 to 3 years old
Up to about 6
Under 13 kg
months old
(group 0+)
Up to about 1 year old
Type of ISOFIX child seat
Carrycot (1)
rearward facing
rearward
forward facing
facing
ISOFIX size category
F
G
C
D
E
C
D
A
B
B1
B2
B3
Row 3
Outer seats
X
IL (4)
IL
IL (4)
IUF, IL
Centre seat (b)
X
IL (4)
IL
IL (4)
IUF, IL
Rear seats
IL (1-4)
X
IL (4)
X
IL (4)
IUF, IL
X
127
CarManuals2.co
Safety
(a) Refer to the current legislation in the country
(3)
Installation possible only behind the driver's
IUF: Seat position suitable for the installation of
in which you are driving before placing a
seat with individual passenger seat.
an Isofix Universal seat, "Forward facing",
child in this seat position.
(4)
The seat in row 2 must be adjusted so that
secured using the upper strap.
(b) The seat can be installed centrally in the
there is no contact between the child in row
IL: Seat position suitable for the installation
vehicle; it then prevents the use of the outer
3 and the seat immediately in front.
of an Isofix Semi-UniversaL seat which is
seats.
(5)
The front seat must be adjusted so that
either:
there is no contact between the child in row
- "rearward facing" fitted with an upper
For information on securing the upper
2 and the seat immediately in front.
strap or a support leg,
strap using the ISOFIX mountings, refer
- "forward facing" fitted with a support leg,
to the corresponding section.
(6)
The front seat must be adjusted so that
- a carrycot fitted with an upper strap or a
there is no contact between the child in row
support leg.
(1) Installing a carrycot on this seat may
2 and the seat immediately in front (with the
prevent the use of one or more of the other
front seat adjusted to 2 notches ahead of
X: Seat position not suitable for the installation
seats in this row.
the centre of the slide).
of an ISOFIX child seat or carrycot for the
specified weight group.
(2) Installation possible only behind the driver's
seat.
i-Size child seats
i-Size child seats have two latches that are anchored to the two rings A.
These i-Size child seats also have:
- either an upper strap that is attached to ring B.
- or a support leg that rests on the vehicle floor, compatible with the approved i-Size seat position.
Their role is to prevent the child seat from tipping forward in the event of a collision.
For more information on the ISOFIX mountings, refer to the corresponding section.
Locations for i-Size child seats
In accordance with the new European regulations, this table indicates the options for installing i-Size child seats on seats in the vehicle fitted with i-Size
approved ISOFIX mountings.
128
CarManuals2.co
Safety
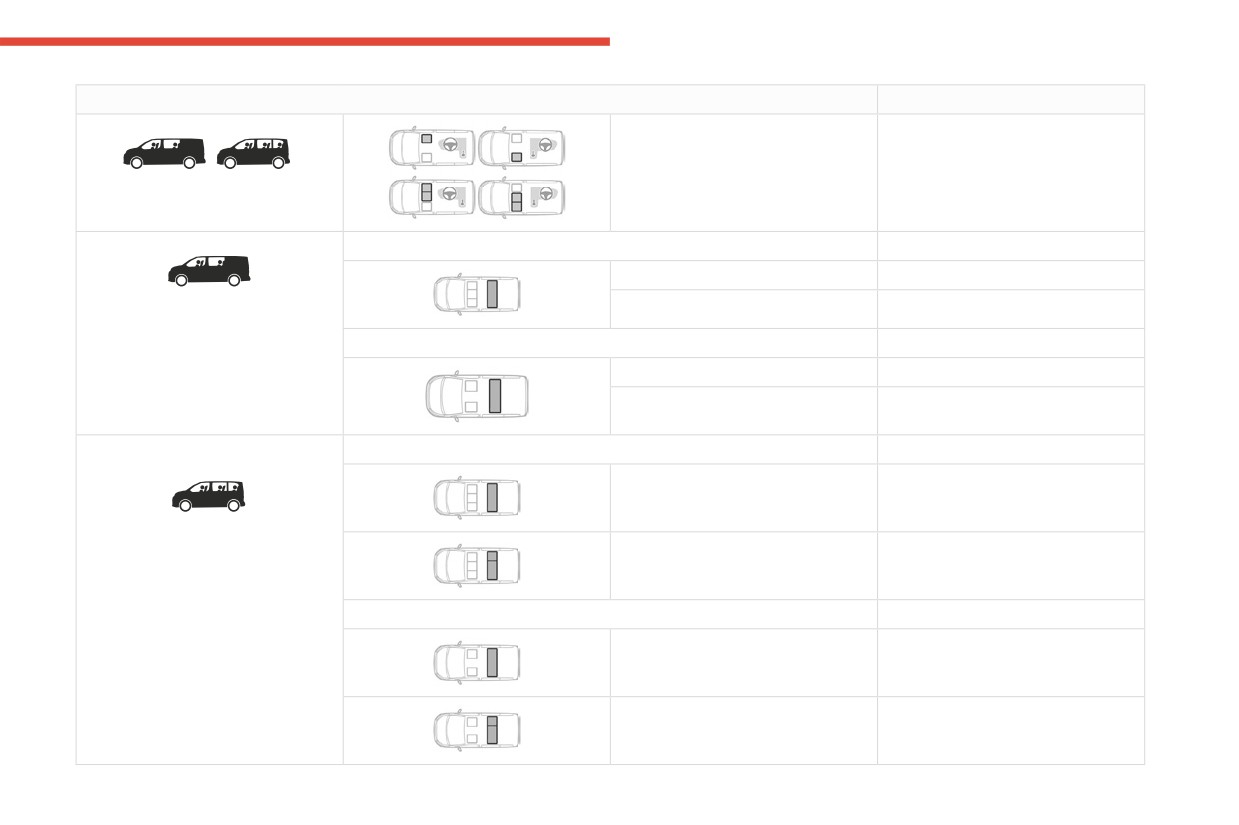
Seat
i-Size restraint system
5
Passenger seat with passenger
Not i-Size
airbag deactivated "OFF" or
activated "ON"
Row 1 (a)
With 2-seat bench seat in row 1
Outer seats
Not i-Size
Centre seat
Not i-Size
Row 2
With individual seats in row 1
Outer seats
Not i-Size
Centre seat
Not i-Size
Combi, Business, Feel
With 2-seat bench seat in row 1
Fixed one-piece bench seat, outer
i-UF
seats and centre seat (b)
Row 2
Seat and bench seat, outer seats
i-UF
and centre seat (b)
With individual seats in row 1
Fixed one-piece bench seat, outer
i-U
seats and centre seat (b)
Seat and bench seat, outer seats
i-U
and centre seat (b)
129
CarManuals2.co
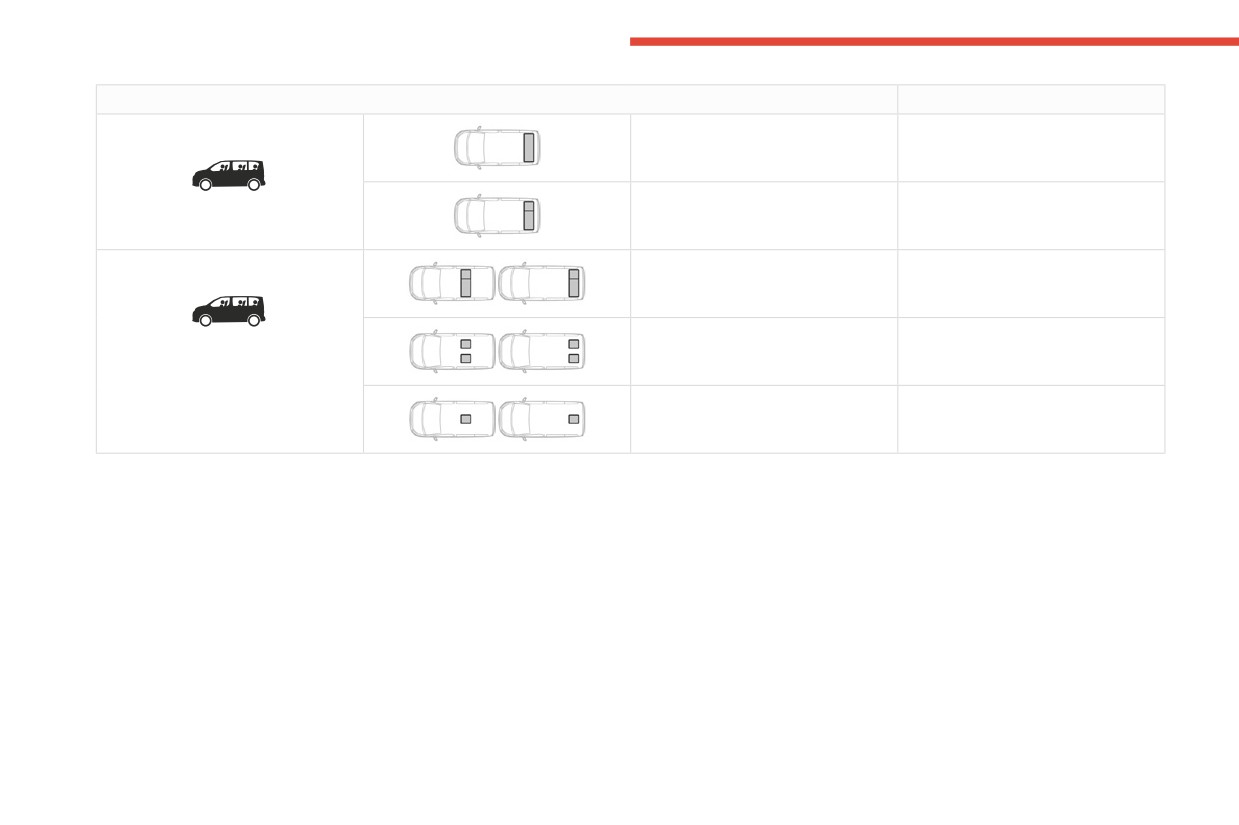
Safety
Seat
i-Size restraint system
Combi, Business, Feel
Fixed one-piece bench seat, outer
i-U (c)
seats and centre seat (b)
Seat and bench seat, outer seats
i-U (c)
Row 3
and centre seat (b)
Shine, Business Lounge
Rear seats with seat and bench
i-U (c)
seat
Rear seats with 2 individual seats
i-UF (c, d)
Row 2 and 3
(Excluding group 0)
Rear seats with 1 individual seat
i-UF (c, d)
(Excluding group 0)
i-U: Suitable for forward facing and rearward facing "Universal" i-Size restraint systems.
i-UF: Only suitable for forward facing "Universal" i-Size restraint systems.
(a) Refer to the current legislation in the country in which you are driving before placing a child in this seat position.
(b) The seat can be installed centrally in the vehicle; it then prevents the use of the outer seats.
(c) The seat in row 2 cannot be used when an i-Size child seat is installed immediately behind.
(d) Install an i-Size child restraint system only if seats are installed in forward direction.
130
CarManuals2.co
Safety
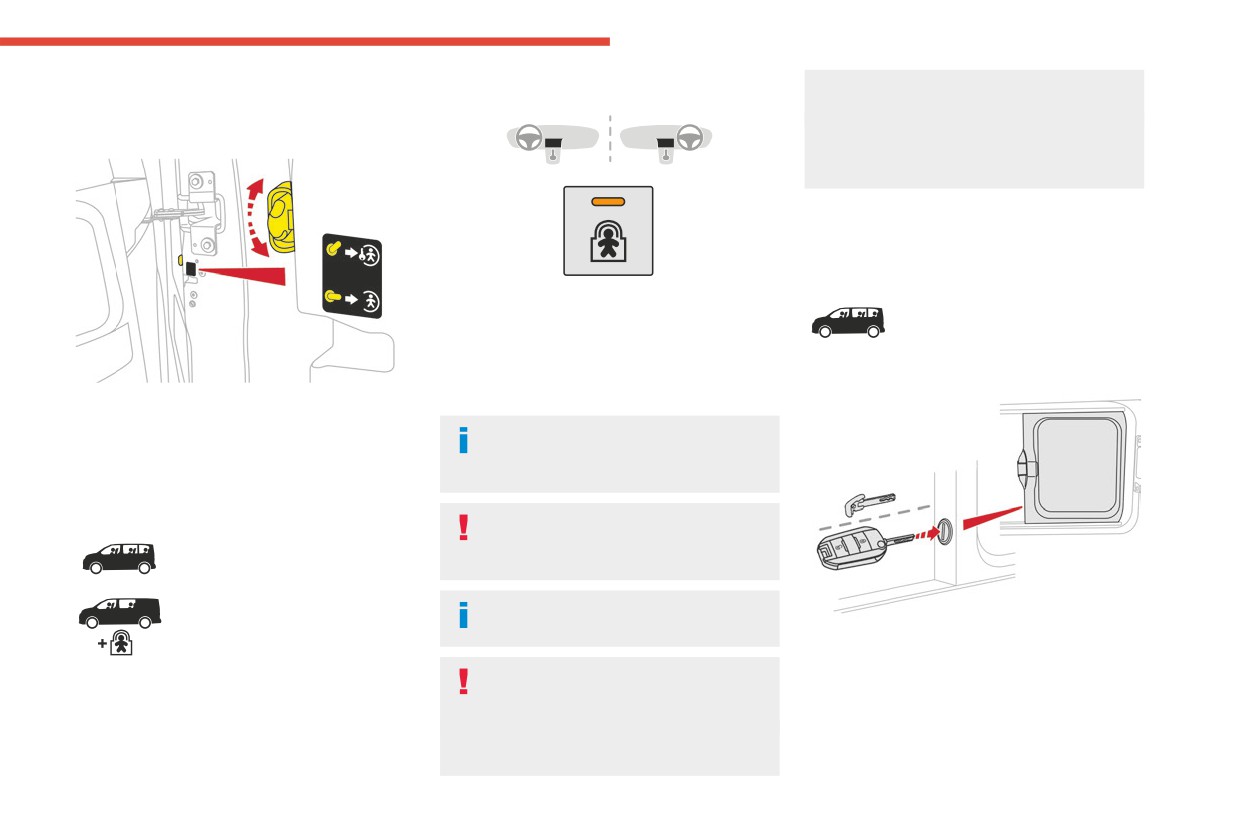
Manual child lock
Activation/Deactivation
Always keep the electronic key with you when
5
leaving the vehicle, even for a short time.
Mechanical system to prevent opening of the
In the event of a serious impact, the electric
sliding side door using its interior lever.
child lock is switched off automatically to
permit the exit of the rear passengers.
Child lock on rear
windows
► With the ignition on, press this button to
This mechanical system
activate/deactivate the child lock.
prevents opening of the left-
A message is displayed, confirming activation/
hand and/or right-hand rear side
deactivation of the child lock.
windows.
When the indicator lamp is on, the child lock is
Locking/Unlocking
activated.
► Rotate the control located on the edge of the
In the event of a serious impact, the
side door up to lock it, or down to unlock it.
electric child lock is deactivated
automatically.
Electric child lock
Any other status of the indicator lamp
Remote control system to
indicates a malfunction of the electric
prevent opening of the rear
child lock.
doors (sliding side door(s), side-
hinged rear doors or tailgate
With the child lock activated, it is still
(depending on version)) using
possible to open the doors from outside.
► The system is locked/unlocked using the
their interior controls.
remote control key or the back-up key for the
This control prevents the opening of the rear
This system is independent and in no
Keyless Entry and Start system.
doors using their interior handles and the use of
circumstances does it take the place of
the rear electric windows.
the central locking control.
Check the status of the child lock each time
you switch on the ignition.
131
CarManuals2.co
Driving
Be aware of the effect of side winds on the
Never drive on surfaces covered with
Driving recommendations
vehicle.
vegetation (e.g. tall grass,
► Observe the driving regulations and remain
Maintenance
accumulated dead leaves, crops, debris)
vigilant whatever the traffic conditions.
such as a field, a country lane overgrown
► Monitor your environment and keep your
Inflate to the minimum pressure indicated on the
with bushes or a grassy verge.
hands on the wheel to be able to react to
label, or even over-inflate by 0.2 to 0.3 bar for
This vegetation could come into contact with
anything that may happen any time.
long journeys.
the vehicle's exhaust system or other systems
► Drive smoothly, anticipate the need for
which are very hot. Risk of fire!
Important!
braking and maintain a longer safety distance,
especially in bad weather.
Never leave the engine running in a
Make sure you do not leave any item in
► Stop the vehicle before performing operations
closed space without sufficient
the passenger compartment which could
that require sustained attention (e.g. settings).
ventilation. Internal combustion engines emit
act like a magnifying glass under the effect of
► During long trips, take a break every 2 hours.
toxic exhaust gases such as carbon
the sun's rays and cause a fire. Risk of fire or
To ensure the durability of the vehicle and
monoxide. Danger of poisoning and death!
damage to interior surfaces!
for safety reasons, remember that certain
precautionary measures must be taken when
In very severe wintry conditions
Never leave the vehicle unattended,
driving the vehicle:
(temperature below -23°C), let the engine
with the engine running. If you have to
Manoeuvre cautiously, at low speed
run for 4 minutes before moving off, to ensure
leave your vehicle with the engine running,
Manoeuvre slowly.
the correct operation and durability of the
apply the parking brake and put the gearbox
Before turning, check that there are no obstacles
mechanical components of your vehicle
or drive selector into neutral or position N or P
at mid-height along the sides.
(engine and gearbox).
(depending on version).
Before reversing, check that there are no
obstacles, particularly at high level behind the
Never drive with the parking brake
Never leave children inside the vehicle
vehicle.
applied. Risk of overheating and
unsupervised.
Be aware of the external dimensions, if ladders
damaging the braking system!
are fitted.
On flooded roads
Drive the vehicle carefully
Never park the vehicle and never
We strongly advise against driving on flooded
Take corners gently.
leave the engine running on a
roads, as this could cause serious damage to the
Anticipate the need to brake as the stopping
flammable surface (e.g. dry grass, dead
engine or gearbox, as well as to your vehicle's
distance is increased, particularly on wet or icy
leaves).The vehicle exhaust system is very
electrical systems.
roads.
hot, even several minutes after the engine
stops. Risk of fire!
132
CarManuals2.co
Driving
Cooling the traction battery
If the outside temperature is high, let the
6
The cooling fan comes on during
engine idle for 1 to 2 minutes after the
charging to cool the on-board charger and the
vehicle comes to a stop, to help it to cool.
traction battery.
Before setting off
On the inside
Nose weight
During use, you may hear certain perfectly
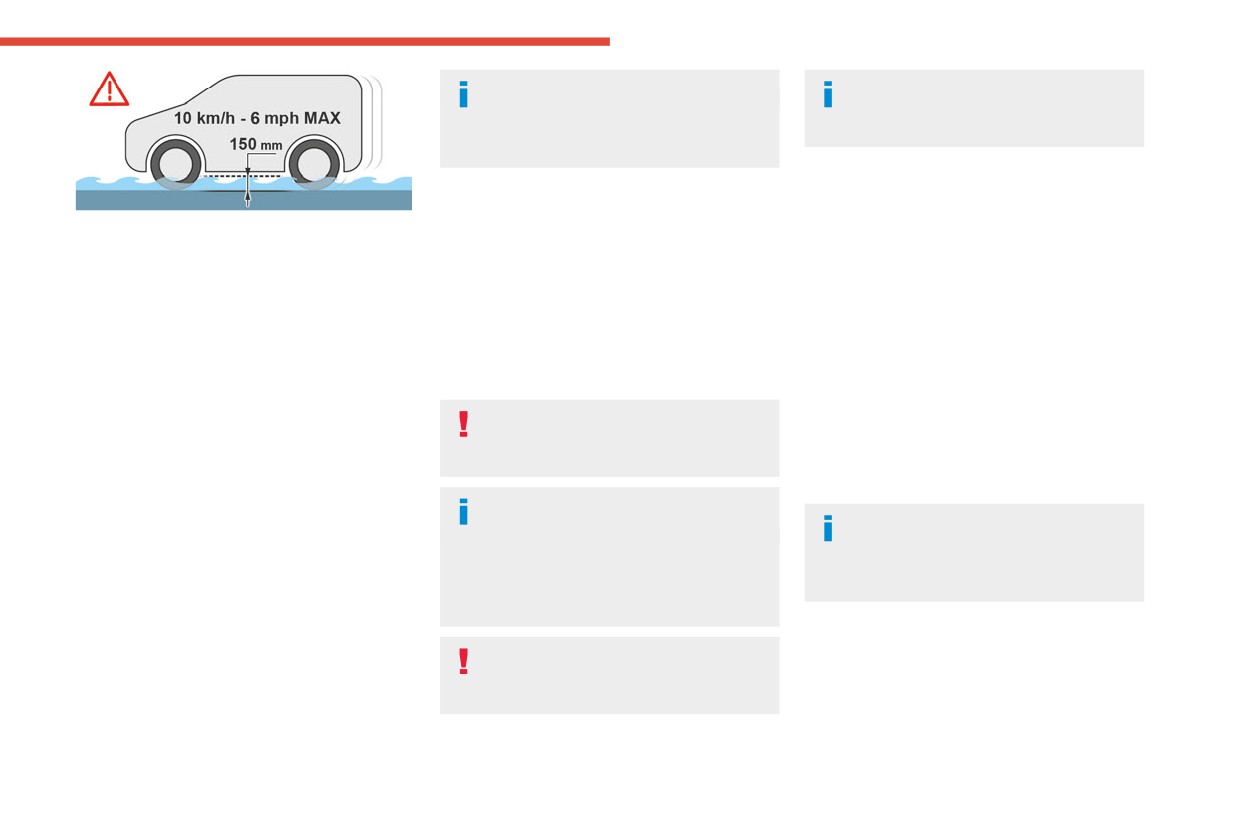
If the vehicle absolutely must drive through a
normal noises specific to electric vehicles, such
► Distribute the load in the trailer so that the
flooded section of road:
as:
heaviest items are located as close as possible
► Check that the depth of the water does not
- Traction battery relay when starting.
to the axle, and the nose weight (at the point
exceed 15 cm, taking account of waves that
- Vacuum pump when braking.
where it joins your vehicle) approaches the
might be generated by other users.
- Vehicle tyres or aerodynamics when driving.
maximum permitted, without exceeding it.
► Deactivate the Stop & Start function.
- Jolting and knocking noise during hill starts.
► Drive as slowly as possible without stalling. In
Tyres
all cases, do not exceed 6 mph (10 km/h).
► Check the tyre pressures of the towing
Towing
► Do not stop and do not switch off the engine.
vehicle and of the trailer, observing the
On leaving the flooded road, as soon as safety
Driving with a trailer places greater
recommended pressures.
conditions allow, make several light brake
demands on the towing vehicle and
Lighting
applications to dry the brake discs and pads.
particular care must be taken.
► Check the electrical signalling on the trailer
If in doubt about the state of your vehicle,
and the headlamp beam height of your vehicle.
contact a CITROËN dealer or a qualified
Do not exceed the maximum towable
workshop.
If a genuine CITROËN towing device is
weights.
At altitude: reduce the maximum load by
used, the rear parking sensors will be
Noise (Electric)
deactivated automatically to avoid activating
10% per 1,000 metres of altitude; the lower
On the outside
air density at high altitudes decreases engine
the audible signal.
performance.
Due to the vehicle’s quiet operation when
driving, the driver must pay particular attention.
When driving
When manoeuvring, the driver must always
New vehicle: do not tow a trailer until the
Cooling
check the vehicle's immediate surroundings.
vehicle has driven at least 620 miles
At speeds of up to 19 mph (30 km/h), the
(1,000 kilometres).
Towing a trailer uphill causes the coolant
pedestrian horn warns other road users of the
temperature to increase. The maximum towable
vehicle’s presence.
load depends on the gradient and the exterior
133
CarManuals2.co
Driving
temperature. The fan’s cooling capacity does not
In the event of a fault, you are informed
With the conventional key / With the
increase with engine speed.
by illumination of this warning lamp, an
remote control key
► Reduce speed and lower the engine speed to
audible signal and a message on the screen.
limit the amount of heating produced.
The vehicle will not start; contact a CITROËN
► Pay constant attention to the coolant
dealer as soon as possible.
temperature.
If this warning lamp and the
Starting/switching off the
STOP warning lamp come
on, stop the vehicle and switch off the engine as
engine
soon as possible.
Brakes
Starting
Using the engine brake is recommended to limit
The parking brake must be applied.
the overheating of the brakes. Braking distances
are increased when towing a trailer.
► With a manual gearbox, place the gear
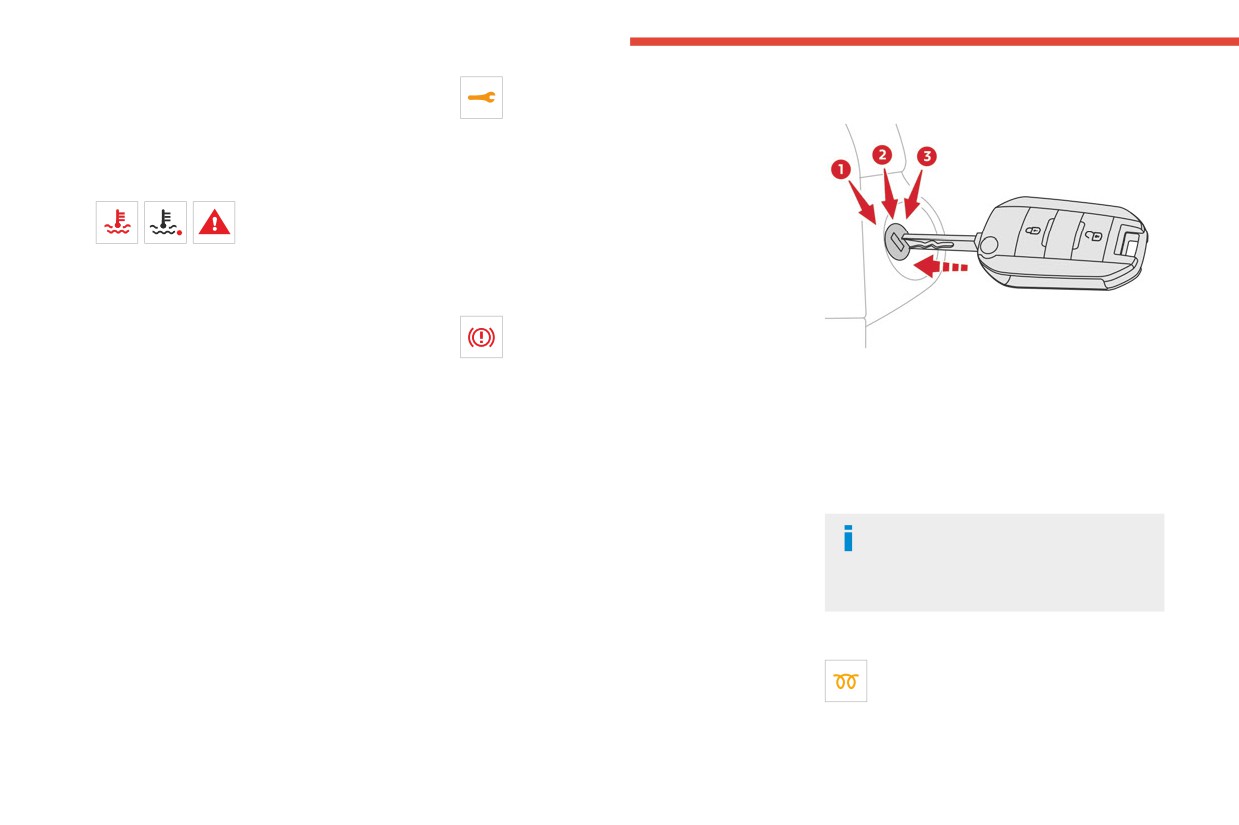
1. Stop position.
lever in neutral, fully depress the clutch pedal
2. Ignition on position.
Side wind
and keep the pedal down until the engine starts.
3. Starting position.
Bear in mind that the vehicle will be more
► With an automatic gearbox, place the
► Insert the key into the ignition switch. The
susceptible to wind when towing.
selector in position P then depress the brake
system recognises the starting code.
pedal.
► Unlock the steering column by simultaneously
Anti-theft protection
turning the steering wheel and the key.
In certain circumstances, you may have
Electronic immobiliser
to turn the steering wheel firmly to move
The remote control contains an electronic chip
the wheels (if the wheels are against a kerb,
which has a special code. When the ignition is
for example).
switched on, this code must be recognised in
order for starting to be possible.
► Turn the key to position 2, Ignition On, to
A few seconds after switching off the ignition,
activate the engine pre-heating system.
this system locks the engine control system,
► Wait until this warning lamp goes off in
therefore preventing the engine from being
the instrument panel, then turn the key to
started in the event of a break-in.
position 3 without pressing the accelerator pedal,
to operate the starter motor until the engine
134
CarManuals2.co
Driving
starts. As soon as the engine starts, release the
With the Keyless Entry and Start
Never leave the engine running in an
6
key so it returns to position 2.
enclosed area without adequate ventilation:
internal combustion engines emit toxic
The warning lamp does not come on if
exhaust gases, such as carbon monoxide.
the engine is already warm. In some
Danger of poisoning and death!
climatic conditions, the following
recommendations should be followed:
For Diesel vehicles, when the
- In mild conditions, do not leave the engine
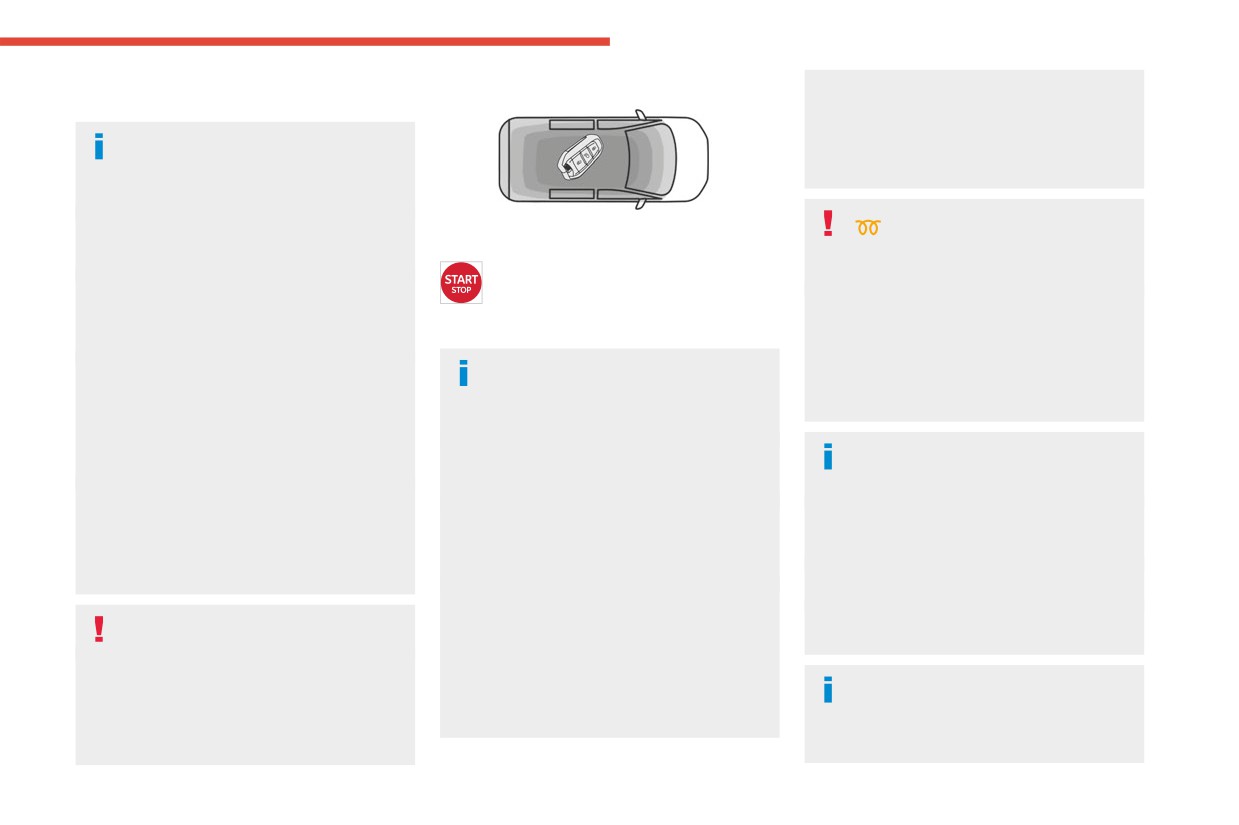
► Place the remote control inside the vehicle, in
temperature is below zero,
at idle to warm up but move off straight away
the recognition zone.
starting will only occur once the pre-heating
and drive at moderate speed.
► Press the "START/STOP" button.
warning lamp goes off.
- In wintry conditions, the pre-heater warning
If this warning lamp comes on after pressing
lamp will stay on for a longer period after
The steering column unlocks and the engine
the "START/STOP" button, keep the brake
switching on the ignition; wait until it goes off
starts more or less instantly.
or clutch pedal depressed until the warning
before starting.
- In very severe wintry
The warning lamp does not come on if
lamp goes off, without pressing the "START/
conditions (temperature below -23 °C), to
the engine is already warm. In some
STOP" button again, until the engine starts
ensure correct operation and durability of your
climatic conditions, it is advised to follow the
and is running.
vehicle’s mechanical components (engine
recommendations below:
and gearbox), leave the engine running for
- In mild conditions, do not leave the engine
The "Keyless Entry and Start" system
4 minutes before moving off.
to warm up while stationary, but move off
remote control must be within the
Never leave the engine running in an
straight away and drive at moderate speed.
recognition zone.
enclosed area without adequate ventilation:
- In wintry conditions, when the ignition is
Never leave the vehicle with the engine
internal combustion engines emit toxic
switched on, the duration of lighting of the
running and with the remote control on your
exhaust gases, such as carbon monoxide.
preheating indicator lamp is extended. Wait
person.
Danger of poisoning and death!
until it goes off before starting the engine.
If the remote control leaves the recognition
- In very severe wintry
zone, a message is displayed.
conditions (temperature below -23°C),
Move the remote control into the zone in
If the engine does not start straight away,
to ensure correct operation and preserve
order to be able to start the engine.
switch off the ignition.
the lifespan of the vehicle's mechanical
Wait a few seconds before operating the
starter motor again. If the engine does not
components, engine and gearbox, leave the
If one of the starting conditions is not
start after several attempts, do not keep
engine running for 4 minutes before moving
met, a message is displayed on the
trying: you risk damaging the starter motor
off.
instrument panel. In some circumstances, you
and the engine.
must turn the steering wheel while pressing
135
CarManuals2.co

Driving
the "START/STOP" button to assist unlocking
Avoid attaching heavy objects to the key
► With the remote control in the recognition
of the steering column. A message is
or the remote control, which would weigh
zone, press the "START/STOP" button.
displayed.
down on its blade in the ignition switch and
The engine stops and the steering column locks.
could cause a malfunction.
If the vehicle is not immobilised, the
Switching off
engine will not stop.
Energy economy mode
With the conventional key/With the
After the engine has stopped (position 1. Stop),
To avoid any risk of jamming the pedals:
remote control key
for a maximum combined duration of 30 minutes,
- only use mats which are suited to the
► Immobilise the vehicle.
you can still use functions such as the audio and
fixings already present in the vehicle; these
► Turn the key all the way to position 1 (Stop)
telematics system, courtesy lamps or dipped
fixings must be used,
and remove it from the ignition.
beam headlamps.
- never place one mat on top of another.
► To lock the steering column, turn the steering
The use of mats not approved by CITROËN
For more information on Energy
wheel until it locks.
may interfere with access to the pedals and
economy mode, refer to the
hinder the operation of the cruise control /
To facilitate unlocking of the steering
corresponding section.
speed limiter.
column, it is recommended that the
The mats approved by CITROËN have two
wheels be returned to the straight ahead
Key left in the ignition
fixings located below the seat.
position before switching off the engine.
When opening the driver's door, an alert
► Check that the parking brake is correctly
message is displayed, accompanied by
Starting/Switching off the
applied, particularly on sloping ground.
an audible signal, to remind you that the key
electric motor
Never switch off the ignition before the
is still in the ignition switch at position 1
Starting
complete immobilisation of the vehicle.
(Stop).
With the engine off, the braking and steering
If the key has been left in the ignition switch
The drive selector must be in mode P.
assistance systems are also turned off: risk of
at position 2 (Ignition on), the ignition will be
► If using a conventional or remote control
loss of control of the vehicle.
switched off automatically after one hour.
key, depress the brake pedal and turn the key
To switch the ignition back on, turn the key
to position 3 until the motor starts, without
to position 1 (Stop), then back to position 2
depressing the accelerator. As soon as the motor
As a safety measure, never leave the
(Ignition on).
starts, release the key so it returns to position 2.
vehicle without taking the remote control
► If using Keyless Entry and Start, depress the
with you, even for a short time.
brake pedal and briefly press the "START/STOP"
With Keyless Entry and Start
button.
► Immobilise the vehicle.
136
CarManuals2.co
Driving
► Keep your foot on the brake pedal until the
Special case with Keyless
The engine starts.
6
READY indicator lamp comes on and an audible
Entry and Start
Remote control not recognised
signal is emitted, indicating that the vehicle is
ready to drive.
If the remote control is no longer in the
Switching on the ignition without
► With your foot on the brake, select mode D
recognition zone, a message appears on the
starting the engine
or R.
instrument panel when closing a door or trying to
► Release the brake pedal, then accelerate.
With the "Keyless Entry and Start"
switch off the engine.
On starting, the instrument panel lights up
electronic key inside the vehicle, pressing
► Press the "START/STOP" button for about
and the power indicator needle performs one
the "START/STOP" button, without depressing
3 seconds to confirm switching off the engine,
sweep then moves to the "neutral" position. The
any of the pedals, allows the ignition to be
then contact a CITROËN dealer or a qualified
steering column automatically unlocks (you may
switched on.
workshop.
hear a sound and feel the steering wheel move).
► Press this button again to switch off the
ignition and allow the vehicle to be locked.
Forced switch-off (also called
Switching off
Back-up switch-off)
► If using a conventional or remote control
Back-up starting
In case of emergency only, the engine can be
key, turn the key fully to position 1 (Stop).
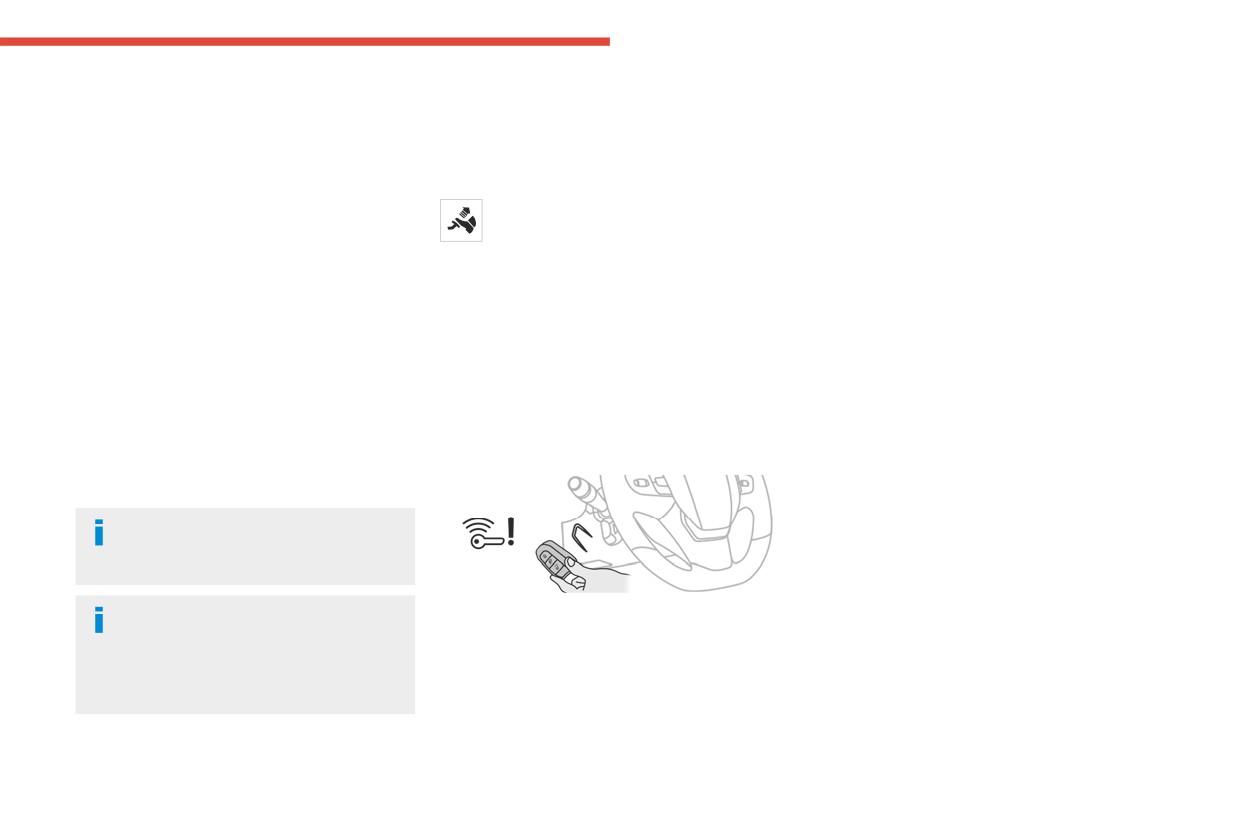
A back-up reader is fitted to the steering column,
switched off without conditions (even when
► If using Keyless Entry and Start, press the
to enable the engine to be started if the system
driving).
"START/STOP" button.
fails to detect the key in the recognition zone, or
► To do this, press and hold the "START/
Before exiting the vehicle, check that:
if the battery in the electronic key is flat.
STOP" button for about 5 seconds.
- The drive selector is in mode P.
In this case, the steering column locks as soon
- The READY indicator lamp is off.
as the vehicle stops.
The drive selector moves automatically
to mode P when the motor is switched off
"Key off" mode
or when the driver's door is opened.
"Key off" mode allows you to lock the vehicle
while leaving the engine running without the
If the driver's door is opened while the
► Place and hold the remote control against the
key or Keyless Entry and Start being inside the
required conditions for switching off are
back-up reader.
vehicle.
not met, an audible signal is emitted,
► With a manual gearbox, place the gear lever
This mode allows electrical devices to continue
accompanied by the display of a warning
in neutral, then fully depress the clutch pedal.
operating to ensure thermal comfort, vehicle
message.
► With an automatic gearbox or a drive
security and operation of the vehicle systems
selector, select mode P, then depress the brake
needed for the task.
pedal.
► Press the "START/STOP" button.
137
CarManuals2.co
Driving
that the parking brake is still applied or has not
been fully released.
When parking on a slope or on a steep
slope with a loaded vehicle, turn the
wheels against the kerb then apply the
parking brake.
KEY
OFF
Pressing the brake pedal facilitates the
application and release of the manual
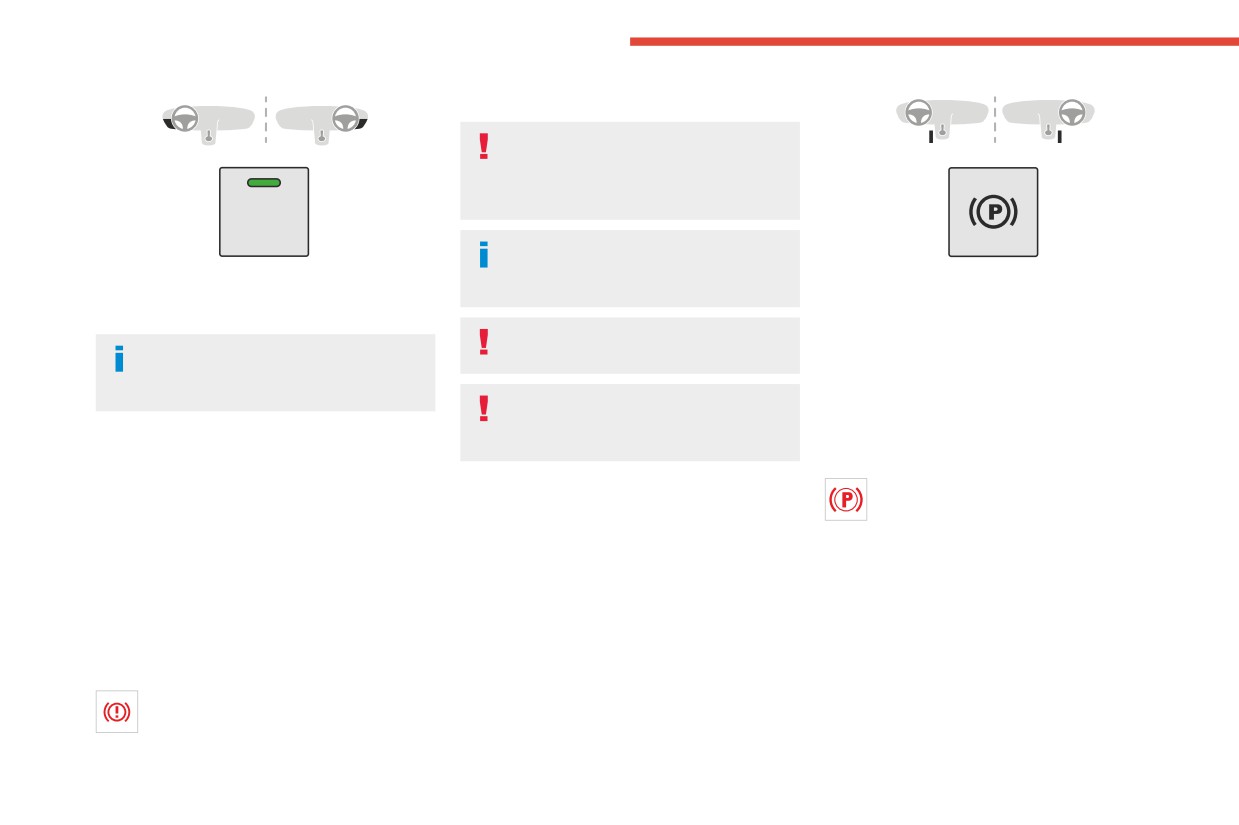
► To activate or deactivate this mode, press this
At any time, with the engine running:
parking brake.
button (the button's indicator lamp is on when
► To apply the parking brake, briefly pull the
the mode is activated).
control.
With a manual gearbox, engage a gear
► To release it, briefly push the control while
With an electric motor, this mode remains
and then switch off the ignition.
pressing the brake pedal.
active for about 10 minutes after the
Automatic mode is activated by default.
vehicle is locked.
With an automatic gearbox, place the
This automatic operation can be deactivated in
gear selector in position P, then switch
certain situations.
off the ignition.
Manual parking brake
Indicator lamp
This indicator lamp comes on both on the
Application
Electric parking brake
instrument panel and on the control to
► With your foot on the brake pedal, pull
confirm that the parking brake has been applied,
In automatic mode, this system applies the
the parking brake lever up to immobilise your
accompanied by display of the message
parking brake when the engine is switched off
vehicle.
"Parking brake applied".
and releases it when the vehicle moves off.
The indicator lamp goes out to confirm the
Release on level ground
release of the parking brake, accompanied by
► With your foot on the brake pedal, pull the
the display of the message "Parking brake
parking brake lever up gently, press the release
released".
button, then lower the lever fully.
The indicator lamp flashes in response to a
When the vehicle is being driven, this
manual request to apply or release the brake.
warning lamp coming on, accompanied
by an audible signal and a message, indicates
138
CarManuals2.co
Driving
In the event of a battery failure, the
When the vehicle is parked: on a
Automatic operation
6
electric parking brake will not operate.
steep slope, heavily loaded or during
As a safety measure, with a manual gearbox,
towing
Automatic release
if the parking brake is not applied, immobilise
With a manual gearbox, turn the wheels
First ensure that the engine is running and that
the vehicle by engaging a gear.
toward the pavement and engage a gear.
the driver's door is closed.
As a safety measure, with an automatic
With an automatic gearbox or a drive selector,
The electric parking brake gradually releases
gearbox or drive selector, if the parking brake
turn the wheels toward the pavement and
automatically as the vehicle moves off.
is not applied, immobilise the vehicle by
select mode P.
With a manual gearbox
placing the supplied chock against one of the
When towing, the vehicle is approved for
► Fully depress the clutch pedal and engage
wheels.
parking on slopes of up to 12%.
first gear or reverse.
Contact a CITROËN dealer or a qualified
► Depress the accelerator pedal and release
workshop.
Manual operation
the clutch pedal.
With an automatic gearbox
Manual release
► Depress the brake pedal.
► Select mode D, M or R.
With the ignition on or engine running:
► Release the brake pedal and depress the
► Press the brake pedal.
accelerator pedal.
► While maintaining pressure on the brake
With a drive selector
pedal, briefly push the control.
► Depress the brake pedal.
If the brake pedal is not depressed, the
► Select mode D, B or R.
parking brake is not released and a
► Release the brake pedal and depress the
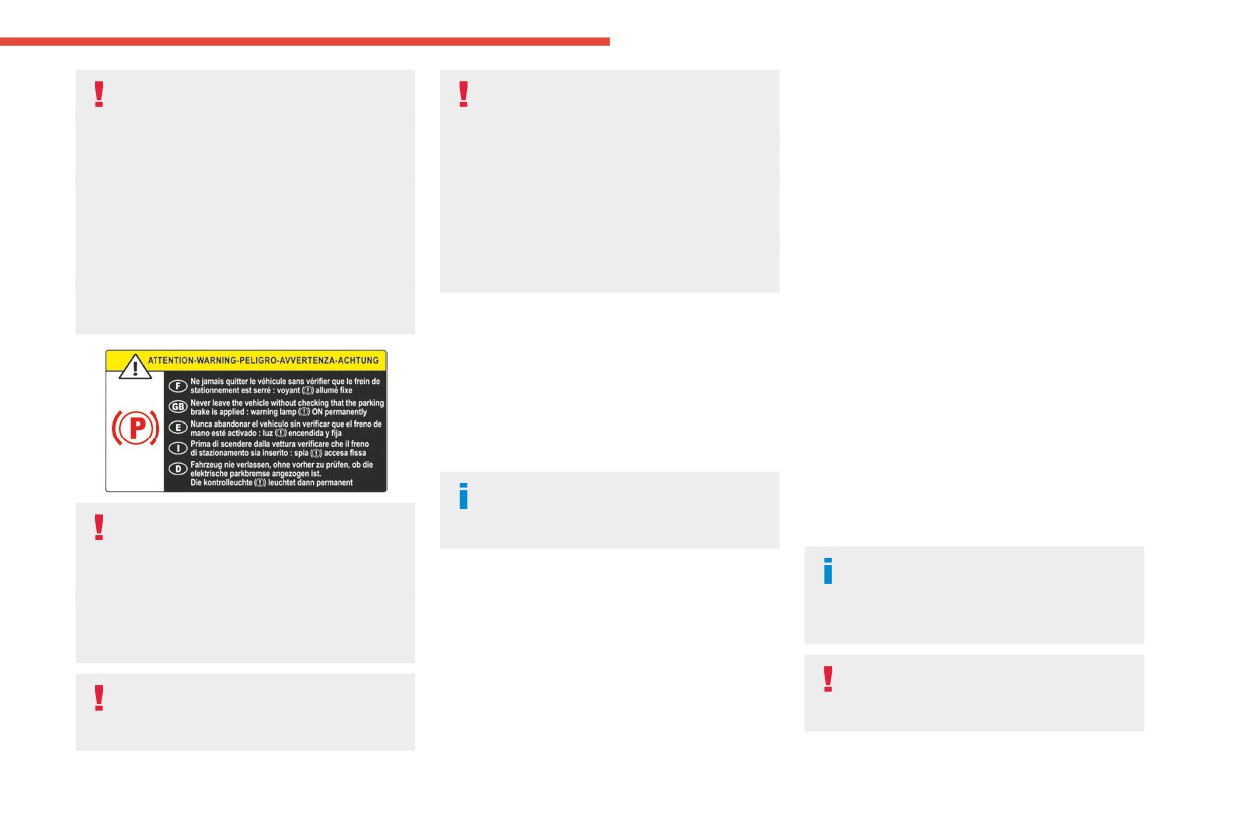
Before leaving the vehicle, check that the
message is displayed.
accelerator pedal.
parking brake is applied: the parking
brake indicator lamps on the instrument panel
With an automatic gearbox or drive
and the control must be on fixed.
Manual application
selector, if the brake does not release
If the parking brake is not applied, there is an
With the vehicle stationary:
automatically, check that the front doors are
audible signal and a message is displayed on
► Briefly pull the control.
properly closed.
opening the driver's door.
The control indicator lamp flashes to confirm the
application request.
When stationary with the engine running,
Never leave a child alone inside the
do not depress the accelerator pedal
vehicle, as they could release the parking
unnecessarily. Risk of parking brake release.
brake.
139
CarManuals2.co