Citroen Jumpy Dispatch (2023 year). Manual in english - page 2
Access
identification documents and if possible, the label
If the vehicle is unlocked with the key in
► Pull the interior door opening handle.
2
bearing the key code.
the lock after locking it with the remote
Locking
The CITROËN dealer will be able to retrieve the
control or the Keyless Entry and Start
► Open the door.
key code and the transponder code, enabling a
system, all doors and the boot are
► For the side door, check that the child lock is
new key to be ordered.
unlocked.
not on. Refer to the corresponding section.
If the vehicle is unlocked with the key in the
Complete unlocking/locking
lock after locking it with the key, only the
doors (front door and sliding side door(s)) are
of the vehicle with the key
unlocked. The side-hinged doors and tailgate
Use this procedure in the following situations:
are not unlocked. Switching on the ignition
- Remote control battery discharged.
unlocks them.
Front passenger door
- Remote control malfunction.
- Vehicle battery discharged.
- Vehicle in an area subject to strong
Central locking not
electromagnetic interference.
functioning
In the first case, change the remote control
Use these procedures in the following cases:
battery.
- Central locking malfunction.
Sliding side door
In the second case, reinitialise the remote
- Battery disconnected or discharged.
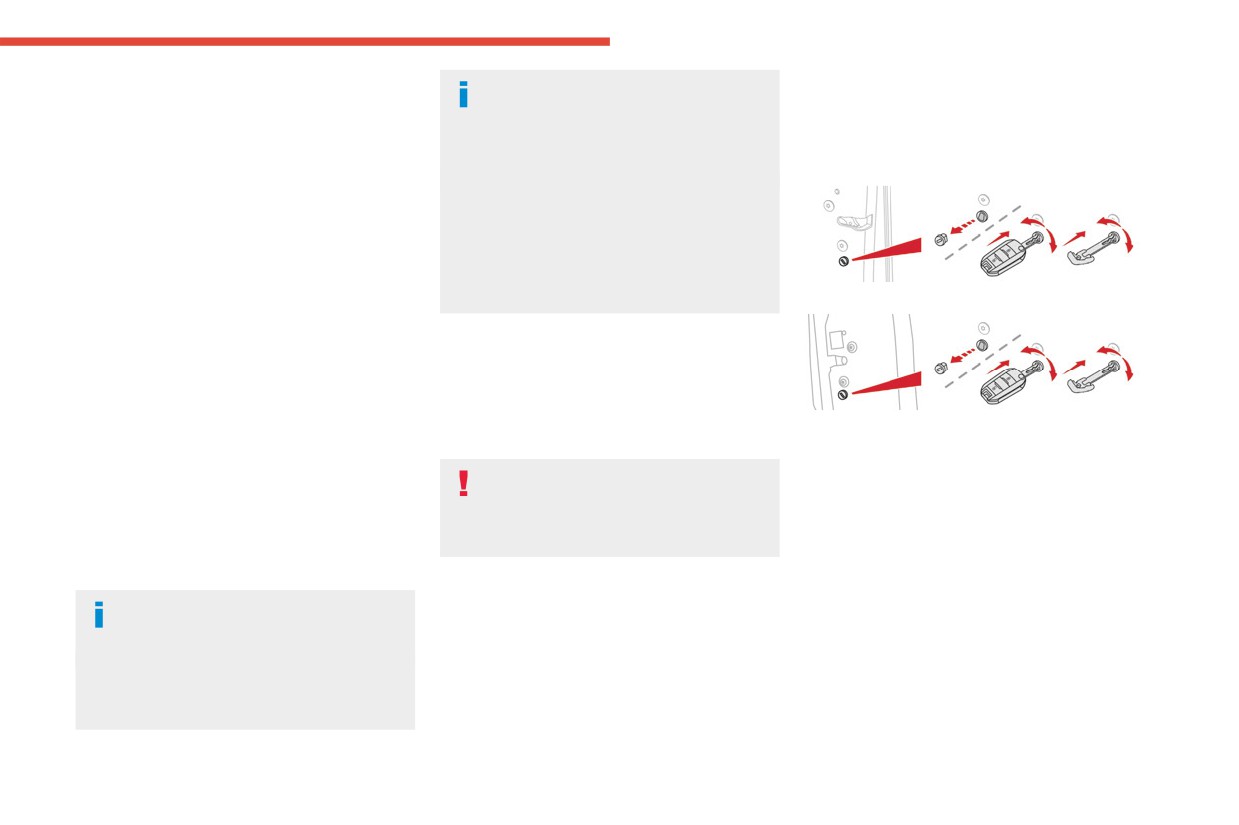
► Remove the black cap on the edge of the
control.
Refer to the corresponding sections.
door, using the key.
In the event of a malfunction of the
► Insert the key into the door lock.
► Insert the key in the aperture without
central locking system, the battery must
► Turn the key towards the front/rear to unlock/
forcing it, then without turning it, move the latch
be disconnected to ensure that the vehicle is
lock the vehicle.
sideways towards the inside of the door.
locked fully.
► Turn the key towards the rear again within
► Remove the key and refit the black cap.
5 seconds to deadlock the vehicle.
► Close the doors and check from the outside
Front left-hand door
that the vehicle is locked.
If the vehicle is fitted with an alarm, it will
► Insert the key into the door lock.
not be activated when locking with the
Side-hinged doors
► Turn the key towards the rear of the vehicle
key.
to lock it, or towards the front to unlock it.
Unlocking
If the alarm is activated, the siren sounds
► Use the interior opening handle.
when the door is opened; switch on the
Front passenger door and sliding
Locking
ignition to stop it.
side door
► If fitted to your vehicle, check that the electric
Unlocking
child lock is not on.
35
CarManuals2.co
Access
► Open the left-hand side-hinged door.
Changing the battery
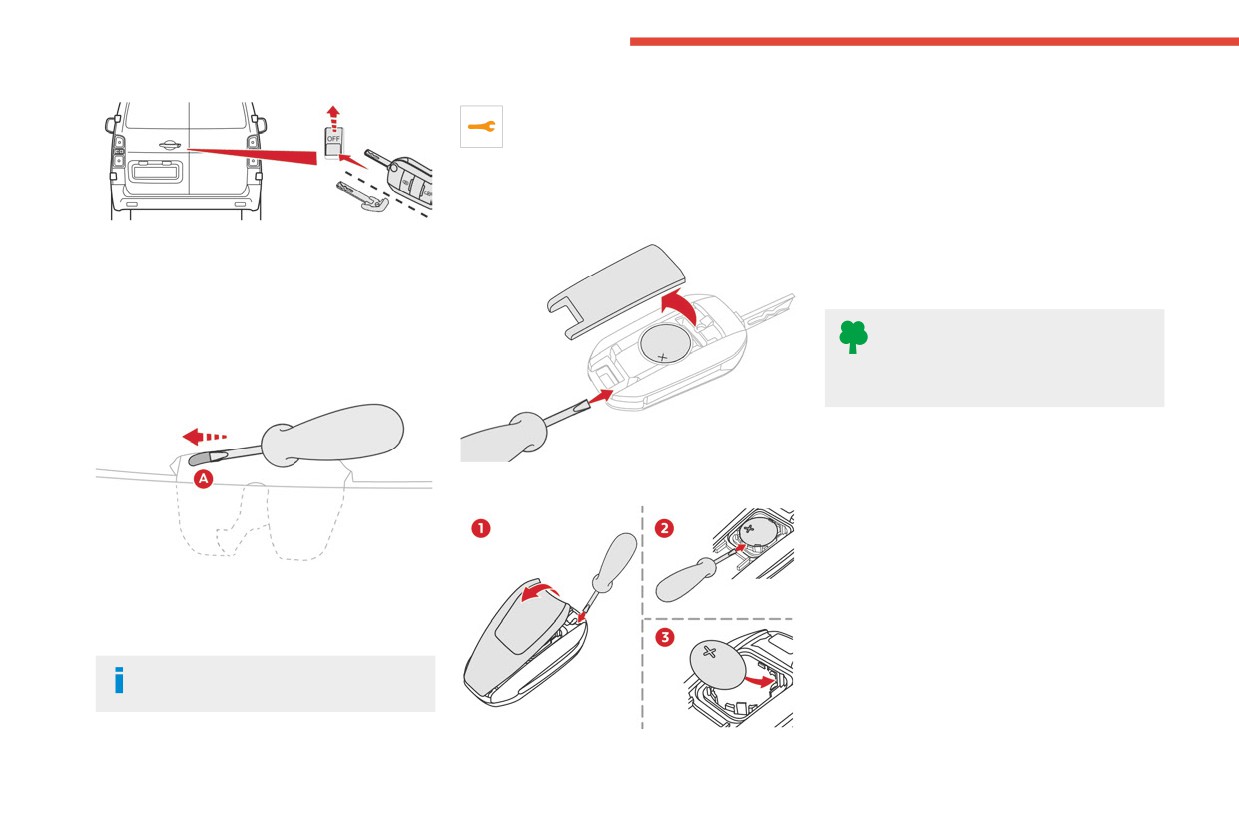
► Unclip the cover by inserting a small
screwdriver in the slot and lift the cover.
If the battery is flat, this warning lamp
► Remove the flat battery from its housing.
comes on, accompanied by an audible
► Put the new battery in place, respecting the
signal and the display of a message.
polarity. Start by inserting it into the contacts
Battery type: CR2032/3 volts.
located in the corner, then clip the cover onto
Without Keyless Entry and Start
the unit.
► Insert the key into the latch aperture on the
► Reinitialise the remote control.
edge of the door (without forcing it) and slide the
For more information on Reinitialising the
assembly upwards.
remote control, refer to the corresponding
► Remove the key.
section.
► Close the door and check from the outside
Do not throw remote control batteries
that the vehicle is locked.
away, as they contain metals that are
harmful to the environment. Take them to an
Unlocking the tailgate
approved disposal point.
Reinitialising the remote
control
With Keyless Entry and Start
Following replacement of the battery or in
the event of a fault, it may be necessary to
reinitialise the remote control.
► From inside the vehicle, insert a small
screwdriver into hole A on the lock to unlock the
tailgate.
► Move the latch to the left.
If the fault persists after closing again,
the tailgate will remain locked.
36
CarManuals2.co
Access
Without Keyless Entry and Start
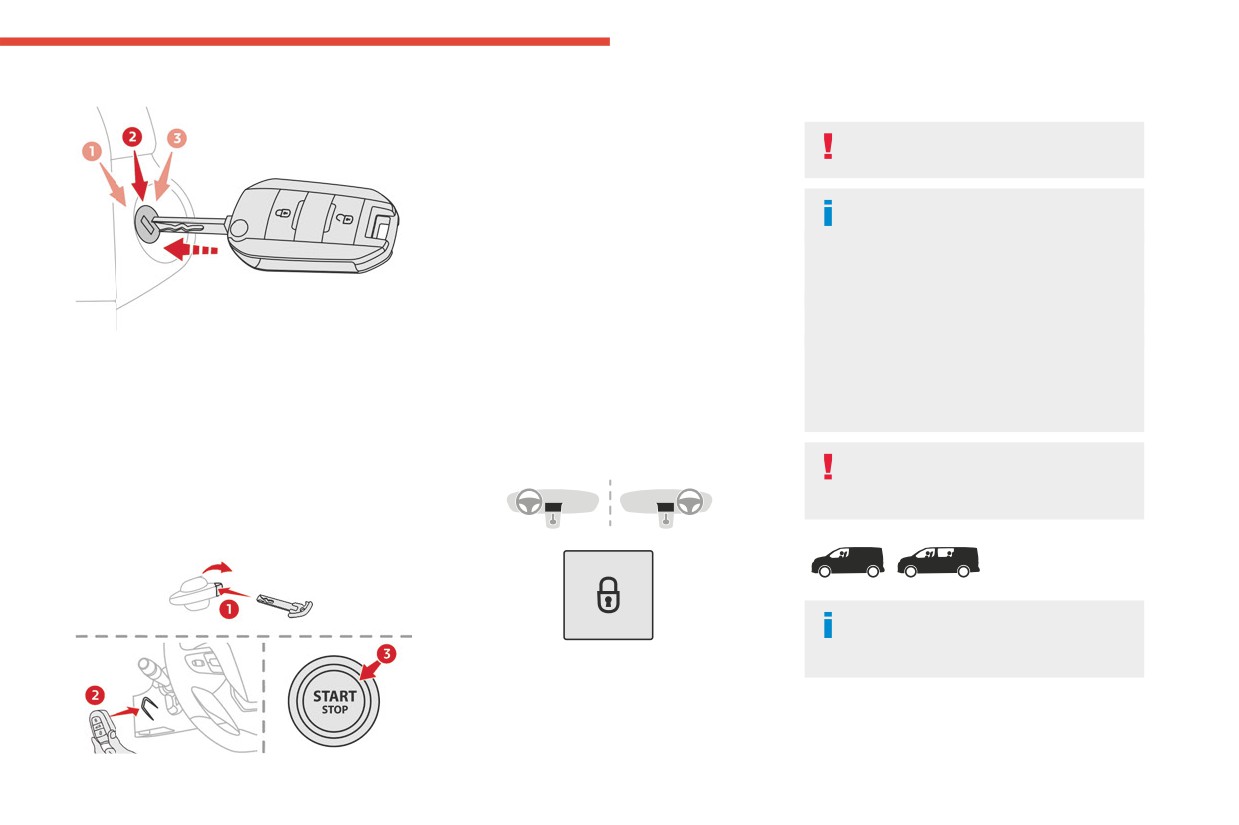
► Insert the mechanical key (incorporated into
The indicator lamp comes on to confirm the
2
the remote control) into the lock to open the
central locking of the vehicle.
vehicle.
Central locking does not take place if any
► Place the electronic key against the back-up
of the doors are open.
reader on the steering column and hold it there
until the ignition is switched on.
When locking/deadlocking from the
► With a manual gearbox, place the gear lever
outside
in neutral then fully depress the clutch pedal.
When the vehicle is locked or deadlocked
► With an automatic gearbox or drive
from the outside, the indicator lamp flashes
selector, while in mode P, depress the brake
and the button is deactivated.
pedal.
► After normal locking, pull one of the
► Switch on the ignition by pressing the
interior door controls to unlock the vehicle.
"START/STOP" button.
► Switch the ignition off.
► After deadlocking, you must use the
If the fault persists after reinitialisation, contact a
► Turn the key to position 2 (Ignition on).
remote control, the "Keyless Entry and
CITROËN dealer or a qualified workshop without
► Immediately press the closed padlock button
Start" system or the built-in key to unlock the
delay.
for a few seconds.
vehicle.
► Switch off the ignition and remove the key
from the ignition switch.
Central locking
Driving with the doors locked makes
The remote control is now fully operational
access for the emergency services more
again.
difficult in an emergency.
With Keyless Entry and Start
When transporting an oversized load
(tailgate or side-hinged doors open),
press the button to lock only the cab doors.
Manual
► Press this button to lock/unlock the vehicle
(doors, tailgate or side-hinged doors) from inside
the passenger compartment.
37
CarManuals2.co
Access
► With the door unlocked, press and
Electric sliding side
hold this button until the corresponding
door(s)
sliding side door has opened.
The exterior and interior door handles and the
► Press this button again to reverse the
interior buttons allow the electrically powered
direction of the door's movement.
When transporting an oversized load
movement of the door to be started.
(tailgate or side-hinged doors open),
The remote control buttons are not active
Opening and closing of the doors is
press the button to lock only the front and rear
with the ignition switched on.
accompanied by an audible signal.
doors (sliding side door).
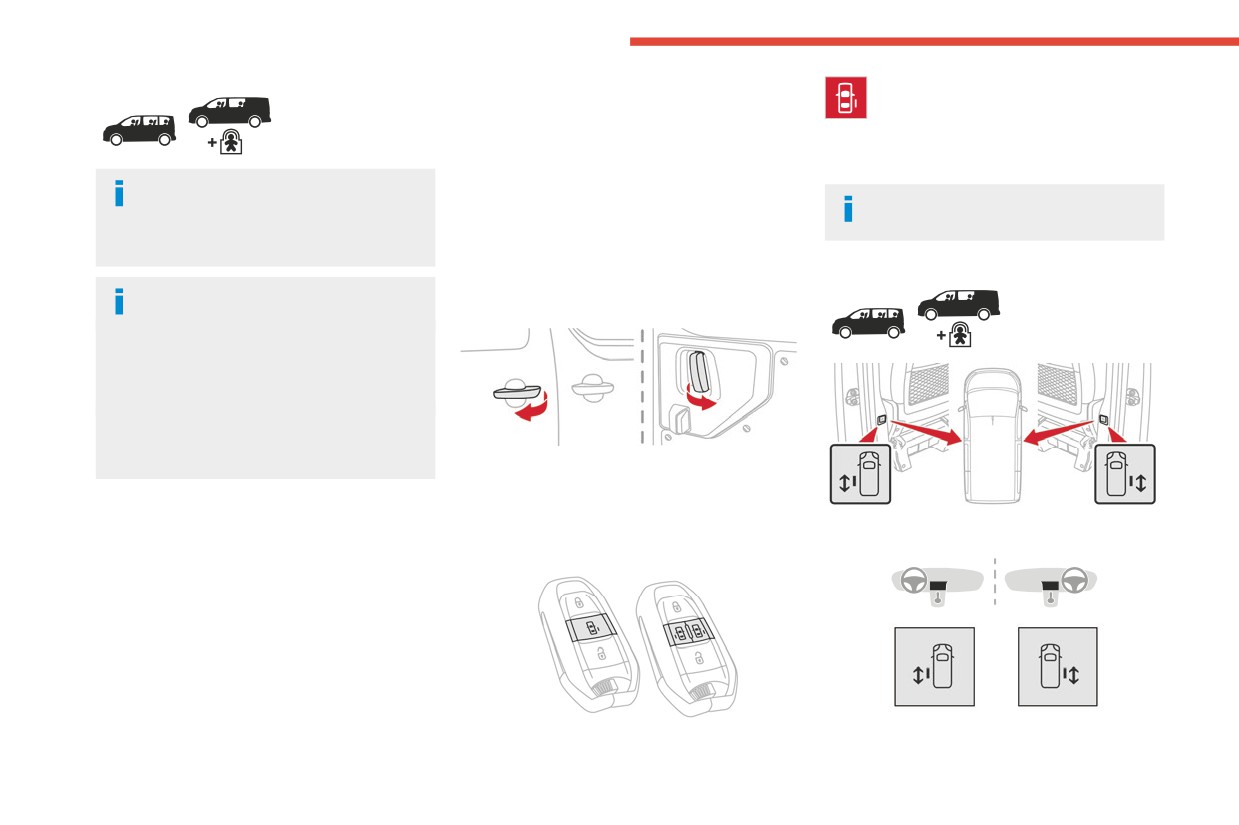
With the button(s) on the door pillar
Opening
When locking from inside, the door
With the exterior or interior handle
mirrors do not fold.
Central locking from the inside does not
operate if one of the doors is open (indicated
by a mechanical noise coming from the
locks).
When the tailgate or side-hinged doors are
open, only the other doors are locked (the
button does not light up).
► With the door unlocked, pull and release the
handle to start opening the door. Pull the handle
again to reverse the direction of the door's
Automatic (anti-intrusion
movement.
With the button(s) at the front
security)
With the remote control
The doors and the tailgate or the side-hinged
doors can lock automatically while driving (speed
above 6 mph (10 km/h)).
To deactivate/reactivate this function (activated
by default):
► Press the button until an audible signal is
heard and/or a message appears on the screen.
► With total unlocking activated and the child
lock deactivated, to unlock the vehicle and start
38
CarManuals2.co
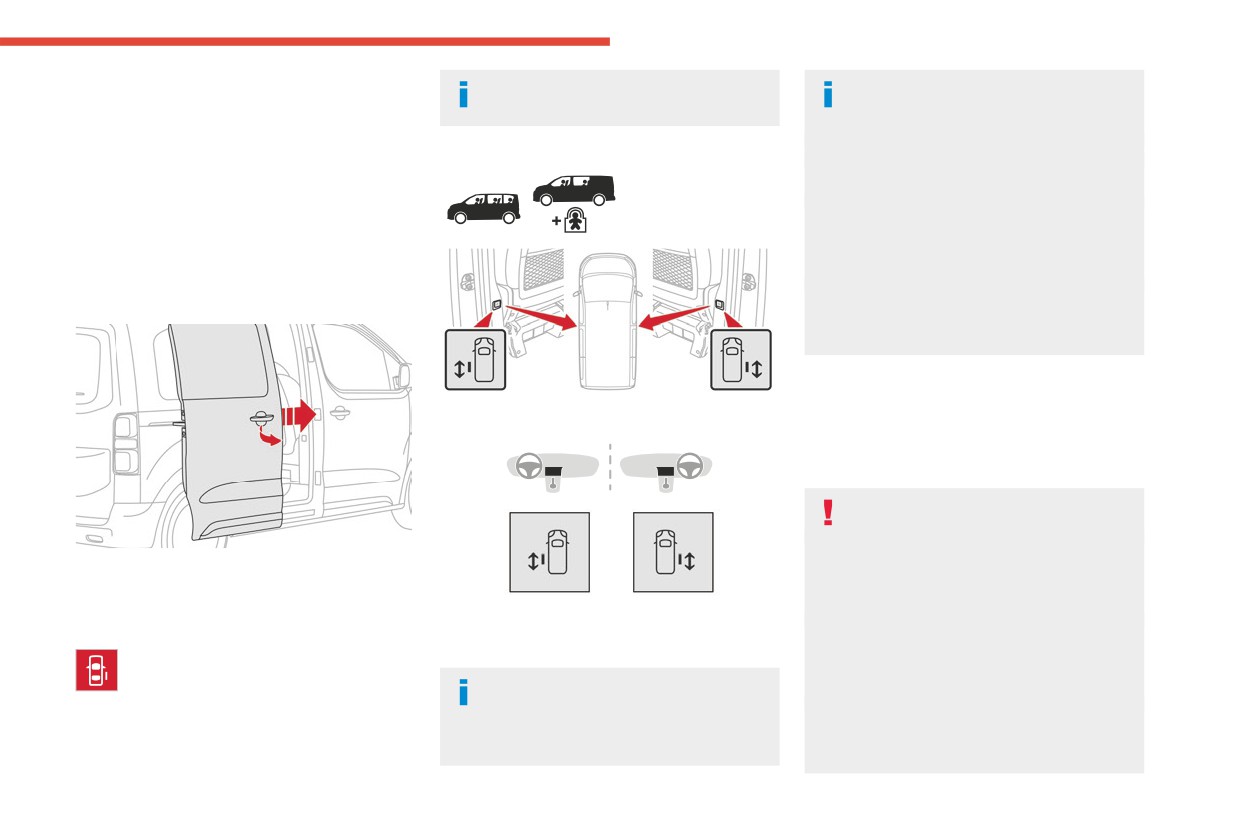
Access
opening a door, press the button corresponding
The remote control buttons are not active
The button(s) at the front or on the door
2
to the door you wish to open.
with the ignition switched on.
pillar is not operational and pressing it
► With selective unlocking activated, to unlock
results in an audible signal, if:
only the loading area and start opening a door,
With the button(s) on the door pillar
- the vehicle is moving,
press the button corresponding to the door you
- the child lock is on (activated) (for the
wish to open.
buttons on the door pillars),
► In both cases, pressing the button again
- the vehicle has been locked or deadlocked
reverses the direction of the door's movement.
from outside (using the key, remote control
or Keyless Entry and Starting, depending on
Closing
equipment).
The button for the left-hand door is not
With the exterior handle
operational and pressing it results in an
audible signal if the fuel filler flap is open.
General
With the button(s) at the front
recommendations for the
sliding side doors
Doors must only be operated when the
vehicle is stationary.
For your safety and that of your passengers,
► Pull and release the handle to start closing
as well as for correct operation of the doors,
the door. Pull the handle again to reverse the
you are strongly advised not to drive with a
direction of the door's movement.
► To start closing a door, press the
door open.
With the remote control
corresponding button for that door. Press again
Always check that it is safe to operate the
to reverse the direction of the door's movement.
door and in particular, be sure not to leave
► Press and hold this button until the
children or animals near the door controls
sliding side door has closed. Pull the
The button is not operational and
without supervision.
handle again to reverse the direction of the
pressing it results in an audible signal, if
The audible warning, the lighting of the "door
door's movement.
the speed of the vehicle is above 20 mph (30
open" warning lamp and the message on the
km/h).
screen are there to remind you. Contact a
39
CarManuals2.co
Access
CITROËN dealer or a qualified workshop if
Take care not to block the guide space
Doors and door clearances
you want to deactivate this warning.
on the floor so that the door can slide
Lock the vehicle when you use an automatic
correctly.
car wash.
For safety and functional reasons, do not
drive with the sliding side door open.
Before opening or closing and while
moving doors, ensure that no person,
The electric controls are disabled in the
animal or object is in the door frame or any
event of an impact. Manual opening and
other position that would block the desired
closing remain possible.
movement, inside or outside the vehicle.
If this advice is not followed, injuries or
While starting the engine, door
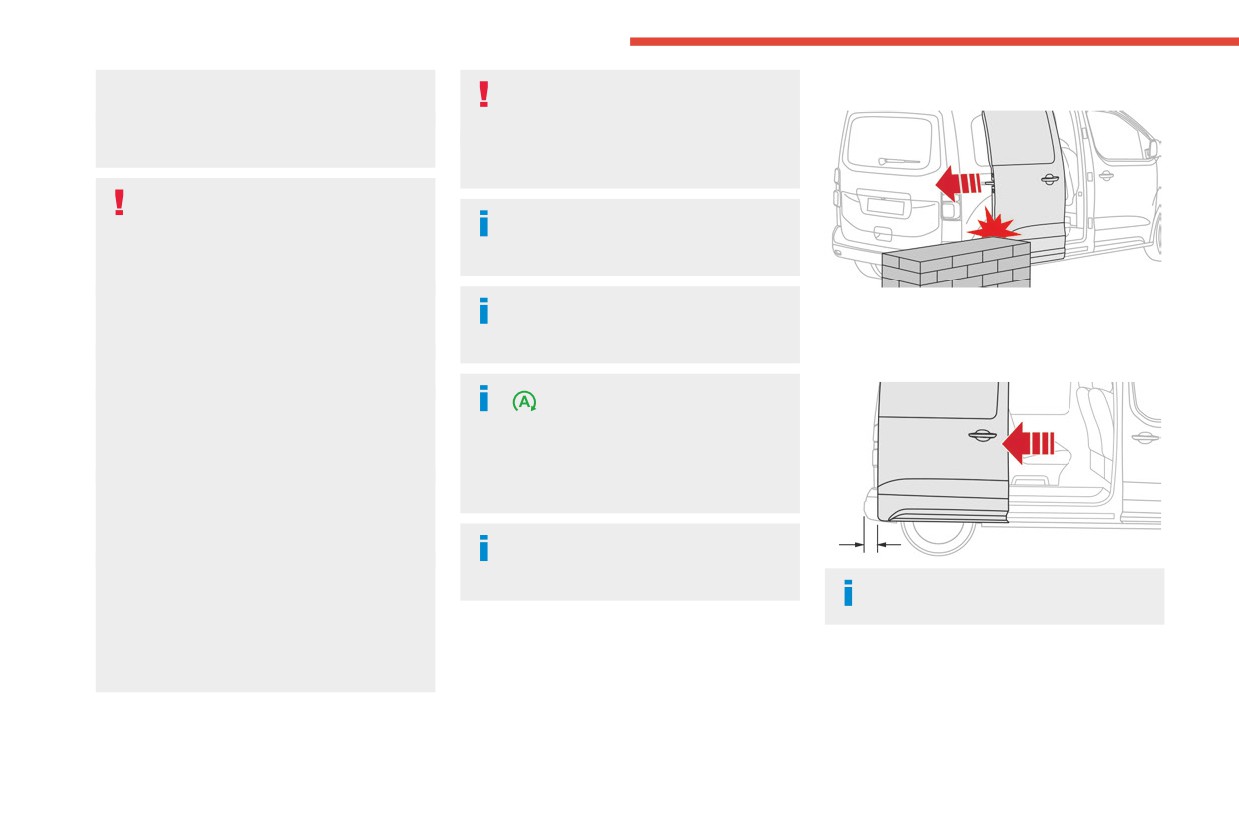
When open, a door projects beyond the body.
damage may occur if any part of a person or
movements are paused, resuming when
Allow adequate clearance when parking
an object is trapped or caught.
the engine is running.
alongside walls, lamp-posts, high pavements,
Electrical door opening is disabled at speeds
etc.
above 2 mph (3 km/h):
Depending on the engine fitted, if
- However, if the vehicle started moving
the door is closed and an opening
while the doors were open, the speed must
request is issued in Stop mode of Stop &
be reduced below 19 mph (30 km/h) before
Start, the door will open slightly and then
they can be closed.
stop. In Start mode, the door will resume its
- Any attempt to open a door electrically
movement when the engine re-starts.
using the interior handle while driving results
in it only being possible to open the door
To hold the sliding side door in the open
manually.
position, open the door fully to engage
- This situation is accompanied by the
the latch (located at the bottom of the door).
When open, a door never projects
audible warning, the lighting of the "door
beyond the rear bumper.
open" warning lamp and the message on the
screen. To release the door and be able to
operate it again, it is necessary to stop the
vehicle.
40
CarManuals2.co
Access
Safety/Obstacle detection
► Fully open the door(s) electrically.
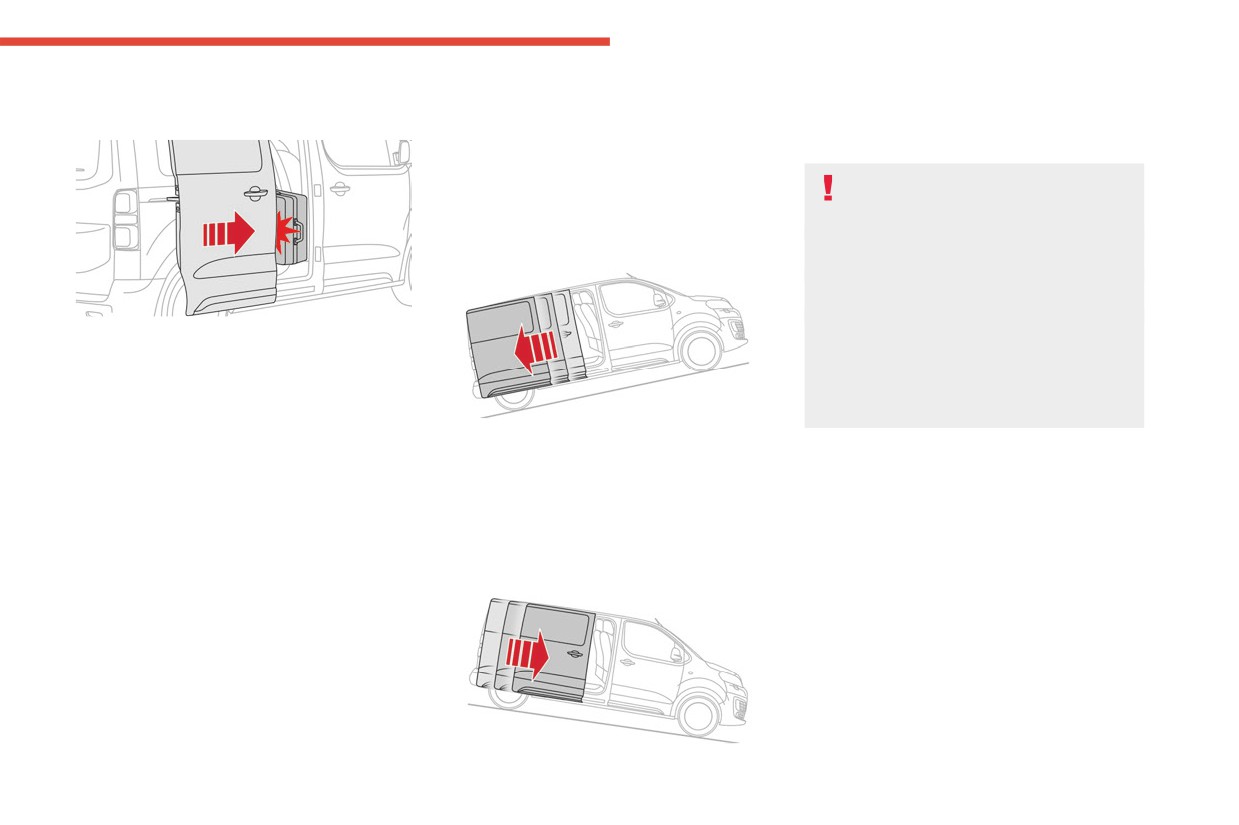
If your vehicle is on a slope, with the front of the
2
► Close the door(s) electrically.
vehicle facing down the slope, the door may not
with electric door(s)
On completion of this procedure, electric
stay open and may close violently with the risk
operation of the doors is restored.
of injury.
However, if a problem persists following this
In the case of a steep slope, the door
procedure, contact a CITROËN dealer or a
may be driven by its own weight and as a
qualified workshop.
consequence may open or close violently.
There would not be time for action at the
On a steep slope
electric controls to take effect.
There would not be time for the obstacle
detection system to react.
Take care not to leave the vehicle on a
The obstacle detection system is triggered when
steep slope with the door(s) open without
the moving door encounters an obstacle with a
supervision. If this advice is not followed,
certain level of physical resistance. If an obstacle
injuries or damage may occur if a person or
is detected:
an object is trapped or caught.
- while the door is closing, the door stops then
opens fully.
It is possible to open and close the doors
- while the door is opening, the door stops then
electrically on slopes of up to a 20% gradient.
closes.
If the vehicle is on a slope, with the front of the
- twice in succession during a movement of the
vehicle facing up the slope, open the door with
door, the door will no longer close electrically
care. The door may open more quickly due to
(uninitialisation).
the incline.
On a steep slope: a safety system slows down
On a steep slope, guide the side door manually
the movement of the door.
to help it to close.
In all cases, wait a few seconds before operating
the door (closing or opening).
Close the door manually for safety reasons.
Then reinitialise the door.
Reinitialising electric doors
If electrical operations no longer work:
► Fully close the door(s) manually.
41
CarManuals2.co
Access
positioned, so that you do not lose your
indicators flashing for a few seconds,
Hands-free sliding side
balance (rain, snow, ice, mud, etc.).
accompanied by an audible signal.
door(s)
Take care not to touch the exhaust tailpipe
The movement of the door is reversed if the
when making the movement with your foot -
movement of the foot takes place during the
Opening/Closing
risk of burns.
manoeuvre.
If the vehicle is so equipped, the electric door
mirrors fold/unfold on locking/unlocking the
vehicle.
Automatic locking
The vehicle locks itself following the hands-free
closing of the sliding door.
If your vehicle is not fitted with an alarm,
locking is signalled by the fixed
illumination of the direction indicators for
about two seconds.
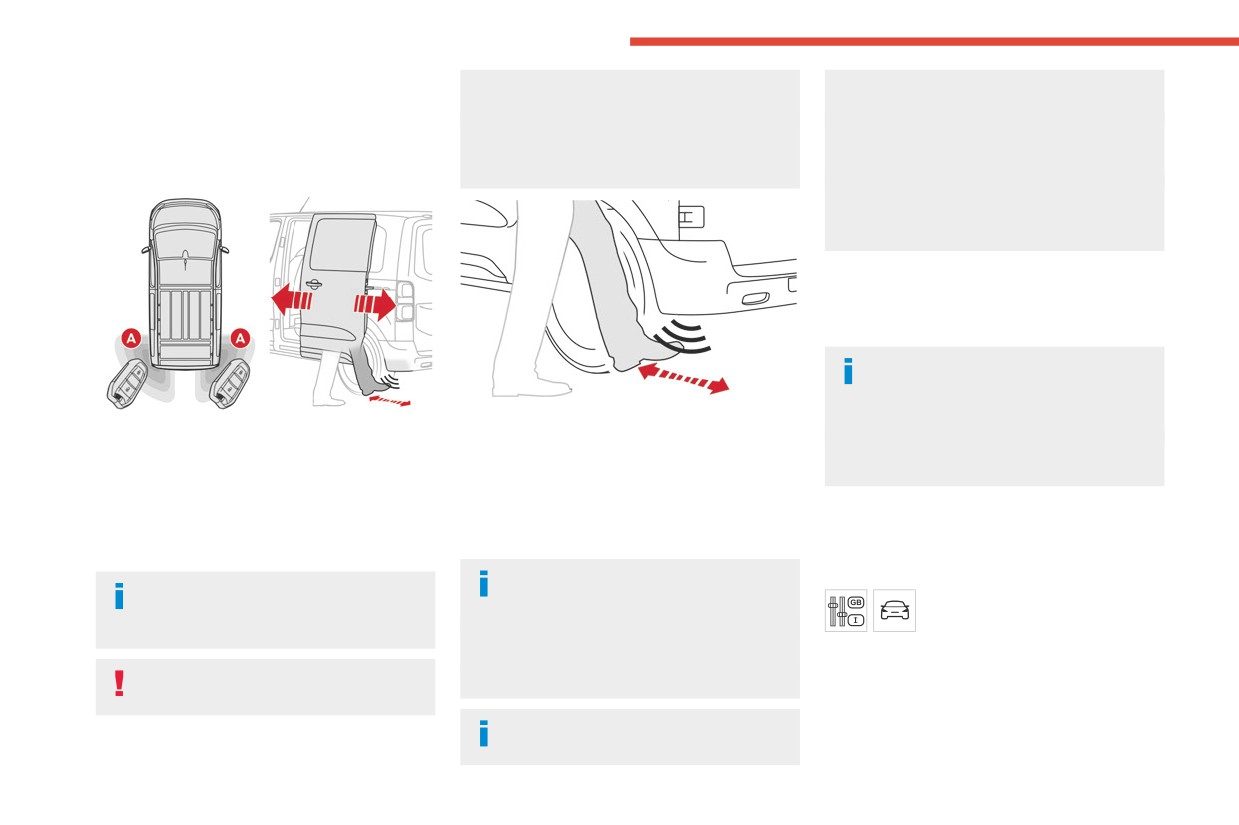
With a movement of your foot while keeping the
► Put your foot beneath the corner of the rear
Depending on your version, the door mirrors
remote control on your person in the recognition
bumper, then move the foot at normal speed with
fold at the same time.
zone A, the system unlocks and opens the
a sweeping side movement.
sliding side door or closes and locks it.
The sensor detects the foot approaching and
The remote control must be located at the rear
leaving and triggers the opening or closing of the
Activation/Deactivation
of the vehicle, at least about 30 cm but no more
side door.
With audio system or touch screen
than about 2 m from the vehicle.
Make the movement without interruption
By default, hands-free access is activated.
The automatic locking after closing the
and do not repeat it immediately
The "Hands-Free Tailgate Access"
door can be programmed in the vehicle
afterwards or several times.
function or automatic vehicle
configuration menu.
If the door does not open, wait about
locking when the sliding door is closed is
2 seconds before trying again.
activated and deactivated via the vehicle
Before making the movement with your
Do not keep the foot in the air.
configuration menu.
foot, ensure that you are steady and well
Confirmation that the door is going to
open or close is signalled by the direction
42
CarManuals2.co
Access
Malfunction
- A trailer is coupled or decoupled.
Side-hinged rear doors
2
- A bicycle carrier is installed or removed.
An audible signal repeated three times while
- Bicycles are loaded on to or unloaded from
using the function indicates a fault with the
the bicycle carrier.
system.
- Something is deposited or lifted behind the
Have it checked by a CITROËN dealer or a
vehicle.
qualified workshop.
- An animal approaches the bumper,
If the "Hands-free tailgate access
- The vehicle is washed.
self-locking" option is selected in the
- The vehicle is being serviced.
vehicle menu and after closing the door,
- A wheel is changed.
check that the vehicle is properly locked.
To avoid any sudden operation, keep the key
Locking will not take place:
away from the detection zone (also from the
- if the ignition is on,
boot’s interior sides) or deactivate the function
- if one of the doors or the tailgate is open,
in the vehicle configuration menu.
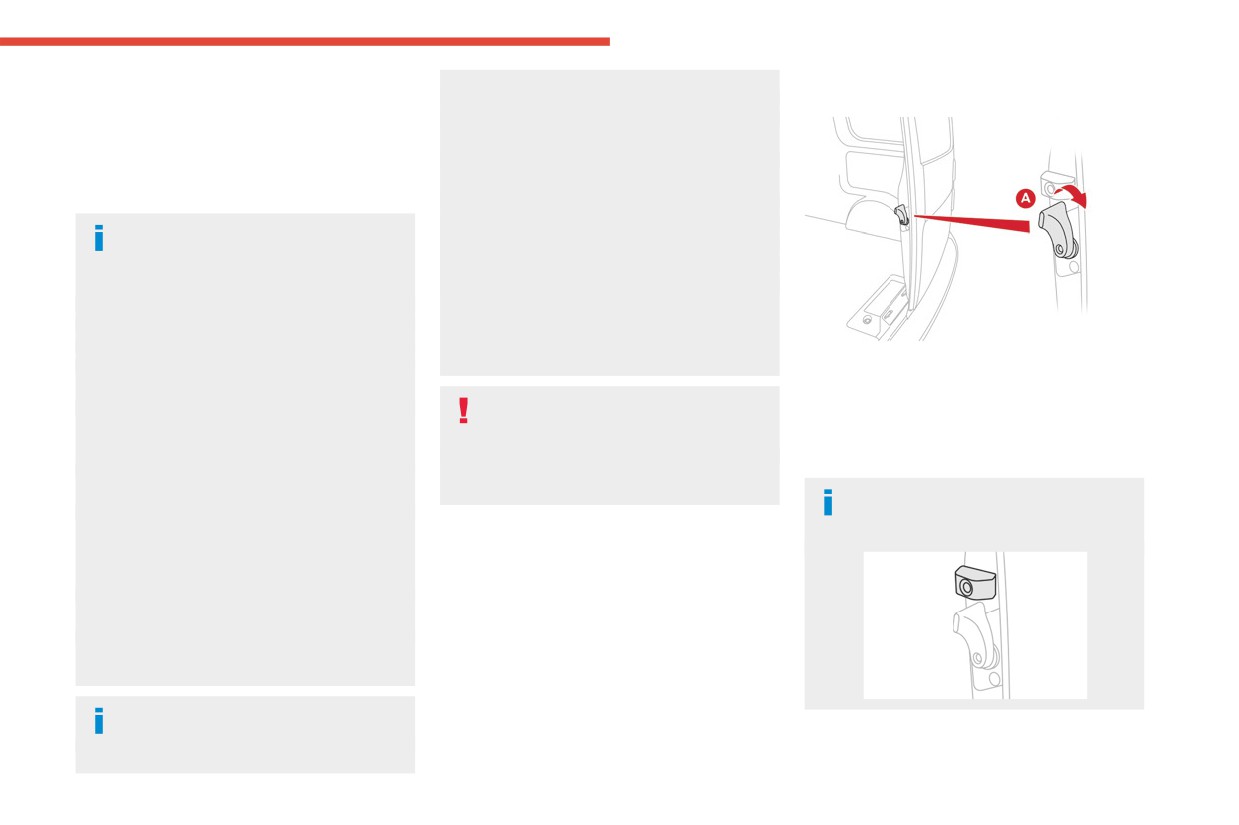
► After first opening the left-hand door, pull the
- if a "Keyless Entry and Start" remote
lever A towards you to open the right-hand door.
control is inside the vehicle.
Ensure that no person or object might
If a number of gestures with your foot have
Closing
prevent the correct opening or closing of
no effect, wait a few seconds before starting
the doors.
► First close the right-hand door, then the left-
again.
Be aware of children when operating the
hand door.
The system is automatically deactivated in
doors.
If the left-hand door is closed first, a
heavy rain or with accumulations of snow.
buffer stop located on the edge of the
If it does not work, make sure that the
right-hand door prevents it closing.
remote control is not exposed to a source of
electromagnetic interference (smartphone,
etc.).
Operation may be affected if using a
prosthetic leg.
This system may not work correctly if your
vehicle is fitted with a towbar.
The side door may open or close without
warning if:
If the left-hand side-hinged door is not properly
– Your vehicle is fitted with a towbar.
closed, the "door open" warning lamp lights up
43
CarManuals2.co
Access
(the right-hand door is not detected). For more
device required by legislation and regulations
In the event of a malfunction or if you
information on the List of warning lamps and,
in your country.
experience difficulty opening or closing
in particular, the door open warning, refer to the
the tailgate, have it checked by a CITROËN
corresponding section.
dealer or a qualified workshop without delay,
to avoid the issue deteriorating and prevent
Opening to approximately
any risk of the tailgate dropping, potentially
causing serious injury.
180°
Tailgate rear screen
The opening rear screen allows you to access
Tailgate
the rear of the vehicle directly, without having to
open the tailgate.
Opening
Opening
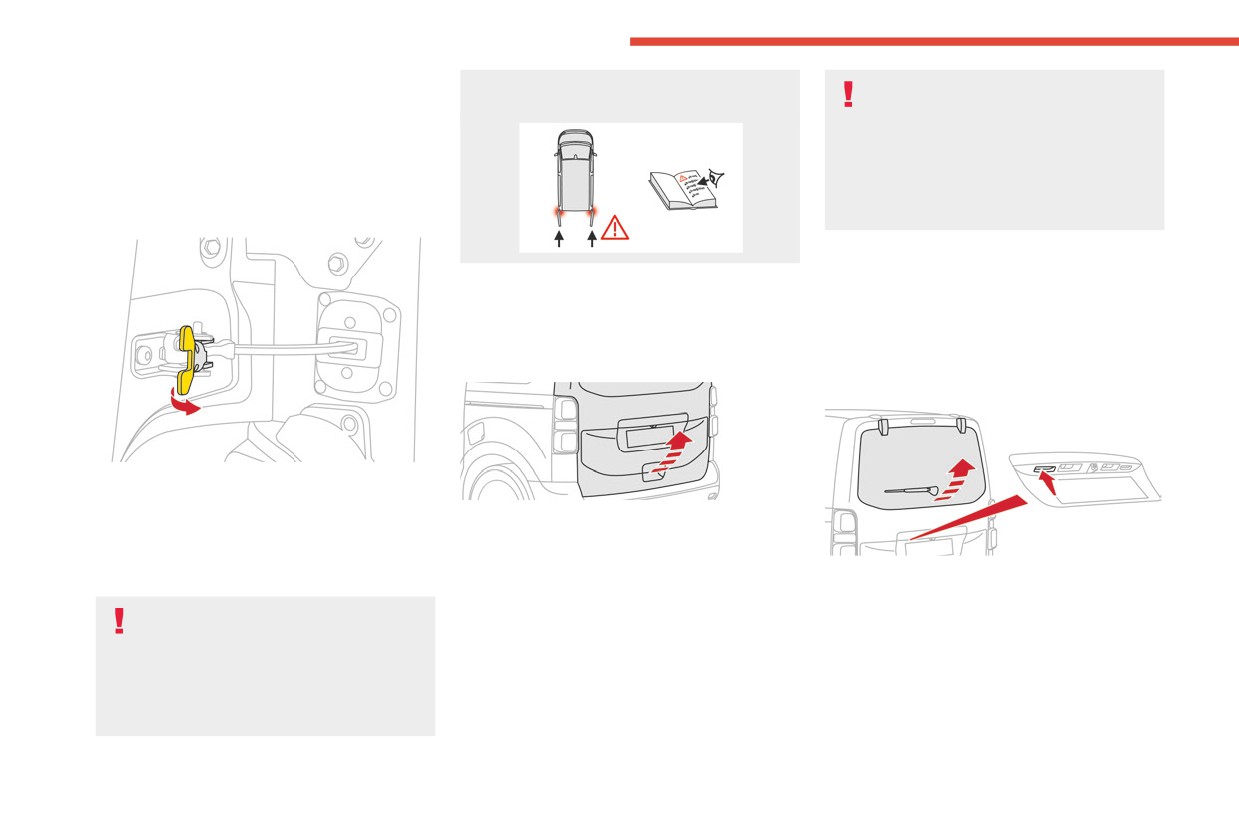
If fitted to your vehicle, a check strap system
allows the doors to be opened from about 90° to
about 180°.
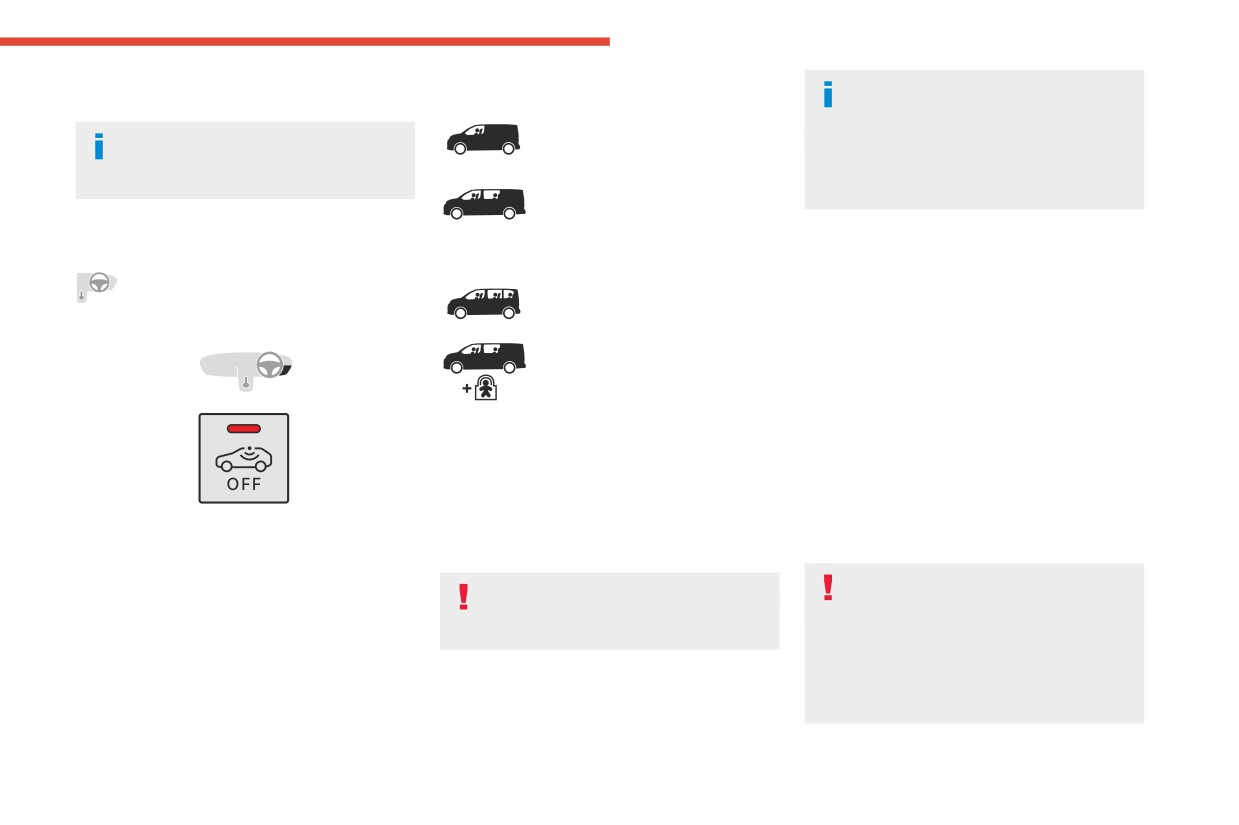
► After unlocking the vehicle, pull the handle,
► Pull the yellow control when the door is open.
then raise the tailgate.
The check strap will engage again automatically
Closing
After unlocking the vehicle, press this control and
on closing.
lift the rear screen to open it.
► Lower the tailgate using the interior grab
When parked with the rear doors open to
handle, then lock it.
90°, the doors will cover the rear lamps.
Closing
If the tailgate is not properly closed, the "door
In order to warn other road users travelling in
Close the rear screen by pressing the centre of
open" warning lamp comes on. For more
the same direction (who may not be aware
the glass until it is fully closed.
information on the list of warning and indicator
that the vehicle is stationary) of the vehicle's
If the tailgate rear screen is not properly closed,
lamps, and in particular the door open warning,
position, use a warning triangle or other
the "door open" warning lamp comes on. For
refer to the corresponding section.
more information on the list of warning and
44
CarManuals2.co
Access
indicator lamps and in particular the door open
Interior volumetric monitoring
If your vehicle is fitted with Additional
2
warning, refer to the corresponding section.
Heating / Ventilation, volumetric
The system only checks for any
monitoring is not compatible with this system.
The tailgate and rear screen cannot both
variation in volume in the cab.
For more information on Additional Heating
be open at the same time, to avoid
The alarm is triggered if anyone
/ Ventilation, refer to the corresponding
damaging them.
breaks a window or enters the
section.
vehicle’s cab; however it is not
triggered if someone enters the
Alarm
loading area.
Locking the vehicle with full
alarm system
The system checks for any
variation in volume in the
Activation
(Depending on version)
passenger compartment.
► Switch off the ignition and exit the vehicle.
The alarm is triggered if anyone
► Lock or deadlock the vehicle using the
breaks a window, enters the
remote control or with the Keyless Entry and
passenger compartment or
Start system.
moves inside the vehicle.
When the monitoring system is active, the red
Self-protection function
indicator lamp in the button flashes once per
second and the direction indicators come on for
The system checks whether any of its
about 2 seconds.
components are out of service.
The exterior perimeter monitoring is activated
The alarm is triggered if the battery, the central
System which protects and provides a deterrent
after 5 seconds and the interior volumetric
control or the siren wiring is put out of service or
against theft and break-ins.
monitoring after 45 seconds.
damaged.
Exterior perimeter monitoring
Door, tailgate/side-hinged doors or
Work on the alarm system
The system checks for opening of the vehicle.
bonnet
Contact a CITROËN dealer or a qualified
The alarm is triggered if anyone tries to open a
If an opening is not properly closed, the
workshop.
door, the boot or the bonnet, for example.
vehicle is not locked, but the exterior
perimeter monitoring will be activated after
45 seconds, at the same time as the interior
volumetric monitoring.
45
CarManuals2.co
Access
Deactivation
Locking the vehicle
Reactivating interior volumetric
► Press the remote control unlocking
monitoring
with exterior perimeter
button.
► Deactivate exterior perimeter monitoring by
or
monitoring only
unlocking the vehicle using the remote control or
► Unlock the vehicle with the Keyless Entry and
Deactivate the interior volumetric monitoring to
the "Keyless Entry and Start" system.
Start system.
avoid the unwanted triggering of the alarm, in
The indicator lamp in the button goes off.
The monitoring system is deactivated: the
certain cases such as:
► Reactivate the full alarm system by locking
indicator lamp in the button goes off and the
- Slightly open window.
the vehicle using the remote control or the
direction indicators flash for about 2 seconds.
- Washing the vehicle.
"Keyless Entry and Start" system.
- Changing a wheel.
The red indicator lamp in the button once again
If the vehicle automatically locks itself
- Towing the vehicle.
flashes every second.
again (as happens if a door or the boot is
- Transport on a ship or ferry.
not opened within 30 seconds of unlocking),
Locking the vehicle without
the monitoring system is automatically
Deactivating interior volumetric
reactivated.
activating the alarm
monitoring
► Lock or deadlock the vehicle using the key
► Switch off the ignition and within 10 seconds
(integral to the remote control) in the driver's
Triggering of the alarm
press the alarm button until the indicator lamp is
door lock.
This is indicated by sounding of the siren
on fixed.
and flashing of the direction indicators for 30
► Exit the vehicle.
Failure of the remote control
seconds.
► Immediately lock the vehicle using the remote
To deactivate the monitoring functions:
The monitoring functions remain active until
control or the "Keyless Entry and Start" system.
► unlock the vehicle using the key (integral to
the alarm has been triggered ten times in
Only exterior perimeter monitoring is activated;
the remote control) in the driver's door lock,
succession.
the red indicator lamp in the button flashes every
► Open the door; this sets off the alarm.
When the vehicle is unlocked, rapid flashing of
second.
► Upon switching on the ignition the alarm
the indicator lamp in the button indicates that the
To take effect, this deactivation must be
stops. The button indicator lamp goes off.
alarm was triggered during your absence. When
performed whenever the ignition is switched
the ignition is switched on, this flashing stops
off.
Malfunction
immediately.
When the ignition is switched on, the fixed
lighting of the red indicator lamp in the button
indicates a system malfunction.
Have it checked by a CITROËN dealer or a
qualified workshop.
46
CarManuals2.co
Access
Automatic activation
the ignition is switched off if the front doors
If an electric window meets an obstacle
2
are not open.
during operation, the movement of the
(Depending on version)
After that time, the controls are disabled. To
window must be reversed. To do this, press
The system is activated automatically 2 minutes
reactivate them, switch the ignition on again.
the relevant control.
after the last door or the boot is closed.
When the driver operates the passenger
► To avoid triggering the alarm on entering the
electric window control, it is important to
vehicle, first press the unlocking button on the
Safety anti-pinch
ensure that nothing can prevent the window
remote control or unlock the vehicle using the
If your vehicle is fitted with the safety anti-pinch
from closing properly.
"Keyless Entry and Start" system.
function, when the window rises and meets an
Pay particular attention to children when
obstacle, it stops and partially lowers.
operating the windows.
Electric windows
In the event of unwanted opening of the window
Do not put your head or arms through the
on closing, press the control until the window
open windows when the vehicle is moving -
opens completely. Within 4 seconds, pull the
risk of serious injury!
control until the window closes.
The safety anti-pinch does not operate while
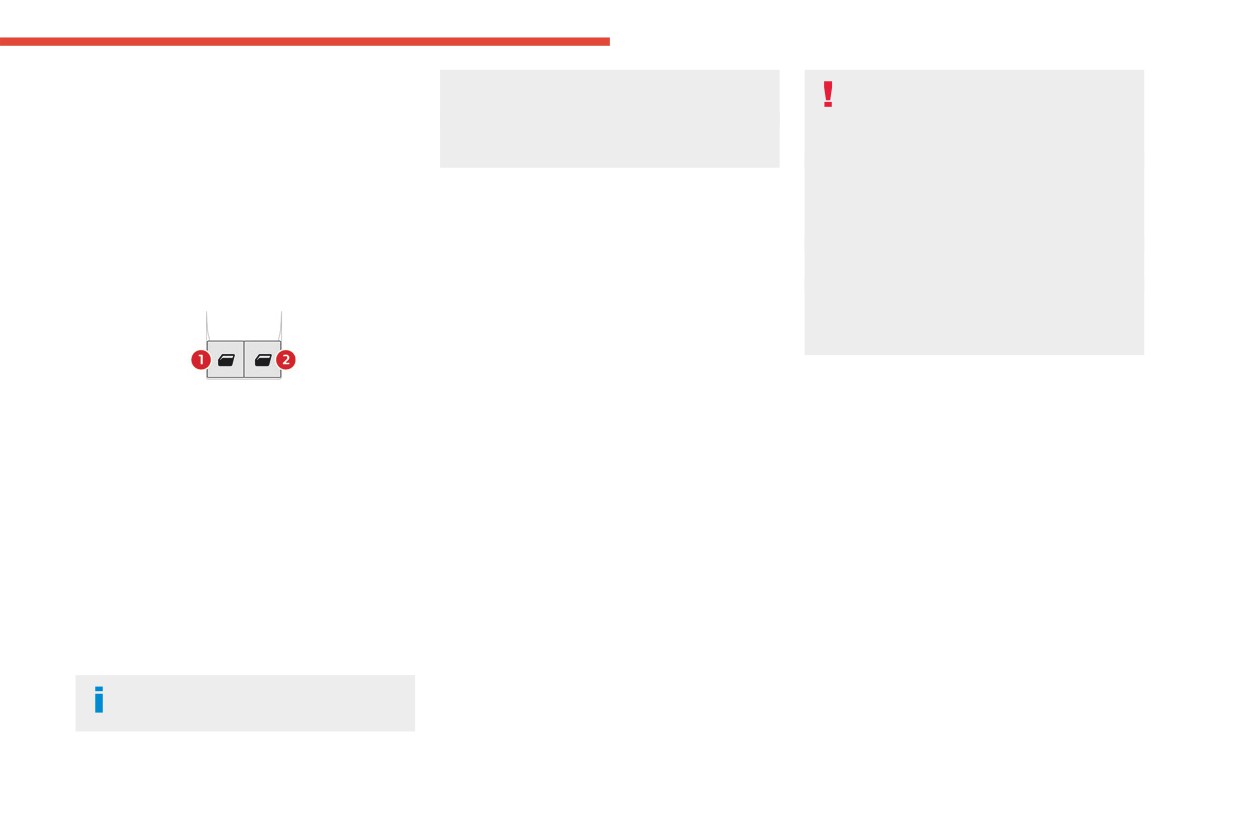
1. Left-hand front.
doing this.
2. Right-hand front.
Reinitialising the electric
Operation
windows
► To open/close the window manually, press/
After reconnecting the battery, or in the event
pull the switch without passing the point of
of abnormal window movement, the anti-pinch
resistance; the window stops as soon as the
function must be reinitialised.
switch is released.
The anti-pinch function is disabled during the
► To open/close the window automatically,
following sequence of operations.
press/pull the switch fully, beyond the point of
For each window:
resistance; the window opens/closes completely
► Lower the window fully, then raise it; it will
when the switch is released (pressing the switch
rise in steps of a few centimetres each time the
again stops the movement of the window).
control is pressed. Repeat the operation until the
window is fully closed.
The electric window controls remain
► Continue to pull the control for at least one
operational for about 45 seconds after
second after the window reaches the closed
position.
47
CarManuals2.co
Ease of use and comfort
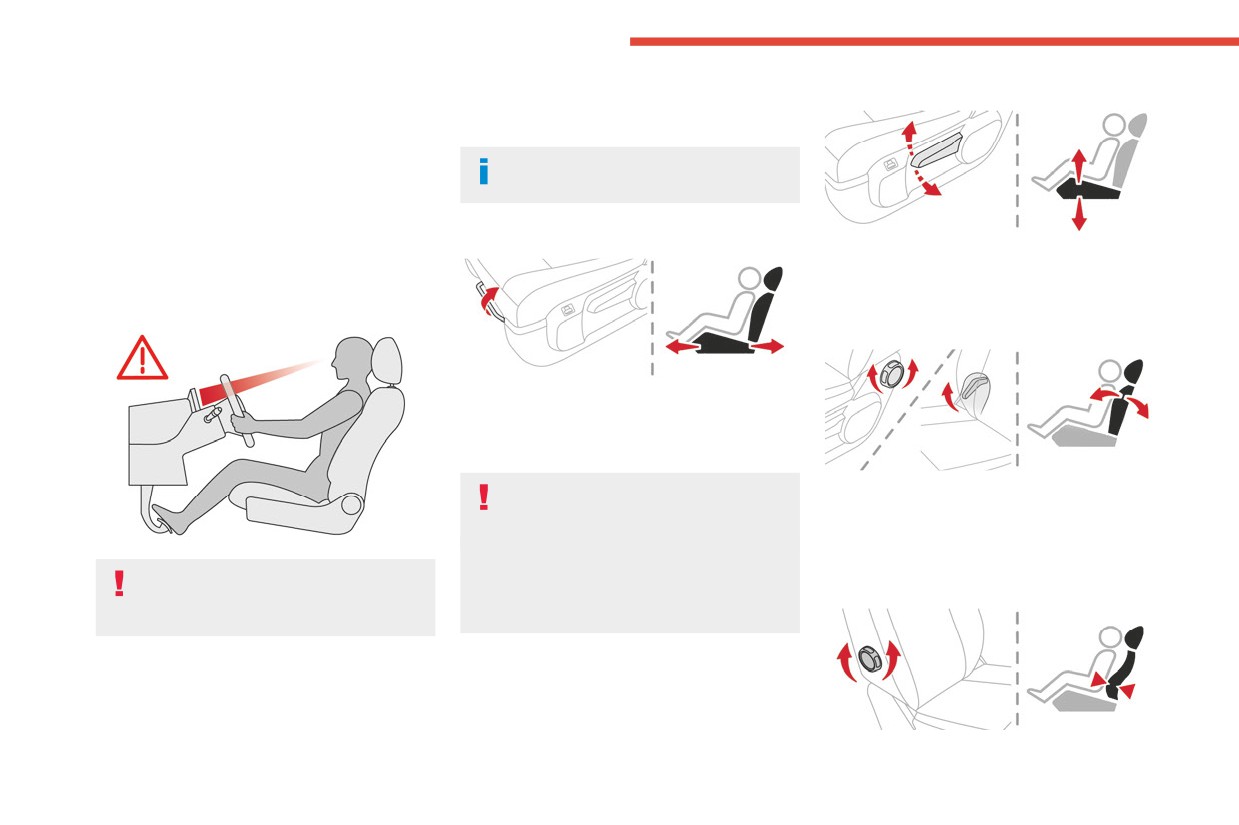
Correct driving position
Manually-adjusted front
Height
Before taking to the road and to make the most
seats
of the ergonomic layout of the instruments and
controls, carry out these adjustments in the
For more information on the Seat belts,
following order:
refer to the corresponding section.
- the height of the head restraint,
- the seat backrest angle,
Longitudinal
- the seat cushion height,
► Pull the control upwards to raise or push it
- the longitudinal position of the seat,
downwards to lower, until you obtain the position
- the height and reach of the steering wheel,
required.
- the rear view mirror and door mirrors.
Backrest angle
► Raise the control bar and slide the seat
forwards or backwards.
► Release the control bar to lock the seat in
position on one of the notches.
Before moving the seat backwards,
► Depending on equipment, turn the knob
ensure that there is nothing that might
or pull the control all the way up and tilt the
prevent the full travel of the seat.
backrest forwards or backwards to obtain the
There is a risk of trapping or pinching
desired angle.
Once these adjustments have been
passengers if present in the rear seats or
jamming the seat if large objects are placed
Lumbar
made, check the instrument panel can be
viewed correctly from your driving position.
on the floor behind the seat.
48
CarManuals2.co
Ease of use and comfort
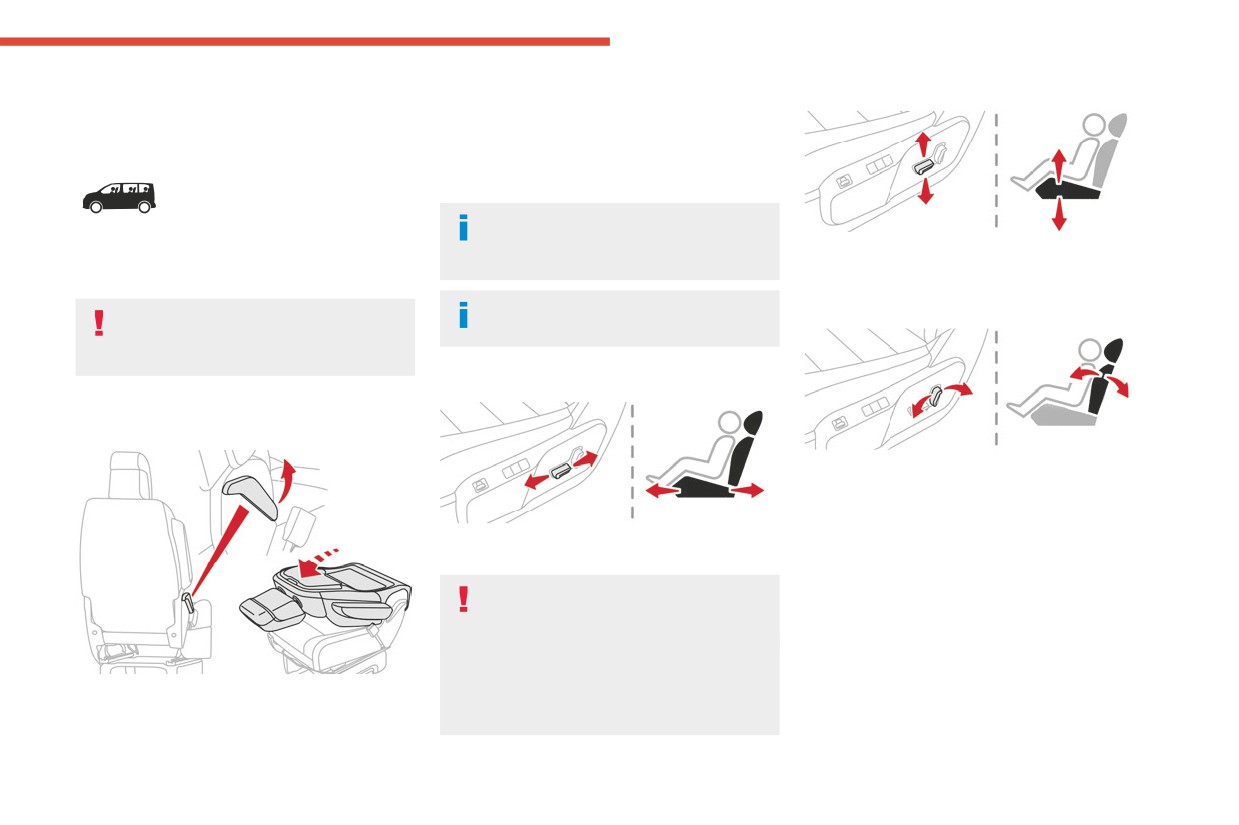
► Turn the knob to obtain the desired level of
To return to the normal position, pull the control
Seat cushion height
3
lumbar support.
up to release the backrest, then pull the backrest
up to its raised position.
Table position of the driver's
Electric front seat
To avoid discharging the battery, carry
The table position of the driver's allows rear
out these adjustments with the engine
► Tilt the control upwards or downwards to
passengers to be helped out of the vehicle (by
running.
obtain the desired height.
the emergency services).
For more information on the Seat belts,
Backrest angle
Check that there is no object that could
refer to the corresponding section.
interfere with the movement of a seat,
both above and below.
Longitudinal
► Place the head restraint in the low position,
and if fitted to your vehicle, raise the armrest and
fold the table fitted to the back of the seat.
► Tilt the control forwards or rearwards to
adjust the angle of the backrest.
► Push the control forwards or rearwards to
slide the seat.
Before moving the seat backwards,
ensure that there is nothing that might
prevent the full travel of the seat.
There is a risk of trapping or pinching
passengers if present in the rear seats or
► Pull the control fully up and tip the backrest
jamming the seat if large objects are placed
forward.
on the floor behind the seat.
49
CarManuals2.co
Ease of use and comfort
Never drive with the head restraints removed;
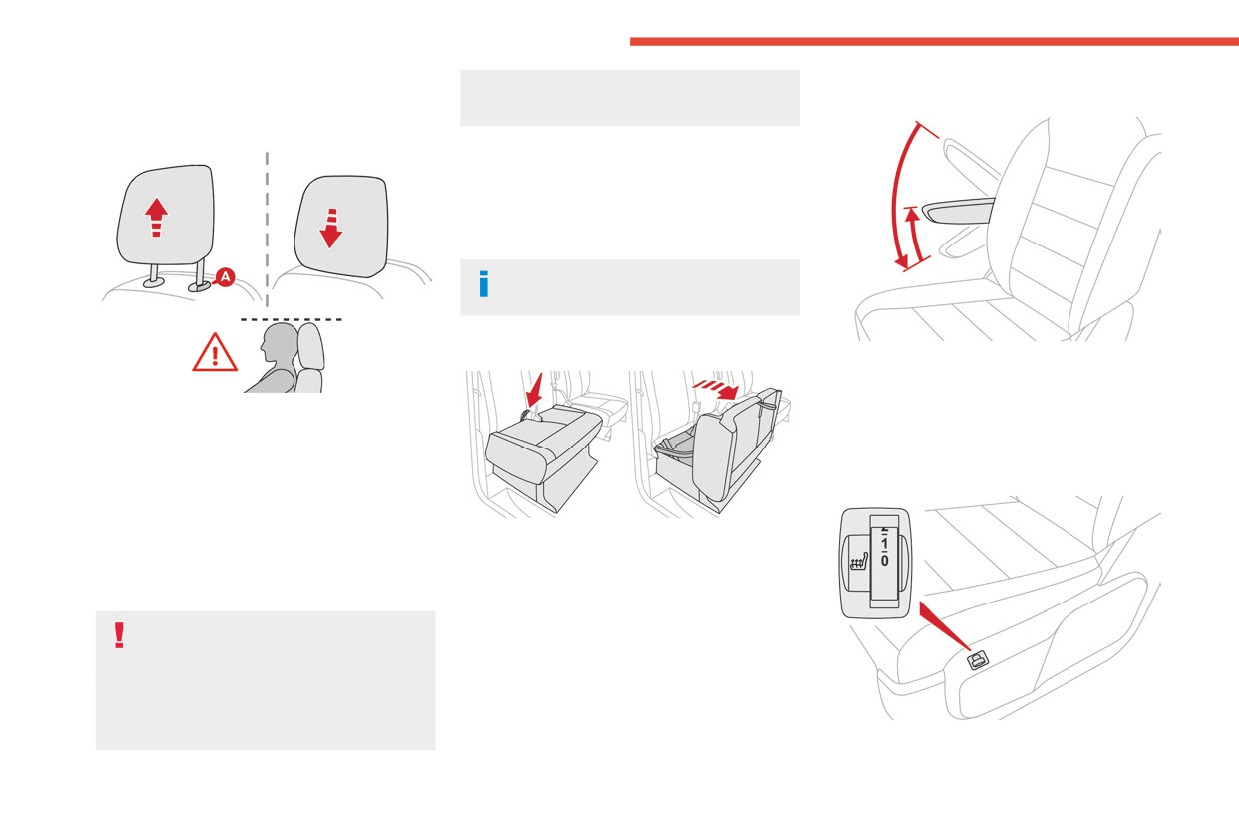
Head restraint height
Armrest
they must be fitted and correctly adjusted.
adjustment
2-seat front bench seat
If fitted in the vehicle, this is fixed and has a seat
belt built into the backrest for the seat next to the
driver’s seat.
For more information on the Seat belts,
refer to the corresponding section.
Under-seat storage
The armrest has notches.
► Pull the armrest fully up
► Lower it fully down.
If fitted to your vehicle.
► Raise the armrest to the desired position.
► To raise it, pull it upwards as far as possible
(notch).
► To remove it, press the lug A and pull it
Heated driver's seat
upwards.
► To put it back in place, engage the head
restraint rods in the openings keeping them in
If the vehicle is so equipped, a storage space is
line with the seat backrest.
provided under the seat.
► To lower it, press the lug A and push down on
► Pull the strap towards you to tip the seat
the head restraint at the same time.
cushion.
The head restraint has a frame with
notches which prevents it from lowering;
this is a safety device in case of impact.
The adjustment is correct when the upper
edge of the head restraint is level with the
top of the head.
If fitted to your vehicle.
50
CarManuals2.co
Ease of use and comfort
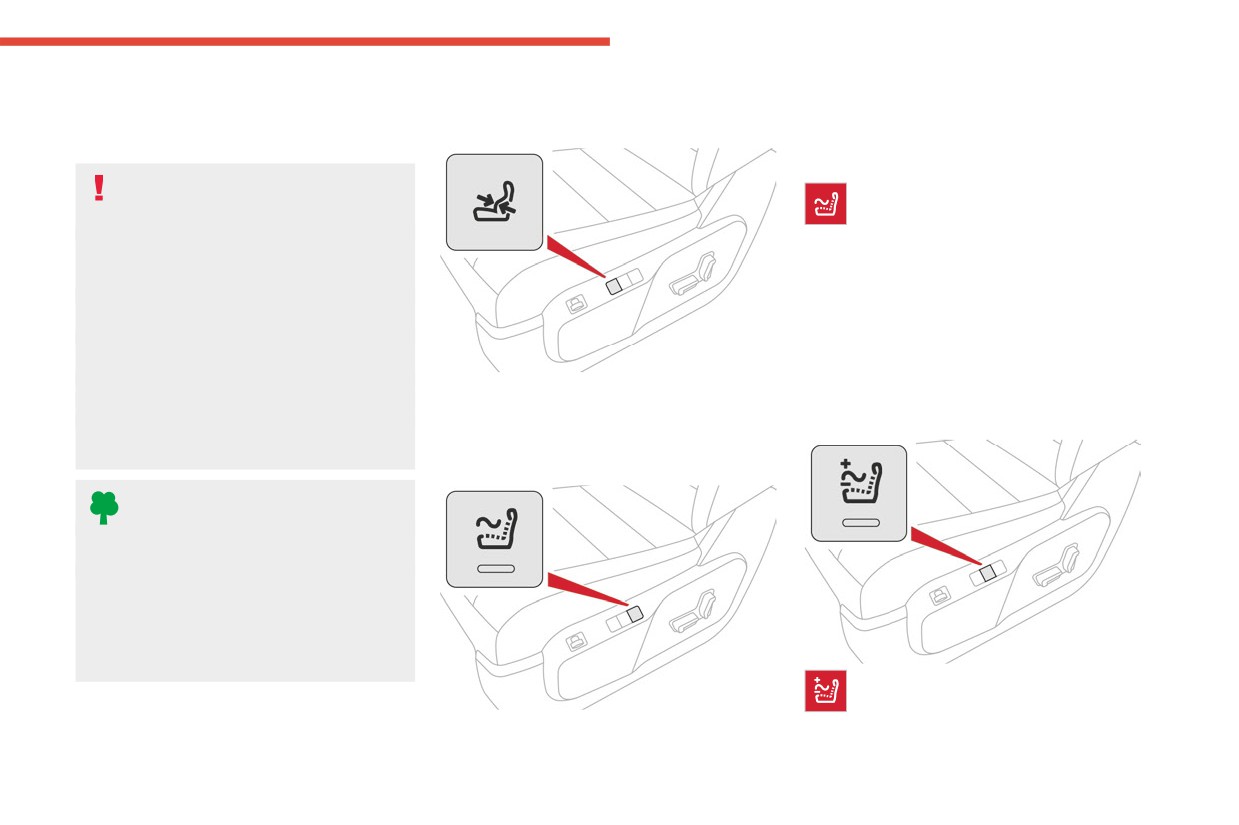
► With the engine running and when the
This function provides lumbar massage; it only
Electric lumbar
3
outside temperature is below 20 °C, use the
operates when the engine is running as well as
adjustment knob to switch on and select the level
adjustment
in STOP mode of the Stop & Start system.
of heating required from 0 (off) to 3 (high).
Activation/Deactivation
Prolonged use of heated seats is not
► Press this button to activate/deactivate
recommended for people with sensitive
the function.
skin.
Upon activation, the indicator lamp comes on.
There is a risk of burns for people whose
The massage function is activated for a period
perception of heat is impaired (e.g. illness,
of one hour.
taking medication).
During this time, massage is performed in
To keep the heated pad intact and to prevent
6 cycles of 10 minutes (6 minutes of massage
a short circuit:
followed by a 4-minute break).
- Do not place heavy or sharp objects on the
After one hour, the function is deactivated; the
seat.
indicator lamp goes off.
- Do not kneel or stand on the seat.
► Press the control to obtain the desired lumbar
- Do not spill liquids onto the seat.
support.
Adjustment of intensity
- Never use the heating function if the seat
is damp.
Massage function
Do not use the function when the seat
is not occupied.
Reduce the heating intensity as soon as
possible.
When the seat and passenger compartment
have reached a satisfactory temperature,
switch the function off; reducing electrical
consumption in turn decreases energy
consumption.
Press this button to adjust the intensity of
the massage.
Two levels of massage are available.
51
CarManuals2.co
Ease of use and comfort
into account in order to correctly judge the
► Lock the vehicle from the outside.
Steering wheel
distance of vehicles approaching from behind.
If the mirrors are folded using control A,
adjustment
they will not unfold when the vehicle is
unlocked.
Electric unfolding
The door mirrors are unfolded electrically when
the vehicle is unlocked using the remote control
or key. Unless folding was selected with control
A, pull the control in the central position towards
the rear again.
Folding/unfolding when locking/unlocking
the vehicle can be deactivated. Contact a
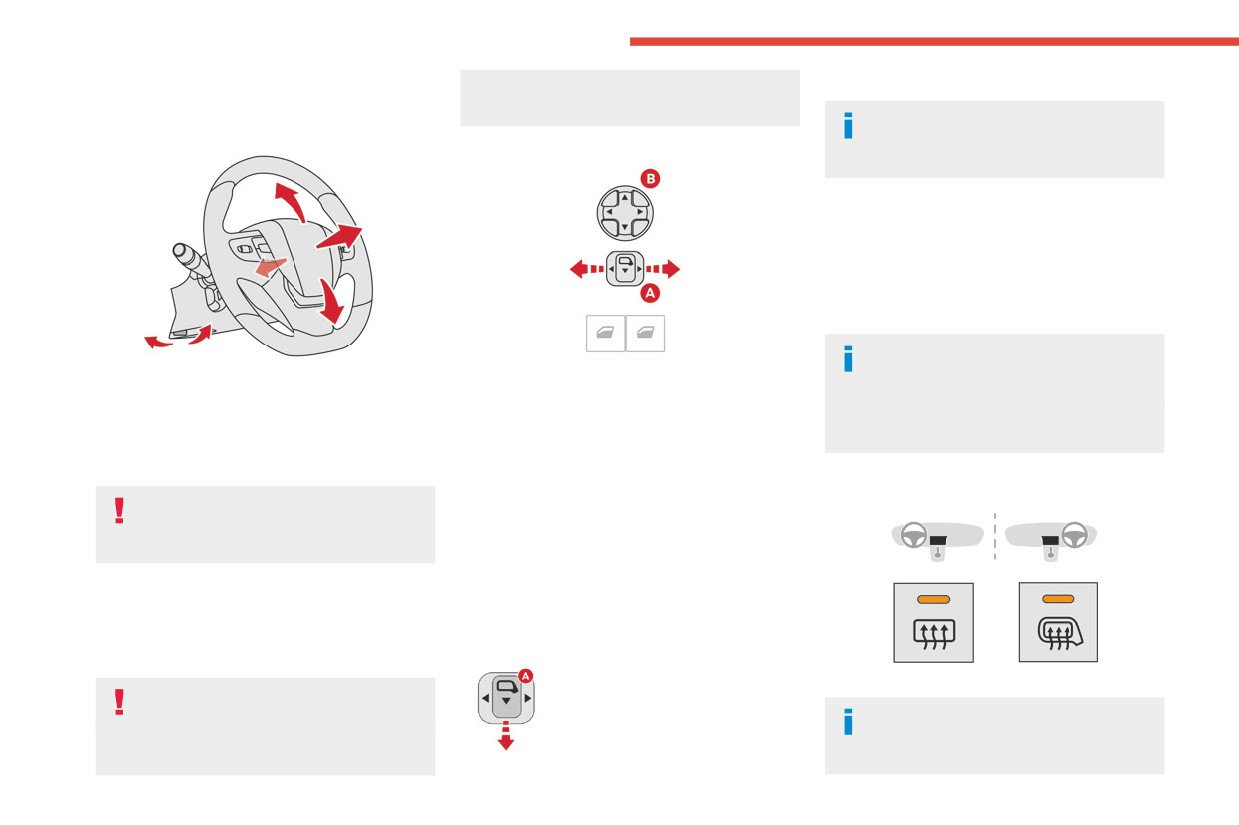
► Move control A to the right or to the left to
► When stationary, lower the control lever to
CITROËN dealer or a qualified workshop.
select the corresponding mirror.
release the steering wheel.
If necessary, the mirrors can be folded
► Move control B in any of the four directions
► Adjust the height and reach.
manually.
to adjust.
► Pull the control lever to lock the steering
► Return control A to its central position.
wheel.
Heated mirrors
As a safety precaution, these operations
Manual folding
must only be carried out while the vehicle
The mirrors can be folded manually (parking
is stationary.
obstruction, narrow garage, etc.).
► Turn the mirror towards the vehicle.
Electric folding
Mirrors
Depending on equipment, the door mirrors can
be folded electrically.
Door mirrors
► From the inside, with the
► Press one of these buttons.
As a safety measure, the mirrors should
ignition on, place control A in the
be adjusted to reduce the "blind spots".
For more information on Rear screen
central position.
The objects that you see in the mirrors are
demisting/de-icing, refer to the
► Pull control A backwards.
in fact closer than they appear. Take this
corresponding section.
52
CarManuals2.co
Ease of use and comfort
Rear view mirror
3
Equipped with an anti-dazzle system, which
darkens the mirror glass and reduces the
nuisance to the driver caused by the sun,
headlamps of other vehicles, etc.
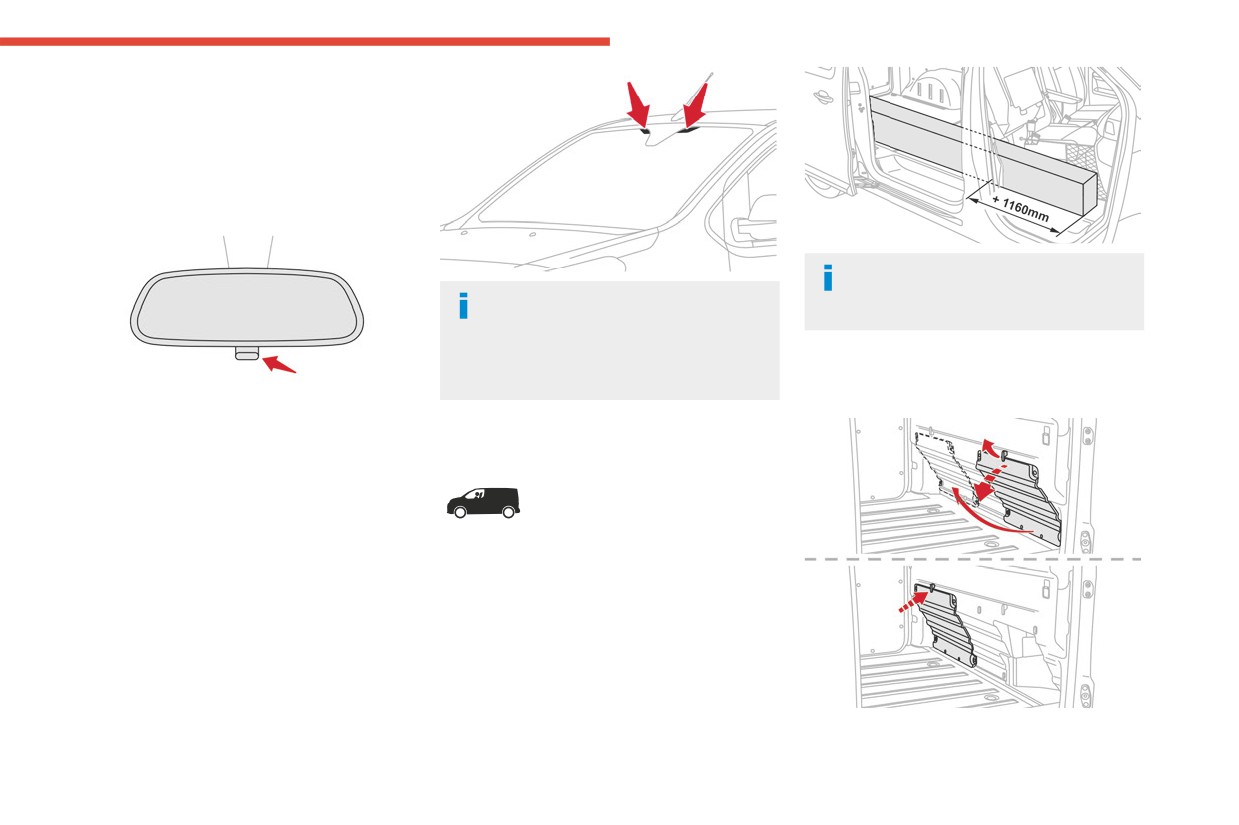
Day/night position
Once the removable flap has been
removed, you can load long objects
For the version without athermic
under the outer seat.
windscreen, to limit the obstruction of you
field of vision through the windscreen, we
recommend you to place the toll badge in the
Removable flap (type 1)
upper part of the windscreen.
► Pull the lever to change to the anti-dazzle
Removing the flap
"night” position.
► Push the lever to change to the normal "day"
Moduwork
position.
Windscreen zone for toll
badge
The cushion of the bench seat's outer seat can
Depending on the version, the vehicle can be
be folded up against the backrest to create a
equiped with a athermic windscreen type.
loading area inside the cab.
For a best functionnement of the toll badge
A removable flap on the partition can be
system, it is necessary to place the toll badge on
removed to allow long objects to be loaded.
the zone of windscreen provided for the purpose
symbolised with of black dotteds around of the
interior rear view mirror base.
53
CarManuals2.co
Ease of use and comfort
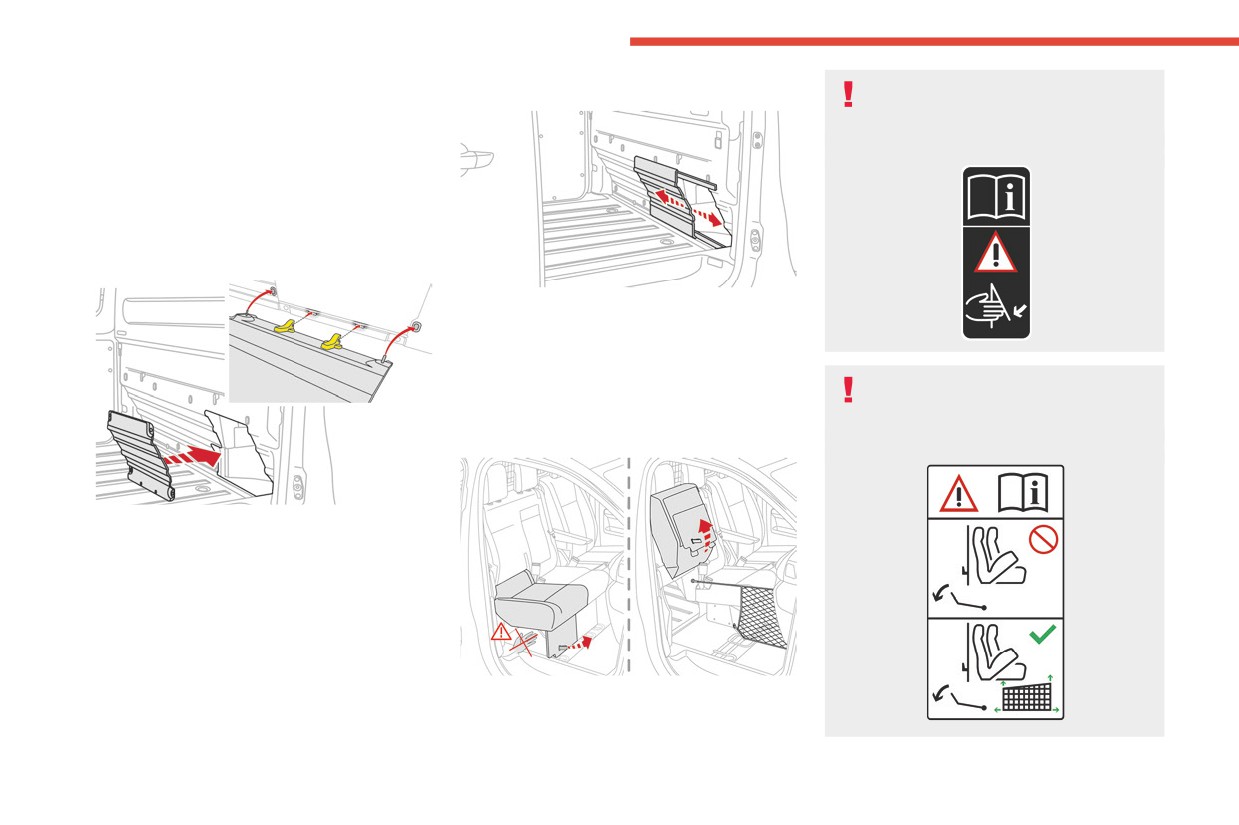
► While holding the flap with one hand, turn the
Removable flap (type 2)
Never put your hand underneath the seat
control at the top of the flap with the other hand
cushion to guide it upwards, as your
to release it.
fingers may become trapped.
► Lower the flap to remove it from its housing.
Always use only the strap.
► Stow it behind the driver’s seat, clipping it into
the attachment lugs.
► Turn the control at the top of the flap to
secure it.
Refitting the flap
► To open or close the flap, slide it to the left
or right.
The flap is kept in the closed or open position
with magnets located at each end position.
When the outer seat is raised and the
Folding seat cushion
flap is removed, you must install the
anti-slip net.
Raising the seat cushion
Refer to the Anti-slip net section.
► Tilt the flap, with the yellow hinges pointing
downwards.
► Insert the hinges into their housing then press
down fully (to avoid vibrations).
► With one hand lift the flap to close it, then
with the other hand turn the control at the top of
the flap to secure it.
► With one hand, firmly pull the strap forwards
to unlock the seat cushion.
► A strut lifts the seat cushoin against the
backrest.
54
CarManuals2.co
Ease of use and comfort
Lowering the seat cushion
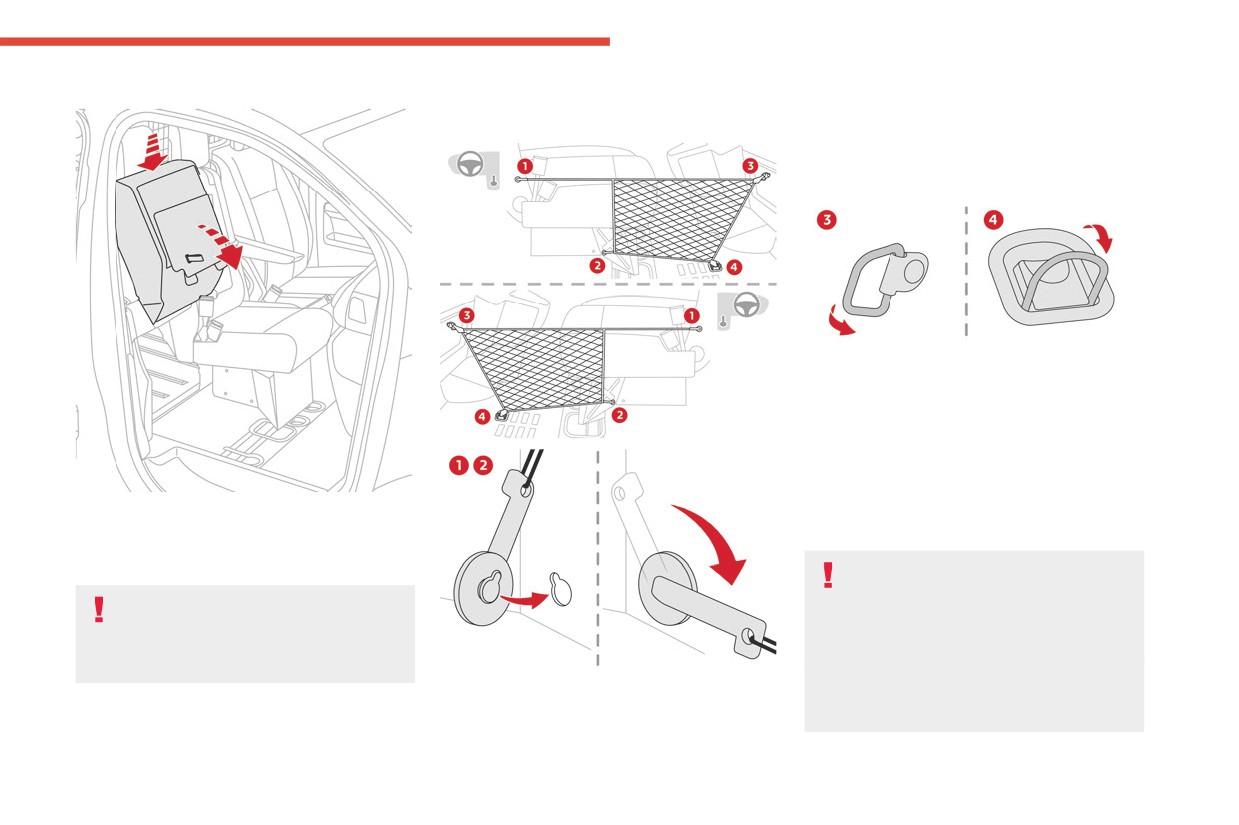
Anti-slip net
turn it a quarter turn (in a clockwise direction) to
3
lock it.
Installing the net
► Put the second fastener into the lower cut-out
2, located on the seat base. Keep the fastener
pressed against the structure, then turn it a
quarter turn (in a clockwise direction) to lock it.
► Secure the first hook to the ring 3 located in
the glove box.
► Secure the second hook to the ring 4 located
on the floor.
Removing the net
► Release the hooks from the rings 4 and 3.
► Remove the lower fastener 2 then the upper
► Remove the anti-slip net.
fastener 1, turning them by a quarter turn
► To reposition the seat cushion, press firmly
backwards to unlock them.
on the top of the seat with one hand to lower the
seat cushion until it locks into the seat position.
Make sure that the size, shape and
volume of the loads carried are
Ensure that there are no objects or feet
compatible with the highway code and safety
obstructing the anchorage points or
regulations and do not impair the driver’s field
preventing the assembly from locking
of vision.
properly.
All loads must be appropriately secured
► Put the first fastener into the upper cut-out 1,
to prevent or minimise displacement and
located beneath the folded seat cushion. Keep
prevent injury.
the fastener pressed against the structure, then
55
CarManuals2.co
Ease of use and comfort
Install the anti-slip net (supplied with the
Central seat cushion
vehicle) every time that the seat is raised and
storage
the partition flap removed.
Never use the net for any other purposes.
Regularly check the condition of the anti-
slip net. As soon as signs of wear or tear
appear, contact a CITROËN dealer to have
it replaced by an anti-slip net that meets the
specifications required by CITROËN for the
vehicle.
Always fit the removable flap back into place
when you are not carrying any long loads.
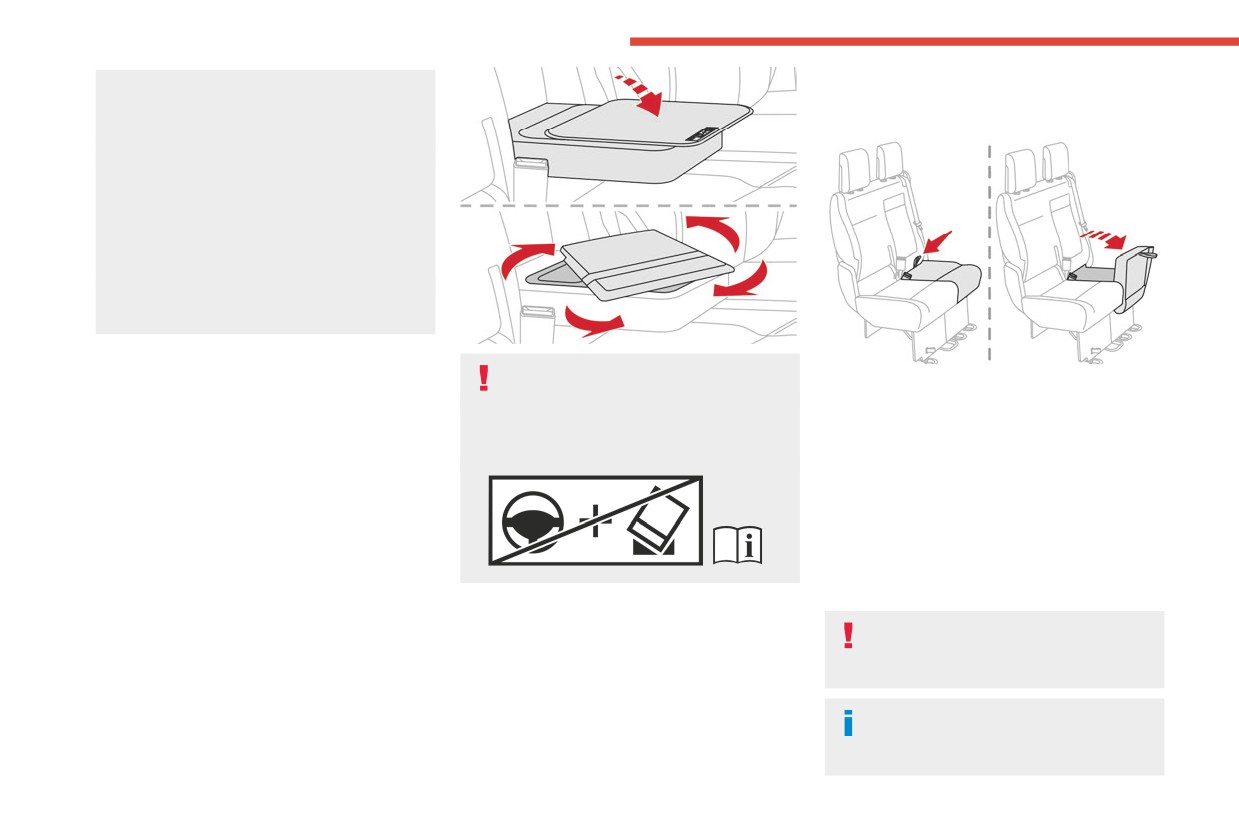
"Rotating writing table"
Never use the table while the vehicle is
If fitted to your vehicle, the central seat cushion
being driven.
of the bench seat can be tilted to form a pivoting
In the event of sudden braking or impact, any
Precautions for the seats
writing table, thus creating a mobile desk (with
objects on the table might become dangerous
and bench seats
the vehicle stationary).
projectiles that could cause injury.
Do not remove a head restraint without storing it
► Pull the handle located at the top of the
and securing it to a support.
backrest cushion.
Ensure that the passengers can always access
the seat belts and fasten them easily.
A passenger must not take their seat without
adjusting the seat's head restraint correctly and
adjusting and fastening their seat belt.
Ensure that no object or passenger feet
could obstruct the anchorage points or
prevent the correct latching of the assembly.
If removing and storing seats and bench
seats out of the vehicle, ensure that they
are placed in a clean area, so as to avoid
56
CarManuals2.co
Ease of use and comfort
introducing any foreign bodies into the
The different equipment and settings described
3
mechanisms.
hereafter vary according to the version and the
configuration of your vehicle.
The seats and bench seats are not
designed for any other use than in the
vehicle. They are equipped with mechanisms
and features that may be damaged if used
improperly or if dropped.
Loading luggage or objects
behind the row 3 seat and
The bench seat has a one-piece backrest that
bench seat
may be fixed or foldable (table position).
For more information on the Seat belts,
When driving, it is prohibited to have a
refer to the corresponding section.
passenger:
- in rows 2 and 3, in the outer right-hand seat, if
Access to row 3
the bench seat is in the fully folded position,
- in the centre seat if the outer right-hand seat is
in the fully folded position,
- in row 3 if the backrest in front (row 2) is in the
table position,
- in row 3 if the seat/bench seat in front (row 2)
is in the fully folded position.
If you want to load luggage onto the backrests in
row 3 while in the table position, the backrests in
row 2 must also be in the table position.
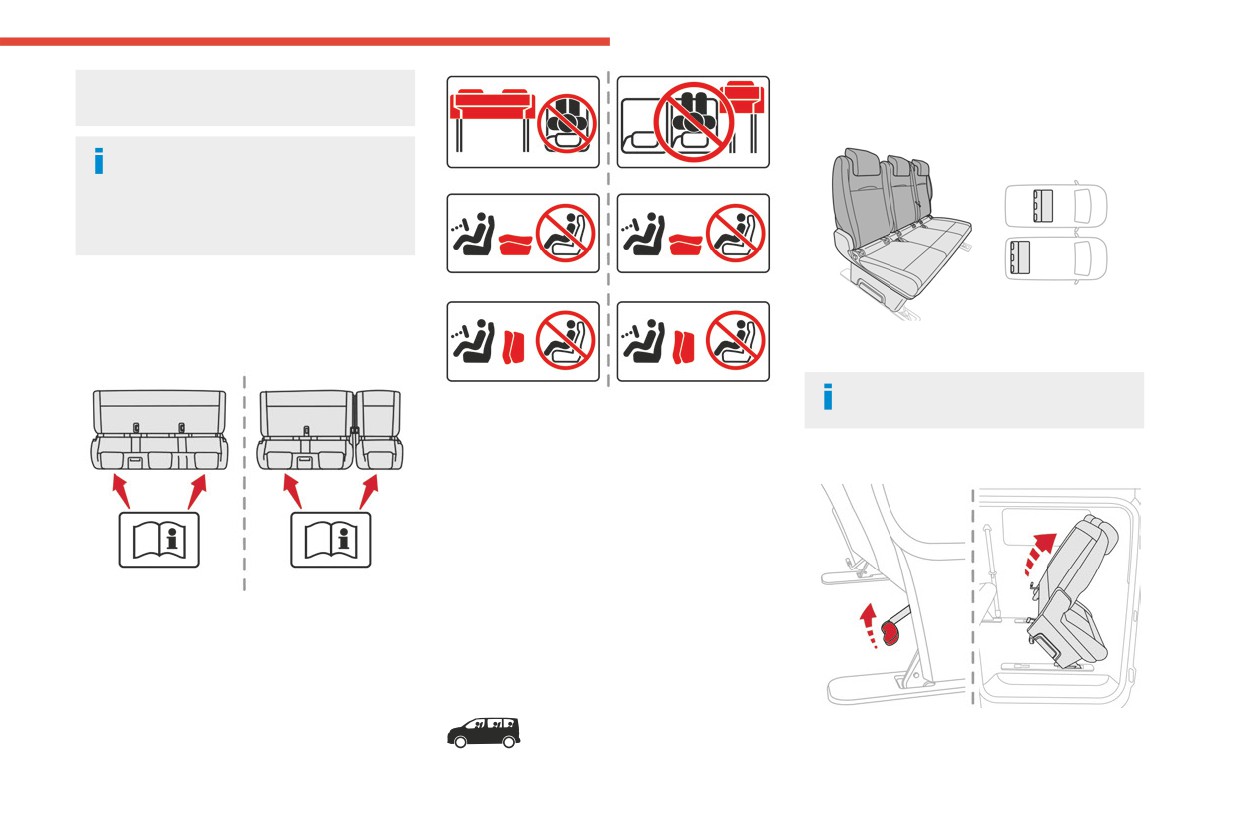
Fixed one-piece bench
seat
Combi, Business
► Using the handle, release the rear feet then
tip the seat forward.
57
CarManuals2.co
Ease of use and comfort
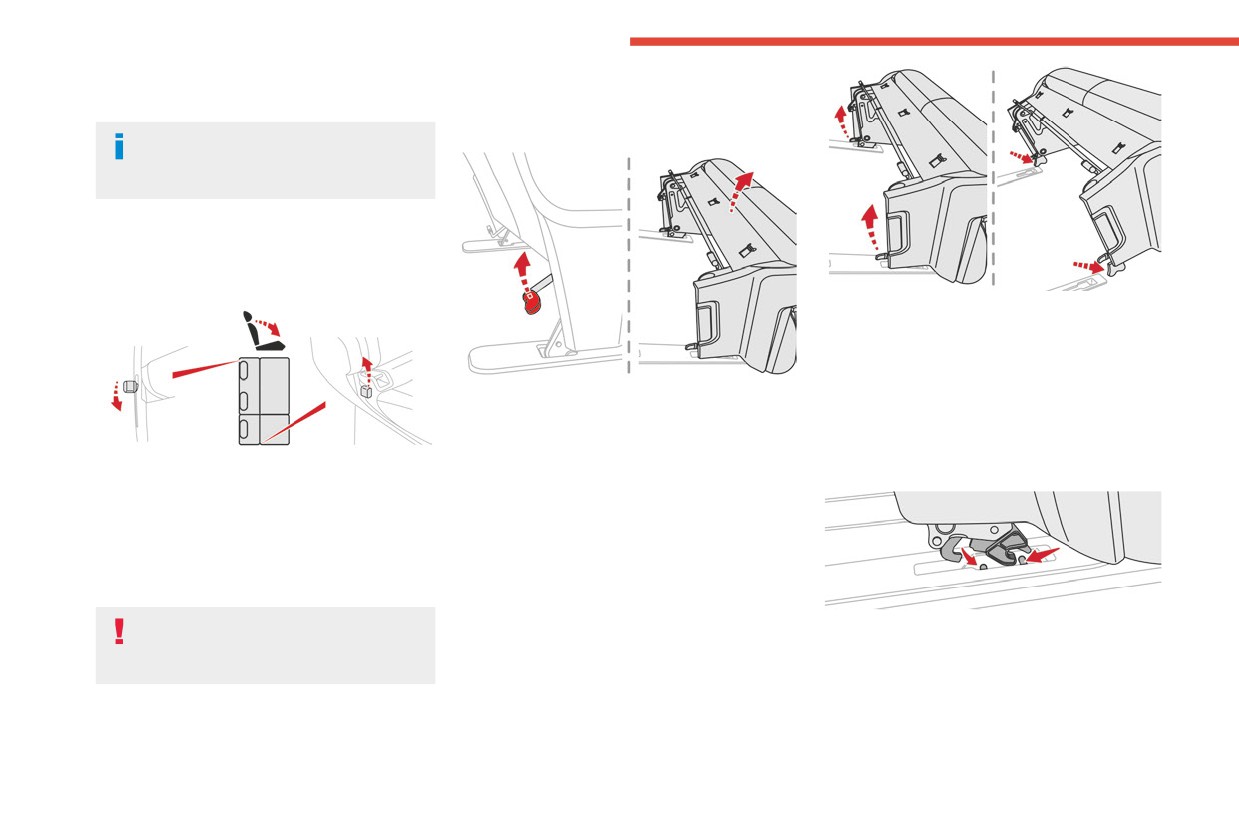
► To return the seat, tip the bench towards the
Tilting
rear until the feet lock into place..
► If your vehicle has the facility, place the
It is not necessary to fold the backrest
backrest in the table position.
(table position) to tip the bench seat for
access to row 3.
Folding the backrest to the
table position
► Put the head restraints in the low position.
► Release the front feet using the handles.
► Disengage the bench seat from its
anchorages.
► Remove the bench seat.
► Using the handle, release the rear feet then
tip the seat forward.
Refitting
► To return the seat, tip the bench towards the
► Check that there is no object obstructing the
rear until the feet lock into place..
anchorages and preventing the feet locking into
► From the rear, lower the handle to release the
place.
backrest.
Removing
► From the front, raise the handle to release
► If the vehicle is so equipped, place the
the backrest.
backrest in the table position.
► Fold the backrest onto the cushion.
► Tip the bench seat.
► To return the backrest to its normal position,
raise the handle and pull the backrest up.
Do not leave objects (such as a bag or
► Engage the front feet in the anchorages on
toys) on the cushion when folding the
the floor (as shown above).
backrest.
58
CarManuals2.co
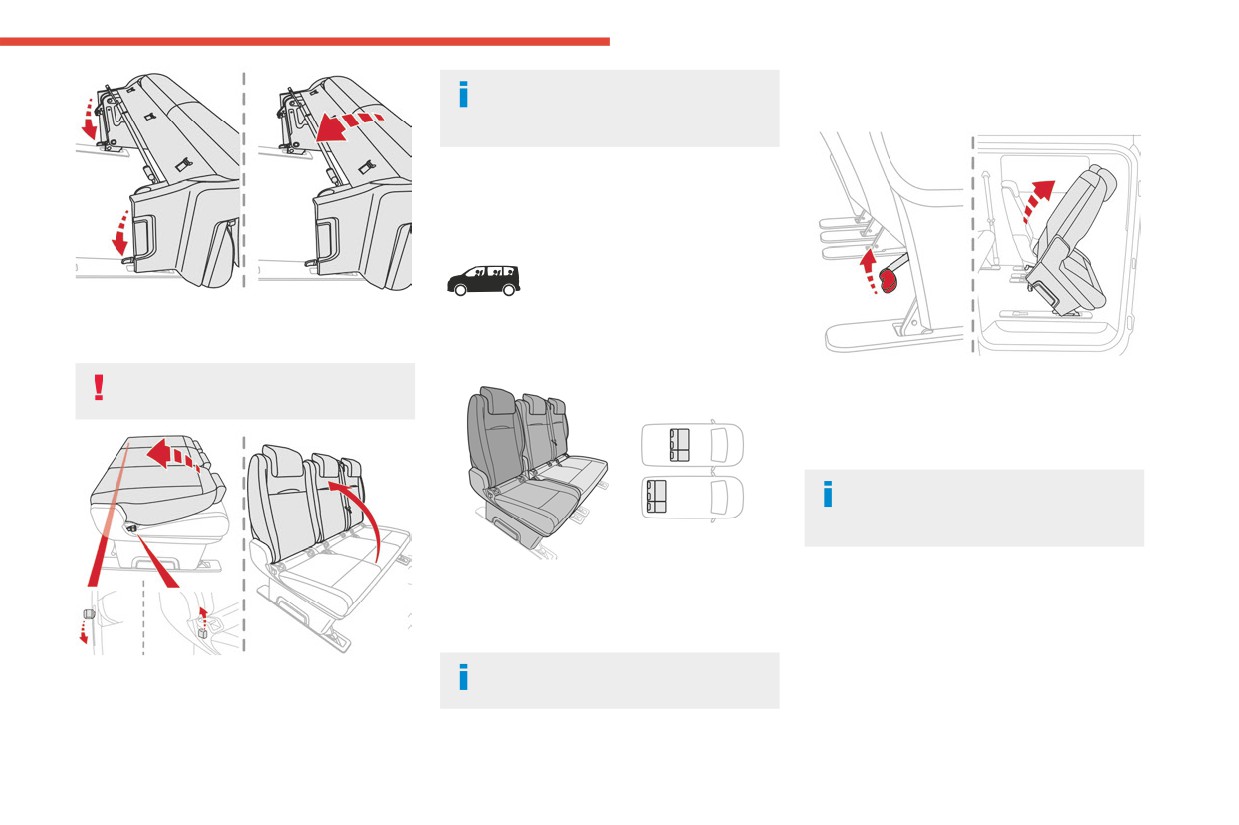
Ease of use and comfort
Check that the seat has correctly locked
Access to row 3
3
on the floor when returned to the seating
(example for an individual seat)
position.
Fixed rear seat and bench
seat
Combi, Business
► Lock the front feet using the handles.
► Tip the bench seat backwards until the rear
The different equipment and settings described
feet lock into place.
hereafter vary according to the version and the
configuration of your vehicle.
► Using the handle, release the rear feet then
Be careful of passengers' feet when
tip the seat forward.
tipping.
► To return the seat to the normal position, tip
the seat backwards until the rear feet engage in
their anchorages.
It is not necessary to fold the backrest
(table position) to tip the bench seat and
so access row 3.
The seat has a backrest that may be fixed or
Folding the backrest into
foldable (table position).
the table position
The bench seat has a one-piece backrest that
may be fixed or foldable (table position).
► Place the head restraints in the low position.
► If the vehicle is so equipped, pull the control
For more information on the Seat belts,
and raise the backrest (from the rear, lower the
refer to the corresponding section.
handle).
59
CarManuals2.co
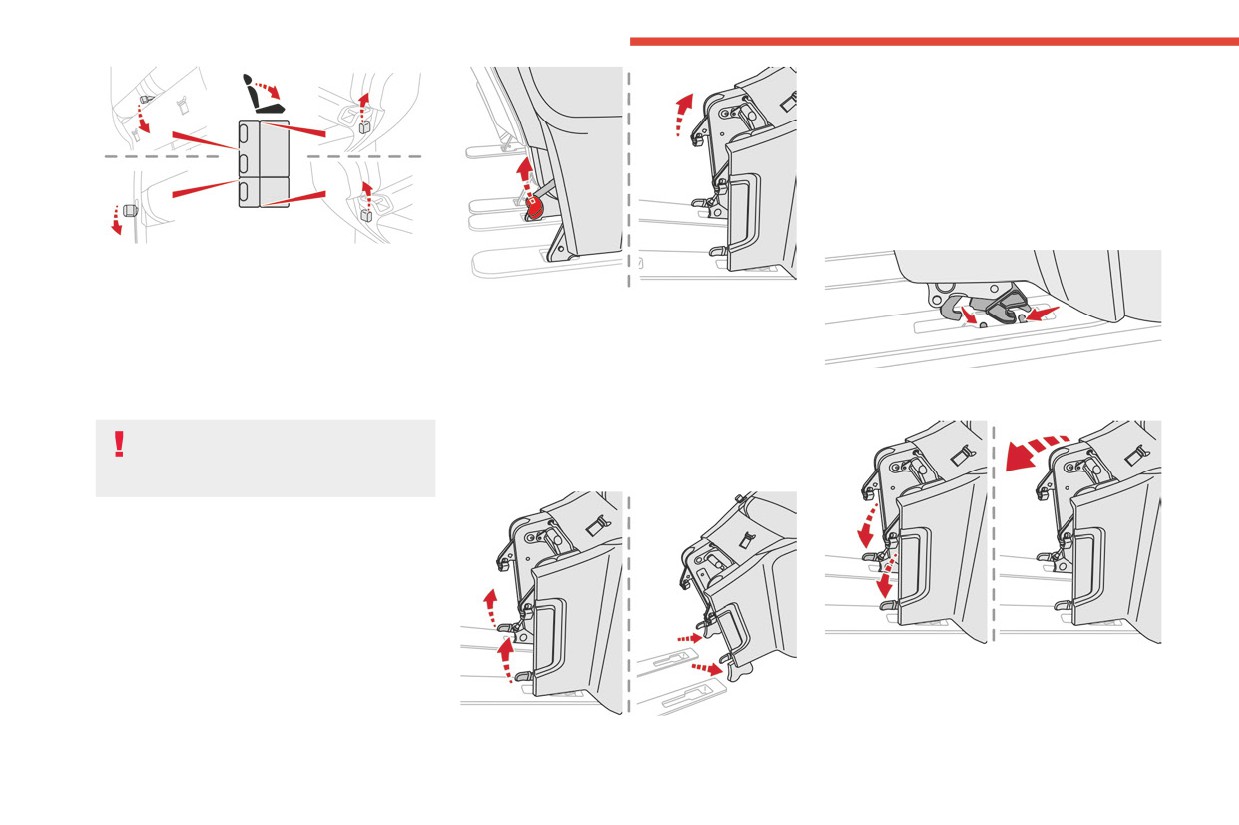
Ease of use and comfort
► Remove the seat through the side door for
row 2 or from the rear for row 3.
Refitting
(example of an individual seat)
► Check that there is no object obstructing the
anchorage points and preventing the feet locking
correctly into place.
► From the rear, lower the lever to release the
backrest.
► From the front, raise the lever to release the
► Using the handle, release the rear feet then
backrest.
tip the seat forward.
► Fold the backrest onto the seat cushion.
► To return the seat to the normal position,
► To return the backrest to the normal position,
unfold the seat backwards until the rear feet
raise the lever and pull the backrest up (from the
► Engage the front feet in the anchorage points
engage in their anchorages.
rear, lower the lever).
on the floor (as shown above).
Removing
Do not leave objects (such as a bag or
toys) on the seat cushion when folding
(example of an individual seat)
the backrest.
► Tip the seat.
Tilting
(example of an individual seat)
► If your vehicle has the facility, place the
backrest in the table position.
► Lock the front feet using the levers.
► Tilt the seat towards the rear until the rear
feet lock into place.
Be careful of passengers' feet during the
► Release the front feet using the handles.
manoeuvre.
► Disengage the seat from its anchorages.
60
CarManuals2.co
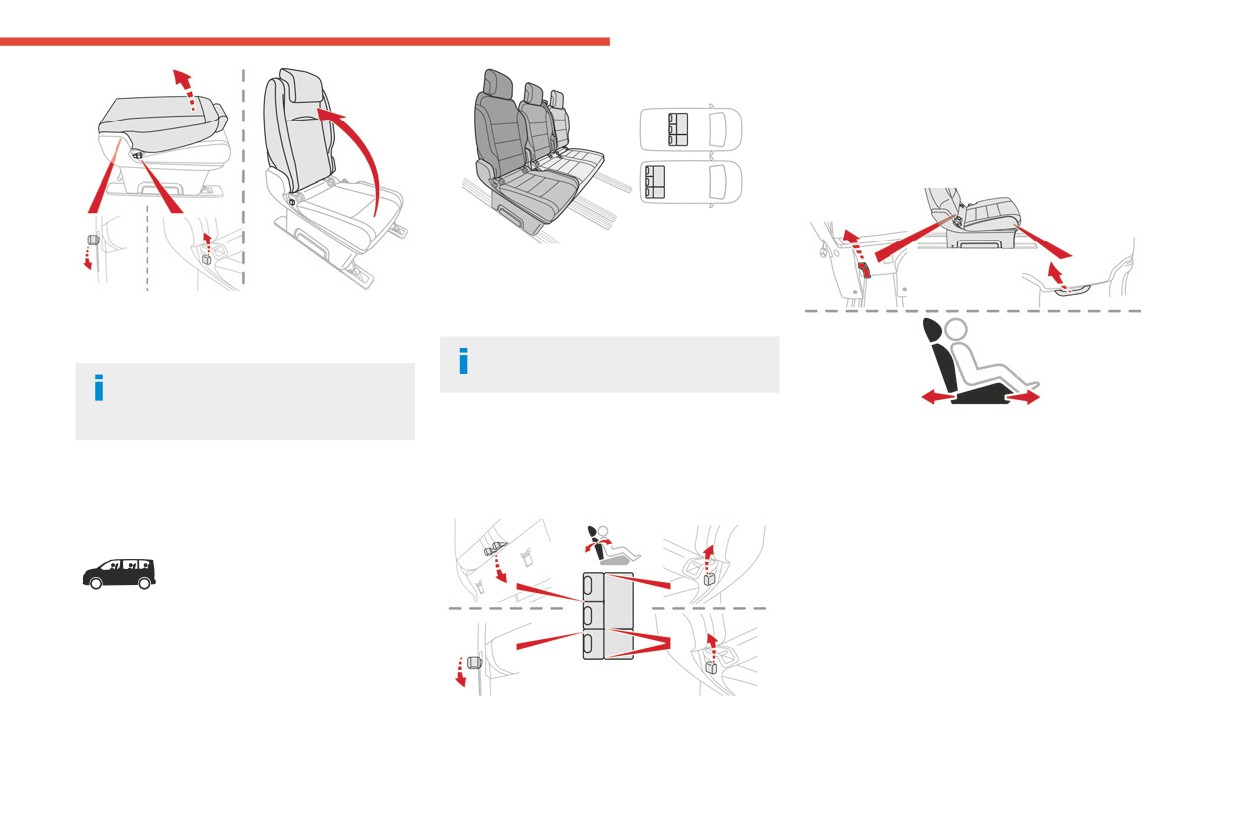
Ease of use and comfort
► Release the control when the desired position
3
is reached.
Moving forward or backward
(example for an individual seat)
The individual seat is always on the right and the
bench seat on the left (facing forward).
The seat has an independent backrest and the
► If fitted to your vehicle, pull the control and
bench seat has two independent backrests.
raise the backrest (from the rear, lower the
lever).
For more information on the Seat belts,
refer to the corresponding section.
Check that the seat has correctly
engaged in its anchorage points on the
floor when returned to the sitting position.
Adjusting the angle of the
Two controls are provided for moving the seat
forward and backward:
backrest
► From the rear, pull the strap without going
The reclining backrest can be adjusted to several
Rear seat and bench seat
beyond the point of resistance and push the seat
positions.
forward or pull it backward.
on rails
► From the front, raise the control and slide the
Feel, Shine, Business Lounge
seat forward or backward.
The different equipment and settings described
hereafter vary according to the version and the
configuration of your vehicle.
► To recline the backrest, pull the control
upwards (from the rear, lower the handle).
61
CarManuals2.co
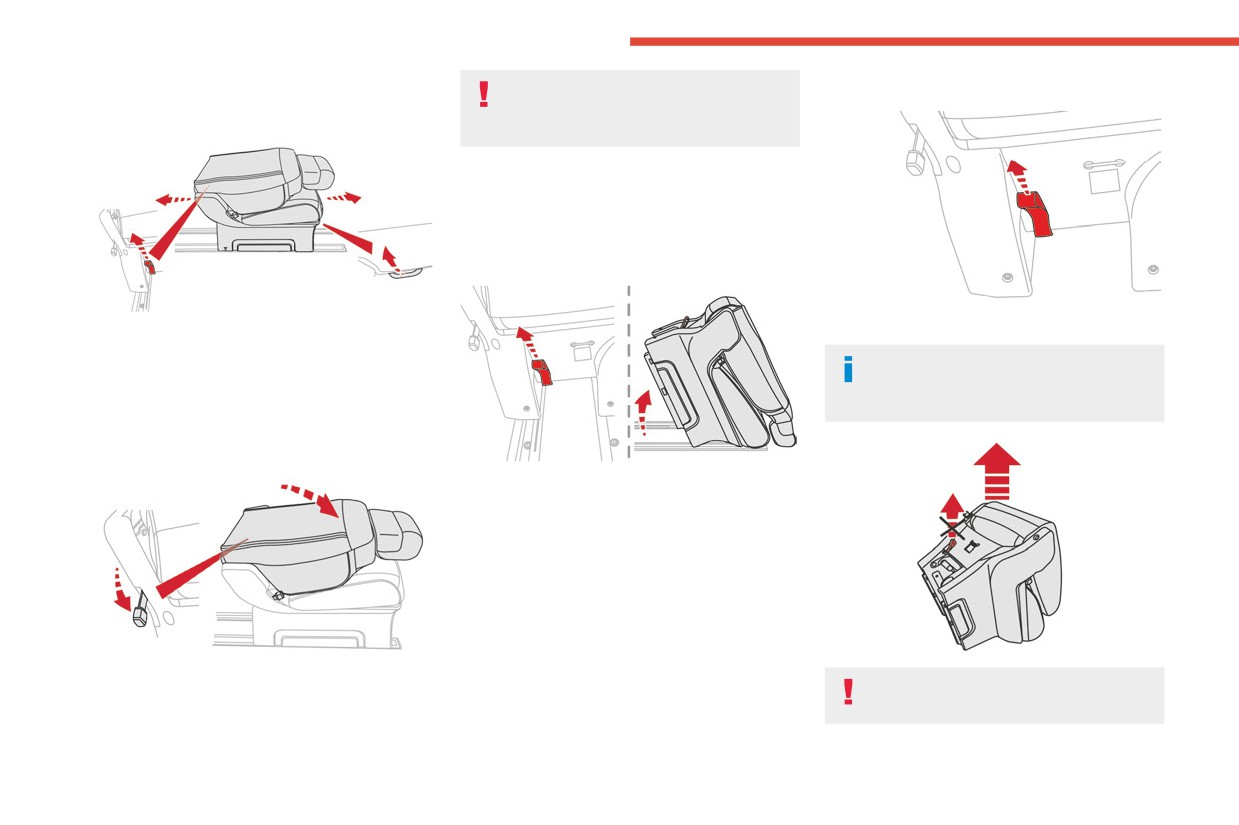
Ease of use and comfort
Moving the seat along the
Do not leave objects (such as a bag or
Refitting
toys) on the cushion when folding the
full length of the rail
backrest.
Removing
(example of an individual seat)
► Move the seat forward for access to the
strap.
► Fold the backrest to the table position
► Slide the seat by pulling on the front control
or rear strap.
Before refitting the seat or bench seat in
the vehicle, pull the strap fully to ensure
Folding the backrest to the
that the latching mechanism has engaged.
table position
(example for an individual seat)
► Put the head restraints in the low position.
► From the rear, pull the strap fully to release
the anchorages and tip the seat forwards to
place it in the vertical position.
► Remove the seat through the side door for
row 2 or through the rear for row 3.
► From the rear, lower the handle to release the
Do not use the strap to lift the seat or
backrest.
bench seat.
► From the front, raise the handle to release
the backrest.
(example of an individual seat)
► Fold the backrest onto the cushion.
62
CarManuals2.co
Ease of use and comfort
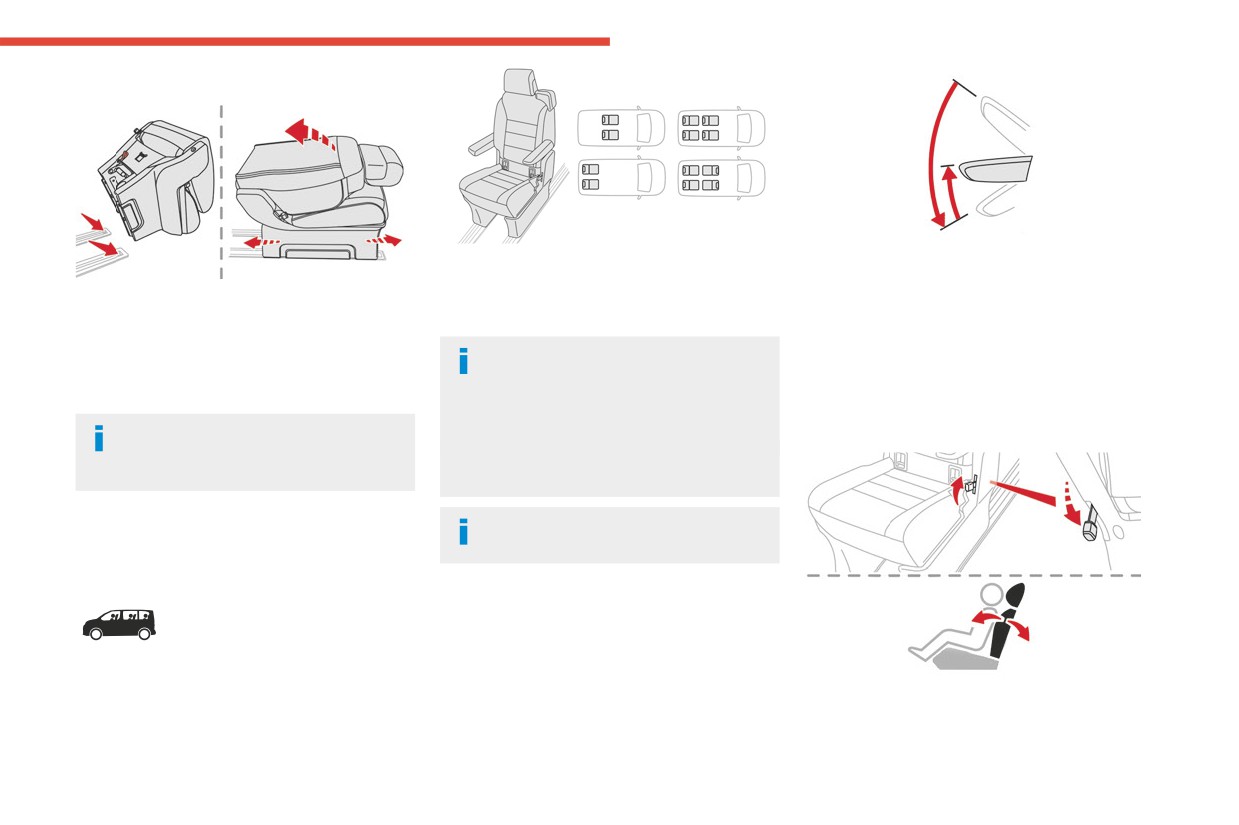
► Check that nothing is obstructing the rails.
3
The individual seat is fitted with a three-point
► Pull the armrest fully up.
inertia reel seat belt.
► Lower it fully.
► Place the front part of the guides on the rails.
It can be placed facing forwards or facing
► Raise the armrest to the desired notched
► Tip the seat to align the rear of the guides in
rearwards.
position.
the rails.
► Slide the seat forwards or backwards until it
If there is an individual seat facing
Adjusting the angle of the
engages in the notches.
rearwards in row 2, ensure that the seat
in row 1 (driver or passenger) is not set too
backrest
► Raise the backrest.
far back, in order to avoid contact between
The backrest can be adjusted to several
Check that the seat has correctly locked
the two seats.
positions.
on the floor when returned to the seating
This could cause significant wear of the parts
position.
which are in contact.
For more information on the Seat belts,
Individual rear seat(s) on
refer to the corresponding section.
rails
Armrest(s)
Shine, Business Lounge
The armrest has notches.
The different equipment and settings described
hereafter vary according to the version and the
► To recline the backrest, pull the control
configuration of your vehicle.
upwards (from the rear, lower the handle).
► Release the control when the desired position
is reached.
63
CarManuals2.co
Ease of use and comfort
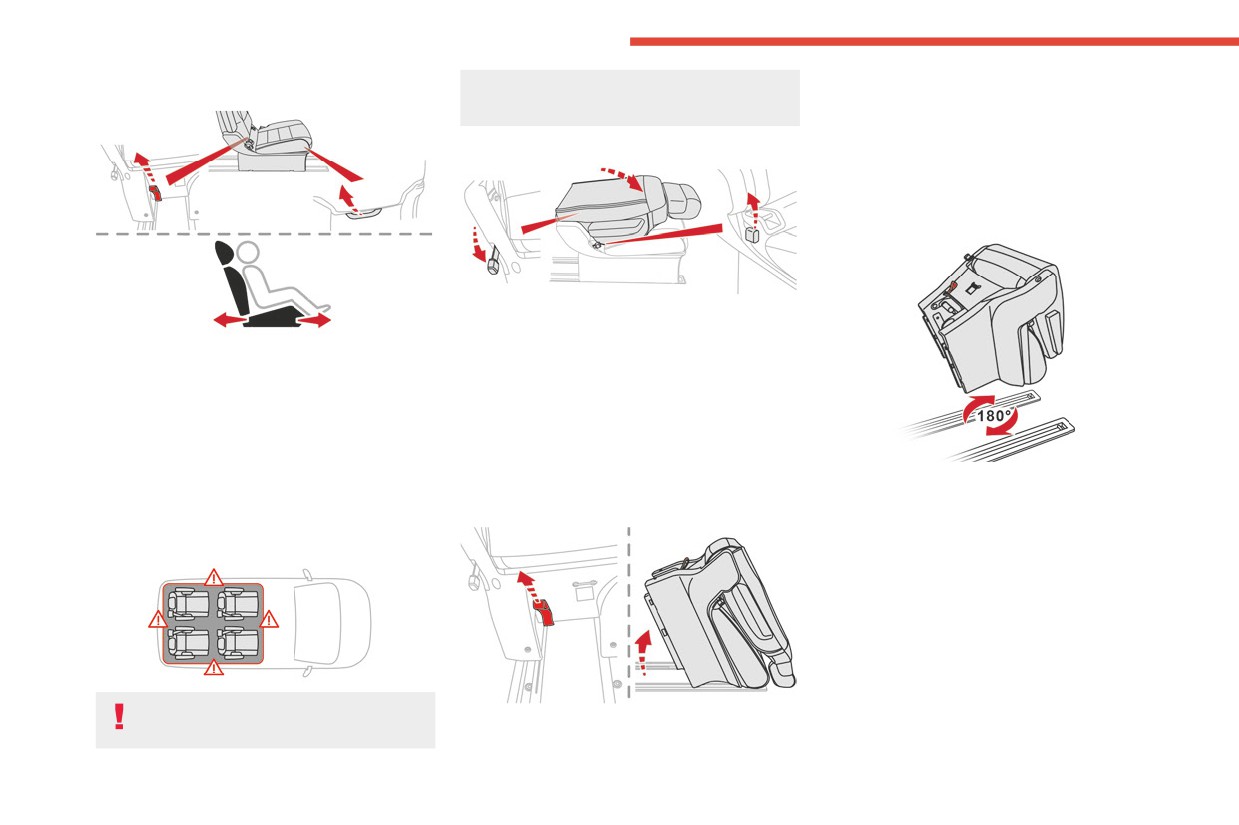
Moving forward or backward
interfering with the operation to fold the
tip the seat forwards to place it in the vertical
backrest.
position.
► Remove the seat through the side door for
► Put the head restraints in the low position.
row 2 or through the rear for row 3.
Changing the direction of
the seat
► From the rear, lower the handle to release the
backrest.
Two controls are provided for moving the seat
► From the front, raise the handle to release
forward and backward:
the backrest.
► From the rear, pull the strap without going
► Fold the backrest onto the cushion.
beyond the point of resistance and push the seat
forward or pull it backward.
Removing
► From the front, raise the control and slide the
► Move the seat forwards for access to the
seat forward or backward.
When the seat is removed, your can rotate it by
strap.
180°.
Folding the backrest to the
► Fold the backrest to the table position.
table position
Ensure that nothing (examples: bag,
► From the rear, pull the strap beyond the point
case, toy, folding and sliding table) is
of resistance to release the anchorages and
64
CarManuals2.co
Ease of use and comfort
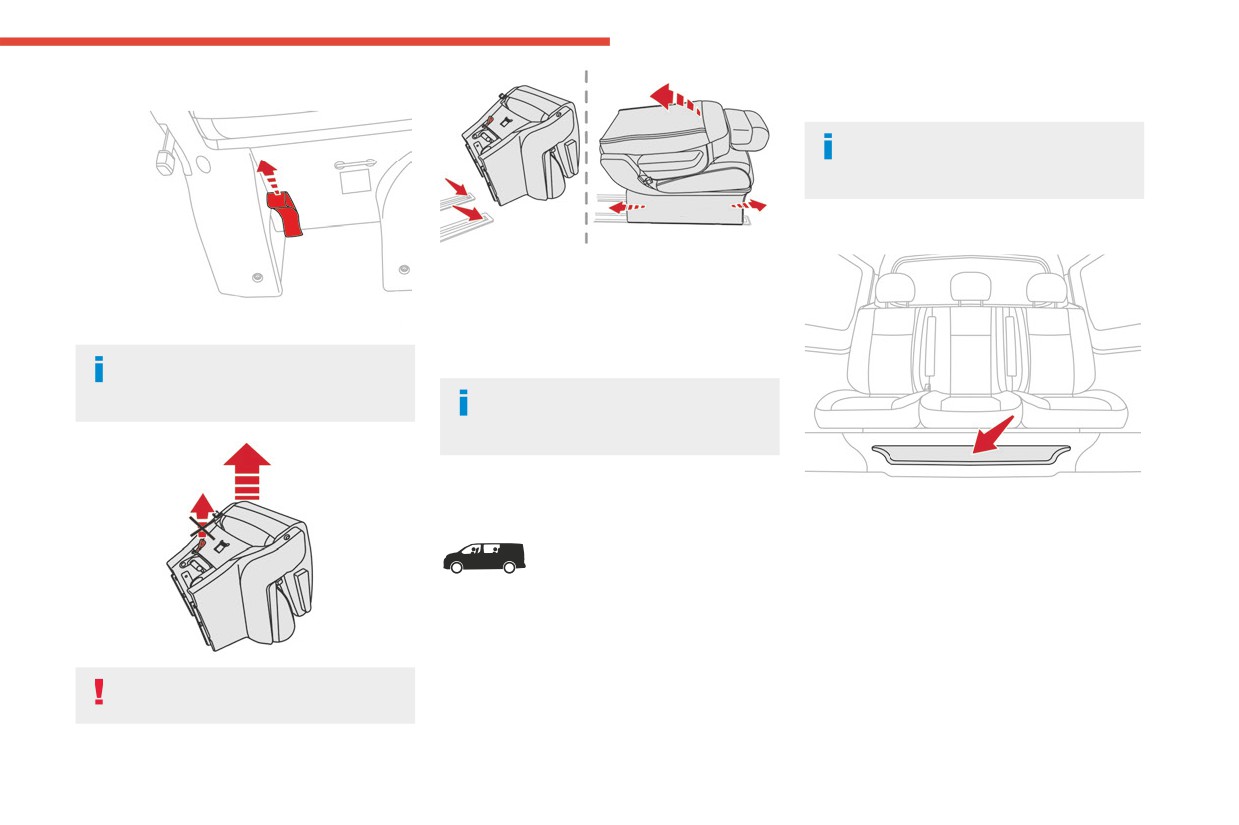
Refitting
The two outer seats are fitted with ISOFIX
3
mountings.
For more information on the ISOFIX
mountings, refer to the corresponding
section.
Storage compartment
► Fit the front part on the rails.
► Tip the seat to align the rear of the guides in
the rails.
► Slide the seat forwards or backwards until it
engages in the notches.
Before refitting the seat in the vehicle,
► Raise the backrest.
pull the strap fully to ensure that the
Check that the seat has correctly locked
latching mechanism has engaged.
on the floor when returned to the seating
position.
If applicable, a storage compartment is available
Fixed crew cab
at the front, underneath the bench seat.
The crew cab is made up of a fixed bench seat,
seat belts, storage compartments (depending
on equipment) and side windows. It is separated
from the loading area by a high-strength
Do not use the strap to lift the seat.
partition.
Rear bench seat
► Check that nothing is obstructing the rails.
This ergonomic bench seat has three seats.
65
CarManuals2.co
Ease of use and comfort
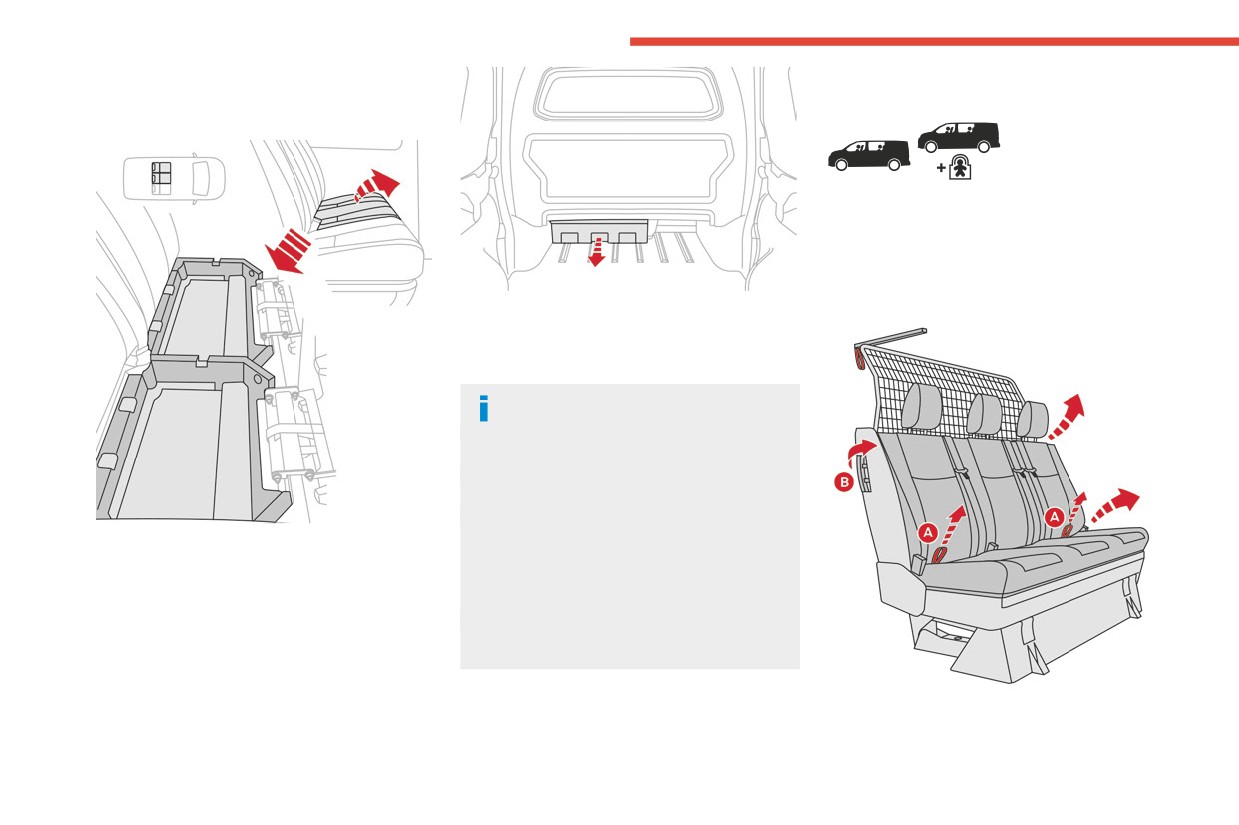
Under seat cushion storage
Folding crew cab
wells
The crew cab has a folding bench seat, seat
belts and side windows. It is separated from
the loading area by the bench seat by a high-
strength grille.
Folded position
Depending on the country of sale, the wells can
be dismantled and removed through the rear so
that bulky objects can be stowed underneath the
bench seat.
Do not attach anything to the cab fixing
structure.
Do not exceed the number of passengers
indicated on the registration certificate.
In the rear, the loading area is intended for
carrying goods only.
You are advised to place the goods or heavy
If the vehicle is so equipped, they are located
objects as far forwards as possible in the
underneath the centre and outer left-hand seats.
loading area (towards the cab) and secure
To gain access to it from the cab, tip the required
them by means of straps using the stowing
seat forwards.
rings on the floor.
The rear seat belt frames are not designed to
secure the load being carried.
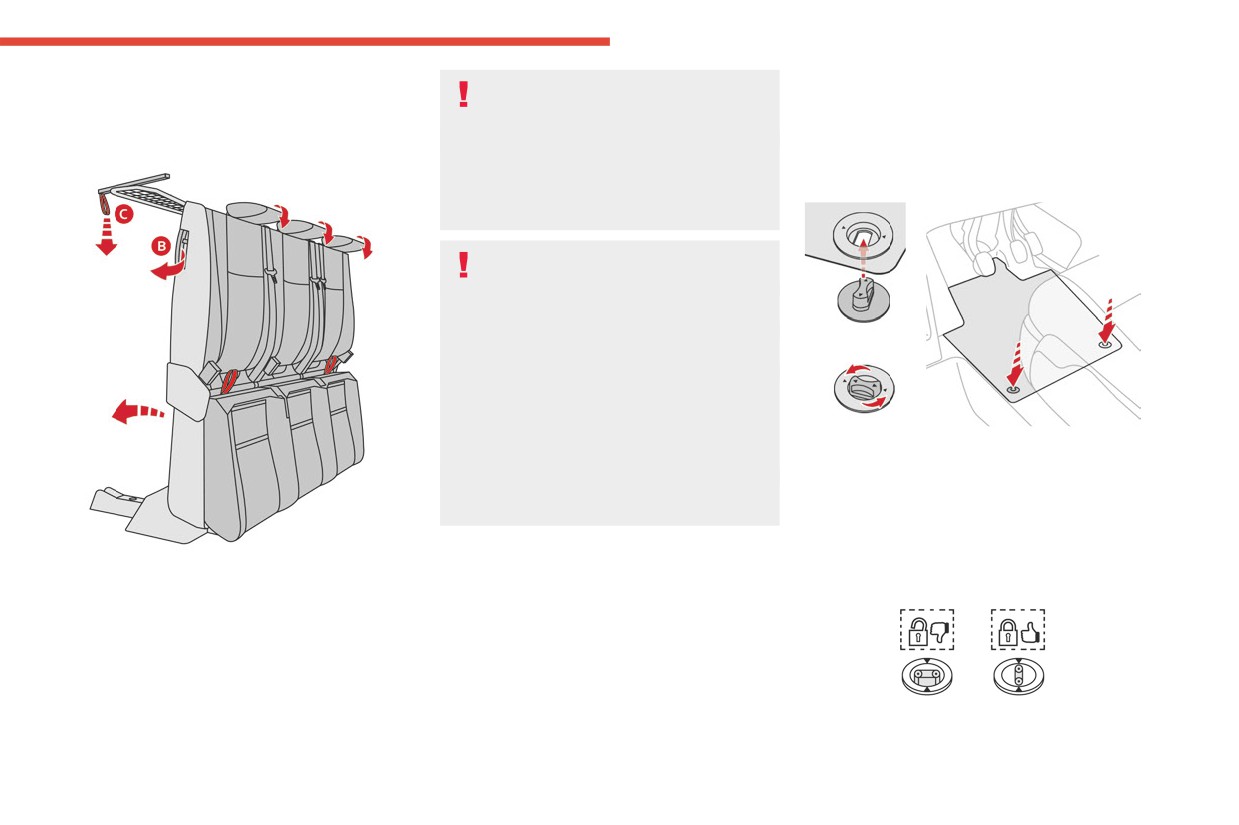
► With just one hand, pull one of the straps A
upwards to fold the bench seat.
66
CarManuals2.co
Ease of use and comfort
► Using handle B, guide the movement of the
Never put your hand underneath the
Interior fittings
3
bench seat until it locks in the folded position.
bench seat to guide it downwards, as you
could get your fingers trapped.
Mats
Bench seat position
Ensure there are no objects or feet beneath
the bench seat or obstructing the anchorage
Fitting
system, preventing the assembly from being
correctly locked.
Do not attach anything to the cab fixing
structure.
Do not exceed the number of passengers
indicated on the registration certificate.
In the rear, the load space is intended for
carrying goods only.
It is recommended to place goods or heavy
objects as far forwards as possible in the load
space (towards the cab) and secure them by
means of straps using the stowing rings on
When fitting it on the driver's side, only use the
the floor.
mountings present on the carpet.
The rear seat belt frames are not designed to
The other mats are simply laid over the carpet.
secure the load being carried.
Removing/refitting
► To remove it on the driver's side, move
► To put the bench seat back in place, pull the
the seat as far back as possible and give the
strap C to unlock the bench seat, then release
fasteners a quarter turn.
the strap.
► Then, using only the handle B, guide the
descent of the backrest to tip the assembly until
it locks in the bench seat position.
► To refit it, position the mat and replace the
fasteners, giving them a quarter turn.
► Check that the mat is secured correctly.
67
CarManuals2.co
Ease of use and comfort
To avoid any risk of jamming the pedals:
Glove box
a risk of injury in the event of an accident or
- Only use mats which are suited to the
sudden braking.
It houses the front passenger airbag deactivation
fixings already present in the vehicle; these
switch and can hold a bottle of water, the
fixings must be used.
vehicle's handbook pack, etc.
Front door storage pockets
- Never fit one mat on top of another.
The use of mats not approved by CITROËN
Never drive with the glove box (if
Liquids carried in an open vessel (e.g. a
may interfere with access to the pedals and
equipped) open when a passenger is
cup or mug) could be spilt, presenting a
hinder the operation of the cruise control/
sitting at the front. It may cause injury during
risk of damage on contact with the controls in
speed limiter.
sharp deceleration.
the dashboard and centre console. Be
The approved mats have two fasteners
careful.
located underneath the seat.
Storage compartment
This can hold a bottle of water, the vehicle's
Upper glove box
In row 2 and row 3
documentation, etc.
This is located in the dashboard, behind the
steering wheel.
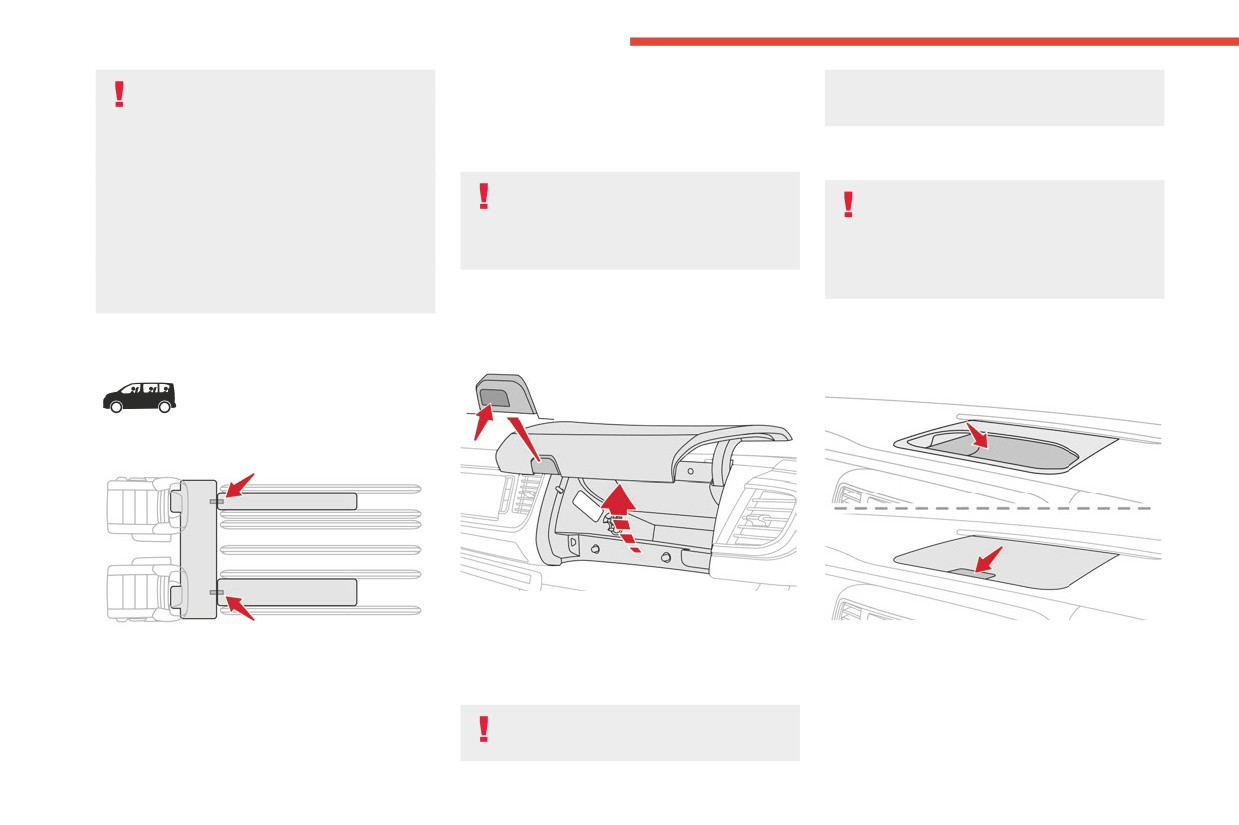
► To open the storage compartment, press the
left-hand end of the control and guide the lid to
Press the control to open the lid (depending on
its open position notch.
version) then guide it to its fully open position.
If your vehicle is so equipped, it is lit when the lid
Use the Velcro straps to attach the transverse
To close it, guide the lid then press the centre
is opened.
mat in row 2 with the longitudinal mats in rows
gently.
2 and 3.
When driving, keep the storage
compartment closed. Otherwise, there is
68
CarManuals2.co
Ease of use and comfort
Any liquid which could spill risks causing
For more information on the Front seats,
3
an electrical short circuit and therefore a
and in particular placing the backrest in
potential fire.
the "table" position, refer to the corresponding
section.
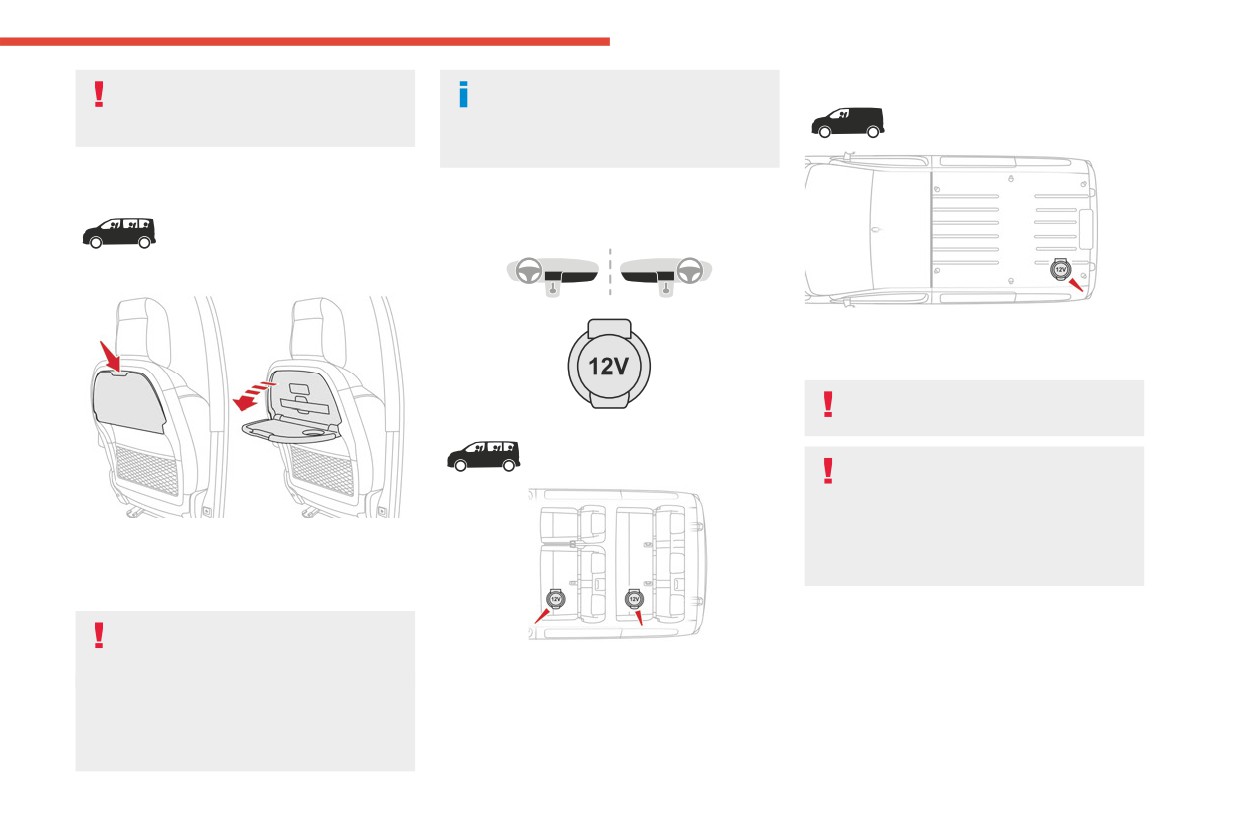
"Aircraft" type tables
12 V socket(s)
Depending on version.
Fitted to the back of each front seat.
► To connect a 12 V accessory (maximum
power: 120 Watts), lift the cover and plug in a
suitable adapter.
Observe the maximum power rating to
avoid damaging the accessory.
The connection of an electrical device
not approved by CITROËN, such as a
USB charger, may adversely affect the
operation of vehicle electrical systems,
► To use the table, lower it fully until it locks in
causing faults such as poor radio reception or
the low position.
interference with displays in the screens.
► To stow it, raise the table to the high position,
passing the point of resistance.
On the passenger side, do not forget to
fold the table up before placing the seat
in the "table" position.
Do not place hard or heavy objects on
the table. They could become dangerous
projectiles in the event of emergency braking
or impact.
69
CarManuals2.co