Citroen Jumpy Dispatch (2023 year). Manual in english - page 1
Welcome
Key
Safety warning
Thank you for choosing Citroën Jumpy/ë-Jumpy or Citroën
SpaceTourer/ë-SpaceTourer.
Additional information
This document contains the key information and recommendations you
will need to be able to explore your vehicle in complete safety. We strongly
Environmental protection feature
recommend familiarising yourself with it, as well as the Maintenance and
Warranty Guide.
Your vehicle will be fitted with only some of the equipment described in this
Left-hand drive vehicle
document, depending on its trim level, version and the specification for the
country in which it was sold.
Right-hand drive vehicle
The descriptions and illustrations are for guidance only.
Automobiles CITROËN reserves the right to modify the technical
specifications, equipment and accessories without having to update this
Location of equipment/button indicated using a
document.
black area
If ownership of your vehicle is transferred, please ensure this Handbook is
passed on to the new owner.
Identification
This allows you to identify the special features of the vehicle:
For any work on your vehicle, contact a qualified workshop that has
the required technical information, skills and equipment, all of which
Van
a CITROËN dealer is able to provide.
Crew cab with manual child lock
Crew cab with electric child lock
Combi, Business, Feel, Shine, Business Lounge
CarManuals2.co
Contents
Overview ■
Ease of use and comfort 3
Automatic illumination of headlamps
89
Overview
4
Correct driving position
48
Guide-me-home and welcome lighting
90
Front seats
48
Automatic lighting systems - General
2-seat front bench seat
50
recommendations
91
Eco-driving ■
Steering wheel adjustment
52
Automatic headlamp dipping
91
Mirrors
52
Headlamp beam height adjustment
92
Dashboard instruments 1
Moduwork
53
Interior ambient lighting
93
Instrument Panel
9
Precautions for the seats and bench seats
56
Wiper control stalk
93
Head-up display
10
Fixed one-piece bench seat
57
Automatic wipers
94
Warning and indicator lamps
12
Fixed rear seat and bench seat
59
Changing a wiper blade
95
Indicators
18
Rear seat and bench seat on rails
61
Distance recorders
23
Individual rear seat(s) on rails
63
Safety 5
Lighting dimmer
24
Crew cab, fixed
65
General safety recommendations
97
Trip computer
24
Crew cab, folding
66
Hazard warning lamps
97
Touch screen
26
Interior fittings
67
Emergency or assistance
98
Remotely operable additional functions (Electric)
27
Loading area fittings
71
Horn
100
Setting the date and time
28
Seating area fittings
72
Pedestrian horn (Electric)
100
Panoramic sunroof
74
Electronic stability control (ESC)
100
Access 2
Retractable sliding table
74
Advanced Grip Control
102
Electronic key with remote control function
Heating and Ventilation
77
Seat belts
103
and built-in key
29
Heating
78
Airbags
107
Unlocking/Complete or selective unlocking
31
Manual air conditioning
78
Child seats
109
Back-up procedures
34
Dual-zone automatic air conditioning
79
Deactivating the front passenger airbag
111
Central locking
37
Front demisting - defrosting
81
ISOFIX and i-Size child seats
117
Electric sliding side door(s)
38
Demisting/de-icing the rear screen and/or
i-Size child seats
128
General recommendations for
the door mirrors
82
Manual child lock
131
the sliding side doors
39
Rear heating - air conditioning
82
Electric child lock
131
Hands-free sliding side door(s)
42
Additional heating/ventilation system
83
Child lock on rear windows
131
Side-hinged rear doors
43
Temperature pre-conditioning (Electric)
85
Tailgate
44
Courtesy lamp(s)
86
Driving 6
Tailgate rear screen
44
Driving recommendations
132
Alarm
45
Lighting and visibility 4
Starting/switching off the engine
134
Electric windows
47
Lighting control stalk
88
Manual parking brake
138
Direction indicators
89
Electric parking brake
138
Daytime running lamps/Sidelamps
89
Hill start assist
141
2
CarManuals2.co
Contents
6-speed manual gearbox
141
Checking levels
191
MyCitroën Play 11
Gear shift indicator
142
Checks
194
First steps
244
Automatic gearbox
142
AdBlue® (BlueHDi)
196
Steering mounted controls
245
Drive selector (Electric)
145
Free-wheeling
198
Menus
246
Driving modes (Electric)
146
Advice on care and maintenance
199
Applications
247
Stop & Start
147
Radio
247
Tyre under-inflation detection
148
DAB (Digital Audio Broadcasting) radio
249
In the event of a breakdown 8
Driving and manoeuvring aids - General
Media
249
Warning triangle
202
recommendations
150
Telephone
251
Running out of fuel (Diesel)
202
Memorising speeds
151
Settings
254
Tool box
203
Road signs recognition
152
Frequently asked questions
255
Temporary puncture repair kit
204
Speed limiter
154
Spare wheel
207
Cruise control - Specific recommendations
156
Changing a bulb
211
MyCitroën Drive 12
Cruise control
156
Fuses
216
First steps
257
Adaptive cruise control
158
12 V battery / Accessory battery
216
Steering mounted controls
258
Active Safety Brake with Collision Risk Alert and
Towing the vehicle
220
Menus
258
Intelligent emergency braking assistance
162
Voice commands
260
Lane departure warning
165
Navigation
263
Technical data
9
Distraction detection
166
Connected navigation
266
Engine technical data and towed loads
223
Blind spot monitoring
167
Applications
268
Diesel engines
224
Parking sensors
168
Radio
271
Electric motor
227
Top Rear Vision
170
DAB (Digital Audio Broadcasting) radio
272
Dimensions
229
Media
272
Identification markings
231
Practical information 7
Telephone
274
Compatibility of fuels
174
Settings
276
Bluetooth® audio system 10
Refuelling
174
Frequently asked questions
278
First steps
232
Diesel misfuel prevention
175
Steering mounted controls
233
Charging system (Electric)
176
Vehicle data recording and privacy 13
Menus
233
Charging the traction battery (Electric)
183
Radio
234
Energy economy mode
187
DAB (Digital Audio Broadcasting) radio
235
Alphabetical index ■
Snow chains
188
Media
236
Towing device
188
Telephone
238
Roof bars/Roof rack
189
Appendix ■
Frequently asked questions
241
Bonnet
190
Engine compartment
191
Hydrogen electric motor supplement ■
3
CarManuals2.co
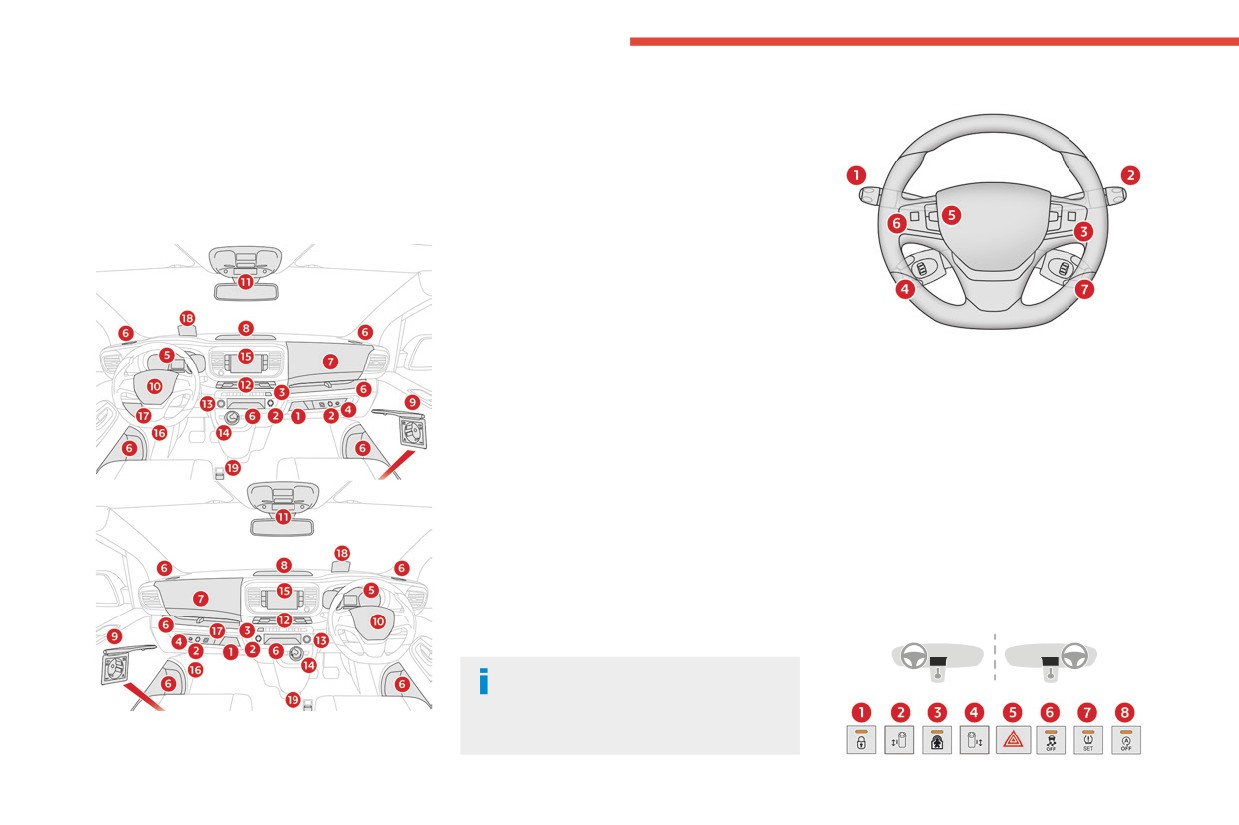
Overview
Presentation
2.
12 V (120 W) accessory sockets
Steering-mounted controls
3.
USB socket
4.
JACK socket
Instruments and controls
5.
Instrument panel
These illustrations and descriptions are intended
6.
Storage
as a guide. The presence and location of some
Cup/can holder
components varies according to the version or
7.
Storage compartment
trim level.
8.
Upper storage compartment
9.
220 V (120 W) accessory socket
10.
Horn
11.
Courtesy lamp
Warning lamps display for seat belts and
front passenger airbag
1.
Exterior lighting/Direction indicators control
Interior rear view mirror
stalks
Emergency and assistance call buttons
2.
Wiper controls/Screenwash/Trip computer
12.
Heating/Air conditioning
3.
Audio system setting controls
Front demisting - de-icing
4.
Controls for Cruise control/Speed limiter/
Rear screen demisting - de-icing
Adaptive cruise control
13.
"START/STOP" button
5.
Instrument panel display mode selection
14.
Gearbox or drive selector
wheel
Choice of driving mode
6.
Voice synthesis control
15.
Monochrome screen with audio system
Volume adjustment
Touch screen
7.
Audio system setting controls
16.
Bonnet release
17.
Dashboard fuses
18.
Head-up display
Central control bar
19.
Electric parking brake
Depending on the vehicle's equipment,
the storage compartments may be open
or closed. This configuration is shown as an
1.
Glove box
example.
Deactivation of the front passenger airbag
4
CarManuals2.co
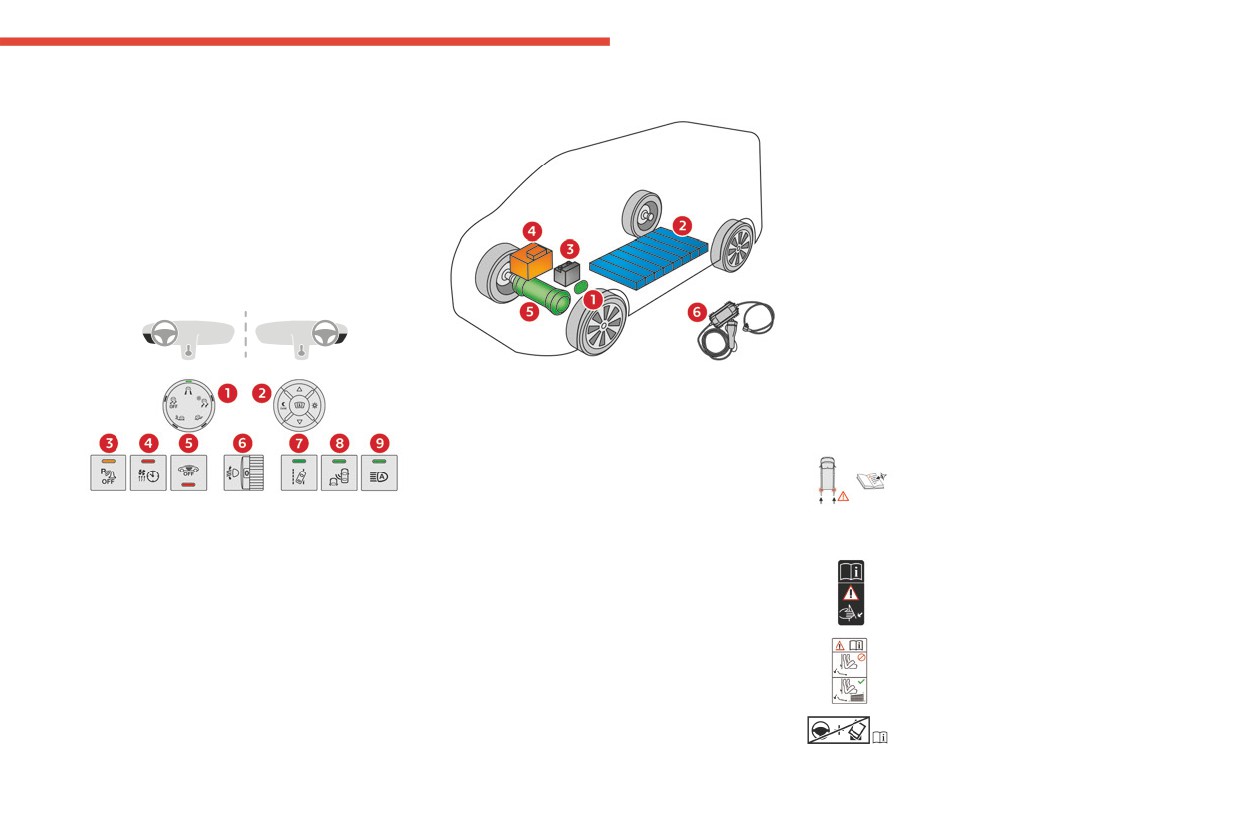
Overview
1. Locking/unlocking from the inside
Electric motor
represented by an indicator and a reserve power
2. Left-hand electric sliding side door
warning lamp on the instrument panel.
3. Electric child lock
The 12 V accessory battery 3 powers the
4. Right-hand electric sliding side door
vehicle’s conventional electrical system. It is
5. Hazard warning lamps
recharged automatically by the traction battery
6. DSC/ASR system
via the on-board charger.
7. Tyre under-inflation detection
The on-board charger 4 provides domestic
8. Stop & Start (Diesel)
charging (mode 2) and accelerated charging
(mode 3) of the traction battery as well as
recharging of the 12 V accessory battery.
Side control bar
The electric motor 5 provides propulsion in
accordance with the selected driving mode and
driving conditions. It recovers energy during
vehicle braking and deceleration phases.
1.
Charging connectors
2.
Traction battery
Labels
3.
12 V accessory battery
4.
On-board charger
"Access - Side-hinged rear doors" section:
5.
Electric motor
6.
Charging cable
1.
Advanced Grip Control
The charging connectors 1 allow 3 types of
"Ease of use and comfort - Moduwork"
2.
Head-up display
charging:
section:
3.
Parking sensors
- Domestic charging in mode 2 using a domestic
4.
Additional heating/ventilation system (Diesel)
socket and associated charging cable 6.
5.
Alarm (Diesel or Electric)
- Accelerated charging in mode 3 using an
6.
Headlamp beam height adjustment
accelerated charging unit (Wallbox).
7.
Lane departure warning system
- Superfast charging in mode 4 using a fast
8.
Blind spot monitoring system
public charger.
9.
Automatic headlamp dipping
The 400 V traction battery 2 uses Lithium-Ion
technology. It stores and supplies the energy
required for the operation of the electric motor,
air conditioning and heating. Its charge level is
5
CarManuals2.co
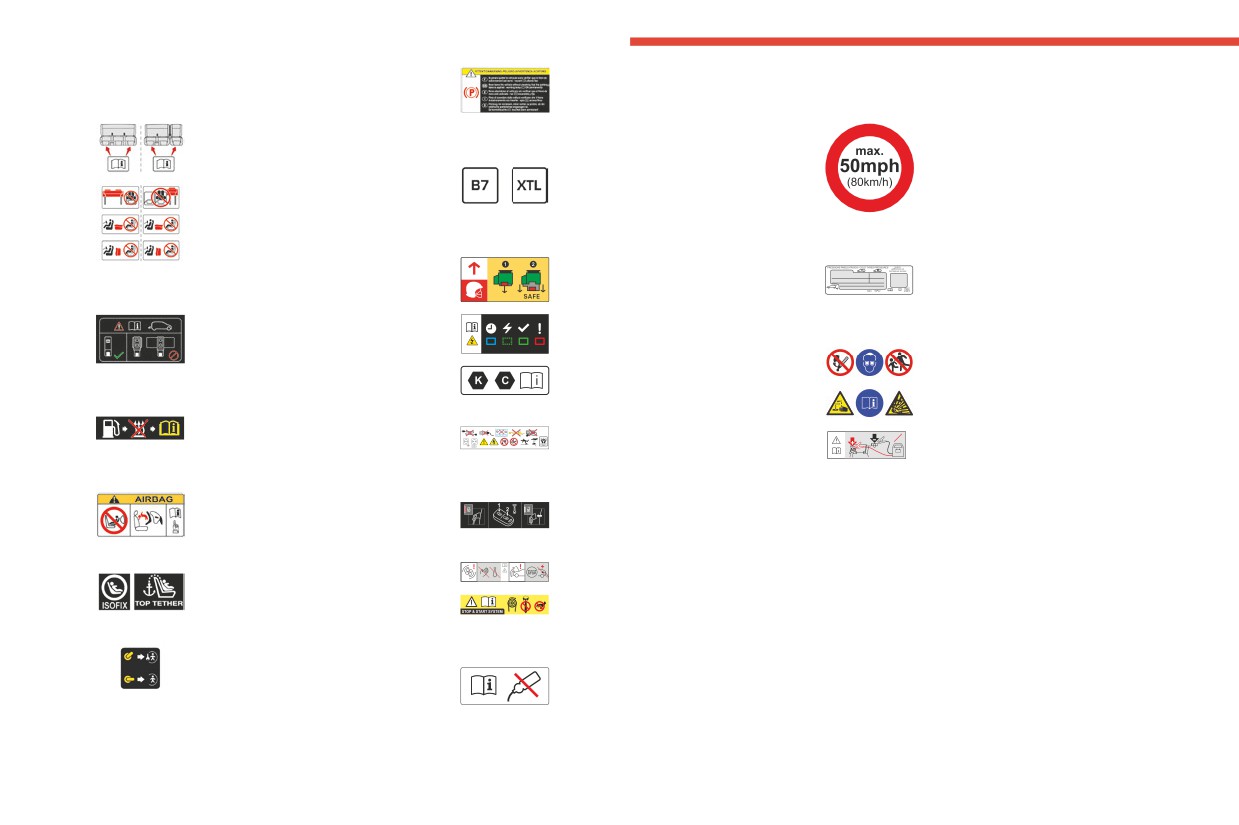
Overview
"Ease of use and comfort - Precautions for
"In the event of a breakdown - Temporary
seats and bench seats" section:
puncture repair kit" section:
"Practical information - Compatibility of
fuels" section:
"Practical information - Charging system
"In the event of a breakdown - Spare wheel"
(Electric)" section:
section:
"Ease of use and comfort - Retractable
sliding table" section:
"In the event of a breakdown - 12 V battery/
Accessory battery" section:
"Ease of use and comfort - Additional
heating/ventilation" section:
24V
"Safety - Child seats - Deactivating the front
12V
"Practical information - Charging the traction
passenger airbag" section:
battery (Electric)" section:
"Practical information - Bonnet" section:
"Safety - ISOFIX child seats" section:
"Safety - Manual child lock" section:
"Practical information - Checking levels -
Engine coolant" section:
"Driving - Electric parking brake" section:
6
CarManuals2.co
Eco-driving
Control the use of electrical equipment
Limit the loads carried in the vehicle and
Eco-driving
minimise wind resistance (e.g. roof bars, roof
Before moving off, if the passenger compartment
Eco-driving refers to a range of everyday
rack, bicycle carrier, trailer). Preferably, use a
is too warm, ventilate it by opening the windows
practices that allow the motorist to optimise
roof box.
and air vents before using the air conditioning.
the vehicle's energy consumption (fuel and/or
Remove roof bars and roof racks after use.
At speeds above 31 mph (50 km/h), close the
electricity) and CO2 emissions.
At the end of winter, remove snow tyres and refit
windows and leave the air vents open.
Optimise your use of the gearbox
summer tyres.
Consider using equipment that can help keep
With a manual gearbox, move off gently and
the temperature in the passenger compartment
Comply with the servicing instructions
change up promptly. While accelerating, change
down (e.g. sunroof blind, window blinds).
Check tyre pressures regularly, with the tyres
up early.
Unless automatically regulated, switch off the air
cold, referring to the label in the door aperture on
With an automatic gearbox, favour automatic
conditioning as soon as the desired temperature
the driver's side.
mode. Do not depress the accelerator pedal
has been reached.
Carry out this check in particular:
heavily or suddenly.
Switch off the demisting and defrosting functions,
- before a long journey.
The gear shift indicator prompts you to engage
if they are not managed automatically.
- at each change of season.
the most suitable gear. Whenever this indication
Switch off the heated seat as soon as possible.
- after a long period out of use.
is displayed on the instrument panel, follow it
Adapt your use of the headlamps and/or
Do not forget the spare wheel and, where
straight away.
foglamps to the level of visibility, in accordance
applicable, the tyres on your trailer or caravan.
With an automatic gearbox, this indicator
with current legislation in the country in which
Have your vehicle serviced regularly (e.g. engine
appears only in manual mode.
you are driving.
oil, oil filter, air filter, passenger compartment
Drive smoothly
Avoid running the engine before moving off,
filter, etc.). Observe the schedule of operations in
particularly in winter (other than in severe wintry
the manufacturer's service schedule.
Maintain a safe distance between vehicles, use
conditions: temperature below -23°C). The
With a BlueHDi Diesel engine, if the SCR system
engine braking rather than the brake pedal and
vehicle will warm up much faster while driving.
has a fault, your vehicle will emit pollution. Visit
press the accelerator gradually. These practices
As a passenger, avoid connecting your
a CITROËN dealer or a qualified workshop
help to save on energy consumption, reduce
multimedia devices (e.g. film, music, video
as soon as possible to restore your vehicle's
CO2 emissions and decrease general traffic
game) to help reduce the consumption of energy.
nitrogen oxide emissions to legal levels.
noise.
Disconnect all portable devices before leaving
When filling the fuel tank, do not continue after
When the traffic is flowing smoothly, select the
the vehicle.
the third cut-out of the nozzle, to avoid overflow.
cruise control.
Limit the causes of excess consumption
You will only see the fuel consumption of your
new vehicle settle down to a consistent average
Spread loads throughout the vehicle. Place the
after the first 1,900 miles (3,000 kilometres).
heaviest items in the boot as close as possible to
the rear seats.
7
CarManuals2.co
Eco-driving
Optimising the driving range (Electric)
The vehicle's consumption of electrical energy
greatly depends on the route, speed and driving
style, as well as the use of the heating/air
conditioning.
Try to remain in the "ECO" zone on the power
indicator, by driving smoothly and maintaining a
steady speed.
Anticipate the need to slow down, and brake
smoothly, whenever possible using engine
braking with the regenerative braking function,
which will move the power indicator into the
"CHARGE" zone.
Use the air conditioning rather than the heating
to demist the passenger compartment.
8
CarManuals2.co
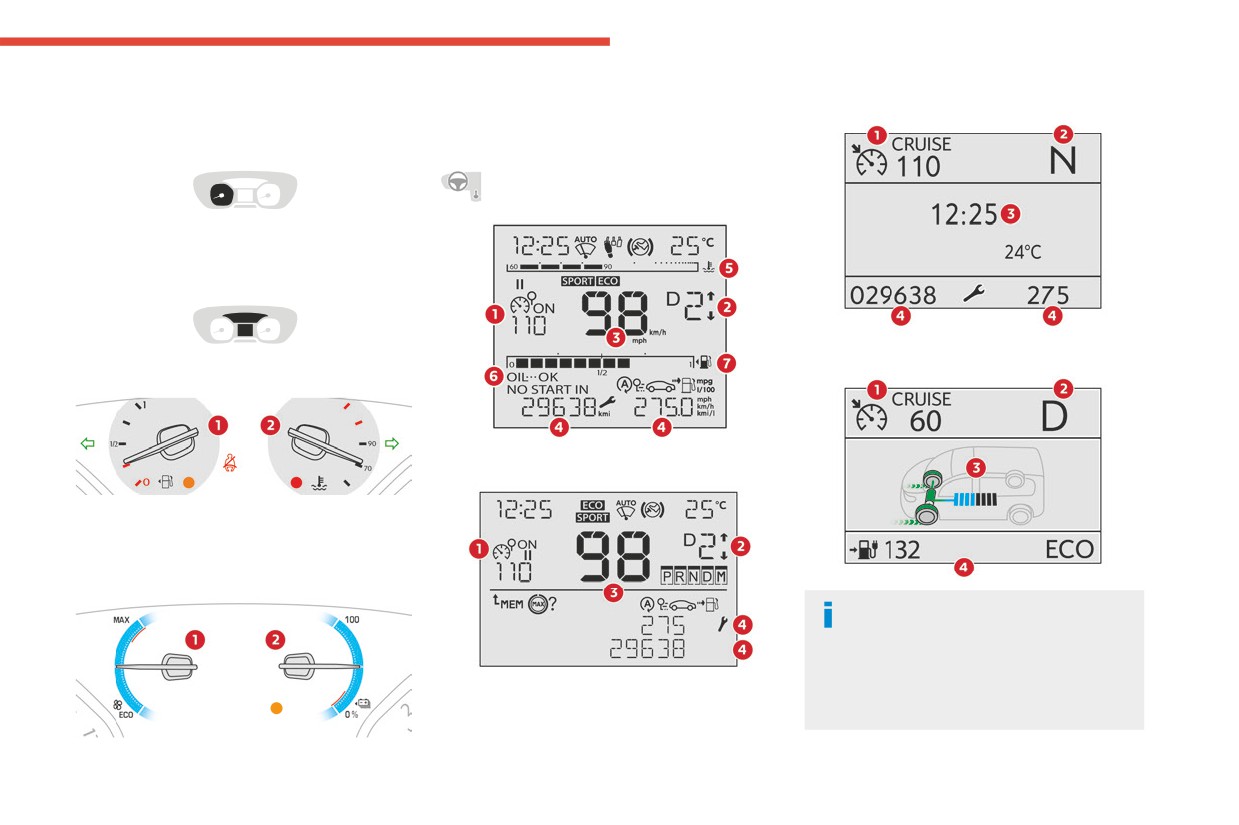
Dashboard instruments
Instrument panel
1. Thermal comfort consumption indicator
With matrix display
1
2. Charge level indicator
Speedometer
With LCD display
Analogue speedometer (mph or km/h).
Indicators and displays
With matrix display (Electric)
With LCD text or matrix display
With LCD text display
1. Fuel gauge
2. Engine coolant temperature indicator
With matrix display (Electric)
When travelling abroad, you may need to
change the distance unit: the speed must
be displayed in the country’s official unit (mph
or km/h). The unit is changed via the screen's
configuration menu, with the vehicle
stationary.
9
CarManuals2.co
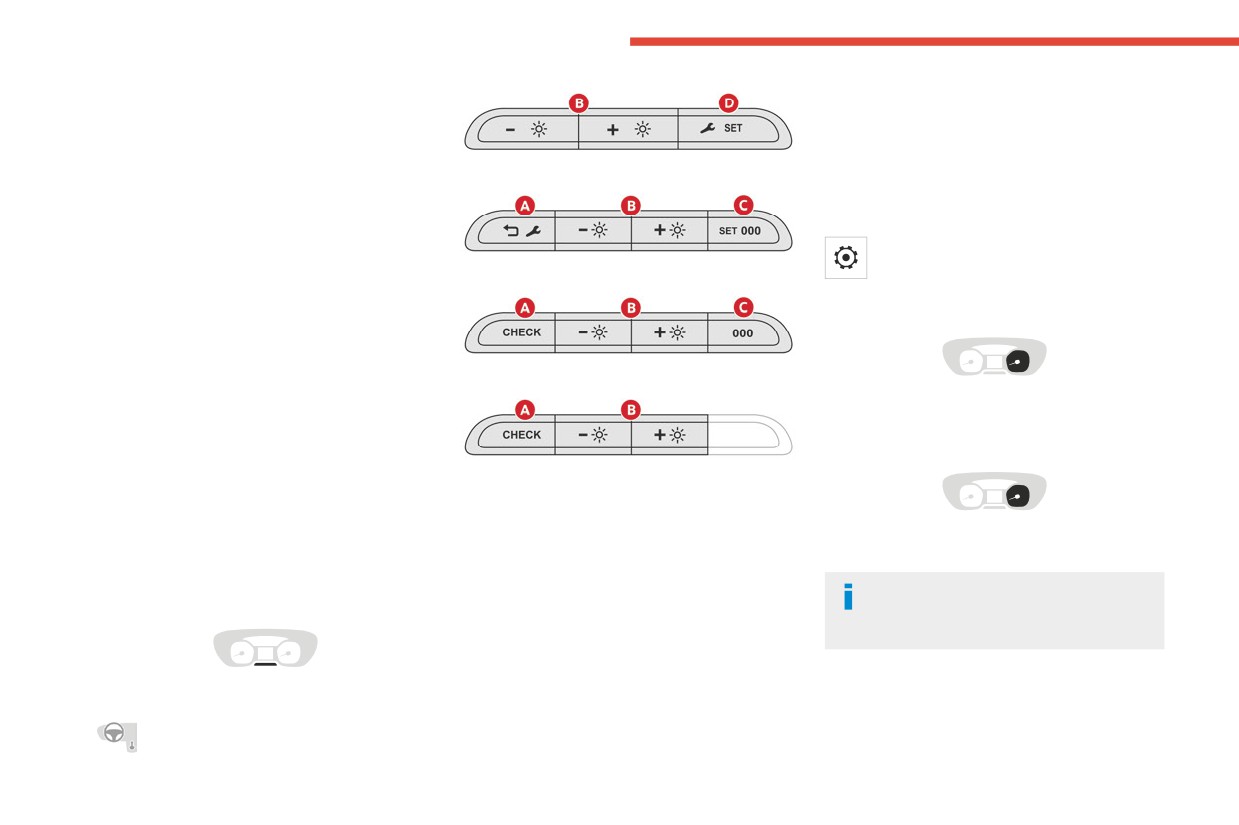
Dashboard instruments
1.
Cruise control or speed limiter settings
D. Reminder of servicing information or driving
Display of speed limit signs
range with the SCR system and the AdBlue®.
2.
Gear shift indicator (Diesel)
Resetting the selected function (service
Gear with an automatic gearbox (Diesel) or
indicator or trip distance recorder).
Drive selector position (Electric)
With LCD text display
Depending on version: enter the configuration
3.
Digital speedometer (mph or km/h) with LCD
menu (long press), confirm a choice (short
and LCD text instrument panel (Diesel)
press).
Display area with matrix instrument panel:
With the touch screen, it is also possible
alert or function status message, trip
to adjust the lighting dimmer.
computer, digital speedometer (mph or km/h),
With matrix display
power flow/vehicle charge state (Electric),
Rev counter
etc.
4.
Service indicator, then total distance recorder
(miles or km)
With matrix display (Electric)
Trip distance recorder (miles or km) (Diesel)
Remaining range/Driving mode selected
Rev counter (x 1000 rpm).
(Electric)
Display area with LCD text instrument
Power indicator (Electric)
panel: alert or function status message, trip
A. Resetting the service indicator.
computer, etc.
Temporary reminder of servicing information.
5.
Engine coolant temperature gauge
Reminder of driving range with the AdBlue®
6.
Engine oil level indicator
system.
Power indicator CHARGE, ECO, POWER or
7.
Fuel gauge
Depending on version: go back up a level or
NEUTRAL.
cancel the current operation.
For more information on the Indicators,
Control buttons
B. General lighting dimmer.
please refer to the corresponding
Depending on version: browse a menu or list,
section.
or change a value.
C. Resetting the trip distance recorder.
Depending on version: enter the configuration
With LCD display
Head-up display
menu (long press), confirm a choice (short
press).
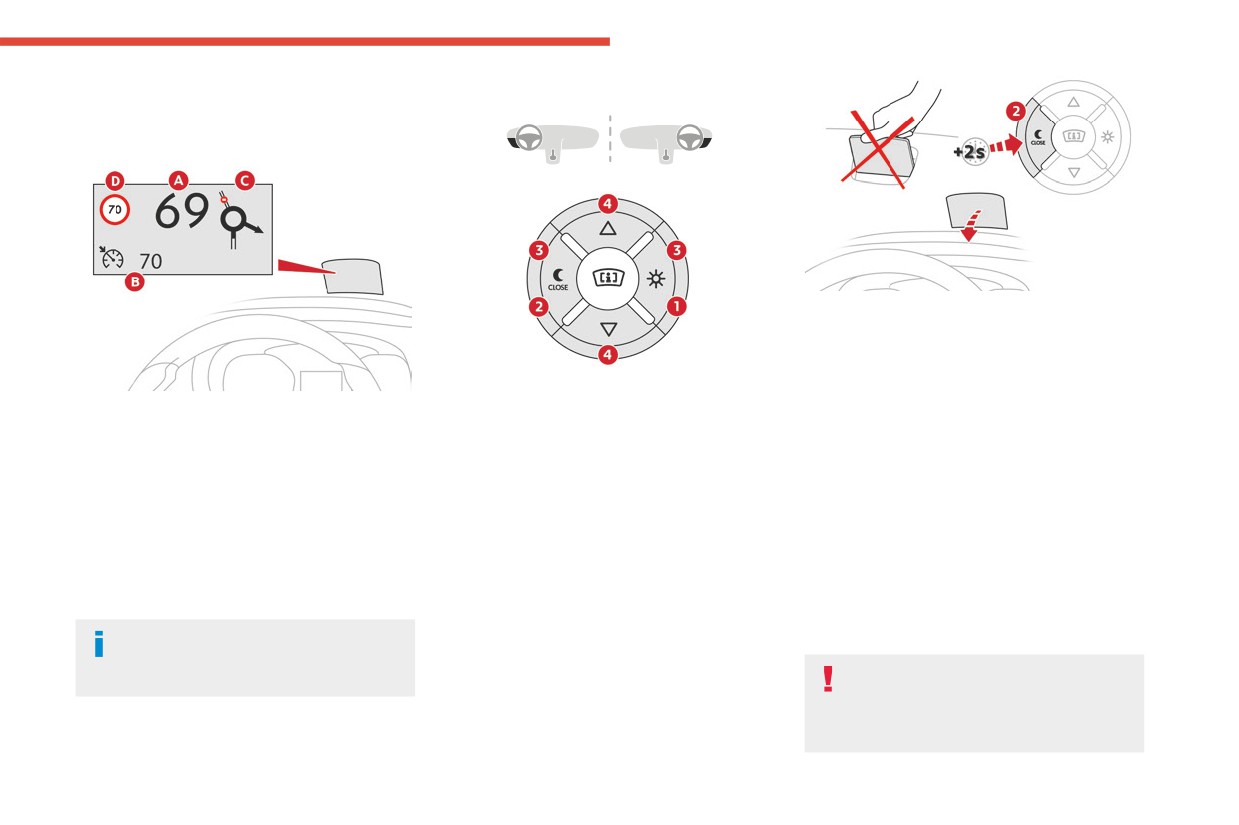
System which projects various information onto a
smoked blade placed in the driver's field of vision
10
CarManuals2.co
Dashboard instruments
to avoid the driver having to take their eyes off
Selectors
1
the road.
Display in operation
► Press and hold button 2 to deactivate the
system and retract the projection blade.
The state of the system is saved when the
engine is switched off and restored on restarting.
1. On.
Once the system has been activated, the
Adjusting the height
2. Off (long press).
following information is grouped together in the
► With the engine running, adjust the display to
3. Brightness adjustment.
head-up display:
the desired height using the buttons 4:
4. Display height adjustment.
A. The speed of the vehicle.
• up to move the display up,
B. Cruise control/speed limiter information.
• down to move the display down.
C. If the vehicle is so equipped, inter-vehicle
Activation/Deactivation
distance information, automatic emergency
► With the engine running, press button 1 to
Brightness adjustment
braking alerts and navigation instructions.
activate the system and deploy the projection
► With the engine running, adjust the
D. If the vehicle is so equipped, speed limit
blade.
brightness of the information display using the
information.
buttons 3:
• on the "sun" to increase the brightness,
For more information about Navigation,
• on the "moon" to decrease the brightness.
refer to the sections describing the audio
When stationary or while driving, no
and telematics systems.
objects should be placed around the
projection blade (or in its recess) so as not to
impede its movement and correct operation.
11
CarManuals2.co
Dashboard instruments
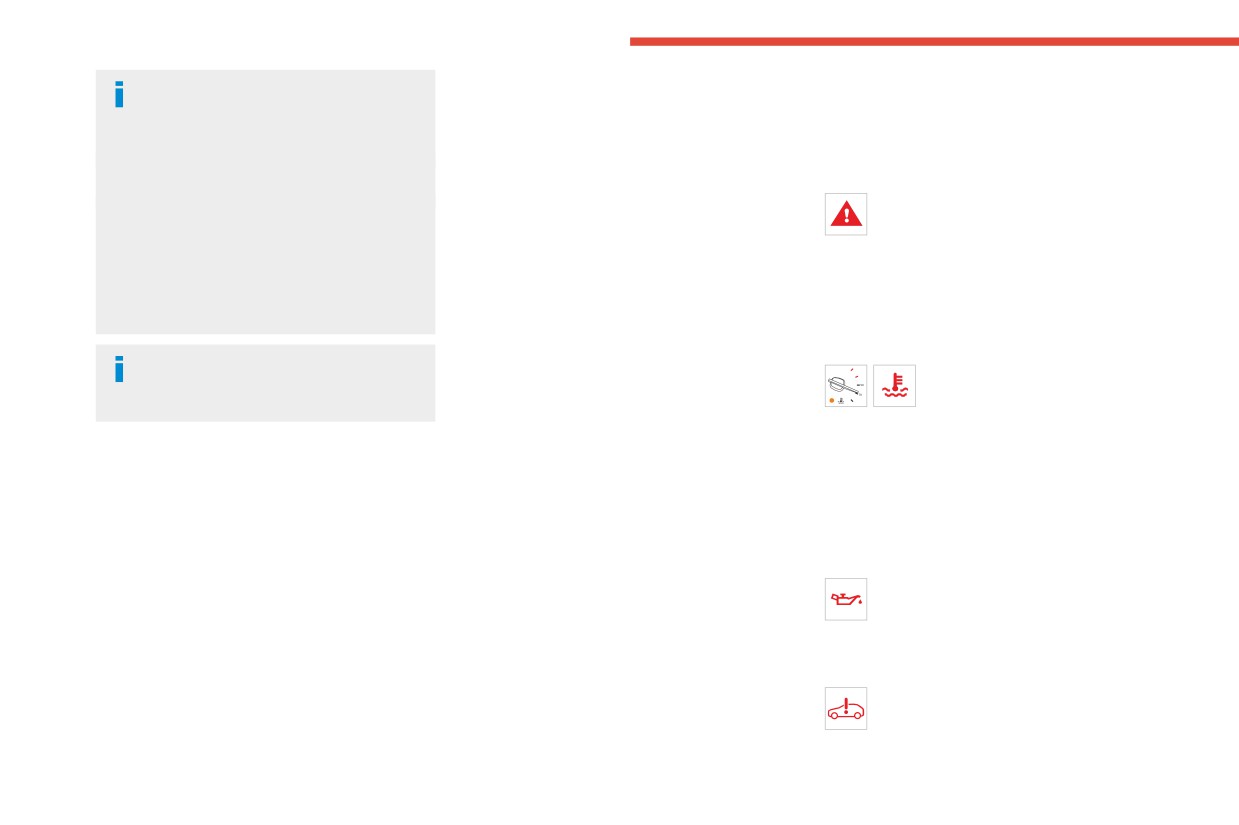
In certain extreme weather conditions
Relating the type of alert to the operating status
List of warning and
(rain and/or snow, bright sunshine, etc.),
of the vehicle allows you to determine whether
indicator lamps
the head-up display may not be legible or
the situation is normal or whether a fault has
may suffer temporary interference.
occurred: refer to the description of each lamp
Red warning/indicator lamps
Some sunglasses may hamper reading of the
for further information.
STOP
information.
When the ignition is switched on
Fixed, associated with another warning
To clean the projection blade, use a clean,
Certain red or orange warning lamps come on
lamp, accompanied by the display of a
soft cloth (such as a spectacles cloth or
for a few seconds when the ignition is switched
message and an audible signal.
microfibre cloth). Do not use a dry or abrasive
on. These warning lamps should go off as soon
A serious fault with the engine, braking system,
cloth, or detergent or solvent products, due to
as the engine is started.
power steering or automatic gearbox or a major
the risk of scratching the projection blade or
For more information on a system or a function,
electrical fault has been detected.
damaging the non-reflective coating.
refer to the corresponding section.
Carry out (1) and then (2).
Maximum engine coolant temperature
This system operates when the engine is
Persistent warning lamp
Fixed (warning lamp or LED), with
running, and the settings are saved when
If a red or orange warning lamp comes on, there
the needle in the red zone
the ignition is switched off.
may be fault which needs further investigation.
(depending on version).
If a lamp remains lit
The temperature of the cooling system is too
high.
Warning and indicator
The references (1), (2) and (3) in the warning
Carry out (1), then wait until the engine has
and indicator lamp description indicate whether
lamps
cooled down before topping up the level, if
you should contact a qualified professional in
necessary (Diesel). If the problem persists, carry
Displayed as symbols, the warning and indicator
addition to the immediate recommended actions.
out (2).
lamps inform the driver of the occurrence of a
(1): You must stop the vehicle.
malfunction (warning lamps) or of the operating
Stop as soon as it is safe to do so and switch off
Engine oil pressure
status of a system (operation or deactivation
the ignition.
Fixed.
indicator lamps). Certain lamps light up in two
(2): Contact a CITROËN dealer or a qualified
There is a fault with the engine lubrication
ways (fixed or flashing) and/or in several colours.
workshop.
system.
(3): Visit a CITROËN dealer or a qualified
Carry out (1) and then (2).
Associated warnings
workshop.
System malfunction (Electric)
The illumination of a lamp may be accompanied
Fixed.
by an audible signal and/or a message displayed
A fault involving the electric motor or
in a screen.
traction battery has been detected.
12
CarManuals2.co
Dashboard instruments
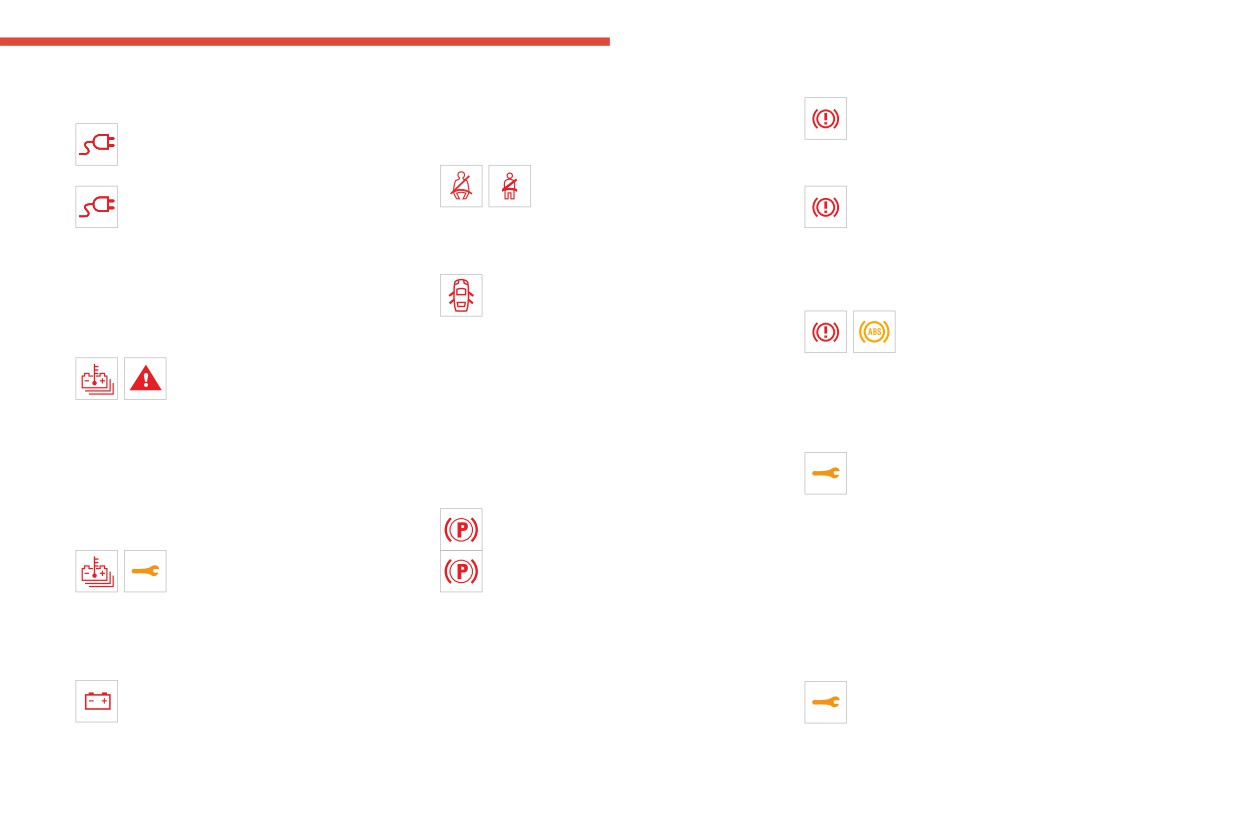
Carry out (1) and then (2).
Clean and retighten the lugs. If the warning lamp
Manual parking brake
1
Cable connected (Electric)
does not go off when the engine is started, carry
Fixed.
Fixed when the ignition is switched on.
out (2).
The parking brake is applied or not
The charging cable is connected to the
Seat belts not fastened/unfastened
properly released.
vehicle's connector.
Fixed or flashing, accompanied by
Braking
Fixed when the ignition is switched on,
an increasing audible signal.
Fixed.
accompanied by a message.
A seat belt has not been fastened or has been
The brake fluid level in the braking circuit
It is not possible to start the vehicle while the
unfastened (depending on version).
has dropped significantly.
charging cable is connected to the vehicle’s
Carry out (1), then top up with fluid that complies
Door open
connector.
with the manufacturer's recommendations. If the
Fixed, associated with a message
Disconnect the charging cable and close the
problem persists, carry out (2).
indicating which access is open.
flap.
Fixed.
An audible signal supplements the alert if the
The electronic brake force
Traction battery overheating (Electric)
speed is higher than 6 mph (10 km/h).
distribution (EBFD) system is faulty.
Fixed, combined with the STOP
A door, the boot, the tailgate or the opening rear
Carry out (1) and then (2).
warning lamp, accompanied by the
screen is still open (depending on version).
display of a message and an audible signal.
Close whichever access is open.
Orange warning/indicator lamps
The traction battery's temperature is too high.
If your vehicle is equipped with a right-hand side-
Service
Carry out (1).
hinged door, this warning lamp will not indicate
Temporarily on, accompanied by the
Evacuate the vehicle as quickly as possible
that it is open.
display of a message.
and move to a safe distance.
Electric parking brake
One or more minor faults, for which there is/are
Carry out (2).
Fixed.
no specific warning lamp(s), have been detected.
Traction battery malfunction (Electric)
The electric parking brake is applied.
Identify the cause of the fault using the message
Fixed, combined with the Service
Flashing.
displayed on the instrument panel.
warning lamp, accompanied by the
Application/release is faulty.
You may be able to deal with some faults
display of a message.
Carry out (1): park on flat ground (on a level
yourself, such as changing the battery in the
The traction battery has a fault.
surface).
remote control.
Carry out (2).
With a manual gearbox, engage a gear.
For other faults, such as with the tyre under-
With an automatic gearbox or drive selector,
Battery charge
inflation detection system, carry out (3).
select mode P.
Fixed.
Fixed, accompanied by the display of a
Switch off the ignition and carry out (2).
The battery charging circuit has a fault
message.
(dirty terminals, slack or cut alternator belt, etc.).
One or more major faults, for which there is/are
no specific warning lamp(s), have been detected.
13
CarManuals2.co
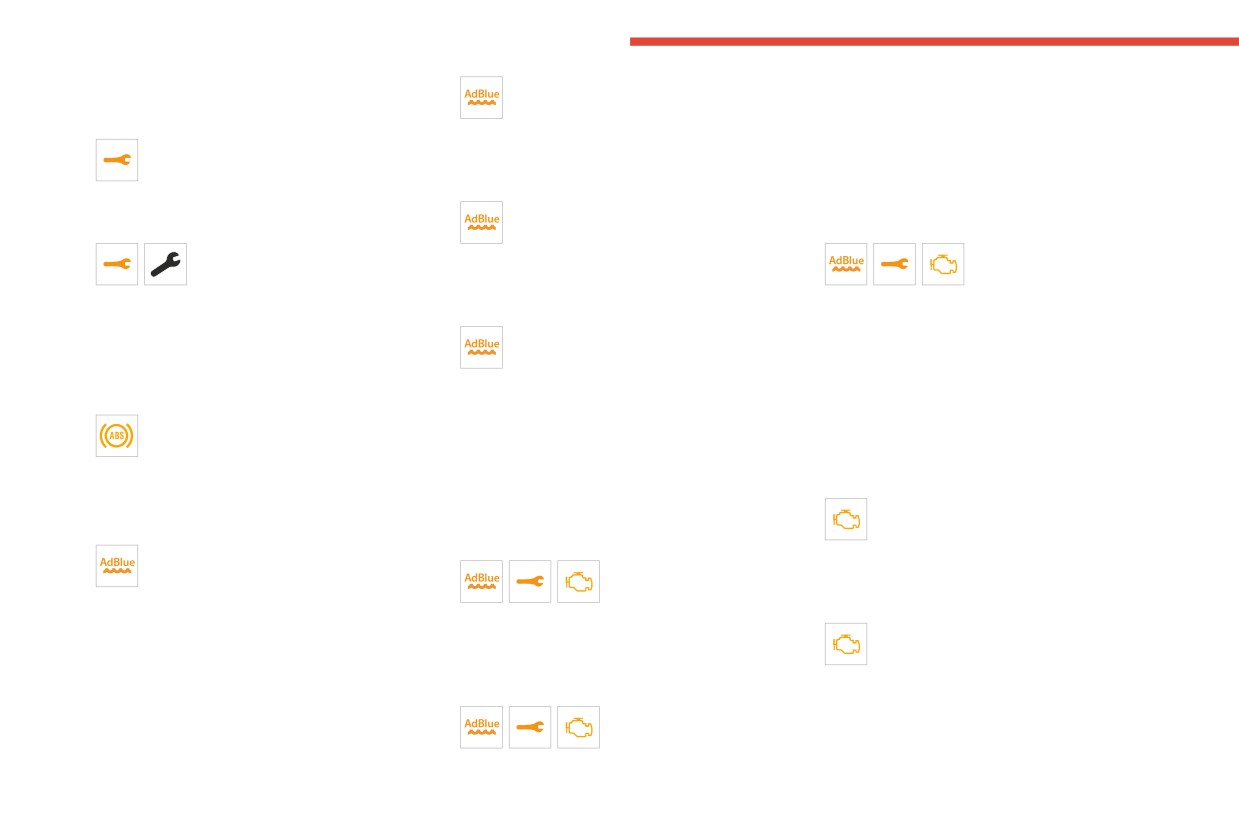
Dashboard instruments
Identify the cause of the fault using the message
Fixed, on switching on the ignition,
self-diagnostics warning lamps on fixed,
displayed on the instrument panel, then carry
accompanied by an audible signal and a
accompanied by an audible signal and a
out (3).
message indicating the driving range.
message indicating the driving range.
Fixed, accompanied by the message
The driving range is between 500 and 62 miles
Depending on the message displayed, it is
"Parking brake fault".
(800 and 100 km).
possible to drive for up to 685 miles (1,100 km)
Automatic release of the electric parking brake is
Promptly top up the AdBlue®, or carry out (3).
before the engine immobiliser is triggered.
unavailable.
Flashing, accompanied by an audible
Carry out (3) without delay, to avoid starting
Carry out (2).
signal and a message indicating the
being prevented.
Service warning lamp fixed and
driving range.
Flashing AdBlue® warning
service spanner flashing then
The driving range is less than 62 miles (100 km).
lamp on switching on the
fixed.
You must top up the AdBlue® to avoid engine
ignition, with the Service and Engine self-
The servicing interval has been exceeded.
starting being prevented, or carry out (3).
diagnostics warning lamps on fixed,
The vehicle must be serviced as soon as
Flashing, accompanied by an audible
accompanied by an audible signal and a
possible.
signal and a message indicating that
message indicating that starting is prevented.
Only with BlueHDi Diesel engines.
starting is prevented.
The engine immobiliser prevents the engine from
Anti-lock braking system (ABS)
The AdBlue® tank is empty: the legally required
restarting (the permitted driving limit has been
Fixed.
engine immobiliser system prevents the engine
exceeded after confirmation of a malfunction of
The anti-lock braking system has a fault.
from starting.
the emissions control system).
The vehicle retains conventional braking.
To restart the engine, top up the AdBlue® or carry
To start the engine, carry out (2).
Drive carefully at moderate speed, then carry
out (2).
Engine self-diagnostic system (Diesel)
out (3).
It is essential to add at least 10 litres of AdBlue®
Flashing.
to the tank.
The engine management system has a
AdBlue® (Euro 6.3/6.4)
SCR emissions control system (BlueHDi)
fault.
On for around 30 seconds when starting
Fixed when the ignition is
There is a risk that the catalytic converter will be
the vehicle, accompanied by a message
switched on, accompanied
destroyed.
indicating the driving range.
by an audible signal and a message.
You must carry out (2).
The driving range is between 1,500 and 500
A malfunction of the SCR emissions control
Fixed.
miles (2,400 and 800 km).
system has been detected.
The emissions control system has a fault.
Top up the AdBlue®.
This alert disappears once the exhaust
The warning lamp should go off when the engine
emissions return to normal levels.
is started.
Flashing AdBlue® warning
Carry out (3) without delay.
lamp on switching on the
ignition, with the Service and Engine
14
CarManuals2.co
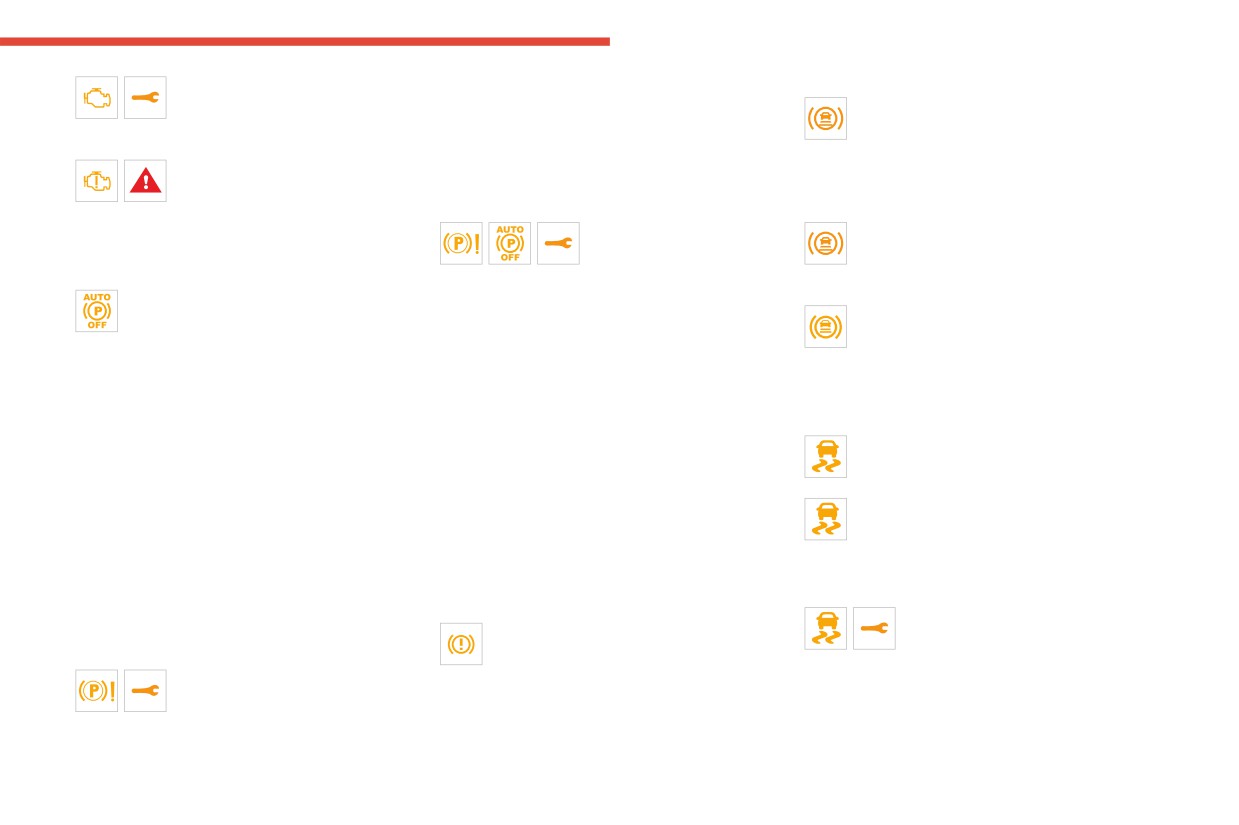
Dashboard instruments
Fixed.
If manual application and release commands are
Collision Risk Alert/Active Safety Brake
1
A minor engine fault has been
not working, the electric parking brake control is
Flashing.
detected.
faulty.
The system activates and brakes the
Carry out (3).
The automatic functions must be used at all
vehicle momentarily to reduce the speed of
Fixed.
times and are automatically reactivated in the
collision with the vehicle in front.
A major engine fault has been
event of a fault with the control.
For more information, refer to the Driving
detected.
Carry out (2).
section.
Carry out (1) and then (2).
Fixed, accompanied by the
Fixed, accompanied by a message and
Automatic functions deactivated (electric
message "Parking brake
an audible signal.
parking brake)
fault".
The system has a fault.
Fixed.
The electric parking brake is faulty: manual and
Carry out (3).
The "automatic application" (on switching
automatic functions may not be working.
Fixed, accompanied by the display of a
off the engine) and "automatic release" (on
When stationary, to immobilise the vehicle:
message.
acceleration) functions are deactivated.
► Pull the electric parking brake control and
The system has been deactivated via the vehicle
If automatic application/release is no longer
hold it for approximately 7 to 15 seconds, until
configuration menu.
possible:
the indicator lamp lights up on the instrument
Dynamic stability control (DSC)/Anti-slip
► Start the engine.
panel.
regulation (ASR)
► Use the control to apply the electric parking
If this procedure does not work, secure the
Flashing.
brake.
vehicle:
DSC/ASR system regulation is activated
► Take your foot fully off the brake pedal.
► Park on a level surface.
in the event of a loss of grip or trajectory.
► Hold the control pressed in the release
► With a manual gearbox, engage a gear.
Fixed.
direction for between 10 and 15 seconds.
► With an automatic gearbox or drive selector,
The DSC/ASR system has a fault.
► Release the control.
select mode P, then place the supplied chock
Carry out (3).
► Depress and hold the brake pedal.
against one of the wheels.
Emergency brake malfunction (with
► Pull the control in the application direction for
Then carry out (2).
electric parking brake)
2 seconds.
Braking
Fixed, accompanied by the
► Release the control and the brake pedal.
Fixed.
message "Parking brake fault".
A minor fault with the braking system has
Malfunction (with electric parking brake)
Emergency braking does not deliver optimal
been detected.
Fixed, accompanied by the
performance.
Drive carefully.
message "Parking brake fault".
If automatic release is not available, use manual
Carry out (3).
The vehicle cannot be immobilised with the
release or carry out (3).
engine running.
15
CarManuals2.co
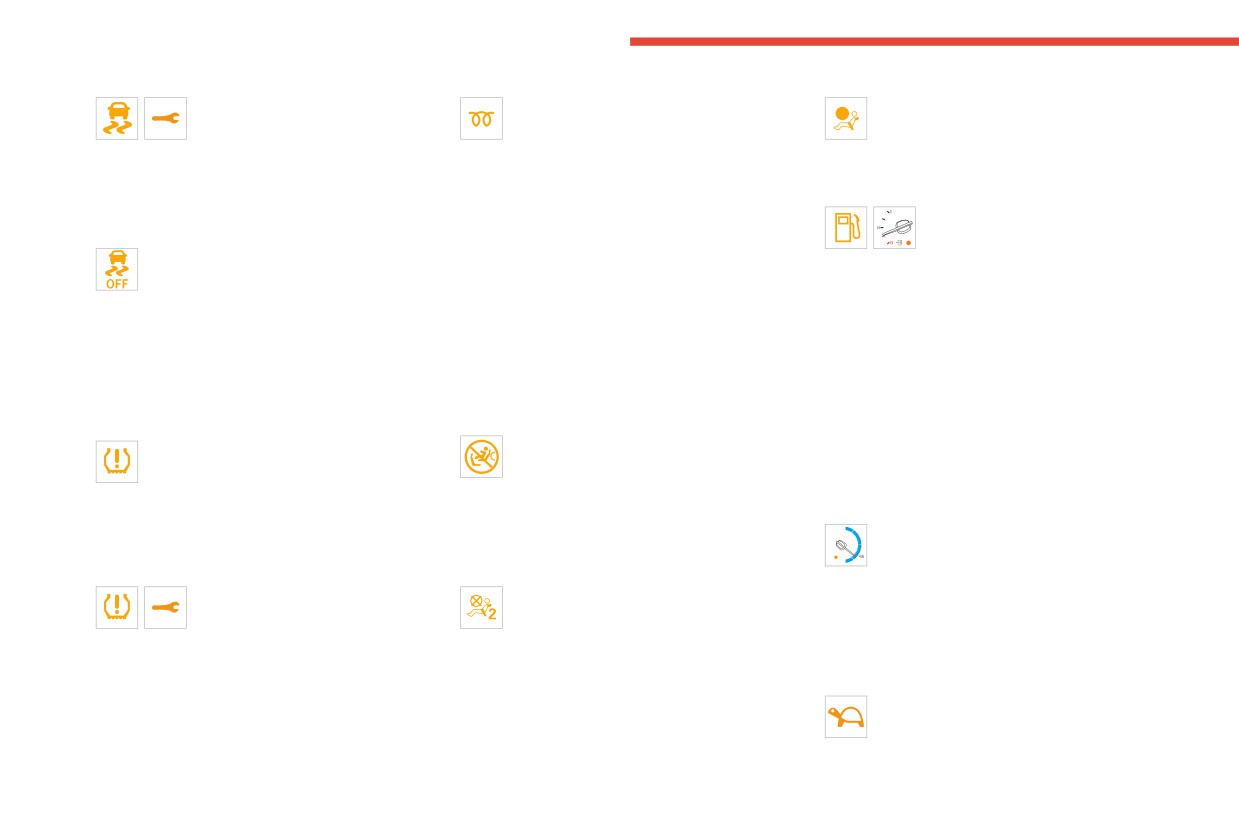
Dashboard instruments
Hill start assist
Engine preheating (Diesel)
Airbags
Fixed, accompanied by the
Temporarily on
Fixed.
message "Anti roll-back system
(up to approximately 30 seconds in
One of the airbags or seat belt
fault".
severe weather conditions).
pyrotechnic pretensioners is faulty.
The system has a fault.
When switching on the ignition, if the weather
Carry out (3).
Carry out (3).
conditions and the engine temperature make it
Low fuel level (Diesel)
Dynamic stability control (DSC)/Anti-slip
necessary.
Fixed (warning lamp or LED) and
regulation (ASR)
Wait until the warning lamp goes off before
needle in the red zone (depending
Fixed.
starting.
on version), accompanied by an audible signal
The system is deactivated.
When the warning lamp goes off, starting will
and a message.
The DSC/ASR system is reactivated
occur immediately if you press and hold:
When it first comes on, there remains less than
automatically when the vehicle is restarted,
- the clutch pedal with a manual gearbox.
8 litres of fuel in the tank.
and at speeds above approximately 31 mph
- the brake pedal with an automatic gearbox.
Until the fuel level is topped up, this alert will
(50 km/h).
If the engine does not start, make the engine
be repeated every time the ignition is switched
At speeds below 31 mph (50 km/h), it can be
starting request again, while keeping your foot
on, with increasing frequency as the fuel level
reactivated manually.
on the pedal.
decreases and approaches zero.
Front passenger airbag (ON)
Refuel without delay to avoid running out of fuel.
Under-inflation
Fixed.
Never drive until completely empty, as
Fixed, accompanied by an audible signal
The front passenger airbag is activated.
this could damage the emissions control and
and a message.
The control is in the "ON" position.
injection systems.
The pressure in one or more tyres is too low.
In this case, do NOT install a "rearward
Check the pressure of the tyres as soon as
Low traction battery level (Electric)
facing" child seat on the front passenger seat
100
possible.
Fixed LED and needle in the red zone,
- Risk of serious injury!
Reinitialise the detection system after adjusting
0 %
accompanied by an audible signal and a
the pressure.
Front passenger airbag (OFF)
message.
Under-inflation warning lamp
Fixed.
The state of charge of the traction battery is low.
flashing then fixed and Service
The front passenger airbag is deactivated.
View the remaining range.
warning lamp fixed.
The control is set to the “OFF” position.
Put the vehicle on charge as soon as possible.
The tyre pressure monitoring system is faulty.
A "rearward facing" child seat can be installed,
Tortoise mode with limited driving range
Under-inflation detection is no longer monitored.
unless there is a fault with the airbags (Airbags
(Electric)
Check the tyre pressures as soon as possible
warning lamp on).
Fixed.
and carry out (3).
The state of charge of the traction battery
is critical.
16
CarManuals2.co
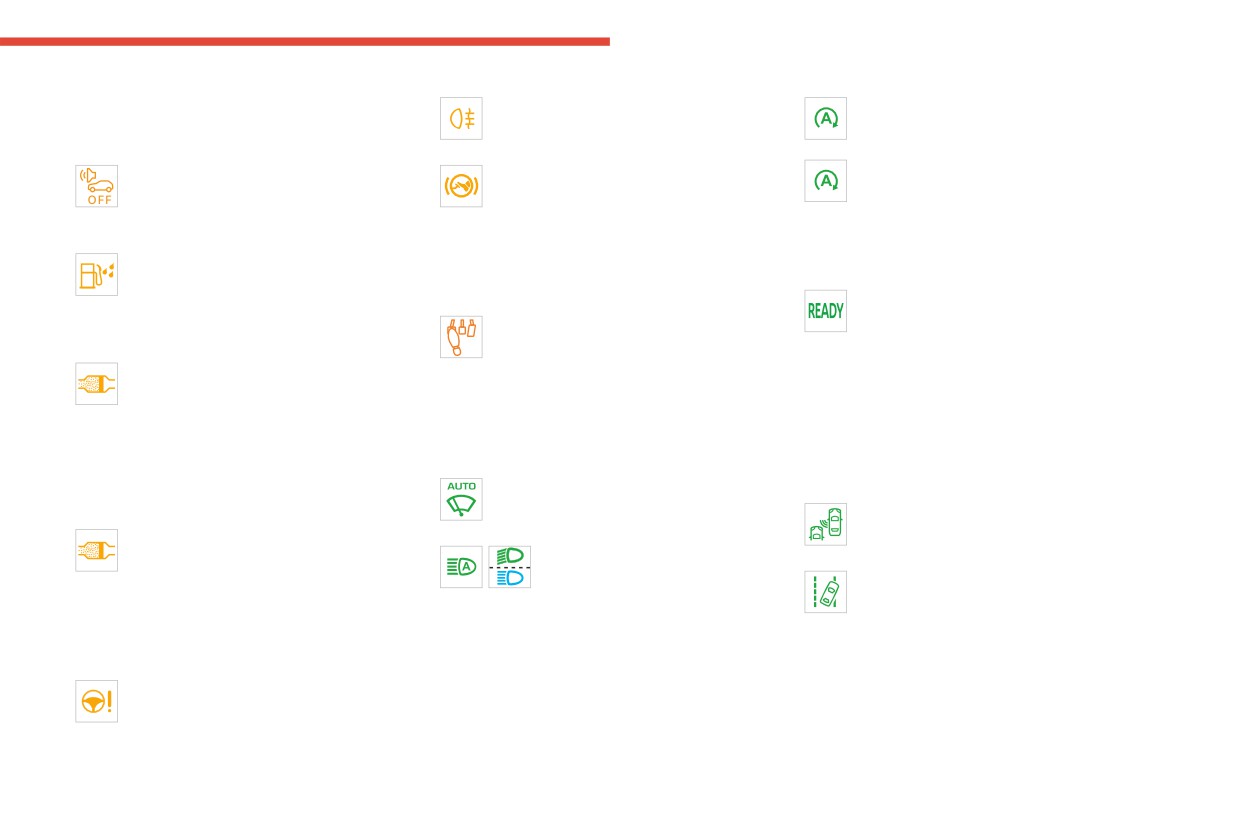
Dashboard instruments
The engine power gradually decreases.
Rear foglamp
Stop & Start
1
You must put the vehicle on charge.
Fixed.
Fixed.
If the warning lamp remains lit, carry out (2).
The lamp is on.
When the vehicle stops, the Stop & Start
Pedestrian horn (Electric)
Foot on the brake
system puts the engine into STOP mode.
Fixed.
Fixed.
Flashing temporarily.
Horn fault detected.
Insufficient or no pressure on the brake
STOP mode is momentarily unavailable
Carry out (3).
pedal.
or START mode is automatically triggered.
With the automatic gearbox or the drive selector,
For more information, refer to the Driving
Water in Diesel fuel filter (Diesel)
it may be necessary to depress the brake pedal
section.
Fixed (with LCD instrument panel).
to unlock the gearbox from mode N.
Vehicle ready to drive (Electric)
The Diesel fuel filter contains water.
Fixed, accompanied by an audible signal
Carry out (2) without delay. Risk of damaging the
Foot on the clutch
when it comes on.
fuel injection system!
Fixed.
The vehicle is ready to drive and the thermal
Particle filter (Diesel)
Stop & Start: the change to START mode
comfort systems are available.
Fixed, accompanied by an audible signal
is rejected because the clutch pedal is not fully
The indicator lamp goes out upon reaching a
and a message about the risk of particle
depressed.
speed of approximately 3 mph (5 km/h) and
filter blockage.
Fully depress the clutch pedal.
lights up again when the vehicle stops moving.
The particle filter is nearing saturation.
Green warning/indicator lamps
The lamp will go out when you switch off the
As soon as traffic conditions allow, regenerate
Automatic wiping
motor and exit the vehicle.
the filter by driving at a speed of at least 37 mph
Fixed.
Blind spot monitoring
(60 km/h), with an engine speed of above 2,500
Automatic windscreen wiping is activated.
Fixed.
rpm, until the warning lamp goes off.
Fixed, accompanied by an audible signal
Automatic headlamp dipping
The function has been activated.
and a message indicating that the
Fixed.
Lane departure warning
additive level in the particle filter is too low.
The function has been activated
Flashing, accompanied by an audible
The low level in the additive tank has been
via the vehicle’s configuration menu.
signal.
reached.
The lighting control stalk is in the "AUTO"
A lane marking has been crossed on the left or
Top up without delay: carry out (3).
position.
right.
For more information, refer to the Lighting and
Turn the steering wheel in the opposite direction
Power steering
visibility section.
to return to the correct trajectory.
Fixed.
For more information, refer to the Driving
The power steering has a fault.
section.
Drive carefully at moderate speed, then carry
out (3).
17
CarManuals2.co
Dashboard instruments
Fixed, accompanied by an onscreen
Resetting the service indicator
Indicators
message.
The service indicator must be reset after each
The system has a fault.
service.
Service indicator
Stay alert and drive carefully, then carry out (3).
► Switch the ignition off.
The service indicator is displayed on the
Direction indicators
instrument panel. Depending on the vehicle
Flashing with audible signal.
version:
The direction indicators are on.
- the distance recorder display line indicates
Sidelamps
the distance remaining before the next service
Fixed.
is due, or the distance travelled since it was due
The lamps are on.
preceded by the sign “-”.
Dipped beam headlamps
- an alert message indicates the distance
Fixed.
remaining, as well as the period before the next
The lamps are on.
service is due or how long it is overdue.
► Press and hold this button.
Front foglamps
Service spanner
► Switch on the ignition; the distance recorder
Fixed.
On temporarily when the ignition is
display begins a countdown.
The front foglamps are on.
switched on.
► Release the button when =0 is displayed; the
Between 620 and 1,860 miles (1,000 and 3,000
spanner disappears.
Blue warning/indicator lamps
km) remain before the next service is due.
If you have to disconnect the battery
Main beam headlamps
Fixed, when the ignition is switched on.
following this operation, lock the vehicle
Fixed.
The next service is due in less than 620
and wait at least 5 minutes for the reset to be
The lamps are on.
miles (1,000 km).
registered.
Black/white warning lamps
Have your vehicle serviced very soon.
Service spanner flashing
Foot on the brake
Retrieving the service information
Flashing then fixed, when the
Fixed.
ignition is switched on.
The service information can be accessed at any
Insufficient or no pressure on the brake
(With BlueHDi Diesel engines, associated with
time.
pedal.
the Service warning lamp.)
► Press this button.
With an automatic gearbox, with the engine
The servicing interval has been exceeded.
The service information is displayed for a few
running, before releasing the parking brake, to
Have your vehicle serviced as soon as possible.
seconds, then disappears.
move out of position P.
The distance indicated (in miles or
kilometres) is calculated according to the
18
CarManuals2.co
Dashboard instruments
distance covered and the time elapsed since
This is indicated by a message on the instrument
Engine coolant temperature
1
the last service.
panel.
indicator (Diesel)
The alert may be triggered close to a due
If a low oil level is confirmed by a check using
date.
the dipstick, the level must be topped up to avoid
damage to the engine.
For more information on Checking levels, refer
Engine oil level indicator
to the corresponding section.
(Depending on version)
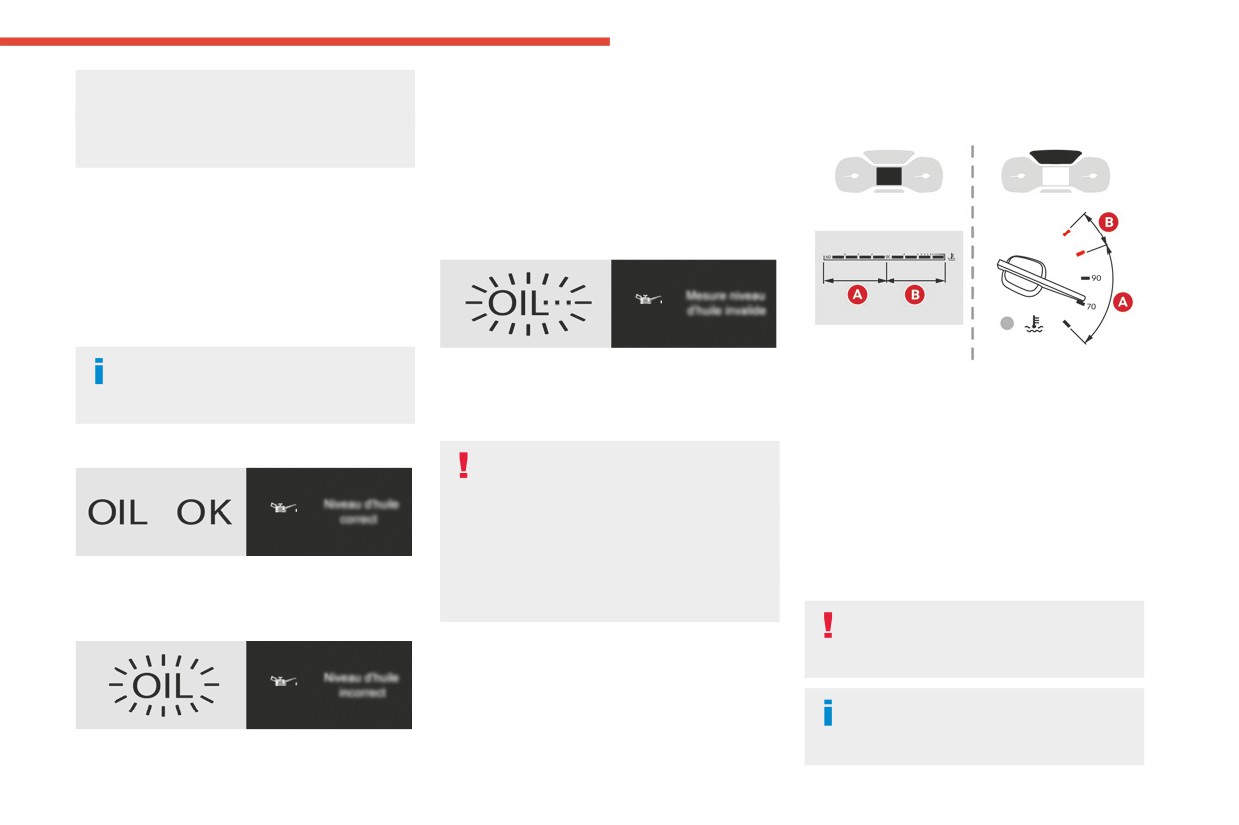
Oil gauge malfunction
On versions fitted with an electric gauge, the
engine oil level status is displayed on the
instrument panel for a few seconds when the
ignition is switched on, at the same time as the
servicing information.
The level read will only be correct if the
This is indicated by the display of a message on
With the engine running:
vehicle is on level ground and the engine
the instrument panel.
- In zone A, the temperature is correct.
has been off for more than 30 minutes.
Contact a CITROËN dealer or a qualified
- In zone B, the temperature is too high. The
workshop.
Oil level correct
associated warning lamp and the STOP warning
In the event of a malfunction of the
lamp light up in red on the instrument panel,
electric gauge, the oil level is no longer
accompanied by the display of a message and
monitored.
an audible signal.
If the system is faulty, you must check the
You must stop the vehicle as soon as it is
engine oil level using the manual dipstick
safe to do so.
located in the engine compartment.
Wait a few minutes before switching off the
This is indicated by a message on the instrument
For more information on Checking levels,
engine.
panel.
refer to the corresponding section.
Low oil level
After switching off the ignition, carefully
open the bonnet and check the coolant
level.
For more information on Checking
levels, refer to the corresponding
section.
19
CarManuals2.co
Dashboard instruments
Checking
engine starting is prevented is displayed in the
Actions required related to a lack of
After driving for a few minutes, the temperature
instrument panel.
AdBlue®
and pressure in the cooling system increase.
The following warning lamps light up when the
The engine starting prevention system
To top up the level:
quantity of AdBlue® is below the reserve level:
required by regulations is activated
► wait at least one hour for the engine to cool,
driving range of 1,500 miles (2,400 km).
automatically once the AdBlue® tank is empty.
► unscrew the cap by two turns to allow the
Together with the warning lamps, messages
It is then no longer possible to start the
pressure to drop,
regularly remind you of the need to top up to
engine until the minimum level of AdBlue® has
► when the pressure has dropped, remove the
avoid engine starting being prevented. Refer to
been topped up.
cap,
the Warning and indicator lamps section for
► top up the level to the "MAX" mark.
details of the messages displayed.
For more information on Checking levels, refer
Manual display of driving range
For more information on AdBlue®
to the corresponding section.
While the driving range is greater than
(BlueHDi) and in particular on topping
1,500 miles (2,400 km), it is not displayed
Be aware of the risk of scalding when
up, refer to the corresponding section.
automatically.
topping up the coolant. Do not fill above
the maximum level (indicated on the
With BlueHDi (Euro 6.3/6.4) engines
reservoir).
Warning/
Action
Remaining
indicator
range
AdBlue® range indicators
lamps on
(BlueHDi)
Top up.
Between
The Diesel BlueHDi engines are equipped with
1,500
a system that associates the SCR (Selective
miles and
Catalytic Reduction) emissions control system
► Press this button to temporarily display the
500 miles
and the Diesel particle filter (DPF) for the
driving range.
(2,400 km
treatment of exhaust gases. They cannot
With touch screen
and 800 km)
function without AdBlue® fluid.
You can view the range information in the
When the level of AdBlue® falls below the
"Driving/Vehicle" menu.
Top up as
Between
reserve level (between 1,500 and 0 miles (2,400
soon as
500 miles
and 0 km)), a warning lamp lights up when
possible.
and 62
the ignition is switched on and an estimate
miles
of the distance that can be travelled before
(800 km and
100 km)
20
CarManuals2.co
Dashboard instruments
Malfunction of the SCR emissions
"NO START IN X miles (kms)"), indicating the
Warning/
Action
Remaining
1
control system
driving range in miles or kilometres.
indicator
range
While driving, the message is displayed every 30
lamps on
Malfunction detection
seconds. The alert is repeated when switching
A top-up is
Between
on the ignition.
If a malfunction is detected,
vital, there is
62 miles
You can continue driving for up to 685 miles
these warning lamps come
a risk that the
and 0 miles
(1,100 km) before the engine starting
on, accompanied by an
engine will
(100 km and
prevention system is triggered.
audible signal and the display
be prevented
0 km)
of an "Emissions control
Have it checked by a CITROËN dealer or
from starting.
fault" or "NO START IN"
a qualified workshop.
To be able
0 miles (km)
message.
to restart the
Starting prevented
The alert is triggered while driving when the
engine, add at
fault is detected for the first time, and thereafter
Every time the ignition is switched on, the
least 10 litres
when switching on the ignition for subsequent
message "Emissions control fault: Starting
of AdBlue® to
journeys, for as long as the cause of the fault
prevented" or "NO START IN" is displayed.
the tank.
persists.
To restart the engine
Taking into account of top-up
If the fault is temporary, the alert
Contact a CITROËN dealer or a qualified
Top-up detection may not be
disappears during the next journey, after
workshop.
instantaneous after addition. It may take a few
self-diagnostic checks of the SCR emissions
minutes of driving before the top-up detection
control system.
is effective.
Malfunction confirmed during the
permitted driving phase (between 685
miles and 0 miles (1,100 km and 0 km))
If the fault indication is still displayed
permanently after 31 miles (50 km) of driving, the
fault in the SCR system is confirmed.
The AdBlue warning lamp flashes and a
message is displayed ("Emissions control
fault: starting prevented in X miles (kms)" or
21
CarManuals2.co
Dashboard instruments
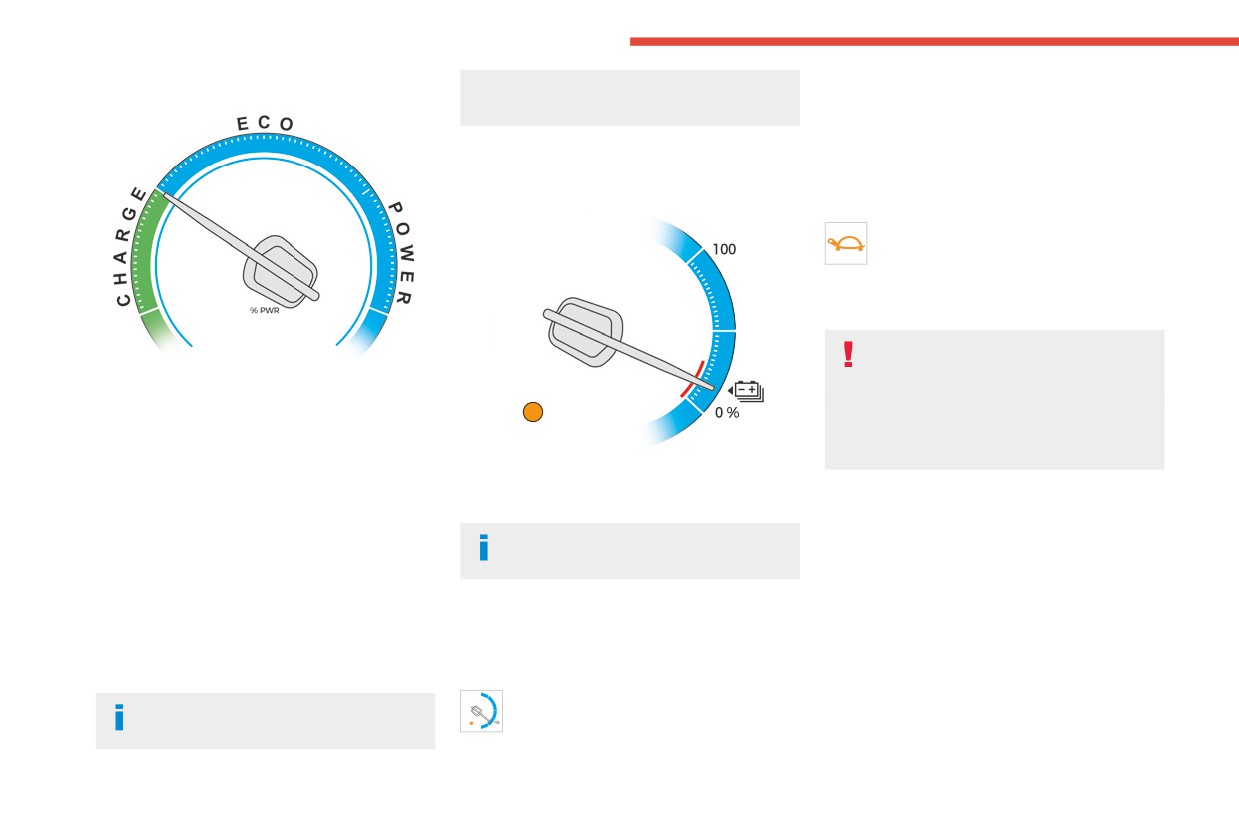
Power indicator (Electric)
to the "neutral" position: between ECO and
Fixed LED and needle in the red zone,
CHARGE.
accompanied by an audible signal.
► View the remaining range on the instrument
panel.
Charge level indicator
► Put the vehicle on charge as soon as
(Electric)
possible.
2nd level: Critical
The state of charge of the traction battery
is critical.
Fixed, together with the reserve LED,
accompanied by an audible signal.
► You must put the vehicle on charge.
The remaining range is no longer
calculated. The drive train power
CHARGE
gradually decreases.
Traction battery charging during deceleration
The heating and air conditioning are switched
and braking.
off (even if the needle indicating their
ECO
consumption is not at the "ECO" position).
Moderate energy consumption and optimised
The traction battery's actual charge level and
driving range.
the remaining range are displayed continuously
POWER
when the vehicle is started.
Energy consumption by the drive train during
With the ignition off, opening the driver's
acceleration.
door activates the indicator.
NEUTRAL
When the ignition is switched on, the vehicle’s
electric drive train neither consumes nor
Associated warning lamps
generates energy; after sweeping over the
Two successive alert levels indicate that the
indicator, the needle returns to its "neutral"
energy available has dropped to a low level:
position: between ECO and CHARGE.
1st level: Reserve
100
The state of charge of the traction battery
With the ignition off, opening the driver's
0 %
is low.
door activates the indicator, which moves
22
CarManuals2.co
Dashboard instruments
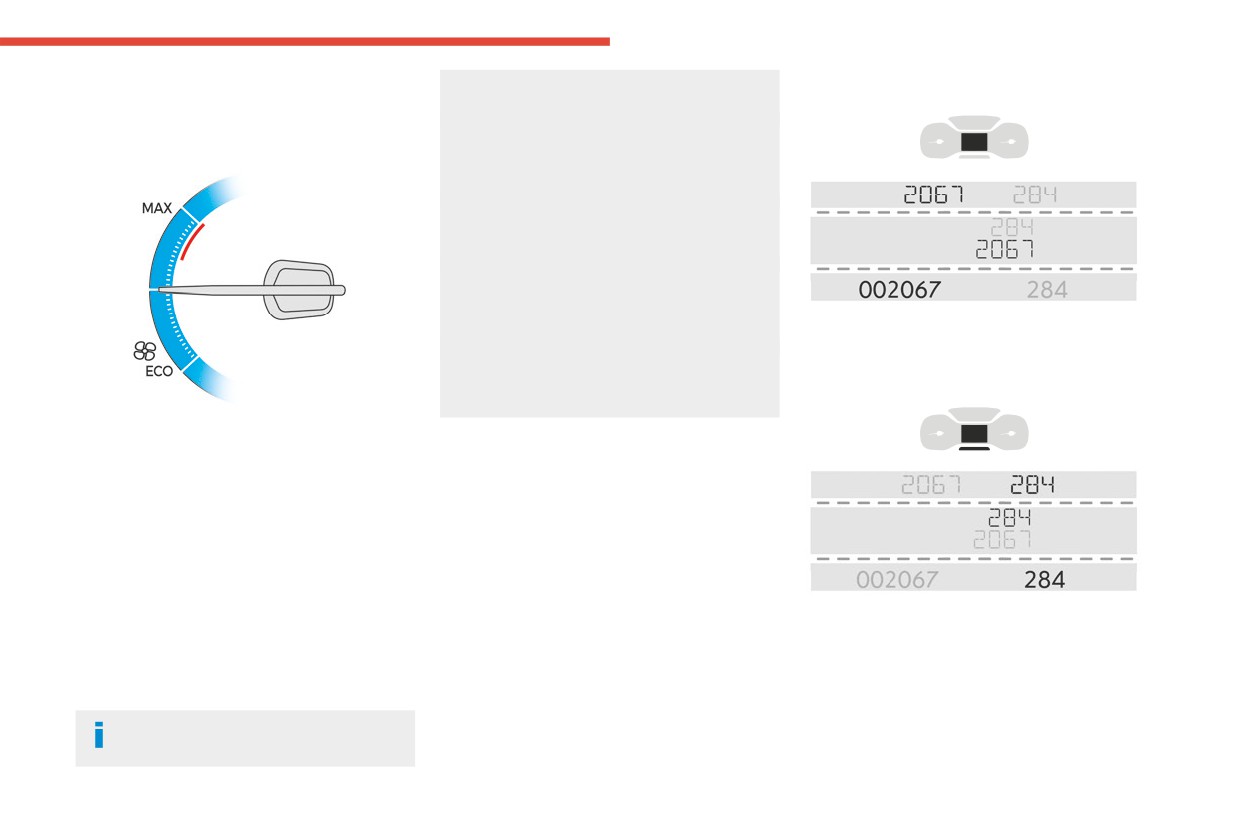
Thermal comfort
select the maximum heating or cooling
Total distance recorder
1
setting.
consumption indicator
When the heating is on maximum, the gauge
(Electric)
on the thermal comfort consumption indicator
is in the MAX zone. When the air conditioning
is on maximum, it stays in the ECO zone.
Excessive use of thermal comfort equipment,
particularly at low speed, can significantly
decrease the vehicle's range.
Remember to optimise equipment settings
upon achieving the desired level of comfort,
and adjust them if necessary whenever you
This measures the total distance travelled by the
start the vehicle.
vehicle since its initial registration.
After an extended period without using the
heating, you may notice a slight odour during
Trip distance recorder (Diesel)
the first few minutes of use.
The gauge shows the consumption of the
traction battery's electrical energy by the thermal
Distance recorders
comfort devices in the passenger compartment.
The total and trip distances are displayed for
The devices in question are the heating and air
thirty seconds when the ignition is switched off,
conditioning systems.
when the driver's door is opened and when the
This equipment can be used:
vehicle is locked or unlocked.
- If the vehicle is not plugged in, when the
READY lamp is lit.
- If the vehicle is plugged in, when the ignition is
switched on ("Lounge" mode).
This measures the distance travelled since it was
Selecting ECO mode limits the performance
last reset by the driver.
of some of this equipment. The needle on the
Resetting the trip recorder
thermal comfort consumption indicator then
moves into the "ECO" zone.
To quickly heat or cool the passenger
compartment, feel free to temporarily
23
CarManuals2.co
Dashboard instruments
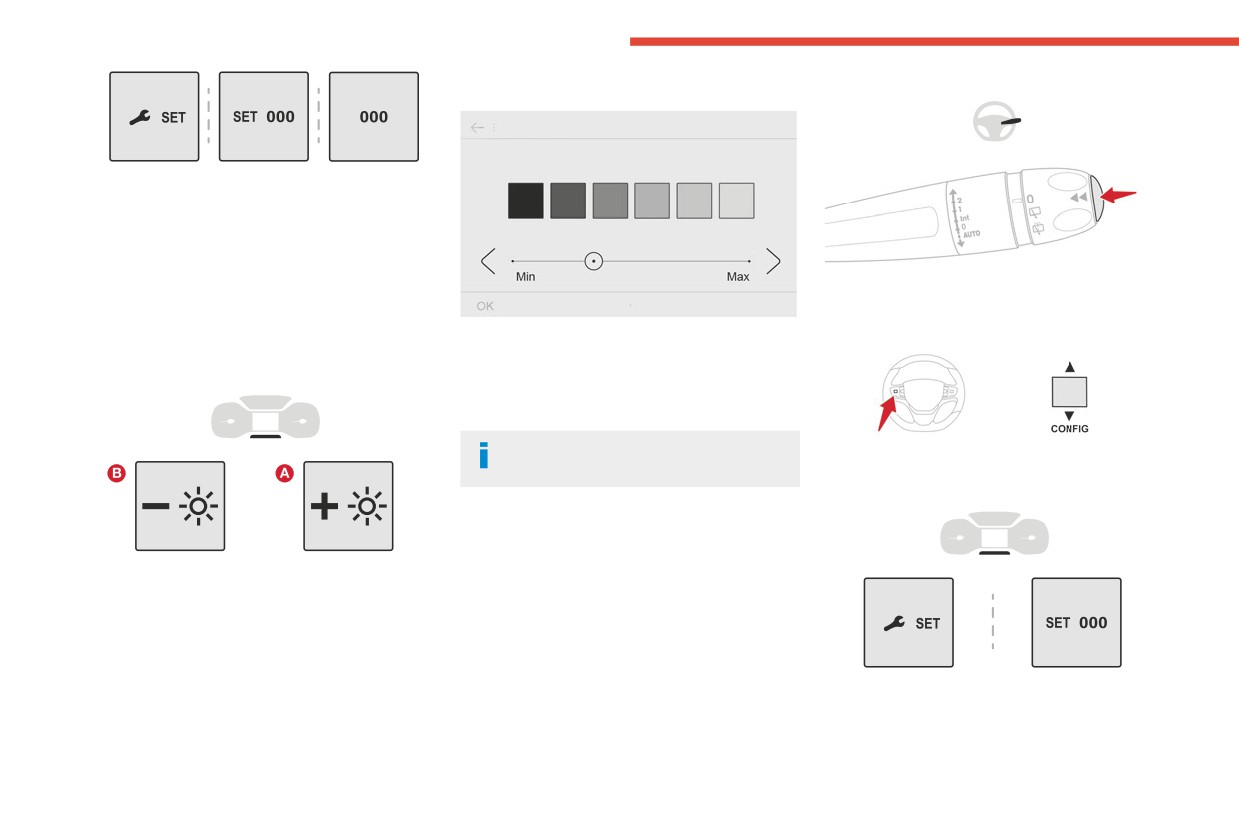
With touch screen
► With the ignition on, press the button until
zeros appear.
Lighting dimmer
This system allows the brightness of the
► Press the button located on the end of the
instruments and controls to be adjusted manually
wiper control stalk.
to suit the ambient light level.
With steering-mounted controls
► In the Settings menu, select "Brightness"
or "OPTIONS", "Screen configuration" then
With buttons
"Brightness".
► Adjust the brightness by pressing the arrows
or moving the slider.
The brightness can be set differently for
► Press the knob on the steering wheel.
day mode and night mode.
On the instrument panel
Trip computer
Displays information related to the current trip
With the lamps on, press button A to increase
(range, fuel consumption, average speed, etc.).
the brightness of the lighting, or button B to
decrease it.
Information display
Release the button when the desired brightness
To display the various trip computer tabs in turn:
is reached.
► Press this button.
The following current information is shown in
turn:
- Driving range (Diesel).
24
CarManuals2.co
Dashboard instruments
- Current consumption.
Contact a CITROËN dealer or a qualified
1
- Stop & Start time counter (Diesel).
workshop.
- Trip "1" followed by (depending on version)
trip "2" including average speed, average
Current consumption
consumption and distance travelled for each trip.
(mpg or l/100 km or km/l)
Trips "1" and "2" are independent but their use
(miles/kWh or kWh/100 km or km/kWh) (Electric)
is identical.
/
Calculated during the last few
For example, trip "1" can be used for daily
seconds.
figures and trip "2" for monthly figures.
This function is only displayed at speeds above
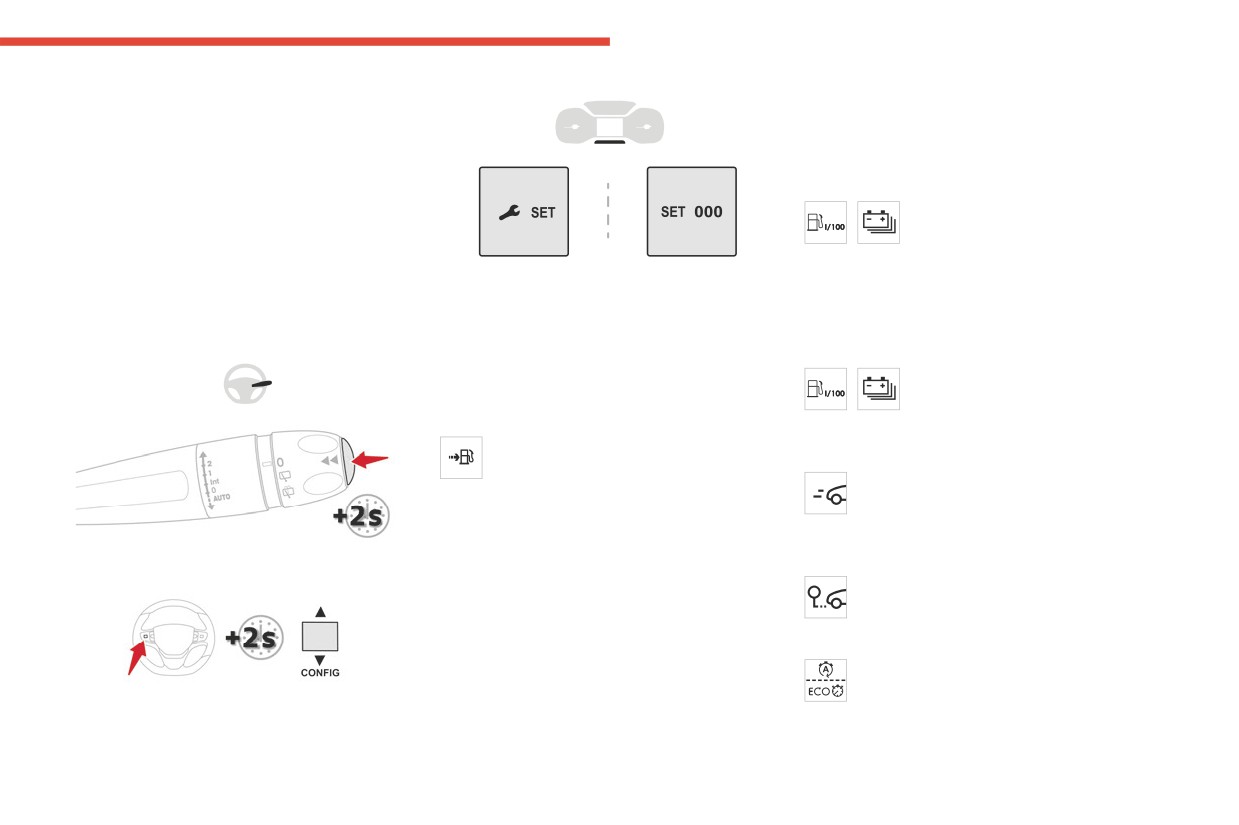
► Press this button for more than 2 seconds.
19 mph (30 km/h) (Diesel).
Trip reset
Average consumption
The reset is performed when the trip counter is
Definitions
displayed.
(mpg or l/100 km or km/l)
Range
(miles/kWh or kWh/100 km or km/kWh) (Electric)
/
Calculated since the last trip
(miles or km)
computer reset.
(Traction battery charge level percentage)
(Electric)
Average speed
Distance that can still be travelled with the
(mph or km/h)
fuel remaining in the tank (based on the
Calculated since the last trip computer
average fuel consumption over the last few miles
reset.
(kilometres) travelled).
This value may vary following a change in driving
Distance travelled
style or terrain, leading to a significant change in
► Press the button on the end of the wiper
(miles or km)
current fuel consumption.
control stalk for more than two seconds.
Calculated since the last trip computer
When the range falls below 19 miles (30 km),
reset.
dashes are displayed.
After filling with at least 5 litres of fuel, the range
Stop & Start time counter
is recalculated and is displayed if it exceeds 62
(minutes/seconds or hours/minutes)
miles (100 km).
► Press the knob on the steering wheel for
Dashes appearing permanently in place of
If your vehicle is fitted with the Stop & Start
more than two seconds.
numbers while driving indicates a malfunction.
function, a time counter calculates the time spent
in STOP mode during a journey.
25
CarManuals2.co
Dashboard instruments
The time counter is reset each time the ignition is
- Use a soft, clean cloth to clean the touch
Press the touch screen with three fingers
switched on.
screen.
to show all of the menu buttons.
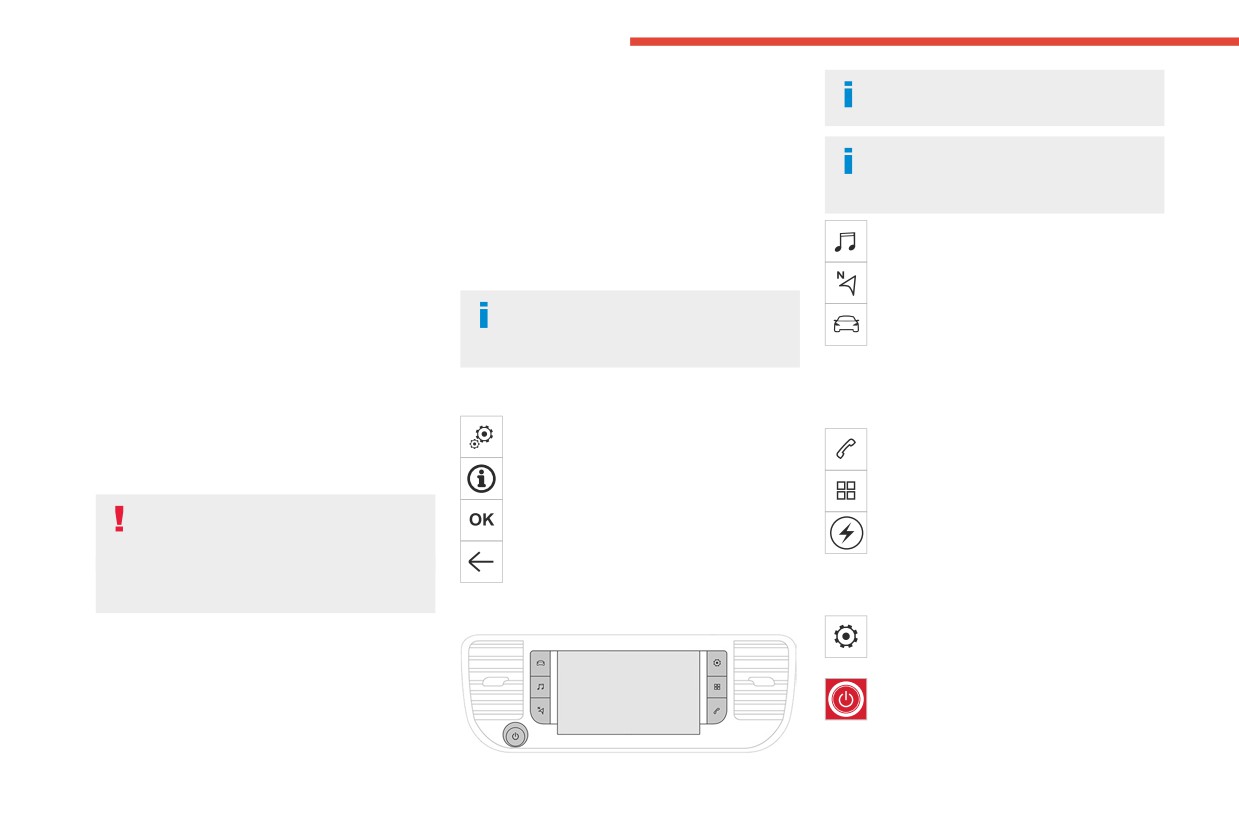
Principles
For more information about the menus,
Touch screen
► Use the buttons on each side of the touch
refer to the sections describing the audio
This system gives access to the following
screen to access the menus, then press the
and telematics systems.
elements:
buttons that appear on the touch screen.
- Permanent display of the time and outside
Some menus may display across two pages:
Radio/Media
temperature (a blue warning lamp appears if
press the "OPTIONS" button to access the
there is a risk of ice).
second page.
Navigation (Depending on equipment)
- Vehicle functions and equipment setting
After a few moments with no action on
menus.
Driving or Vehicle (Depending on
the second page, the first page is
- Audio system and telephone controls and
equipment)
displayed automatically.
display of related information.
Activation, deactivation and settings for certain
- Display of visual manoeuvring aid functions
functions.
To deactivate/activate a function, select "OFF"
- Internet services and display of related
The functions are organised in 2 tabs: "Driving
or "ON".
information.
functions" and "Vehicle settings".
Configuring a function
- Navigation system controls and
Telephone
display of related information (depending on
Access to additional information on the
version).
Applications
function
Display of available connected services.
For safety reasons, always stop the
Confirm
Energy
vehicle before performing operations
Access the specific Electric functions
that require sustained attention.
Return to the previous page or confirm
(energy flow, consumption statistics, deferred
Some functions are not accessible while
charge) organised in the corresponding 3 tabs.
driving.
or
Menus
Settings
Recommendations
Main settings for the audio system and
touch screen.
This screen uses capacitive sensing technology.
Audio system on/off
- Do not use pointed objects on the touch
Volume adjustment/mute
screen.
– Do not touch the touch screen with wet hands.
26
CarManuals2.co
Dashboard instruments
Upper bar
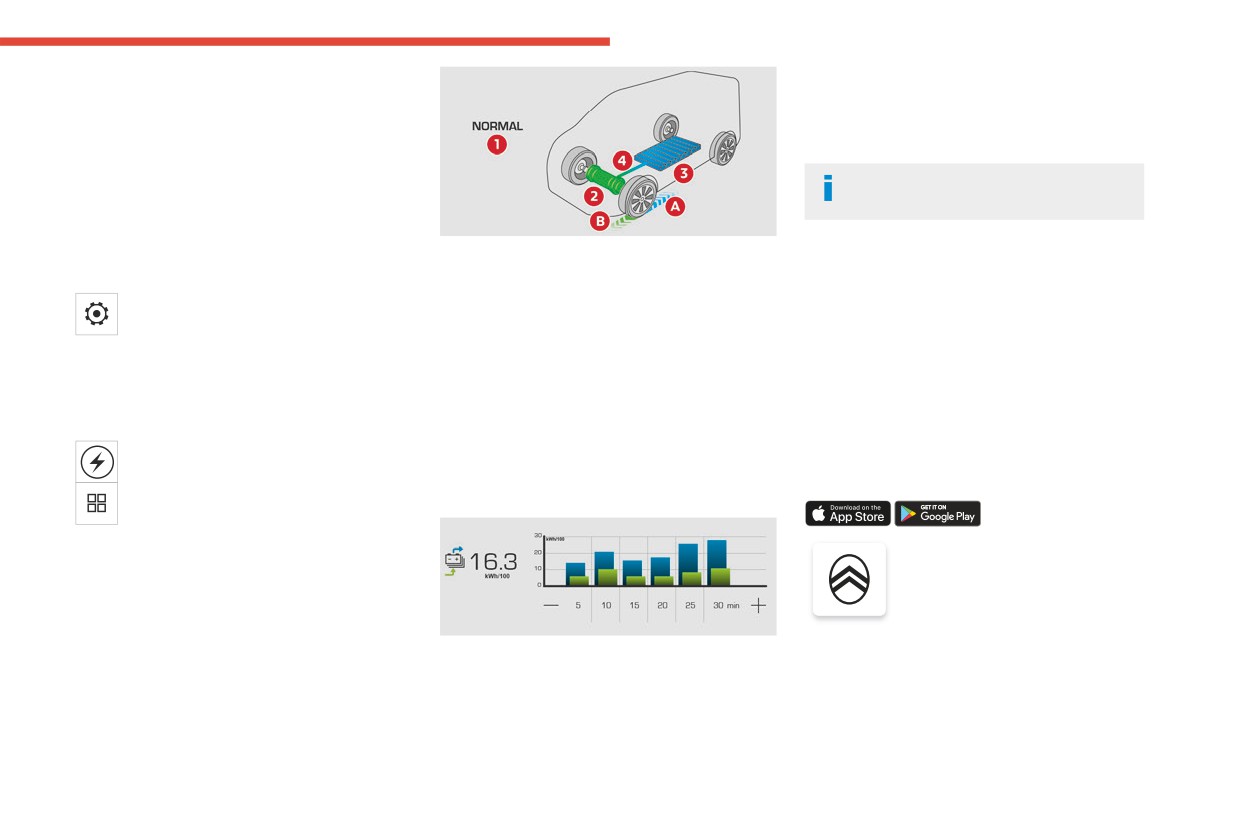
The average result for the current trip is stated in
1
kWh/100 km.
Certain information is displayed permanently in
► You can change the displayed time scale by
the upper bar of the touch screen:
pressing the - or + buttons.
- Time and outside temperature (a blue warning
lamp appears if there is a risk of ice).
A current trip is any trip of more than 20
- Reminder of information from the
minutes without switching off the ignition.
RadioMedia and Telephone menus and
navigation instructions (depending on
1. Active driving mode
Charging
equipment).
2. Electric motor
This page allows you to programme deferred
- Notifications.
3. Estimated traction battery charge level
charging.
- Access to the Settings.
4. Energy flows
For more information on Charging the traction
The energy flows have a specific colour for each
battery, refer to the corresponding section.
Energy menu (Electric)
type of driving:
This menu is only available with MyCitroën
A. Blue: energy consumption
Remotely operable
Drive.
B. Green: energy recovery
additional functions
Depending on version, this is accessible either:
- directly, by pressing the button near the
Statistics
(Electric)
touch screen.
This page shows electrical energy consumption
(Depending on country of sale)
- via the Applications menu.
statistics.
Flow
The following functions are
The page displays a real-time representation of
available from the MyCitroën
the electric drive train’s operation.
App application, which is
accessible from a smartphone:
- Managing the traction battery charging
- Blue bar chart: directly consumed energy
(deferred charging).
supplied by the traction battery.
- Managing the temperature pre-conditioning.
- Green bar chart: energy recovered during
- Viewing the state of charge and range of the
deceleration and braking, used to recharge the
vehicle.
battery.
27
CarManuals2.co
Dashboard instruments
Installation procedure
► Press the "5" or "6" button to select the
Additional settings
Display configuration menu, then confirm by
► Download the MyCitroën App application
You can choose:
pressing the OKbutton.
from the appropriate online store for your
- To change the time zone.
► Press the "5" or "6" and "7" or "8" buttons
smartphone.
- To change the display format of the date and
to adjust the date and time values, then confirm
► Create an account.
time (12h/24h).
by pressing the OK button.
► Enter the vehicle identification number
- To activate or deactivate the summer time
(available on the vehicle registration certificate).
management function (+1 hour).
With MyCitroën Play
For more information on Identification
- To activate or deactivate GPS synchronisation
markings, refer to the corresponding section.
► Select the Settings menu in the upper
(UTC).
banner of the touch screen.
Network coverage
The system does not automatically
► Select "Configuration".
In order to be able to use the various
change between winter and summer time
► Select "Date and time".
remotely operable features, ensure that your
(depending on the country of sale).
vehicle is located in an area covered by the
► Select "Date" or "Time".
mobile network.
► Choose the display formats.
A lack of network coverage may prevent
► Change the date and/or time using the
communication with the vehicle (for example,
numeric keypad.
if it is in an underground car park). In such
► Confirm with "OK".
cases, the application will display a message
indicating that the connection with the vehicle
With MyCitroën Drive
could not be established.
Time and date settings are only available if GPS
synchronisation is deactivated.
► Select the Settings menu in the
Setting the date and time
banner of the touch screen.
► Press the "OPTIONS" button to access the
With audio system
secondary page.
► Select "Setting the time-date".
► Press the MENU button for access to the
main menu.
► Select the "Date:" or "Time" tab.
► Press the "7" or "8" button to select the
► Set the date and/or time using the numeric
"Personalisation-configuration" menu, then
keypad.
confirm by pressing the OK button.
► Confirm with "OK".
28
CarManuals2.co
Access
If a door is not properly closed (except the
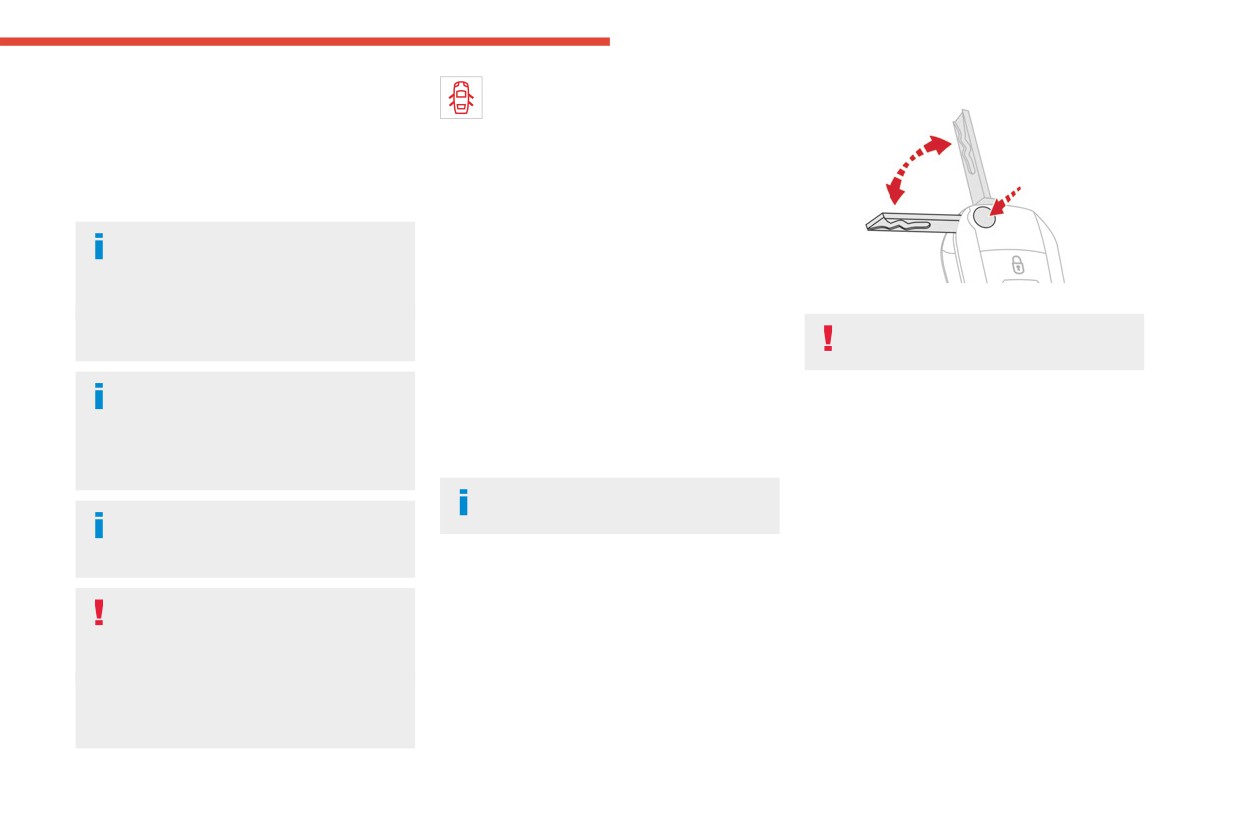
Unfolding / Folding the key
Electronic key with
2
right-hand door with side-hinged rear
remote control function
doors):
- when the vehicle is stationary and engine
and built-in key
running, this warning lamp comes on,
accompanied by a warning message for a few
Advice
seconds,
- when the vehicle is moving (at speeds above
If one of the doors or the boot is still open
6 mph (10 km/h)), this warning lamp comes on,
or if the electronic key for the Keyless
accompanied by an audible signal and a warning
Entry and Start system has been left inside
the vehicle, central locking will not take place.
message for a few seconds.
► Press this button to unfold or fold the key.
However, if the vehicle is fitted with an alarm,
Remote control key
The remote control may be damaged if
it will be activated after 45 seconds.
you do not press the button.
This allows the central locking or unlocking of the
vehicle using the door lock or from a distance.
If the vehicle is unlocked but the doors or
It also allows the vehicle to be located, the fuel
Keyless Entry and Start
boot are not subsequently opened, the
filler cap and charging flap to be opened and
vehicle will automatically lock itself again after
This allows the central locking or unlocking of the
closed and the engine to be started or switched
about 30 seconds. If the vehicle is fitted with
vehicle from a distance.
off, as well as providing protection against theft.
an alarm, it will be reactivated automatically.
It is also used to locate and start the vehicle, as
The remote control buttons are not active
well as providing protection against theft.
Automatic door mirror folding and
with the ignition switched on.
Integral key
unfolding can be deactivated by a
CITROËN dealer or a qualified workshop.
This is used to lock and unlock the vehicle when
the remote control cannot operate:
- cell battery flat, vehicle battery discharged or
As a safety measure, never leave the
disconnected, etc.
vehicle, even for a short time, without
- vehicle located in an area with strong
taking the Keyless Entry and Start system’s
electromagnetic signals.
electronic key with you.
Be aware of the risk of theft of the vehicle if
the key is present in one of the defined areas
while the vehicle is unlocked.
29
CarManuals2.co
Access
It allows the unlocking, locking and starting of the
inoperative. It would then be necessary to
vehicle while carrying the remote control on your
reset it.
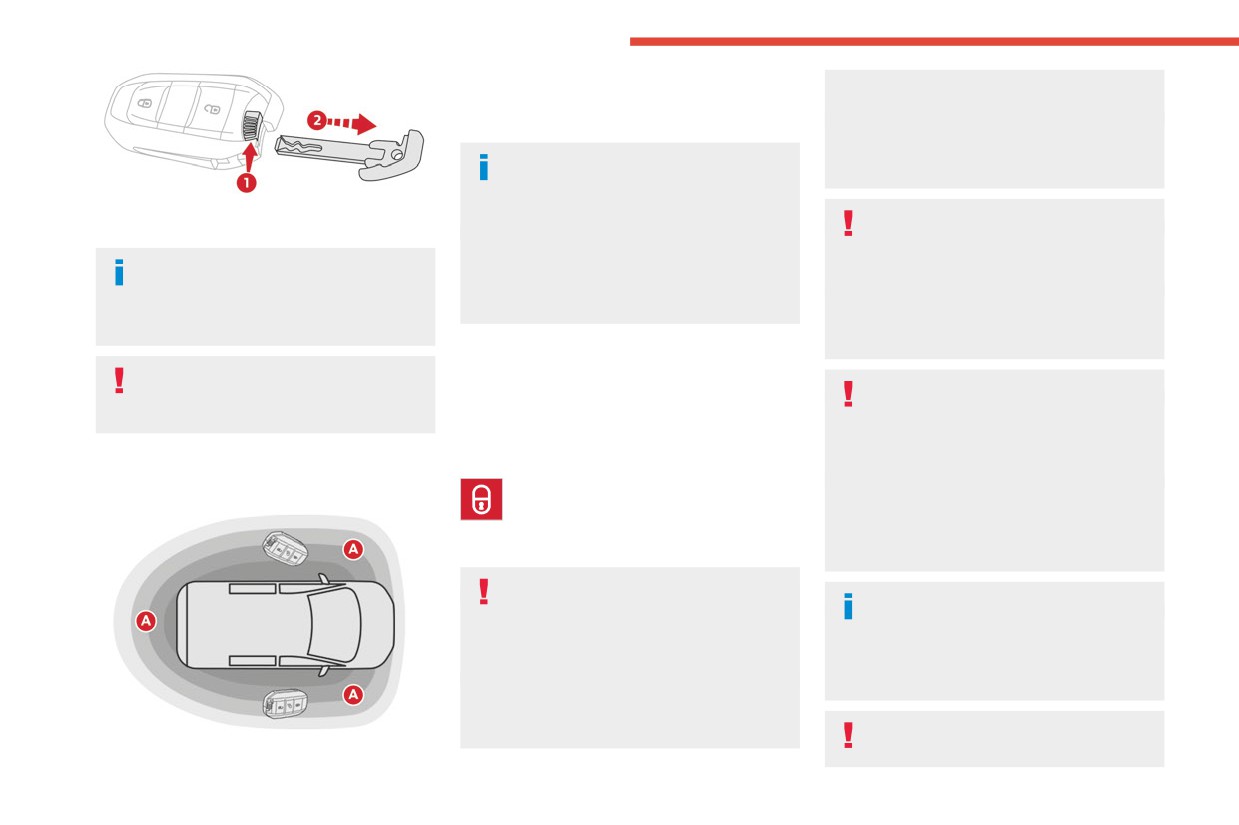
person in recognition zone "A".
The remote control does not work when the
key is in the ignition switch, even when the
In the ignition on (accessories) position,
ignition is switched off.
with the "START/STOP" button, the
hands-free function is deactivated and it is
► Keep this button 1 pulled while removing
Anti-theft protection
impossible to open the doors.
key 2 from the housing.
Do not modify the electronic vehicle
For more information on Starting/switching
immobiliser, as this might result in
If the alarm is activated, the audible
off the engine, Keyless Entry and Start and
malfunctions.
signal triggered on opening a door with
in particular the "ignition on" position, refer to
For vehicles with a key ignition switch,
the key (integral with the remote control) will
the corresponding section.
remember to remove the key and turn the
stop when the ignition is switched on.
steering wheel to engage the steering lock.
Locating the vehicle
Once the built-in key is ejected, always
This function helps you to spot your vehicle from
Locking the vehicle
keep it with you to be able to carry out
a distance, with the vehicle locked:
Driving with the doors locked could make
the corresponding back-up procedures.
- The direction indicators flash for approximately
it more difficult for the emergency services
10 seconds.
to enter the passenger compartment in an
"Keyless Entry and Start" on your
- The courtesy lamps come on.
emergency.
person
► Make a long press on this button.
As a safety precaution, remove the key from
the ignition or take the electronic key with you
when leaving the vehicle, even for a short
Advice
time.
Remote control
Purchasing a second-hand vehicle
The remote control is a sensitive, high-
Have the key codes memorised by a
frequency device; avoid handling it in your
CITROËN dealer, to ensure that the keys in
pocket, due to the risk of unintentionally
your possession are the only ones able to
unlocking the vehicle.
start the vehicle.
Avoid pressing the remote control buttons
while out of range of the vehicle, due to
the risk of rendering the remote control
To preserve the battery charge in the
electronic key and the vehicle's battery,
30
CarManuals2.co
Access
the "hands-free" functions are set to
With Keyless Entry and Start on your
Unlocking/Complete or
2
hibernation mode after 21 days without use.
person
To restore these functions, press one of the
selective unlocking
To unlock the vehicle, the remote control must be
remote control buttons or start the engine with
in recognition zone A.
the electronic key in the reader.
Unlocking/Complete
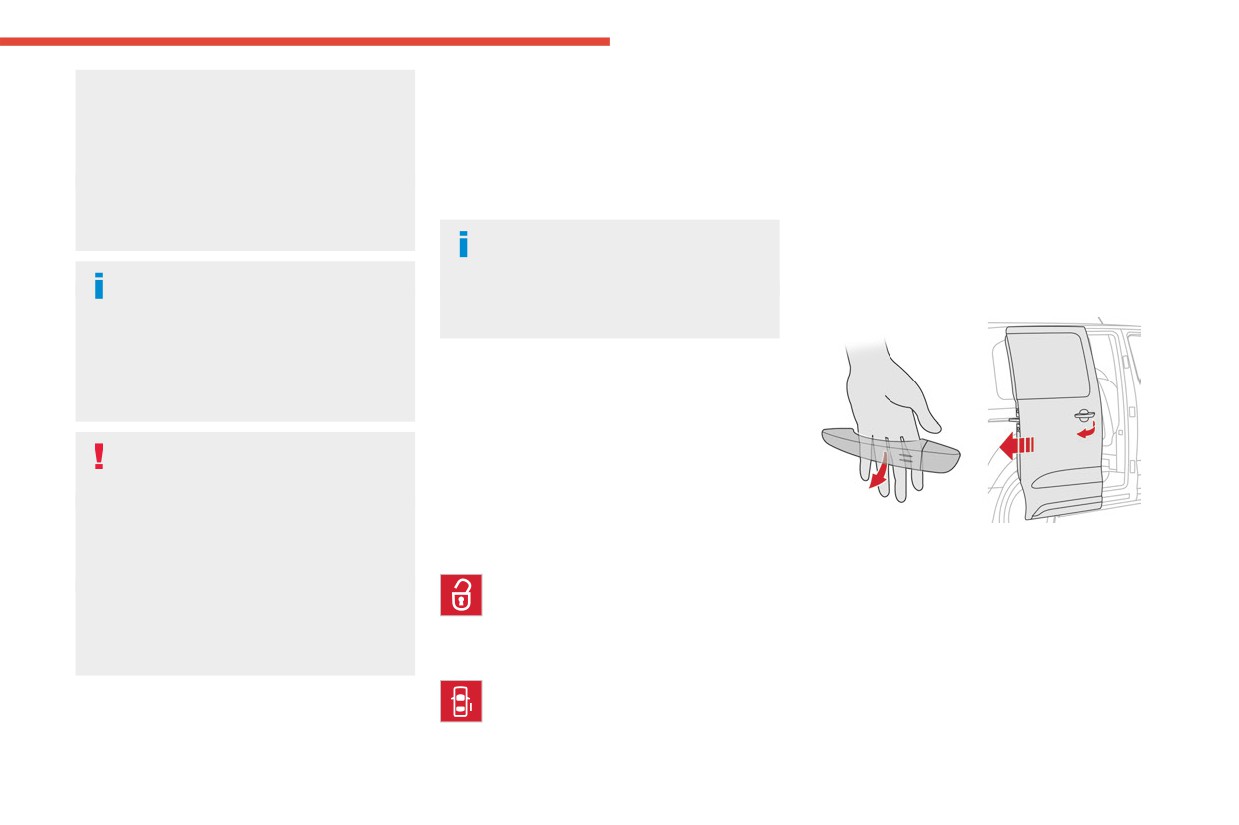
► To unlock the vehicle fully, pass your hand
For more information on starting with the
unlocking
behind one of the door handles (front door(s),
Keyless Entry and Start system, refer to the
manual sliding side door(s) or left-hand side-
corresponding section.
Unlocking is signalled by rapid flashing of
hinged door) and then pull the handle to open
the direction indicators for a few
the corresponding door.
Electrical interference
seconds.
With electric sliding side door(s)
The electronic key may not work if it is
Depending on version, the door mirrors unfold
close to an electronic device (e.g. mobile
and the alarm is deactivated.
telephone (switched on or on standby), laptop
computer, strong magnetic fields). If this
With the key
occurs, move the electronic key away from
► To unlock the vehicle fully, turn the key in the
the electronic device.
front left-hand door lock towards the front of the
vehicle.
Accumulations (water, dust, grime, salt,
If the vehicle has an alarm, it will not be
etc.) on the inner surface of the door
deactivated. Opening a door will trigger the
handle may affect detection.
alarm, which can be stopped by switching the
If cleaning the inner surface of the door
ignition on.
handle using a cloth does not restore
► With the Keyless Entry and Start on your
detection, contact a CITROËN dealer or a
With the remote control
person, pass your hand behind the handle
qualified workshop.
► Press this button to unlock the vehicle.
to unlock the vehicle, then pull and release
A sudden splash of water (stream of water,
the handle. This action also causes the
high pressure jet washer, etc.) may be
corresponding door to open.
identified by the system as the desire to open
Using the remote control with electric
the vehicle.
sliding side door(s)
► To fully unlock the vehicle and open
the side door, press and hold this button
until the door has opened.
31
CarManuals2.co
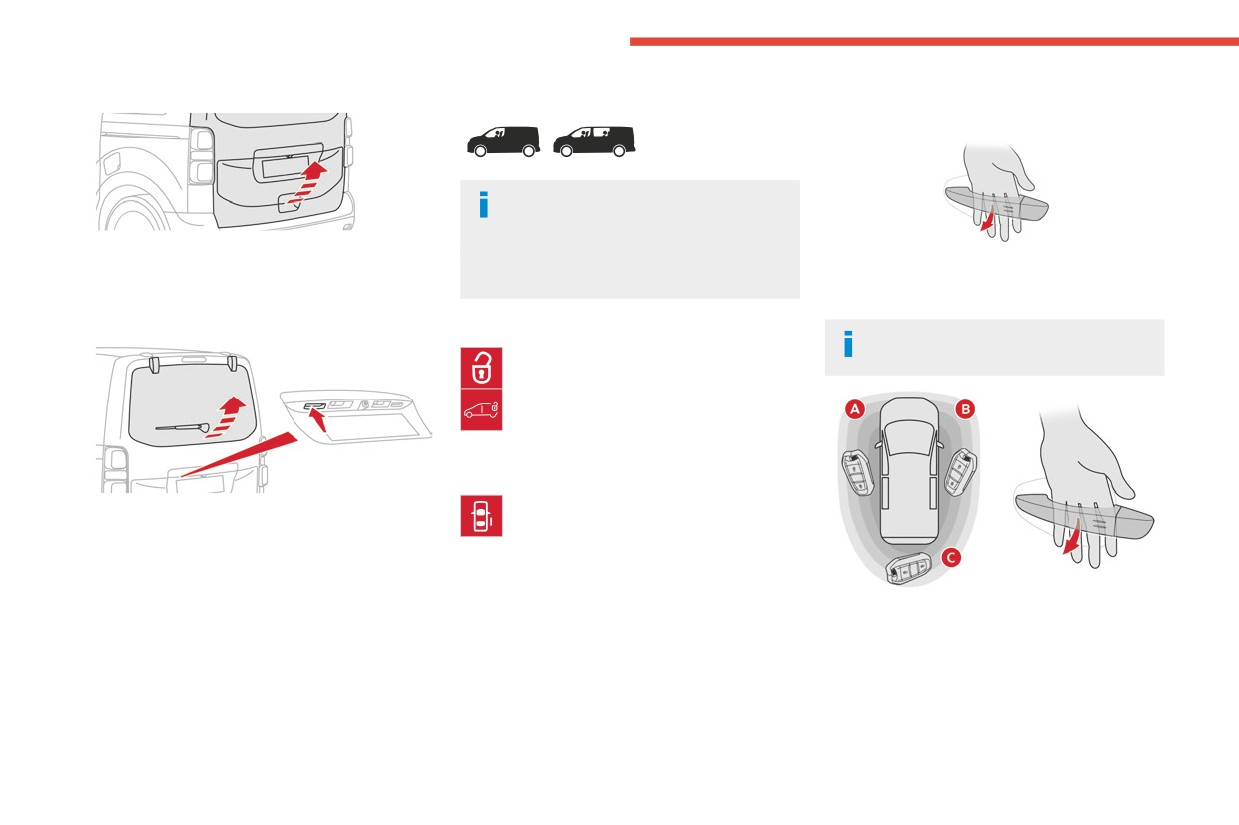
Access
With tailgate
Selective unlocking
With Keyless Entry and Start on your
person
Unlocking is signalled by rapid flashing of
the direction indicators for a few
seconds.
► With the Keyless Entry and Start on your
Depending on version, the door mirrors unfold
► To unlock the cabin alone, pass your hand
person, to unlock the vehicle, pull the tailgate
and the alarm is deactivated.
behind a handle of the front left or right doors,
handle and then lift it up to open it.
then pull the handle to open the door.
With an opening rear screen in the tailgate
With the remote control
The door locking state of the loading
► To unlock the cabin doors alone,
area remains unchanged.
press this button.
► Press this button to unlock the
loading area only.
Using the remote control with electric
sliding side door(s)
► With the Keyless Entry and Start on your
► To unlock the loading area alone
person, to unlock the vehicle, press the tailgate
without opening the side door, press the
opening rear screen unlocking control. The
relevant door button or keep the button pressed
screen will open slightly; then, lift it up to open it.
down to open the door.
► To unlock the loading area alone, the remote
control on your person in recognition zone A, B
or C, pass your hand behind a handle of the front
left or right doors, then pull the handle to open
the corresponding door.
32
CarManuals2.co
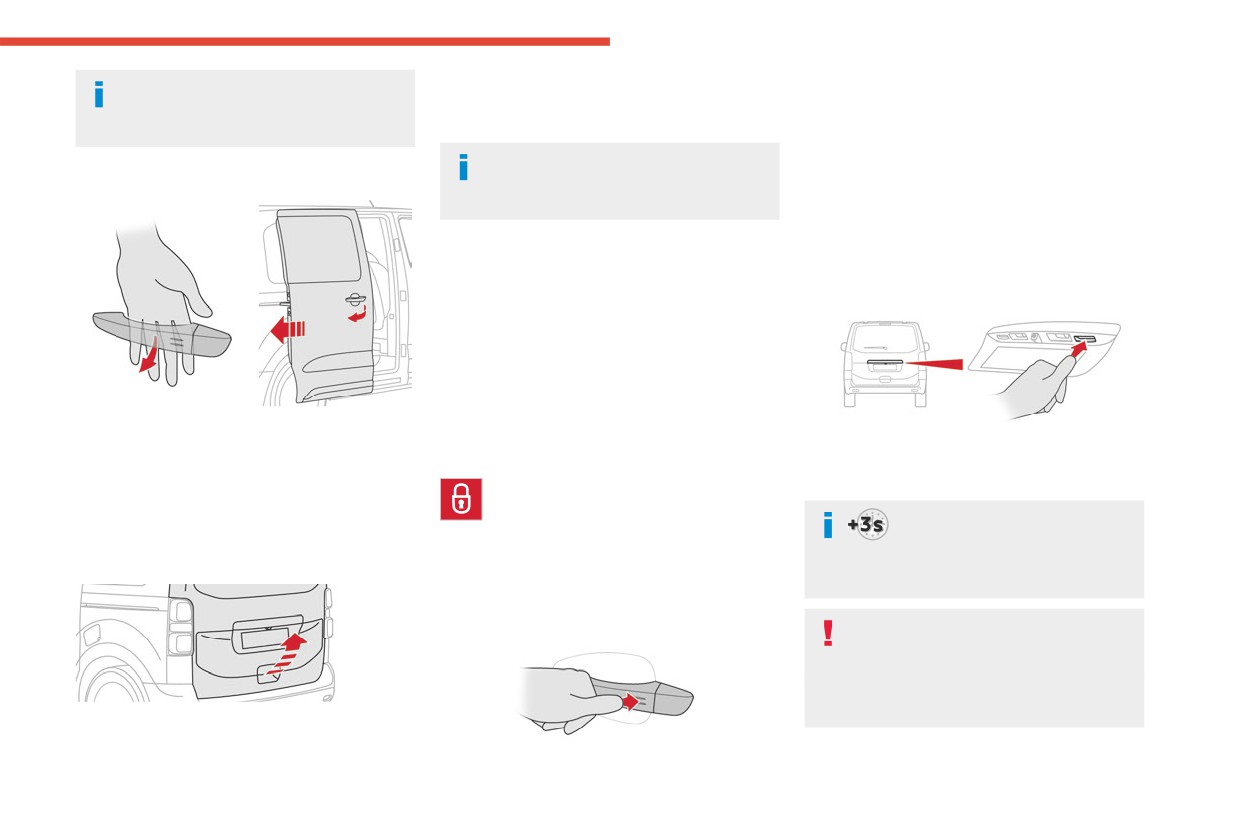
Access
Depending on the version, the door
► With the Keyless Entry and Start on your
► To lock the vehicle, press the markings on
2
mirrors unfold only when the cabin is
person, to unlock the loading area, pull the
one of the door handles (front door(s), manual
unlocked, the alarm is deactivated.
tailgate handle and then lift it up.
sliding side door(s) or left-hand side-hinged
door).
Unlocking is signalled by rapid flashing of
With electric sliding side door(s)
the direction indicators for a few
With electric sliding side door(s)
seconds.
► With the Keyless Entry and Start on your
person, to lock the vehicle fully, press the
markings on one of the front door handles.
Locking
With tailgate
With the key
► To lock the vehicle fully, turn the key in the
front left-hand door lock towards the rear of the
vehicle.
If your vehicle has an alarm, it will not be
► With the Keyless Entry and Start on your
activated.
person, pass your hand behind the left-hand or
► With the Keyless Entry and Start on your
right-hand door handle to unlock the loading
With the remote control
person, press the tailgate locking control to lock
area, then pull and release the handle. This
► To lock the vehicle completely, press
the vehicle.
action also causes the corresponding door to
this button.
Depending on version, keeping
open.
the locking controls depressed
With Keyless Entry and
With tailgate
closes the windows. If the control is released,
Start on your person
the window stops in its current position.
To lock the vehicle, the remote control must be in
recognition zone A.
Ensure that no person or object might
prevent the windows from closing
properly.
Pay particular attention to children when
operating windows.
33
CarManuals2.co
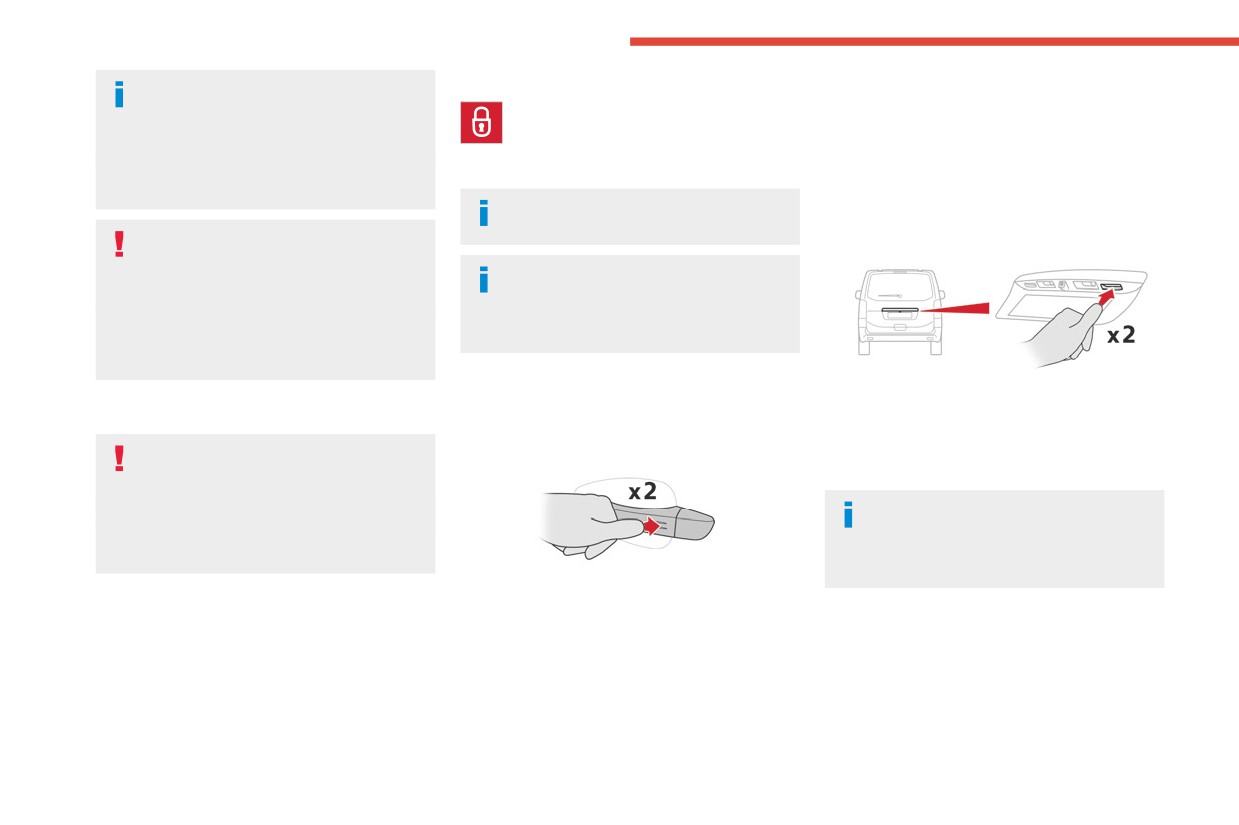
Access
If the vehicle is not fitted with an alarm,
With the remote control
With electric sliding side door(s)
locking is signalled by fixed lighting of the
► To deadlock the vehicle, press this
► With the Keyless Entry and Start on your
direction indicators for approximately two
button.
person, to lock the vehicle fully, press the
seconds.
► Then within five seconds after locking,
markings on one of the front door handles.
Depending on version, the door mirrors fold at
press this button again.
► To deadlock the vehicle, press the markings
the same time.
Depending on version, the electric door
again within five seconds.
mirrors fold at the same time.
Driving with the doors locked could make
With tailgate
it more difficult for the emergency
If the vehicle is not fitted with an alarm,
services to enter the passenger compartment
deadlocking is confirmed by fixed
in an emergency.
illumination of the direction indicators for
As a safety measure, never leave the vehicle
about two seconds.
without taking the remote control with you,
even for a short time.
With Keyless Entry and Start on your
► With the Keyless Entry and Start on your
Deadlocking
person
person, press the tailgate locking control to lock
To lock the vehicle, the remote control must be in
the entire vehicle.
Deadlocking deactivates the exterior and
recognition zone A.
► To deadlock the vehicle, press the control
interior door controls, as well as the
again within five seconds.
central locking button on the dashboard.
If the vehicle is not fitted with an alarm,
The horn remains operational.
deadlocking is signalled by fixed lighting
You must therefore never leave anyone inside
of the direction indicators for approximately
the vehicle when it is deadlocked.
two seconds.
► To lock the vehicle fully, press the markings
on one of the door handles (front door(s),
With the key
manual sliding side door(s) or left-hand side-
► To deadlock the vehicle, turn the key in the
Back-up procedures
hinged door).
front left-hand door lock towards the rear of the
► To deadlock the vehicle, press the markings
vehicle.
again within five seconds.
Lost keys, remote control,
► Then, within five seconds, turn the key
towards the rear again.
electronic key
Go to a CITROËN dealer with the vehicle's
registration certificate, your personal
34
CarManuals2.co
//////////////////////////////////////////