Citroen C3 Picasso (2016 year). Manual - part 17
 

  Index      Citroen     Citroen C3 Picasso - service manual 2016 year in english


Search            


Content   ..  15  16  17  18   ..


Citroen C3 Picasso (2016 year). Manual - part 17


255

C3PICASSO_EN_CHAP13B_RD45_ED01_2015

Audio system

Your Audio system is coded in such a way that it will 

only operate in your vehicle.

For safety reasons, the driver must only carry out 

operations which require prolonged attention while the 

vehicle is stationary.
When the engine is switched off and to prevent 

discharging of the battery, the audio equipment may 

switch off after a few minutes.

Audio system / Bluetooth

®

01  First steps 
02  Steering mounted controls 
03  Main menu 
04 Audio 
05  USB Box 
06  Bluetooth functions 
07  Screen menu map(s) 
Frequently asked questions 

p.
p.
p.
p.
p.
p.
p.
p.

 256
 257
 258
 259
 262
 265
 268
 273

CONTENTS

01

256

C3PICASSO_EN_CHAP13B_RD45_ED01_2015

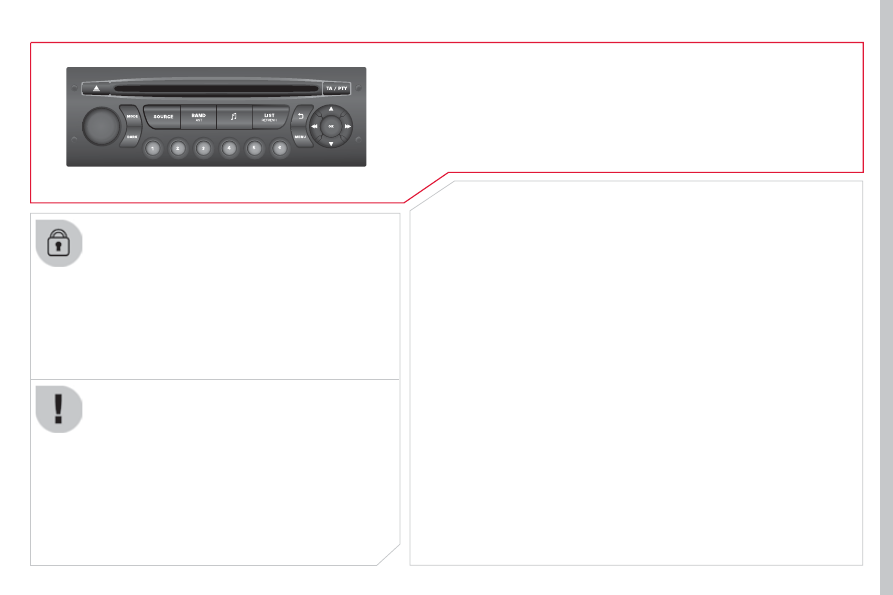
FIRST STEPS

Eject CD.

Select source: 
radio, audio CD / MP3 CD, USB, 

Jack connection, Streaming, 

AUX.

Select the screen display 
mode:
Date, audio functions, trip 
computer, telephone.

Automatic frequency search 

down/up.

Select previous/next CD, MP3 

or USB track.

Audio settings: front/
rear fader, left/right 
balance, bass/treble, 
loudness, audio 
ambiences.

Display the list of 
local stations.
Long press: CD 
tracks or MP3 
folders (CD / USB).

TA (Traffic Announcements) 

on/off.
Long press: PTY* (radio 
Programme TYpe) mode.

Display main menu.

The DARK button changes the screen display 
for improved driving comfort at night.
1

st

 press: upper bar only illuminated.

2

nd

 press: black screen.

3

rd

 press: return to standard display.

On/off, volume setting.

Buttons 1 to 6:
Select a pre-set radio station.
Long press: pre-set a station.

Select next frequency down/up.

Select previous/next MP3 folder.

Select previous/next folder / genre / 

artist / playlist (USB).

Confirm.

Select AM / FM 

wavebands.

Abandon the current 
operation.

* Available according to version.

02

257

C3PICASSO_EN_CHAP13B_RD45_ED01_2015

STEERING MOUNTED CONTROLS

Radio: automatic search for a higher frequency.
CD / MP3 / USB: selection of the next track.

CD / USB: continuous press: fast forwards play.
Move in the list.

Change audio source.
Confirm a selection.
Call/end call on the telephone.
Press for more than 2 seconds: 
telephone main menu.

Radio: automatic search for a lower 

frequency.
CD / MP3 / USB: selection of the 
previous track.
CD / USB: continuous press: fast 
reverse.
Move in the list.

Radio: select the previous/next pre-set 

station.
USB: select genre / artist / folder from  

the classification list.

Select the previous/next item in a menu.

Volume increase.

Volume decrease.

Mute: press the volume 
increase and decrease 
buttons simultaneously.
The sound is restored 
by pressing one of the 

two volume buttons.

03

258

C3PICASSO_EN_CHAP13B_RD45_ED01_2015

MAIN MENU

Audio functions
Radio; CD; USB; AUX.

Screen C

For an overview of the menus 

available, refer to the "Screen 
menu map" section.

Trip computer
Enter distances; Alerts; State of functions.

Bluetooth

®

: Telephone - Audio

Pairing; Hands-free kit; Streaming.

Personalisation-configuration

Vehicle parameters; Display; Languages.

Screen A

04

259

C3PICASSO_EN_CHAP13B_RD45_ED01_2015

AUDIO

Press the SOURCE button several 
times in succession and select the 
radio.

Press the BAND AST button to 

select a waveband.

Briefly press one of the buttons to 

carry out an automatic search of the 
radio stations.

Press one of the buttons to carry out 

a manual search up / down for radio 

frequencies.

Press the LIST REFRESH button to 
display the list of stations received 

locally (30 stations maximum).
To update this list, press for more 

than two seconds.

The external environment (hills, buildings, tunnels, basement car parks, ...) 

may block reception, including in RDS mode. This is a normal effect of the 

way in which radio waves are transmitted and does not indicate any failure 

of the audio system.

RDS

Selecting a station

Press the MENU button.

Select "Audio functions".

Select the "FM waveband 
preferences
" function.

Select "Activate RDS".

Press OK.

Press OK.

Press OK, RDS is displayed in the 
screen.

In "Radio" mode, press OK directly to activate / deactivate RDS 
mode.

RDS, if displayed, enables you to continue listening to the same station 

by automatic retuning to alternative frequencies. However, in certain 

conditions, coverage of an RDS station may not be assured throughout 
the country as radio stations do not cover 100 % of the territory. This 

explains the loss of reception of a station that can occur during a journey.

04

260

C3PICASSO_EN_CHAP13B_RD45_ED01_2015

AUDIO

Insert circular compact discs only.
Some anti-pirating systems, on original discs or CDs copied using a 

personal recorder, may cause faults which are no reflection on the 

quality of the vehicle's player.
Insert a CD in the player, play begins automatically.

CD player

To play a disc which has already been 

inserted, press the SOURCE button 
several times in succession and 
select CD.

Press one of the buttons to select a 
track on the CD.

Press the LIST REFRESH button to display the list of tracks on 
the CD.

Press and hold one of the buttons for 

fast forward or fast back.

Receiving TA messages

Press the TA button to activate or 

deactivate traffic messages.

The TA (Traffic Announcement) function gives priority to TA alert 

messages. To operate, this function needs good reception of a 

radio station transmitting this type of message. When a traffic 

report is transmitted, the current audio source (Radio, CD, ...) is 
interrupted automatically to play the TA message. Normal playback 
of the audio source resumes at the end of the transmission of the 
message.

04

261

C3PICASSO_EN_CHAP13B_RD45_ED01_2015

The audio system will only play files with the extension ".mp3" with 

a sampling rate of 22.05 KHz or 44.1 KHz. No other type of file 

(.wma, .mp4, .m3u...) can be played.

In order to be able to play a recorded CDR or CDRW, when 

recording, the ISO 9660 level 1.2 or Joliet file format is 

recommended.
If the disc is recorded in another format, it may not be played 
correctly.
It is recommended that the same recording format is always 

used for an individual disc, with as low a speed as possible 

(4x maximum) for optimum sound quality.

In the particular case of a multi-session CD, the Joliet format is 

recommended.

Use only USB memory sticks formatted FAT32 (File Allocation 
Table).

It is advisable to restrict file names to 20 characters without using 

special characters (e.g. " ? ; ù) to avoid any playing or displaying 

problems.

Information and advice

AUDIO

It is recommended that you use genuine Apple

®

 USB cables for 

correct operation.

Insert an MP3 CD compilation in the player.
The audio equipment searches for all of the music tracks, 

which may take anything between a few seconds and several 

tens of seconds, before play begins.

Playing an MP3 CD compilation

On a single disc, the CD player can read up to 255 MP3 files 

spread over 8 folder levels. However, it is advisable to keep to 

a limit of two levels to reduce the access time before the CD is 

played.
While the CD is being played, the folder structure is not followed.

All of the files are displayed on a single level.

To play a disc which has already 

been inserted, press the SOURCE 
button several times in succession 
and select CD.

Press one of the buttons to select a 
folder on the CD.

Press the LIST REFRESH button to display the list of directories of 
the MP3 compilation.

Press and hold one of the buttons for 

fast forward or backward play.

Press one of the buttons to select a 
track on the CD.

05

262

C3PICASSO_EN_CHAP13B_RD45_ED01_2015

USB PLAYER

The system puts together playlists (temporary memory) created 

over a period which depends on the capacity of the USB device.
The other sources are available during this time.
The playlists are updated each time the ignition is switched off or 

each time a USB memory stick is connected.
When connecting for the first time, the classification suggested 

is by folder. When you reconnect, the classification selected 

previously is retained.

Connect the memory stick to the port, directly or 

using a lead. If the audio equipment is switched 

on, the USB source is detected as soon as it is 
connected. Play begins automatically after a delay 

which depends on the capacity of the USB memory 

stick.
The file formats supported are .mp3 (mpeg1 layer 3 only) 

and .wma (standard 9 only, 128 kbits/sec compression).
Certain playlist formats are supported (.m3u, ...)
On reconnection of the previous memory stick used, 

play is resumed automatically with the last track 

played.

This unit consists of a USB port and an auxiliary 

Jack socket*. The audio files are transmitted 

from a portable device - digital player or a USB 
memory stick - to your Audio system and heard 
via the vehicle's speakers.

USB memory stick or Apple

®

 player of 

generation 5 or later:

Use only USB memory sticks formatted 
FAT32 (File Allocation Table),

the Apple

®

 player lead is essential,

-  navigation through the file database is also 

possible by means of the steering mounted 
controls.

Using the USB PORT

Connecting a USB memory stick

Other Apple

®

 players of earlier generations and 

players using the MTP protocol*:
-  play via Jack-Jack lead only (not supplied),

-  navigation through the file database is from 

the portable device.

* Depending on vehicle.

05

263

C3PICASSO_EN_CHAP13B_RD45_ED01_2015

Using the USB PORT

Press LIST briefly to display the 

previously selected classification.
Navigate through the list using the left/

right and up/down buttons.

Confirm the selection by pressing OK.

The lists available are Artist, Genre and Playlist (as defined in the 

Apple

®

 player).

Selection and Navigation are described in steps 1 to 4 above.

Do not connect a hard disk or USB connection device other 
than audio equipment to the USB port. This could damage your 
installation.

Connecting an Apple

®

 player via the USB port

Press one of these buttons to gain 

access to the previous / next track on 

the classification list currently being 

played.
Press and hold one of the buttons for 

fast forward or backward play.

Press one of these buttons to 

gain access to the previous / next 

Genre, Folder, Artist or Playlist on 

the classification list currently being 

played.

Press and hold LIST to display the 

different classifications.
Select by Folder / Artist / Genre / Playlist, 

press OK to select the classification 

required, then press OK again to confirm.

by Folder: all folders containing audio 

files recognised on the peripheral 

device.

by Artist: all of the artist names 

defined in the ID3 Tags, classified in 

alphabetical order.

-  by Genre: all of the genres defined in 

the ID3 Tags.

-  by Playlist: in accordance with the 

playlists recorded on the USB device.

USB PLAYER

05

264

C3PICASSO_EN_CHAP13B_RD45_ED01_2015

The display and control is via the portable device.

First adjust the volume of your portable device.

Then adjust the volume of your audio 
system.

Auxiliary socket (AUX)

Adjusting the volume of the auxiliary 
source

USB PLAYER

Do not connect a device to both the Jack auxiliary socket and the 

USB port at the same time.

First adjust the volume on your portable device (to a high level). 
Then adjust the volume on your audio system. Operation of 
controls is via the portable device.

Press the SOURCE button several 
times in succession and select AUX.

Connect the portable device 

(MP3 player, …) to the auxiliary 

Jack socket using an audio cable 

(not supplied).

06

265

C3PICASSO_EN_CHAP13B_RD45_ED01_2015

BLUETOOTH FUNCTIONS

As a safety measure and because they require prolonged attention 
on the part of the driver, the operations for pairing of the Bluetooth 

mobile telephone with the Bluetooth hands-free system of your 

audio equipment must be carried out with the vehicle stationary 

and the ignition on.

Press the MENU button.

A window is displayed with a message that a search is in progress.

Activate the telephone's Bluetooth function 
and ensure that it is "visible to all" (telephone 

configuration).

In the menu, select:
- "Bluetooth: Telephone - Audio"
- "

Bluetooth configuration"

- "Perform a Bluetooth search"

The services available depend on the network, the SIM card and the 

compatibility of the Bluetooth device used.
Consult your telephone's manual and your operator to find out which 

services are available to you.

Pairing a Bluetooth

®

 telephone

Screen C

The "Telephone

" menu permits access to the following functions 

in particular: "Directory"*, "Calls list", "Consult the paired 
equipment
".

The first 4 telephones recognised are displayed in this window.

A virtual keypad is displayed in the 

screen: enter a code with at least 4 digits.
Confirm by pressing OK.

A message that the pairing has been successful appears in the 
screen.

Select the telephone to be connected from the list. Only one 
telephone can be connected at a time.

A message in the screen indicates the telephone 
chosen. To accept the pairing, enter the same code 

on the telephone, then confirm with OK.

The automatic connection authorised is only active after the 

telephone has been configured.
The directory and the call list can be accessed after the necessary 
synchronisation period.

(Available according to model and version)

* If your telephone is fully compatible.

If pairing fails, the number of attempts is not limited.

Go to www.citroen.co.uk for more information (compatibility, more 

help, ...).

06

266

C3PICASSO_EN_CHAP13B_RD45_ED01_2015

An incoming call is announced by a ring and a superimposed 
display in the screen.

Select the YES tab on the display 
using the buttons.

Confirm by pressing OK.

Press this button at the steering mounted controls 
to accept the call.

Select "Manage the telephone call".

Select "Call".

From the "Bluetooth: Telephone - Audio" menu.

Or

Select "Calls list".

Or

Select "Directory".

BLUETOOTH FUNCTIONS

Receiving a call

Making a call

Press this button for more than two seconds for 

access to your directory, then navigate using the 

thumb wheel.

Or

To dial a number, use your telephone's keypad, 

with the vehicle stationary.

06

267

C3PICASSO_EN_CHAP13B_RD45_ED01_2015

Connect the telephone: see the "Telephone
section.

Select in the "Bluetooth: Telephone - Audio" menu the telephone 
to be connected.
The audio system connects to a newly paired telephone 

automatically.

Bluetooth

®

 audio streaming

Streaming allows music files on the telephone to be played via the 

audio system.

*  In certain cases, play of the audio files must be initiated from the 

keypad.

** If the telephone supports the function.

Activate the streaming source by 
pressing the SOURCE button*.
Control of tracks to be played is via 
the buttons on the audio system 
control panel and the steering 

mounted controls**. The contextual 

information can be displayed in the 
screen.

During a call, press this button for more than 
2 seconds.

Confirm with OK to end the call.

BLUETOOTH FUNCTIONS

The system accesses the telephone's contacts directory, depending 

on its compatibility, and while it is connected by Bluetooth.

With certain telephones connected by Bluetooth you can send a 
contact to the directory of the audio system.
Contacts imported in this way are saved in a permanent directory 

visible to all, whatever the telephone connected.
The menu for the directory is not accessible if it is empty.

Ending a call

07

268

C3PICASSO_EN_CHAP13B_RD45_ED01_2015

SCREEN MENU MAP(S)

Radio-CD

*  The settings vary according to the trim level of 

the vehicle.

REG mode

CD repeat

Shuffle play

Vehicle config*

R wiper in rev

Options

Guide lighting

Diagnostic

RDS options

View

Abandon

1

2

3

3

1

2

2

2

2

1

2

2

Screen A

Main function

Option A1

Option A11

Option A

Option B...

1

2

3

1

07

269

C3PICASSO_EN_CHAP13B_RD45_ED01_2015

Units

Temperature: °Celsius / °Fahrenheit

Fuel consumption:  
KM/L - L/100 - MPG

1

2

2

SCREEN MENU MAP(S)

Display adjust

Month

Day

Hour

Minutes

Year

12 H/24 H mode

Language

Italiano

Nederlands

Portuguès

Português do Brasil

Français

Deutsch

Čeština

English

Hrvatski

Español

Magyar

1

2

2

2

2

2

2

2

1

2

2

2

2

2

2

2

2

2

2

07

270

C3PICASSO_EN_CHAP13B_RD45_ED01_2015

SCREEN MENU MAP(S)

activate / deactivate RDS

activate / deactivate REG mode

activate / deactivate radiotext

Radio

activate / deactivate Intro

CD / MP3 CD

activate / deactivate track repeat (the 
entire current CD for CD, the entire current 
folder for MP3 CD)

activate / deactivate random play (the 
entire current CD for CD, the entire current 
folder for MP3 CD)

activate / deactivate track repeat (of the 
current folder / artist / genre / playlist)

USB

activate / deactivate random play (of the 
current folder / artist / genre / playlist)

1

1

1

1

1

1

1

1

Screen C

Press the OK dial for access to short-cut menus according 
to the display on the screen.


Content   ..  15  16  17  18   ..