Citroen C3 Picasso (2016 year). Manual - part 12
 

  Index      Citroen     Citroen C3 Picasso - service manual 2016 year in english


Search            


Content   ..  10  11  12  13   ..


Citroen C3 Picasso (2016 year). Manual - part 12


11

Practical information

175

C3Picasso_en_Chap11_informations-pratiques_ed01-2015

Rear lamps

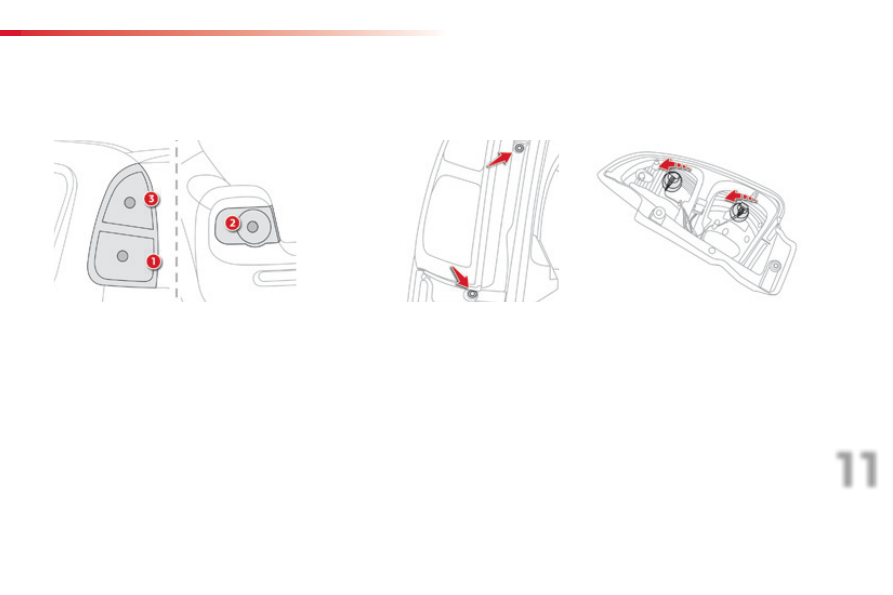
1.  Brake lamps / sidelamps (12VP21/5 W).
2.
  Foglamp, offside (PR21W) 
 

Reversing lamp, nearside (P21W).

3.  Direction indicators (P21W)

Changing brake lamp/ sidelamp 
and direction indicator bulbs

F  turn the bulb-holder a quarter turn,
F  remove the failed bulb and replace it.
To refit, carry out these operations in reverse 
order.

F

  unscrew the two lamp unit fixing bolts,

F

  extract the lamp unit carefully pulling it 

straight out,

Practical information

176

C3Picasso_en_Chap11_informations-pratiques_ed01-2015

Changing foglamp / reversing 
lamp bulbs

F  open the boot,
F

  press on the tabs using 2 screwdrivers,

F  disconnect the lamp unit connector,
F  turn the bulb-holder by a quarter turn,
F  remove the bulb and replace it.
To refit, carry out these operations in reverse 
order.

Changing the third brake lamp 
bulbs (4 x W 5 W bulbs)

F  open the boot,
F

  remove the two plugs located on the boot 

inner panel,

F

  press on the body of the lamp with 

2 screwdrivers to remove it from its 
housing,

F  turn the corresponding bulb-holder a 

quarter turn,

F  pull the bulb and replace it.
To refit, carry out these operations in reverse 
order.

Changing the number plate lamp 
bulbs (W5W)

F

  insert a thin screwdriver into one of the 

lens' exterior holes,

F

  push it outwards to unclip.

F  remove the lens.
F  pull the bulb and replace it.
To refit, carry out these operations in reverse 
order.

11

Practical information

177

C3Picasso_en_Chap11_informations-pratiques_ed01-2015

Interior lighting

Interior lamps (1 / W5W)

Detach the cover of the interior lamp 1

 with a 

thin screwdriver, close to the button, to access 
the faulty bulb.

Map reading lamps (2 / W5W)

Detach the cover of the interior lamp. To 
access the faulty bulb, detach the partition for 
the reading lamp 2 concerned, as necessary.

Boot lamps (W5W)

Detach the unit by pushing it rearwards.

Front courtesy lamp mood 
lighting LED

For the replacement of the LED, contact a 
CITROËN dealer or a qualified workshop.

Door mirror lamps (W5W)

Unclip the cover using a thin screwdriver to 
access the faulty bulb.

Practical information

178

C3Picasso_en_Chap11_informations-pratiques_ed01-2015

Changing a fuse

Procedure for replacing a failed fuse with a new fuse to rectify a failure of the corresponding function.

The extraction tweezer and the spare fuse 
storage compartment are installed on the back 
of the dashboard fusebox cover.
For access to them:
F  unclip the cover by pulling on the side,
F  remove the cover completely,
F

  remove the tweezer.

Changing a fuse

Before changing a fuse, the cause of the failure 
must be identified and rectified.
F  Identify the faulty fuse by checking the 

condition of its filament.

F

  Use the special tweezer to extract the fuse 

from its housing.

F

  Always replace the faulty fuse with a fuse 

of the same rating.

F  Check that the number marked on the 

fusebox, the rating marked on the fuse and 
the following tables all agree.

Good

Failed

CITROËN will not accept responsibility 
for the cost incurred in repairing your 
vehicle or for rectifying malfunctions 
resulting from the installation of 
accessories not supplied and not 
recommended by CITROËN and 
not installed in accordance with its 
instructions, in particular when the 
combined consumption of all of the 
additional equipment connected 
exceeds 10 milliamperes.

Installing electrical 
accessories

Your vehicle's electrical system is 
designed to operate with standard or 
optional equipment.
Before installing other electrical 
equipment or accessories on your 
vehicle, contact a CITROËN dealer or a 
qualified workshop.

Access to tooling

11

Practical information

179

C3Picasso_en_Chap11_informations-pratiques_ed01-2015

Dashboard fuses

The fusebox is placed in the lower dashboard 
(left-hand side).

Access to fuses

F  refer to the paragraph "Access to tooling".

Fuse tables

Fuse N°

Rating

Functions

FH36

5 A

Trailer relay unit.

FH37

15 A

Trailer accessories socket supply.

FH38

20 A

Aftermarket navigation.

FH39

20 A

Heated seats.

FH40

30 A

Trailer relay unit.

Fuse N°

Rating

Functions

F1

15 A

Rear wiper.

F2

-

Not used.

F3

5 A

Airbags and pretensioners control unit.

F4

10 A

Steering wheel angle sensor, air conditioning, clutch switch, 
particle filter pump, diagnostic socket, airflow meter.

F5

30 A

Electric window switch panel, passenger's electric window 
control, front electric window motor.

F6

30 A

Rear electric window motors and driver's electric window 
motor.

F7

5 A

Courtesy and front map reading lamps, rear reading lamps.

Practical information

180

C3Picasso_en_Chap11_informations-pratiques_ed01-2015

Fuse N°

Rating

Functions

F8

20 A

Multifunction screen, audio system, navigation radio.

F9

30 A

Audio system (aftermarket), 12 V socket.

F10

15 A

Steering wheel controls.

F11

15 A

Ignition, diagnostic socket.

F12

15 A

Rain / sunshine sensor, trailer relay unit.

F13

5 A

Main stop switch, engine relay unit.

F14

15 A

Parking assistance control unit, seat belt unfastened warning 
lamp, airbag control unit, instrument panel, air conditioning, 
USB Box.

F15

30 A

Locking.

F16

-

Not used.

F17

40 A

Rear screen and door mirrors demist/defrost.

SH

-

PARC shunt.

11

Practical information

181

C3Picasso_en_Chap11_informations-pratiques_ed01-2015

Engine compartment fuses

The fusebox is placed in the engine 
compartment near the battery (left-hand side).

Access to fuses

F  Unclip the cover.
F  Change the fuse (see corresponding 

paragraph).

F  When you have finished, close the cover 

carefully to ensure the correct sealing of 
the fusebox.

All work on these fuses, located on 
the battery, must be carried out by 
a CITROËN dealer or a qualified 
workshop.

Practical information

182

C3Picasso_en_Chap11_informations-pratiques_ed01-2015

Fuse table

Fuse N°

Rating

Functions

F1

20 A

Engine control unit supply, cooling fan unit control, multifunction 
engine control main relay.

F2

15 A

Horn.

F3

10 A

Front / rear wash-wipe.

F4

20 A

Daytime running lamps.

F5

15 A

Diesel heater (Diesel engine), fuel pump (petrol engine)

F6

10 A

ABS/ESP control unit, ABS/ESP cut-off relay, secondary stop 
switch.

F7

10 A

Electric power steering.

F8

25 A

Starter motor control.

F9

10 A

Switching and protection unit (Diesel).

F10

30 A

Diesel engine injection pump valve, injectors and ignition coils 
(petrol engine)

F11

40 A

Air conditioning fan.

11

Practical information

183

C3Picasso_en_Chap11_informations-pratiques_ed01-2015

Fuse N°

Rating

Functions

F12

30 A

Windscreen wipers slow / fast speed.

F13

40 A

Built-in systems interface supply (ignition positive).

F14

30 A

Valvetronic supply (petrol).

F15

10 A

Right-hand main beam headlamp.

F16

10 A

Left-hand main beam headlamp.

F17

15 A

Left-hand dipped beam headlamp.

F18

15 A

Right-hand dipped beam headlamp.

F19

15 A

Multifunction engine management supply (petrol engine), air 
cooling electrovalves (Diesel).

F20

10 A

Multifunction engine management supply (petrol engine), Turbo 
pressure regulation electrovalve (Diesel), engine coolant level 
sensor (Diesel).

F21

5 A

Fan assembly control supply, APC, ABS ESP relays.

Practical information

184

C3Picasso_en_Chap11_informations-pratiques_ed01-2015

Table of maxi-fuses

Fuse N°

Rating

Functions

MF1*

60 A

Cooling fan assembly.

MF2*

30 A

ABS / ESP control unit.

MF3*

30 A

ABS / ESP control unit.

MF4*

60 A

Built-in Systems Interface (BSI) supply.

MF5*

60 A

Built-in Systems Interface (BSI) supply.

MF6*

-

Not used.

MF7*

-

Passenger compartment fusebox.

MF8*

-

Not used.

*  The maxi-fuses provide additional protection for the electrical systems. All work on the maxi-fuses 

must be carried out by a CITROËN dealer or a qualified workshop.

11

Practical information

185

C3Picasso_en_Chap11_informations-pratiques_ed01-2015

Battery

Procedure for charging your battery when it is flat or for starting the engine using another battery.

Access to the battery

The battery is located under the bonnet.
To gain access to it:
F  open the bonnet using the interior release 

lever, then the exterior safety catch,

F  secure the bonnet stay,
F  lift the plastic cover on the (+) terminal.

First check that the slave battery has a 
nominal voltage of 12 V and a capacity 
at least equal to that of the discharged 
battery.
Do not try to start the engine by 
connecting a battery charger.
Do not disconnect the (+) terminal when 
the engine is running.

F  Connect the red cable to the positive 

terminal (+) of the flat battery A, then to the 
positive terminal (+) of the slave battery B.

F  Connect one end of the green or black 

cable to the negative terminal (-) of the 
slave battery B (or earth point on the other 
vehicle).

F  Connect the other end of the green or 

black cable to the negative terminal C (or 
the engine mounting) of the broken-down 
vehicle.

F  Start the engine of the other vehicle and 

allow it to run for a few minutes.

Starting using another 
battery

When the battery on your vehicle is discharged, 
the engine can be started using a slave battery 
(external or on another vehicle) and jump leads.

F

  Operate the starter of the broken-down 

vehicle and let the engine run.


If the engine does not start immediately, 
switch off the ignition and wait a few 
moments before trying again.

F  Wait until the engine returns to idle, then 

disconnect the jump leads in reverse order.

Some functions are not available if the 
battery is not sufficiently charged.

Practical information

186

C3Picasso_en_Chap11_informations-pratiques_ed01-2015

Charging the battery using 
a battery charger

F

  Follow the instructions for use provided by 

the manufacturer of the charger.

Protect your eyes and face before 
handling the battery.
All operations on the battery must be 
carried out in a well ventilated area 
away from naked flames and sources 
of sparks, so as to avoid the risk of 
explosion and fire.
Do not try to charge a frozen battery; 
the battery must first be thawed out to 
avoid the risk of explosion. If the battery 
has been frozen, before charging have 
it checked by a CITROËN dealer or a 
qualified workshop who will check that 
the internal components have not been 
damaged and the casing is not cracked, 
which could cause a leak of toxic and 
corrosive acid.
Do not reverse the polarity and use only 
a 12 V charger.
Do not disconnect the terminals while 
the engine is running.
Do not charge the batteries without 
disconnecting the terminals first.
Wash your hands afterwards.

Batteries contain harmful substances such 
as sulphuric acid and lead. They must be 
disposed of in accordance with regulations 
and must not, in any circumstances, be 
discarded with household waste.
Take used remote control batteries and 
vehicle batteries to a special collection 
point.

11

Practical information

187

C3Picasso_en_Chap11_informations-pratiques_ed01-2015

Load reduction mode

System which manages the use of certain 
functions according to the level of charge 
remaining in the battery.
When the vehicle is being driven, the load 
reduction function temporarily deactivates 
certain functions, such as the air conditioning, 
the heated rear screen...
The deactivated functions are reactivated 
automatically as soon as conditions permit.

Energy economy mode

Exiting economy mode

These functions are reactivated automatically 
the next time the vehicle is driven.
F  In order to resume the use of these 

functions immediately, start the engine and 
let it run for a few minutes.

The time available to you will then be double 
the period for which the engine is left running. 
However, this period will always be between 
five and thirty minutes.

Switching to economy mode

Once this period has elapsed, a message 
appears on the multifunction screen indicating 
that the vehicle has switched to economy mode 
and the active functions are put on standby.

A flat battery prevents the engine from 
starting (refer to the corresponding 
paragraph).

If the telephone is being used at the 
same time on the eMyWay audio 
navigation system, it will be interrupted 
after 10 minutes.

System which manages the period of use of certain functions to conserve a sufficient level of 
charge in the battery.
After the engine has stopped, you can still use functions such as the audio equipment, windscreen 
wipers, dipped beam headlamps, courtesy lamps, etc. for a maximum combined period of 
thirty minutes.
This period may be greatly reduced if the battery is not fully charged.

Practical information

188

C3Picasso_en_Chap11_informations-pratiques_ed01-2015

Changing a front or rear wiper blade

Removal

F

  Raise the corresponding wiper arm.

F

  Unclip the wiper blade and remove it.

Fitting

F

  At the front, check the size of the wiper 

blade as the shorter blade is fitted to the 
passenger side of the vehicle.

F

  Put the corresponding new wiper blade in 

place and clip it.

F

  Fold down the wiper arm carefully.

Before removing a front 
wiper blade

F

  Within one minute after switching off the 

ignition, operate the wiper stalk to position 
the wiper blades in the vertical position.

This position must be used in order to avoid 
damaging the wiper blade and the bonnet.

After fitting a front wiper 
blade

F

  Switch on the ignition.

F

  Operate the wiper stalk again to park the 

wiper blades.

Procedure for replacing a worn wiper blade with a new one without the use of tools.

11

Practical information

189

C3Picasso_en_Chap11_informations-pratiques_ed01-2015

Towing the vehicle

The towing eye is installed under the boot floor.
To gain access to it:
F  open the boot,
F  remove the adjustable boot floor,
F  lift up the boot carpet,
F

  remove the towing eye from the tool holder.

Procedure for having your vehicle towed or for towing another vehicle using a removable towing eye.

General recommendations

Observe the legislation in force in your country.
Ensure that the weight of the towing vehicle is higher than that of the towed vehicle.
The driver must remain at the wheel of the towed vehicle and must have a valid driving licence.
When towing a vehicle with all four wheels on the ground, always use an approved towing 
arm; rope and straps are prohibited.
The towing vehicle must move off gently.
When towing a vehicle with the engine off, there is no longer any power assistance for 
braking or steering.
In the following cases, you must always call on a professional recovery service:
-  vehicle broken down on a motorway or fast road,
-  four-wheel drive vehicle,
-  when it is not possible to put the gearbox into neutral, unlock the steering, or release 

the parking brake,

-  towing with only two wheels on the ground,
-  where there is no approved towing arm available...

Practical information

190

C3Picasso_en_Chap11_informations-pratiques_ed01-2015

Towing your vehicle

F  On the front bumper, passenger's side

remove the protective access cover located 
alongside the front fog lamp, using the flat 
end of the towing eye.

F  On the rear bumper, unclip the cover by 

pressing at the bottom.

F

  Screw the towing eye in fully.

F

  Install the towing arm.

F

  Switch on the hazard warning lamps on the 

towed vehicle.

Towing another vehicle

Failure to observe this special condition 
could result in damage to certain 
braking components and the absence 
of braking assistance the next time the 
engine is started.

When removing the protective access 
cover, take care to avoid damaging the 
paintwork with the towing eye.

F

  Screw the towing eye in fully.

F

  Install the towing arm.

F

  Switch on the hazard warning lamps on the 

towed vehicle.

F  Place the gear lever in neutral.


Content   ..  10  11  12  13   ..