Citroen C3 Picasso (2016 year). Manual - part 10
 

  Index      Citroen     Citroen C3 Picasso - service manual 2016 year in english


Search            


Content   ..  8  9  10  11   ..


Citroen C3 Picasso (2016 year). Manual - part 10


10

Checks

143

C3Picasso_en_Chap10_verification_ed01-2015

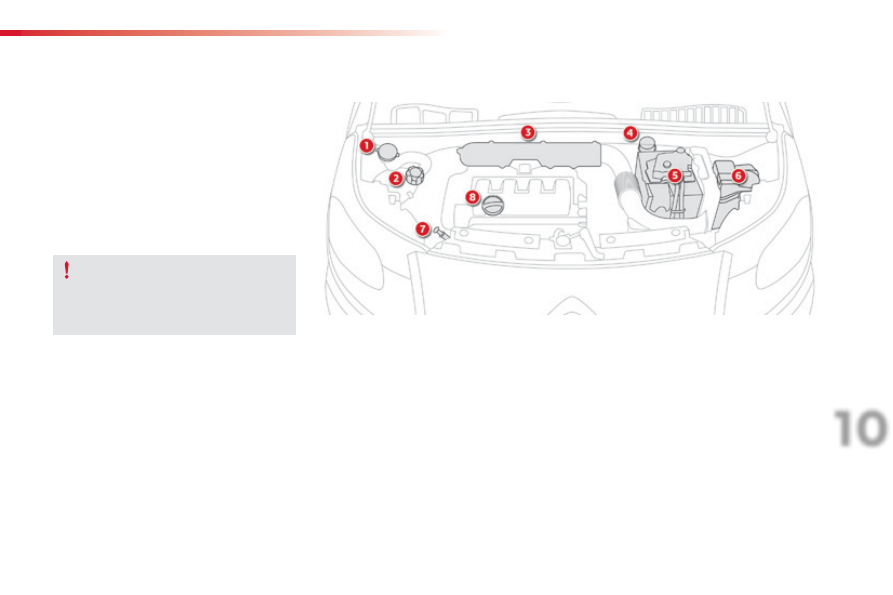
Petrol engines

1.

  Screenwash fluid reservoir.

2.  Coolant header tank.
3.  Air filter.
4.  Brake fluid reservoir.
5. Battery.
6.

  Fusebox.

7.  Engine oil dipstick.
8.  Engine oil filler cap.

To avoid damaging the electrical units, 
never use

 a high pressure jet wash in 

the engine compartment.

Checks

144

C3Picasso_en_Chap10_verification_ed01-2015

Diesel engine

1.

  Screenwash fluid reservoir.

2.  Coolant header tank.
3.  Air filter.
4.  Brake fluid reservoir.
5. Battery.
6.

  Fusebox.

7.  Engine oil dipstick.
8.  Engine oil filler cap.

The Diesel fuel system operates under 
high pressure:
-  Never carry out any work on this 

system yourself.

HDi engines make use of advanced 
technology.

All maintenance and repairs require 
specially trained staff, which only a 
CITROËN dealer can provide.

To avoid damaging the electrical units, 
never use

 a high pressure jet wash in 

the engine compartment.

10

Checks

145

C3Picasso_en_Chap10_verification_ed01-2015

Checking levels

Engine oil level

The check is carried out either when 
the ignition is switched on using the 
oil level indicator in the instrument 
panel for vehicles so equipped, or 
using the dipstick.

Checking using the dipstick

A = MAX

Check all of these levels regularly, in line with the manufacturer's service schedule. Top them up if necessary, unless otherwise indicated.
If a level drops significantly, have the corresponding system checked by a CITROËN dealer or a qualified workshop.

Take care when working under the 
bonnet, as certain areas of the engine 
may be extremely hot (risk of burns) 
and the cooling fan could start at any 
time (even with the ignition off).

To ensure that the reading is correct, 
your vehicle must be parked on a level 
surface with the engine having been off 
for more than 30 minutes.

It is normal to top up the oil level between 
two services (or oil changes). CITROËN 
recommends that you check the level, and top 
up if necessary, every 3 000 miles (5 000 kms).

B = MIN

If you find that the level is above the A mark or 
below the B mark, do not start the engine.

If the level is above the MAX mark (risk 
of damage to the engine), contact a 
CITROËN dealer or a qualified workshop.

-  If the level is below the MIN mark, you 

must top up the engine oil.

Oil grade

Before topping-up the oil or changing the oil, 
check that the oil is the correct grade for your 
engine and conforms to the manufacturer's 
recommendations.

F  Locate the dipstick in the engine 

compartment of your vehicle.

For more information on the petrol or Diesel 
engine, refer to the corresponding section.
F  Take the dipstick by its coloured grip and 

remove it completely.

F  Wipe the end of the dipstick using a clean 

non-fluffy cloth.

F

  Refit the dipstick and push fully down, then 

pull it out again to make the visual check: 
the correct level is between the marks A 
and B.

Checks

146

C3Picasso_en_Chap10_verification_ed01-2015

Brake fluid level

The brake fluid level should be close 
to the "MAX" mark. If it is not, check 
the brake pad wear.

Changing the fluid

Refer to the manufacturer's service schedule 
for details of the interval for this operation.

Fluid specification

The brake fluid must conform to the 
manufacturer's recommendations.

Topping-up the engine oil level

F  Locate the oil filler cap in the engine 

compartment of your vehicle.

For more information on the petrol or Diesel 
engine, refer to the corresponding section.
F

  Unscrew the oil filler cap to reveal the filler 

aperture.

F  Add oil in small quantities, avoiding any 

spills on engine components (risk of fire).

F

  Wait a few minutes before checking the 

level again using the dipstick.

F  Add more oil if necessary.
F  After checking the level, carefully refit the 

oil filler cap and the dipstick in its tube.

After topping-up the oil, the check when 
switching on the ignition with the oil level 
indicator in the instrument panel is not valid 
during the 30 minutes after topping up.

Engine oil change

Refer to the manufacturer's service schedule 
for details of the interval for this operation.
In order to maintain the reliability of the engine 
and emission control system, never use 
additives in the engine oil.

10

Checks

147

C3Picasso_en_Chap10_verification_ed01-2015

Coolant level

The coolant level should be close 
to the "MAX" mark but should never 
exceed it.

Fluid specification

For optimum cleaning and to avoid freezing, 
this fluid must not be topped up or replaced 
with plain water.
In wintry conditions, it is recommended that you 
use an ethyl alcohol or methanol based fluid.

Coolant specification

The coolant must conform to the 
manufacturer's recommendations.

Screenwash fluid level

When the engine is warm, the temperature of 
the coolant is regulated by the fan.

Top up the level when necessary.

The cooling fan may start after switching 
off the engine: take care with articles and 
clothing that might be caught by the fan 
blades.

In addition, as the cooling system is pressurised, 
wait at least one hour after switching off the 
engine before carrying out any work.
To avoid any risk of scalding, unscrew the cap 
by two turns to allow the pressure to drop. When 
the pressure has dropped, remove the cap and 
top up the level.

Diesel additive level (Diesel 
engine with particle filter)

Used products

Topping up

This additive must be topped up by a CITROËN 
dealer or a qualified workshop without delay.

Avoid prolonged contact of used oil or 
fluids with the skin.
Most of these fluids are harmful to 
health or indeed very corrosive.

Do not discard used oil or fluids into 
sewers or onto the ground.
Take used oil to a CITROËN dealer or 
a qualified workshop (France) or to an 
authorised waste disposal site.

The additive reservoir low 
level is indicated by fixed 
illumination of this warning lamp, 
accompanied by an audible 
warning and a message in the 
multifunction screen.

Checks

148

C3Picasso_en_Chap10_verification_ed01-2015

Particle filter (Diesel)

The start of saturation of the 
particle filter is indicated by 

the temporary illumination of this warning lamp 
accompanied by a message in the multifunction 
screen.
As soon as the traffic conditions permit, regenerate 
the filter by driving at a speed of at least 40 mph 
(60 km/h) until the warning lamp goes off.
If the warning lamp stays on, this indicates a low 
additive level.
For more information on checking levels, refer to 
the corresponding section.

On a new vehicle, the first particle 
filter regeneration operations may be 
accompanied by a "burning" smell, 
which is perfectly normal.
Following prolonged operation of the 
vehicle at very low speed or at idle, 
you may, in exceptional circumstances, 
notice the emission of water vapour at 
the exhaust on acceleration. This does 
not affect the behaviour of the vehicle 
or the environment.

Checks

12 V battery

The battery does not require any maintenance.
However, check that the terminals are clean 
and correctly tightened, particularly in summer 
and winter.

Air filter and passenger compartment filter

Refer to the manufacturer's 
service schedule for details of the 
replacement intervals for these 
components.

Oil filter

Replace the oil filter each time the 
engine oil is changed.
Refer to the manufacturer's 
service schedule for details of 
the replacement interval for this 
component.

Unless otherwise indicated, check these components in accordance with the manufacturer's service schedule and according to your engine.
Otherwise, have them checked by a CITROËN dealer or a qualified workshop.

When carrying out work on the battery, refer 
to the "12 V battery" section for details of the 
precautions to be taken before disconnecting 
the battery and following its reconnection.

Depending on the environment (e.g. dusty 
atmosphere) and the use of the vehicle 
(e.g. city driving), replace them twice as often 
if necessary
.
A clogged passenger compartment filter may 
have an adverse effect on the performance 
of the air conditioning system and generate 
undesirable odours.

10

Checks

149

C3Picasso_en_Chap10_verification_ed01-2015

Parking brake

If excessive travel or a loss of 
effectiveness of this system is 
noticed, the parking brake must be 
checked, even between two services.

Manual gearbox

The gearbox does not require any 
maintenance (no oil change).
Refer to the manufacturer's service 
schedule for the checking interval for 
this component.

For information on checking brake 
disc wear, contact a CITROËN dealer 
or a qualified workshop.

Brake disc wear

Brake wear depends on the style 
of driving, particularly in the case 
of vehicles used in town, over short 
distances. It may be necessary to have 
the condition of the brakes checked, 
even between vehicle services.

Brake pads

The gearbox does not require any 
maintenance (no oil change).
Refer to the manufacturer's service 
schedule for details of the checking 
interval for this component.

Electronic gearbox

Only use products recommended by 
CITROËN or products of equivalent 
quality and specification.
In order to optimise the operation of 
units as important as those in the 
braking system, CITROËN selects and 
offers very specific products.
After washing the vehicle, dampness, 
or in wintry conditions, ice can form 
on the brake discs and pads: braking 
efficiency may be reduced. Make light 
brake applications to dry and defrost 
the brakes.

Checking this system must be done by a 
CITROËN dealer or a qualified workshop.

Unless there is a leak in the circuit, a drop in 
the brake fluid level indicates that the brake 
pads are worn.

Practical information

150

C3Picasso_en_Chap11_informations-pratiques_ed01-2015

Composition of the kit

1.

  12 V compressor, with integral pressure 

gauge.

2.

  Sealant cartridge, with integral hose.

3.  Speed limit sticker.

Access to the kit

This kit is installed in the storage box, under the 
boot floor.

The speed limit sticker must be secured 
to the interior of the vehicle in the 
driver's field of vision, to remind you 
that a wheel is in temporary use.

Comprising a compressor and a sealant 
cartridge, it allows the temporary repair of 
a tyre so that you can drive to the nearest 
garage.
It is designed to repair most punctures which 
could affect the tyre, located on the tyre tread 
or shoulder.

Do not exceed a speed of 50 mph 
(80 km/h) when driving with a tyre 
repaired using this type of kit.

The vehicle's electric system allows the 
connection of a compressor for long 
enough to inflate a tyre after a puncture 
repair or for inflating a small inflatable 
accessory.

Temporary puncture repair kit

11

Practical information

151

C3Picasso_en_Chap11_informations-pratiques_ed01-2015

F

  Switch off the ignition.

F  Secure the speed limit sticker inside the 

vehicle.

F

  Uncoil the pipe stowed under the 

compressor.

F  Connect the pipe from the compressor to 

the sealant cartridge.

F  Turn the the sealant cartridge and secure it 

in the cut-out provided on the compressor.

Avoid removing any foreign bodies 
which have penetrated into the tyre.

F  Remove the valve cap from the tyre to be 

repaired, and place it in a clean area.

F  Connect the hose from the sealant 

cartridge to the valve of the tyre to be 
repaired and tighten firmly.

Repair procedure

Practical information

152

C3Picasso_en_Chap11_informations-pratiques_ed01-2015

F

  Check that the compressor switch is at the 

"O" position.

F

  Uncoil fully the electric cable, stowed under 

the compressor.

F  Connect compressor's plug to the vehicle's 

12 V socket.

F

  Switch on the ignition.

Take care, the sealant product 
is harmful (e.g. ethylene-glycol, 
colophony...) if swallowed and causes 
irritation to the eyes.
Keep this product out of the reach of 
children.
The use-by date is marked on the 
cartridge.
After use, do not discard the 
cartridge by the roadside, take it to 
a CITROËN dealer or an authorised 
waste disposal site.
Don't forget to obtain a new sealant 
cartridge, available from a CITROËN 
dealer or a qualified workshop.

F

  Start the compressor by placing the switch 

at the "I" position and leave it running until 
the tyre pressure reaches 2.0 bar.


The sealant product is injected into the tyre 
under pressure; do not disconnect the pipe 
from the valve during this operation (risk of 
splashing and stains).

If after around 5 to 7 minutes the 
pressure is not attained, this indicates 
that the tyre is not repairable; contact 
a CITROËN dealer or a qualified 
workshop for assistance.

11

Practical information

153

C3Picasso_en_Chap11_informations-pratiques_ed01-2015

F

  Place the switch in the "O" position.

F  Remove the kit.
F

  Drive immediately for approximately 

three miles (five kilometres), at reduced 
speed (between 15 and 35 mph (20 and 
60 km/h)), to plug the puncture.

F  Stop to check the repair and the tyre 

pressure using the kit.

Checking / adjusting tyre pressures

You can also use the compressor, without 
injecting sealant, to check and if necessary 
adjust the tyre pressures

F  Remove the valve cap from the tyre and 

place it in a clean area.

F

  Uncoil the pipe stowed under the 

compressor.

F

  Screw the pipe onto the valve and tighten 

firmly.

F

  Check that the compressor switch is at the 

"O" position.

F

  Uncoil fully the electric cable, stowed under 

the compressor.

F  Connect the compressor's plug to the 

vehicle's 12 V socket.

F

  Switch on the ignition.

Practical information

154

C3Picasso_en_Chap11_informations-pratiques_ed01-2015

F

  Start the compressor by placing the switch 

at the "I" position and adjust the pressure 
to the value shown on the vehicle's tyre 
pressure label.


To deflate: press the black button on the 
compressor pipe, at the valve connector.

F  Once the correct pressure is reached, put 

the switch to the "O" position.

F

  Remove the kit then stow it.

Tyre under-inflation 

detection

After repair of the tyre, the warning 
lamp will remain on until the system is 
reinitialised.
For more information on under-inflation 
detection, refer to the corresponding 
section.

Should the pressure of one or more 
tyres be adjusted, it is necessary to 
reinitialise the under-inflation detection 
system.
For more information on under-inflation 
detection, refer to the corresponding 
section.

11

Practical information

155

C3Picasso_en_Chap11_informations-pratiques_ed01-2015

Spare wheel

The tools are installed under the boot floor.
For access to them:
F  open the boot,
F  remove the boot floor,
F  lift up the boot carpet,
F

  remove the box containing the tools,

F

  remove the polystyrene storage box.

Other accessories

5.

   Removable towing eye.


Refer to the "Towing the vehicle" section.

Access to the tooling

Procedure for changing a wheel with a damaged tyre for the spare wheel using the tooling provided with the vehicle.

List of tools

All of these tools are specific to your vehicle. 
Do not use them for any purpose other than 
those indicated below.
1. Wheelbrace.
 

For removing the wheel trim and removing 
the wheel fixing bolts.

2.

  Jack with integral handle.


For raising the vehicle.

3.  Wheel bolt cover removal tool.
 

For removing the wheel bolt head covers 
on alloy wheels.

4.  Socket for the security bolts (located in the 

glove box).


For adapting the wheelbrace to the special 
"security" bolts (if your vehicle has them).

Practical information

156

C3Picasso_en_Chap11_informations-pratiques_ed01-2015

Wheel with trim

When removing the wheel, first 
detach the trim using the wheelbrace 1 
pulling at the valve passage hole.
When refitting the wheel, refit the trim 
starting by placing its notch facing the 
valve and press around its edge with 
the palm of your hand.

Access to the spare wheel

The spare wheel is installed in the boot under 
the floor.
The spare wheel is the "space-saver" type.
For access to it, refer to "Access to tooling" on 
the previous page.

Fitting the "space-saver" 
type spare wheel

If your vehicle is fitted with alloy wheels, 
it is normal to notice, when tightening 
the bolts on fitting, that the washers do 
not come into contact with the "space-
saver" type spare wheel. The wheel is 
secured by the conical contact of each 
bolt.

11

Practical information

157

C3Picasso_en_Chap11_informations-pratiques_ed01-2015

Taking out the wheel

F

  Unscrew the yellow central bolt, and 

remove it.

F

  Raise the spare wheel towards you from 

the rear.

F

  Take the wheel out of the boot.

Putting the wheel back in place

F

  Put the wheel back in its housing.

F

  Refit the yellow central bolt in the centre of 

the wheel.

F  Tighten fully until the central bolt clicks to 

retain the wheel correctly.

F

  Put the polystyrene storage box back in 

place.

F

  Put the box back in place and clip it.

Practical information

158

C3Picasso_en_Chap11_informations-pratiques_ed01-2015

Removing a wheel

List of operations

F  Remove the bolt cover from each of the 

wheel bolts using the tool 3 (with alloy 
wheels only).

F  Fit the security socket 4 to the 

wheelbrace 1 to slacken the security bolt  
(if your vehicle has them).

F  Slacken the other bolts using the 

wheelbrace 1 only.

Parking the vehicle

Immobilise the vehicle where it does not 
block traffic: the ground must be level, 
stable and non-slippery.
Apply the parking brake, switch off the 
ignition and engage first gear* to lock 
the wheels.
If necessary, place a chock against the 
wheel diagonally opposite the wheel to 
be changed.
You must ensure that the occupants get 
out of the vehicle and wait where they 
are safe.
Never go underneath a vehicle 
supported by a jack; use an axle stand.

* Position R

 for an electronic gearbox.

The jack must only be used to change a 
wheel with a damaged tyre.
The jack does not require any 
maintenance.


Content   ..  8  9  10  11   ..