Citroen C3 Picasso (2016 year). Manual - part 11
 

  Index      Citroen     Citroen C3 Picasso - service manual 2016 year in english


Search            


Content   ..  9  10  11  12   ..


Citroen C3 Picasso (2016 year). Manual - part 11


11

Practical information

159

C3Picasso_en_Chap11_informations-pratiques_ed01-2015

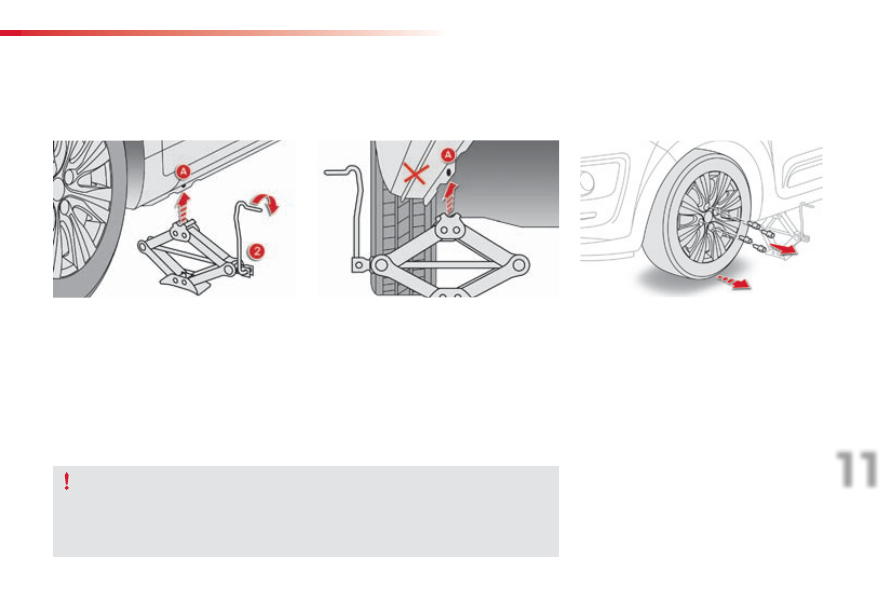
F  Position the foot of the jack 2 on the 

ground, ensuring that it is directly below 
one of the front A or rear B jacking points 
provided on the underbody, whichever is 
closest to the wheel to be changed.

F  Remove the bolts and store them in a clean 

place.

F

  Remove the wheel.

Ensure that the jack is stable. If the ground is slippery or loose, the jack could slip or drop - 
Risk of injury!
Position the jack only at one of the jacking points A or B under the vehicle, ensuring that the 
vehicle's contact area is positioned centrally on the head of the jack. Otherwise, there is a 
risk of damage to the vehicle and/or the jack dropping - Risk of injury!

F

  Extend the jack 2 until its head comes into 

contact with the jacking point A or B used. 
The vehicle's contact area A or B must be 
fully engaged with the central part of the 
head of the jack.

F  Raise the vehicle until there is sufficient 

space between the wheel and the ground 
to admit the spare (not punctured) wheel 
easily.

Practical information

160

C3Picasso_en_Chap11_informations-pratiques_ed01-2015

List of operations

F

  Put the wheel in place on the hub.

F

  Screw in the bolts by hand as far as 

possible.

F  Pre-tighten the security bolt (if your vehicle 

has them) using the wheelbrace 1 fitted 
with the security socket 4.

F  Pre-tighten the other bolts using the 

wheelbrace 1 only.

Fitting a wheel

After changing a wheel

To stow the punctured wheel in the boot 
correctly, first remove the central cover.
When using the "space-saver" type 
spare wheel, do not exceed 50 mph 
(80 km/h).
Have the tightening of the bolts and the 
pressure of the spare wheel checked 
by a CITROËN dealer or a qualified 
workshop without delay.
Have the punctured wheel repaired 
and refit it to the vehicle as soon as 
possible.

11

Practical information

161

C3Picasso_en_Chap11_informations-pratiques_ed01-2015

F  Tighten the security bolt (if your vehicle has 

them) using the wheelbrace 1 fitted with 
the security socket 4.

F  Tighten the other bolts using the 

wheelbrace 1 only.

F  Refit the bolt covers on each of the bolts 

(with alloy wheels only).

F

  Stow the tools in the box.

F

  Lower the vehicle fully.

F  Fold the jack 2 and detach it.

Practical information

162

C3Picasso_en_Chap11_informations-pratiques_ed01-2015

Snow chains

Original tyre size

Maximum link size

195 / 60 R15

9 mm

195 / 55 R16

9 mm

205 / 45 R17

7 mm

For more information on snow chains, 
contact a CITROËN dealer or a 
qualified workshop.

In wintry conditions, snow chains improve traction as well as the behaviour of the vehicle when 
braking.

The snow chains must be fitted only 
to the front wheels. They must never 
be fitted to "space-saver" type spare 
wheels.

Take account of the legislation in force 
in your country on the use of snow 
chains and the maximum running speed 
authorised.

Advice on installation

F  If you have to fit the chains during a 

journey, stop the vehicle on a flat surface 
on the side of the road.

F  Apply the parking brake and position any 

wheel chocks to prevent movement of your 
vehicle.

F

  Fit the chains following the instructions 

provided by the manufacturer.

F

  Move off gently and drive for a few 

moments, without exceeding 30 mph 
(50 km/h).

F

  Stop your vehicle and check that the snow 

chains are correctly tightened.

Avoid driving with snow chains on roads 
that have been cleared of snow, to 
avoid damaging your vehicle's tyres and 
the road surface. If your vehicle is fitted 
with alloy wheels, check that no part of 
the chain or its fixings is in contact with 
the wheel rim.

All original tyre sizes (15", 16", 17") can be 
fitted with chains.
Use only the chains designed to be fitted to the 
type of wheel fitted to your vehicle:

It is strongly recommended that before 
you leave, you practise fitting the snow 
chains on a level and dry surface.

11

Practical information

163

C3Picasso_en_Chap11_informations-pratiques_ed01-2015

AdBlue

®

 additive and SCR system

for BlueHDi Diesel engines

To assure respect for the environment and 
conformity with the new Euro 6 emissions 
standard, without adversely affecting the 
performance or fuel consumption of Diesel 
engines, CITROËN has taken the decision to 
equip its vehicles with an effective system that 
associates SCR (Selective Catalytic Reduction) 
with a particle filter (FAP) for the treatment of 
exhaust gases.

Presentation of the SCR system

Using an additive called AdBlue

®

 containing 

urea, a catalytic converter turns up to 85% 
of nitrous oxides (NOx) into nitrogen and 
water, which are harmless to health and the 
environment.

Once the AdBlue

®

 tank is empty, a 

system required by regulations prevents 
starting of the engine.
If the SCR is faulty, the level of 
emissions from your vehicle will no 
longer meet the Euro 6 standard: your 
vehicle becomes polluting.
In the event of a confirmed fault 
with the SCR system, you must go 
to a CITROËN dealer or a qualified 
workshop as soon as possible: after 
a running distance of 650 miles 
(1 100 km), a system will be triggered 
automatically to prevent engine starting.

The AdBlue

®

 additive is held in a special 

tank located under the boot at the rear of 
the vehicle. It has a capacity of 17 litres: this 
provides a driving range of about 12 500 miles 
(20 000 km), after which an alert is triggered 
warning you when the reserve remaining is 
enough for just 1 500 miles (2 400 km).

During each scheduled service of your vehicle 
by a CITROËN dealer or a qualified workshop, 
the AdBlue

®

 additive tank is refilled in order to 

allow normal operation of the SCR system.

If the estimated mileage between two services 
is greater than 12 500 miles (20 000 km), we 
recommend that you go to a CITROËN dealer 
or a qualified workshop to have the necessary 
top-up carried out.

Practical information

164

C3Picasso_en_Chap11_informations-pratiques_ed01-2015

Range indicators

Once the AdBlue

®

 tank is on reserve or after 

detection of a fault with the SCR emissions 
control system, when the ignition is switched 
on, an indicator displays an estimate of the 
distance that can be covered, the range, before 
engine starting is prevented.
In the event of simultaneous system fault and 
low AdBlue

®

 level, the shortest range figure is 

the one displayed.

In the event of the risk of  
non-starting related to a lack  
of AdBlue

®

The engine start prevention system 
required by regulations is activated 
automatically once the AdBlue

®

 tank is 

empty.

Range greater than 1 500 miles (2 400 km)
When the ignition is switched on, no 
information on range is displayed automatically 
in the instrument panel.

For more information on topping-
up the AdBlue

®

 additive, refer to the 

corresponding section.

11

Practical information

165

C3Picasso_en_Chap11_informations-pratiques_ed01-2015

Remaining range between 350 and 1500 miles (600 and 2 400 km)

When switching on the ignition, the 
UREA warning lamp comes on, accompanied 
by an audible signal and the display of a 
message (e.g.: "Top up emissions additive: 
Starting prevented in 900 miles") indicating 
the remaining range expressed in miles or 
kilometres.
When driving, the message is displayed every 
200 miles (300 km) until the additive tank has 
been topped-up.
Go to a CITROËN dealer or a qualified 
workshop to have the AdBlue

®

 tank topped-up.

You can also top-up the tank yourself.
For more information on topping-up the 
AdBlue

® 

additive, refer to the corresponding 

section.

Remaining range between 0 and 350 miles (0 and 600 km)

When switching on the ignition, the SERVICE 
warning lamp comes on and the UREA warning 
lamp flashes, accompanied by an audible 
signal and the display of a message (e.g.  
"Top up emissions additive: Starting prevented 
in 350 miles") indicating the remaining range 
expressed in miles or kilometres.
When driving, the message is displayed every 
30 seconds until the additive tank has been 
topped-up.
Go to a CITROËN dealer or a qualified 
workshop to have the AdBlue

®

 tank topped-up.

You can also top-up the tank yourself.
Otherwise you will not be able to restart your 
engine.

When switching on the ignition, the SERVICE 
warning lamp comes on and the UREA warning 
lamp flashes, accompanied by an audible 
signal and the display of the message "Top up 
emissions additive: Starting prevented".
The AdBlue

®

 tank is empty: the system required 

by regulations prevents engine starting.

Breakdown related to a lack of AdBlue

®

 additive

To be able to start the engine, 
we recommend that you call on 
a CITROËN dealer or a qualified 
workshop for the top-up required.
If you carry out the top-up yourself, it 
is essential to add at least 3.8 litres of 
AdBlue

®

 to the tank.

Practical information

166

C3Picasso_en_Chap11_informations-pratiques_ed01-2015

In the event of a fault with the the SCR emissions control system

A system that prevents engine starting is activated automatically from 650 miles (1 100 km) after confirmation of a fault with the SCR emissions control 
system. Have the system checked by a CITROËN dealer or a qualified workshop as soon as possible.

You have exceeded the authorised 
driving limit: the starting prevention 
system inhibits engine starting.

If it is a temporary fault, the alert 
disappears during the next journey, 
after self-diagnosis of the SCR system.

The UREA, SERVICE and diagnostic warning 
lamps comes on, accompanied by an audible 
signal and the display of the message 
"Emissions fault".
The alert is triggered when driving when the 
fault is detected for the first time, then when 
switching on the ignition for subsequent 
journeys, while the fault persists.

In the event of the detection of a fault

If a fault with the SCR system is confirmed (after 
30 miles (50 km) covered with the permanent display 
of the message signalling a fault), the SERVICE and 
engine diagnostic warning lamps come on and the 
UREA warning lamp flashes, accompanied by an 
audible signal and the display of a message (e.g.: 
"Emissions fault: Starting prevented in 150 miles") 
indicating the remaining range express in miles or 
kilometres.
While driving, the message is displayed every 
30 seconds while the fault with the SCR system 
persists.
The alert is repeated when switching on the ignition.
You should go to a CITROËN dealer or a qualified 
workshop as soon as possible.
Otherwise, you will not be able to restart your engine.

During an authorised driving phase (between 
650 miles and 0 miles) (1 100 km and 0 km)

Every time the ignition is switched on, the 
SERVICE and engine diagnostic warning 
lamps come on and the UREA warning lamp 
flashes, accompanied by an audible signal and 
the display of the message "Emissions fault: 
Starting prevented".

Starting prevented

To be able to start the engine, you must call on 
a CITROËN dealer or a qualified workshop.

11

Practical information

167

C3Picasso_en_Chap11_informations-pratiques_ed01-2015

Freezing of the AdBlue

®

 additive

The AdBlue

®

 additive freezes at 

temperatures below around -11°C.
The SCR system includes a heater 
for the AdBlue

®

 tank, allowing you to 

continue driving in very cold conditions.

Filling the AdBlue

®

 tank is an operation 

included in every routine service on your 
vehicle by a CITROËN dealer or a qualified 
workshop.
Nevertheless, given the capacity of the tank, 
it may be necessary to top-up the additive 
between services, more particularly if an alert 
(warning lamps and a message) signals the 
requirement.
You can got to a CITROËN dealer or a qualified 
workshop.
If you envisage topping-up yourself, please 
read the following warnings carefully.

Topping-up the AdBlue

®


additive

The AdBlue

®

 additive is an urea-based 

solution. This liquid is non-flammable, 
colourless and odourless (kept in a cool area).
In the event of contact with the skin, wash 
the affected area with soap and water. In the 
event of contact with the eyes, wash (irrigate) 
the eyes with large amounts of water or with 
an eye wash solution for at least 15 minutes. 
If a burning sensation or irritation persists, get 
medical attention.
If swallowed, immediately wash out the mouth 
with clean water and then drink plenty of water.
In certain conditions (high ambient 
temperature, for example), the risk of release 
of ammonia cannot be excluded: do not inhale 
the product. Ammonia vapour has en irritant 
effect on mucous membranes (eyes, nose and 
throat).

Precautions in use

Keep AdBlue

®

 out of the reach of 

children, in its original bottle.
Never transfer AdBlue

®

 to another 

container: it would lose its purity.

Use only AdBlue

®

 additive that meets the  

ISO 22241 standard.

Never dilute the additive with water.
Never pour the additive into the Diesel 
fuel tank.

Never top-up from an AdBlue

®


dispenser reserved for heavy goods 
vehicles.

The supply in a non-drip bottle simplifies 
toping-up. You can obtain 1.89 litre (half a US 
gallon) bottles from a CITROËN dealer or a 
qualified workshop.

Practical information

168

C3Picasso_en_Chap11_informations-pratiques_ed01-2015

Never store bottles of AdBlue

®

 in your 

vehicle.

AdBlue

®

 freezes at about -11°C and 

deteriorates above 25°C. It is recommended 
that bottles be stored in a cool area and 
protected from direct sunlight.
Under these conditions, the additive can be 
kept for at least a year.
If the additive has frozen, it can be used once it 
has completely thawed out.

Recommendations on storage

Before topping-up, ensure that the vehicle is 
parked on a flat and level surface.
In wintry conditions, ensure that the 
temperature of the vehicle is above -11°C. 
Otherwise the AdBlue

®

 may be frozen and 

so cannot be poured into its tank. Park your 
vehicle in a warmer area for a few hours to 
allow the top-up to be carried out.

Procedure

F  For access to the AdBlue

®

 tank, raise the 

boot carpet then, depending on equipment, 
lift out the spare wheel and/or the storage 
box.

F  Without pressing, turn the black cap a 

quarter turn anti-clockwise and lift it off.

F  Turn the blue cap a 6

th

 of a turn anti-

clockwise.

F  Lift off the cap.

F

  Switch off the ignition and remove the key.

11

Practical information

169

C3Picasso_en_Chap11_informations-pratiques_ed01-2015

F  Obtain a bottle of AdBlue

®

. After first 

checking the use-by date, read carefully 
the instructions on use on the label before 
pouring the contents of the bottle into your 
vehicle's AdBlue

®

 tank.

Important: if your vehicle's 
AdBlue

®

 tank is completely empty - 

which is confirmed by the alert 
messages and the impossibility of 
starting the engine, you must add at 
least 3.8 litres (so two 1.89 litre bottles).

If any additive is split or splashed, wash 
immediately with cold water or wipe with 
a damp cloth.
If the additive has crystallised, clean it 
off using a sponge and hot water.

Important: in the event of a top-up after 
a breakdown because of a lack of 
additive

, you must wait around 5 minutes 

before switching on the ignition, without 
opening the driver's door, locking the 
vehicle or introducing the key into the 
ignition switch
.
Switch on the ignition, then, after 
10 seconds, start the engine.

Never dispose of AdBlue

®

 additive 

bottles in the household waste. Place 
them in a special container provided 
this purpose or take them to your dealer.

F

  After emptying the bottle, wipe away any 

spillage around the tank filler using a damp 
cloth.

F  Refit the blue cap to the tank and turn it a 

6

th

 of a turn clockwise, to its stop.

F  Refit the black cap and turn it a quarter of 

a turn clockwise without pressing. Ensure 
that the indicator on the cap lines up with 
the indicator on the support.

F  Depending on equipment, return the spare 

wheel and/or the storage box to the bottom 
of the boot.

F  Refit the boot carpet and close the tailgate.

Practical information

170

C3Picasso_en_Chap11_informations-pratiques_ed01-2015

Changing a bulb

Procedure for replacing a faulty bulb with a new bulb.

1.  Direction indicators (H21W amber).
2.
  Dipped beam headlamps (H7-55W).
3.
  Main beam headlamps (H1-55W).
4.
  Sidelamps (W5W).
5.
  Foglamps (PSX24W).
6.
  LED daytime running lamps.

Front lamps

The headlamps are fitted with 
polycarbonate glass with a protective 
coating:
F  do not clean them using a dry 

or abrasive cloth, nor with a 
detergent or solvent product,

F

  use a sponge and soapy water or a 

pH neutral product,

F

  when using a high pressure washer 

on persistent marks, do not keep 
the lance directed towards the 
lamps or their edges for too long, 
so as not to damage their protective 
coating and seals.

Changing a bulb should only be done 
after the headlamp has been switched 
off for several minutes (risk of serious 
burns).
F

  Do not touch the bulb directly with 

your fingers, use a lint-free cloth.

It is imperative to use only anti-
ultraviolet (UV) type bulbs to avoid 
damaging the headlamp.
Always replace a failed bulb with a 
new bulb with the same type and 
specification.

11

Practical information

171

C3Picasso_en_Chap11_informations-pratiques_ed01-2015

Changing direction indicator 
bulbs

F  Remove the plastic protective cover.
F  Pull the bulb-holder and replace the bulb.
To refit, carry out these operations in reverse 
order.

Changing dipped headlamp 
bulbs

F  Remove the protective plastic cover by 

pulling on the tab.

F  Turn the bulb-holder by a quarter turn.
F  Remove the bulb and change it.
To refit, carry out these operations in reverse 
order.

If either of the direction indicator 
warning lamps is flashing quickly, one 
of the bulbs is faulty.

When refitting, close the plastic cover 
carefully to ensure the sealing of the 
headlamp.

Amber coloured bulbs, such as the 
direction indicators, must be replaced 
with bulbs of identical specifications 
and colour.

Practical information

172

C3Picasso_en_Chap11_informations-pratiques_ed01-2015

Changing main beam headlamp bulbs

F  Remove the protective plastic cover by 

pulling on the tab.

F  Disconnect the bulb connector.
F  Move the springs to release the bulb.
F  Remove the bulb and change it.
To refit, carry out these operations in reverse 
order.

Changing sidelamp bulbs

F  Remove the protective plastic cover by 

pulling on the tab.

F  Pull the bulb-holder.
F  Remove the bulb and replace it.
To refit, carry out these operations in reverse 
order.

11

Practical information

173

C3Picasso_en_Chap11_informations-pratiques_ed01-2015

Changing front foglamp bulbs

F  Remove the grille located alongside the 

foglamp.

If you experience any difficulty in 
replacing bulbs, contact your CITROËN 
dealer or a qualified workshop.

F  Through the cover, remove the foglamp 

finisher by pulling it towards you.

F

  Unscrew the two fixing screws of the 

module and remove it from its housing.

F  Disconnect the bulb-holder connector.
F  Remove the bulb and change it.

To refit, carry out these operations in reverse 
order.

Practical information

174

C3Picasso_en_Chap11_informations-pratiques_ed01-2015

Changing the LED lamps

For the replacement of this type of LED lamp, 
contact a CITROËN dealer or a qualified 
workshop.

Changing integral direction 
indicator side repeaters

To obtain a new module, contact 
a CITROËN dealer or a qualified 
workshop.

If you experience any difficulty in 
replacing these lamps, you can contact 
a CITROËN dealer or a qualified 
workshop.

While removing the module:

take care not to damage your vehicle's 
paintwork with the screwdriver,

-  do not allow the wiring and connector to 

slip behind the wing.

To refit, carry out these operations in reverse 
order.

F

  Insert a screwdriver in the edge of the 

repeater.

F

  Lever with the screwdriver to extract the 

repeater and pull it out.

F

  Disconnect the wiring from the repeater.

F  Replace the module.


Content   ..  9  10  11  12   ..