Westfalia. Testing repair electrical manual - part 10
 

  Index      Westfalia     Westfalia (903.662) testing repair electrical manual in english


Search            copyright infringement  


Content   ..  8  9  10  11   ..


Westfalia. Testing repair electrical manual - part 10


AR67.30-D-2301A

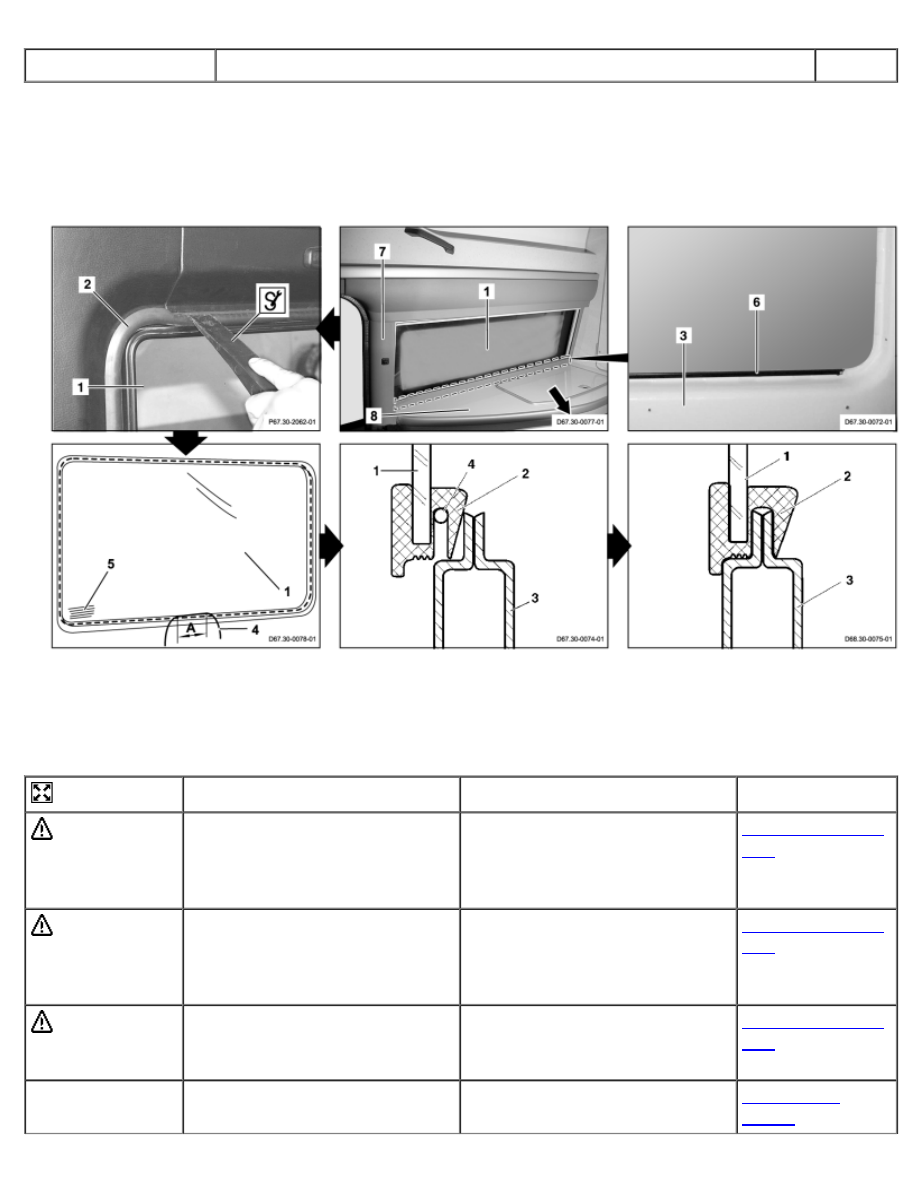
Remove/install side window between C and D-pillars

22.7.04

MODEL  903.662


with CODE (ZU8) National version for USA


with CODE (Z29) "James Cook" touring camper, NAFTA

D67.30-0079-09

1 Door window 
2 Sealing rubber 
3 Body flange


4 Installation cord 
5 Imprint 
6 Spacer rail


7 Paneling 
8 Stowage cabinet

Remove


 Danger!

Risk of injury caused by
scraping or cutting body parts on
sharp vehicle parts

Always wear protective gloves
when working on or near sharp
and undeburred vehicle parts. 
Deburr replacement panels.

AS00.00-Z-0017-
01B

 Danger!

Injury hazard by pinching or
cutting off extremities with doors,
covers, flaps and loose
components

Keep limbs away from motion
area when moving doors, covers,
flaps and components.Wear
protective gloves

AS00.00-Z-0025-
01A

 Danger!

Risk of injury due to hands
being crushed when window
glass is not secure

Secure window to prevent it from
falling down.

AS67.00-Z-0002-
01A

1

Remove C-pillar paneling (7)

Right side

AR68.30-D-
4490A

2

Loosen stowage cabinet (8)

Refrigerator box

AR86.60-D-
0045A

3

Slightly pull stowage cabinet (8)
of refrigerator box from side wall
paneling to center of vehicle
(arrow).

 Until sufficient accessibility to

the sealing rubber (2) of the side
window is ensured


4

Remove wardrobe storage shelf


AR86.60-D-
0061A

5

Install two cup suction tools on
outside of side window (1)

 Cup suction tool

WH58.30-Z-1010-
02A

6

Pry rubber lip on sealing rubber
(2) over edge of body flange (3)
of side wall paneling toward
outside

 Helper holds side window (1)

with cup suction tools.


 Cup suction tool

WH58.30-Z-1010-
02A


 Mounting wedge

110 589 03 59 00

7

Remove side window (1) with
cup suction tools


8

Pull sealing rubber (2) off of side
window (1)

 Check whether sealing rubber

(2) and side window (1) can be
reused


Install


9

Check spacer rail (6) for correct
seat


10

Pull sealing rubber (2) over edge
of side window (1)

 The long chamfered lip of the

sealing rubber (2) should point
toward the passenger
compartment. The imprint (5)
should be positioned at the
bottom of the side window after
inserting.


11

Lay installation cord (4) below
long lip of sealing rubber (2)
around entire side window (1)

 Allow installation cord (4) to

overlap 10 cm (A) at bottom of
side window


12

Coat chamfered side of sealing
rubber (2) with lubricant

Lubricant

BR00.45-Z-1039-
06A

13

Press side window (1) to body
flange (3) of side wall paneling

 Uniformly press side window

(1) with sealing rubber (2)
attached against body flange (3)
on side wall paneling from
outside.


 Allow free ends of installation

cord (4) to hang into passenger
compartment.


14

Uniformly pull free ends of pull-in
cord (4) into passenger
compartment.

 The long lip on the sealing

rubber (2) should be positioned
above the body flange (3) on the
side wall paneling all the way
around.


15

Check whether sealing rubber (2)
is seated correctly.

 Check whether sealing rubber

(2) is seated correctly inside and
outside; correct if necessary


16

Check whether side window (1)
is seated correctly.

 Check whether side window

(1) is seated correctly inside and
outside, correct if necessary


17

Remove lubricant residues from
side window (1) and sealing
rubber (2)


18

Remove both cup suction tools
from outside of side window (1)

 Cup suction tool

WH58.30-Z-1010-
02A

19

Install wardrobe storage shelf


AR86.60-D-
0061A

20

Slide stowage cabinet (8) for
refrigerator box back from center
of vehicle to side wall paneling


21

Fasten stowage cabinet (8)

Refrigerator box

AR86.60-D-
0045A

22

Install C-pillar paneling (7)

Right side

AR68.30-D-
4490A

23

Check side window (1) for
leakage

 Perform water check.


24

Clean side window (1)


110 589 03 59 00


Mounting wedge


Commercially available tools (see Workshop Equipment Manual)

Number

Designation

Make (e. g.)

Order number

WH58.30-Z-1010-
02A

Cup suction tool

Karl Assfalg KG

Buchstr. 149 
D-73525
Schwäbisch-
Gmünd

602-2

Auxiliary repair materials

Number

Designation

Order number

BR00.45-Z-1039-
06A

Lubricant

000 989 11 60

AR67.30-D-2305A

Remove/install side window

22.7.04

MODEL  903.662


with CODE (ZU8) National version for USA


with CODE (Z29) "James Cook" touring camper, NAFTA


On right sliding door

D67.30-0076-09

1 Door window 
2 Sealing rubber 
3 Body flange


4 Installation cord 
5 Imprint 
6 Spacer rail


7 Bolts 
8 Mounting angle

Remove


 Danger!

Risk of injury caused by
scraping or cutting body parts on
sharp vehicle parts

Always wear protective gloves
when working on or near sharp
and undeburred vehicle parts. 
Deburr replacement panels.

AS00.00-Z-0017-
01B

 Danger!

Injury hazard by pinching or
cutting off extremities with doors,
covers, flaps and loose
components

Keep limbs away from motion
area when moving doors, covers,
flaps and components. Wear
protective gloves

AS00.00-Z-0025-
01A

 Danger!

Risk of injury due to hands
being crushed when window
glass is not secure

Secure window to prevent it from
falling down.

AS67.00-Z-0002-
01A

1

Remove door paneling from

Upper door paneling

AR72.16-D-

sliding door

6610A

2

Remove roller sun blind


AR68.50-D-
3400C

3

Unscrew bolts (7).


4

Remove mounting angle (8)


5

Install cup suction tool (1) on
inside of side window

 Cup suction tool

WH58.30-Z-1010-
02A

6

Pry rubber lip on sealing rubber
(2) over edge of body flange (3)
of sliding door toward outside

 Hold side window (1) with cup

suction tool.


 Cup suction tool

WH58.30-Z-1010-
02A


 Mounting wedge

110 589 03 59 00

7

Remove side window (1) with
cup suction tool

 Cup suction tool

WH58.30-Z-1010-
02A

8

Pull sealing rubber (2) off of side
window (1)

 Check whether sealing rubber

(2) and side window (1) can be
reused


Install


9

Check spacer rail (6) for correct
seat


10

Pull sealing rubber (2) over edge
of side window (1)

 The long chamfered lip of the

sealing rubber (2) should point
toward the passenger
compartment. The imprint (5)
should be positioned at the
bottom edge of the side window
after inserting.


11

Lay installation cord (4) below
long lip of sealing rubber (2)
around entire side window (1)

 Allow installation cord (4) to

overlap 10 cm (A) at bottom of
side window


12

Coat angled side of sealing
rubber (2) with lubricant

Lubricant

BR00.45-Z-1039-
06A

13

Press side window (1) to body
flange (3) of sliding door

 Uniformly press side window

(1) with sealing rubber (2)
attached against body flange (3)
on side wall paneling from
outside.


 Allow free ends of installation

cord (4) to hang into passenger
compartment.


14

Uniformly pull free ends of pull-in
cord (4) into passenger
compartment.

 The long lip of the sealing

rubber (2) should be positioned
above the body flange (3) on the
side wall paneling all the way
around.


15

Check whether sealing rubber (2)
is seated correctly.

 Check whether sealing rubber

(2) is seated correctly inside and
outside, correct if necessary


16

Check whether side window (1)
is seated correctly.

 Check whether side window

(1) is seated correctly inside and
outside, correct if necessary


17

Remove cup suction tool on
inside of side window (1)

 Cup suction tool

WH58.30-Z-1010-
02A

18

Remove lubricant residues from
side window (1) and sealing
rubber (2)


19

Install mounting bracket (8)

 For this purpose, screw in

bolts (7).


20

Install roller sun blind


AR68.50-D-
3400C

21

Install door panel for sliding door

Upper door panel

AR72.16-D-
6610A

22

Check side window (1) for
leakage

 Perform water check.


23

Clean side window (1)


110 589 03 59 00


Mounting wedge


Commercially available tools (see Workshop Equipment Manual)

Number

Designation

Make (e. g.)

Order number

WH58.30-Z-1010-
02A

Cup suction tool

Karl Assfalg KG

Buchstr. 149 
D-73525
Schwäbisch-
Gmünd

602-2

Auxiliary repair materials

Number

Designation

Order number

BR00.45-Z-1039-
06A

Lubricant

000 989 11 60


Content   ..  8  9  10  11   ..