Snowmobile Lynx UTILITY ACE SERIES. OPERATOR’S GUIDE (2024) - page 4
MAINTENANCE PROCEDURES
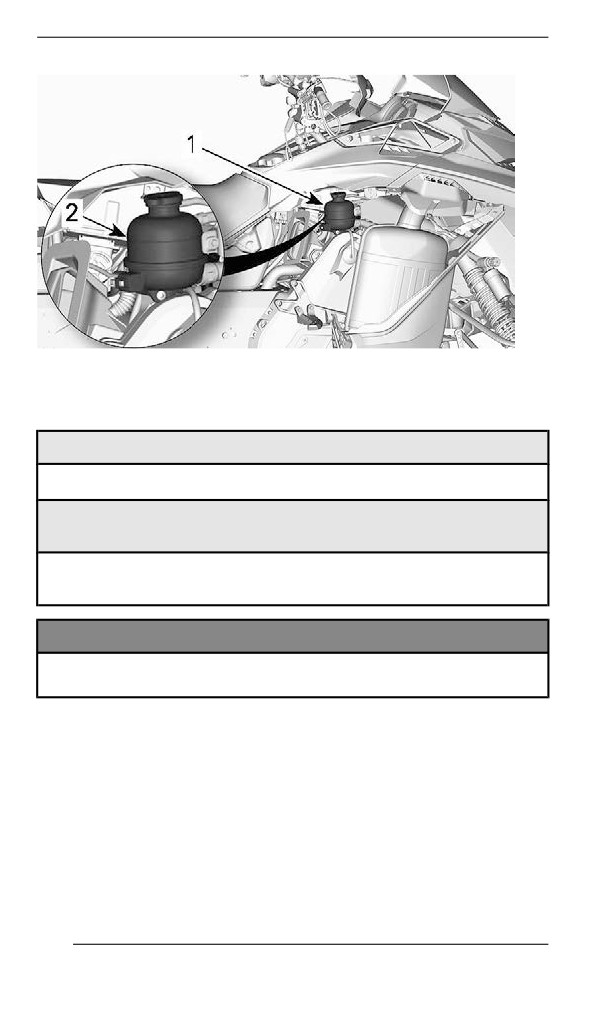
1. Coolant reservoir
2. COLD line
Recommended Engine Coolant
RECOMMENDED COOLANT
XPS Extended life pre-mixed coolant
IF THE RECOMMENDED XPS COOLANT IS NOT
AVAILABLE
Distilled water and antifreeze solution (50% distilled water, 50%
antifreeze)
NOTICE
Always use ethylene-glycol antifreeze containing corrosion in-
hibitors specifically for internal combustion aluminum engines.
Engiine Oiil
Extreme Cold Condition
An engine that is operated in -25°C/-13°F and below environment will
require an increase in service and maintenance schedule.
Any combustion engine operated in such a low load and rather cold
operating temperature collects an increased amount of condensation
at every startup/warm-up.
214
MAINTENANCE PROCEDURES
Since the engine is not reaching operating temperatures for extended
periods of time, the oil is starting to be strongly diluted with water and
gas residue (more water content).
An engine needs to reach operating temperature, in order to be able
to evaporate condensate out of the oil.
If daily usage (work or leisure driving cycle) is similar to those men-
tioned below, BRP strongly recommends changing the oil at least
once a month.
Parameters of an increase in service and maintenance schedule:
- Engine not reaching the proper operating temperature during nor-
mal daily usage
- Multiple starts and stops without reaching operating temperature
- Short idle periods
- Low RPM driving cycle in short distances without reaching operat-
ing temperature.
NOTE:
BRP strongly recommends the installation of a block heater to help
warm up the liquids, this will also help to extend the oil lifetime.
Recommended Oil
Rotax® engines were developed and validated using the XPS™ oil.
BRP recommends the use of its XPS engine oil or an equivalent at all
time. Do not add any oil additives to the recommended engine oil.
Damages caused by the use of an oil not suitable for the engine or by
adding of an oil additives may not be covered by the BRP Limited
Warranty.
XPS RECOMMENDED Engine Oil
4T 0W40 Synthetic oil
IF THE RECOMMENDED XPS ENGINE OIL IS NOT
AVAILABLE
Use a 0W40 4-stroke SAE synthetic engine oil meeting or
exceeding the following lubricant industry specifications.
Always check the API service label certification on the oil container,
it must contain at least the indicated standard.
- API service classification SN
215
MAINTENANCE PROCEDURES
Verifying the Engine Oil Level
NOTICE
Check level before each ride and refill if necessary. Do not
overfill. Operating the engine with an improper level may se-
verely damage engine. Wipe off any spillage.
Place vehicle on a level surface and proceed as follows to check oil
level:
1. Start engine and let it reach its normal operating temperature. En-
gine is at normal temperature when rear radiator gets warm, indi-
cating that the thermostat is open.
2. Let engine run at idle for 30 more seconds.
3. Stop engine.
4. Open the LH side panel. Refer to Body and Seat.
5. Remove the drive belt guard, refer to Drive Belt Guard.
6. Remove dipstick from the filler tube, then wipe it clean.
7. Completely insert dipstick in the filler tube.
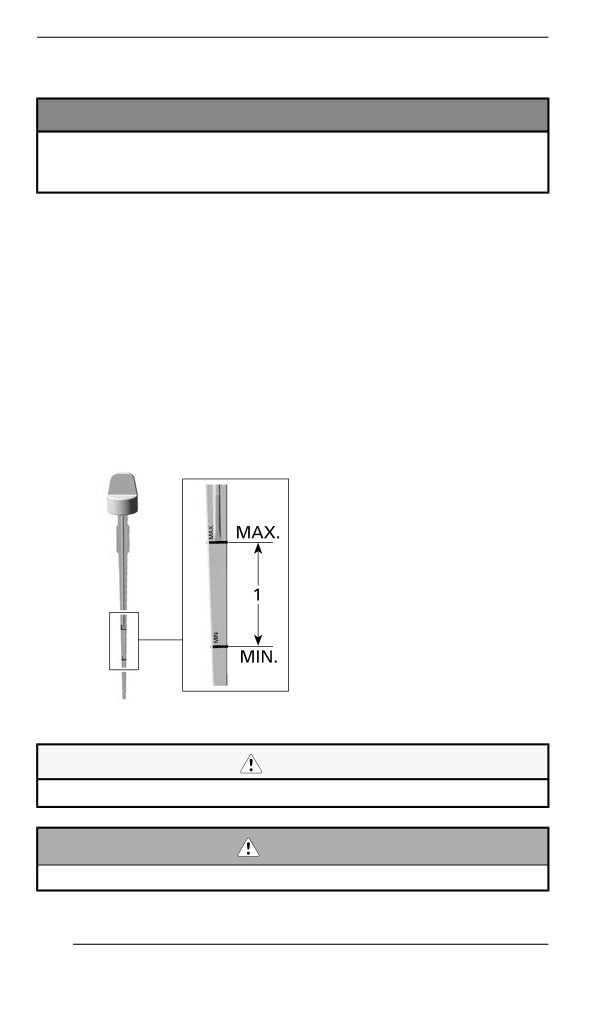
8. Remove dipstick and check the oil level. Oil level should be be-
tween the MIN and MAX marks as shown, add if necessary.
1. Oil level between MIN. and MAX.
CAUTION
Engine oil can be very hot.
WARNING
Wipe off any oil spills. Oil is highly flammable when heated.
216
MAINTENANCE PROCEDURES
Replacing the Engine Oil
CAUTION
The engine oil can be very hot. Wait until engine oil is warm.
NOTICE
Engine oil and oil filter must be replaced at the same time.
1. Bring engine to its normal operating temperature.
2. Place vehicle on a level surface.
3. Remove the LH side panel.
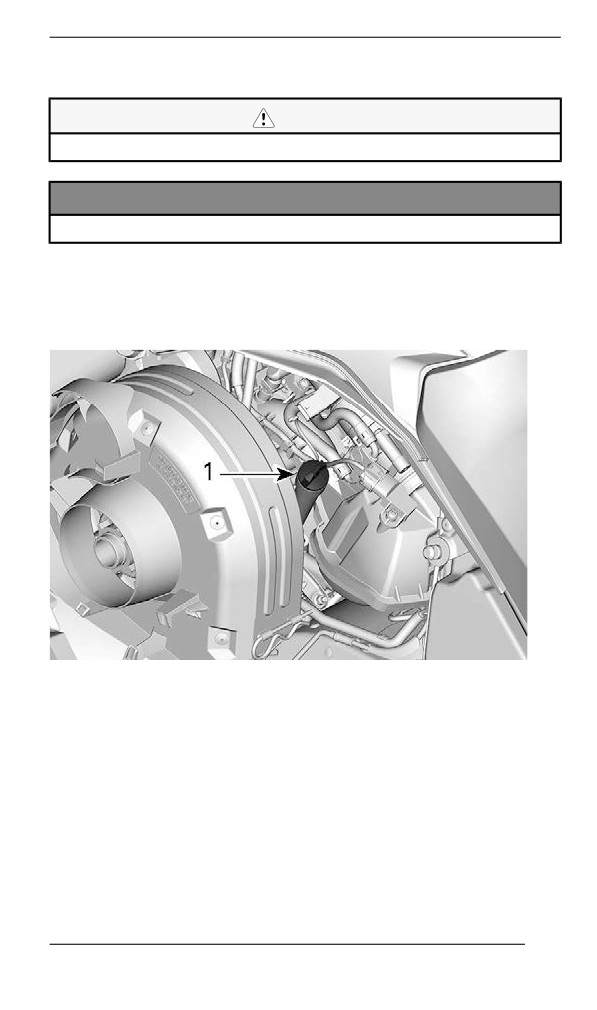
4. Remove dipstick.
LH SIDE OF VEHICLE
1. Oil tank dipstick
5. Remove the oil filter. Refer to the procedure in this subsection.
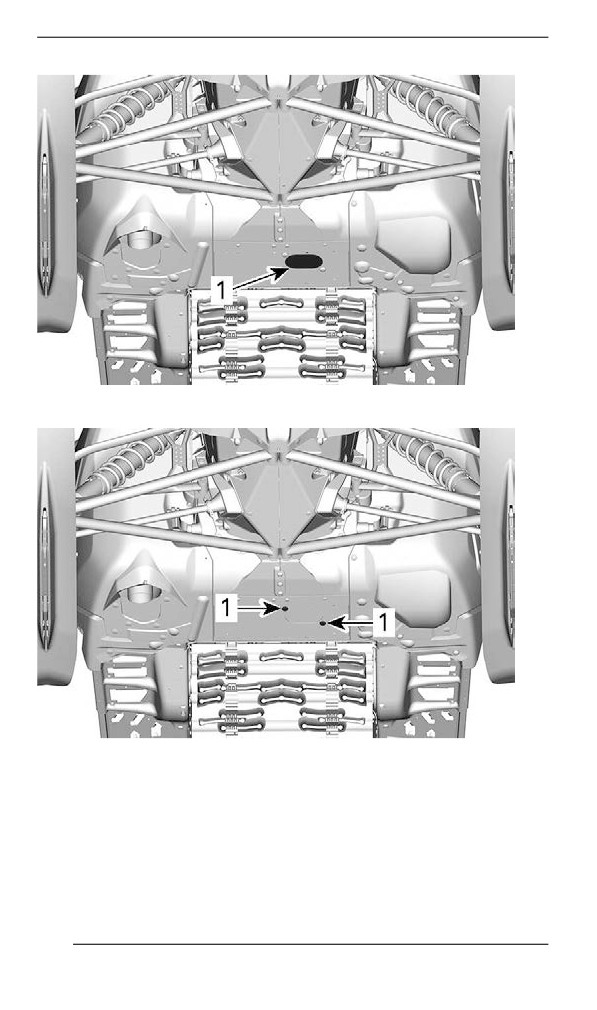
6. From underneath the vehicle, access the drain plug:
1. Remove one access cover retaining screw and loosen the
other.
217
MAINTENANCE PROCEDURES
1. Drain plugs access cover
PIVOT THE ACCESS COVER
1. Retaining screws
2. Pivot the access cover to clear the bottom pan opening.
7. Clean drain plug area.
8. Place a drain pan under the bottom pan opening.
218
MAINTENANCE PROCEDURES
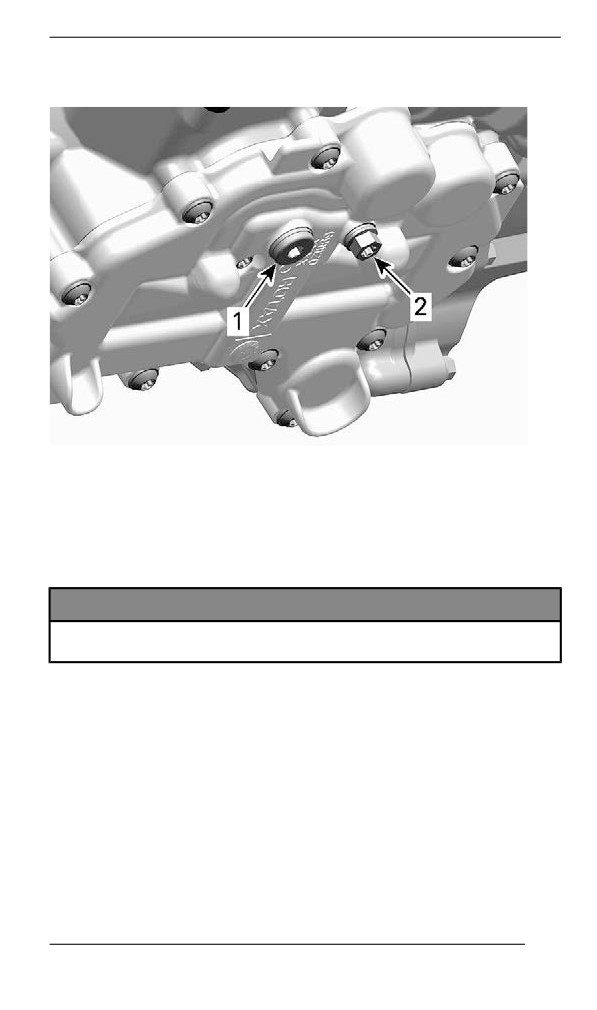
9. Remove engine drain plugs in the following order.
UNDERNEATH THE ENGINE
1. Main drain plug
2. Secondary drain plug
10. Allow oil to drain completely.
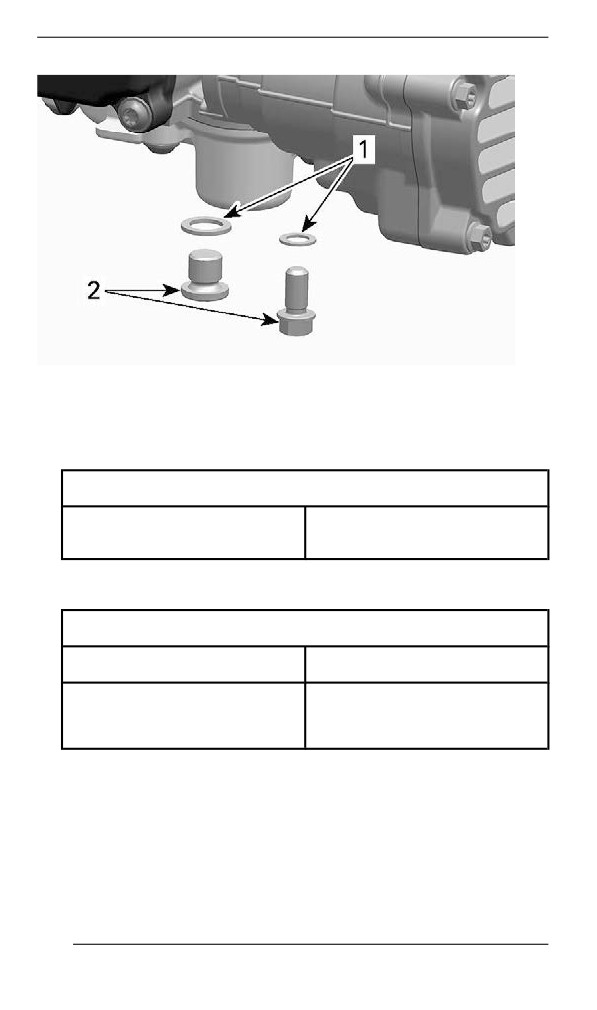
11. Install NEW sealing washers on oil drain plugs.
NOTICE
Never use a sealing washer a second time. Always replace with
a new one.
219
MAINTENANCE PROCEDURES
1. Sealing washer
2. Oil drain plug
12. Install drain plugs and tighten to specification.
Tightening Torque
15 ± 2 Nm
Drain plugs
(133 ± 18 lbf-in)
13. Install a new oil filter. Refer to procedure in this subsection.
14. Refill oil tank at the proper level with the recommended oil.
Approximate Engine Oil Capacity (with filter)
600 ACE
2.1 l (2.22 qt(liq.,US))
900 ACE
900 ACE Turbo
3.3 l (3.5 qt(liq.,US))
900 ACE Turbo R
15. Reinstall dipstick in oil tank and properly tighten it.
16. Start engine and let it idle for a few minutes.
17. Ensure there are no leaks.
18. Stop engine and check oil level as explained in this subsection. Re-
fill if necessary.
19. Dispose oil and filter as per your local environmental regulations.
220
MAINTENANCE PROCEDURES
Engine Oill Fillter
Engine Oil Filter Replacement
Removing the Oiil Fiilter
1. Remove the RH side panel.
2. Clean oil filter area.
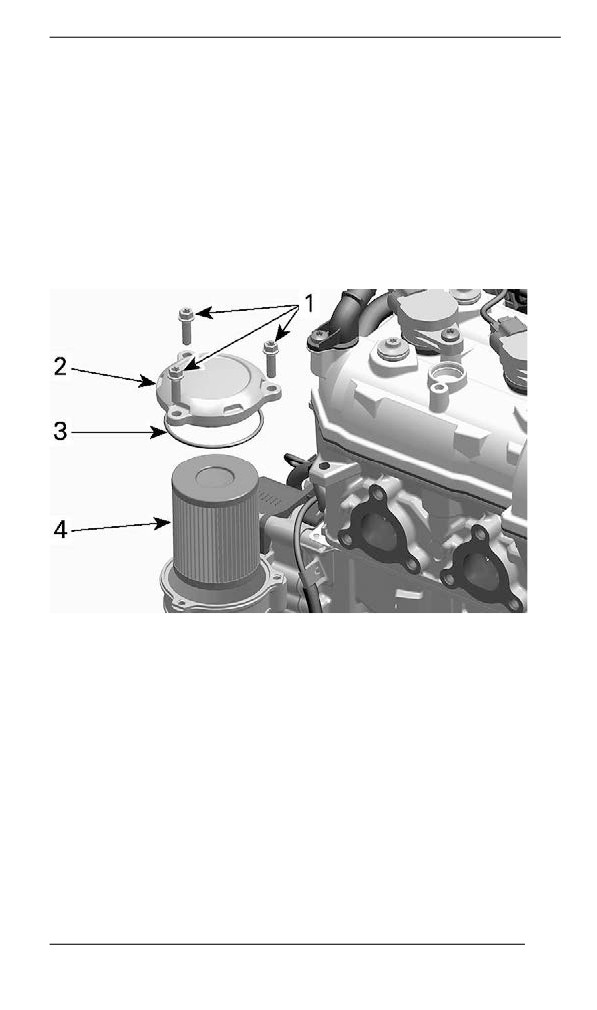
3. Remove:
- Oil filter cover screws
- Oil filter cover with O-ring
- Oil filter.
1. Oil filter cover screws
2. Oil filter cover
3. O-ring
4. Oil filter
4. Dispose filter as per your local environmental regulations.
Installliing the Oill Fiilter
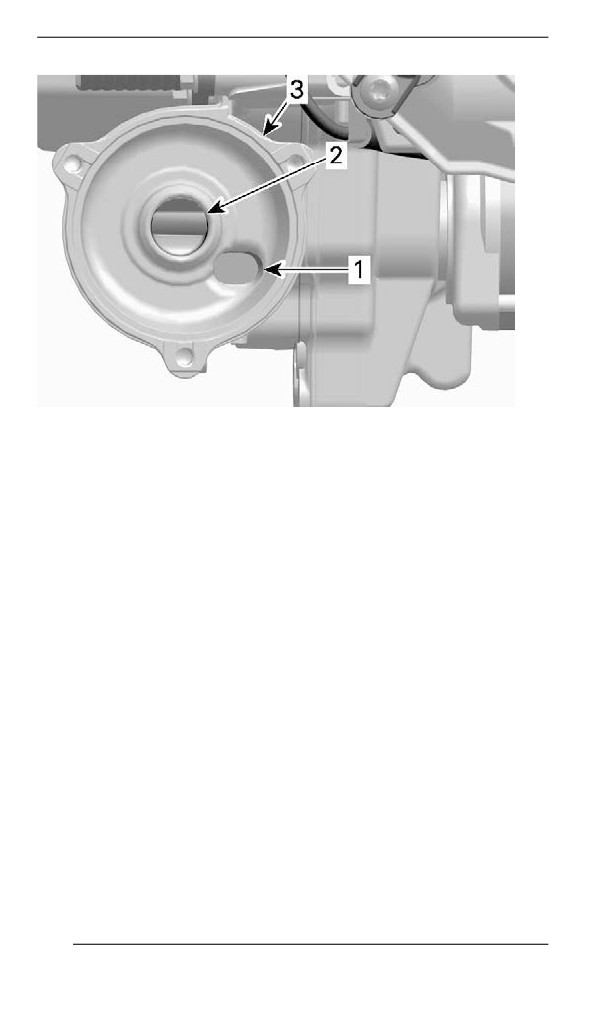
1. Check the oil filter inlet and outlet orifices inside oil filter receptacle
(integrated part of magneto cover) for dirt and contaminations.
221
MAINTENANCE PROCEDURES
1. Oil inlet orifice from the oil pressure pump
2. Oil outlet orifice to the engine lubrication system
3. Oil filter receptacle
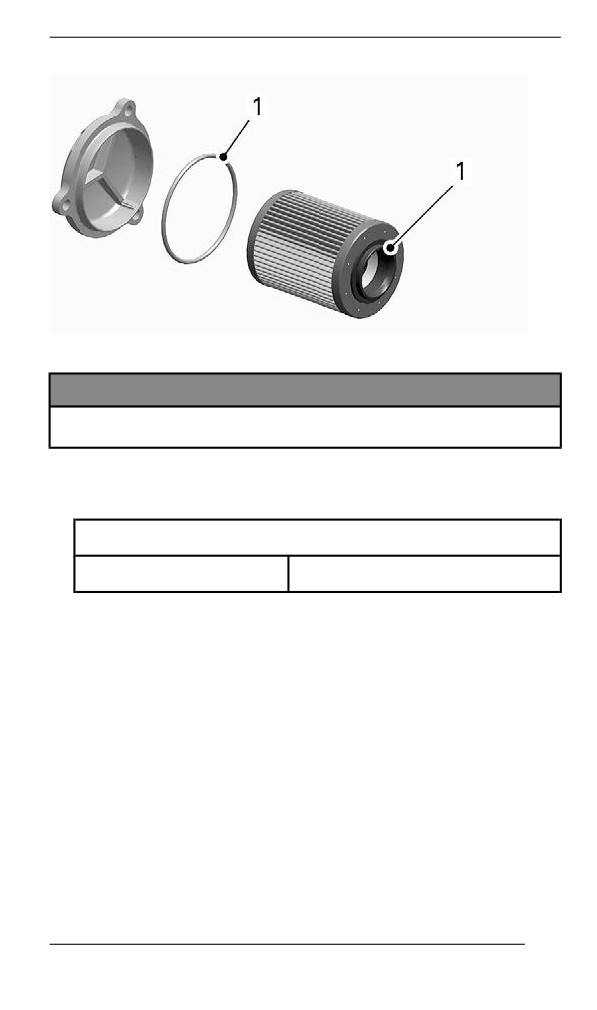
2. Install a new O-ring on oil filter cover.
3. Install the new filter into the cover.
4. Lubricate filter seal and cover O-ring with engine oil.
222
MAINTENANCE PROCEDURES
1. Lubricate with engine oil
NOTICE
Pay attention to avoid pinching the O-ring during filter and cov-
er installation.
5. Install the oil filter cover.
6. Tighten oil filter cover screws to specification.
Tightening Torque
Oil filter cover screws
10 ± 1 Nm (89 ± 9 lbf-in)
7. Wipe off any oil spillage on engine.
Exhaust System
Exhaust System Verification
The muffler tail pipe should be centered with the exit hole in the bottom
pan. Exhaust system must be free of rust or leaks. Make sure that all
parts are securely in place.
Check retaining springs and heat shields condition and replace if
necessary.
The exhaust system is designed to reduce noise and to improve the
total performance of the engine. Modification may be in violation of lo-
cal laws.
223
MAINTENANCE PROCEDURES
NOTICE
If any exhaust system component is removed, modified or dam-
aged, severe engine damage may result.
Spark Pllugs
Spark plugs inspection or replacement may be performed by an au-
thorized BRP snowmobile dealer, repair shop, or person of your own
choosing. Spark plugs inspection or replacement requires an in-depth
technical knowledge. Though not required, it is recommended that an
authorized BRP snowmobile dealer performs spark plugs inspection
or replacement.
Brake Flluiid
Brake Fluid Level Verification
NOTICE
Vehicle must be on a level surface before checking any fluid
levels.
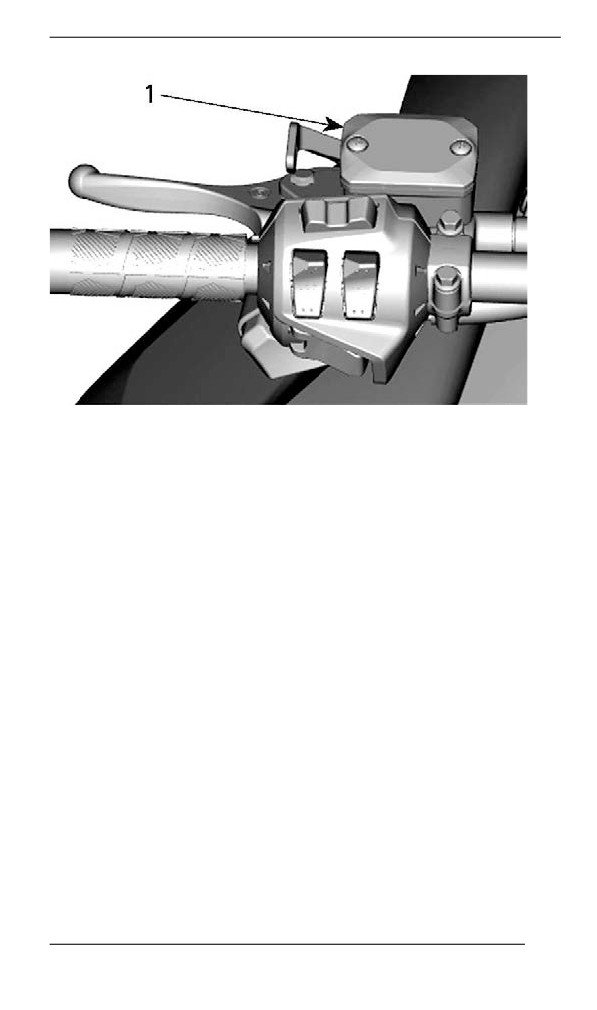
Check brake fluid (DOT 4) in reservoir for proper level. Add fluid (DOT
4) as required.
224
MAINTENANCE PROCEDURES
TYPICAL
1. Brake fluid reservoir
225
MAINTENANCE PROCEDURES
TYPICAL
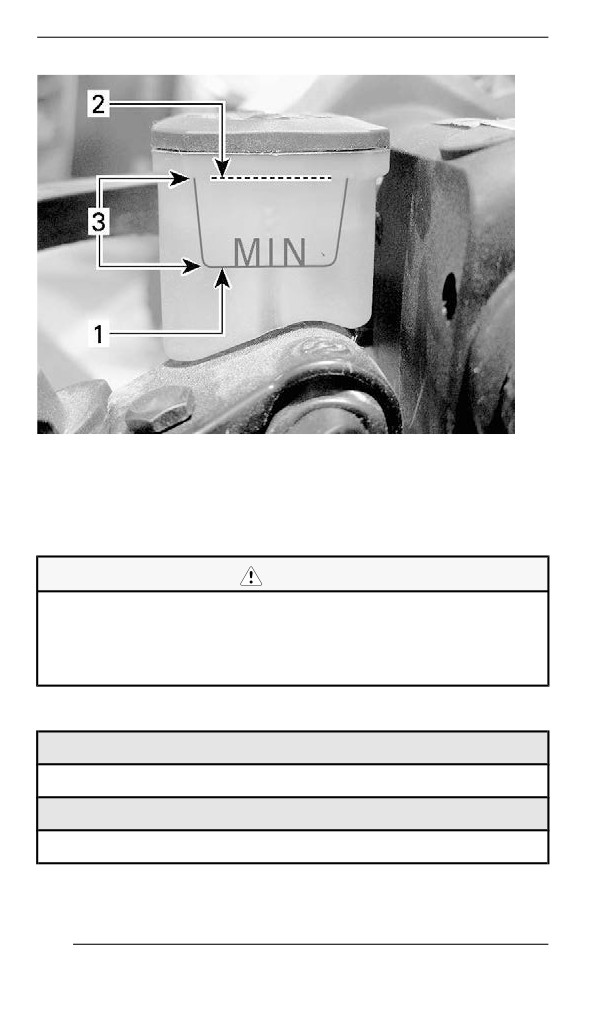
1. Minimum
2. Maximum
3. Operating range
CAUTION
Avoid getting brake fluid on skin or eyes - it may cause severe
burns. In case of contact with the skin, wash thoroughly. In
case of contact with the eyes, immediately rinse with plenty of
water for at least 10 minutes and then consult a doctor
immediately.
Recommended Brake Fluid
Recommended Brake Fluid
XPS DOT 4 Brake Fluid
Alternative or if not available
DOT 4 Brake Fluid
226
MAINTENANCE PROCEDURES
Use only DOT 4 brake fluid from a sealed container. An opened con-
tainer may be contaminated or may have absorbed moisture from the
air.
WARNING
Use only DOT 4 brake fluid from a sealed container. To avoid
serious damage to the braking system, do not use fluids other
than the recommended one, nor mix different fluids for topping
up.
Chaincase Oiil
Recommended Chaincase Oil
Recommended Chaincase Oil
XPS Synthetic chaincase oil
Alternative or if not available
75W140 gear oil that meets the API GL-5 specification
NOTICE
If the recommended XPS chaincase oil is not available, use a
75W140 gear oil that meets the API GL-5 specification. The
chaincase of this snowmobile has been developed and vali-
dated using the XPS™ Synthetic chaincase oil. BRP strongly
recommends the use of its XPS Synthetic chaincase oil at all
times. Damages caused by oil which is not suitable for the
chaincase will not be covered by the BRP limited warranty.
Verifying the Chaincase Oil Level
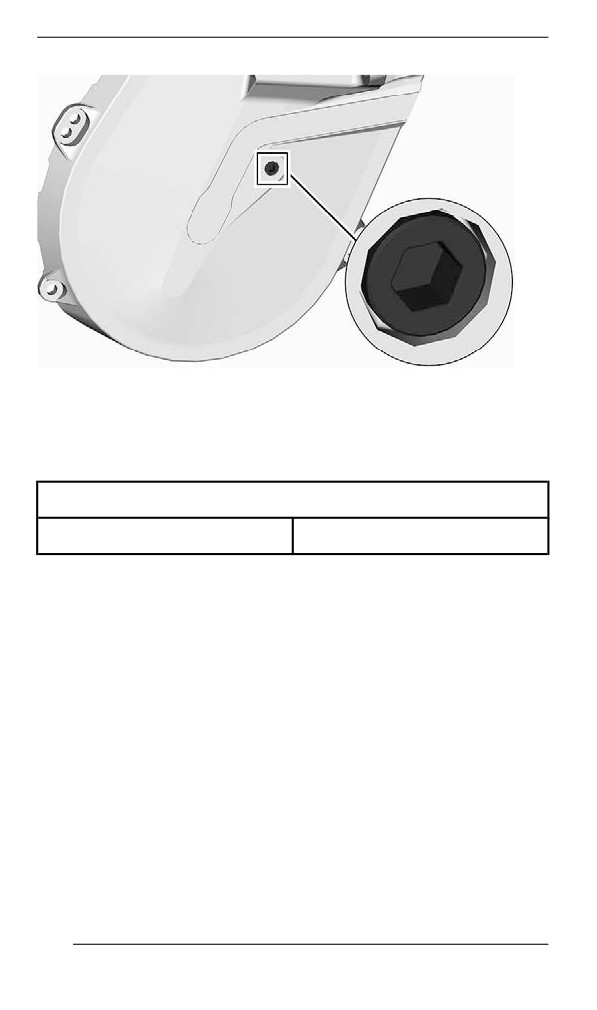
With the vehicle on a level surface, check the oil level by removing the
check plug.
227
MAINTENANCE PROCEDURES
CHECK PLUG
Oil level must reach the threaded hole.
If level is correct, reinstall check plug and tighten to the specified
torque.
Tightening Torque
Check plug
6 ± 1 Nm (53 ± 9 lbf-in)
If level is insufficient, refer to Chaincase Filling Procedure.
Replacing the Chaincase Oil
Draining the Chaincase Oill
1. Place the vehicle on a level surface.
2. Place a drain pan under the chaincase drain plug area.
3. Remove filler cap.
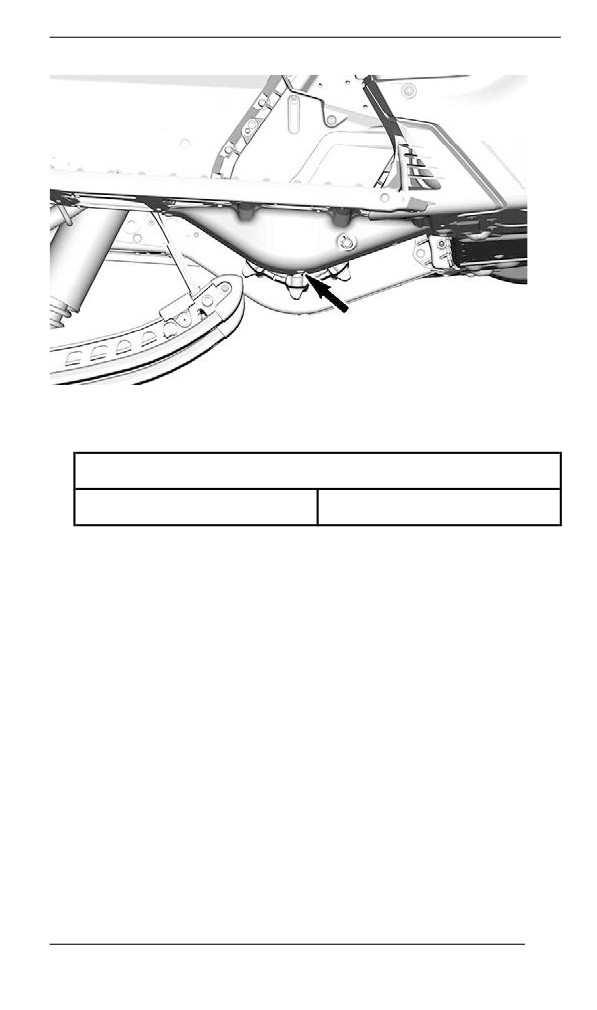
4. Remove the drain plug located at the bottom of the chaincase.
228
MAINTENANCE PROCEDURES
5. Wait a while to allow all oil to drain out of the chaincase.
6. Install drain plug and tighten to specification.
Tightening Torque
Chaincase drain plug
6 ± 1 Nm (53 ± 9 lbf-in)
Fillliing the Chaiincase
1. Open the RH side panel. Refer to Equipment.
2. Remove the check plug.
229
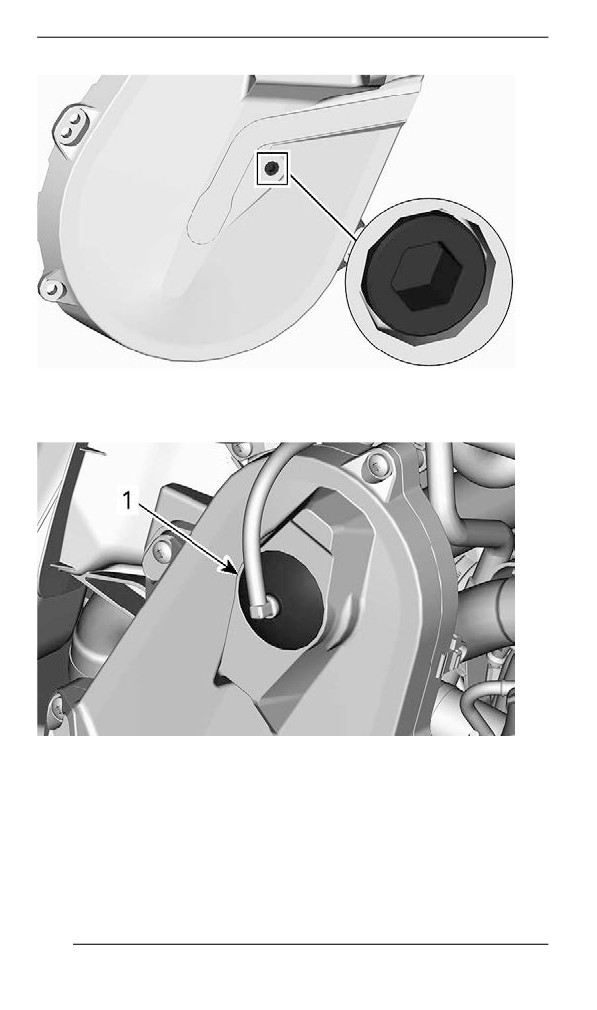
MAINTENANCE PROCEDURES
CHECK PLUG
3. Remove the filler cap.
TYPICAL - TOP OF CHAINCASE
1. Filler cap
4. Pour recommended oil in the filler hole until oil comes out by the
check plug hole.
5. Reinstall check plug and tighten to specification.
230
MAINTENANCE PROCEDURES
Tightening Torque
Check plug
6 ± 1 Nm (53 ± 9 lbf-in)
Reinstall the filler cap.
Gearbox Oiil
Recommended Gearbox Oil
XPS RECOMMENDED Chaincase Oil
XPS™ Synchromesh Transmission Synthetic Oil
IF THE RECOMMENDED XPS OIL IS NOT
AVAILABLE
Use a 75W140 gear oil that meets the API GL-5 specification
NOTICE
The gearbox of this snowmobile has been developed and vali-
dated using the XPS synchromesh transmission synthetic oil.
BRP strongly recommends the use of its synchromesh trans-
mission synthetic oil at all times. Damages caused by oil which
is not suitable for the gearbox will not be covered by the BRP
limited warranty.
Gearbox Oil Level
With the vehicle on a level surface, check the oil level by removing the
check plug on the left side of gearbox.
Oil level must reach the threaded hole's lower edge.
231
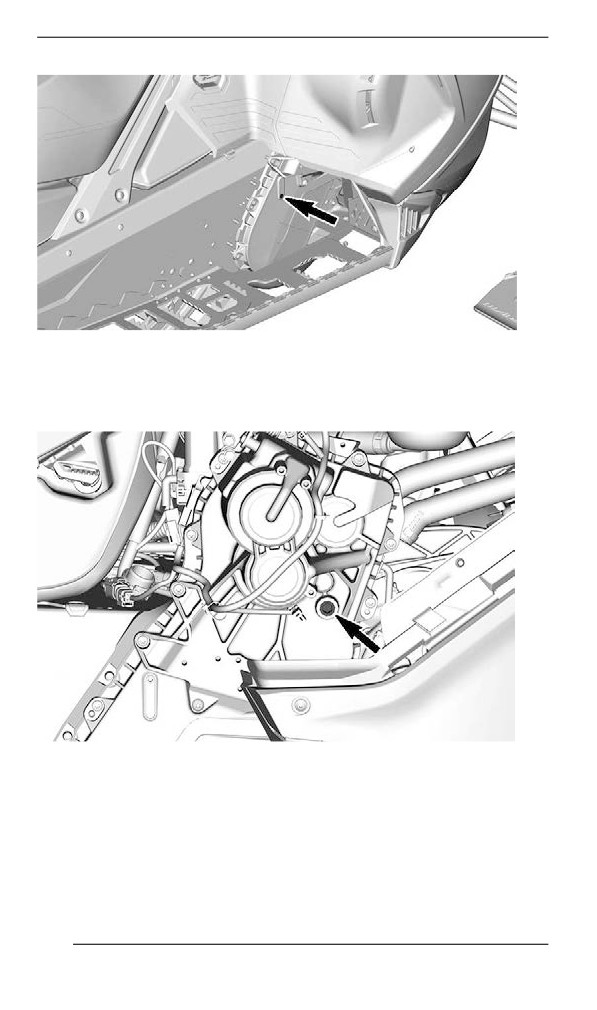
MAINTENANCE PROCEDURES
CHECK PLUG.
To add oil, proceed as follows:
1. Remove the filler plug.
FILLER PLUG
2. Pour recommended oil in gearbox by the filler hole until oil comes
out by the check plug hole.
3. Reinstall check and filler plug and tighten to specifications.
232
MAINTENANCE PROCEDURES
TIGHTENING TORQUE
Check plug
6 ± 1 Nm (53 ± 9 lbf-in)
Filler plug
8 ± 1 Nm (71 ± 9 lbf-in)
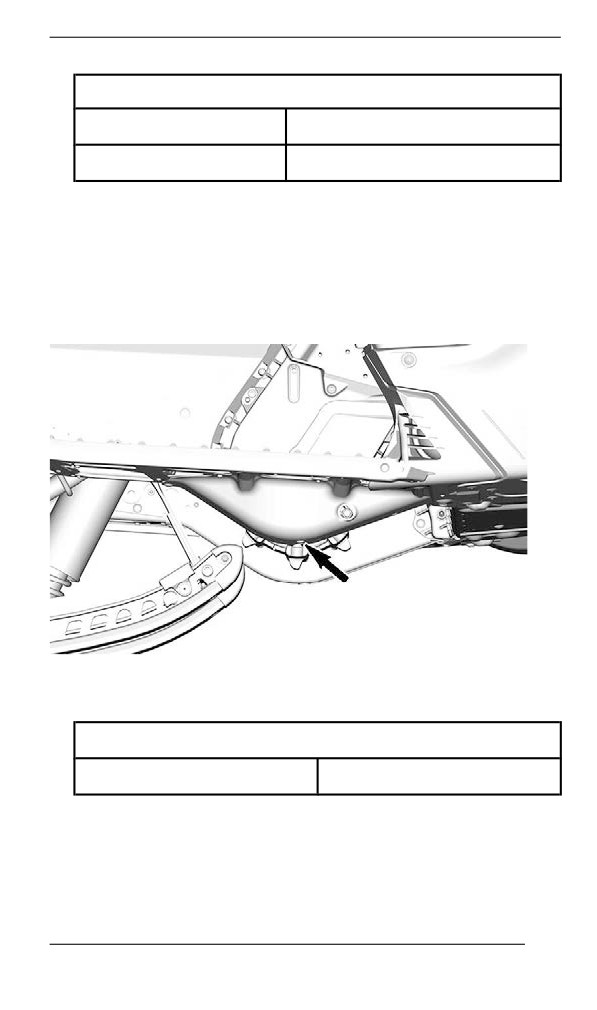
Replacing the Gearbox Oil
Gearbox Oiil Drainiing
1. Place the vehicle on a level surface.
2. Place a drain pan under gearbox drain plug area.
3. Remove filler cap.
4. Remove the drain plug located at the bottom of gearbox.
5. Wait a while to allow all oil to drain out of gearbox.
6. Install drain plug and tighten to specification.
Tightening Torque
Gearbox drain plug
6 ± 1 Nm (53 ± 9 lbf-in)
Gearbox Oiil Fillliing
NOTE:
Vehicle must be on a level surface.
233
MAINTENANCE PROCEDURES
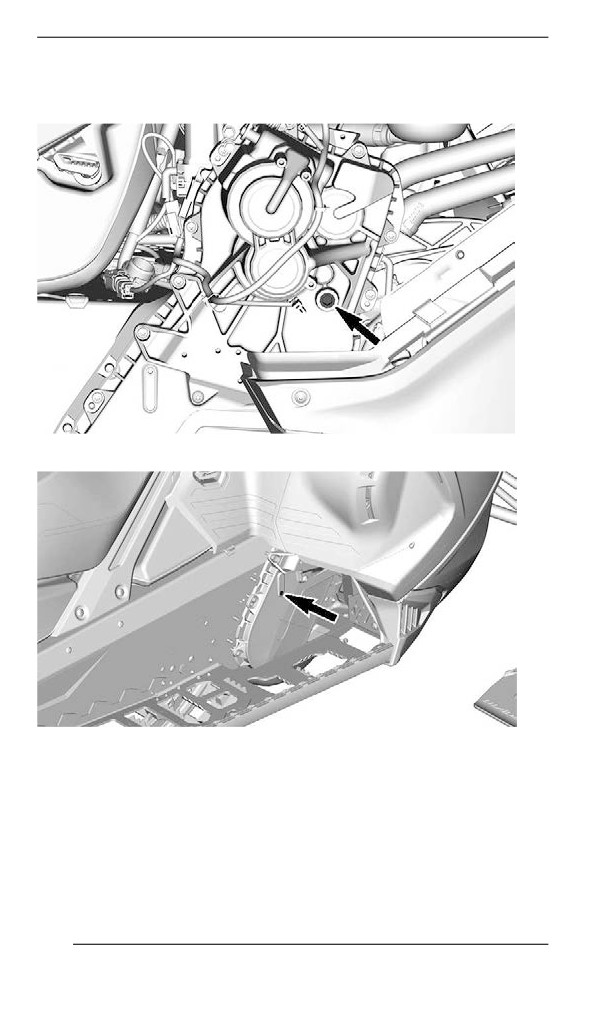
1. Remove the filler plug.
2. Remove oil level check plug.
FILLER PLUG
CHECK PLUG
3. Pour recommended oil into gearbox through the filler hole.
NOTE:
Oil level is correct when it just begins to come out of the check plug
orifice.
4. Reinstall check plug and tighten to specification.
234
MAINTENANCE PROCEDURES
tightening torque
Oil level check plug
6 ± 1 Nm (53 ± 9 lbf-in)
Driive Chain
Access to Chaincase
Open RH side panel, refer to Equipment.
Drive Chain Adjustment
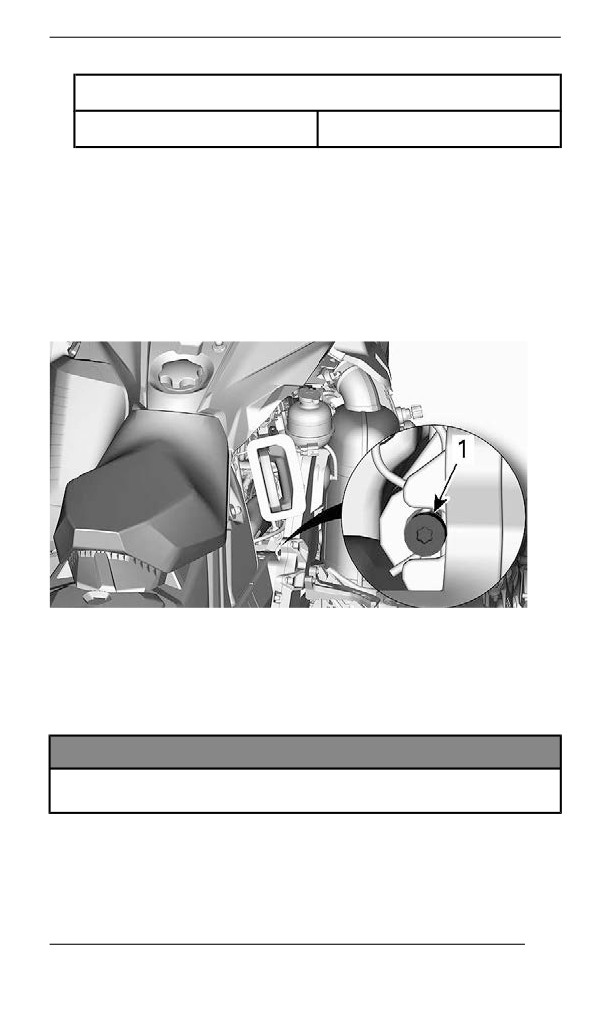
Using the Torx end of the driven pulley expander, GENTLY turn ten-
sioner clockwise to eliminate the play.
TYPICAL
Do not force the tensioner in.
NOTE:
Do not remove the hair cotter pin.
NOTICE
Overtightening the drive chain could result in severe damage to
the chaincase components.
235
MAINTENANCE PROCEDURES
Drive Belt
Drive Belt Inspection
Remove the drive belt guard. Refer to the procedure in Equipment.
Inspect belt for cracks, fraying or abnormal wear (uneven wear, wear
on one side, missing cogs, cracked fabric). If abnormal wear is noted,
probable cause could be pulley misalignment, excessive RPM with
frozen track, fast starts without warm-up period, burred or rusty
sheave, oil on belt or distorted spare belt. Contact an authorized BRP
snowmobile dealer.
Replacing the Drive Belt
Removiing the Driive Belt
1. Remove the tether cord cap from engine cut-off switch.
2. Remove the LH side panel.
3. Remove the drive belt guard. Refer to Removing the Drive Belt
Guard.
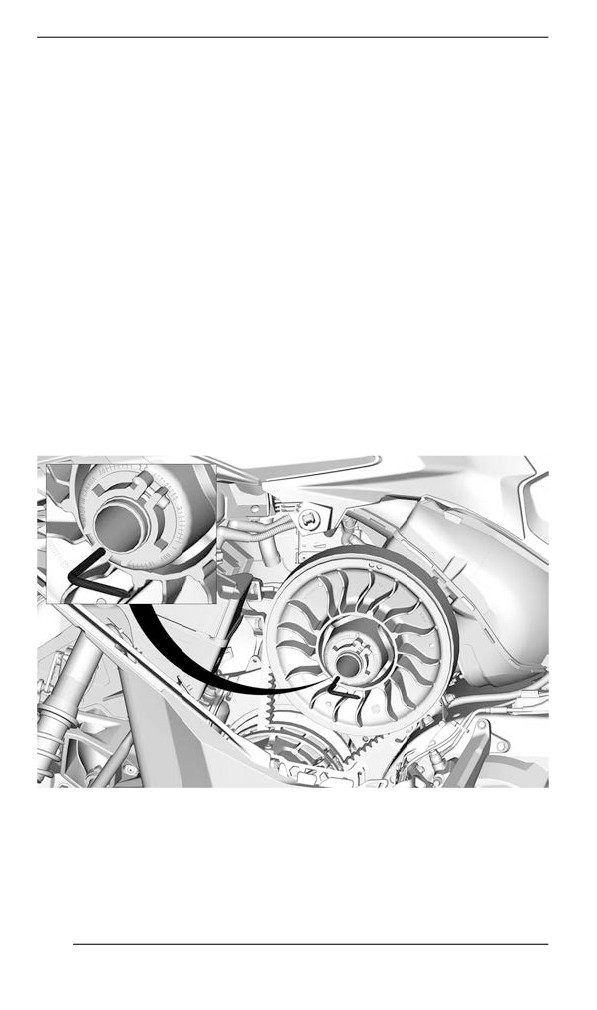
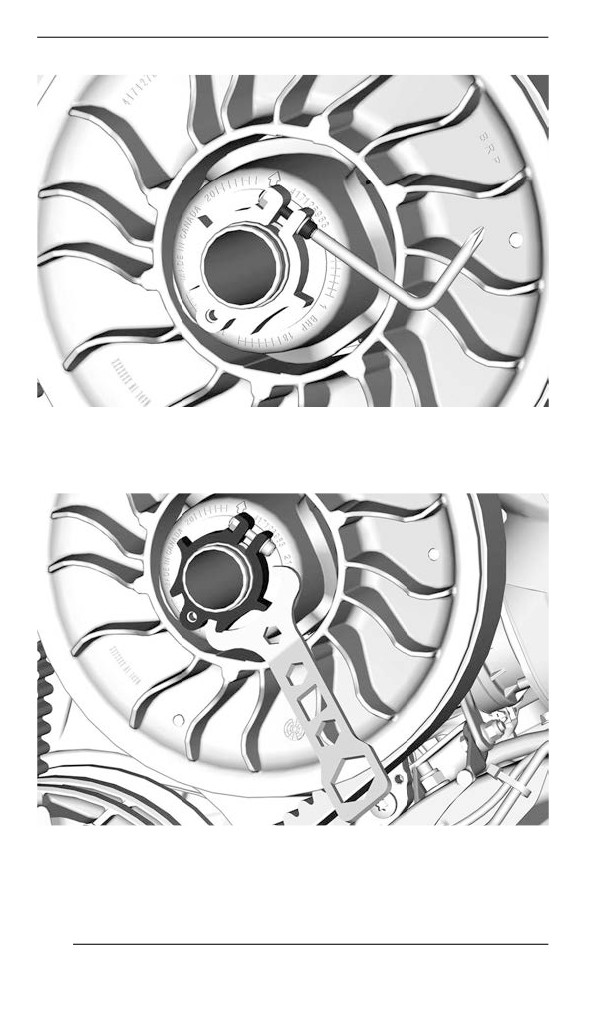
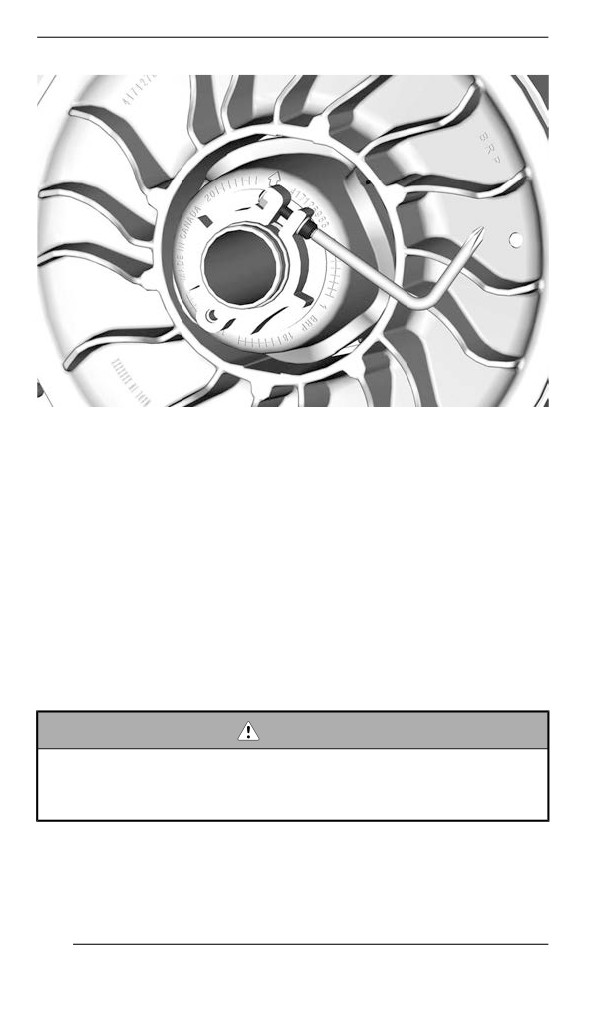
4. Insert the driven pulley expander provided, in the threaded hole on
the adjuster hub as shown.
TYPICAL - PULLEY EXPANDER INSTALLED ON ADJUSTER
HUB
5. Open the driven pulley by screwing the tool in.
6. Remove the drive belt by slipping it over the edge of the driven pul-
ley, then over the drive pulley.
236
MAINTENANCE PROCEDURES
Installliing the Drive Belt
The driven pulley must be expanded. Refer to Removing the Drive
Belt.
1. Slip the belt over the drive pulley, then over the driven pulley.
NOTICE
Do not force or use tools to pry the belt into place, as this could
cut or break the cords in the belt.
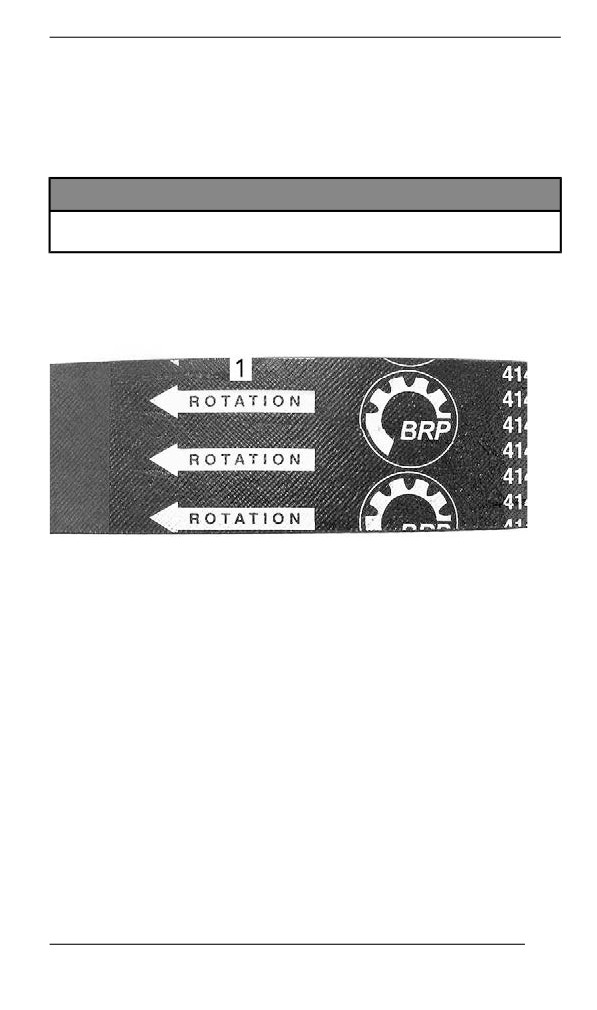
NOTE:
The maximum drive belt life span is obtained when belt is installed
with arrows in the direction of rotation.
1. To be pointed in the direction of rotation
2. Unscrew and remove the driven pulley expander from the pulley.
3. Rotate the driven pulley several times to properly set the belt be-
tween the sheaves.
4. If a new belt was installed, an adjustment will be required for the
proper belt height. Refer to Adjusting the Drive Belt Height.
5. Install belt guard.
6. Close side panel.
Adjusting the Drive Belt Height
Remove the tether cord cap from engine cut-off switch.
Remove the LH side panel.
Remove the drive belt guard.
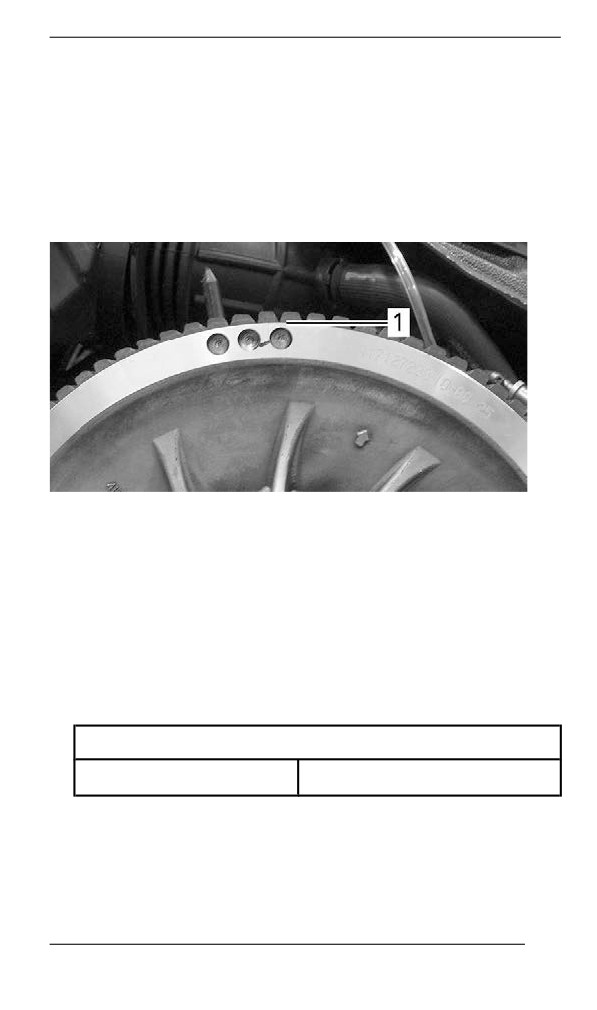
1. Loosen the clamping bolt.
237
MAINTENANCE PROCEDURES
2. Using the suspension adjustment tool provided, turn the ring 1/4
turn at a time then rotate the driven pulley to properly set the drive
belt between the pulley sheaves.
238
MAINTENANCE PROCEDURES
NOTE:
The adjustment ring has left hand treads.
Repeat step 4 until the lowest portion of the cogs on the external
surface of drive belt is even with the driven pulley edge.
TYPICAL - PRELIMINARY SETTING
1. Lowest portion of cogs even with external surface of drive belt
NOTE:
Turning the ring counterclockwise lowers the drive belt in the pulley.
Turning the ring clockwise raises the drive belt in the pulley.
3. Firmly tighten the clamping bolt. If possible, tighten to specified tor-
que using a torque wrench.
TIGHTENING TORQUE
Clamping bolt
5.5 ± 0.5 Nm (49 ± 4 lbf-in)
239
MAINTENANCE PROCEDURES
4. Install belt guard, refer to Installing the Drive Belt Guard.
5. Install LH side panel.
6. Start engine and check if vehicle creeps.
7. If vehicle does not creep, adjustment is complete.
8. If vehicle creeps, check the drive belt deflection.
Reverse Actiivatiion (iif equipped)
Reverse may not activate or may be harder to activate if the belt is
positioned too high in the driven pulley. If reverse activation does not
work properly, ensure the drive belt is properly adjusted.
Adjust the drive belt lower in the driven pulley if needed.
Track
Track Condition
WARNING
Remove tether cord cap from engine cut-off switch before per-
forming any maintenance or adjustment, unless otherwise
specified. Vehicle must be parked in a safe place, away from
the trail.
Remove tether cord cap from engine cut-off switch.
240
MAINTENANCE PROCEDURES
Lift the rear of the snowmobile and support it with a wide-base snow-
mobile mechanical stand with a rear deflector panel. With the engine
off, rotate the track by hand, and inspect condition. If worn or cut, or if
track fibers are exposed, or if missing or defective inserts or guides
are noted; contact an authorized BRP snowmobile dealer.
Snowmobiles Equipped with Traction Enhancing Products
If your snowmobile is equipped with a BRP approved studded track,
PROCEED WITH A VISUAL INSPECTION OF YOUR TRACK BE-
FORE EACH USE.
Look for any defects, such as:
- Perforations in the track
- Tears in the track (particularly around traction holes on studded
tracks)
- Lugs that are broken or torn off, exposing portions of rods
- Delamination of the rubber
- Broken rods
- Broken studs (studded tracks)
- Bent studs (studded tracks)
- Missing studs
- Studs that are torn off the track
- Missing track guide(s)
- Also, ensure that studs nut are tighten to the recommended
torque.
On approved studded tracks, replace broken or damaged studs imme-
diately. If your track shows signs of deterioration, it must be replaced
immediately. When in doubt, ask your dealer.
WARNING
Riding with a damaged track or studs could lead to a loss of
control.
For complete information on traction enhancing products, refer to
TRACTION ENHANCING PRODUCTS in SAFETY INFORMATION at
the beginning of this Operator's Guide.
Track Tension and Alignment
NOTE:
Track tension and alignment are interrelated. Do not adjust one with-
out the other.
241
MAINTENANCE PROCEDURES
WARNING
To prevent serious injury to individuals near the snowmobile:
– NEVER stand behind or near a moving track.
– Always use a wide-base snowmobile stand with a rear de-
flector panel if it is necessary to rotate track.
– When the track is raised off the ground, only run it at the low-
est possible speed.
Centrifugal force could cause debris, damaged or loose studs,
pieces of torn track, or an entire severed track to be violently
thrown backwards out of the tunnel with tremendous force, pos-
sibly resulting in the loss of a leg or other serious injury.
Veriifyiing the Track Tension
NOTE:
Ride the snowmobile in snow about 15 to 20 minutes prior to adjusting
track tension.
1. Remove tether cord cap from engine cut-off switch.
2. Lift rear of vehicle and support it off the ground.
CAUTION
Use proper lifting techniques, notably using your legs force. Do
not attempt to lift the rear of vehicle if it is above your limits.
3. Allow rear suspension to fully extend.
4. Prepare the tensiometer.
Service tool
Tensiometer (P/N 414348200)
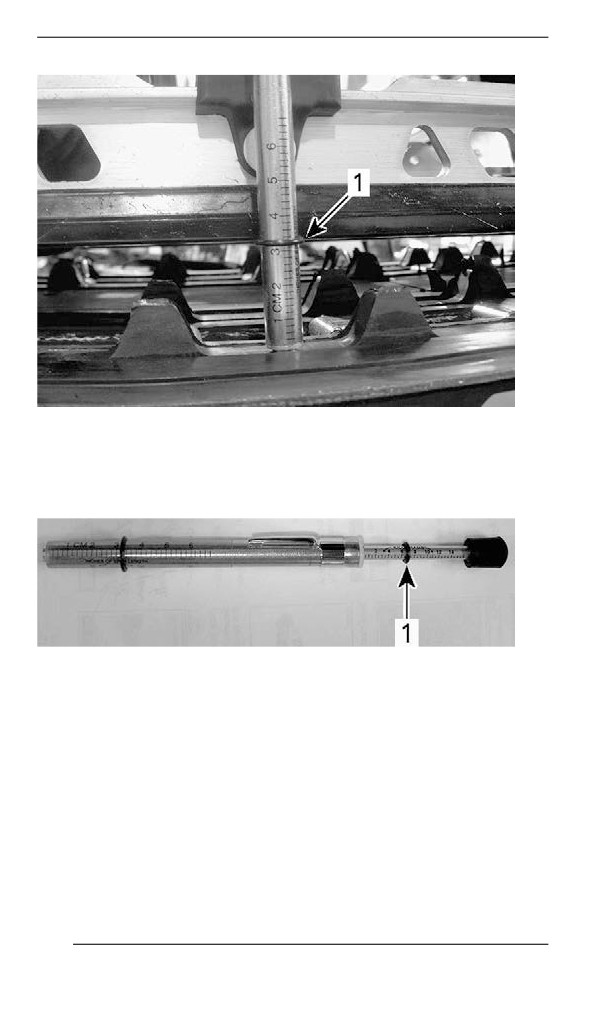
1. Set the bottom O-ring as per the Track Deflection from the ap-
plicable vehicle in the Technical Specifications table.
242
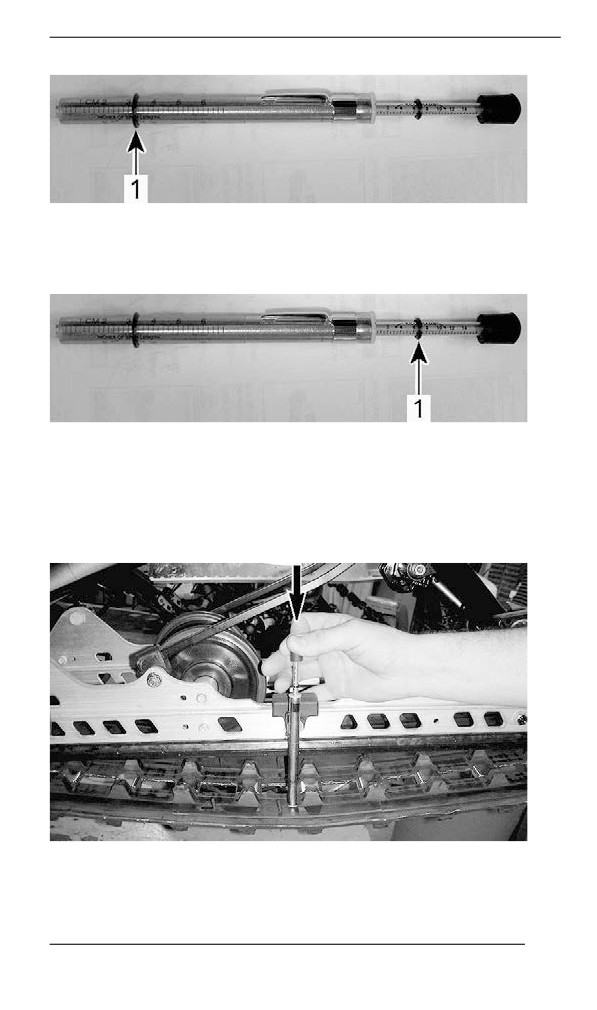
MAINTENANCE PROCEDURES
1. Bottom O-ring
2. Place the upper O-ring to 0 kgf (0 lbf).
1. Upper O-ring
5. Position the tensiometer on track, halfway between front and rear
idler wheels.
6. Push the tensiometer downwards until bottom O-ring (deflection
set earlier) be aligned with the bottom of slider shoe.
TYPICAL
243
MAINTENANCE PROCEDURES
TYPICAL
1. Deflection O-ring aligned with slider shoe
7. Read load recorded by the upper O-ring on the tensiometer.
TYPICAL - LOAD READING
1. Upper O-ring
8. Load reading must be as per the track deflection in the Technical
Specifications.
9. If load reading is not in accordance with the specification, adjust
track tension. Refer to Track Tension Adjustment.
Adjjusting the Track Tensiion - EasyRide-A
Suspensiion
1. Remove the tether cord cap from engine cut-off switch.
2. Lift rear of vehicle and support it off the ground.
244
MAINTENANCE PROCEDURES
CAUTION
Use proper lifting techniques, notably using your legs force. Do
not attempt to lift the rear of vehicle if it is above your limits.
3. Allow rear suspension to fully extend.
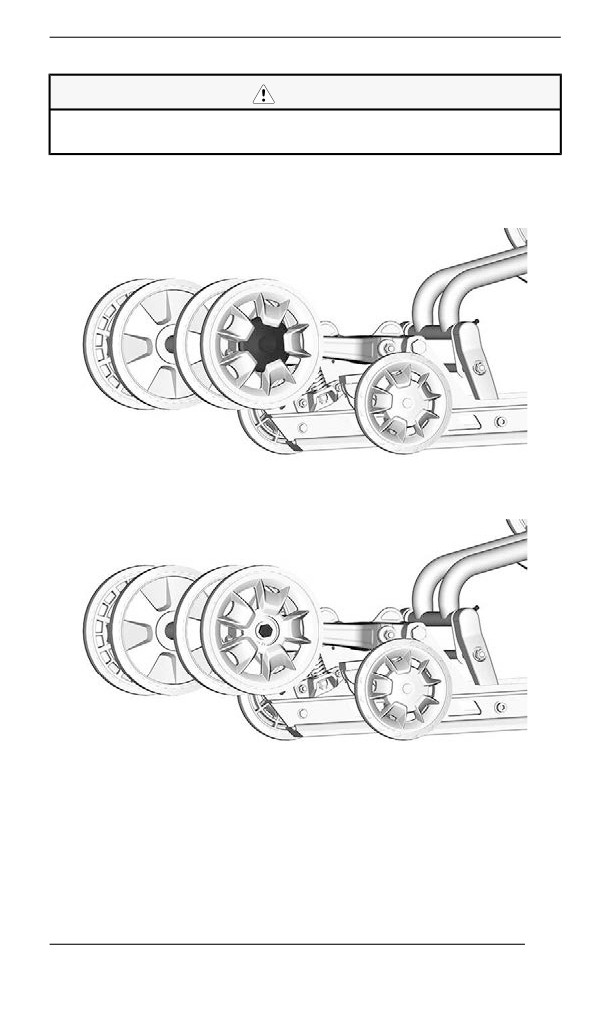
4. Remove rear wheel caps.
5. Loosen the rear idler wheels retaining screws.
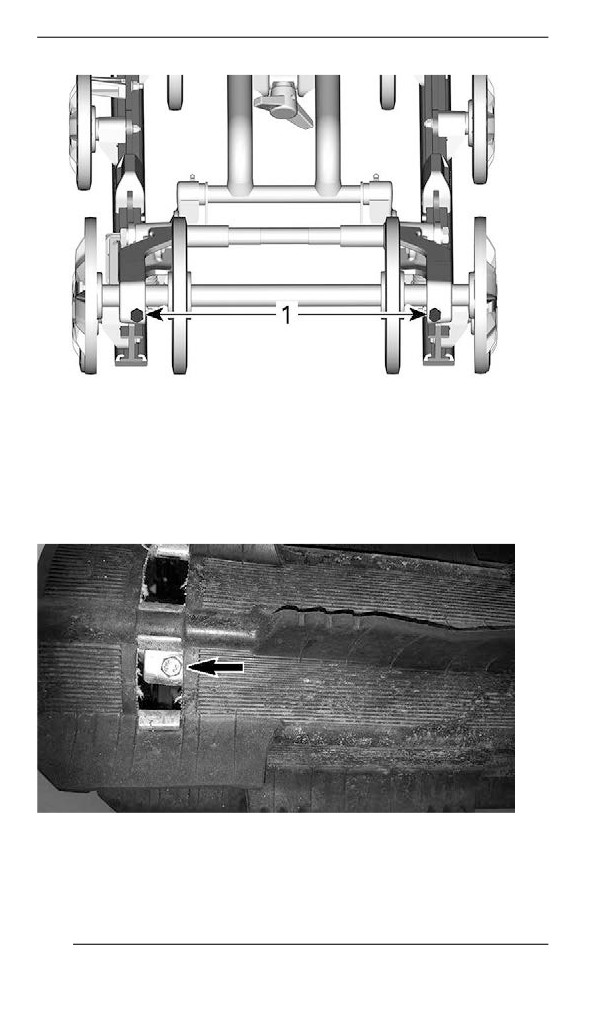
6. Tighten or loosen both adjustment screws to increase or decrease
track tension.
245
MAINTENANCE PROCEDURES
1. Adjustment screws
NOTE:
It may be necessary to rotate the driven pulley to access the adjust-
ment screw.
7. If correct tension is unattainable, contact an authorized BRP snow-
mobile dealer.
8. Retighten idler wheels retaining screws to specification.
246
MAINTENANCE PROCEDURES
TIGHTENING TORQUE
Idler wheel screw
48 ± 6 Nm (35 ± 4 lbf-ft)
9. Check track alignment as described below.
Alligning the Track
WARNING
Before checking track alignment, ensure that the track is free of
all particles which could be thrown out while track is rotating.
Keep hands, tools, feet and clothing clear of track. Always lift
the snowmobile on a wide-base stand with a rear deflector pan-
el. Ensure no one is standing in close proximity to the snowmo-
bile, especially at the rear of the track. Never rotate track at
high speed.
Centrifugal force could cause debris, damaged or loose studs,
pieces of torn track, or an entire severed track to be violently
thrown backwards out of the tunnel with tremendous force.
1. Lift rear of vehicle and support it off the ground.
CAUTION
Use proper lifting techniques, notably by using the force of your
legs . Do not attempt to lift the rear of vehicle if it is above your
limits.
2. Start engine and accelerate slightly so that track slowly turns. This
must be done in a short period of time (15 to 20 seconds).
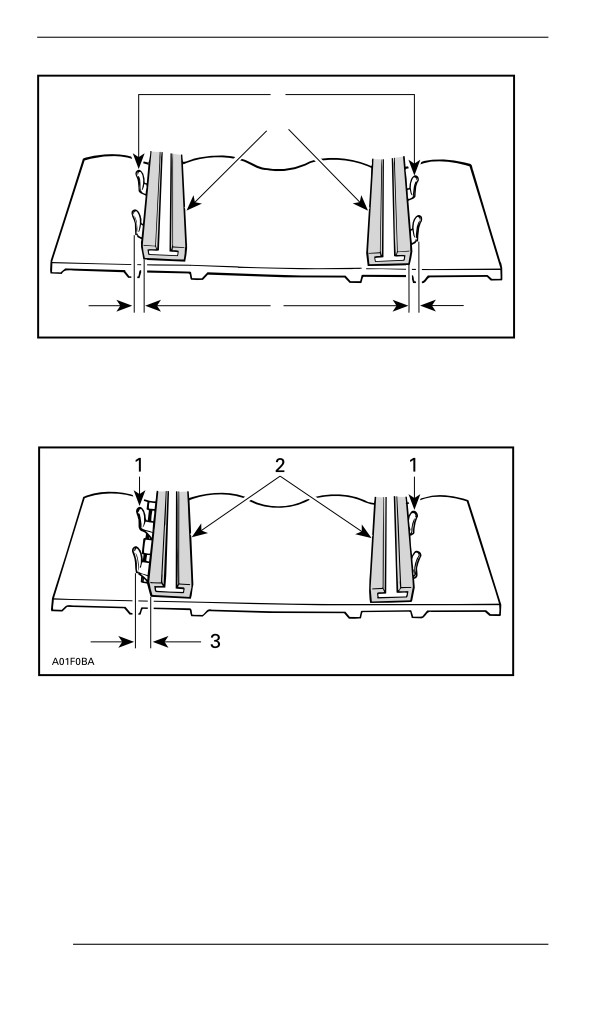
3. Check that the track is well centered; equal distance on both sides
between edges of track guides and slider shoes.
247
MAINTENANCE PROCEDURES
1
2
3
A01F05A
1. Guides
2. Slider shoes
3. Equal distance
4. To correct track alignment:
1. Guides
2. Slider shoes
3. Tighten on this side
1. Stop engine.
2. Remove tether cord cap from engine cut-off switch.
248
MAINTENANCE PROCEDURES
WARNING
Remove tether cord cap from engine cut-off switch before per-
forming any maintenance or adjustment, unless otherwise
specified. Vehicle must be parked in a safe place, away from
the trail.
3. Loosen the rear axle nut.
4. Tighten adjustment screw on side where the slider shoe is the
farthest from the track insert guides.
5. Tighten the rear axle nut.
WARNING
Properly tighten wheel retaining bolt, otherwise wheel may
come off and cause track to “lock”.
6. Restart engine and rotate track slowly to recheck alignment.
7. Tighten the rear axle nut to specified torque.
Tightening Torque
Rear axle screw
48 ± 6 Nm (35 ± 4 lbf-ft)
8. Reposition snowmobile on the ground.
Suspension
Rear Suspension Condition
Visually inspect all suspension components including slider shoes,
springs, wheels, etc.
NOTE:
During normal driving, snow will act as a lubricant and coolant for the
slider shoes. Extensive riding on ice or sanded snow, will create ex-
cessive heat build-up and cause premature slider shoe wear.
Suspension Stopper Strap Condition
Inspect stopper straps for wear and cracks, bolt and nut for tightness.
If loose inspect holes for deformation. Replace as required. Tighten
nut to specification.
249
MAINTENANCE PROCEDURES
Tightening Torque
Stopper strap nut
11 ± 1 Nm (97 ± 9 lbf-in)
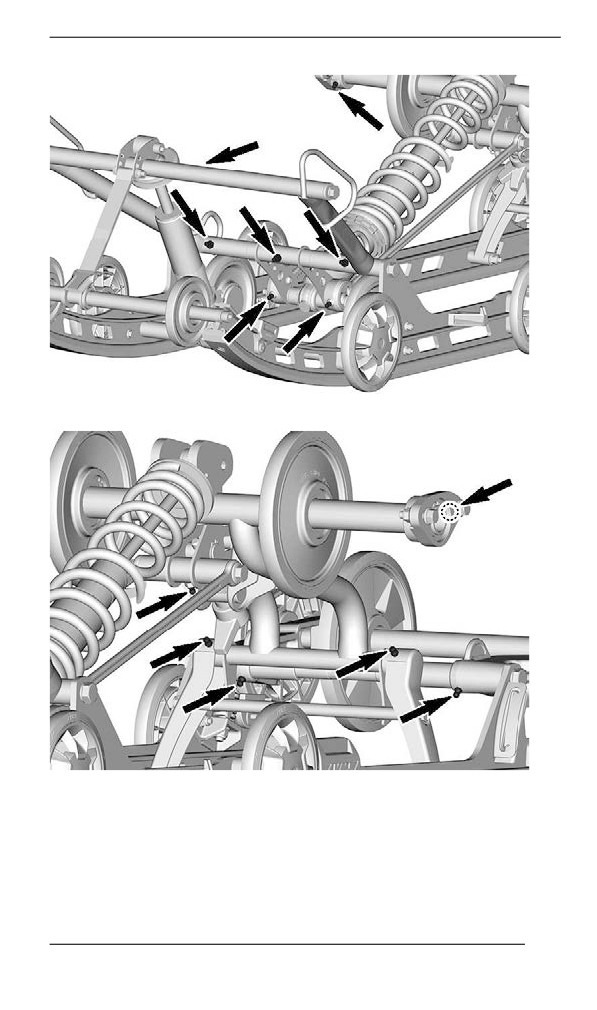
Suspension Lubrication – EasyRide
Lubricate the following suspension pivots at grease fittings. Refer to
Maintenance Schedule for maintenance frequency.
Suspension Grease
XPS Synthetic suspension grease
250
MAINTENANCE PROCEDURES
Steering and Front Suspension Condition
Visually inspect steering and front suspension for tightness of compo-
nents (steering arms, control arms and links, tie rods, ball joints, ski
bolts, ski legs, etc.). If necessary, contact an authorized BRP snowmo-
bile dealer.
251
MAINTENANCE PROCEDURES
Skiis
Wear and Condition of Skis and Runners
Check the condition of the skis and ski runner carbides. If worn, con-
tact an authorized BRP snowmobile dealer.
WARNING
Excessively worn skis and/or ski runners will adversely affect
snowmobile control.
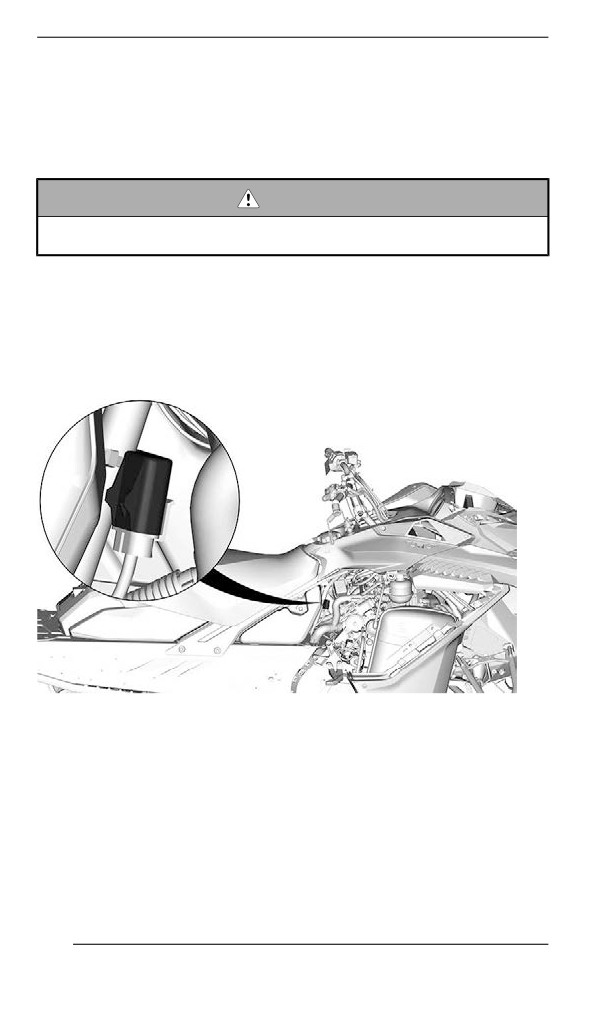
Fuses
Access to Fuse Block
Open RH side panel, refer to Body and Seat.
Fuses Location
TYPICAL – FA
252
MAINTENANCE PROCEDURES
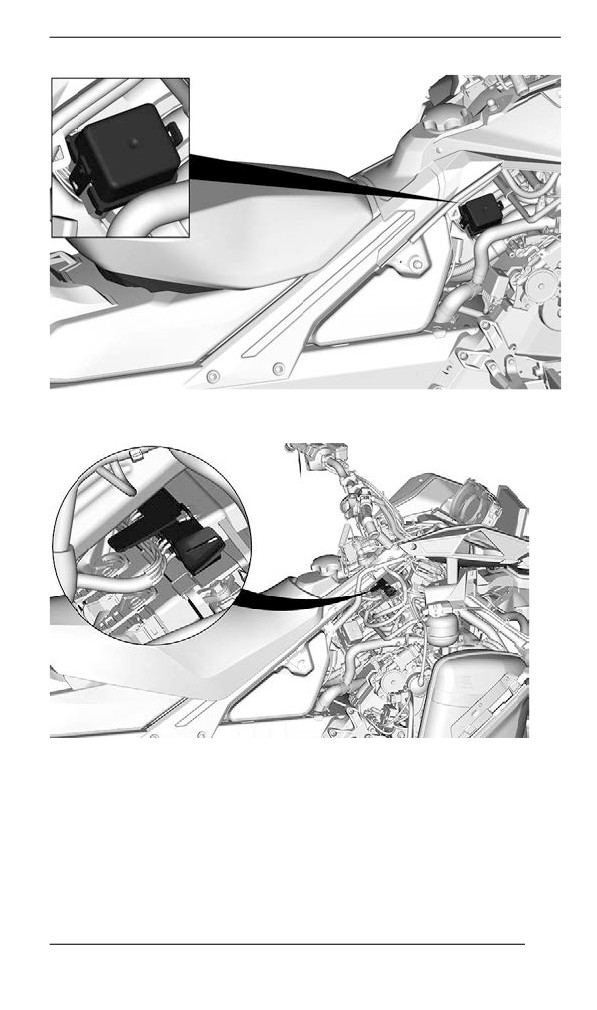
TYPICAL – FUSE BOX 1 (FB1)
TYPICAL – RELAY BLOCK - IF EQUIPPED
253
MAINTENANCE PROCEDURES
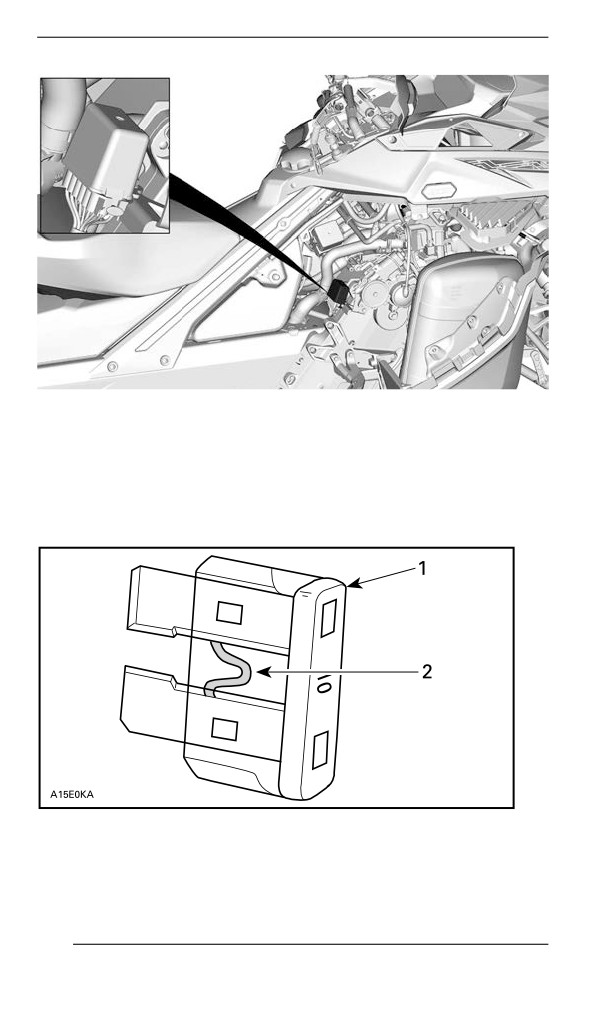
TYPICAL – FUSE BOX 2 (FB2) - IF EQUIPPED
Refer to Technical Specification for relay and fuse identification.
Fuse Inspection
Check fuse condition and replace it if necessary.
To remove fuse from holder, pull fuse out. Check if filament is melted.
1. Fuse
2. Check if melted
254
MAINTENANCE PROCEDURES
WARNING
Do not use a higher rated fuse.
WARNING
If fuse has burnt out, source of malfunction should be deter-
mined and corrected before restarting. See an authorized BRP
snowmobile dealer for servicing.
Headliights
Headlights Bulb Replacement
1. Remove the windshield. Refer to Removing the Windshield in Body
and Seat subsection.
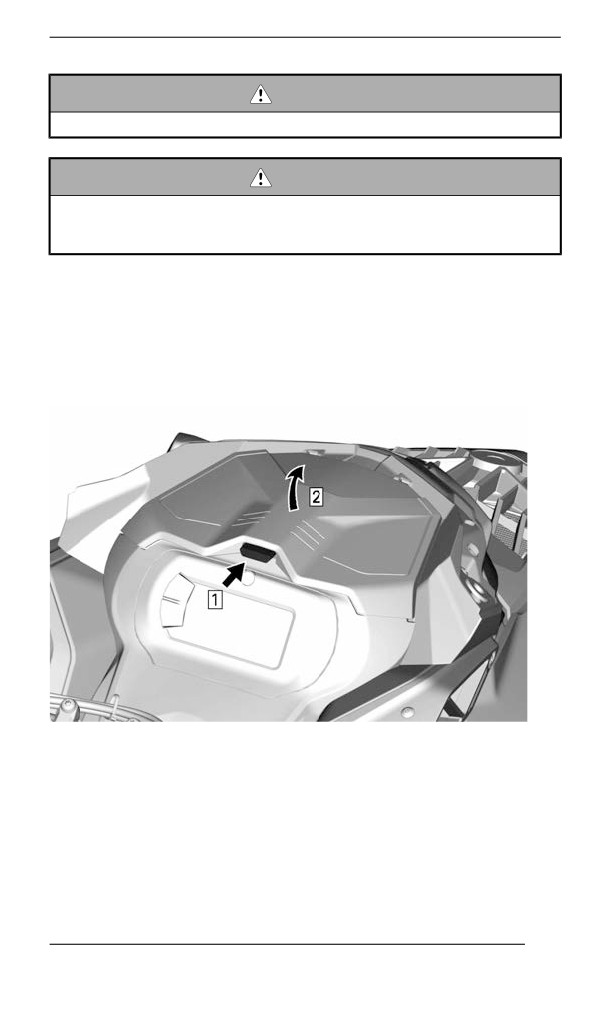
2. Open the storage compartment.
TYPICAL
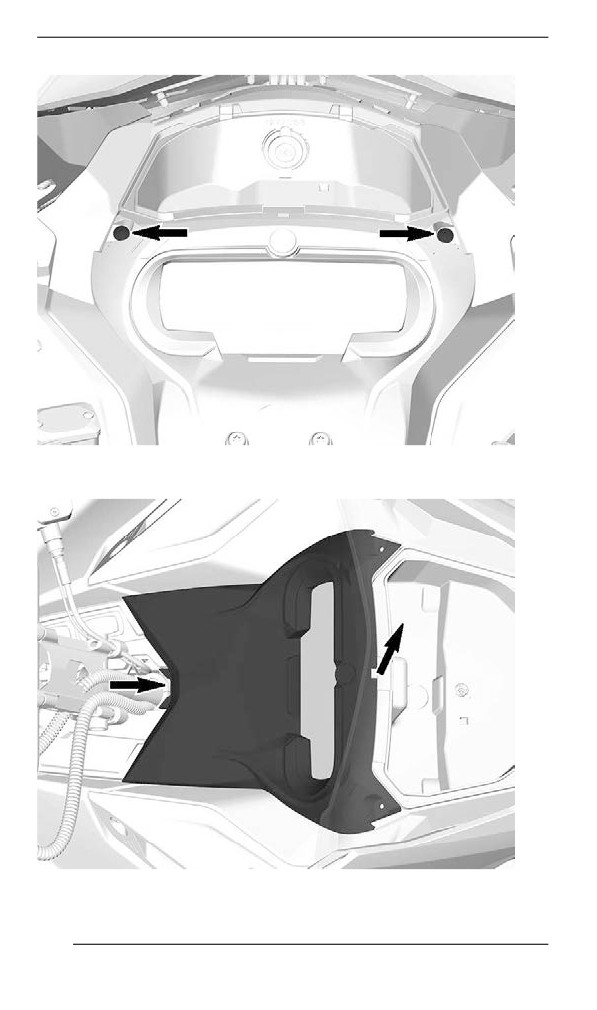
3. Remove the gauge support retaining screws.
255
MAINTENANCE PROCEDURES
4. Lift the front of the gauge support, then slide it forward to remove it.
256
MAINTENANCE PROCEDURES
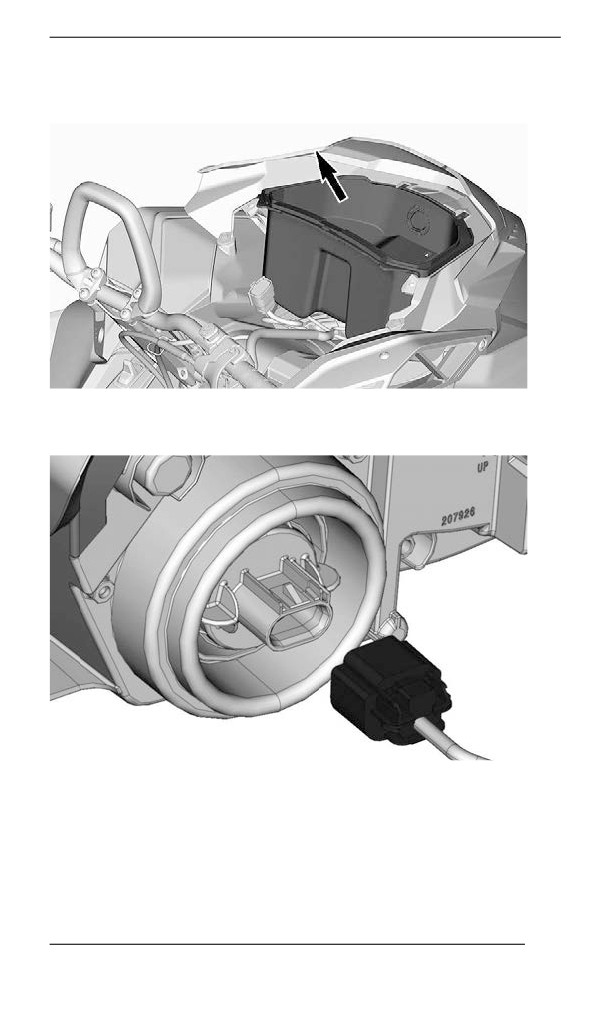
5. Set gauge support aside.
6. Remove the storage compartment.
7. Disconnect 12V power outlet connectors to remove (if equipped).
8. Disconnect bulb connector.
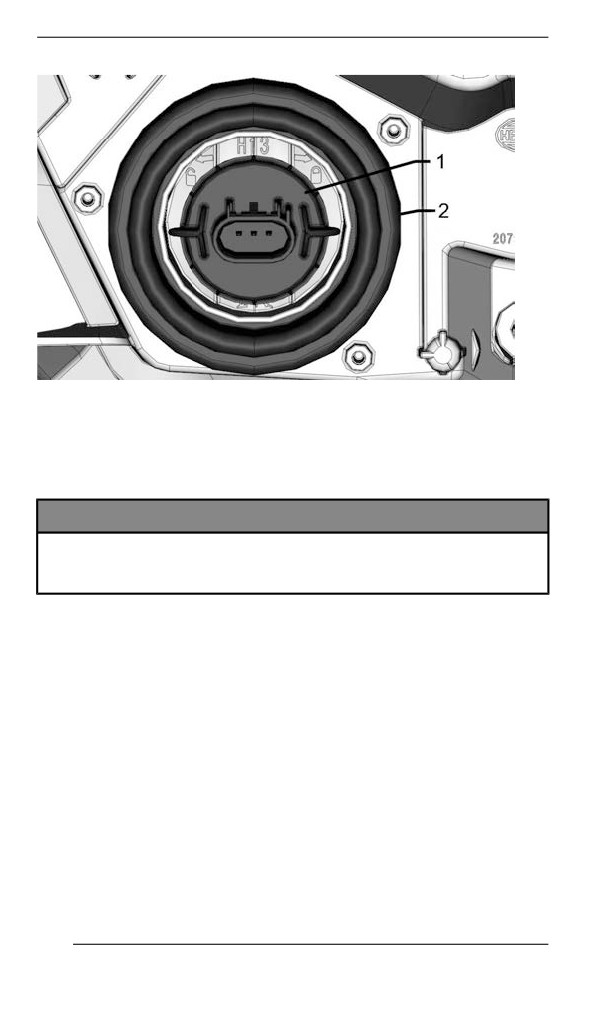
9. Unlock bulb by turning it counterclockwise.
10. Pull bulb out.
NOTE:
Ensure bulb seal stays in place.
257
MAINTENANCE PROCEDURES
1. Bulb
2. Bulb seal
Install a new bulb using the reverse of the removal procedure.
NOTICE
Never touch glass portion of an halogen bulb with bare fingers,
it shortens its operating life. If glass is touched, clean it with
isopropyl alcohol which will not leave a film on the bulb.
Check headlights operation.
Headlights Beam Aiming
Open the storage compartment.
258
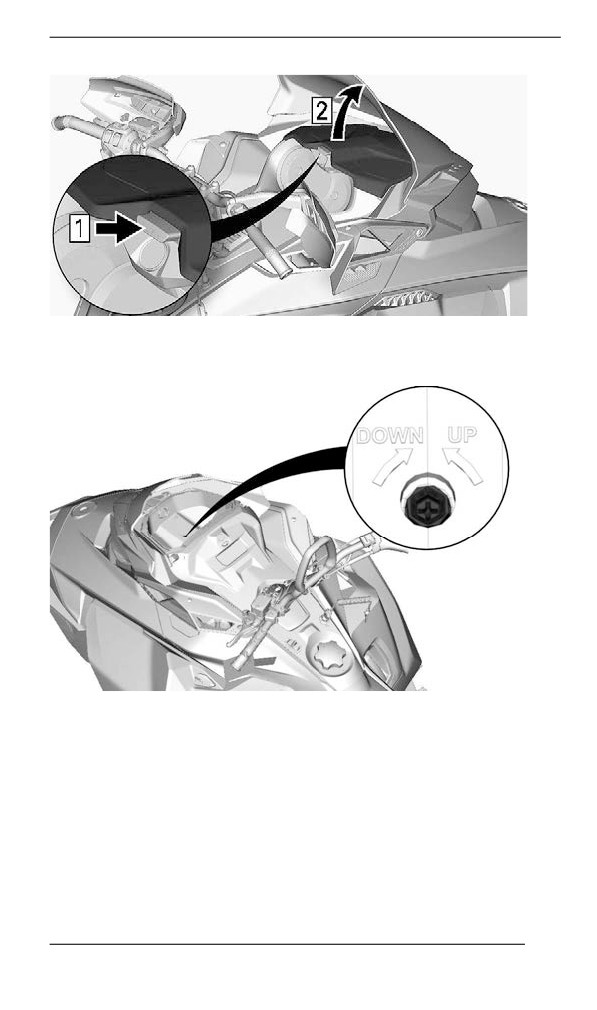
MAINTENANCE PROCEDURES
TYPICAL
Turn the adjustment screw to reach desired beam height.
Battery
400 mm (16 in.) Tunnel Width
Removing the Battery
1. Remove the seat.
2. Remove the battery cover.
259
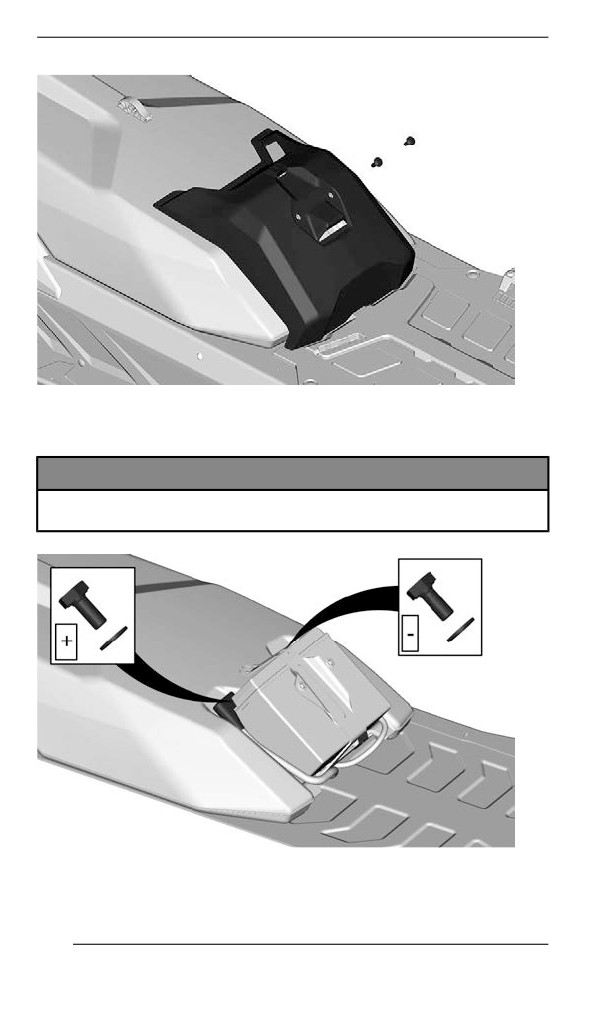
MAINTENANCE PROCEDURES
TYPICAL
3. Disconnect the negative terminal first, then the positive terminal.
NOTICE
Battery BLACK ( – ) cable must always be disconnected first
and connected last.
4. Remove the battery hold down bracket.
260
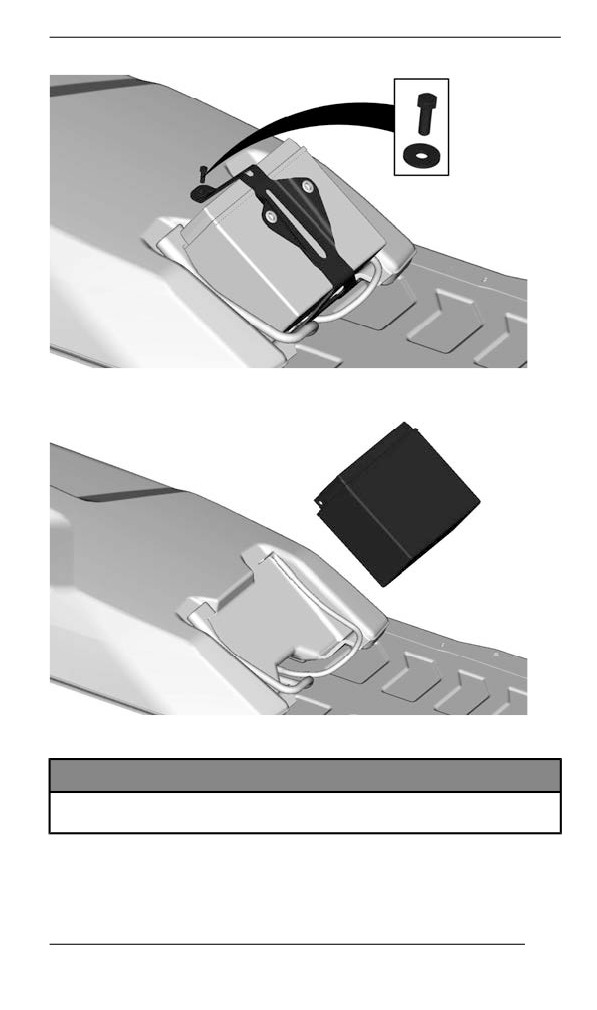
MAINTENANCE PROCEDURES
5. Remove the battery.
Installliing the Battery
NOTICE
Battery BLACK ( – ) cable must always be disconnected first
and connected last.
The installation is the reverse of the removal procedure. However, pay
attention to the following details.
261
MAINTENANCE PROCEDURES
TIGHTENING TORQUE
Battery terminals (positive and
10 ± 2 Nm
negative)
(89 ± 18 lbf-in)
5 ± 0.5 Nm
Battery hold down bracket
(44 ± 4 lbf-in)
1.5 ± 0.5 Nm
Battery cover retaining screws
(13 ± 4 lbf-in)
262
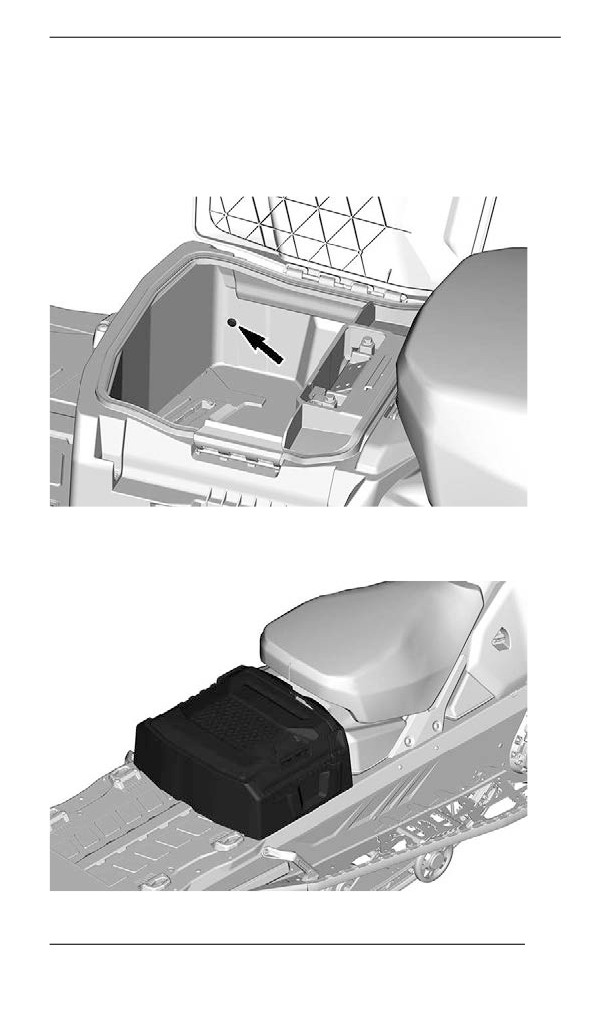
MAINTENANCE PROCEDURES
500 and 600 mm (20 and 24 in.) Tunnel Width
Removing the Battery
1. Remove the passenger seat and backrest, if equipped.
2. Open the cargo box, remove the battery cover and all mounting
screws.
LH SIDE SCREW SHOWN
3. Remove the cargo box.
263
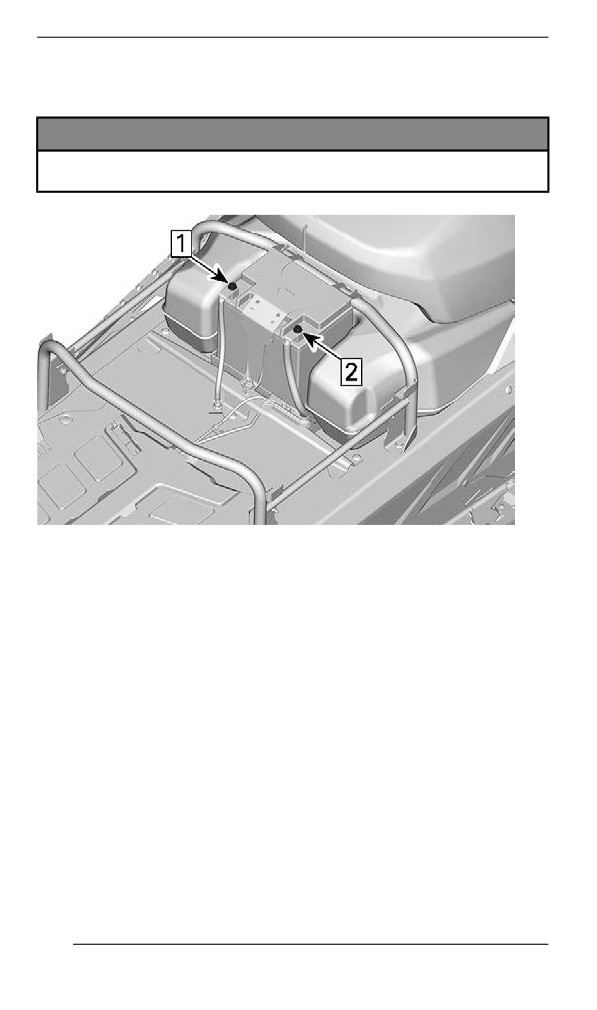
MAINTENANCE PROCEDURES
4. Disconnect the negative terminal first, then the positive terminal.
NOTICE
Battery BLACK ( – ) cable must always be disconnected first
and connected last.
1. Disconnect negative
2. Disconnect positive
5. Remove the battery hold down bracket.
264
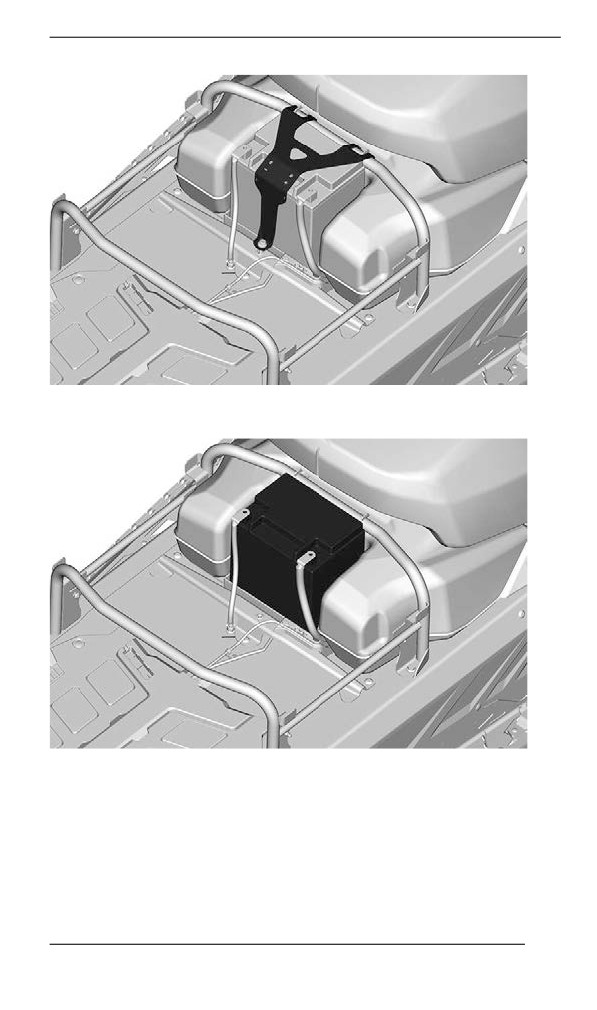
MAINTENANCE PROCEDURES
6. Remove the battery.
Installliing the Battery
The installation is the reverse of the removal procedure. However, pay
attention to the following details.
265
MAINTENANCE PROCEDURES
TIGHTENING TORQUE
Battery terminals (positive and
10 ± 2 Nm (89 ± 18 lbf-in)
negative)
Battery hold down bracket
5 ± 0.5 Nm (44 ± 4 lbf-in)
Battery cover retaining screws
5±0.5Nm(44±4lbf-in)
266
VEHICLE CARE
Post-Operatiion Care
Remove snow and ice from rear suspension, track, front suspension,
steering mechanism and skis.
WARNING
Make sure D.E.S.S. key is removed from D.E.S.S. post before
standing in front the vehicle, getting close to the track or rear
suspension components.
Always cover your snowmobile when leaving it outside overnight or
during extended periods of inactivity. This will protect it from frost and
snow as well as help retain its appearance.
Vehicle Cleaning and Protectiion
Wash snowmobile using water mixed with a mild detergent.
Use only microfiber cloths or an equivalent.
NOTICE
Never use a high pressure washer to clean the vehicle. Use low
pressure only, like a garden hose.
Non Compatible Cleaning Products
Material Type
Non-Compatible Cleaning Products
BRAKE AND PARTS CLEANER
All plastics, vinyls,
OR
painted steel and
ANY PETROLEUM BASE CLEANING
aluminium
PRODUCTS
Compatible Cleaning Products
Material Type
Cleaning Product
All plastics, vinyls,
Automotive type soap with water
painted steel and
XPS Spray Cleaner and Polish
aluminium.
XPS All Purpose Cleaner
For more information and products, Visit the XPS Products website at
267
STORAGE
During summer, or when a snowmobile is not in use for more than
three months, proper storage is necessary.
Storage
Clean the vehicle
Add fuel stabilizer to fuel following the product manufacturer
recommendations.
Run the engine after adding the product to the fuel
Lubricate engine
Lubricate brake lever pivot
Lubricate rear suspension
Charge battery monthly to keep it fully charged during storage
Block muffler outlet with rags
Lift rear of vehicle until track is clear of the ground. Do not release
track tension
CAUTION
Use appropriate lifting device or have assistance to share lifting
stress. If a lifting device is not used, use proper lifting techni-
ques, notably using your legs force. Do not attempt to lift the
rear of vehicle if it is above your limits.
NOTICE
The snowmobile has to be stored in a cool and dry place and
covered with an opaque but ventilated tarpaulin. This will pre-
vent sun rays and grime from affecting plastic components and
vehicle finish.
NOTICE
Fuel stabilizer should be added prior to engine lubrication to
ensure carburetor protection against varnish deposits.
268
PRESEASON PREPARATION
Proper vehicle preparation is necessary when a vehicle has not been
used for more than three months.
Using the maintenance schedule, perform the items titled EVERY
YEAR AT PRESEASON.
Visit your authorized BRP snowmobile dealer for more information.
269
MAINTENANCE RECORDS
Send photocopy of maintenance record to BRP if needed.
Pre-delivery
Serial
Signature/Print:
number:
Mileage /
km:
Hours:
Date:
Dealer
no:
Notes:
Refer to vehicle Pre-Delivery Bulletin for detailed installation
procedures
270
MAINTENANCE RECORDS
First inspection
Mileage /
Signature/Print:
km:
Hours:
Date:
Dealer
no:
Notes:
For maintenance schedule refer to Maintenance Information
section of this operator's guide
Service
Mileage /
Signature/Print:
km:
Hours:
Date:
Dealer
no:
Notes:
For maintenance schedule refer to Maintenance Information
section of this operator's guide
271
MAINTENANCE RECORDS
Service
Mileage /
Signature/Print:
km:
Hours:
Date:
Dealer
no:
Notes:
For maintenance schedule refer to Maintenance Information
section of this operator's guide
Service
Mileage /
Signature/Print:
km:
Hours:
Date:
Dealer
no:
Notes:
For maintenance schedule refer to Maintenance Information
section of this operator's guide
272
MAINTENANCE RECORDS
Service
Mileage /
Signature/Print:
km:
Hours:
Date:
Dealer
no:
Notes:
For maintenance schedule refer to Maintenance Information
section of this operator's guide
Service
Mileage /
Signature/Print:
km:
Hours:
Date:
Dealer
no:
Notes:
For maintenance schedule refer to Maintenance Information
section of this operator's guide
273
MAINTENANCE RECORDS
Service
Mileage /
Signature/Print:
km:
Hours:
Date:
Dealer
no:
Notes:
For maintenance schedule refer to Maintenance Information
section of this operator's guide
Service
Mileage /
Signature/Print:
km:
Hours:
Date:
Dealer
no:
Notes:
For maintenance schedule refer to Maintenance Information
section of this operator's guide
274
MAINTENANCE RECORDS
Service
Mileage /
Signature/Print:
km:
Hours:
Date:
Dealer
no:
Notes:
For maintenance schedule refer to Maintenance Information
section of this operator's guide
Service
Mileage /
Signature/Print:
km:
Hours:
Date:
Dealer
no:
Notes:
For maintenance schedule refer to Maintenance Information
section of this operator's guide
275
MAINTENANCE RECORDS
Service
Mileage /
Signature/Print:
km:
Hours:
Date:
Dealer
no:
Notes:
For maintenance schedule refer to Maintenance Information
section of this operator's guide
Service
Mileage /
Signature/Print:
km:
Hours:
Date:
Dealer
no:
Notes:
For maintenance schedule refer to Maintenance Information
section of this operator's guide
276
MAINTENANCE RECORDS
Service
Mileage /
Signature/Print:
km:
Hours:
Date:
Dealer
no:
Notes:
For maintenance schedule refer to Maintenance Information
section of this operator's guide
Service
Mileage /
Signature/Print:
km:
Hours:
Date:
Dealer
no:
Notes:
For maintenance schedule refer to Maintenance Information
section of this operator's guide
277
MAINTENANCE RECORDS
This page is intention-
ally blank
278
TECHNICAL
INFORMATION
279
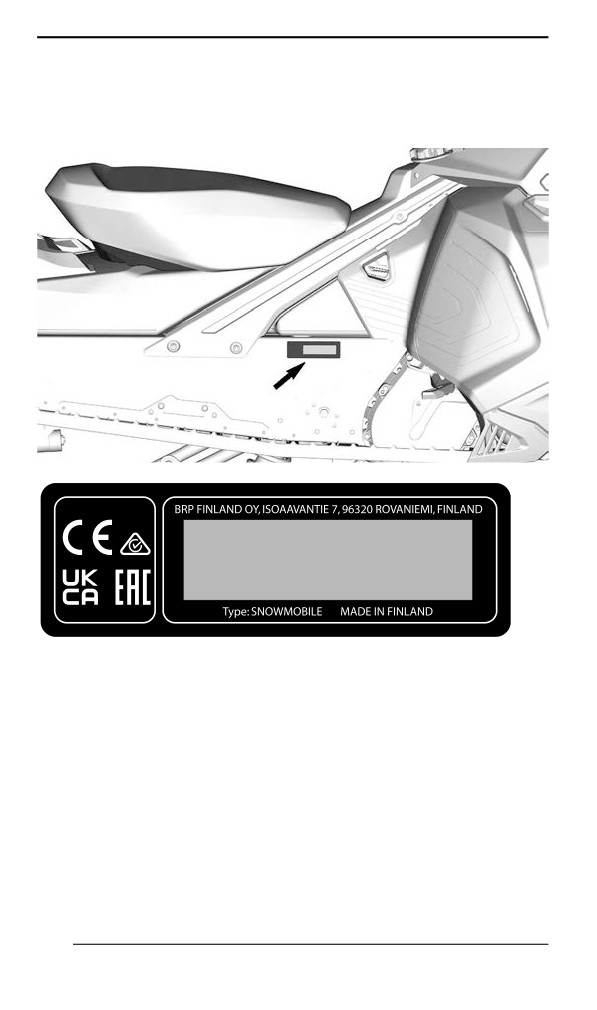
VEHICLE IDENTIFICATION
Vehiiclle Descriiptiion Decal
Vehicle description decal is located on right hand side of tunnel.
520002459
FOR EUROPEAN MARKET
Identiifiication Numbers
The main components of your snowmobile (engine and frame) are
identified by different identification numbers. It may sometimes be-
come necessary to locate these numbers for warranty purposes or to
trace your snowmobile in the event of loss. These numbers are re-
quired by the authorized BRP snowmobile dealer to complete war-
ranty claims properly. We strongly recommend that you take note of
all the identification numbers on your snowmobile and supply them to
your insurance company.
280
VEHICLE IDENTIFICATION
Vehicle Identification Number (VIN)
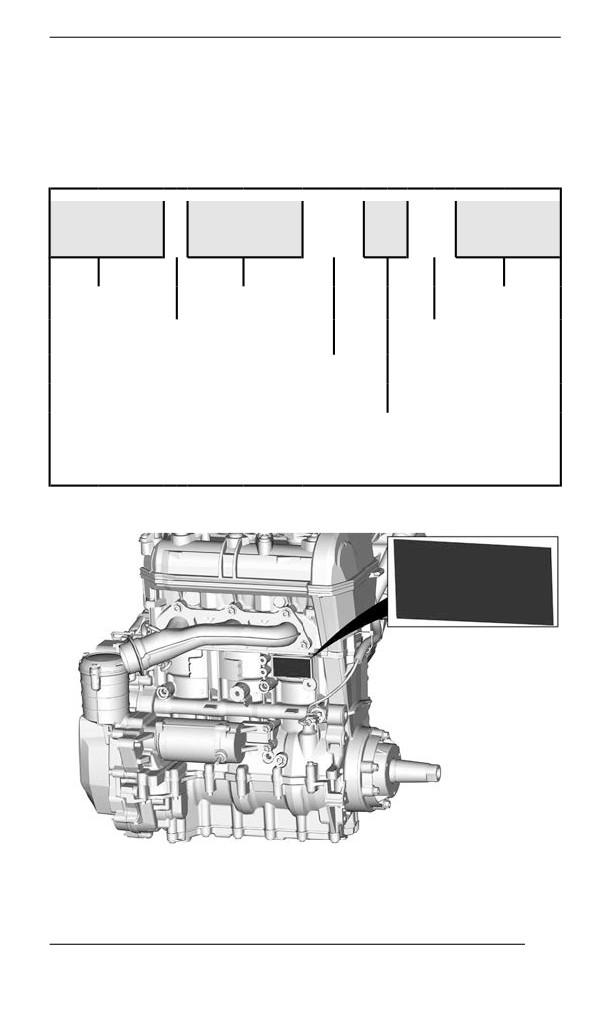
VIN is scribed on vehicle description decal. See above. It is also en-
graved on tunnel near vehicle description decal.
Model number and model year are part of the information found in the
VIN. See illustration.
2BP
S
LSAB
9
A
V
000001
2BP = Canada
Serial
Model number
YH2 = Finland
number
Factory
S = Ski-Doo
V = Valcourt
L = Lynx
R = Rovaniemi
Numeric or
Alphabetic
Model year: P = 2023
Q = 2024
R = 2025 etc.
Engine Identification Number Location
281
COMPLIANCE LABELS
282
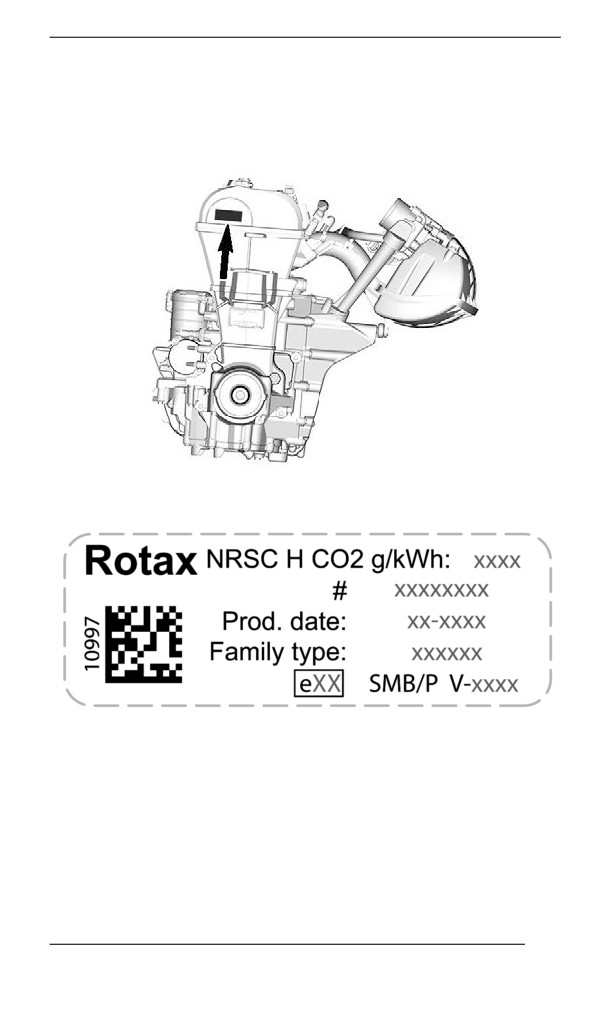
COMPLIANCE LABELS
Regulation (EU) 2016/1628 appliicable for
Non-Road Mobille Machiineriies
Vehicles who comply to Regulation (EU) 2016/1628 (NRMM) are iden-
tified on the engine valve cover.
TYPICAL
NRMM IDENTIFICATION ON ENGINE
283