CLAAS DOMINATOR 150 / 140 / 130. Operator’s Manual - page 20
13 Maintenance
13.6 Chassis
67089
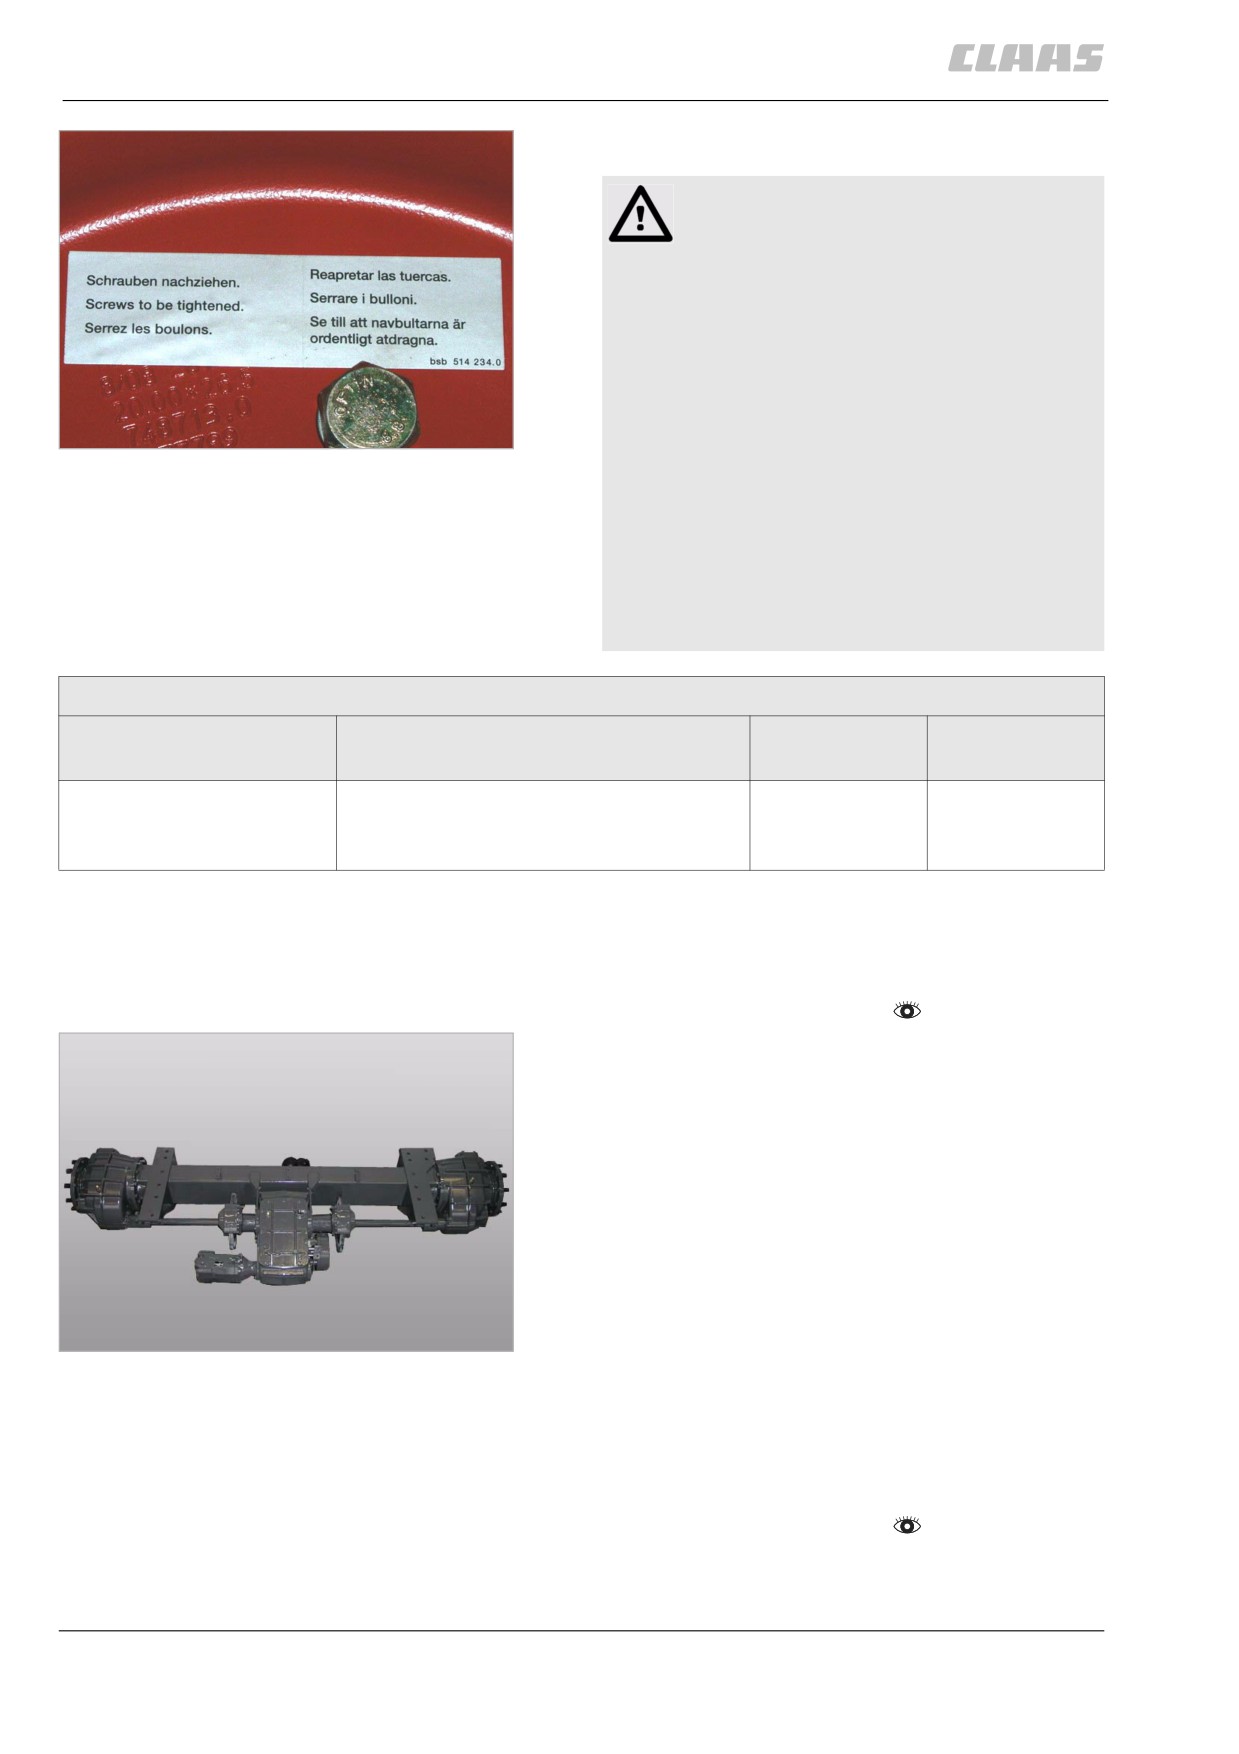
Rear axle / rear drive axle
Danger!
Wheel bolts / wheel nuts may come loose
when not tightened as specified.
Death or serious injuries!
- Retighten all wheel bolts / wheel nuts on
new machines and when wheels have
been removed and refitted.
Observe the maintenance intervals:
61
- immediately after installation.
Rear axle decal
30789
- after the first 10 working hours.
- after the first 100 working hours.
- The threads must be clean and free of
grease.
- Tighten wheel bolts / wheel nuts
crosswise.
- Observe the tightening torque.
Tightening torque of rear axle wheels / rear drive axle wheels
Use
Designation of thread, type of
Wrench size
Tightening
fastening
torque
Rear axle
M18 x 1.5 - 8.8, bolt with spring
260 Nm
washer C 18.5 DIN 74361 (Limes type
conical spring washer)
39373
13.6.3 Cleaning the surroundings of the drive
axle manual gearbox
- Observe the general warnings at the beginning of
the "Maintenance" chapter.
- Clean surroundings of gearbox on the machine.
62
14198
86778
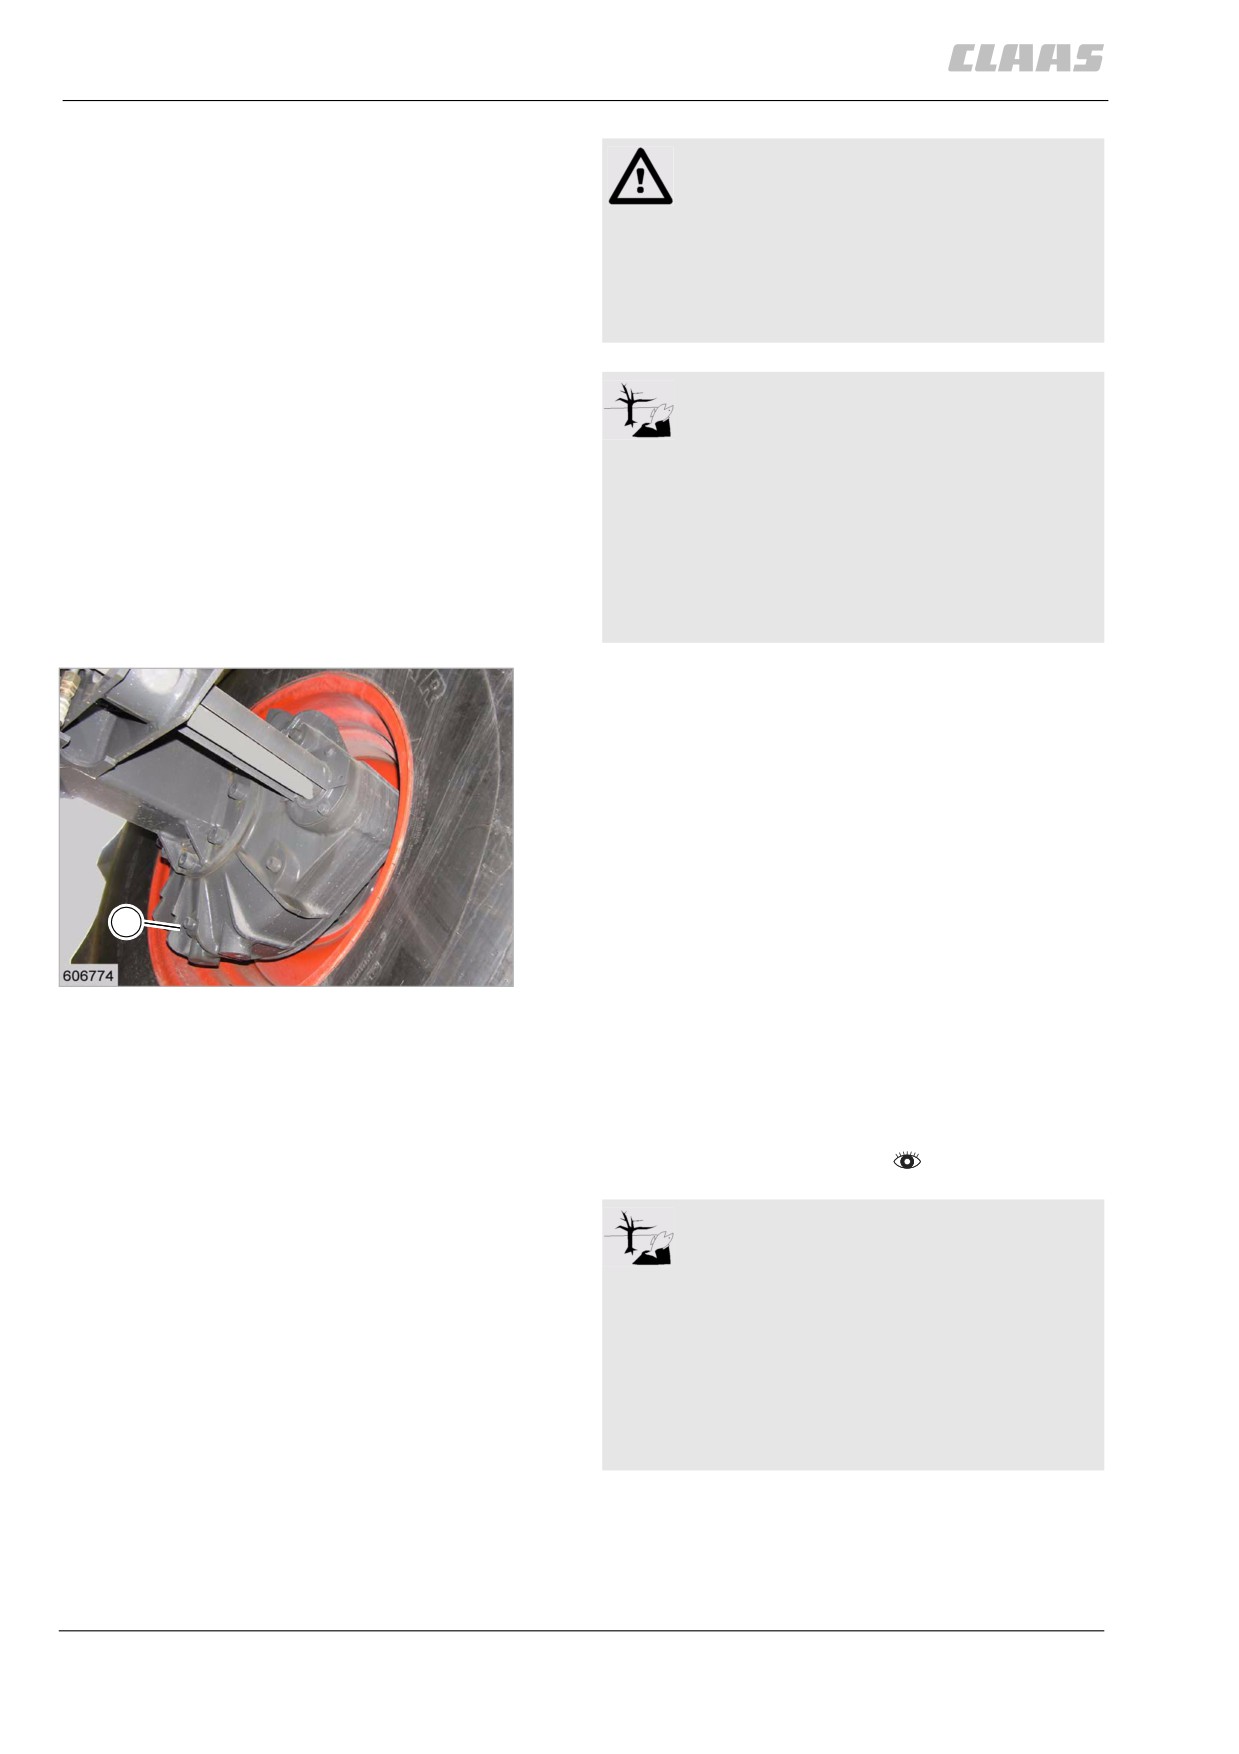
13.6.4 Checking the final drive oil level
DOMINATOR 150 / 140
- Park the machine on level ground.
- Observe the general warnings at the beginning of
the "Maintenance" chapter.
308
13 Maintenance
13.6 Chassis
67089
Caution!
Machine operation with unpermitted or pol-
luted lubricants.
Machine damage.
- Ensure a clean environment.
- Use suitable and clean tools.
- Use permitted lubricants.
- Lubricants must be free of pollution.
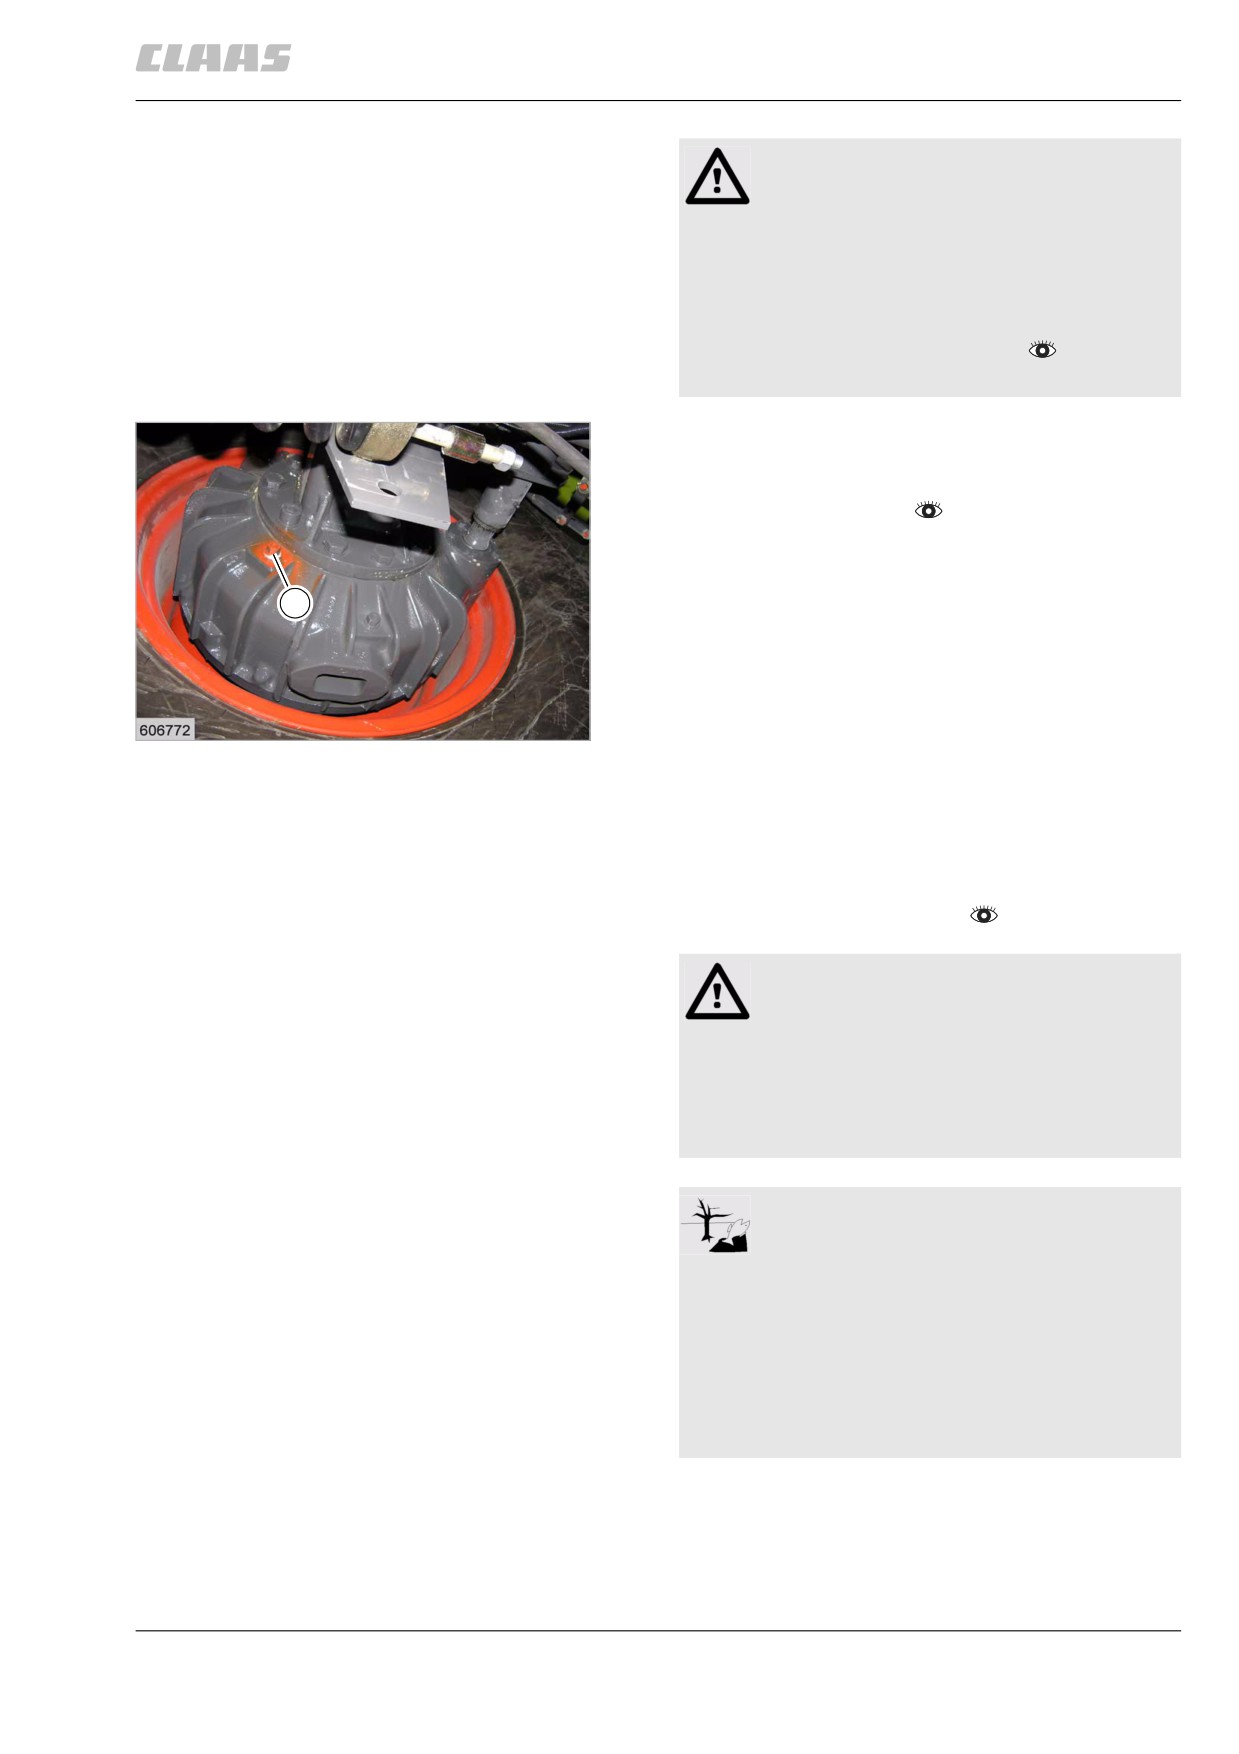
- Unscrew bolt (1).
The oil level must be up to the bore at bolt (1).
- Top up oil if required.
- Remove dirt from bolt (1).
- Screw in bolt (1) with sealant.
1
- Repeat this procedure on the other side of the
machine.
63
23392
86780
13.6.5 Draining the final drive oil
DOMINATOR 150 / 140
- Park the machine on level ground.
- Observe the general warnings at the beginning of
the "Maintenance" chapter.
Warning!
Contact with hot liquids or machine parts.
Danger of burns
- Wear suitable protective clothing.
- Let liquids or machine parts cool down.
- Comply with instructions.
Environment!
Lubricants and fuels end up in the
environment.
Environmental pollution.
- Lubricants and fuels must be collected
and stored in suitable containers and dis-
posed of in a way that is harmless to the
environment and in accordance with
existing anti-pollution regulations.
309
13 Maintenance
13.6 Chassis
67089
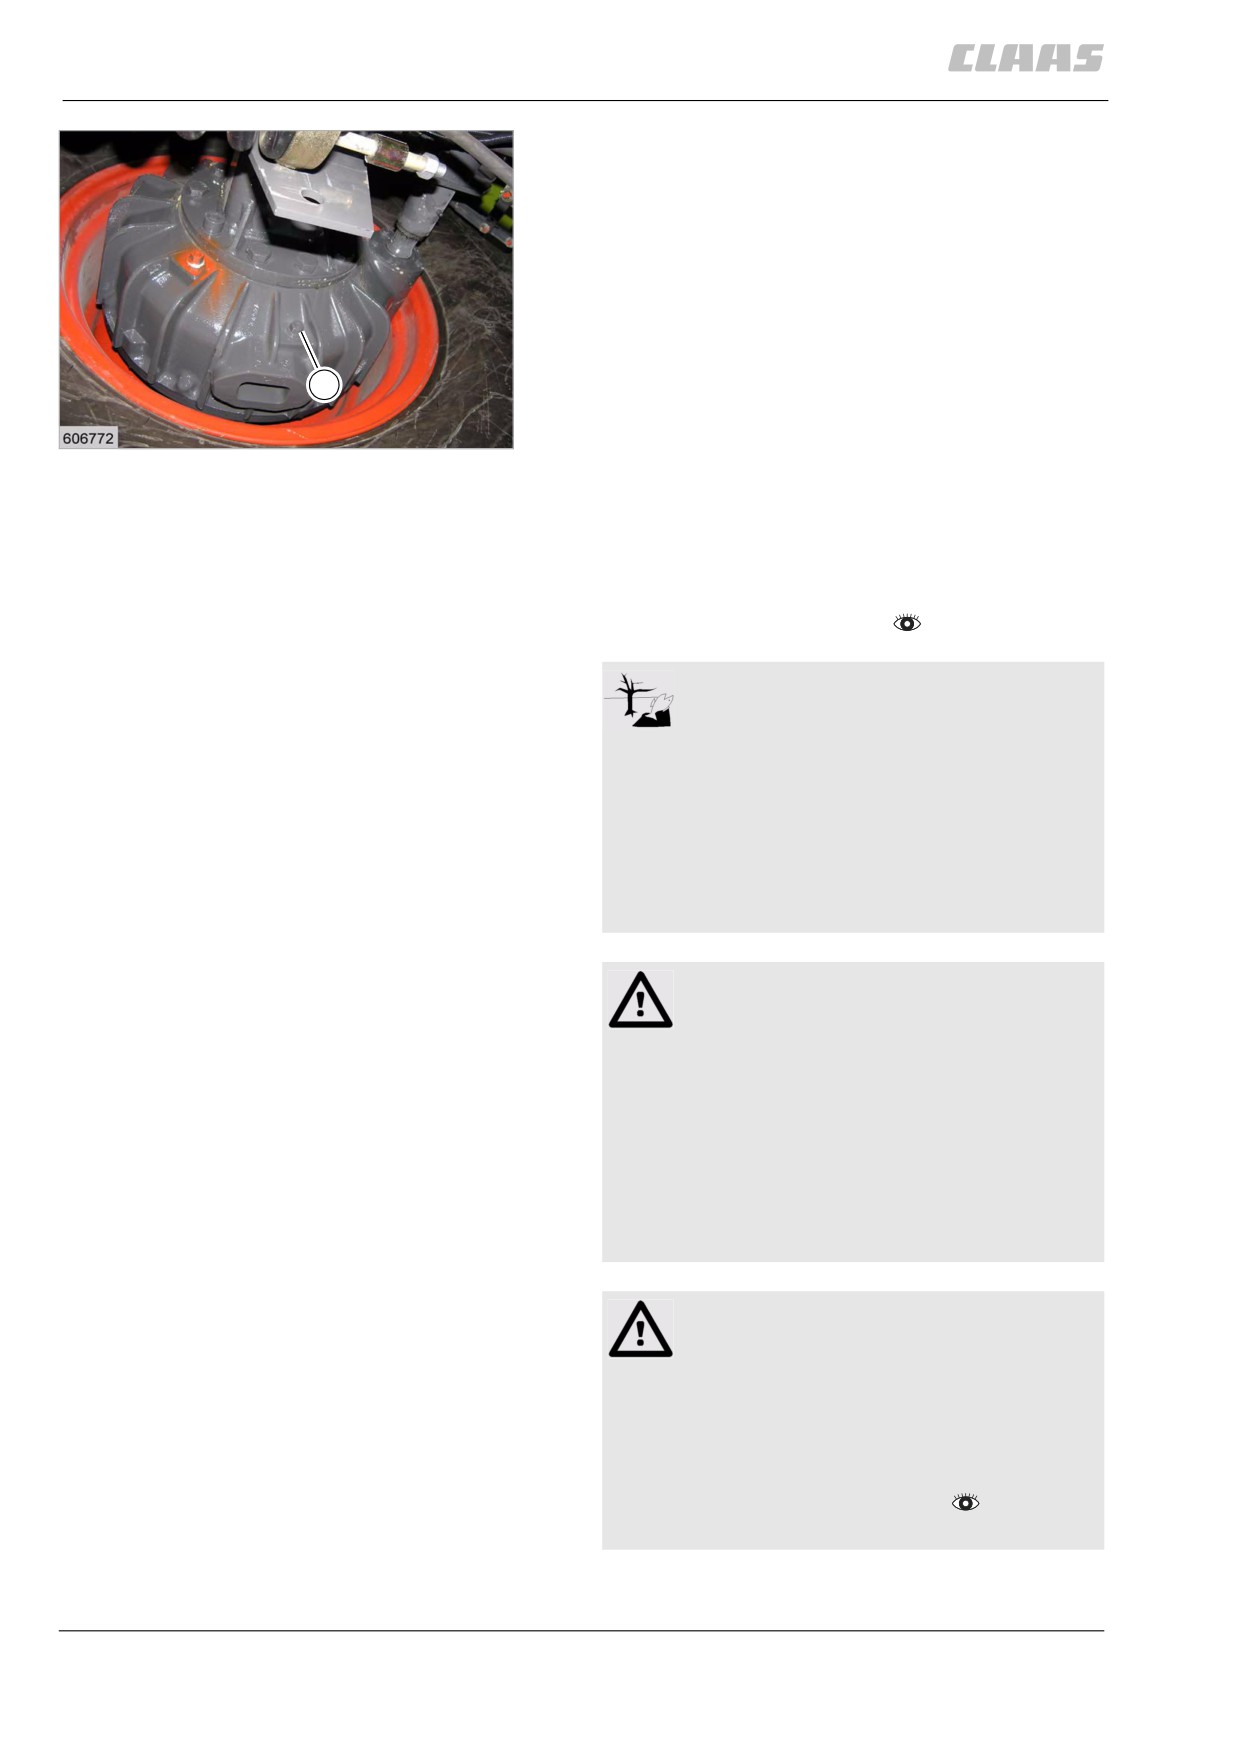
- Remove screw (1).
- Collect the used oil in a sufficiently large
container.
- Clean screw (1).
- Turn in screw (1).
- Repeat this procedure on the other side of the
machine.
1
64
23392
86782
13.6.6 Topping up the final drive oil
DOMINATOR 150 / 140
-
Park the machine on level ground.
–
Observe the general warnings at the beginning of
the "Maintenance" chapter.
Environment!
Lubricants and fuels end up in the
environment.
Environmental pollution.
- Lubricants and fuels must be collected
and stored in suitable containers and dis-
posed of in a way that is harmless to the
environment and in accordance with
existing anti-pollution regulations.
WARNING:
Use of unpermissible spare parts or
lubricants.
Machine damage or increased wear.
- Spare parts and lubricants must at least
comply with the technical standards
required by the manufacturer of the
implement!
- The use of genuine CLAAS spare parts
and lubricants is recommended.
Caution!
Machine operation with unpermitted or pol-
luted lubricants.
Machine damage.
- Ensure a clean environment.
- Use suitable and clean tools.
- Use permitted lubricants.
- Lubricants must be free of pollution.
310
13 Maintenance
13.6 Chassis
67089
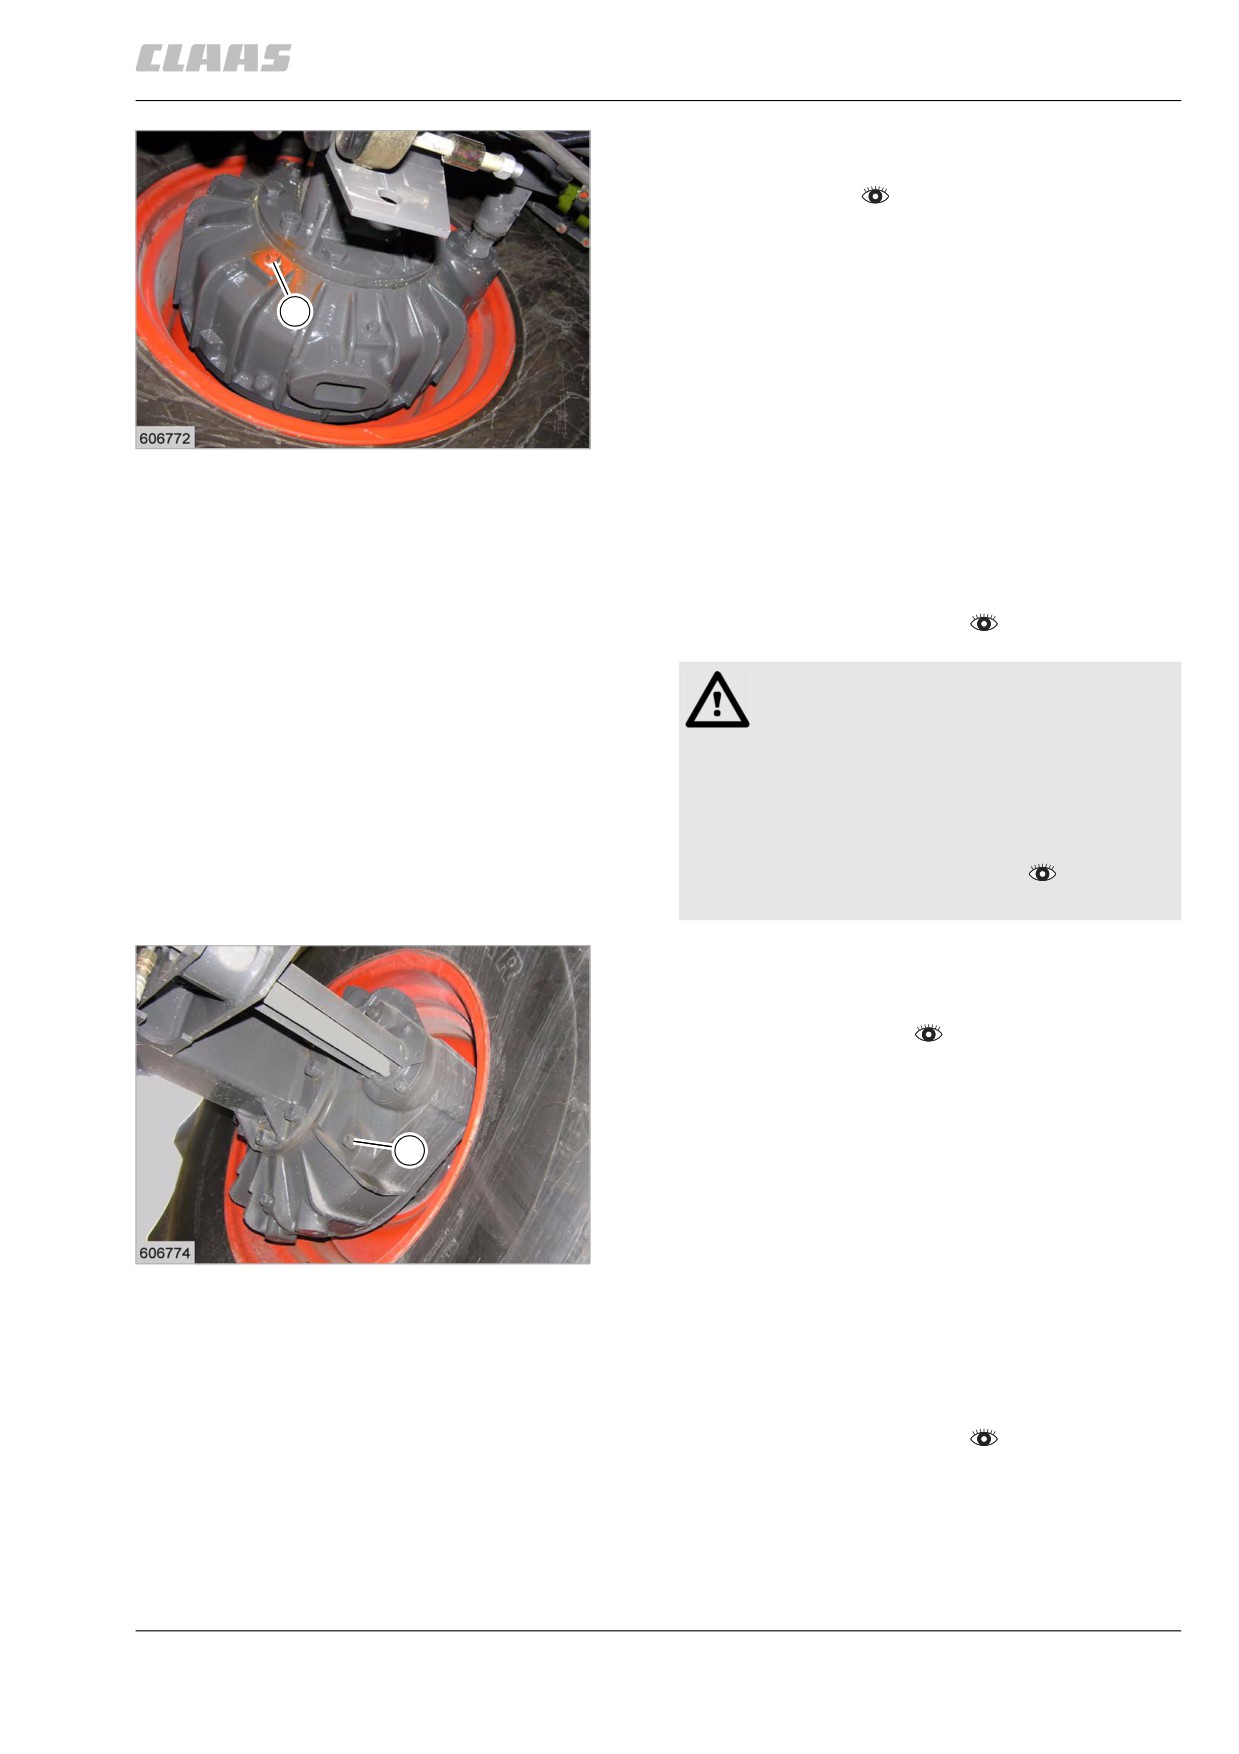
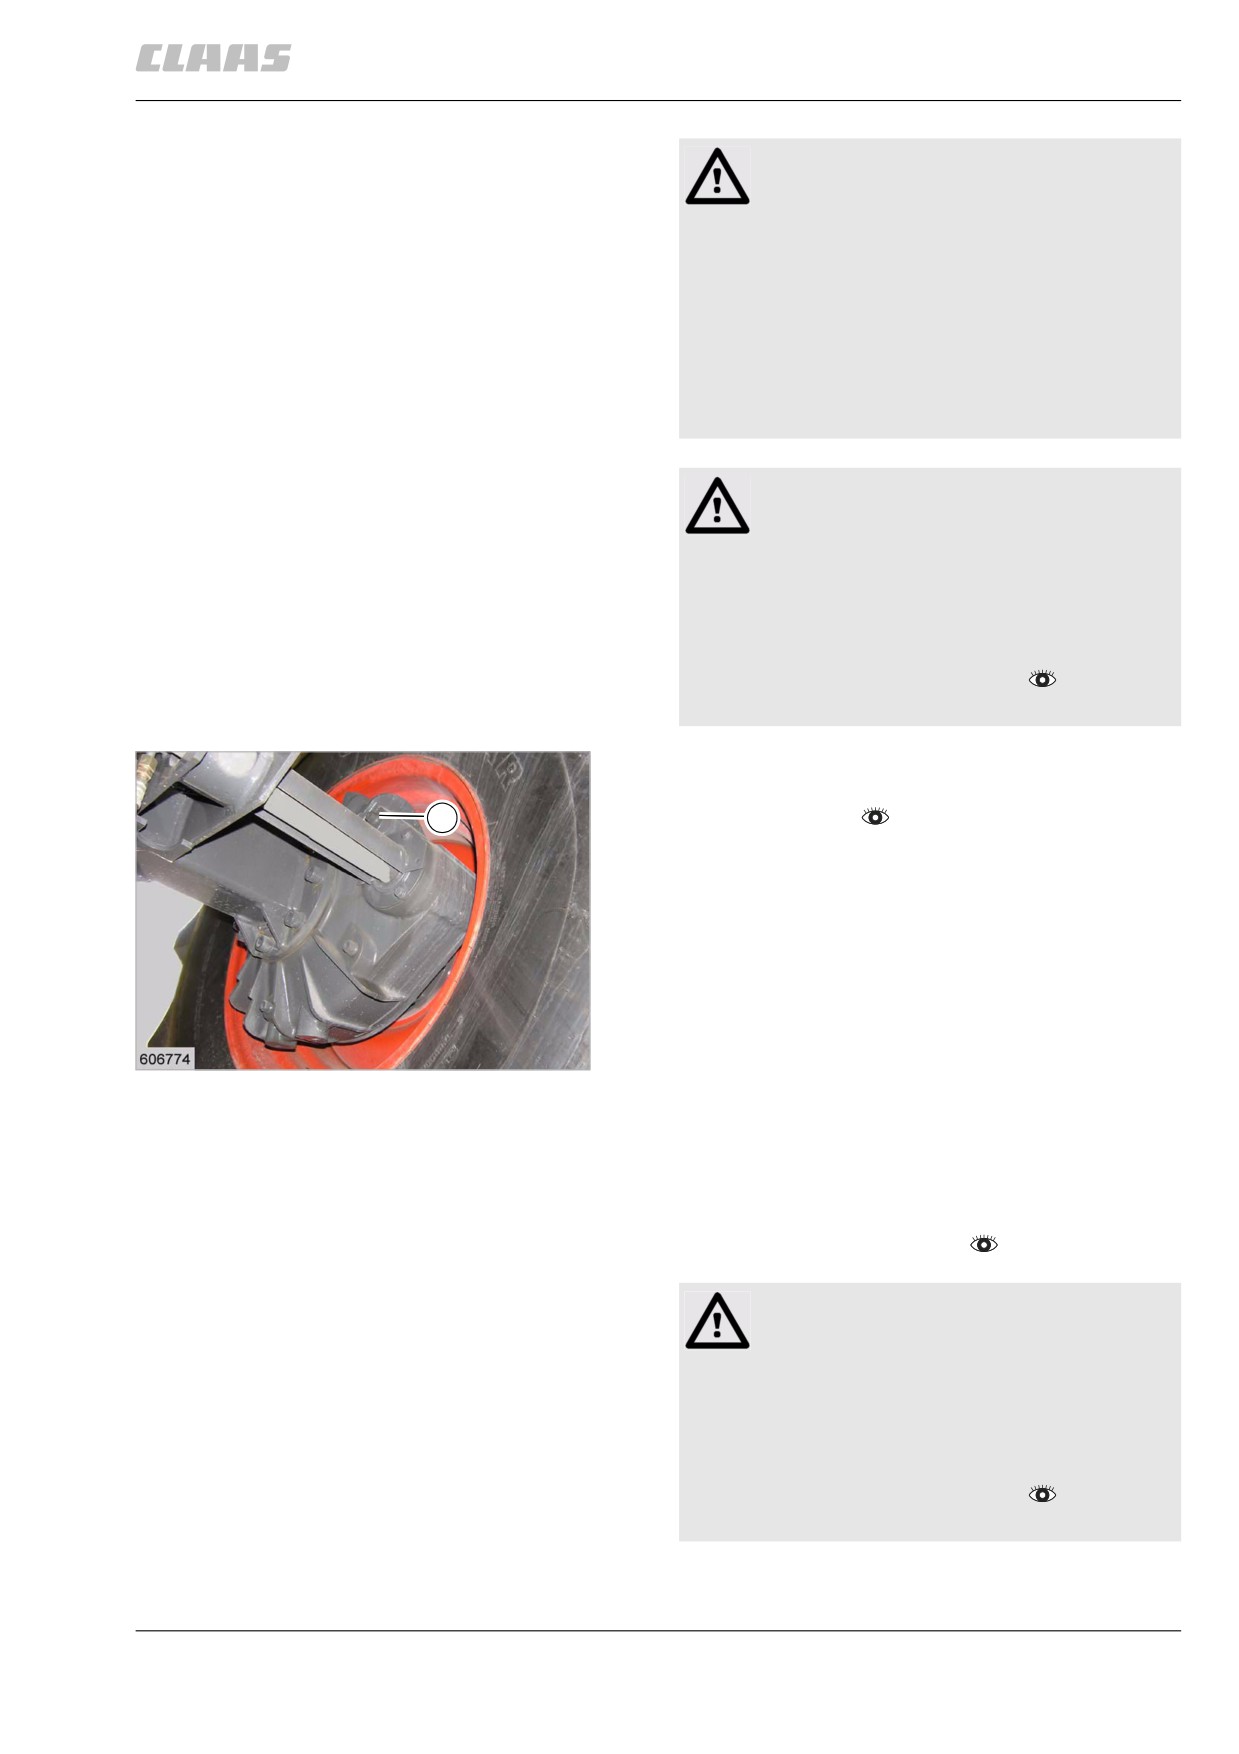
- Unscrew bolt (1).
- Fill in new oil.
- Check oil level
, top up if necessary.
– Remove dirt from bolt (1).
- Screw in bolt (1) with sealant.
- Repeat this procedure on the other side of the
1
machine.
65
23392
86784
13.6.7 Checking the final drive oil level
DOMINATOR 130
- Park the machine on level ground.
- Observe the general warnings at the beginning of
the "Maintenance" chapter.
Caution!
Machine operation with unpermitted or pol-
luted lubricants.
Machine damage.
- Ensure a clean environment.
- Use suitable and clean tools.
- Use permitted lubricants.
- Lubricants must be free of pollution.
- Unscrew bolt (1).
The oil level must be up to the bore at bolt (1).
- Top up oil if required.
- Remove dirt from bolt (1).
- Screw in bolt (1) with sealant.
- Repeat this procedure on the other side of the
1
machine.
66
Right side
23393
86786
13.6.8 Draining the final drive oil
DOMINATOR 130
- Park the machine on level ground.
- Observe the general warnings at the beginning of
the "Maintenance" chapter.
311
13 Maintenance
13.6 Chassis
67089
Warning!
Contact with hot liquids or machine parts.
Danger of burns
- Wear suitable protective clothing.
- Let liquids or machine parts cool down.
- Comply with instructions.
Environment!
Lubricants and fuels end up in the
environment.
Environmental pollution.
- Lubricants and fuels must be collected
and stored in suitable containers and dis-
posed of in a way that is harmless to the
environment and in accordance with
existing anti-pollution regulations.
-
Remove screw (1).
–
Collect the used oil in a sufficiently large
container.
-
Clean screw (1).
–
Turn in screw (1).
–
Repeat this procedure on the other side of the
machine.
1
67
Right side
23393
86788
13.6.9 Topping up the final drive oil
DOMINATOR 130
- Park the machine on level ground.
- Observe the general warnings at the beginning of
the "Maintenance" chapter.
Environment!
Lubricants and fuels end up in the
environment.
Environmental pollution.
- Lubricants and fuels must be collected
and stored in suitable containers and dis-
posed of in a way that is harmless to the
environment and in accordance with
existing anti-pollution regulations.
312
13 Maintenance
13.6 Chassis
67089
WARNING:
Use of unpermissible spare parts or
lubricants.
Machine damage or increased wear.
- Spare parts and lubricants must at least
comply with the technical standards
required by the manufacturer of the
implement!
- The use of genuine CLAAS spare parts
and lubricants is recommended.
Caution!
Machine operation with unpermitted or pol-
luted lubricants.
Machine damage.
- Ensure a clean environment.
- Use suitable and clean tools.
- Use permitted lubricants.
- Lubricants must be free of pollution.
-
Unscrew bolt (1).
–
Fill in new oil.
1
–
Check oil level
, top up if necessary.
–
Remove dirt from bolt (1).
–
Screw in bolt (1) with sealant.
–
Repeat this procedure on the other side of the
machine.
68
Right side
23393
86771
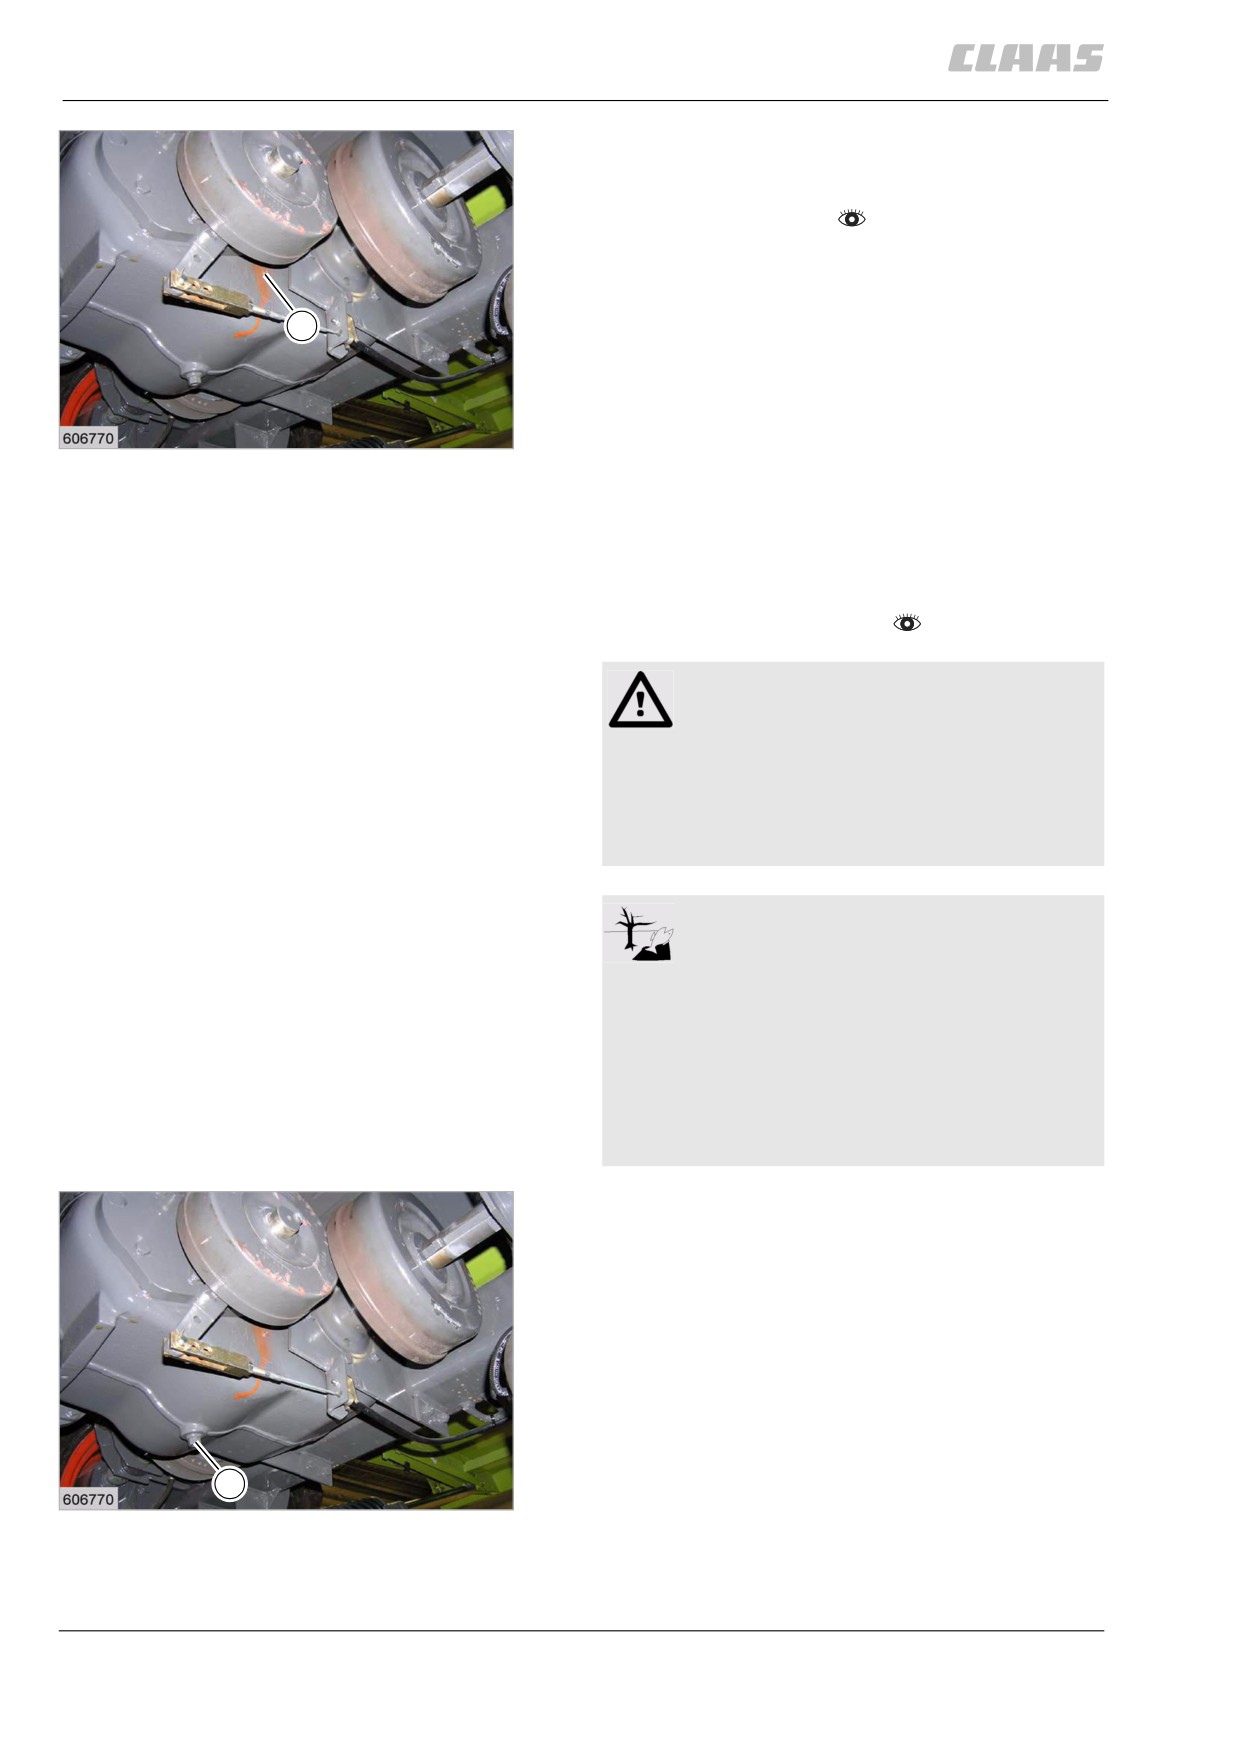
13.6.10 Checking the drive axle gearbox oil
level
- Park the machine on level ground.
- Observe the general warnings at the beginning of
the "Maintenance" chapter.
Caution!
Machine operation with unpermitted or pol-
luted lubricants.
Machine damage.
- Ensure a clean environment.
- Use suitable and clean tools.
- Use permitted lubricants.
- Lubricants must be free of pollution.
313
13 Maintenance
13.6 Chassis
67089
- Unscrew bolt (1).
The oil level must be up to the bore at bolt (1).
- Top up oil if required.
- Remove dirt from bolt (1).
- Screw in bolt (1) with sealant.
1
69
23389
86773
13.6.11 Draining the oil from the drive axle
gearbox
-
Park the machine on level ground.
–
Observe the general warnings at the beginning of
the "Maintenance" chapter.
Warning!
Contact with hot liquids or machine parts.
Danger of burns
- Wear suitable protective clothing.
- Let liquids or machine parts cool down.
- Comply with instructions.
Environment!
Lubricants and fuels end up in the
environment.
Environmental pollution.
- Lubricants and fuels must be collected
and stored in suitable containers and dis-
posed of in a way that is harmless to the
environment and in accordance with
existing anti-pollution regulations.
-
Remove screw (1).
–
Collect the used oil in a sufficiently large
container.
-
Clean screw (1).
–
Turn in screw (1).
1
70
23389
314
13 Maintenance
13.6 Chassis
67089
86775
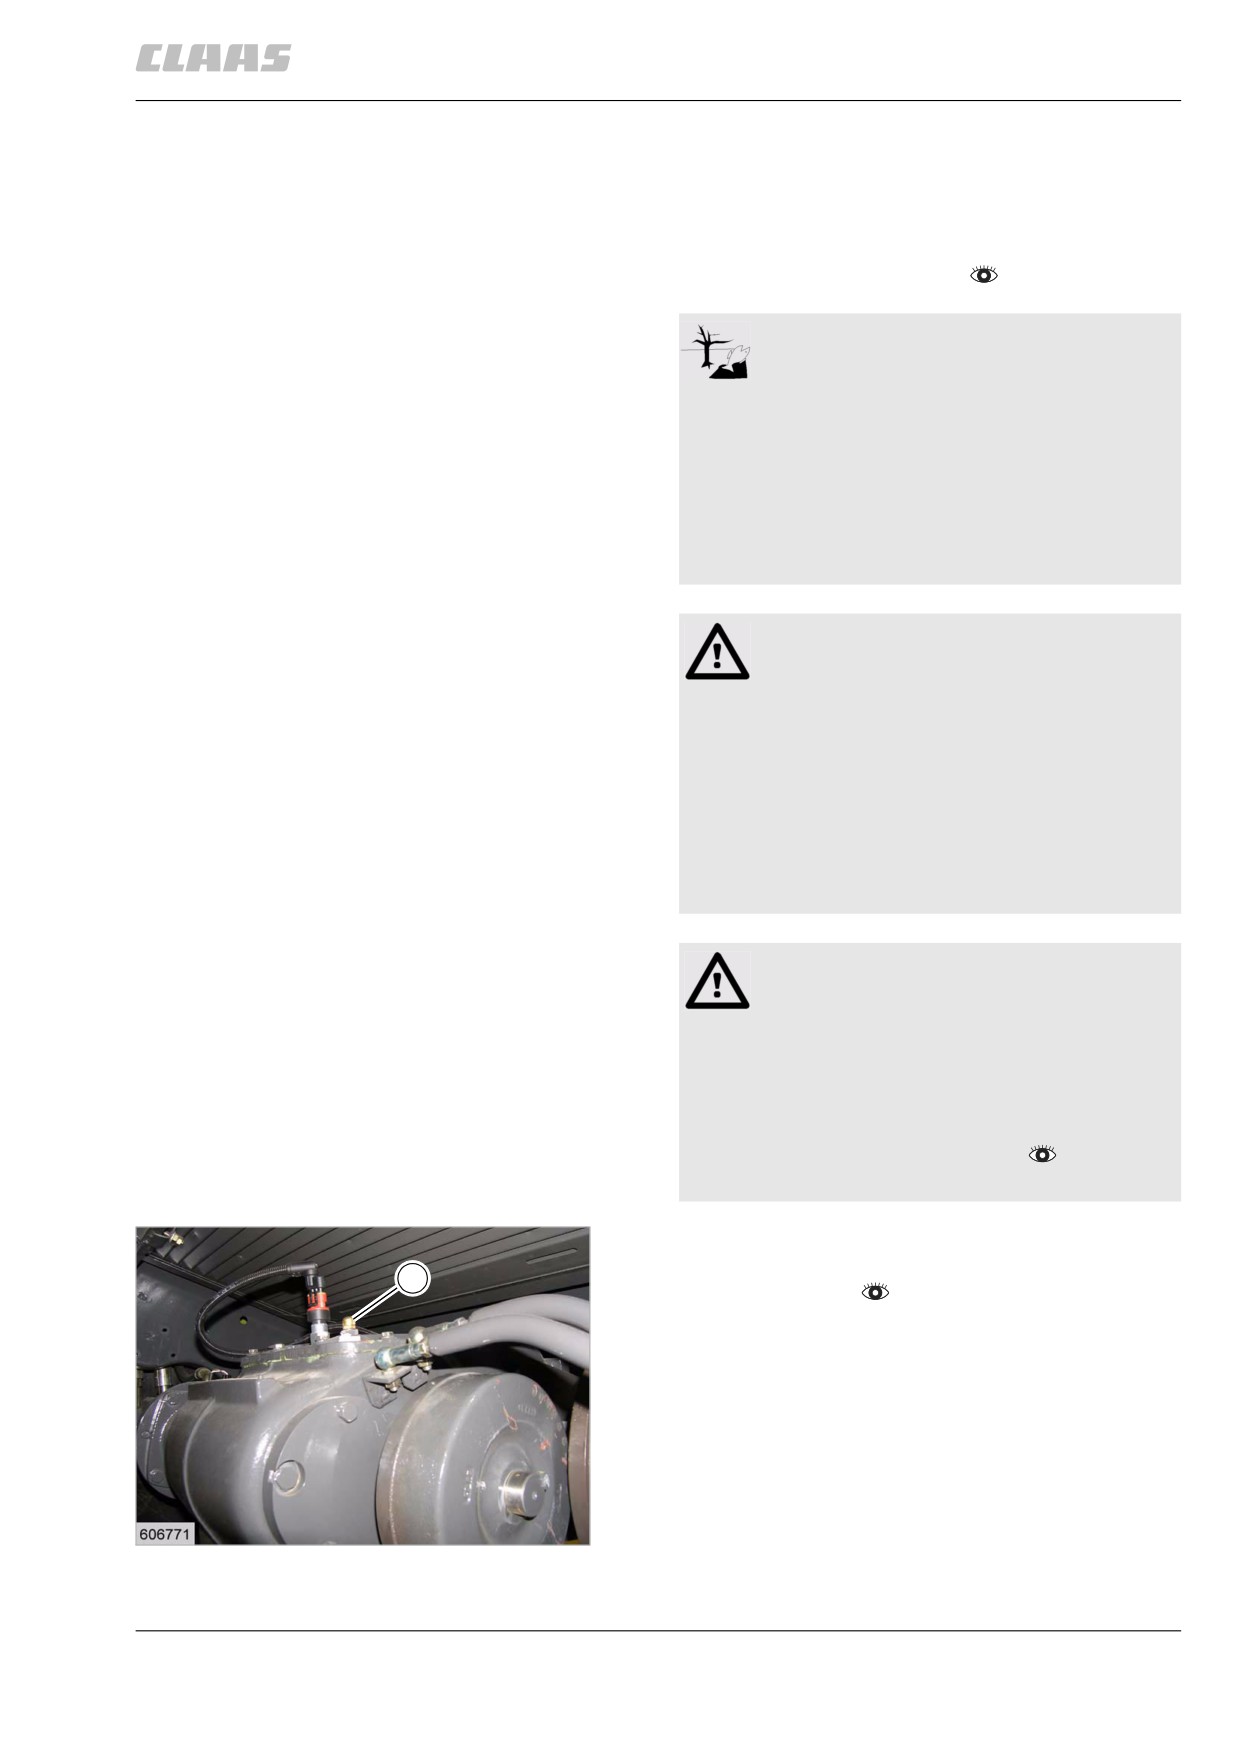
13.6.12 Topping up oil in the drive axle
gearbox
-
Park the machine on level ground.
–
Observe the general warnings at the beginning of
the "Maintenance" chapter.
Environment!
Lubricants and fuels end up in the
environment.
Environmental pollution.
- Lubricants and fuels must be collected
and stored in suitable containers and dis-
posed of in a way that is harmless to the
environment and in accordance with
existing anti-pollution regulations.
WARNING:
Use of unpermissible spare parts or
lubricants.
Machine damage or increased wear.
- Spare parts and lubricants must at least
comply with the technical standards
required by the manufacturer of the
implement!
- The use of genuine CLAAS spare parts
and lubricants is recommended.
Caution!
Machine operation with unpermitted or pol-
luted lubricants.
Machine damage.
- Ensure a clean environment.
- Use suitable and clean tools.
- Use permitted lubricants.
- Lubricants must be free of pollution.
-
Unscrew bolt (1).
–
Fill in new oil.
1
-
Check oil level
, top up if necessary.
–
Remove dirt from bolt (1).
–
Screw in bolt (1) with sealant.
71
23390
315
13 Maintenance
13.6 Chassis
67089
86622
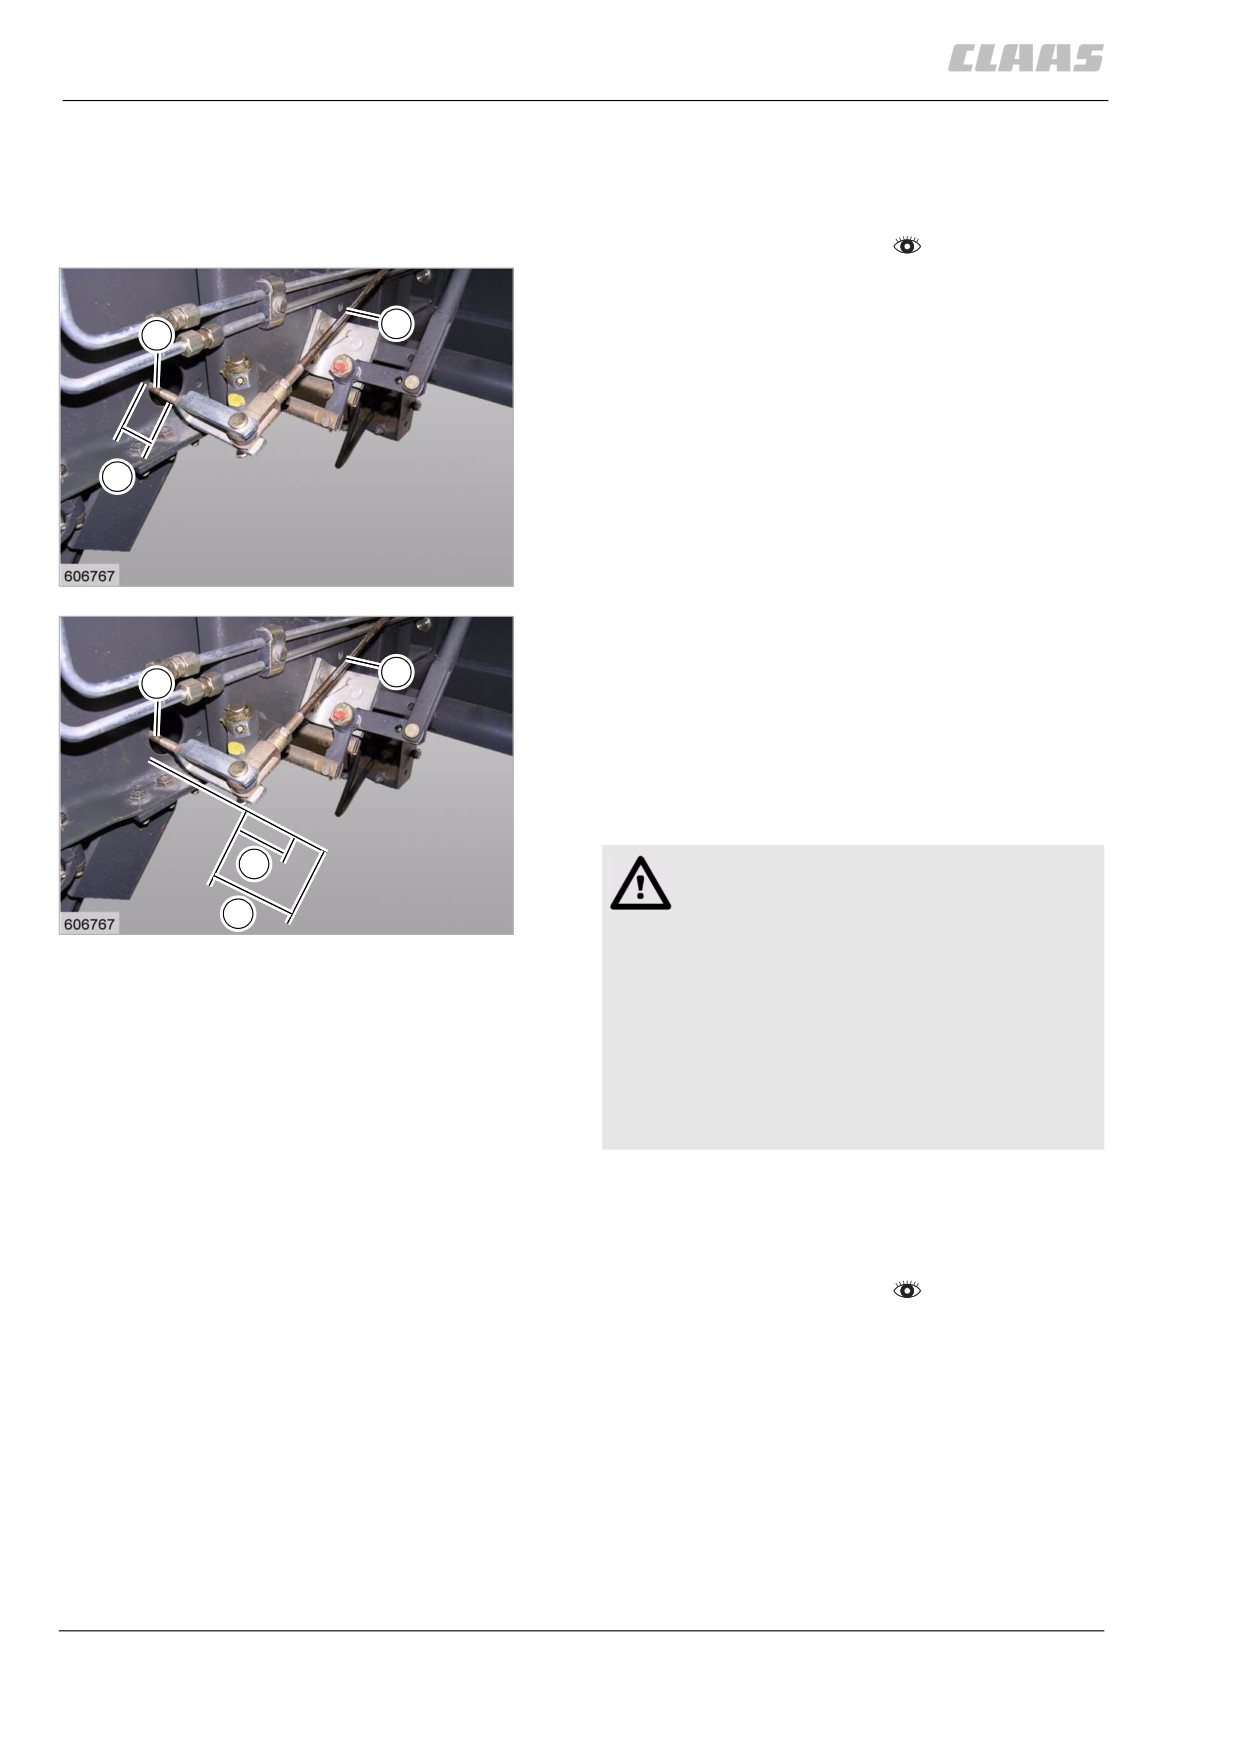
13.6.13 Adjusting the chassis clutch
DOMINATOR 130
- Observe the general warnings at the beginning of
the "Maintenance" chapter.
- Unhinge rods (1 and 2) at lever (3).
- Pull rod (1) to the outside until a resistance is
2
clearly felt and adjust the pre-set
1
dimension (C = 40 mm) from the inner edge of the
nut up to the side panel.
C
72
23386
- Fit rods (1 and 2) to lever (3), using pin (4).
- Depress the clutch pedal until a clear resistance is
2
felt, measure the play (A = 7 - 11 mm) and adjust
1
at rod (1) if required. Note: The play should be set
to the upper tolerance limit (10 - 11 mm).
- Depress the clutch pedal to the maximum, meas-
ure the overall clutch path (B = 20±1 mm) and
adjust at rod (2) if required.
A
Caution
Incorrect installation of components.
B
73
Increased wear on components or machine
23386
damage.
- The yokes (5) of rods (1 and 2) must not
touch lever (3) either when operated or
when in rest position.
- Observe the adjusting dimensions.
- Ensure that the overall clutch path
is (B = 20±1 mm).
86746
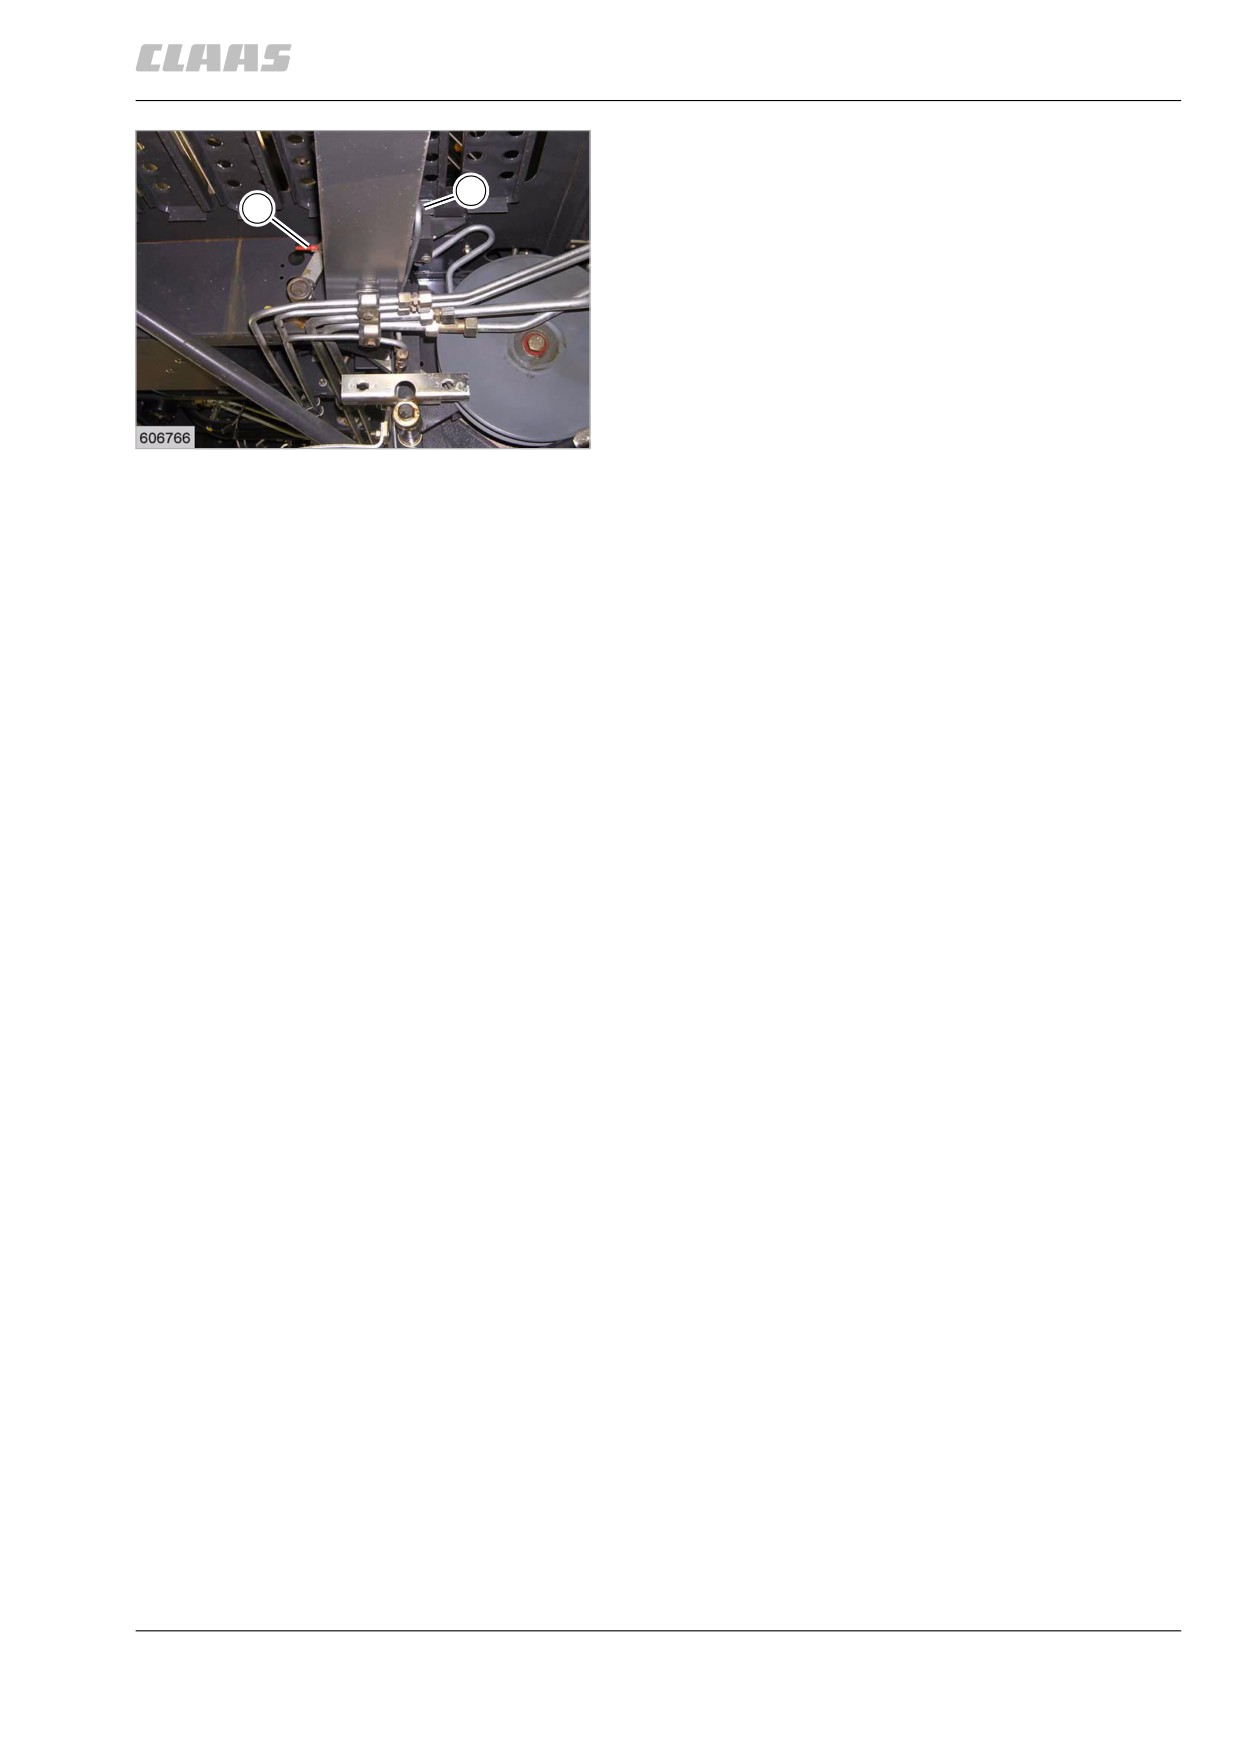
13.6.14 Adjusting the short-circuit valve
DOMINATOR 130
- Observe the general warnings at the beginning of
the "Maintenance" chapter.
316
13 Maintenance
13.6 Chassis
67089
- With the clutch pedal in rest position, adjust link-
age (2) so that the actuating lever of short-circuit
1
valve (1) is retracted by 3 to 5 mm.
2
74
23387
317
13 Maintenance
13.7 Brake
67089
13.7 Brake
86789
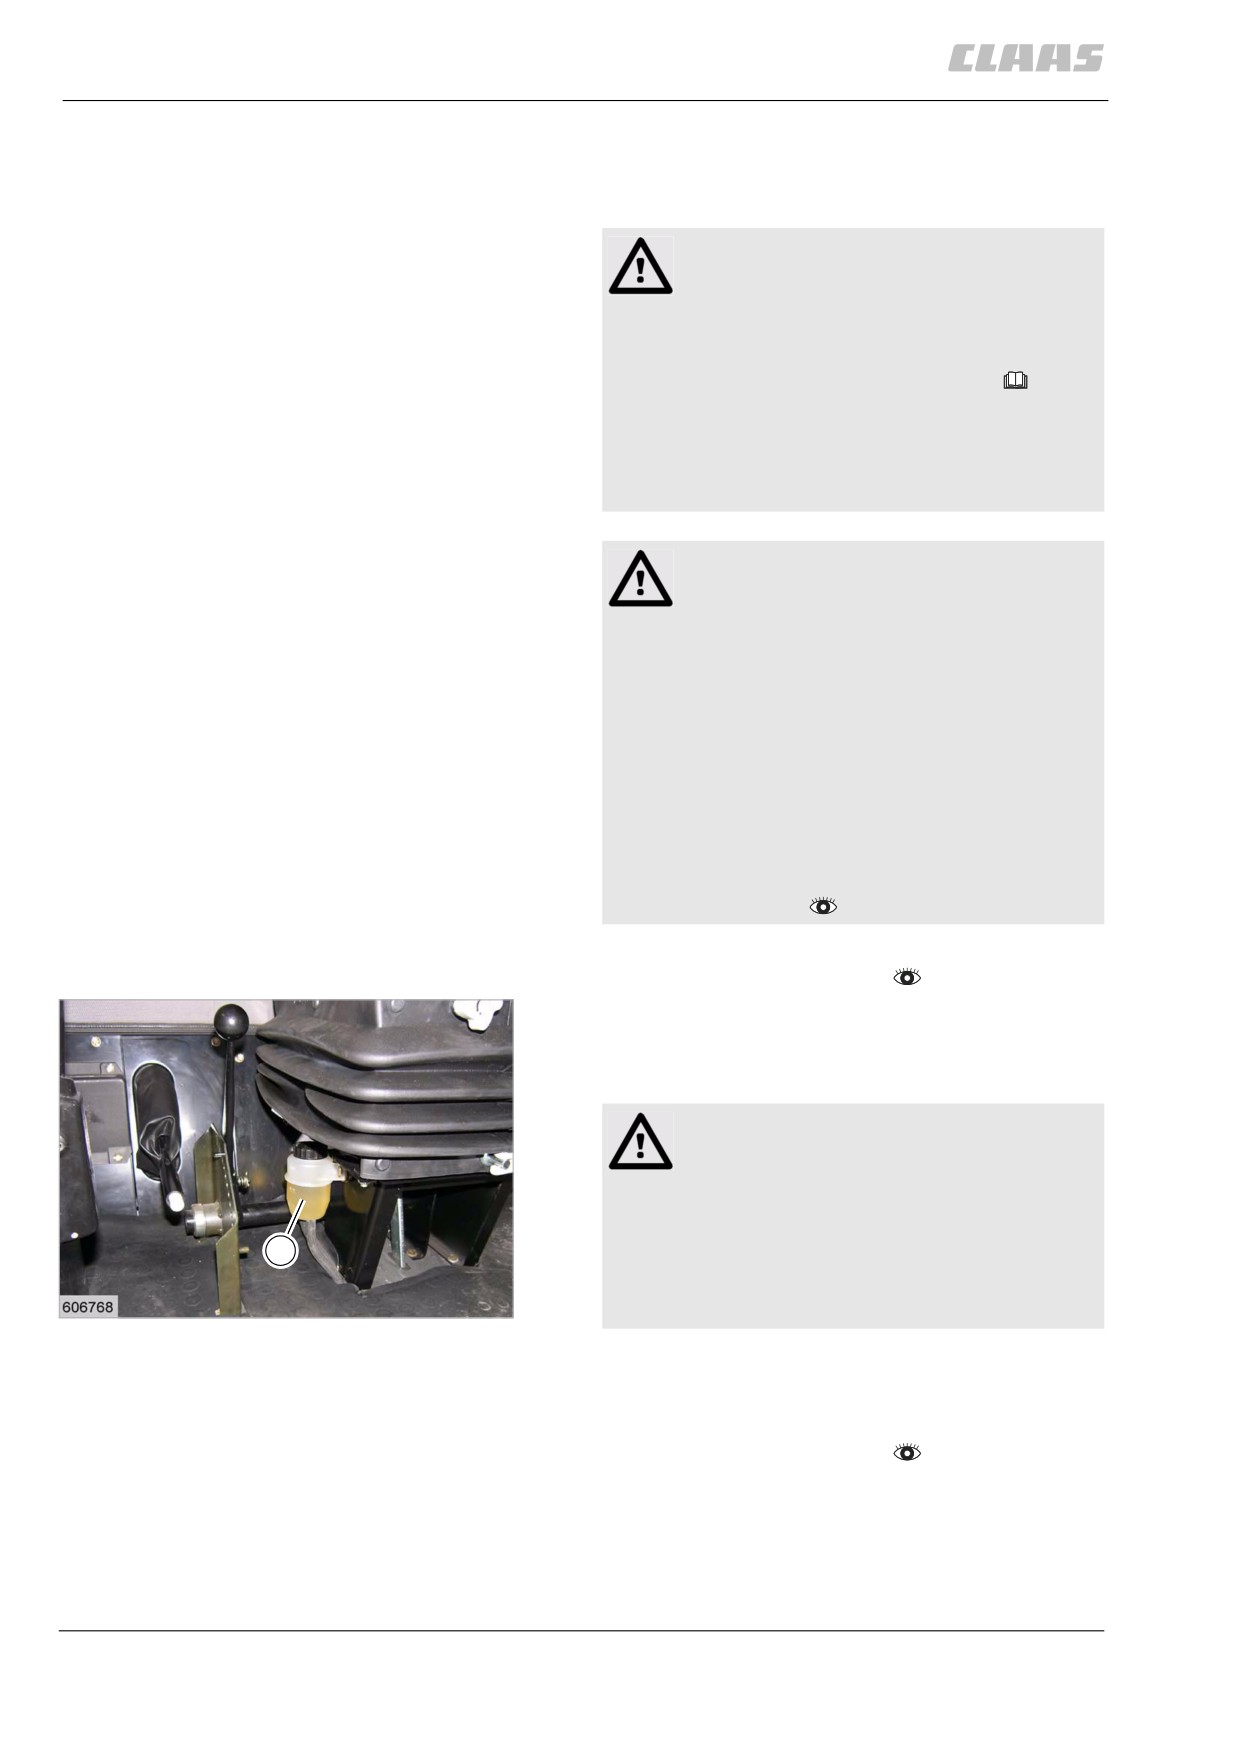
13.7.1 Checking / refilling brake fluid
Warning!
Incorrect handling of brake fluid.
Medium-grade injuries.
- Observe the details regarding brake fluid
use provided on the container.
- Wear safety gloves.
- Collect brake fluid in a suitable container.
- Dispose of brake fluid in accordance with
existing environmental regulations!
Danger!
Insufficient brake system maintenance.
Death or serious injuries!
- Inspect the brake system thoroughly at
regular intervals.
- Adjustment, repairs and service work on
the brake system may be performed only
by authorised specialist workshops.
- Check the level of the brake fluid at regu-
lar intervals.
Only use the recommended type of brake
fluid and change the brake fluid as
specified.
-
Observe the general warnings at the beginning of
the "Maintenance" chapter.
-
Open the lid (1).
–
Top up brake fluid up to the specified mark.
–
Close the lid (1).
Danger!
Machine loses brake fluid.
Death or serious injuries!
- In case of loss of brake fluid, there is a
1
leak in the brake system.
- Have the brake system inspected by an
75
authorised workshop.
23388
86791
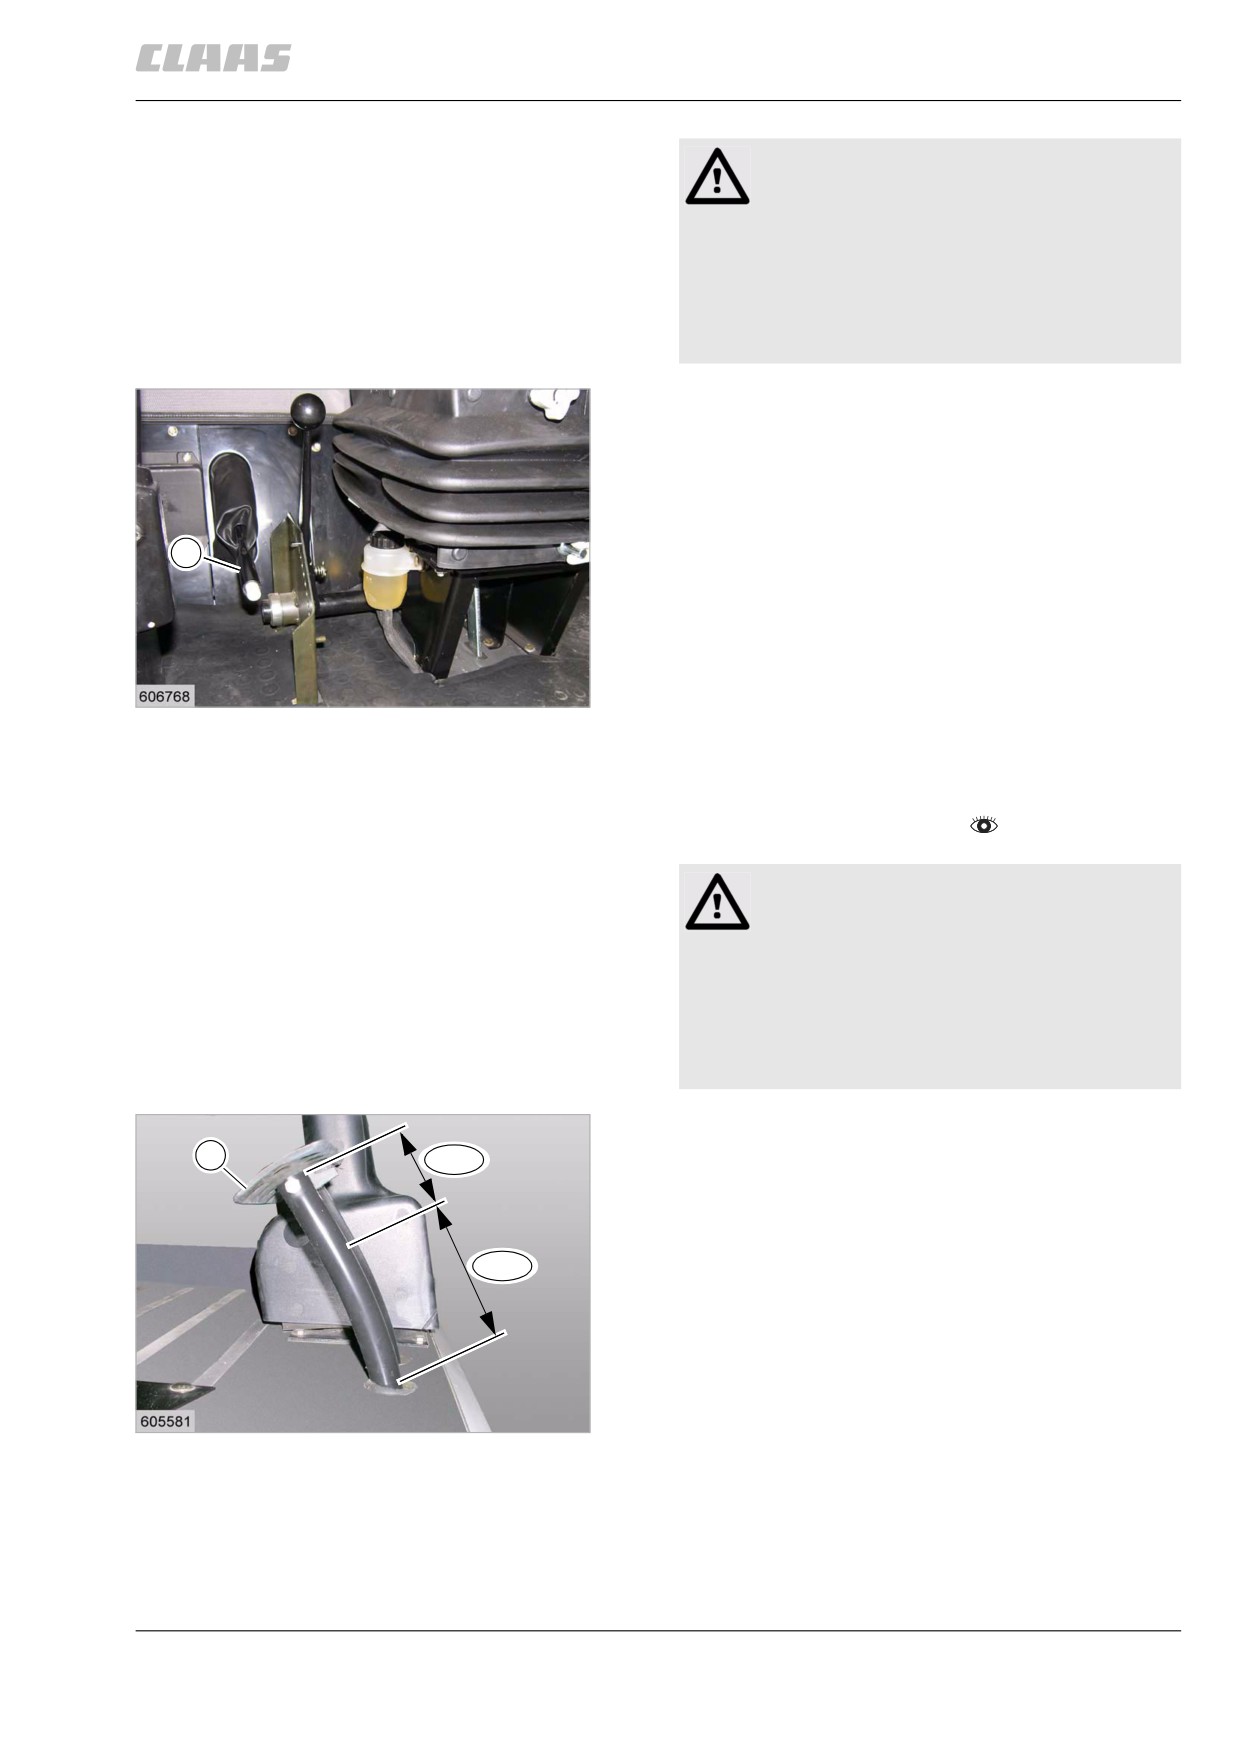
13.7.2 Adjusting the parking brake
- Observe the general warnings at the beginning of
the "Maintenance" chapter.
318
13 Maintenance
13.7 Brake
67089
Danger!
Improperly adjusted brake system.
Death or serious injuries!
- Adjustment, repairs and service work on
the brake system may be performed only
by authorised specialist workshops.
- Comply with instructions.
Check the adjustment of the parking brake (1).
The parking brake is correctly adjusted if the brake
takes effect after the first 3 to 4 teeth are actuated.
- Ensure that the ratchet still engages securely in
the segment even after prolonged use of the
1
machine.
- If required, adjust parking brake.
- If necessary, change segment.
76
23388
80335
13.7.3 Adjusting the foot brake
- Observe the general warnings at the beginning of
the "Maintenance" chapter.
Danger!
Improperly adjusted brake system.
Death or serious injuries!
- Adjustment, repairs and service work on
the brake system may be performed only
by authorised specialist workshops.
- Comply with instructions.
Check the adjustment of the foot brake (1).
1
1/3
The foot brake is correctly adjusted when the brake
takes effect after depressing the pedal by one third of
its path.
- Check the braking effect.
2/3
- Check the brake pads at regular intervals.
- Replace the brake pads.
77
19470
319
13 Maintenance
13.8 Drive belts / drive chains
67089
13.8 Drive belts / drive chains
43644
13.8.1 General warnings
In the following sections of this chapter, a procedure
instruction refers to the following general warnings.
Danger!
Always stop the engine before carrying out
any work on the machine.
Moving machine parts and / or unexpected
machine movement.
Death or serious injury.
- Diesel engine OFF.
- Apply parking brake.
- Remove the ignition key.
- Remove key of battery isolating
switch.
- Wait for machine parts which run on have
come to a complete halt.
- Secure machine by wheel chocks.
- Ensure that the machine cannot be
started by any third persons.
Danger!
Machine components may run on although the
drive has been shut down.
Death or serious injury.
- Never touch any machine parts that are
running on.
- Wait until all machine parts have stopped
moving.
320
13 Maintenance
13.8 Drive belts / drive chains
67089
87740
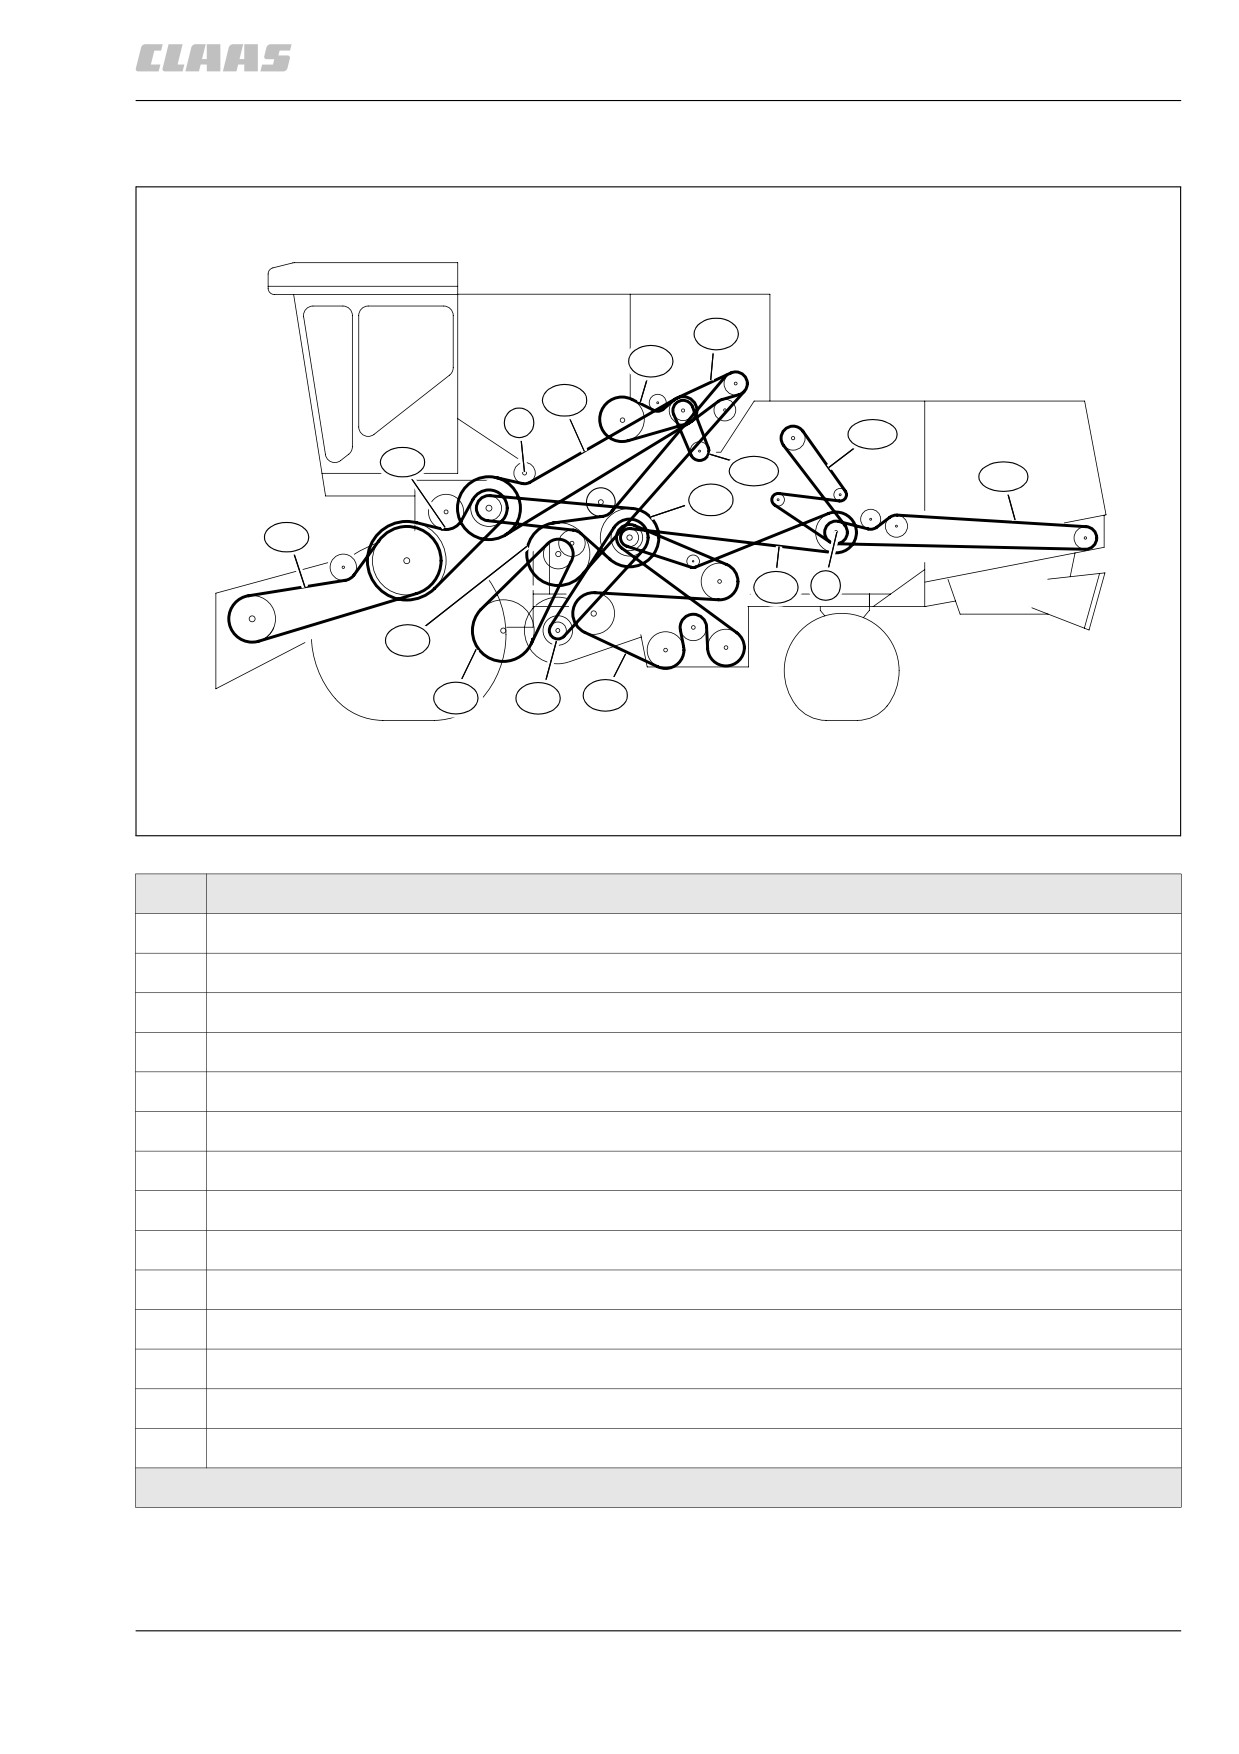
13.8.2 Drive diagram, left side DOMINATOR 150 / 140 / 130
R5
R4
R3
W
R10
R2
R12
R11
R6
R1
R9
S
R13
R14
R7
R8
30063
78
Designation
R1
Front attachment drive, stage 2
R2
Front attachment drive, stage 1
R3
Threshing mechanism drive
R4
Grain tank unloading drive 1st step
R5
Hydraulic ground drive DOMINATOR 150 / 140
R6
Sieve pan drive 1st step
R7
Fan drive
R8
Sieve pan drive 2nd step
R9
Straw walker drive
R10
Intensive separation system drive
R11
Straw spreader drive
R12
Air conditioner compressor drive
R13
Ground drive DOMINATOR 130
R14
Ground drive variable-speed drive DOMINATOR 130
W=Impeller, S=Straw walker drive shaft, R=Drive belt
321
13 Maintenance
13.8 Drive belts / drive chains
67089
87248
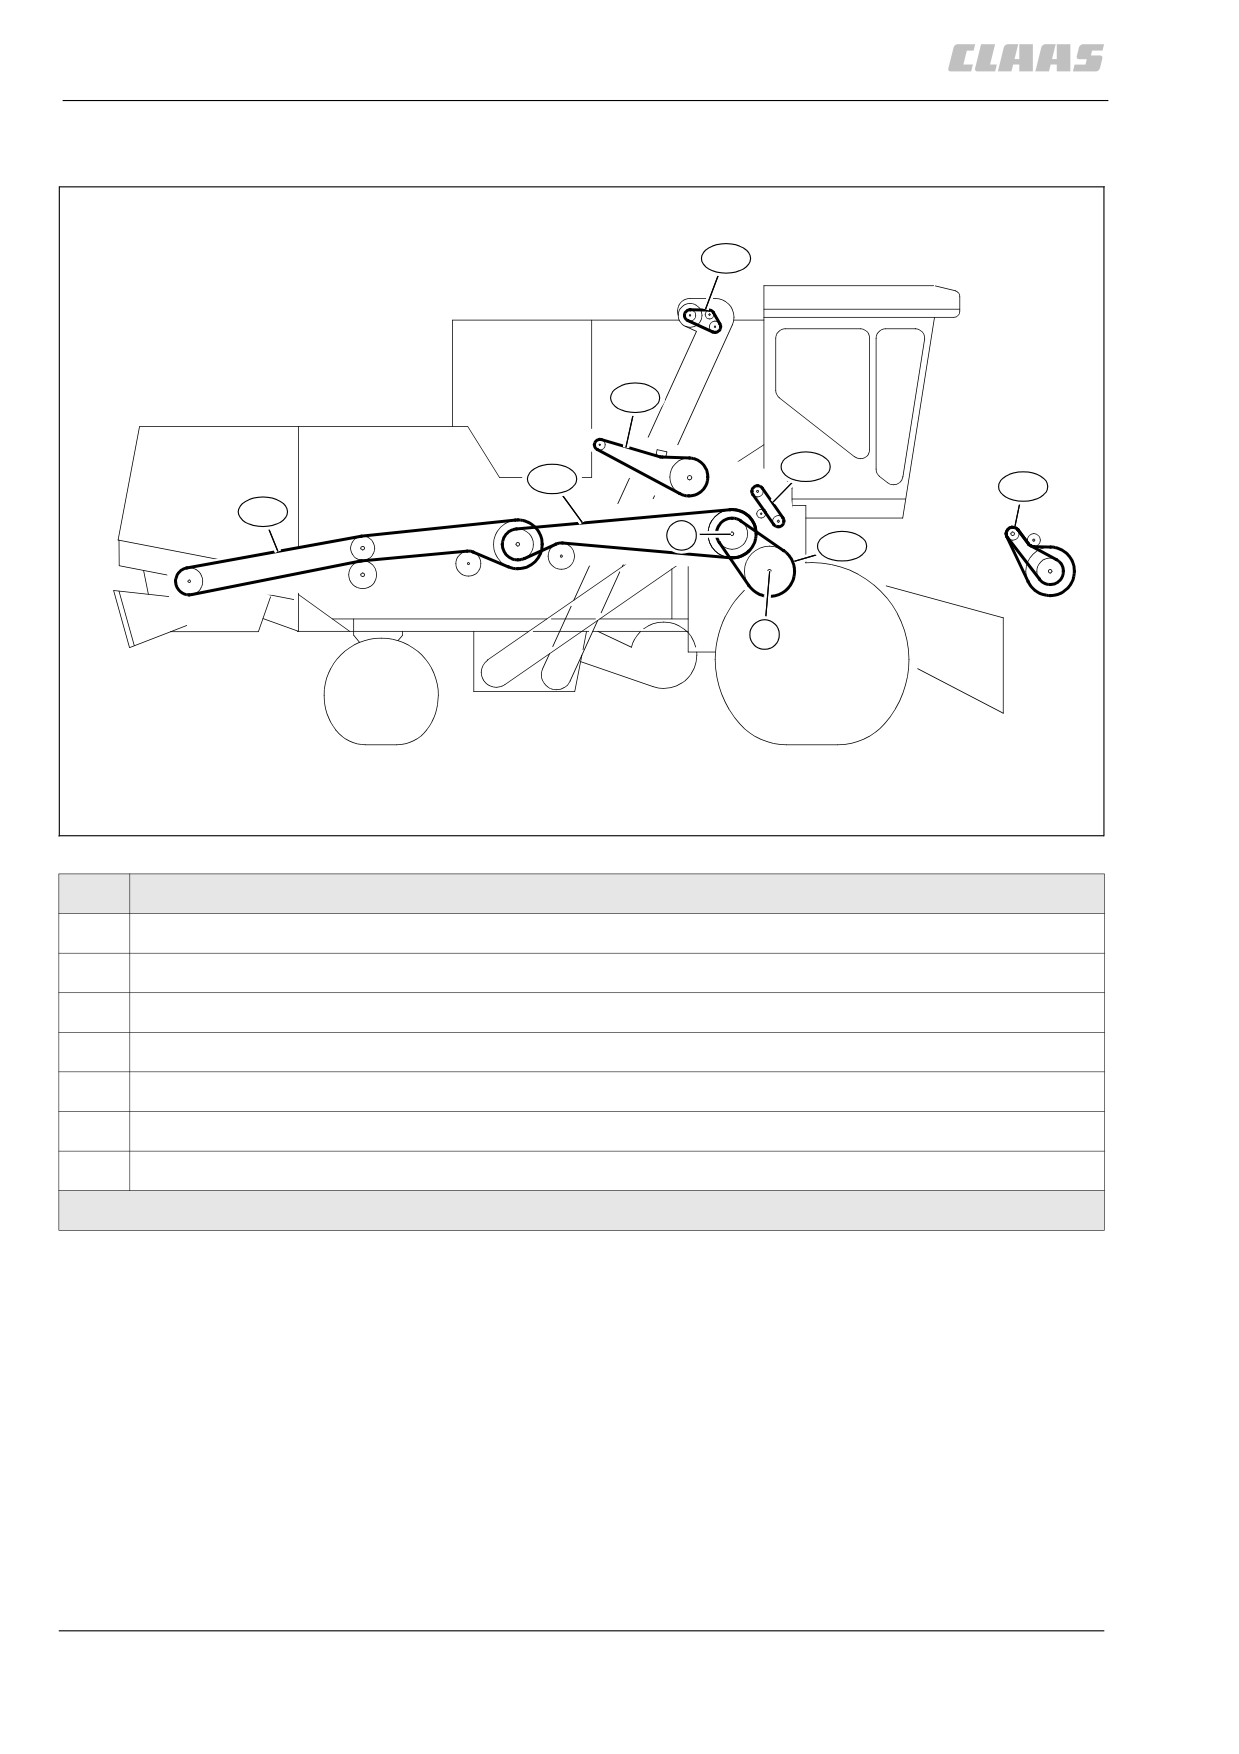
13.8.3 Drive diagram, right side DOMINATOR 150 / 140 / 130
K56
K55
K57
R41
K54
R40
W
R42
D
29863
79
Designation
R40
Straw chopper drive 2nd step
R41
Straw chopper drive 1st step
R42
Threshing drum variable speed drive
K54
Threshing drum chain drive
K55
Grain tank unloading drive 2nd step
K56
Grain tank filler auger drive
K57
Returns auger drive
D=Threshing drum, W=Impeller, R=Drive belt, K=Drive chains
322
13 Maintenance
13.8 Drive belts / drive chains
67089
72131
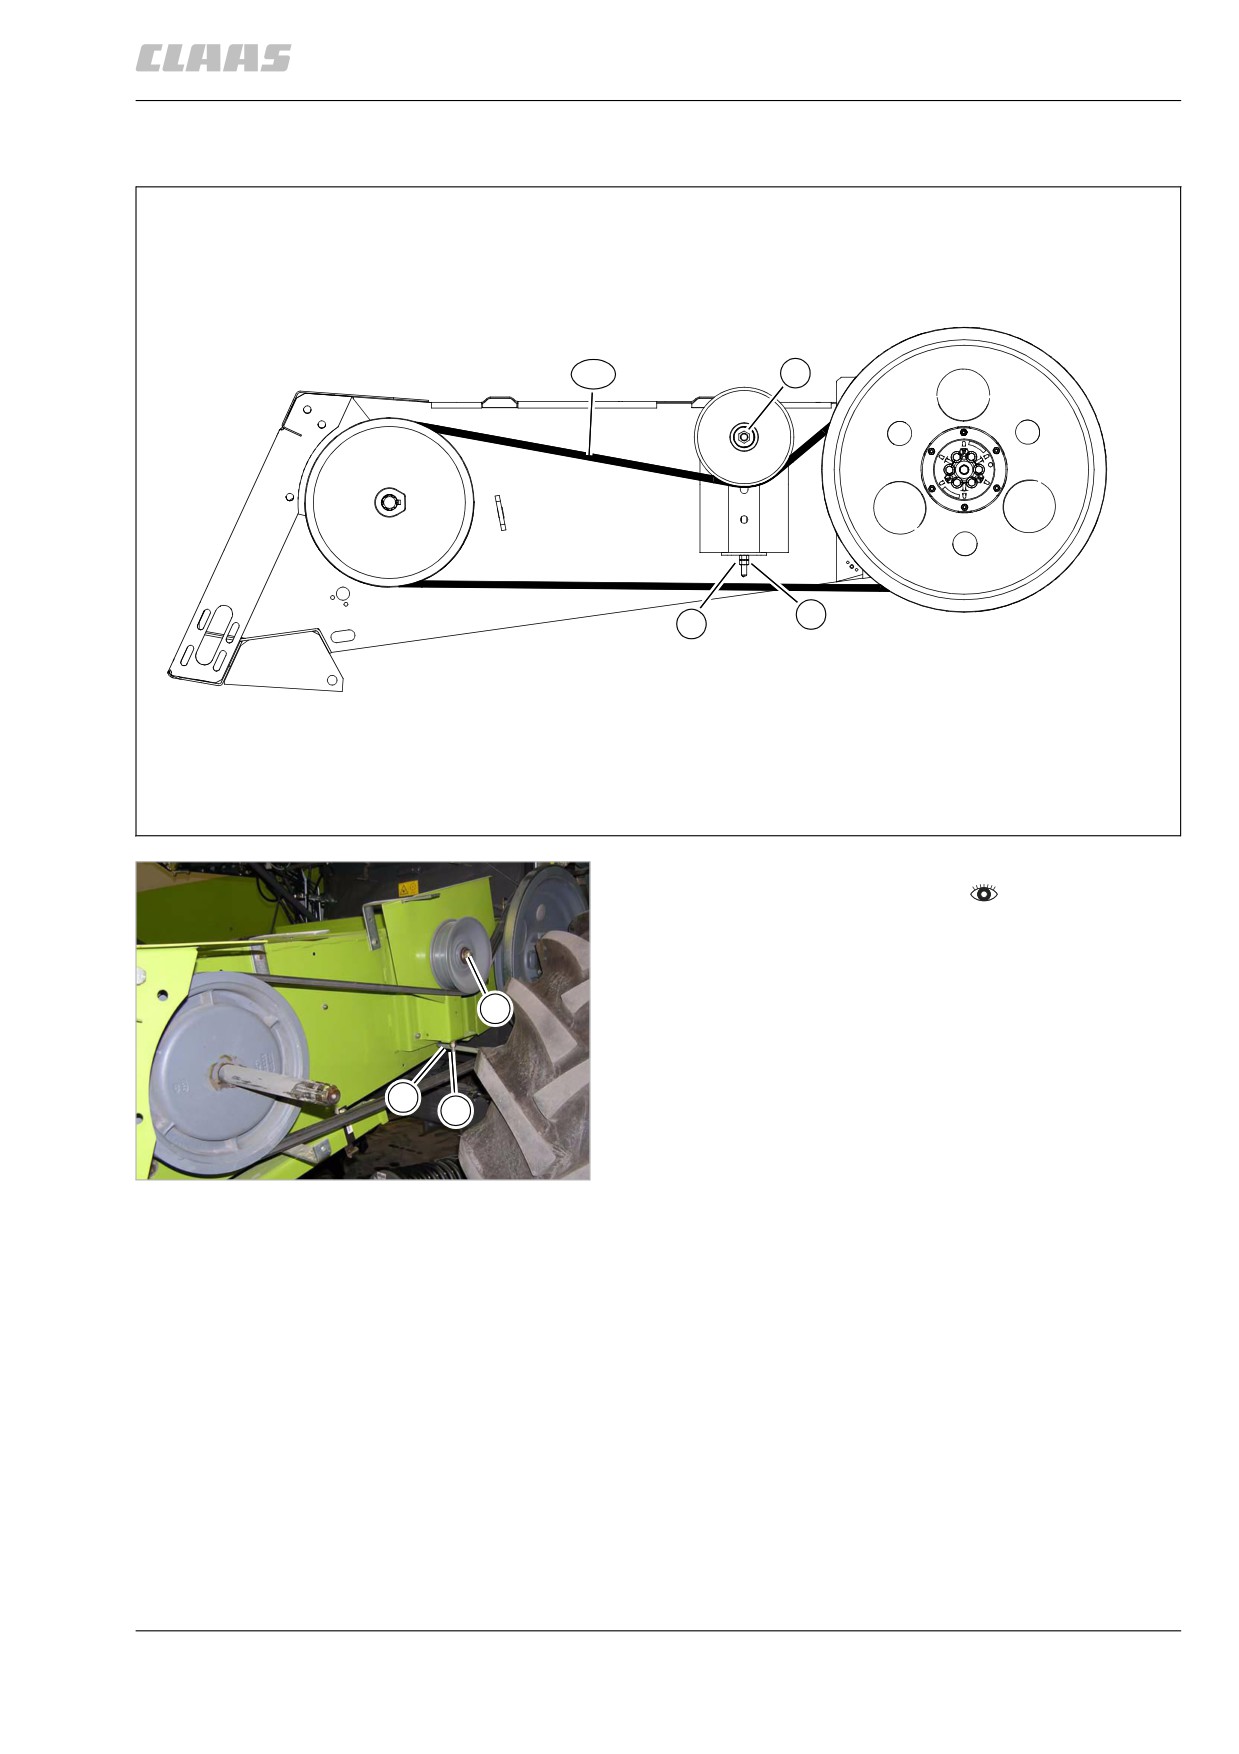
13.8.4 Adjusting belt (R1)
R1
1
3
2
29864
80
- Observe the general warnings at the beginning of
the "Maintenance" chapter.
- Loosen nut (1).
- Turn nuts (2) and (3) until the belt is tensioned.
- Lock nuts (2) and (3).
1
- Tighten nut (1).
Tightening torque = 130 Nm
- Carry out a test run and check belt tension.
2
3
81
23846
323