CLAAS DOMINATOR 150 / 140 / 130. Operator’s Manual - page 19
13 Maintenance
13.5 Engine
67089
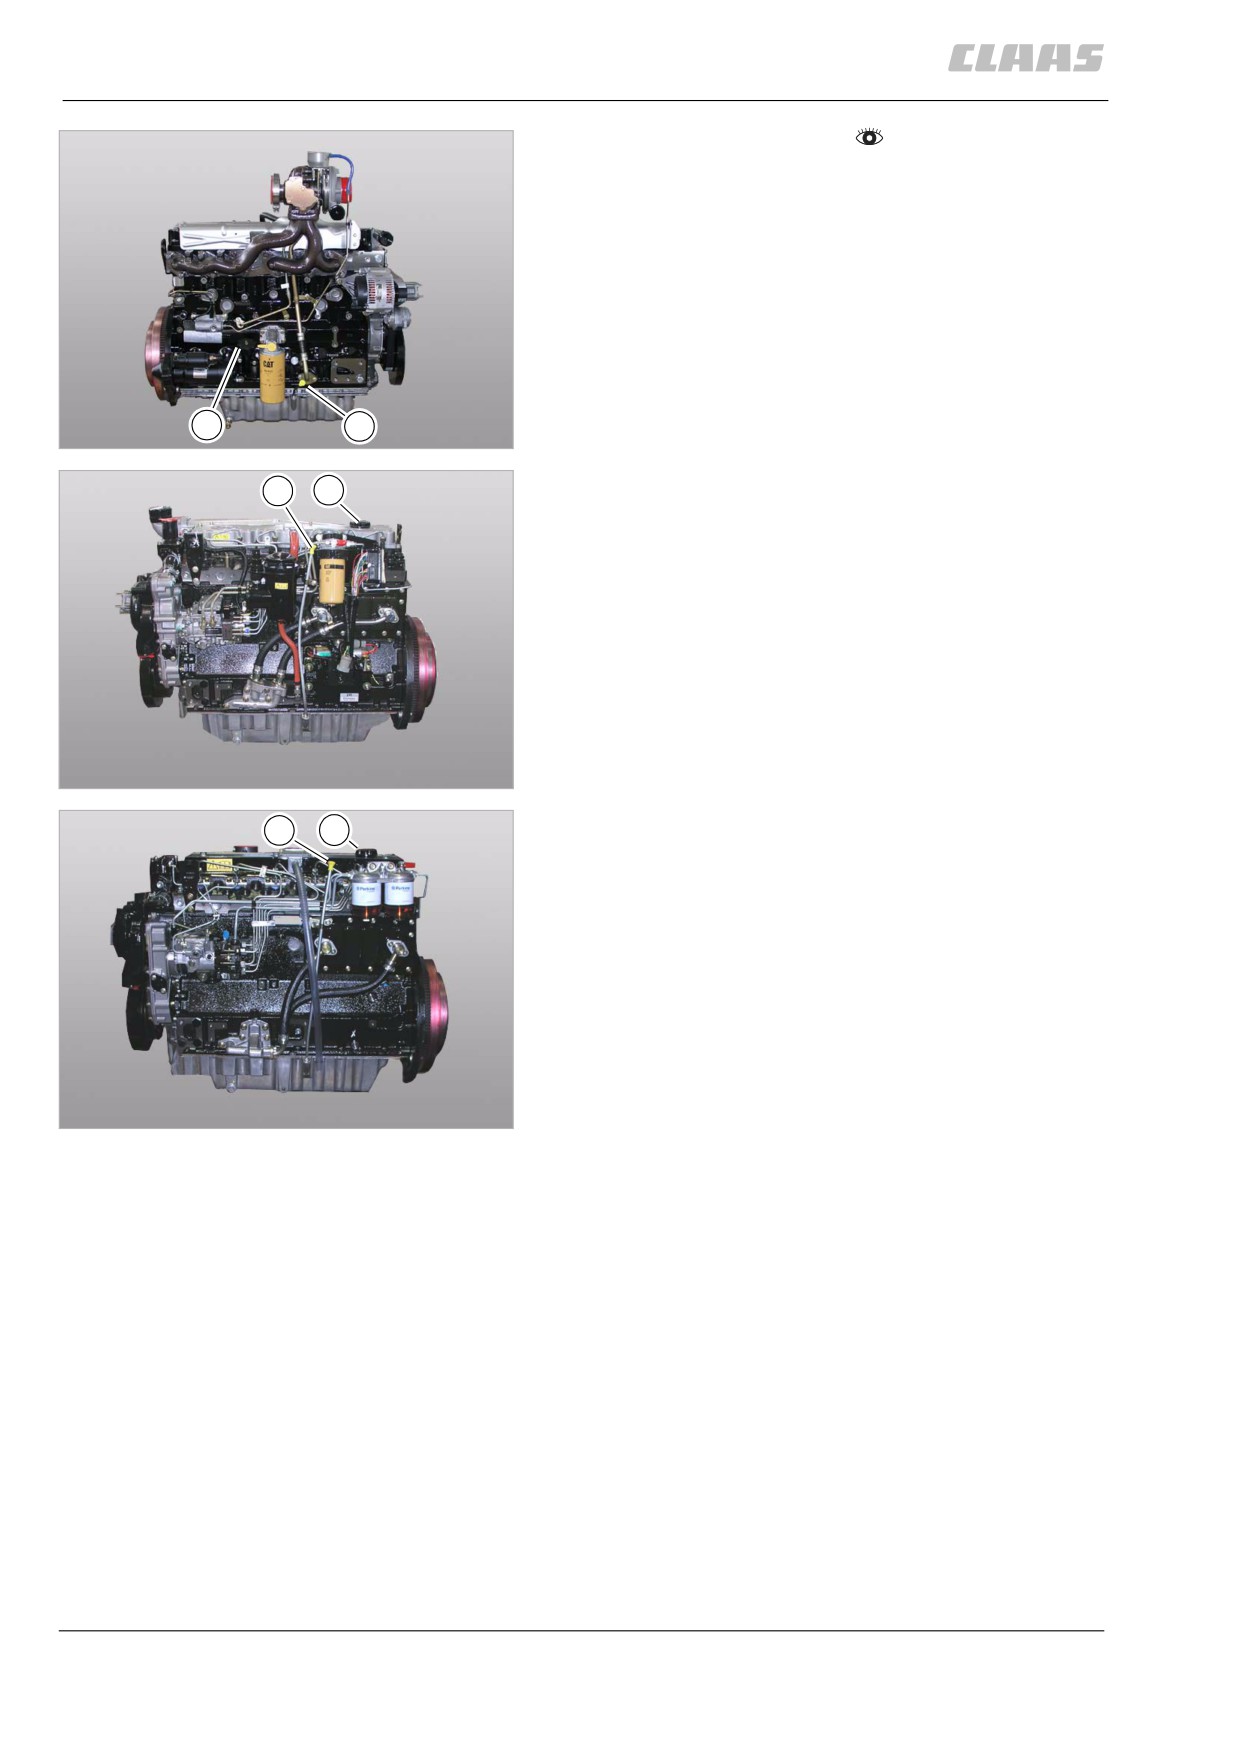
- Stop the diesel engine.
- Wait for about 5 minutes.
- Read the oil level on the gauge rod (1).
The oil must not be higher than the FULL mark (maxi-
mum) and must not drop below the SAFE mark
(minimum) on the oil dipstick.
- If necessary, top up oil at (2).
2
1
30
CATERPILLAR C-6.6
27295
1
2
31
CATERPILLAR 3056 E
29340
1
2
32
PERKINS 1006-6T
29344
292
13 Maintenance
13.5 Engine
67089
86290
13.5.19 Changing the diesel engine oil / oil
filter
- Observe the general warnings at the beginning of
the "Maintenance" chapter.
- Observe the information provided in the operator's
manual of the engine manufacturer.
Warning!
Contact with hot liquids or machine parts.
Danger of burns
- Wear suitable protective clothing.
- Let liquids or machine parts cool down.
1
33
- Comply with instructions.
CATERPILLAR C-6.6
27295
1
Environment!
Lubricants and fuels end up in the
environment.
Environmental pollution.
- Lubricants and fuels must be collected
and stored in suitable containers and dis-
posed of in a way that is harmless to the
environment and in accordance with
existing anti-pollution regulations.
34
Drain the engine oil immediately after switching off the
CATERPILLAR 3056 E
29340
engine with the engine still at operating temperature in
1
order to flush dirt particles in the sump out with the
draining oil.
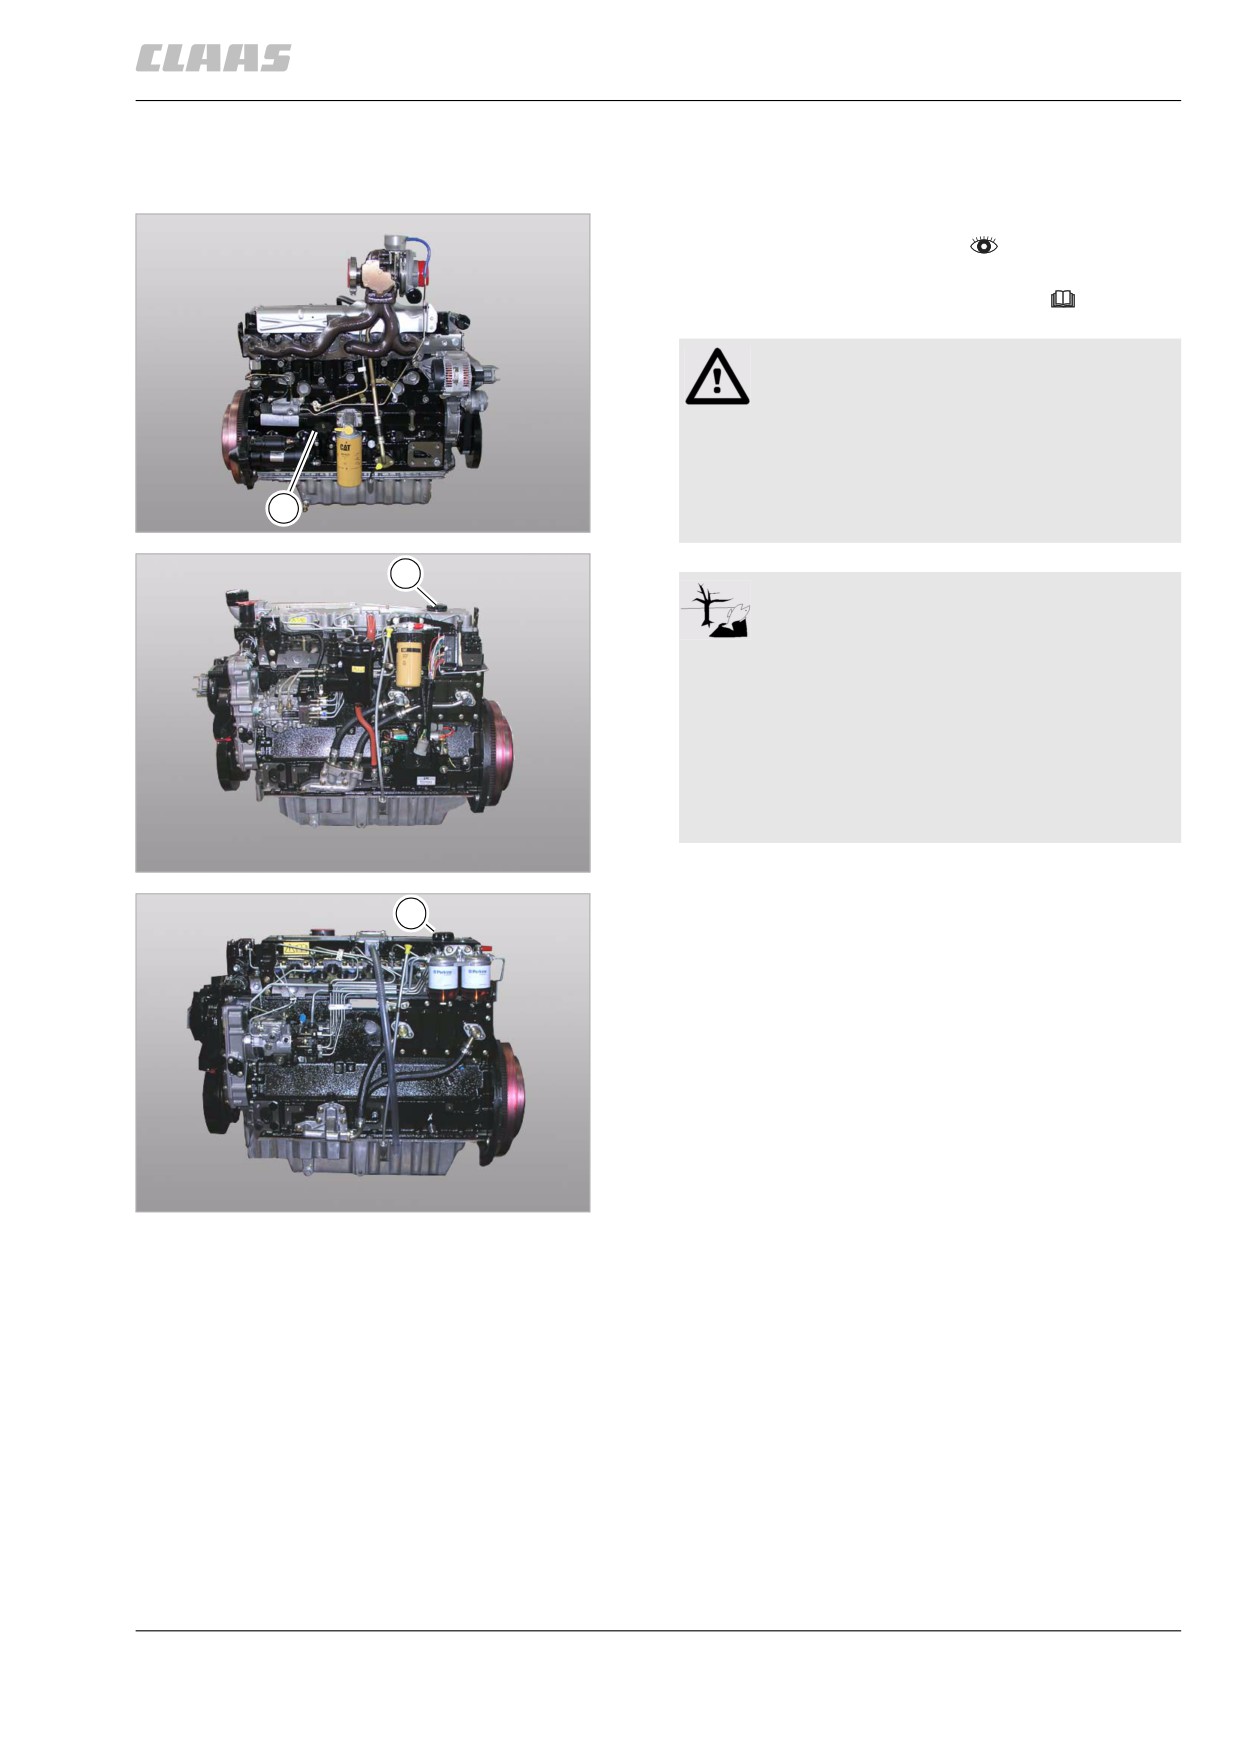
- Unscrew the cover (1).
35
PERKINS 1006-6T
29344
293
13 Maintenance
13.5 Engine
67089
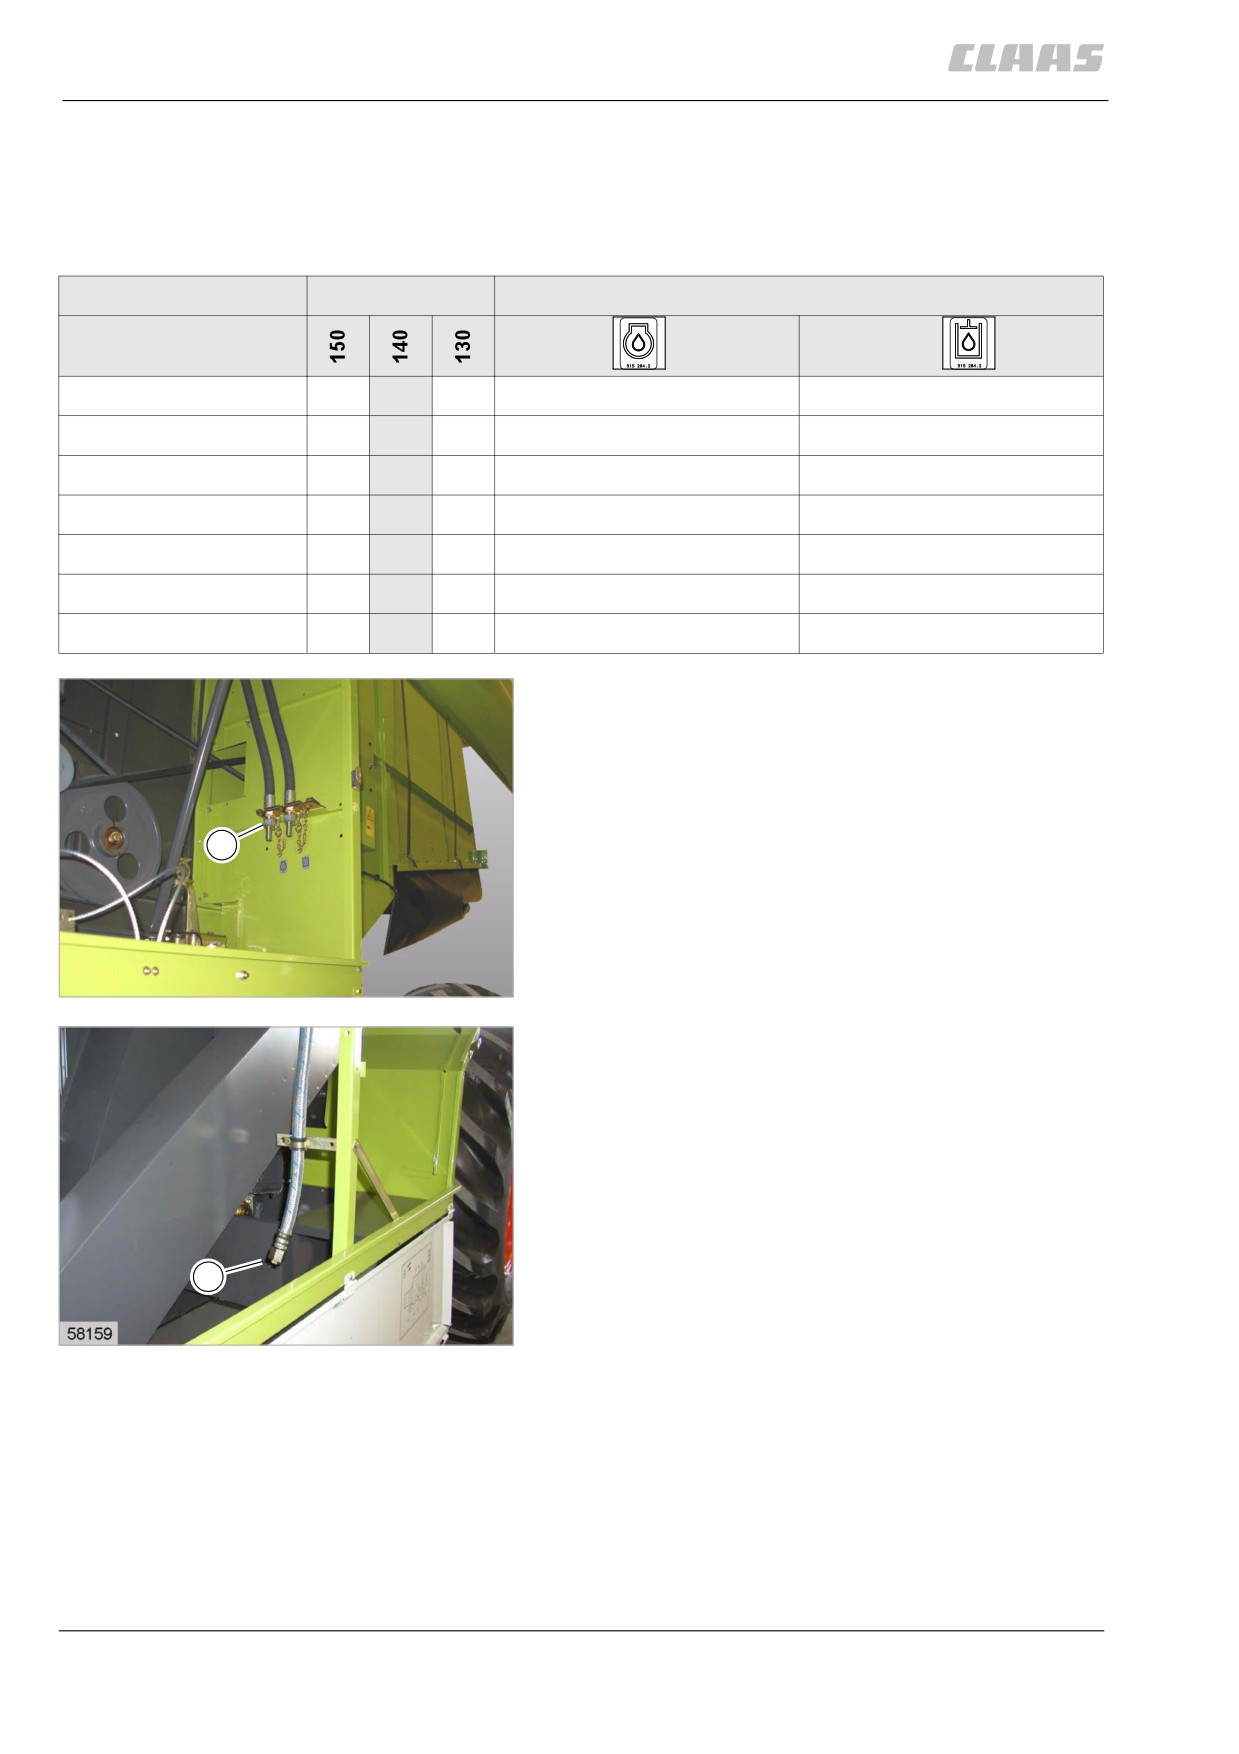
- Identify the position of the engine oil drain nozzle
in the table and on the machine. The oil drain noz-
zle is marked on the machine by an engine oil
decal.
DOMINATOR
Position of drain hose
Engine type
Engine oil
Hydraulic oil
CATERPILLAR C-6.6
•
left machine side, inside
left machine side, outside
CATERPILLAR C-6.6
•
left machine side, inside
left machine side, outside
CATERPILLAR C-6.6
•
left machine side, inside
on the steering cylinder
CATERPILLAR 3056 E
•
right machine side
left machine side, inside
CATERPILLAR 3056 E
•
right machine side
left machine side, inside
CATERPILLAR 3056 E
•
right machine side
on the steering cylinder
PERKINS 1006-6T
•
right machine side
on the steering cylinder
- Fit a suitable hose on the engine oil drain nozzle.
- Slacken off nut (1) slightly.
- Collect the used oil in a sufficiently large
container.
- Tighten nut (1).
- Remove hose.
1
36
left machine side
29543
- Unscrew engine oil drain plug (1).
- Collect the used oil in a sufficiently large
container.
- Tighten drain plug (11).
1
37
right machine side
23415
294
13 Maintenance
13.5 Engine
67089
WARNING:
Use of unpermissible spare parts or
lubricants.
Machine damage or increased wear.
A
1
– Spare parts and lubricants must at least
comply with the technical standards
required by the manufacturer of the
implement!
- The use of genuine CLAAS spare parts
2
and lubricants is recommended.
38
27295
-
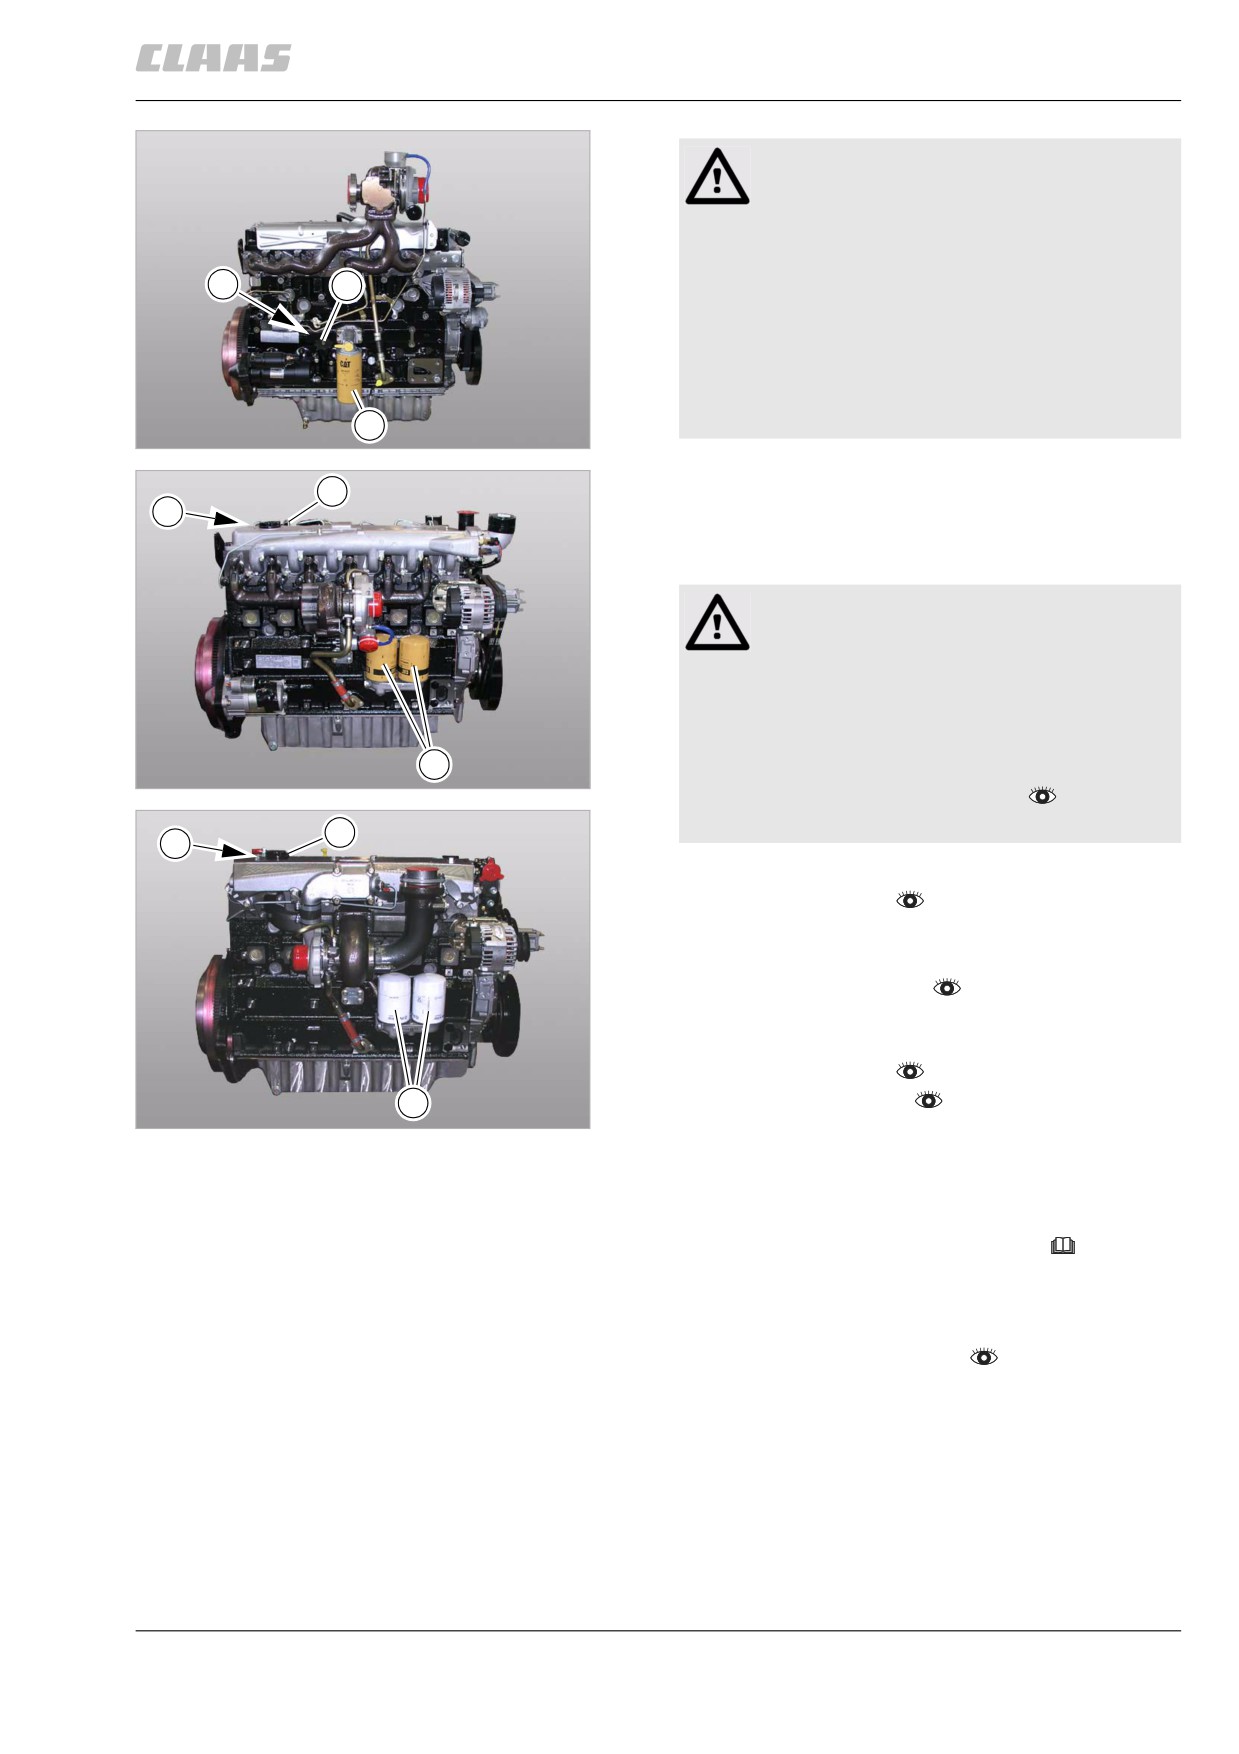
Unscrew filter (2).
1
–
Apply some oil to the new seal and screw on new
A
filter (2) until the filter seal touches the filter head.
Tighten the filter by hand.
Caution!
Machine operation with unpermitted or pol-
luted lubricants.
Machine damage.
- Ensure a clean environment.
2
- Use suitable and clean tools.
39
29342
- Use permitted lubricants.
- Lubricants must be free of pollution.
1
A
-
Top up oil at position (A).
–
Check the oil level.
Top up oil if required.
-
Screw on the lid (1) at position (A).
–
Start the diesel engine.
Let the diesel engine run at lower no-load speed
for about 10 seconds.
-
Check the oil level.
2
Top up oil if required.
40
29343
38745
13.5.20 Adjusting the diesel engine valves
- Observe the information provided in the operator's
manual of the engine manufacturer.
86455
13.5.21 Checking the radiator coolant level
- Observe the general warnings at the beginning of
the "Maintenance" chapter.
- Let diesel engine cool down.
- Ensure that the drain cock of the cooling system is
closed.
295
13 Maintenance
13.5 Engine
67089
Warning!
Contact with hot liquids or machine parts.
1
Danger of burns
- Wear suitable protective clothing.
- Let liquids or machine parts cool down.
- Comply with instructions.
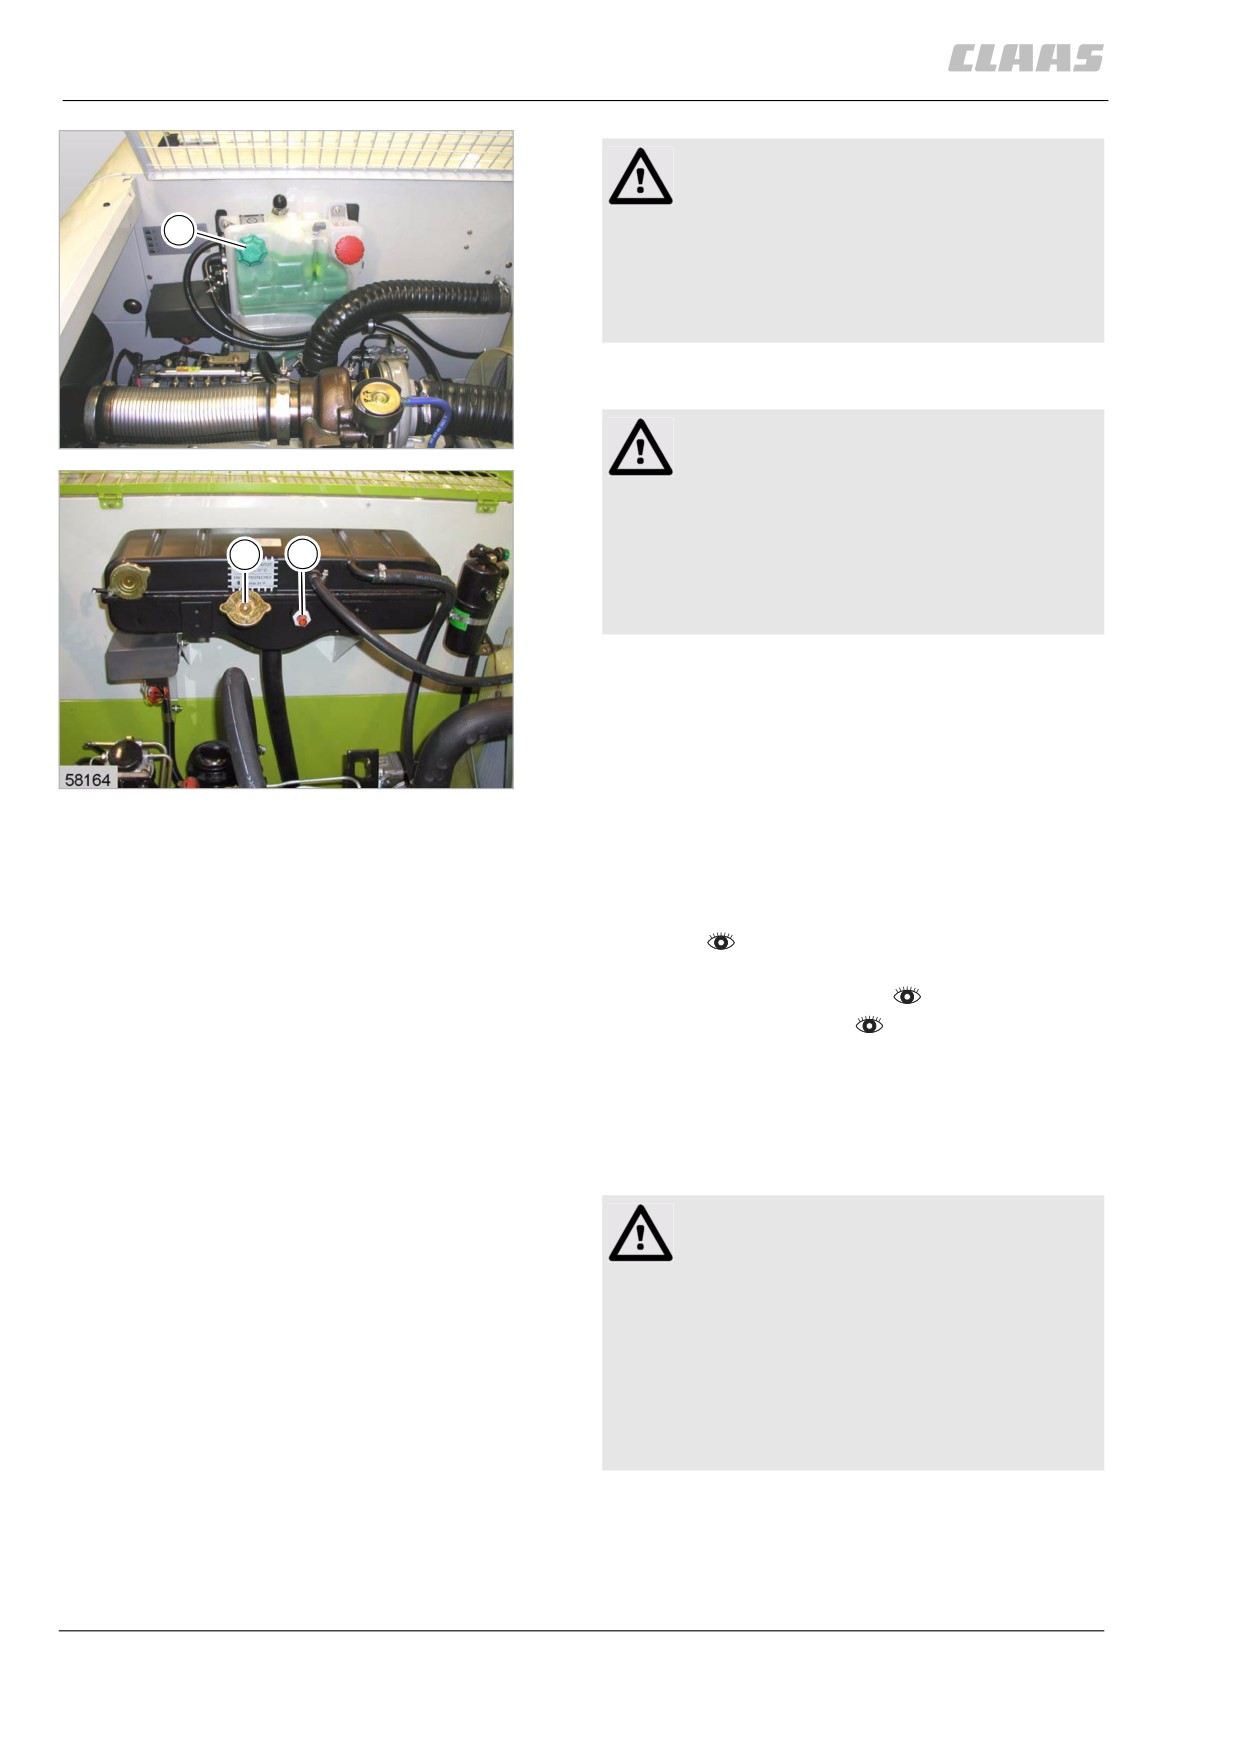
- Unscrew cover (1).
Caution!
41
from serial no
29602
Temperature difference between coolant and
diesel engine.
Machine damage
1
2
- Let diesel engine cool down.
- Do not fill cold coolant into the engine
when at operating temperature.
- Check the coolant level.
from serial no
: The coolant level must not exceed
the FULL mark (maximum) and not fall below the
SAFE mark (minimum) of the container.
42
up to serial no
23479
up to serial no
: The coolant level must not rise
above the filler neck level and not fall below the SAFE
mark (sight glass (2)) of the container.
- Bolt on cover (1).
- Start the diesel engine and let it run at slow idling
speed.
- Observe the general warnings at the beginning of
the "Maintenance" chapter.
- Stop the diesel engine.
- Let diesel engine cool down.
- Check coolant level one more time and top up if
required.
37872
13.5.22 Checking the coolant mixing ratio
WARNING:
Use of coolant with an incorrect mixing ratio.
Engine damage by corrosion or cavitation.
- Do not use more than 55 % anti-corrosion
agent/antifreeze when mixing. This
reduces both frost protection and heat
dissipation.
- Operation without anti-corrosion
agent/antifreeze is not permitted.
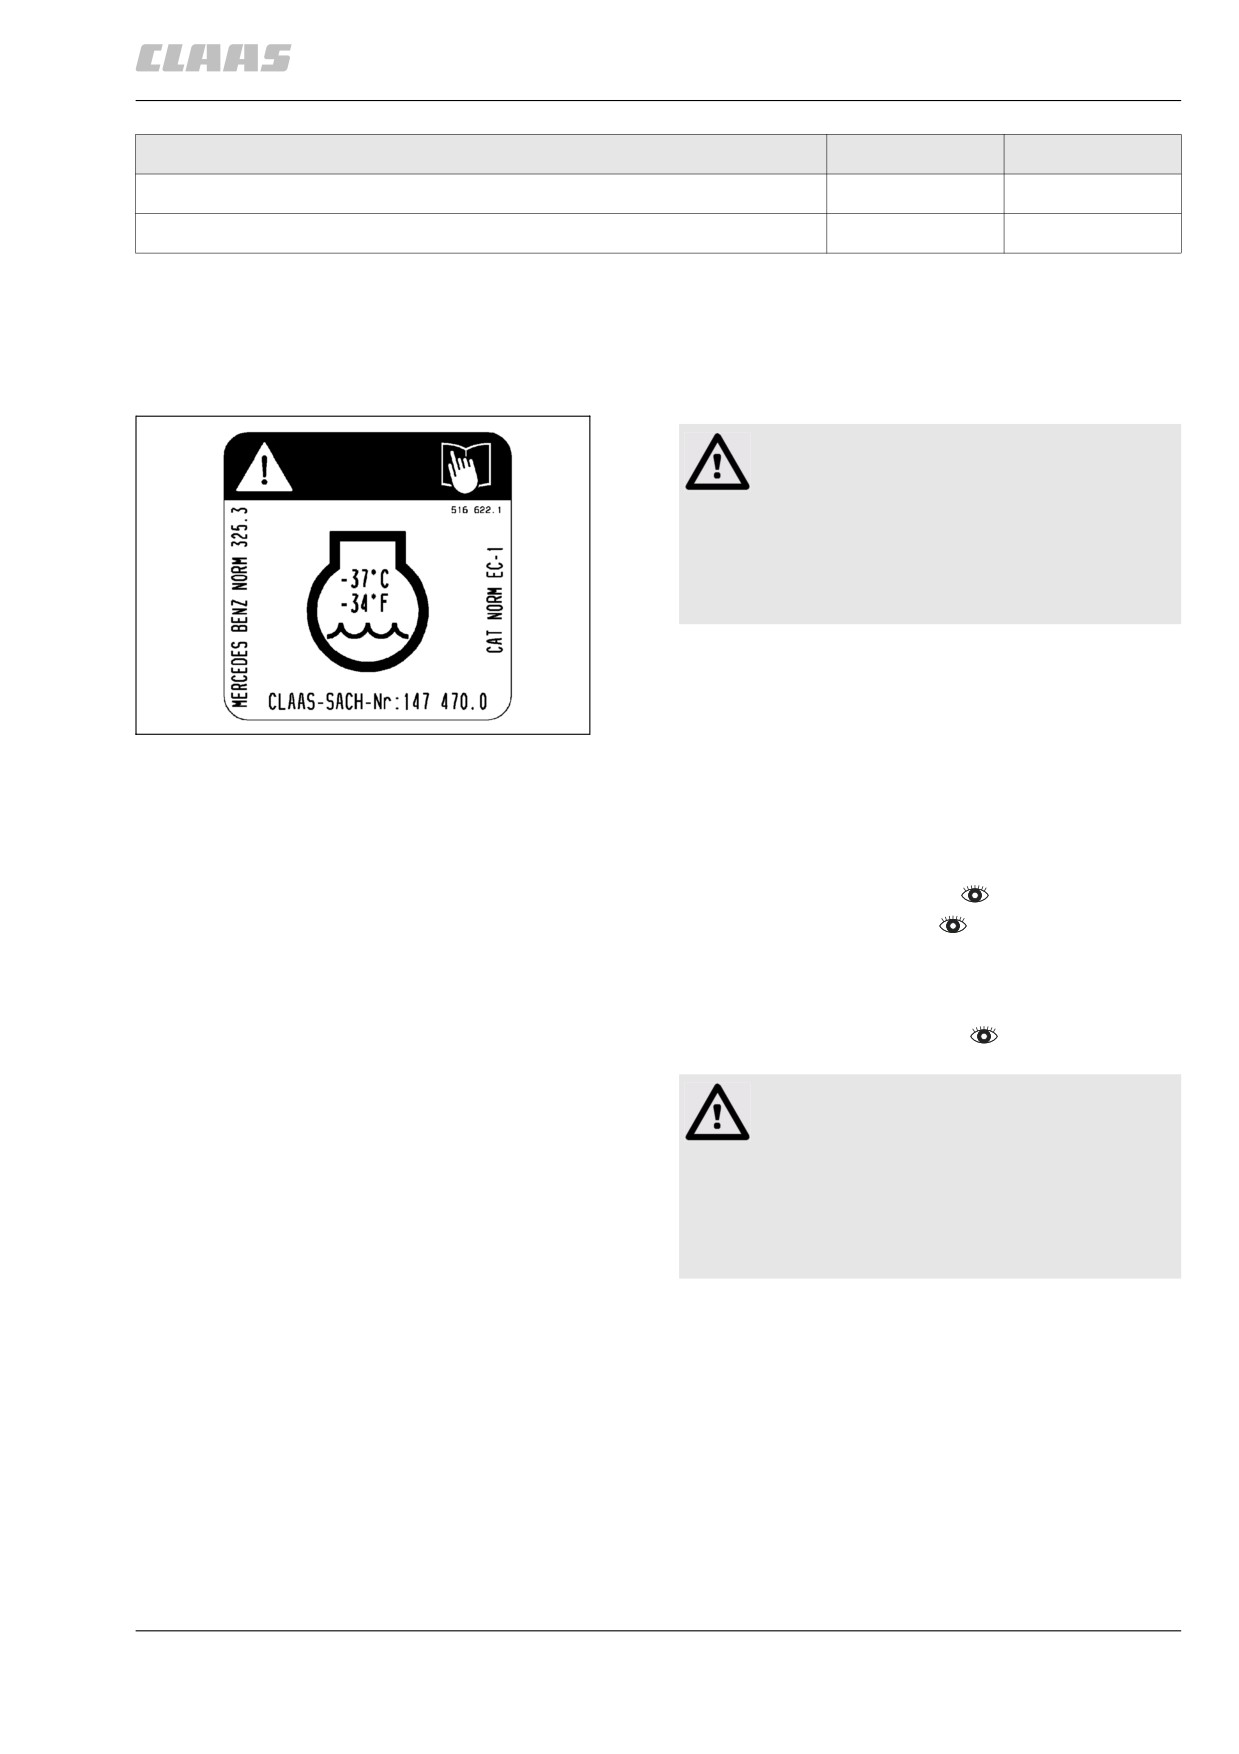
Coolant mixing ratio:
296
13 Maintenance
13.5 Engine
67089
Outside temperature
-37°C
approx. -45°C
Share of water
50 %
45 %
Share of anti-corrosion agent/antifreeze
50 %
55 % max.
In exceptional cases when no anti-corrosion
agent/antifreeze is available and/or no frost protection
is required (tropical zones), an approved coolant addi-
tive without a frost protection requirement must be
used (see lubricants chart).
Warning!
Soiling of liquids / lubricants.
Machine damage
- Use clean, low-lime and low-chlorine
water.
- Use clean containers.
Ex works, the machine cooling system is filled with
anti-corrosion agent/antifreeze and water in order to
prevent damage caused by corrosion and frost.
43
4033
The coolant consists of 50 % corrosion inhibiting anti-
freeze and 50 % water.
This ensures frost protection down to approx. -37 °C.
62703
13.5.23 Changing the radiator coolant
- Drain the radiator coolant.
- Top up radiator coolant.
86461
13.5.24 Draining the radiator coolant
- Observe the general warnings at the beginning of
the "Maintenance" chapter.
Warning!
Contact with hot liquids or machine parts.
Danger of burns
- Wear suitable protective clothing.
- Let liquids or machine parts cool down.
- Comply with instructions.
- Let diesel engine cool down.
297
13 Maintenance
13.5 Engine
67089
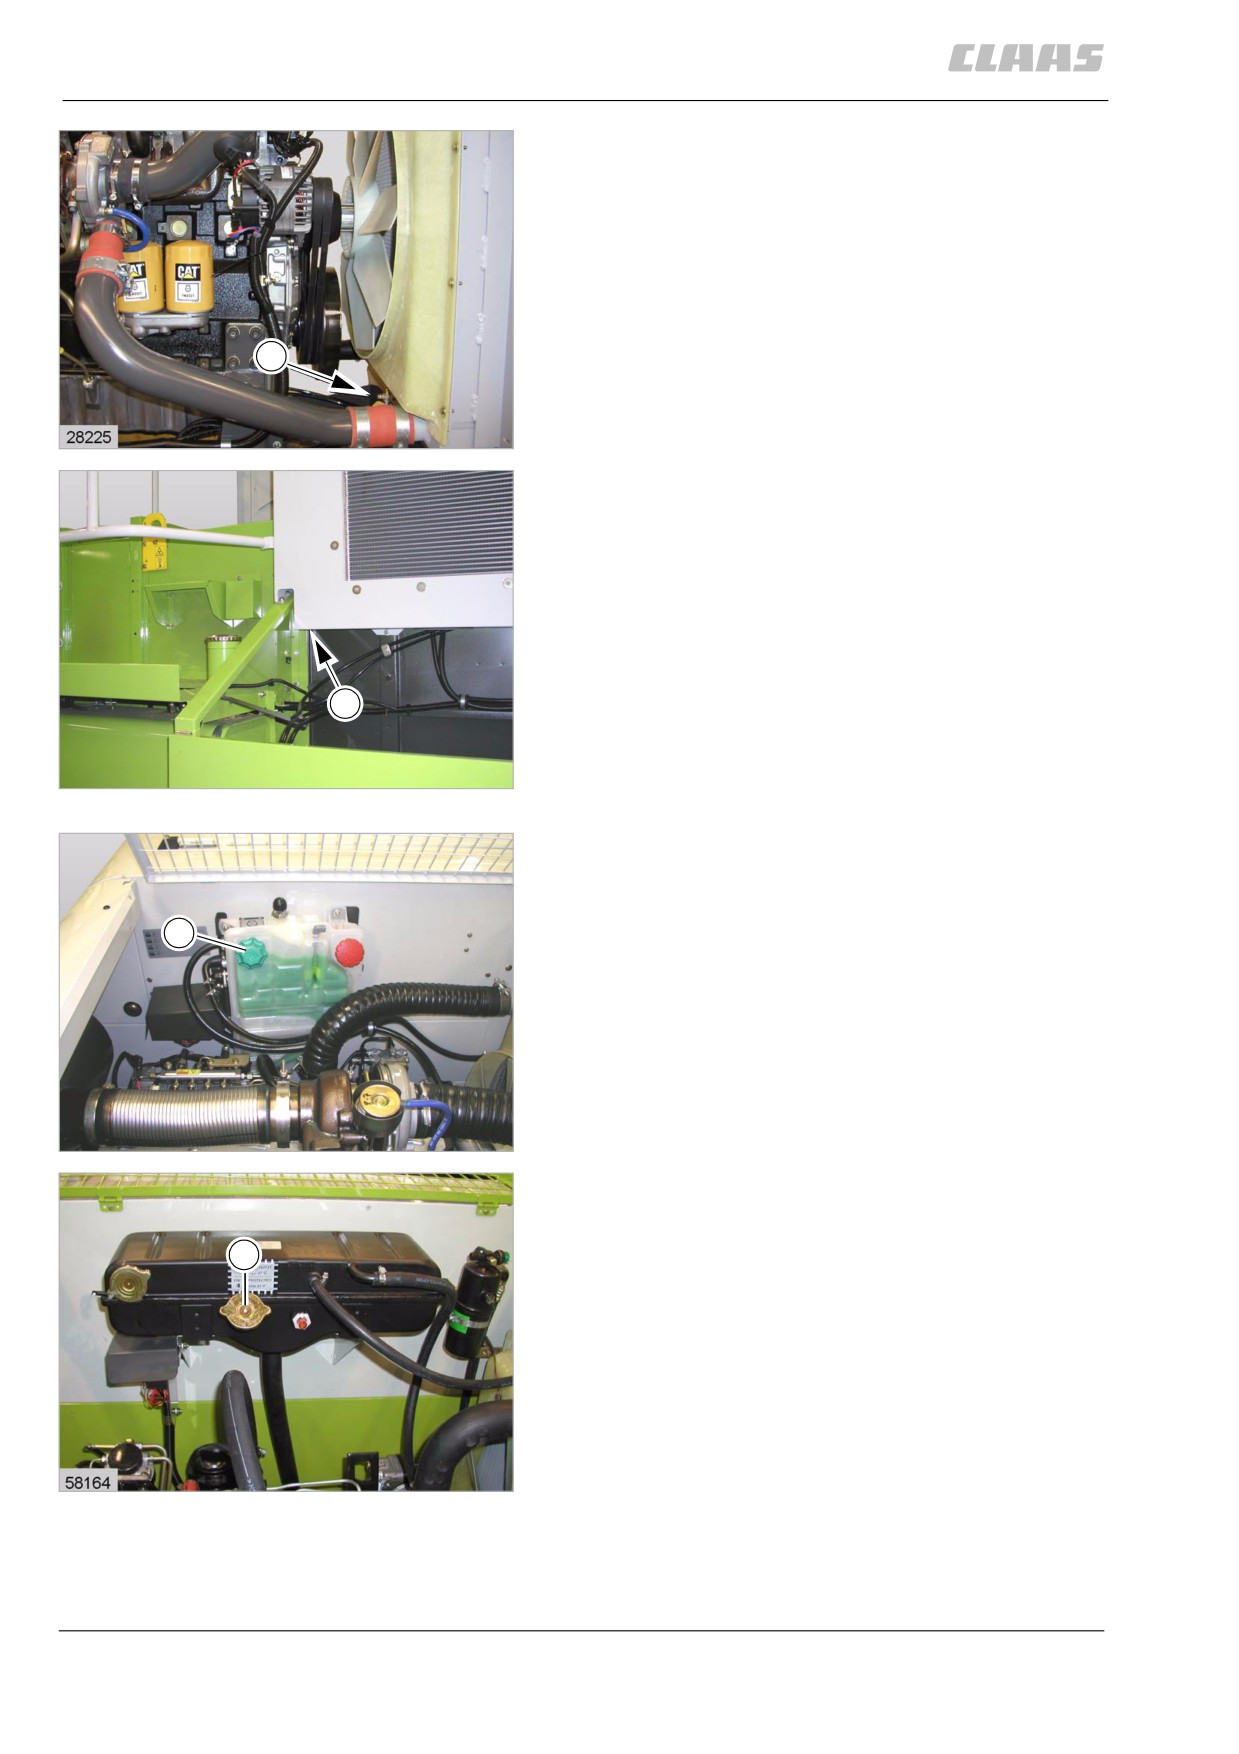
- Fit a suitable hose on the drain cock (1). Place the
end of the hose into a container.
- Open the drain cock (1) carefully.
The pressure inside the system is relieved and the
coolant escapes.
1
44
23478
1
45
29585
- Slacken off cover (1) to the stop and relieve the
excess pressure.
- Unscrew cover (1).
1
Any possible vacuum in the system is relieved, the
remaining coolant flows out of the drain tap.
- Bolt on cover (1).
- Close drain tap.
46
from serial no
29602
1
47
up to serial no
23479
298
13 Maintenance
13.5 Engine
67089
86462
13.5.25 Topping up coolant
-
Observe the general warnings at the beginning of
the "Maintenance" chapter.
Caution
Mixing coolants changes their properties.
The coolant can flocculate. Engine
overheating.
- Only fill with coolant according to the
lubricants chart.
-
Let diesel engine cool down.
–
Ensure that the drain cock of the cooling system is
closed.
-
Observe the coolant mixing ratio.
Warning!
Contact with hot liquids or machine parts.
1
Danger of burns
- Wear suitable protective clothing.
- Let liquids or machine parts cool down.
- Comply with instructions.
-
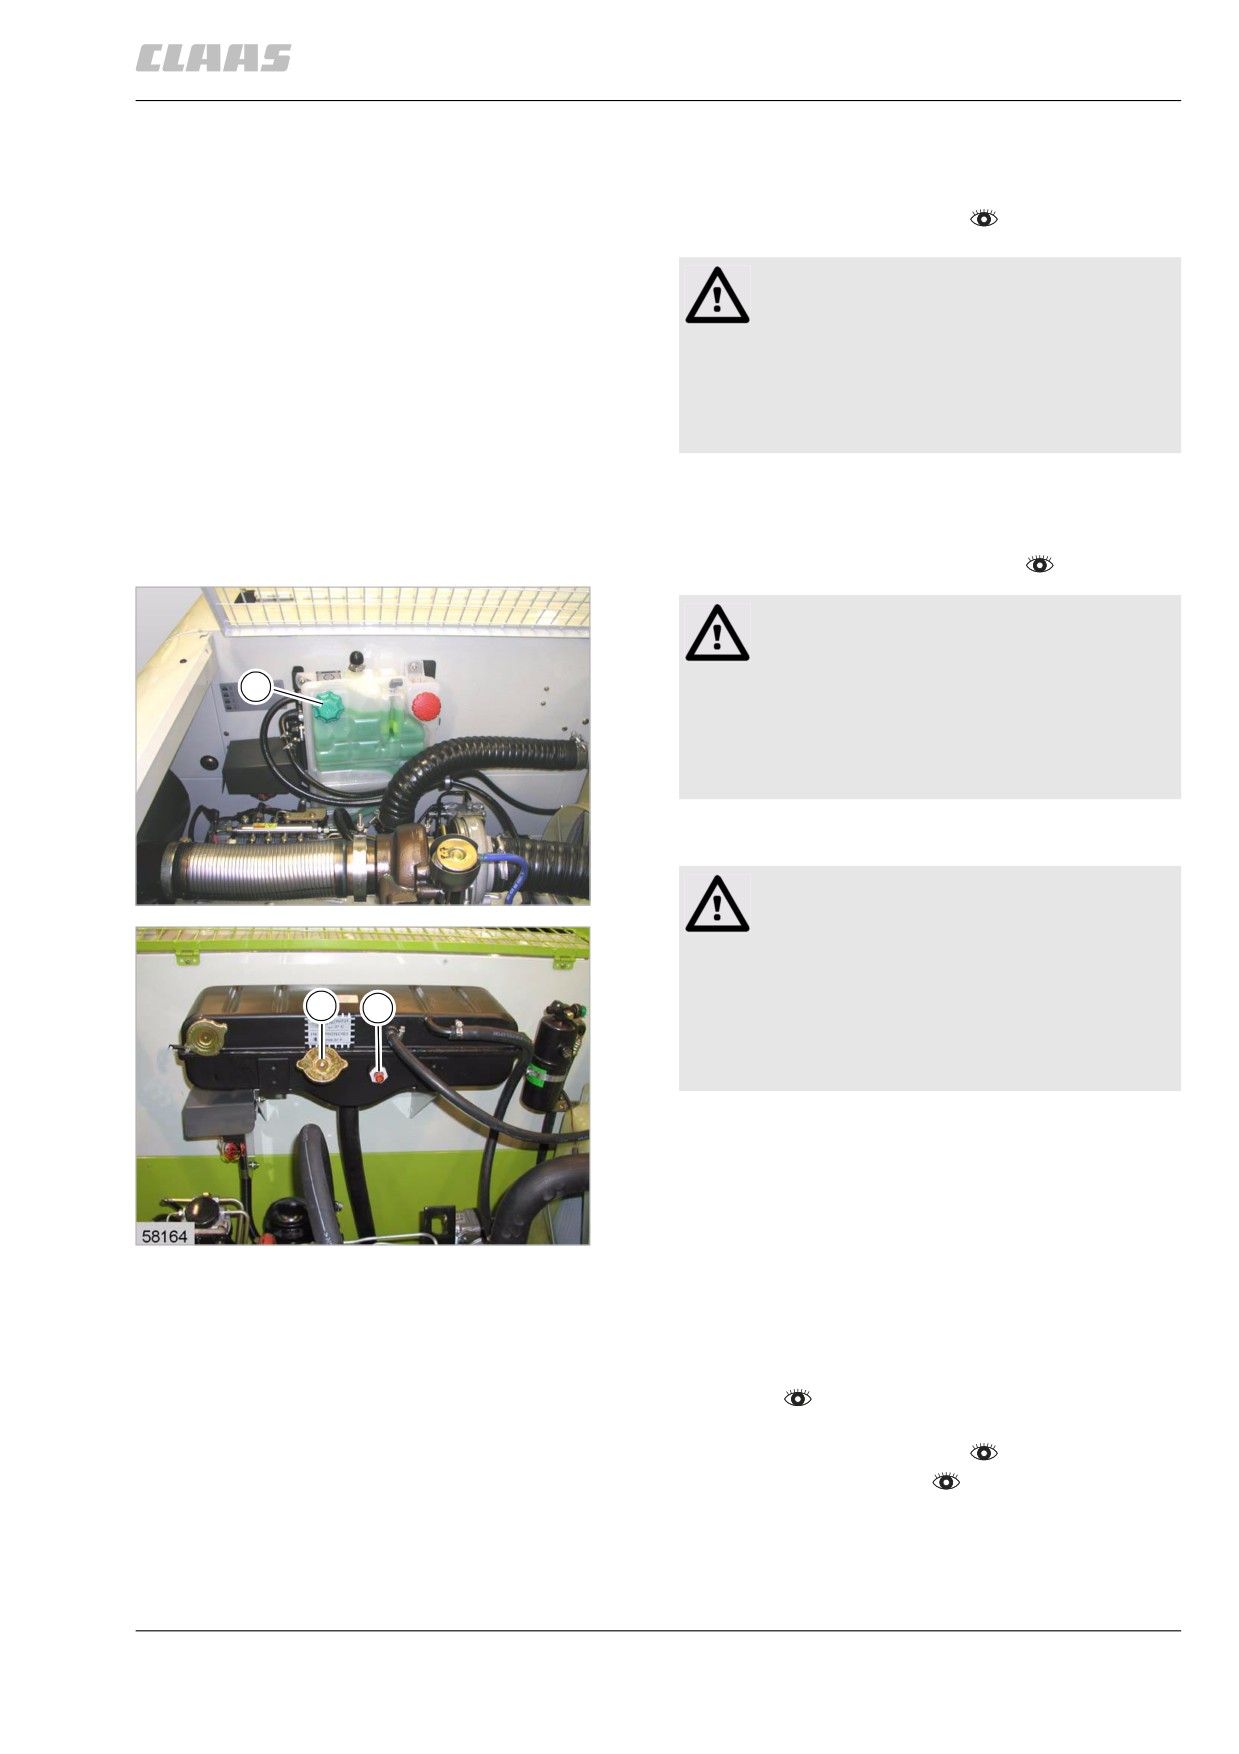
Unscrew cover (1).
Caution!
48
from serial no
29602
Temperature difference between coolant and
diesel engine.
Machine damage
1
2
- Let diesel engine cool down.
- Do not fill cold coolant into the engine
when at operating temperature.
-
Fill in coolant at nozzle at (1).
from serial no
: The coolant level must not exceed
the FULL mark (maximum) and not fall below the
SAFE mark (minimum) of the container.
49
up to serial no
23479
up to serial no
: The coolant level must not rise
above the filler neck level and not fall below the SAFE
mark (sight glass (2)) of the container.
- Bolt on cover (1).
- Start the diesel engine and let it run at slow idling
speed.
- Observe the general warnings at the beginning of
the "Maintenance" chapter.
- Stop the diesel engine.
- Let diesel engine cool down.
- Check coolant level one more time and top up if
required.
299
13 Maintenance
13.5 Engine
67089
85751
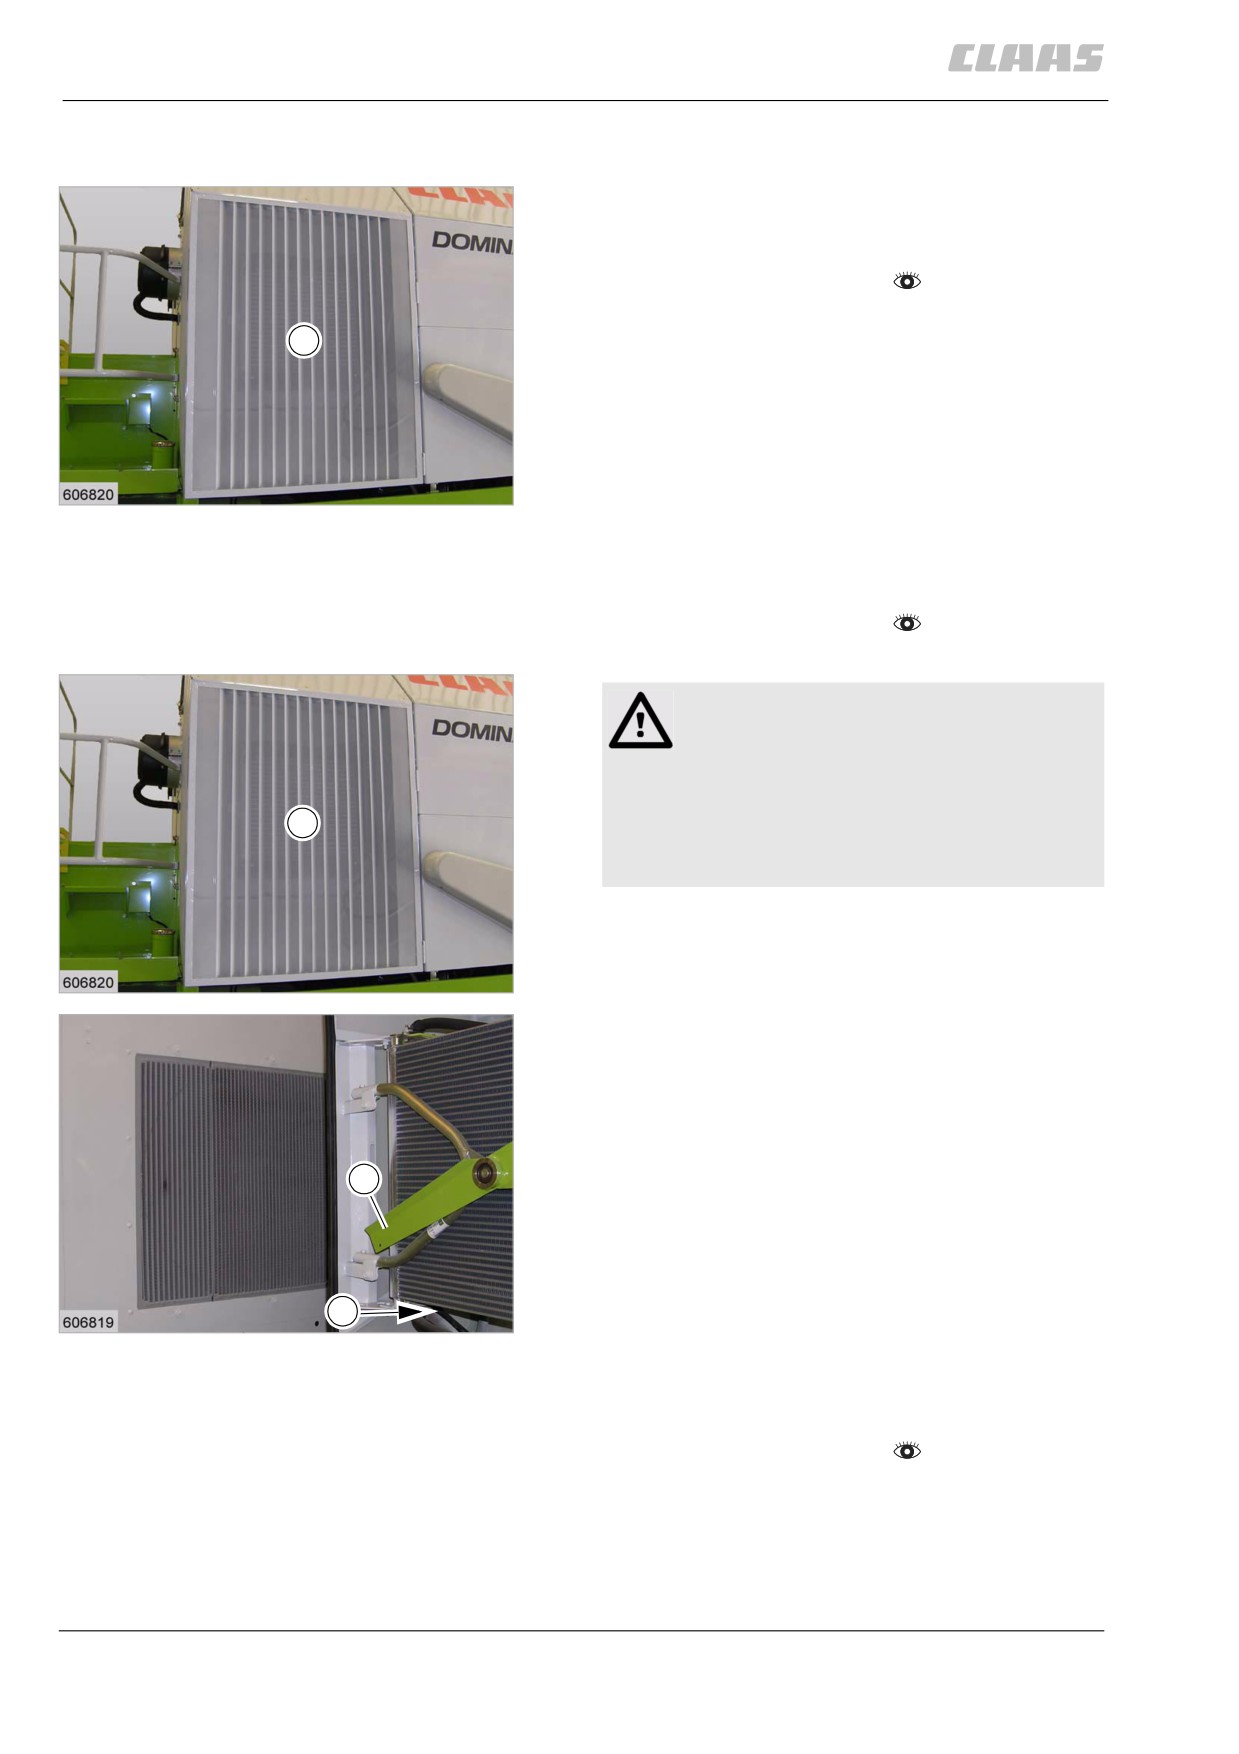
13.5.26 Cleaning the rotary chaff screen
When the engine is running, dust and dirt particles are
filtered out at the rotating rotary chaff screen (1).
- Observe the general warnings at the beginning of
the "Maintenance" chapter.
- In case of severe dust, regularly check the rotary
1
chaff screen and clean only when the diesel
engine is stopped.
50
23481
85753
13.5.27 Cleaning the cooling unit
- Observe the general warnings at the beginning of
the "Maintenance" chapter.
- Let diesel engine cool down.
Warning!
Contact with hot liquids or machine parts.
Danger of burns
- Wear suitable protective clothing.
1
- Let liquids or machine parts cool down.
- Comply with instructions.
- Fold the rotary chaff screen (1) open.
- Clean cooling units and rotary chaff screen with
compressed air.
51
23481
Clean the condenser (3) with 5 bar max.!
Do not damage the fins of cooling unit!
- Check easy movement of rotor (2) and replace
bearing if necessary.
- Close the rotary chaff screen (1).
- Secure the rotary chaff screen (1) with lock.
2
3
52
23477
38808
13.5.28 Changing the coolant hoses
- Observe the general warnings at the beginning of
the "Maintenance" chapter.
300
13 Maintenance
13.5 Engine
67089
Warning!
Contact with hot liquids or machine parts.
Danger of burns
- Wear suitable protective clothing.
- Let liquids or machine parts cool down.
- Comply with instructions.
Caution!
Improperly performed work on the machine or
the front attachment can lead to
malfunctioning.
Risk of machine damage
- Have adjustment and repairs performed
only by an authorised specialist
workshop.
-
Drain the radiator coolant.
–
Remove all coolant hoses and install new coolant
hoses.
-
Top up radiator coolant.
85756
13.5.29 Cleaning / changing the diesel engine
air cleaner with plastic housing
Caution!
Machine operation with soiled or damaged air
filter.
Engine damage.
- Replace air filter immediately when the
display of the on-board information sys-
tem shows the relevant warning.
- Replace damaged air filters immediately.
Note!
Uneconomic use of machine.
Increased fuel consumption.
- Replace air filter immediately when a cor-
responding warning appears in the
display of the onboard information
system.
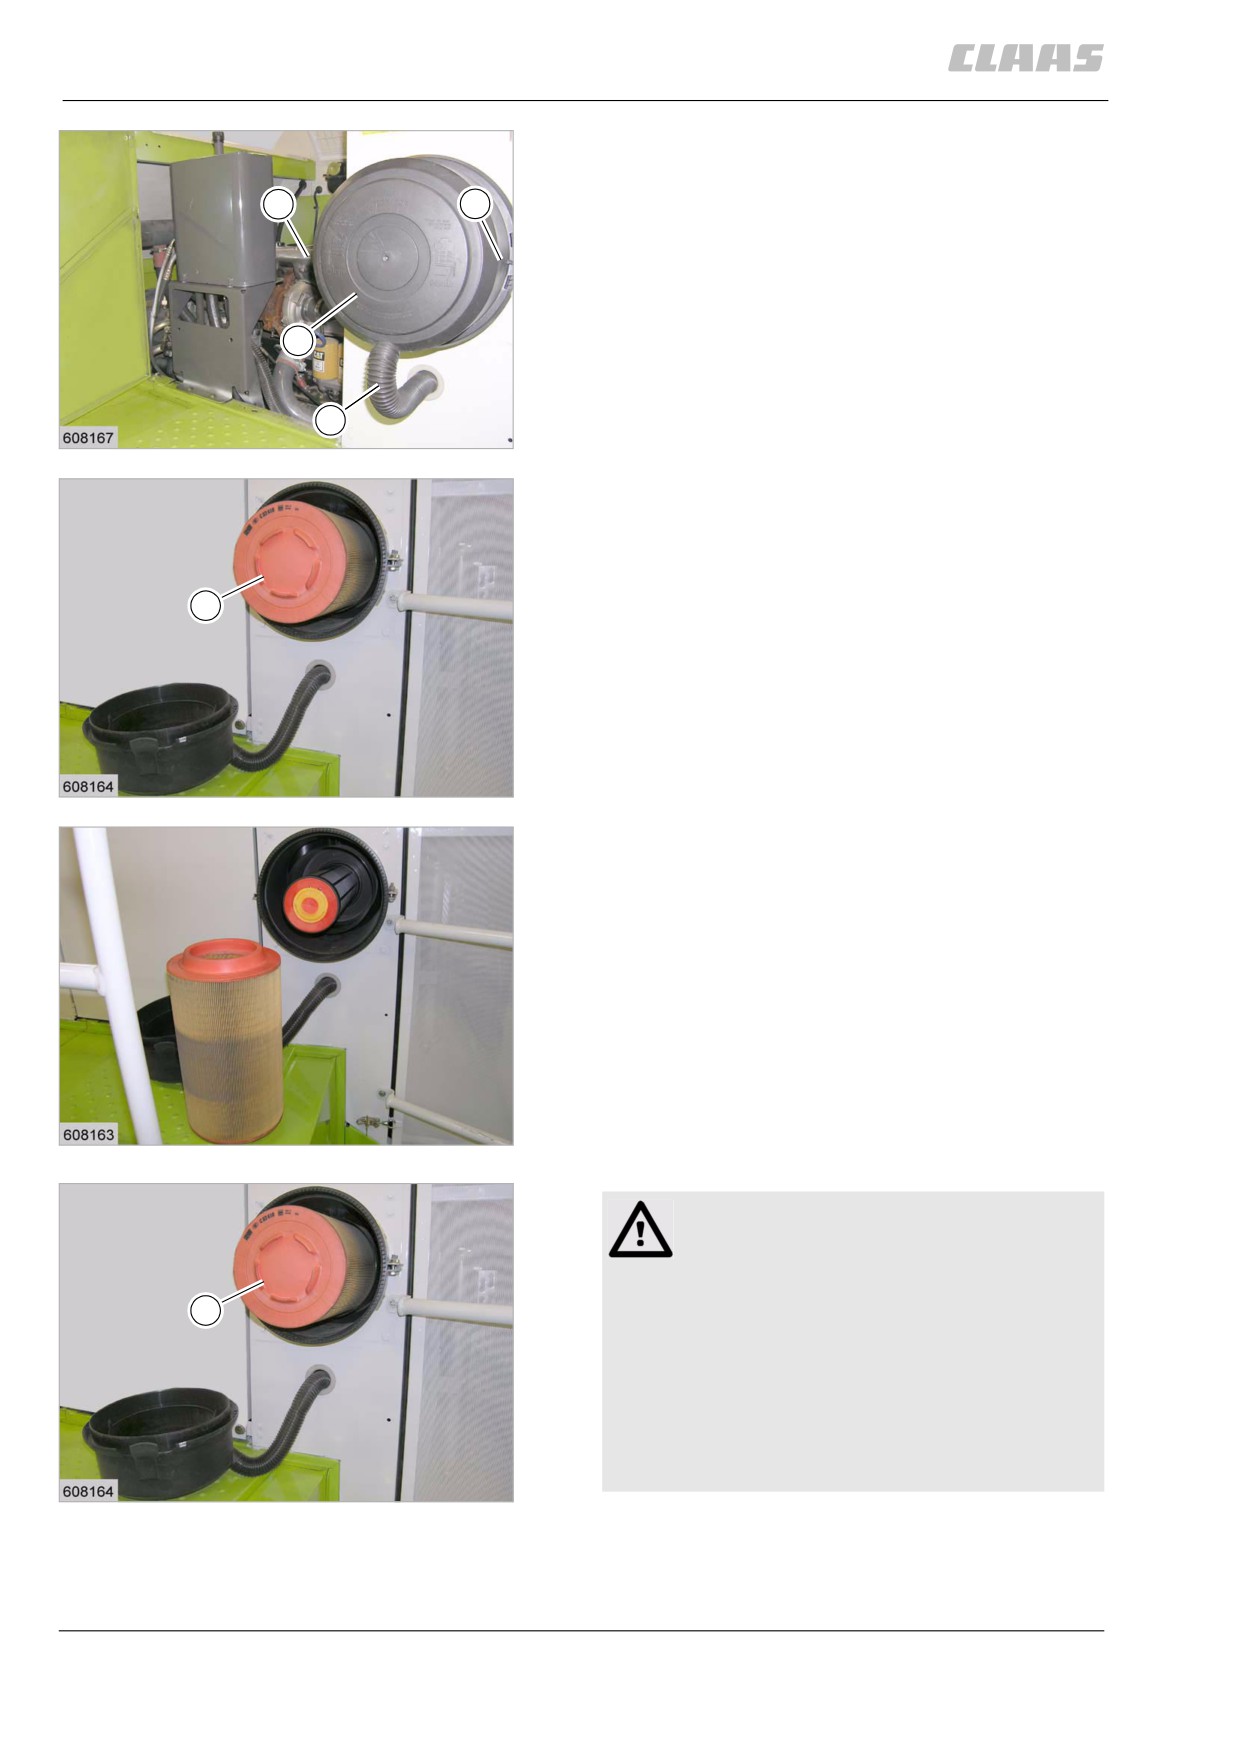
The hose (1) is connected to air filter cover (2) and to
the exhaust pipe.
The permanent suction effect sucks the major part of
the polluted air out of the housing.
The polluted air is discharged through the exhaust.
- Observe the general warnings at the beginning of
the "Maintenance" chapter.
301
13 Maintenance
13.5 Engine
67089
- Loosen the closures (3).
- Remove cover (2).
3
3
2
1
53
23486
- Carefully pull out cartridge (1) using slight rotating
movements.
- Clean the filter housing thoroughly.
1
54
23488
- Clean component with compressed air of 5 bar
max. from inside to outside.
During fieldwork, the cartridge may also be temporarily
cleaned by knocking slightly on the palm of your hand.
Heavy knocking or upsetting the main filter will
deform it, resulting in leaks at the filter seat!
55
23489
WARNING:
Use of unpermissible spare parts or
lubricants.
1
Machine damage or increased wear.
- Spare parts and lubricants must at least
comply with the technical standards
required by the manufacturer of the
implement!
- The use of genuine CLAAS spare parts
and lubricants is recommended.
56
23488
- Check cartridge (1) for external and internal dam-
age and replace if necessary.
- Insert cartridge (1) into the housing.
302
13 Maintenance
13.5 Engine
67089
- Refit lid and close it tightly.
Ensure a tight and firm seat!
85761
13.5.30 Changing the diesel engine air cleaner
safety cartridge with plastic housing
Caution!
Machine operation with soiled or damaged air
filter.
Engine damage.
- Replace air filter immediately when the
display of the on-board information sys-
tem shows the relevant warning.
- Replace damaged air filters immediately.
Note!
Uneconomic use of machine.
Increased fuel consumption.
- Replace air filter immediately when a cor-
responding warning appears in the
display of the onboard information
system.
Safety cartridges must not be cleaned and reused!
- Observe the general warnings at the beginning of
the "Maintenance" chapter.
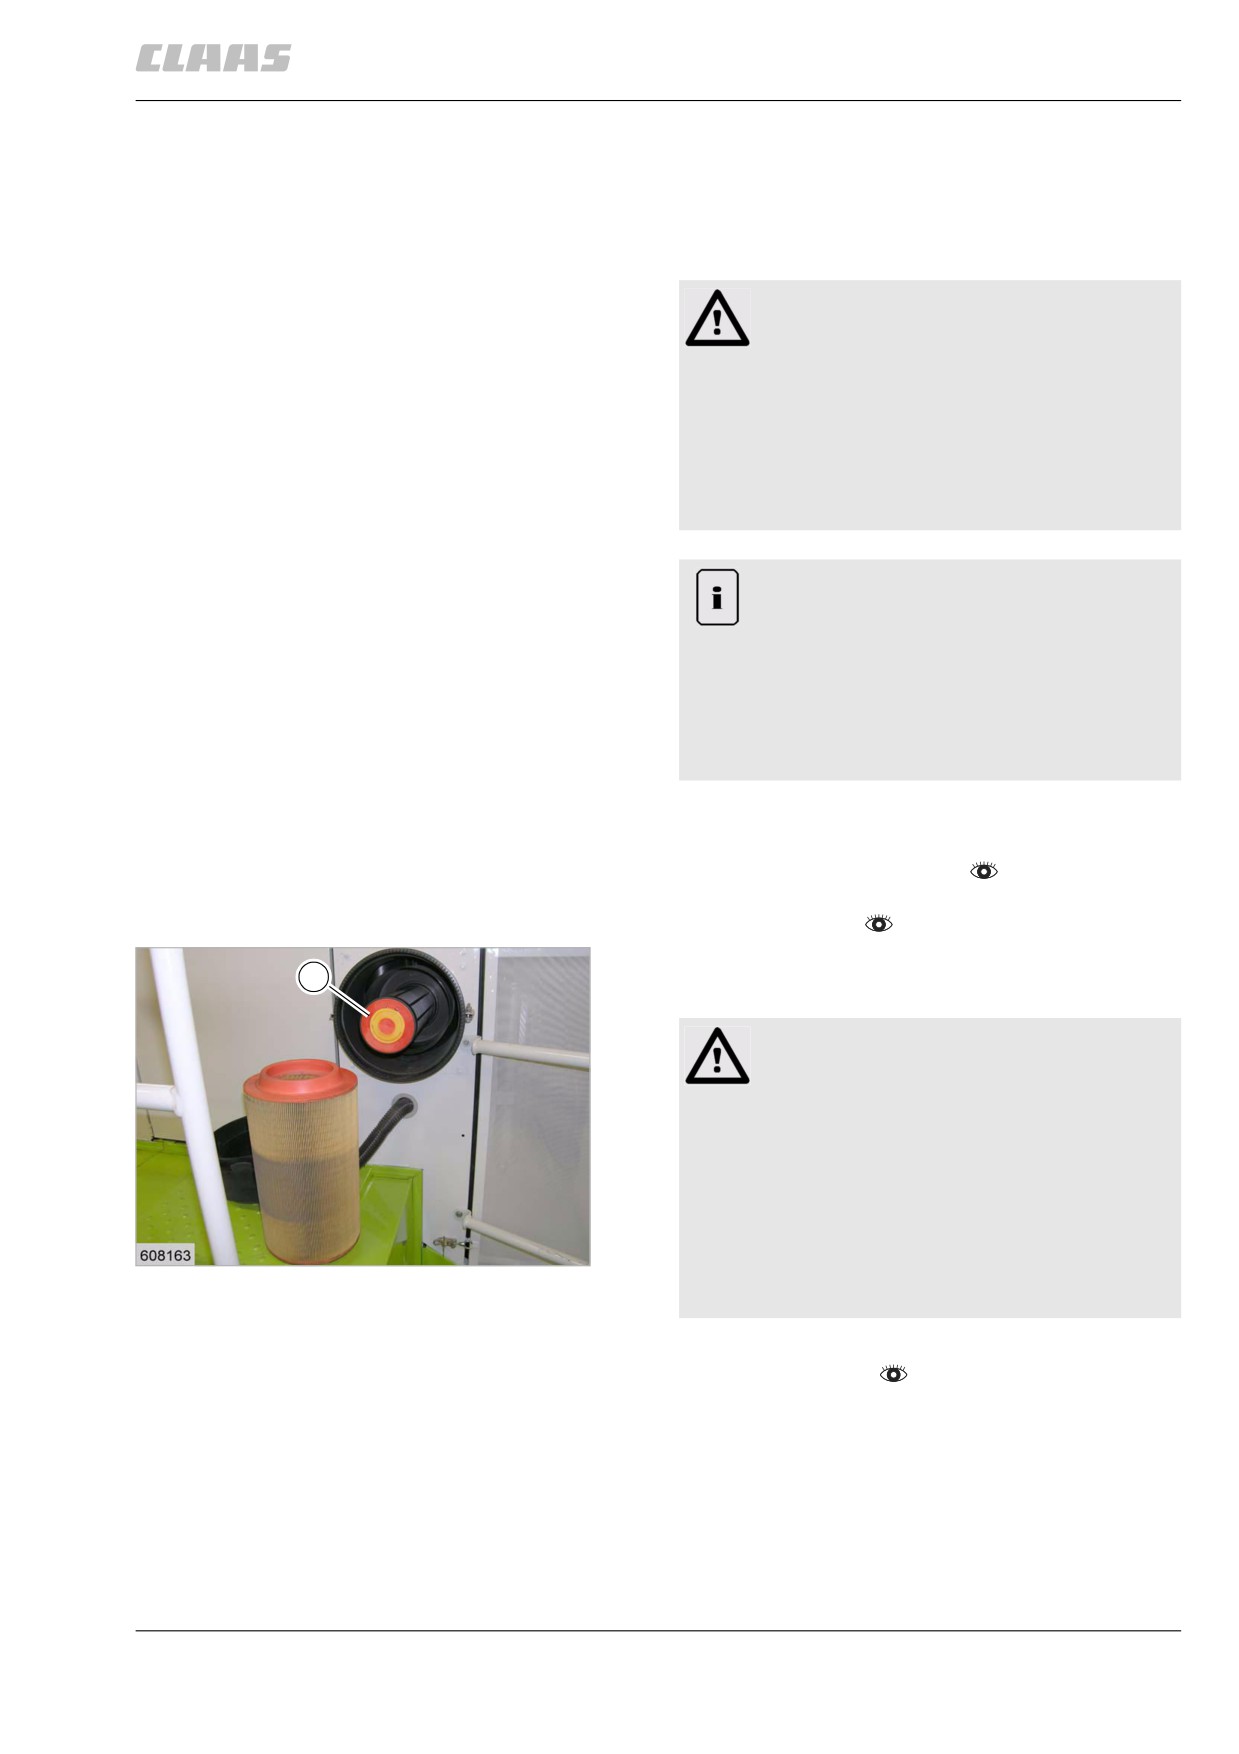
- Clean / change the diesel engine air filter with
plastic housing.
- Carefully pull out cartridge (1) using slight rotating
1
movements.
WARNING:
Use of unpermissible spare parts or
lubricants.
Machine damage or increased wear.
- Spare parts and lubricants must at least
comply with the technical standards
required by the manufacturer of the
implement!
57
23489
- The use of genuine CLAAS spare parts
and lubricants is recommended.
- Fit new cartridge.
- Reinstall air filter.
85762
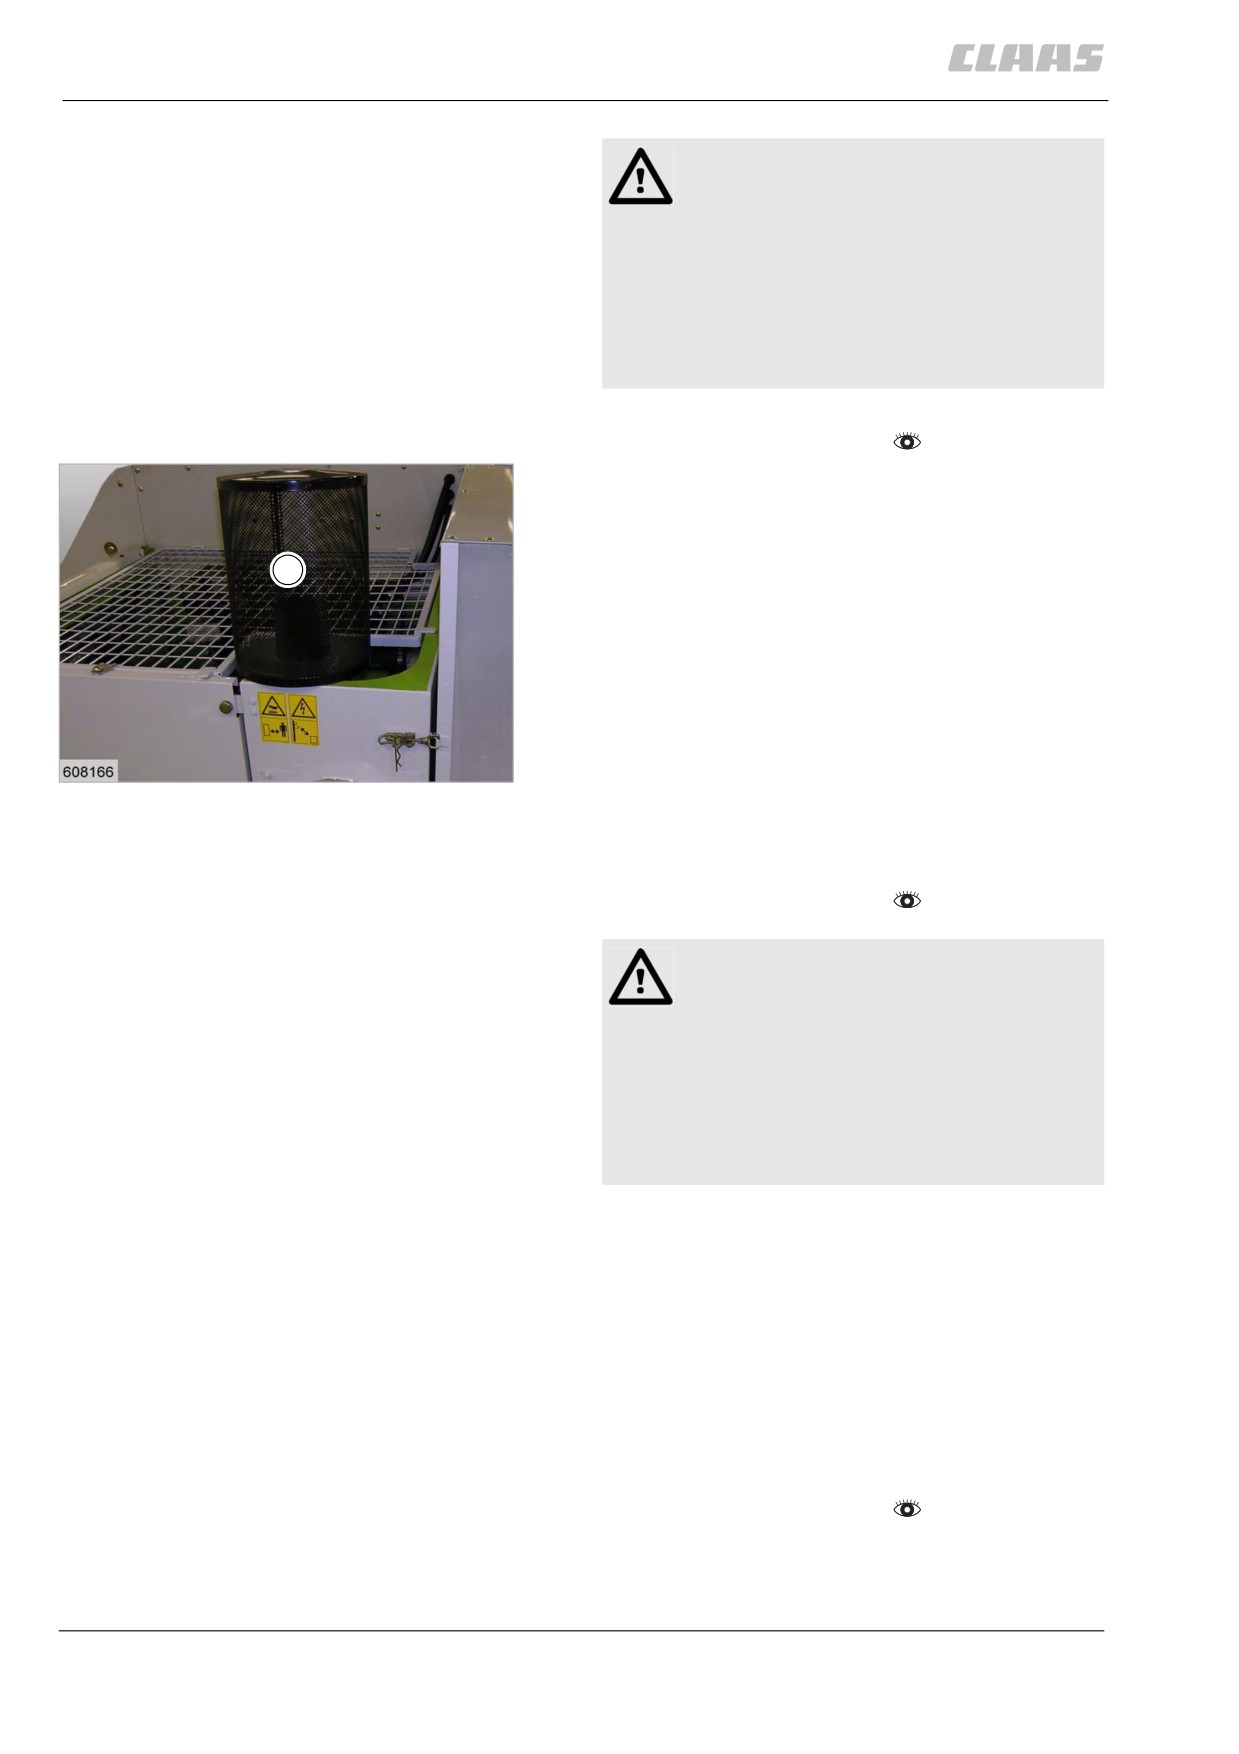
13.5.31 Cleaning the air filter intake screen
When the engine is running, air is suctioned through
the sieve. Coarse dust and dirt particles remain out-
side at the sieve.
303
13 Maintenance
13.5 Engine
67089
Caution!
Machine operation with soiled or damaged air
filter.
Engine damage.
- Replace air filter immediately when the
display of the on-board information sys-
tem shows the relevant warning.
- Replace damaged air filters immediately.
- Observe the general warnings at the beginning of
the "Maintenance" chapter.
- In case of severe dust, regularly check the
sieve (1) and clean only when the diesel engine is
stopped.
1
58
23485
38812
13.5.32 Changing the air intake hoses
- Observe the general warnings at the beginning of
the "Maintenance" chapter.
Caution!
Improperly performed work on the machine or
the front attachment can lead to
malfunctioning.
Risk of machine damage
- Have adjustment and repairs performed
only by an authorised specialist
workshop.
- Remove all air intake hoses and install new air
intake hoses.
Tightening torque for hose clamp with round pin, with
spring = 10 Nm
Tightening torque for hose clamp with worm thread =
7 Nm
38817
13.5.33 Retightening the air intake tube
clamps
- Observe the general warnings at the beginning of
the "Maintenance" chapter.
304
13 Maintenance
13.5 Engine
67089
Caution!
Improperly performed work on the machine or
the front attachment can lead to
malfunctioning.
Risk of machine damage
- Have adjustment and repairs performed
only by an authorised specialist
workshop.
- Retighten clamps at both ends of the air intake
hoses.
- Replace damaged or porous hoses.
Tightening torque for hose clamp with round pin, with
spring = 10 Nm
Tightening torque for hose clamp with worm thread =
7 Nm
305
13 Maintenance
13.6 Chassis
67089
13.6 Chassis
11114
13.6.1 Wheels / tyres
Warning!
If tyre pressures exceed the specified values,
the tyres may explode.
Danger of injury
- Never stand in the vicinity of the tyre
while it is being inflated. Always stand
clear!
- Regularly check the pressure of the tyres.
- The specified tyre pressure must be
respected.
-
Check if wheel nuts / wheel bolts are tightly seated
every time after fitting a wheel and after the speci-
fied maintenance interval or tighten them.
-
Retighten the track adjustment elements in
accordance with the manufacturer's instructions
-
The tyres must only be ballasted to the extent that
the specified tyre pressures can be
maintained.
-
Keep oil and grease away from tyres.
–
Check tyres for damage regularly on the inside as
well.
-
Do not clean tyres by applying a steam cleaner
directly.
306
13 Maintenance
13.6 Chassis
67089
89477
13.6.2 Checking the tightening torque of
wheel nuts / wheel bolts
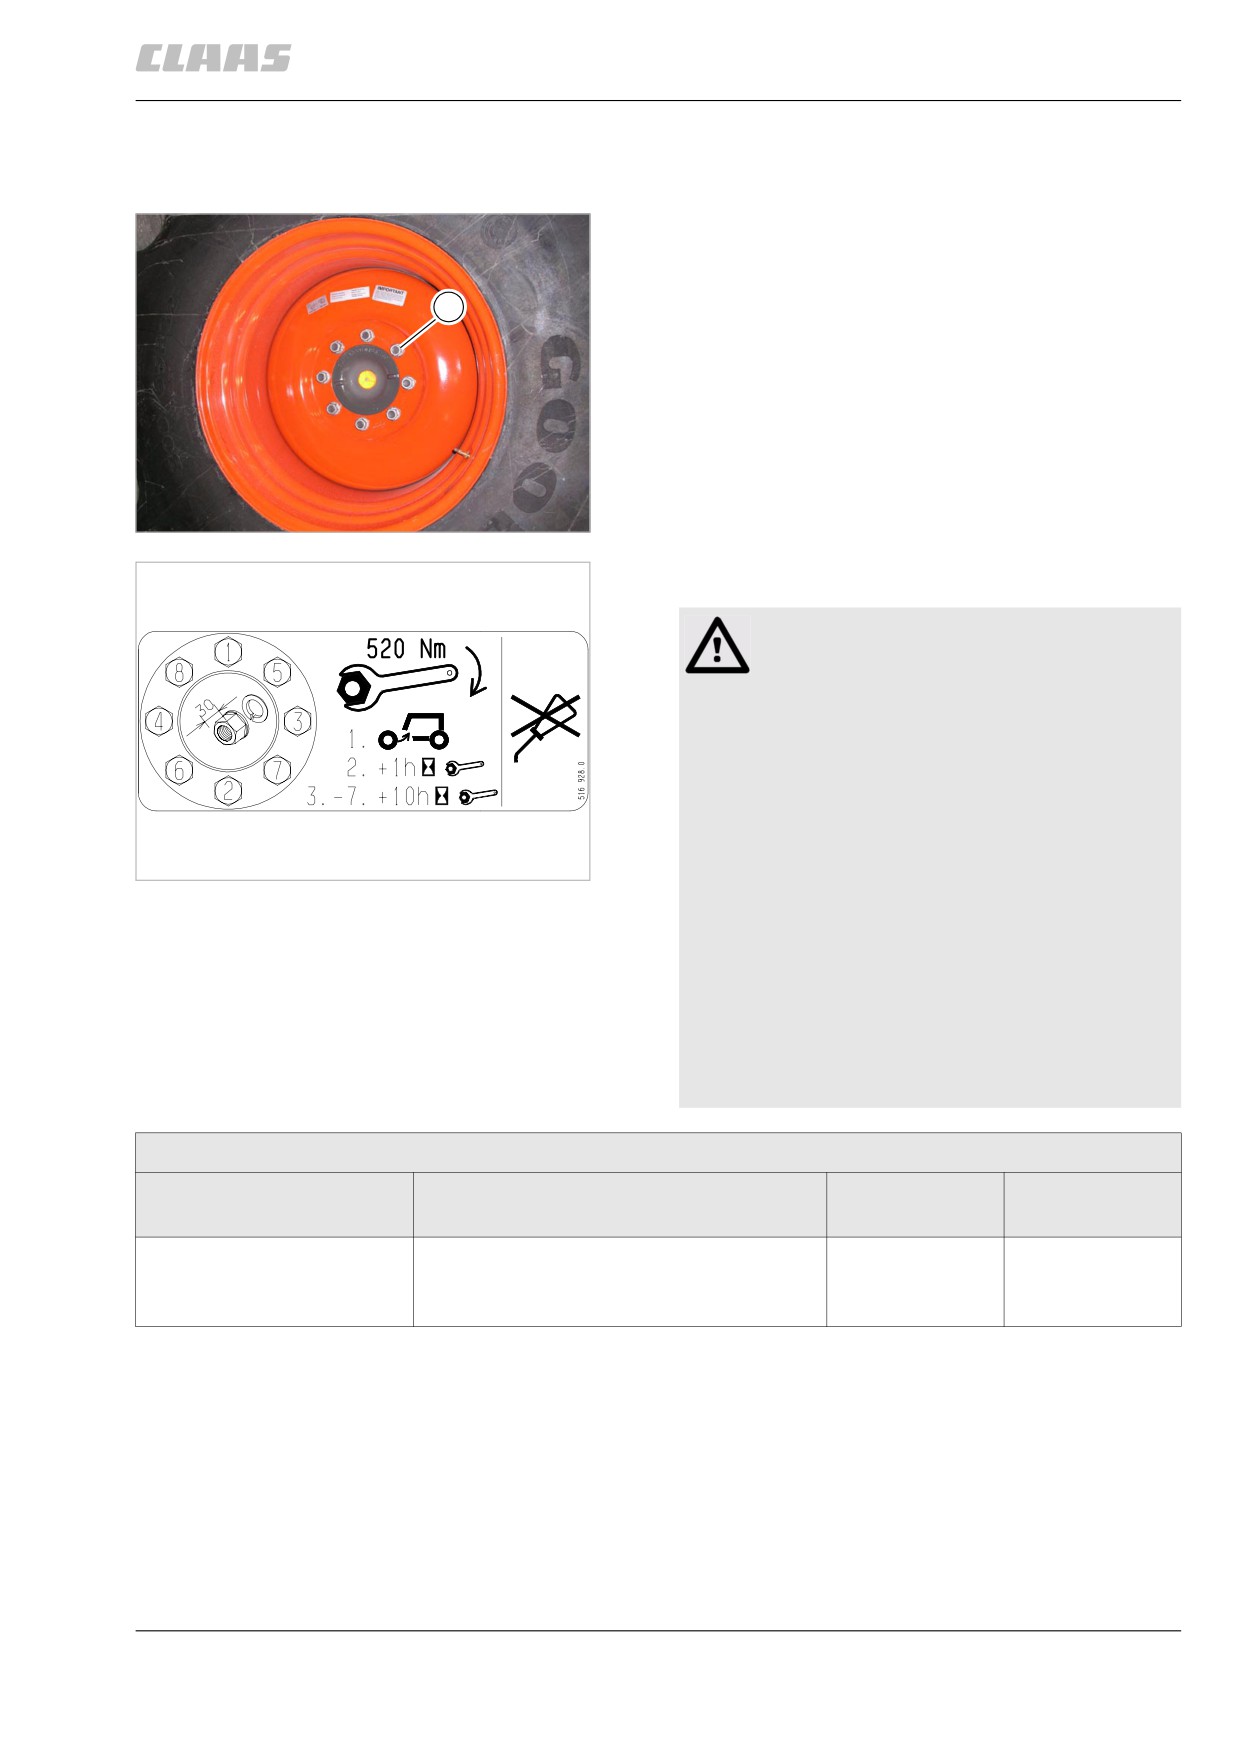
- Tighten all wheel nuts / wheel bolts (1) of the
machine on the drive axle and the rear axle as
specified.
1
59
9617
Drive axle
Danger!
Wheel bolts / wheel nuts may come loose
when not tightened as specified.
Death or serious injuries!
- Retighten all wheel bolts / wheel nuts on
new machines and when wheels have
been removed and refitted.
Observe the maintenance intervals:
60
- immediately after installation.
Drive axle decal
30848
- after the first working hour.
- during the first 50 working hours: every
10 working hours.
- The threads must be clean and free of
grease.
- Tighten the wheel bolts / wheel nuts
crosswise (as numbered on the decal).
- Observe the tightening torque.
Tightening torque of drive axle wheels
Use
Designation of thread, type of
Wrench size
Tightening
fastening
torque
Drive axle
M22 x 1.5 - 8.8, nut with spring
30
520 Nm
washer C 18.5 DIN 74361 (Limes type
conical spring washer)
307