CLAAS DOMINATOR 150 / 140 / 130. Operator’s Manual - page 17
13 Maintenance
13.2 General Information
67089
-
Grease machine regularly according to the lubri-
cation chart.
Environment!
Lubricants and fuels end up in the
environment.
Environmental pollution.
- Lubricants and fuels must be collected
and stored in suitable containers and dis-
posed of in a way that is harmless to the
environment and in accordance with
existing anti-pollution regulations.
Warning!
Contact with hot liquids or machine parts.
Danger of burns
- Wear suitable protective clothing.
- Let liquids or machine parts cool down.
- Comply with instructions.
WARNING:
Cleaning of central lubrication system with
unsuitable agents.
Damage to the system.
- Clean system with white spirit or kerosine
exclusively.
- Do not use trichloroethene (TRI), tetra-
chloroethene (PER) or similar solvents or
alcohol, methanol, acetone or similar sub-
stances for cleaning the system.
32862
13.2.7 Cleanliness of lubricants
Caution!
Machine operation with unpermitted or pol-
luted lubricants.
Machine damage.
- Ensure a clean environment.
- Use suitable and clean tools.
- Use permitted lubricants.
- Lubricants must be free of pollution.
Warning!
Operation of the machine with contaminated
lubricants.
Machine damage.
- Make sure surroundings are clean.
260
13 Maintenance
13.2 General Information
67089
11112
13.2.8 Brakes
Danger!
Insufficient brake system maintenance.
Death or serious injuries!
- Inspect the brake system thoroughly at
regular intervals.
- Adjustment, repairs and service work on
the brake system may be performed only
by authorised specialist workshops.
- Check the level of the brake fluid at regu-
lar intervals.
Only use the recommended type of brake
fluid and change the brake fluid as
specified.
Warning!
Contact with hot liquids or machine parts.
Danger of burns
- Wear suitable protective clothing.
- Let liquids or machine parts cool down.
- Comply with instructions.
Warning!
Incorrect handling of brake fluid.
Medium-grade injuries.
- Observe the details regarding brake fluid
use provided on the container.
- Wear safety gloves.
- Collect brake fluid in a suitable container.
- Dispose of brake fluid in accordance with
existing environmental regulations!
11114
13.2.9 Wheels / tyres
Warning!
If tyre pressures exceed the specified values,
the tyres may explode.
Danger of injury
- Never stand in the vicinity of the tyre
while it is being inflated. Always stand
clear!
- Regularly check the pressure of the tyres.
- The specified tyre pressure must be
respected.
261
13 Maintenance
13.2 General Information
67089
- Check if wheel nuts / wheel bolts are tightly seated
every time after fitting a wheel and after the speci-
fied maintenance interval or tighten them.
- Retighten the track adjustment elements in
accordance with the manufacturer's instructions
- The tyres must only be ballasted to the extent that
the specified tyre pressures can be
maintained.
- Keep oil and grease away from tyres.
- Check tyres for damage regularly on the inside as
well.
- Do not clean tyres by applying a steam cleaner
directly.
11118
13.2.10 Hydraulic system
Danger!
Work on the hydraulic system.
Death or serious injury
- Relieve the hydraulic pressure before
working on the system.
Danger!
Dealing incorrectly with injuries due to hydrau-
lic fluids.
Death or serious injury.
Even a pinhole can result in severe injuries.
- If hydraulic fluid gets in the skin or eyes,
have the injury treated by a medical spe-
cialist immediately.
Danger!
Pre-loaded energy accumulators (spring,
accumulator, hydraulic cylinder).
Death or serious injury.
- Only have authorised and qualified work-
shops carry out work on energy
accumulators.
262
13 Maintenance
13.2 General Information
67089
Danger!
Liquids under high pressure.
Liquids penetrate the skin and cause serious
injury.
- Only have authorised and qualified work-
shops carry out work on the hydraulic
system.
- Check hose lines at regular intervals.
Search for leaks using a piece of wood or
cardboard.
Ensure that the oil jet will not be directed
towards your body.
- Replace any damaged hose lines.
- Replace hose lines 6 years after the date
of manufacture at the latest.
11200
13.2.11 Electrical system
WARNING:
Work on the electrical system.
Machine damage.
- Before starting work, disconnect the cable
from the negative terminal first and then
from the positive terminal of the battery.
- When wrk is complete, first connect the
positive terminal and then the negative
terminal to the battery.
- Always disconnect the cables from the
alternator and battery before performing
electrical welding work on the machine
and the front attachment.
Danger!
Incorrect handling of batteries.
Death or serious injury.
- Be careful with battery gases, they are
highly explosive.
- Avoid sparks and naked flames in the
vicinity of a battery!
- Remove the covers (vent caps) when
recharging the battery to prevent the
accumulation of highly explosive gases.
- Be careful when handling battery acids,
they are caustic.
263
13 Maintenance
13.2 General Information
67089
WARNING:
Use of fuses that are too strong.
Damage to the electric system.
- Only use original fuses.
Environment!
Handling of used batteries.
Environmental pollution.
- Dispose of old batteries in a way that is
harmless to the environment and in
accordance with existing anti-pollution
regulations.
WARNING:
Incorrect handling of alternators.
Alternator damage.
- Do not turn off the battery isolating switch
while the engine is running.
- Never disconnect the cable between the
alternator and the battery while the alter-
nator is running.
- Never carry out a voltage test in a cable
on a metal object against ground.
- Immediately replace defective lamps of
the battery display.
11205
13.2.12 Air conditioner
Danger!
Refrigerant.
Death or serious injury.
- Only have authorised and qualified work-
shops carry out work on air conditioning
systems.
- Never get in contact with refrigerants!
- Wear safety gloves and safety goggles.
- Do not weld any components of the refrig-
erant circuit and or in the immediate
vicinity of any parts of the refrigerant
circuit.
- Maximum ambient temperature for refrig-
erant is 80 °C.
264
13 Maintenance
13.2 General Information
67089
Environment!
Lubricants and fuels end up in the
environment.
Environmental pollution.
- Lubricants and fuels must be collected
and stored in suitable containers and dis-
posed of in a way that is harmless to the
environment and in accordance with
existing anti-pollution regulations.
Environment!
Incorrect handling of refrigerant.
Refrigerants pollute the environment if vented
to the atmosphere.
- Take particular care when working on the
air conditioner.
- Refrigerant must always be discharged
by use of the correct recovery equipment
prior to the repair work to prevent it from
venting to the atmosphere.
11207
13.2.13 Protective guards
Danger!
Missing or damaged safety devices.
Death or serious injury.
- Fit safety devices before putting the
machine into operation.
- Check function of safety devices at regu-
lar intervals.
- Replace worn or damaged safety devices
by new ones.
11209
13.2.14 Spare parts
Danger!
Use of unauthorised spare parts.
Death or serious injury.
- Spare parts must at least comply with the
technical standards required by the man-
ufacturer of the implement!
- We recommend using genuine CLAAS
spare parts.
265
13 Maintenance
13.2 General Information
67089
11212
13.2.15 Unbalance
Caution!
Uneven running of machine parts.
Machine damage and excessive wear.
- Remove dirt accumulations in rotating
machine parts regularly and thoroughly.
85487
13.2.16 Welding work on combine harvester
WARNING:
Overvoltage may occur during all electric
welding work on the machine.
Electronic unit damage.
- Carry out all work steps below.
- Connect the earth clamp of the welder in
the near vicinity of the area where the
welding is being carried out.
- Observe the general warnings at the beginning of
the "Maintenance" chapter.
- Disconnect the battery isolating switch.
- Disconnect the electrical connectors between the
engine wiring harness and the main wiring
harness.
- Remove the electronic plug-in modules from the
central terminal compartment.
- Disconnect radio and CB radio.
- Disconnect all cable connections (1) from the
alternator.
- Always connect the ground clamp of the welders
in the immediate vicinity of the welding point.
5768
13.2.17 Putting the machine out of action
Before work is carried out on the machine, perform the
following steps:
- Stop the diesel engine.
- Apply parking brake.
- Remove the ignition key.
- Remove key of battery isolating switch.
- Wait for machine parts which run on have come to
a complete halt.
- Secure machine by wheel chocks.
- Ensure that the machine cannot be started by any
third persons.
266
13 Maintenance
13.2 General Information
67089
83929
13.2.18 Cleaning of surfaces with decals
applied
Caution!
Cleaning areas where adhesives have been
applied with a high-pressure jet cleaner.
The decals will be damaged.
- Avoid cleaning with a high-pressure jet
cleaner.
- Clean such areas with a high-pressure jet
cleaner only from a sufficient distance.
- Set the water pressure and the water
temperature as low as possible.
- Do not stress decals mechanically when
cleaning.
- Replace damaged and illegible decals
(hazard warning signs / safety decals /
lettering) immediately.
38041
13.2.19 Winter storage instructions for
combines
Winter storage of the machine after the harvest is nec-
essary in order to protect the capital invested into the
machine. Thorough and conscientious maintenance
and cleaning and the replacement of worn or damaged
parts at this point will save time and money when the
machine is required for operation again.
WARNING:
Cleaning of front attachment / machine with
water.
Material damage by corrosion.
- Avoid cleaning with water.
- Before and after cleaning with water
grease all grease points.
After that, let the front attach-
ment/machine run for some minutes.
- Do not clean hollow spaces and cable
leadthroughs with water.
- Clean the machine thoroughly inside, particularly
the threshing drum, concave, the space behind
the drum, the preparation floor, return floors, straw
walkers and above the cleaning fan.
- Open the elevator covers and auger troughs.
- Clean the exterior of all bearings thoroughly of
grease and dust.
- Preserve the machine including the grease points
to be greased at annual intervals after the harvest
by pressing in brand-name grease.
267
13 Maintenance
13.2 General Information
67089
To achieve even grease distribution, let the
machine run briefly after greasing until a small
grease edge has formed at the outside of the
bearings.
Before and after cleaning the machine with a
high-pressure jet cleaner, the bearings must
be greased!
-
With the combine still running, operate the varia-
ble-speed drives to distribute the grease evenly
between the sliding parts.
Coat the inner flanks of the variable speed pulleys
with corrosion inhibitor as far as possible.
Remove preservation before putting the
machine into operation the next time!
-
Seal off peripheries of slip clutches with paint
to keep moisture out and to keep friction faces
from rusting.
-
Grease all polished parts such as finger bars and
crop lifters.
-
Carry out all maintenance work according to the
specified intervals.
-
Check machine prior to cleaning.
Have repairs carried out if necessary.
-
Store the machine in a dry, weatherproof shed
where no fertilisers are stored!
-
Lower the front attachment to the ground or
remove it in order to relieve the hydraulic system.
-
Jack up the machine so that the full weight is not
resting on the wheels.
-
Check the coolant antifreeze content.
–
Charge the battery and recharge every six weeks
or leave it with a battery service point to take care
of.
12884
13.2.20 Coolant
The engine cooling system has been filled with a mix-
ture of corrosion / frost protection and water at the
factory.
The coolant consists of 50% corrosion / frost protection
and 50% water.
This ensures frost protection down to approx. -37 °C.
Also refer to the specifications of the engine
manufacturer.
268
13 Maintenance
13.3 Maintenance schedule
67089
13.3 Maintenance schedule
72590
13.3.1 Service intervals
- You can find detailed information on maintenance work below in this chapter.
Maintenance operations
Service intervals in working hours
After the
Every
first
10
100
50
100
250
General maintenance
Cross off all points according to the
grease
•
greasing cycles
Engine
Diesel engine surroundings
clean
•
•
Fuel tank fuel
drain
•
Fuel tank (machine)
fill up
•
•
Filler neck filter
clean
•
Fuel system
bleed
•
Fuel sediment bowl filter
clean
•
•
Condensation at the fuel prefilter
drain
•
•
•
(standard equipment)
Fuel prefilter (standard equipment)
change
•
•
Condensation at the fuel prefilter
drain
•
•
•
(additional equipment)
Fuel prefilter (additional equipment)
change
•
•
Fuel filter CATERPILLAR C-6.6 /
change
•
•
3056 E
Fuel filter PERKINS 1006-6T
change
•
•
Diesel engine Oil level
check
•
Diesel engine Oil / oil filter C-6.6
change
•
Diesel engine Oil / oil filter
change
CATERPILLAR 3056 E
•
PERKINS 1006-6T
Diesel engine valves
adjust
(Refer to engine manufacturer's
operator's manual)
Radiator coolant level
check
•
•
Radiator coolant
change
Every 5 years
Coolant mixing ratio
check
•
•
Rotary chaff screen
clean
•
•
Cooling unit
clean
•
•
Coolant hoses
change
•
Diesel engine air filter
clean
•
•
269
13 Maintenance
13.3 Maintenance schedule
67089
Maintenance operations
Service intervals in working hours
After the
Every
first
10
100
50
100
250
Diesel engine air filter
change
•
•
Diesel engine air filter safety
change
(or after servicing the
cartridge
main filter cartridge five
•
•
times)
air filter intake sieve
clean
•
•
Air intake pipes
change
•
Clamps on air suction hoses
retighten
•
Chassis
Wheel nuts of drive axle tyres, tight-
check
*immediately after installation.
ening torque
*after the first working hour
•**
•*
**during the first 50 working
hours: every 10 working hours
Wheel nuts / wheel bolts of rear axle
check
*immediately after installation.
•
•
•*
tyres tightening torque
Gearbox drive axle surroundings
clean
•
•
Final drives Oil level
check
•
•
Final drives Oil
change
•
•
Rear axle gearbox Oil level
check
•
•
Rear axle gearbox Oil
change
•
•
Adjusting the chassis clutch
adjust
•
DOMINATOR 130
Adjusting the short-circuit valve
adjust
•
DOMINATOR 130
Brake
Brake fluid level
check
•
•
•
Brake fluid
change
(only through authorised
•
workshop)
Parking brake
adjust
(only through authorised
•
workshop)
Foot brake
adjust
(only through authorised
•
workshop)
Brake pads
check
•
•
•
Output / drives
Belts (all)
adjust
•
•
•
Chains (all)
adjust
•
•
•
270
13 Maintenance
13.3 Maintenance schedule
67089
Maintenance operations
Service intervals in working hours
After the
Every
first
10
100
50
100
250
Hydraulic system
Hydraulic system Oil level
check
•
•
•
Hydraulic system Oil / oil filter / Fresh
change
•
air filter element
Electrical / electronic equipment
Battery acid level
check
•
•
Cab / operator's platform
Cab air filter
clean
•
Cab air filter
change
•
•
Cab recirculation air filter
clean
•
•
Cab roof-mounted units
clean
•
•
Air conditioner
put into
•
operation
Air conditioner refrigerant moisture
check
•
•
saturation
Air conditioner refrigerant
change
(only through authorised
•
•
workshop)
Intake
Feed rake conveyor retainers
clean
•
Feeder chains
adjust
•
•
Slip clutch feeder chain
adjust
•
Rasp plate on feed rake conveyor
check
•
Threshing mechanism
Concave
adjust
•
•
Threshing mechanism
clean
•
Stone trap
clean
•
•
Separation
Straw walker
clean
•
Deflector curtain
check
•
Performance monitor sensors
clean
•
•
Cleaning unit
Performance monitor sensors
clean
•
•
Fan
clean
•
Setting the fan speed gauge
•
Stepped preparation floors
clean
•
Sieves
clean
•
271
13 Maintenance
13.3 Maintenance schedule
67089
Maintenance operations
Service intervals in working hours
After the
Every
first
10
100
50
100
250
Crop receptacle / straw receptacle
Grain delivery
Returns elevator chain
adjust
•
•
Grain elevator chain
adjust
•
•
Auger troughs
clean
•
Grain tank
clean
•
Grain tank unloading tube support
adjust
•
transport position
Attachment parts / machine
components
Fire extinguisher
check
•
•
Miscellaneous
Maintenance operations on front
Note
•
attachments
272
13 Maintenance
13.4 Lubricants chart
67089
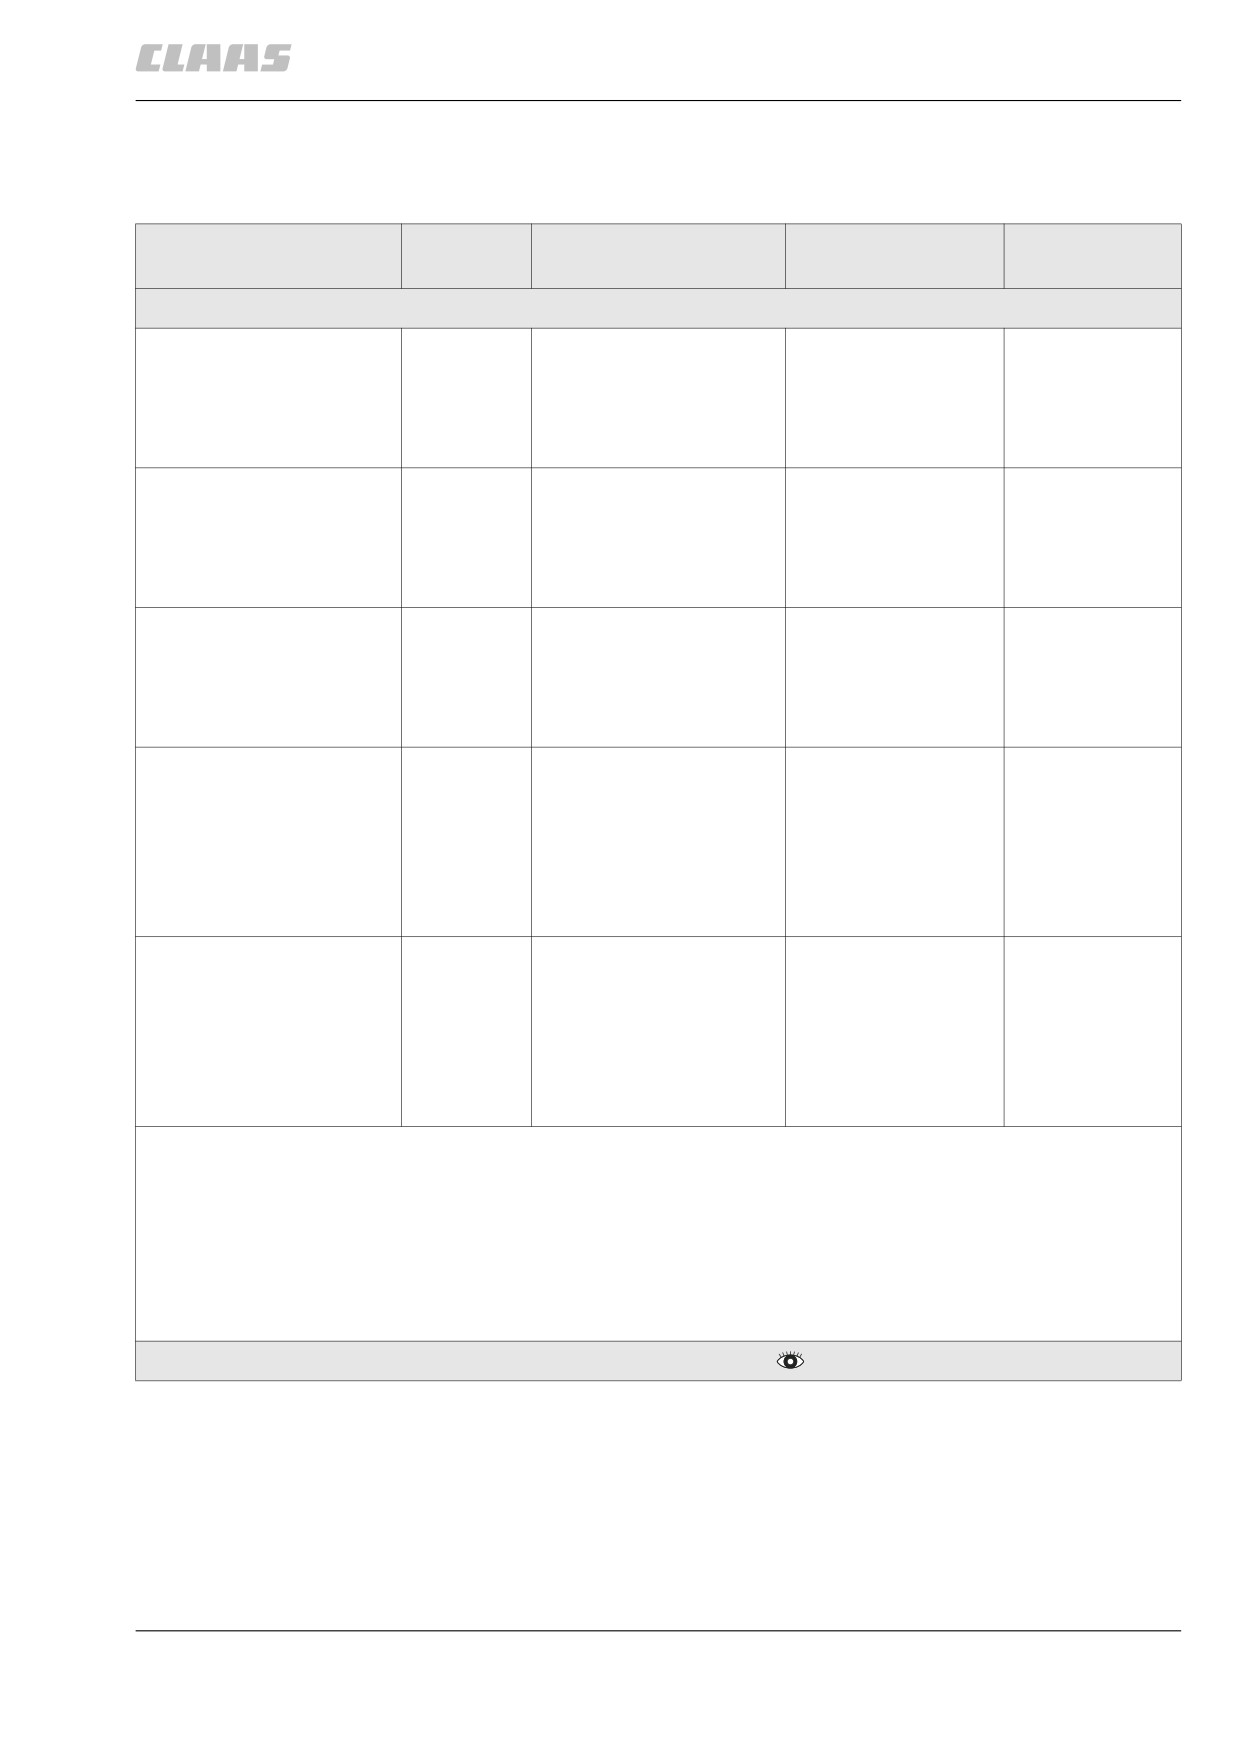
13.4 Lubricants chart
85102
13.4.1 Lubricants
Component
Capacity
Type of lubricant /
Viscosity class /
Remark
Specification
SAE class
Engine
CATERPILLAR C6.6
around
CLAAS AGRIMOT
15W-40
Check oil level
exhaust gas category 3a
14.5 litres*
SDX 15W-40 (mineral)
at dipstick
API CI-4/SL
MB 228.3
CATERPILLAR 3056E
around 14
CLAAS AGRIMOT
15W-40
Check oil level
exhaust gas category 2
litres*
SDX 15W-40 (mineral)
at dipstick
API CH-4
MB 228.3
Perkins 1006-T6 exhaust
around 14
CLAAS AGRIMOT
15W-40
Check oil level
gas category 0
litres*
SDX 15W-40 (mineral)
at dipstick
API CH-4
MB 228.3
Cooling system**
around 30
CLAAS AGRI-COOL
Check for suffi-
litres*
radiator protective agent
cient antifreeze
CATERPILLAR C6.6
protection
See also the Operator's
CATERPILLAR 3056 E
before winter
Manual of the engine
storage
manufacturer
MB sheet 325.3
Cooling system**
around 33
CLAAS AGRI-COOL
Check for suffi-
litres*
radiator protective agent
cient antifreeze
Perkins 1006-T6
protection
See also the Operator's
before winter
Manual of the engine
storage
manufacturer
MB sheet 325.3
** The coolants of MB sheet 325.0 and MB sheet 325.2 can be mixed.
** The coolants of MB sheet 325.3 and CAT EC-1 can be mixed.
** The coolants of MB sheet 325.0 and MB sheet 325.2 must not be mixed with the coolants of MB sheet 325.3
and CAT EC-1.
** Mixing with commercially available coolant is not allowed.
** Use only specified coolant for refilling.
* Check the necessary filling quantity by checking the oil level!
273
13 Maintenance
13.4 Lubricants chart
67089
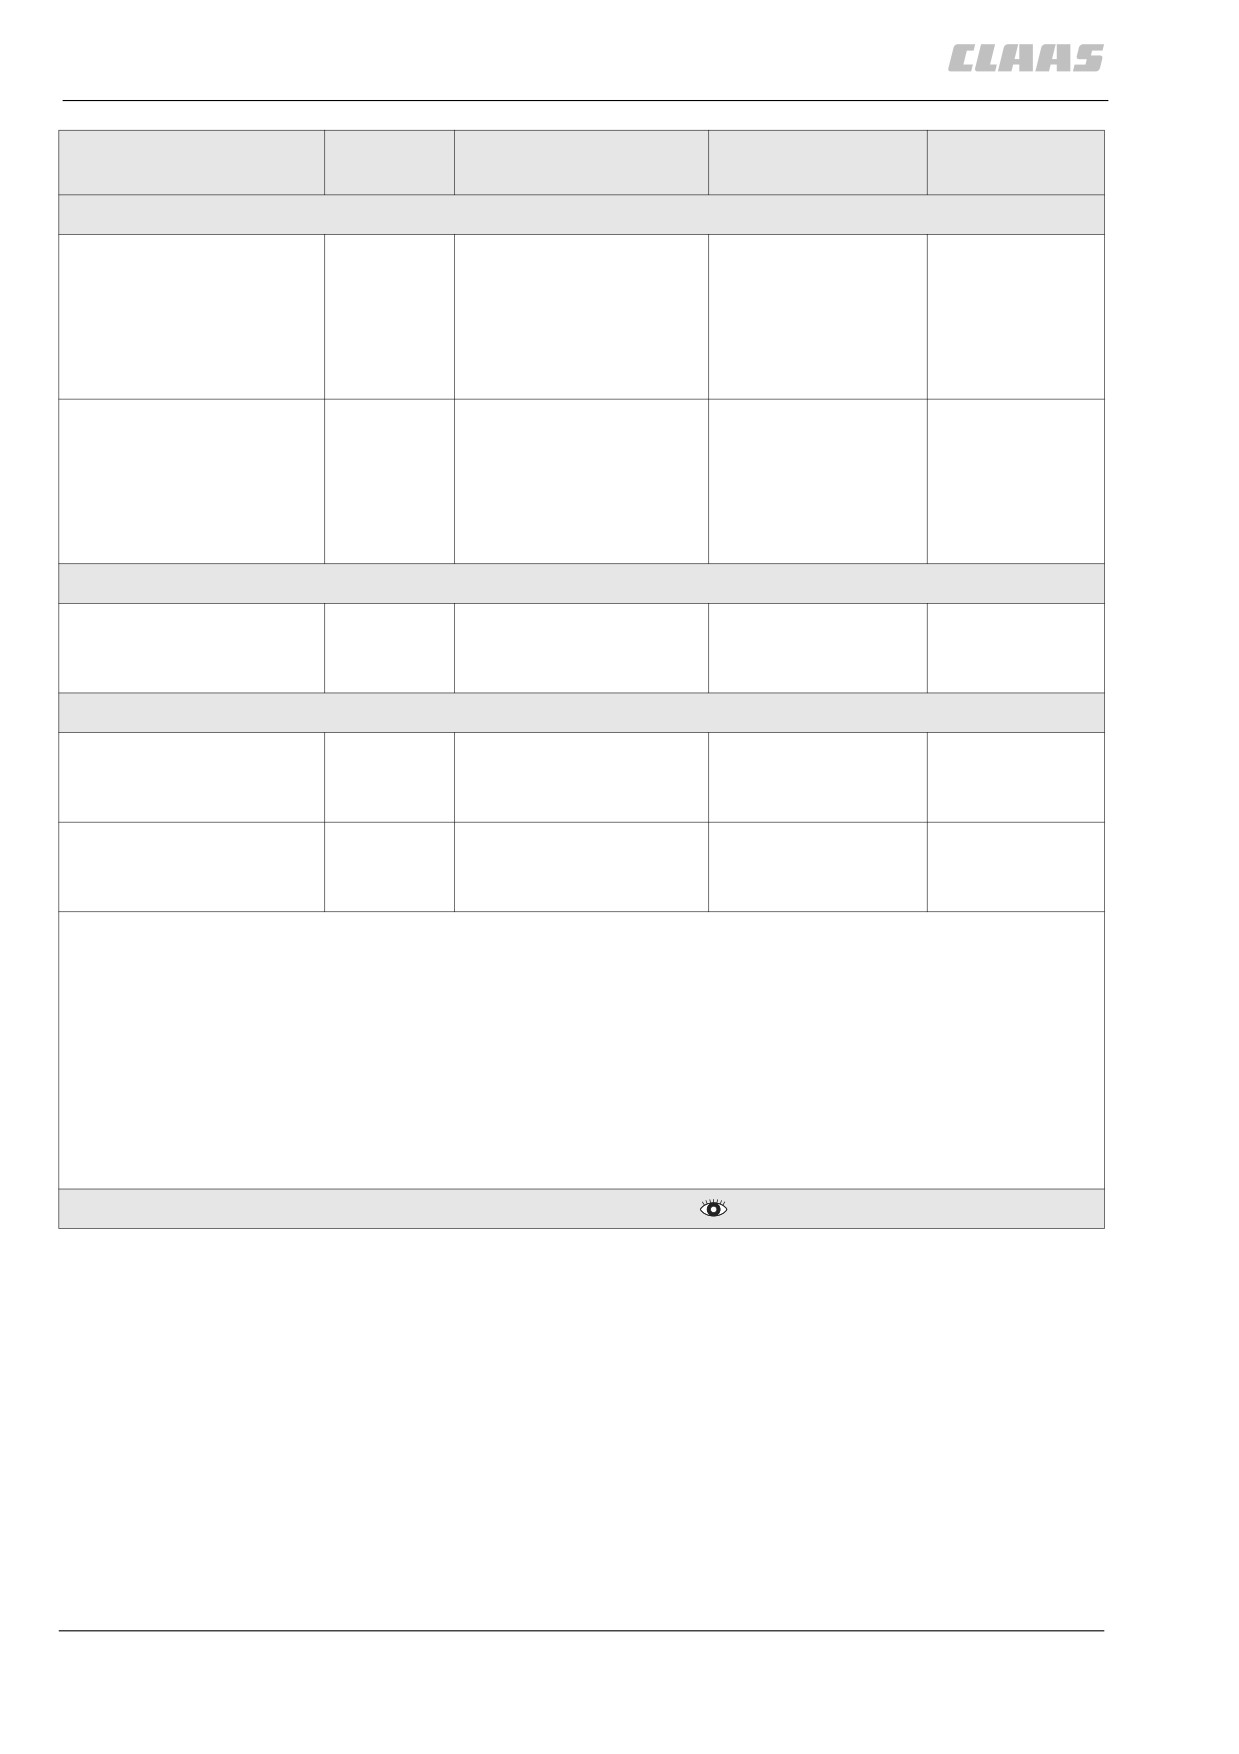
Component
Capacity
Type of lubricant /
Viscosity class /
Remark
Specification
SAE class
Chassis
Manual gearbox
around 6.8
CLAAS AGRISHIFT
85W-90
Check oil level
litres*
MT 80W-90
on oil level
(total driveline)
check plug
API GL5
MIL: 2105 B
Final drives
around
CLAAS AGRISHIFT
85W-90
Check oil level
MT 80W-90
on oil level
3.0 litres
(total driveline)
check plug
each*
API GL5
MIL: 2105 B
Brake
Foot brake
Compen-
ATE brake fluid
DOT 4
Check liquid
sating tank
level on com-
filled
pensating tank
Hydraulic system
DOMINATOR 150 /
140
around 20
CLAAS AGRIHYD
HVLP Part 3
Check oil level
hydraulic system
litres*
HVLPD 46 (detergent
at dipstick
ISO-VG 46
multigrade) **
DOMINATOR 130
around 6
CLAAS AGRIHYD
HVLP Part 3
Check oil level
hydraulic system
litres*
HVLPD 46 (detergent
at dipstick
ISO-VG 46
multigrade) **
** When selecting the hydraulic oil, the following conditions need to be met:
Density at 15 °C
0.874 g/cm3 (DIN 51 757)
Viscosity 40 °C
46.8 mm2/s (DIN 51 562)
Viscosity 100 °C
8.30 mm2/s (DIN 51 562)
Viscosity index
154 (DIN ISO 2909)
Pourpoint
-36 °C (DIN ISO 3016)
The oil must have detergent properties!
* Check the necessary filling quantity by checking the oil level!
274
13 Maintenance
13.4 Lubricants chart
67089
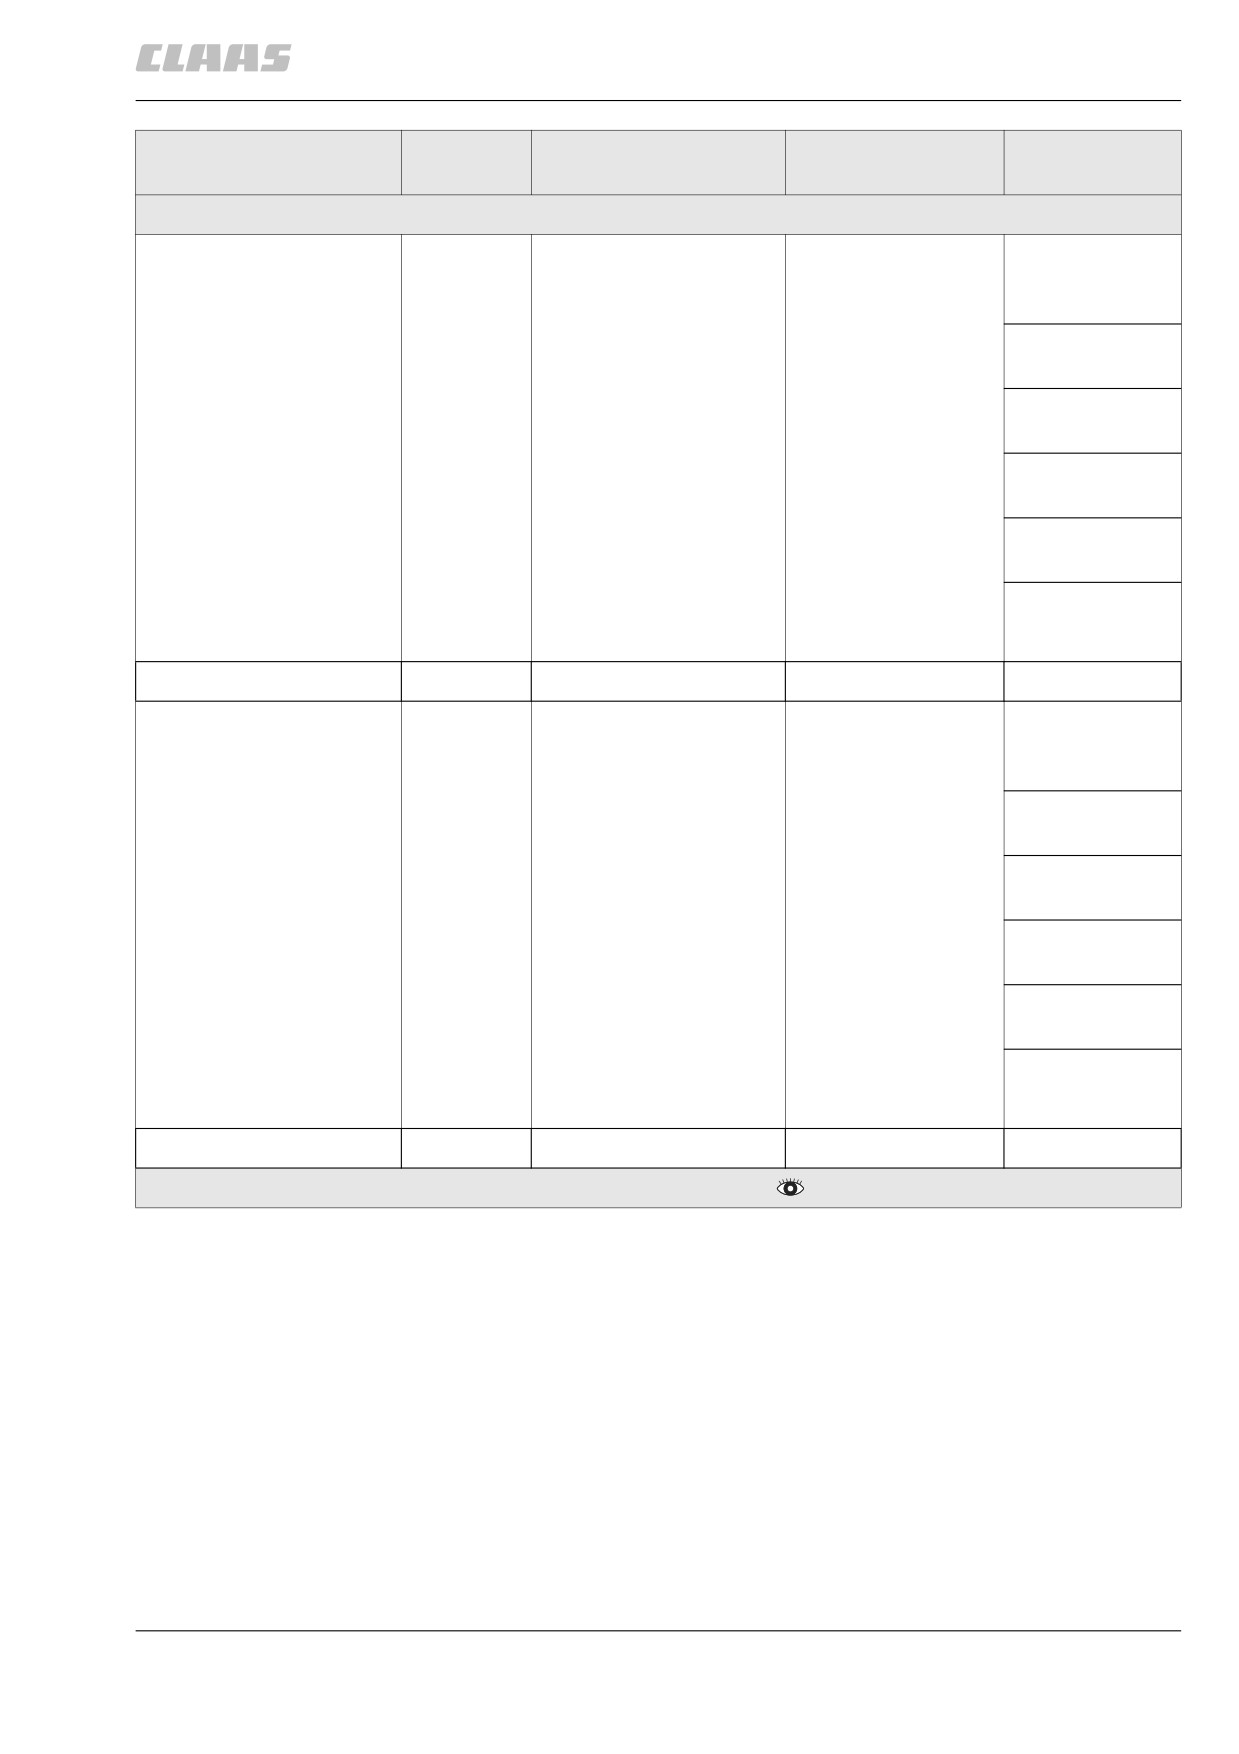
Component
Capacity
Type of lubricant /
Viscosity class /
Remark
Specification
SAE class
Cab / operator's platform
Sanden compressor SD 7
0.3 litres
in case of com-
H 15
pletely new
system
Condenser
0.02 litres
in case of
Sanden refrigerant oil
replacement
SP 20 PAG
per hose line
0.02 litres
in case of
Part no. 00 0241 752
0,
replacement
0.04 litres
Evaporator
0.04 litres
in case of
Part no. 00 0241 755
0,
replacement
0.25 litres
Filter receiver drier
0.01 litres
in case of
replacement
Refrigerant loss
0.02 litres
suddenly drained system
0.04 litres
Refrigerant
1500 g
R 134a
York compressor
0.3 litres
in case of com-
pletely new
system
Condenser
0.02 litres
in case of
replacement
per hose line
0.02 litres
in case of
replacement
Ester refrigerant oil
Evaporator
0.04 litres
in case of
replacement
Filter receiver drier
0.01 litres
in case of
replacement
Refrigerant loss
0.02 litres
suddenly drained system
0.04 litres
Refrigerant
1390 g
R 134a
* Check the necessary filling quantity by checking the oil level!
275