CLAAS DOMINATOR 150 / 140 / 130. Operator’s Manual - page 16
12 Faults and remedies
12.2 Cab / Operator's platform
67088
12.2 Cab / Operator's platform
54878
12.2.1 Central terminal compartment
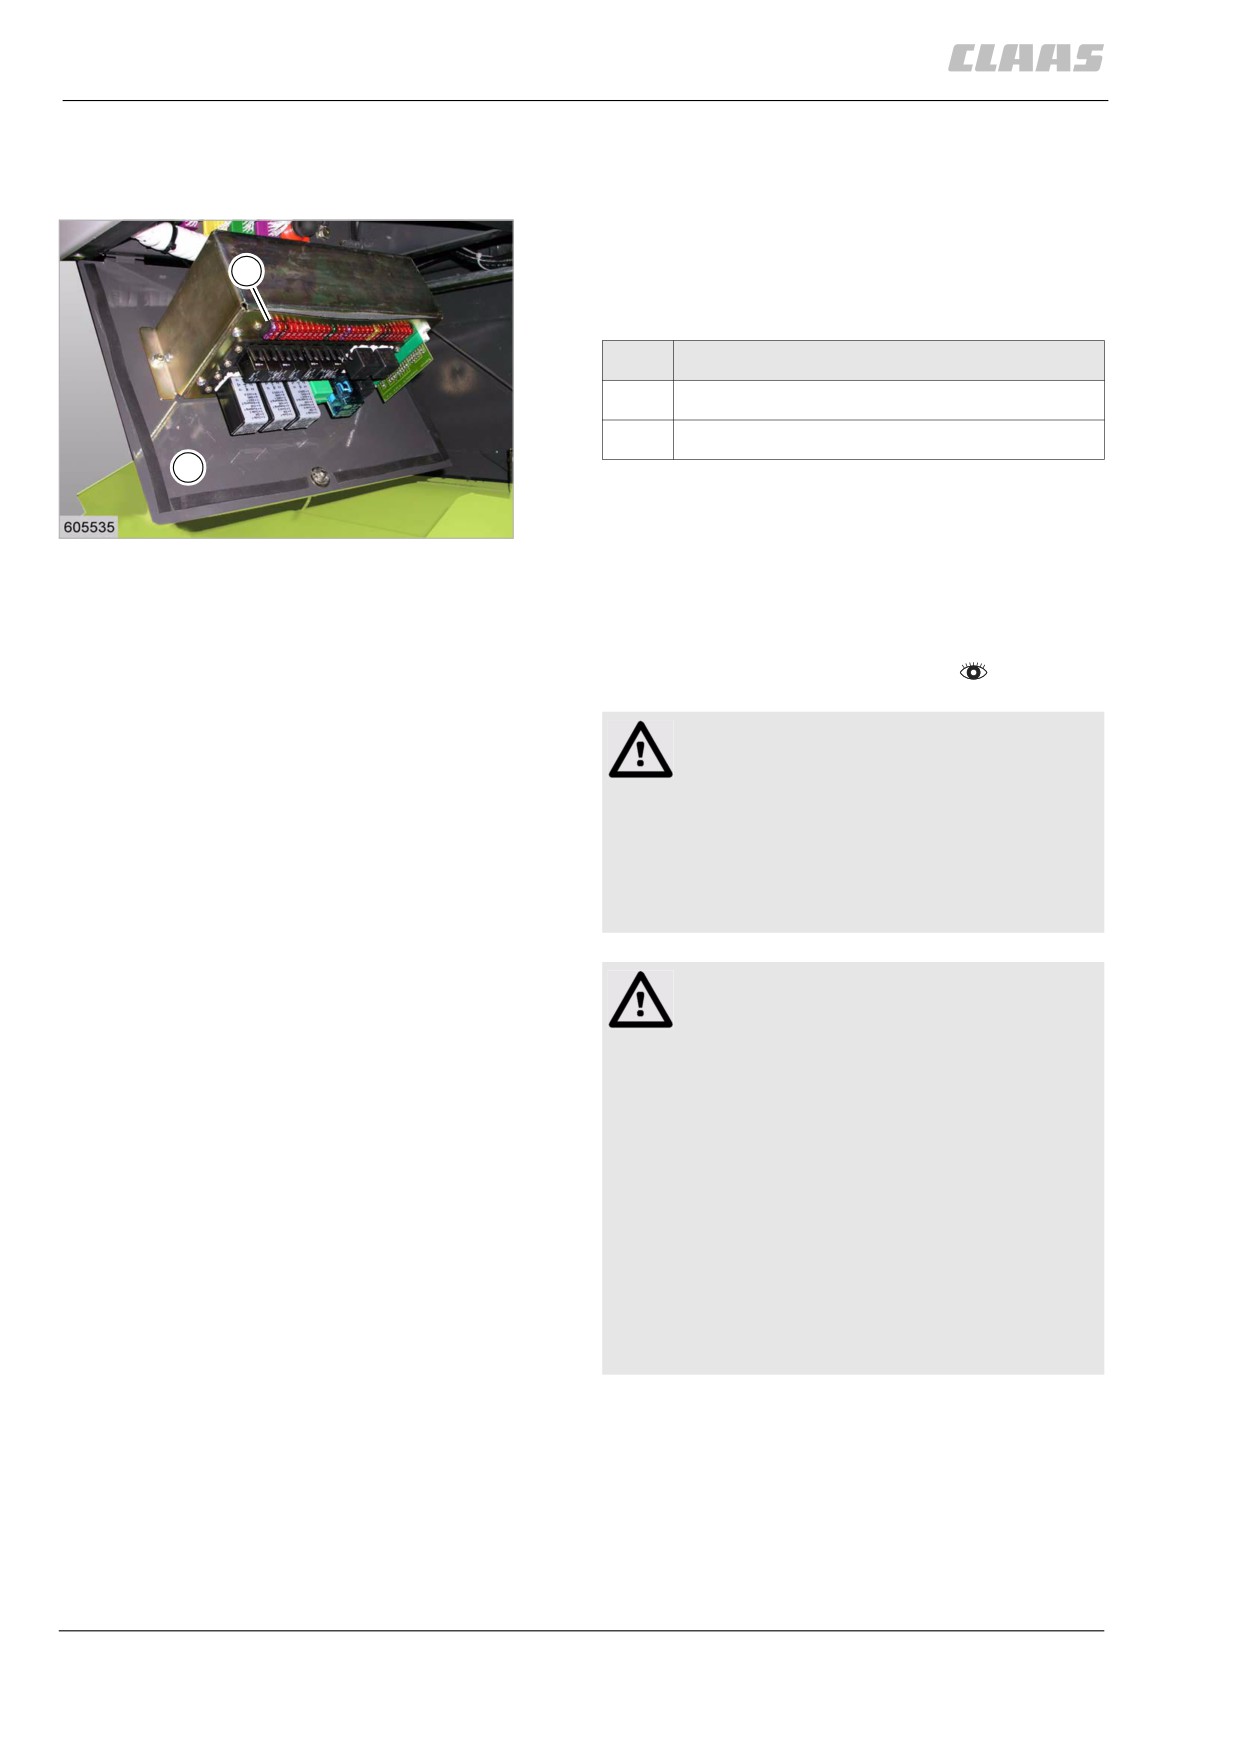
The central terminal compartment is located under
the operator's platform on the left-hand side. Plug-in
S
modules, relays and fuses are readily accessible
after cover (D) has been opened.
Designation
D
Lid
S
Fuses
D
1
19373
79522
12.2.2 Air conditioner faults and remedies
-
Observe the general warnings at the beginning of
the "Trouble and remedy" chapter.
Danger!
Improper handling of injuries cause by
refrigerant.
Death or serious injury.
- When refrigerant penetrates the skin or
the eyes, have the injury treated immedi-
ately by a specialist doctor.
Danger!
Refrigerant.
Death or serious injury.
- Only have authorised and qualified work-
shops carry out work on air conditioning
systems.
- Never get in contact with refrigerants!
- Wear safety gloves and safety goggles.
- Do not weld any components of the refrig-
erant circuit and or in the immediate
vicinity of any parts of the refrigerant
circuit.
- Maximum ambient temperature for refrig-
erant is 80 °C.
244

12 Faults and remedies
12.2 Cab / Operator's platform
67088
Malfunction
Possible cause and remedy
Air conditioner shuts down automatically.
•
Extremely high outside temperature.
- Let system cool down, then switch it on
again.
- Close door and windows.
Air conditioner does not provide cooling.
•
Magnetic clutch does not engage.
- Have clutch replaced.
Only uncooled air comes out of the air louvres.
•
Drive belt slack.
- Tension or replace V-belt.
•
Cable connections loose.
- Tighten loose or disconnected cables.
•
Fuses blown.
- Install new fuse.
•
Compressor will not pump coolant.
Expansion valve has frozen.
Saturation of moisture indicator has been
reached.
- Have filter-receiver replaced.
For this, the system has to be discharged
using the correct recovery equipment and
then recharged.
Cool air is blown through the air louvres,
•
Evaporator in cab roof blocked.
- Clean evaporator.
but the air flow is insufficient for cooling the cab.
•
Evaporator defective.
- Have evaporator replaced (Have air condi-
tioner system discharged and then recharge
with refrigerant).
•
Condenser upstream of radiator is soiled.
- Clean condenser.
•
Low refrigerant level.
White ball does not float and is at bottom of
indicator.
- Have air conditioning system checked by a
specialist workshop.
•
Outside air getting into the cab.
- Close door and windows completely.
Air conditioner provides cool air for a time, then
•
Ice formation in the expansion valve.
discharges warm air again.
up to serial no. …:
The filter receiver drier is saturated when the
blue ball has turned pink.
- Have filter-receiver replaced. (Discharge and
then recharge air conditioner.)
from serial no. …:
The filter receiver drier is saturated when the
orange ball has lost its colour.
- Have filter-receiver replaced. (Discharge and
then recharge air conditioner.)
245
12 Faults and remedies
12.2 Cab / Operator's platform
67088
Malfunction
Possible cause and remedy
Compressor too loud.
• Compressor bearings damaged.
- Have the compressor repaired or replaced.
For this, the system has to be discharged
using the correct recovery equipment and
then recharged.
• Oil level in compressor too low (indicated by
external leakage).
- Have repair work carried out by a specialist
workshop.
Check oil level in compressor only with sys-
tem drained.
For this, system has to be discharged using
the correct recovery equipment.
Moisture in cab.
• Water drain hoses clogged or not properly
routed.
Water dripping from air louvres.
- Check water drain hoses for free passage.
If necessary, blow out hoses with com-
pressed air.
246
12 Faults and remedies
12.3 Front attachment
67088
12.3 Front attachment
87895
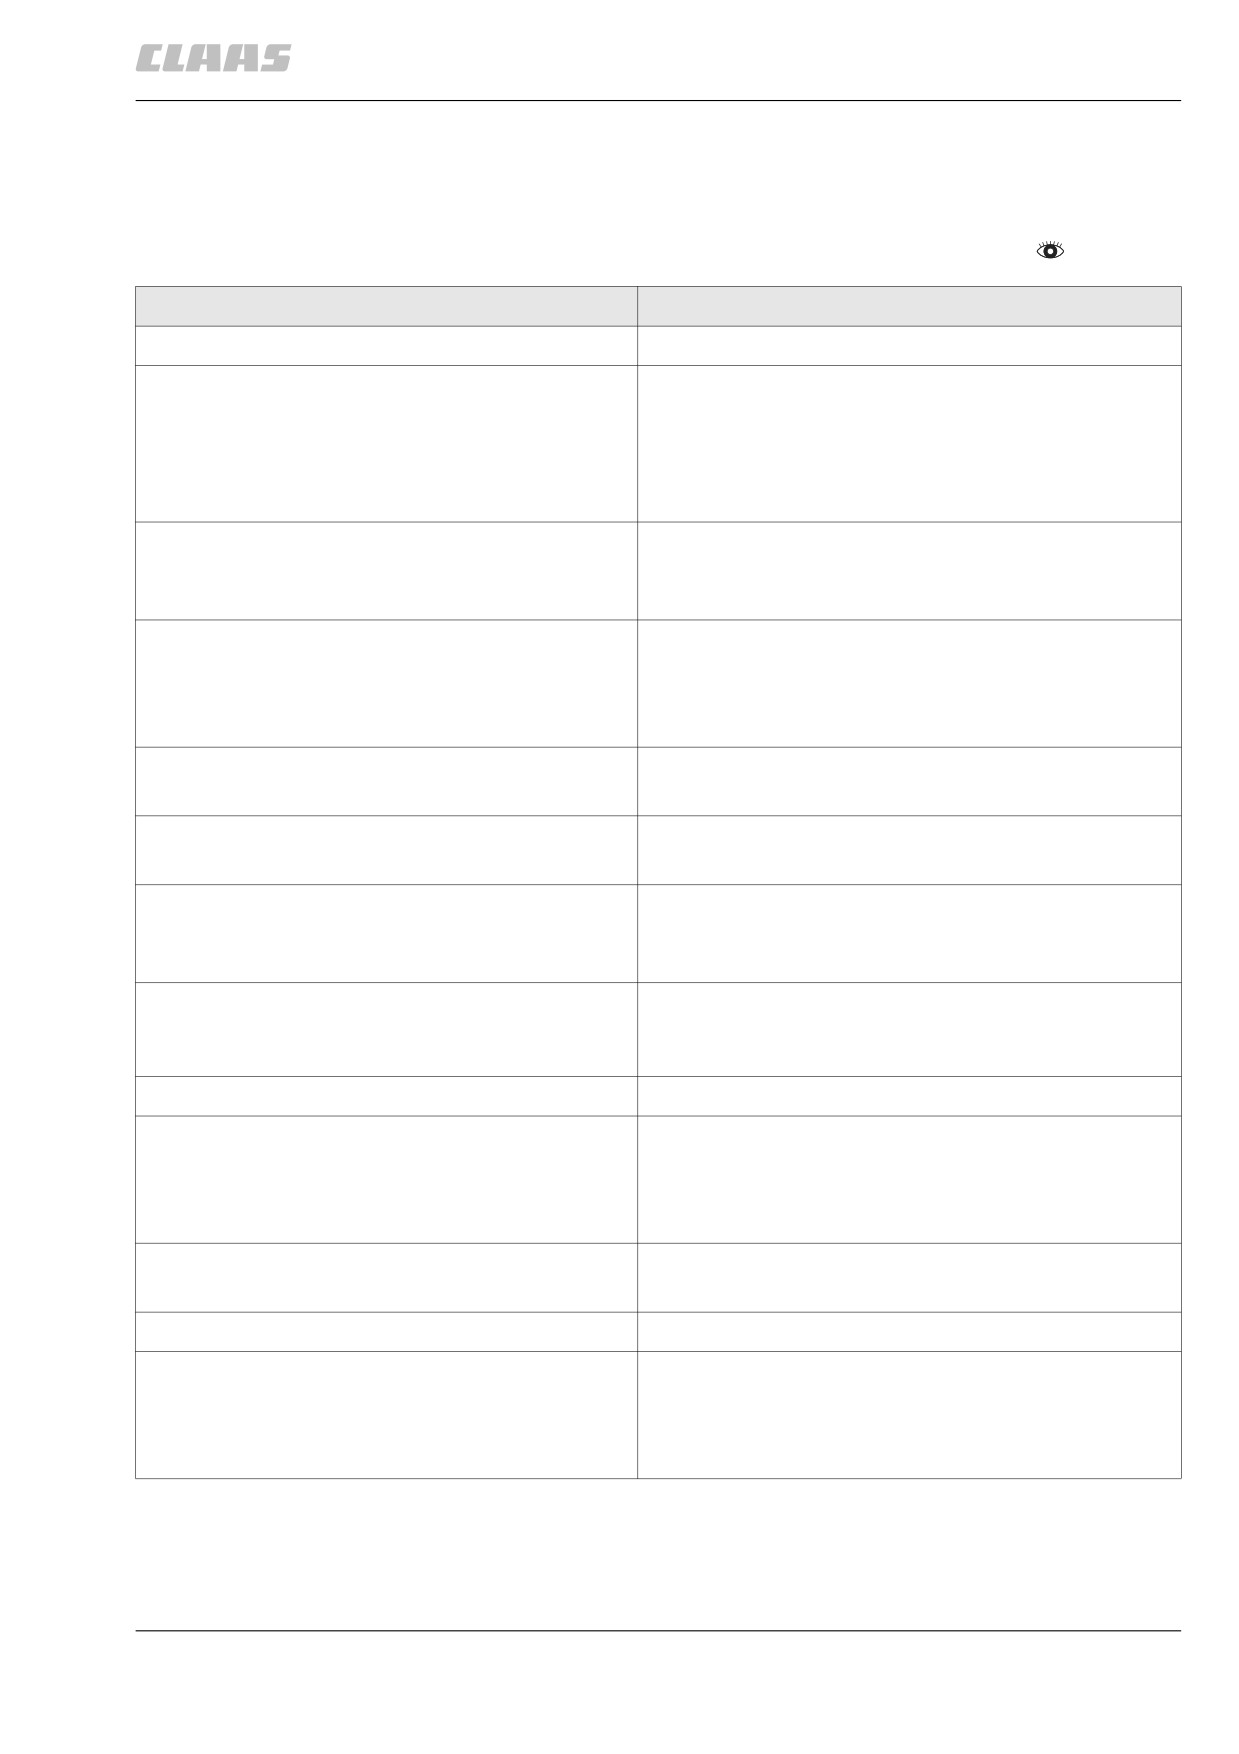
12.3.1 Front attachment
- Observe the general warnings at the beginning of
the "Trouble and remedy" chapter.
Malfunction
Cause, remedy
Front attachment
Poor cutting action
•
Adjust the knife clip.
•
Replace the knives.
•
Align knife fingers.
•
Replace any damaged knife sections and/or fingers.
•
Remove build-up of foreign material from cutterbar.
The knife suddenly stops
•
Remove foreign objects.
•
Replace damaged double fingers.
•
Tension the knives drive belt.
Lodged crops not properly picked up
•
Check spacing of crop lifters.
•
Adjust the reel further forward.
•
Set reel fingers to »grabbing« position.
•
If necessary, set the cutterbar skids inwards.
Dirt and material build up on divider points
•
Set the crop divider upwards at the adjusting plate.
•
Use special crop dividers.
Cutterbar cannot be raised
•
Check fuse.
•
Have hydraulic oil pressure checked.
Feeder chains and cutterbar stop too easily
•
Tension the cutterbar drive belt as specified.
•
Have the feeder chain slip clutch adjusted.
•
Have the cutterbar clutch checked.
The front attachment is in an oblique position
•
Check pressure of tyres.
(machine without Auto-Contour)
•
Align the front attachment mountings on the trough
suspension.
Cutterbar clutch will not disengage
•
Have the cutterbar clutch checked.
Uneven material flow
•
Correct reel speed and reel tine position.
•
Correct reel horizontal position.
•
Adapt intake auger height to material to crop.
•
Adjust feed rake chains to correct tension.
Intake auger tending to stop or gets blocked
•
Turn intake auger back and remove foreign object.
•
Have slip clutch reset to correct torque.
Crop wrapping round the reel shaft ends
•
Adjust the inner deflector properly.
Crop wrapping round the reel tine tubes
•
Slightly raise the reel.
•
Incline the reel tine a little more to the front.
•
Adjust reel speed to match ground speed.
•
Cover up reel tine tubes.
247
12 Faults and remedies
12.3 Front attachment
67088
Malfunction
Cause, remedy
Reel tines colliding with knife in lowest position
• Adjust reel hydraulic cylinder eyebolts for higher
reel setting.
The raised reel is in an oblique position
• Check for equal adjustment of reel cylinders
eyebolts.
• Check tightness of hydraulic cylinders.
• Bleed hydraulic cylinders.
Too many stones being picked up
• Reduce number of crop lifters.
• Do not cut unnecessarily low (lodged crops should
be lifted with crop lifters).
248
12 Faults and remedies
12.4 Feeder unit
67088
12.4 Feeder unit
87897
12.4.1 Feeder unit problem and remedy
- Observe the general warnings at the beginning of
the "Trouble and remedy" chapter.
Malfunction
Cause, remedy
Intake
Feeder unit cannot be raised
• Check fuse.
• Have hydraulic oil pressure checked.
Feeder chains stop too easily
• Adjust the front attachment drive belt.
• Have the feeder chain slip clutch adjusted.
Uneven material flow
• Adjust feed rake chains to correct tension.
249
12 Faults and remedies
12.5 Threshing mechanism
67088
12.5 Threshing mechanism
87900
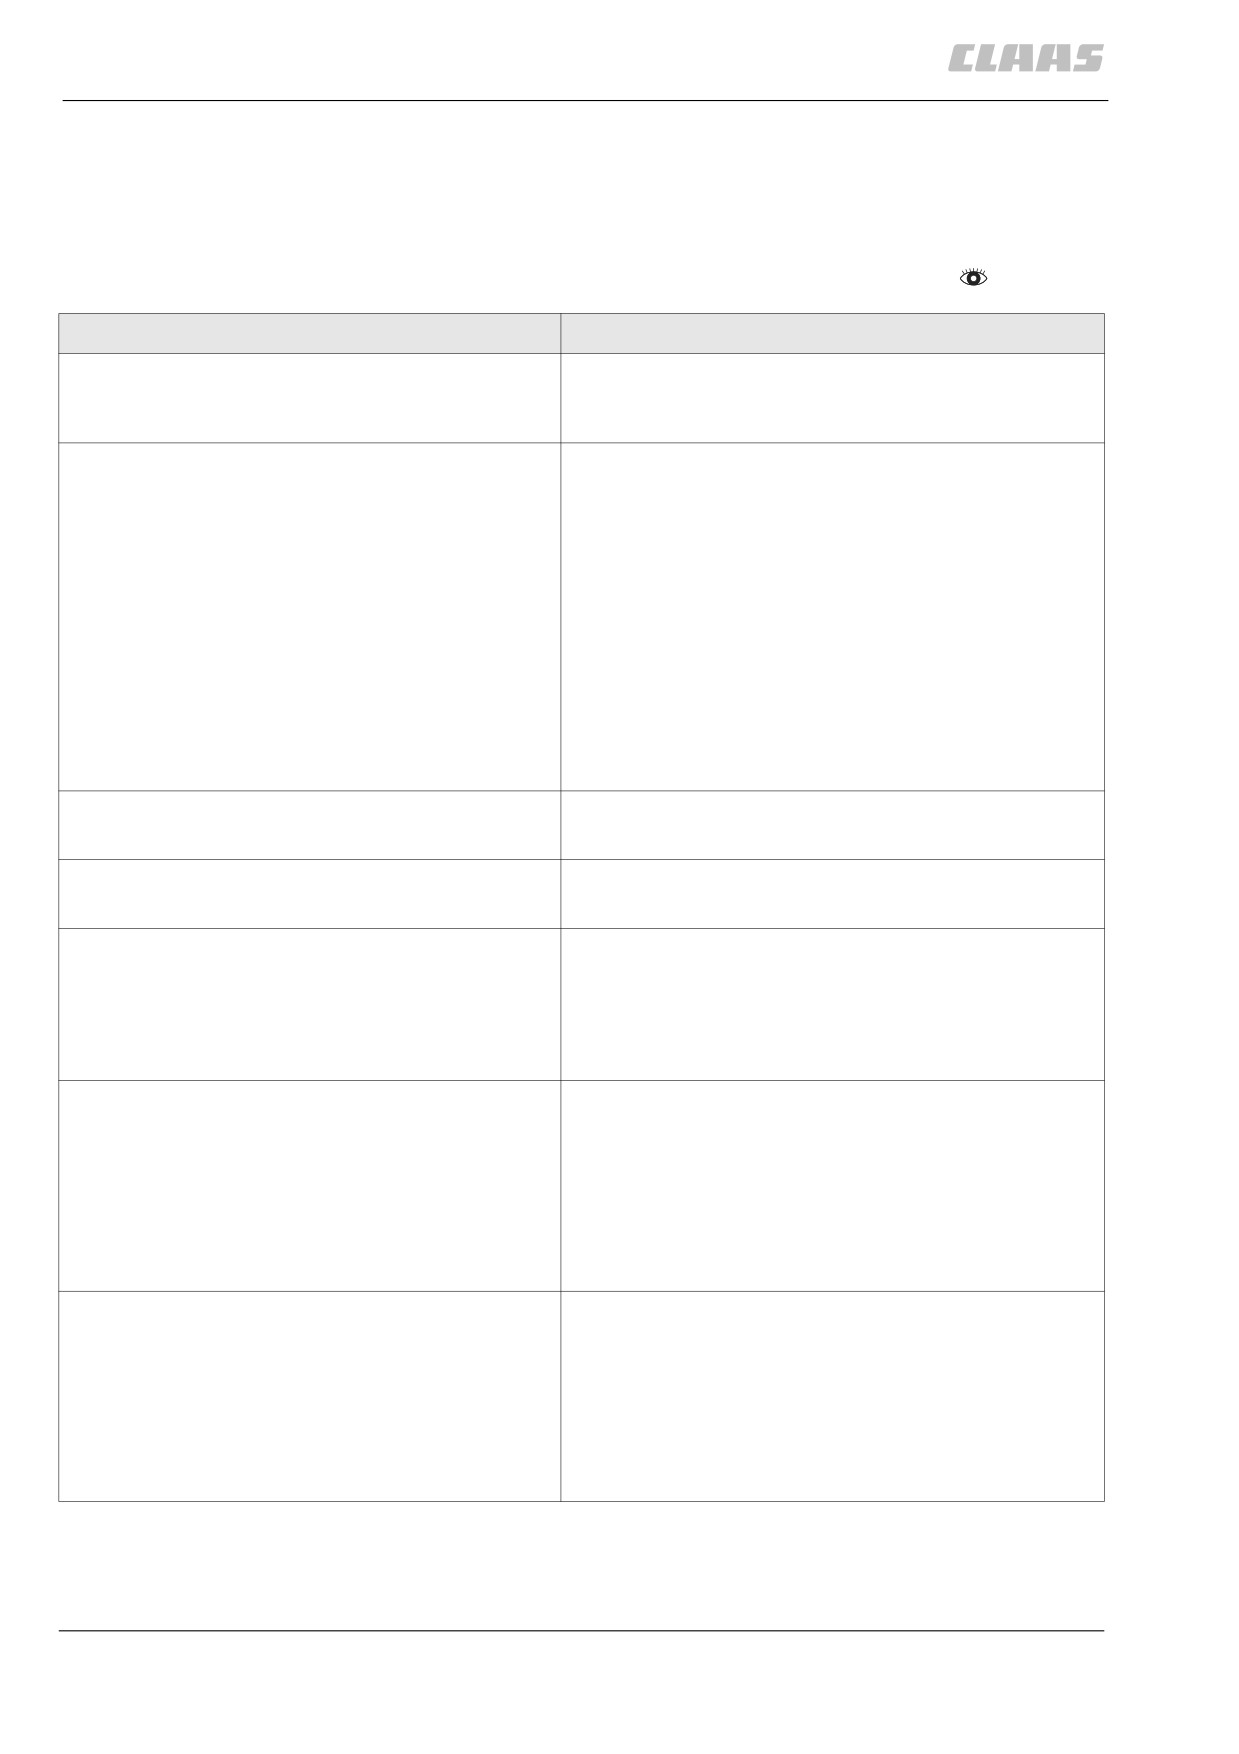
12.5.1 Threshing mechanism problem and
remedy
- Observe the general warnings at the beginning of
the "Trouble and remedy" chapter.
Malfunction
Cause, remedy
Threshing mechanism
Dirty threshing parts cause unbalance and grain
losses and worn threshing parts reduce combine
throughput and leave unthreshed grain heads.
Drum wrapping up
•
Observe even material flow from the cutterbar!
•
Position intake auger lower.
•
Have the feeder chain slip clutch adjusted.
•
Decrease concave-to-drum clearance.
•
Increase drum speed in damp crops.
•
Drive more slowly as moisture increases.
•
Correct basic adjustment of concave.
•
Clean and grease the threshing drum variable-
speed drive (belt slippage).
•
Check low-pressure hydraulic system and smooth
movements of threshing mechanism drive belt ten-
sioner cylinder with jockey pulley.
Machine speed varies heavily.
•
Check and/or adjust main drive V-belt clutch.
•
Check engine (see engine problems).
Stones and other foreign objects damage the
•
Clear stone trap regularly.
threshing mechanism.
•
Do not cut unnecessarily low on stony ground.
High V-belt wear
•
Adjust the V-belt tensioning device properly.
•
Derust and clean the V-belt pulley contact faces.
•
Clean and grease sliding faces of variable speed
pulleys.
•
Clean oily belts with soapy solution.
Poor threshing action
•
Decrease concave-to-drum clearance.
•
Increase the threshing drum speed.
•
Install disawner bars.
•
Correct basic adjustment of concave.
•
Have worn and/or damaged threshing mechanisms
repaired (concave, threshing drum bars).
•
If necessary use special threshing equipment.
Insufficient disawning
•
Decrease concave-to-drum clearance.
•
Increase drum speed.
•
Install disawner bars.
•
Wait for crop to ripen for some more time.
•
Correct basic adjustment of concave.
•
Check concave and threshing drum bars for wear
and damage.
250
12 Faults and remedies
12.5 Threshing mechanism
67088
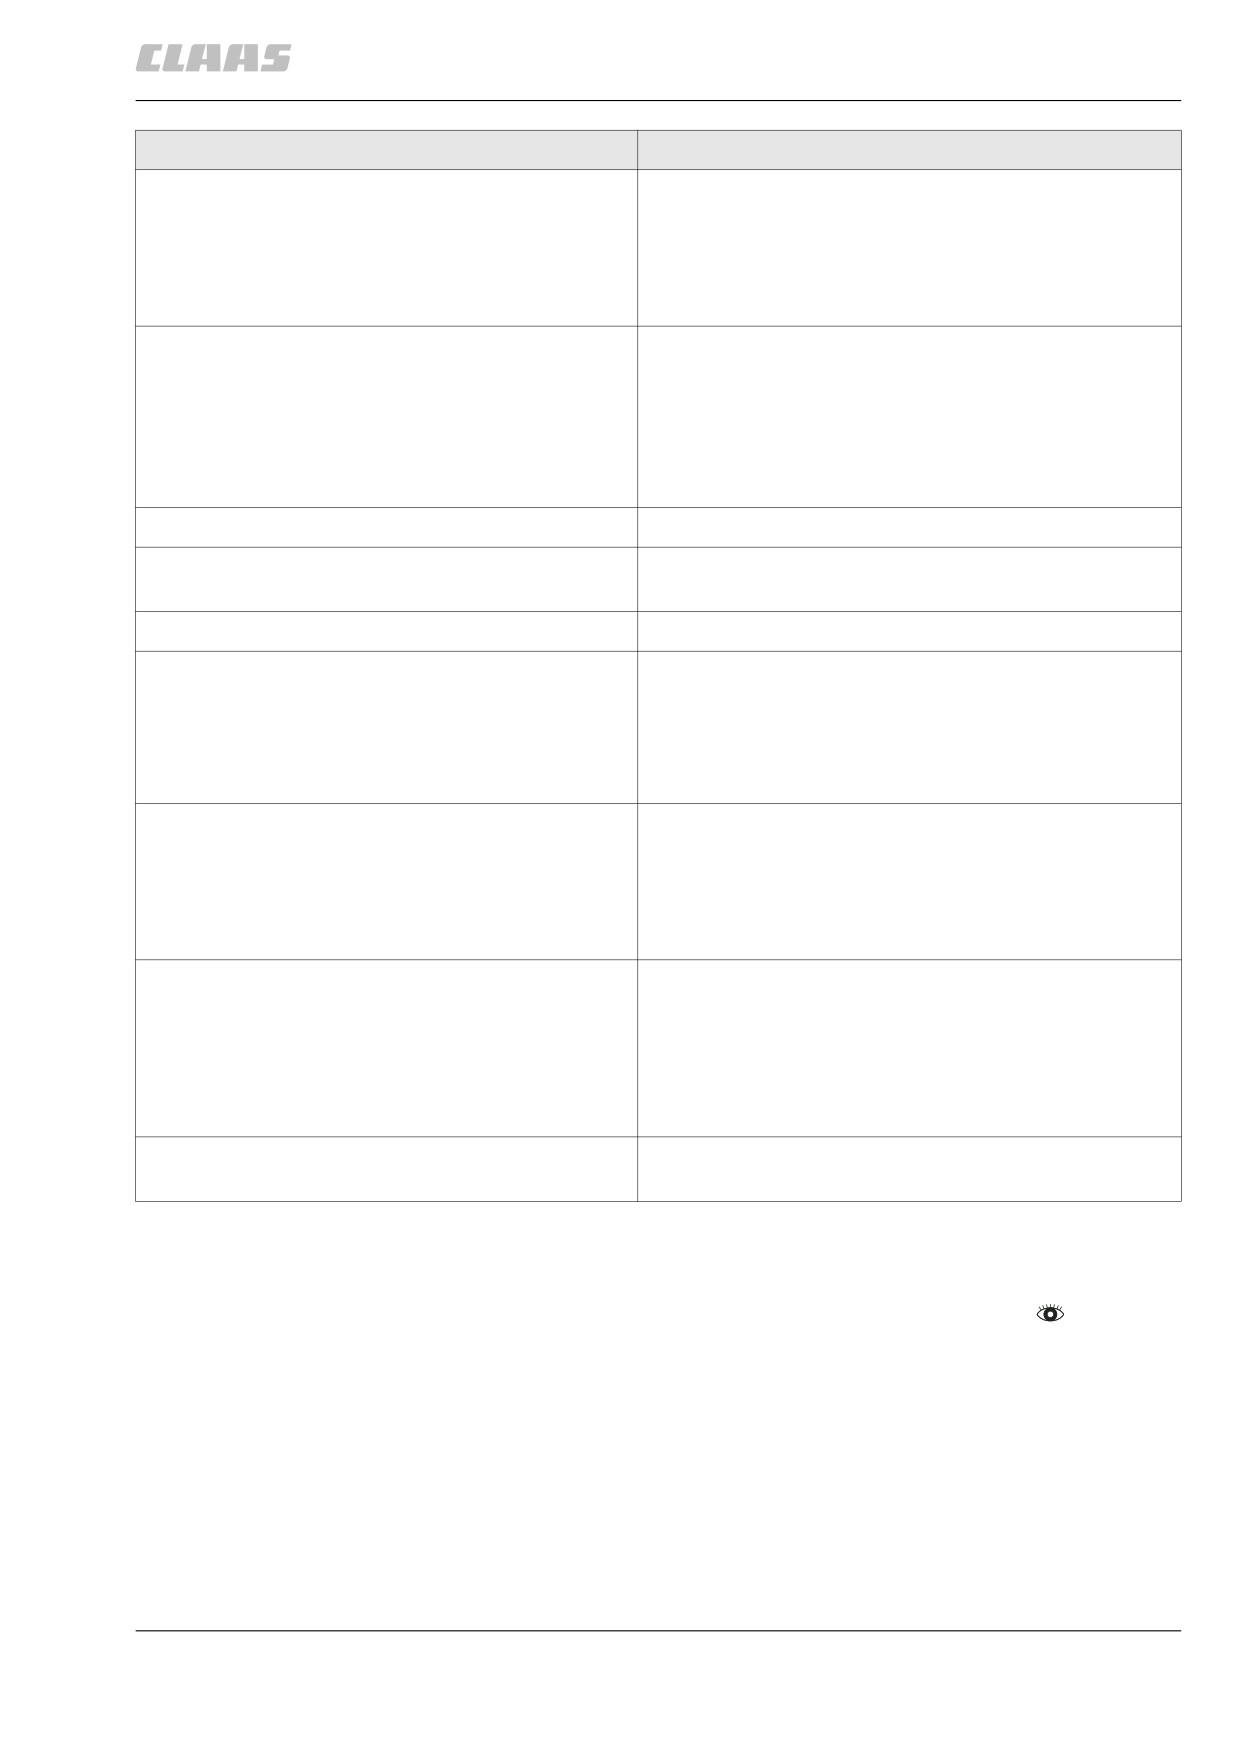
Malfunction
Cause, remedy
Cracked grain
•
Reduce the threshing drum speed.
•
Increase concave-to-drum clearance.
•
Remove disawner bars.
•
Tension the elevator chains properly.
•
Reduce the grain portion in the returns.
Unbalance
•
Clean dirty threshing drum.
•
Remove accumulated dust in V-belt pulleys and
jockey pulleys.
•
Have damaged threshing drum repaired.
•
Check impeller for damage.
•
Check the straw chopper free-swinging knives.
The drum speed cannot be adjusted.
•
Set the diesel engine to the max. no-load speed.
Slip reported from different units
•
If necessary, check tight seat and correct position of
cam wheels.
Returns
Excessive amount of chaff and short straw in the
•
Increase the air blast.
returns
•
Set the frogmouth sieves a little more narrow.
•
Reduce drum speed.
•
Have basic speed of machine checked and cor-
rected, if necessary.
To many grains in the returns
•
Ensure even feeding (cutterbar).
•
Check threshing mechanism adjustments.
•
Open the frogmouth sieves further.
•
Reduce the air blast.
•
Adjust the wind boards properly.
Elevator clogged
•
Open the elevator boot and the auger trough,
remove clogging, let combine harvester run idle,
close doors again tightly.
•
Retension elevator drive V-belt.
•
Tension the elevator chain properly.
•
Clean soiled elevator housings and augers.
Slip reported from different units
•
If necessary, check tight seat and correct position of
cam wheels.
6626
12.5.2 Threshing drum
- Observe the general warnings at the beginning of
the "Trouble and remedy" chapter.
The threshing drum can only work efficiently when
the rasp bars are straight and not too worn. The
threshing drum was balanced at the factory.
- When replacing the rasp bars, always fit bars of
the same weight and replace them only in pairs.
- After this, rebalance the threshing drum.
The rasp bars must fit tightly into the drum plates.
- Threshing drum repairs should only be carried out
by trained expert personnel.
251
12 Faults and remedies
12.6 Separation
67088
12.6 Separation
87903
12.6.1 Separation problem and remedy
- Observe the general warnings at the beginning of
the "Trouble and remedy" chapter.
Malfunction
Cause, remedy
Straw walker
Plugging on the straw walker
• Adjust tension of straw walker drive belt.
• Remove soling (awn accumulations) on the straw
walker.
Slip reported from different units
• If necessary, check tight seat and correct position of
cam wheels.
The separation performance monitor displays insuf-
• Clean sensor trough.
ficient performance.
• Check tight seat of sensor trough and sensor.
Loose sensor trough - Tighten sensor trough.
Loose sensor - Replace sensor trough.
252
12 Faults and remedies
12.7 Cleaning unit
67088
12.7 Cleaning unit
87905
12.7.1 Cleaning problem and remedy
- Observe the general warnings at the beginning of
the "Trouble and remedy" chapter.
Malfunction
Cause, remedy
Cleaning unit
Uneven feeding to the sieves
•
Ensure even feeding (cutterbar).
•
Clean preparation floor.
•
Straighten wire rakes on the preparation floor.
Mat formation on frogmouth sieves
•
Set the frogmouth sieves to a wider position.
•
Increase the air blast.
•
Reduce threshing drum speed (broken straw).
•
Adjust the wind boards properly.
•
Set the pre-sieve deflector to another position.
Dirty grain sample
•
Increase the air blast.
•
Decrease frogmouth sieves opening.
•
Adjust the wind boards properly.
Cleaning performance monitor deflects all the way.
•
Set the chaff spreader so that no chaff can be
thrown on the sensor.
•
Check tight seat of sensor trough and sensor.
Loose sensor trough - Tighten sensor trough.
Loose sensor - Replace sensor trough.
The cleaning performance monitor displays insuffi-
•
Clean sensor trough.
cient performance.
•
Check tight seat of sensor trough and sensor.
Loose sensor trough - Tighten sensor trough.
Loose sensor - Replace sensor trough.
Slip reported from different units
•
If necessary, check tight seat and correct position of
cam wheels.
253
12 Faults and remedies
12.8 Crop receptacle / straw receptacle
67088
12.8 Crop receptacle / straw receptacle
64824
12.8.1 Crop / straw discharge problems and
remedies
- Observe the general warnings at the beginning of
the "Trouble and remedy" chapter.
Problem
Possible cause or remedy
Straw chopper
Chopped material has uneven lengths and is not
• Free-swinging knives are dull. Replace free-
spread over the entire front attachment width.
swinging knives.
• Stationary knives are dull. Replace stationary
knives.
Chopper standstill / slip fault message when
• Readjust the straw guide plate limit switch.
discharging straw.
254

12 Faults and remedies
12.9 Grain delivery
67088
12.9 Grain delivery
87907
12.9.1 Grain delivery problems and remedies
- Observe the general warnings at the beginning of
the "Trouble and remedy" chapter.
Malfunction
Cause, remedy
Grain tank
Grain tank unloading does not work or works poorly
• Check and/or adjust V-belt clutch for grain tank
unloading drive.
• Have shear bolt in drive sprocket replaced.
• Bend misaligned auger flights.
• Clean dirty auger troughs, augers and unloading
auger tube.
Grain losses
Losses of grain may have different reasons. Therefore,
always determine first where the losses occur.
Check combine for leakage losses. Check whether grain
is lost where working parts join, especially check auger
troughs, elevators etc. Extra care should be taken to
check the working parts for good fitting when combining
small seeds. Repair all leaks as necessary.
Losses that are caused by overripe crops or poor
weather conditions must not be taken for combine
losses.
Grain losses that are due to combining usually have four
main causes:
• Losses of grain over the cutterbar
• Losses of grain caused by insufficient threshing
• Grain losses over the straw walkers
• Grain losses over the cleaning stage
•
Losses of grain over the cutterbar
• Adjust the reel tine position to suit the harvesting
conditions.
• Adjust the reel speed to suit the ground speed.
• Set the clearance between the reel and the intake
auger properly.
• Adjust the hydraulic fore and aft reel adjustment to
suit the present conditions.
• When working in crops with hanging ears, install a
crop lifter on every second finger.
• Adjust dividers to avoid build-up of material.
• Adjust intake auger height to suit crop conditions.
255

12 Faults and remedies
12.9 Grain delivery
67088
Malfunction
Cause, remedy
•
Grain losses caused by insufficient threshing
•
Adjust the cutterbar so that even feeding of the
threshing parts is achieved.
•
Adjust threshing drum speed to suit crop conditions.
•
Set the concave clearance to suit the crop.
•
Add disawner plates if required.
•
Provide for even crop feed to the threshing parts.
•
Correct basic adjustment of concave.
•
Have damaged or worn threshing drum repaired
•
Grain losses over the straw walkers
•
Adjust tension of the belt driving the intensive sepa-
ration system.
•
Adjust tension of the belt driving the straw walkers.
•
Ensure even feeding of threshing parts (front
attachment).
•
Clean concave and space behind it.
•
Avoid excessive returns by correct adjustment of
cleaning unit.
•
Clean dirty straw walkers and under-walker return
floor.
•
Reduce drum speed and reduce concave-to-drum
clearance.
•
Reduce ground travel speed.
•
Provide correct position of deflector curtain above
straw walkers.
•
Have deflector curtain above the straw walkers
replaced.
•
Grain losses over the cleaning stage
•
Avoid excessive matting.
•
Adapt air blast to meet crop conditions.
•
Adjust wind boards to correct position.
•
Decrease drum speed when short straw overloads
the sieve pan.
•
Check fan variable-speed pulleys for smooth
operation.
•
Standard cleaning system:
Adjust returns passthrough area of upper frogmouth
sieve wider open.
•
Adjust frogmouth sieve gaps wider open and
increase air blast.
•
Avoid excessive returns.
•
Clean upper sieve, lower sieve and preparation
floor.
•
Reduce ground travel speed.
256
12 Faults and remedies
12.9 Grain delivery
67088
83154
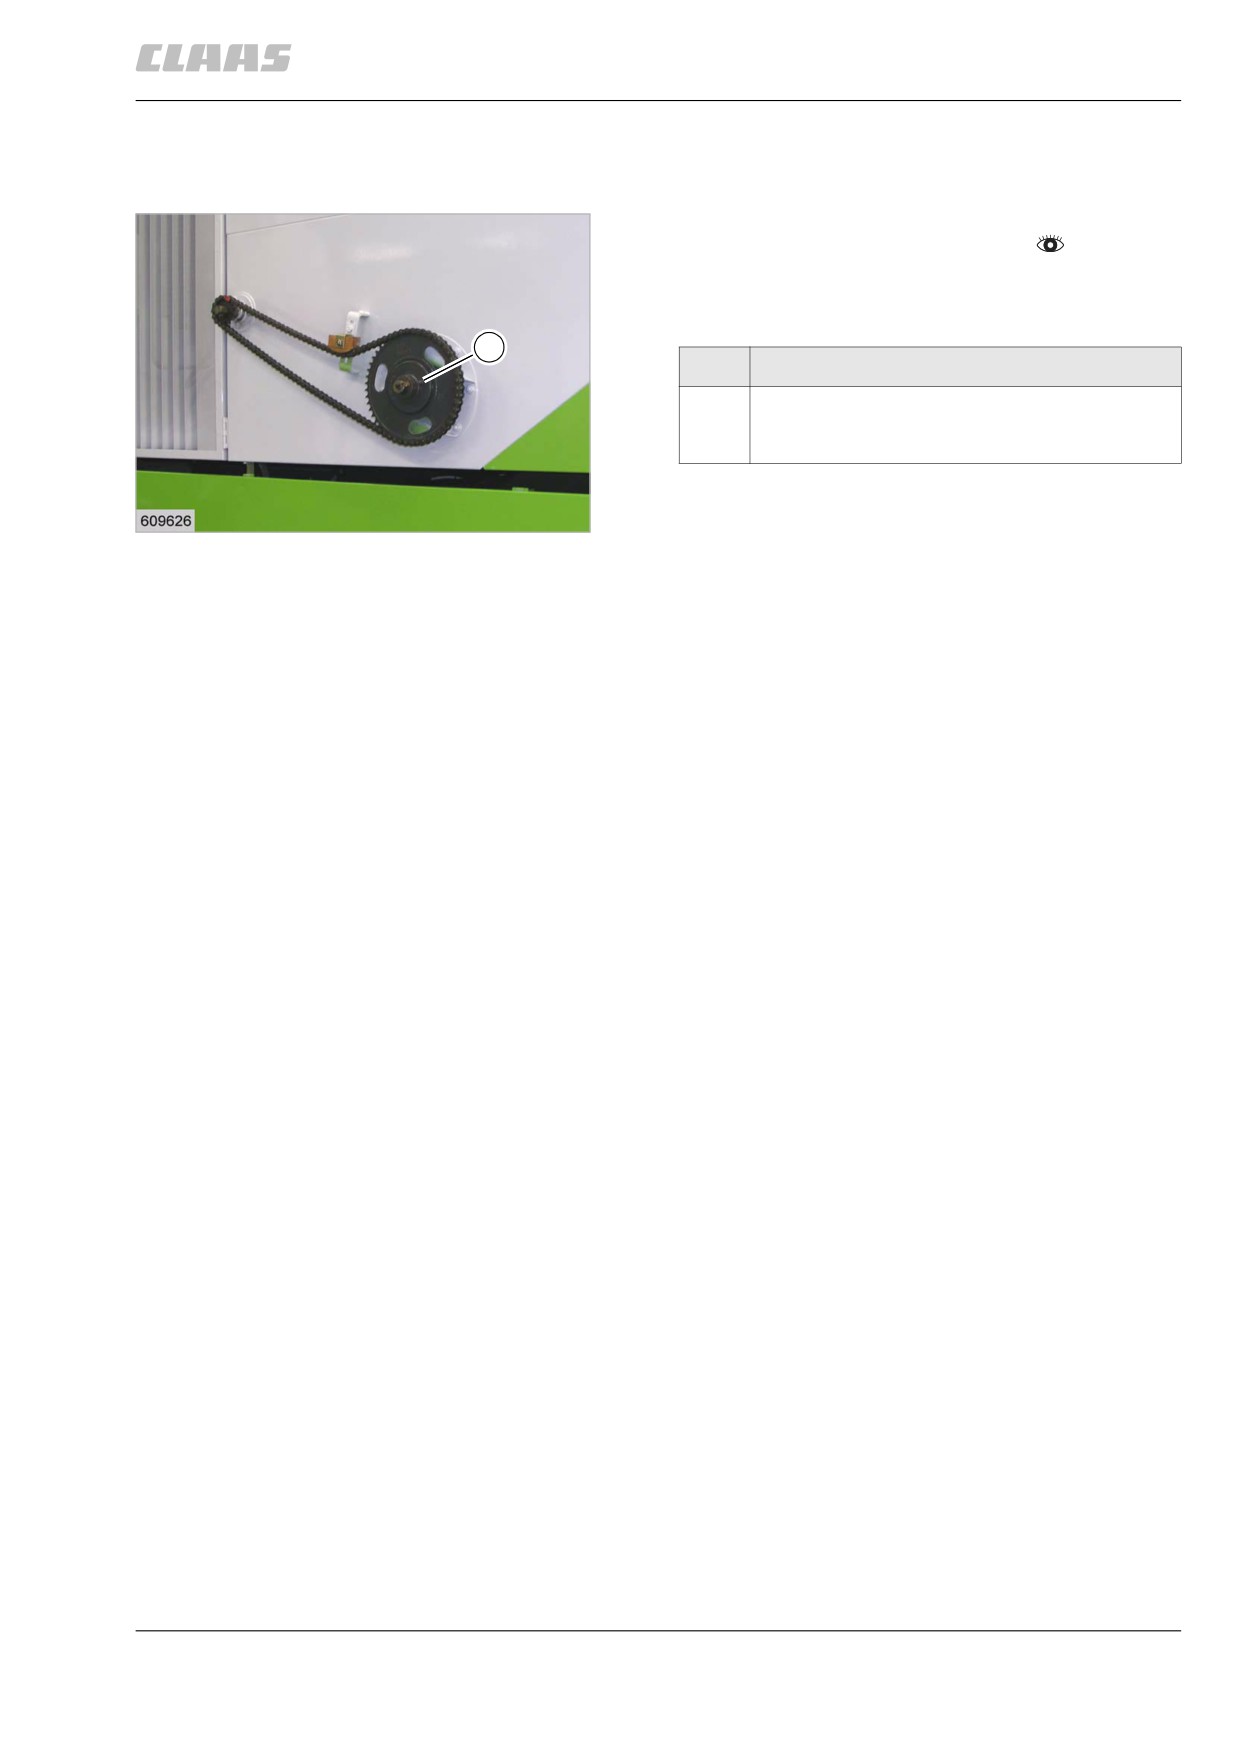
12.9.2 Installing the grain tank unloading
shear bolt
- Observe the general warnings at the beginning of
the "Trouble and remedy" chapter.
The shear bolt (1) in the sprocket protects the grain
tank unloading drives against damage.
1
Shear bolt (1)
1
Hex. bolt ISO 4014 M8 x 35 -8.8
Self-locking nut ISO 7042 VM 8 -8
- Eliminate cause of the problem.
2
- If required install new shear bolt.
19661
Tightening torque = 24.5 Nm
257
13 Maintenance
13.1 General Information
67089
13 Maintenance
13.1 General Information
85074
13.1.1 General warnings Maintenance
In the following sections of this chapter, a procedure
instruction refers to the following general warnings.
Danger!
Always stop the engine before carrying out
any work on the machine.
Moving machine parts and / or unexpected
machine movement.
Death or serious injury.
- Diesel engine OFF.
- Apply parking brake.
- Remove the ignition key.
- Remove key of battery isolating
switch.
- Wait for machine parts which run on have
come to a complete halt.
- Secure machine by wheel chocks.
- Ensure that the machine cannot be
started by any third persons.
Danger!
The front attachment, reel and feeder unit may
drop uncontrolled.
Death or serious injuries!
- Apply safety locks.
- Keep a safe distance from the hazard
area.
258
13 Maintenance
13.2 General Information
67089
13.2 General Information
11089
13.2.1 Front attachment
Danger!
The front attachment, reel and feeder unit may
drop uncontrolled.
Death or serious injuries!
- Apply safety locks.
- Keep a safe distance from the hazard
area.
7791
13.2.2 Cleaning the engine compartment and
hazard areas
- Clean the engine area and above all the exhaust
system as well as the areas around the brakes,
gearbox and similar components thoroughly in
order to avoid fire hazards.
- When working in very dry crop and very dusty
conditions, check the spots mentioned above for
dirt accumulations more frequently and clean
them if necessary.
7466
13.2.3 Belts
- Keep all belts well-tensioned at all times.
- Belts soiled with oil can be cleaned with cleaning
lye. Do not use gasoline or similar products.
- After installing a new belt, check tension after the
first 2 to 3 working hours and adjust if
necessary.
7467
13.2.4 Variable-speed drives
- Whenever the variable-speed pulleys have been
greased, operate the pulleys a few times to
ensure even spreading of grease on sliding parts.
- Remove any accumulations of dust from between
the variable speed pulley halves to make sure the
pulleys can be run through their full speed range.
7468
13.2.5 Bolts
- Check all bolts for a tight seat and retighten if nec-
essary (especially all nuts on the chassis and on
the steering system).
11103
13.2.6 Lubrication
- Observe the specified oil change intervals and oil
grades in the hydraulic system and in the
gearboxes.
- Use only the specified grease for greasing the
machine.
- Before greasing, remove the dirt on the grease
nipple.
259