CLAAS DOMINATOR 150 / 140 / 130. Operator’s Manual - page 15
11 Fieldwork
11.9 Crop receptacle / straw receptacle
67087
- Close the right side cover.
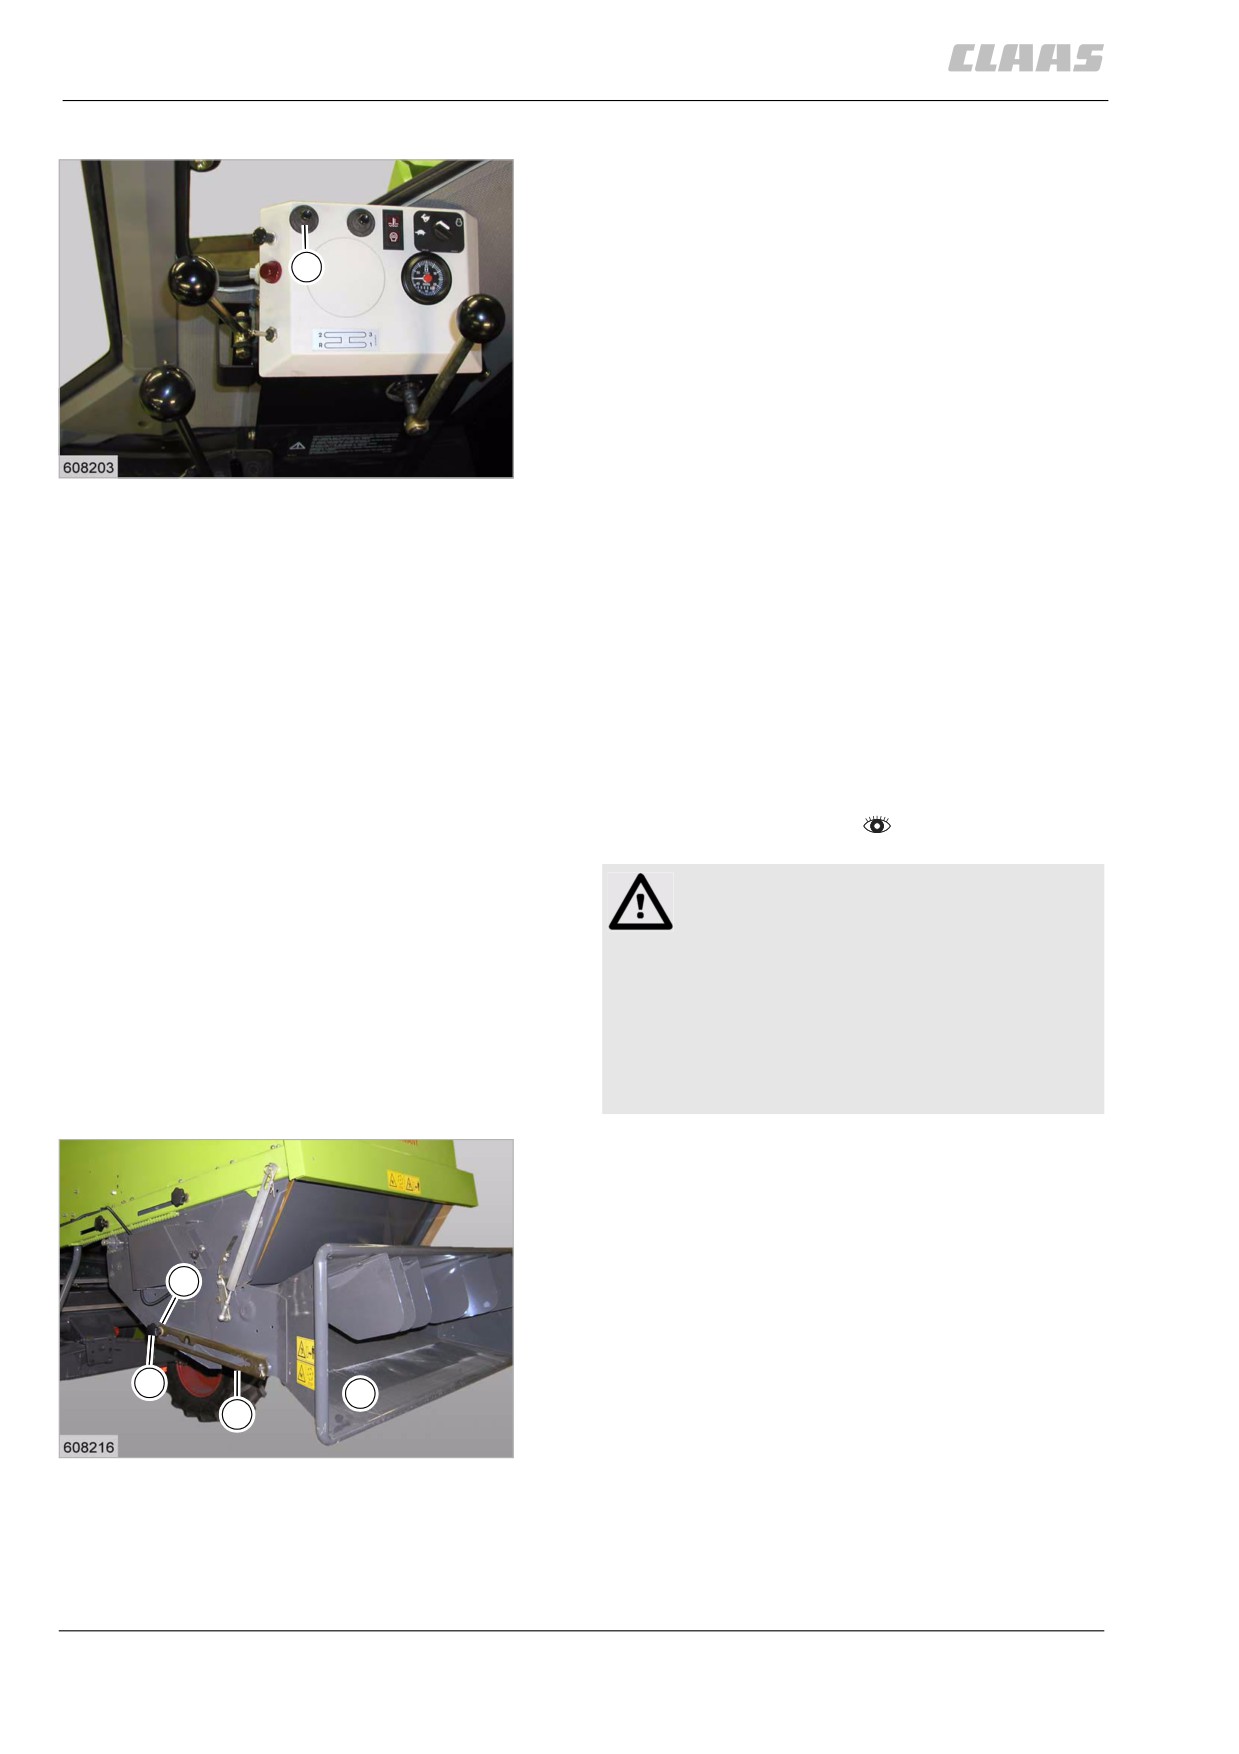
Switching off the straw chopper function monitor
DOMINATOR 130 (optional equipment)
The straw chopper speed monitor must be switched off
when putting the straw chopper out of operation
1
(swinging the standard spreader to swathing position),
using the pull switch (1).
When the chopper is standing still while the pull switch
is OFF, the horn on the operator's platform produces
no horn sound. The straw chopper indicator light in the
vehicle information unit is also deactivated.
68
19554
Straw chopper function monitor
DOMINATOR 150 / 140 (optional equipment)
The straw chopper speed monitor is switched off auto-
matically when putting the straw chopper out of
operation (swinging the standard spreader to swathing
position).
83211
11.9.3 Swinging the standard distributor into
the transport trolley transport position
- Observe the general warnings at the beginning of
the "Fieldwork" chapter.
Danger!
The cutting cylinders of the straw chopper can
run on even if the drive is switched off.
Death or serious injuries!
- Never touch any machine parts that con-
tinue running.
- Wait until all machine parts have com-
pletely stopped moving.
- Slacken off toggles (7) on both sides.
- Lift the sheet metal plate (8) on the left side.
Swing the standard distributor (9) all the way up
until the sheet metal plates on both sides snap
into the notches (A).
A
- Bolt down toggles (7) on both sides.
The transport trolley can now be hitched.
7
9
8
69
19696
228
11 Fieldwork
11.9 Crop receptacle / straw receptacle
67087
83478
11.9.4 Adjusting the stationary knives
(standard straw chopper)
- Observe the general warnings at the beginning of
the "Fieldwork" chapter.
Danger!
The cutting cylinders of the straw chopper can
run on even if the drive is switched off.
Death or serious injuries!
- Never touch any machine parts that con-
tinue running.
- Wait until all machine parts have com-
pletely stopped moving.
Danger!
Sharp-edged machine parts, sharp blades.
Death or serious injuries!
- Wear safety gloves.
Adjusting the stationary knives
3
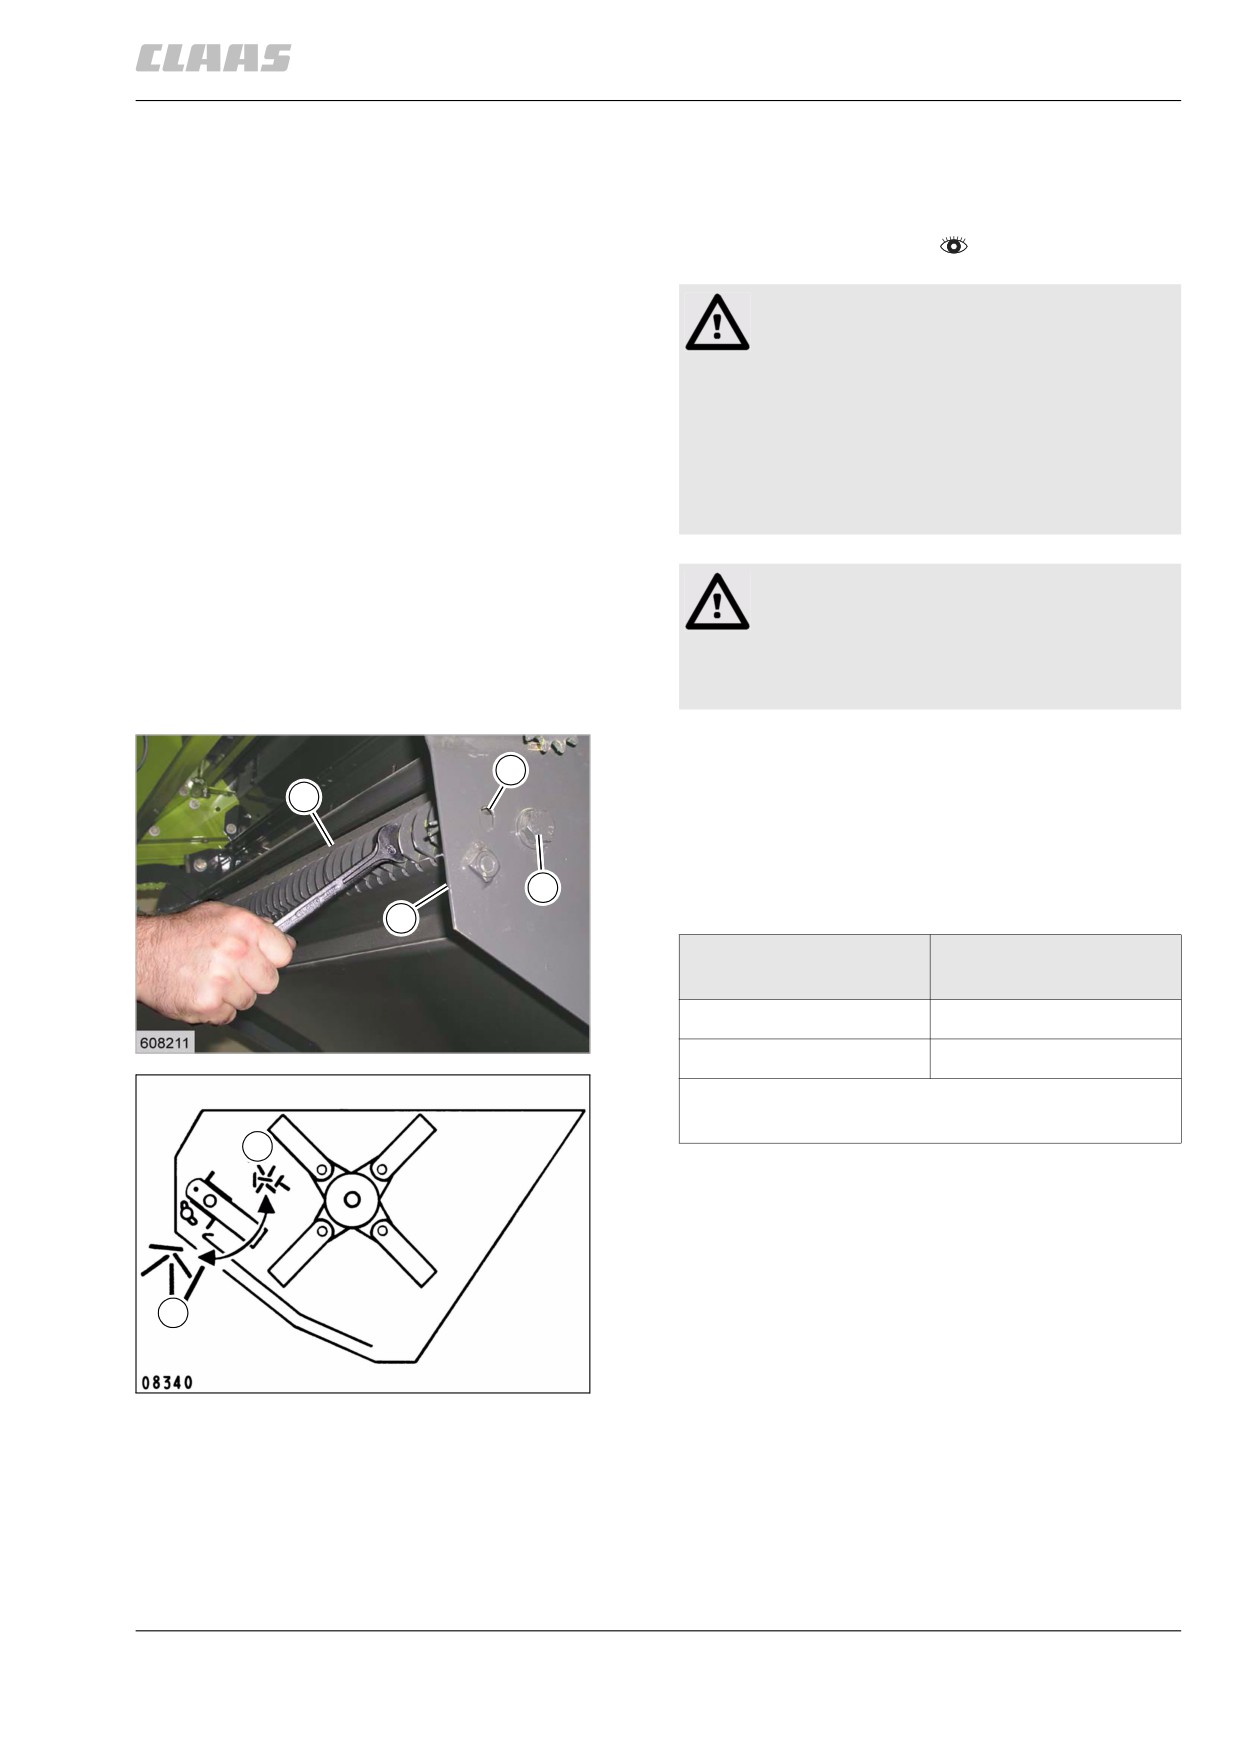
The length of cut can be varied by relocating the sta-
1
tionary knives (1) between position (A and B).
- Slacken off bolts (2) on both sides.
- Swivel stationary knives to any position, using
2
wrench.
2
Position of stationary
Long chopped straw
knives / knife carrier
A
Chop shorter
70
19668
B
Chop longer
For operation in rape it is recommended setting the
knife carrier all the way down.
A
- Bolt down bolts (2) on both sides.
B
71
19669
Removing the stationary knives
- Unlock and pull out spring clip of rod (3).
- Pull out rod (3).
- Remove the stationary knives.
- Push in rod (3) and secure with spring clips.
229
11 Fieldwork
11.9 Crop receptacle / straw receptacle
67087
Installing the stationary knives
- Unlock and pull out spring clip of rod (3).
- Pull out rod (3).
- Install the stationary knives.
- Push in rod (3) and secure with spring clips.
Change the stationary knives
This process is necessary when the stationary knives
are blunt or worn.
Note!
Uneconomic use of machine.
Increased fuel consumption.
- Turn around or replace worn stationary
knives.
- Remove the stationary knives.
- Install stationary knives (new, sharp).
230
11 Fieldwork
11.10 Grain delivery
67087
11.10 Grain delivery
83011
11.10.1 Inspecting the returns
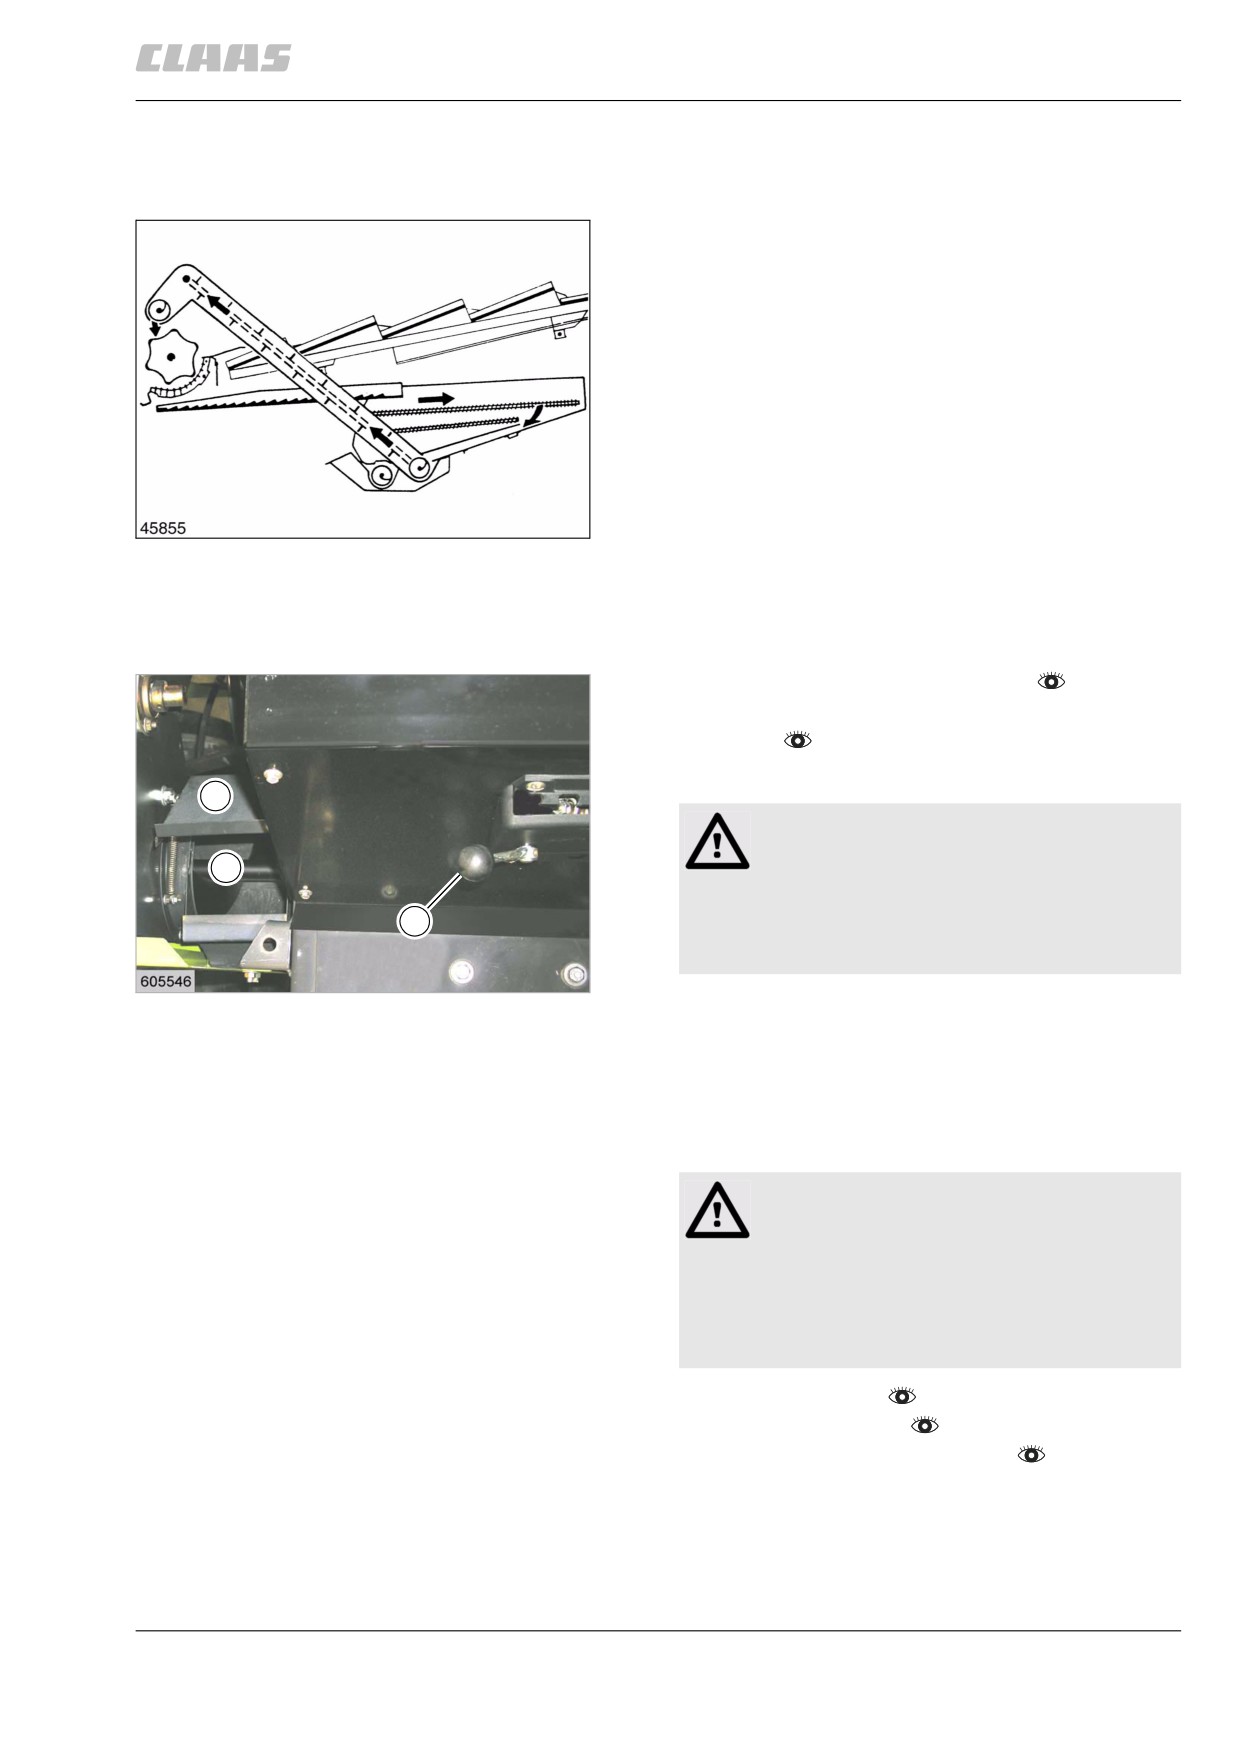
Coarse particles (e.g. unthreshed heads) drop through
the upper sieve and from the lower sieve into the
returns auger which moves the material to the returns
elevator. The elevator carries the returns to the thresh-
ing drum for second threshing.
Excessive returns cut down on efficiency and
cause cracked grain and grain losses.
Excessive returns can have a number of reasons:
• Incorrect setting of the threshing mechanism, con-
cave, threshing drum speed (excessive cracked
grain).
72
19644
• Sieves set too close or lower sieve holes
too small.
• Incorrect setting of the wind blast (too high
or too low).
• Ground speed too high.
- Engage the threshing mechanism.
- Set the diesel engine speed to fast idling
speed.
- Move the machine into the crop.
2
Danger!
Rotating and moving machine parts.
1
Death or serious injuries!
3
- Keep a sufficient distance from all rotating
and moving machine parts.
73
19646
- Actuate lever (3) and open cover (2).
- Inspect the quantity and composition of the
returns (1) by means of a visual inspection.
If necessary, correct the machine setting.
83021
11.10.2 Opening / closing the grain tank cover
Danger!
Danger of collision!
Death or serious injuries!
- Ensure that when driving on public roads
and lanes, the grain tank cover is com-
pletely closed.
- Stop the machine.
- Apply parking brake.
- Disengage the front attachment.
231
11 Fieldwork
11.10 Grain delivery
67087
Opening the grain tank cover
B
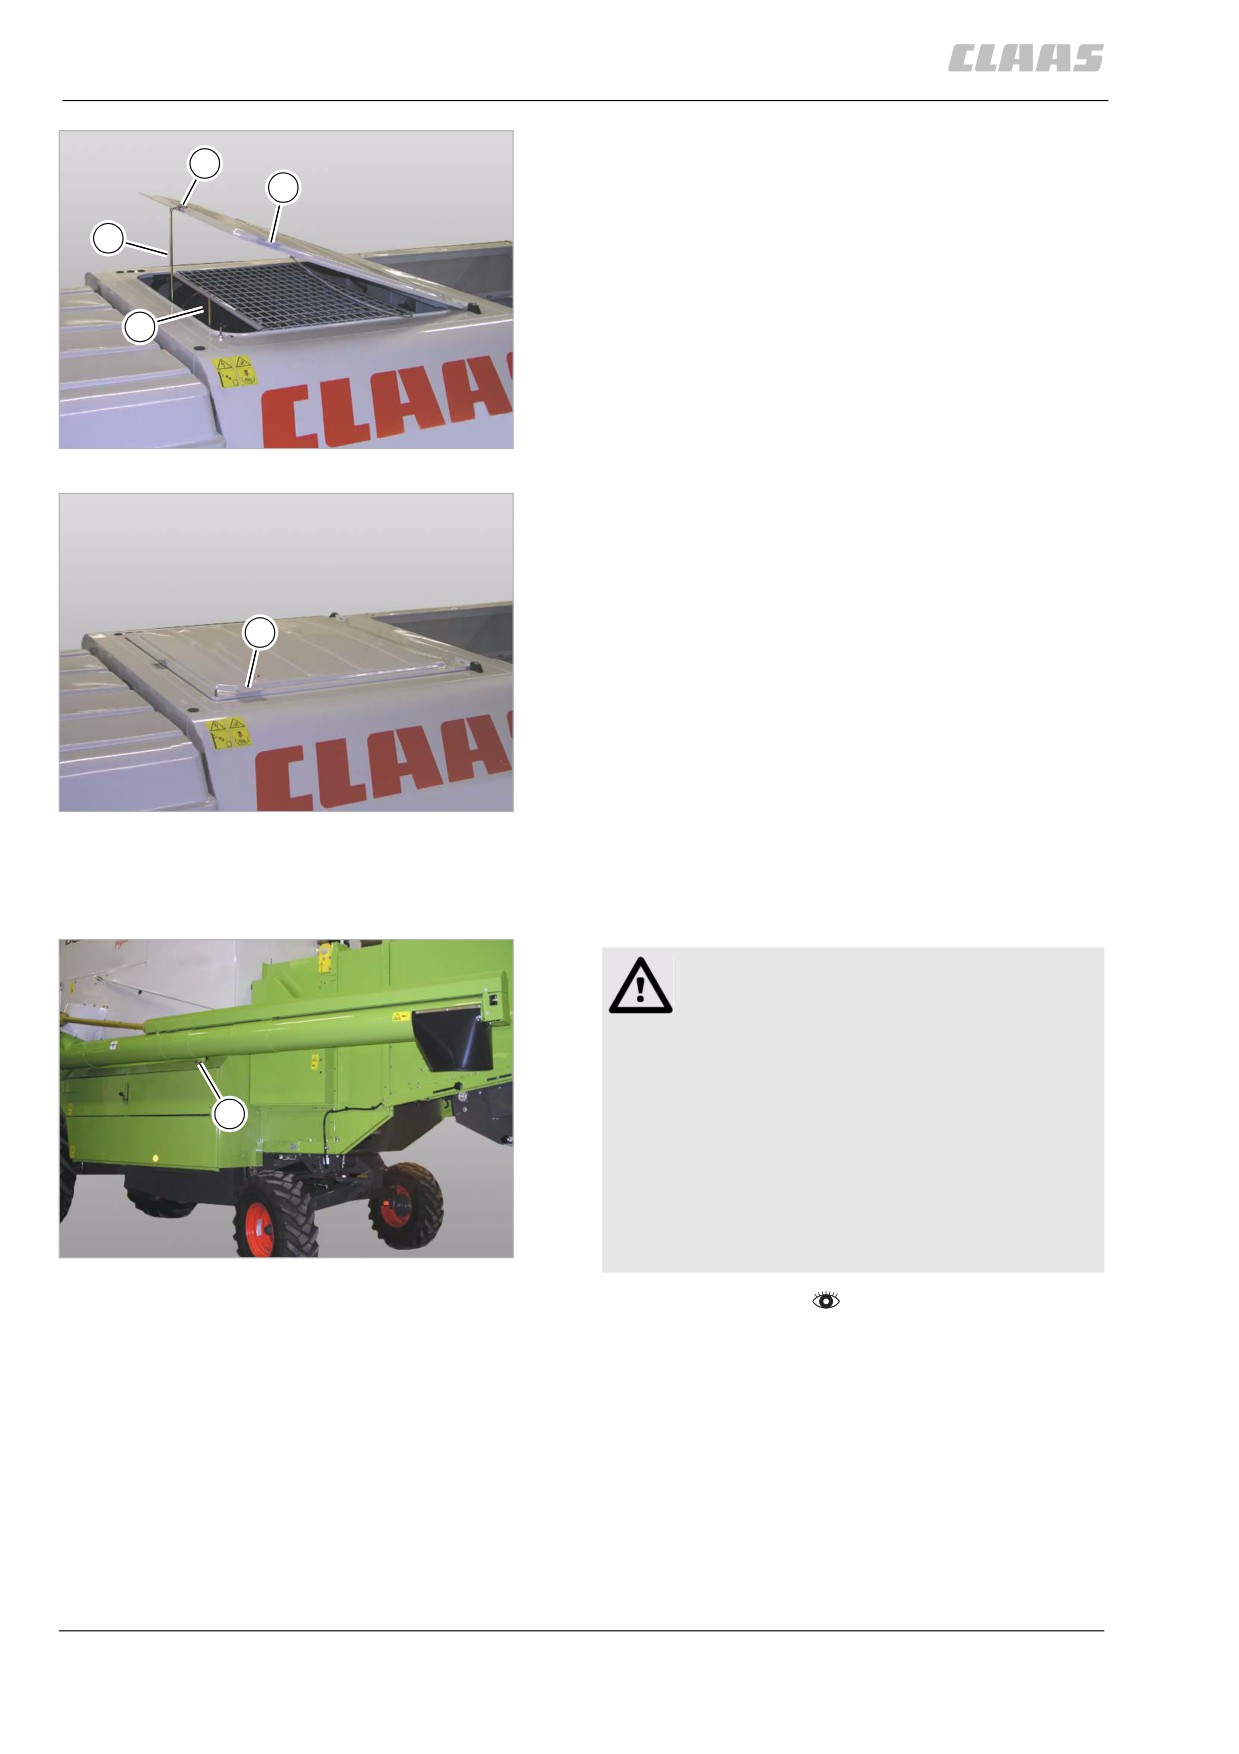
- Lift cover at position (A).
A
- Rotate rod (1) at lever (2) and engage at
position (B).
1
The grain tank cover is open.
2
74
28632
Closing the grain tank cover
- Lift cover at position (A).
- Disengage rod (1) at position (B) and place it on
the grating.
- Lower the cover.
A
The grain tank cover is closed.
75
28633
83047
11.10.3 Swinging the grain tank unloading
tube out / in (DOMINATOR 150 / 140)
Danger!
Large swivel range of the grain tank unloading
tube.
Death or serious injuries!
- Make sure that no persons are located in
1
the swivel range of the grain tank unload-
ing tube.
- Make sure that the grain tank unloading
tube is swivelled in all the way in and
rests on the support (1) when travelling
76
on public roads and paths.
28639
- Prepare fieldwork.
232
11 Fieldwork
11.10 Grain delivery
67087
-
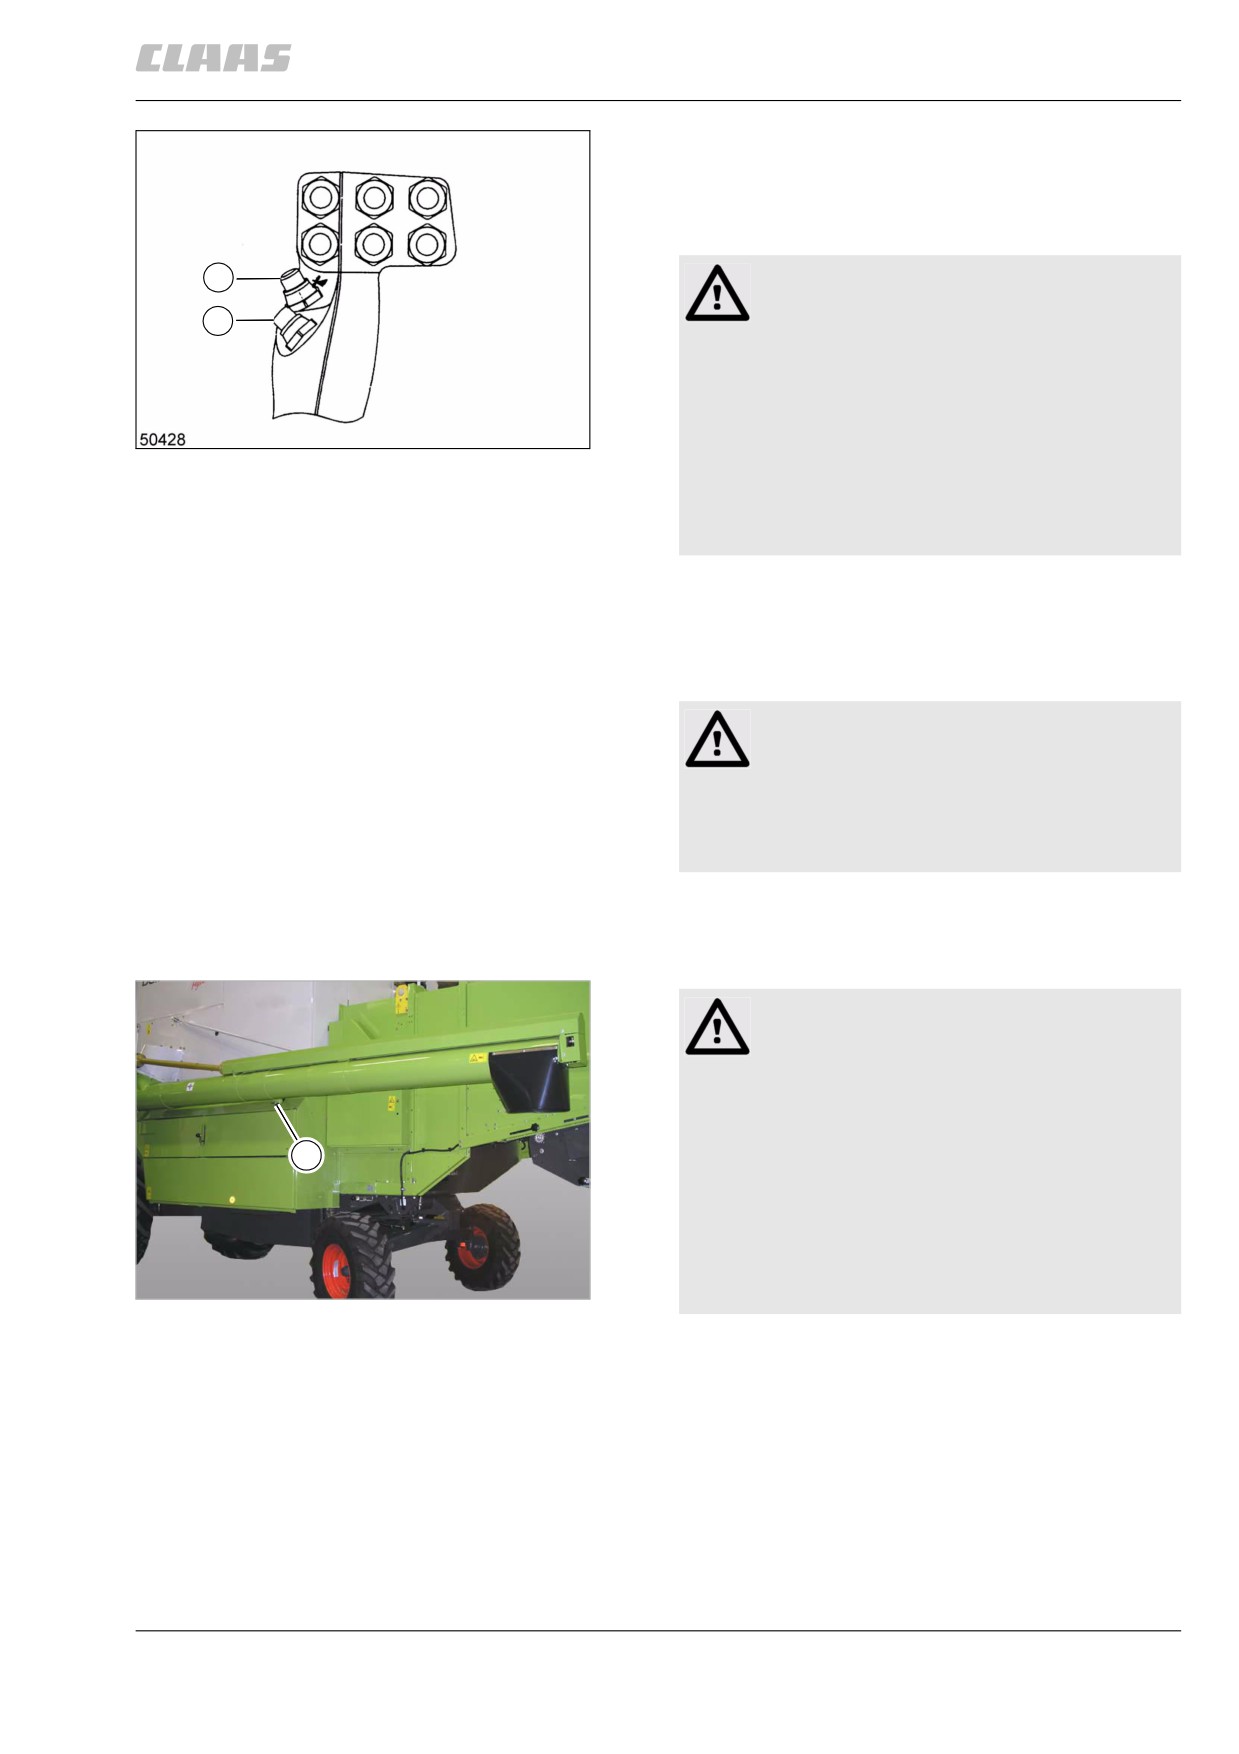
Swing out the grain tank unloading tube.
- When actuating switch (1), the grain tank
unloading tube swings out and stops upon
releasing the switch (1).
WARNING:
1
Activated grain tank unloading upon swinging
2
of grain tank unloading tube.
Machine damage.
- Switch off grain tank unloading and wait
77
for components to stand still, then swing
19410
the grain tank unloading tube.
- Swing the grain tank unloading tube to
the maximum, then engage grain tank
unloading.
-
Swing in grain tank unloading tube.
- When actuating switch (2), the grain tank
unloading tube swings in and stops upon
releasing the switch (2).
Danger!
Unexpected machine movements.
Death or serious injuries!
- For road travel the road travel / fieldwork
switch must be OFF.
83140
11.10.4 Swinging the grain tank unloading
tube out / in (DOMINATOR 130)
Danger!
Large swivel range of the grain tank unloading
tube.
Death or serious injuries!
- Make sure that no persons are located in
1
the swivel range of the grain tank unload-
ing tube.
- Make sure that the grain tank unloading
tube is swivelled in all the way in and
rests on the support (1) when travelling
78
on public roads and paths.
28639
233
11 Fieldwork
11.10 Grain delivery
67087
WARNING:
Activated grain tank unloading upon swinging
of grain tank unloading tube.
Machine damage.
- Switch off grain tank unloading and wait
for components to stand still, then swing
the grain tank unloading tube.
- Swing the grain tank unloading tube to
the maximum, then engage grain tank
unloading.
-
Prepare fieldwork.
–
Swing out the grain tank unloading tube.
A
1
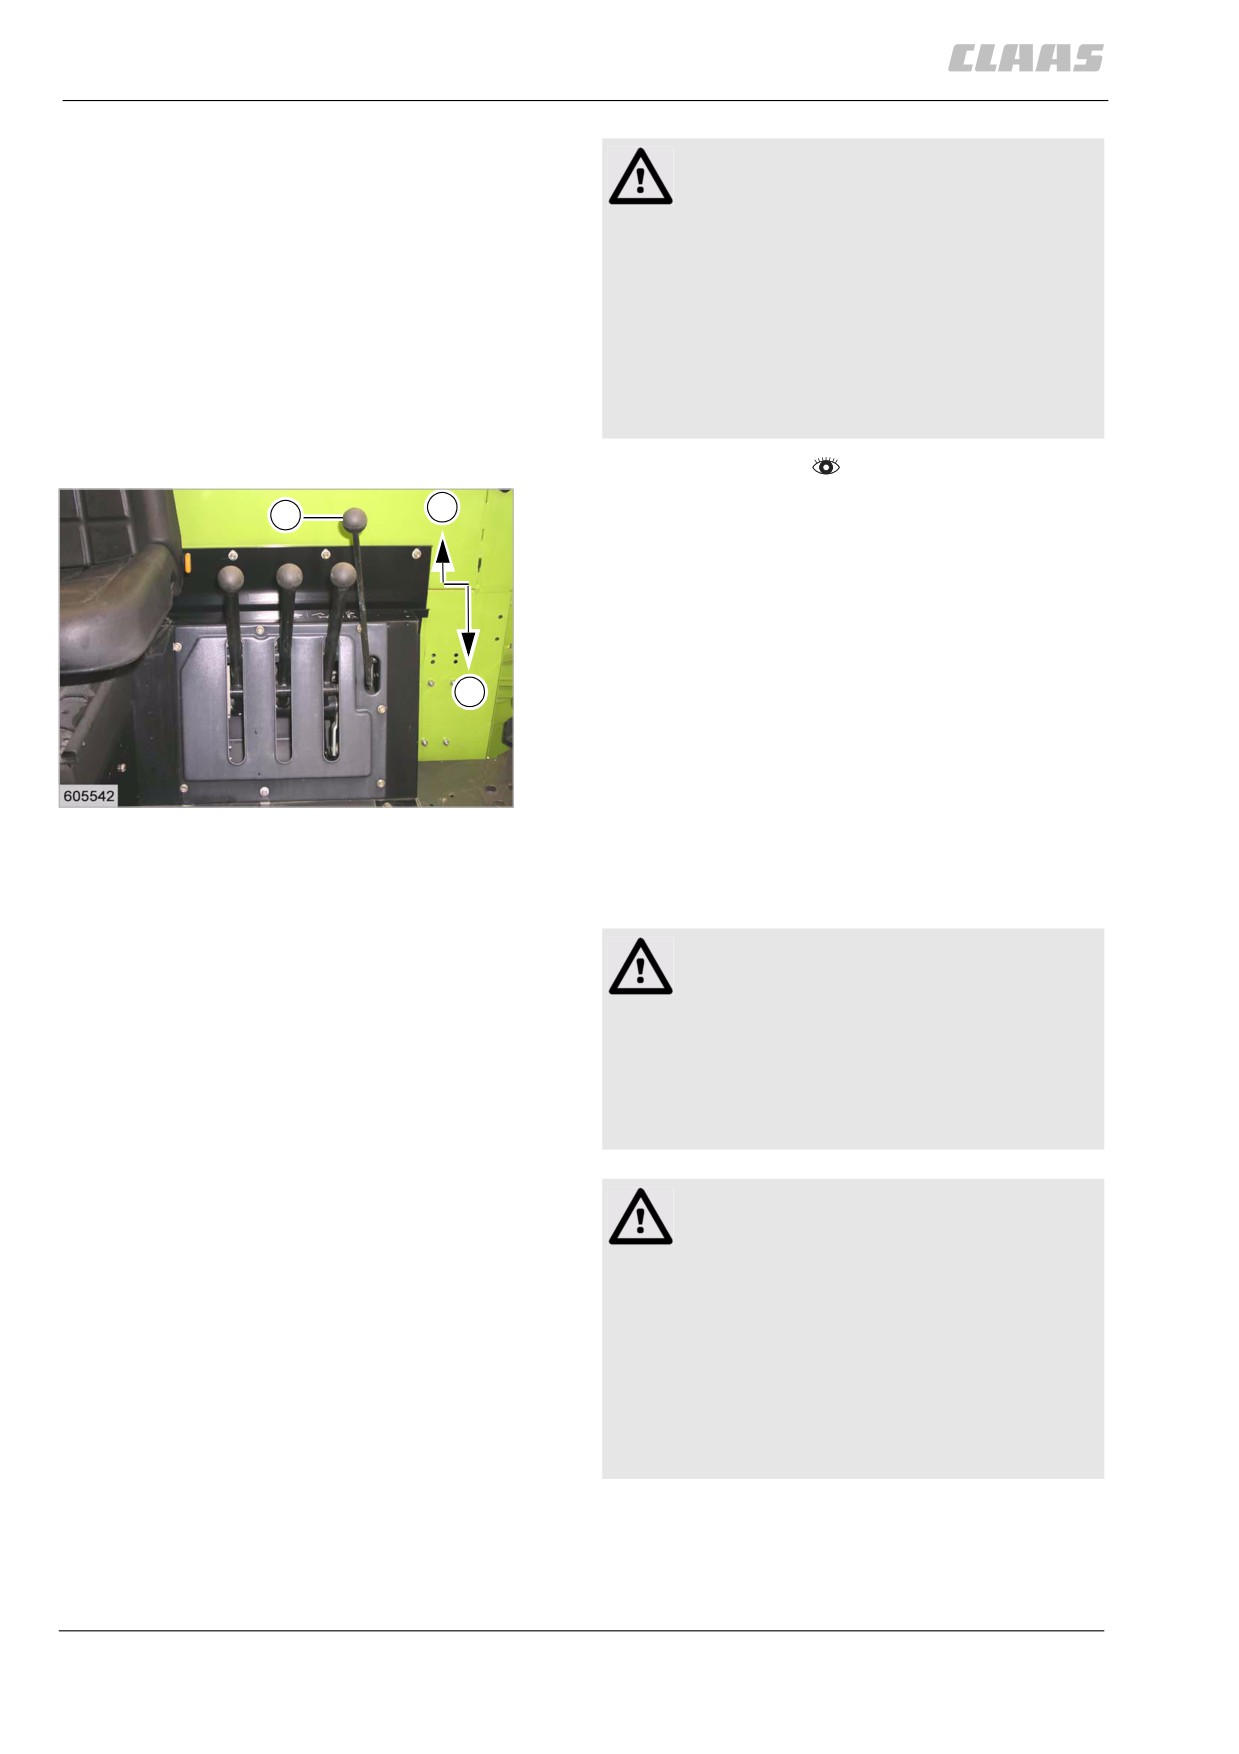
- When actuating lever (1) in direction (B), the
grain tank unloading tube will swing out and
stop upon releasing the lever (1).
-
Swing in grain tank unloading tube.
- When actuating lever (1) in direction (A), the
grain tank unloading tube will swing in and stop
upon releasing the lever (1).
B
79
19419
83150
11.10.5 Engaging / disengaging the grain tank
unloading
Danger!
When starting the machine, persons are on
the machine or in its hazard area.
Death or serious injury.
- Before starting the machine ensure that
there are no persons or objects in the
hazardous area.
WARNING:
Activated grain tank unloading upon swinging
of grain tank unloading tube.
Machine damage.
- Switch off grain tank unloading and wait
for components to stand still, then swing
the grain tank unloading tube.
- Swing the grain tank unloading tube to
the maximum, then engage grain tank
unloading.
234
11 Fieldwork
11.10 Grain delivery
67087
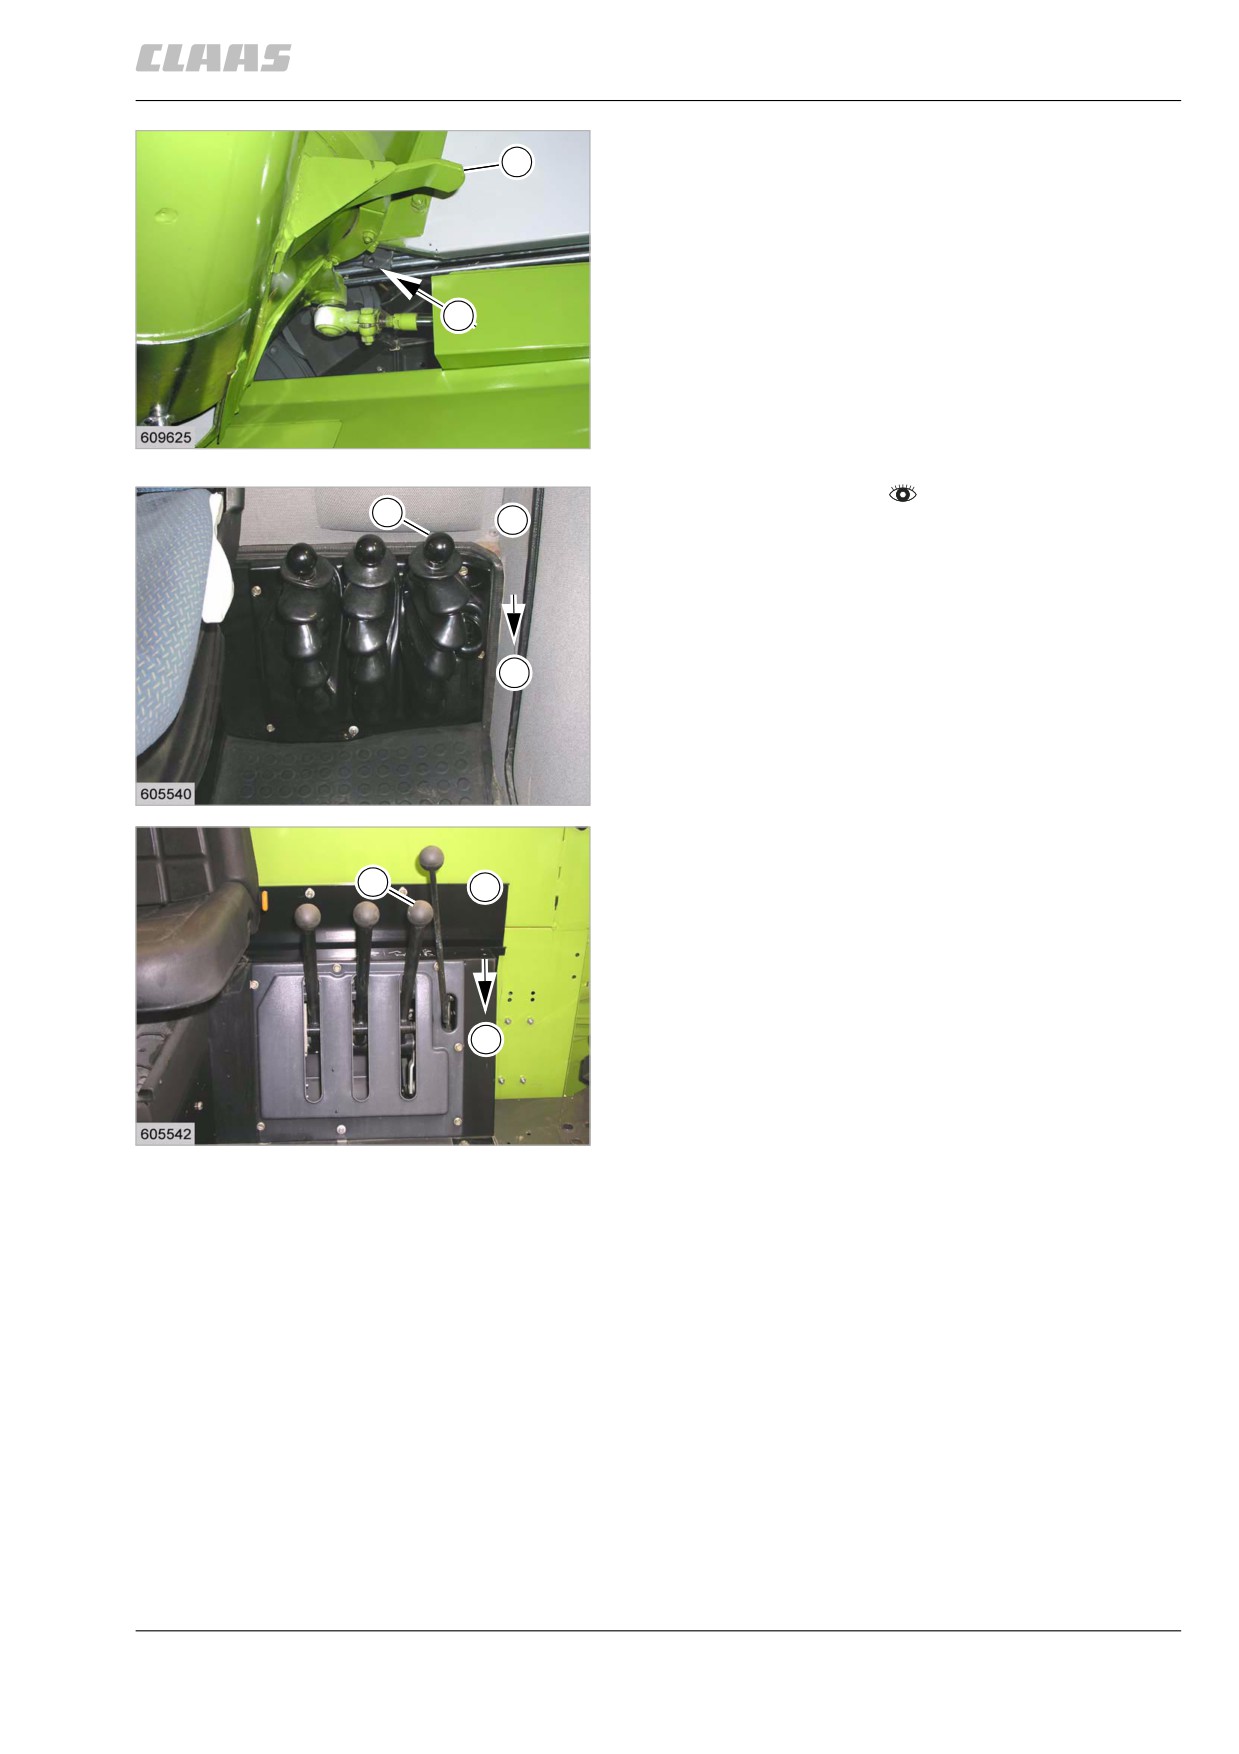
The grain tank unloading is blocked by means of cam
1
(1) and lever (2) when the unloading auger is in the
transport position. This way the unloading system can
not be engaged by mistake and damage is avoided.
2
80
19658
- Prepare fieldwork.
1
A
- Engage the grain tank unloading.
- Swing out grain tank unloading tube to the
maximum.
- Push lever (1) slowly in direction (B) up to the
stop.
B
The grain tank unloading is engaged softly. The
lever (1) remains in the bottom position after engaging.
81
DOMINATOR 150 / 140
19655
1
A
B
82
DOMINATOR 130
19419
235
11 Fieldwork
11.10 Grain delivery
67087
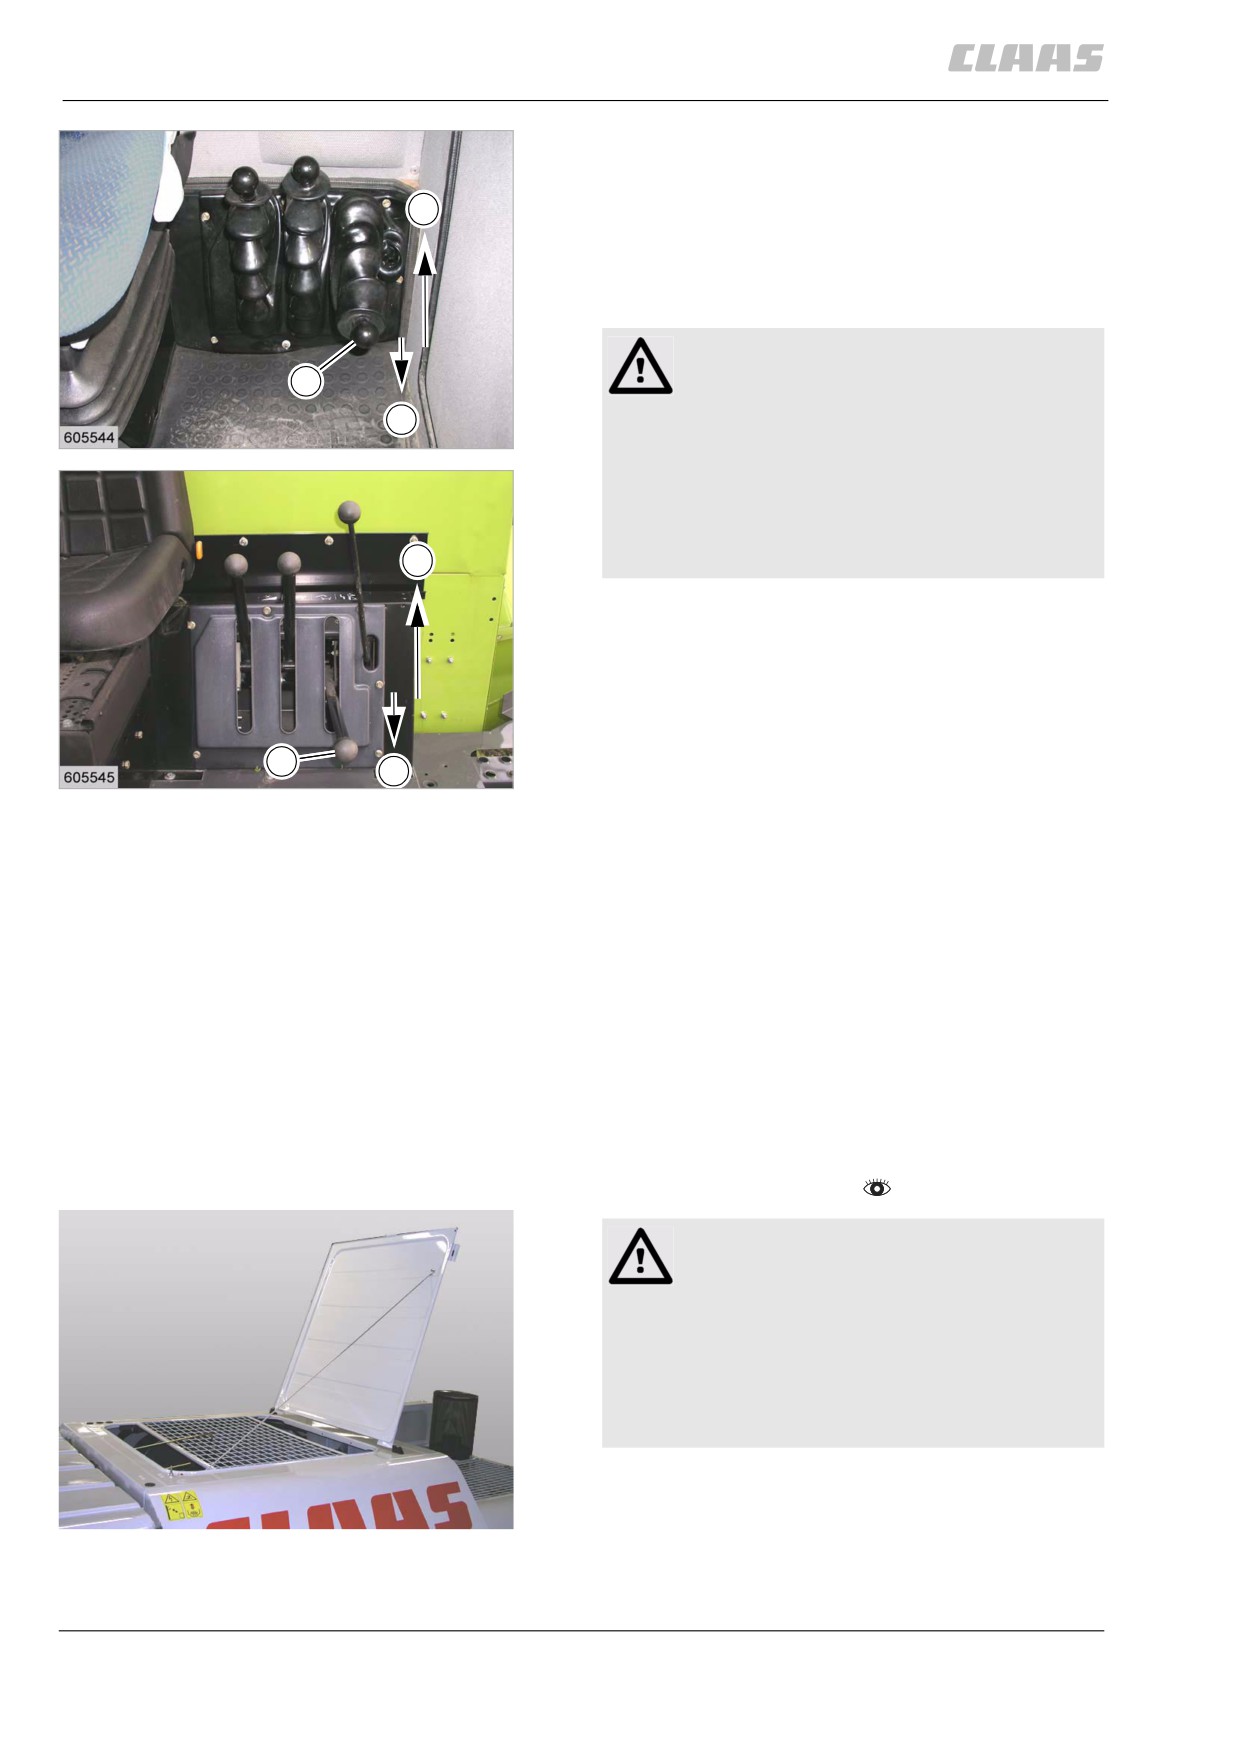
- Switch off the grain tank unloading mechanism.
- Push lever (1) in direction (B) up to the stop.
Pull up lever (1). The lever now automatically
A
remains at the upper position (A).
The grain tank unloading is disengaged and runs on
slightly.
Danger!
1
Machine components may run on although the
drive has been shut down.
B
83
Death or serious injury.
DOMINATOR 150 / 140
19656
- Never touch any machine parts that are
running on.
- Wait until all machine parts have stopped
A
moving.
1
B
84
DOMINATOR 130
19657
83040
11.10.6 Removing / installing the grain tank
auger cover plates
Due to the conical shape of the grain tank auger cover
plates, the inlet slots to the bottom grain tank unload-
ing augers are wider on the left side than on the right
side.
This ensures that plugs in the unloading augers are
avoided when working in well-flowing crops.
In poorly flowing crops (grass seed), remove the plates
as needed.
- Observe the general warnings at the beginning of
the "Fieldwork" chapter.
Danger!
Danger of falling!
Death or serious injuries!
- Arrange for additional safety precautions.
- Only enter areas protected by railings.
- Areas originally without railings must be
protected by additional railings.
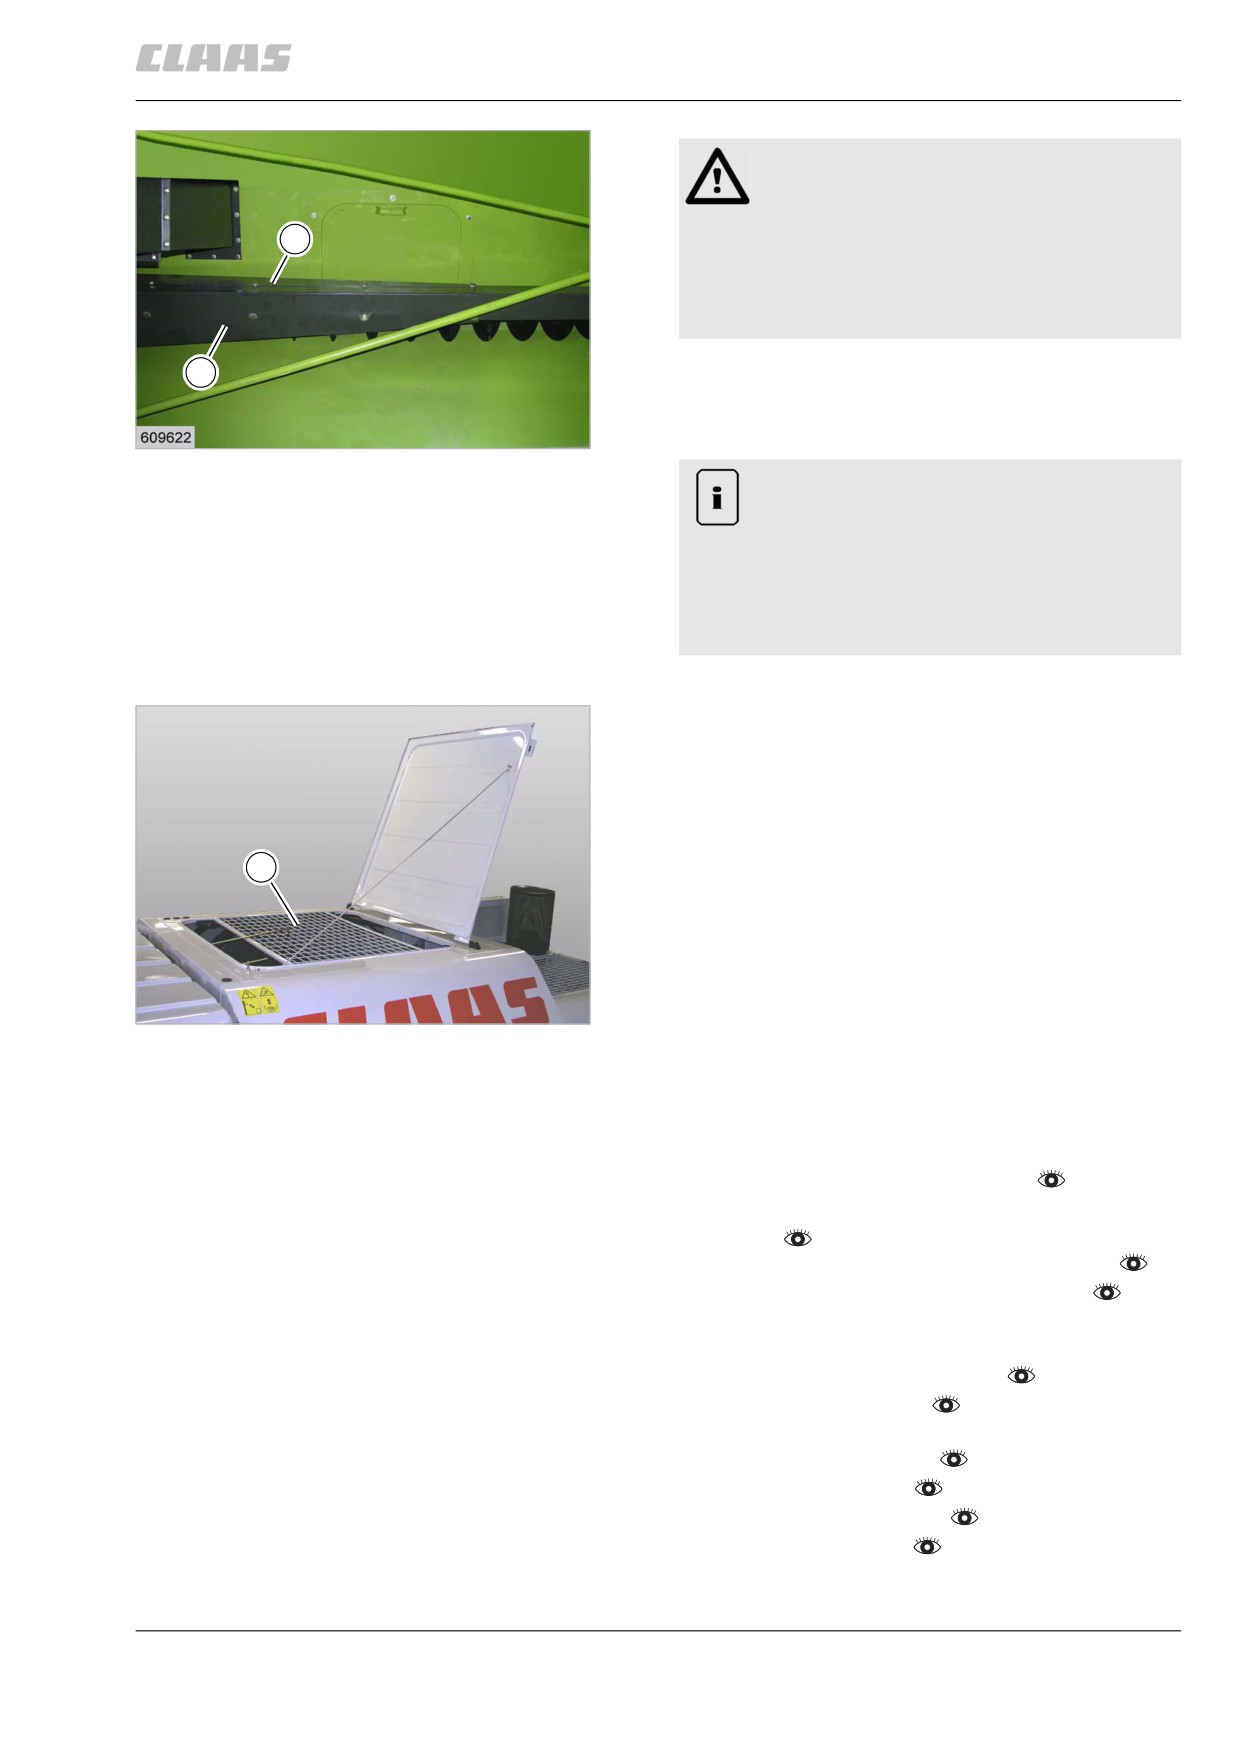
- Open the grain tank cover and fold it open to the
rear as far as possible.
85
- Remove guard (1).
30205
236
11 Fieldwork
11.10 Grain delivery
67087
Warning!
Sharp edges and pointed machine parts.
Slight injuries.
1
- Do not touch sharp edges of the auger
flights.
- Wear safety gloves.
1
-
Unscrew bolts.
–
Removing / installing the grain tank auger cover
plates (1).
86
19653
Note!
Performance of necessary installations.
Increased time needed.
- Screw the bolts back in immediately after
removing the plates; otherwise the tapped
holes will become plugged.
-
Screw in bolts.
–
Fit guard (1).
–
Remove additional safety precautions.
1
87
30205
43957
11.10.7 Clean machine for bulk seed change
The machine must be cleaned after each bulk seed
change.
- Engage the threshing mechanism.
- Set the diesel engine speed to fast idling
speed.
- Set the threshing drum speed at maximum.
- Set the cleaning fan speed at maximum.
- Let machine run about 2 minutes at top idle
speed.
- Stop the threshing mechanism.
- Stop the diesel engine.
- Observe the general warnings at the beginning of
the "Fieldwork" chapter.
- Clean the stone trap.
- Clean the auger troughs.
- Clean the grain tank.
– Adjust the machine settings to the crop.
237
11 Fieldwork
11.11 Sieve charts / threshing charts
67087
11.11 Sieve charts / threshing charts
83521
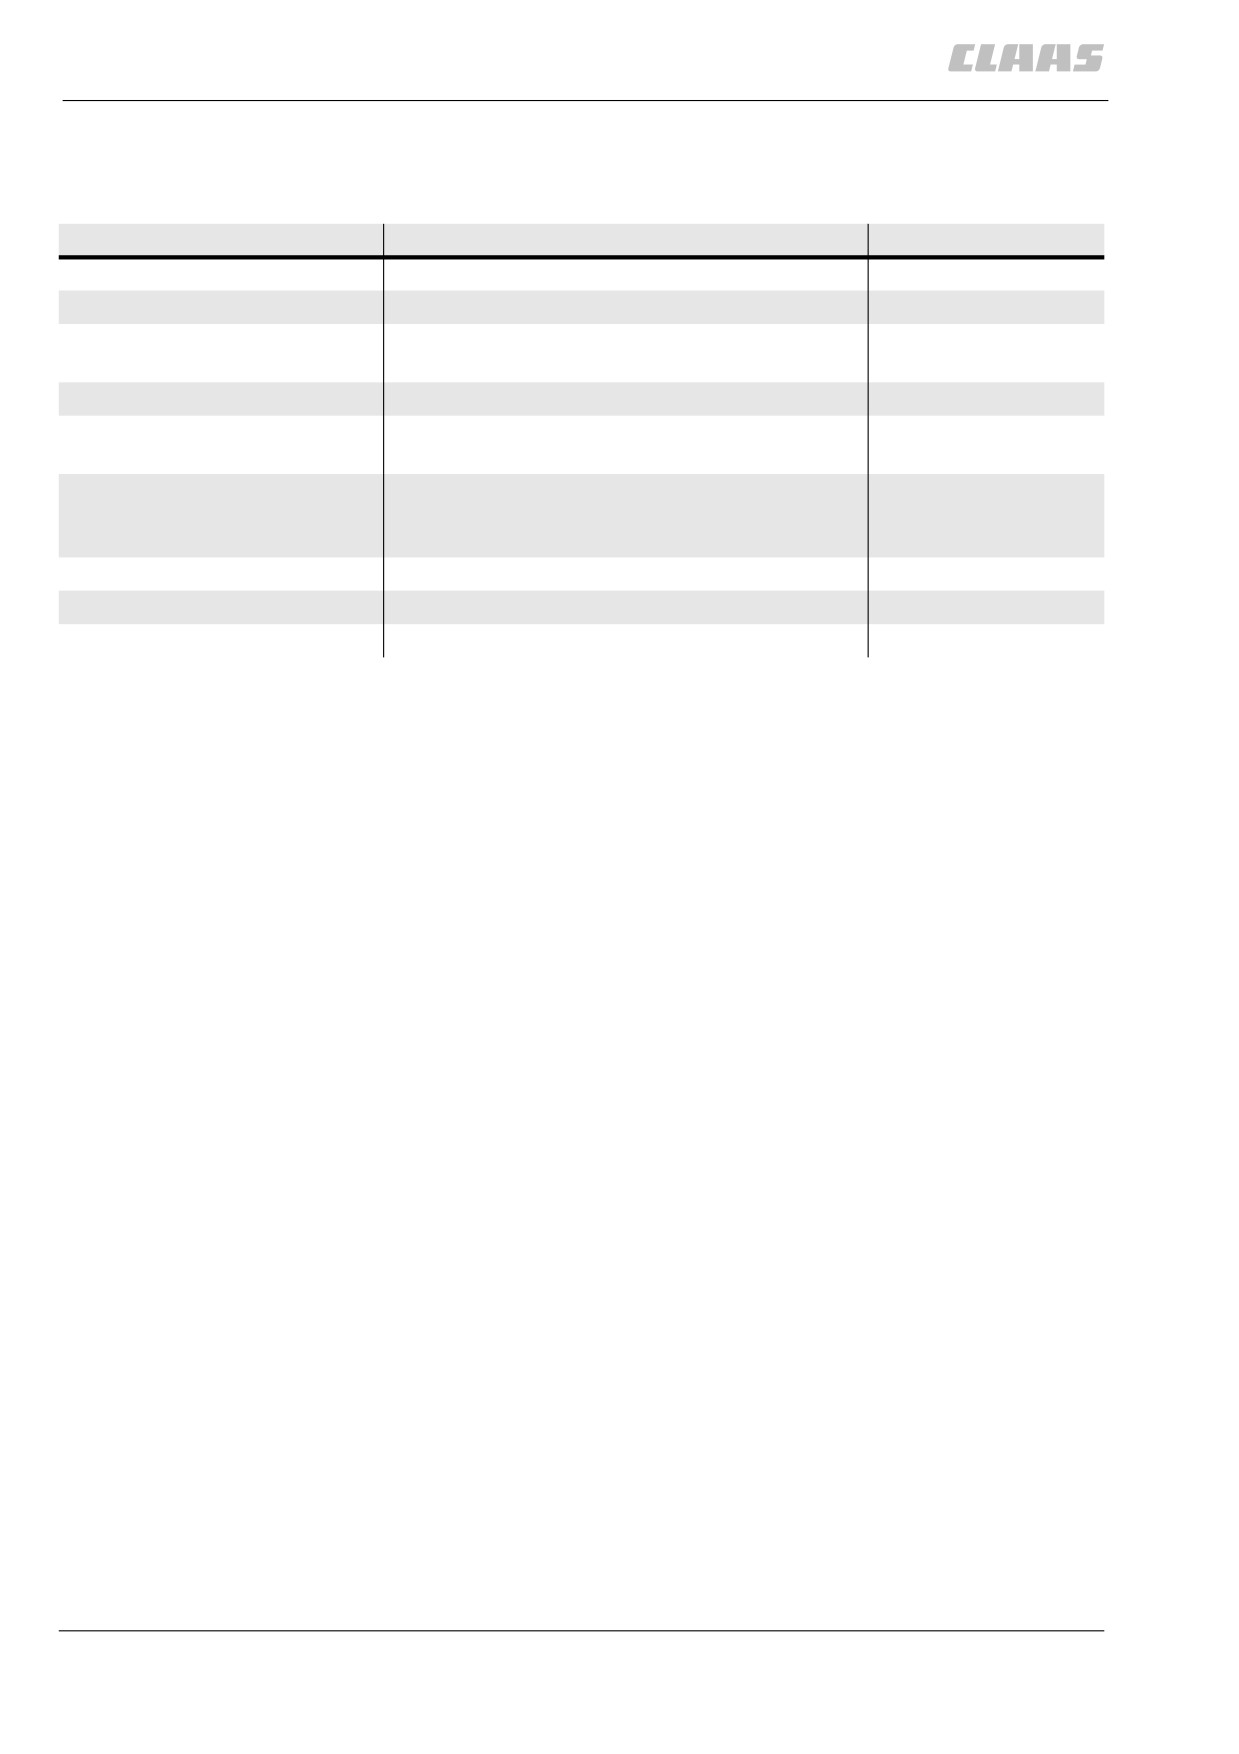
11.11.1 Sieve table
Sieves / hole sizes
Crop
Depressed sieves
Standard frogmouth sieve
Grain
Lower flat sieve, Ø 2.5 mm
Poppy / sesame / clover / lucerne
Lower flat sieve, Ø 4.5 mm
Poppy / sesame / clover / lucerne / linseed / rape
seed / spinach
Lower flat sieve, Ø 5.6 mm
Rye / wheat / winter barley
Lower flat sieve, Ø 7 mm
Rape seed / rape / lupine / caraway / linseed / rad-
ish / mustard / serradella / spinach
Lower flat sieve, Ø 12 mm
Wheat / rutabaga / barley / fodder peas / rye / spin-
ach / milo / vetches / durra / grass / lupine / durra /
sorghum
Lower flat sieve, Ø 16 mm
Sunflowers / maize / broad beans / peas
Lower flat sieve, Ø 18 mm
Broad beans / maize
X
Lower flat sieve, Ø 20 mm
Broad beans / maize
X
238
11 Fieldwork
11.11 Sieve charts / threshing charts
67087
82565
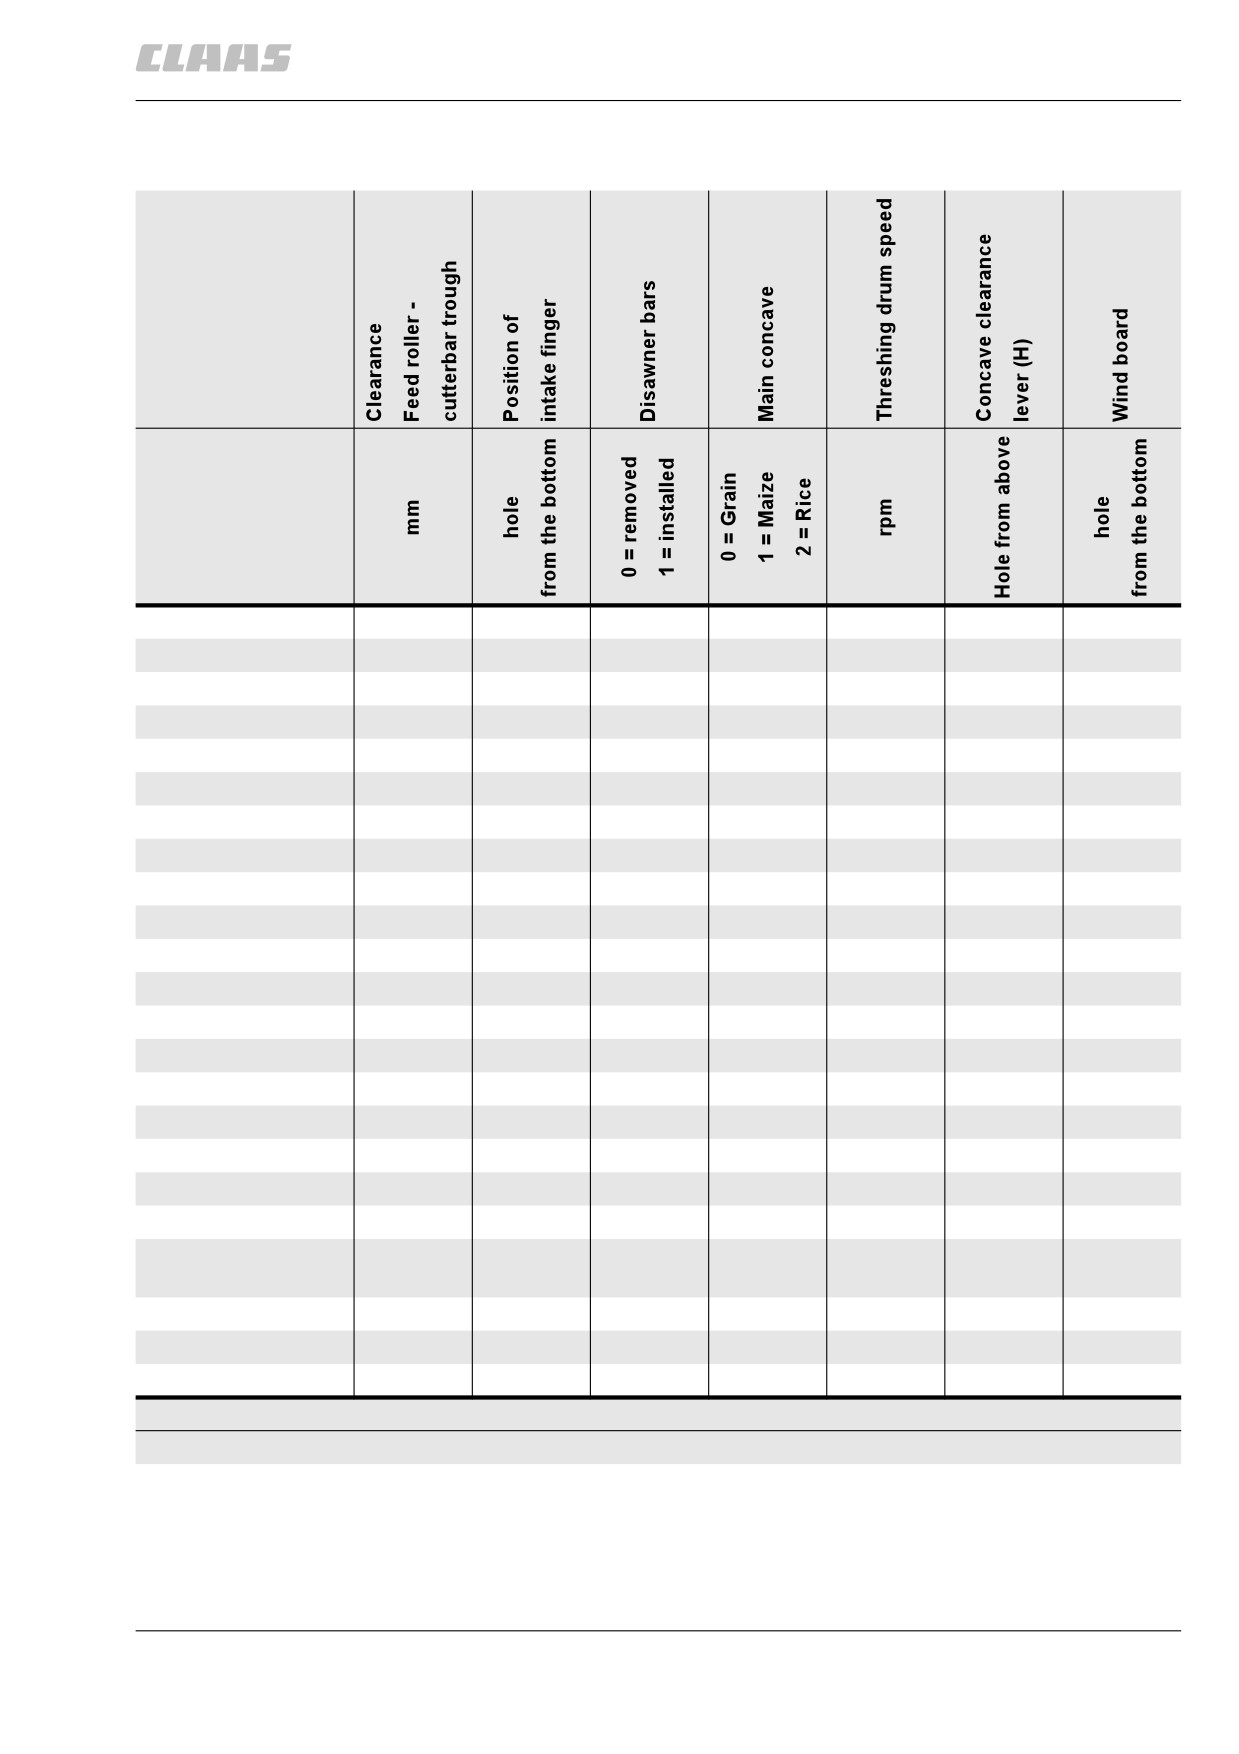
11.11.2 Threshing table
Type 200 / 156
Crop
Wheat
15
3rd
0
0
1200
3rd
2nd
Rye
15
3rd
0
0
1300
3rd
2nd
Winter barley
15
3rd
1
0
1400
2nd
2nd
Spring barley
15
3rd
0
0
1400
2nd
2nd
Oats
20
3rd
0
0
1250
4th
2nd
Rice
15
3rd
0
2
850
6th
2nd
Spelt
15
3rd
0
0
1200
3rd
2nd
Triticale
20
3rd
0
0
1350
3rd
2nd
Field beans
20
3rd
0
1
825
8th
2nd
Dwarf beans
20
3rd
0
1
615
9th
2nd
Peas
15
3rd
0
0
650
9th
2nd
Soybeans
15
3rd
0
1
650
4th
2nd
Sunflowers
15
3rd
0
1
650
4th
2nd
Grain maize
25
-
0
1
650
9th
2nd
CCM/Maize concave
25
-
0
1
700
9th
2nd
Rape / Bird rape
20
3rd
0
0
750
6th
2nd
Millet
15
3rd
0
0
725
6th
2nd
Linseed
15
3rd
0
0
1000
4th
2nd
Clover / Lucerne
15
3rd
1
0
1200
2nd
2nd
Common meadow
15
3rd
0
0
1100
2nd
2nd
grass
Ryegrass
15
3rd
0
0
1000
2nd
2nd
Meadow fescue
15
3rd
0
0
1000
2nd
2nd
Cocksfoot
15
3rd
0
0
1000
2nd
2nd
- = use is not possible
This information represents guideline values and may deviate in differing harvesting conditions.
239
11 Fieldwork
11.11 Sieve charts / threshing charts
67087
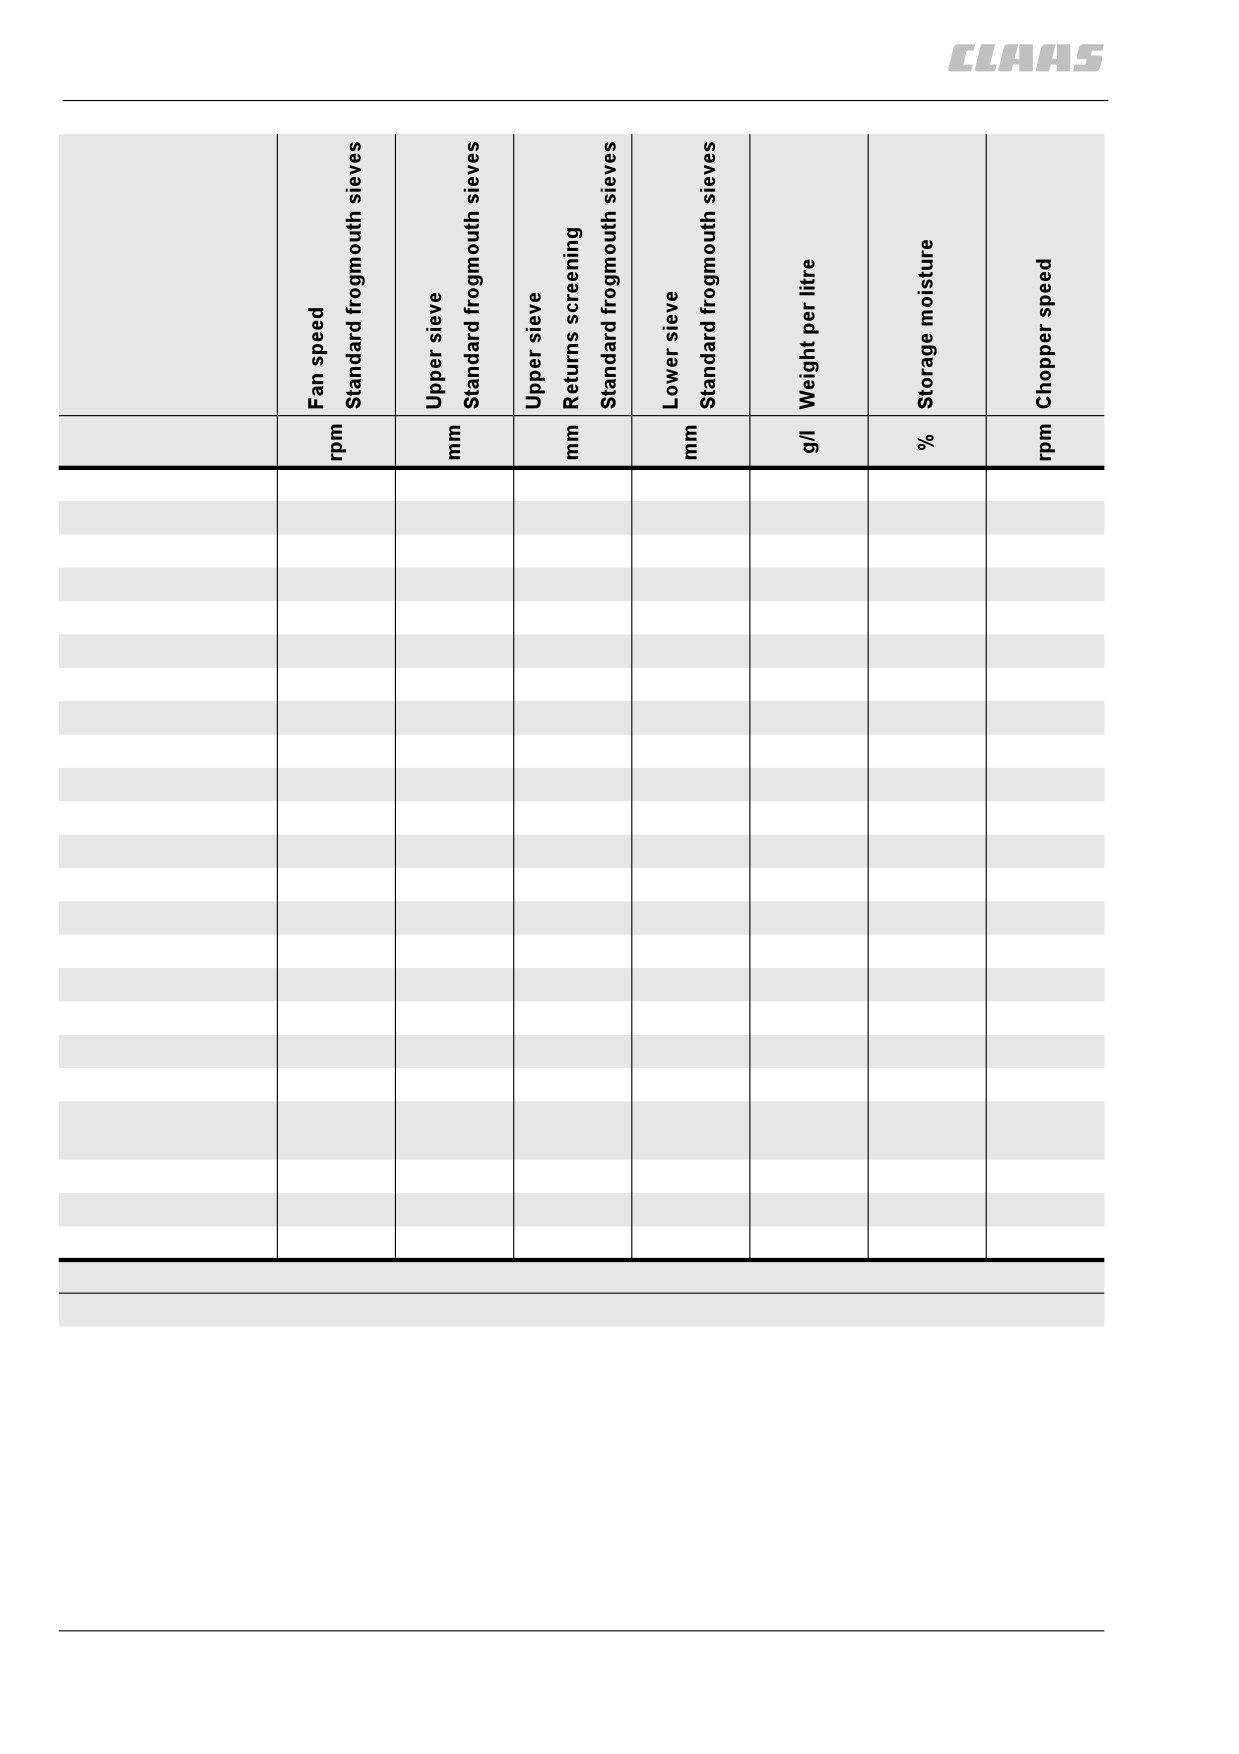
Type 200 / 156
Crop
Wheat
800
12
12
7
750
14
3270
Rye
750
12
12
7
700
14
3270
Winter barley
750
12
12
7
620
14
3270
Spring barley
700
12
12
7
620
14
3270
Oats
550
12
12
7
420
14
3270
Rice
750
12
12
10
550
14
3270
Spelt
800
14
14
10
700
14
3270
Triticale
750
13
13
8
650
14
3270
Field beans
750
12
12
11
750
14
3270
Dwarf beans
750
12
12
11
750
14
3270
Peas
750
15
15
10
750
14
3270
Soybeans
750
12
12
9
750
14
3270
Sunflowers
750
12
12
9
340
14
3270
Grain maize
900
13
13
-
700
14
-
CCM/Maize concave
500
-
-
-
500
14
-
Rape / Bird rape
500
5
5
4
620
9
3270
Millet
750
12
12
7
700
14
3270
Linseed
500
12
12
4
500
14
3270
Clover / Lucerne
500
9
9
4
500
14
3270
Common meadow
500
9
9
4
500
14
3270
grass
Ryegrass
500
9
9
4
500
14
3270
Meadow fescue
500
9
9
4
500
14
3270
Cocksfoot
500
9
9
4
500
14
3270
- = use is not possible
This information represents guideline values and may deviate in differing harvesting conditions.
240
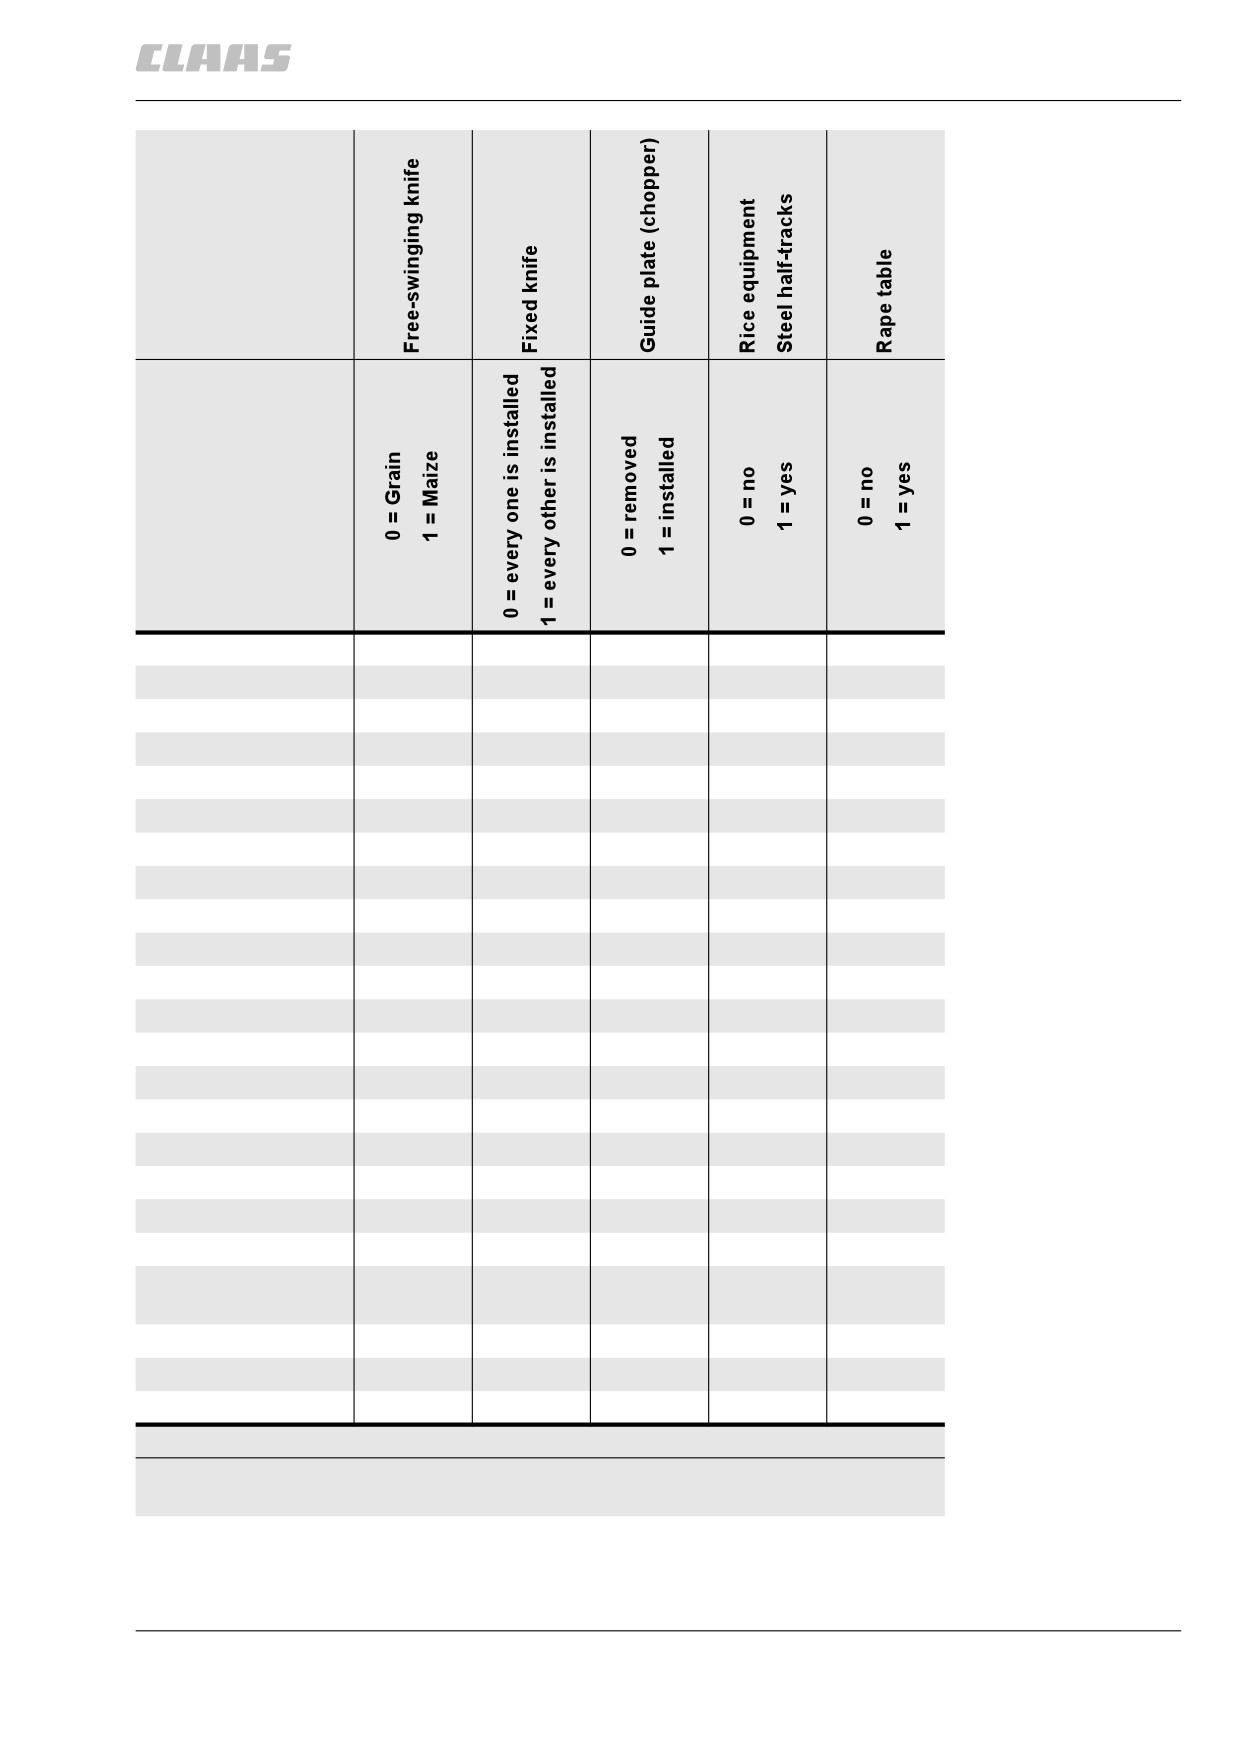
11 Fieldwork
11.11 Sieve charts / threshing charts
67087
Type 200 / 156
Crop
Wheat
0
0
0
0
0
Rye
0
0
0
0
0
Winter barley
0
0
0
0
0
Spring barley
0
0
0
0
0
Oats
0
0
0
0
0
Rice
0
0
0
1
0
Spelt
0
0
0
0
0
Triticale
0
0
0
0
0
Field beans
0
0
0
0
0
Dwarf beans
0
0
0
0
0
Peas
0
0
0
0
0
Soybeans
0
0
0
0
0
Sunflowers
0
0
0
0
0
Grain maize
1
1
1
0
0
CCM/Maize concave
1
1
1
0
0
Rape / Bird rape
0
0
0
0
1
Millet
0
0
0
0
0
Linseed
0
0
0
0
0
Clover / Lucerne
0
0
0
0
0
Common meadow
0
0
0
0
0
grass
Ryegrass
0
0
0
0
0
Meadow fescue
0
0
0
0
0
Cocksfoot
0
0
0
0
0
- = use is not possible
This information represents guideline values and may deviate in differing har-
vesting conditions.
241
11 Fieldwork
11.12 Disawning
67087
11.12 Disawning
83561
11.12.1 Disawner bars
In some cases, the separation of individual non-decor-
ticated or disawned grains must be avoided by
installing the disawner bars and this concave area
must be used for rasping out. To this end, disawner
bars can be fitted.
The optimum preparation of the crop in the front con-
cave section ensures early separation on the
downstream concave surface.
Effect on function
positive __________ negative
Disawner bars
Removal of
Unnecessary
installed
husks,
mechanical
disawning,
load when har-
preparation
vesting crops
for early
that can be
separation
threshed easily
Disawner bars
The entire
Lower husk
removed
separating
removal and
area is used,
disawning level
higher
residual grain
separation
242
12 Faults and remedies
12.1 General Information
67088
12 Faults and remedies
12.1 General Information
85072
12.1.1 General warnings Faults and remedy
In the following sections of this chapter, a procedure
instruction refers to the following general warnings.
Danger!
Always stop the engine before carrying out
any work on the machine.
Moving machine parts and / or unexpected
machine movement.
Death or serious injury.
- Diesel engine OFF.
- Apply parking brake.
- Remove the ignition key.
- Remove key of battery isolating
switch.
- Wait for machine parts which run on have
come to a complete halt.
- Secure machine by wheel chocks.
- Ensure that the machine cannot be
started by any third persons.
Danger!
The front attachment, reel and feeder unit may
drop uncontrolled.
Death or serious injuries!
- Apply safety locks.
- Keep a safe distance from the hazard
area.
243