UD Trucks. Owner’s Manual (2011-2013) - page 8


  Главная      Manuals     UD Trucks. Owner’s Manual (VEHICLE SERVICE AND MAINTENANCE) (2011-2013)


Search            copyright infringement  


Content      ..     6      7      8      9     ..


UD Trucks. Owner’s Manual (2011-2013) - page 8


-------------------------------------------------------------------------------------------------------------------------------------------------------------
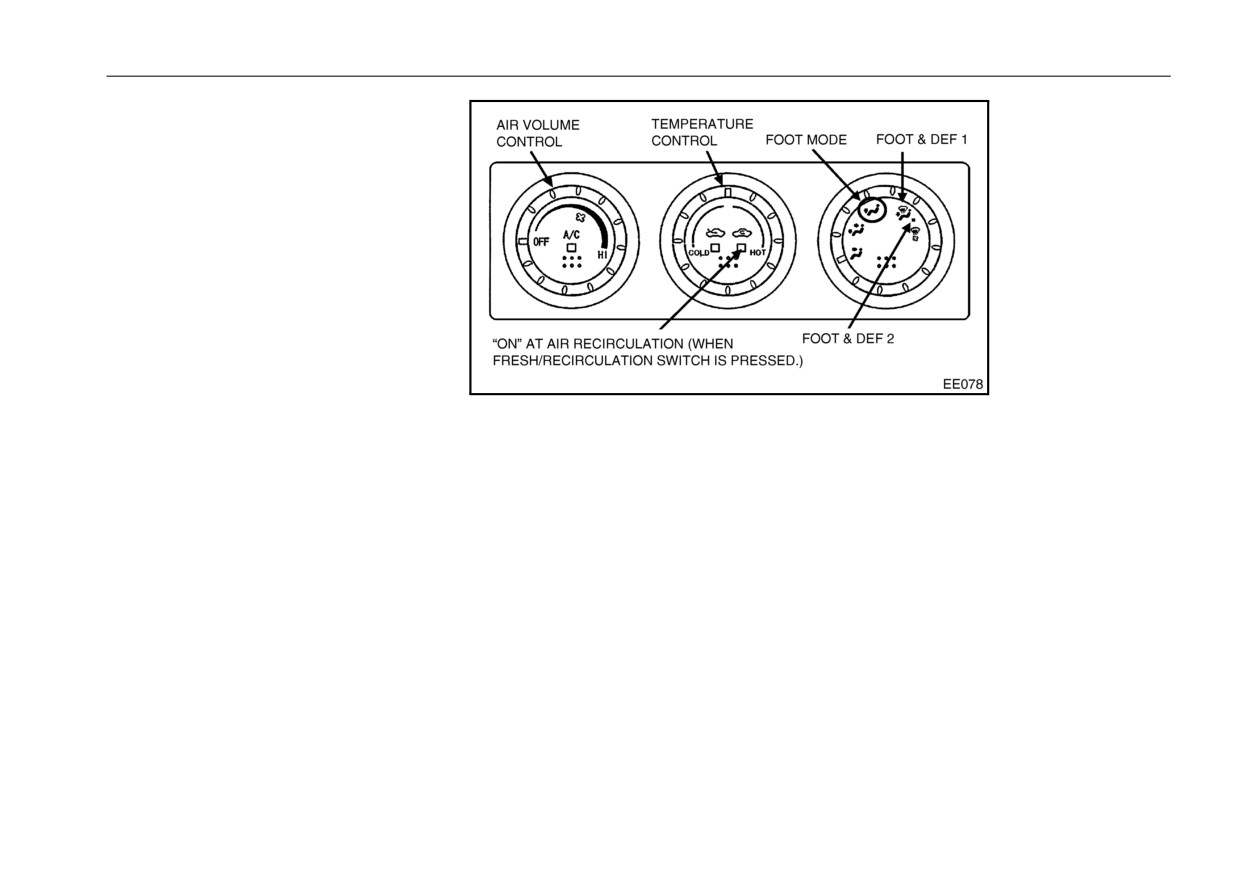
HEATER OR AIR CONDITIONER CONTROL
Heating
z
Moving the mode dial to the Foot
position will blow warm air on the
feet.
z
The temperature control dial is
used to adjust the air temperature,
and the fan dial is used to adjust
the fan speed as desired.
z
When you want to heat up the cab
quickly or when you are in a dusty
location, push the Fresh/Recircula-
tion switch to select the inside air.
z
When the windshield fogs up eas-
NOTE:
ily, set the air vents to Foot &
z Mode dial Foot & Defrost
1
Defrost.
blows more air through the foot
vents than the defrost vents,
and Foot & Defrost
2 blows
more air through the defrost
vents than through the foot
vents.
9 - 5

-------------------------------------------------------------------------------------------------------------------------------------------------------------

HEATER OR AIR CONDITIONER CONTROL
When resting in the seat
Use the heater as instructed below when idling the engine to heat the cab during cold weather.
No.
Operation method and description
Illustration
Adjust the air conditioner temperature higher than normal.
z The air temperature in the cabin rises according to the adjustment of the tem-
perature control dial.
1
NOTE:
z The air temperature in the cabin tends to decrease because the tempera-
ture of the engine coolant becomes low. Set the air conditioner tempera-
ture higher beforehand to keep the air temperature comfortable.
Push the air conditioner switch and turn off the position light (heater mode).
z The air conditioner compressor stops.
NOTE:
2
z When the position light is on (dehumidifier mode), the air conditioner
cools the incoming air before warming it. Thus, the air temperature from
the vent becomes low.
Push the fresh/recirculation switch to illuminate the position light of the inside air recir-
culation mode.
z The intake vent is fixed at inside air recirculation.
3
NOTE:
z The air temperature from the vent becomes low when the outside air mode
is selected because the cold outside air is warmed. However, the air tem-
perature from the vent becomes high when the inside air recirculation
mode is selected because the warm inside air is warmed again.
If the air temperature in the cabin is cool after performing steps 1 to 3 above, perform the following step.
9 - 6

-------------------------------------------------------------------------------------------------------------------------------------------------------------

HEATER OR AIR CONDITIONER CONTROL
No.
Operation method and description
Illustration
Turn the warm-up switch to the ON position.
z The exhaust brake operates, and the idle speed increases and then the temper-
ature of engine coolant rises.
NOTE:
4
z While parking the vehicle for a long period of time, the temperature of the
engine coolant tends to decrease. However, using the warm-up switch
allows sufficient performance of the heater.
z For details on how to use the warm-up switch, refer to the “VEHICLE
OPERATION” chapter.
If it is still cold, even when the warm-up switch is turned on, operate the engine
throttle control knob to turn idle speed up with the warm-up switch in the ON posi-
tion.
5
<When resting in the seat after driving>
Push the fresh/recirculation switch to illuminate the position light of the inside air recir-
culation mode.
z The intake vent is fixed at inside air recirculation.
NOTE:
z The heater utilizes heat from the engine coolant. While idling, the engine coolant temperature gauge may indicate a
lower value because the temperature of engine coolant tends to decrease. However, performing the steps above will
allow sufficient performance of the heater.
9 - 7

-------------------------------------------------------------------------------------------------------------------------------------------------------------

HEATER OR AIR CONDITIONER CONTROL
Vent & Foot (Cool head, warm feet)
Defrost
Switching between inside and
outside air
z Moving the mode dial to the Vent &
Putting the mode dial in the Defrost
position will blow warm air from the
Normally, the intake vents use out-
Foot eliminates the discomfort
defroster on the inside of the wind-
side air, but when you want to
caused by the warm air making the
shield.
avoid dust, exhaust fumes, etc.,
heat too hot, etc.
push the Fresh/Recirculation
z The temperature control dial is
switch to switch to inside air recir-
used to adjust the air temperature,
culation.
and the fan dial is used to adjust
the fan speed as desired.
NOTE:
z When the mode dial is moved to
the Defrost position, the com-
pressor begins to run and the
intake vents are set to outside
WARNING
air. Note that the compressor
might not turn on due to certain
z Do not use inside air recircula-
conditions, such as the outside
tion for a long time. Doing so
air temperature.
will cause the air inside the
z When the mode dial is moved to
cab to become foul or the
the Defrost position, the mini-
windshield to fog up, etc.
mum amount of air will blow
even if the fan dial is set to OFF.
9 - 8

-------------------------------------------------------------------------------------------------------------------------------------------------------------

HEATER OR AIR CONDITIONER CONTROL
Cooling and dehumidifying
Information regarding automobile
refrigerant
z
Cooling and dehumidifying can be
z The cooling performance could
done by pushing the air condi-
drop causing poor cooling if there
tioner switch.
is insufficient refrigerant or the
z
The temperature control dial is
refrigerant compressor belt is
used to adjust the air temperature,
loose.
the fan dial is used to adjust the
z If refrigerant is leaking, have it
fan speed, and the mode dial is
inspected by the nearest autho-
used to select the air vents as
rized UD Trucks dealer. Also, if the
desired.
belt is loose, have it adjusted.
z
When you want to quickly cool
down the cab, push the Fresh/
Recirculation switch to switch
CAUTION
inside air recirculation.
z Use Freon HFC134a to help
protect the environment. Only
use the specified refrigerant to
charge the cooling system.
z To protect the global environ-
ment, do not discharge refrig-
erant into the atmosphere.
9 - 9

-------------------------------------------------------------------------------------------------------------------------------------------------------------

VEHICLE OPERATION
OPERATING PRECAUTIONS
VEHICLE
WARNING
Following a few precautions will help
OPERATION
lengthen the life and reliability of
Never drive the vehicle with
your vehicle.
z
the engine stopped.
z
After starting, warm up the engine
z
the clutch disengaged
(not
applicable to automatic trans-
until it runs smoothly.
mission).
z
Do not race the engine during the
z
the transmission gear shift
warm-up period.
lever in neutral.
z
Avoid sudden starts and abrupt
These are very hazardous and
stops.
can cause loss of control
z
When you start a loaded vehicle,
resulting in death or serious
use 1st gear. When you go uphill,
injury. This is because:
use an appropriate lower gear.
1.You cannot use the engine
z
Use the same gears going down a
brake.
grade as you used or would use
2.When the engine is not run-
going up.
ning, the brake system will
not function properly, and
this can result in a longer
stopping distance.
3.The power steering system
will not function, and much
greater effort is needed to
control the steering.
10 - 1

-------------------------------------------------------------------------------------------------------------------------------------------------------------

VEHICLE OPERATION
BREAK-IN PRECAUTIONS
VEHICLE LOADING
WARNING
During the initial
600 miles (1,000
Do not exceed the GVWR or the
km) of operation:
front and rear GAWRs of the vehicle.
z
The vehicle’s stopping dis-
z
Observe the “OPERATING PRE-
The vehicle GAWRs may be
tance will increase as the load
CAUTIONS” section above.
exceeded before the vehicle load
of the vehicle increases. Accel-
z
Do not exceed 75% of the vehicle
reaches the GVWR depending on
eration performance will also
the body and equipment on the vehi-
GVWR. See the “BEFORE DRIV-
be reduced. In addition, a
cle. Confirm that the vehicle’s tires,
ING YOUR VEHICLE” section for
loaded vehicle’s handling
springs and axles are not over-
details.
characteristics differ from
loaded. Always balance and secure
those of an unloaded vehicle.
the vehicle load. Loading and bal-
Depending on the loading, dif-
ance of the load will affect the brak-
ferences in steering response
ing, handling, stability and other
and vehicle leaning while turn-
characteristics of your vehicle.
ing and in curves may occur.
Anticipate these differences
and operate your vehicle
accordingly. Always balance
and secure the vehicle load.
z
The muffler (catalyst system in
the muffler) become very hot.
Do not touch it, also do not let
it come in contact with the
sheets or ropes on the rear
body or dry grass on the
ground as they may ignite and
cause a fire.
10 - 2

-------------------------------------------------------------------------------------------------------------------------------------------------------------

VEHICLE OPERATION
TOWING TRAILERS
ning lights, brake lights, turn signals
z Do not exceed the GCWR rating or
and hazard lights are working. Con-
transmission damage may occur.
sult your authorized UD Trucks
Trailer brakes
dealer or the authorized dealer/man-
Servicing after towing
Electric brakes and manual, auto-
ufacturer of your trailer for instruc-
matic or surge-type trailer brakes are
tions to connect the trailer lamps to
If you tow a trailer for long distances,
safe if installed properly and
the tow vehicle.
your vehicle will require more fre-
adjusted to the manufacturer’s spec-
quent service intervals. Refer to the
ifications. The trailer brakes must
“Vehicle Service and Maintenance”
Safety chains
meet local and Federal regulations.
section for “Type 1” vehicle opera-
Always connect the trailer’s safety
tion.
If you own a trailer with a hydraulic
chains to the frame or hook retainers
brake system, do not connect the
of the vehicle hitch.
trailer’s hydraulic brake system
Trailer towing safety tips
To connect the trailer's safety chains,
directly to your vehicle’s brake sys-
cross the chains under the trailer
tem. The vehicle’s brake system is
General
tongue and allow slack for turning
only designed to carry the appropri-
z Ensure that the trailer, safety
corners. If you use a rental trailer,
ate amount of brake fluid for the
chains and electrical connectors
follow the instructions that the rental
vehicle alone. Connecting a hydrau-
are securely fastened.
agency provides to you.
lic trailer braking system could
z Make sure the truck receiver, draw
adversely affect your vehicle’s brak-
bar, and coupler are properly con-
ing performance.
Driving while you tow
nected and adjusted.
NOTE:
When towing a trailer:
z Check side mirrors for proper visi-
z The braking system of the tow
z Turn off and do not use the cruise
bility, especially when towing a
vehicle is rated for operation at
control.
trailer wider than the truck.
the GVWR not GCWR.
z Consult your local motor vehicle
z When towing, operate the vehicle
speed regulations for towing a
at lower speeds than you would
Trailer lamps
trailer.
when not towing a trailer. The like-
z Anticipate stops and brake gradu-
Trailer lamps are required on most
lihood of trailer sway is greater at
towed vehicles. Make sure all run-
ally.
higher speeds.
10 - 3

-------------------------------------------------------------------------------------------------------------------------------------------------------------

VEHICLE OPERATION
z When turning, make wide turns to
or if they will not hold, chances are
STARTING THE ENGINE
allow trailer tires to properly clear
that they need adjustment.
any obstacles.
z Anticipate the need to stop; allow
Before starting the engine, check to
z Be prepared for trailer sway due to
additional distance and time to
be sure that:
buffeting when larger vehicles
stop than normal.
z The MTM is shifted to the neu-
pass in either direction.
z Do not apply the trailer brakes for
tral position. The engine can
extended periods of time as they
only be started when the shift
Loading
can overheat and lose their effec-
lever is in the N (Neutral) posi-
z Keep the center-of-gravity low for
tiveness.
tion.
best handling.
For ATM, put the selector lever
z Trailer loads should be evenly dis-
Backing up
(switch) into the P (Park) or N
tributed front to back and left to
z Practice backing up, particularly if
(Neutral) position.
right.
you are a novice. Turn the steering
z The transmission PTO switch
z Never exceed truck, trailer,
wheel to the right to move the
(optional) is turned off.
receiver, ball, tongue, tire or cou-
trailer’s rear end to the right.
z The parking brake is pulled to
pler loading recommendations.
z Sharp steering movements may
the PARK position.
cause the trailer to jackknife or go
z The power steering fluid level
Braking
out of control.
is proper.
z The trailer brakes must be
z The engine oil level and engine
inspected and serviced at intervals
Tires
coolant level are proper.
specified by the trailer manufac-
z All trailer tires should be of the
Normal temperature conditions:
turer. This includes shoes, drums,
same size and construction.
Depress the clutch pedal (Not avail-
and trailer brake magnets.
z Select tires that meet the trailer
able with automatic transmission)
z Electric brakes also require peri-
loading requirements.
fully, and then turn the ignition key to
odic adjustment to keep the shoes
z Always check tow vehicle and
the START position.
properly spaced.
trailer tire pressure before towing.
If the brakes get hot when driving
10 - 4

-------------------------------------------------------------------------------------------------------------------------------------------------------------

VEHICLE OPERATION
Cold weather conditions (Vehicle
cate that the anti-overheating
with intake air heater system: If so
function is operating.
equipped):
This message displays the cool-
1.When the engine coolant tempera-
ing time (10 to 15 minutes regu-
ture is low, turn the ignition key to
larly) that is required for the
ON position. The indicator light
starter to operate again.
turns on and pre-heating is carried
out.
2.After the indicator light turns off,
turn the ignition key to the START
position and start the engine. After
starting the engine, the indicator
z
Turn the ignition key to ON posi-
light will illuminate again and after-
tion before depressing the
heating will be performed for a set
accelerator pedal. When the
time.
ignition key is at LOCK or ACC
position, the fuel system func-
NOTE:
z
When the PTO engine start inter-
tion for cold weather will not
z The engine start control system
rupt warning is operated, a
operate.
is equipped with an automatic
warning and a warning message
z
Right after stalling the engine,
anti-overheating device. (Gener-
will be displayed. These warn-
the engine start control system
ally, when attempting to start the
ings indicate that the engine is
inhibits the cranking for about 1
engine for about
15 seconds
unable to start because the PTO
second to avoid the damage for
and doing so three or four times
switch is in the ON position.
the starter.
in a row, this will cause the
If this occurs, turn the PTO
z
When the engine does not start
operation of the automatic anti-
switch to the OFF position, and
on the first attempt, wait approx-
overheating device.)
then start the engine.
imate 30 seconds before trying
When the anti-overheating
again.
device is operated, a warning
and a warning message will be
displayed. These warnings indi-
10 - 5

-------------------------------------------------------------------------------------------------------------------------------------------------------------

VEHICLE OPERATION
z
Do not keep the starter engaged
for more than 15 seconds at a
WARNING
time.
z
Do not start or idle the engine
in inadequately ventilated
areas. Carbon monoxide poi-
soning can cause uncon-
sciousness and is potentially
lethal.
z
Avoid breathing exhaust
fumes. If you suspect that
exhaust fumes are entering the
cab, stop the vehicle immedi-
3.When the engine starts, make sure
ately. Open all windows, and
the gearshift lever is still in neutral
have the vehicle inspected and
If the vehicle is equipped with
repaired immediately. Do not
automatic transmission, the selec-
drive the vehicle if you notice
tor lever is still in the N (Neutral) or
the presence of any exhaust
fumes in the cab.
P (Parking) position, and release
z
Do not use ether or other start-
the clutch pedal (Not available with
ing aids which are flammable.
automatic transmission).
z
Avoid attempting to start your
vehicle by pushing or towing.
Instead, use the jump starting
procedure or tow your vehicle,
as described in this manual, to
the nearest service station.
10 - 6

-------------------------------------------------------------------------------------------------------------------------------------------------------------

VEHICLE OPERATION
WARMING UP ENGINE
CAUTION
z
Do not attempt to start the
To avoid shortening engine life,
engine with a power source of
engine warm-up is necessary. The
more than 12 volts.
warm up is performed by adjusting
z
After the engine starts, do not
the engine throttle control knob.
turn the ignition key to the
START position. This could
Adjusting engine idling speed
cause damage to the starter
The automatic adjustment of engine
motor and/or engine.
idling speed.
z
Do not attempt to start the
z
When the engine throttle control
vehicle until the intake air
knob is turned all the way to the
heater indicator light goes out.
left, automatic idling mode will be
reached, and the idling speed will
be adjusted automatically accord-
ing to the temperature of engine
coolant.
Refer to "Engine throttle control
knob" on page 7-53.
z
Normally, the knob should be
turned all the way to the left (coun-
terclockwise).
z
When the knob
is
turned
to the
right
(clockwise), the
mode
changes from automatic
idling
mode to manual adjustment mode,
the engine speed will increase,
and adjustment up to about 980
rpm will become possible.
10 - 7

-------------------------------------------------------------------------------------------------------------------------------------------------------------

VEHICLE OPERATION
z The standard idling speed is 550
WARNING
WARNING
rpm.
z Warm-up has been completed
z Driving with the throttle con-
z Do not warm up the engine in
when the idling speed drops.
trol knob set to any speed
an insufficiently ventilated
higher than standard idling
location such as a garage or
The manual adjustment of engine
idling speed.
speed is dangerous and could
indoors. This can be danger-
z When the engine has started,
cause the vehicle to suddenly
ous and can cause carbon
accelerate, even when the
monoxide poisoning.
gradually release the accelerator
vehicle is stopped with the
pedal and set a slightly higher
engine running.
Activation
idling speed with the throttle con-
1.Put the parking brake in the PARK
trol knob.
position.
z Perform warm-up operation until
To warm up more quickly
2.Shift the gear shift lever to the “N”
the needle of the engine coolant
position.
temperature gauge starts to move.
If you wish to make the heater or
3.Start the engine and turn the
z When the needle of the engine
defroster work more quickly after
warm-up switch to ON to engage
coolant temperature gauge starts
starting the engine, or to enhance
the exhaust brake, and the idle
to move, return the throttle control
the effectiveness of the heater in
speed increases and begin engine
knob to the standard idling speed.
cold weather, activate the exhaust
warm-up. During this time, the
brake and the idle speed increases.
NOTE:
switch’s built-in indicator light will
z Never drive with higher idling
illuminate.
speed than standard. That could
result in excessive fuel con-
sumption and reduced clutch
life.
z Failure to warm up the engine
will shorten engine life.
10 - 8

-------------------------------------------------------------------------------------------------------------------------------------------------------------

VEHICLE OPERATION
Deactivation
STOPPING THE ENGINE
Turn the warm-up switch to OFF to
After vehicle operation, idle the
turn off the indicator lights and can-
engine for
3 to
5 minutes before
cel engine warm-up.
stopping the engine. After the engine
is cooled by idling, stop the engine.
Follow the instructions in the "Engine
stop" on page 7-4. Turn the ignition
key to the OFF position.
NOTE:
z For information regarding pre-
cautions when using the
warm-up switch, refer to the
"Engine warm-up switch" on
page 7-54.
10 - 9

-------------------------------------------------------------------------------------------------------------------------------------------------------------

VEHICLE OPERATION
DRIVING ON GRADES
WARNING
WARNING
1.When driving up a grade, operate
the vehicle in a lower transmission
z Do not rest your foot on the
z Operating the engine in the red
gear at the engine speed (about
brake pedal or use the foot
zone of the tachometer can
1,400 rpm) for which the engine
brakes for extended periods.
cause severe engine damage
develops its maximum torque.
Such can cause the brake
and serious injury.
Sustained high speed operation
drums to overheat, the linings
z Do not downshift if the engine
to wear excessively and/or
speed is in the red zone of the
may cause severe engine failure.
cause a drop in braking pres-
tachometer.
2.When descending a grade, first
sure resulting in a reduction in
use engine braking by selecting
braking effectiveness and
4.Check the operation of the brakes
the same gear which was used or
increased stopping distances.
before you begin the descent of an
would be appropriate for going up
extended or steep grade.
the grade. Supplement the engine
3.When downshifting, wait until
braking with exhaust braking and
engine speed corresponds to the
finally with service brakes, as nec-
road speed of the next lower gear
essary, to maintain a safe vehicle
before shifting. Do not allow the
speed.
engine to overspeed. Do not oper-
ate the engine at speeds within the
tachometer red zone.
10 - 10

-------------------------------------------------------------------------------------------------------------------------------------------------------------

VEHICLE OPERATION
DRIVING IN DIFFICULT
improperly inflated tires provide
OPERATING WITH MANUAL
CONDITIONS
poor traction and increase the haz-
TRANSMISSION
1.Ice, snow, loose sand, mud or wet
ards of driving on slippery sur-
Your UD Trucks vehicle is equipped
surfaces present hazardous driv-
faces.
with a manual transmission with 6
ing conditions. Tire traction is
4.A loaded vehicle handles differ-
forward and 1 reverse gears. The
ently from an empty one. Be pre-
gear shift pattern is shown on the
decreased, stopping distance
pared for
longer
stopping
shift lever knob.
becomes unpredictable and heavy
braking, sudden maneuvers or
distances, slower acceleration,
excessive speeds can result in
more leaning on curves, different
loss of vehicle control.
steering response. A vehicle
should be evenly loaded.
5.When driving on slippery surfaces
CAUTION
or on curves, be sure to use the
service brake together with the
z When a wheel spins when trac-
tion is poor, do not spin the
exhaust brake.
wheels for a long time or the
differential could seize up.
CAUTION
2.On slippery surfaces, avoid quick
Familiarize yourself and others oper-
z Never drive the vehicle
movements of the steering wheel
ating the vehicle with the manual
through a flooded area. If the
transmission, the gear shift pattern
or transmission shift lever. Gently
water is deep enough to reach
and clutch operation. When using
apply the brakes steadily and
the bottom of the oil pan, this
the clutch, be sure that the clutch is
evenly to avoid skidding and wheel
will cause failure of the cooling
fully engaged or disengaged. Never
lockup. Decrease your vehicle
fan, slippage of the drive belts,
operate the vehicle with the clutch
or failure of the engine due to
speed and allow for extra stopping
partially engaged.
water sucked into the air
distances.
intake.
3.Always make sure your tires are in
good condition. Badly worn or
10 - 11

-------------------------------------------------------------------------------------------------------------------------------------------------------------

VEHICLE OPERATION
CAUTION
WARNING
z
Do not ride the clutch pedal.
To avoid engine and clutch fail-
“Riding the clutch” by resting
ure which may result in serious
your foot on the clutch pedal
injury:
while driving can lead to pre-
z Do not operate your vehicle
mature clutch failure.
with a worn or damaged
z
Avoid shifting the transmis-
clutch.
sion into first gear while the
z Do not operate the vehicle with
vehicle is moving. Shifting into
your foot resting on the clutch
first gear while moving may
pedal.
damage the transmission.
z Do not use the clutch to hold
z
Stop the vehicle completely
your vehicle on a grade.
before shifting from forward to
reverse or from reverse to for-
To reduce the possibility of loss
ward.
of vehicle control:
z
When shifting down or up, shift
z Do not allow the vehicle to
the lever being careful not to
coast with the clutch pedal
pass the correct shift gate.
depressed or with the trans-
When shifting from 6th to 5th
mission in neutral.
gear, push the shift lever to the
z Do not operate the vehicle with
right. If this is not done during
the clutch partially engaged.
shifting 6th to 5th, a misdown-
z Always use
1st gear when
shift to
3rd gear may occur,
starting to move the vehicle.
resulting in engine overspeed-
ing and possible engine or
clutch damage.
10 - 12

-------------------------------------------------------------------------------------------------------------------------------------------------------------

VEHICLE OPERATION
Double-clutch operation
Use the following double-clutch technique when shifting:
1.Fully depress the clutch pedal to
3.Release the clutch pedal. When
6.Release the clutch pedal. When
disengage the clutch.
downshifting, raise the engine
downshifting, wait until engine
2.With the clutch pedal fully
speed using the accelerator pedal.
speed corresponds to the road
depressed, shift the gear shift lever
4.Fully depress the clutch pedal
speed of the next lower gear
to the neutral position.
again.
before shifting. Do not overspeed
5.While holding the pedal down, shift
the engine.
to the next gear.
10 - 13

-------------------------------------------------------------------------------------------------------------------------------------------------------------

VEHICLE OPERATION
OPERATING WITH
ALLISON 1000, 2200 and 2500
AUTOMATIC TRANSMISSION
automatic transmission (1000:
Your UD trucks vehicle may be
Optional for UD1800 and UD2000)
equipped with an optional automatic
(2200: Optional for UD2300 and
transmission. The automatic trans-
UD2600)
mission has the operation flexibility
(2500: Optional for UD3300)
of manual selecting and holding in
The Allison
1000, 2200 and 2500
lower driving ranges.
automatic transmissions have 5 for-
This permits the driving selection of
ward and 1 reverse gear ranges.
the most suitable forward gear range
to match varying road and load con-
1000 and 2200 series
ditions.
2500 series
(P): Park Position —
z This position is used when starting
the engine, for warming up the
engine, and when stopped or
parked. The engine can only be
10 - 14

-------------------------------------------------------------------------------------------------------------------------------------------------------------

VEHICLE OPERATION
started when the shift lever is in
lever will move). At this time the
NOTE:
the P (Park) or N (Neutral) posi-
SHIFT LIMIT warning light comes
z When shifting from Neutral to
tion.
on. If this occurs, stop the vehicle,
any other range, approximately
z When shifting from Park to any
and shift first to P
(Park) or N
1 second is required for the
other range, depress the brake
(Neutral). Then depress the brake
transmission clutch to connect.
pedal while shifting.
pedal and shift to the desired driv-
If
the accelerator pedal is
z Shifting is not done if the engine
ing range.
depressed during this time,
excessive stress is placed on
speed is high (1,000 rpm or more).
(N): Neutral Position —
the transmission. Wait until the
z
This position is used when starting
clutch has connected and then
Use P (Park) for the following.
the engine, for warming up the
gradually depress the accelera-
z to turn on or turn off the engine
engine, and when stopped. The
tor pedal.
z to check vehicle accessories
engine can only be started when
z to operate the engine in idle for
the shift lever is in the P (Park) or
(D): Driving Position —
longer than five minutes
N (Neutral) position.
z
This is the position used during
z for stationary operation of the
z
When shifting from Neutral to a
normal driving.
power takeoff
(if your vehicle is
driving range, depress the brake
Gears will change from 1 - 5 when
equipped with a PTO)
pedal while shifting. At this time
the overdrive (O/D) switch is on,
This position places the transmission
the SHIFT LIMIT warning light illu-
and from 1st to 4th when it is off.
in N (Neutral) and engages the park
minates. If this occurs, return the
pawl.
shift lever to the P
(Park) or N
(R): Reverse Position —
(Neutral) position, then depress
z This position is used when moving
the brake pedal and shift to the
the vehicle backwards. You must
desired driving range.
first stop the vehicle before shifting
z
Shifting will not be done if the
from a forward gear to Reverse, or
engine speed is high (1,000 rpm or
from Reverse to a forward gear.
more).
z This range cannot be shifted to
while driving
(although the shift
10 - 15


Content      ..     6      7      8      9     ..