FIRST AID. Field Manual (2002) - page 4
come through the skin or a missile such as a bullet or shell fragment may go
through the flesh and break the bone.
NOTE
An open fracture is contaminated and subject to infection.
4-3.
Signs and Symptoms of Fractures
Indications of a fracture are deformity, tenderness, swelling, pain, inability
to move the injured part, protruding bone, bleeding, or discolored skin at the
injury site. A sharp pain when the service member attempts to move the part
is also a sign of a fracture.
WARNING
DO NOT encourage the casualty to move the injured
part in order to identify a fracture since such movement
could cause further damage to surrounding tissues and
promote shock. If you are not sure whether a bone is
fractured, care for the injury as a fracture. At the site of
the fracture, the bone ends are sharp and could cause
vessel (artery and/or vein) damage.
4-4.
Purposes of Immobilizing Fractures
A fracture is immobilized to prevent the sharp edges of the bone from
moving and cutting tissue, muscle, blood vessels, and nerves. This reduces
pain and helps prevent or control shock. In a closed fracture, immobilization
keeps bone fragments from causing an open wound, which can become
contaminated and subject to infection.
4-5.
Splints, Padding, Bandages, Slings, and Swathes
a.
Splints. Splints may be improvised from such items as boards,
poles, sticks, tree limbs, or cardboard. If nothing is available for a splint, the
chest wall can be used to immobilize a fractured arm and the uninjured leg
can be used to immobilize (to some extent) the fractured leg.
b.
Padding. Padding may be improvised from such items as a
jacket, blanket, poncho, shelter half, or leafy vegetation.
4-2
c.
Bandages. Bandages may be improvised from belts, rifle
slings, kerchiefs, or strips torn from clothing or blankets. Narrow materials
such as wire or cord should not be used to secure a splint in place. The
application of wire and/or narrow material to an extremity could cause tissue
damage and a tourniquet effect.
d.
Slings. A sling is a bandage suspended from the neck to
support an upper extremity. If a bandage is not available, a sling can be
improvised by using the tail of a coat or shirt or pieces of cloth torn from
such items as clothing and blankets. The triangular bandage is ideal for this
purpose. Remember that the casualty’s hand should be higher than his
elbow, and the fingers should be showing at all times. The sling should be
applied so that the supporting pressure is on the uninjured side.
e.
Swathes. Swathes are any bands (pieces of cloth or load
bearing equipment [LBE]) that are used to further immobilize a splinted
fracture. Triangular and cravat bandages are often used and are called
swathe bandages. The purpose of the swathe is to immobilize; therefore, the
swathe bandage is placed above and/or below the fracture—not over it.
4-6.
Procedures for Splinting Suspected Fractures
Before beginning first aid procedures for a fracture, gather whatever splinting
materials are available. Ensure that splints are long enough to immobilize the
joint above and below the suspected fracture. If possible, use at least four
ties (two above and two below the fracture) to secure the splints. The ties
should be square knots and should be tied away from the body on the splint.
Distal pulses of the affected extremity should be checked before and after the
application of the splint.
a.
Evaluate the Casualty. Be prepared to perform any necessary
lifesaving measures. Monitor the casualty for development of conditions that
may require you to perform necessary lifesaving measures.
WARNING
Unless there is immediate life-threatening danger, such
as a fire or an explosion, DO NOT move the casualty
with a suspected back or neck injury. Improper
movement may cause permanent paralysis or death.
4-3
WARNING
In a chemical environment, DO NOT remove any
protective clothing. Apply the dressings and splints
over the garments.
b.
Locate the Site of the Suspected Fracture.
(1)
Ask the casualty for the location of the injury.
•
Does he have any pain?
•
Where is it tender?
•
Can he move the extremity?
NOTE
With the presence of an obvious deformity, do not make the
casualty move extremity.
(2)
Look for an unnatural position of the extremity.
(3)
Look for a bone sticking out (protruding).
c.
Prepare the Casualty for Splinting the Suspected Fracture.
(1)
Reassure the casualty. Tell him that you will be
providing first aid for him and that medical help is on the way.
(2)
Loosen any tight or binding clothing.
(3)
Remove all jewelry from the injured part and place it in
the casualty’s pocket. Tell the casualty you are doing this because if the
jewelry is not removed and swelling occurs later, he may not be able to get it
off and further bodily injury could result.
(4)
Boots should not be removed from the casualty unless they
are needed to stabilize a neck injury or there is actual bleeding from the foot.
d.
Gather Splinting Materials. If standard splinting materials
(splints, padding, and cravats) are not available, gather improvised materials.
If splinting material is not available and the suspected fracture CANNOT be
4-4
splinted, then swathes, or a combination of swathes and slings can be used to
immobilize the extremity.
e.
Pad the Splints. Pad the splints where they touch any bony
part of the body, such as the elbow, wrist, knee, ankle, crotch, or armpit
areas. Padding prevents excessive pressure on the area, which could lead to
circulation problems.
f.
Check the Circulation Below the Site of the Injury.
(1)
Note any pale, white, or bluish-gray color of the skin,
which may indicate impaired circulation. Circulation can also be checked by
depressing the toe or fingernail beds and observing how quickly the color
returns. A slower return of color to the injured side when compared with the
uninjured side indicates a problem with circulation. The fingernail bed is the
method to use to check the circulation in a dark-skinned casualty.
(2)
Check the temperature of the injured extremity. Use
your hand to compare the temperature of the injured side with the uninjured
side. The body area below the injury may be colder to the touch indicating
poor circulation.
(3)
Question the casualty about the presence of numbness,
tightness, cold, or tingling sensations.
WARNING
Casualties with fractures of the extremities may show
impaired circulation, such as numbness, tingling, cold
or pale to bluish skin tone. These casualties should be
evacuated by medical personnel and treated as soon as
possible. Prompt medical treatment may prevent
possible loss of the limb.
WARNING
If it is an open fracture and the bone is protruding from
the skin, DO NOT ATTEMPT TO PUSH THE BONE BACK
UNDER THE SKIN. Apply a field dressing over the
wound to protect the area.
4-5
g.
Apply the Splint in Place.
(1)
Splint the fracture in the position found. DO NOT
attempt to reposition or straighten the injury. If it is an open fracture, stop
the bleeding and protect the wound. Cover all wounds with field dressings
before applying a splint. Remember to use the casualty’s field dressing, not
your own.
(2)
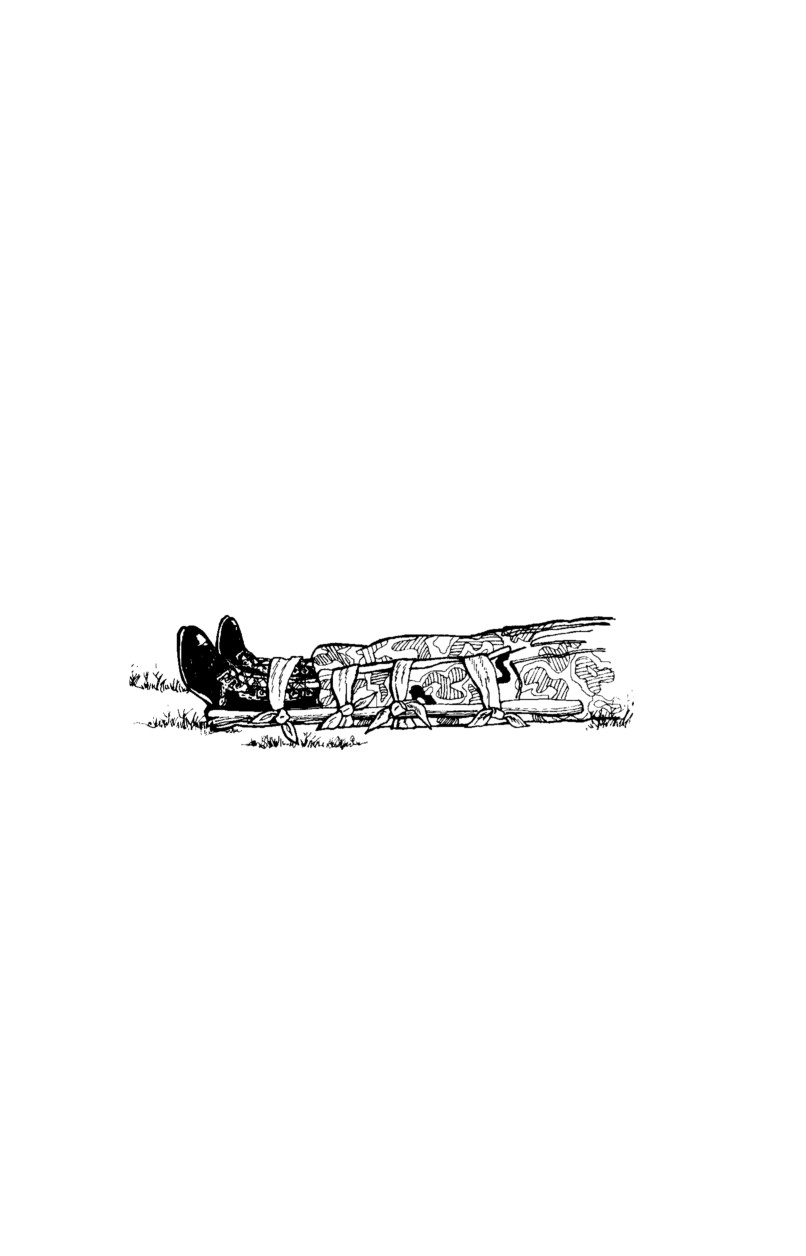
Place one splint on each side of the fracture. Make sure
that the splints reach, if possible, beyond the joints above and below the
fracture.
(3)
Tie the splints. Secure each splint in place above and
below the fracture site with improvised (or actual) cravats. Improvised
cravats, such as strips of cloth, belts, or whatever else you have, may be
used. With minimal motion to the injured areas, place and tie the splints with
the bandages. Push cravats through and under the natural body curvatures,
and then gently position improvised cravats and tie in place. Use square
knots. Tie all knots on the splint away from the casualty (Figure 4-2). DO
NOT tie cravats directly over the suspected fracture site.
Figure 4-2. Square knots tied away from casualty.
h.
Check the Splint for Tightness.
(1)
CHECK to be sure that bandages are tight enough to
securely hold splinting materials in place, but not so tight that circulation is
impaired.
(2)
RECHECK the circulation after application of the splint.
Check the skin color and temperature. This is to ensure that the bandages
holding the splint in place have not been tied too tightly. A fingertip check
can be made by inserting the tip of the finger between the bandaged knot and
the skin.
(3)
MAKE any necessary adjustment without allowing the
splint to become ineffective.
4-6
i.
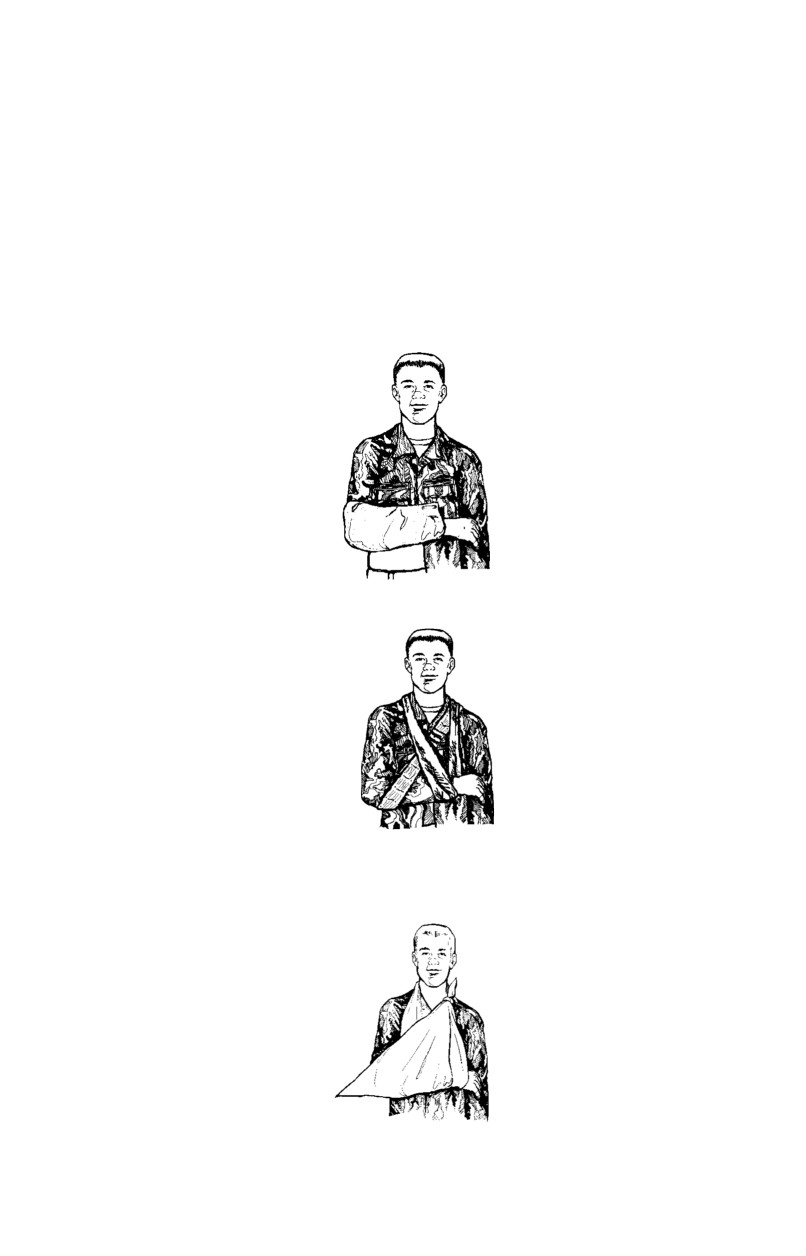
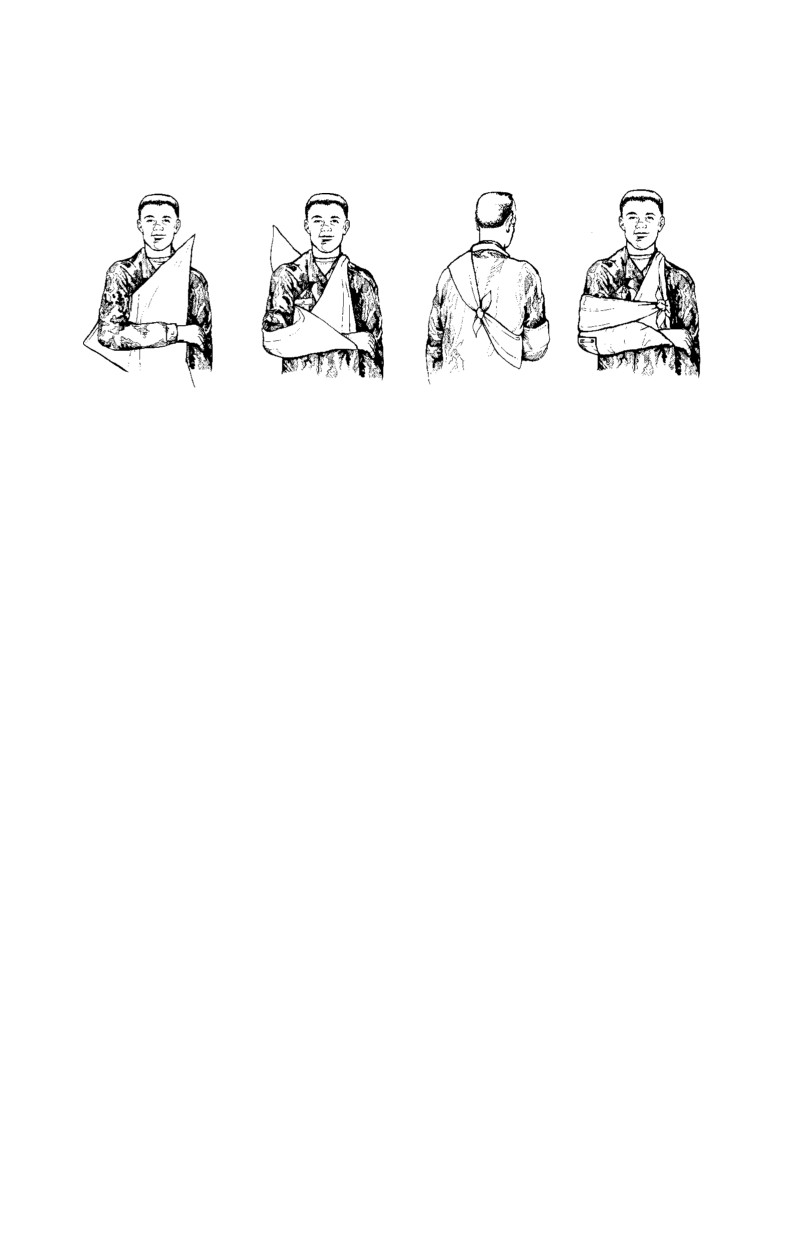
Apply a Sling. An improvised sling may be made from any
available nonstretching piece of cloth, such as a battle dress uniform (BDU)
shirt or trousers, poncho, or shelter half. Slings may also be improvised
using the tail of a coat, belt, or a piece of cloth. Figure 4-3 depicts a shirttail
used for support. A trousers belt or LBE may also be used for support
(Figure 4-4). A sling should place the supporting pressure on the casualty’s
uninjured side. The supported arm should have the hand positioned slightly
higher than the elbow showing the fingers.
Figure 4-3. Shirttail used for support.
Figure 4-4. Belt used for support.
(1)
Insert the splinted arm in the center of the sling (Figure 4-5).
Figure 4-5. Arm inserted in center of improvised sling.
4-7
(2)
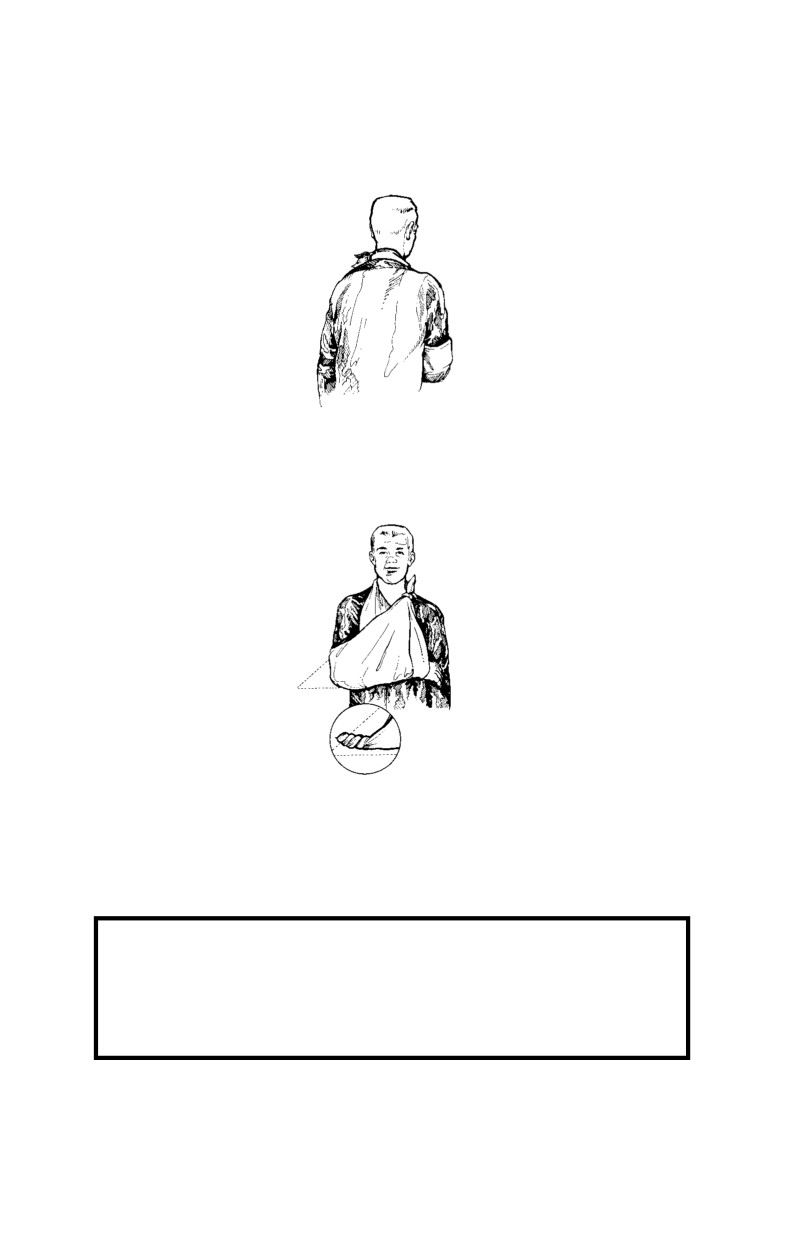
Bring the ends of the sling up and tie them at the side (or
hollow) of the neck on the uninjured side (Figure 4-6).
Figure 4-6. Ends of improvised sling tied to side of neck.
(3)
Twist and tuck the corner of the sling at the elbow
(Figure 4-7).
Figure 4-7. Corner of sling twisted and tucked at elbow.
j.
Apply a Swathe. You may use any large piece of cloth, service
member’s belt, or pistol belt, to improvise a swathe.
WARNING
The swathe should not be placed directly on top of the
injury, but positioned either above or below the fracture
site.
(1)
Apply swathes to the injured arm by wrapping the swathe
over the injured arm, around the casualty’s back, and under the arm on the
uninjured side. Tie the ends on the uninjured side (Figure 4-8).
4-8
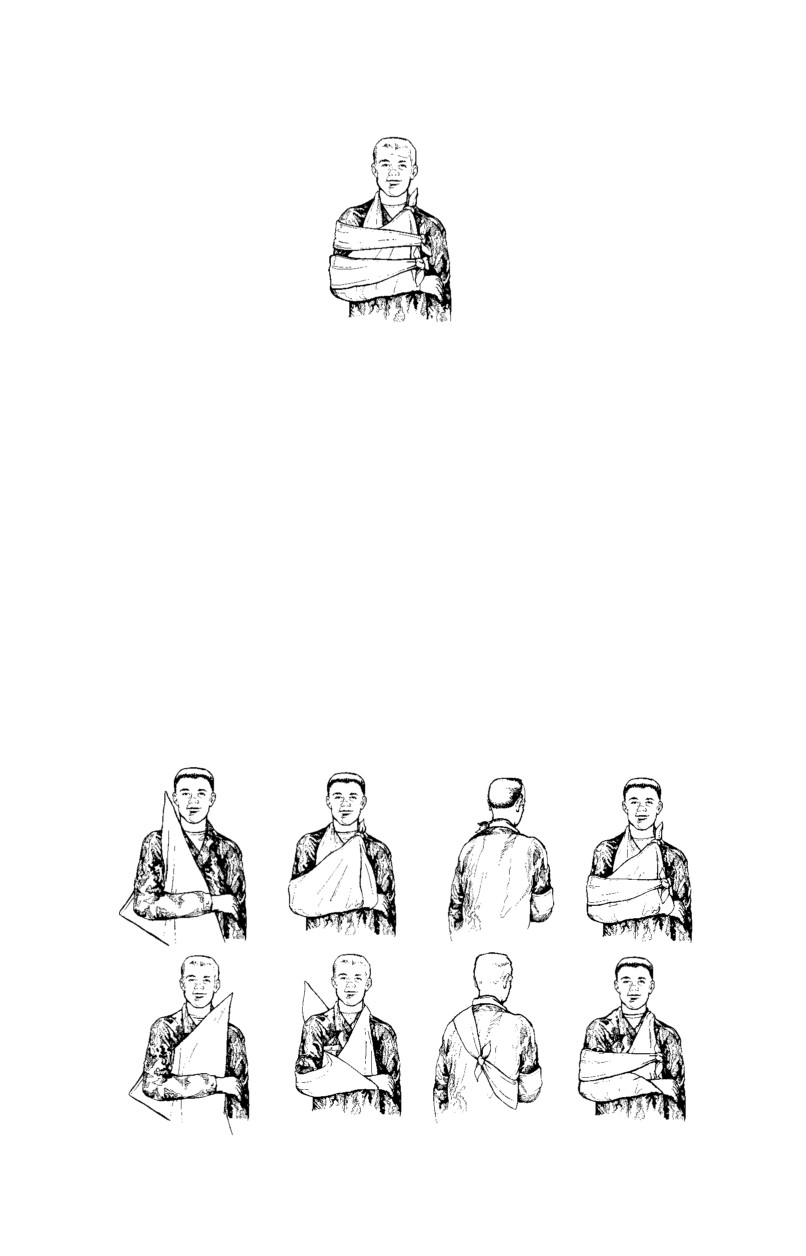
Figure 4-8. Arm immobilized with strip of clothing.
(2)
A swathe is applied to an injured leg by wrapping the
swathe around both legs and securing it on the uninjured side.
k.
Seek Medical Assistance. Notify medical personnel, watch
closely for development of life-threatening conditions and/or impaired
circulation to the injured extremity.
(Refer to Chapter 1 for additional
information on life-threatening conditions.)
4-7.
Upper Extremity Fractures
Figures 4-9 through 4-17 show how to apply slings, splints, and cravats
(swathes) to immobilize and support fractures of the upper extremities.
Although the padding is not visible in some of the illustrations, it is always
preferable to apply padding along the injured part for the length of the splint
and especially where it touches any bony parts of the body.
Figure 4-9. Application of triangular bandage to form sling (two methods).
4-9
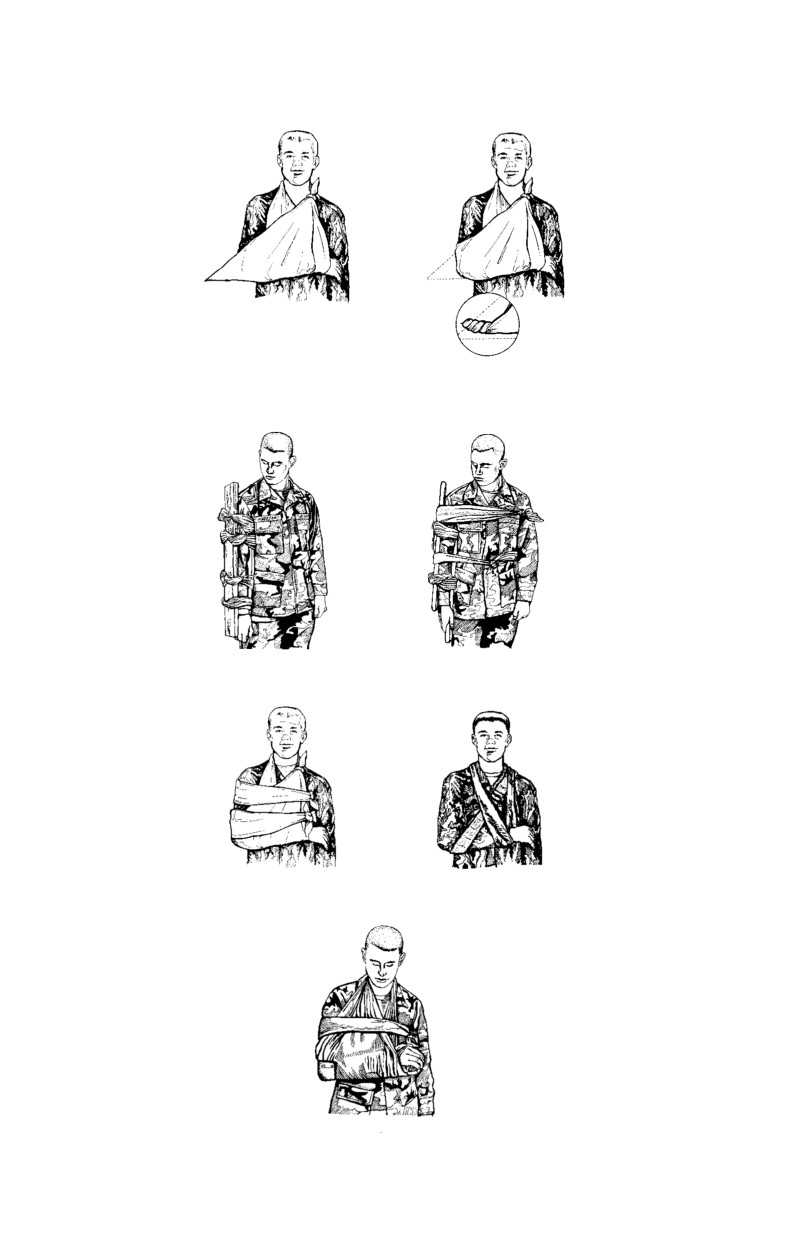
Figure 4-10. Completing sling sequence by twisting and tucking the corner
of the sling at the elbow.
Figure 4-11. Board splints applied to fractured elbow when elbow is not
bent (two methods).
Figure 4-12. Chest wall used as splint for upper arm fracture when no
splint is available.
Figure 4-13. Chest wall, sling, and cravat used to immobilize fractured
elbow when elbow is bent.
4-10
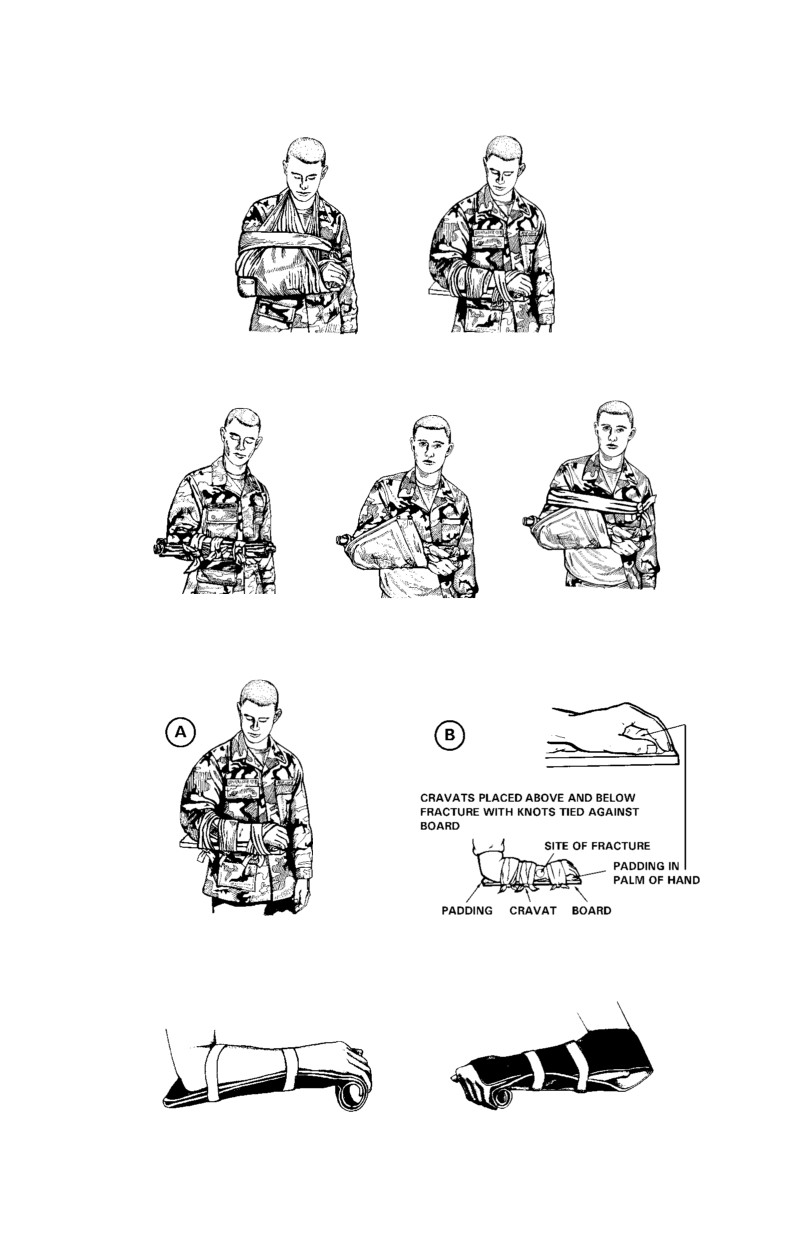
Figure 4-14. Board splint applied to fractured forearm.
Figure 4-15. Fractured forearm or wrist splinted with sticks and supported
with tail of shirt and strips of material.
Figure 4-16. Board splint applied to fractured wrist and hand
(Illustrated A—B).
Figure 4-17. SAM® splint applied to fractured wrist or forearm.
4-11
4-8.
Lower Extremity Fractures
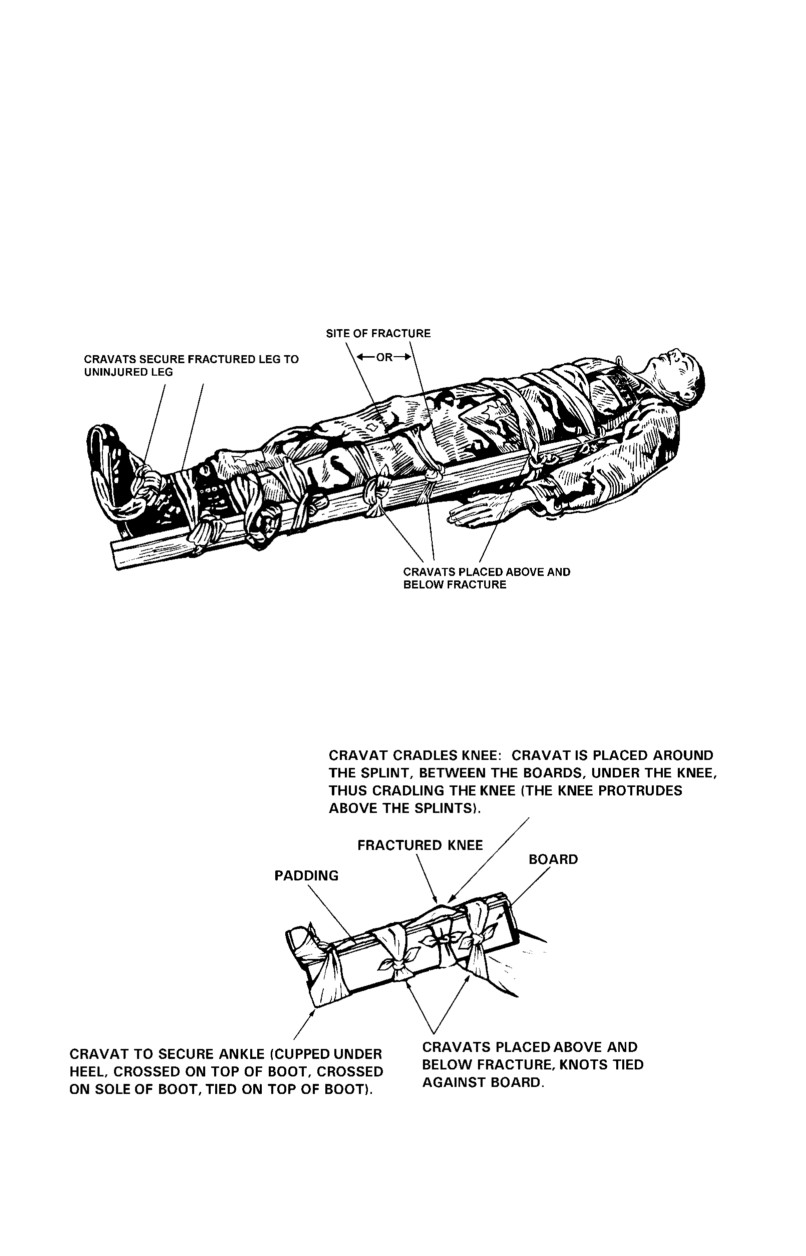
Figures 4-18 through 4-24 show how to apply splints to immobilize fractures
of the lower extremities. Although padding is not visible in some of the
illustrations, it is always preferable to apply padding along the injured part
for the length of the splint and especially where it touches any bony parts of
the body.
Figure 4-18. Board splints applied to fractured hip or thigh.
Figure 4-19. Board splint applied to fractured or dislocated knee.
4-12
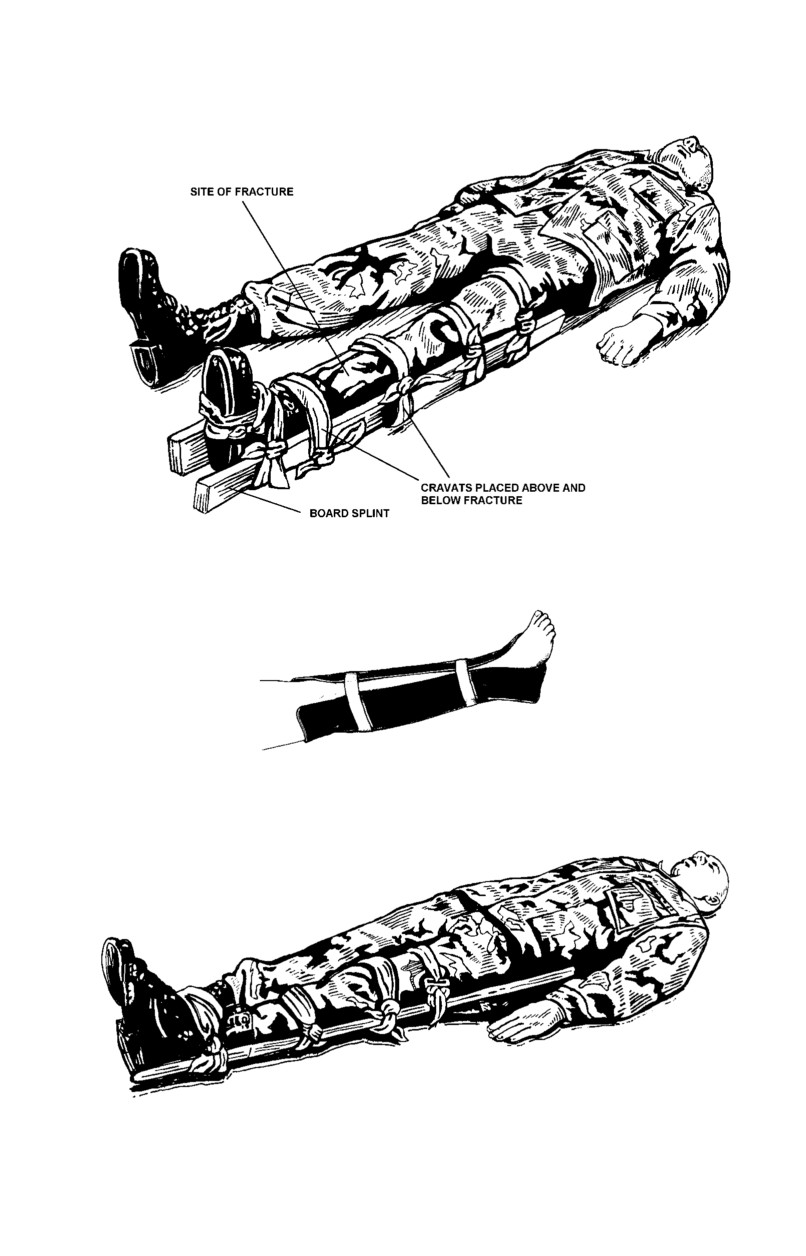
Figure 4-20. Board splints applied to fractured lower leg or ankle.
Figure 4-21. SAM® splint applied to fractured lower leg or ankle.
Figure 4-22. Improvised splints applied to fractured lower leg or ankle.
4-13
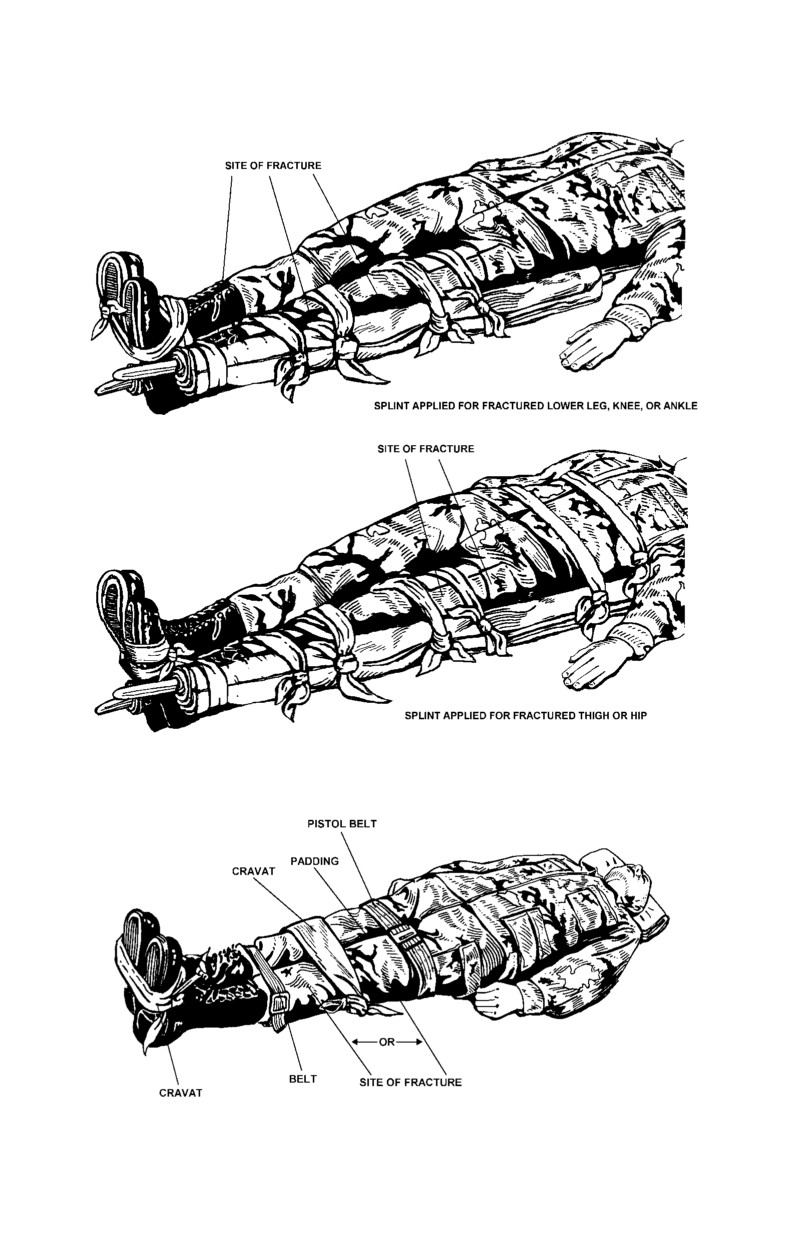
Figure 4-23. Poles rolled in a blanket and used as splints applied to
fractured lower extremity.
Figure 4-24. Uninjured leg used as splint for fractured leg
(anatomical splint).
4-14
4-9.
Jaw, Collarbone, and Shoulder Fractures
a.
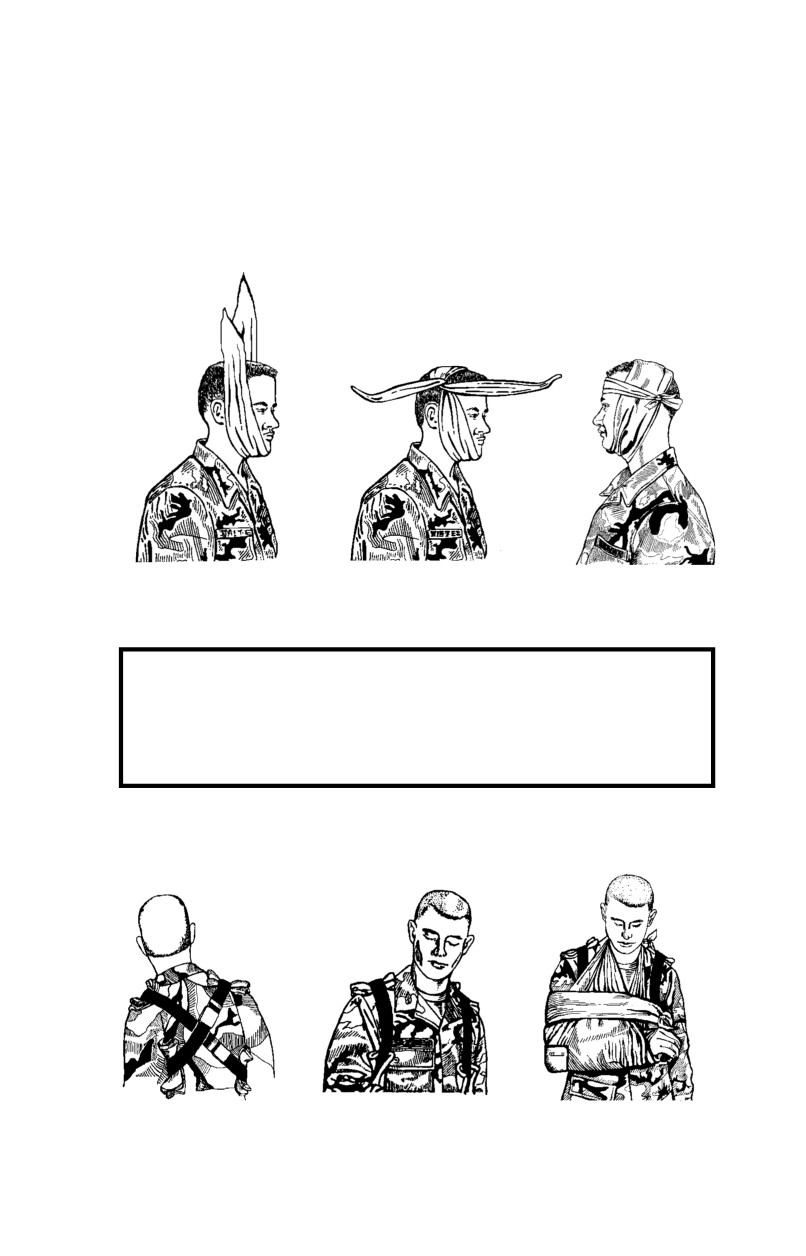
Apply a cravat to immobilize a fractured jaw as illustrated in
Figure 4-25. Direct all bandaging support to the top of the casualty’s head,
not to the back of his neck. If incorrectly placed, the bandage will pull the
casualty’s jaw back and interfere with his breathing.
Figure 4-25. Fractured jaw immobilized.
WARNING
Casualties with lower jaw (mandible) fractures cannot
be laid flat on their backs because facial muscles will
relax and may cause an airway obstruction.
b.
Apply two belts, a sling, and a cravat to immobilize a fractured
collarbone, as illustrated in Figure 4-26.
Figure 4-26. Application of belts, sling, and cravat to immobilize a
fractured collarbone.
4-15
c.
Apply a sling and a cravat to immobilize a fractured or
dislocated shoulder, using the technique illustrated in Figure 4-27.
Figure 4-27. Application of sling and cravat to immobilize a fractured or
dislocated shoulder.
4-10. Spinal Column Fractures
It is often impossible to be sure a casualty has a fractured spinal column. Be
suspicious of any back injury, especially if the casualty has fallen or if his
back has been sharply struck or bent. If a casualty has received such an
injury and does not have feeling in his legs or cannot move them, you can be
reasonably sure that he has a severe back injury, which should be managed as
a fracture. Remember, that the possibility of a neck fracture or injury to the
back should always be suspected, and it is often impossible to be sure if a
casualty has a fractured spinal column. If the spine is fractured, bending it
can cause the sharp bone fragments to bruise or cut the spinal cord and result
in permanent paralysis or death (Figure 4-28A). The spinal column must
maintain normal spinal position at the lower back (lumbar region) to help
remove pressure from the spinal cord.
a.
If the casualty is not to be transported until medical personnel
arrive—
•
Caution him not to move. Ask him if he is in pain or if
he is unable to move any part of his body.
•
Leave him in the position in which he is found. DO
NOT move any part of his body, unless he is in imminent danger.
•
If the casualty is lying face up, slip a blanket or other
supporting material under the arch of his lower back to help support the spine
in a normal position (Figure 4-28B). Take care not to place so much bulky
padding as to cause potential damage by causing undo pressure on the spine.
If he is lying face down, DO NOT put anything under any part of his body.
4-16
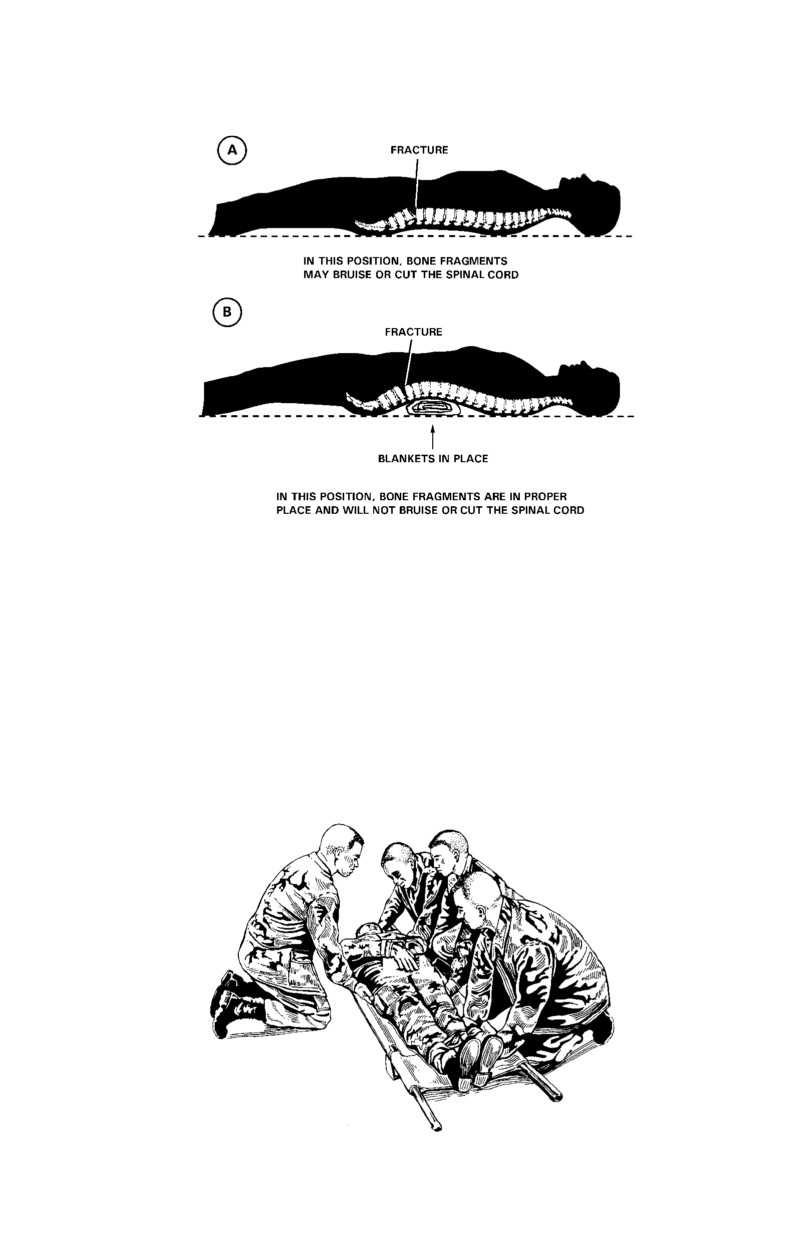
Figure 4-28. Spinal column must maintain a normal spine position.
b.
If the casualty must be transported to a safe location before
medical personnel arrive and if the casualty is in a—
•
Face-up position, transport him by litter or use a firm
substitute, such as a wide board or a door longer than his height. Loosely tie
the casualty’s wrists together over his waistline, using a cravat or a strip of
cloth. Tie his feet together to prevent the accidental dropping or shifting of
his legs. Lay a folded blanket across the litter where the arch of his back is to
be placed. Using a four-man team (Figure 4-29), place the casualty on the
litter without bending his spinal column or his neck.
Figure 4-29. Placing face-up casualty with fractured back onto litter.
4-17
•
The number two man positions himself at the
casualty’s head. His responsibility is to provide manual in-line (neutral)
stabilization of the head and neck. The number three, and four men position
themselves on one side of the casualty; all kneel on one knee along the side of
the casualty. The number one man positions himself to the opposite side of
the casualty (or can be on the same side of number three and four). The
numbers two, three, and four men gently place their hands under the casualty.
The number one man on the opposite side places his hands under the injured
part to assist.
•
When all four men are in position to lift, the
number two man commands, “PREPARE TO LIFT” and then, “LIFT.”
All men, in unison, gently lift the casualty about 8 inches. Once the casualty
is lifted, the number one man recovers and slides the litter under the casualty,
ensuring that the blanket is in proper position. The number one man then
returns to his original lift position (Figure 4-29).
•
When the number two man commands, “LOWER
CASUALTY,” all men, in unison, gently lower the casualty onto the litter.
•
Facedown position, he must be transported in this same
position. The four-man team lifts him onto a regular or improvised litter,
keeping the spinal column in a normal spinal position. If a regular litter is
used, first place a folded blanket on the litter at the point where the chest will
be placed.
4-11. Neck Fractures
A fractured neck is extremely dangerous. Bone fragments may bruise or cut
the spinal cord just as they might in a fractured back.
a.
If the casualty is not to be transported until medical personnel
arrive—
•
Caution him not to move. Moving may cause permanent
injury or death.
•
Leave the casualty in the position in which he is found.
If his neck and head (cervical spine) are in an abnormal position, immediately
immobilize the neck and head.
•
Keep his head still, if the casualty is lying face up,
raise his shoulders slightly, and slip a roll of cloth that has the bulk of a bath
towel under his neck (Figure 4-31). The roll should be thick enough to arch
4-18
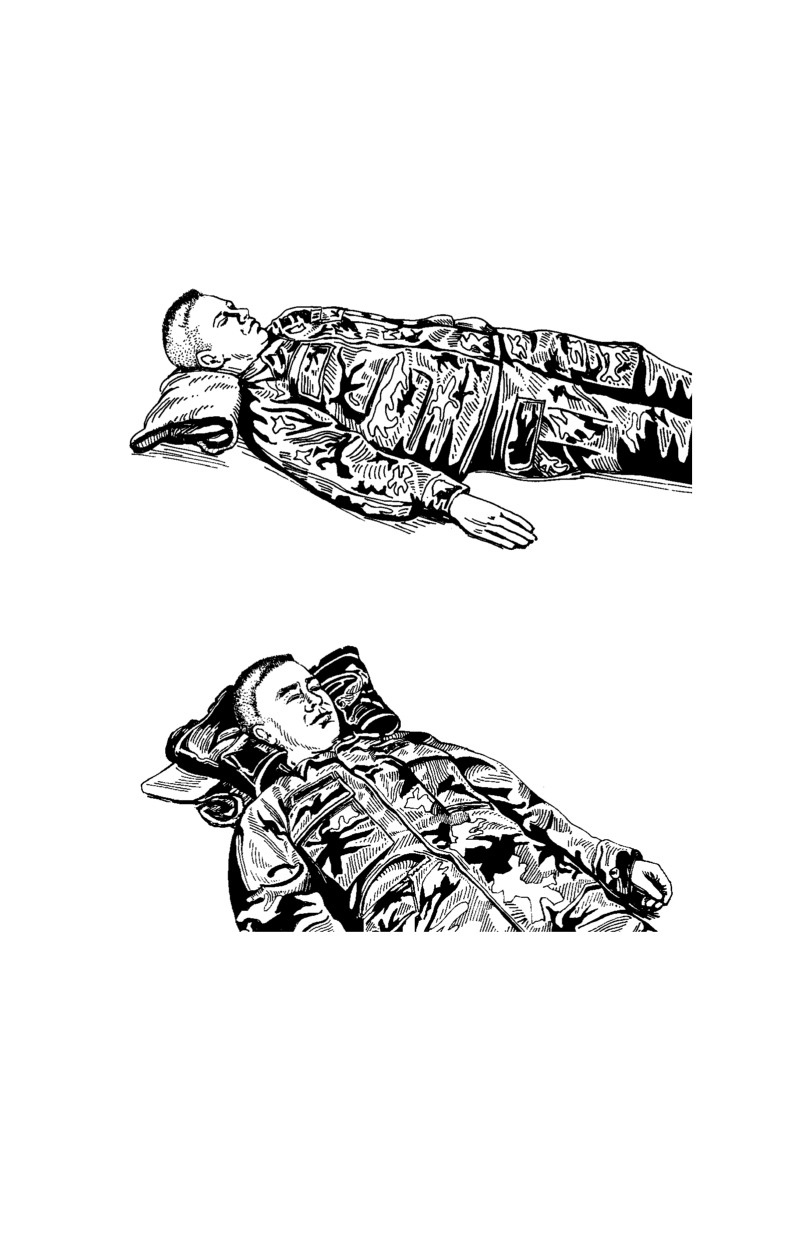
his neck only slightly, leaving the back of his head on the ground. DO NOT
bend his neck or head forward. DO NOT raise or twist his head. Immobilize
the casualty’s head (Figure 4-32). Do this by padding heavy objects (such as
rocks or his boots filled with dirt, sand, gravel, or rock) and placing them on
each side of his head. If it is necessary to use boots, after filling them, tie the
top tightly or stuff with pieces of cloth to secure the contents.)
Figure 4-30. Casualty with roll of cloth (bulk) under neck.
Figure 4-31. Immobilization of fractured neck.
•
DO NOT move him if the casualty is lying face
down. Immobilize the head and neck by padding heavy objects and placing
them on each side of his head. DO NOT put a roll of cloth under the neck.
DO NOT bend the neck or head, nor roll the casualty onto his back.
b.
If the casualty must be prepared for transportation before
medical personnel arrive—
4-19
•
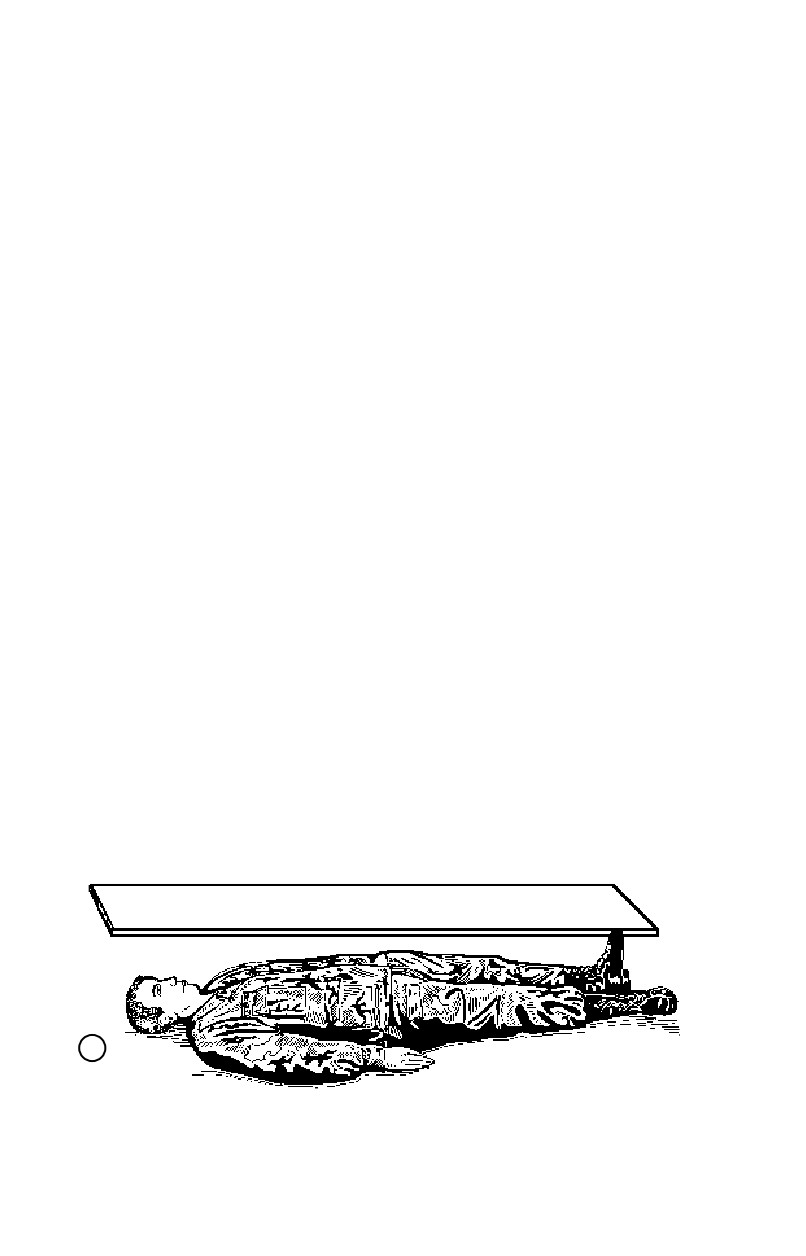
If the casualty has a fractured neck, at least two persons
are needed because the casualty’s head and trunk must be moved in unison.
The two persons must work in close coordination (Figure 4-32) to avoid
bending of the neck.
•
A wide board is placed lengthwise beside the casualty.
It should extend at least 4 inches beyond the casualty’s head and feet (Figure
4-32A).
•
If the casualty is lying face up, the number one man
steadies the casualty’s head and neck between his hands. At the same time,
the number two man positions one foot and one knee against the board to
prevent it from slipping. He then grasps the casualty underneath his shoulder
and hip and gently slides him onto the board (Figure 4-32B).
•
If the casualty is lying face down, the number one man
steadies the casualty’s head and neck between his hands, while the number
two man gently rolls the casualty over onto the board (Figure 4-32C).
•
The number one man continues to steady the casualty’s
head and neck. The number two man simultaneously raises the casualty’s
shoulders slightly, places padding under his neck, and immobilizes the
casualty’s head (Figures 4-32D—E).
•
Any improvised supports are secured in position with a
cravat or strip of cloth extended across the casualty’s forehead and under the
board (Figure 4-32D).
•
The board is lifted onto a litter or blanket in order to
transport the casualty (Figure 4-32E).
A
Figure 4-32. Preparing casualty with fractured neck for transportation
(Illustrated A—E).
4-20
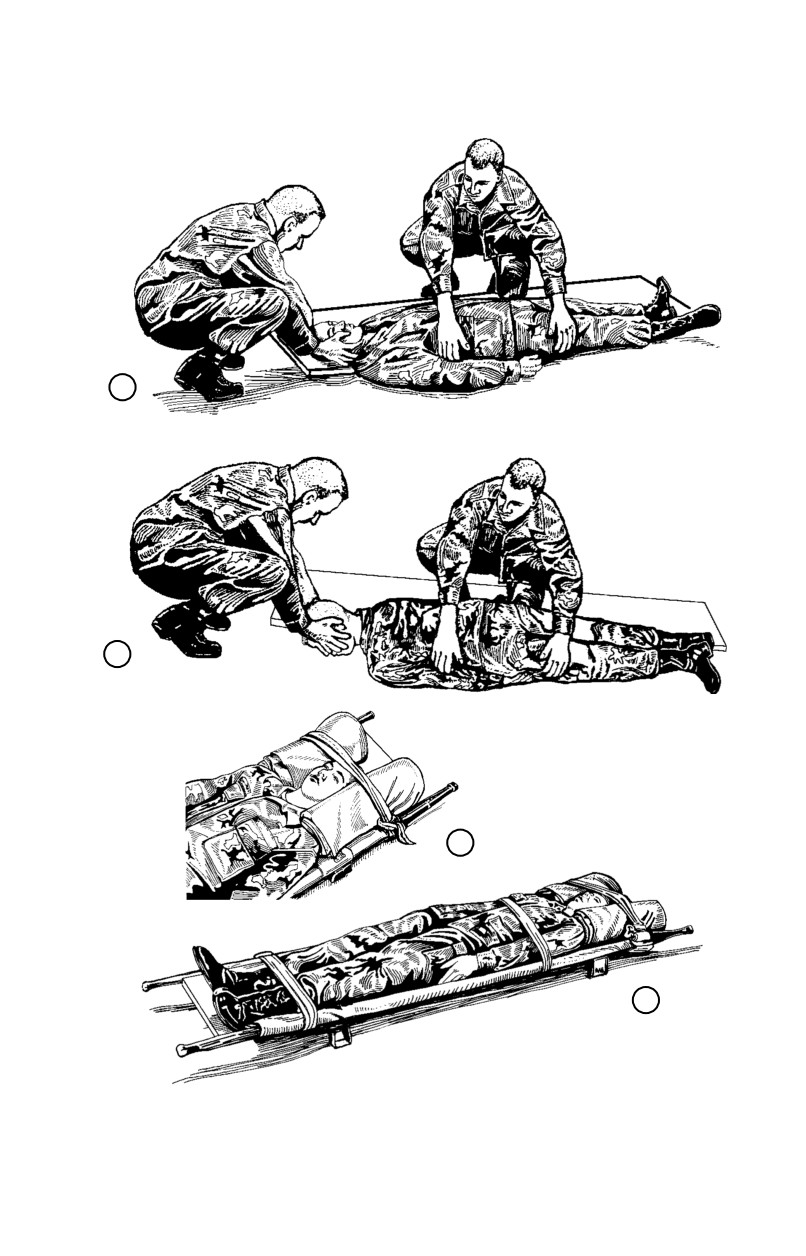
B
C
D
E
Figure 4-32. Preparing casualty with fractured neck for
transportation (Illustrated A—E) (Continued).
4-21
CHAPTER 5
FIRST AID FOR CLIMATIC INJURIES
5-1.
General
a.
It is desirable, but not always possible, for an individual’s
body to become adjusted (acclimated) to an environment.
(1)
The service members physical condition determines the
amount of time their bodies need to adjust to the environment. Even those
individuals in good physical condition need time before working or training
in extremes of hot or cold weather. Climate-related injuries are usually
preventable; prevention is both an individual and leadership responsibility.
(2)
Several factors contribute to health and well-being in
any environment—
•
Diet.
•
Sleep and rest.
•
Exercise.
•
Suitable clothing.
(3)
Diet should be suited to an individual’s needs in a
particular climate. A special diet started for any purpose (such as weight
reduction) should be done with appropriate medical supervision.
WARNING
Service members should use extreme caution when
starting fad diets or taking over-the-counter herbal
supplements. Medical records revealed that deaths and
severe injuries occurred in individuals using dietary/
herbal supplements without medical monitoring.
NOTE
Weight loss and the use of weight loss supplements should be
supervised by a trained health care provider.
(4)
Specialized clothing and equipment (such as cold weather
gear) for a specific environment should be obtained and used properly.
5-1
b.
For information on the prevention of heat and cold injuries,
refer to FM 21-10/Marine Corps Reference Publication (MCRP) 4-11.1D.
5-2.
Heat Injuries
a.
Heat injuries are environmental injuries. They may result
when a service member—
•
Is exposed to extreme heat, such as from the sun or from
high temperatures.
•
Does not wear proper clothing.
•
Is in MOPP gear.
•
Is inside closed spaces, such as inside an armored
vehicle.
•
Wears body armor.
b.
Heat injury can be divided into three categories: heat cramps,
heat exhaustion, and heatstroke.
c.
Each service member must be able to recognize and give first
aid for heat injuries.
WARNING
The heat casualty should be continually monitored for
development of conditions which may require the
performance of necessary basic lifesaving measures.
CAUTION
Do not use salt solutions in first aid procedures for heat injuries.
(1)
Check the casualty for signs and symptoms of cramping.
•
Signs and symptoms. Cramping is caused by an
imbalance of chemicals (called electrolytes) in the body as a result of excessive
sweating. This condition causes the casualty to exhibit:
5-2
•
Cramping in the extremities (arms and legs).
•
Abdominal (stomach) cramps.
•
Excessive sweating.
NOTE
Thirst may or may not occur. Cramping can occur without the
service member being thirsty.
•
First aid measures.
•
Move the casualty to a cool, shady area or
improvise shade if none is available.
•
Loosen his clothing (if not in a chemical
environment).
NOTE
In a chemical environment, transport the heat casualty to a
noncontaminated area as soon as the mission permits.
•
Have him slowly drink at least one canteen
full of water.
(The body absorbs cool water faster than warm or cold water;
therefore, cool water is preferred if it is available.)
•
Seek medical assistance should cramps
continue.
(2)
Check the casualty for signs and symptoms of heat
exhaustion.
•
Signs and symptoms. Heat exhaustion is caused by
loss of body fluids (dehydration) through sweating without adequate fluid
replacement. It can occur in an otherwise fit individual who is involved in
physical exertion in any hot environment especially if the service member is
not acclimatized to that environment. These signs and symptoms are—
•
Excessive sweating with pale, moist, cool skin.
•
Headache.
•
Weakness.
5-3
•
Dizziness.
•
Loss of appetite.
•
Cramping.
•
Nausea (with or without vomiting).
•
Urge to defecate.
•
Chills (gooseflesh).
•
Rapid breathing.
•
Tingling of hands and/or feet.
•
Confusion.
•
First aid measures.
•
Move the casualty to a cool, shady area or
improvise shade if none is available.
•
Loosen or remove his clothing and boots
(unless in a chemical environment); pour water on him and fan him.
•
Have him slowly drink at least one canteen
of water.
•
Elevate his legs.
•
If possible, the casualty should not participate
in strenuous activity for the remainder of the day.
•
Monitor the casualty until the symptoms are
gone, or medical assistance arrives.
(3)
Check the casualty for signs and symptoms of heatstroke.
WARNING
Heatstroke is a medical emergency which may result in
death if care is delayed.
5-4
•
Signs and symptoms. A service member suffering
from heatstroke has been exposed to high temperatures (such as direct
sunlight) or been dressed in protective overgarments, which causes the body
temperature to rise. Heatstroke occurs more rapidly in service members who
are engaged in work or other physical activity in a high heat environment.
Heatstroke is caused by a failure of the body’s cooling mechanism which
includes a decrease in the body’s ability to produce sweat. The casualty’s
skin is red (flushed), hot, and dry. He may experience weakness, dizziness,
confusion, headaches, seizures, nausea, stomach pains or cramps, and his
respiration and pulse may be rapid and weak. Unconsciousness and collapse
may occur suddenly.
•
First aid measures. Cool casualty immediately by—
•
Moving him to a cool, shady area or
improvising shade if none is available.
•
Loosening or removing his clothing (except
in a chemical environment).
•
Spraying or pouring water on him; fanning
him to permit the coolant effect of evaporation.
•
Massaging his extremities and skin, which
increases the blood flow to those body areas, thus aiding the cooling process.
•
Elevating his legs.
•
Having him slowly drink at least one canteen
full of water if he is conscious.
NOTE
Start cooling casualty immediately. Continue cooling while
awaiting transportation and during transport to an MTF.
•
Medical assistance. Seek medical assistance
because the casualty should be transported to an MTF as soon as possible.
Do not interrupt the cooling process or lifesaving measures to seek help; if
someone else is present send them for help. The casualty should be
continually monitored for development of conditions that may require the
performance of necessary basic lifesaving measures.
d.
Table. See Table 5-1 for further information.
5-5

Table 5-1. Heat Injuries
INJURIES
SIGNS AND SYMPTOMS
FIRST AID1
HEAT CRAMPS
THE CASUALTY EXPERIENCES
1. MOVE THE CASUALTY
MUSCLE CRAMPS OF THE
TO A COOL SHADY AREA
ARMS, LEGS, AND/OR STOMACH.
OR IMPROVISE SHADE
THE CASUALTY MAY ALSO HAVE
AND LOOSEN CLOTHING.2
EXCESSIVE SWEATING.
2. HAVE HIM SLOWLY
DRINK AT LEAST ONE
CANTEEN FULL OF COOL
WATER SLOWLY.
3. MONITOR THE
CASUALTY AND GIVE HIM
MORE WATER AS
TOLERATED.
HEAT
THE CASUALTY EXPERIENCES
1. MOVE THE CASUALTY
EXHAUSTION
HEAVY SWEATING WITH PALE,
TO A COOL, SHADY AREA
MOIST, COOL SKIN; HEADACHE,
OR IMPROVISE SHADE
WEAKNESS, DIZZINESS, AND/OR
AND LOOSEN OR REMOVE
LOSS OF APPETITE, HEAT
HIS CLOTHING.2
CRAMPS, NAUSEA (WITH OR
WITHOUT VOMITING), URGE TO
2. POUR WATER ON HIM
DEFECATE, CHILLS (GOOSE-
AND FAN HIM TO PERMIT
FLESH), RAPID BREATHING,
THE COOLANT EFFECT OF
CONFUSION, AND TINGLING OF
EVAPORATION.
THE HANDS AND/OR FEET.
3. HAVE HIM SLOWLY
DRINK AT LEAST ONE
CANTEEN FULL OF COOL
WATER.
4. ELEVATE THE
CASUALTY'S LEGS.
5. SEEK MEDICAL
ASSISTANCE IF
SYMPTOMS CONTINUE;
MONITOR UNTIL
SYMPTOMS ARE GONE
OR MEDICAL ASSISTANCE
ARRIVES.
HEATSTROKE3
THE CASUALTY STOPS SWEATING
1. MOVE THE CASUALTY
(SUNSTROKE)
(RED [FLUSHED] HOT, DRY SKIN).
TO A COOL, SHADY AREA
HE FIRST MAY EXPERIENCE
OR IMPROVISE SHADE
HEADACHE, DIZZINESS, NAUSEA,
AND LOOSEN OR REMOVE
FAST PULSE AND RESPIRATION,
HIS CLOTHING, REMOVE
SEIZURES, AND MENTAL
THE OUTER GARMENTS
CONFUSION. HE MAY COLLAPSE
AND PROTECTIVE
5-6

Table 5-1. Heat Injuries (Continued)
INJURIES
SIGNS AND SYMPTOMS
FIRST AID1
AND SUDDENLY BECOME
CLOTHING IF THE
UNCONSCIOUS. THIS IS A
SITUATION PERMITS.2
MEDICAL EMERGENCY.
2. START COOLING THE
CASUALTY IMMEDIATELY.
SPRAY OR POUR WATER
ON HIM. FAN HIM.
MASSAGE HIS
EXTREMITIES AND SKIN.
3. ELEVATE HIS LEGS.
4. IF CONSCIOUS, HAVE
HIM SLOWLY DRINK AT
LEAST ONE CANTEEN
FULL OF COOL WATER.
5. SEEK MEDICAL AID.
CONTINUE COOLING
WHILE AWAITING
TRANSPORT AND
CONTINUE FIRST AID
WHILE EN ROUTE.
LEGEND:
1
THE FIRST AID PROCEDURE FOR HEAT RELATED INJURIES CAUSED BY
WEARING INDIVIDUAL PROTECTIVE EQUIPMENT (IPE) IS TO MOVE THE
CASUALTY TO A CLEAN AREA AND GIVE HIM WATER TO DRINK.
2
WHEN IN A CHEMICAL ENVIRONMENT, DO NOT LOOSEN OR REMOVE
THE CASUALTY’S CLOTHING.
3
CAN BE FATAL IF NOT PROVIDED FIRST AID AND MEDICAL TREATMENT
PROMPTLY.
5-3.
Cold Injuries
Cold injuries are most likely to occur when conditions are moderately cold,
but accompanied by wet or windy conditions. Cold injuries can usually be
prevented. Well-disciplined and well-trained service members can be
protected even in the most adverse circumstances. They and their leaders
must know the hazards of exposure to the cold. They must know the
importance of personal hygiene, exercise, care of the feet and hands, and the
use of protective clothing.
a.
Contributing Factors.
5-7
(1)
Temperature, humidity, precipitation, and wind greatly
increase likelihood of cold injuries, and the service members with wet clothing
are at great risk of cold injuries. Riverine operations (river, swamp, and
stream crossings) increase likelihood of cold injuries. Low temperatures
and low relative humidity (dry cold) promote frostbite. Higher temper-
atures, together with moisture, promote immersion syndrome. Windchill
accelerates the loss of body heat and may aggravate cold injuries.
(2)
Relatively stationary activities such as being in an
observation post or on guard duty increase the service member’s vulnerability
to cold injury. Also, a service member is more likely to receive a cold injury
if he is—
•
In contact with the ground (such as marching,
performing guard duty, or engaging in other outside activities).
•
Immobile for long periods (such as while riding in
an unheated or open vehicle).
•
Standing in water, such as in a foxhole.
•
Out in the cold for days without being warmed.
•
Deprived of an adequate diet and rest.
•
Not able to take care of his personal hygiene.
(3)
Physical fatigue contributes to apathy, which leads to
inactivity, personal neglect, carelessness, and reduced heat production. In
turn, these increase the risk of cold injury. Service members with prior cold
injuries have a higher-than-normal risk of subsequent cold injury; not
necessarily involving the body part previously injured.
(4)
Depressed or unresponsive service members are also
vulnerable because they are less active. These service members tend to be
careless about precautionary measures, especially warming activities, when
cold injury is a threat.
(5)
Excessive use of alcohol or drugs leading to faulty
judgment or unconsciousness in a cold environment increases the risk of
becoming a cold injury casualty.
b.
Signs and Symptoms. Once a service member becomes familiar
with the factors that contribute to cold injury, he must learn to recognize cold
injury signs and symptoms.
5-8
(1)
Many service members suffer cold injury without
realizing what is happening to them. They may be cold and generally
uncomfortable. These service members often do not notice the injured part
because it is already numb from the cold.
(2)
Superficial cold injury usually can be detected by
numbness or tingling sensations. These signs and symptoms often can be
relieved simply by loosening boots or other clothing and by exercising to
improve circulation. In more advanced cases involving deep cold injury, the
service member often is not aware that there is a problem until the affected
part feels like a stump or block of wood.
(3)
Outward signs of cold injury include discoloration of the
skin at the site of injury. In light-skinned persons, the skin first reddens and
then becomes pale or waxy white. In dark-skinned persons, grayness in the skin
is usually evident. An injured foot or hand feels cold to the touch. Swelling
may be an indication of deep injury. Also note that blisters may occur after
rewarming the affected parts. Service members should work in pairs (buddy
teams) to check each other for signs of discoloration and other symptoms.
c.
First Aid Measures. First aid for cold injuries depends on
whether they are superficial or deep. Rewarming the affected part using
body heat can adequately treat cases of superficial cold injury.
(For example,
this can be done by covering cheeks with hands, putting fingertips in armpits,
or placing the casualty’s feet under the clothing of a buddy [next to his
belly].) The injured part should NOT be massaged, exposed to a fire or
stove, rubbed with snow, slapped, chafed, or soaked in cold water. Walking
on injured feet should be avoided. Deep cold injury (frostbite) is very
serious and requires prompt first aid to avoid or to minimize the loss of parts
or all of the fingers, toes, hands, or feet. The sequence for treating cold
injuries depends on whether the condition is life-threatening. The first priority
in managing cold injuries is to remove the casualty from the cold environment
(such as building an improvised shelter). Other injuries the casualty may
have are provided first aid simultaneously while waiting for transportation or
evacuation. If the casualty is to be transported in a nonmedical vehicle, first
aid measures should be continued en route to the MTF.
d.
Conditions Caused by Cold. Conditions caused by cold include
chilblain, immersion syndrome (immersion foot and trench foot), frostbite,
snow blindness, dehydration, and hypothermia.
(1)
Chilblain.
•
Signs and symptoms. Chilblain is caused by repeated
prolonged exposure of bare skin at temperatures from 60° Fahrenheit (F) to
5-9
32°F, or 20°F for acclimated, dry, unwashed skin. The area may be acutely
swollen, red, tender, and hot with itchy skin. There may be no loss of skin tissue
in untreated cases but continued exposure may lead to infected, ulcerated, or
bleeding lesions.
•
First aid measures. Within minutes, the area
usually responds to locally applied body heat. Rewarm the affected part by
applying firm steady pressure with your hands, or placing the affected part
under your arms or against the stomach of a buddy. DO NOT rub or
massage affected areas.
NOTE
Medical personnel should evaluate the injury, because signs and
symptoms of tissue damage may be slow to appear.
(2)
Immersion syndrome (immersion foot and trench foot).
Immersion foot and trench foot are injuries that result from fairly long
exposure of the feet to wet conditions at temperatures from approximately
32°F to 50°F. Inactive feet in damp or wet socks and boots, or tightly laced
boots which impair circulation, are even more susceptible to injury. This
injury can be very serious; it can lead to loss of toes or parts of the feet. If
exposure of the feet has been prolonged and severe, the feet may swell so
much that pressure closes the blood vessels and cuts off circulation. Should
an immersion injury occur, dry the feet thoroughly and transport the casualty
to an MTF by the fastest means possible.
•
Signs and symptoms. At first, the parts of the
affected foot are cold and painless, the pulse is weak, and numbness may be
present. Second, the parts may feel hot, and burning and shooting pains may
begin. In later stages, the skin is pale with a bluish cast and the pulse
decreases. Other signs and symptoms that may follow are blistering, swelling,
redness, heat, hemorrhaging (bleeding), and gangrene.
•
First aid measures. First aid measures are required
for all stages of immersion syndrome injury. Rewarm the injured part
gradually by exposing it to warm air. Protect it from trauma and secondary
infections. Dry, loose clothing or several layers of warm coverings are
preferable to extreme heat. Under no circumstances should the injured part
be exposed to an open fire. Elevate the injured part to relieve the swelling.
Transport the casualty to an MTF as soon as possible. When the part is
rewarmed, the casualty often feels a burning sensation and pain. Symptoms
may persist for days or weeks even after rewarming.
5-10