FIRST AID. Field Manual (2002) - page 2
respiration unless it has occurred first. Be calm! Think and act! When a
casualty’s heart has stopped, there is no pulse at all; the person is unconscious
and limp, and the pupils of his eyes are open wide. When evaluating a
casualty or when performing the preliminary steps of rescue breathing, feel
for a pulse. If you DO NOT detect a pulse, seek medical help.
2-10. Airway Obstructions
In order for oxygen from the air to flow to and from the lungs, the upper
airway must be unobstructed.
a.
Upper airway obstructions often occur because—
(1)
The casualty’s tongue falls back into his throat while he
is unconscious. The tongue falls back and obstructs the airway, it is not
swallowed by the casualty.
NOTE
Ensure the correct positioning and maintenance of the open
airway for an injured or unconscious casualty.
(2)
Foreign bodies become lodged in the throat. These
obstructions usually occur while eating. Choking on food (usually meat) is
associated with—
•
Attempting to swallow large pieces of poorly
chewed food.
•
Drinking alcohol.
•
Slipping dentures.
(3)
The contents of the stomach are regurgitated and may
block the airway.
(4)
Blood clots may form as a result of head and facial
injuries.
b.
Upper airway obstruction may cause either partial or complete
airway blockage.
(1)
Partial airway obstruction. The casualty may still have
an air exchange. A good air exchange means that the casualty can cough
2-10
forcefully, though he may be wheezing between coughs. You, the rescuer,
should not interfere, and should encourage the casualty to cough up the
object obstructing his airway on his own. A poor air exchange may be
indicated by weak coughing with a high pitched noise between coughs.
Further, the casualty may show signs of shock (paragraph 1-6b[5]) indicating
a need for oxygen. You should assist the casualty and treat him as though he
had a complete obstruction.
(2)
Complete airway obstruction. A complete obstruction
(no air exchange) is indicated if the casualty cannot speak, breathe, or cough
at all. He may be clutching his neck and moving erratically. In an
unconscious casualty, a complete obstruction is also indicated if after opening
his airway you cannot ventilate him.
2-11. Opening the Obstructed Airway—Conscious Casualty
Clearing a conscious casualty’s airway obstruction can be performed with the
casualty either standing or sitting and by following a relatively simple
procedure.
WARNING
Once an obstructed airway occurs, the brain will
develop an oxygen deficiency resulting in uncon-
sciousness. Death will follow rapidly if breathing is not
promptly restored.
a.
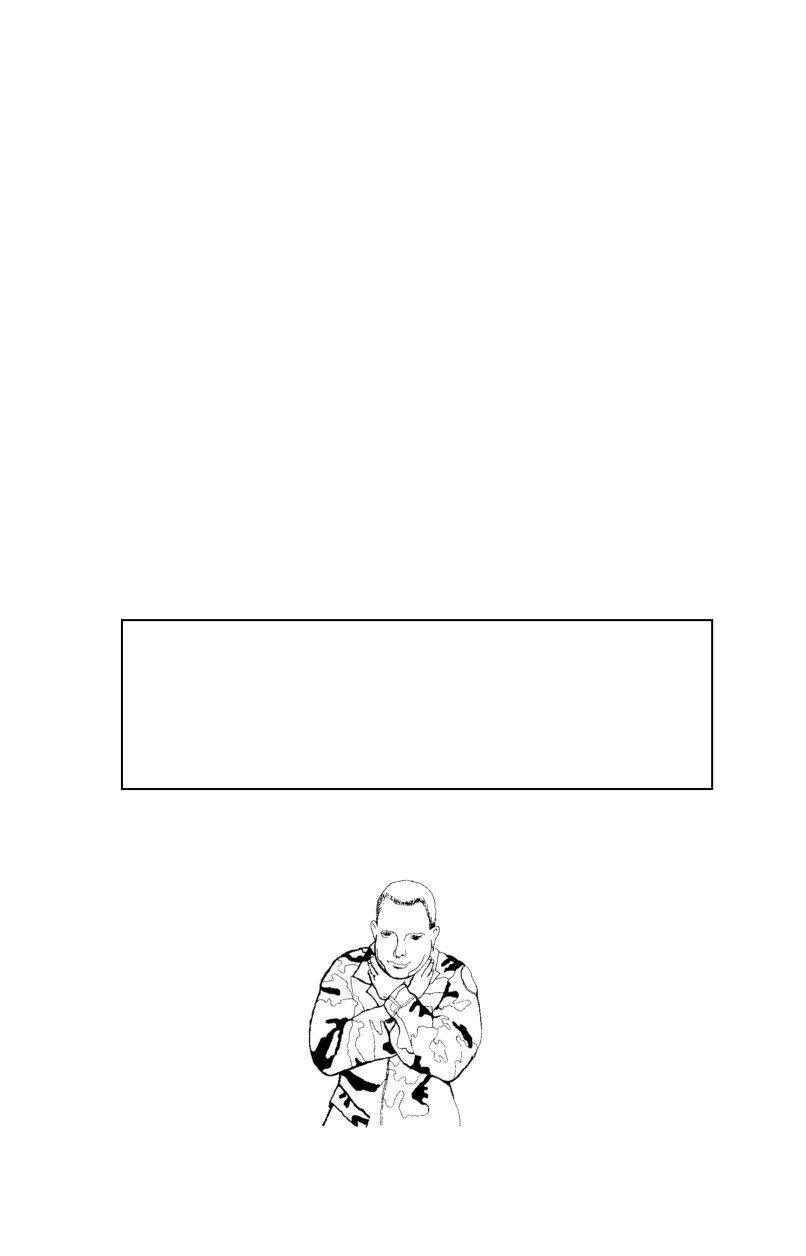
Ask the casualty if he can speak or if he is choking. Check for
the universal choking sign (Figure 2-10).
Figure 2-10. Universal sign of choking.
2-11

b.
If the casualty can speak, encourage him to attempt to cough;
the casualty still has a good air exchange. If he is able to speak or cough
effectively, DO NOT interfere with his attempts to expel the obstruction.
c.
Listen for high pitched sounds when the casualty breathes or
coughs (poor air exchange). If there is poor air exchange or no breathing,
CALL FOR HELP and immediately deliver manual thrusts (either an
abdominal or chest thrust).
NOTE
The manual thrust with the hands centered between the waist
and the rib cage is called an abdominal thrust (or Heimlich
maneuver). The chest thrust (the hands are centered in the
middle of the breastbone) is used only for an individual in the
advanced stages of pregnancy, in the markedly obese casualty,
or if there is a significant abdominal wound.
(1)
Apply abdominal thrusts. This can be accomplished by
using the following procedures:
(a) Stand behind the casualty and wrap your arms
around his waist.
(b) Make a fist with one hand and grasp it with the
other. The thumb side of your fist should be against the casualty’s abdomen,
in the midline and slightly above the casualty’s navel, but well below the tip
of the breastbone (Figure 2-11).
Figure 2-11. Anatomical view of abdominal thrust procedure.
(c) Press the fists into the abdomen with a quick
backward and upward thrust (Figure 2-12).
2-12
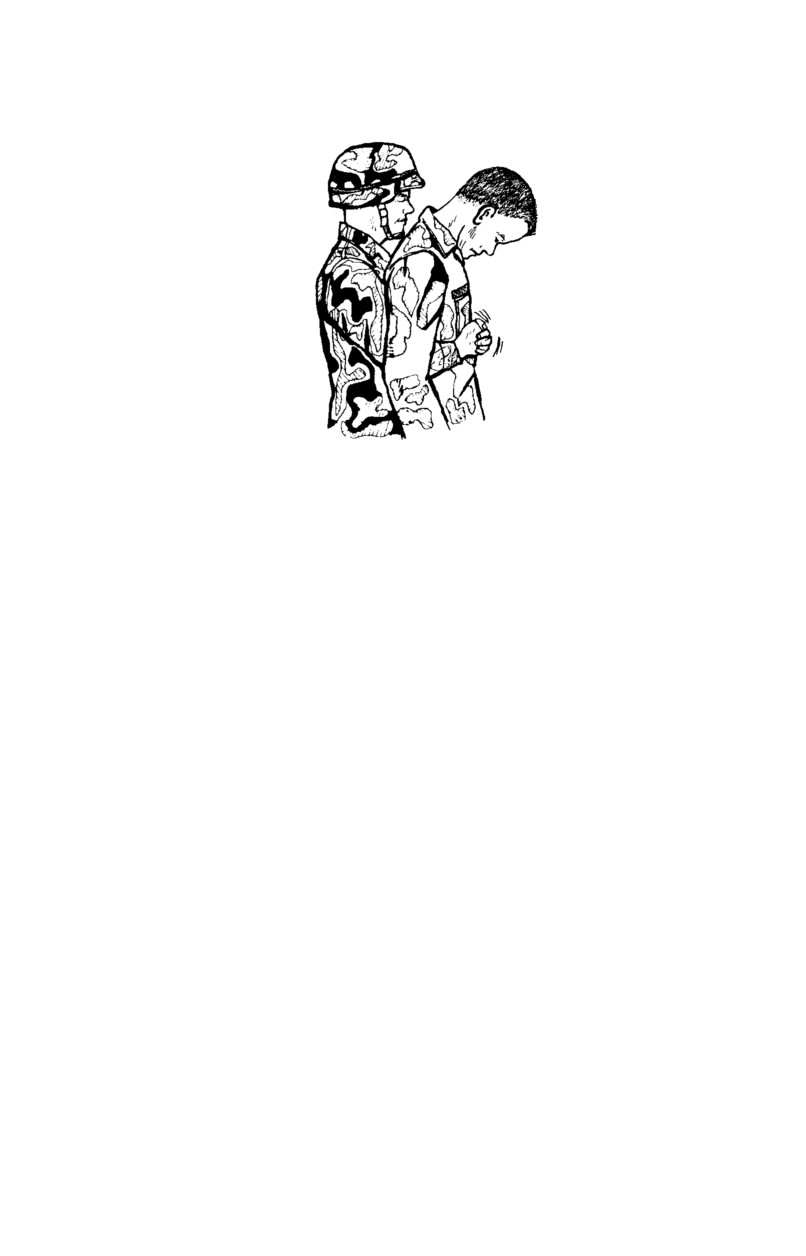
Figure 2-12. Profile view of abdominal thrust.
(d) Each thrust should be a separate and distinct
movement.
NOTE
Continue performing abdominal thrusts until the obstruction is
expelled or the casualty becomes unresponsive.
(e) If the casualty becomes unresponsive, call for help
as you proceed with steps to open the airway, and perform rescue breathing.
(Refer to paragraph 2-7 for information on how to perform mouth-to-mouth
resuscitation.)
(2)
Apply chest thrusts. An alternate technique to the
abdominal thrust is the chest thrust. This technique is useful when the
casualty has an abdominal wound, when the casualty is pregnant, or when the
casualty is so large that you cannot wrap your arms around the abdomen. To
apply chest thrusts with casualty sitting or standing:
(a) Stand behind the casualty and wrap your arms
around his chest with your arms under his armpits.
(b) Make a fist with one hand and place the thumb
side of the fist in the middle of the breastbone (take care to avoid the tip of
the breastbone and the margins of the ribs).
(c) Grasp the fist with the other hand and exert thrusts
(Figure 2-13).
2-13
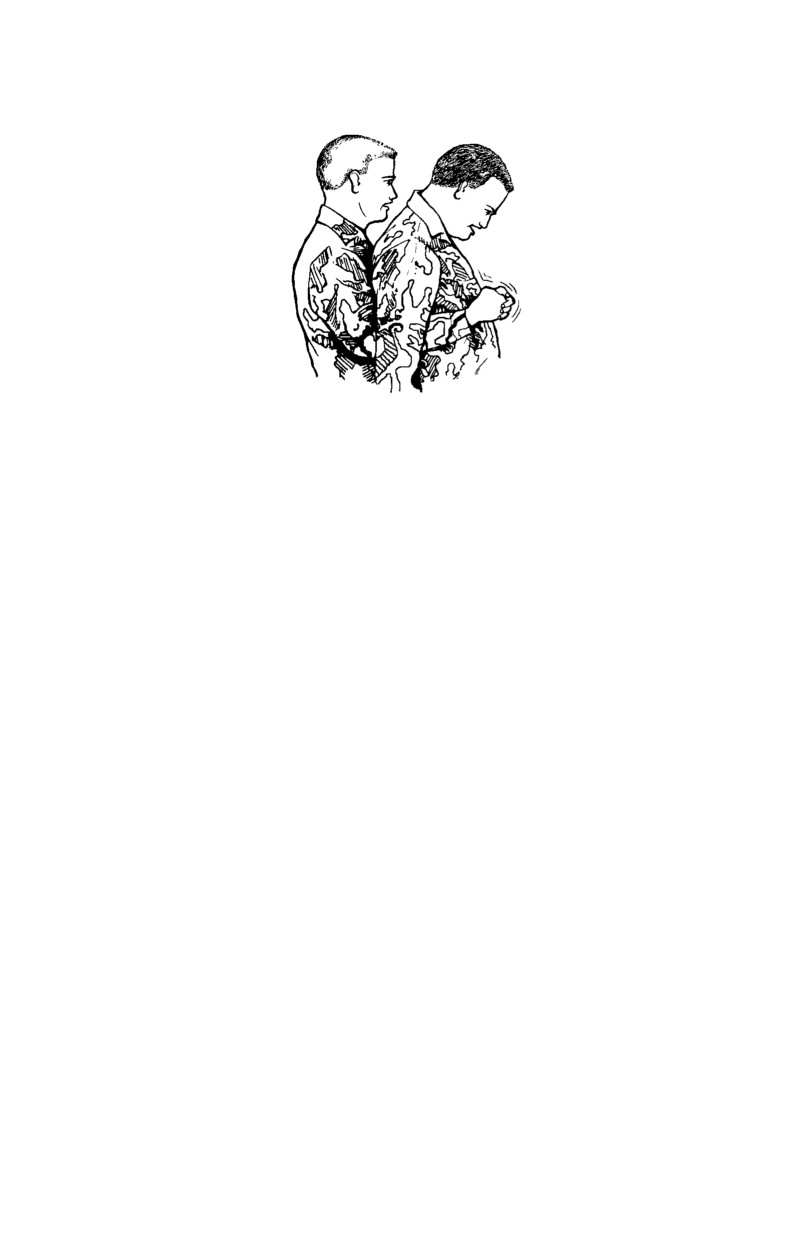
Figure 2-13. Profile view of chest thrust.
(d) Each thrust should be delivered slowly, distinctly,
and with the intent of relieving the obstruction.
(e) Perform chest thrusts until the obstruction is
expelled or the casualty becomes unresponsive.
(f)
If the casualty becomes unresponsive, call for help
as you proceed with steps to open the airway and perform rescue breathing.
2-12. Opening the Obstructed Airway—Casualty Lying Down or Unre-
sponsive
The following procedures are used to expel an airway obstruction in a casualty
who is lying down, who becomes unconscious, or who is found unconscious
(the cause unknown):
•
If a conscious casualty who is choking becomes unresponsive,
call for help, open the airway, perform a finger sweep, and attempt rescue
breathing (paragraphs 2-4 through 2-8). If you still cannot administer rescue
breathing due to an airway blockage, then remove the airway obstruction
using the procedures as in b below.
•
If a casualty is unresponsive when you find him (the cause
unknown), assess or evaluate the situation, call for help, position the casualty
on his back, open the airway, establish breathlessness, and attempt to perform
rescue breathing (paragraphs 2-4 through 2-8).
a.
Open the airway and attempt rescue breathing
(refer to
paragraph
2-7 for information on how to perform mouth-to-mouth
resuscitation).
2-14
b.
If still unable to ventilate the casualty, perform 6 to 10 manual
(abdominal or chest) thrusts.
(1)
To perform the abdominal thrusts:
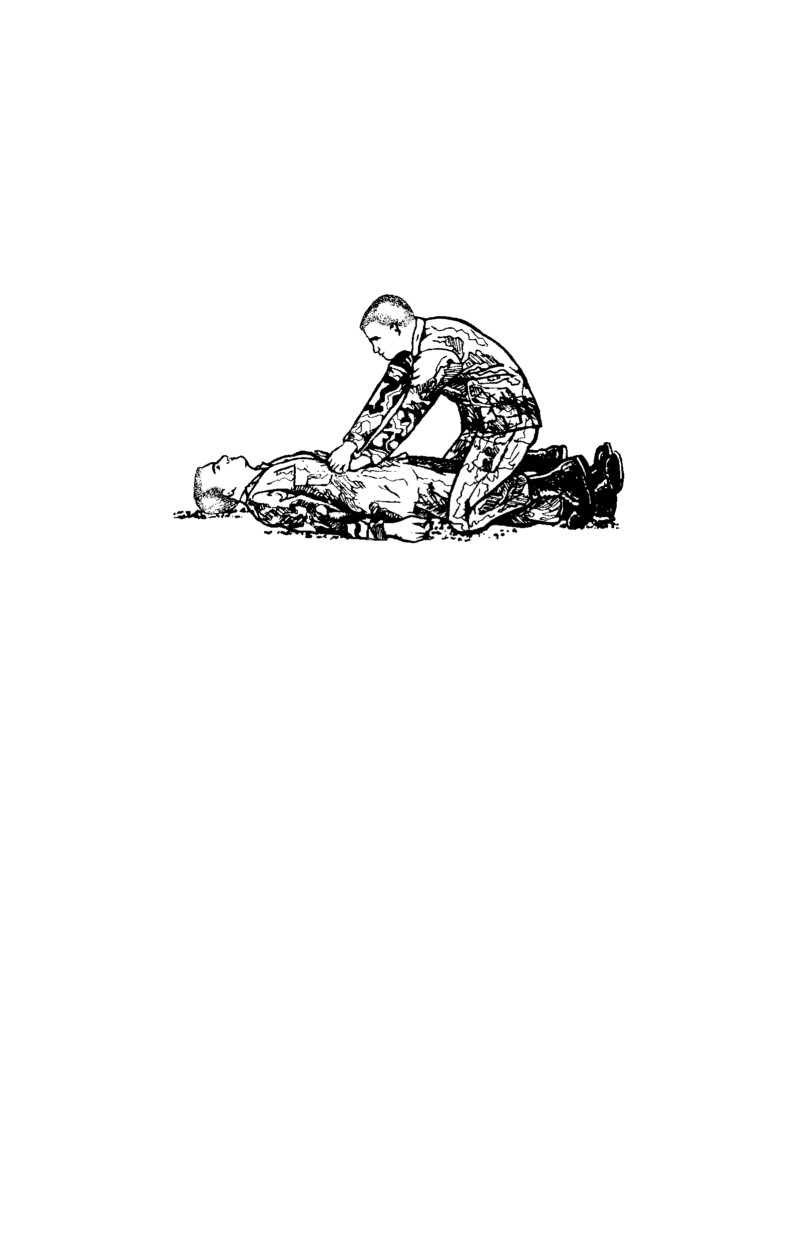
(a) Kneel astride the casualty’s thighs (Figure 2-14).
Figure 2-14. Abdominal thrust on unresponsive casualty.
(b) Place the heel of one hand against the casualty’s
abdomen (in the midline slightly above the navel but well below the tip of the
breastbone). Place your other hand on top of the first one. Point your
fingers toward the casualty’s head.
(c) Press into the casualty’s abdomen with a quick,
forward and upward thrust. You can use your body weight to perform the
maneuver. Deliver each thrust quickly and distinctly.
(d) Repeat the sequence of abdominal thrusts, finger
sweep, and rescue breathing (attempt to ventilate) as long as necessary to
remove the object from the obstructed airway.
(e) If the casualty’s chest rises, proceed to feeling for
pulse.
(2)
To perform chest thrusts:
(a) Place the unresponsive casualty on his back, face
up, and open his mouth. Kneel close to the side of the casualty’s body.
1.
Locate the lower edge of the casualty’s ribs
with your fingers. Run the fingers up along the rib cage to the notch (Figure
2-15A).
2-15
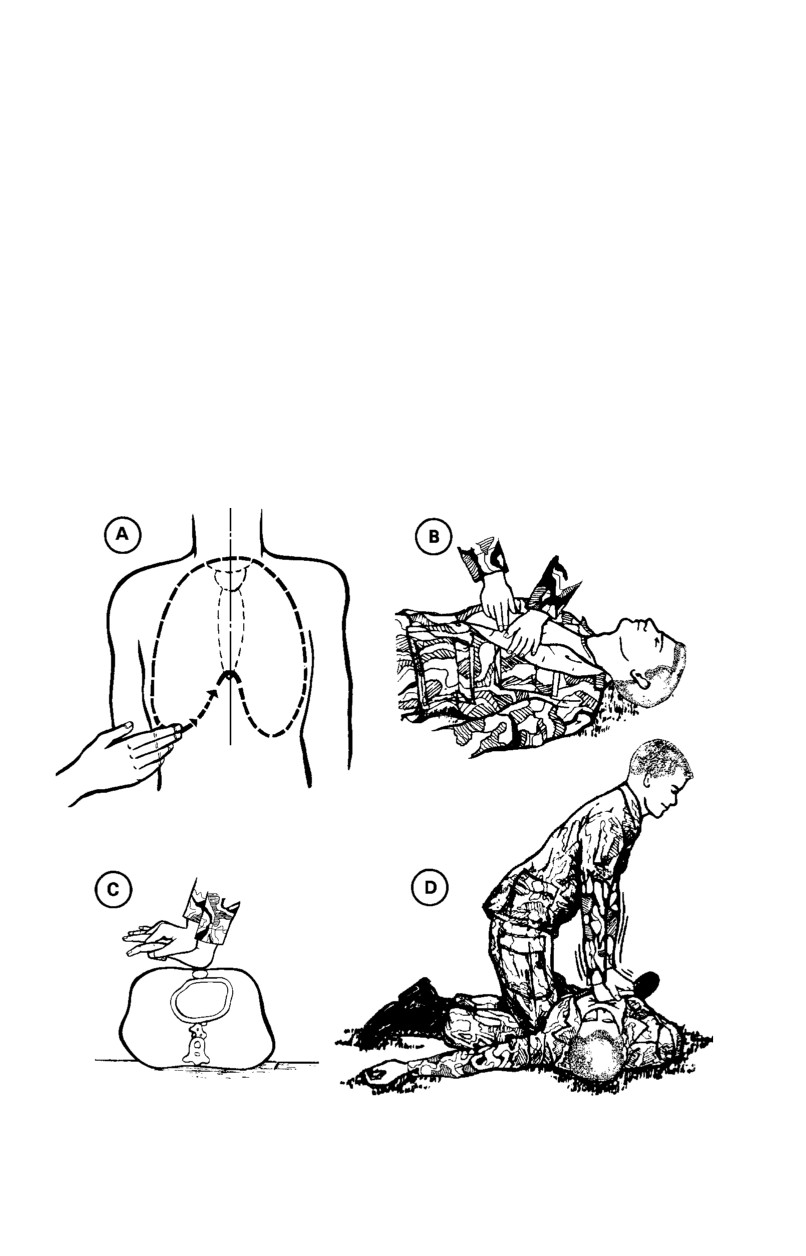
2.
Place the middle finger on the notch and the
index finger next to the middle finger on the lower edge of the breastbone.
Place the heel of the other hand on the lower half of the breastbone next to
the two fingers (Figure 2-15B).
3.
Remove the fingers from the notch and place
that hand on top of the positioned hand on the breastbone, extending or
interlocking the fingers (Figure 2-15C).
4.
Straighten and lock your elbows with your
shoulders directly above your hands without bending the elbows, rocking, or
allowing the shoulders to sag. Apply enough pressure to depress the
breastbone 1 1/2 to 2 inches, then release the pressure completely (Figure 2-
15D). Do this 6 to 10 times. Each thrust should be delivered quickly and
distinctly. See Figure
2-16 for another view of the breastbone being
depressed.
Figure 2-15. Hand placement for chest thrust (Illustrated A-D).
2-16
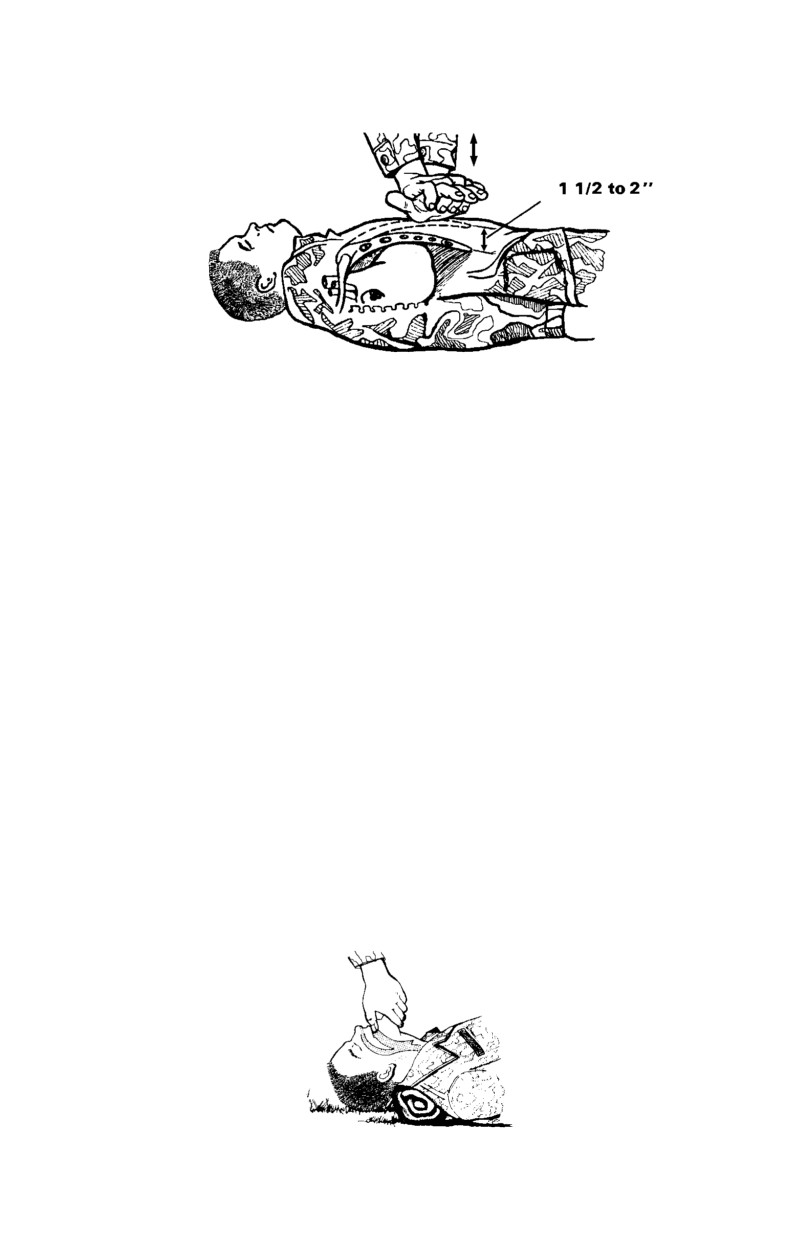
Figure 2-16. Breastbone depressed 1 1/2 to 2 inches.
(b) Repeat the sequence of chest thrust, finger sweep,
and rescue breathing as long as necessary to clear the object from the
obstructed airway. See paragraph (3) below.
(c) If the casualty’s chest rises, proceed to feeling for
his pulse.
(3)
If you still cannot administer rescue breathing due to an
airway obstruction, then remove the airway obstruction using the procedures
in steps (a) and (b) below.
(a) Place the casualty on his back, face up, turn the
unresponsive casualty as a unit, and call out for help.
(b) Perform finger sweep, keep casualty face up, use
tongue-jaw lift to open mouth.
1.
Open the casualty’s mouth by grasping both
his tongue and lower jaw between your thumb and fingers and lifting (tongue-
jaw lift) (Figure 2-17). If you are unable to open his mouth, cross your
fingers and thumb (crossed-finger method) and push his teeth apart (Figure
2-18) by pressing your thumb against his upper teeth and pressing your
finger against his lower teeth.
Figure 2-17. Opening casualty’s mouth (tongue-jaw lift).
2-17
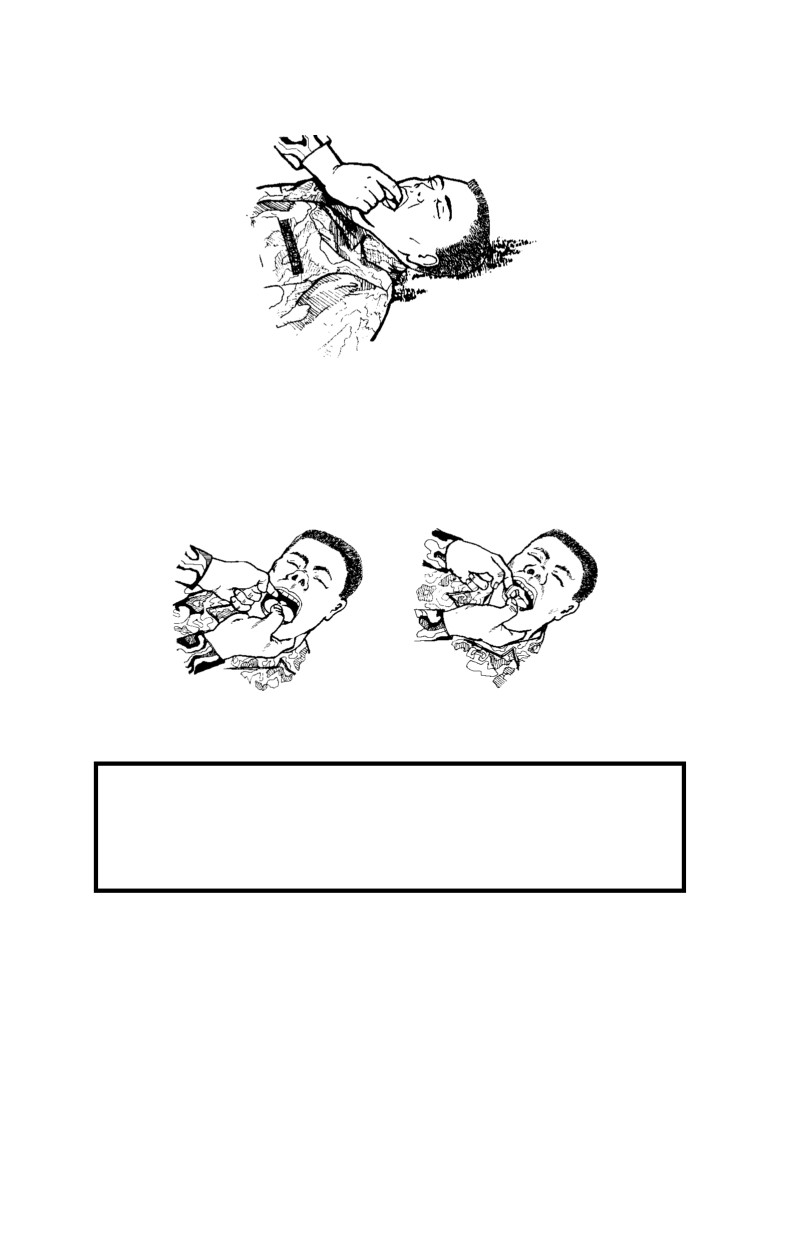
Figure 2-18. Opening casualty’s mouth (crossed-finger method).
2.
Insert the index finger of the other hand
down along the inside of his cheek to the base of the tongue. Use a hooking
motion from the side of the mouth toward the center to dislodge the foreign
body (Figure 2-19).
Figure 2-19. Using finger to dislodge a foreign body.
WARNING
Take care not to force the object deeper into the airway
by pushing it with the finger.
Section II. STOP THE BLEEDING AND
PROTECT THE WOUND
2-13. General
The longer a service member bleeds from a major wound, the less likely he
will be able to survive his injuries. It is, therefore, important that the first aid
provider promptly stop the external bleeding.
2-18
2-14. Clothing
In evaluating the casualty for location, type, and size of the wound or injury,
cut or tear his clothing and carefully expose the entire area of the wound.
This procedure is necessary to properly visualize injury and avoid further
contamination. Clothing stuck to the wound should be left in place to avoid
further injury. DO NOT touch the wound; keep it as clean as possible.
WARNING
DO NOT REMOVE protective clothing in a chemical envi-
ronment. Apply dressings over the protective clothing.
2-15. Entrance and Exit Wounds
Before applying the dressing, carefully examine the casualty to determine if there
is more than one wound. A missile may have entered at one point and exited at
another point. The EXIT wound is usually LARGER than the entrance wound.
WARNING
The casualty should be continually monitored for
development of conditions which may require the
performance of necessary basic lifesaving measures,
such as clearing the airway and mouth-to-mouth
resuscitation. All open (or penetrating) wounds should
be checked for a point of entry and exit and first aid
measures applied accordingly.
WARNING
If the missile lodges in the body (fails to exit), DO NOT
attempt to remove it or probe the wound. Apply a
dressing. If there is an object extending from (impaled
in) the wound, DO NOT remove the object. Apply a
dressing around the object and use additional
improvised bulky materials/dressings (use the cleanest
material available) to build up the area around the object
to stabilize the object and prevent further injury. Apply
a supporting bandage over the bulky materials to hold
them in place.
2-19
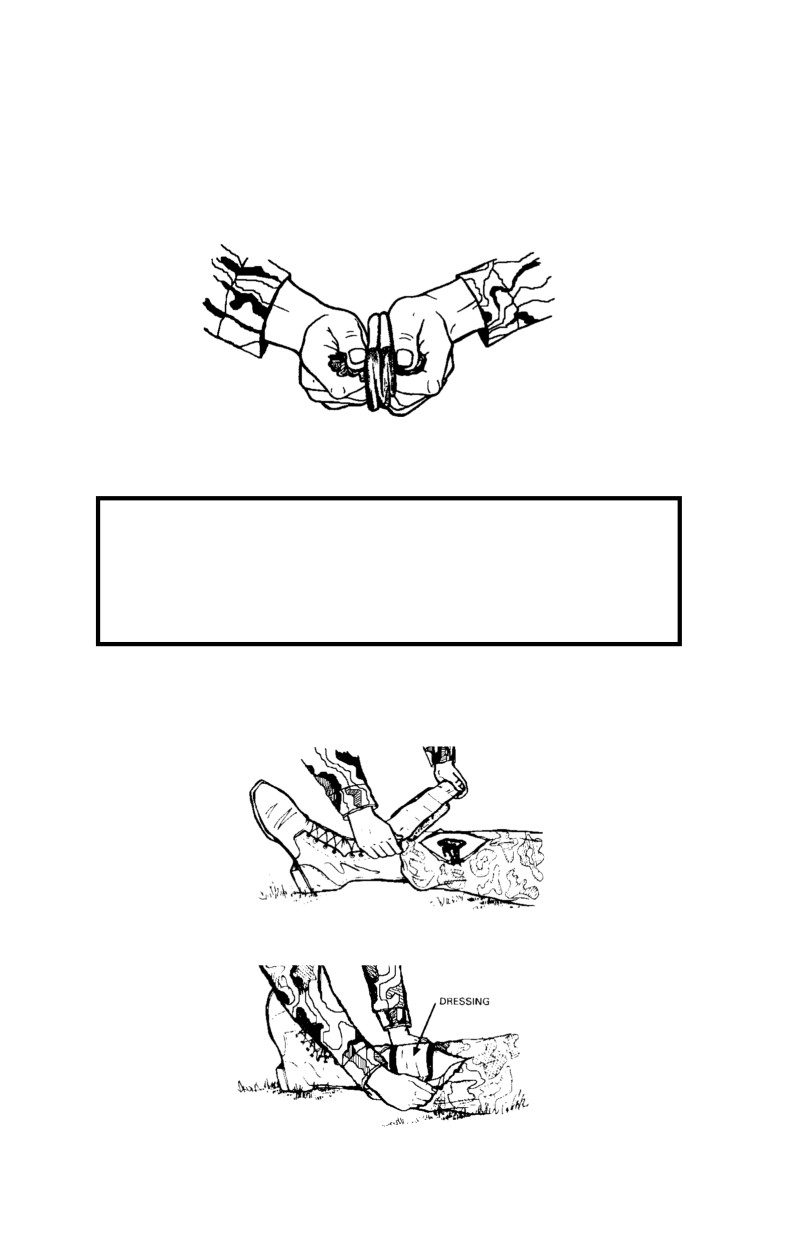
2-16. Field Dressing
a.
Use the casualty’s field dressing; remove it from the wrapper
and grasp the tails of the dressing with both hands (Figure 2-20).
Figure 2-20. Grasping tails of dressing with both hands.
WARNING
DO NOT touch the white (sterile) side of the dressing,
and DO NOT allow it to come in contact with any surface
other than the wound.
b.
Hold the dressing directly over the wound with the white side
down. Pull the dressing open (Figure 2-21) and place it directly over the
wound (Figure 2-22).
Figure 2-21. Pulling dressing open.
Figure 2-22. Placing dressing directly on wound.
2-20
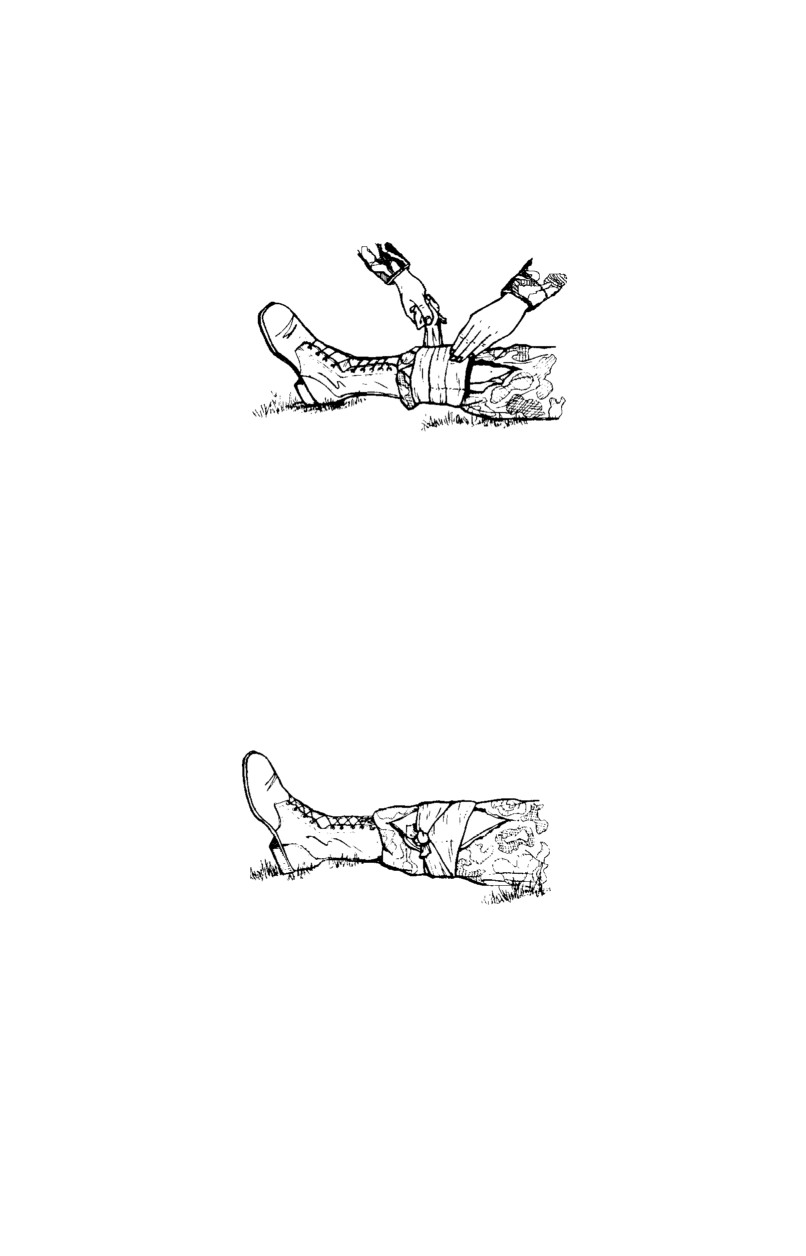
c.
Hold the dressing in place with one hand. Use the other hand
to wrap one of the tails around the injured part, covering about one-half of
the dressing (Figure 2-23). Leave enough of the tail for a knot. If the
casualty is able, he may assist by holding the dressing in place.
Figure 2-23. Wrapping tail of dressing around injured part.
d.
Wrap the other tail in the opposite direction until the remainder
of the dressing is covered. The tails should seal the sides of the dressing to
keep foreign material from getting under it.
e.
Tie the tails into a nonslip knot over the outer edge of the
dressing (Figure 2-24). DO NOT TIE THE KNOT OVER THE WOUND.
In order to allow blood to flow to the rest of an injured limb, tie the dressing
firmly enough to prevent it from slipping but without causing a tourniquet-
like effect; that is, the skin beyond the injury should not becomes cool, blue,
or numb.
Figure 2-24. Tails tied into nonslip knot.
2-17. Manual Pressure
a.
If bleeding continues after applying the sterile field dressing,
direct manual pressure may be used to help control bleeding. Apply such
pressure by placing a hand on the dressing and exerting firm pressure for 5
to 10 minutes (Figure 2-25). The casualty may be asked to do this himself if
he is conscious and can follow instructions.
2-21
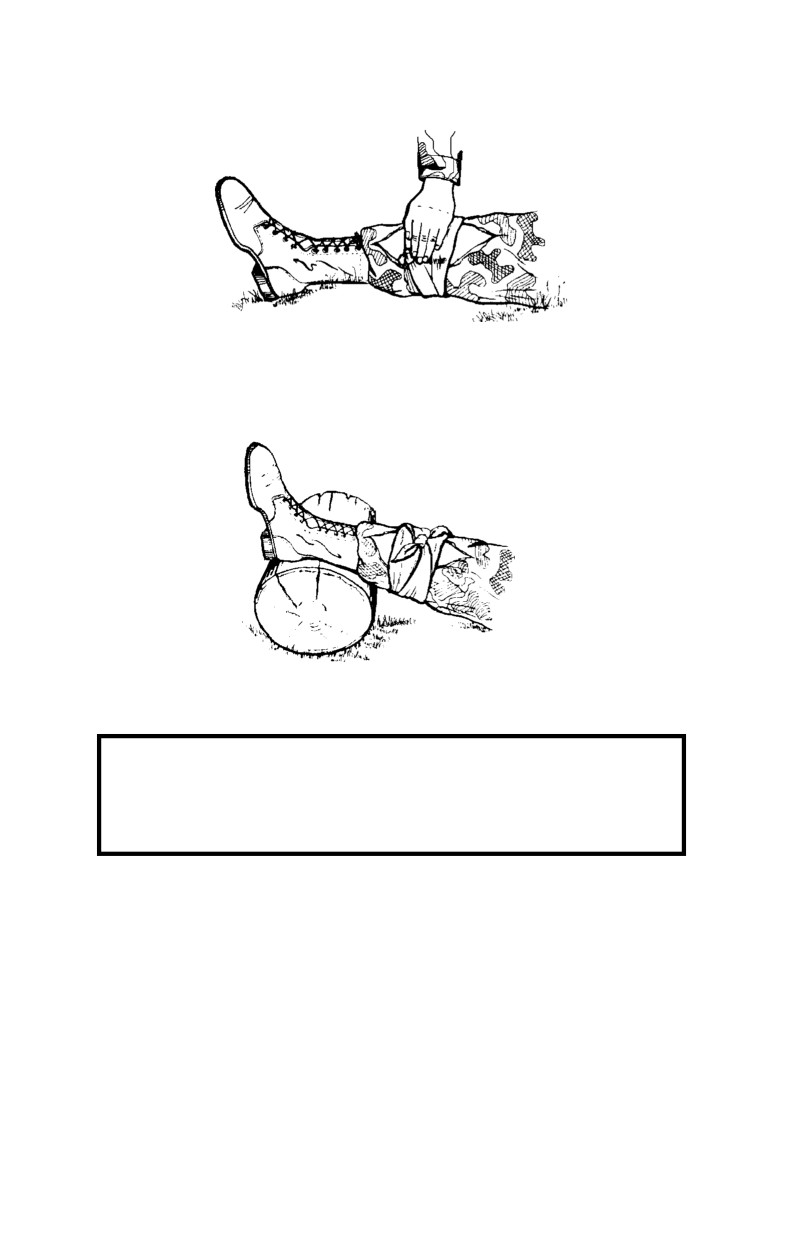
Figure 2-25. Direct manual pressure applied.
b.
Elevate an injured limb slightly above the level of the heart to
reduce the bleeding (Figure 2-26).
Figure 2-26. Injured limb elevated.
WARNING
DO NOT elevate a suspected fractured limb unless it
has been properly splinted.
c.
If the bleeding stops, check shock; administer first aid for
shock as necessary. If the bleeding continues, apply a pressure dressing.
2-18. Pressure Dressing
Pressure dressings aid in blood clotting and compress the open blood vessel.
If bleeding continues after the application of a field dressing, manual pressure,
and elevation, then a pressure dressing must be applied as follows:
a.
Place a wad of padding on top of the field dressing, directly
over the wound (Figure 2-27). Keep the injured extremity elevated.
2-22
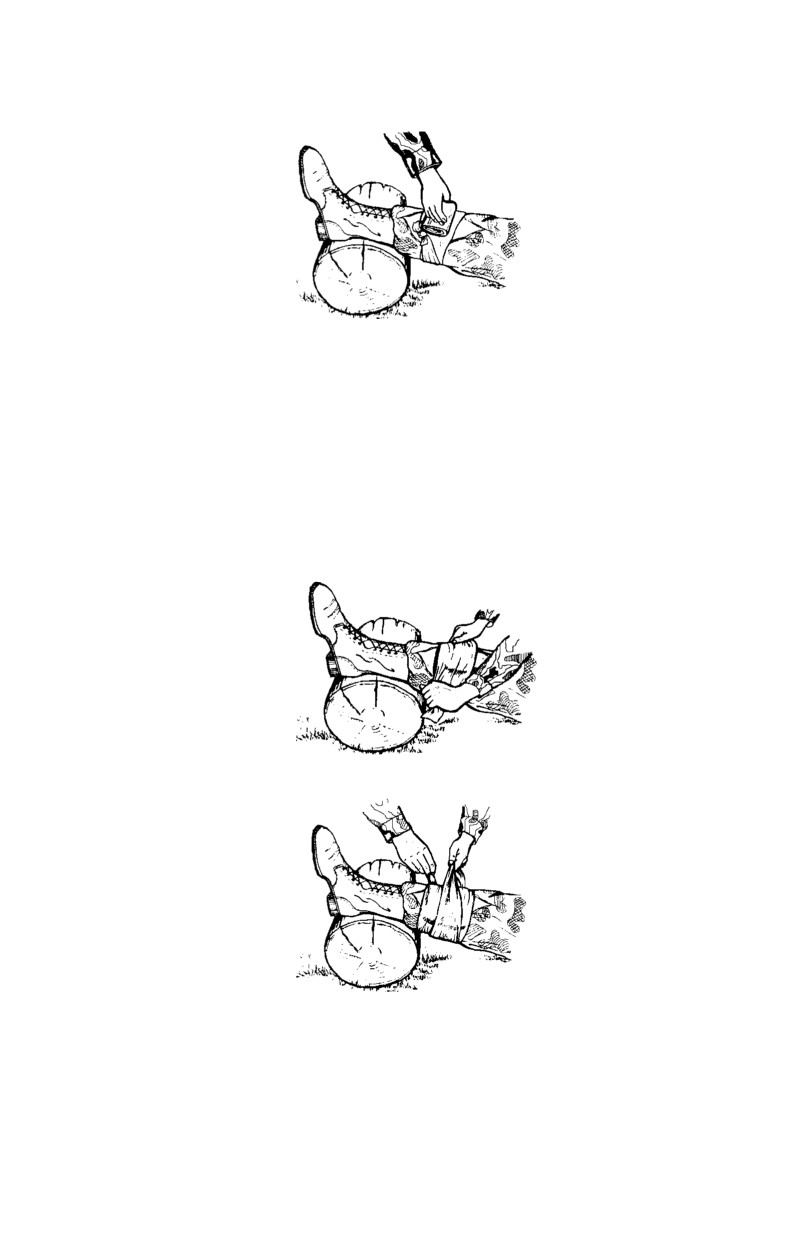
Figure 2-27. Wad of padding on top of field dressing.
NOTE
Improvised bandages may be made from strips of cloth. These
strips may be made from T-shirts, socks, or other garments.
b.
Place an improvised dressing (or cravat, if available) over the
wad of padding (Figure 2-28). Wrap the ends tightly around the injured
limb, covering the previously placed field dressing (Figure 2-29).
Figure 2-28. Improvised dressing over wad of padding
Figure 2-29. Ends of improvised dressing wrapped tightly around limb.
c.
Tie the ends together in a nonslip knot, directly over the wound
site (Figure 2-30). DO NOT tie so tightly that it has a tourniquet-like effect. If
bleeding continues and all other measures have failed, or if the limb is severed,
then apply a tourniquet. Use the tourniquet as a LAST RESORT. When the
bleeding stops, check for shock; administer first aid for shock as necessary.
2-23
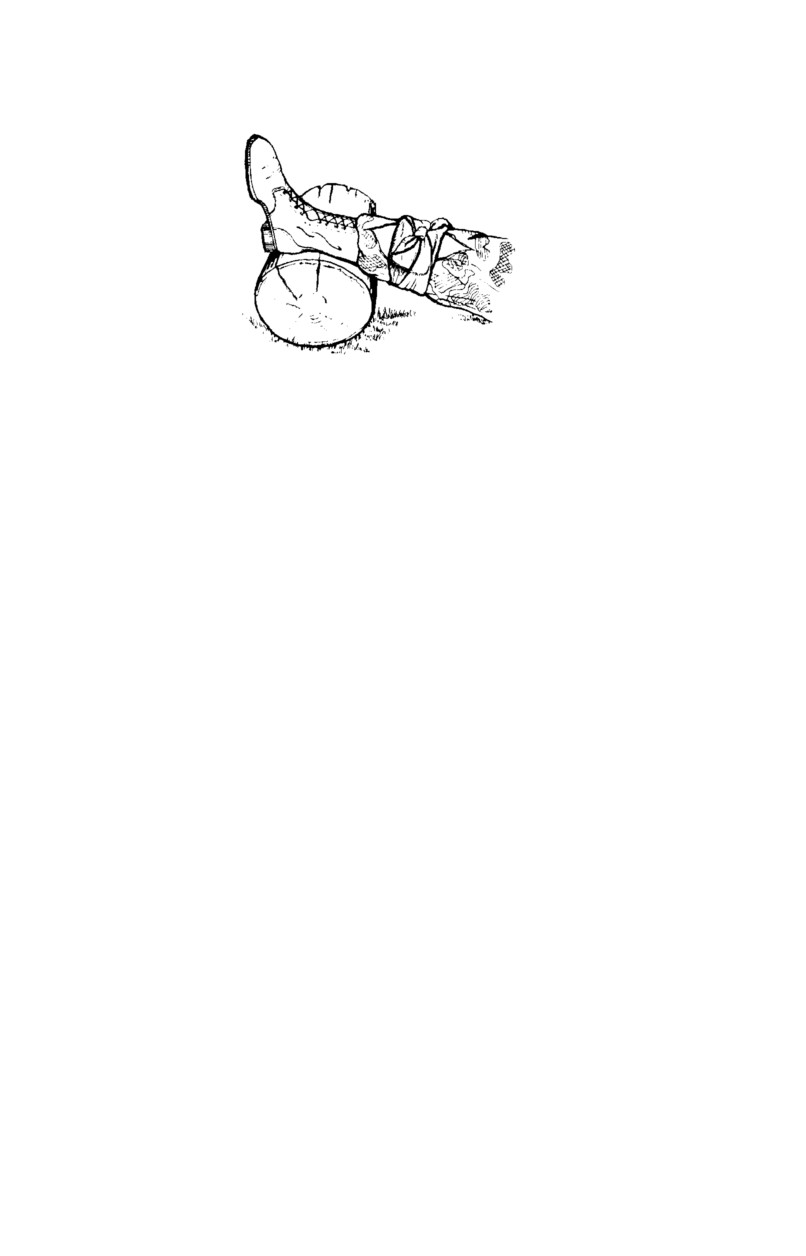
Figure 2-30. Ends of improvised dressing tied together in nonslip knot.
NOTE
Distal end of wounded extremities (fingers and toes) should be
checked periodically for adequate circulation. The dressing
must be loosened if the extremity becomes cool, blue, or numb.
NOTE
If bleeding continues and all other measures have failed
(dressings and covering wound, applying direct manual
pressure, elevating the limb above the heart level, and applying
a pressure dressing while maintaining limb elevation) then apply
digital pressure (see paragraph 2-19).
2-19. Digital Pressure
Digital pressure (often called “pressure points”) is an alternative method to
control bleeding. This method uses pressure from the fingers, thumbs, or
hands to press at the site or point where a main artery supplying the
wounded area lies near the skin surface or over bone (Figure 2-31). This
pressure may help shut off or slow down the flow of blood from the heart
to the wound and is used in combination with direct pressure and elevation.
It may help in instances where bleeding is not easily controlled, where a
pressure dressing has not yet been applied, or where pressure dressings are
not readily available.
2-24
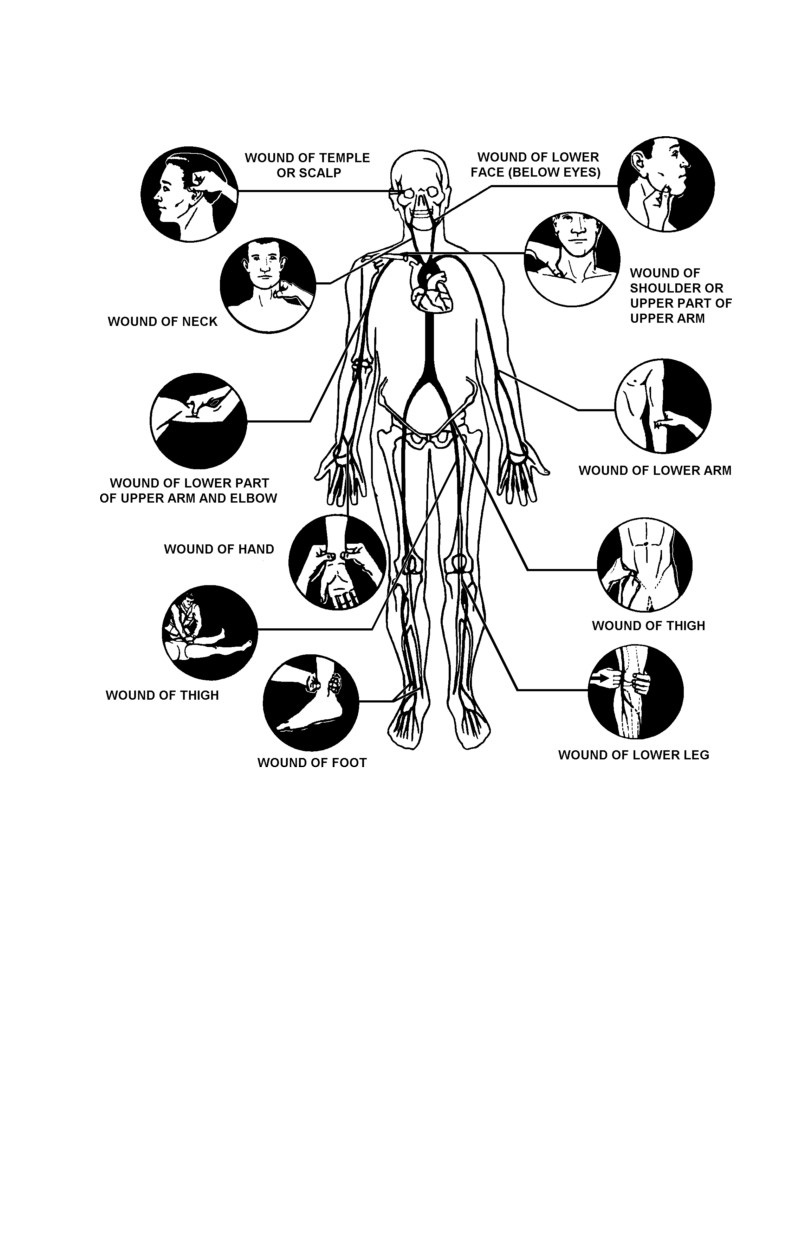
Figure 2-31. Digital pressure (pressure with fingers, thumbs or hands).
2-20. Tourniquet
DANGER
A tourniquet is only used on an arm or leg where
there is a danger of the casualty losing his life
(bleeding to death).
A tourniquet is a constricting band placed around an arm or leg to control
bleeding. A service member whose arm or leg has been completely amputated
may not be bleeding when first discovered, but a tourniquet should be applied
anyway. This absence of bleeding is due to the body’s normal defenses
(contraction or clotting of blood vessels) as a result of the amputation, but
2-25
after a period of time bleeding will start as the blood vessels relax or the clot
may be knocked loose by moving the casualty. Bleeding from a major artery
of the thigh, lower leg, or arm and bleeding from multiple arteries (which
occurs in a traumatic amputation) may prove to be beyond control by manual
pressure. If the pressure dressing (see paragraph 2-18, above) under firm
hand pressure becomes soaked with blood and the wound continues to bleed,
apply a tourniquet.
WARNING
Casualty should be continually monitored for
development of conditions which may require the
performance of necessary basic lifesaving measures,
such as: clearing the airway, performing mouth-to-
mouth resuscitation, preventing shock, and/or bleeding
control. All open (or penetrating) wounds should be
checked for a point of entry or exit and treated
accordingly.
The
tourniquet should not be used unless a pressure dressing has failed to
stop the bleeding or an arm or leg has been cut off. On occasion, tourniquets
have injured blood vessels and nerves. If left in place too long, a tourniquet
can
cause loss of an arm or leg. Once applied, it must stay in place, and the
casualty must be taken to the nearest MTF as soon as possible. DO NOT
loosen or release a tourniquet after it has been applied as release could
precipitate bleeding and potentially lead to shock.
a.
Improvising a Tourniquet. In the absence of a specially
designed tourniquet, a tourniquet may be made from a strong, pliable
material, such as gauze or muslin bandages, clothing, or cravats. An
improvised tourniquet is used with a rigid stick-like object. To minimize
skin damage, ensure that the improvised tourniquet is at least 2 inches wide.
WARNING
The tourniquet must be easily identified or easily seen.
WARNING
DO NOT use wire or shoestring for a tourniquet band.
2-26
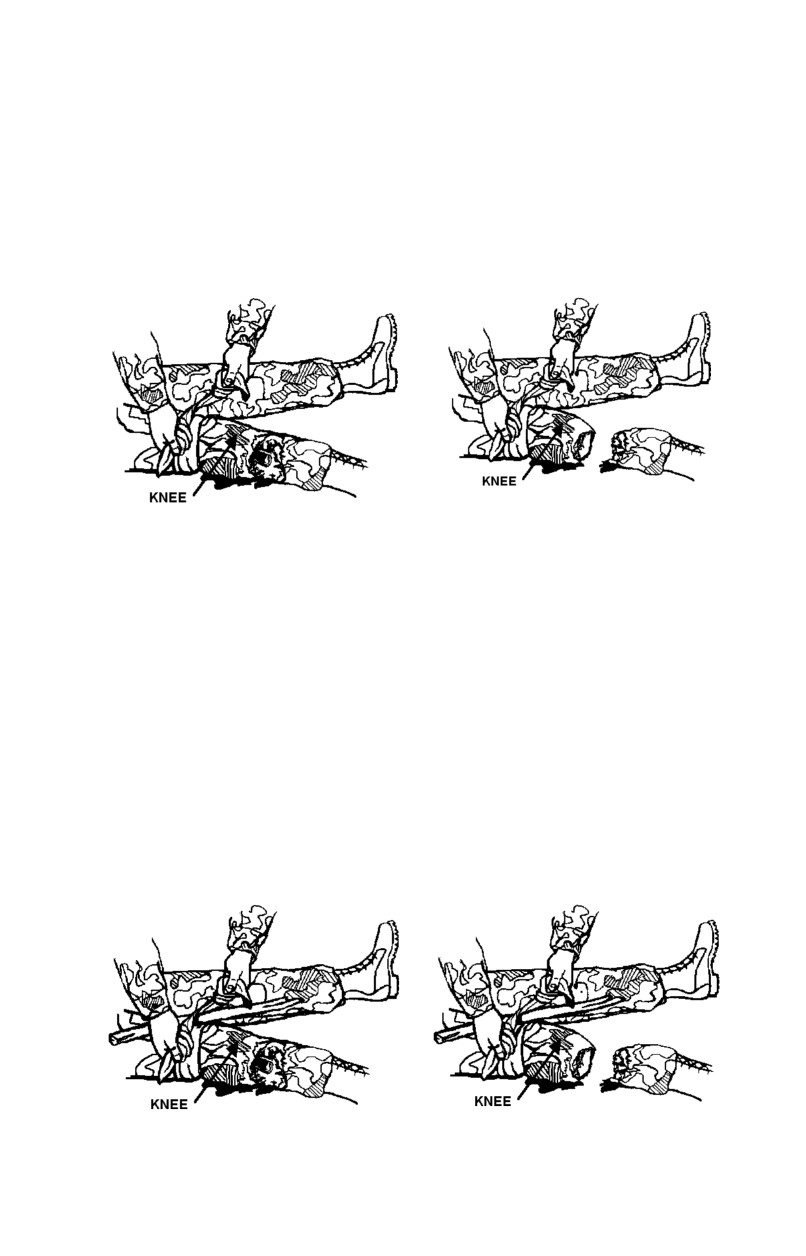
b.
Placing the Improvised Tourniquet.
(1)
Place the tourniquet around the limb, between the wound
and the body trunk (or between the wound and the heart). Never place it
directly over a wound, a fracture, or joint. Tourniquets, for maximum
effectiveness, should be placed on the upper arm or above the knee on the
thigh (Figure 2-32).
Figure 2-32. Tourniquet above knee.
(2)
The tourniquet should be well-padded. If possible, place
the tourniquet over the smoothed sleeve or trouser leg to prevent the skin
from being pinched or twisted. If the tourniquet is long enough, wrap it
around the limb several times, keeping the material as flat as possible.
Damaging the skin may deprive the surgeon of skin required to cover an
amputation. Protection of the skin also reduces pain.
c.
Applying the Tourniquet.
(1)
Tie a half-knot.
(A half-knot is the same as the first part
of tying a shoe lace.)
(2)
Place a stick (or similar rigid object) on top of the half-
knot (Figure 2-33).
Figure 2-33. Rigid object on top of half-knot.
2-27
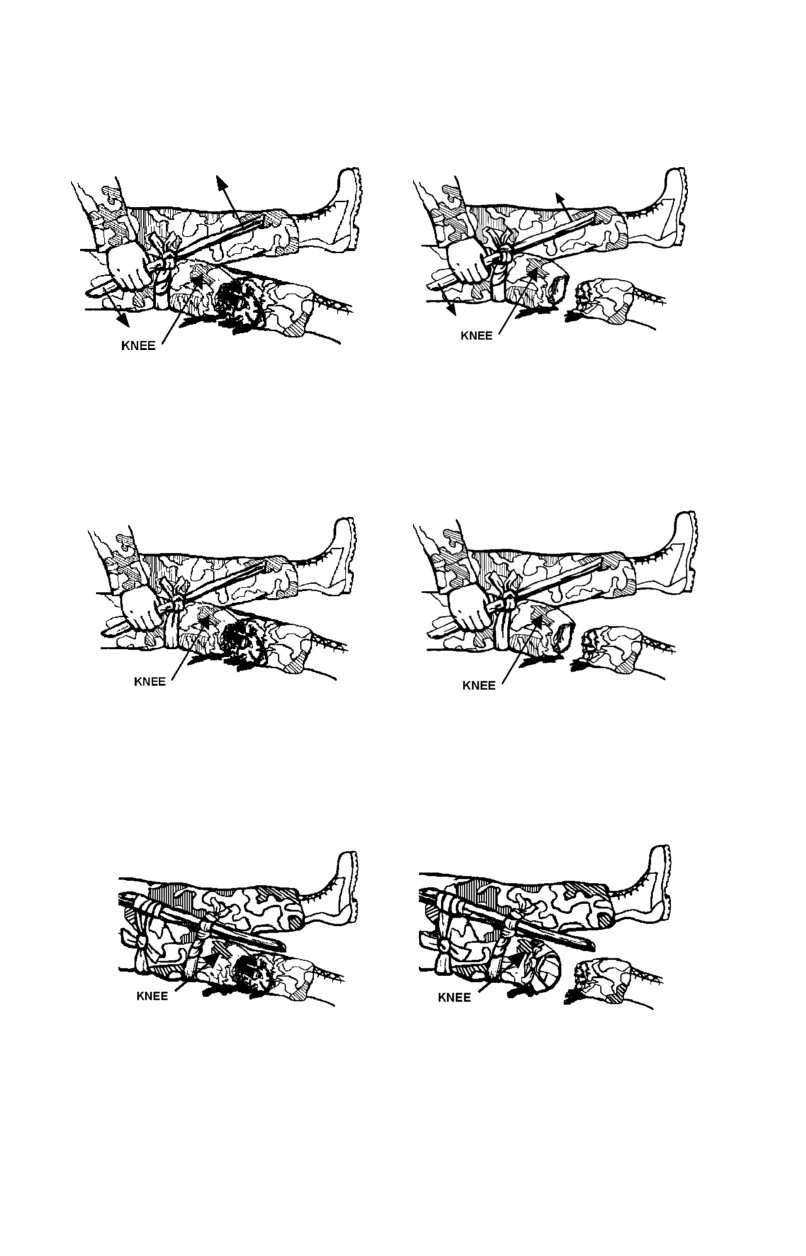
(3)
Tie a full knot over the stick (Figure 2-34).
Figure 2-34. Full knot over rigid object.
(4)
Twist the stick (Figure 2-35) until the tourniquet is tight
around the limb and/or the bright red bleeding has stopped. In the case of
amputation, dark oozing blood may continue for a short time. This is the
blood trapped in the area between the wound and tourniquet.
Figure 2-35. Stick twisted.
(5)
Fasten the tourniquet to the limb by looping the free
ends of the tourniquet over the ends of the stick. Then bring the ends around
the limb to prevent the stick from loosening. Tie them together on the side of
the limb (Figure 2-36).
Figure 2-36. Tie free ends on side of limb.
NOTE
Other methods of securing the stick may be used as long as the
stick does not unwind and no further injury results.
2-28
NOTE
If possible, save and transport any severed (amputated) limbs or
body parts with (but out of sight of) the casualty.
(6)
DO NOT cover the tourniquet—you should leave it in
full view. If the limb is missing (total amputation), apply a dressing to the
stump. All wounds should have a dressing to protect the wound from
contamination.
(7)
Mark the casualty’s forehead with a “T” and the time to
indicate a tourniquet has been applied. If necessary, use the casualty’s blood
to make this mark.
(8)
Check and treat for shock.
(9)
Seek medical aid.
CAUTION
Only appropriately skilled medical personnel may adjust or
otherwise remove/release the tourniquet in the appropriate
setting.
Section III. CHECK FOR SHOCK AND ADMINISTER
FIRST AID MEASURES
2-21. General
The term shock has a variety of meanings. In medicine, it refers to a collapse
of the body’s cardiovascular system which includes an inadequate supply of
blood to the body’s tissues. Shock stuns and weakens the body. When the
normal blood flow in the body is upset, death can result. Early recognition
and proper first aid may save the casualty’s life.
2-22. Causes and Effects
a.
There are three basic mechanisms associated with shock.
These are—
2-29
•
The heart is damaged and fails to work as a pump.
•
Blood loss (heavy bleeding) causes the volume of fluid
within the vascular system to be insufficient.
•
The blood vessels dilate (open wider) so that the blood
within the system (even though it is a normal volume [the casualty is not
bleeding or dehydrated]) is insufficient to provide adequate circulation within
the body.
b.
Shock may be the result of a number of conditions. These
include—
•
Dehydration.
•
Allergic reaction to foods, drugs, insect stings, and
snakebites.
•
Significant loss of blood.
•
Reaction to the sight of a wound, blood, or other
traumatic scene.
•
Traumatic injuries, such as—
•
Burns.
•
Gunshot or shrapnel wounds.
•
Crush injuries.
•
Blows to the body (which can cause broken bones
or damage to internal organs).
•
Head injuries.
•
Penetrating wounds (such as from a knife, bayonet,
or missile).
2-23. Signs and Symptoms of Shock
Examine the casualty to see if he has any of the following signs and
symptoms:
•
Sweaty but cool skin (clammy skin).
2-30
•
Weak and rapid pulse.
•
Paleness of skin (in dark-skinned individuals they may have a
grayish look to their skin).
•
Restlessness, nervousness.
•
Thirst.
•
Loss of blood (bleeding).
•
Confusion (or loss of awareness).
•
Faster-than-normal breathing rate.
•
Blotchy or bluish skin (especially around the mouth and lips).
•
Nausea and/or vomiting.
2-24. First Aid Measures for Shock
In the field, the first aid procedures administered for shock are identical to
procedures that would be performed to prevent shock. When treating a
casualty, assume that shock is present or will occur shortly. By waiting until
actual signs and symptoms of shock are noticeable, the rescuer may jeopardize
the casualty’s life.
a.
Position the Casualty.
(DO NOT move the casualty or his
limbs if suspected fractures have not been splinted. See Chapter 4 for details.)
(1)
Move the casualty to cover, if cover is available and the
situation permits.
(2)
Lay the casualty on his back.
NOTE
A casualty in shock from a chest wound or one who is
experiencing breathing difficulty, may breathe easier in a sitting
position. If this is the case, allow him to sit upright, but monitor
carefully in case his condition worsens.
(3)
Elevate the casualty’s feet higher than the level of his
heart. Use a stable object (field pack or rolled up clothing) so that his feet
will not slip off (Figure 2-37).
2-31
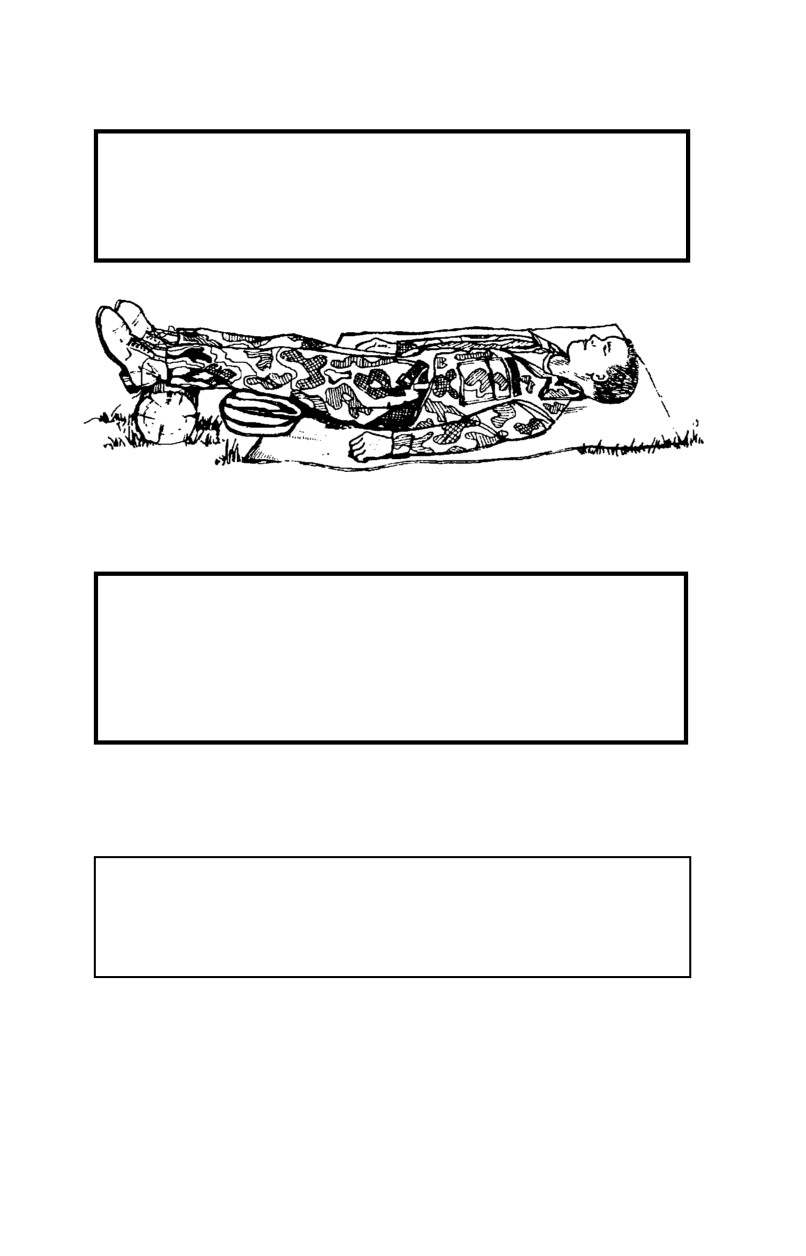
WARNING
DO NOT elevate legs if the casualty has an unsplinted
broken leg, head injury, or abdominal injury.
Figure 2-37. Clothing loosened and feet elevated.
WARNING
Check casualty for leg fracture(s) and splint, if
necessary, before elevating his feet. For a casualty with
an abdominal wound, place his knees in an upright
(flexed) position.
(4)
Loosen clothing at the neck, waist, or wherever it may
be binding.
CAUTION
DO NOT loosen or remove protective clothing in a chemical
environment.
(5)
Prevent chilling or overheating. The key is to maintain
body temperature. In cold weather, place a blanket or other like item over
him to keep him warm and under him to prevent chilling (Figure 2-38).
However, if a tourniquet has been applied, leave it exposed (if possible). In
hot weather, place the casualty in the shade and protect him from becoming
chilled; however, avoid the excessive use of blankets or other coverings.
2-32
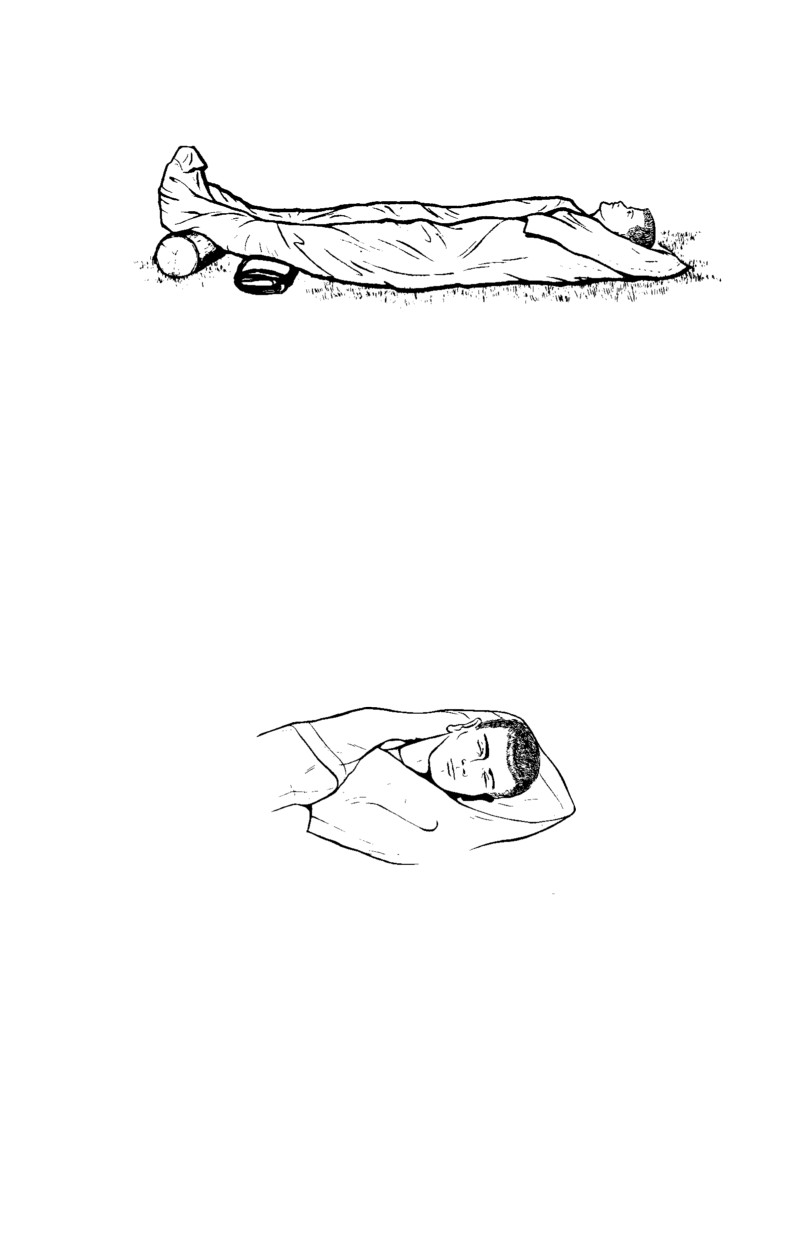
Figure 2-38. Body temperature maintained.
(6)
Calm the casualty. Throughout the entire procedure of
providing first aid for a casualty, the rescuer should reassure the casualty and
keep him calm. This can be done by being authoritative (taking charge) and
by showing self-confidence. Assure the casualty that you are there to help
him.
(7)
Seek medical aid.
b.
Food and/or Drink. When providing first aid for shock, DO
NOT give the casualty any food or drink. If you must leave the casualty or if
he is unconscious, turn his head to the side to prevent him from choking if
he vomits (Figure 2-39).
Figure 2-39. Casualty’s head turned to side.
c.
Evaluate Casualty. Continue to evaluate the casualty until
medical personnel arrives or the casualty is transported to an MTF.
2-33
CHAPTER 3
FIRST AID FOR SPECIFIC INJURIES
3-1.
General
Basic lifesaving steps are discussed in Chapters 1 and 2; they apply to first
aid measures for all injuries. Some wounds and burns will require special
precautions and procedures when applying these measures. This chapter
discusses specific first aid procedures for wounds of the head, face, and
neck; chest and stomach wounds; and burns. It also discusses the techniques
for applying dressings and bandages to specific parts of the body.
3-2.
Head, Neck, and Facial Injuries
a.
Head Injuries.
(1)
Head injuries range from minor abrasions or cuts on the
scalp to severe brain injuries that may result in unconsciousness and
sometimes death. Head injuries are classified as open or closed wounds. An
open wound is one that is visible, has a break in the skin, and usually has
evidence of bleeding. A closed wound may be visible (such as a depression
in the skull) or the first aid provider may not be able to see any apparent
injury
(such as internal bleeding).
Some head injuries result in
unconsciousness; however, a service member may have a serious head wound
and still be conscious. Casualties with head and neck injuries should be
treated as though they also have a spinal injury. The casualty should not be
moved until the head and neck is stabilized unless he is in immediate danger
(such as close to a burning vehicle).
(2)
Prompt first aid measures should be initiated for
casualties with suspected head and neck injuries. The conscious casualty
may be able to provide information on the extent of his injuries. However, as a
result of the head injury, he may be confused and unable to provide accurate
information. The signs and symptoms a first aid provider might observe are—
•
Nausea and vomiting.
•
Convulsions or twitches.
•
Slurred speech.
•
Confusion and loss of memory.
(Does he know
who he is? Does he know where he is? Does he know what day it is?)
•
Recent unconsciousness.
3-1
•
Dizziness.
•
Drowsiness.
•
Blurred vision, unequal pupils, or bruising (black
eyes).
•
Paralysis (partial or full).
•
Complaint of headache.
•
Bleeding or other fluid discharge from the scalp,
nose, or ears.
•
Deformity of the head (depression or swelling).
•
Staggering while walking.
b.
Neck Injuries. Neck injuries may result in heavy bleeding.
Apply pressure above and below the injury, but do not interfere with the
breathing process, and attempt to control the bleeding. Apply a dressing.
Always evaluate the casualty for a possible neck fracture/spinal cord injury;
if suspected, seek medical treatment immediately.
NOTE
Establish and maintain the airway in cases of facial or neck
injuries. If a neck fracture or spinal cord injury is suspected,
immobilize the injury and, if necessary, perform basic life
support measures.
c.
Facial Injuries. Soft tissue injuries of the face and scalp are
common. Abrasions (scrapes) of the skin cause no serious problems.
Contusions (injury without a break in the skin) usually cause swelling. A
contusion of the scalp looks and feels like a lump. Laceration (cut) and
avulsion
(torn away tissue) injuries are also common. Avulsions are
frequently caused when a sharp blow separates the scalp from the skull
beneath it. Because the face and scalp are richly supplied with blood vessels
(arteries and veins), wounds of these areas usually bleed heavily.
3-3.
General First Aid Measures
a.
General Considerations. The casualty with a head injury (or
suspected head injury) should be continually monitored for the development
of conditions that may require basic lifesaving measures. After initiating first
3-2
aid measures, request medical assistance and evacuation. If dedicated medical
evacuation assets are not available, transport the casualty to an MTF as soon
as the situation permits. The first aid provider should not attempt to remove
a protruding object from the head or give the casualty anything to eat or
drink. Further, the first aid provider should be prepared to—
•
Clear the airway.
•
Control bleeding (external).
•
Administer first aid measures for shock.
•
Keep the casualty warm.
•
Protect the wound.
b.
Unconscious Casualty. An unconscious casualty does not have
control of all of his body’s functions and may choke on his tongue, blood,
vomitus, or other substances.
(Refer to Figure 2-39.)
(1)
Breathing. The brain requires a constant supply of
oxygen. A bluish (or in an individual with dark skin—grayish) color of skin
around the lips and nail beds indicates that the casualty is not receiving
enough oxygen. Immediate action must be taken to clear the airway, to
position the casualty on his side, or to initiate rescue breathing.
(2)
Bleeding. Bleeding from a head injury usually comes
from blood vessels within the scalp. Bleeding can also develop inside the
skull or within the brain. In most instances visible bleeding from the head
can be controlled by application of the field first aid dressing.
CAUTION
DO NOT attempt to put unnecessary pressure on the wound
or attempt to push any brain matter back into the head
(skull). DO NOT apply a pressure dressing.
c.
Concussion. If an individual receives a heavy blow to the
head or face, he may suffer a brain concussion (an injury to the brain that
involves a temporary loss of some or all of the brain’s ability to function).
For example, the casualty may not breathe properly for a short period of
time, or he may become confused and stagger when he attempts to walk.
Symptoms of a concussion may only last for a short period of time. However,
3-3
if a casualty is suspected of having suffered a concussion, he should be
transported to an MTF as soon as conditions permit.
d.
Convulsions. Convulsions (seizures/involuntary jerking) may
occur even after a mild head injury. When a casualty is convulsing, protect
him from hurting himself. Take the following measures:
(1)
Ease him to the ground if he is standing or sitting.
(2)
Support his head and neck.
(3)
Maintain his airway.
(4)
Protect him from further injury (such as hitting close-by
objects).
NOTE
DO NOT forcefully hold the arms and legs if they are jerking
because this can lead to broken bones. DO NOT force anything
between the casualty’s teeth—especially if they are tightly
clenched because this may obstruct the casualty’s airway.
Maintain the casualty’s airway if necessary.
e.
Brain Damage. In severe head injuries where brain tissue is
protruding, leave the wound alone; carefully place a loose moistened dressing
(moistened with sterile normal saline if available) and also a first aid dressing
over the tissue to protect it from further contamination. DO NOT remove or
disturb any foreign matter that may be in the wound. Position the casualty so
that his head is higher than his body. Keep him warm and seek medical
assistance immediately.
NOTE
If there is an object extending from the wound, DO NOT
remove the object. Improvise bulky dressings from the cleanest
material available and place this material around the protruding
object for support, then apply the field dressing.
3-4.
Chest Wounds
Blunt trauma, bullet or missile wounds, stab wounds, or falls may cause chest
injuries. These injuries can be serious and may cause death quickly if first aid
is not administered in a timely manner. A casualty with a chest injury may
3-4
complain of pain in the chest or shoulder area; he may have difficulty breathing.
His chest may not rise normally when he breathes. The injury may cause the
casualty to cough up blood and to have a rapid or a weak heartbeat. A casualty
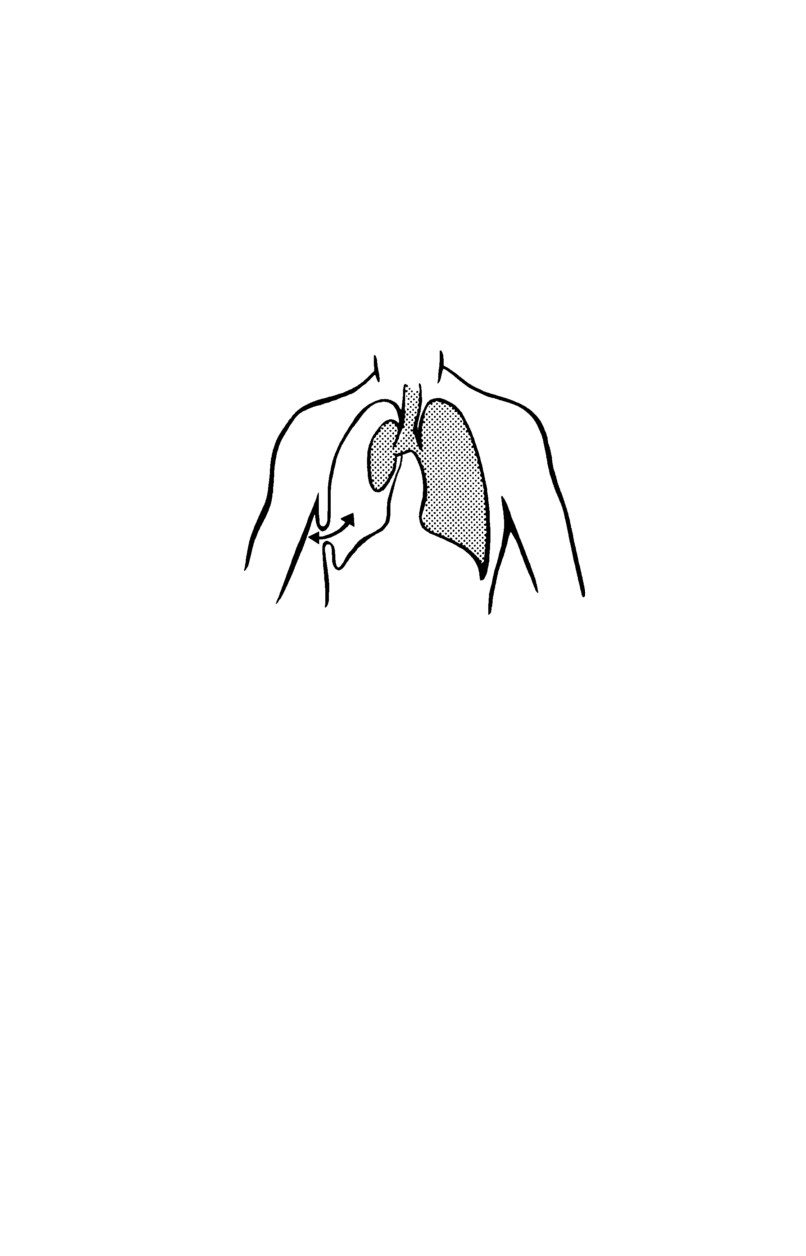
with an open chest wound has a punctured chest wall. The sucking sound
heard when he breathes is caused by air leaking into his chest cavity. This
particular type of wound is dangerous and will collapse the injured lung
(Figure 3-1). Breathing becomes difficult for the casualty because the wound
is open. The service members life may depend upon how quickly you apply
an occlusive dressing over the wound (refer to paragraph 3-5).
Figure 3-1. Collapsed lung.
3-5.
First Aid for Chest Wounds
a.
Evaluate the Casualty. Be prepared to perform first aid
measures. These measures may include clearing the airway, rescue breathing,
treatment for shock, and/or bleeding control.
b.
Expose the Wound. If appropriate, cut or remove the
casualty’s clothing to expose the wound. Remember, DO NOT remove
clothing that is stuck to the wound because additional injury may result. DO
NOT attempt to clean the wound.
NOTE
Examine the casualty to see if there is an entry and exit wound.
If there are two wounds
(entry, exit), perform the same
procedure for both wounds. Treat the more serious (heavier
bleeding, larger) wound first. It may be necessary to improvise
a dressing for the second wound by using strips of cloth, such as
a torn T-shirt, or whatever material is available. Also, listen
for sucking sounds to determine if the chest wall is punctured.
3-5
CAUTION
If there is an object impaled in the wound, DO NOT remove
it. Apply a dressing around the object and use additional
improvised bulky materials/dressings (use the cleanest
materials available) to build up the area around the object.
Apply a supporting bandage over the bulky materials to hold
them in place.
CAUTION
DO NOT REMOVE protective clothing in a chemical
environment. Apply dressings over the protective clothing.
c.
Open the Casualty’s Field Dressing Plastic Wrapper. In cases
where there is a sucking chest wound, the plastic wrapper is used with the
field dressing to create an occlusive dressing. If a plastic wrapper is not
available, or if an additional wound needs to be treated; cellophane, foil, the
casualty’s poncho, or similar material may be used. The covering should be
wide enough to extend 2 inches or more beyond the edges of the wound in all
directions.
(1)
Tear open one end of the casualty’s plastic wrapper
covering the field dressing. Be careful not to destroy the wrapper and DO
NOT touch the inside of the wrapper.
(2)
Remove the inner packet (field dressing).
(3)
Complete tearing open the empty plastic wrapper using
as much of the wrapper as possible to create a flat surface.
d.
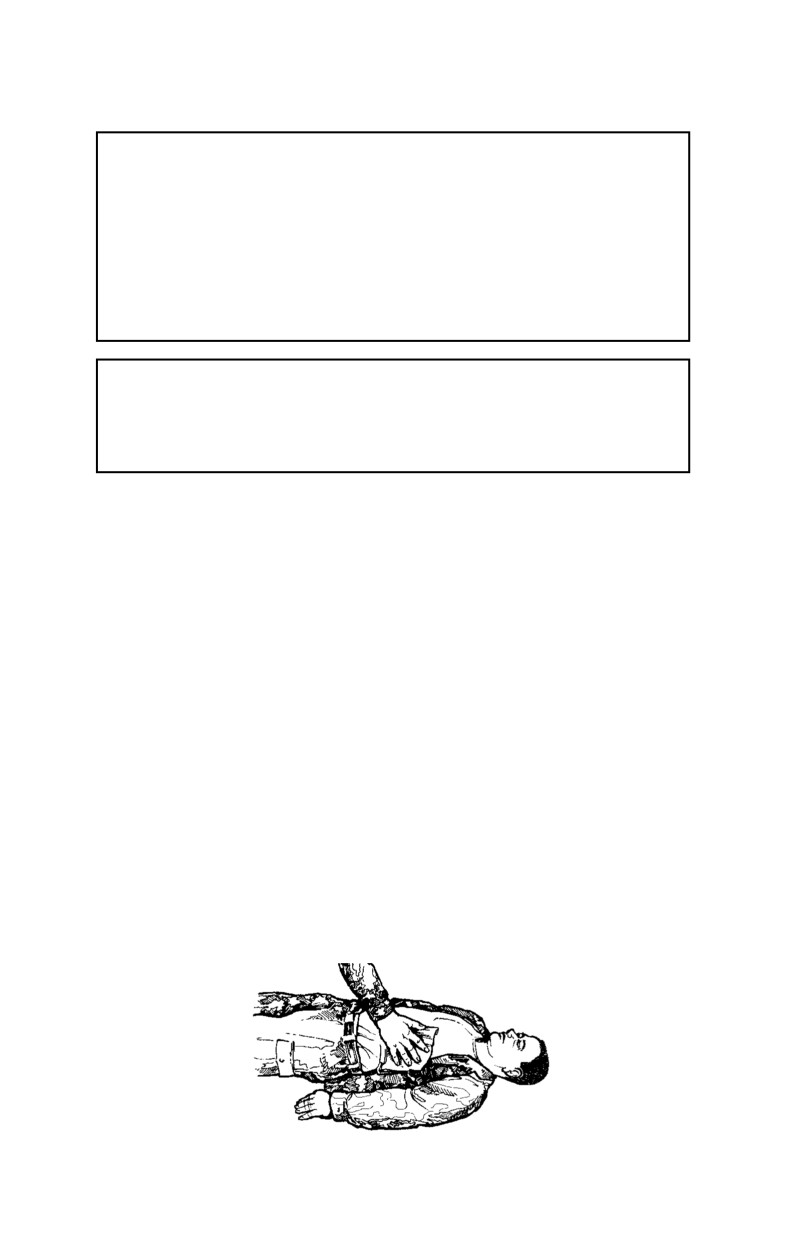
Place the Wrapper Over the Wound. Place the inside surface
of the plastic wrapper directly over the wound when the casualty exhales and
hold it in place (Figure 3-2). The casualty may hold the plastic wrapper in
place if he is able.
Figure 3-2. Open chest wound sealed with an occlusive dressing.
3-6