FIRST AID. Field Manual (2002) - page 3
e.
Apply the Dressing to the Wound.
(1)
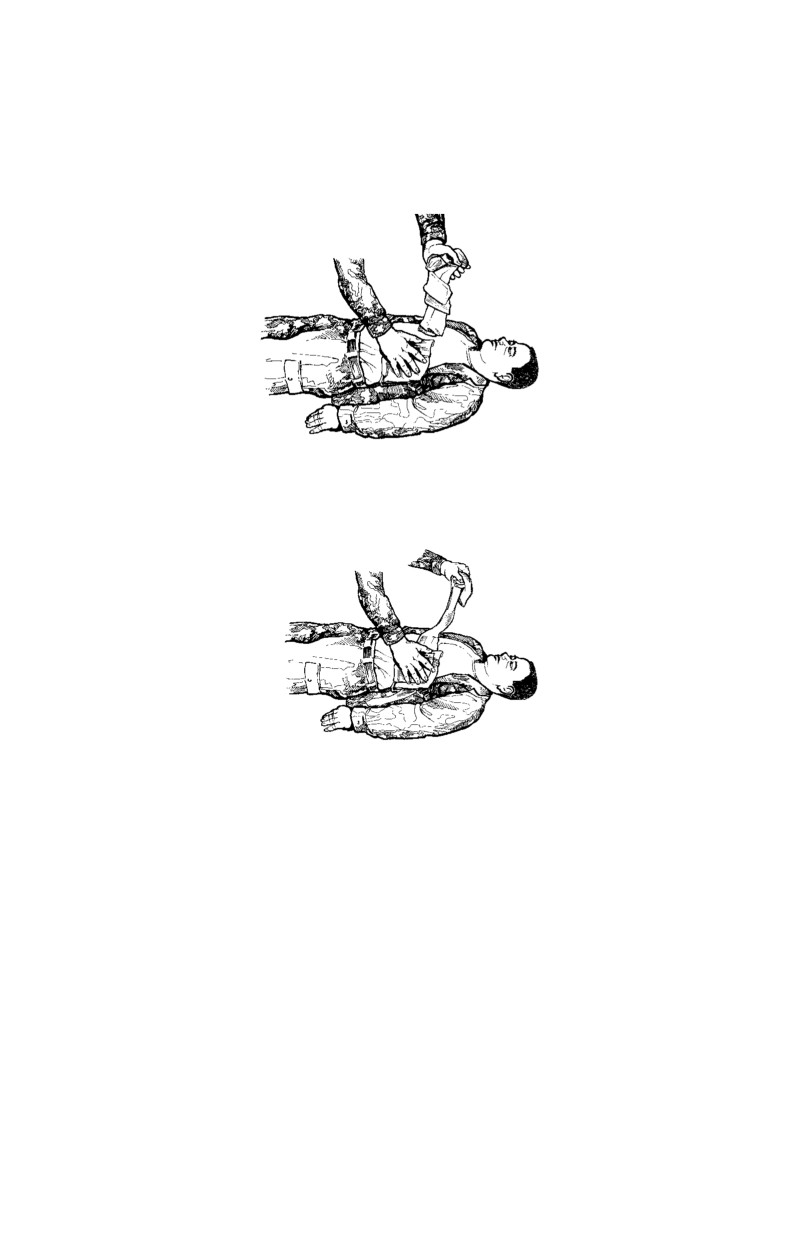
Use your free hand and shake open the field dressing
(Figure 3-3).
Figure 3-3. Shaking open the field dressing.
(2)
Place the white side of the dressing on the plastic wrapper
covering the wound (Figure 3-4).
Figure 3-4. Field dressing placed on plastic wrapper.
NOTE
Use the casualty’s field dressing, not your own.
(3)
Have the casualty breathe normally.
(4)
While maintaining pressure on the dressing, grasp one
tail of the field dressing with the other hand and wrap it around the casualty’s
back. If tape is available, tape three sides of the plastic wrapper to the chest
wall to provide occlusive type dressing. Leave one side untapped to provide
emergency escape for air that may build up in the chest. If tape is not
available, secure wrapper on three sides with field dressing leaving the fourth
side as a flap.
(5)
Wrap the other tail in the opposite direction, bringing
both tails over the dressing (Figure 3-5).
3-7
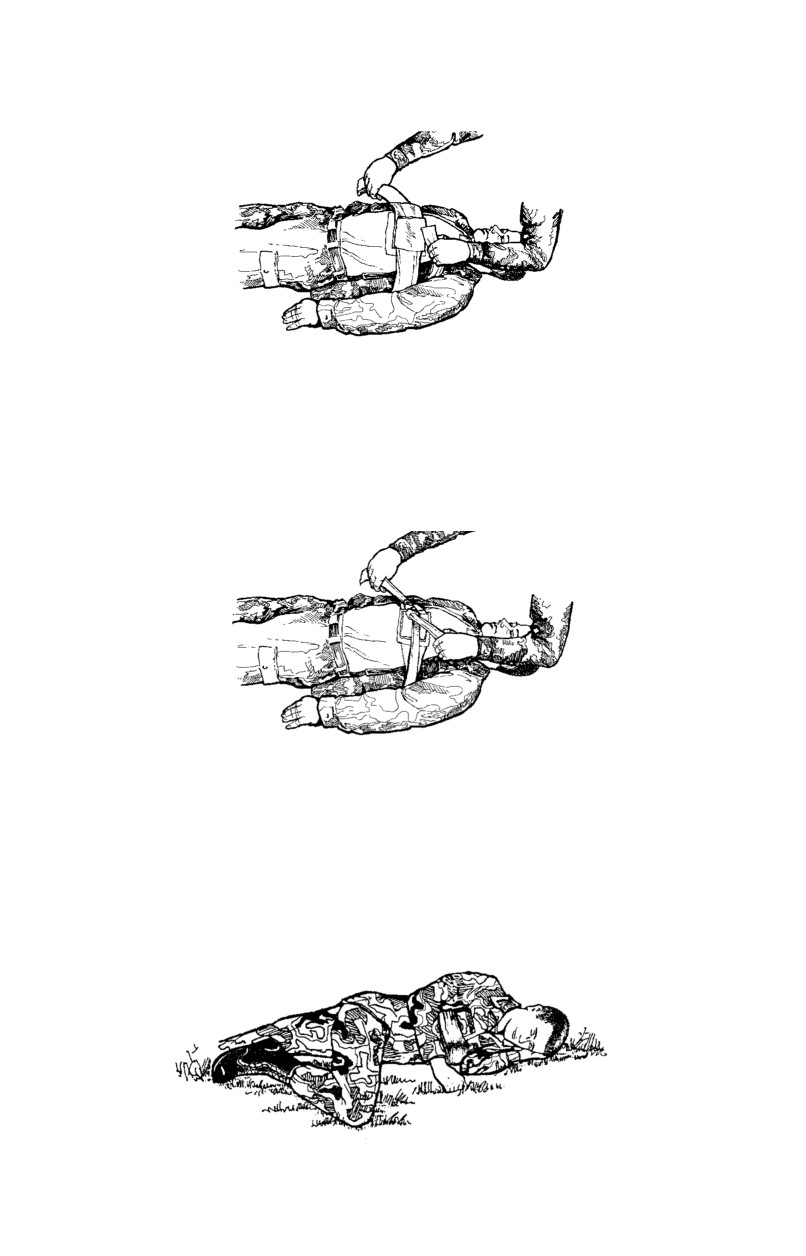
Figure 3-5. Tails of field dressing wrapped around casualty
in opposite direction.
(6)
Tie the tails into a square knot in the center of the
dressing after the casualty exhales and before he inhales. This will aid in
maintaining pressure on the bandage after it has been tied (Figure 3-6). Tie
the dressing firmly enough to secure the dressing without interfering with the
casualty’s breathing.
Figure 3-6. Tails of dressing tied into square knot over center of dressing.
NOTE
When practical, apply direct manual pressure over the dressing
for 5 to 10 minutes to help control the bleeding.
f.
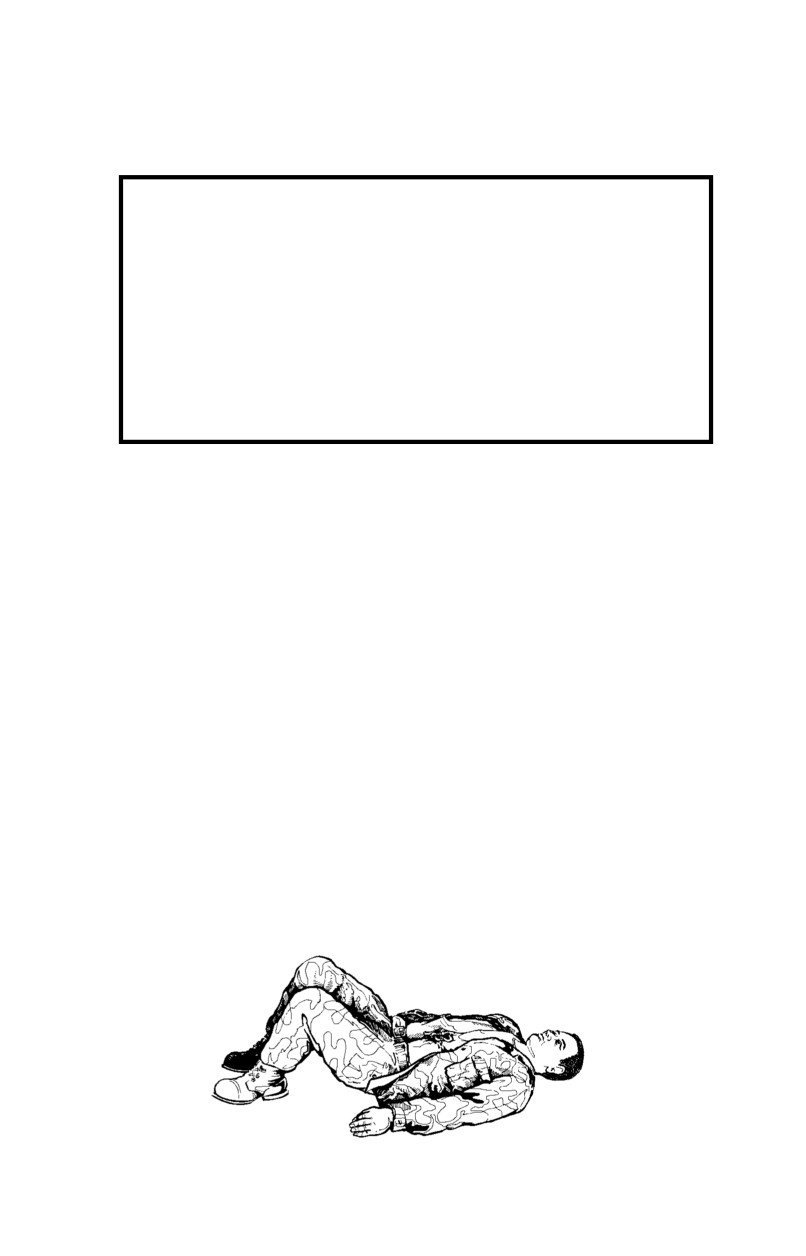
Position the Casualty. Position the casualty on his injured side
or in a sitting position, whichever makes breathing easier (Figure 3-7).
Figure 3-7. Casualty positioned (lying) on injured side.
3-8
g.
Seek Medical Assistance. Contact medical personnel.
WARNING
If an occlusive dressing has been improperly placed,
air may enter the chest cavity with no means of escape.
This causes a life-threatening condition called tension
pneumothorax. If the casualty’s condition (for example,
difficulty breathing, shortness of breath, restlessness,
or blueness/grayness of the skin) worsens after placing
the dressing, quickly lift or remove, and then replace
the occlusive dressing.
3-6.
Abdominal Wounds
The most serious abdominal wound is one in which an object penetrates the
abdominal wall and pierces internal organs or large blood vessels. In these
instances, bleeding may be severe and death can occur rapidly.
3-7.
First Aid for Abdominal Wounds
a.
Evaluate the Casualty. Be prepared to perform basic first aid
measures. Always check for both entry and exit wounds. If there are two
wounds (entry and exit), treat the wound that appears more serious first (for
example, the heavier bleeding, protruding organs, larger wound, and so
forth). It may be necessary to improvise dressings for the second wound by
using strips of cloth, a T-shirt, or the cleanest material available.
b.
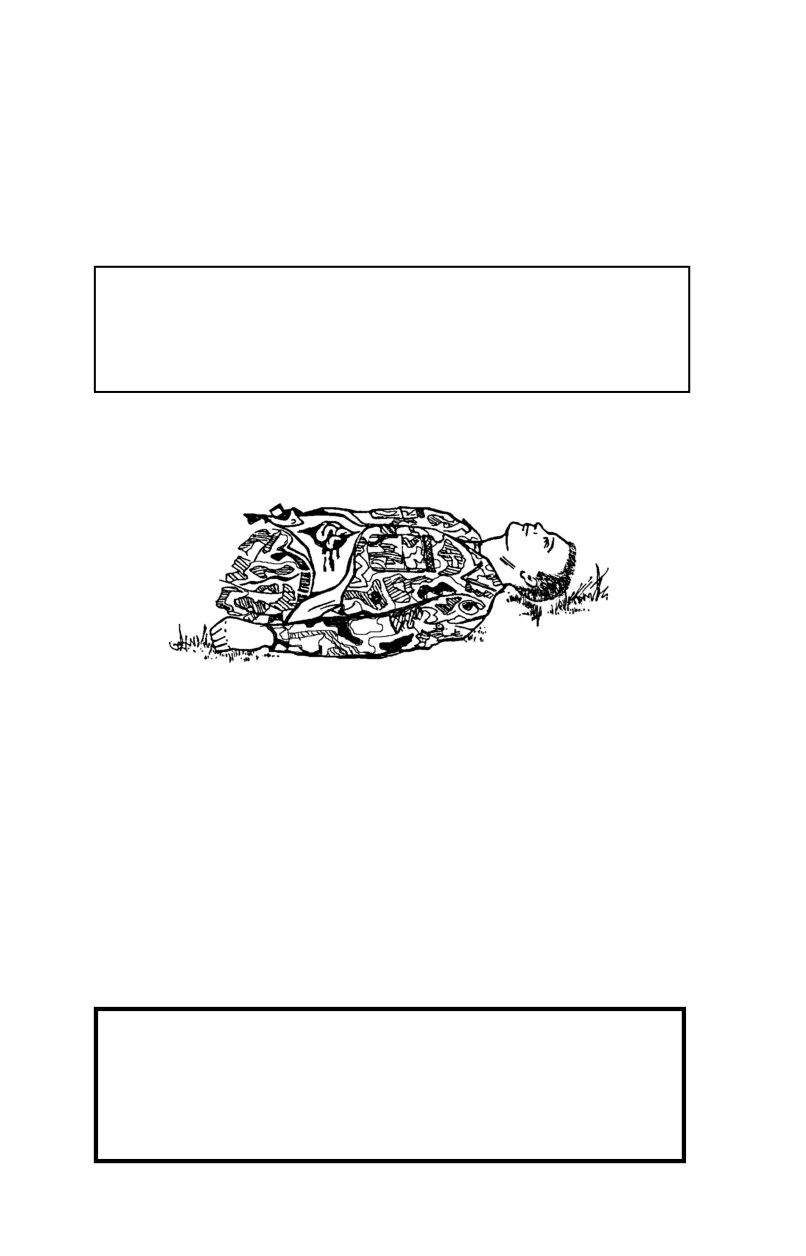
Position the Casualty. Place and maintain the casualty on his
back with his knees in an upright (flexed) position (Figure 3-8). The knees-
up position helps relieve pain, assists in the treatment of shock, prevents
further exposure of the bowel (intestines) or abdominal organs, and helps
relieve abdominal pressure by allowing the abdominal muscles to relax.
Figure 3-8. Casualty positioned (lying) on back with knees (flexed) up.
3-9
c.
Expose the Wound.
(1)
Remove the casualty’s loose clothing to expose the
wound. However, DO NOT attempt to remove clothing that is stuck to the
wound; removing it may cause further injury.
CAUTION
DO NOT REMOVE protective clothing in a chemical
environment. Apply dressings over the protective clothing.
(2)
Gently pick up any organs that may be on the ground.
Do this with a clean, dry dressing or with the cleanest available material.
Place the organs on top of the casualty’s abdomen (Figure 3-9).
Figure 3-9. Protruding organs placed near wound.
NOTE
DO NOT probe, clean, or try to remove any foreign object
from the abdomen. DO NOT touch with bare hands any
exposed organs. DO NOT push organs back inside the body.
d.
Apply the Field Dressing. Use the casualty’s field dressing,
not your own. If the field dressing is not large enough to cover the entire
wound, the plastic wrapper from the dressing may be used to cover the wound
first
(placing the field dressing on top). Open the plastic wrapper carefully
without touching the inner surface. If necessary, other improvised dressings
may be made from clothing, blankets, or the cleanest materials available.
WARNING
If there is an object extending from the wound, DO NOT
remove it. Place as much of the wrapper over the
wound as possible without dislodging or moving the
object. DO NOT place the wrapper over the object.
3-10
(1)
Grasp the tails in both hands.
(2)
Hold the dressing with the white side down directly over
the wound. DO NOT touch the white (sterile) side of the dressing or allow
anything except the wound to come in contact with it.
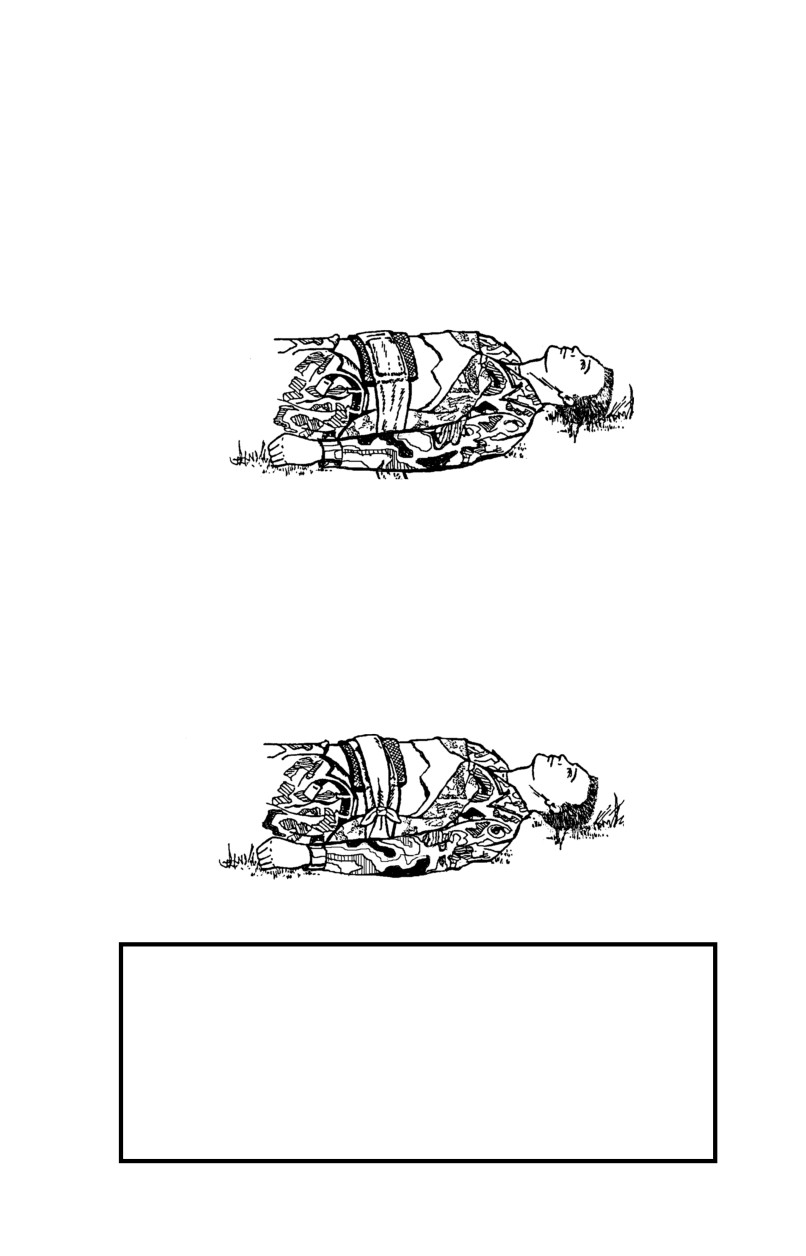
(3)
Pull the dressing open and place it directly over the wound
(Figure 3-10). If the casualty is able, he may hold the dressing in place.
Figure 3-10. Dressing placed directly over the wound.
(4)
Hold the dressing in place with one hand and use the
other hand to wrap one of the tails around the body.
(5)
Wrap the other tail in the opposite direction until the
dressing is completely covered. Leave enough of the tail for a knot.
(6)
Loosely tie the tails with a square knot at the casualty’s
side (Figure 3-11).
Figure 3-11. Dressing applied and tails tied with a square knot.
WARNING
When the dressing is applied, DO NOT put pressure on
the wound or exposed internal parts, because pressure
could cause further injury
(vomiting, ruptured
intestines, and so forth). Therefore, tie the dressing
ties (tails) loosely at casualty’s side, not directly over
the dressing.
3-11
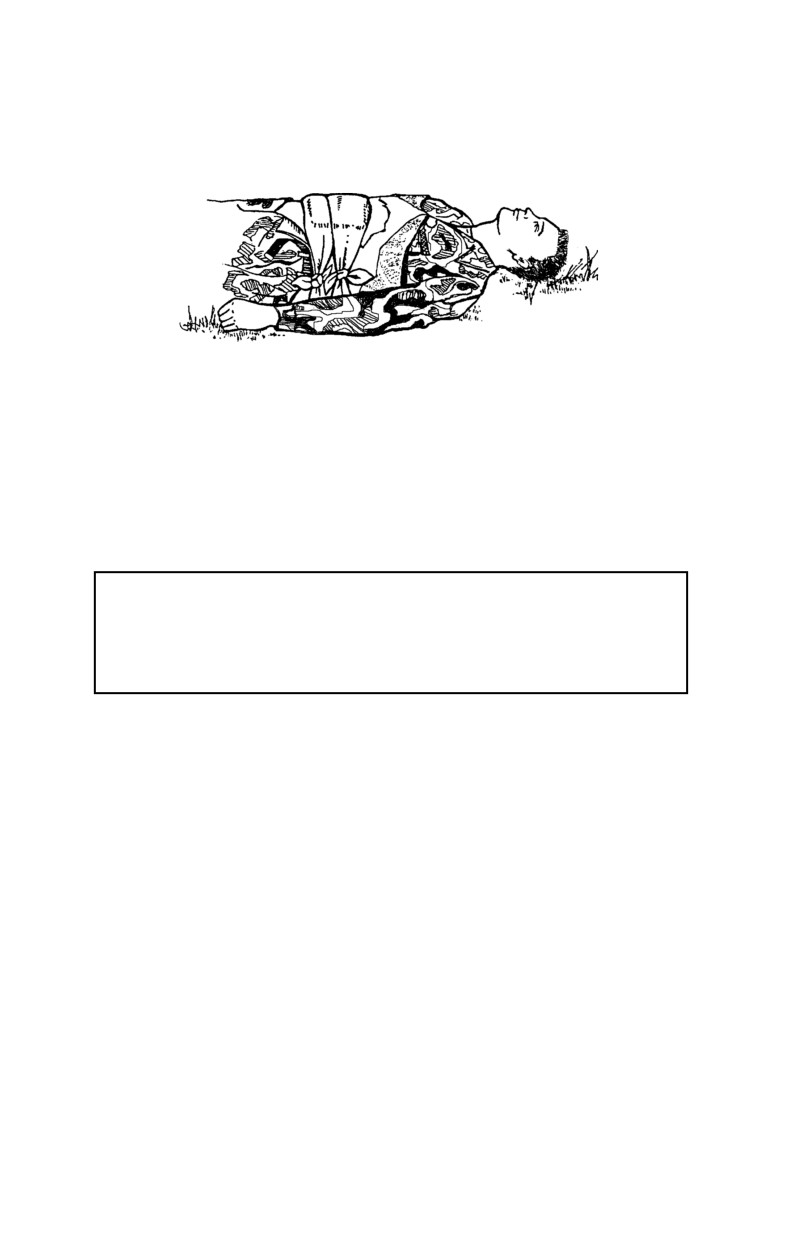
(7)
Tie the dressing firmly enough to prevent slipping
without applying pressure to the wound site (Figure 3-12).
Figure 3-12. Field dressing covered with improvised material
and loosely tied.
Field dressings can be covered with improvised reinforcement material
(cravats, strips of torn T-shirt, or other cloth) for additional support and
protection. Tie improvised bandage on the opposite side of the dressing ties
firmly enough to prevent slipping but without applying additional pressure to
the wound.
CAUTION
DO NOT give casualties with abdominal wounds food or
water (moistening the lips is allowed).
e.
Seek Medical Assistance. Notify medical personnel.
3-8.
Burn Injuries
Burns often cause extreme pain, scarring, or even death. Before
administering first aid, you must be able to recognize the type of burn.
There are four types of burns:
•
Thermal burns caused by fire, hot objects, hot liquids, and
gases; or by nuclear blast or fireball.
•
Electrical burns caused by electrical wires, current, or
lightning.
•
Chemical burns caused by contact with wet or dry chemicals
or white phosphorus (WP)—from marking rounds and grenades.
•
Laser burns
(eye [ocular] injury).
3-12
3-9.
First Aid for Burns
a.
Eliminate the Source of the Burn. The source of the burn must
be eliminated before any evaluation of the casualty can occur and first aid
administered.
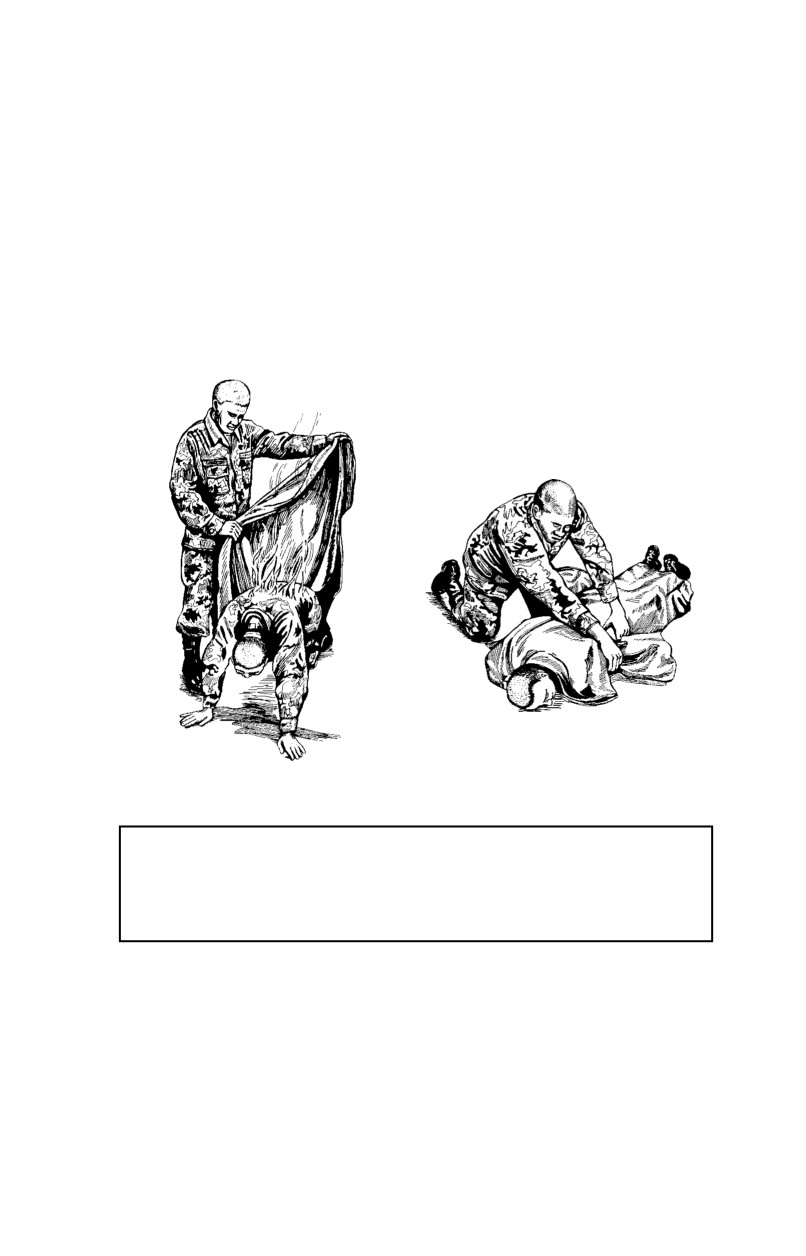
(1)
Quickly remove the casualty from danger and cover the
thermal burn with any large nonsynthetic material, such as a field jacket. If
the casualty’s clothing is still on fire, roll the casualty on the ground to
smother (put out) the flames (Figure 3-13).
Figure 3-13. Casualty covered and rolled on ground.
CAUTION
Synthetic materials, such as nylon, may melt and cause
further injury.
(2)
Remove the electrical burn casualty from the electrical
source by turning off the electrical current. DO NOT attempt to turn off the
electricity if the source is not close by. Speed is critical, so DO NOT waste
unnecessary time. If the electricity cannot be turned off, wrap any
nonconductive material (dry rope, clothing, wood, and so forth) around the
casualty’s back and shoulders and drag the casualty away from the electrical
source (Figure 3-14). DO NOT make body-to-body contact with the casualty
or touch any wires because you could also become an electrical burn casualty.
3-13
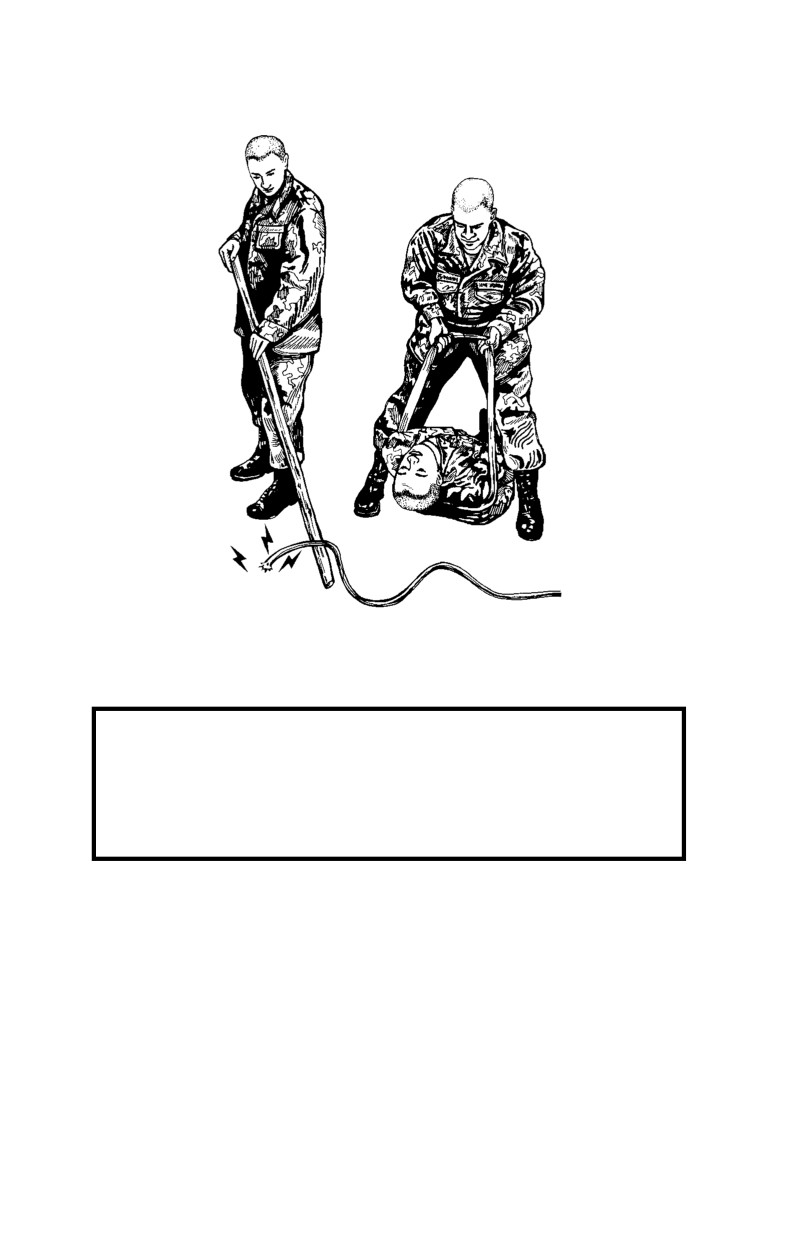
Figure 3-14. Casualty removed from electrical source
(using nonconductive material).
WARNING
High voltage electrical burns may cause temporary
unconsciousness, difficulties in breathing, or diffi-
culties with the heart (heartbeat).
(3)
Remove the chemical from the burned casualty. Remove
liquid chemicals by flushing with as much water as possible. Remove dry
chemicals by brushing off loose particles (DO NOT use the bare surface of
your hand because you could become a chemical burn casualty) and then flush
with large amounts of water, if available. If large amounts of water are not
available, then NO water should be applied because small amounts of water
applied to a dry chemical burn may cause a chemical reaction. When WP
strikes the skin, smother with a wet cloth or mud. Keep WP covered with a
wet material to exclude air; this should help prevent the particles from burning.
(4)
Remove the laser burn casualty from the source. When
removing the casualty from the laser beam source, be careful not to enter the
3-14
beam or you may become a casualty. Never look directly at the beam source
and if possible, wear appropriate eye protection.
NOTE
After the casualty is removed from the source of the burn, he
should be evaluated for conditions requiring basic first aid
measures.
b.
Expose the Burn. Cut and gently lift away any clothing
covering the burned area, without pulling clothing over the burns. Leave in
place any clothing that is stuck to the burn. If the casualty’s hands or wrists
have been burned, remove jewelry if possible without causing further injury
(rings, watches, and so forth) and place in his pockets. This prevents the
necessity to cut off jewelry since swelling usually occurs as a result of a burn.
CAUTION
DO NOT lift or cut away clothing if in a chemical
environment. Apply the dressing directly over the casualty’s
protective clothing. DO NOT attempt to decontaminate skin
where blisters have formed.
c.
Apply a Field Dressing to the Burn.
(1)
Grasp the tails of the casualty’s dressing in both hands.
(2)
Hold the dressing directly over the wound with the white
side down, pull the dressing open, and place it directly over the wound. DO
NOT touch the white (sterile) side of the dressing or allow anything except
the wound to come in contact with it. If the casualty is able, he may hold the
dressing in place.
(3)
Hold the dressing in place with one hand and use the
other hand to wrap one of the tails around the limbs or the body.
(4)
Wrap the other tail in the opposite direction until the
dressing is completely covered.
(5)
Tie the tails into a square knot over the outer edge of the
dressing. The dressing should be applied lightly over the burn. Ensure that
dressing is applied firmly enough to prevent it from slipping.
3-15
NOTE
Use the cleanest improvised dressing material available if a field
dressing is not available or if it is not large enough for the entire
wound.
d.
Take the Following Precautions:
•
DO NOT place the dressing over the face or genital area.
•
DO NOT break the blisters.
•
DO NOT apply grease or ointments to the burns.
•
For electrical burns, check for both an entry and exit
burn from the passage of electricity through the body. Exit burns may
appear on any area of the body despite location of entry burn.
•
For burns caused by wet or dry chemicals, flush the
burns with large amounts of water and cover with a dry dressing.
•
For burns caused by WP, flush the area with water, then
cover with a wet material, dressing, or mud to exclude the air and keep the
WP particles from burning.
•
For laser burns, apply a field dressing.
•
If the casualty is conscious and not nauseated, give him
small amounts of water.
e.
Seek Medical Assistance. Notify medical personnel.
3-10. Dressings and Bandages
a.
Head Wounds.
(1)
Position the casualty.
WARNING
DO NOT move the casualty if you suspect he has
sustained a neck, spine, or head injury (which produces
any signs or symptoms other than minor bleeding).
3-16
•
If the casualty has a minor
(superficial) scalp
wound and is conscious:
•
Have the casualty sit up (unless other injuries
prohibit or he is unable to).
•
If the casualty is lying down and is not
accumulating fluids or drainage in his throat, elevate his head slightly.
•
If the casualty is bleeding from or into his
mouth or throat, turn his head to the side or position him on his side so that
the airway will be clear. Avoid putting pressure on the wound and place him
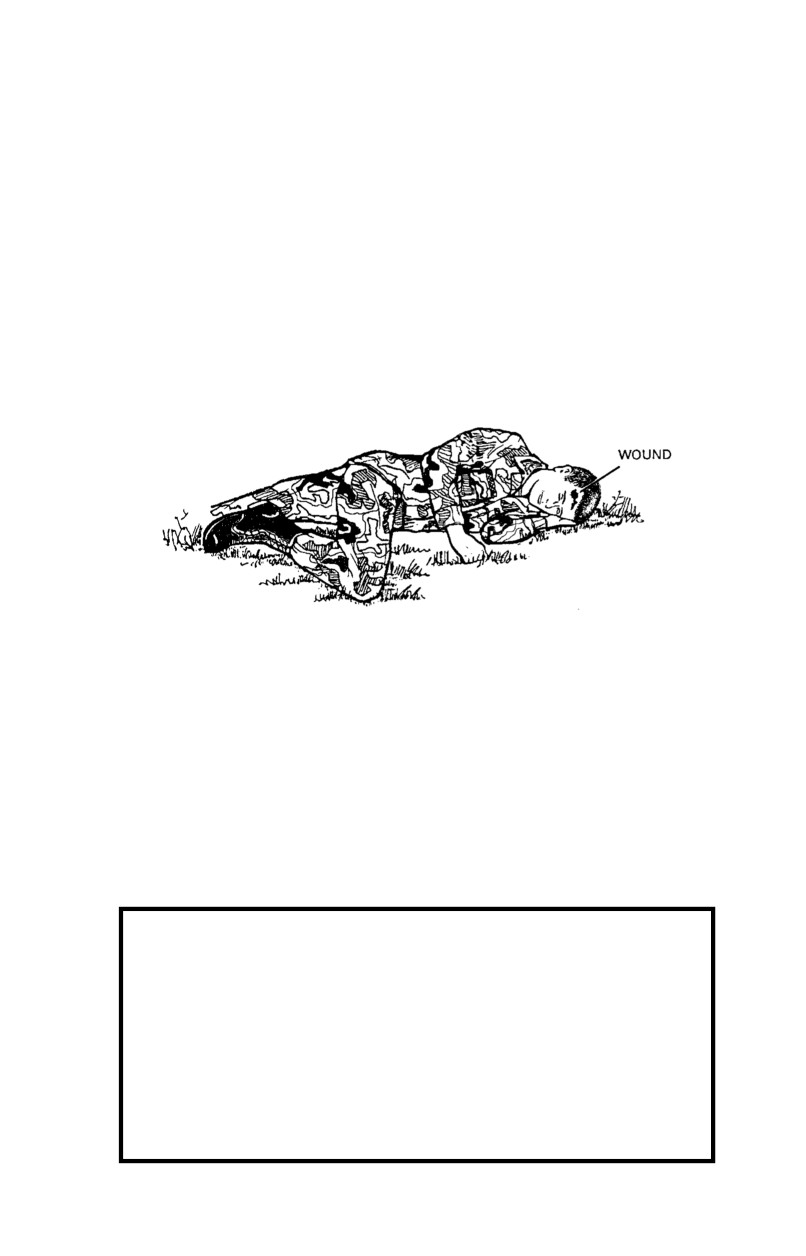
on his uninjured side (Figure 3-15).
Figure 3-15. Casualty lying on side opposite injury.
•
If the casualty is unconscious or has a severe head
injury, then suspect and treat him as having a potential neck or spinal injury,
immobilize and DO NOT move the casualty.
NOTE
If the casualty is choking or vomiting or is bleeding from or into
his mouth (thus compromising his airway), position him on his
uninjured side to allow for drainage and to help keep his airway
clear.
WARNING
If it is necessary to turn a casualty with a suspected
neck/spine injury; roll the casualty gently onto his side,
keeping the head, neck, and body aligned while pro-
viding support for the head and neck. DO NOT roll the
casualty by yourself but seek assistance. Move him only
if absolutely necessary, otherwise keep the casualty
immobilized to prevent further damage to the neck/spine.
3-17
(2)
Expose the wound. Remove the casualty’s helmet (if
necessary). In a nuclear, biological, and chemical (NBC) environment, the
first aid provider must leave the casualty as much protection
(such as
protective mask, mission-oriented protective posture [MOPP] overgarments)
as possible. What items of protective equipment can be removed is dependent
upon the casualty’s injuries (where on the body and what type), the MOPP
level, integrity of protective equipment (such as tears in the garment or mask
seal), availability of chemical protective shelters, and the tactical situation.
WARNING
DO NOT attempt to clean the wound or remove a
protruding object.
NOTE
Always use the casualty’s field dressing, not your own.
(3)
Apply a dressing to a wound of the forehead or back of
head. To apply a dressing to a wound of the forehead or back of the head—
(a) Remove the dressing from the wrapper.
(b) Grasp the tails of the dressing in both hands.
(c) Hold the dressing (white side down) directly over
the wound. DO NOT touch the white (sterile) side of the dressing or allow
anything except the wound to come in contact with it.
(d) Place it directly over the wound.
(e) Hold it in place with one hand. If the casualty is
able, he may assist.
(f)
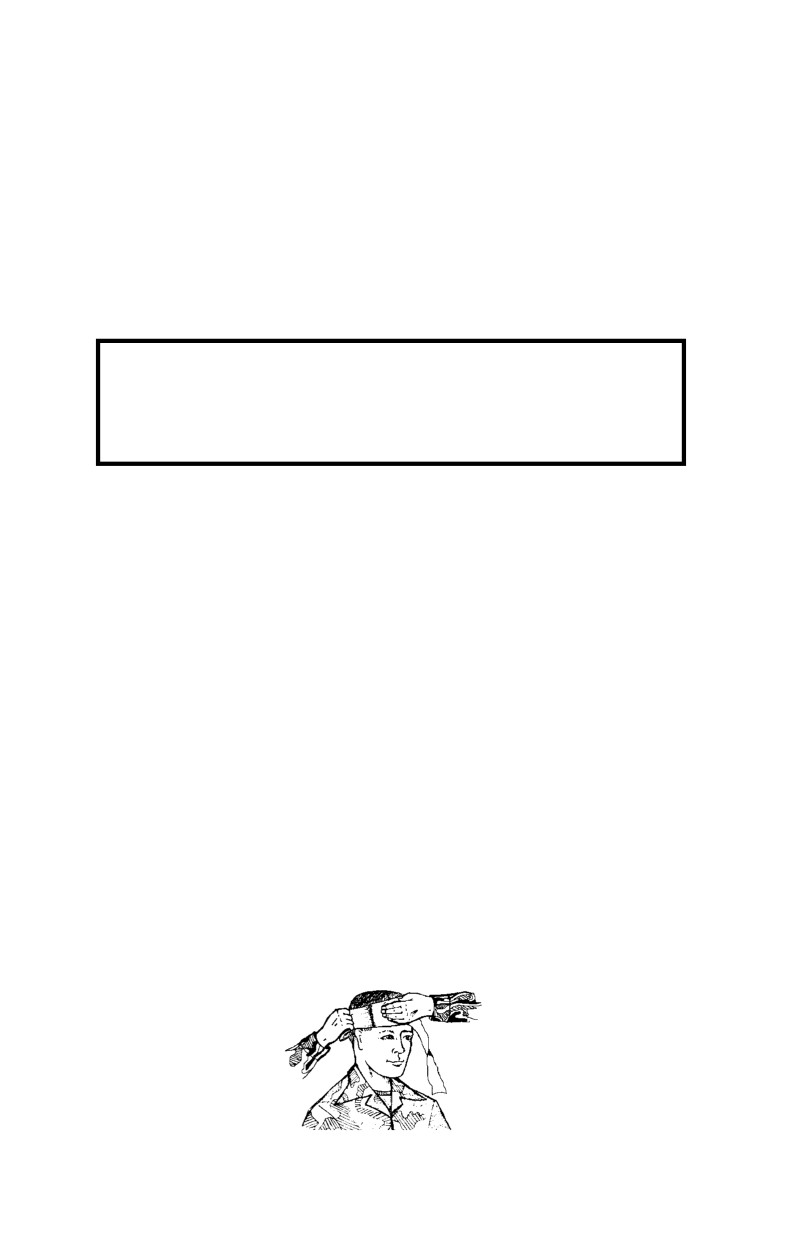
Wrap the first tail horizontally around the head;
ensure the tail covers the dressing (Figure 3-16).
Figure 3-16. First tail of dressing wrapped horizontally around head.
3-18
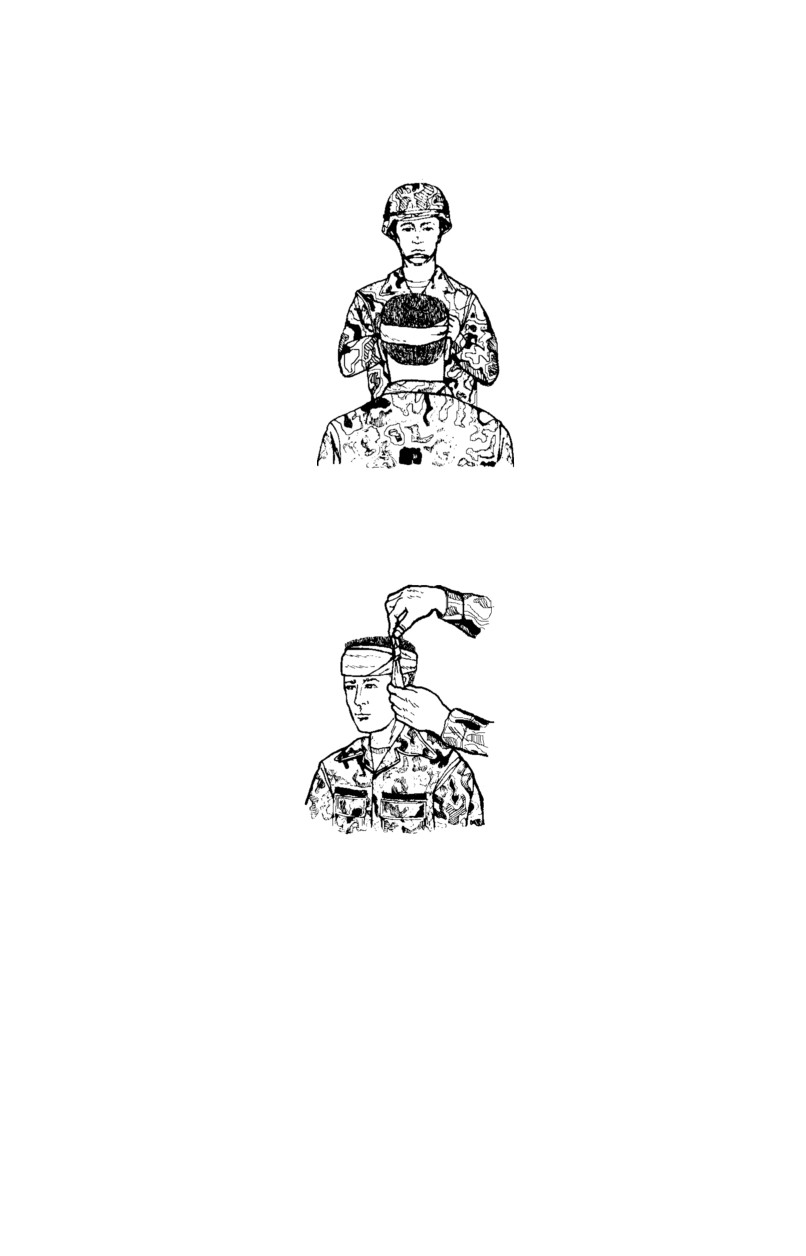
(g) Hold the first tail in place and wrap the second tail
in the opposite direction, covering the dressing (Figure 3-17).
Figure 3-17. Second tail wrapped in opposite direction.
(h) Tie a square knot and secure the tails at the side of
the head, making sure they DO NOT cover the eyes or ears (Figure 3-18).
Figure 3-18. Tails tied in square knot at side of head.
(4)
Apply a dressing to a wound on top of the head. To
apply a dressing to a wound on top of the head—
(a) Remove the dressing from the wrapper.
(b) Grasp the tails of the dressing in both hands.
(c) Hold it (white side down) directly over the wound.
DO NOT touch the white (sterile) side of the dressing or allow anything
except the wound to come in contact with it.
(d) Place it over the wound (Figure 3-19).
3-19
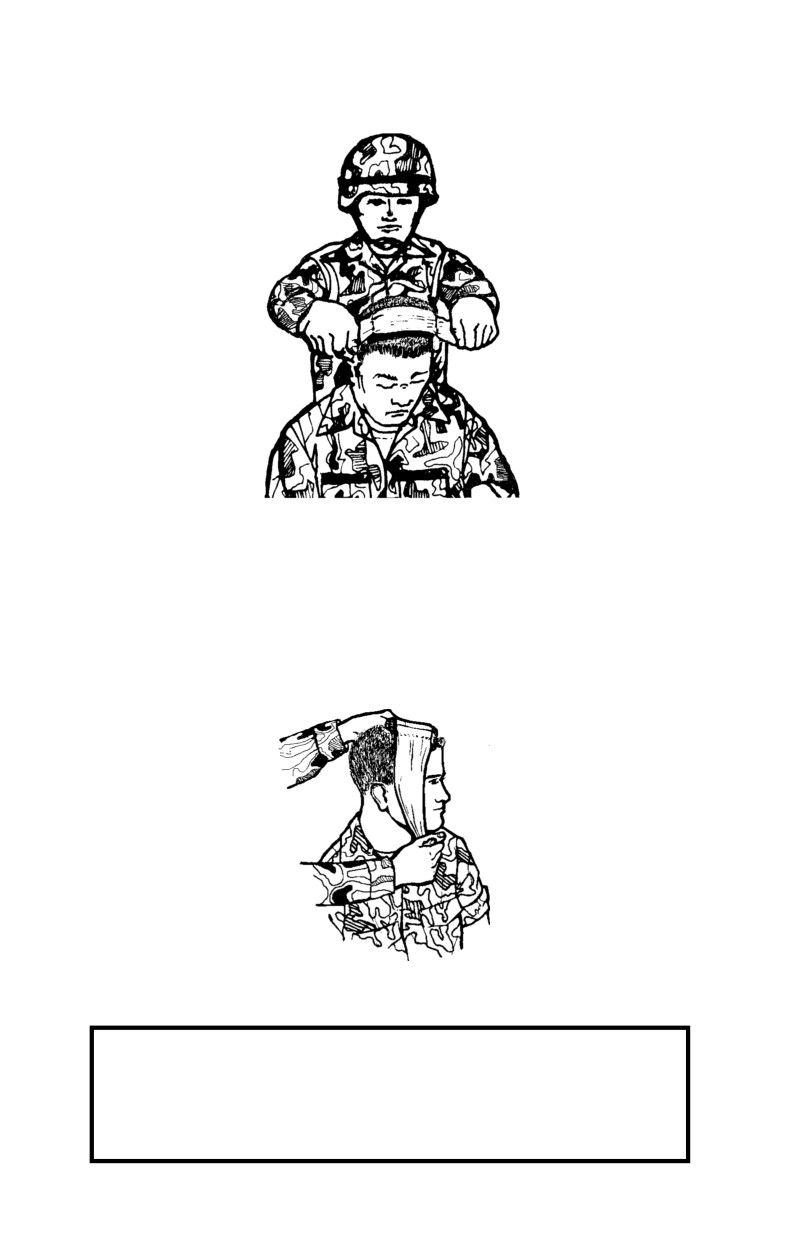
Figure 3-19. Dressing placed over wound.
(e) Hold it in place with one hand. If the casualty is
able, he may assist.
(f)
Wrap one tail down under the chin (Figure 3-20),
up in front of the ear, over the dressing, and in front of the other ear.
Figure 3-20. One tail of dressing wrapped under chin.
WARNING
Ensure the tails remain wide and close to the front of
the chin to avoid choking the casualty.
3-20
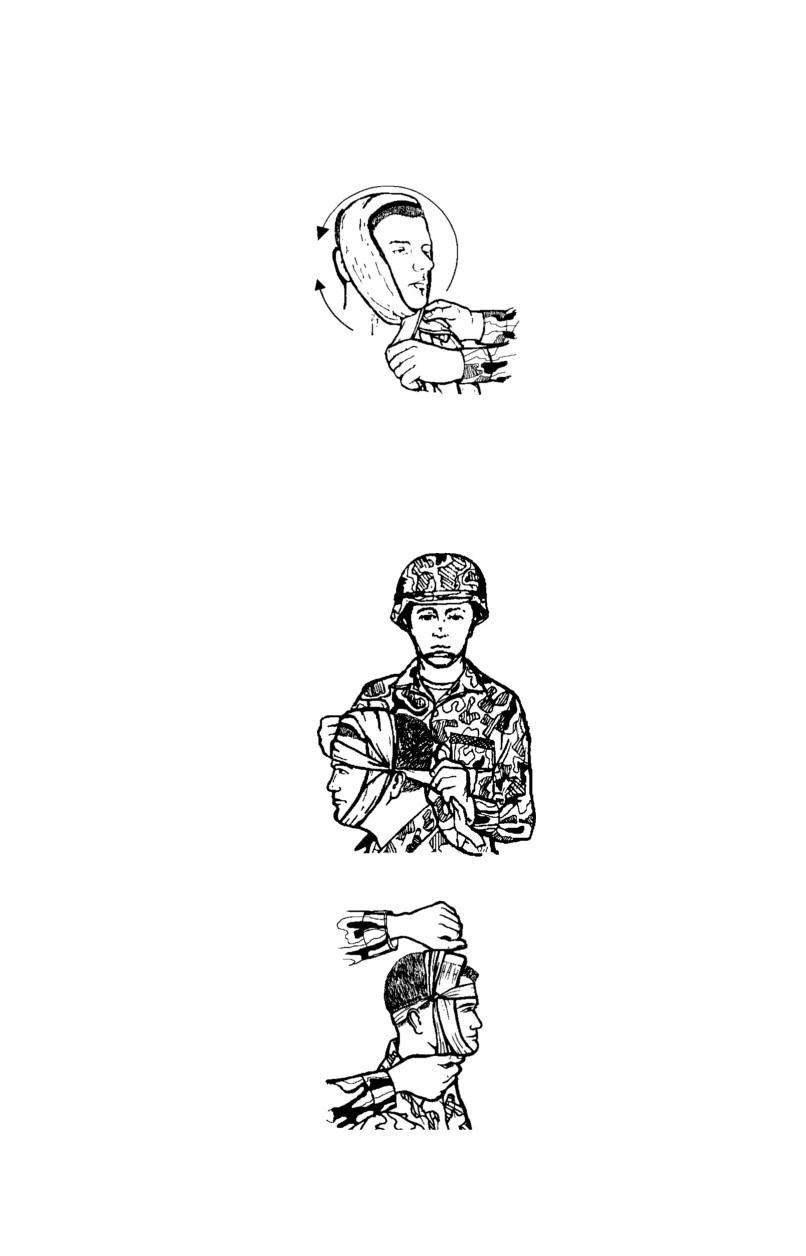
(g) Wrap the remaining tail under the chin in the
opposite direction and up the side of the face to meet the first tail (Figure 3-21).
Figure 3-21. Remaining tail wrapped under chin in opposite direction.
(h) Cross the tails (Figure 3-22), bringing one around
the forehead (above the eyebrows) and the other around the back of the head
(at the base of the skull) to a point just above and in front of the opposite ear,
and tie them using a square knot (Figure 3-23).
Figure 3-22. Tails of dressing crossed with one around forehead.
Figure 3-23. Tails tied in square knot (in front of and above ear).
3-21
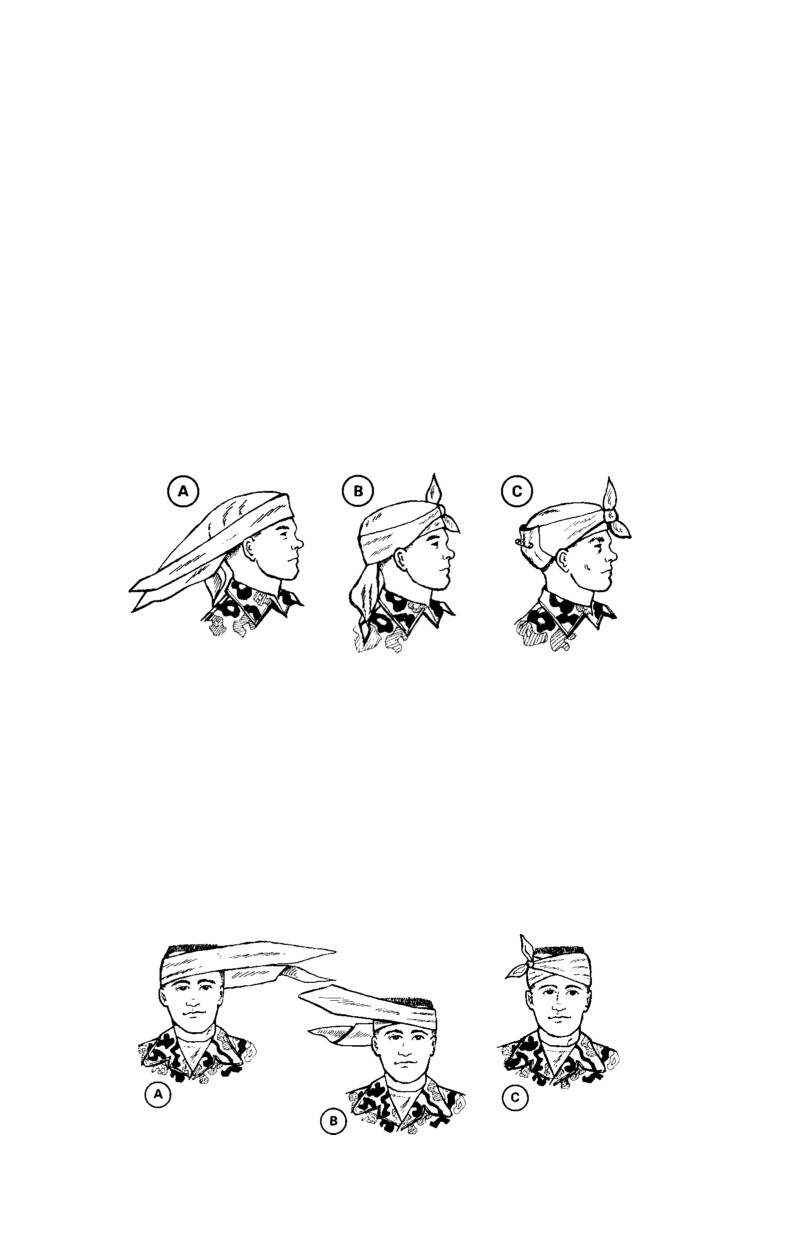
(5)
Apply a triangular bandage to the head. To apply a
triangular bandage to the head—
(a) Turn the base (longest side) of the bandage up and
center its base on the center of the forehead, letting the point (apex) fall on
the back of the neck (Figure 3-24A).
(b) Take the ends behind the head and cross the ends
over the apex.
(c) Take them over the forehead and tie them (Figure
3-24B).
(d) Tuck the apex behind the crossed part of the
bandage or secure it with a safety pin, if available (Figure 3-24C).
Figure 3-24. Triangular bandage applied to head (Illustrated A—C)
(6)
Apply a cravat bandage to the head. To apply a cravat
bandage to the head—
(a) Place the middle of the bandage over the dressing
(Figure 3-25A).
(b) Cross the two ends of the bandage in opposite
directions completely around the head (Figure 3-25B).
(c) Tie the ends over the dressing (Figure 3-25C).
Figure 3-25. Cravat bandage applied to head (Illustrated A—C).
3-22
b.
Eye Injuries. The eye is a vital sensory organ, and blindness
is a severe physical handicap. Timely first aid of the eye may relieve pain
and may also help to prevent shock, permanent eye injury, and possible loss
of vision. Because the eye is very sensitive, any injury can be easily
aggravated if it is improperly handled. Injuries of the eye may be quite
severe. Cuts of the eyelids can appear to be very serious, but if the eyeball is
not involved, a person’s vision usually will not be damaged. However,
lacerations (cuts) of the eyeball can cause permanent damage or loss of sight.
(1)
Lacerated/torn eyelids. Lacerated eyelids may bleed
heavily, but bleeding usually stops quickly. Cover the injured eye with a
sterile dressing. DO NOT put pressure on the wound because you may
injure the eyeball. Handle torn eyelids very carefully to prevent further
injury. Place any detached pieces of the eyelid on a clean bandage or
dressing and immediately send them with the casualty to the medical facility.
(2)
Lacerated eyeball (injury to the globe). Lacerations or
cuts to the eyeball may cause serious and permanent eye damage. Cover the
injury with a loose sterile dressing. DO NOT put pressure on the eyeball
because additional damage may occur. An important point to remember is
that when one eyeball is injured, you should immobilize both eyes. This is
done by applying a bandage to both eyes. Because the eyes move together,
covering both will lessen the chances of further damage to the injured eye.
(However, in hazardous surroundings, leave uninjured eye uncovered to
enable casualty to see.)
CAUTION
DO NOT apply pressure when there is a possible laceration
of the eyeball. The eyeball contains fluid. Pressure applied
over the eye will force the fluid out, resulting in permanent
injury. APPLY PROTECTIVE DRESSING WITHOUT
ADDED PRESSURE.
(3)
Extruded eyeballs. Service members may encounter
casualties with severe eye injuries that include an extruded eyeball (eyeball
out-of-socket). In such instances you should gently cover the extruded eye
with a loose moistened dressing and also cover the unaffected eye. DO NOT
bind or exert pressure on the injured eye while applying the dressing. Keep
the casualty quiet, place him on his back, treat for shock, and evacuate him
immediately.
(4)
Burns of the eyes. Chemical burns, thermal (heat) burns,
and light burns can affect the eyes.
3-23
(a) Chemical burns. Injuries from chemical burns
require immediate first aid. Mainly acids or alkalies cause chemical burns.
The first aid measures consist of flushing the eyes immediately with large
amounts of water for at least 5 to 20 minutes, or as long as necessary to flush
out the chemical and, once flushed, bandaging the eyes. If the burn is an
acid burn, you should flush the eye for at least 5 to 10 minutes. If the burn is
an alkali burn, you should flush the eye for at least 20 minutes. After the eye
has been flushed evacuate the casualty immediately.
(b) Thermal burns. When an individual suffers burns
of the face from a fire, the eyes will close quickly due to extreme heat. This
reaction is a natural reflex to protect the eyeballs; however, the eyelids
remain exposed and are frequently burned. If a casualty receives burns of
the eyelids or face—
•
DO NOT apply a dressing.
•
DO NOT touch.
•
SEEK medical assistance immediately.
(c) Light burns. Exposure to intense light can burn an
individual. Infrared rays, eclipse light (if the casualty has looked directly at
the sun), or laser burns cause injuries of the exposed eyeball. Ultraviolet
rays from arc welding can cause a superficial burn to the surface of the eye.
These injuries are generally not painful but may cause permanent damage to
the eyes. Immediate first aid is usually not required. Loosely bandaging the
eyes may make the casualty more comfortable and protect his eyes from
further injury caused by exposure to other bright lights or sunlight.
CAUTION
With impaled objects or significant sized foreign bodies, both
eyes are usually bandaged to help secure the foreign body
in the injured eye. In a battlefield environment, leave the
uninjured eye uncovered so that the casualty can see.
c.
Side-of-Head or Cheek Wound. Facial injuries to the side of
the head or the cheek may bleed profusely (Figure 3-26). Prompt action is
necessary to ensure that the airway remains open and also to control the
bleeding. It may be necessary to apply a dressing. To apply a dressing—
(1)
Remove the dressing from its wrapper.
3-24
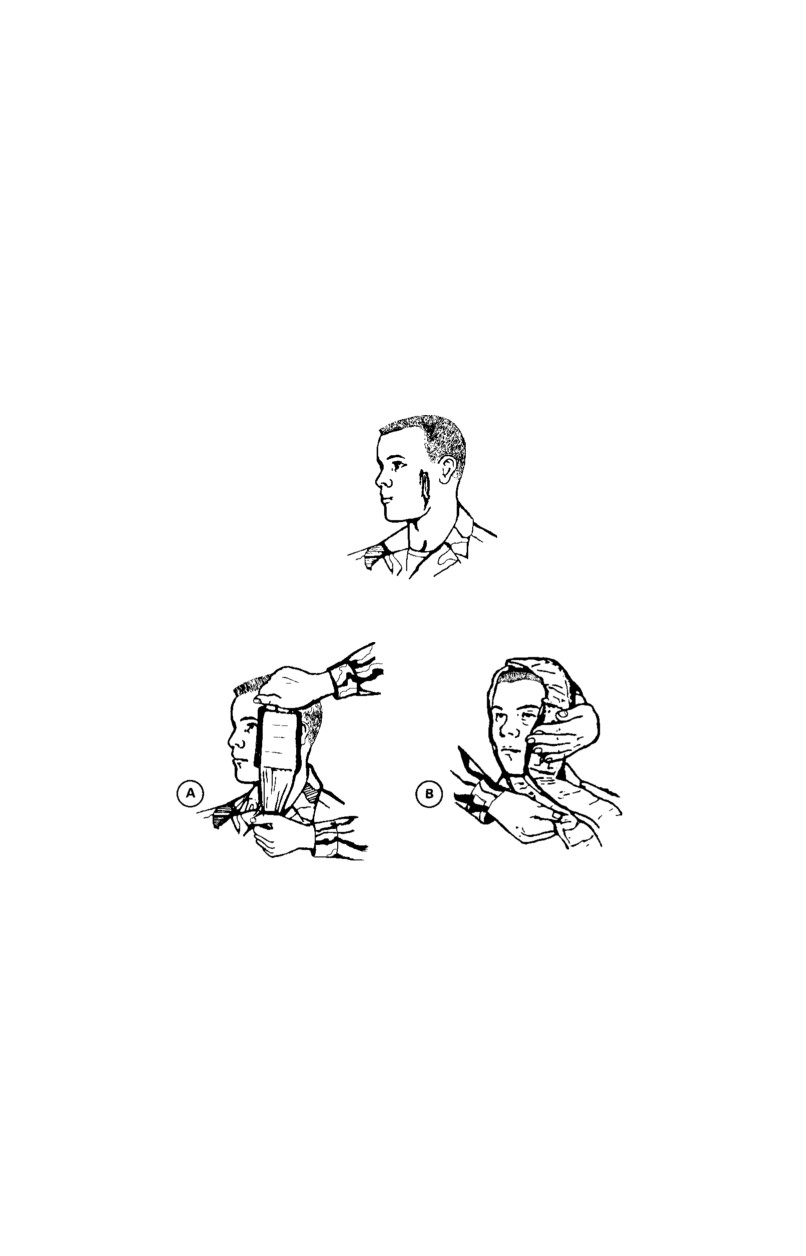
(2)
Grasp the tails in both hands.
(3)
Hold the dressing directly over the wound with the white
side down and place it directly on the wound (Figure 3-27A). DO NOT
touch the white (sterile) side of the dressing or allow anything except the
wound to come in contact with it.
(4)
Hold the dressing in place with one hand (the casualty
may assist if able). Wrap the top tail over the top of the head and bring it
down in front of the ear (on the side opposite the wound), under the chin
(Figure 3-27B) and up over the dressing to a point just above the ear (on the
wound side).
Figure 3-26. Side of head or cheek wound.
Figure 3-27. Dressing placed directly on wound. Top tail wrapped over
top of head, down in front of ear, and under chin (Illustrated A—B).
NOTE
When possible, avoid covering the casualty’s ear with the
dressing, as this will decrease his ability to hear.
(5)
Bring the second tail under the chin, up in front of the
ear (on the side opposite the wound), and over the head to meet the other tail
(on the wounded side) (Figure 3-28).
3-25
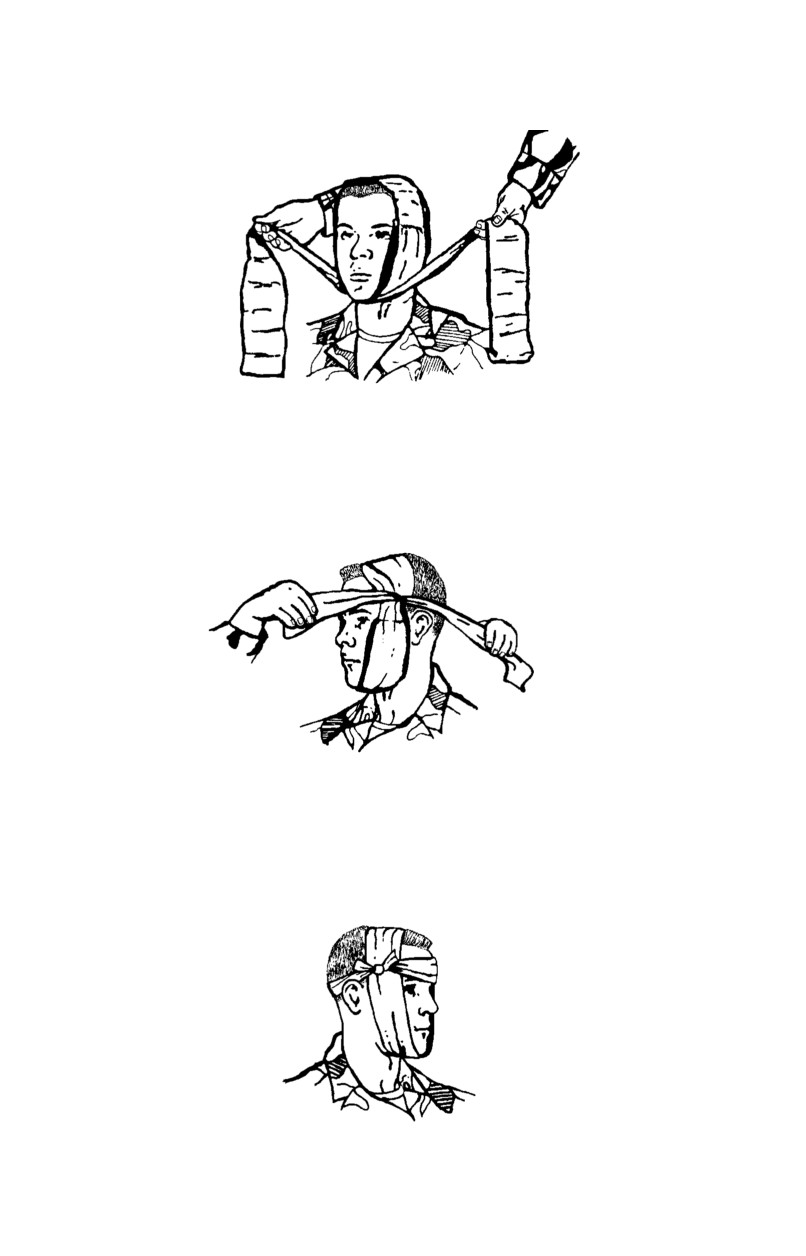
Figure 3-28. Bringing second tail under the chin.
(6)
Cross the two tails (on the wound side) (Figure 3-29)
and bring one end across the forehead (above the eyebrows) to a point just in
front of the opposite ear (on the uninjured side).
Figure 3-29. Crossing the tails on the side of the wound.
(7)
Wrap the other tail around the back of the head (at the
base of the skull), and tie the two ends just in front of the ear on the uninjured
side with a square knot (Figure 3-30).
Figure 3-30. Tying the tails of the dressing in a square knot.
3-26
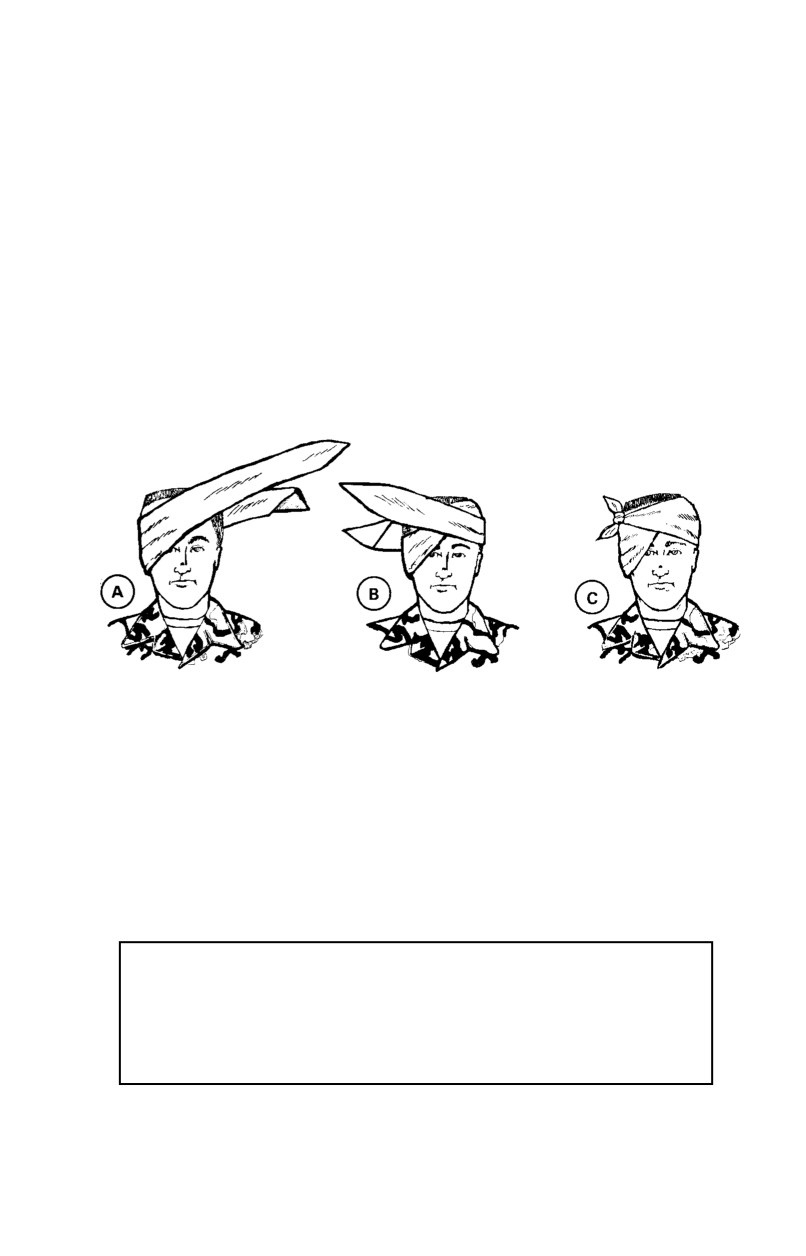
d.
Ear Injuries. Lacerated (cut) or avulsed (torn) ear tissue may
not, in itself, be a serious injury. Bleeding, or the drainage of fluids from the
ear canal, however, may be a sign of a head injury, such as a skull fracture.
DO NOT attempt to stop the flow from the inner ear canal nor put anything
into the ear canal to block it. Instead, you should cover the ear lightly with a
dressing. For minor cuts or wounds to the external ear, apply a cravat
bandage as follows:
(1)
Place the middle of the bandage over the ear (Figure 3-
31A).
(2)
Cross the ends, wrap them in opposite directions around
the head, and tie them (Figures 3-31B and 3-31C).
Figure 3-31. Applying cravat bandage to ear (Illustrated A—C).
(3)
If possible, place some dressing material between the
back of the ear and the side of the head to avoid crushing the ear against the
head with the bandage.
e.
Nose Injuries. Nose injuries generally produce bleeding. The
bleeding may be controlled by placing an ice pack (if available) over the
nose, or pinching the nostrils together. The bleeding may also be controlled
by placing torn gauze (rolled) between the upper teeth and the lip.
CAUTION
DO NOT attempt to remove objects inhaled into the nose.
An untrained person who removes such an object could
worsen the casualty’s condition and cause permanent injury.
f.
Jaw Injuries. Before applying a bandage to a casualty’s jaw,
remove all loose or free-floating foreign material from the casualty’s mouth.
3-27
If the casualty is unconscious, check for obstructions in the airway and
remove if possible. If there is profuse bleeding in the oral cavity, the cavity
may require loose packing with soft bandaging material (for example:
Kerlix™ gauze) prior to applying a bandage. Care should be taken to avoid
occluding the airway. When applying the bandage, allow the jaw enough
freedom to permit passage of air and drainage from the mouth.
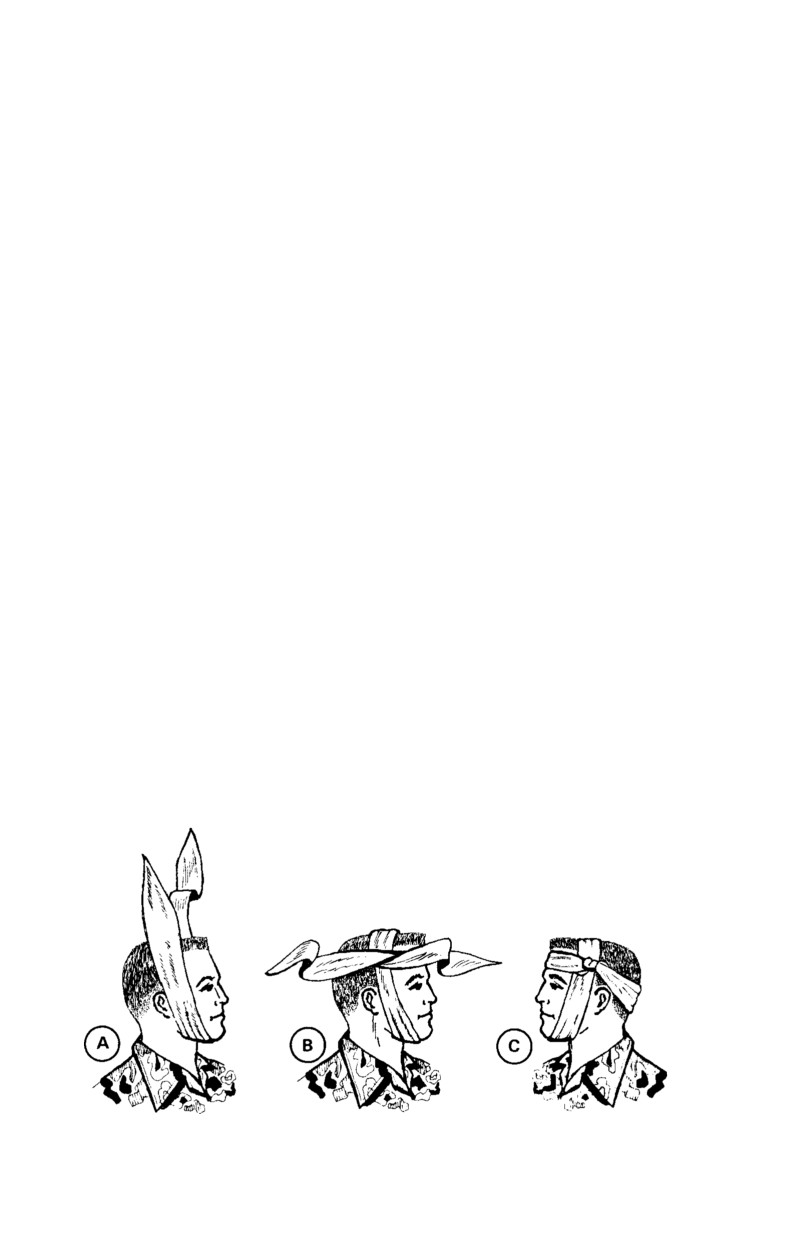
(1)
Apply bandages attached to field first aid dressing to the
jaw. After dressing the wound, apply the bandages using the same technique
illustrated in Figure 3-32A—C.
NOTE
The dressing and bandaging procedure outlined for the jaw
serves a twofold purpose. In addition to stopping the bleeding
and protecting the wound, it also immobilizes a fractured jaw.
(2)
Apply a cravat bandage to the jaw.
(a) Place the bandage under the chin and pull its ends
upward. Adjust the bandage to make one end longer than the other (Figure
3-32A).
(b) Take the longer end over the top of the head to
meet the short end at the temple and cross the ends over (Figure 3-32B).
(c) Take the ends in opposite directions to the other
side of the head and tie them over the part of the bandage that was applied
first (Figure 3-32C).
Figure 3-32. Applying a cravat bandage to jaw (Illustrated A—C).
3-28
NOTE
The cravat bandage technique is used to immobilize a fractured
jaw or to maintain a sterile dressing that does not have tail
bandages attached.
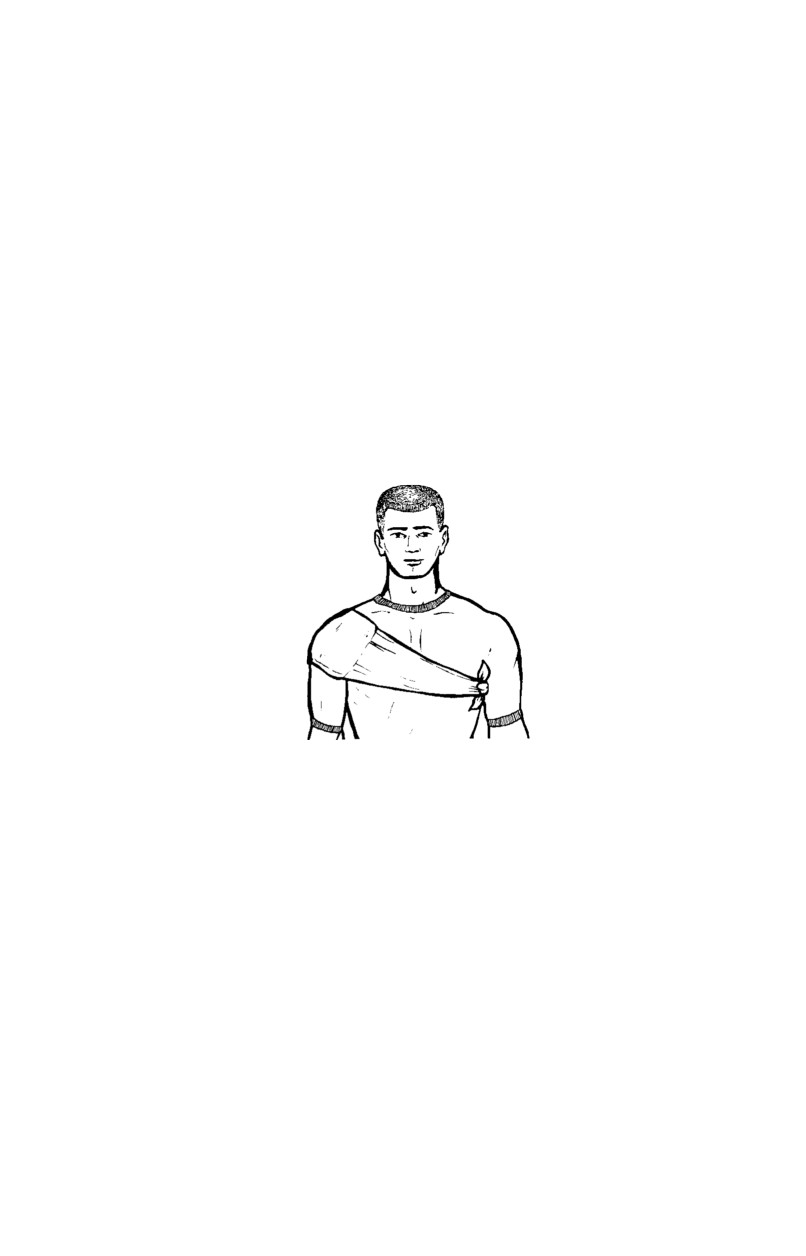
3-11. Shoulder Bandage
a.
To apply bandages attached to the field first aid dressing—
(1)
Take one bandage across the chest and the other across
the back and under the arm opposite the injured shoulder.
(2)
Tie the ends with a square knot (Figure 3-33).
Figure 3-33. Shoulder bandage.
b.
To apply a cravat bandage to the shoulder or armpit—
(1)
Make an extended cravat bandage by using two triangular
bandages (Figure 3-34A); place the end of the first triangular bandage along
the base of the second one (Figure 3-34B).
(2)
Fold the two bandages into a single extended bandage
(Figure 3-34C).
(3)
Fold the extended bandage into a single cravat bandage
(Figure 3-34D). After folding, secure the thicker part (overlap) with two or
more safety pins (Figure 3-34E).
(4)
Place the middle of the cravat bandage under the armpit
so that the front end is longer than the back end and safety pins are on the
outside (Figure 3-34F).
3-29
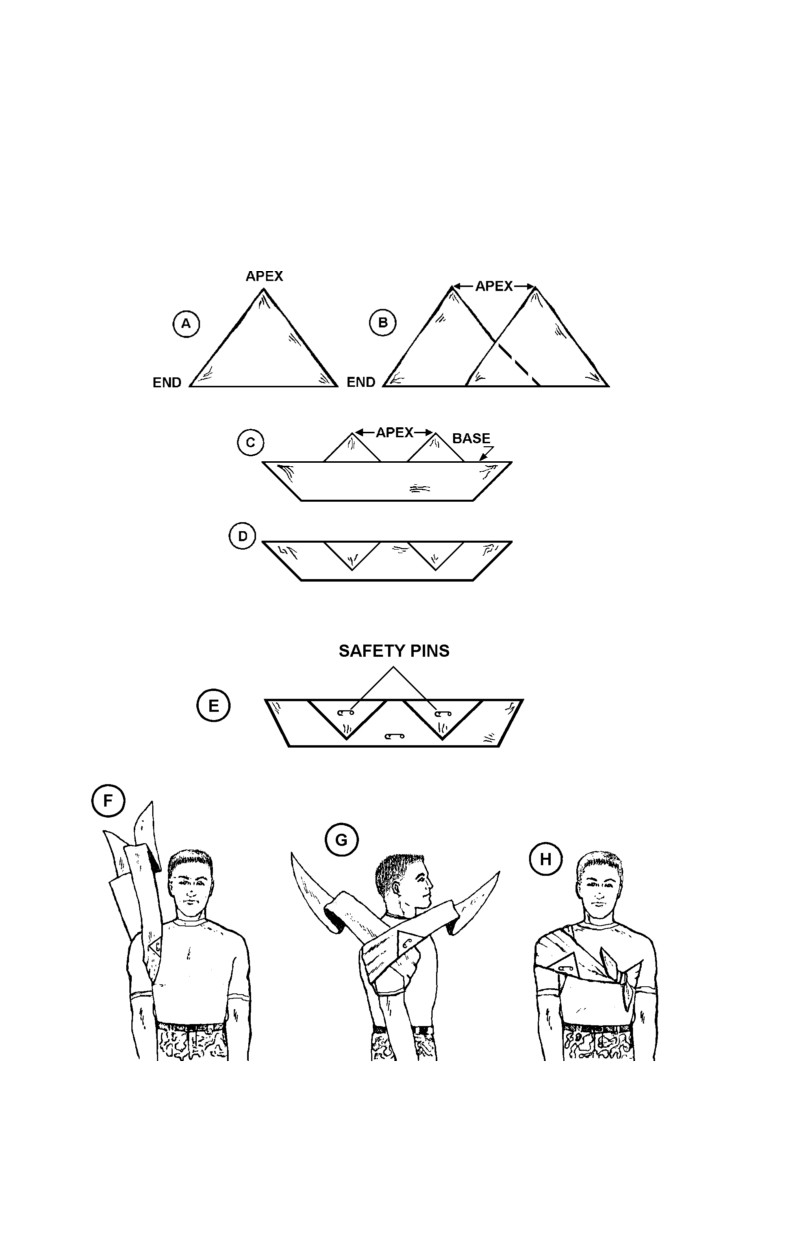
(5)
Cross the ends on top of the shoulder (Figure 3-34G).
(6)
Take one of the bandage ends across the back and under
the arm on the opposite side and the other end across the chest. Tie the ends
(Figure 3-34H).
Figure 3-34. Extended cravat bandage applied to shoulder or armpit
(Illustrated A—H).
3-30
Be sure to place sufficient wadding in the armpit. DO NOT tie the cravat
bandage too tightly. Avoid compressing the major blood vessels in the
armpit.
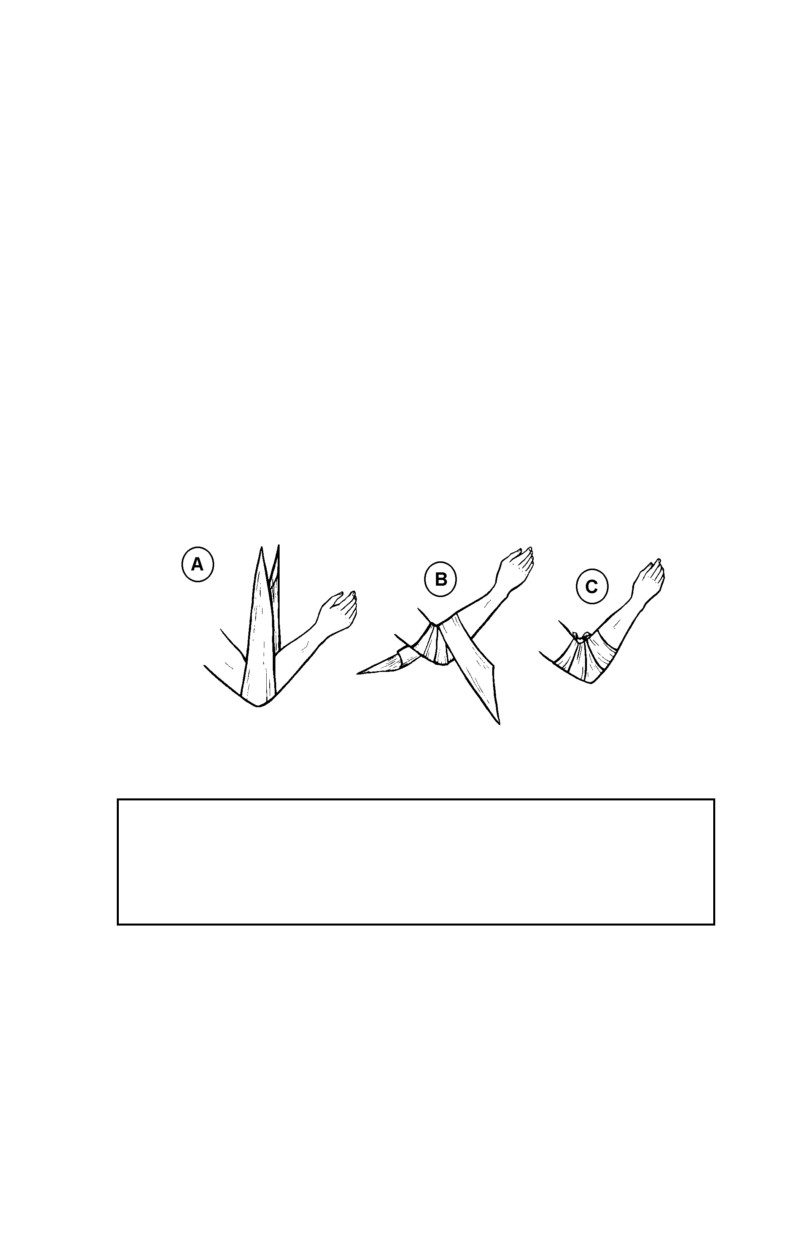
3-12. Elbow Bandage
To apply a cravat bandage to the elbow—
a.
Bend the arm at the elbow and place the middle of the cravat at
the point of the elbow bringing the ends upward (Figure 3-35A).
b.
Bring the ends across, extending both downward (Figure 3-
35B).
c.
Take both ends around the arm and tie them with a square knot
at the front of the elbow (Figure 3-35C).
Figure 3-35. Elbow bandage (Illustrated A—C).
CAUTION
If an elbow fracture is suspected, DO NOT bend the elbow;
bandage it in the position found.
3-13. Hand Bandage
a.
To apply a triangular bandage to the hand—
(1)
Place the hand in the middle of the triangular bandage
with the wrist at the base of the bandage (Figure 3-36A). Ensure that the
fingers are separated with absorbent material to prevent chafing and irritation
of the skin.
3-31
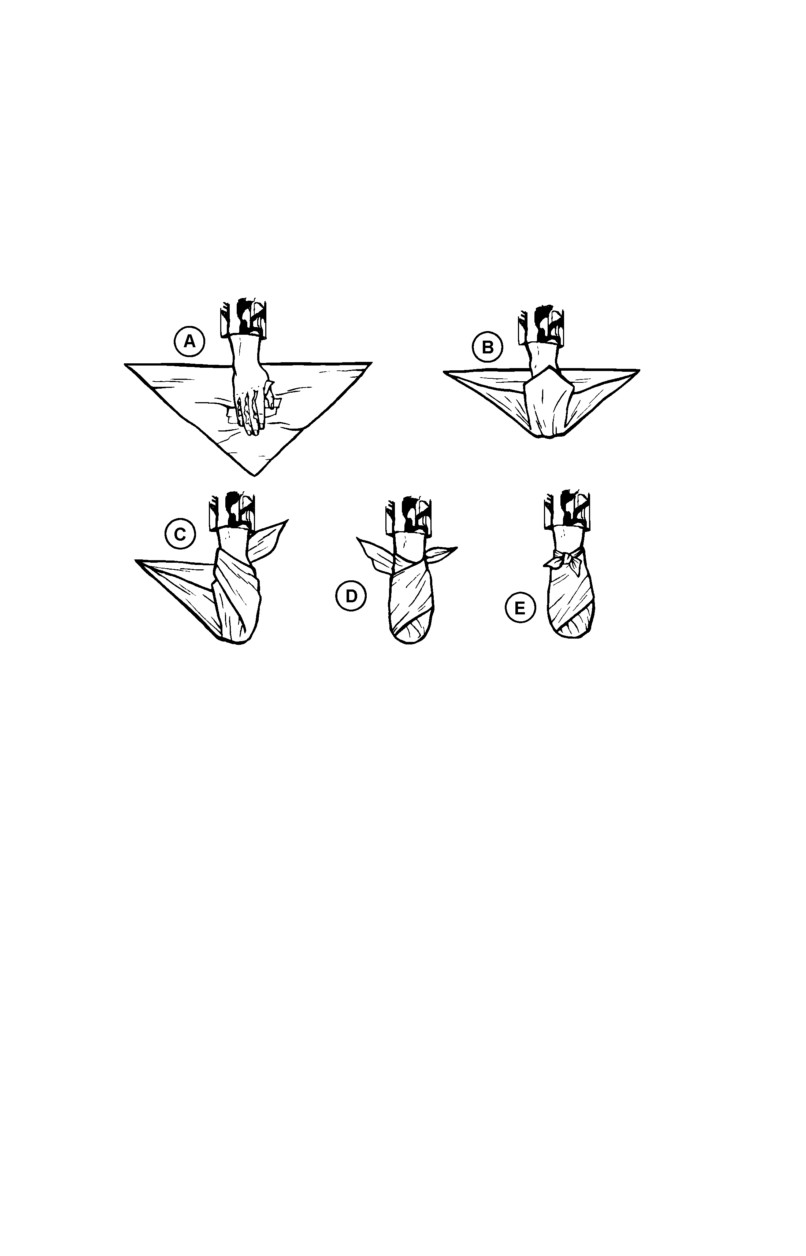
(2)
Place the apex over the fingers and tuck any excess
material into the pleats on each side of the hand (Figure 3-36B).
(3)
Cross the ends on top of the hand, take them around the
wrist, and tie them (Figures 3-36C—E) with a square knot.
Figure 3-36. Triangular bandage applied to hand (Illustrated A—E).
b.
To apply a cravat bandage to the palm of the hand—
(1)
Lay the middle of the cravat over the palm of the hand
with the ends hanging down on each side (Figure 3-37A).
(2)
Take the end of the cravat at the little finger across the
back of the hand, extending it upward over the base of the thumb; then bring
it downward across the palm (Figure 3-37B).
(3)
Take the thumb end across the back of the hand, over
the palm, and through the hollow between the thumb and palm (Figure 3-
37C).
(4)
Take the ends to the back of the hand and cross them;
then bring them up over the wrist and cross them again (Figure 3-37D).
(5)
Bring both ends down and tie them with a square knot on
top of the wrist (Figure 3-37E—F).
3-32
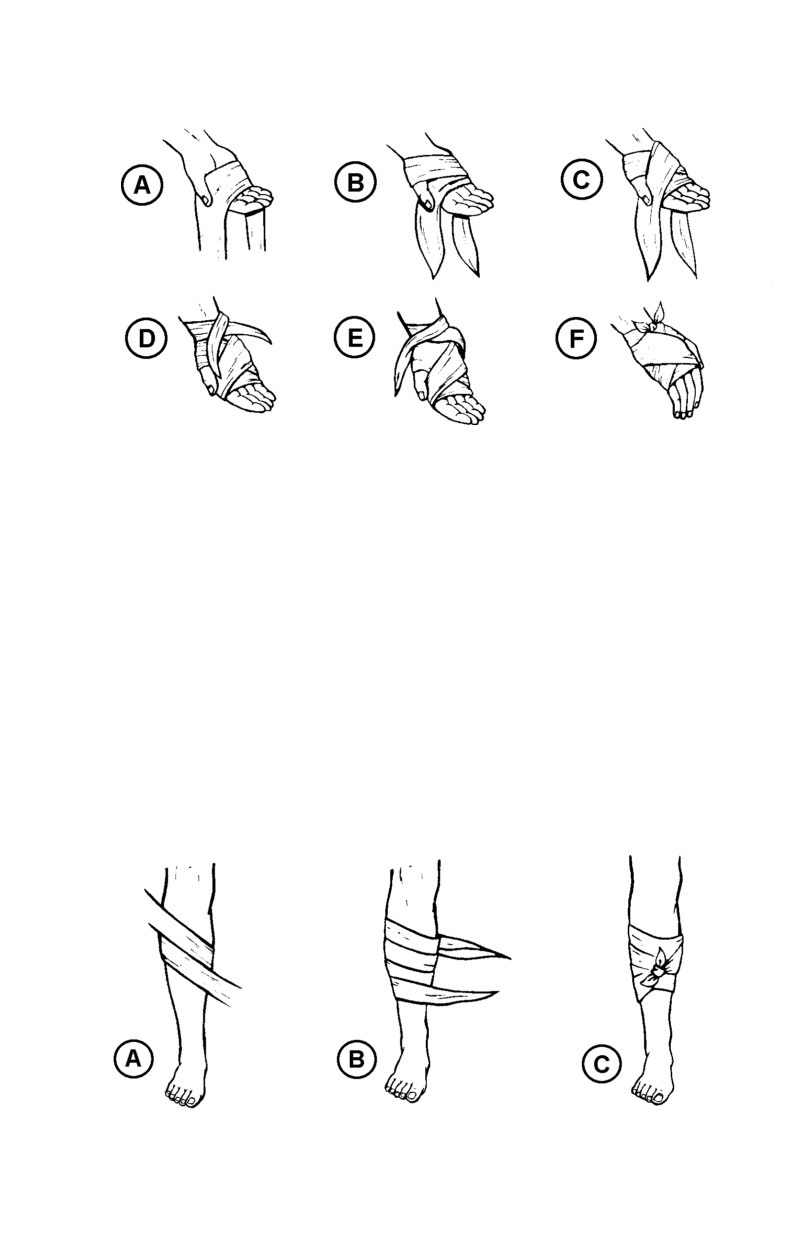
Figure 3-37. Cravat bandage applied to palm of hand
(Illustrated A—F).
3-14. Leg (Upper and Lower) Bandage
To apply a cravat bandage to the leg—
a.
Place the center of the cravat over the dressing (Figure 3-
38A).
b.
Take one end around and up the leg in a spiral motion and the
other end around and down the leg in a spiral motion, overlapping part of
each preceding turn (Figure 3-38B).
c.
Bring both ends together and tie them (Figure 3-38C) with a
square knot.
Figure 3-38. Cravat bandage applied to leg (Illustrated A—C).
3-33
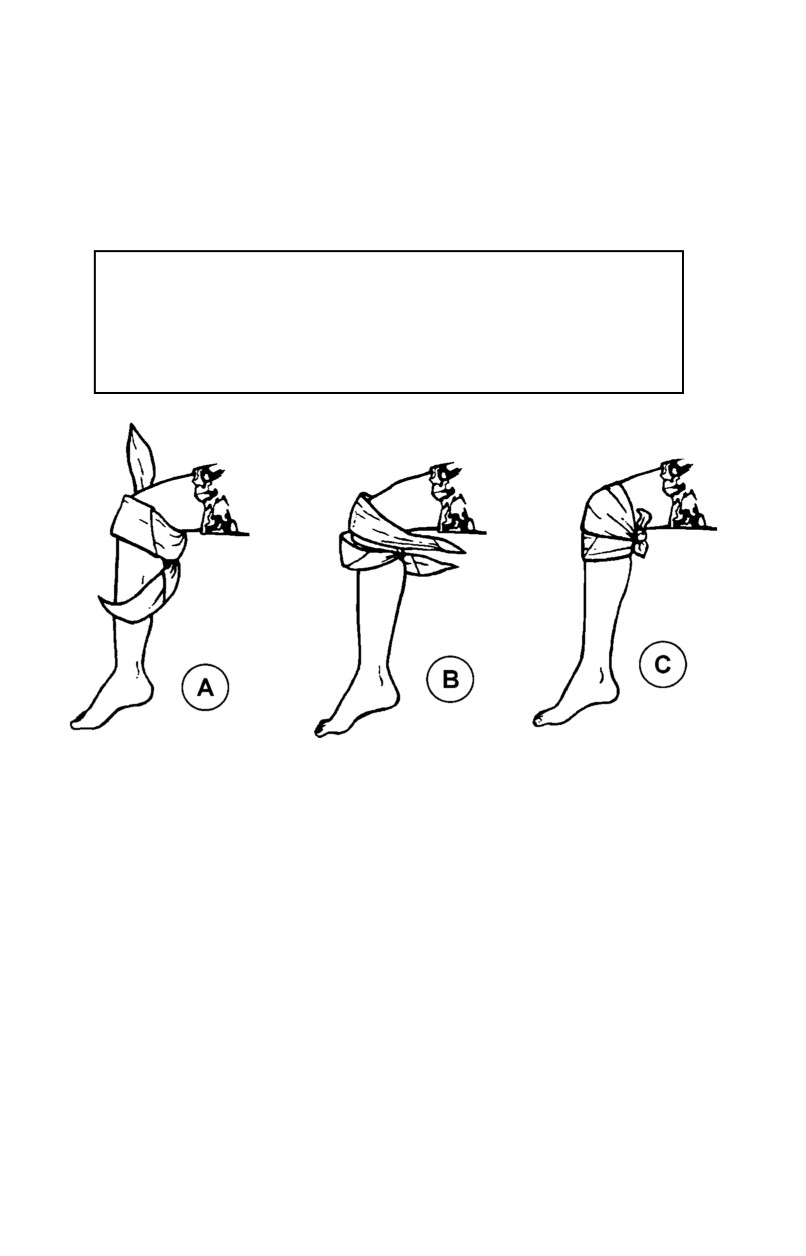
3-15. Knee Bandage
To apply a cravat bandage to the knee as illustrated in Figure 3-39, use the
same technique applied in bandaging the elbow.
CAUTION
If a fracture of the kneecap is suspected, DO NOT bend the
knee; bandage it in the position found.
Figure 3-39. Cravat bandage applied to knee (Illustrated A—C).
3-16. Foot Bandage
To apply a triangular bandage to the foot—
a.
Place the foot in the middle of the triangular bandage with the
heel well forward of the base (Figure 3-40A). Ensure that the toes are
separated by absorbent material to prevent chafing and irritation of the skin.
b.
Place the apex over the top of the foot and tuck any excess
material into the pleats on each side of the foot (Figure 3-40B).
c.
Cross the ends on top of the foot, take them around the ankle,
and tie them at the front of the ankle (Figure 3-40C—E).
3-34
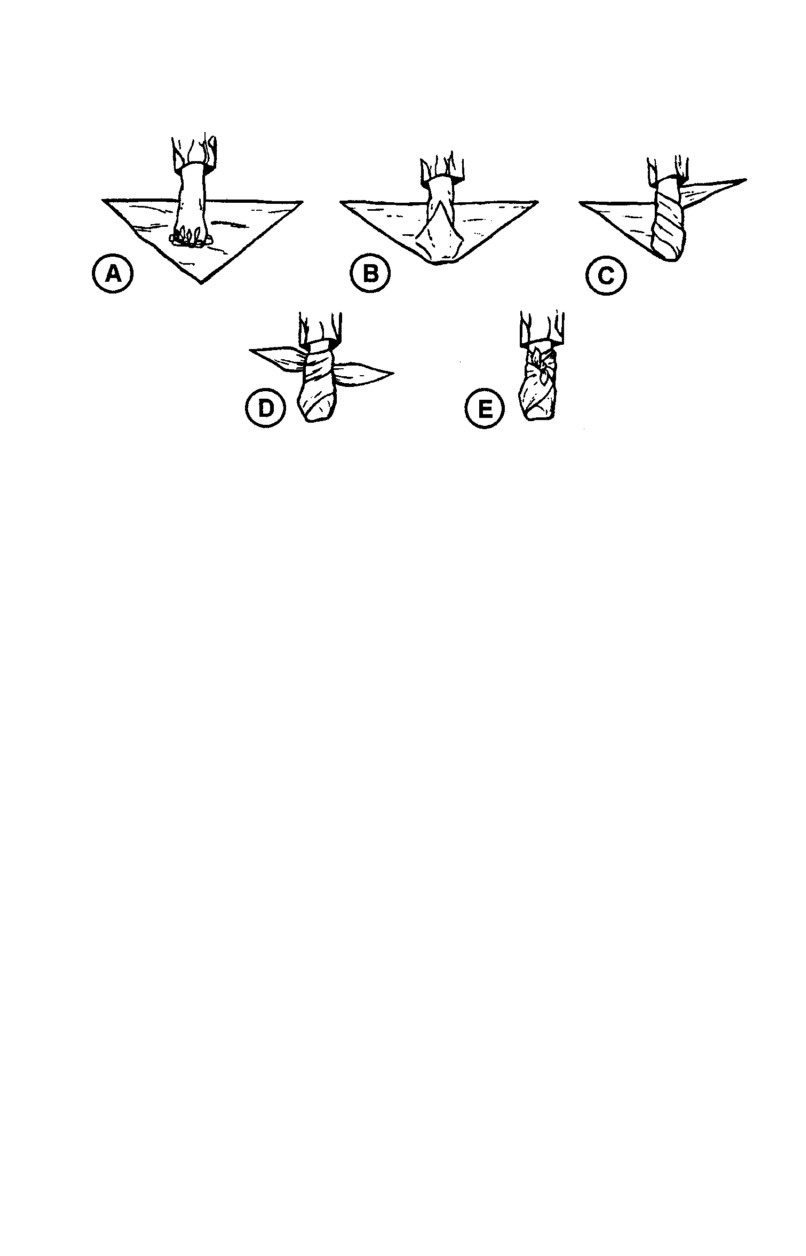
Figure 3-40. Triangular bandage applied to foot (Illustrated A—E).
3-35
CHAPTER 4
FIRST AID FOR FRACTURES
4-1.
General
A fracture is any break in the continuity of a bone. Fractures can cause total
disability or in some cases death by severing vital organs and/or arteries. On
the other hand, they can most often be treated so there is a complete recovery.
The potential for recovery depends greatly upon the first aid the individual
receives before he is moved. First aid includes immobilizing the fractured
part in addition to applying lifesaving measures when necessary. The basic
splinting principle is to immobilize the joints above and below the fracture.
4-2.
Kinds of Fractures
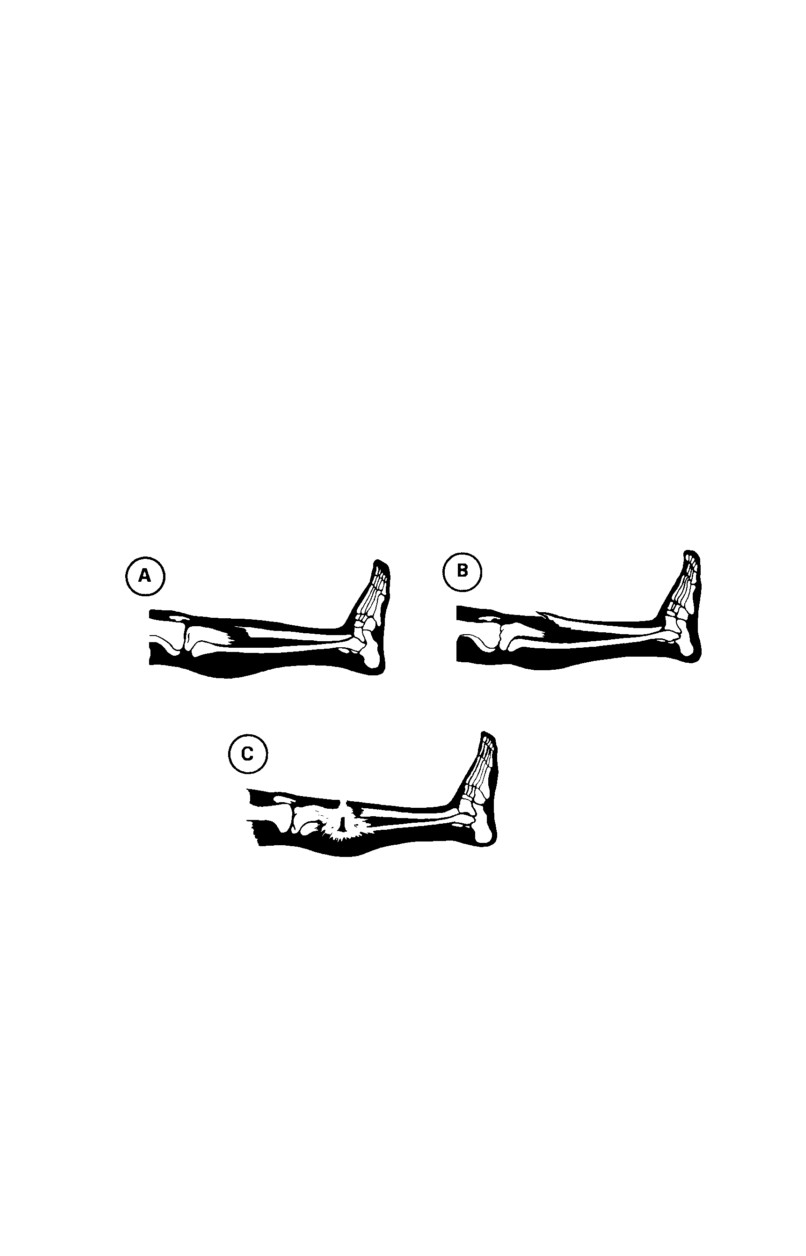
Figure 4-1 depicts types of fractures.
Figure 4-1. Types of fractures (Illustrated A—C).
a.
Closed Fracture (Figure 4-1A). A closed fracture is a broken
bone that does not break the overlying skin. The tissue beneath the skin may
be damaged. A dislocation is when a joint, such as a knee, ankle, or
shoulder, is not in the proper position. A sprain is when the connecting
tissues of the joints have been torn. Dislocations and sprains (swelling,
possible deformity, and discoloration) should be treated as closed fractures.
b.
Open Fracture (Figure 4-1B and 4-1C). An open fracture is a
broken bone that breaks (pierces) the overlying skin. The broken bone may
4-1