Takeuchi Mini Excavator TB215R (No.215000003~). Operator's Manual - page 6
 

  Index      Manuals     Takeuchi Mini Excavator TB215R (No.215000003~). Operator's Manual


Search            copyright infringement  


Content      ..     4      5      6      7     ..


Takeuchi Mini Excavator TB215R (No.215000003~). Operator's Manual - page 6


DISASSEMBLY AND ASSEMBLY

DRIVE SYSTEM

2

4

DRIVE SYSTEM

4B0AX00

ThreeBond #1324

1

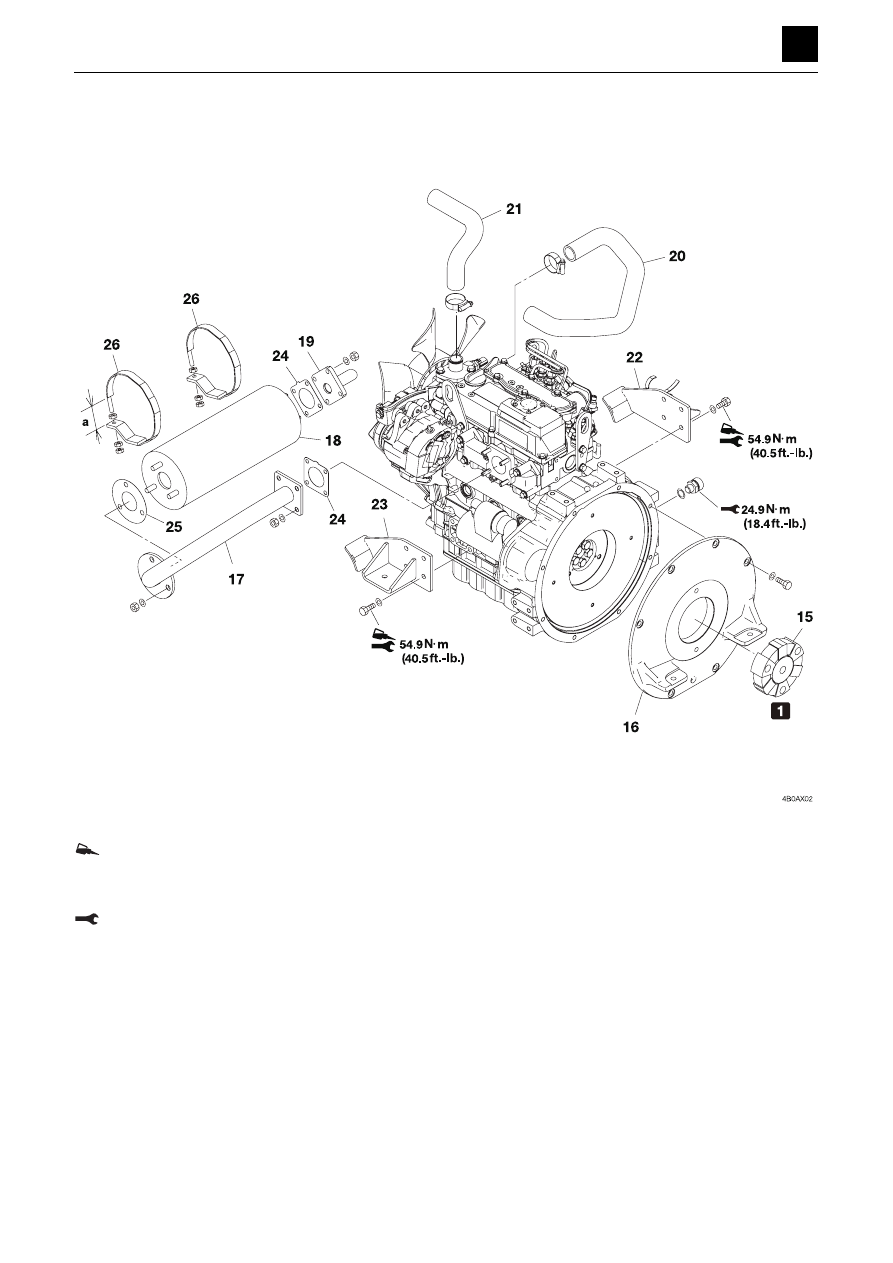
Use the included bolts which have been coated to prevent them from
becoming loose.

54.9 N·m (40.5 ft-lb)
Press-fit the three included spring pins into the assembly to insert
them.

2

 Clearance “a”: 19 mm (0.75 in.)

15. Coupling

21. Hose

16. Housing

22. Engine hood FR

17. Pipe

23. Engine hood FL

18. Silencer

24. Gasket

19. Pipe

25. Gasket

20. Hose

26. Band

DISASSEMBLY AND ASSEMBLY

DRIVE SYSTEM

3

4

DRIVE SYSTEM

4B0AX00

27. RAD/HOC

32. Cushion rubber

28. Plate

33. Plate

29. Elbow

34. Shroud assembly

30. Pipe

35. Nipple

31. Plate

DISASSEMBLY AND ASSEMBLY

DRIVE SYSTEM

4

4

DRIVE SYSTEM

4B0AX00

Removing the engine

1. Remove the battery ground cable from the battery

terminal.

2. Remove the covers.

“Removing the covers”

3. Disconnect the hoses, and take out the air cleaner

assembly (3).

4. Loosen the radiator cap, and bleed out the engine

coolant from the drain valve (8).

• Engine coolant volume: 3.9 L (4.1 USLqt)

5. Disconnect the hoses (21) and (22) from the radiator

assembly (1).

6. Disconnect the hose from the drain valve (8).

7. Disconnect the hose from the sub-tank (9), and re-

move the sub-tank.

8. Drain the hydraulic oil from the tank.

“Removing the hydraulic tank”

9. Disconnect the hydraulic hoses (20) and (21) from

the radiator assembly (1).

10. Remove the fan guard (2).

11. Take out the fixing nuts holding the cushion rubber in

place, and remove the radiator assembly (1).

• Slowly hoist up the radiator assembly while slowly

pulling it forward so that the shroud does not
strike the cooling fan.

: 13 kg (28 lbs)

12. Remove the hydraulic pump.

“Removing the hydraulic pump”

13. Disconnect the fuel hoses on the engine side.

“Removing the hydraulic tank”

14. Disconnect the battery cable and the engine electri-

cal wiring on the engine side.

• Attach an identification label to each wiring.

“2. Wire harness diagram”
“Removing the battery”

15. Disconnect the engine ground cable (11).

16. Take out the nuts, and suspend the engine.

• Use a shim to adjust the clearance between the

engine hood and the stopper (6).

Upper side of the nut: 54.9 N·m (40.5 ft-lb)
Lower side of the nut: 44.1 N·m (32.5 ft-lb)
Refer to the construction diagram
: 103 kg (227 lb)

Installing the engine

For installation of the engine, follow the same procedures
as for removal but in the reverse order.
The radiator must be mounted at a right angle to the
frame and parallel to the cooling fan.

DISASSEMBLY AND ASSEMBLY

DRIVE SYSTEM

5

4

DRIVE SYSTEM

4B0AX00

Hydraulic pump

Apply molybdenum disulfide grease on the spline.

• Applying a large amount of grease on the spline hole

in the coupling assembly may cause the grease to drip
down onto rubber parts and cause the rubber to dete-
riorate.

1

Not adjustable. Do not loosen the lock nut.

1. Hydraulic pump

2. Pipe

3. Elbow

4. Elbow

DISASSEMBLY AND ASSEMBLY

DRIVE SYSTEM

6

4

DRIVE SYSTEM

4B0AX00

Removing the hydraulic pump

1. Remove the battery ground cable from the battery

terminal.

2. Remove the covers.

“Removing the covers”

3. Drain the hydraulic oil from the tank.

“Removing the hydraulic tank”

4. Disconnect the suction hose from the hydraulic

pump.

5. Disconnect the discharge hose from the hydraulic

pump.

6. Take out the bolts, and remove the hydraulic pump

assembly.

Apply molybdenum disulfide grease on the
spline.
Bolt: 102 N·m (75.2 ft.-lb)
Pump: 13 kg (29 lb.)

Installing the hydraulic pump

For installation, follow the same procedures as for remov-
al but in the reverse order.

Cautions on starting the hydraulic pump

a. Start the engine, let it run at a low idling speed for

ten minutes, and then extend and retract each
cylinder 4 or 5 times, without letting them reach
the stroke end.

b. Run the engine at high speed, and then extend

and retract each cylinder 4 or 5 times, without let-
ting them reach the stroke end.

c. Return the engine speed to low idle, and then ex-

tend and retract each cylinder 4 or 5 times, with-
out letting them reach the stroke end.

DISASSEMBLY AND ASSEMBLY

DRIVE SYSTEM

7

4

DRIVE SYSTEM

4B0AX00

Fuel tank

1

To engine

1. Fuel tank

9. Drain plug

2. Plate

10. Fuel hose

3. Plate

11. Fuel hose

4. Fuel sender

12. Fuel hose

5. Sedimenter

13. Fuel hose

6. Feed pump

14. Fuel hose

7. Air breather

15. Fuel hose

8. Plug

16. Fuel hose

DISASSEMBLY AND ASSEMBLY

DRIVE SYSTEM

8

4

DRIVE SYSTEM

4B0AX00

Removing the fuel tank

1. Remove the canopy.

2. Remove the covers from the perimeter around the

tank.

3. Loosen the drain plug (9), and let the fuel drain out.

• Fuel tank capacity: 22 L (5.8 US·gal)

4. Disconnect the fuel hoses from the fuel tank, sedi-

menter, and fuel pump.

5. Take out the bolts holding the fuel tank (1) in place,

and remove the fuel tank (1).

Bolt: 22.6 N·m (16.7 ft-lb)

Installing the fuel tank

For installation, follow the same procedures as for remov-
al but in the reverse order.

DISASSEMBLY AND ASSEMBLY

DRIVE SYSTEM

9

4

DRIVE SYSTEM

4B0AX00

Battery

1

Body earth point

1. Earth ground cable

4. Battery

2

Connection to the starter

2. Battery cable

5. Hook bolt

3. Battery clamp 

DISASSEMBLY AND ASSEMBLY

DRIVE SYSTEM

10

4

DRIVE SYSTEM

4B0AX00

Removing the battery

1. Disconnect the battery ground cable (1) from the

battery terminal.

2. Remove the battery cables (2).

3. Remove the nuts.

Upper nut: 11.1 N·m (8.2 ft-lb.)
Lower nut: 8.8 N·m (6.5 ft-lb.)

• During assembly, tighten down the top nut while

keeping the bottom nut fixed in place so that it
does not turn.

4. Remove the battery (4).

Installing the battery

For installation, follow the same procedures as for remov-
al but in the reverse order.


WARNING

Wear protective glasses and gloves when working with
batteries.

Batteries generate flammable hydrogen gas which may
explode. Keep away from flames and sparks.

Be sure to stop the engine by turning off the starter
switch before inspecting or handling the battery.

Be careful not to let metal tools (or any metal objects)
such as a hammer or wrench come into contact with the
battery terminals.

When disconnecting the battery wiring, always discon-
nect it from the earth side (-). When connecting, con-
nect the earth side last.

Loose battery terminals may cause sparks. Be sure to
fasten terminals tightly.

DISASSEMBLY AND ASSEMBLY

DRIVE SYSTEM

11

4

DRIVE SYSTEM

4B0AX00

Throttle lever

Apply molybdenum disulfide grease to both surfac-
es of the lever.

• Line up the conical washers (3) so that the indented

sides are all on the same side.

ThreeBond #1324

1. Lever

6. Stopper

2. Wire

7. Wire lock pin

3. Conical washer

8. Lock nut

4. Bracket

9. Nut

5. Lock nut

DISASSEMBLY AND ASSEMBLY

DRIVE SYSTEM

12

4

DRIVE SYSTEM

4B0AX00

Adjusting the throttle lever

Engine speed

1. Secure the wire (2) to the throttle lever (1) using the

wire lock pin (7).

2. Push the throttle lever (1) down to the low-idling side

A, and position the governor (10) to the idling posi-
tion C.

• Keep pushing the throttle lever (1) over until it

makes contact with the notch in the bracket.

3. Fasten the wire (2) in place with the wire lock pin (7).

4. Pull the throttle lever (1) out to the full-throttle side B,

and position the governor (10) to the full-throttle po-
sition D.

• Adjust the stopper (6) so that the throttle lever (1)

makes contact with the stopper (6), and secure it
in place using the lock nut (7).

Control force

1. Loosen the lock nut (9), and turn the nut (8) to adjust

the control force.
Control force: 24.5 N (5.5 lbf)

“2. Service data, Performance criteria, Lever op-
erating force”

2. After completing the adjustment, tighten the lock nut

(9) by fixing the nut (8) in place so that it does not
turn.

3. Operate the throttle lever (1) again, and check to

make sure that the control force is stable.

9

8

DISASSEMBLY AND ASSEMBLY

TRAVEL SYSTEM

1

4

TRAVEL SYSTEM

4C0AX00

TRAVEL SYSTEM

Removing the crawler

Important: When replacing crawlers, replace both the
right and left ones at the same time.

1. Lift up the machine.

• Use the blade and hoe attachment to raise the

machine.

2. Loosen the crawler tension for the crawler (1).

• When loosening the check valve (2), do it slowly.

Stop loosening the check valve once grease
starts to come out.
If no grease comes out, slightly move the machine
forward and backward.

Check valve: 177 N·m (130.5 ft.-lb)

3. Insert the iron pipe (3) into the crawler and then ro-

tate the sprocket in the reverse direction.

4. Stop rotating the sprocket once the pipe reaches the

side of the idler.

5. Slide the crawler over to the side and remove it.

Rubber crawler (One side): 55 kg (120 lb)

Installing the crawler

1. Lift up the machine, and insert the crawler into the

frame.

• Set the crawler so that it is engaged with the

sprocket.

2. Insert the iron pipe (3) into the crawler and then ro-

tate the sprocket in the reverse direction.

3. Stop rotating the sprocket once the pipe (3) reaches

the side of the sprocket.

4. Slide the crawler into a position where it can be prop-

erly fitted to engage with the idler.

5. Position the crawler so as to ensure that it is securely

engaged with the sprocket and idler and then adjust
the crawler tension.

“2. Service data, Performance criteria”


WARNING

When working under the machine while it is raised up, be
sure to use a stand to support the machine.

4C0AQ01Z

DISASSEMBLY AND ASSEMBLY

TRAVEL SYSTEM

2

4

TRAVEL SYSTEM

4C0AX00

Removing the track roller

1. Loosen the crawler tension.

2. Loosen the roller bolt (1) slightly (about one turn).

3. Lift up the machine, take out the bolt (1), and remove

the roller (2).

Installing the track roller

1. Temporarily secure the roller (2) in place by tighten-

ing down the bolt (1).

2. Tighten the bolt (1) to the stipulated torque.

Bolt: ThreeBond #1324
Bolt: 102 N·m (75.2 ft.-lb)

3. Lift up the machine, and adjust the crawler tension.

Removing the idler and track adjuster

1. Remove the crawler.

“Removing the crawler"

2. Pull out the idler and the track adjuster.

Idler and track adjuster: 21 kg (46.3 lb)

Installing the idler and track adjuster

To install, follow the same procedures as for removal but
in the reverse order.

Apply on the sliding surfaces of the track adjuster
piston and cylinder.

DISASSEMBLY AND ASSEMBLY

TRAVEL SYSTEM

3

4

TRAVEL SYSTEM

4C0AX00

Removing the travel motor

1. Remove the crawler.

“Removing the crawler"

2. Take out the bolts (1), and remove the sprocket

(2).

Bolt: ThreeBond #1324
Bolt: 55 N·m (40.6 ft.-lb)

3. Remove the cover, and disconnect the hydraulic

hoses (4).

• Make sure to attach identification labels to

each of the hoses and the joints before dis-
connecting the hoses.

4. Hoist up the travel motor (3) temporarily, and re-

move the bolts (5).

Bolt: ThreeBond #1324
Bolt: 55 N·m (40.6 ft.-lb)

5. Raise the travel motor (3), and remove it.

Travel motor: 18 kg (40 lb)

Installing the travel motor

To install, follow the same procedures as for removal
but in the reverse order.

DISASSEMBLY AND ASSEMBLY

SLEW EQUIPMENT

1

4

SLEW EQUIPMENT

4D0AX00

SLEW EQUIPMENT

Slew motor

Construction

ThreeBond #1324

1. Slew motor

2. Cover

DISASSEMBLY AND ASSEMBLY

SLEW EQUIPMENT

2

4

SLEW EQUIPMENT

4D0AX00

Removing the slew motor

1. Disconnect the hydraulic hoses from the slew motor

(1).

2. Remove the bolts from the slew motor.

Bolt: ThreeBond #1324
Bolt: 102 N·m (75.2 ft.-lb) 

3. Raise the slew motor (1), and remove it.

Slew motor: 22 kg (49 lb)

Installing the slew motor

To install, follow the same procedures as for removal but
in the reverse order.


Content      ..     4      5      6      7     ..