Takeuchi Hydraulic Excavator TB175W (S/N 17540001~). WORKSHOP MANUAL - page 13
 

  Index      Manuals     Takeuchi Hydraulic Excavator TB175W (S/N 17540001~). WORKSHOP MANUAL


Search            copyright infringement  


Content      ..     11      12      13      14     ..


Takeuchi Hydraulic Excavator TB175W (S/N 17540001~). WORKSHOP MANUAL - page 13


HYDRAULIC UNITS

SOLENOID VALVES

IV-67

TB175W

SOLENOID VALVES

CONSTRUCTION

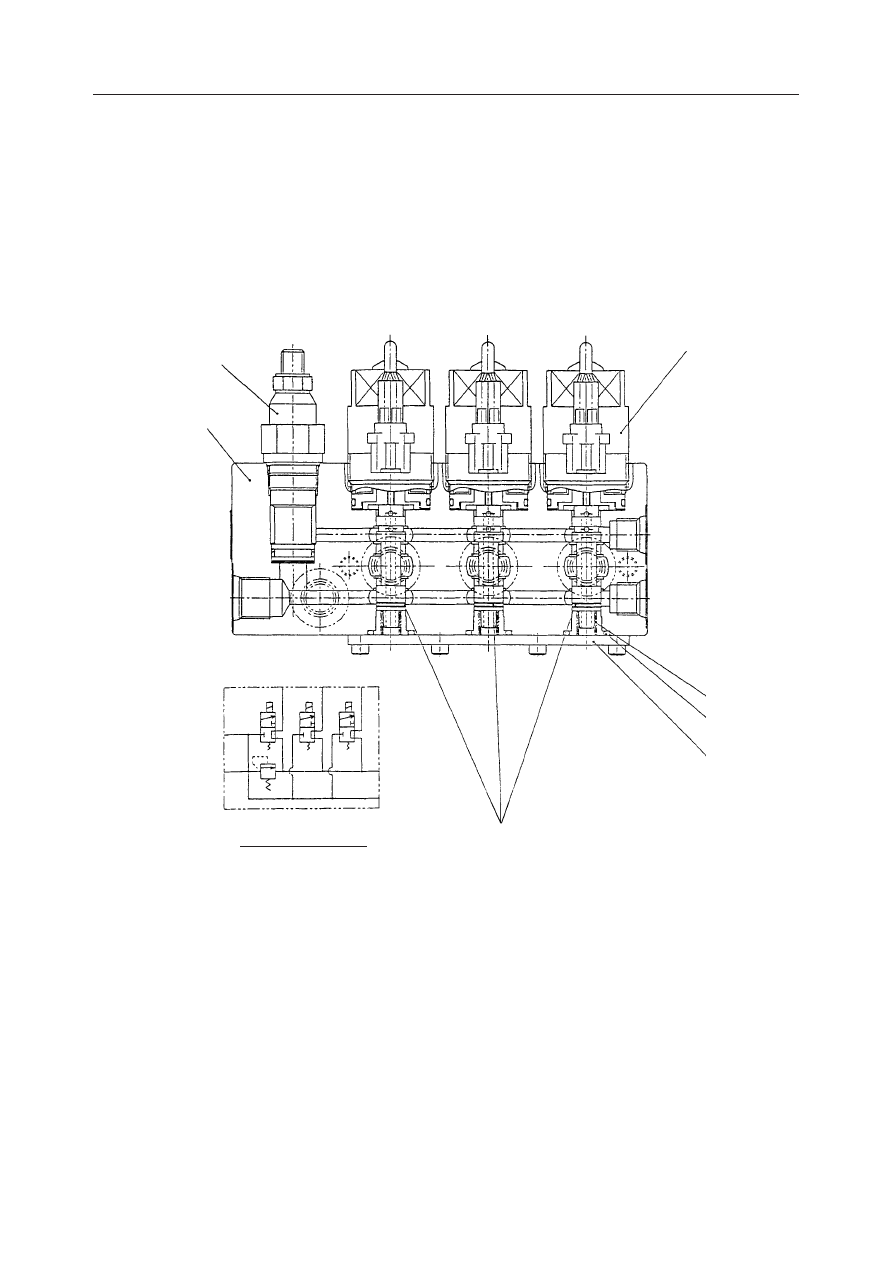
Solenoid Valve (3-Section)
Ram Lock, Lever Lock and Speed Shift

  1. Body
  2. O-ring
  3. Spool
  4. Spring
  5. Cover
  6. Solenoid Valve
  7. Relief Valve

W2H100E

7

1

3

T

T

A4

A4

P

P

P1

P1

A3

A3

A2

A2

A1

A1

4
2

5

6

HYDRAULIC SYMBOL

OUTRIGGER
/RAMLOCK

LEVER
LOCK

 SPEED
 SHIFT
(SLEW)

HYDRAULIC UNITS

SOLENOID VALVES

IV-68

TB175W

Solenoid Valve (3-Section)
Change, Speed Shift and Parking Brake

  1. Spring
  2. Sleeve
  3. Body
  4. Rod
  5. Plate
  6. Solenoid Valve

  7. Spool
  8. Stopper
  9. Plug
10. Washer
11. O-ring
12. O-ring

HYDRAULIC SYMBOL

W2H101E

C

B

A

A

P

T

B

C

PARKING
BRAKE

SWING/ADJUST
CHANGE

SPEED
SHIFT
(LOW)

X

X

X

Y

Y

SECTION “Y”

4 12

9

11 5

6

A C C

T

P

SECTION “X”

11 2 7 10 1 8 3

HYDRAULIC UNITS

SOLENOID VALVES

IV-69

TB175W

Solenoid Valve (4-Section)
Change and Speed Shift

  1. Spring
  2. Sleeve
  3. Body
  4. Rod
  5. Plate
  6. Solenoid Valve

  7. Spool
  8. Stopper
  9. Plug
10. Washer
11. O-ring
12. O-ring

HYDRAULIC SYMBOL

W2H102E

C

D

B

A

A

P

T

B

C

D

SWING/ADJUST
CHANGE

SPEED
SHIFT
(LOW)

SPEED
SHIFT
(HIGH)

SPEED
SHIFT
(INCH)

X

X

X

X

Y

SECTION “Y”

4 12

9

11 5

6

A C C

T

P

SECTION “X”

11 2 7 10 1 8 3

HYDRAULIC UNITS

SOLENOID VALVES

IV-70

TB175W

OPERATION

Solenoid Valve
When current is not flowing

Oil at port P is blocked by the spool (1). Also, since
port A and port T are connected, the pressure in the
pilot circuit downstream becomes the same as the
tank pressure.

When current is flowing

A magnetic field is generated around the coil and the
plunger (2) is pulled down. This pushes the spool (1)
down. As a result, oil at port P flows into port A and
pressure is transmitted to the pilot circuit at the
bottom.

9 0!

A

P

T

1

9 0"

A

P

T

1

2

HYDRAULIC UNITS

SOLENOID VALVES

IV-71

TB175W

DISASSEMBLY AND ASSEMBLY

General Cautions

• Carry out disassembly and assembly operations in

a clean place and place disassembled parts in clean
containers.

• Before disassembly, clean thoroughly around the

ports and remove paint or thread lock, etc. from all
joints with a wire brush.

• Clean all disassembled parts in cleaning solvent.

Use a lint free cloth, or air dry the parts.

• The spool and body are selectively fitted, so if one

is found to be damaged, replace the valve assem-
bly.

• Apply a thin coating of hydraulic oil to sliding

surfaces and a thin coating of grease to seals when
assembling them.

• Replace seals with new parts each time disassem-

bly is done.

• Do not turn adjusting screws if not required.

Following is a description of the solenoid valve block
disassembly procedure. Reassemble the solenoid valve
block by following this procedure in reverse order.

Solenoid Valve (3-Section)
Ram Lock, Lever Lock and Slew Shift

1. Fix the housing and remove the solenoid valve

(1).

Solenoid valve: 44 

±

5 N·m

2. Remove the socket bolt, and then remove the

cover (2).

Cap screw: 3.4 

±

0.5 N·m

3. Remove the spring (3) and the spool (4).

• Pull out the spool slowly, and take care not to

scratch or dent the circumference.

• At the time of reassembly, the spool must be

installed in the same housing hole.

4. Remove the relief valve.

Relief valve: 44 

±

5 N·m

HYDRAULIC UNITS

SOLENOID VALVES

IV-72

TB175W

Solenoid Valve (3-Section)
Change, Speed Shift and Parking Brake

1. Loosen the cap screws and remove the solenoid

coil (5).
• Put matching marks on the solenoid and the

body so that they can be aligned when assem-
bling.

• Take care not to miss the push rod.

Cap screw: 3.9 N·m

2. Remove the O-ring from the solenoid coil (5).

3. Remove the spool (6) and sleeve (7) from the

body.
• Record the positions of the spool, sleeve and

the body hole so that they can be aligned when
assembling.

• To take out the spool, hook the small orifice at

the end of the spool using a tool such as a
scriber.

• To remove the sleeve, turn the body upside

down and lightly tap it.

Solenoid Valve (4-Section)
Change and Speed Shift

1. Loosen the cap screws and remove the solenoid

coil (5).
• Put matching marks on the solenoid and the

body so that they can be aligned when assem-
bling.

• Take care not to miss the push rod.

Cap screw: 3.9 N·m

2. Remove the O-ring from the solenoid coil (5).

3. Remove the spool (6) and sleeve (7) from the

body.
• Record the positions of the spool, sleeve and

the body hole so that they can be aligned when
assembling.

• To take out the spool, hook the small orifice at

the end of the spool using a tool such as a
scriber.

• To remove the sleeve, turn the body upside

down and lightly tap it.

W2H105

5

W2H106

6

7

W2H107

5

W2H108

6

7

HYDRAULIC UNITS

SOLENOID VALVES

IV-73

TB175W

• Replace
• Replace
• Overhaul and repair or replace.

INSPECTION AND ADJUSTMENT

Checking the Parts

Parts

• Replace

• Replace

TROUBLESHOOTING

Symptom

Solenoid valve does not
operate.

• Wiring short-circuit or wire break
• Solenoid coil short-circuit or wire break
• Catching of foreign matter by the spool
• Damage on the outer circumference of the spool
• Catching of foreign matter by the plunger
• Damage on the outer circumference of the plunger

Solenoid coil

• When the solenoid is burned, short-circuited, or has a wire

break

• Wiring short-circuit or wire break

Judgment Criteria

Treatment

• Scratches, rust, or corrosion at the sliding parts with the spool
• Scratches, rust, or corrosion of the seal part in contact with the

O-ring

• Other damage considered to impair the normal functions

• Damage on the outer circumference which catches a fingernail
• No smooth movement

• Rust, corrosion, deformation, breakage, or other notable dam-

age



Body

Spool, plunger

Spring

O-Ring

• Replace
• Replace

• Replace

• Replace
• Adjust or replace

• Replace

• Replace

Probable Causes

Remedy

• Replace
• Replace

• Damaged O-ring
• Damaged O-ring at the emergency manual but-

ton of the solenoid valve

Oil leakage from solenoid
valve, cover, or relief
valve to the outside.

Pressure does not rise.

• Catching of foreign matter by the relief valve

• Clean or replace.

HYDRAULIC UNITS

SOLENOID VALVES

IV-74

TB175W

HYDRAULIC UNITS

PROPORTIONAL CONTROL SOLENOID VALVE

IV-75

TB175W

PROPORTIONAL CONTROL SOLENOID VALVE

CONSTRUCTION

A:

 7 

±

0.5 N·m

  1. Proportional Control Solenoid
  2. Bolt
  3. Spool

HYDRAULIC UNITS

PROPORTIONAL CONTROL SOLENOID VALVE

IV-76

TB175W

T9H201

S

1

2

4

A1

A

P

T

B1

S=A1-B1

Fk

Paxs

Paxs

Fk

Fs

Fks

Fs

Fks

T9H202

1

5

P

A

T

T9H203

1

6

P

A

T

OPERATION PRINCIPLE

This valve controls the secondary pressure by using
the built-in proportional pressure reducing valve. The
secondary pressure of this valve is proportional to the
magnitude of electric current flowing in the valve,
because the force to generate the secondary pressure
is applied by the solenoid based on the current passing
through the coil.
When a current flows in the solenoid, a thrust force
proportional to the current is generated and moves the
spool (1) so that the oil supplied from Port P is led to
the secondary pressure side Port A, thus increasing
pressure Pa of Port A.
Pressure Pa is a function of the differential area S
between the cross sections A1 and B1 of the spool (1),
and the spool (1) is pushed to the solenoid side by the
oil pressure Pa 

×

 S. The spool (1) stops at a position

where the sum of the oil pressure Pa 

×

 S and the force

Fk exerted by the springs (2) is balanced with the
thrust force Fs generated by the solenoid. The weight
Fks of the spring (4) for fine adjustment of the
secondary pressure acts in the direction (left) to help
the thrust force from the solenoid.

When the thrust force is larger than the set value, the
spool (1) is moved to the left, connecting Port P
(primary, supply side) and Port A (secondary, dis-
charge side) through the notch (5).

When the thrust force is smaller than the set value, the
spool (1) is moved to the right, connecting Port A
(secondary, discharge side) and Port T (outlet to tank)
through the notch (6).
Therefore, the opening areas of the supply side notch
(5) and discharge side notch (6) are controlled by the
movement of the spool (1), and secondary (pilot)
pressure created by the thrust force generated by the
solenoid can be provided.

HYDRAULIC UNITS

PROPORTIONAL CONTROL SOLENOID VALVE

IV-77

TB175W

IV-76-1

DISASSEMBLY AND ASSEMBLY

General Cautions

• Carry out disassembly and assembly operations in

a clean place and place disassembled parts in clean
containers.

• Before disassembly, clean thoroughly around the

ports and remove paint or thread lock, etc. from all
joints with a wire brush.

• Clean disassembled parts with light oil or other

cleaning oil.

• The spool and body are selectively fitted, so if one

is found to be damaged, replace the valve assem-
bly.

• Apply a thin coating of hydraulic oil to sliding

surfaces and a thin coating of grease to seals when
assembling them.

• Replace seals with new parts each time disassem-

bly is done.

The following describes the disassembly procedure.
For assembly, follow the disassembly procedure in
the reverse order.

Disassembly

1. Remove the bolts, and then remove the propor-

tional control solenoid (1).

Bolt: 6.9 

±

1 N·m

2. Remove the O-rings from the proportional con-

trol solenoid (1).
• Do not disassemble the sleeve (2) that is swaged

onto the solenoid (4) with the retaining ring
(3).

• Make sure that the spool (5) moves a little if

pushed from the sleeve (2) end.

T9H204

1

T9H205

4

3

2

5

HYDRAULIC UNITS

PROPORTIONAL CONTROL SOLENOID VALVE

IV-78

TB175W

INSPECTION AND ADJUSTMENT

Checking the Parts

Part

Judgment Criteria

Treatment

• When the solenoid is burned, short-circuited, or has a wire

break

• Wiring short-circuit or wire break

• Scratches, rust, or corrosion at the sliding parts with the

spool

• Scratches, rust, or corrosion of the seal part in contact with

the O-ring

• Other damage considered to impair the normal functions

• Damage on the outer circumference which catches a finger-

nail

• No smooth movement

• Rust, corrosion, deformation, breakage, or other notable

damage

Coil assembly

Housing

Spool

Spring

O-ring

• Replace

• Replace

• Replace

• Replace

• Replace

• Replace

• Adjust or replace

• Replace

• Replace

Symptom

Main Causes

Remedy

• Wiring short-circuit or wire break
• Coil assembly short-circuit or wire break
• Catching of foreign matter by the spool

• Damage on the outer circumference of the spool

• Defective the proportional controller
• Primary pressure is insufficient

Oil leakage from sole-
noid valve

• Replace
• Replace
• Overhaul and repair or re-

place

• Overhaul and repair or re-

place

• Repair or replace
• Keep the primary pressure

Solenoid valve does
not operate

TROUBLESHOOTING



• Replace
• Replace

• Damaged O-ring
• Damaged seal nut

IV-76-2

HYDRAULIC UNITS

SELECTOR VALVE

IV-77

TB175W

SELECTOR VALVE

CONSTRUCTION

Pilot Change

  1. Body
  2. Plug
  3. Connector
  4. Spool

  5. Spring
  6. Retainer
  7. O-ring
  8. O-ring

W2H300

PL

T
P

HYDRAULIC SYMBOL

A

3

7

1

4

6

5

8
2

A

B

PL

T

P

A

A:

 26.5 N·m

B:

 70.6 N·m

HYDRAULIC UNITS

SELECTOR VALVE

IV-78

TB175W

Swing/Adjust Change

  1. Spring
  2. Cover
  3. Cover
  4. O-ring

)

22

*

6

6

2

X

X

9 0!-

HYDRAULIC SYMBOL

A

A

1

2

3

4

4

SECTION “X-X”

PP

T

P

1

B

1

A

1

B

2

A

2

P

2

A:

 9.8 N·m

HYDRAULIC UNITS

PORT RELIEF VALVE

IV-79

TB175W

PORT RELIEF VALVE

CONSTRUCTION

  1. Housing
  2. Plug
  3. Sleeve
  4. Main Poppet
  5. Spring
  6. Spring
  7. Spring
  8. Needle Valve
  9. Backup Ring

10. Backup Ring
11. Pin
12. Adjusting Screw
13. Body
14. Lock Nut
15. O-ring
16. O-ring
17. O-ring
18. O-ring

W2H400E

SECTION “X-X”

X

X

P

1

P

2

T

HYDRAULIC SYMBOL

1

2

4

5

6

7

8

9

10

12

14

15

18

11

3

17

16

16

13

HYDRAULIC UNITS

PORT RELIEF VALVE

IV-80

TB175W

OPERATION

“IV-58~59”

DISASSEMBLY AND ASSEMBLY

Genaral Cautions

“IV-60”

Following is an explanation of the relief valve disas-
sembly procedure.
Follow the procedure used to disassemble the relief
valve in reverse order when reassembling it.

Disassembly

1. Remove the port relief valves, then remove the O-

rings from the relief valves.
• Do not disassemble the relief valves unless it is

necessary.

• When using a spanner or adjustable wrench, be

sure to attach it in the place shown in the figure
at right.

Relief valve: 58.84 N·m

W2H401


Content      ..     11      12      13      14     ..