New Holland Tractor Workmaster 50 / Workmaster 60 / Workmaster 70 / Tier 4B (final). SERVICE MANUAL - page 23
Electrical systems - FAULT CODES
B. If the voltage is not present for one or more of the checks, see the appropriate vehicle service manual and
electrical schematics, if necessary, to locate and restore supply power to the ECU A-9000.
4.
Determine the condition of the ECU A-9000 CAN circuit.
With the key switch in the OFF position, use a multimeter to measure the resistance of the CAN connection on the
vehicle (VE) harness side:
From
To
Value
X-9102 pin K24
X-9102 pin K25
There should be 120 Ω.
X-9102 pin K24
chassis ground
There should be no continuity
X-9102 pin K25
chassis ground
There should be no continuity
Use a multimeter to measure the resistance of the CAN termination resistor, internal to the ECU A-9000:
From
To
Value
X-9102 pin K24
X-9102 pin K25
There should be 120 Ω.
A. If the measured resistances are correct and neither conductor is grounded, check the ECU A-9000 for the
appropriate software and re-flash, if necessary.
B. If the measured resistances are not correct or one or both of the conductors is grounded, see the appropriate
vehicle service manual and electrical schematics, if necessary, to locate and restore the termination resistance
to the CAN circuit.
5.
Visually inspect the relevant harnesses and connectors for damage, bent or dislocated pins, corroded terminals,
or broken wires. Verify that the connectors are fully installed. Flex the harnesses involved to reveal intermittent
breaks or shorts in the wiring concerned. Operate the machine while you monitor the display.
A. If you find damage or the display indicates other than normal display readings, then repair the damage discov-
ered during the inspection or locate and repair the other than normal display condition and verify that the error
has been resolved.
B. If you do not find damage and the display indicates only normal readings, then erase the fault code and continue
operation.
Wiring harnesses - Electrical schematic sheet 02 - Engine Control Unit (ECU) power and after treatment
system (engine schematics) (55.100.DP-C.20.E.02)
205
Electrical systems - FAULT CODES
DTC 3D4-02-ECU internal failure - ECU shutdown test failure
Control Module : ECU
Context:
The Engine Control Unit (ECU) A-9000 performs a series of “shut-off path” tests which deactivates all power stages
relevant to fuel injection if certain ECU A-9000 errors are detected. If an incorrect response to the power stage supply
(CY320) is detected during this test, this fault will occur.
Solution:
1. Check the ECU A-9000 for the appropriate software and re-flash, if necessary.
A. If the fault has been resolved, return the machine to service.
B. If the fault has not been resolved, escalate an ASIST concern.
206
Electrical systems - FAULT CODES
DTC 3D4-03-ECU internal failure - Wrong set response time
Control Module : ECU
Context:
The Engine Control Unit (ECU) A-9000 performs a series of “shut-off path” tests which deactivates all power stages
relevant to fuel injection if certain ECU A-9000 errors are detected. If there is a time-out error during this test, this
fault will occur.
Solution:
1. Check the ECU A-9000 for the appropriate software and re-flash, if necessary.
A. If the fault has been resolved, return the machine to service.
B. If the fault has not been resolved, escalate an ASIST concern.
207
Electrical systems - FAULT CODES
DTC 3D4-04-ECU internal failure - SPI errors during MoCSOP
execution
Control Module : ECU
Context:
The Engine Control Unit (ECU) A-9000 performs a series of “shut-off path” tests which deactivates all power stages
relevant to fuel injection if certain ECU A-9000 errors are detected. If there is a faulty communication detected during
this test, this fault will occur.
Solution:
1. Check the ECU A-9000 for the appropriate software and re-flash, if necessary.
A. If the fault has been resolved, return the machine to service.
B. If the fault has not been resolved, escalate an ASIST concern.
208
Electrical systems - FAULT CODES
DTC 3D4-12-ECU internal failure - Loss of synchronization to MM
from CPU
Control Module : ECU
Context:
The Engine Control Unit (ECU) A-9000 performs a shut-off path test of the fuel injection power stages. Every time
the key is turned ON, this test is performed to verify the correct functioning of the shut-off procedure. If an error is
detected during the shut-off test, the fault will occur.
Solution:
1. Check the ECU A-9000 for the appropriate software and re-flash, if necessary.
A. If the fault has been resolved, return the machine to service.
B. If the fault has not been resolved, escalate an ASIST concern.
209
Electrical systems - FAULT CODES
DTC 3E3-00-ECU internal failure - Fuel injection energizing time
is not plausible
Control Module : ECU
Context:
The Engine Control Unit (ECU) A-9000 monitors fuel injector energizing time for plausibility. If the ECU A-9000 de-
termines that this value is implausible for either pilot, main or post injection, this fault will occur.
Solution:
1. Check the ECU A-9000 for the appropriate software and re-flash, if necessary.
A. If the fault has been resolved, return the machine to service.
B. If the fault has not been resolved, escalate an ASIST concern.
210
Electrical systems - FAULT CODES
DTC 3E3-01-ECU internal failure - Fuel injection energizing phase
is not plausible
Control Module : ECU
Context:
The Engine Control Unit (ECU) A-9000 monitors fuel injector energizing start time for plausibility. If the ECU A-9000
determines that this value is implausible for either pilot, main or post injection, this fault will occur.
Solution:
1. Check the ECU A-9000 for the appropriate software and re-flash, if necessary.
A. If the fault has been resolved, return the machine to service.
B. If the fault has not been resolved, escalate an ASIST concern.
211
Electrical systems - FAULT CODES
DTC 3E3-02-Fuel injection correction has exceeded a minimum limit
Control Module : ECU
Context:
The Engine Control Unit (ECU) A-9000 checks the plausibility of the Zero Fuel Quantity Calibration (ZFC) energizing
time. The ZFC is used to correct pilot injection quantity. If the ECU A-9000 determines the energizing time of the ZFC
is implausible, this fault will occur.
Cause:
The ZFC is used to compensate for aging injectors. If the compensation limit is exceeded, this fault will occur.
Possible failure modes:
1. Faulty fuel injectors, worn.
2. Faulty ECU A-9000, software.
Solution:
1. Use the appropriate service manual to perform a leakage test in the high pressure fuel system. Also, test the fuel
injectors for internal and external leakage.
A. If any faults are found, repair as necessary.
B. If no faults are found, check the ECU A-9000 for the appropriate software and re-flash, if necessary.
212
Electrical systems - FAULT CODES
DTC 3E3-03-ECU internal failure - Injection quantity correction
Control Module : ECU
Context:
The Engine Control Unit (ECU) A-9000 checks the plausibility of the Zero Fuel Quantity Calibration (ZFC) energizing
time. The ZFC is used to correct pilot injection quantity. If the ECU A-9000 determines the energizing time of the ZFC
is implausible, this fault will occur.
Solution:
1. Check the ECU A-9000 for the appropriate software and re-flash, if necessary.
A. If the fault has been resolved, return the machine to service.
B. If the fault has not been resolved, escalate an ASIST concern.
213
Electrical systems - FAULT CODES
DTC 3E3-04-ECU internal failure - Rail pressure plausibility
Control Module : ECU
Context:
The Engine Control Unit (ECU) A-9000 monitors fuel pressure in the common rail. This monitoring is performed using
two software levels of monitoring because fuel pressure monitoring is a critical functionality. If the ECU A-9000 sees
an error in the level two monitoring but not in level one monitoring, this fault will occur.
Solution:
1. Check the ECU A-9000 for the appropriate software and re-flash, if necessary.
A. If the fault has been resolved, return the machine to service.
B. If the fault has not been resolved, escalate an ASIST concern.
214
Electrical systems - FAULT CODES
DTC 3E3-12-ECU internal failure - Torque request comparison
Control Module : ECU
Context:
The Engine Control Unit (ECU) A-9000 performs a diagnostic comparison of requested engine torque to allowed
engine torque. If the ECU A-9000 determines that requested engine torque is greater than maximum allowed torque,
this fault will occur.
Solution:
1. Check the ECU A-9000 for the appropriate software and re-flash, if necessary.
A. If the fault has been resolved, return the machine to service.
B. If the fault has not been resolved, escalate an ASIST concern.
215
Electrical systems - FAULT CODES
DTC 3F6-03-DOC inlet temperature sensor voltage is higher than
expected
Control Module : ECU
Context:
The Engine Control Unit (ECU) A-9000 monitors the Diesel Oxidation Catalyst (DOC) inlet temperature sensor B-9127.
If the ECU A-9000 detects a voltage greater than 3.59 V in the diesel oxidation catalyst inlet temperature sensor
B-9127 signal circuit, this fault will occur.
Cause:
The ECU A-9000 has detected a voltage greater than 3.59 V in the diesel oxidation catalyst inlet temperature sensor
B-9127 signal circuit. For more information regarding the technical specifications of the DOC inlet temperature sensor
B-9127, see Exhaust Gas Recirculation (EGR) temperature sensors - Technical Data (55.989).
Possible failure modes:
1. Faulty DOC inlet temperature sensor B-9127 wiring, short to voltage source.
2. Faulty DOC inlet temperature sensor B-9127 wiring, open circuit.
3. Faulty DOC inlet temperature sensor B-9127, internal failure.
4. Faulty ECU A-9000, software.
Solution:
1.
Verify fault is present and active.
Use the Electronic Service Tool (EST) to check the status of this fault.
A. If the fault is present and active, continue with Step 2.
B. If the fault is no longer present or in an inactive state, the fault may be intermittent and not currently active.
Continue with Step 6.
2.
Check the DOC inlet temperature sensor B-9127 for an internal failure.
Disconnect the vehicle harness (VE) from the DOC inlet temperature sensor B-9127 at connector X-9127.
Use a multimeter to measure the resistance on the diesel oxidation catalyst inlet temperature sensor B-9127 :
From
To
Value
X-9127 pin 1
X-9127 pin 2
There should be between 170.2 -
849.7 Ω.
A. If there is between 170.2 - 849.7 Ω, leave connector X-9127 disconnected and continue to Step 3.
B. If there is not between 170.2 - 849.7 Ω, the diesel oxidation catalyst inlet temperature sensor B-9127 has failed.
Replace the DOC inlet temperature sensor B-9127.
3.
Check the DOC inlet temperature sensor B-9127 vehicle harness (VE) wiring for a short circuit.
With the key in the OFF position, use a multimeter to perform the following voltage check on the vehicle harness
side :
From
To
Value
X-9127 pin 1
Chassis ground
There should be no voltage.
A. If there is voltage, there is a short to battery in the diesel oxidation catalyst inlet temperature sensor B-9127
wiring. Use the appropriate service manual, if necessary, to locate and repair the shorted conductor.
B. If there is no voltage, leave connector X-9127 disconnected and continue to Step 4.
216
Electrical systems - FAULT CODES
4.
Check the DOC inlet temperature sensor B-9127 vehicle harness (VE) wiring for an open circuit condition.
Disconnect the vehicle harness (VE) from the ECU A-9000 at connector X-9102.
With the key in the OFF position, use a multimeter to perform the following continuity check on the vehicle harness
(VE) side :
From
To
Value
X-9127 pin 1
X-9102 pin K84
There should be continuity.
X-9127 pin 2
X-9102 pin K83
There should be continuity.
A. If there is no continuity, there is an open circuit in the DOC inlet temperature sensor B-9127 vehicle harness
(VE) wiring. Use the appropriate service manual, if necessary, to locate and repair the broken conductor.
B. If there is continuity, leave connector X-9102 disconnected and continue to Step 5.
5.
Check the DOC inlet temperature sensor B-9127 vehicle harness (VE) wiring for a short circuit condition.
With the key in the OFF position, use a multimeter to perform the following continuity check on the vehicle harness
(VE) side :
From
To
Value
X-9102 pin K84
All pins in connector X-9102
There should be no continuity.
A. If there is continuity, there is a short circuit in the DOC inlet temperature sensor B-9127 vehicle harness (VE)
wiring. Use the appropriate service manual, if necessary, to locate and repair the shorted conductor.
B. If there is no continuity, check the ECU A-9000 for the appropriate software and re-flash, if necessary.
6.
Visually inspect the relevant harnesses and connectors for damage, bent or dislocated pins, corroded terminals,
or broken wires. Verify that the connectors are fully installed. Flex the harnesses involved to reveal intermittent
breaks or shorts in the wiring concerned. Operate the machine while you monitor the display.
A. If you find damage or the display indicates other than normal display readings, then repair the damage discov-
ered during the inspection or locate and repair the other than normal display condition and verify that the error
has been resolved.
B. If you do not find damage and the display indicates only normal readings, then erase the fault code and continue
operation.
Wiring harnesses - Electrical schematic sheet 02 - Engine Control Unit (ECU) power and after treatment
system (engine schematics) (55.100.DP-C.20.E.02)
217
Electrical systems - FAULT CODES
DTC 3F6-04-DOC inlet temperature sensor voltage is lower than
expected
Control Module : ECU
Context:
The Engine Control Unit (ECU) A-9000 monitors the Diesel Oxidation Catalyst (DOC) inlet temperature sensor B-9127.
If the ECU A-9000 detects a voltage less than 459.40 mV in the DOC inlet temperature sensor B-9127 signal circuit,
this fault will occur.
Cause:
The ECU A-9000 has detected a voltage less than 459.40 mV in the DOC inlet temperature sensor B-9127 signal
circuit. For more information regarding the technical specifications of the DOC inlet temperature sensor B-9127, see
Exhaust Gas Recirculation (EGR) temperature sensors - Technical Data (55.989).
Possible failure modes:
1. Faulty DOC inlet temperature sensor B-9127 wiring, short circuit to ground.
2. Faulty DOC inlet temperature sensor B-9127, internal failure.
3. Faulty ECU A-9000, software.
Solution:
1.
Verify fault is present and active.
Use the Electronic Service Tool (EST) to check the status of this fault.
A. If the fault is present and active, continue with Step 2.
B. If the fault is no longer present or in an inactive state, the fault may be intermittent and not currently active.
Continue with Step 5.
2.
Check the DOC inlet temperature sensor B-9127 for an internal failure.
Disconnect the vehicle harness (VE) from the DOC inlet temperature sensor B-9127 at connector X-9127.
Use a multimeter to measure the resistance on the DOC inlet temperature sensor B-9127 :
From
To
Value
X-9127 pin 1
X-9127 pin 2
There should be between 170.2 -
849.7 Ω.
A. If there is between 170.2 - 849.7 Ω, leave connector X-9127 disconnected and continue to Step 3.
B. If there is not between 170.2 - 849.7 Ω, the DOC inlet temperature sensor B-9127 has failed. Replace the DOC
inlet temperature sensor B-9127.
3.
Check the DOC inlet temperature sensor B-9127 vehicle harness (VE) wiring for a short circuit condition.
With the key in the OFF position, use a multimeter to perform the following continuity check on the vehicle harness
(VE) side :
From
To
Value
X-9127 pin 1
X-9127 pin 2
There should be no continuity.
X-9127 pin 1
Chassis ground
There should be no continuity.
A. If there is continuity, there is a short circuit in the DOC inlet temperature sensor B-9127 vehicle harness (VE)
wiring. Use the appropriate service manual, if necessary, to locate and repair the shorted conductor.
B. If there is no continuity, leave the connector X-9127 disconnected and continue to Step 4.
4.
Check the DOC inlet temperature sensor B-9127 vehicle harness (VE) wiring for a short circuit condition.
218
Electrical systems - FAULT CODES
Disconnect the vehicle harness (VE) from the ECU A-9000 at connector X-9102.
With the key in the OFF position, use a multimeter to perform the following continuity check on the vehicle harness
(VE) side :
From
To
Value
X-9102 pin K84
All pins in connector X-9102
There should be no continuity.
A. If there is continuity, there is a short circuit in the DOC inlet temperature sensor B-9127 vehicle harness (VE)
wiring. Use the appropriate service manual, if necessary, to locate and repair the shorted conductor.
B. If there is no continuity, check the ECU A-9000 for the appropriate software and re-flash, if necessary.
5. Visually inspect the relevant harnesses and connectors for damage, bent or dislocated pins, corroded terminals,
or broken wires. Verify that the connectors are fully installed. Flex the harnesses involved to reveal intermittent
breaks or shorts in the wiring concerned. Operate the machine while you monitor the display.
A. If you find damage or the display indicates other than normal display readings, then repair the damage discov-
ered during the inspection or locate and repair the other than normal display condition and verify that the error
has been resolved.
B. If you do not find damage and the display indicates only normal readings, then erase the fault code and continue
operation.
Wiring harnesses - Electrical schematic sheet 02 - Engine Control Unit (ECU) power and after treatment
system (engine schematics) (55.100.DP-C.20.E.02)
219
Electrical systems - FAULT CODES
DTC 426-03-Level 2 Monitoring : Reported Overvoltage of Supply
Control Module : ECU
Context:
The Engine Control Unit (ECU) A-9000 monitors the ECU A-9000 internal 5 V supply. If the 5 V supply exceeds the
maximal limit, this fault will occur.
Cause:
The ECU A-9000 has determined that the 5 V internal voltage supply is too high.
Possible failure modes:
1. Faulty voltage supply.
2. Faulty ECU A-9000, software.
Solution:
1.
Verify fault is present and active.
Use the Electronic Service Tool (EST) to check the status of this fault.
A. If the fault is present and active, continue with Step 2.
B. If the fault is no longer present or in an inactive state, the fault may be intermittent and not currently active.
Continue with Step 3.
2.
Check the ECU A-9000 supply voltage.
Disconnect the vehicle (VE) harness from the ECU A-9000 at connector X-9102.
To energize the Main relay K-9102, place a jumper wire between the vehicle harness (VE) side of connector X-9102
pin K28 and chassis ground.
Use a multimeter to check for voltage on the vehicle (VE) harness side:
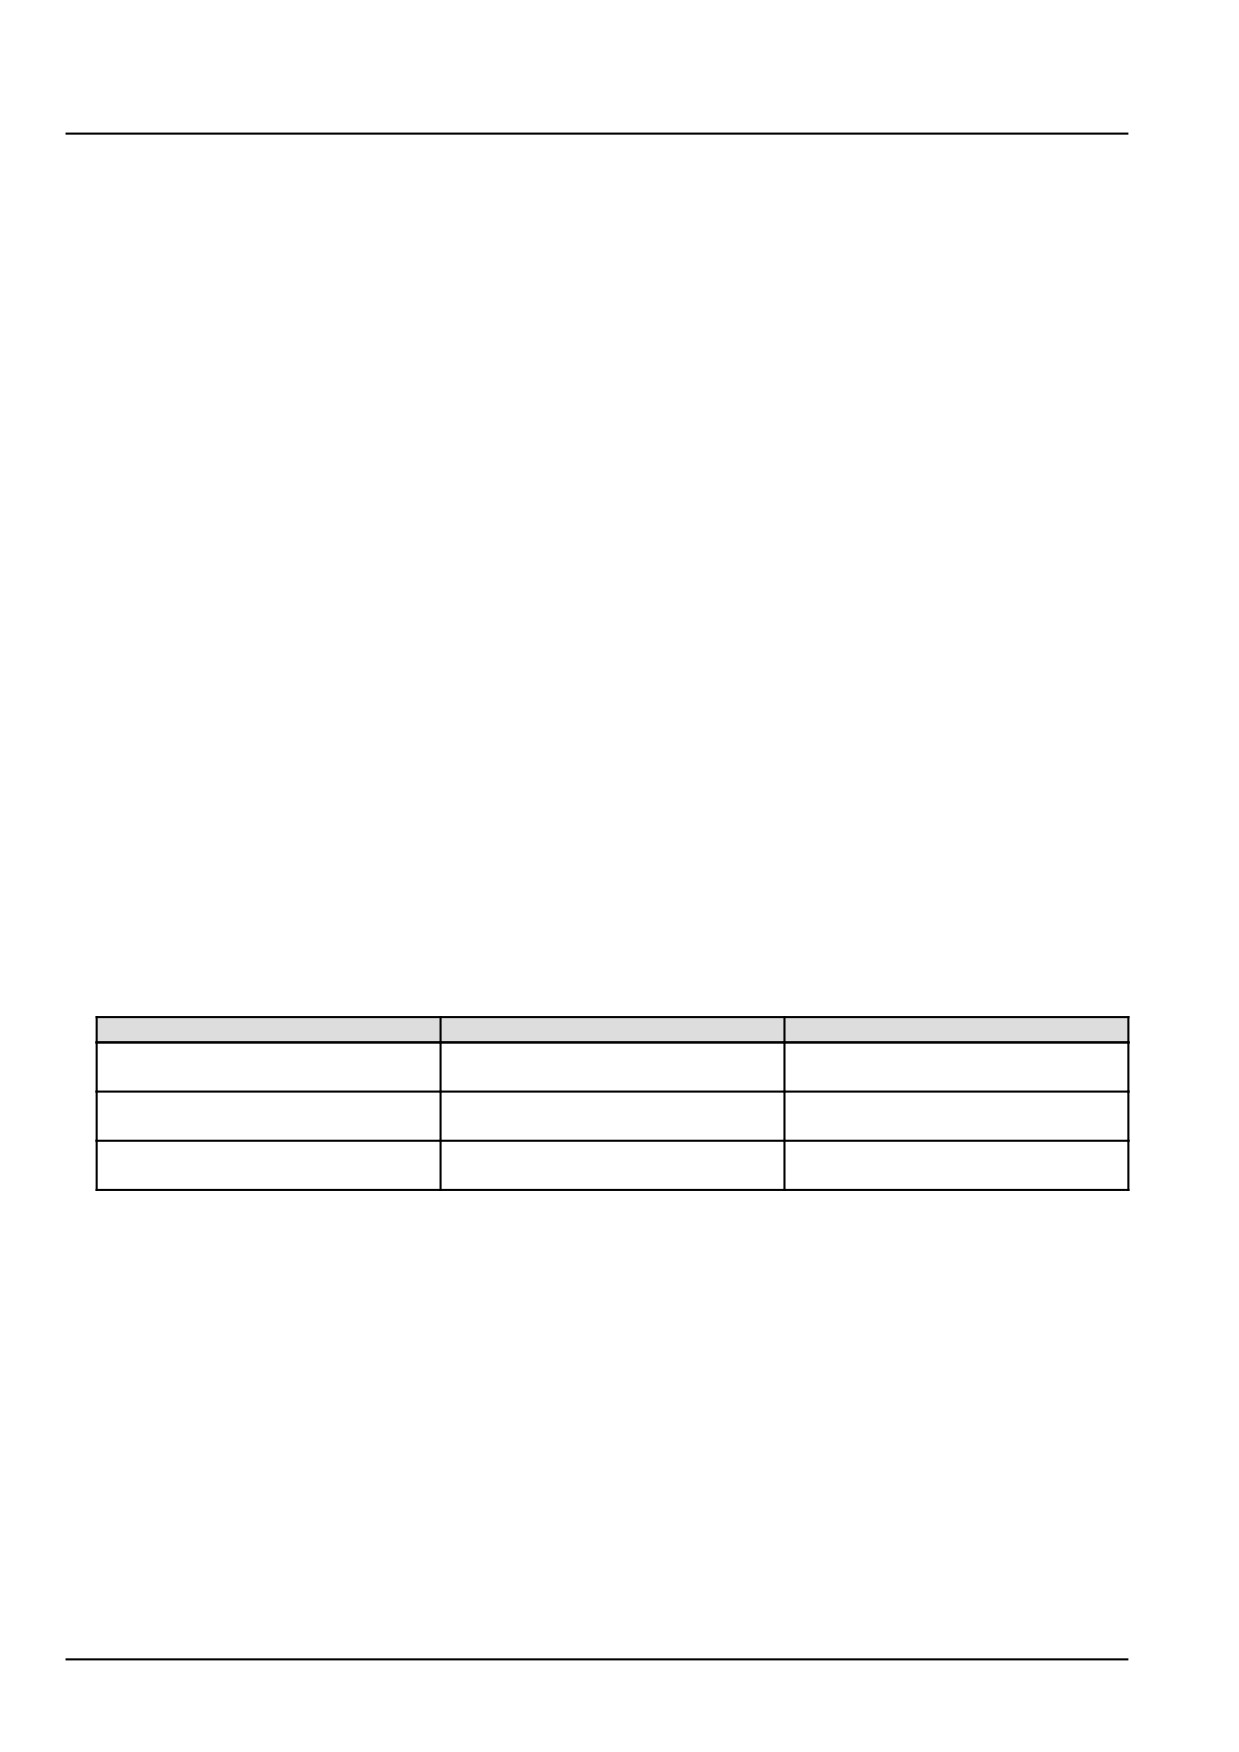
From
To
Value
X-9102 pin K01
X-9102 pin K02
There should be approximately
12.0 V.
X-9102 pin K03
X-9102 pin K04
There should be approximately
12.0 V.
X-9102 pin K05
X-9102 pin K06
There should be approximately
12.0 V.
A. If the voltage is not present for one or more of the checks, use the appropriate service manual, if necessary,
to repair the faulty conductor.
B. If the voltage is present on all of the checks, check the ECU A-9000 for the appropriate service manual and
re-flash, if necessary.
3.
Visually inspect the relevant harnesses and connectors for damage, bent or dislocated pins, corroded terminals,
or broken wires. Verify that the connectors are fully installed. Flex the harnesses involved to reveal intermittent
breaks or shorts in the wiring concerned. Operate the machine while you monitor the display.
A. If you find damage or the display indicates other than normal display readings, then repair the damage discov-
ered during the inspection or locate and repair the other than normal display condition and verify that the error
has been resolved.
B. If you do not find damage and the display indicates only normal readings, then erase the fault code and continue
operation.
Wiring harnesses - Electrical schematic sheet 02 - Engine Control Unit (ECU) power and after treatment
system (engine schematics) (55.100.DP-C.20.E.02)
220
Electrical systems - FAULT CODES
DTC 426-04-Level 2 Monitoring : Reported Under Voltage of Supply
Control Module : ECU
Context:
The Engine Control Unit (ECU) A-9000 monitors the ECU A-9000 internal 5 V supply. If the 5 V supply is below the
minimal limit, this fault will occur.
Cause:
The ECU A-9000 has determined that the 5 V internal voltage supply is too low.
Possible failure modes:
1. Faulty voltage supply.
2. Faulty ECU A-9000, software.
Solution:
1.
Verify fault is present and active.
Use the Electronic Service Tool (EST) to check the status of this fault.
A. If the fault is present and active, continue with Step 2.
B. If the fault is no longer present or in an inactive state, the fault may be intermittent and not currently active.
Continue with Step 3.
2.
Check the ECU A-9000 supply voltage.
Disconnect the vehicle (VE) harness from the ECU A-9000 at connector X-9102.
To energize the Main relay K-9102, place a jumper wire between the vehicle harness (VE) side of connector X-9102
pin K28 and chassis ground.
Use a multimeter to check for voltage on the vehicle (VE) harness side:
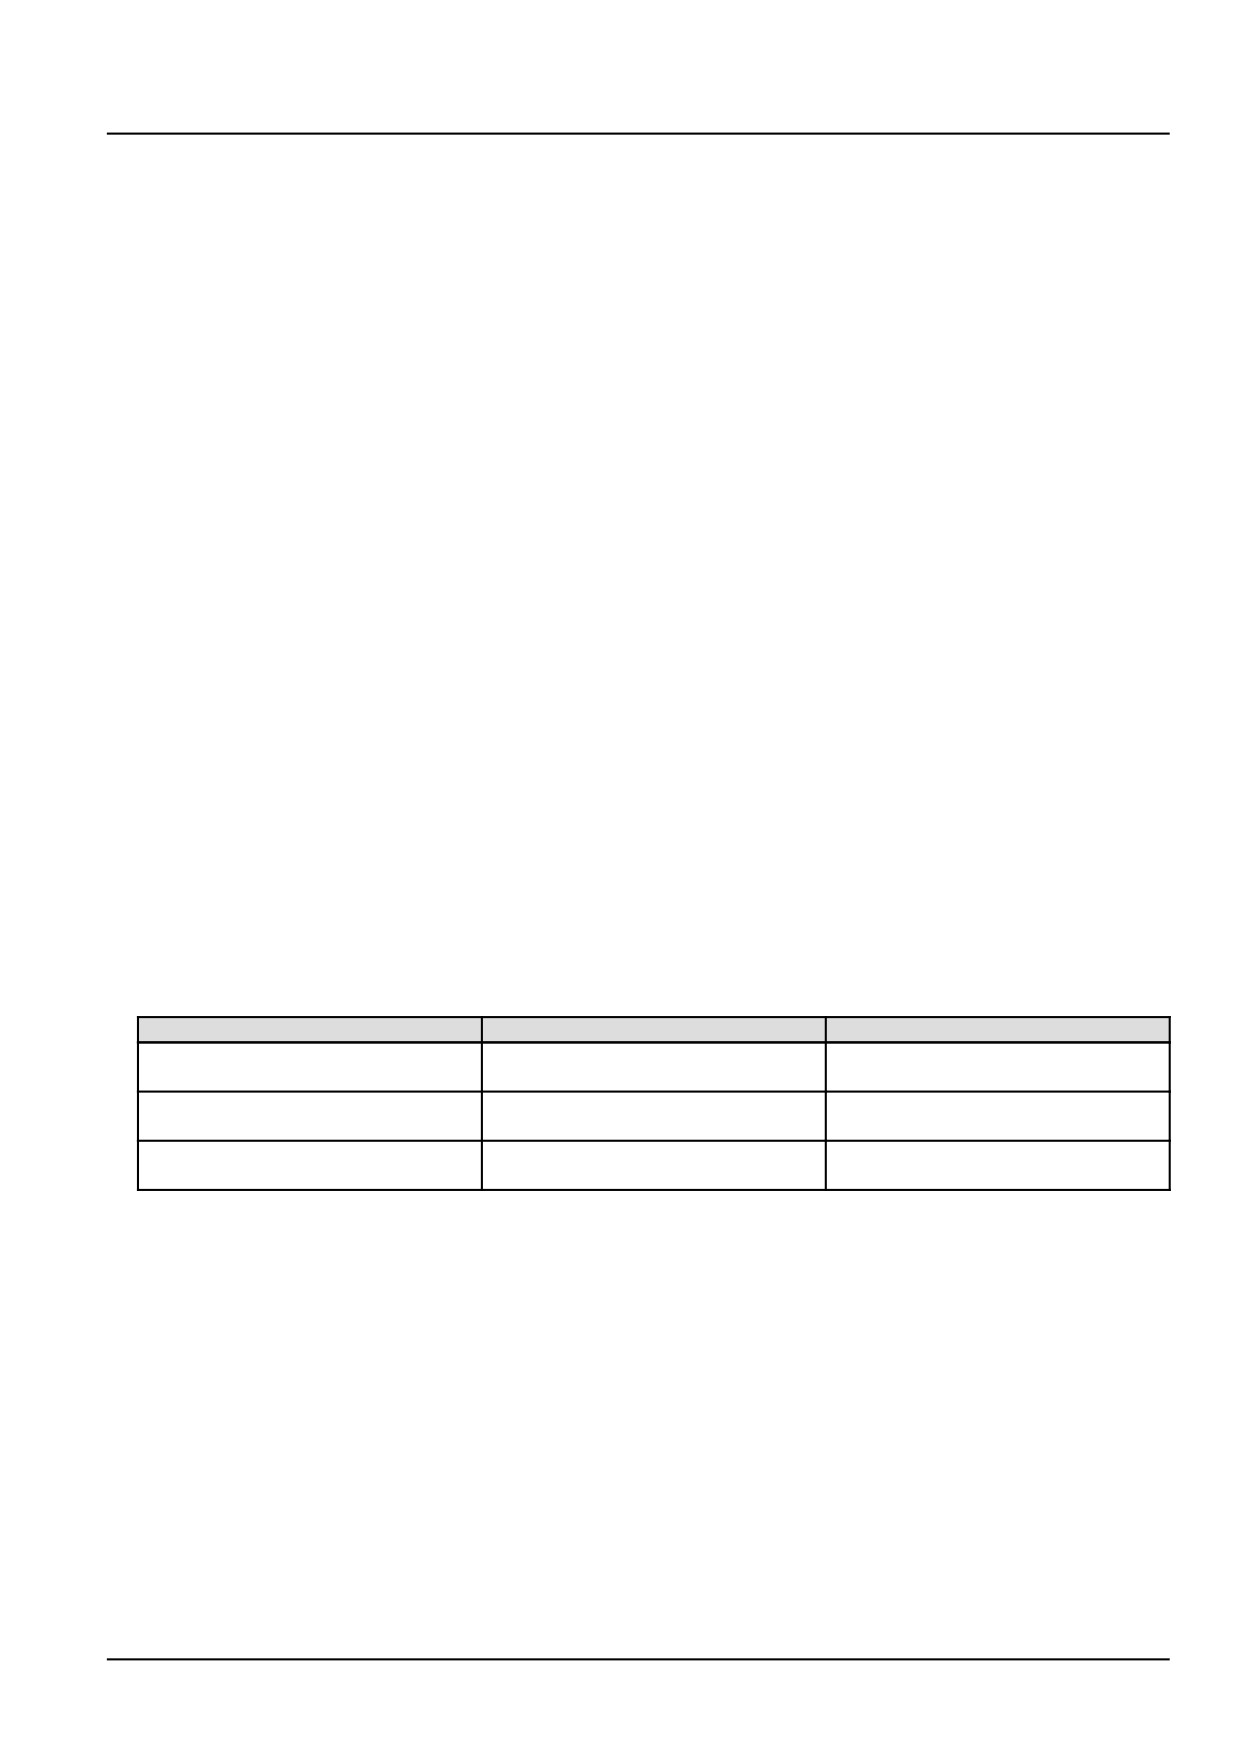
From
To
Value
X-9102 pin K01
X-9102 pin K02
There should be approximately
12.0 V.
X-9102 pin K03
X-9102 pin K04
There should be approximately
12.0 V.
X-9102 pin K05
X-9102 pin K06
There should be approximately
12.0 V.
A. If the voltage is not present for one or more of the checks, use the appropriate service manual, if necessary,
to repair the faulty conductor.
B. If the voltage is present on all of the checks, check the ECU A-9000 for the appropriate service manual and
re-flash, if necessary.
3.
Visually inspect the relevant harnesses and connectors for damage, bent or dislocated pins, corroded terminals,
or broken wires. Verify that the connectors are fully installed. Flex the harnesses involved to reveal intermittent
breaks or shorts in the wiring concerned. Operate the machine while you monitor the display.
A. If you find damage or the display indicates other than normal display readings, then repair the damage discov-
ered during the inspection or locate and repair the other than normal display condition and verify that the error
has been resolved.
B. If you do not find damage and the display indicates only normal readings, then erase the fault code and continue
operation.
Wiring harnesses - Electrical schematic sheet 02 - Engine Control Unit (ECU) power and after treatment
system (engine schematics) (55.100.DP-C.20.E.02)
221

Electrical systems - FAULT CODES
DTC 435-12-Rail pressure sensor value is intermittent
Control Module : ECU
NOTE: If the rail pressure sensor B-9004 is replaced, it is necessary to perform the Replacement of the Rail Pressure
sensor - Reset ECU Data with the Electronic Service Tool (EST) before you return the machine to service. See
Common rail pressure sensor - Configure - Reset ECU data (Rail pressure sensor) (55.010), if necessary.
Context:
The Engine Control Unit (ECU) A-9000 monitors the rail pressure sensor B-9004 If the ECU A-9000 detects more than
5 pressure jumps of greater than 500 bar (7250 psi) and the time between the pressure jumps is less than 3.00 s, an
intermittent connection is assumed and this fault will occur.
Cause:
The ECU A-9000 has detected an intermittent connection in the rail pressure sensor B-9004 signal circuit.
Possible failure modes:
1. Faulty rail pressure sensor B-9004 wiring, intermittent electrical connection.
2. Faulty rail pressure sensor B-9004, internal failure.
3. Faulty ECU A-9000, software.
Solution:
1.
Verify fault is present and active.
Use the Electronic Service Tool (EST) to check the status of this fault.
A. If the fault is present and active, continue with Step 2.
B. If the fault is no longer present or in an inactive state, the fault may be intermittent and not currently active.
Continue with Step 4.
2.
Check the rail pressure sensor B-9004 engine harness (EN) harness wiring for an open circuit or intermittent open
circuit condition.
Disconnect the engine harness (EN) from the rail pressure sensor B-9004 at connector X-9026.
Disconnect the engine harness (EN) from the ECU A-9000 at connector X-9001.
With the key in the OFF position, use a multimeter to perform the following continuity check for an open circuit on
the engine harness (EN) side :
From
To
Value
X-9026 pin 2
X-9001 pin A41
There should be continuity.
NOTE: Wiggle the harness during the check to promote an intermittent electrical connection.
A. If there is no continuity, there is an open circuit in the rail pressure sensor B-9004 wiring in the engine harness
(EN). Locate and repair the broken conductor.
B. If there is continuity, leave connector X-9026 disconnected and continue to Step 3.
3.
Replace the rail pressure sensor B-9004.
Use the Electronic Service Tool (EST) to check the status of this fault.
A. If the fault is no longer active, return the machine to service.
B. If the fault is still active, check the ECU A-9000 for the appropriate software and re-flash, if necessary.
4.
Visually inspect the relevant harnesses and connectors for damage, bent or dislocated pins, corroded terminals,
or broken wires. Verify that the connectors are fully installed. Flex the harnesses involved to reveal intermittent
breaks or shorts in the wiring concerned. Operate the machine while you monitor the display.
222
Electrical systems - FAULT CODES
A. If you find damage or the display indicates other than normal display readings, then repair the damage discov-
ered during the inspection or locate and repair the other than normal display condition and verify that the error
has been resolved.
B. If you do not find damage and the display indicates only normal readings, then erase the fault code and continue
operation.
Wiring harnesses - Electrical schematic sheet 03 - Engine sensors and fuel injection (engine schematics)
(55.100.DP-C.20.E.03)
223
Electrical systems - FAULT CODES
DTC 455-03-High pressure pump fuel delivery quantity at low idle
is too high
Control Module : ECU
Context:
The Engine Control Unit (ECU) A-9000 monitors fuel rail pressure. If the ECU A-9000 determines that the requested
fuel pressure is greater than the actual fuel pressure at idle, leakage is assumed and this fault will occur. Other active
faults may have caused this fault to occur. Use the Electronic Service Tool (EST) to check for other active faults.
Diagnose any active faults related to the fuel system first and then return to this fault. For more information regarding
fuel system troubleshooting, see Fuel injection system - Troubleshooting (10.218).
Cause:
The ECU A-9000 has determined that the requested fuel pressure is greater than the actual fuel pressure at idle.
Possible failure modes:
1. Faulty low pressure fuel system, clogged filter or leakage/blockage.
2. Faulty charge gear pump, low efficiency or line clogged/damaged.
3. Faulty electric fuel pump (if equipped).
4. Faulty fuel metering unit, unable to fully open.
5. Faulty high pressure pump, low efficiency.
6. Faulty fuel injectors, stuck open or internal leakage.
7. Faulty Pressure Relief Valve (PRV), leakage.
8. Faulty rail pressure sensor B-9004 drifted signal or leaking.
9. Faulty ECU A-9000, software.
224
Electrical systems - FAULT CODES
DTC 459-03-Fuel metering unit intermittent electrical connection
failure
Control Module : ECU
Context:
The Engine Control Unit (ECU) A-9000 monitors the fuel metering unit Y-9000 signal circuit. If the ECU A-9000 detects
an intermittent connection in the fuel metering unit Y-9000 signal circuit, this fault will occur.
Cause:
The ECU A-9000 has detected a intermittent connection in the fuel metering unit Y-9000 signal circuit.
Possible failure modes:
1. Faulty fuel metering unit Y-9000 wiring, open circuit or intermittent open circuit.
2. Faulty fuel metering unit Y-9000, internal failure.
3. Faulty ECU A-9000, software.
Solution:
1.
Verify fault is present and active.
Use the Electronic Service Tool (EST) to check the status of this fault.
A. If the fault is present and active, continue with Step 2.
B. If the fault is no longer present or in an inactive state, the fault may be intermittent and not currently active.
Continue with Step 4.
2.
Test the fuel metering unit Y-9000 internal resistance.
Disconnect the engine harness (EN) from the fuel metering unit Y-9000 at connector X-9007.
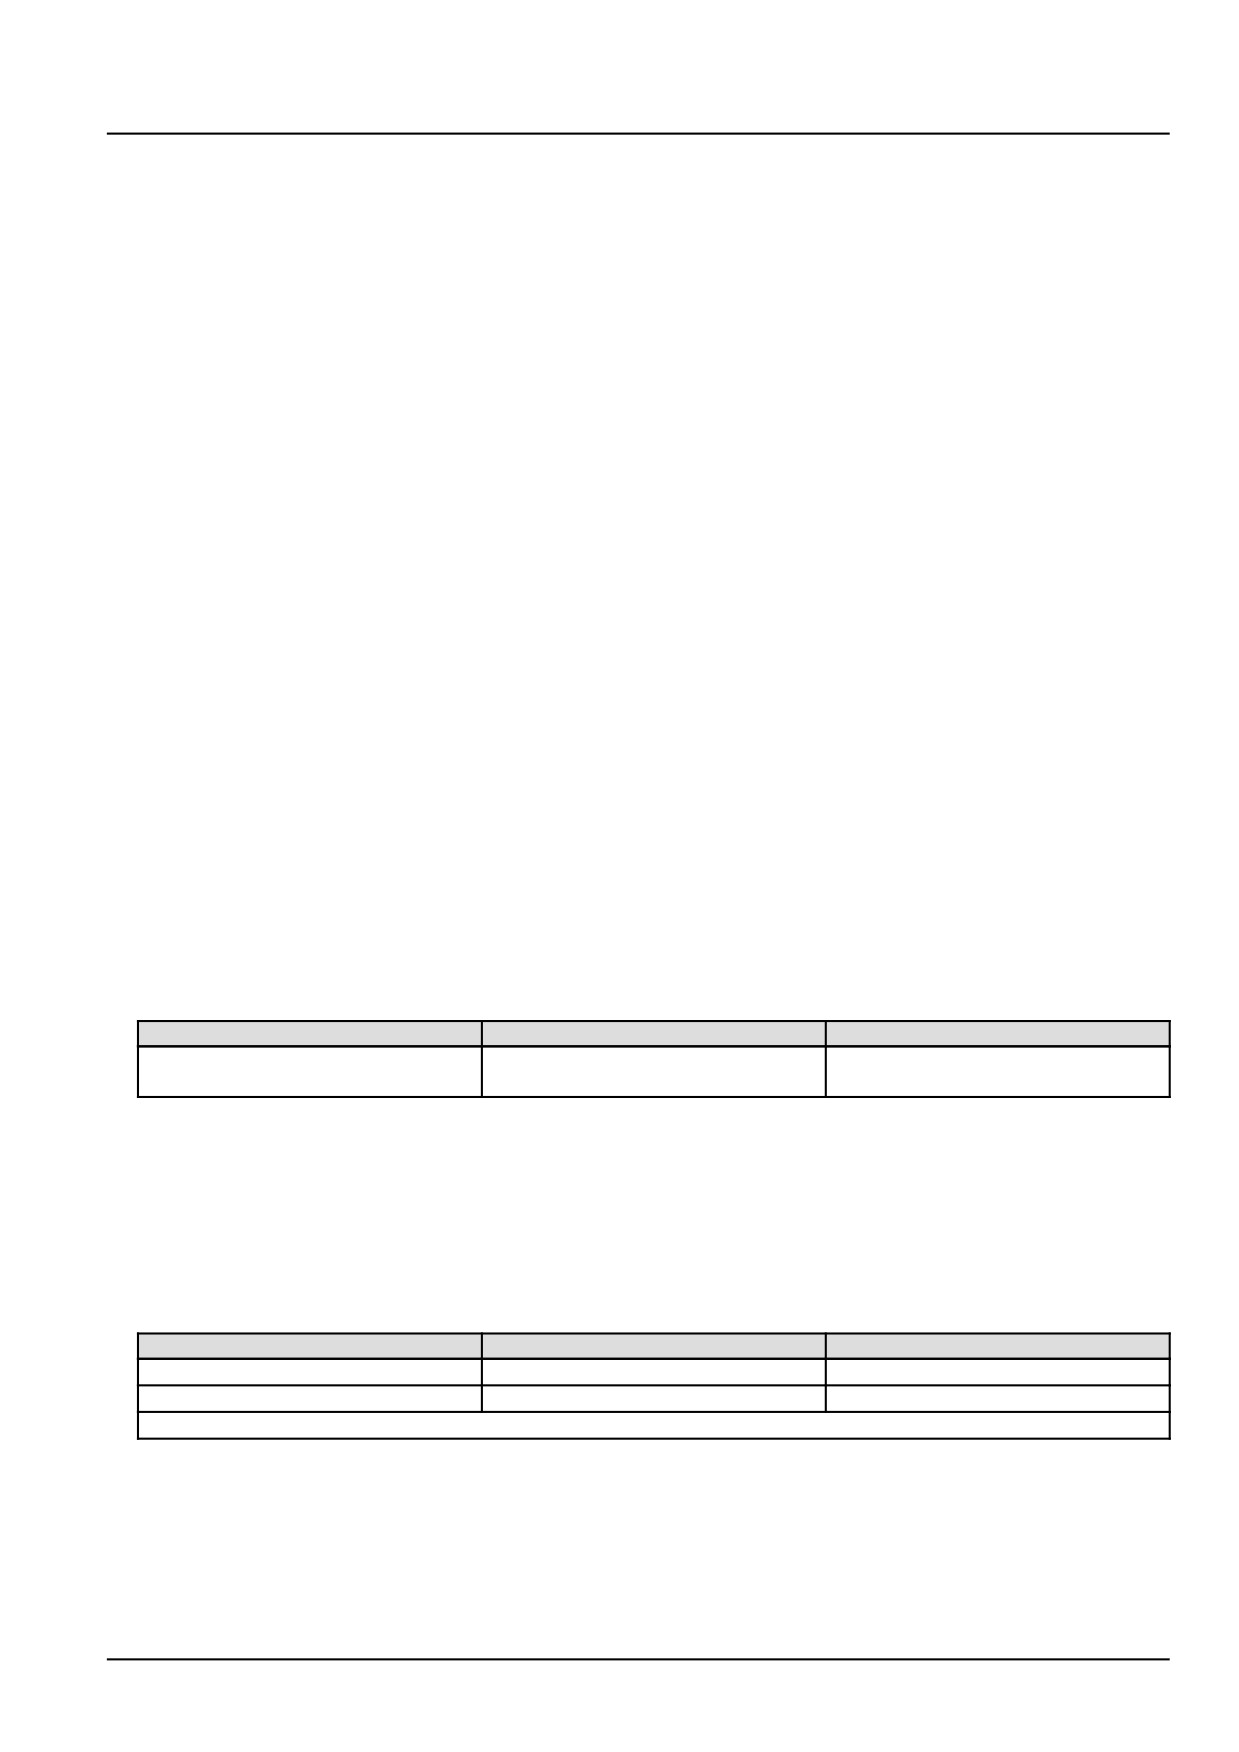
Use a multimeter to measure the resistance on the fuel metering unit Y-9000 pins :
From
To
Value
X-9007 pin 1
X-9007 pin 2
There should be between 2.6 - 3.2 Ω
at approximately 20.0 °C (68.0 °F).
A. If there is between 2.6 - 3.2 Ω, leave connector X-9007 disconnected and continue to Step 3.
B. If there is not between 2.6 - 3.2 Ω, the fuel metering unit Y-9000 has failed. Replace the fuel metering unit
Y-9000.
3.
Check the fuel metering unit Y-9000 engine harness (EN) wiring for an open circuit or intermittent open circuit.
With the key in the OFF position, use a multimeter to perform the following continuity check for an open circuit on
the engine harness (EN) side :
From
To
Value
X-9007 pin 1
X-9001 pin A60
There should be continuity.
X-9007 pin 2
X-9001 pin A15
There should be continuity.
NOTE: Wiggle the harness during the check to promote an intermittent electrical connection.
A. If there is no continuity, there is an open circuit condition in the fuel metering unit Y-9000 engine harness (EN)
wiring. Locate and repair the broken conductor.
B. If there is continuity, check the ECU A-9000 for the appropriate software and re-flash, if necessary.
4.
Visually inspect the relevant harnesses and connectors for damage, bent or dislocated pins, corroded terminals,
or broken wires. Verify that the connectors are fully installed. Flex the harnesses involved to reveal intermittent
breaks or shorts in the wiring concerned. Operate the machine while you monitor the display.
225
Electrical systems - FAULT CODES
A. If you find damage or the display indicates other than normal display readings, then repair the damage discov-
ered during the inspection or locate and repair the other than normal display condition and verify that the error
has been resolved.
B. If you do not find damage and the display indicates only normal readings, then erase the fault code and continue
operation.
Wiring harnesses - Electrical schematic sheet 03 - Engine sensors and fuel injection (engine schematics)
(55.100.DP-C.20.E.03)
226
Electrical systems - FAULT CODES
DTC 45A-03-Error in comparing energizing time to maximum value
for injector in cylinder 3
Control Module : ECU
Context:
The Zero Fuel Calibration (ZFL) evaluates energizing time for injectors at low idle. The ZFL uses learned calibration
values to change the energizing time of the pilot fuel injection. If the Engine Control Unit (ECU) A-9000 determines
that there is an error during this process, this fault will occur.
Cause:
The ECU A-9000 has determined that there is an error in the ZFL process for fuel injector number 3 Y-9003.
Solution:
1. Verify that the correct IMA injector code has been programmed to injector number 3.
A. If the correct IMA code is present, continue to Step 2.
B. If the correct IMA code has not been uploaded, program the correct IMA code.
NOTE: The IMA code may be under the paint on the fuel injector.
NOTE: For more information regarding programming IMA codes, see Fuel injectors - Configure - IMA codes
(10.218).
2. Replace the fuel injector number 3 Y-9003.
Use the Electronic Service Tool (EST) to verify the status of this fault.
A. If the fault has been resolved, return the machine to service.
B. If the fault has not been resolved, continue to Step 3.
3. Check the ECU A-9000 for the appropriate software and re-flash, if necessary.
A. If the fault has been resolved, return the machine to service.
B. If the fault has not been resolved, escalate an ASIST concern.
227
Electrical systems - FAULT CODES
DTC 45A-04-Error in comparing energizing time to minimum value
for injector in cylinder 3
Control Module : ECU
Context:
The Zero Fuel Calibration (ZFL) evaluates energizing time for injectors at low idle. The ZFL uses learned calibration
values to change the energizing time of the pilot fuel injection. If the Engine Control Unit (ECU) A-9000 determines
that there is an error during this process, this fault will occur.
Cause:
The ECU A-9000 has determined that there is an error in the ZFL process for fuel injector number 3 Y-9003.
Solution:
1. Verify that the correct IMA injector code has been programmed to injector number 3.
A. If the correct IMA code is present, continue to Step 2.
B. If the correct IMA code has not been uploaded, program the correct IMA code.
NOTE: The IMA code may be under the paint on the fuel injector.
NOTE: For more information regarding programming IMA codes, see Fuel injectors - Configure - IMA codes
(10.218).
2. Replace the fuel injector number 3 Y-9003.
Use the Electronic Service Tool (EST) to verify the status of this fault.
A. If the fault has been resolved, return the machine to service.
B. If the fault has not been resolved, continue to Step 3.
3. Check the ECU A-9000 for the appropriate software and re-flash, if necessary.
A. If the fault has been resolved, return the machine to service.
B. If the fault has not been resolved, escalate an ASIST concern.
228
Electrical systems - FAULT CODES
DTC 48D-02-Throttle valve actuator control circuit open
Control Module : ECU
Context:
The Engine Control Unit (ECU) A-9000 monitors the throttle valve actuator Z-9001 output 1 and output 2 h-bridge
circuits. If the ECU A-9000 detects a an open circuit in the throttle valve actuator Z-9001 output h-bridge circuits, this
fault will occur.
Cause:
The ECU A-9000 has detected an open circuit in the throttle valve actuator Z-9001 output h-bridge circuits.
Possible failure modes:
1. Faulty throttle valve actuator Z-9001 wiring, open circuit.
2. Faulty throttle valve actuator Z-9001 , internal failure.
3. Faulty ECU A-9000, software.
Solution:
1.
Verify fault is present and active.
Use the Electronic Service Tool (EST) to check the status of this fault.
A. If the fault is present and active, continue with Step 2.
B. If the fault is no longer present or in an inactive state, the fault may be intermittent and not currently active.
Continue with Step 4.
2.
Check the throttle valve actuator Z-9001 h-bridge engine harness (EN) wiring for an open circuit.
Disconnect the engine harness (EN) from the throttle valve actuator Z-9001 at connector X-9011.
Disconnect the engine harness (EN) from the ECU A-9000 at connector X-9001.
With the key in the OFF position, use a multimeter to perform the following continuity check for an open circuit at
the engine harness (EN) side :
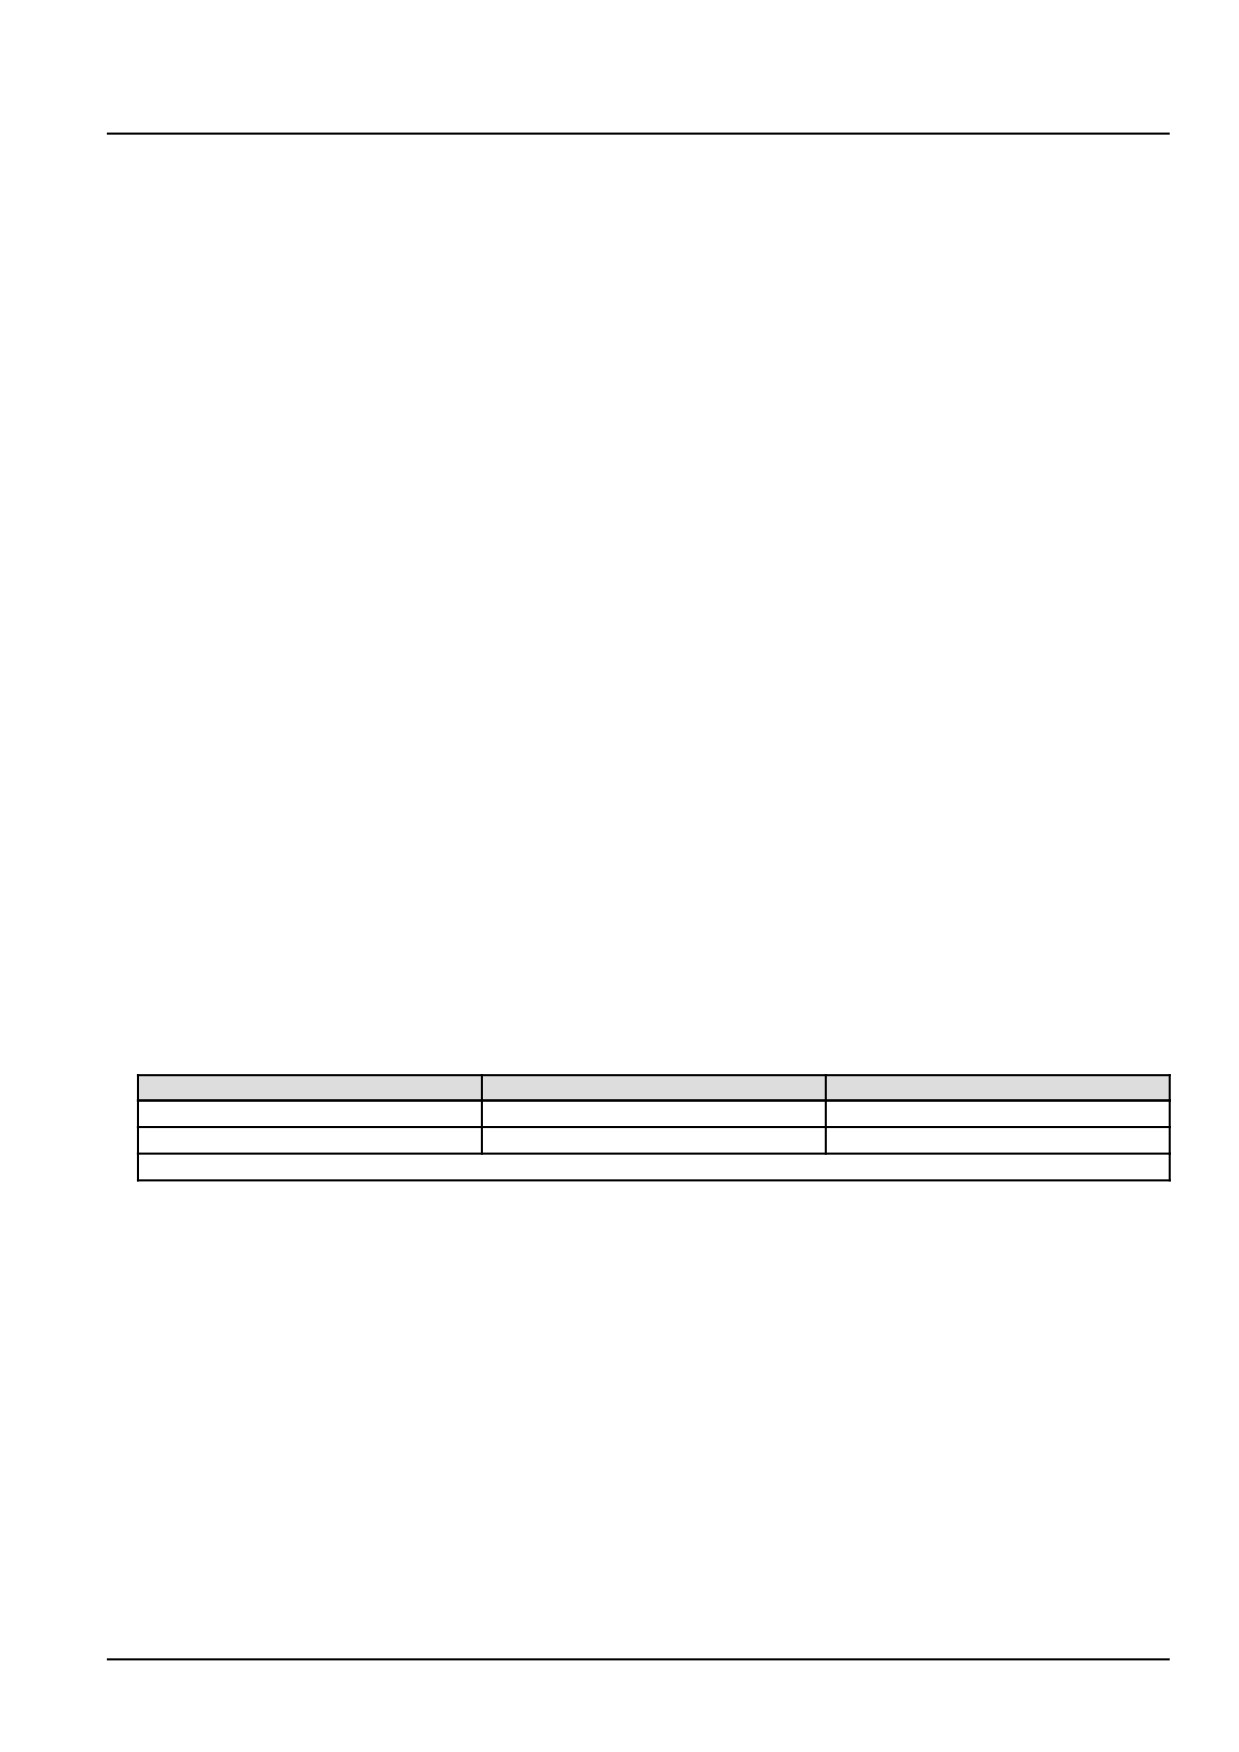
From
To
Value
X-9011 pin 6
X-9001 pin A49
There should be continuity.
X-9011 pin 2
X-9001 pin A34
There should be continuity.
NOTE: Wiggle the harness during the check to promote an intermittent electrical connection.
A. If there is no continuity, there is an open circuit in the throttle valve actuator Z-9001 engine harness (EN)
h-bridge circuit. Locate and repair the broken conductor.
B. If there is continuity, leave connector X-9011 disconnected and continue to Step 3.
3.
Replace the throttle valve actuator Z-9001.
Use the Electronic Service Tool (EST) to check the status of this fault.
A. If the fault is no longer active, return the machine to service.
B. If the fault is still active, check the ECU A-9000 for the appropriate service manual and re-flash, if necessary.
4.
Visually inspect the relevant harnesses and connectors for damage, bent or dislocated pins, corroded terminals,
or broken wires. Verify that the connectors are fully installed. Flex the harnesses involved to reveal intermittent
breaks or shorts in the wiring concerned. Operate the machine while you monitor the display.
229
Electrical systems - FAULT CODES
A. If you find damage or the display indicates other than normal display readings, then repair the damage discov-
ered during the inspection or locate and repair the other than normal display condition and verify that the error
has been resolved.
B. If you do not find damage and the display indicates only normal readings, then erase the fault code and continue
operation.
Wiring harnesses - Electrical schematic sheet 03 - Engine sensors and fuel injection (engine schematics)
(55.100.DP-C.20.E.03)
230
Electrical systems - FAULT CODES
DTC 48D-03-Throttle valve actuator control circuit over current
Control Module : ECU
Context:
The Engine Control Unit (ECU) A-9000 monitors the throttle valve actuator Z-9001 output 1 and output 2 h-bridge
circuits. If the ECU A-9000 detects an over temperature/current condition in the throttle valve actuator Z-9001 h-bridge
circuit, this fault will occur.
Cause:
The ECU A-9000 has detected an over temperature/current condition in the throttle valve actuator Z-9001 h-bridge
circuit.
Possible failure modes:
1. Faulty throttle valve actuator Z-9001 wiring, short to ground condition.
2. Faulty throttle valve actuator Z-9001 wiring, short to high source condition.
3. Faulty throttle valve actuator Z-9001, internal failure.
4. Faulty ECU A-9000, software.
Solution:
1.
Verify fault is present and active.
Use the Electronic Service Tool (EST) to check the status of this fault.
A. If the fault is present and active, continue with Step 2.
B. If the fault is no longer present or in an inactive state, the fault may be intermittent and not currently active.
Continue with Step 7.
2.
Check the throttle valve actuator Z-9001 h-bridge wiring for a short to battery condition.
Disconnect the engine harness (EN) from the throttle valve actuator Z-9001 at connector X-9011.
Disconnect the engine harness (EN) from the ECU A-9000 at connector X-9001.
With the key in the ON position, use a multimeter to perform the following voltage check for a short to battery on
the engine harness (EN) side :
From
To
Value
X-9011 pin 6
Chassis ground
There should be no voltage.
X-9011 pin 2
Chassis ground
There should be no voltage.
A. If there is voltage, there is a short to battery in the throttle valve actuator Z-9001 h-bridge circuit. Use the
appropriate service manual, if necessary, to locate and repair the shorted conductor.
B. If there is no voltage, leave connectors X-9011 and X-9001 disconnected and continue to Step 3.
3.
Check the throttle valve actuator Z-9001 h-bridge wiring for a short to ground condition.
With the key in the OFF position, use a multimeter to perform the following continuity check for a short to ground
on the engine harness (EN) side :
From
To
Value
X-9011 pin 6
Chassis ground
There should be no continuity.
X-9011 pin 2
Chassis ground
There should be no continuity.
A. If there is continuity, there is a short to ground in the throttle valve actuator Z-9001 h-bridge circuit. Use the
appropriate service manual, if necessary, to locate and repair the shorted conductor.
231
Electrical systems - FAULT CODES
B. If there is no continuity, leave connectors X-9011 and X-9001 disconnected and continue to Step 4.
4.
Check the throttle valve actuator Z-9001 engine harness (EN) wiring for a short circuit condition.
With the key in the OFF position, use a multimeter to perform the following continuity check for a short circuit on
the engine harness (EN) side :
From
To
Value
X-9011 pin 6
X-9011 pin 2
There should be no continuity.
X-9011 pin 6
X-9011 pin 1
There should be no continuity.
X-9011 pin 2
X-9011 pin 1
There should be no continuity.
A. If there is continuity, there is a short circuit in the throttle valve actuator Z-9001 engine harness (EN) h-bridge
circuit. Locate and repair the shorted conductor.
B. If there is no continuity, leave connectors X-9011 and X-9001 disconnected and continue to Step 5.
5.
Check the throttle valve actuator Z-9001 vehicle harness (VE) h-bridge circuit for a short to high source condition.
With the key in the OFF position, use a multimeter to perform the following continuity check on the vehicle harness
(VE) side :
From
To
Value
X-9001 pin A49
All pins in connector X-9001
There should be no continuity.
X-9001 pin A34
All pins in connector X-9001
There should be no continuity.
A. If there is continuity, there is a short circuit in the throttle valve actuator Z-9001 engine harness (EN) h-bridge
circuit. Use the appropriate service manual, if necessary, to locate and repair the shorted conductor.
B. If there is no continuity, leave connector X-9011 disconnected and continue to Step 6.
6.
Replace the throttle valve actuator Z-9001.
Use the Electronic Service Tool (EST) to check the status of this fault.
A. If the fault is no longer active, return the machine to service.
B. If the fault is still active, check the ECU A-9000 for the appropriate service manual and re-flash, if necessary.
7.
Visually inspect the relevant harnesses and connectors for damage, bent or dislocated pins, corroded terminals,
or broken wires. Verify that the connectors are fully installed. Flex the harnesses involved to reveal intermittent
breaks or shorts in the wiring concerned. Operate the machine while you monitor the display.
A. If you find damage or the display indicates other than normal display readings, then repair the damage discov-
ered during the inspection or locate and repair the other than normal display condition and verify that the error
has been resolved.
B. If you do not find damage and the display indicates only normal readings, then erase the fault code and continue
operation.
Wiring harnesses - Electrical schematic sheet 03 - Engine sensors and fuel injection (engine schematics)
(55.100.DP-C.20.E.03)
232
Electrical systems - FAULT CODES
DTC 48D-12-Throttle valve actuator control circuit over temperature
Control Module : ECU
Context:
The Engine Control Unit (ECU) A-9000 monitors the throttle valve actuator Z-9001 output 1 and output 2 h-bridge
circuits. If the ECU A-9000 detects an over temperature/current condition in the throttle valve actuator Z-9001 h-bridge
circuit, this fault will occur.
Cause:
The ECU A-9000 has detected an over temperature/current condition in the throttle valve actuator Z-9001 h-bridge
circuit.
Possible failure modes:
1. Faulty throttle valve actuator Z-9001 wiring, short to ground condition.
2. Faulty throttle valve actuator Z-9001 wiring, short to high source condition.
3. Faulty throttle valve actuator Z-9001, internal failure.
4. Faulty ECU A-9000, software.
Solution:
1.
Verify fault is present and active.
Use the Electronic Service Tool (EST) to check the status of this fault.
A. If the fault is present and active, continue with Step 2.
B. If the fault is no longer present or in an inactive state, the fault may be intermittent and not currently active.
Continue with Step 7.
2.
Check the throttle valve actuator Z-9001 h-bridge wiring for a short to battery condition.
Disconnect the engine harness (EN) from the throttle valve actuator Z-9001 at connector X-9011.
Disconnect the engine harness (EN) from the ECU A-9000 at connector X-9001.
With the key in the ON position, use a multimeter to perform the following voltage check for a short to battery on
the engine harness (EN) side :
From
To
Value
X-9011 pin 6
Chassis ground
There should be no voltage.
X-9011 pin 2
Chassis ground
There should be no voltage.
A. If there is voltage, there is a short to battery in the throttle valve actuator Z-9001 h-bridge circuit. Use the
appropriate service manual, if necessary, to locate and repair the shorted conductor.
B. If there is no voltage, leave connectors X-9011 and X-9001 disconnected and continue to Step 3.
3.
Check the throttle valve actuator Z-9001 h-bridge wiring for a short to ground condition.
With the key in the OFF position, use a multimeter to perform the following continuity check for a short to ground
on the engine harness (EN) side :
From
To
Value
X-9011 pin 6
Chassis ground
There should be no continuity.
X-9011 pin 2
Chassis ground
There should be no continuity.
A. If there is continuity, there is a short to ground in the throttle valve actuator Z-9001 h-bridge circuit. Use the
appropriate service manual, if necessary, to locate and repair the shorted conductor.
233
Electrical systems - FAULT CODES
B. If there is no continuity, leave connectors X-9011 and X-9001 disconnected and continue to Step 4.
4.
Check the throttle valve actuator Z-9001 engine harness (EN) wiring for a short circuit condition.
With the key in the OFF position, use a multimeter to perform the following continuity check for a short circuit on
the engine harness (EN) side :
From
To
Value
X-9011 pin 6
X-9011 pin 2
There should be no continuity.
X-9011 pin 6
X-9011 pin 1
There should be no continuity.
X-9011 pin 2
X-9011 pin 1
There should be no continuity.
A. If there is continuity, there is a short circuit in the throttle valve actuator Z-9001 engine harness (EN) h-bridge
circuit. Locate and repair the shorted conductor.
B. If there is no continuity, leave connectors X-9011 and X-9001 disconnected and continue to Step 5.
5.
Check the throttle valve actuator Z-9001 vehicle harness (VE) h-bridge circuit for a short to high source condition.
With the key in the OFF position, use a multimeter to perform the following continuity check on the vehicle harness
(VE) side :
From
To
Value
X-9001 pin A49
All pins in connector X-9001
There should be no continuity.
X-9001 pin A34
All pins in connector X-9001
There should be no continuity.
A. If there is continuity, there is a short circuit in the throttle valve actuator Z-9001 engine harness (EN) h-bridge
circuit. Use the appropriate service manual, if necessary, to locate and repair the shorted conductor.
B. If there is no continuity, leave connector X-9011 disconnected and continue to Step 6.
6.
Replace the throttle valve actuator Z-9001.
Use the Electronic Service Tool (EST) to check the status of this fault.
A. If the fault is no longer active, return the machine to service.
B. If the fault is still active, check the ECU A-9000 for the appropriate service manual and re-flash, if necessary.
7.
Visually inspect the relevant harnesses and connectors for damage, bent or dislocated pins, corroded terminals,
or broken wires. Verify that the connectors are fully installed. Flex the harnesses involved to reveal intermittent
breaks or shorts in the wiring concerned. Operate the machine while you monitor the display.
A. If you find damage or the display indicates other than normal display readings, then repair the damage discov-
ered during the inspection or locate and repair the other than normal display condition and verify that the error
has been resolved.
B. If you do not find damage and the display indicates only normal readings, then erase the fault code and continue
operation.
Wiring harnesses - Electrical schematic sheet 03 - Engine sensors and fuel injection (engine schematics)
(55.100.DP-C.20.E.03)
234
Electrical systems - FAULT CODES
DTC 4D4-03-ECU internal failure - Overvoltage monitoring error
Control Module : ECU
Context:
The Engine Control Unit (ECU) A-9000 performs “shut-off paths” which deactivate all power stages relevant to fuel
injection if certain ECU A-9000 errors are detected. If an over-voltage condition is detected during this test, this fault
will occur.
Solution:
1. Check the ECU A-9000 for the appropriate software and re-flash, if necessary.
A. If the fault has been resolved, return the machine to service.
B. If the fault has not been resolved, escalate an ASIST concern.
235
Electrical systems - FAULT CODES
DTC 4D4-04-ECU internal failure - Undervoltage monitoring error
Control Module : ECU
Context:
The Engine Control Unit (ECU) A-9000 performs “shut-off paths” which deactivate all power stages relevant to fuel
injection if certain ECU A-9000 errors are detected. If an under-voltage condition is detected during this test, this fault
will occur.
Solution:
1. Check the ECU A-9000 for the appropriate software and re-flash, if necessary.
A. If the fault has been resolved, return the machine to service.
B. If the fault has not been resolved, escalate an ASIST concern.
236
Electrical systems - FAULT CODES
DTC 4E3-03-ECU internal failure - Post injection quantity
Control Module : ECU
Context:
The Engine Control Unit (ECU) A-9000 performs a diagnostic fault check for post injection 2 by monitoring start angle
and efficiency. If the ECU A-9000 determines that there is an error during this check, this fault will occur.
Solution:
1. Check the ECU A-9000 for the appropriate software and re-flash, if necessary.
A. If the fault has been resolved, return the machine to service.
B. If the fault has not been resolved, escalate an ASIST concern.
237
Electrical systems - FAULT CODES
DTC 4E3-04-Level 2 Monitoring : Diagnosis fault check to report the
error to demand for an ICO due to an error in the PoI2 shut-off
Control Module : ECU
Context:
The Engine Control Unit (ECU) A-9000 performs a diagnostic fault check for post injection 2. If the ECU A-9000
determines that the post injection 2 quantity has exceeded the expected value, this fault will occur.
Solution:
1. Check the ECU A-9000 for the appropriate software and re-flash, if necessary.
A. If the fault has been resolved, return the machine to service.
B. If the fault has not been resolved, escalate an ASIST concern.
238
Electrical systems - FAULT CODES
DTC 4E3-12-Level 2 Monitoring : Diagnosis fault check to report the
error to demand for an ICO due to an error in the PoI3 efficiency
factor
Control Module : ECU
Context:
The Engine Control Unit (ECU) A-9000 performs a diagnostic fault check for post injection 3. If the ECU A-9000
determines that there is a post injection 3 plausibility error, this fault will occur.
Solution:
1. Check the ECU A-9000 for the appropriate software and re-flash, if necessary.
A. If the fault has been resolved, return the machine to service.
B. If the fault has not been resolved, escalate an ASIST concern.
239
Electrical systems - FAULT CODES
DTC 52C-01-Glow Control Unit (GCU) data error
Control Module : ECU
Context:
For information regarding the functional operation of the glow plug control module Z-9101 see Glow plug system
Glow plug control module - Overview - Glow plug control module (55.202). For more information regarding glow
plugs, see Glow plug system - Overview (55.202). The Engine Control Unit (ECU) A-9000 requests operation of
the glow plug control module Z-9101 via a Pulse Width Modulated (PWM) control circuit and monitors the status of
possible electrical defects via a diagnostic feedback signal from the glow plug control module Z-9101. If the ECU
A-9000 determines the diagnostic data transmission is faulty, this fault will occur.
Cause:
The glow plug control module Z-9101 diagnostic connection with the ECU A-9000 is damaged or the data protocol is
incorrect.
Possible failure modes:
1. Faulty glow plug control module Z-9101 diagnostic circuit wiring, open, shorted or grounded circuit.
2. Faulty glow plug control module Z-9101, internal failure.
3. Faulty ECU A-9000, software.
Solution:
1.
Verify that the fault is present and active.
Use the Electronic Service Tool (EST) to check the status of this fault.
A. If the fault is present and active, continue with Step 2.
B. If the fault is no longer present or in an inactive state, the fault may be intermittent and not currently active.
Continue with Step 4.
2.
Check for damaged diagnostic circuit wiring.
Disconnect the vehicle harness (VE) from the ECU A-9000 at connector X-9102.
With the key in the OFF position, use a multimeter to check for continuity on the vehicle harness (VE) side :
From
To
Result
X-9102 pin K22
chassis ground
There should be no continuity.
X-9102 pin K22
all other pins in connector X-9102
There should be no continuity.
Carefully disconnect the vehicle harness (VE) from the glow plug control module Z-9101 at connector X-9113.
Place a jumper wire between connector X-9113 pin 3 and chassis ground.
With the key in the OFF position, use a multimeter to check for continuity on the vehicle harness (VE) side :
From
To
Result
X-9102 pin K22
chassis ground
There should be continuity.
A. If there is continuity from connector X-9102 pin K22 to ground or any other pin in connector X-9102 there is a
short to ground condition. If there is no continuity from X-9102 pin K22 to connector X-9113 pin 3, there is an
open circuit condition is in the vehicle harness (VE), wire VE-9073.
Use the appropriate service manual, if necessary, to locate and repair the damage in the circuit.
B. If there is no continuity from connector X-9102 pin K22 to ground or any other pin in connector X-9102 and
there is continuity from X-9102 pin K22 to connector X-9113 pin 3, continue with Step 3.
3.
Replace the glow plug control module Z-9101, then use EST to check to see that this fault has been resolved.
240
Electrical systems - FAULT CODES
A. If the fault has been resolved, return the machine to service.
B. If the fault has not been resolved, check the ECU A-9000 for the appropriate software and re-flash, if necessary.
4. Visually inspect the relevant harnesses and connectors for damage, bent or dislocated pins, corroded terminals,
or broken wires. Verify that the connectors are fully installed. Flex the harnesses involved to reveal intermittent
breaks or shorts in the wiring concerned. Operate the machine while you monitor the display.
A. If you find damage or the display indicates other than normal display readings, then repair the damage discov-
ered during the inspection or locate and repair the other than normal display condition and verify that the error
has been resolved.
B. If you do not find damage and the display indicates only normal readings, then erase the fault code and continue
operation.
Wiring harnesses - Electrical schematic sheet 01 - Power distribution and glow plugs (engine schematics)
(55.100.DP-C.20.E.01)
Wiring harnesses - Electrical schematic sheet 02 - Engine Control Unit (ECU) power and after treatment
system (engine schematics) (55.100.DP-C.20.E.02)
241
Electrical systems - FAULT CODES
DTC 532-03-Engine coolant temperature has exceeded the warning
threshold
Control Module : ECU
Context:
The Engine Control Unit (ECU) A-9000 monitors the engine coolant temperature. Two engine temperature thresholds
are monitored by the ECU A-9000, a pre-warning, and a warning. If the ECU A-9000 monitors a temperature greater
than 111.96 °C (233.53 °F), a warning is set and this fault will occur. For more information regarding cooling system
troubleshooting, see Engine cooling system - Troubleshooting (10.400).
Cause:
A coolant temperature level warning has been set by the ECU A-9000.
Possible failure modes:
1. Coolant level low.
2. Faulty cooling system, leakage or blockage.
3. Extremely high environmental temperature or heavy machine use.
4. Faulty coolant temperature sensor B-9003, wiring or internal failure of sensor.
5. Faulty ECU A-9000, software.
242
Electrical systems - FAULT CODES
DTC 535-03-Maximum rail pressure exceeded
Control Module : ECU
NOTE: If the rail pressure sensor B-9004 is replaced, it is necessary to perform the Replacement of the Rail Pressure
sensor - Reset ECU Data with the Electronic Service Tool (EST) before you return the machine to service. See
Common rail pressure sensor - Configure - Reset ECU data (Rail pressure sensor) (55.010), if necessary.
NOTE: If the Pressure Relief Valve (PRV) is replaced, it is necessary to perform the Replacement of the Rail Pressure
Relief Valve (PRV) - Reset ECU Data with the Electronic Service Tool (EST) before you return the machine to service.
See Common rail Relief valve - Configure - Reset ECU data (10.218), if necessary.
Context:
The Engine Control Unit (ECU) A-9000 monitors fuel rail pressure using the rail pressure sensor B-9004. If the ECU
A-9000 determines that rail pressure has exceeded 1790 bar (25955 psi), this fault will occur. A Pressure Relief Valve
(PRV), integral to the fuel rail, is designed to open in the event of an over-pressure in the fuel rail at approximately
1790 bar (25955 psi). If the ECU A-9000 determines that rail pressure has exceeded this threshold, a PRV failure
is assumed. Other active faults may have caused this fault to occur. For more information regarding fuel system
troubleshooting, see Fuel injection system - Troubleshooting (10.218).
Cause:
The ECU A-9000 has determined that rail pressure has exceeded 1790 bar (25955 psi).
Possible failure modes:
1. Faulty fuel back-flow, clogged.
2. Faulty PRV, unable to open to clogged return.
3. Faulty fuel metering unit Y-9000, stuck open or internal failure.
4. Faulty rail pressure sensor B-9004, drifted.
5. Faulty ECU A-9000, software.
243
Electrical systems - FAULT CODES
DTC 54C-03-Engine over speed condition detected
Control Module : ECU
Context:
This fault is intended for information purposes only and does not require any further action. Other active faults may
have caused this fault to occur. The Engine Control Unit (ECU) A-9000 monitors for an engine overspeed condition.
An engine overspeed condition can occur from such conditions as downhill travel. If an engine speed of at least
3100 RPM has been detected for at least 0.05 s, this fault will occur.
244