D-Link DPR-1061 USB 2.0 MFP Server Manual (2007) - page 4
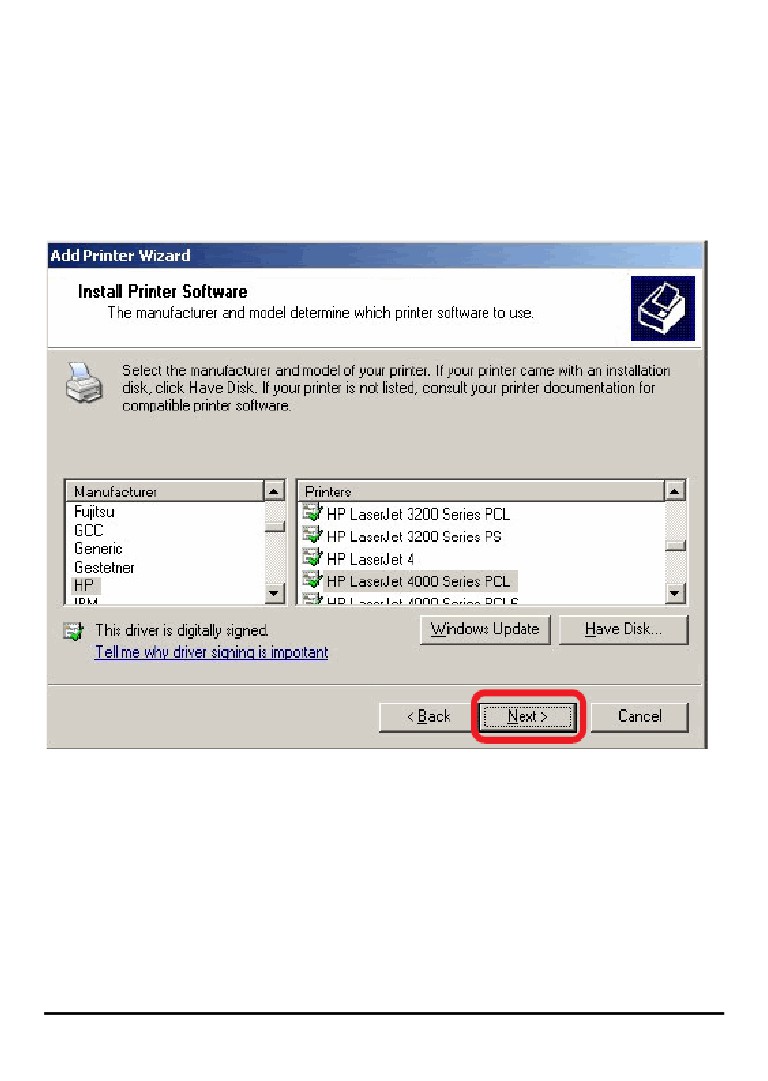
Highlight the printer, as shown. If the desired printer is not on the list, click Have Disk
and insert the printer driver disk that came with your printer to install the printer
drivers.
Click Next.
117
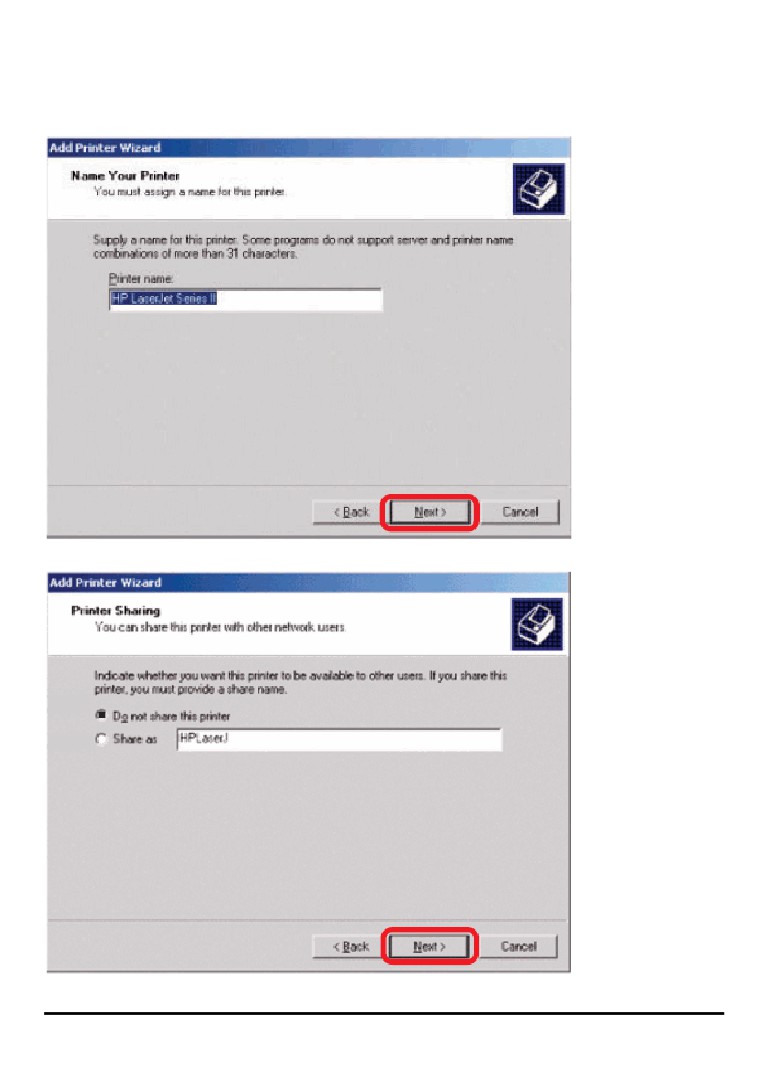
At this screen, you can input a name for the printer, and then click Next
Select the first option, Do not share this printer, and click Next.
118
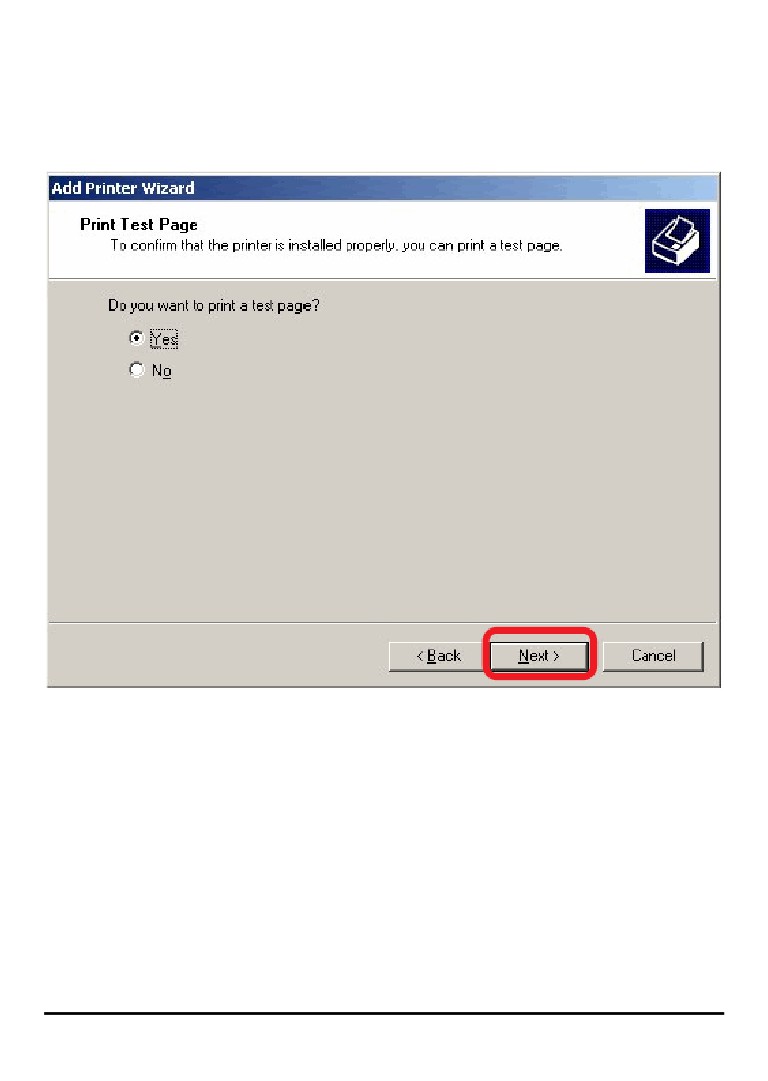
Select Yes to print a test page, click Next.
119
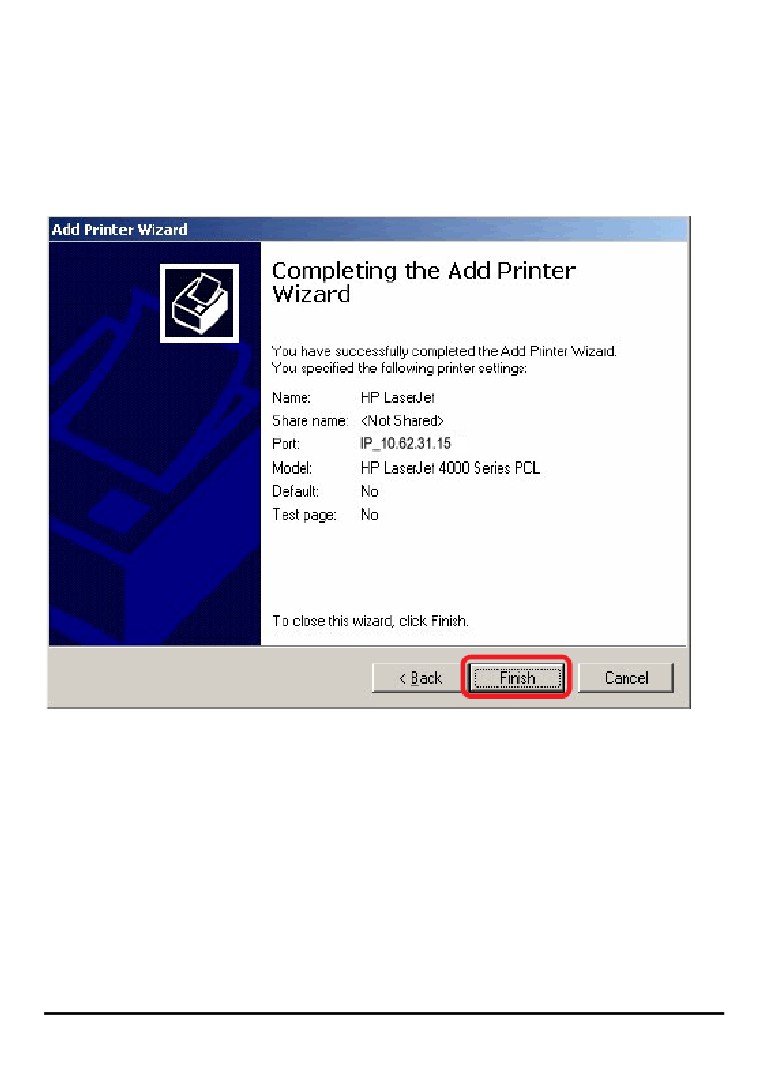
Click Finish. The printer is now ready for printing with Windows 2000 on your
network.
120
TCP/IP Printingfor Windows 98SE/ME
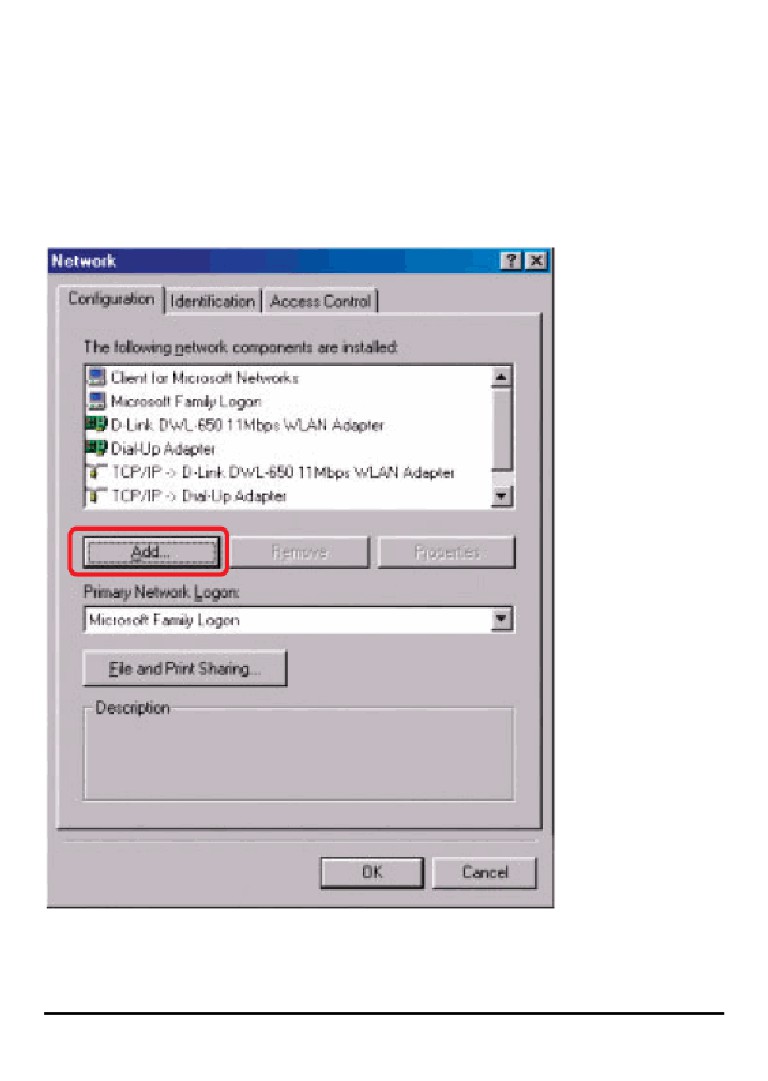
Go to Start Î Settings Î Control Panel. Double click on Network, and then click
Add.
121
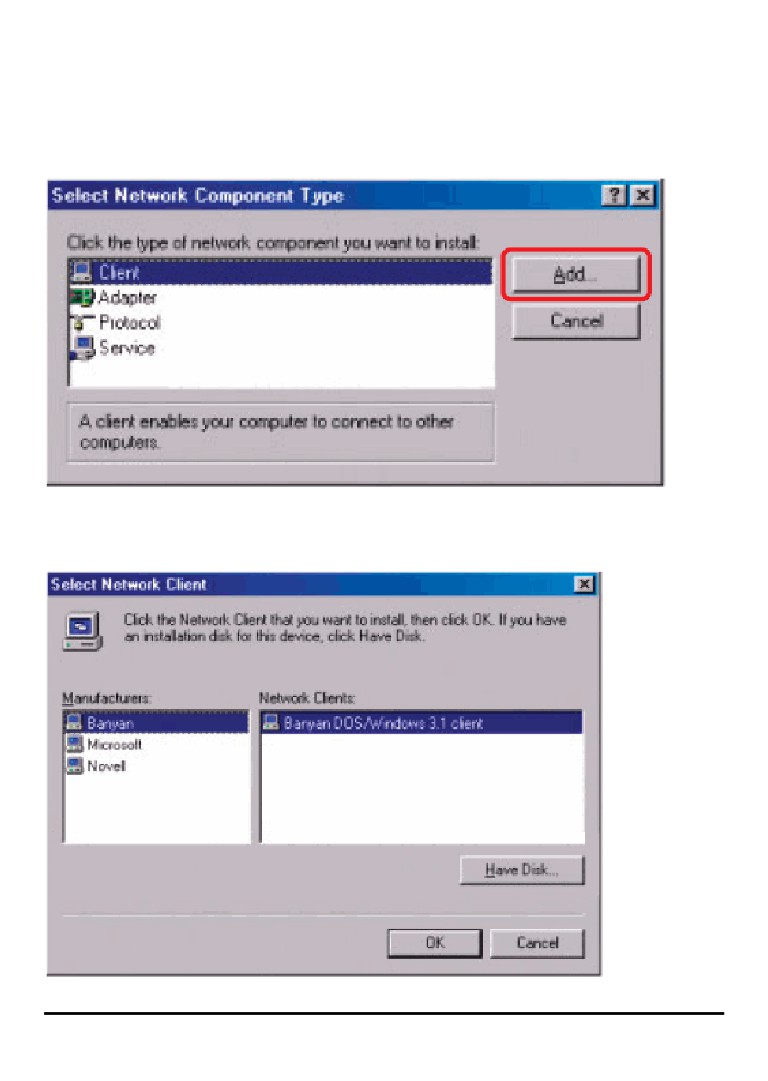
Highlight Client and click Add.
At this window, click Have Disk.
122
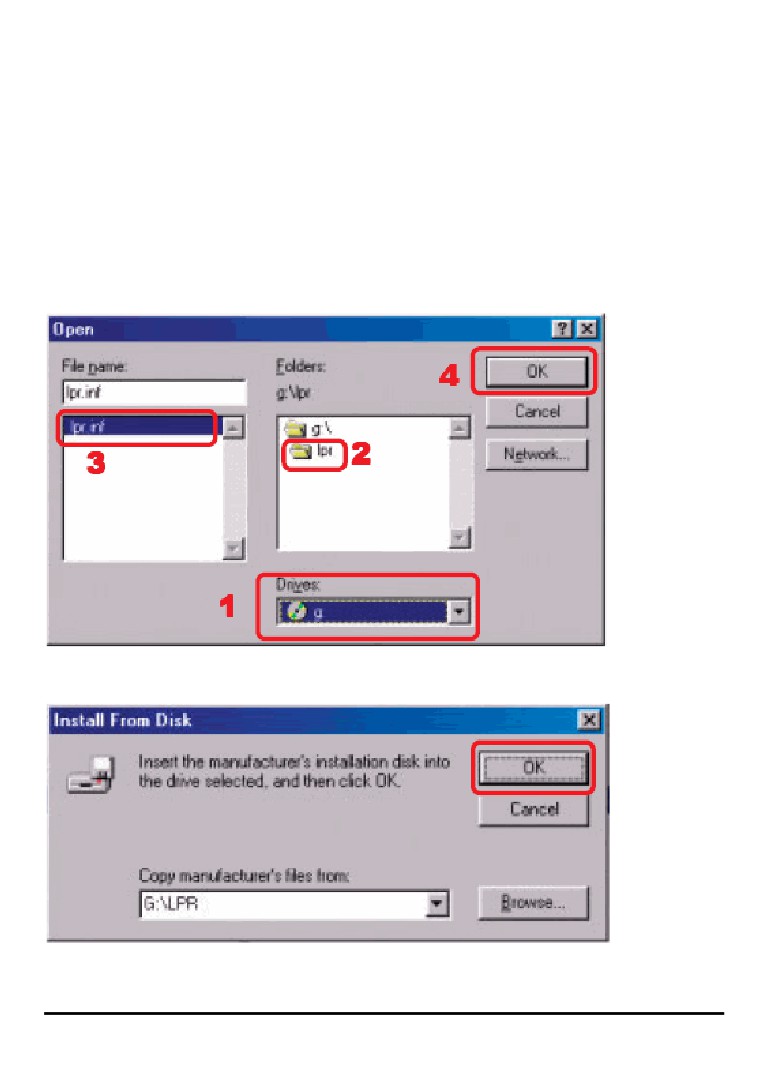
1. Insert the DPP-1061 CD-ROM into your CD-ROM drive. Select the letter
representing the CD-ROM drive on your computer from the pull-down menu.
2. Double-click on the folder lpr.
3. Highlight lpr.inf
4. Click OK.
Click OK to accept the location of the file.
123
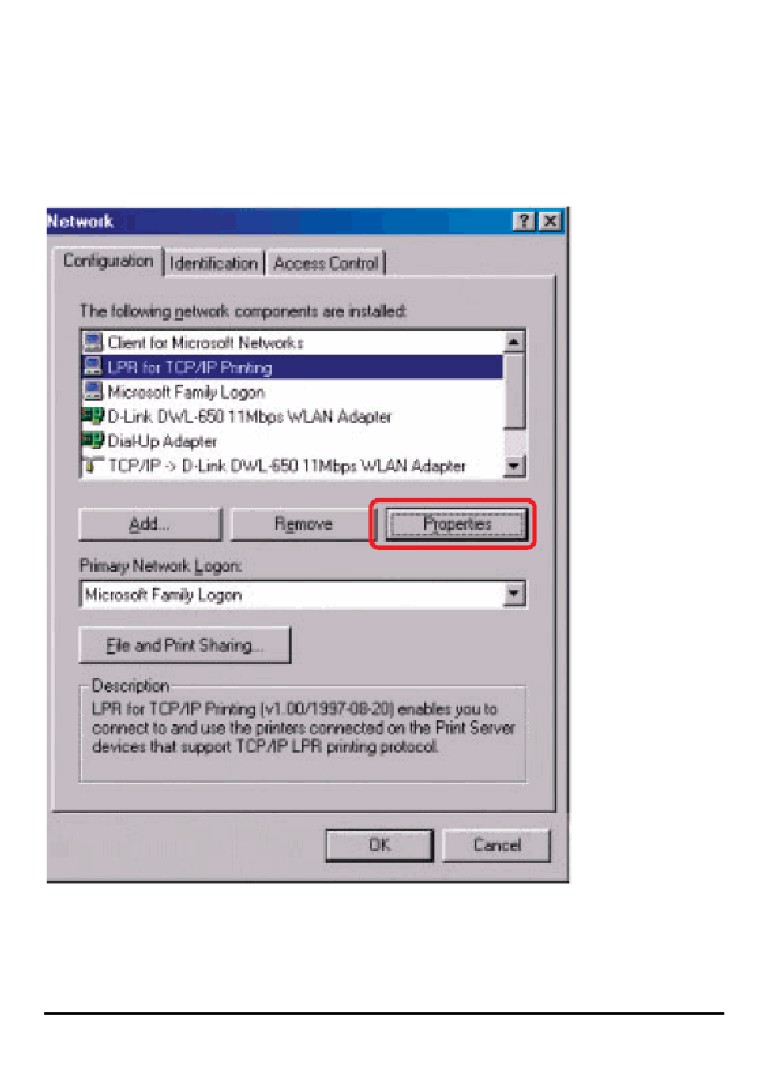
You should now be back to the Network Properties Page. Highlight LPR for TCP/IP
Printing and click Properties.
124
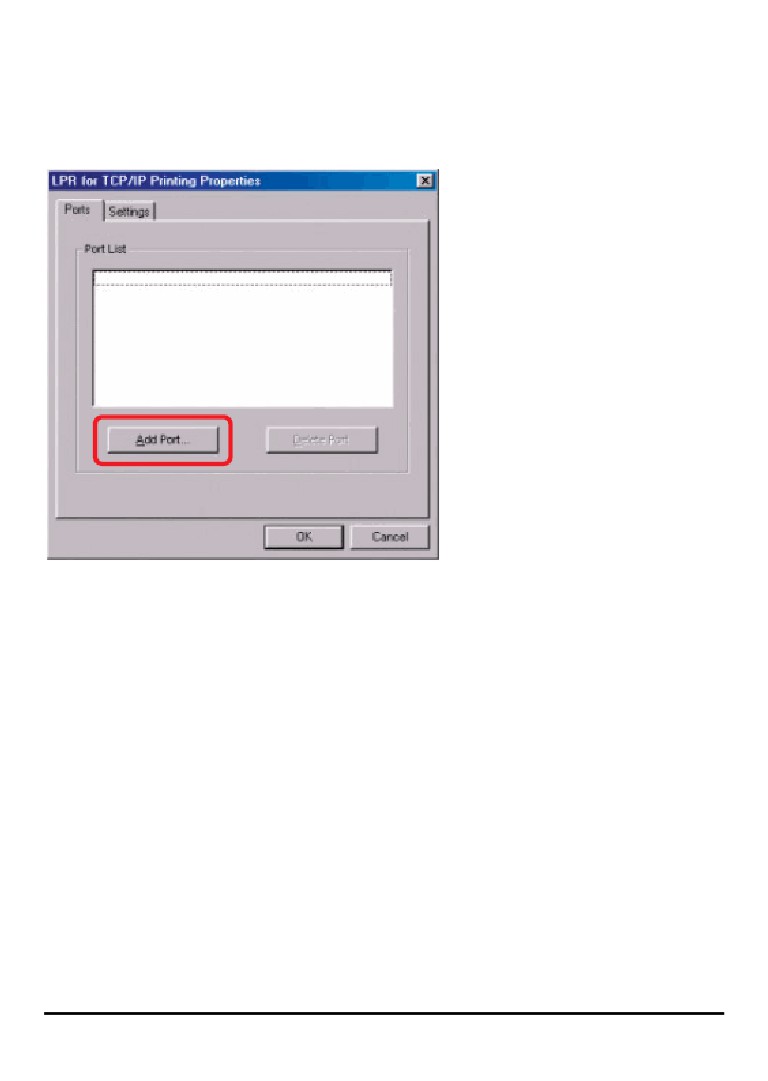
Click Add Port.
125
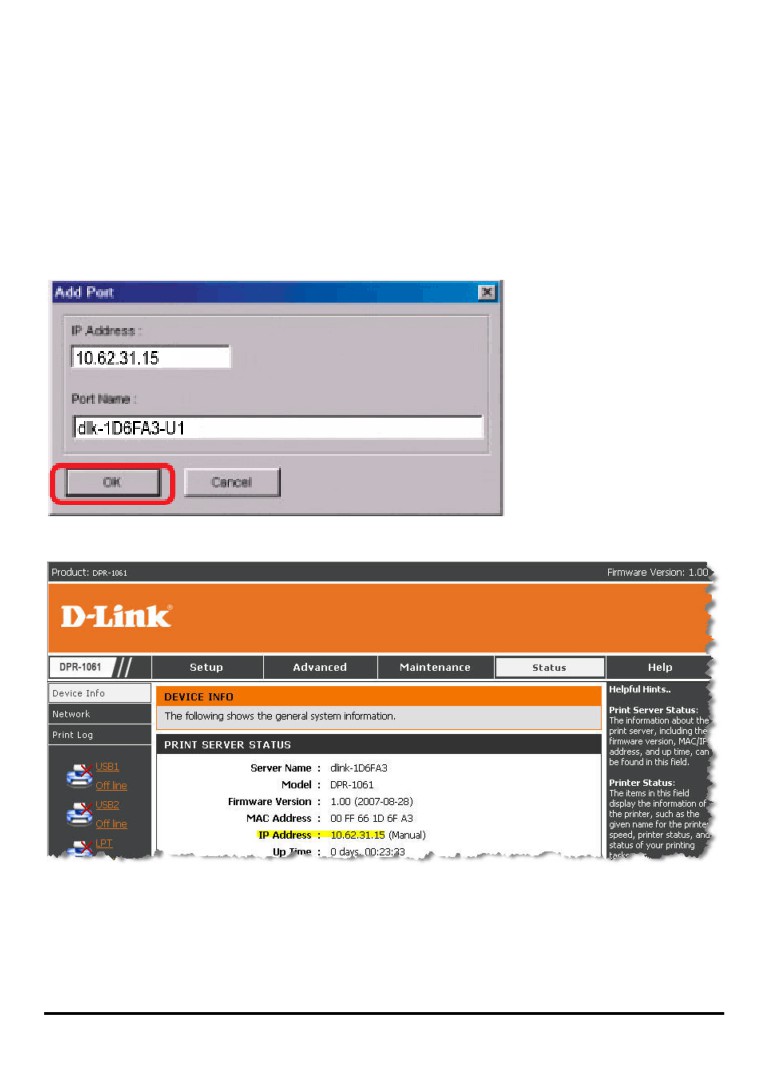
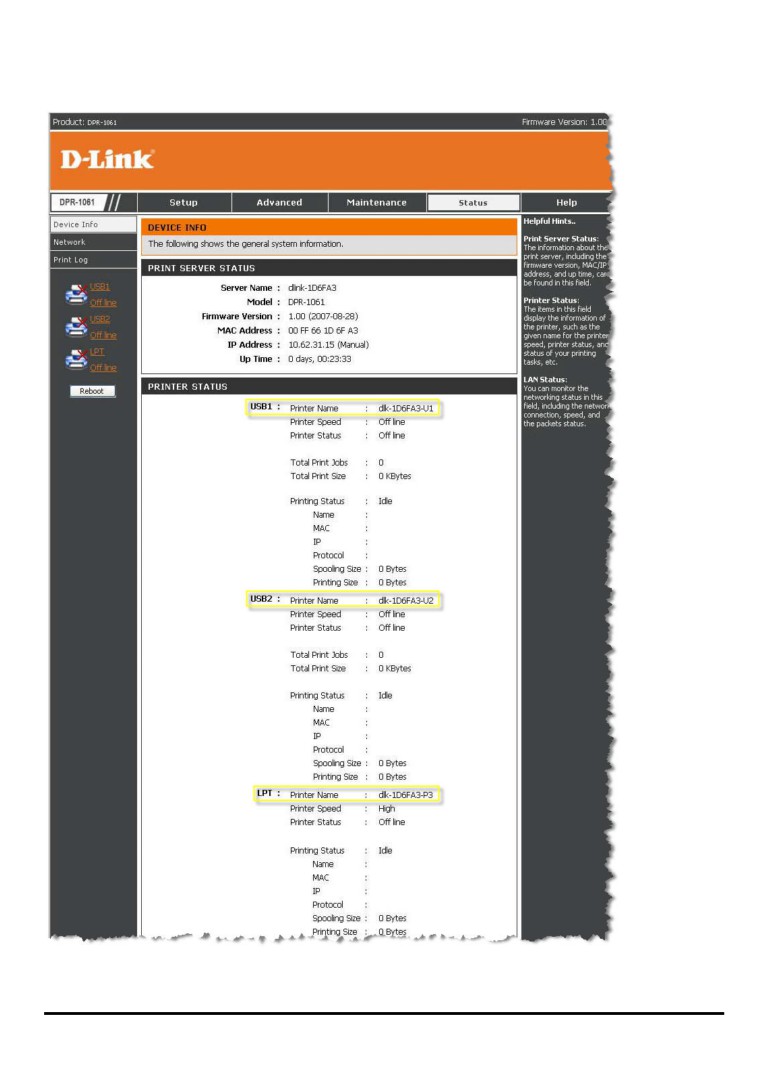
Type in the IP address and Port Name of the MFP server, which can be referred from
the PRINTER SERVER STATUS and PRINTER STATUS of the MFP server’s Web
configuration, in the corresponding field, and then click OK. (The IP Address and
Port Name here are just for example only.)
126
127
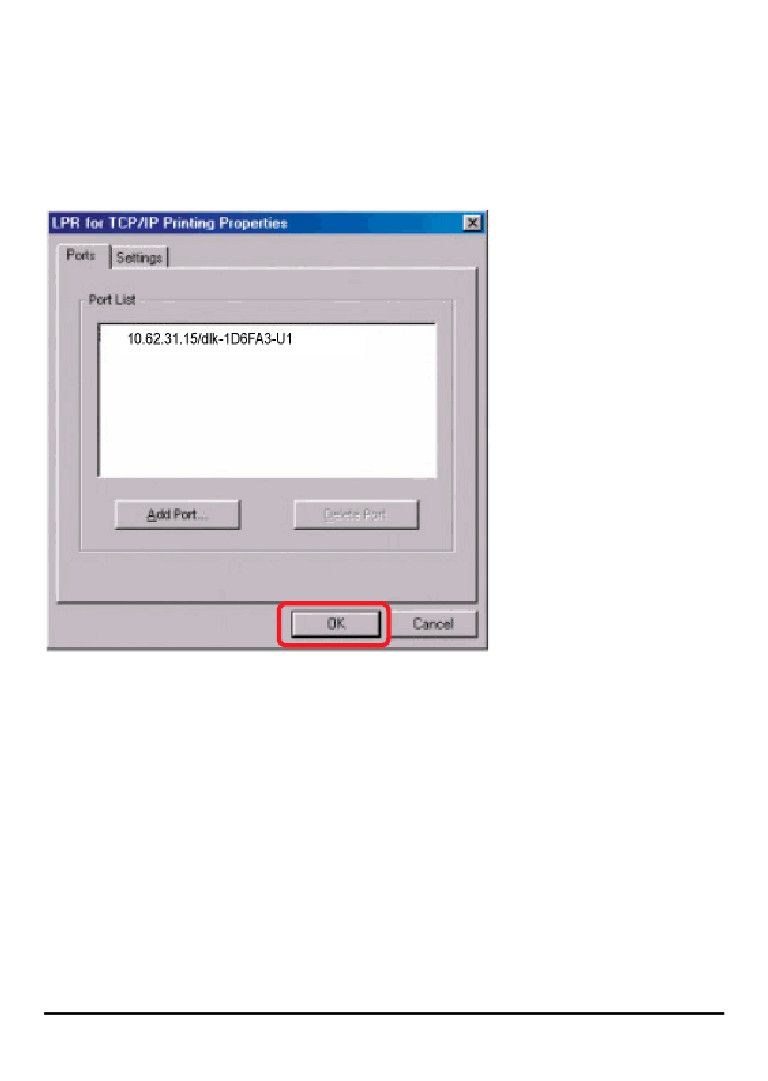
The IP Address and Port Name will be displayed in the following screen. (The IP
Address and Port Name here are just for example only.) Click OK.
128
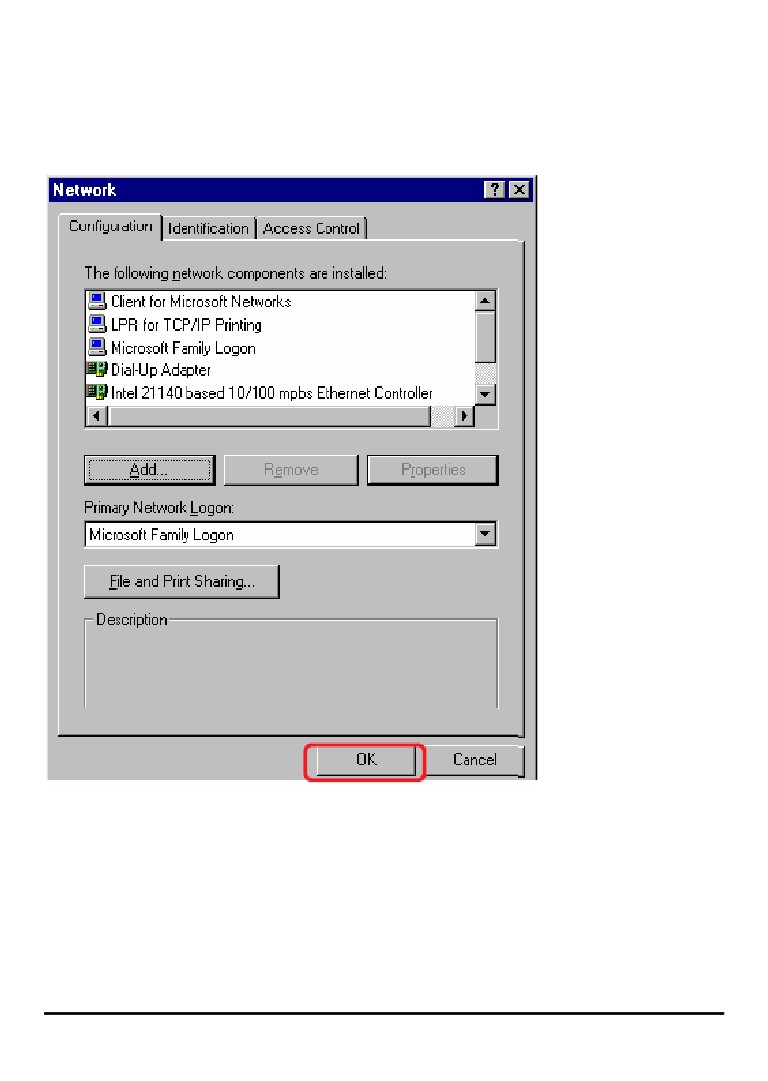
Click OK.
129
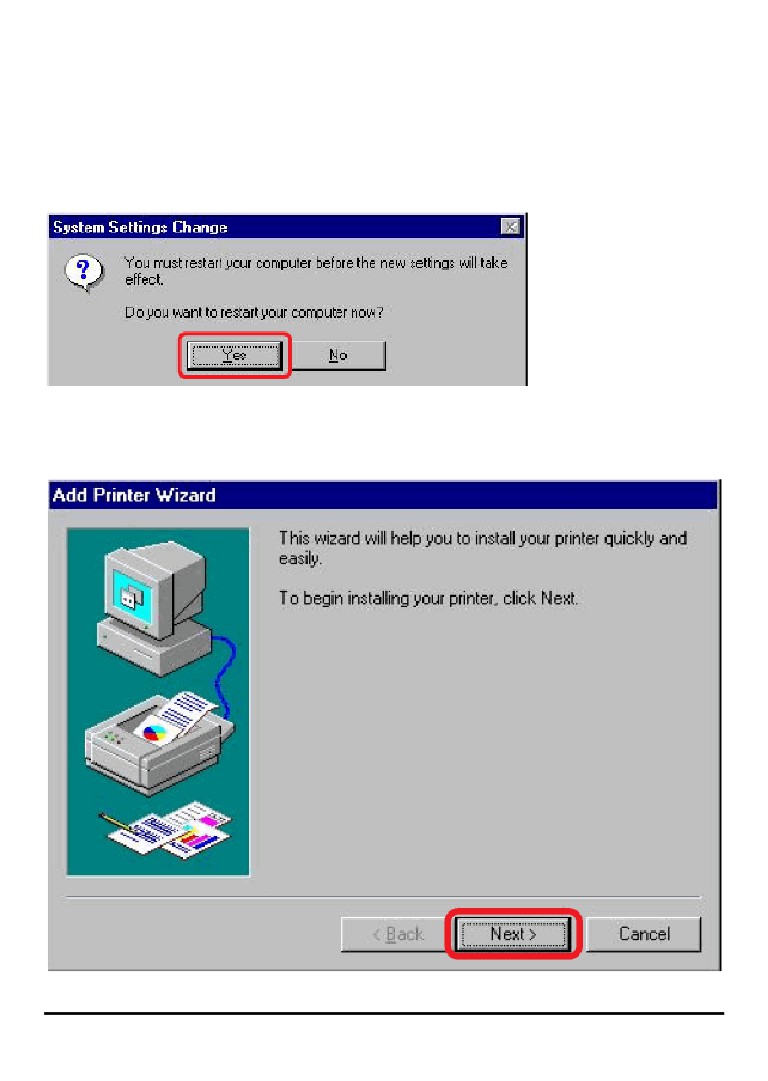
Windows will ask for a restart.
Click Yes.
Once your computer has rebooted, click on Start Î Settings Î Printers Î Add
Printer. When the Add Printer Wizard screen appears, click Next.
130
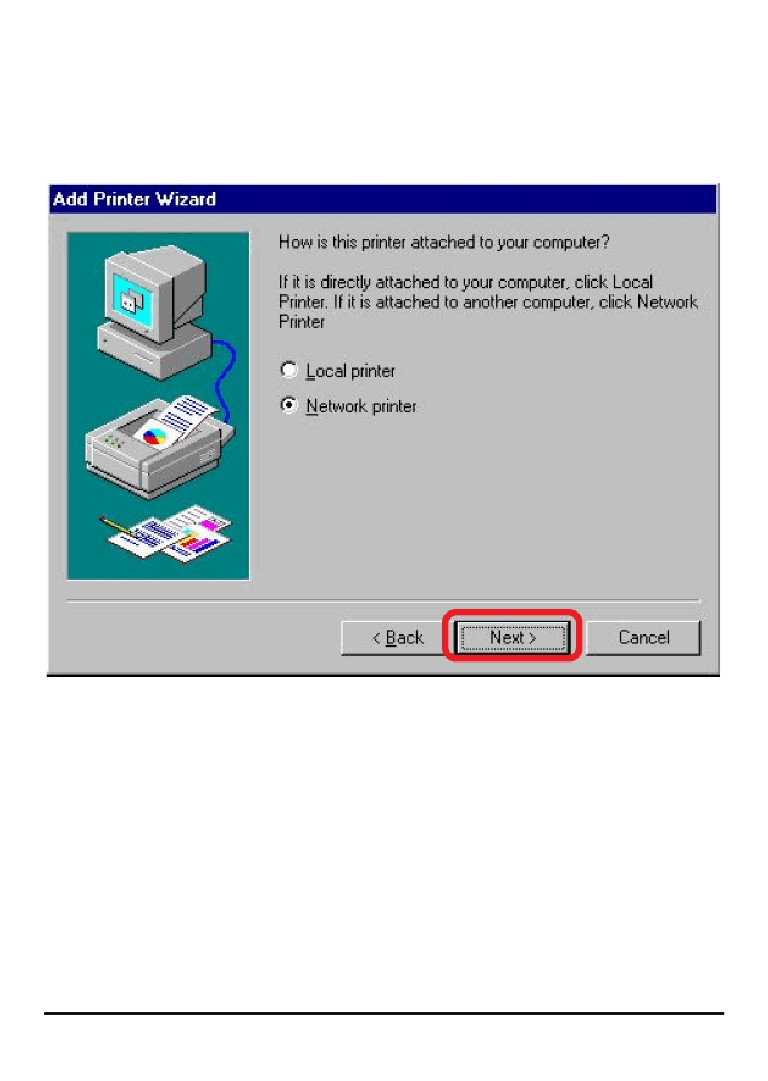
Select Network Printer and click Next.
131
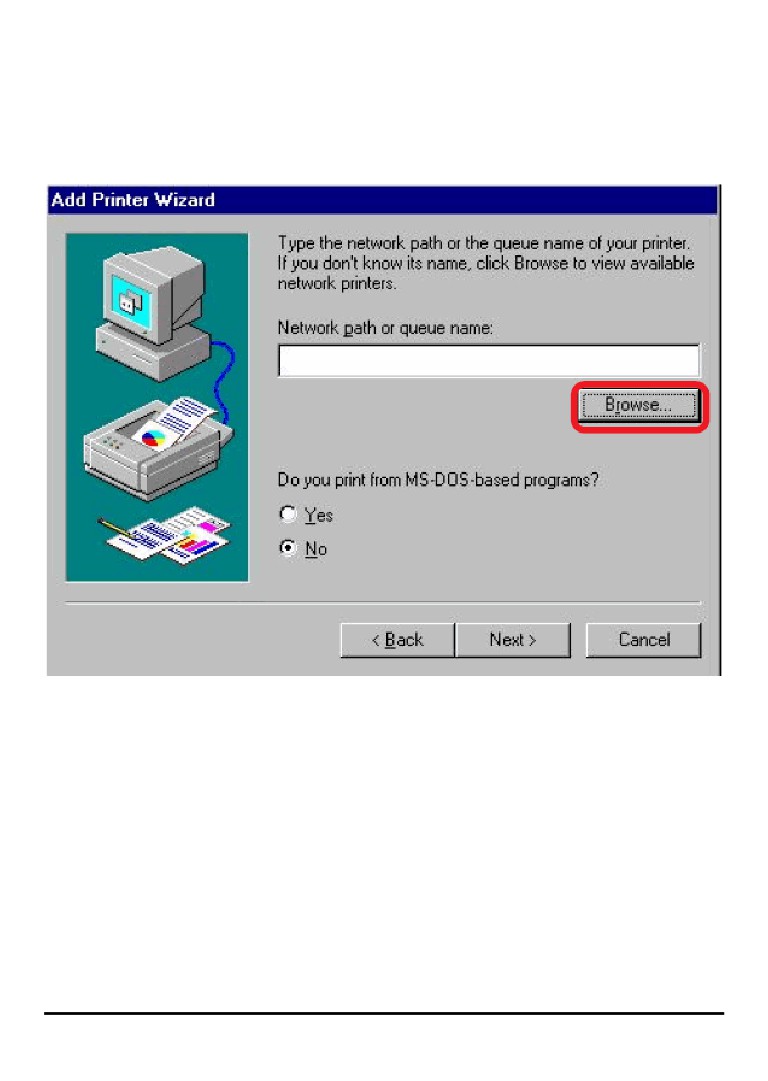
Type in the path if you know it; otherwise, click Browse.
132
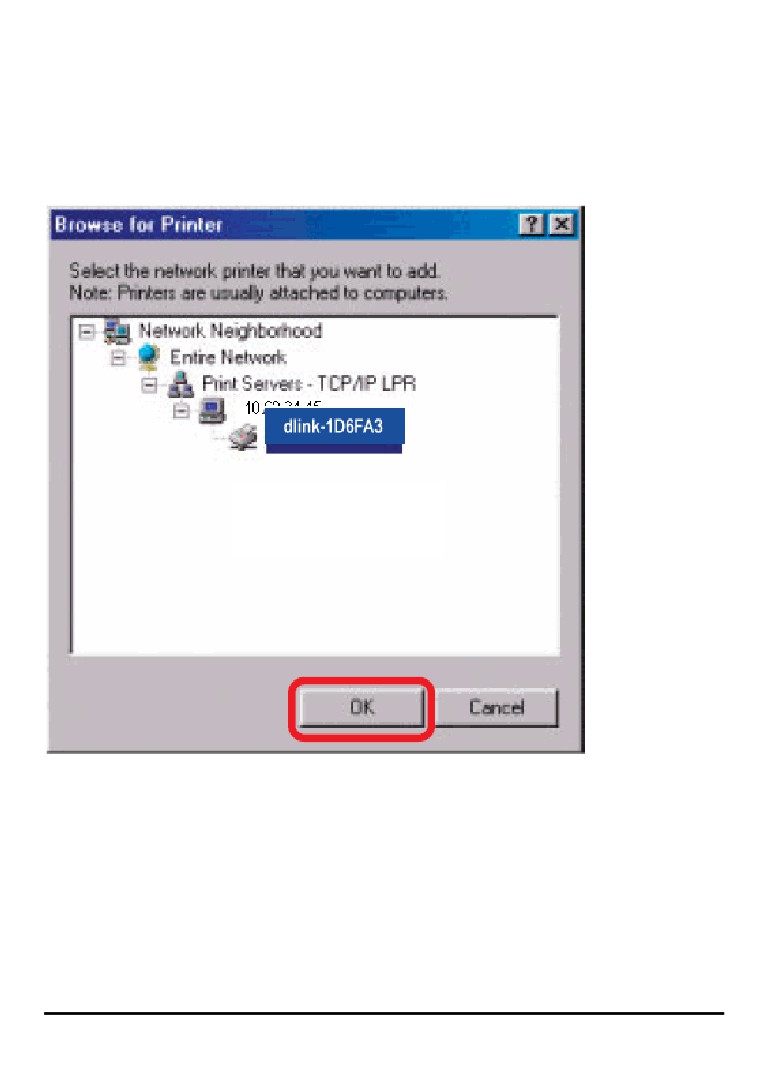
At the following screen, browse for the printer port and highlight the port (e.g.
dlink-1D6FA3 in this manual). Click OK.
133
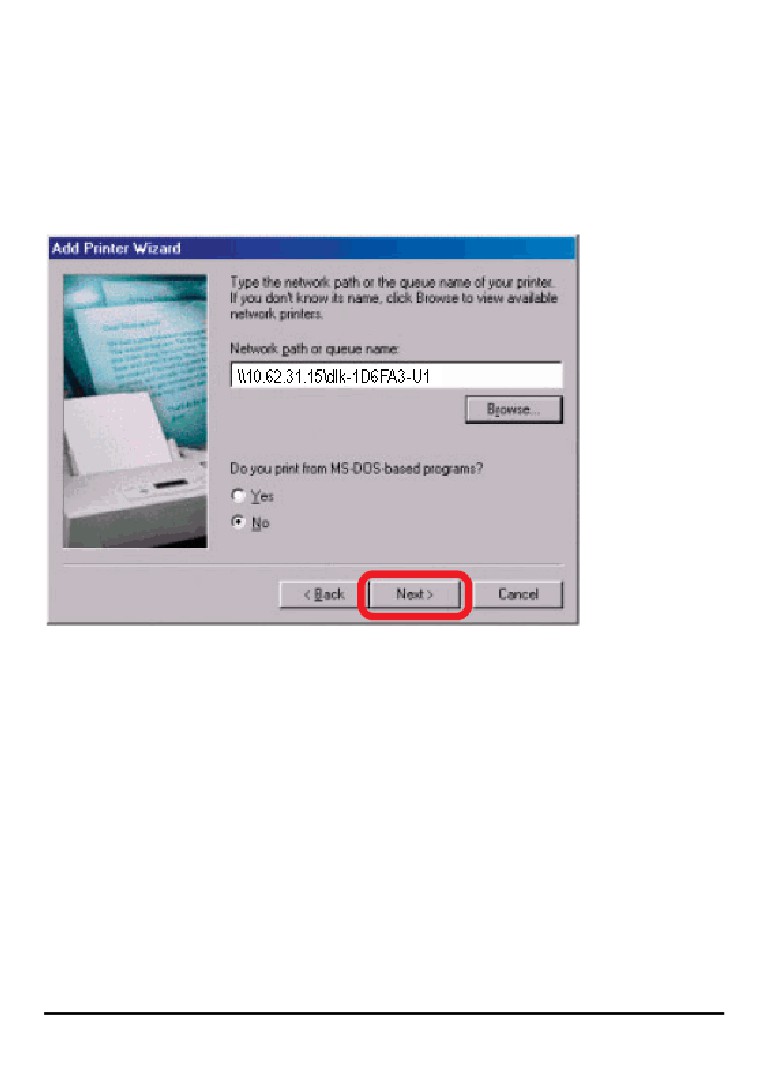
If the network path is not specified, type in the IP Address and Port Name of the MFP
server. Select Yes or No to enable or disable printing from MS-DOS based programs.
Click Next.
134
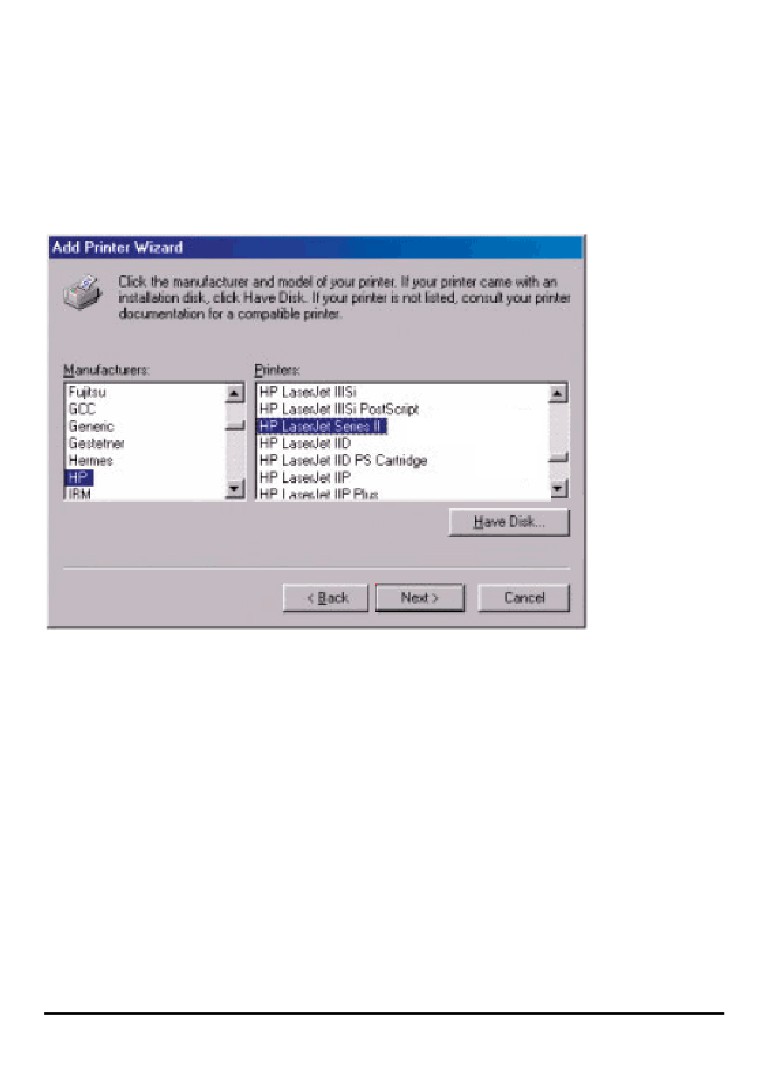
Highlight the printer, as shown. If the desired printer is not on the list, click Have Disk
and insert the printer driver disk that came with your printer to install the printer
drivers. Click Next.
135
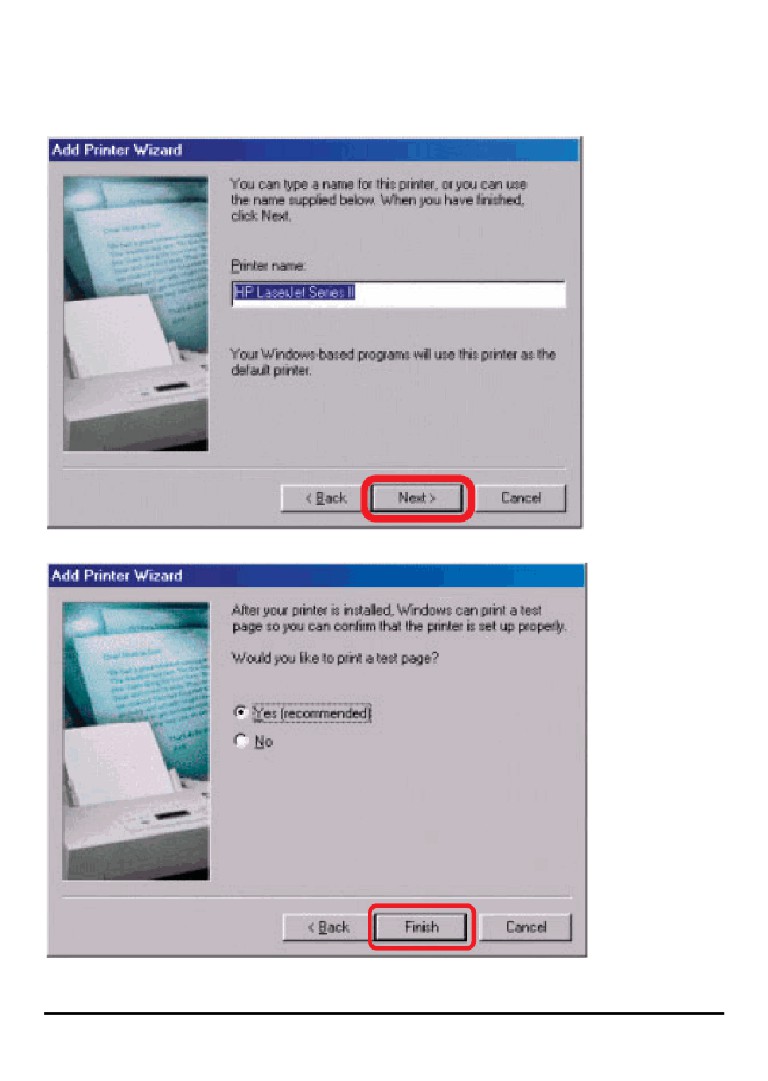
Click Next
Select Yes to print a test page. Click Finish.
136
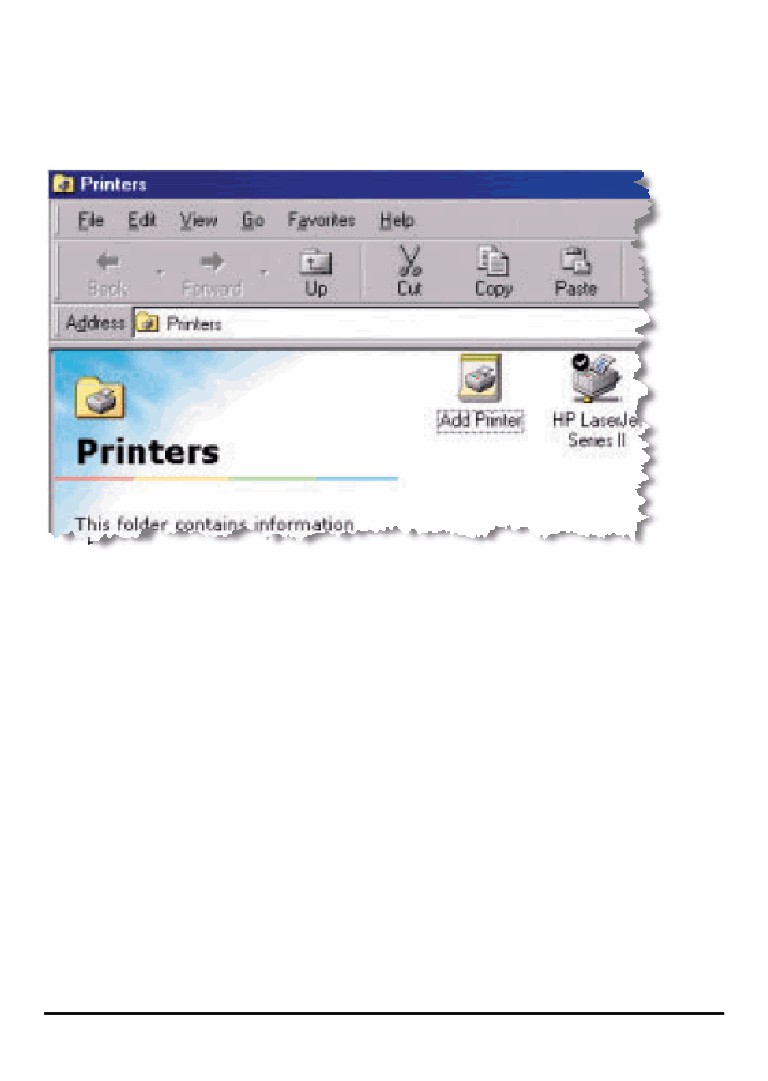
To check whether the printer is installed, go to Start Î Settings Î Printers.
137
Unix/Linux Printing
Printing Text Files form Unix
Text files on Unix systems contain lines that end with “newline” characters, as
opposed to MS-DOS and Windows-related operating systems that end with a
carriage return followed by a linefeed. Most printers require a carriage
return/linefeed pair at the end of each line, making it necessary for some translation
to be done before Unix text files can be printed on most printers.
For this purpose, you can define two “printers” for the same printer port, one that
prints to the port itself, and one that prints to the port name with
_TEXT added to
the name. Files printed to the second port will be translated so that the printer has
the carriage return/linefeed pairs that it needs.
For example, you could define a printer hp5l that prints to port PS-142634-P1, and
a printer hp5lt that prints to port PS-142634-P1_TEXT. Your graphics files could
then be printed to the hp5l printer, and “raw” text files could be printed to the hp5lt
printer.
138
Printing form BSD Unix Versions
For “flavors” of the Unix operating system derived from or related to the BSD
releases, such as SunOS 4.x, Linux, BSD/OS, FreeBSD, or NetBSD, you can use
the following procedure to enable users to print to a printer connected to your
D-LINK network print server:
1. Log in as the superuser (root).
2. Add an entry for the print server in the host’s /etc/hosts file, giving a hostname
for the print server’s IP address. A line in
/etc/hosts contains an IP address
and one or more aliases for the host . For example:
202. 39. 74. 40
ps-142634 ps-142634.dlink.com.tw
If you use DNS (the Domain Naming Services protocol), you can add an address
record entry to your DNS database for the print server.
3. Create a spool directory for the printer:
◊ On SunOS systems, create the directory as a subdirectory of /var/spool,
with the same name as the printer (e.g., /var/spool/hp5l ).
◊ On Linux systems, create the directory as a subdirectory of /user/spool
/lp.
◊ On BSD/OS, FreeBSD, or NetBSD systems, create the directory as
subdirectory of /var/spool.
4. Change the owner and permissions of the directory so that it is owned and
writable by group daemon, using the following commands:
139
chown bin.daemon /var/spool/hp5l
chmod
775 /var/spool/hp5l
5. Add an entry for the printer to /etc/printcap, similar to the following:
hp5l:\
:lp=:sd=/var/spool/hp5l :mx#0:\
:rm=ps-142634:rp=ps-142634-p1:
The meaning of each of the entries is described below. The directory path in the
sd spool directory entry should match the directory name you created above. If
your entry requires more than one line you can escape the newline with a
backslash.
6. Issue the command
lpc start hp5l
to start a spool daemon for the printer. The printer will now be available for use.
7. Optionally, add another printcap entry (and issue another lpc start command)
for a second printer, using the port_TEXT port. This second printer name can be
used for printing text files.
Entries in /ect/printcap begin with a name for the printer or a list of name,
separated by | (a vertical bar). The entries used above are:
◆ʳ lp= The lp entry is used to specify a local printer device.
Since the printer is a remote printer, this entry should be blank.
140
◆ʳ sd=dir The location of the printer’s local spool directory.
◆ʳ mx#blocks The limit for print job files in the local spool directory;
0 means no limit.
◆ʳ rm=address The host where the remote printer is located, in this case
the D-Link print server.
◆ʳ rp=printer The name of the printer on the remote host.
For the D-Link print server, the port name should be used.
Note: this entry is case-sensitive.
141
Printing from SCO Unix System V/386
To allow printing to a printer attached to your D-LINK network print server from a
SCO Unix System V/386 host.
1. Login as the superuser (root).
2. Add an entry for the print server in the host’s /etc/hosts file, giving a hostname
for the print server’s IP address. A line in
/etc/hosts contains an IP address
and one or more aliases for the host. For example:
202.39.74.40
ps-142634 ps-142634.dlink.com.twʳ
If you use DNS (the Domain Naming Services protocol), you can add an address
record entry to your DNS database for the print server.
3. Change to the /dev directory, and issue the command
mkdev rlp
4. The script will ask:
Do you want to install or delet remote printing (i/d/q)?
Answer i and press Enter to continue.
5. The script will ask:
Do you want to change the remote printer description file
/etc/printcap (y/n)?
Answer y and press Enter to continue.
6. The script will ask:
Please enter the printer name (q to quit):
Enter an alias for the printer on the local machine and press Enter. This name
should be the same as the destination port name.
142
7. Answer r (remote printer) to the question
Is printer a remote printer or a local printer (r/l)?
8. When prompted with the question:
Please enter the name of the remote host that printer is attached
to:
then enter the address of the D-Link print server. You can use the name you
added to /etc/host in the step above.
9. Confirm that your entries are correct.
Is this correct? (y/n)
10. Answer the question:
Would you like this to be the system default printer? (y/n)
11. When you are done adding remote printers, enter q for the printer name.
12. Answer y to the question
Do you want to start remote daemon now (y/n)?
Once remote printing is set up, you can use the lp command to print jobs to the new
printer. For more information, consult your SCO Unix documentation.
143
Printing from Solaris
To allow printing from a Sun Solaris workstation,
1. Log in as the superuser (root).
2. Add an entry for the print server in the host’s /etc/hosts file, giving a hostname
for the print server’s IP address. A line in
/etc/hosts contains an IP address
and one or more aliases for the host . For example:
202.39.74.40
ps-142634 ps-142634.dlink.com.tw
If you use DNS (the Domain Naming Services protocol), you can add an address
record entry to your DNS database for the print server.
3. In OpenWindows, start the admintool program.
4. Click on the Printer Manger icon.
5. From the Edit menu, select Add Print, then Add Access to Remote Printer…
6. Enter values for the fields as follow:
◊ Printer Name This field should contain the name of the printer port you wish to
use. The field is case-sensitive.
◊ Printer Server This field should contain the IP address of the print server, or
the alias name you added in step 2.
◊ Printer Server OS This field should be set to BSD.
7. Confirm the addition.
8. Optionally repeat the addition to add another printer for printing text files,
with_TEXT appended to the port name.
Once you have added the new printer, you can use the lp command to print files to
the printer. Consult your Solaris documentation for details.
144
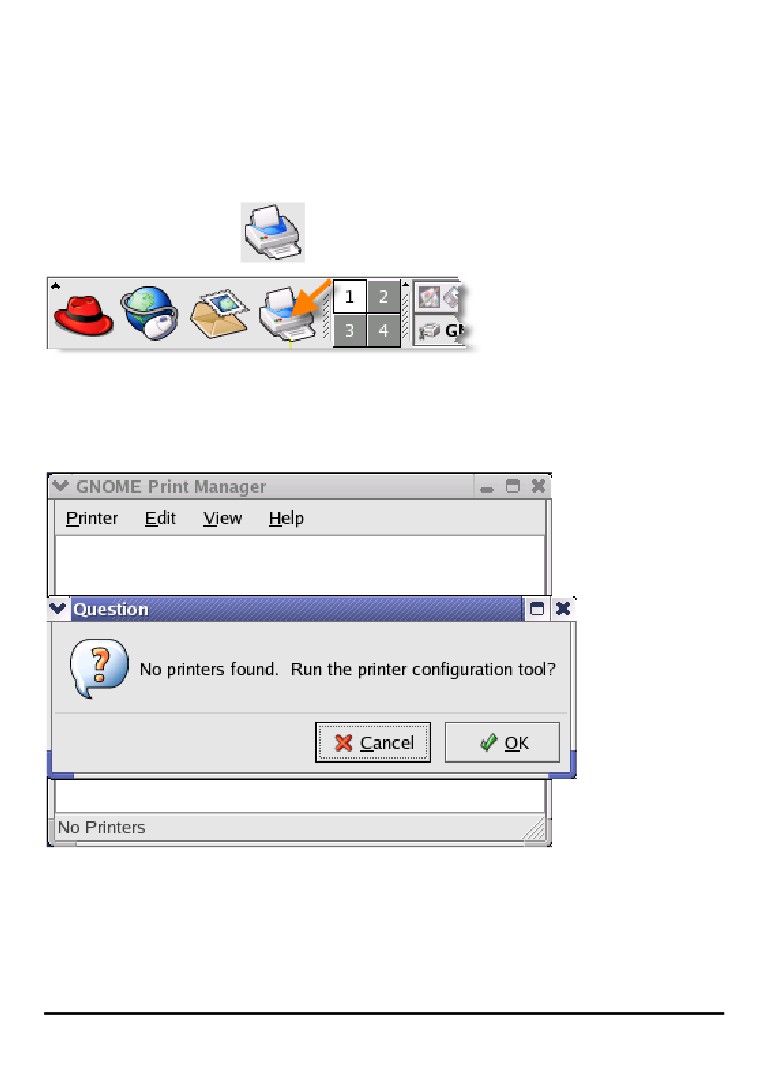
Printing from Red Hat Linux
Adding a Printer
1. Click the printer icon
at the bottom of the desktop.
2. Since no printer is set up so far, a prompt appears asking to run the printer
configuration tool.
145
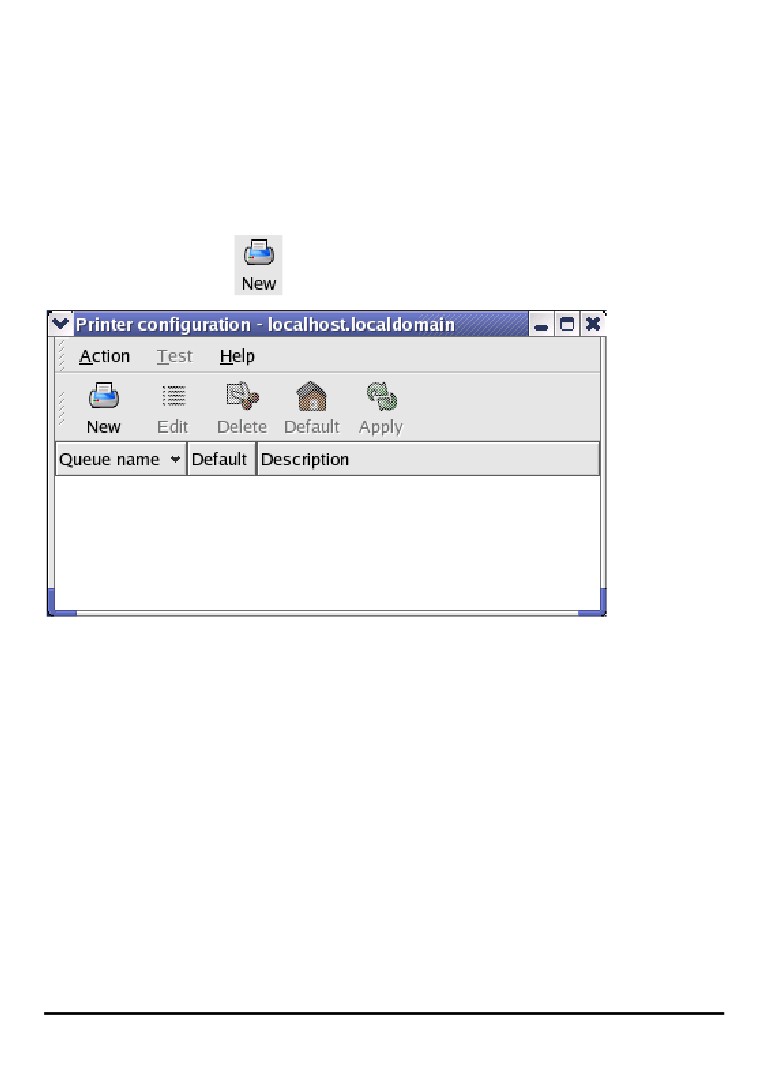
3. Click the OK button in the pop-up dialogue box to open the man Printer
configuration tool menu. Note that to use the Printer configuration tool you must
have root privileges, and to start the application you may also type the command:
“redhat-config-printer”.
4. Click the New button
in the Printer configuration tool menu.
146
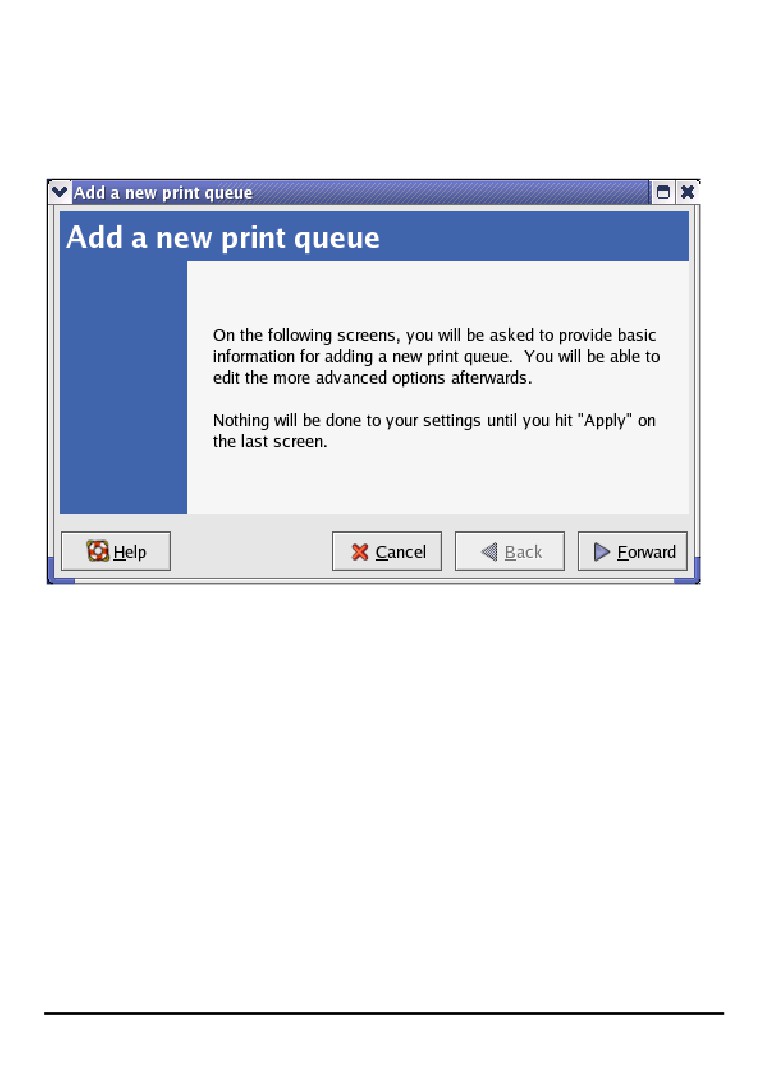
Printer Configuration Tool menu
5. The Add a new print queue menu appears, click Forward to continue.
147
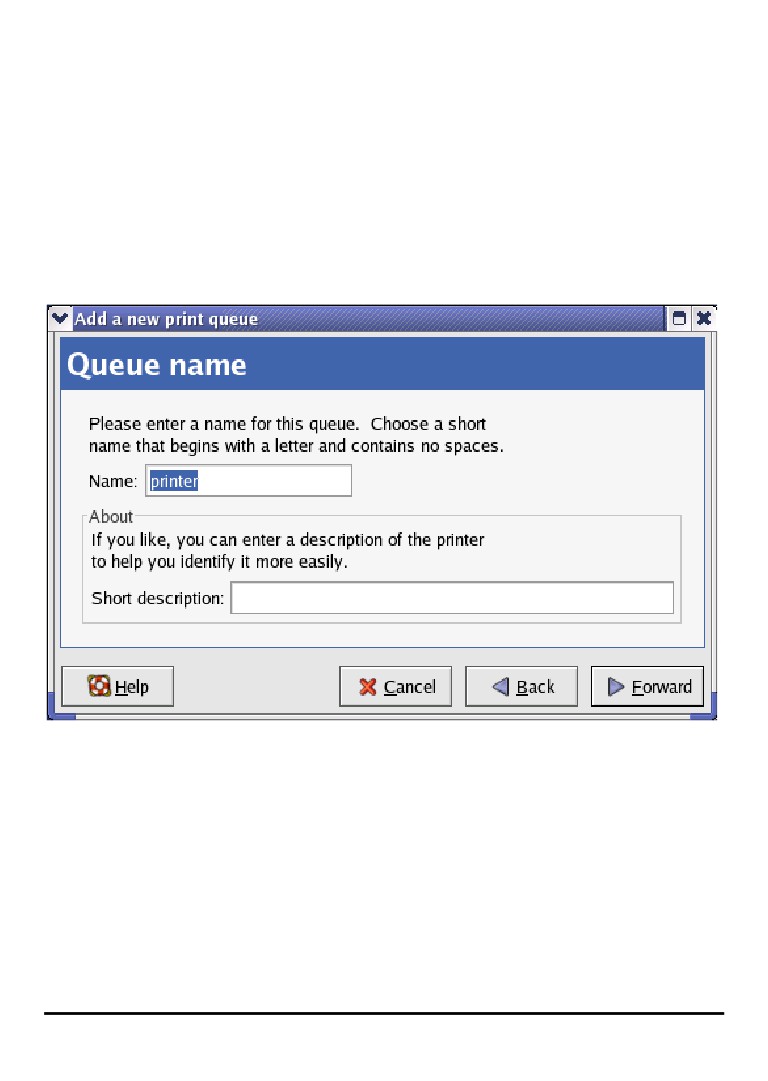
6. Enter a unique name for the printer in the Name text field. The printer name
cannot contain spaces and must begin with a letter. The printer name may contain
letters, numbers, dashes (-), and underscores (_). Optionally, enter a short
description for the printer, which can contain spaces. Then click Forward to enter
Queue type window.
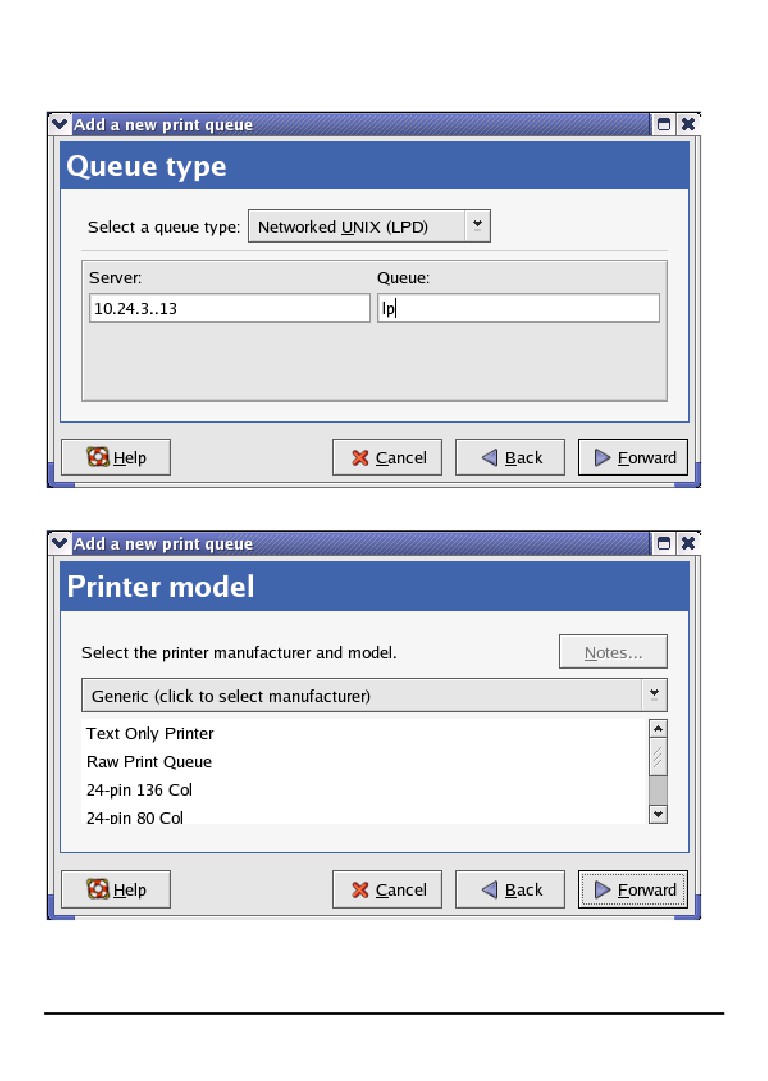
7. Select Networked UNIX (LPD) in the Select a queue type pull down menu, enter
the IP address of the print server to which the printer is attached in Server field, and
type the port name in queue field. Click Forward to select the type of printer.
148
8. Select the printer model.
149
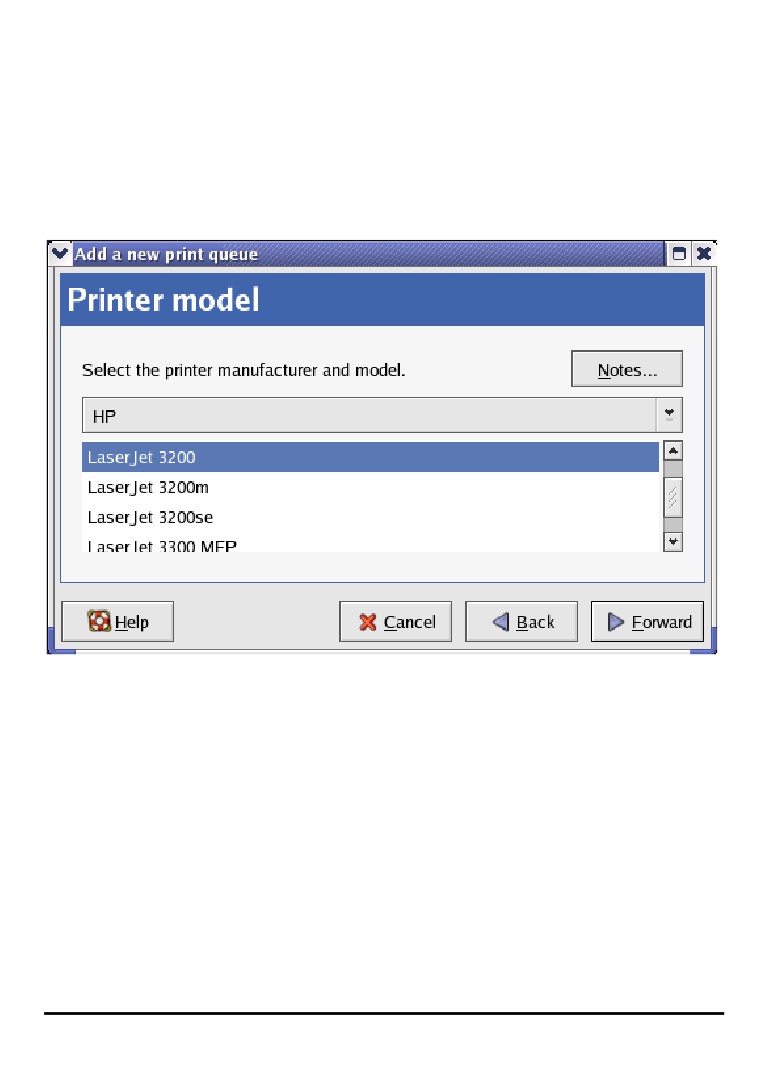
If a printer has not been detected automatically, select the model from the list. You
can manually select the name of the printer manufacturer from the Generic (click to
select manufacturer) pull-down menu, and the printer model from the sub-list. Click
Forward to continue.
9. The last step is to confirm your printer configuration. Click Apply button to confirm
or Back button to modify the configuration.
150
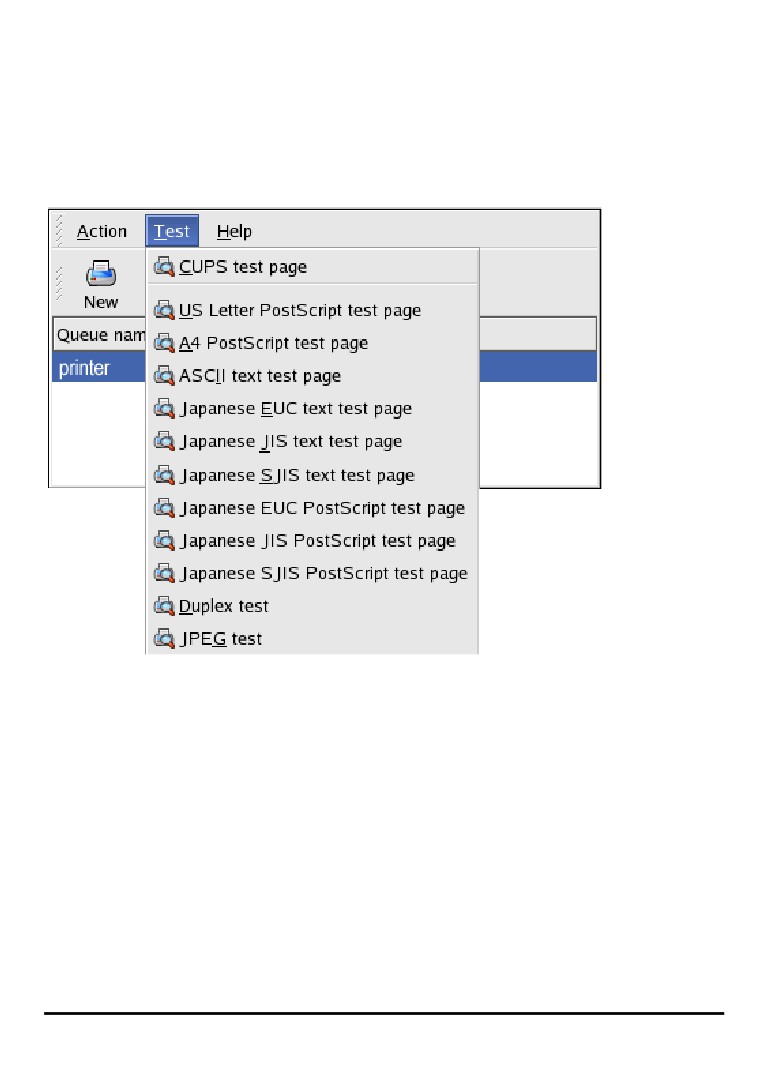
10. Print a test page to make sure the printer is functioning properly. To print a test
page, select the printer from the printer list, then select the appropriate test page
from the Test drop-down menu.
151
Setting up Printing in Mac OS X Tiger(10.4)
NOTE: Mac OS printing is supported by Postscript printers only!
With Mac OS X Tiger (10.4), you can use Apple Talk, Bonjour, Internet Printing
Protocol (IPP), Line Printer Daemon (LPD), and HP Jet Direct-Socket printing
through Print Server.
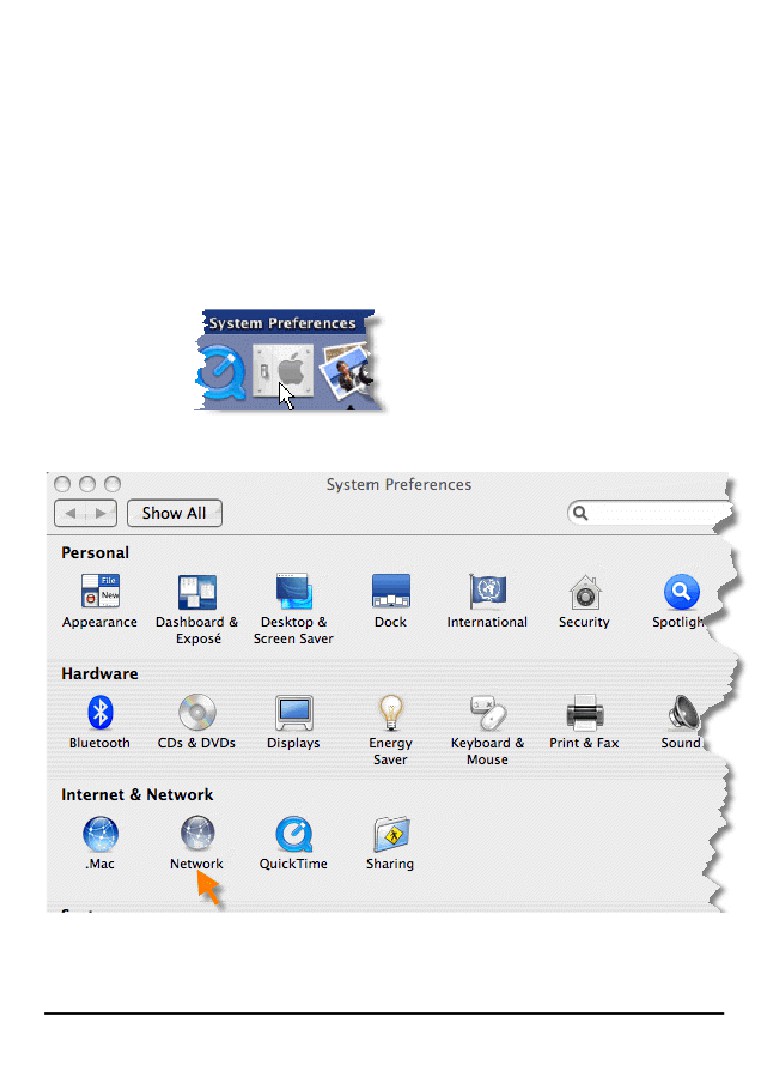
Click on this icon
in your Dock to open your System
Preferences window as below.
Click on the Network icon in System Preferences menu to view the menu below.
152
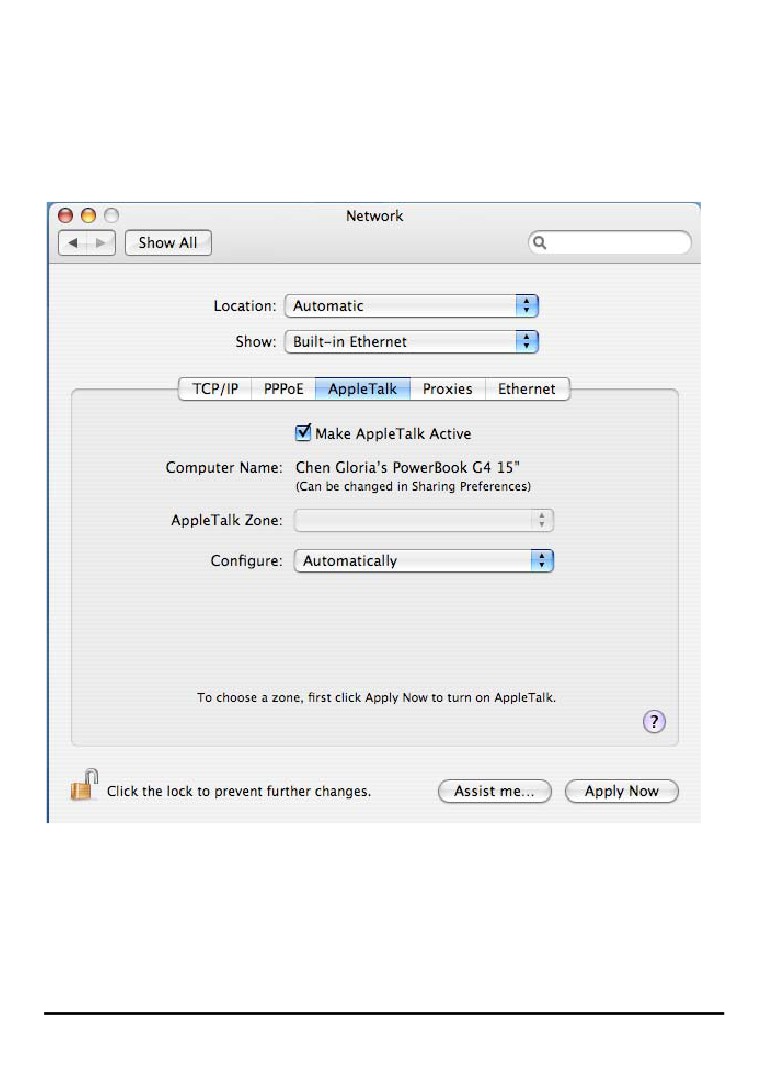
Select the Apple Talk tab in the Network menu. Check to select the Make Apple
Talk Active option. Click on the Apply Now button and close the menu. Apple Talk
is now active on the system. Now a printer can be added.
153
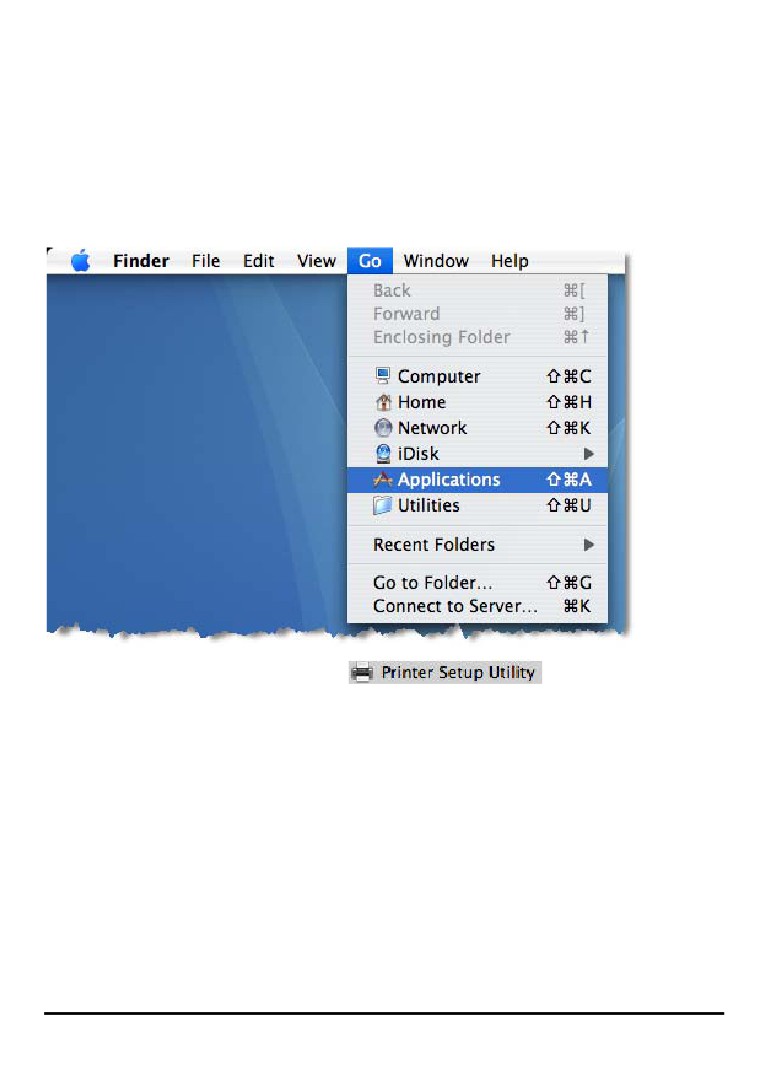
Adding a Printer
Use the Go menu at the top tool bar and select Applications option and find the
Utilities folder or open the Utilities folder directly in Go menu.
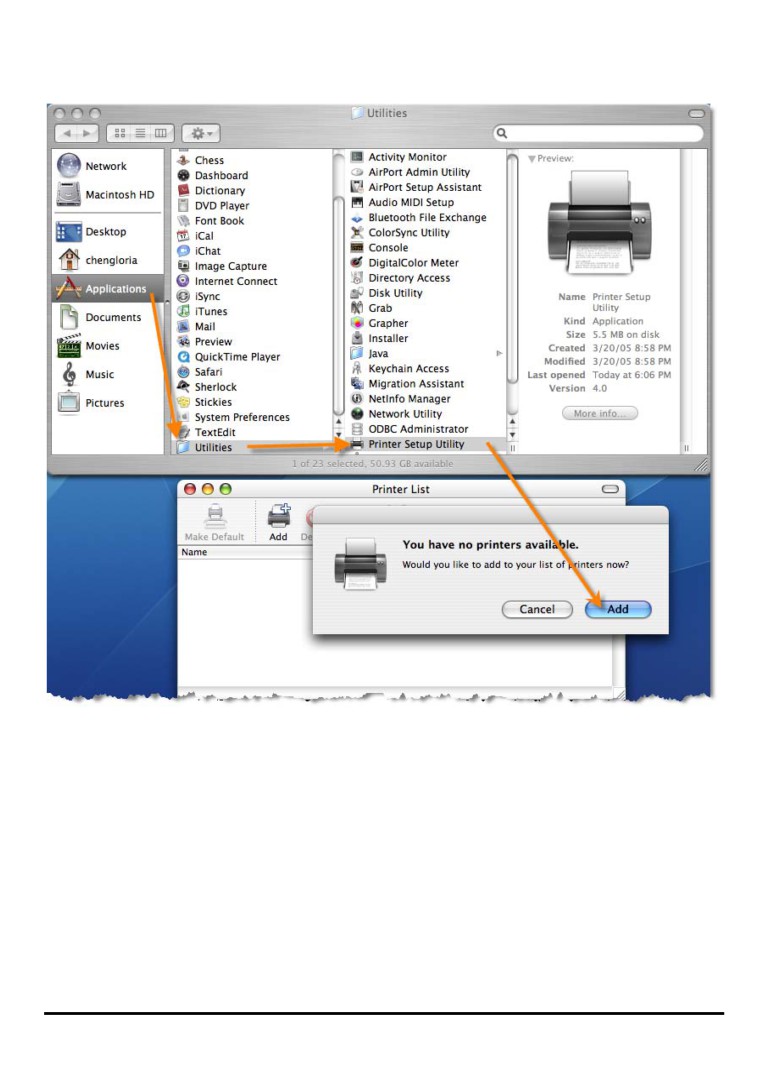
In the Utilities folder, find and select
to open Printer List
window. If no printer has been set up on your Macintosh, you will be prompted to add
a printer. Click Add button on the pop-up dialogue box to open Printer Browser
window.
154
Mac OS X Tiger (10.4) supports five printing protocols:
1. AppleTalk
2. Bonjour
3. Internet Printing Protocol (IPP)
4. Line Printer Daemon (LPD)
5. HP Jet Direct - Socket
To add an Internet Printing Protocol enabled, Line Printer Daemon enabled or HP
155
Jet Direct - Socket enabled printer, click on the
button and follow the
instructions to add an IP Printer beginning on “Adding an IP printer” session.
156