D-Link DPR-1061 USB 2.0 MFP Server Manual (2007) - page 3
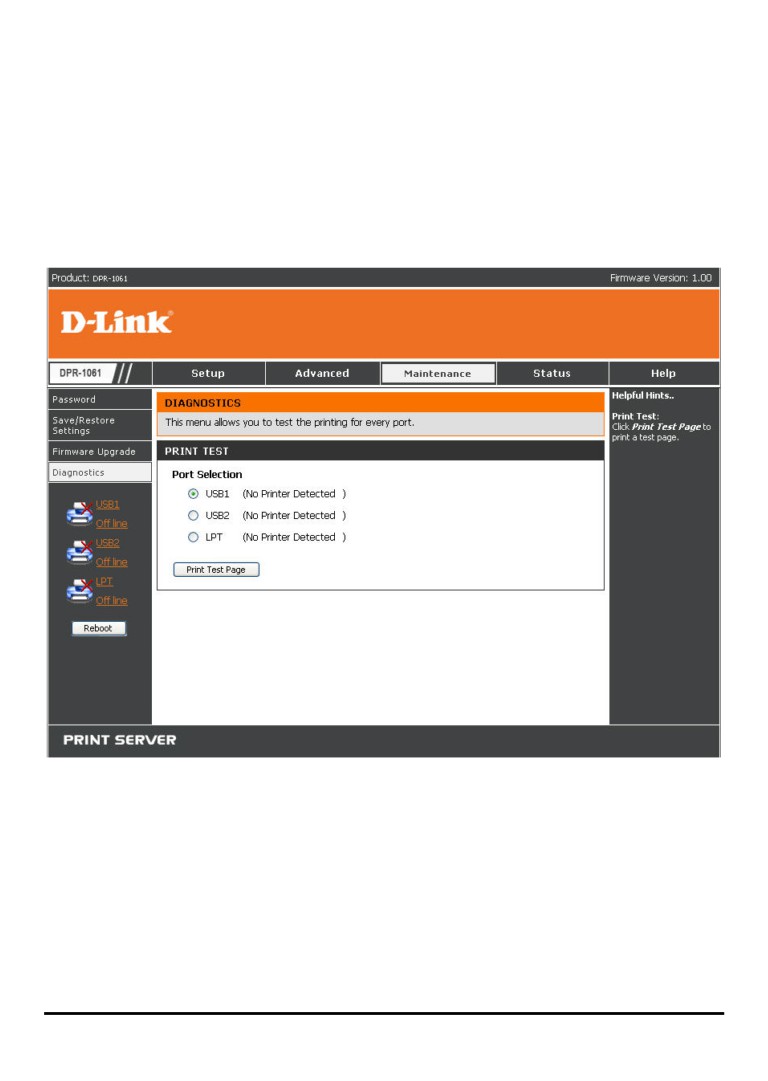
MAINTENANCE > Diagnostics
The Diagnostics screen allows you to test the printing for each port of the MFP
server: USB1, USB2, and LPT. After done the port selection, click Print Test Page to
print a test page.
77
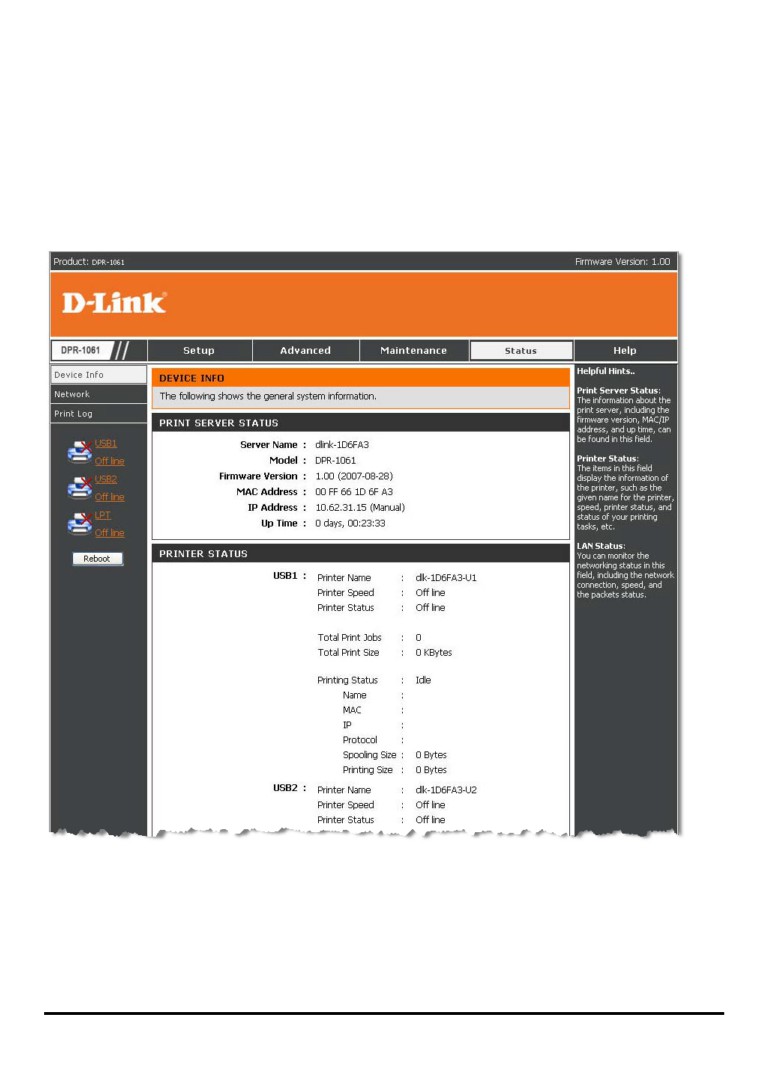
STATUS > Device Info
The Device Info screen displays the status of your MFP Server, printer, and network
for your reference.
78
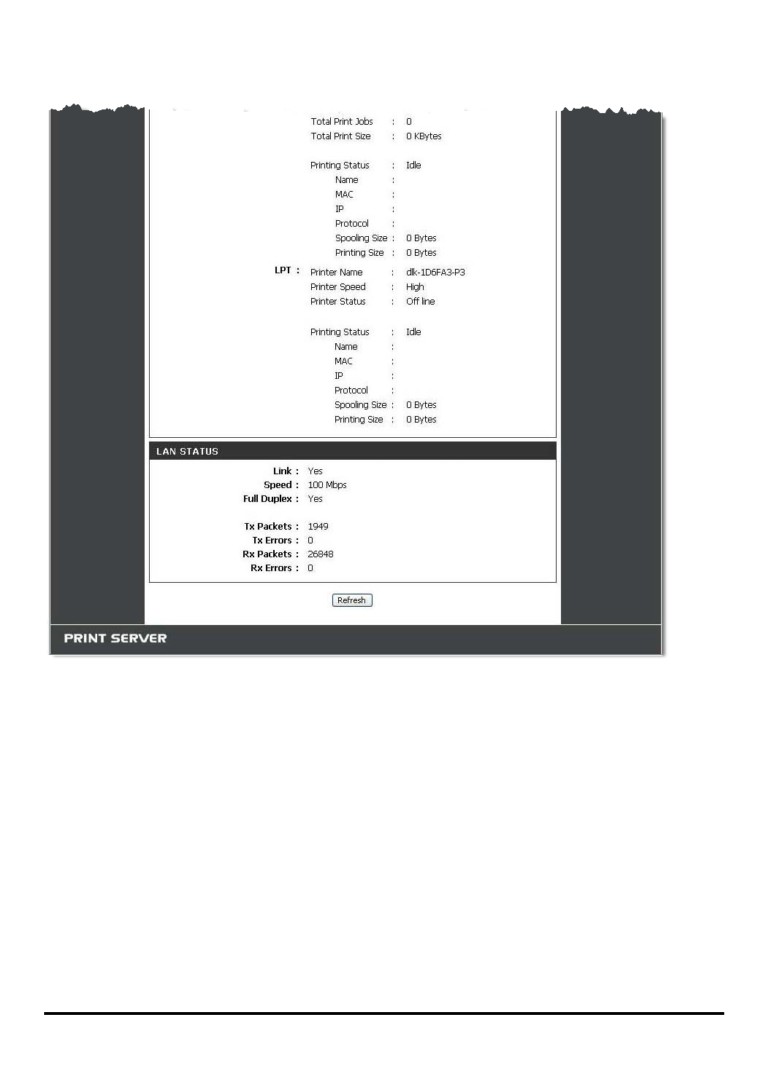
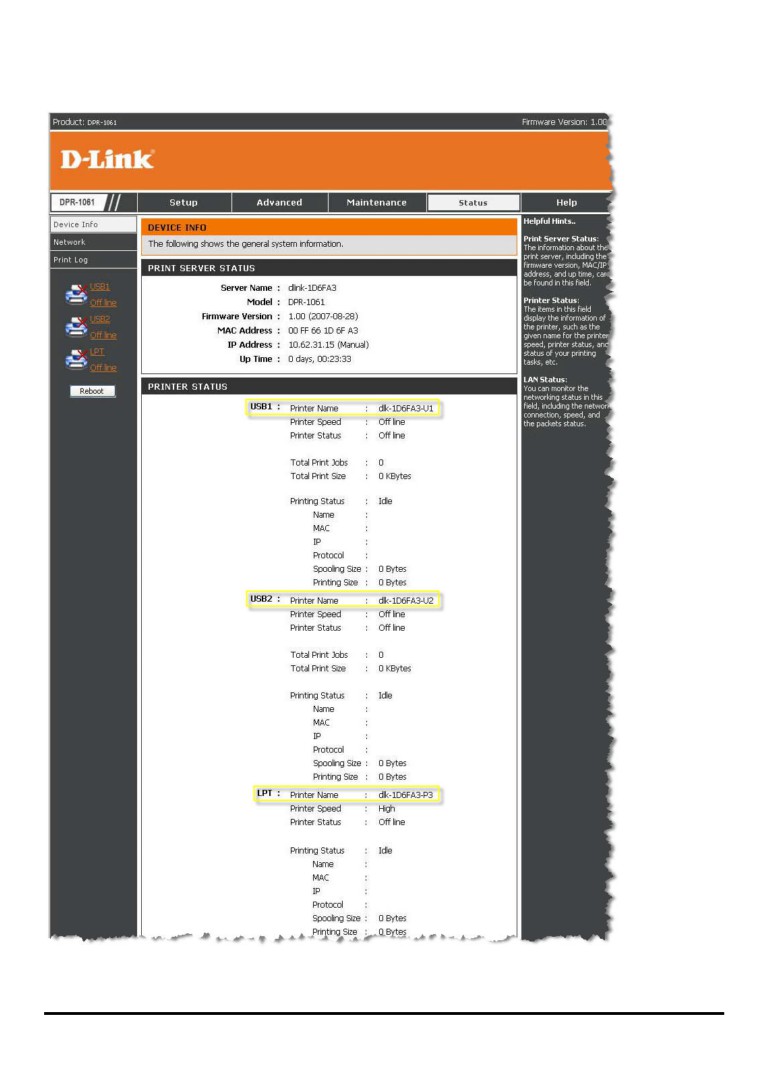
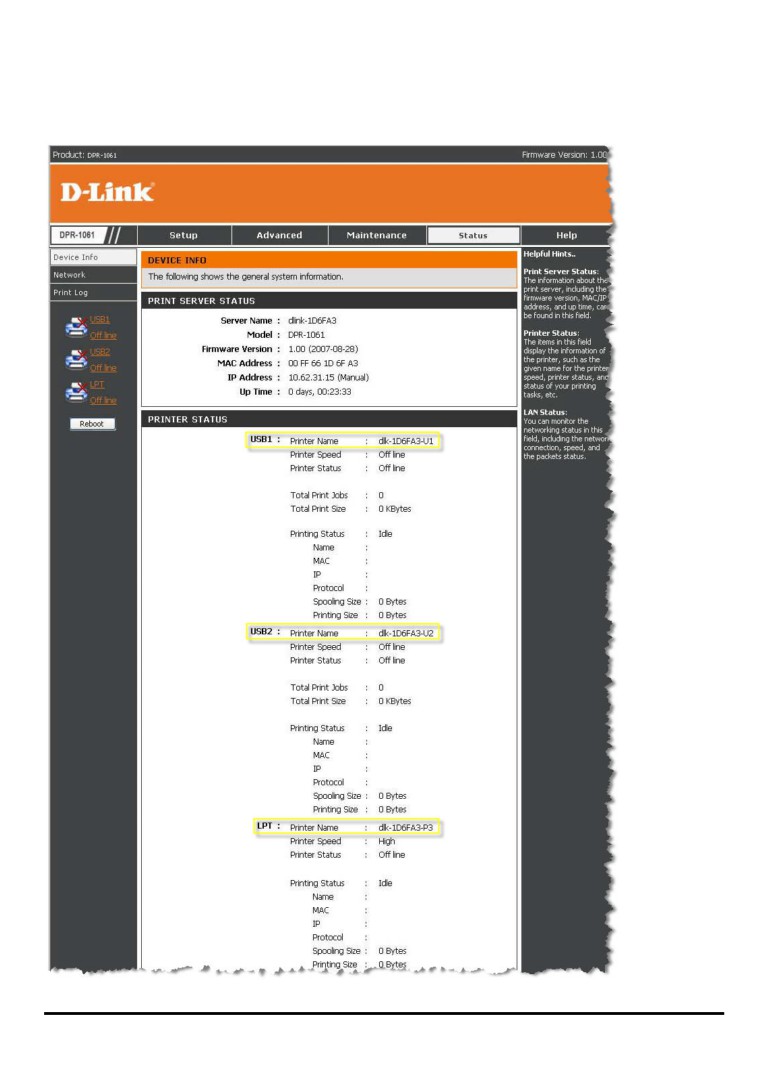
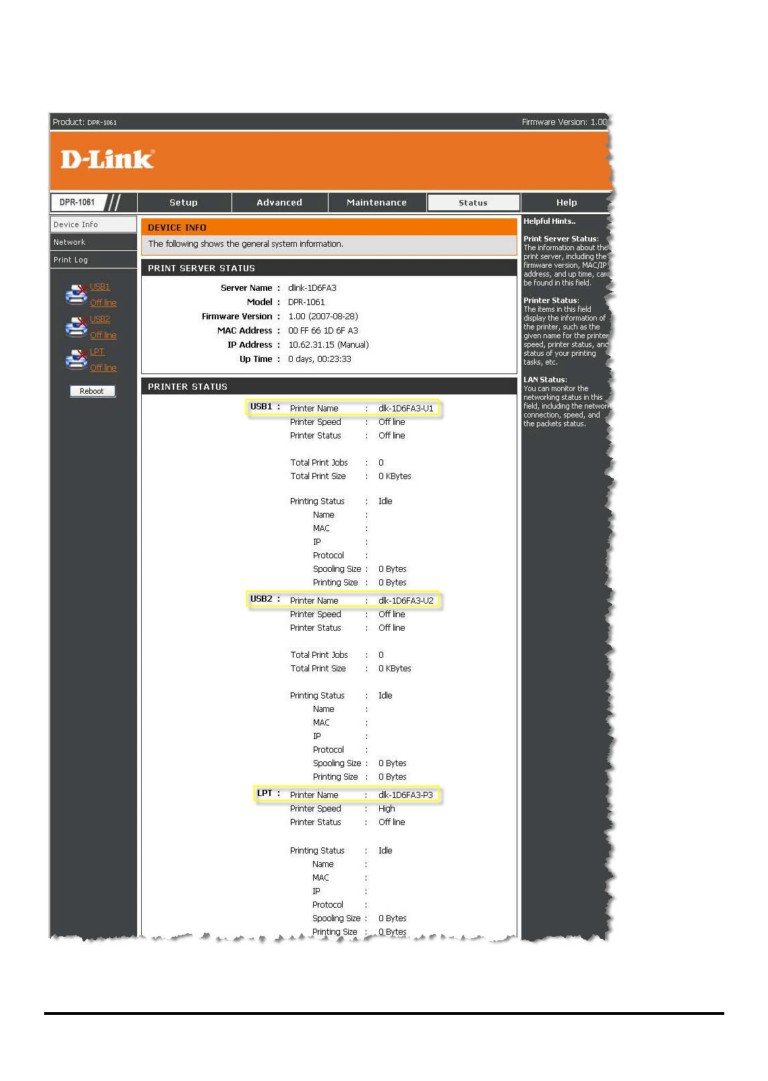
Print Server Status
This field displays the information of the print server about the firmware version,
MAC/IP address, and up time.
Printer Status
The items in this field display the information of the printer, such as the given name
for the printer, speed, printer status, and status of your printing tasks, etc.
LAN Status
You can monitor the networking status in this field, including the network connection,
speed, and the packets status.
79
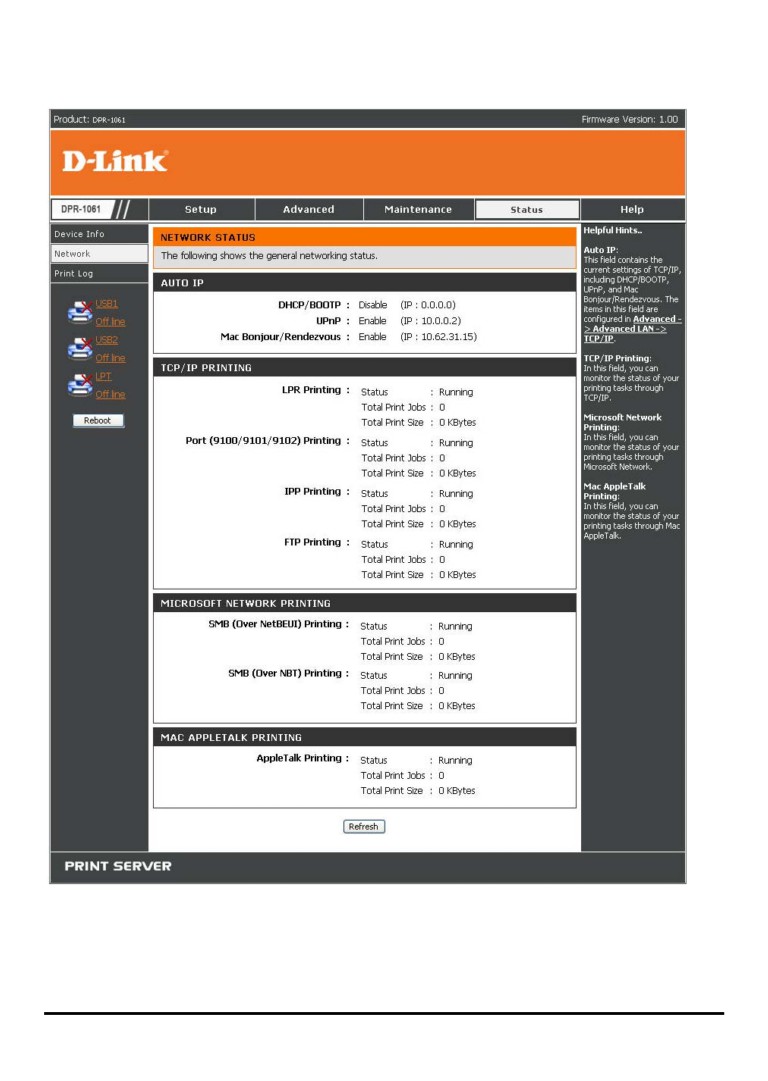
STATUS > Network
The Network screen displays the general Network status of your MFP Server,
including:
Auto IP
This field contains the current settings of TCP/IP, including DHCP/BOOTP, UPnP,
and Mac Bonjour/Rendezvous. The items in this field are configured in Advanced Æ
Advanced LAN Æ TCP/IP.
TCP/IP Printing
In this field, you can monitor the status of your printing tasks through TCP/IP.
Microsoft Network Printing
In this field, you can monitor the status of your printing tasks through Microsoft
Network.
Mac AppleTalk Printing
In this field, you can monitor the status of your printing tasks through Mac AppleTalk.
80
81
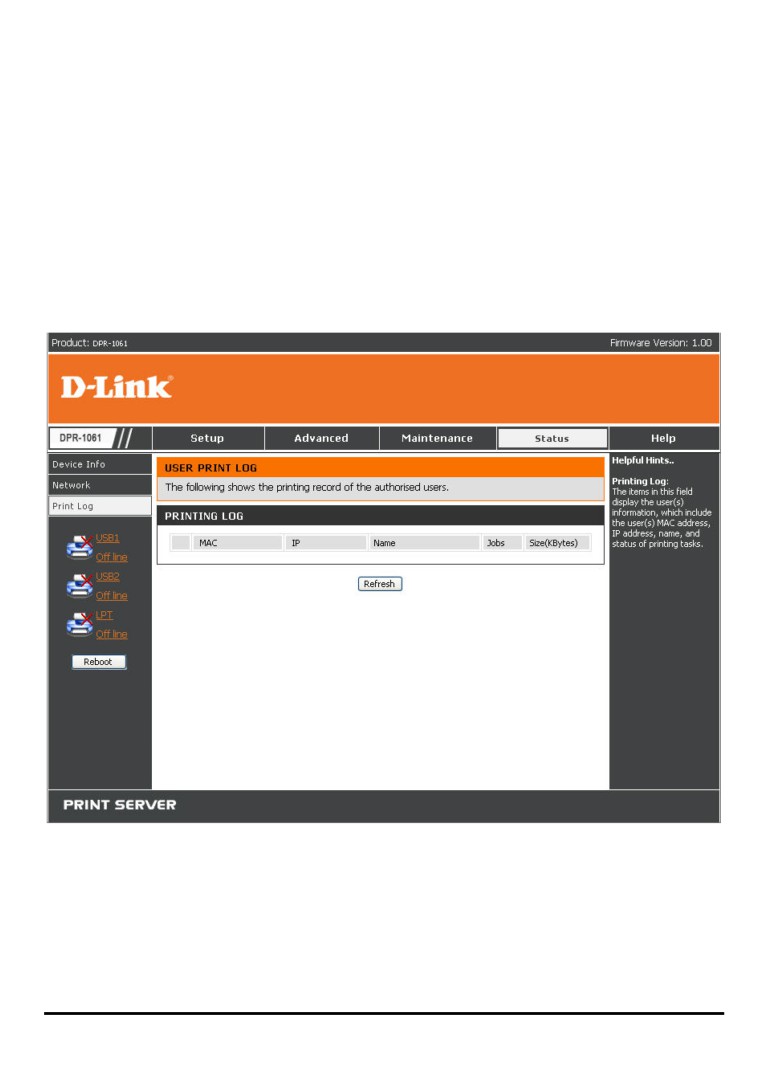
STATUS >Print Log
The Print Log screen displays the printing record of the authorized users.
Print Log
The items in this field display the user(s) information, which include the user(s) MAC
address, IP address, name, and status of printing tasks.
82
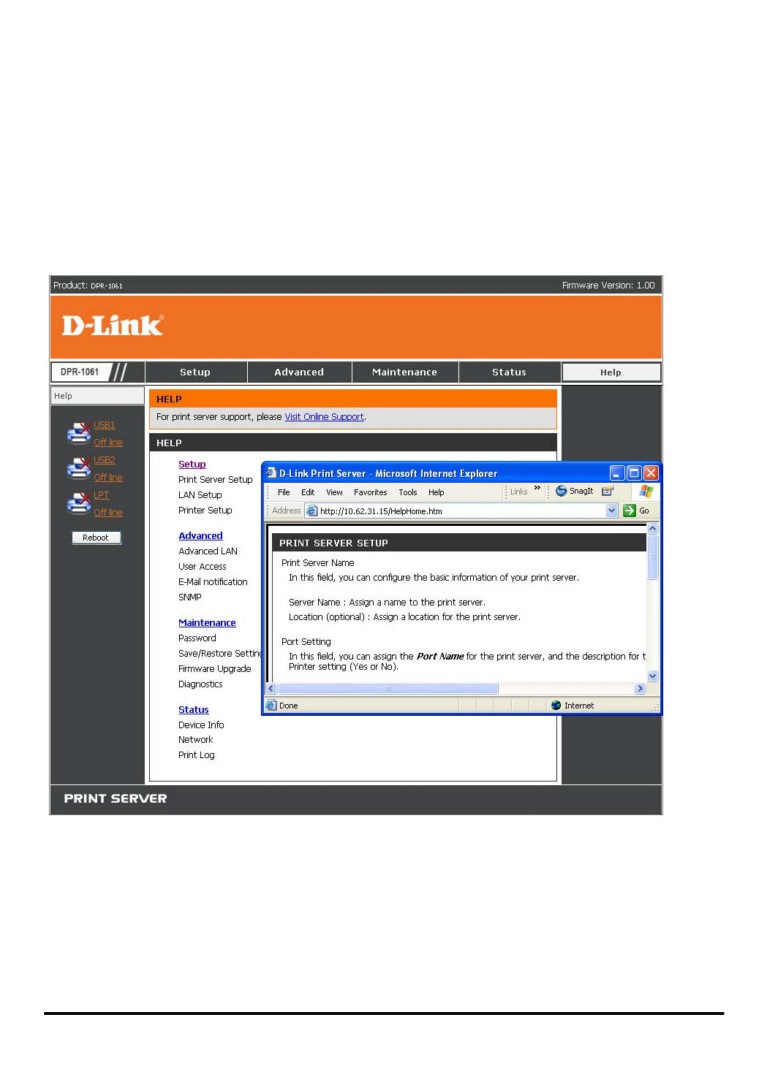
HELP
The Help screen provides you brief information about the MFP Server for your
reference.
83
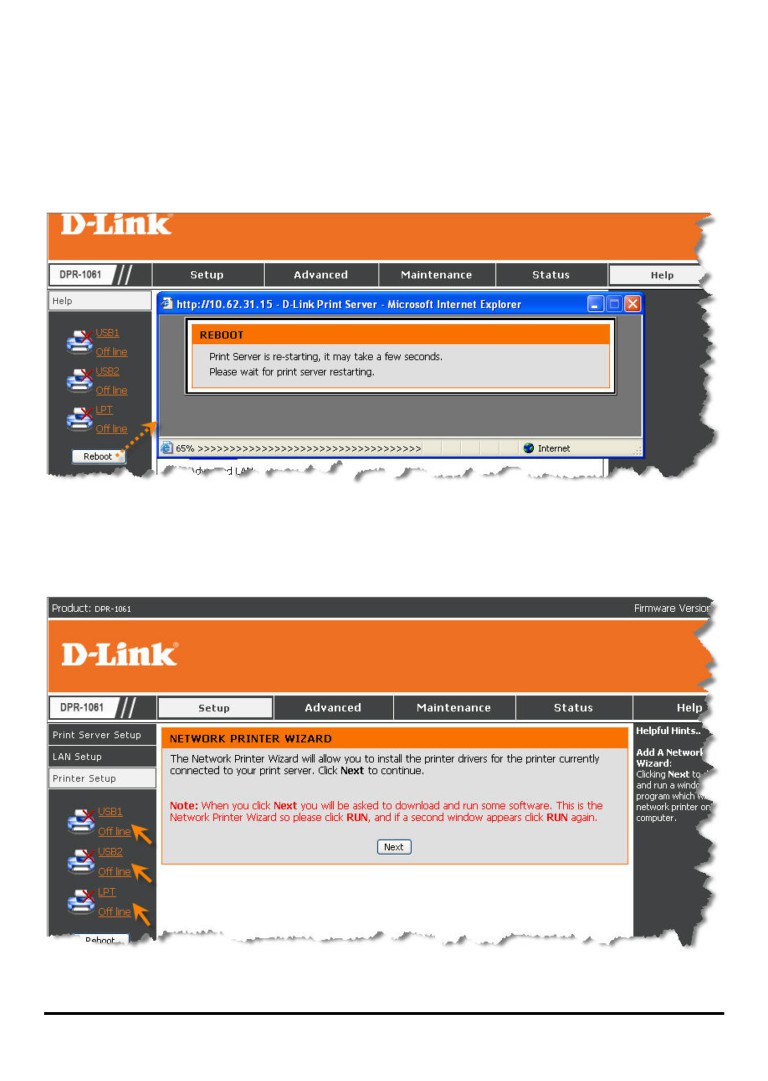
Reboot
If you want to reset the MFP server, you may just click the Reboot for restarting.
Refresh Printer Status
Click USB1, USB2, LPT to refresh printer status.
84
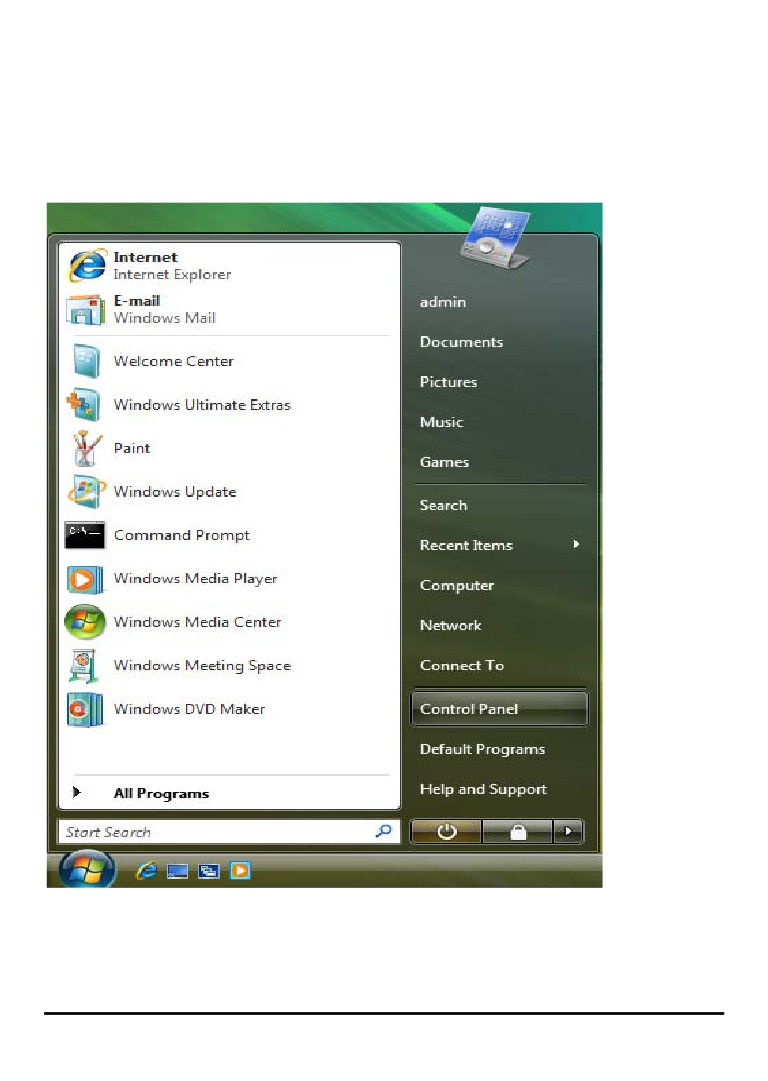
TCP/IP Printing for Windows Vista
Go to Start Î Control Panel Î Printers.
85
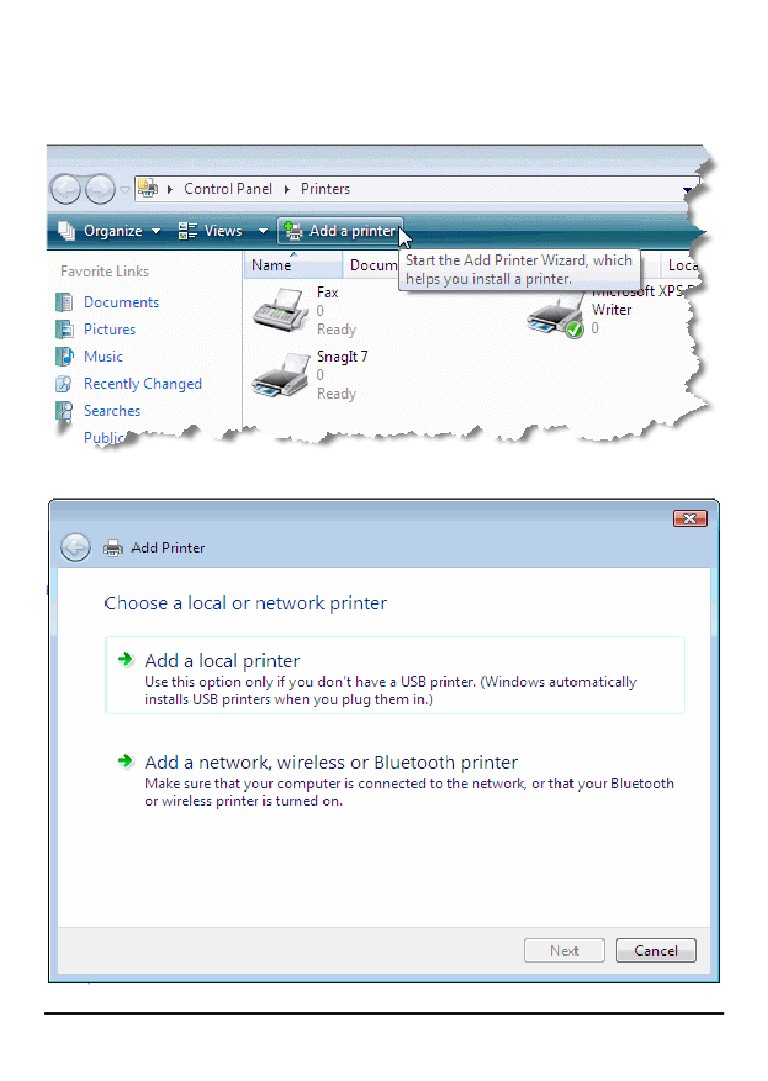
Click Add a printer.
Select the first option, Add a local printer, and then click Next.
86
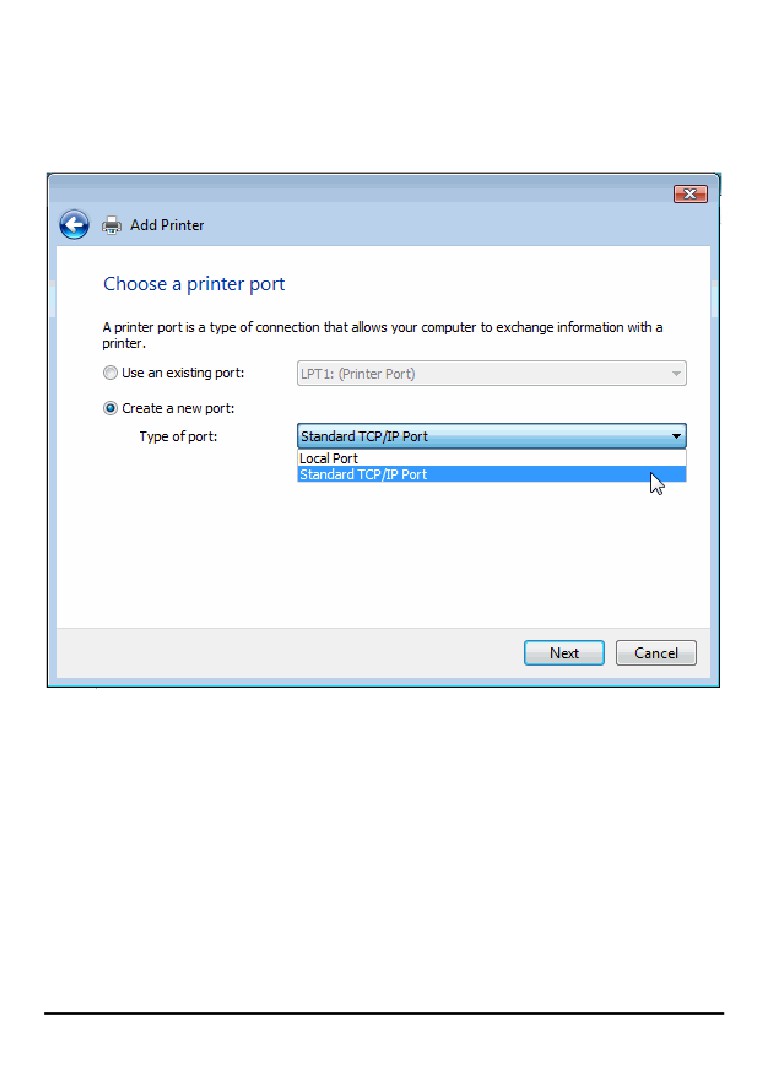
Select the second option, Create a new port, and highlight Standard TCP/IP Port
from the pull-down menu. Click Next.
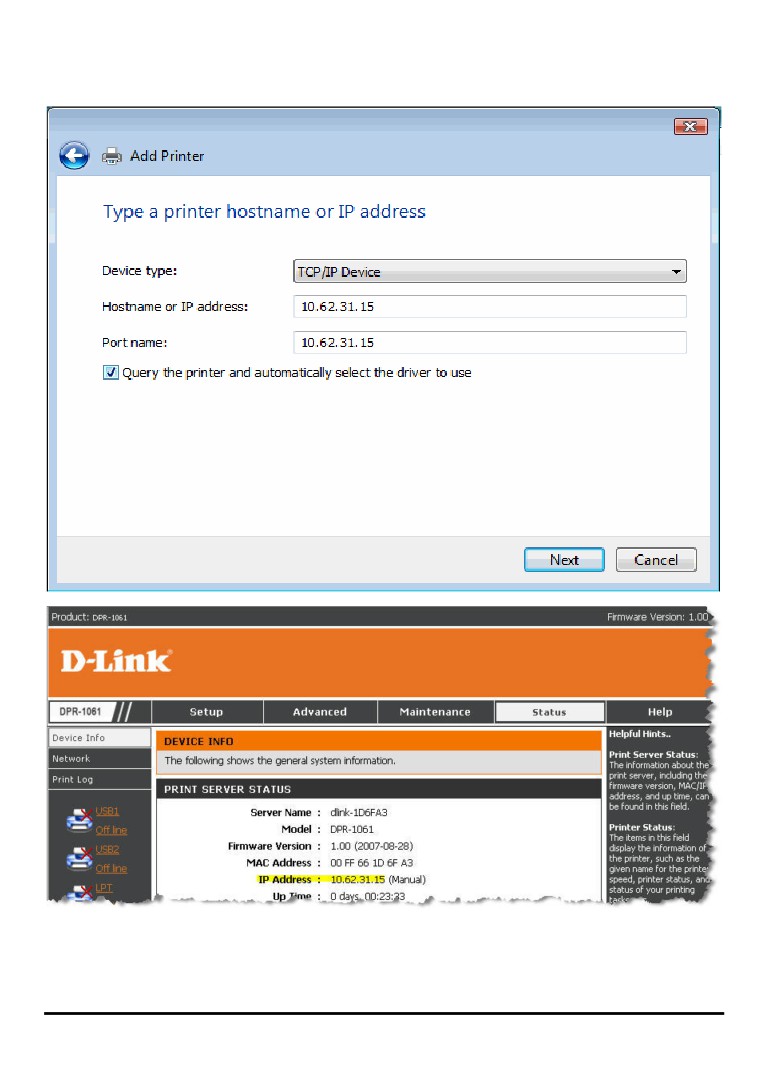
Type the IP address of the MFP server (e.g. 10.62.31.15 used in this manual), which
can be referred from the PRINTER SERVER STATUS of the MFP server’s Web
configuration, and then the Port Name will automatically be filled in. Click Next
87
88
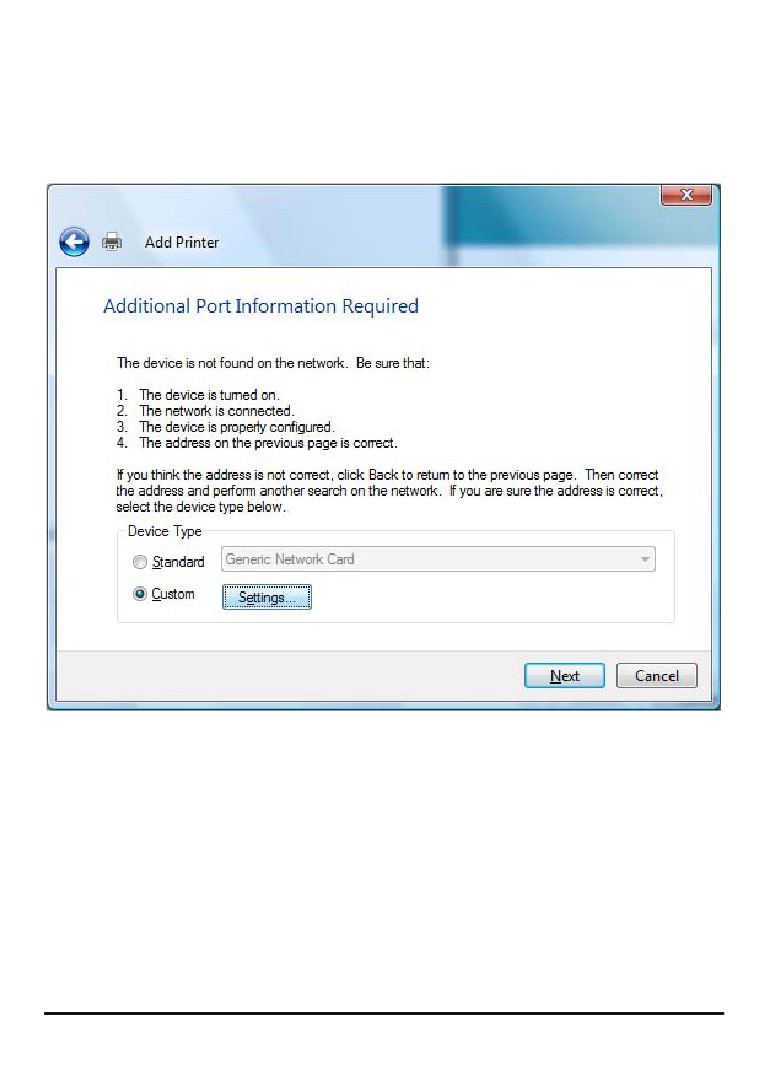
Select Custom and click Settings.
89
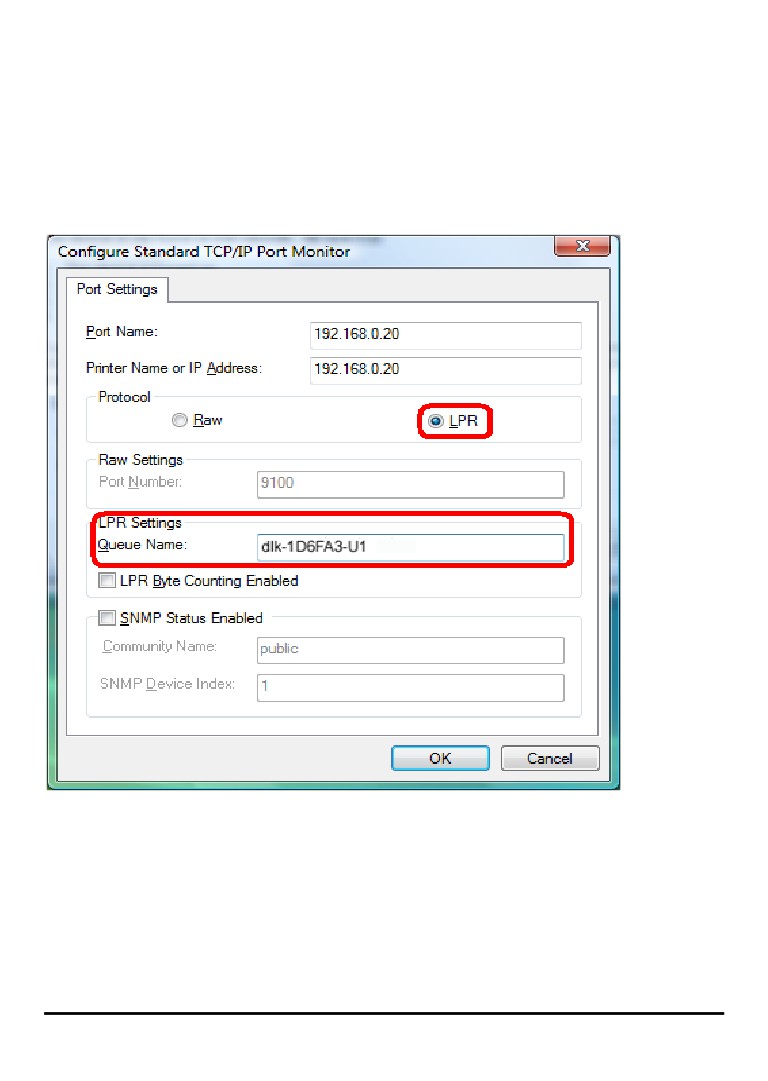
Then the follow screen will shows up, select LPR from the Protocol field.
Then enter the Queue Name, which can be referred from PRINTER STATUS of the
MFP server’s Web configuration, in the LPR Settings field. Click OK.
90
91
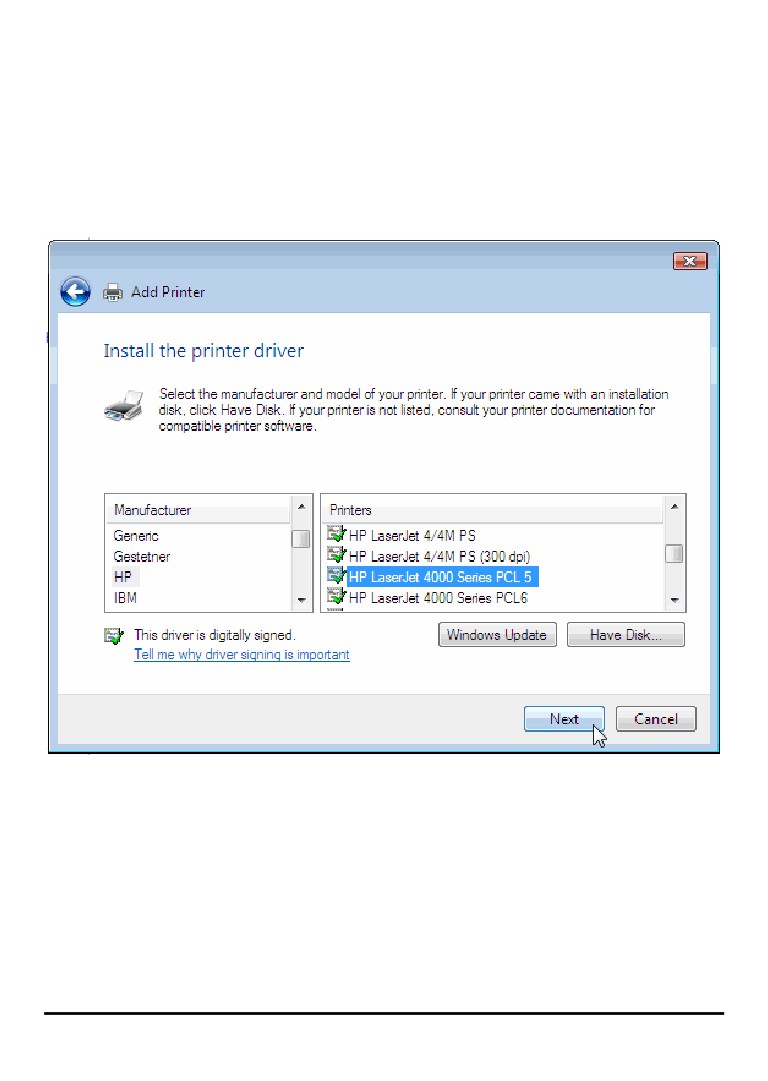
Highlight the printer, as shown. If the desired printer is not on the list, click Have Disk
and insert the printer driver disk that came with your printer to install the printer
drivers.
Click Next
92
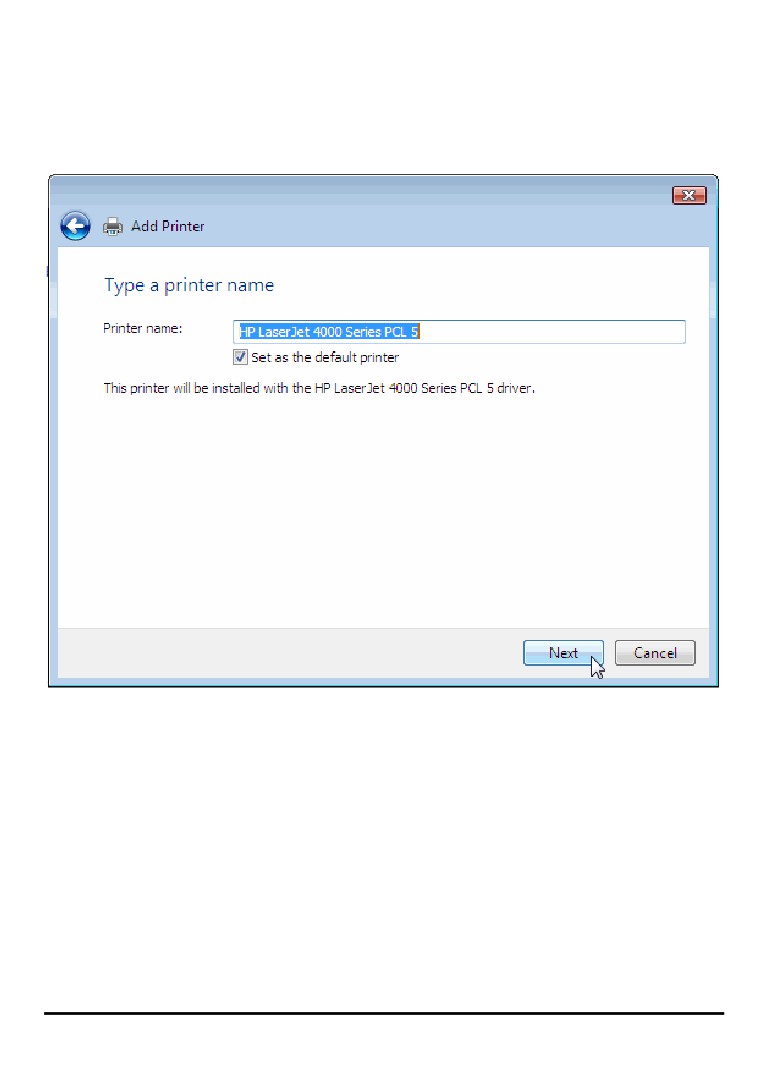
Click Next.
93
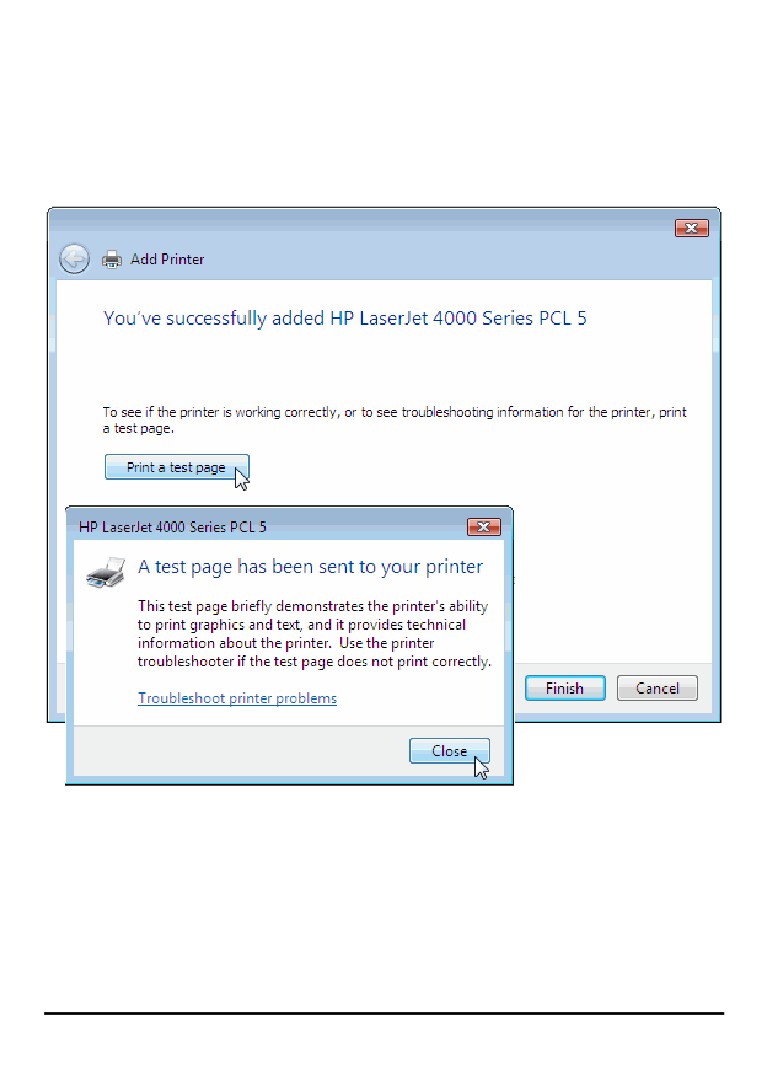
After clicked Print a test page, a small dialogue box will show up as below. Click
Close.
94
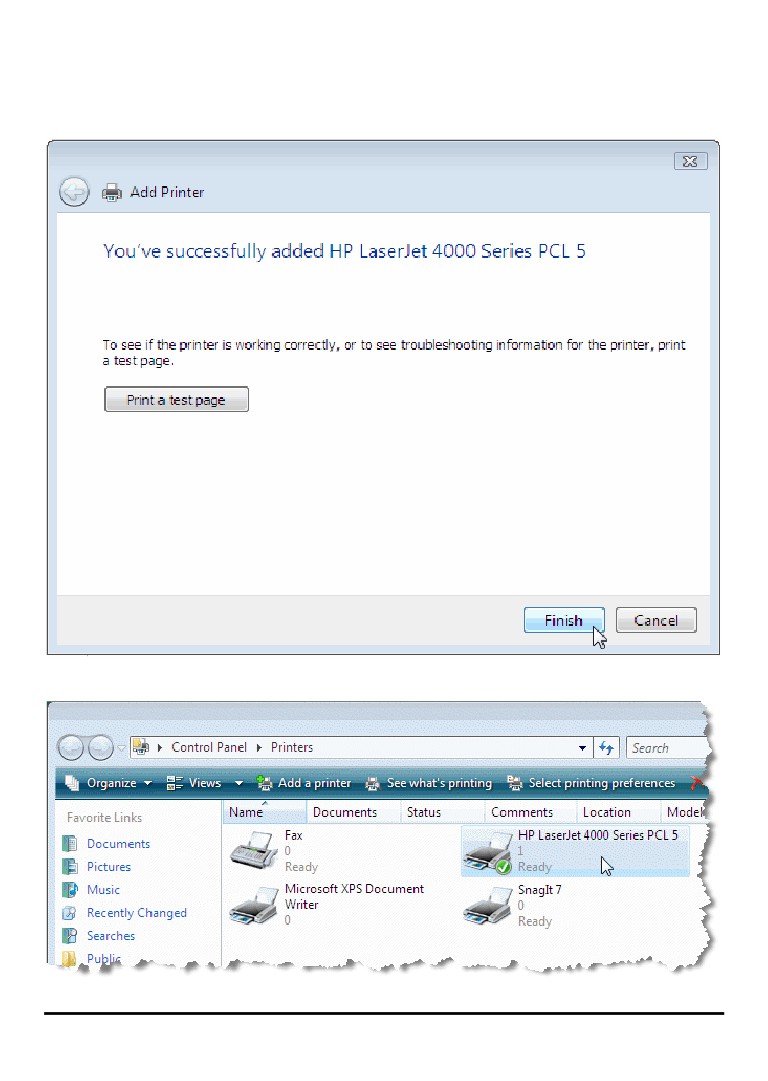
Click Finish.
The printer is now ready for printing with Windows Vista on your network.
95
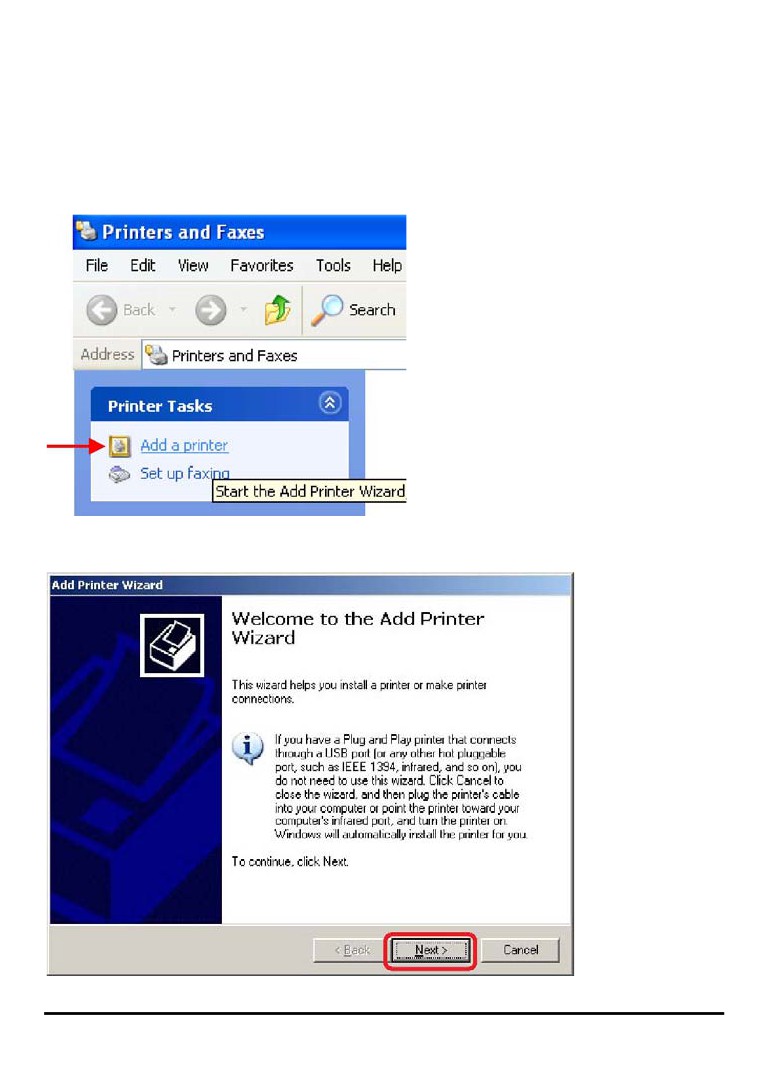
TCP/IP Printing for Windows XP
Go to Start Î Printers and Faxes Î Add a Printer.
When the following screen shows up, click Next.
96
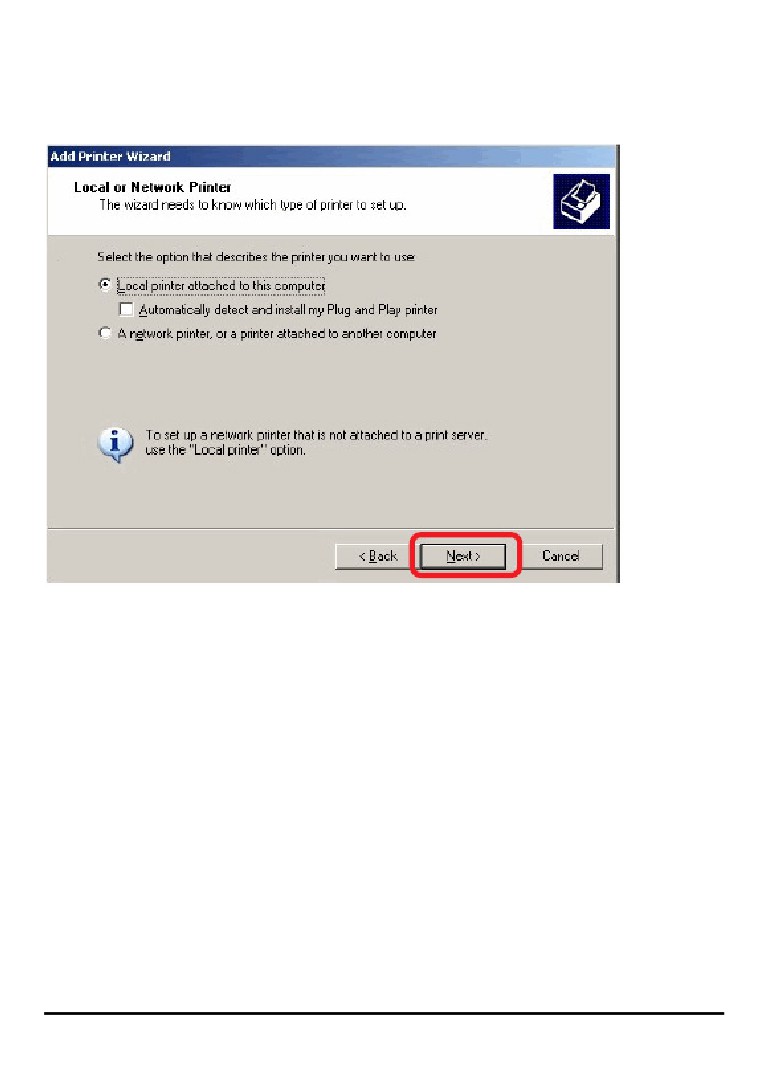
Select the first option, Local printer attached to this computer, and click Next.
97
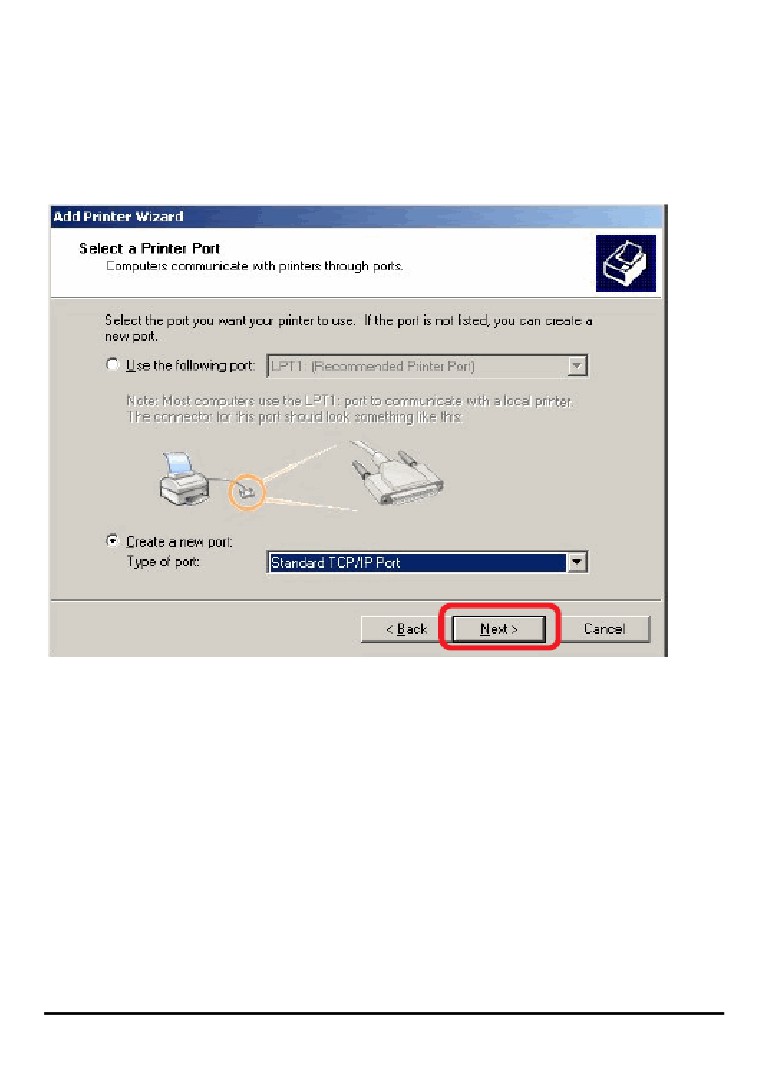
Select the second option, Create a new port, and highlight Standard TCP/IP Port
from the pull-down menu. Click Next.
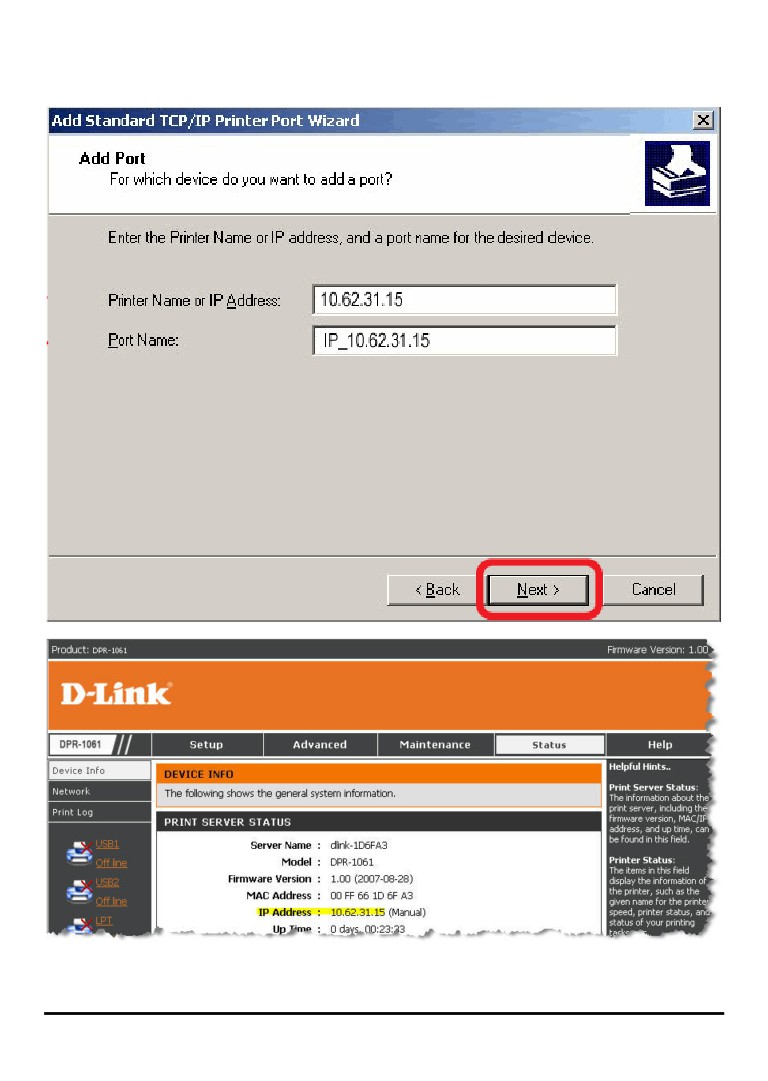
Type the IP address of the MFP server (e.g. 10.62.31.15 used in this manual), which
can be referred from the PRINTER SERVER STATUS of the MFP server’s Web
configuration, and then the Port Name will automatically be filled in. Click Next
98
99
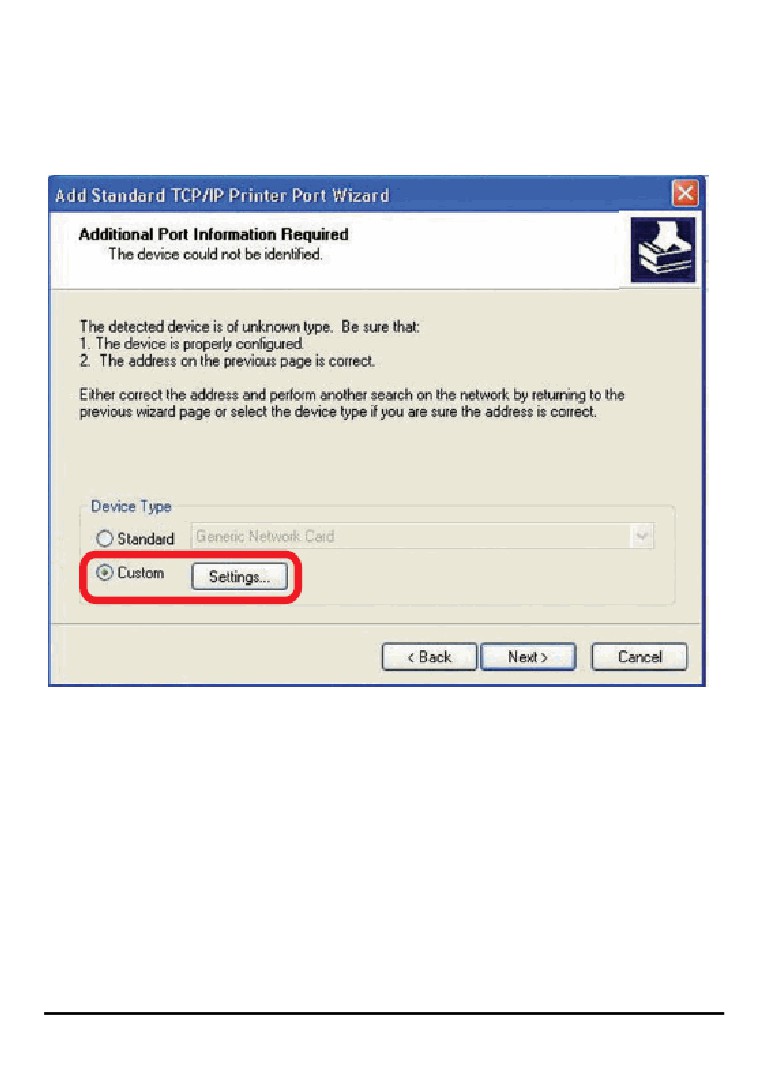
Select Custom and click Settings.
100
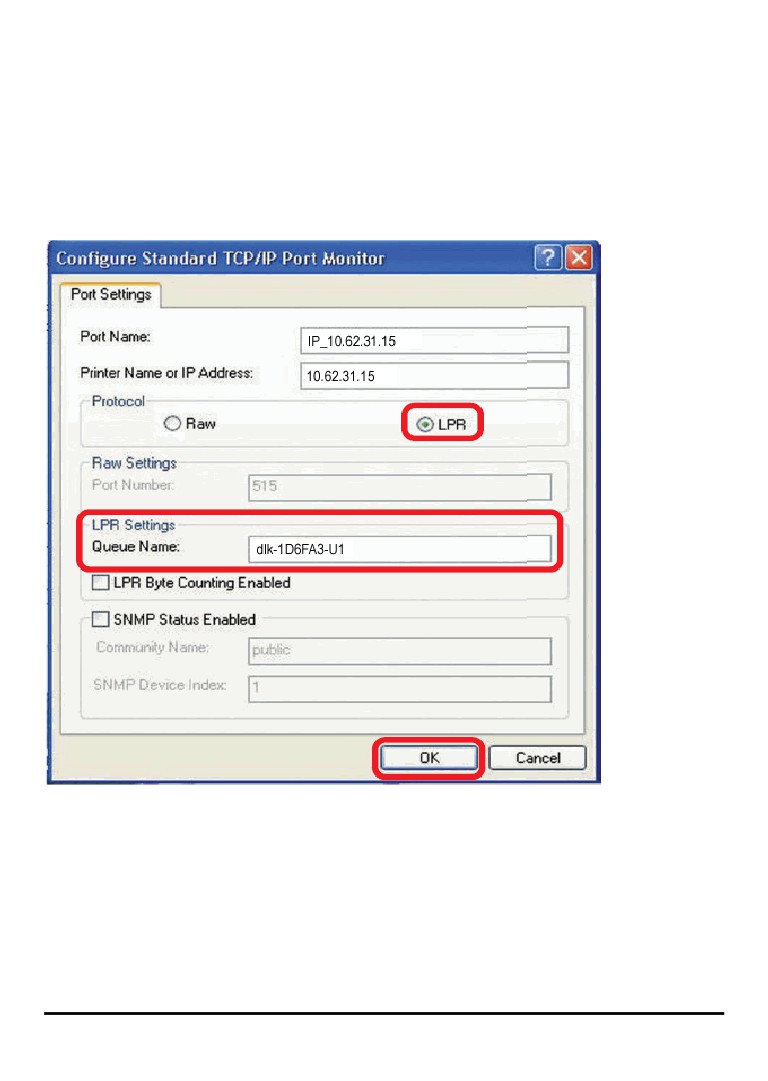
Then the follow screen will shows up, select LPR from the Protocol field.
Then enter the Queue Name, which can be referred from PRINTER STATUS of the
MFP server’s Web configuration, in the LPR Settings field. Click OK.
101
102
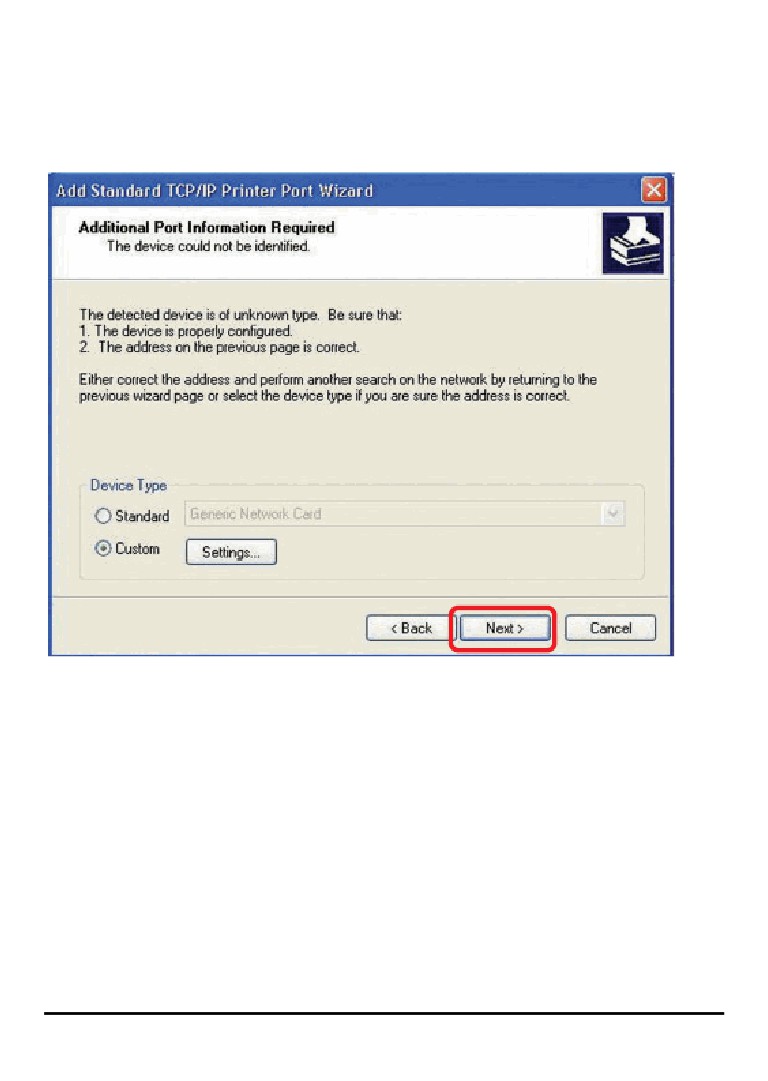
Click Next.
103
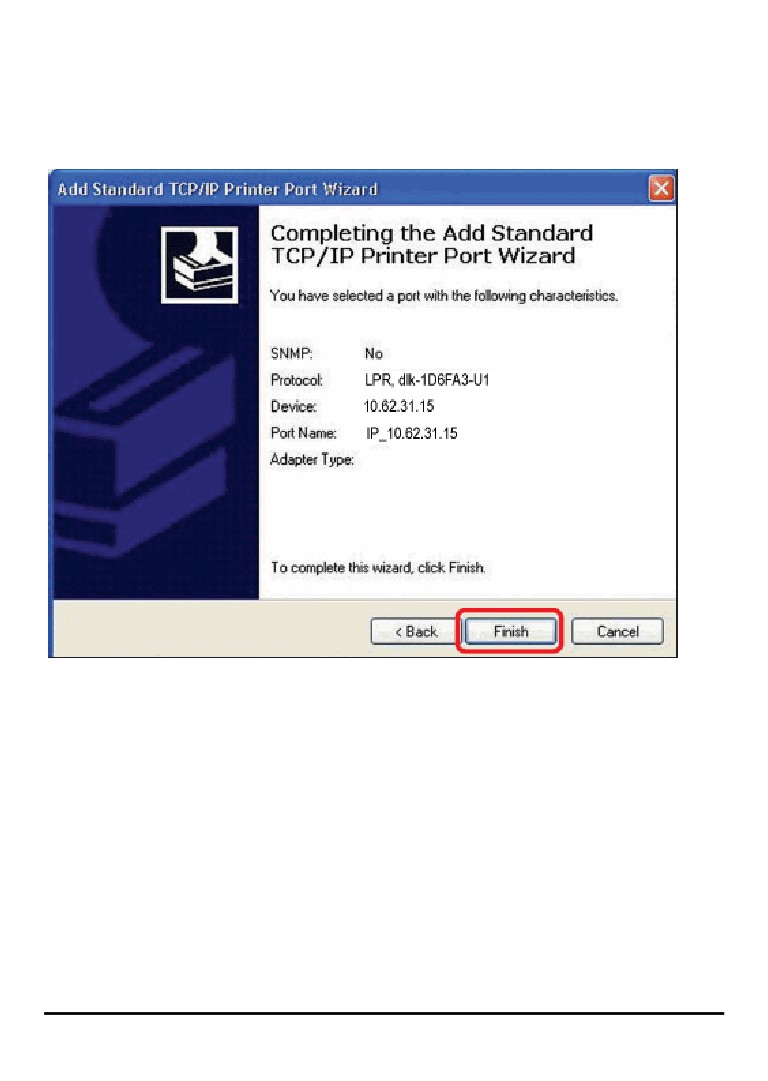
Click Finish.
104
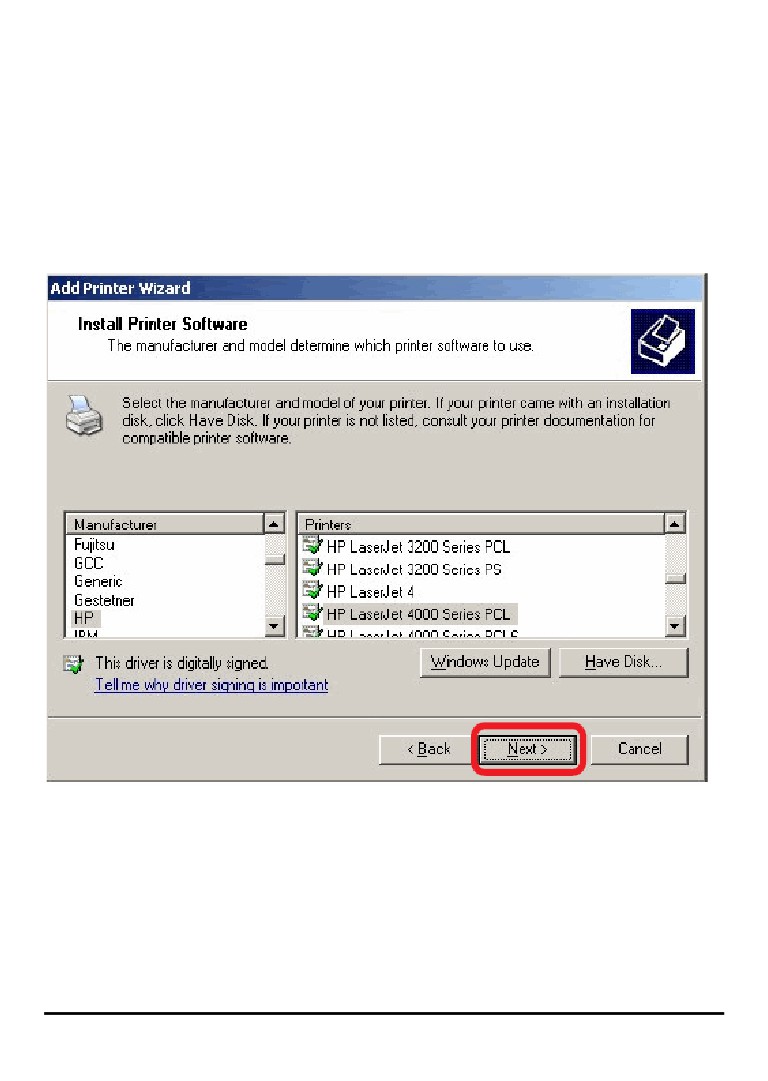
Highlight the printer, as shown. If the desired printer is not on the list, click Have Disk
and insert the printer driver disk that came with your printer to install the printer
drivers.
Click Next
105
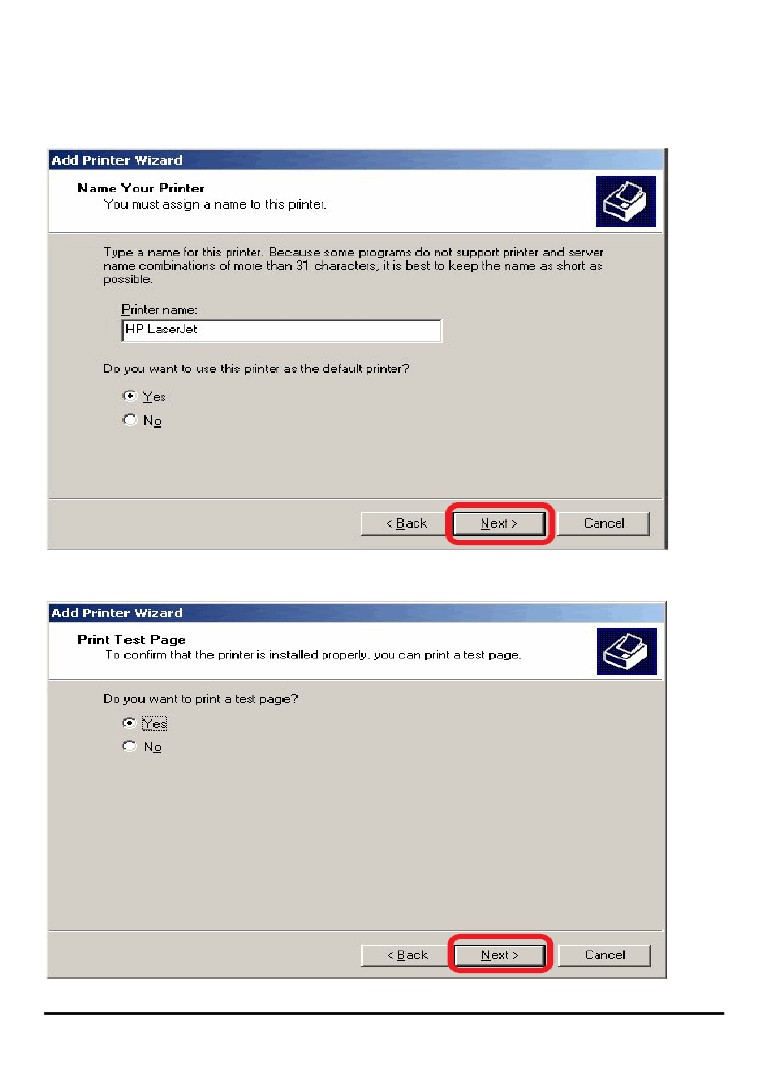
At this screen, you can input a name for the printer, and then click Next
Select Yes to print a test page, click Next.
106
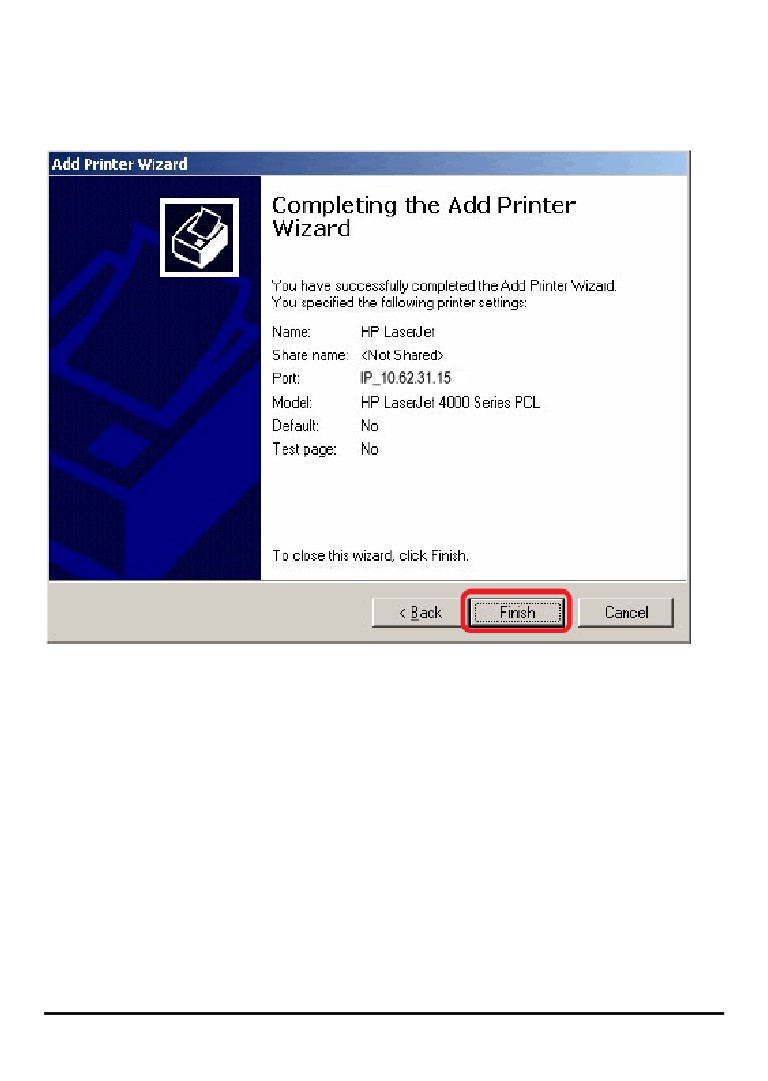
Click Finish. The printer is now ready for printing with Windows XP on your network.
107
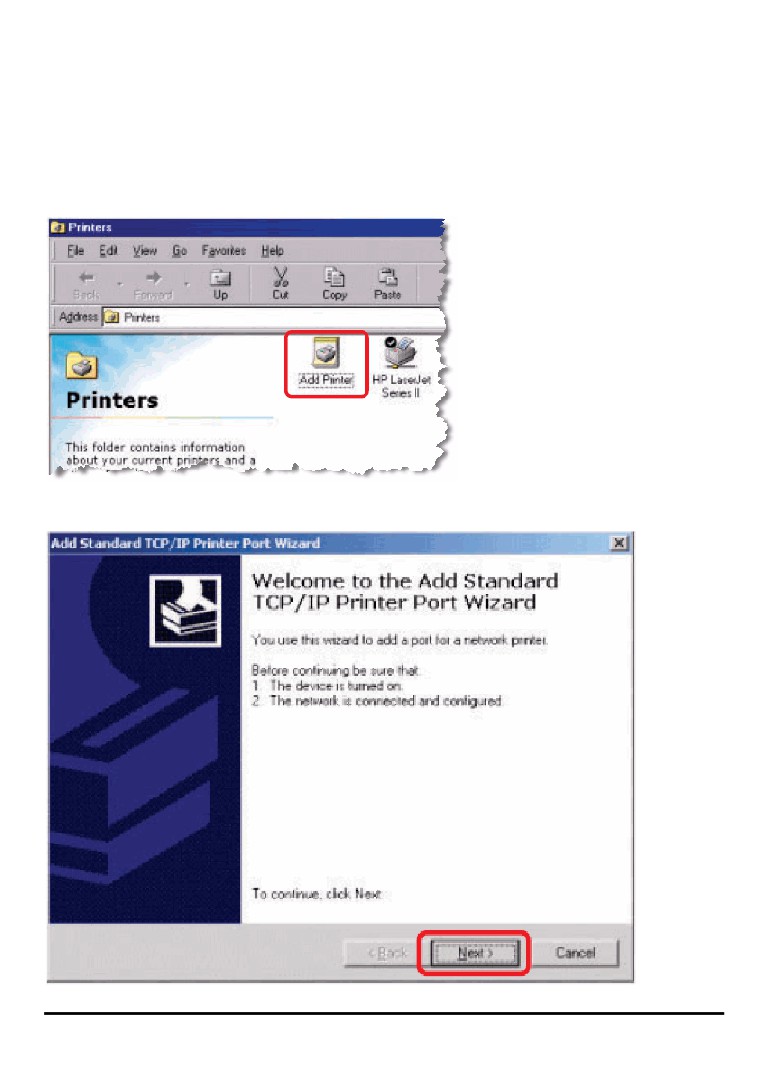
TCP/IP Printing for Windows 2000
Go to Start Î Settings Î Printers and Faxes Î Add a Printer.
When the following screen shows up, click Next.
108
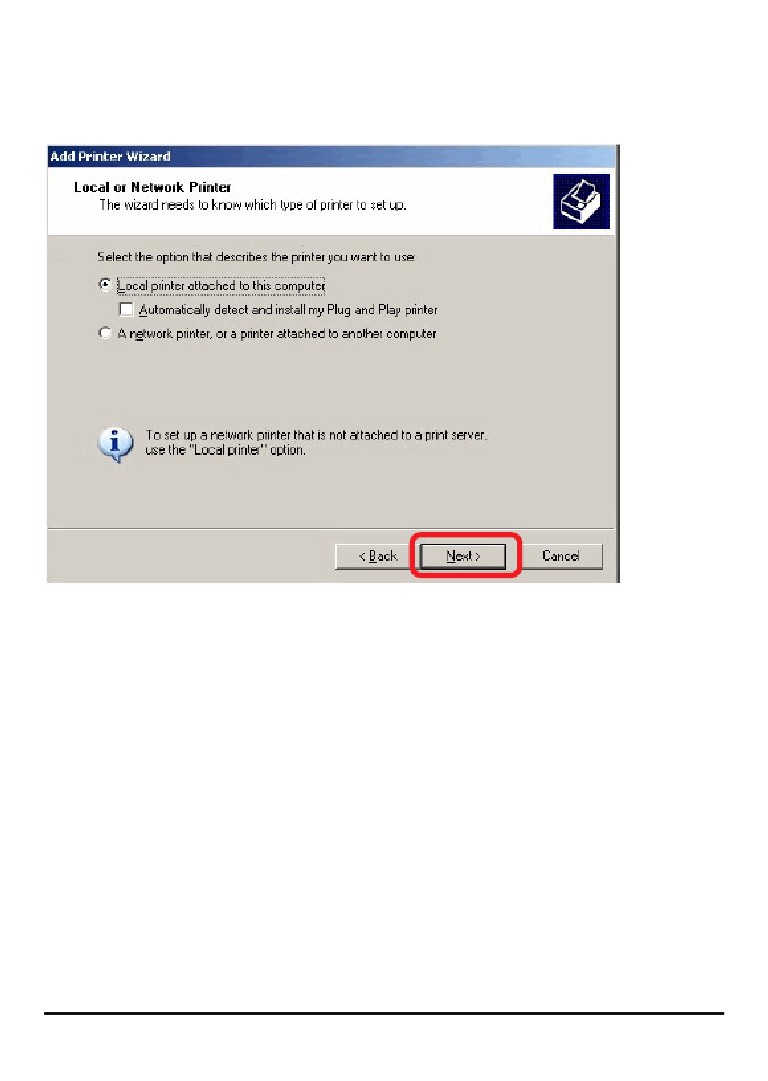
Select the first option, Local printer attached to this computer, and click Next.
109
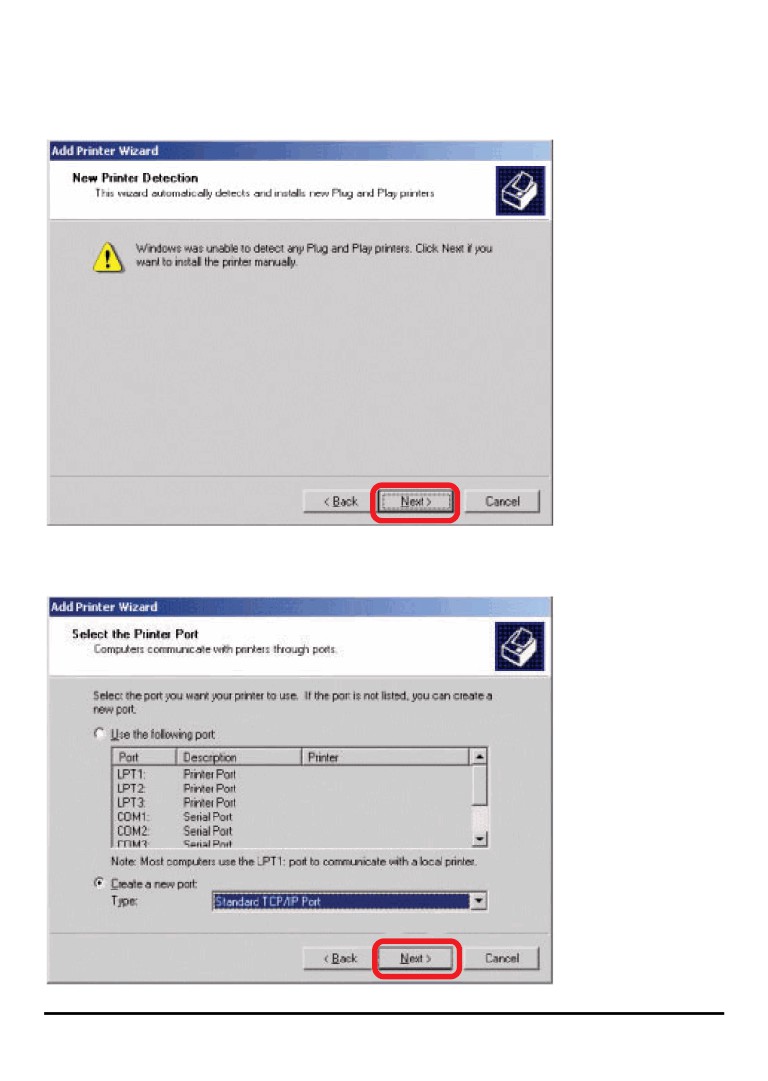
Click Next.
Select the second option, Create a new port, and highlight Standard TCP/IP Port
from the pull-down menu. Click Next.
110
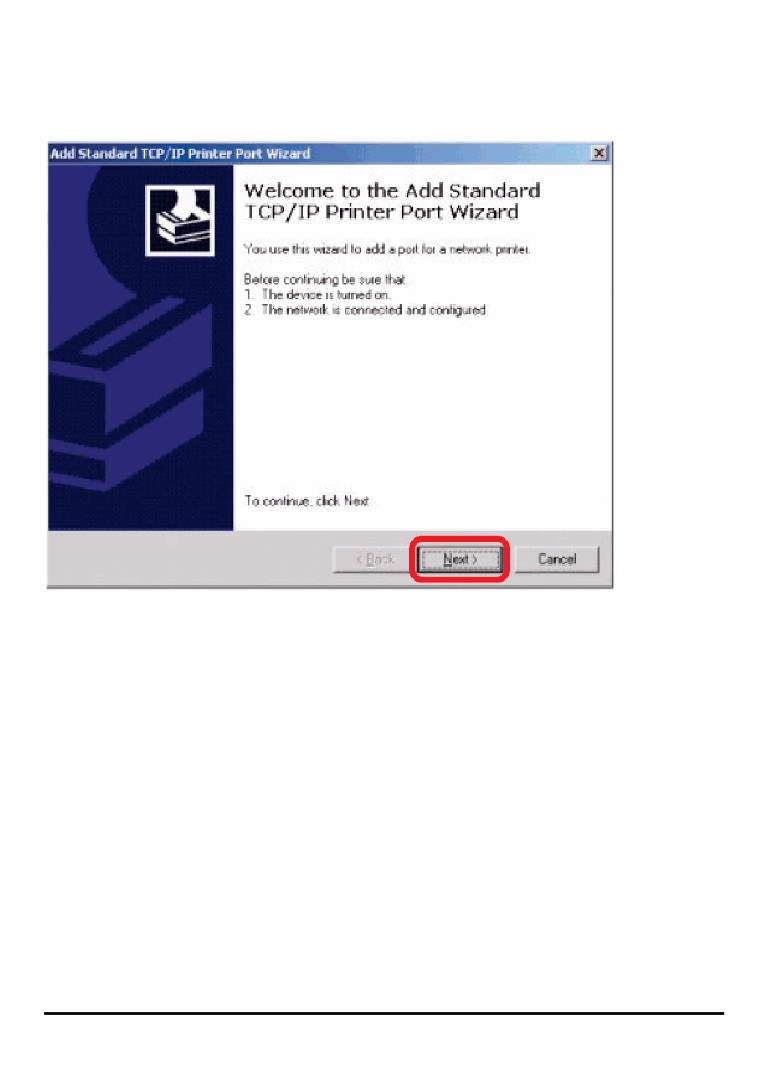
Click Next.
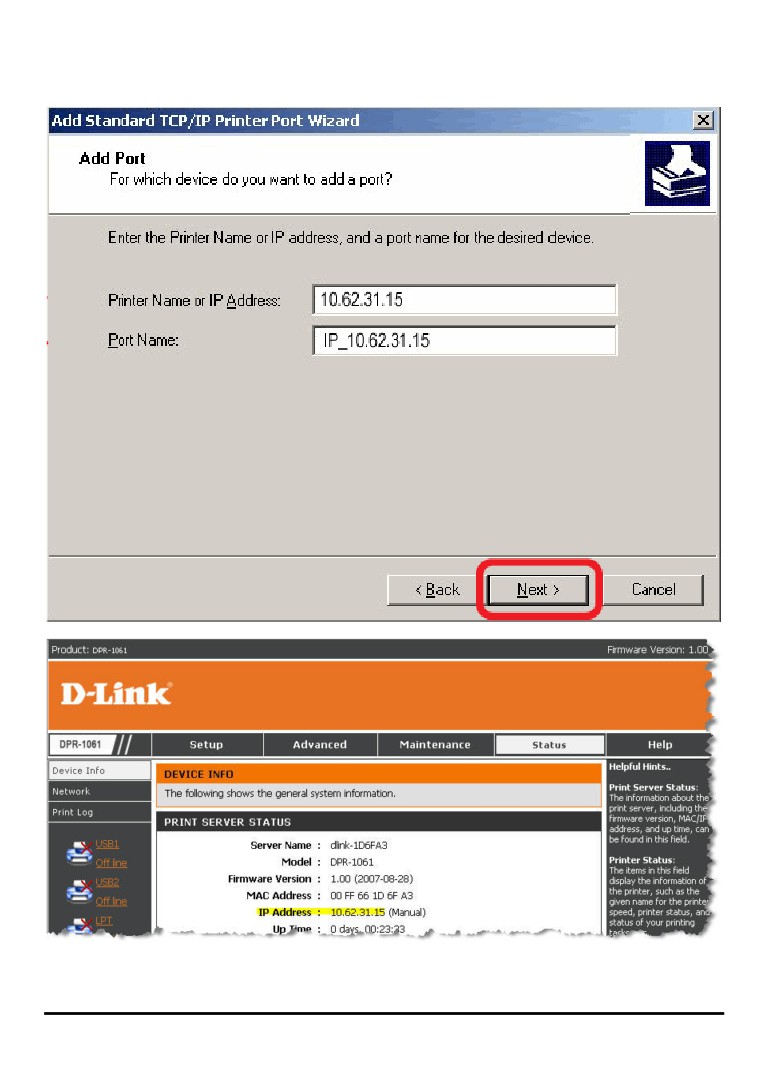
Type the IP address of the MFP server (e.g. 10.62.31.15 used in this manual), which
can be checked from the PRINTER SERVER STATUS of the MFP server’s Web
configuration, and then the Port Name will automatically be filled in. Click Next
111
112
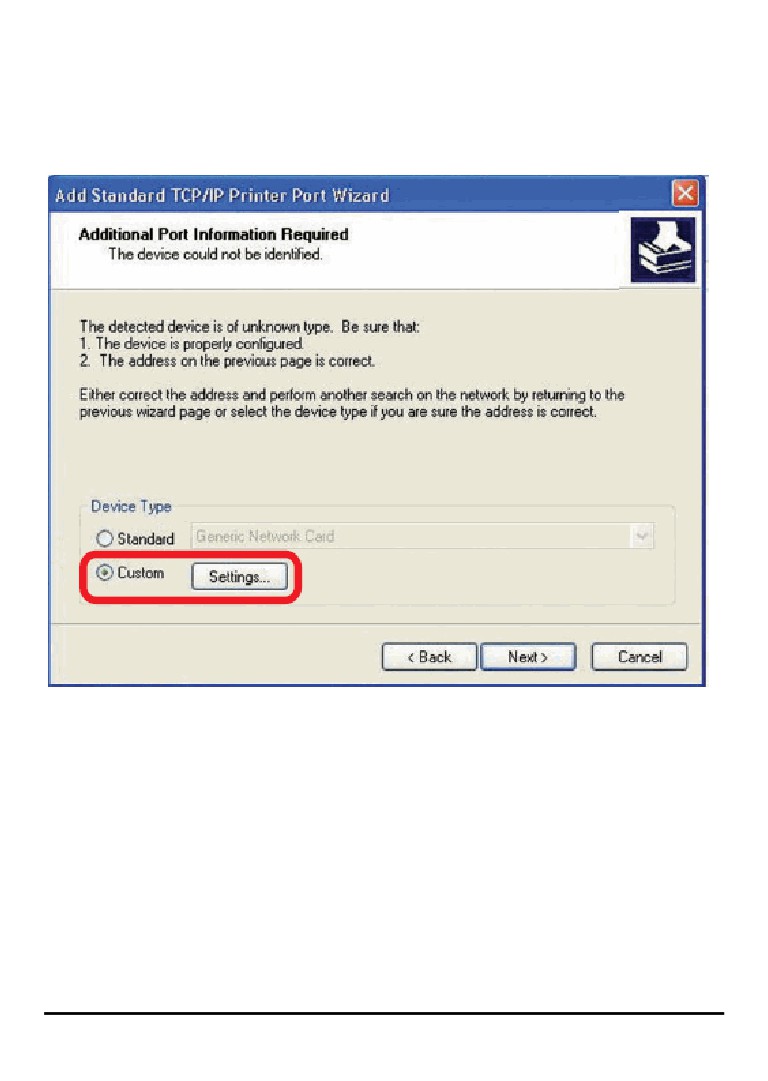
Select Custom and click Settings.
113
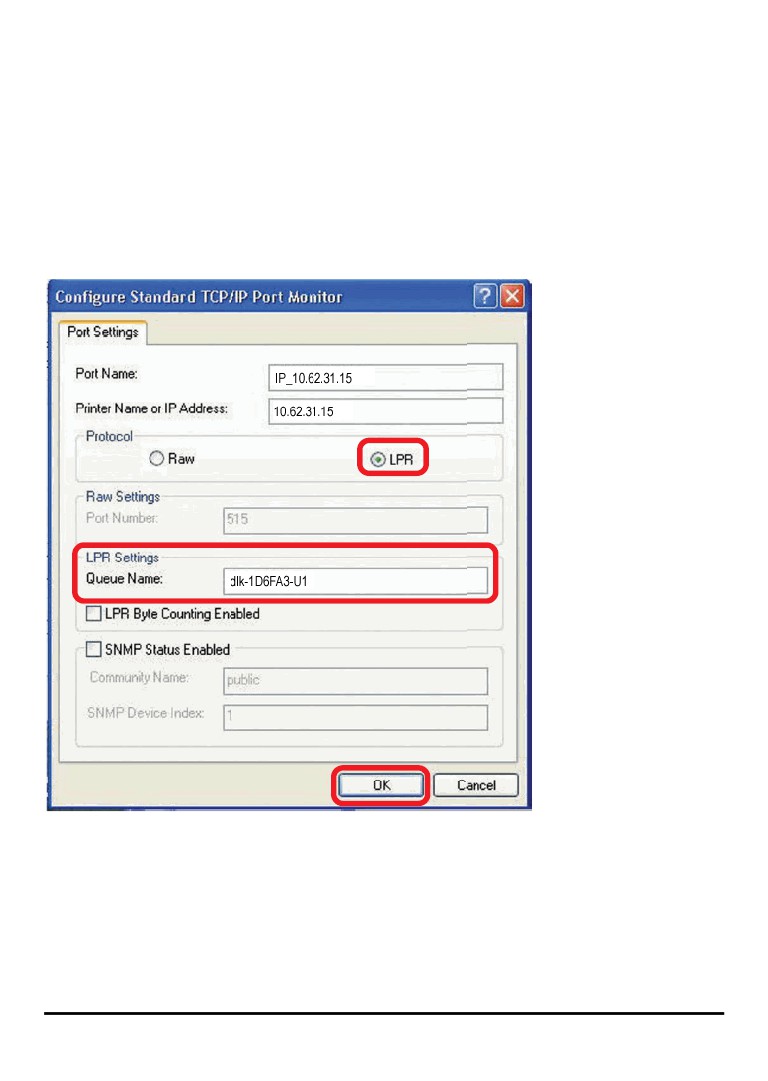
Then the follow screen will shows up, select LPR from the Protocol field.
Then enter the Queue Name, which can be referred from PRINTER STATUS of the
MFP server’s Web configuration, in the LPR Settings field. Click OK.
114
115
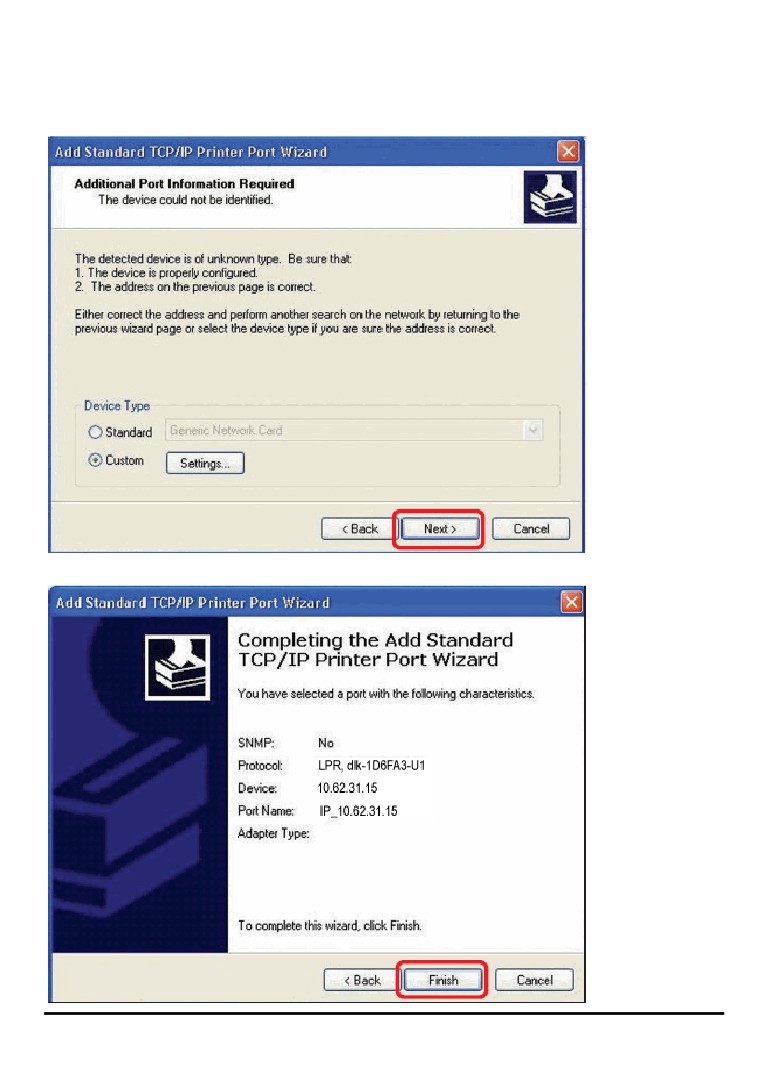
Click Next.
Click Finish.
116