D-Link DPR-1061 USB 2.0 MFP Server Manual (2007) - page 2
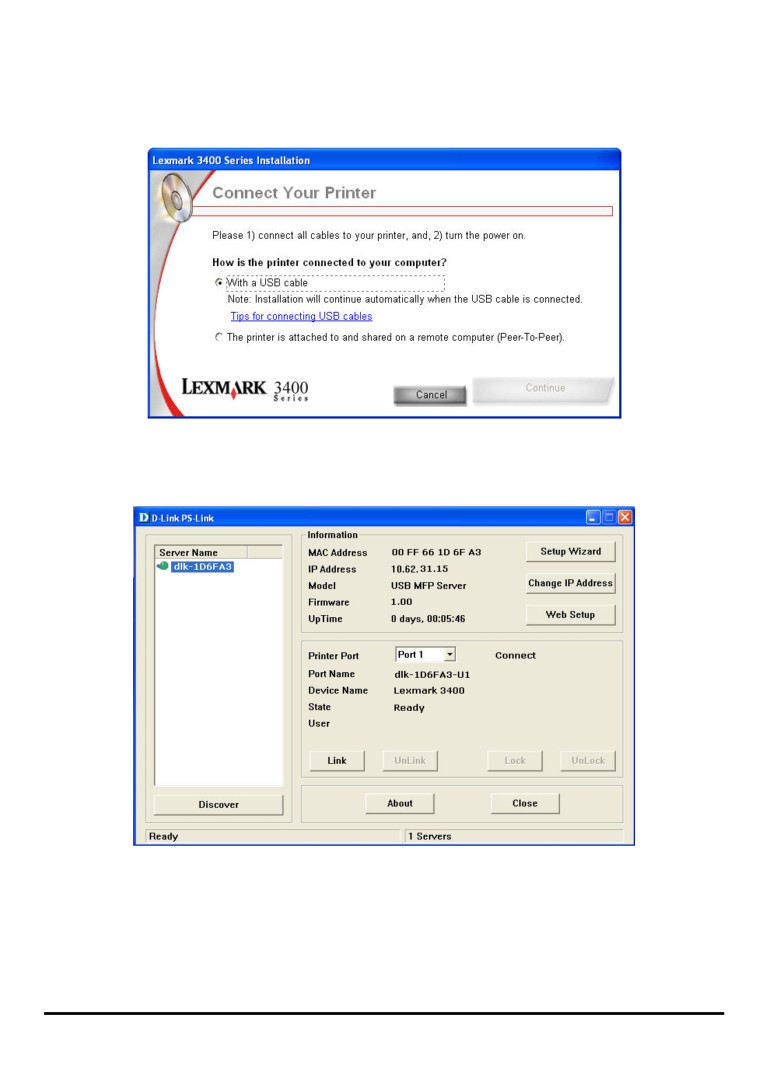
2. Launch the PS-Link utility and click the [Link] button.
37
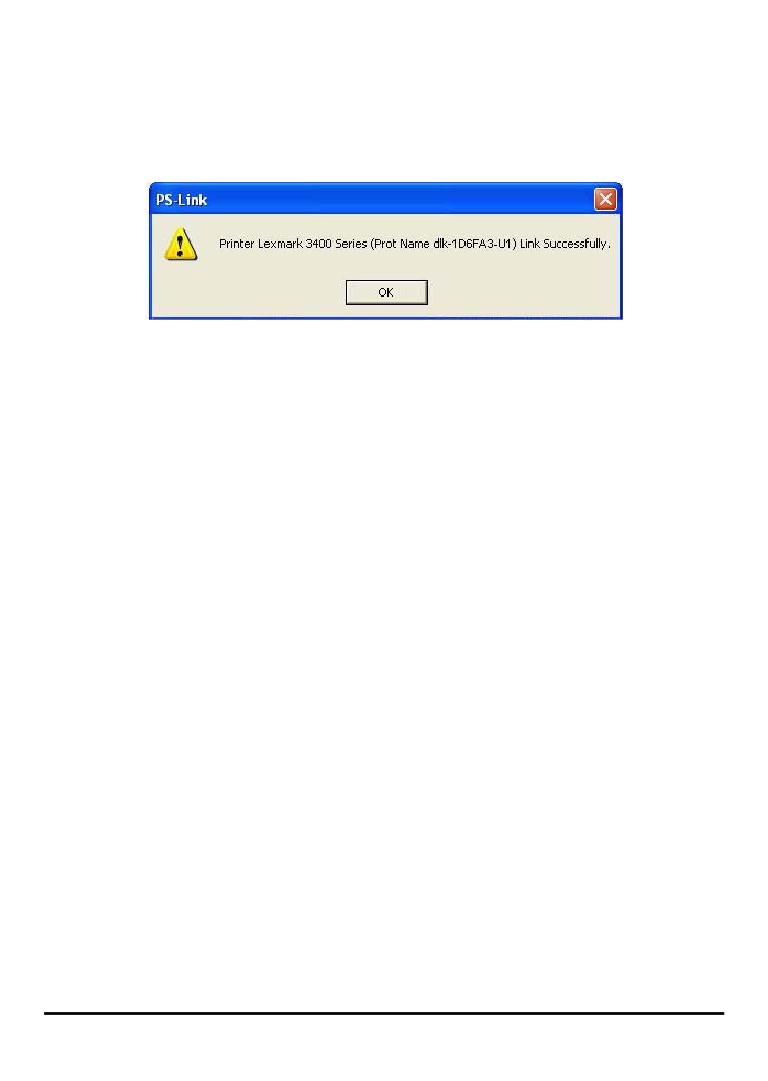
When the connection is completed successfully, a prompt as below will show up to
inform you. Press OK to exit.
3. Then you have to go back to finish the installation of MFP/GDI printer CD-ROM on
your computer for completing the rest of installation steps.
4. When the whole installation of the MFP/GDI printer CD-ROM on your computer is
completed. You may start to use multi-functions (Print/Scan/Copy/Fax) of the
MFP/GDI printer through your computer.
38
For Samsung:
39
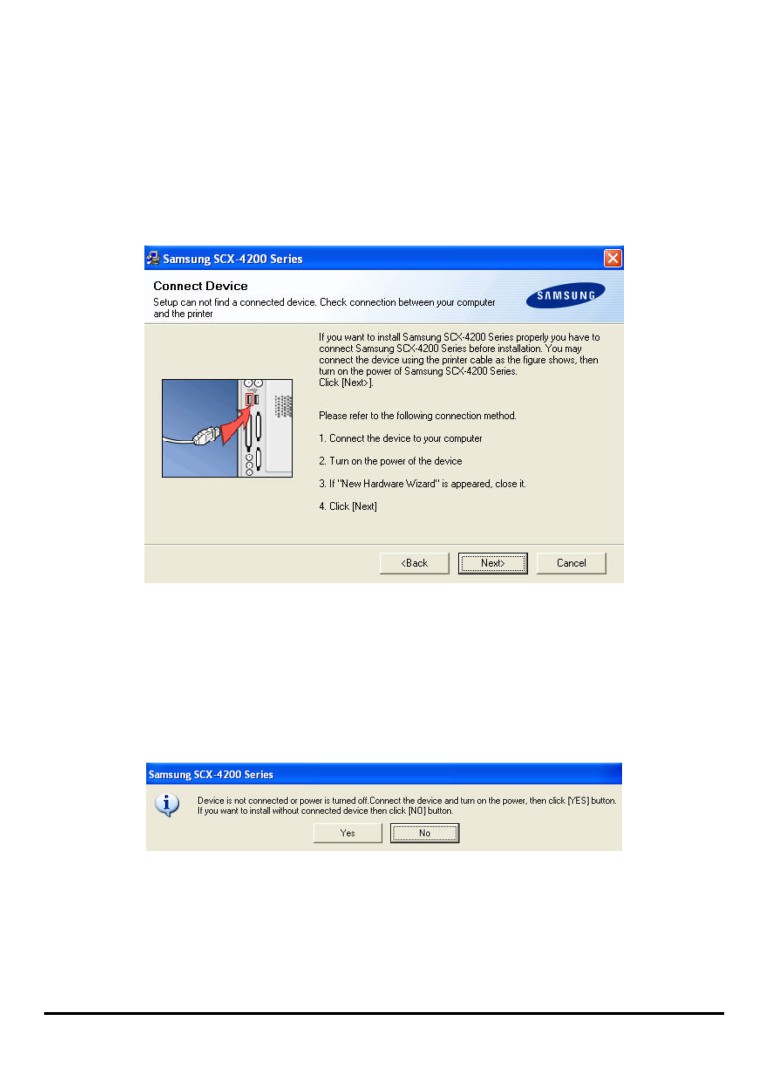
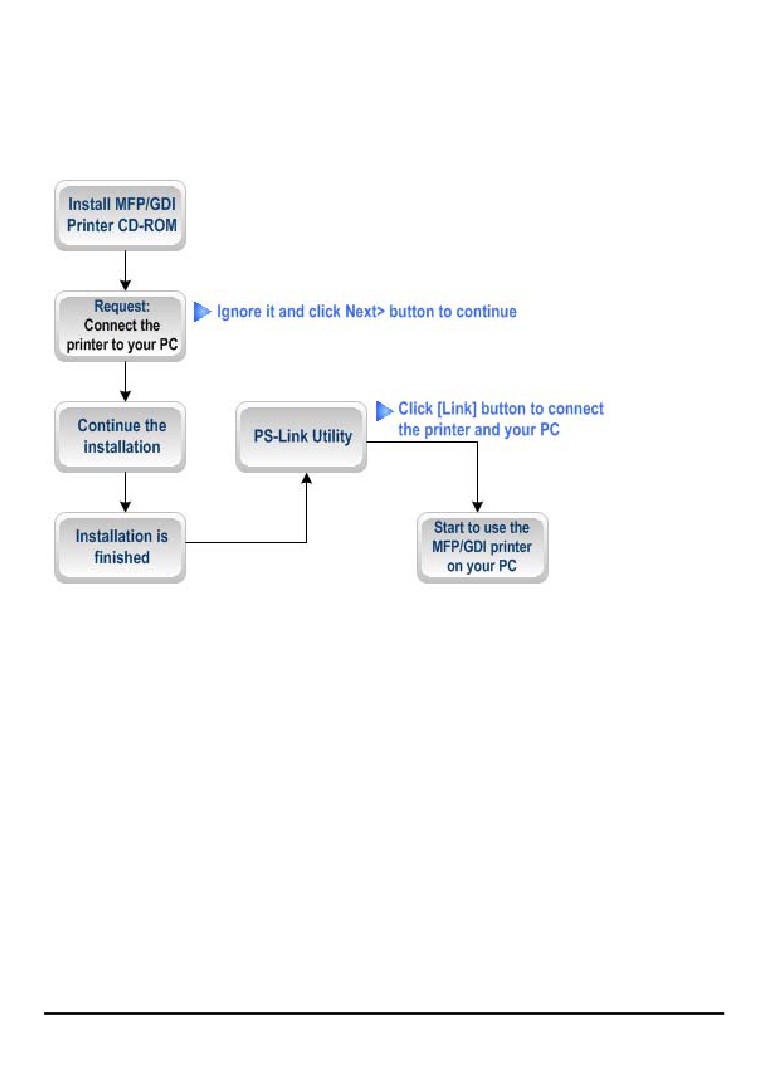
1. When the installation program asks you to connect the printer to your computer,
just ignore it and click Next> button to continue.
2. Soon after Next> button is clicked, the program will prompt you again to connect
the two devices, click No to ignore it and go on the rest of the installation (generally,
for other multimedia software such as scanner driver, etc.).
40
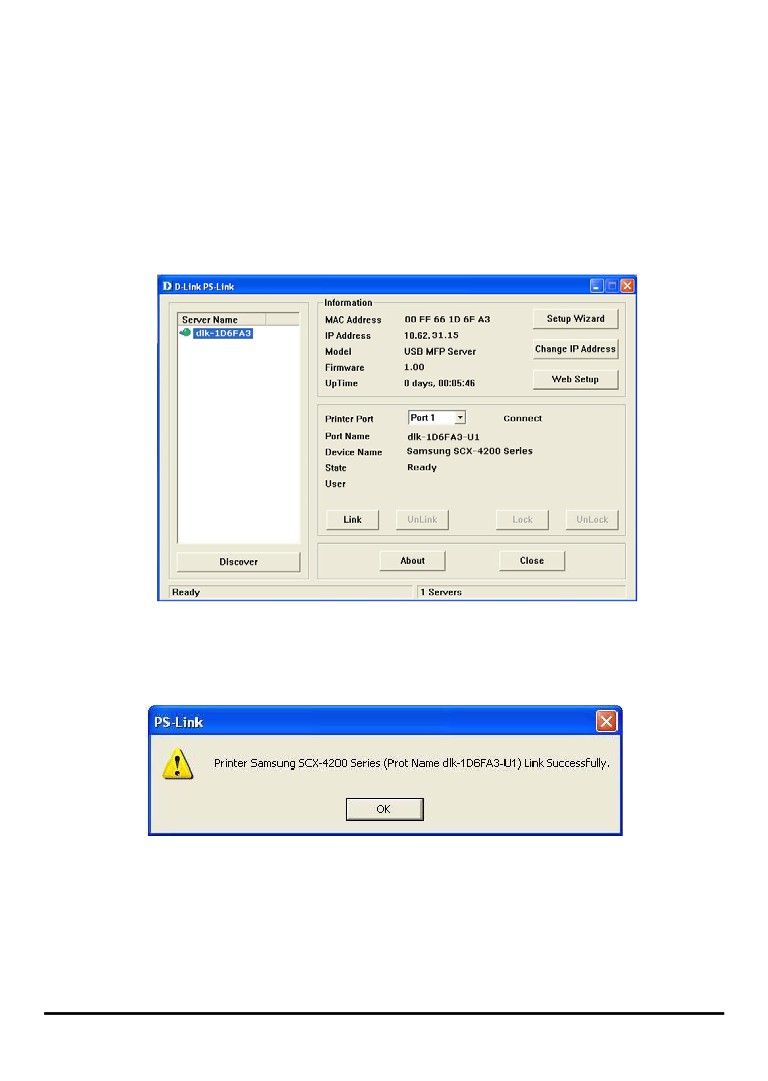
3. After the installation of the MFP/GID CD-ROM is finished, you may start to utilize
PS-Link to complete the physical connection between the MFP/GDI printer and your
computer.
Click the [Link] button of the PS-Link window as below.
When the connection is done successfully, a prompt of PS-Link window as below
will show up to inform you. Press OK to exit.
4. Now the MFP/GDI printer is ready to serve you with its multi-functions
(Print/Scan/Copy/Fax). You may start to use the MFP/GDI printer through your
compute.
41
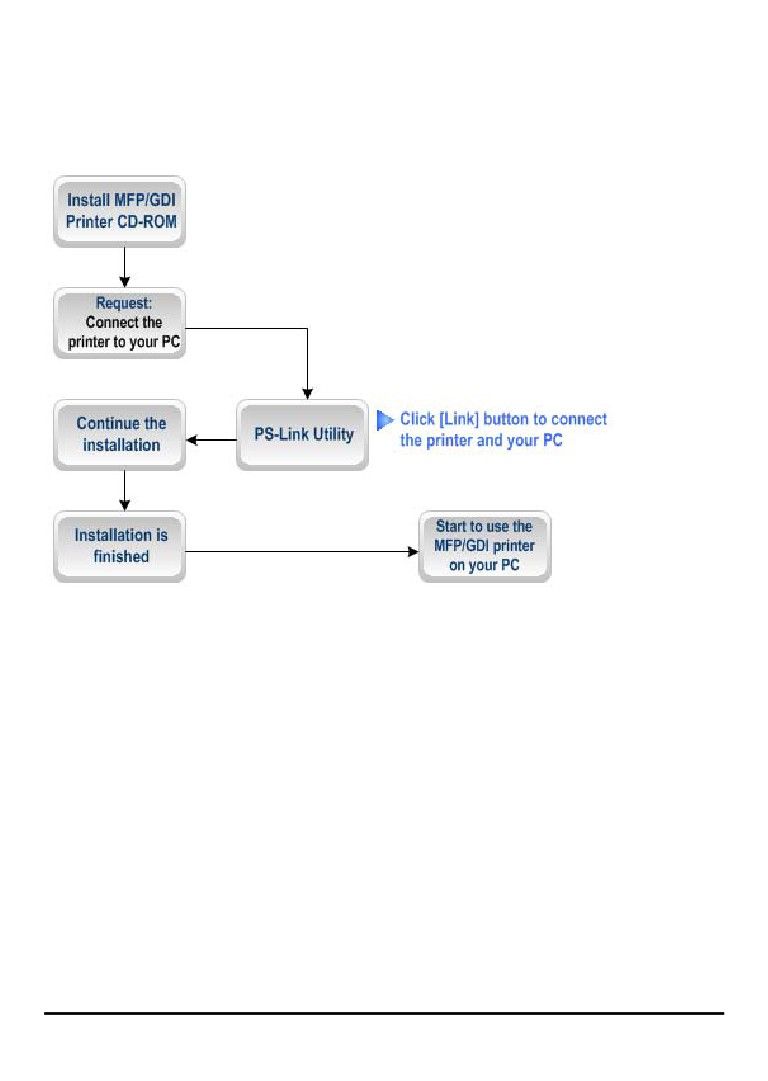
For Brother:
1. When the installation program asks you to plug in the USB cable of the MFP/GDI
printer to your computer, then you have to follow; otherwise, you will not allow
continuing the installation. Therefore, you need to utilize PS-Link to complete it
without doing physical connection for the MFP/GDI printer and your computer.
42
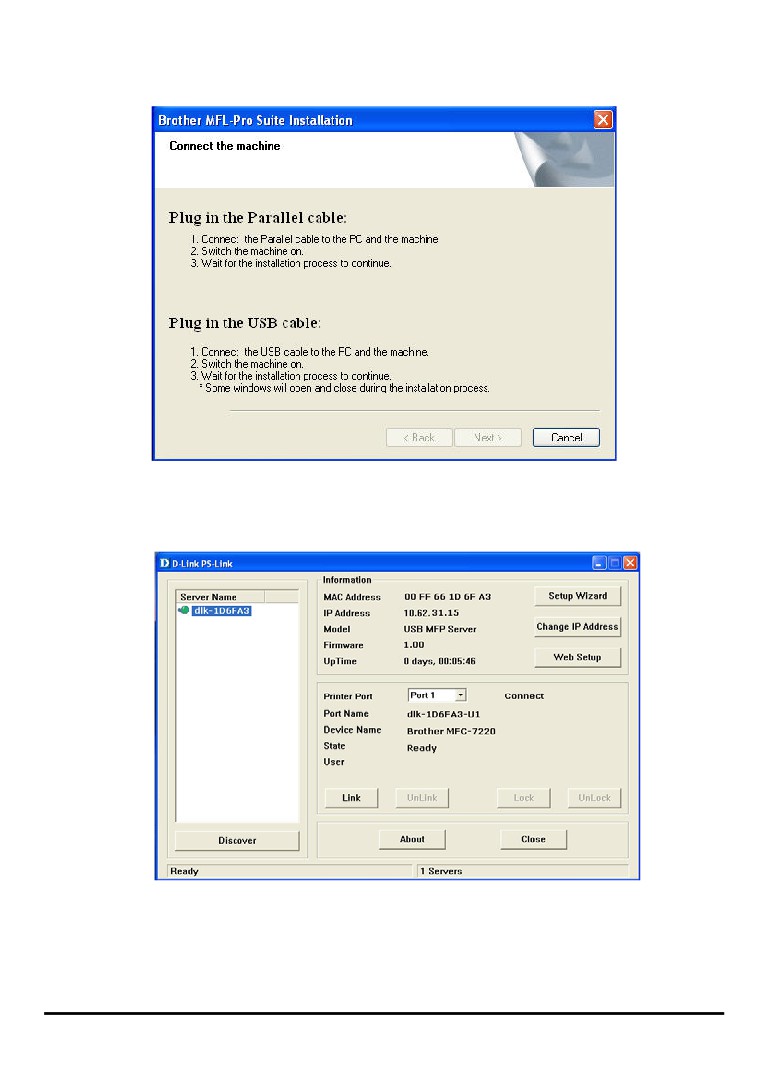
2. Launch the PS-Link utility and click the [Link] button.
43
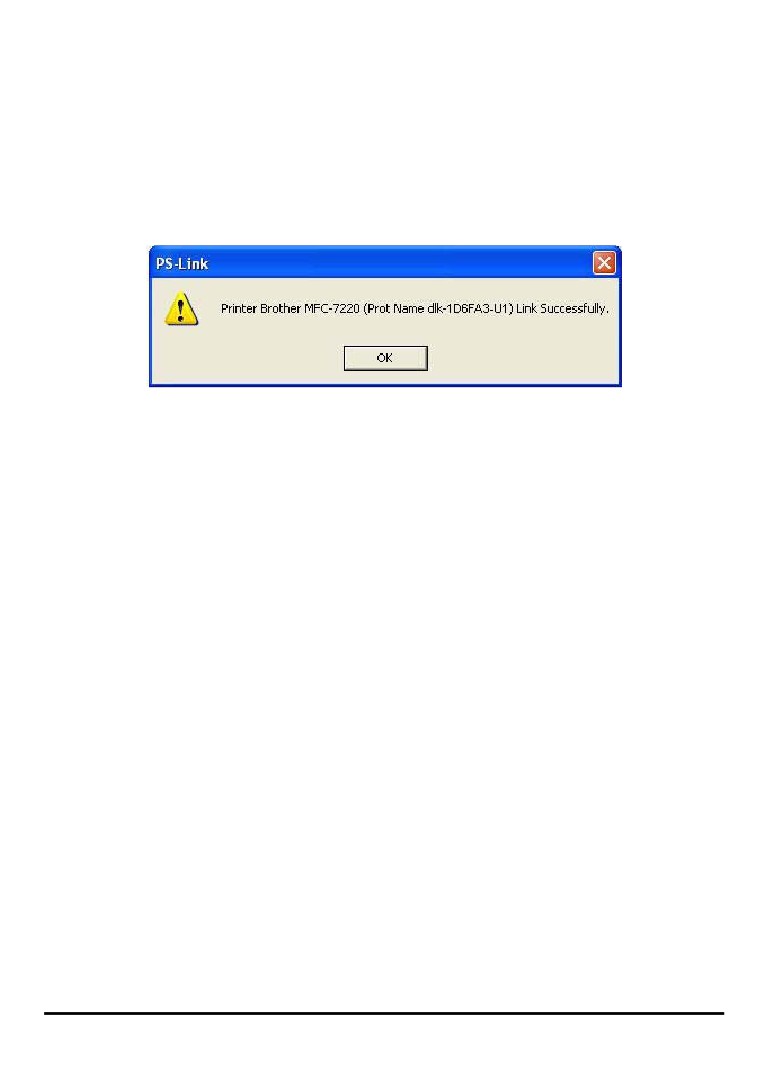
When the connection is completed successfully, a prompt as below will show up to
inform you. Press OK to exit.
3. Then you have to go back to finish the installation of MFP/GDI printer CD-ROM on
your computer for completing the rest of installation steps.
4. When the whole installation of the MFP/GDI printer CD-ROM on your computer is
completed. You may start to use multi-functions (Print/Scan/Copy/Fax) of the
MFP/GDI printer through your computer.
44
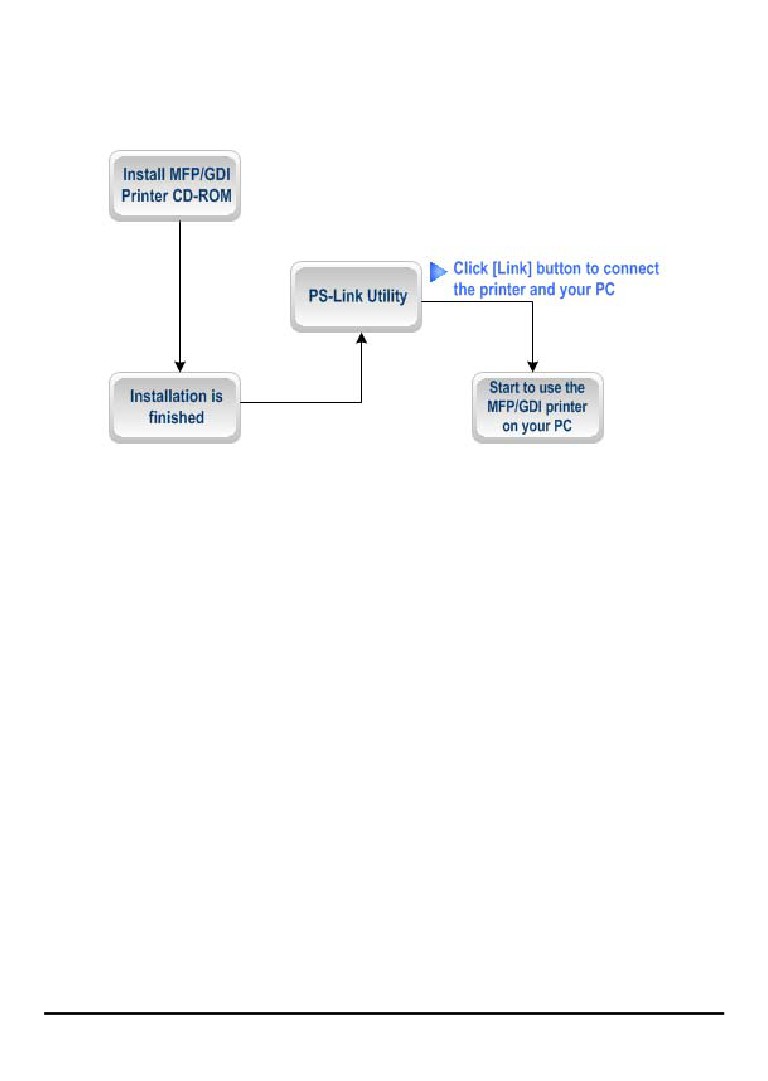
For Fuji Xerox:
1. Owing to the installation program of Xerox MFP/GDI printer will not request you to
do physical connection between the printer and your computer during the installation
of the MFP/GDI printer driver on your computer, you may just accomplish the whole
installation on your computer at one go.
45
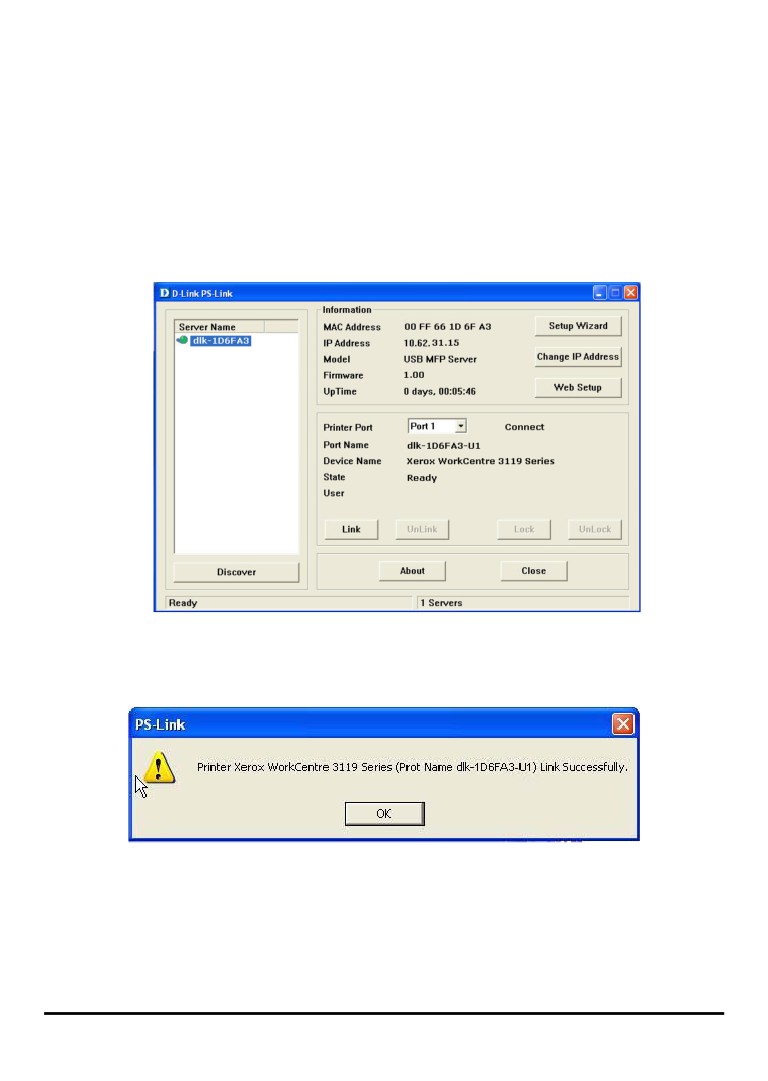
2. While after the installation is finished, you have to link the connection between the
MFP/GDI printer and your computer in order to use the MFP/GDI printer on your
computer. Thus, you need to utilize PS-Link to link the two devices.
Launch the PS-Link utility and click the [Link] button.
When the connection is completed successfully, a prompt as below will show up to
inform you. Press OK to exit.
3. Now the MFP/GDI printer is ready to serve you with its multi-functions
(Print/Scan/Copy/Fax). You may start to use the MFP/GDI printer through your
computer.
46
Using PS-Wizard
PS-Wizard, supports for Windows 2000/XP/2003/Vista, is a simple and useful tool
for you easily adding a printer on your computer in order to quickly start your printing
task without any complicated configuration. That is, the main goal and advantage of
the PS-Wizard is to let you add a printer on your PC in the easiest way.
Furthermore, the PS-Wizard also allows you to set up IP addresses of MFP Server,
such as IP address, Subnet Mask address,, and default Gateway address.
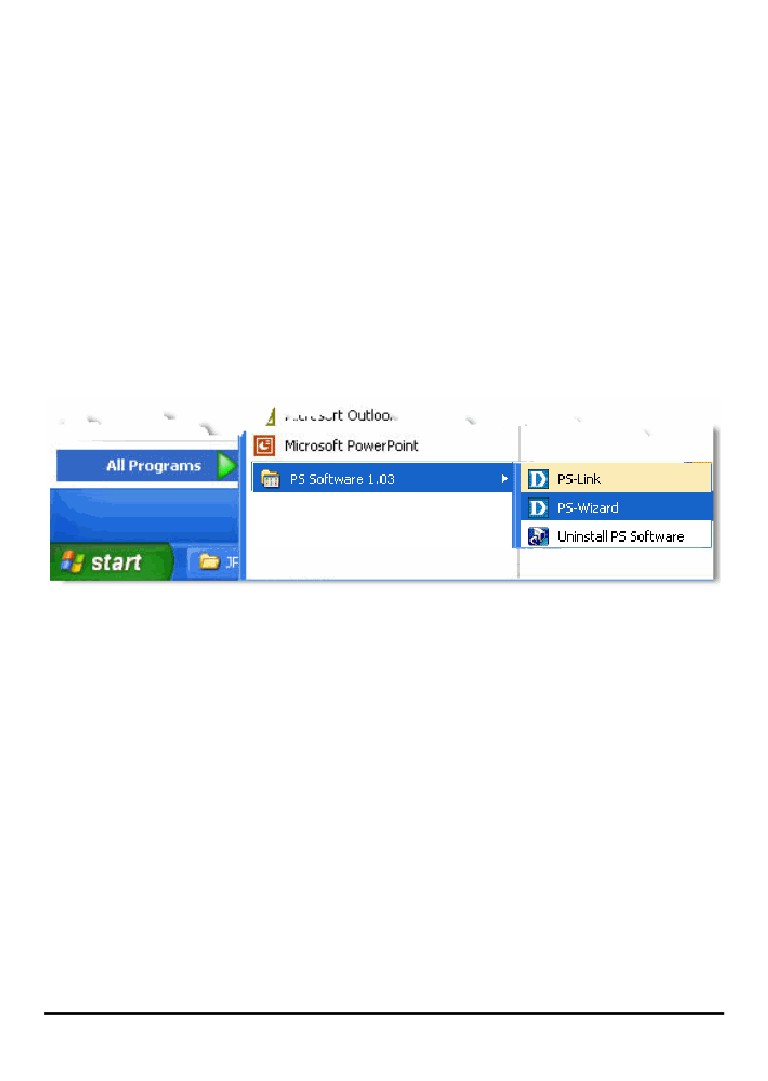
Go to StartÎ ProgramsÎ PS Software, and select PS-Link.
47
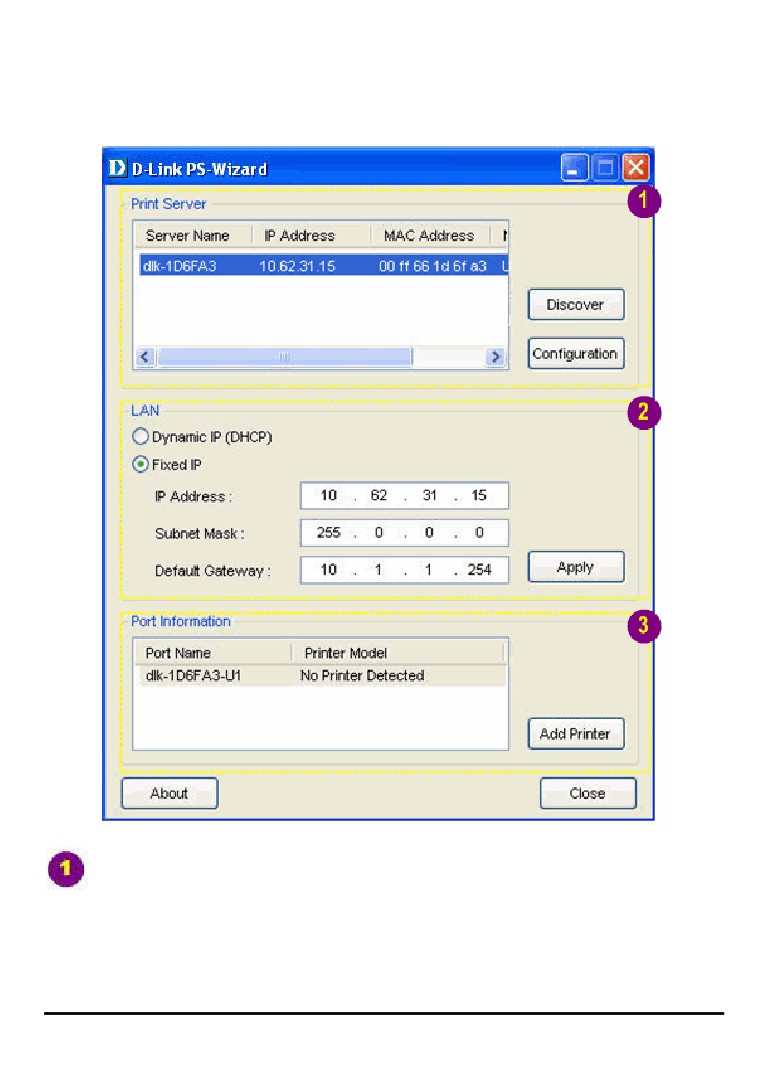
Print Server: This field allows you to manually discover the connected MFP
Server and to do further configuration of the MFP Server that is selected from
the list.
48
LAN: You may also to specify dynamic or static IP address for your MFP Server.
Then click Apply button to implement the new setting.
Port Information: This is the main function of the PS-Wizard for you to easily
add a printer on your computer.
To add a printer, click
, then the following window will display.
49
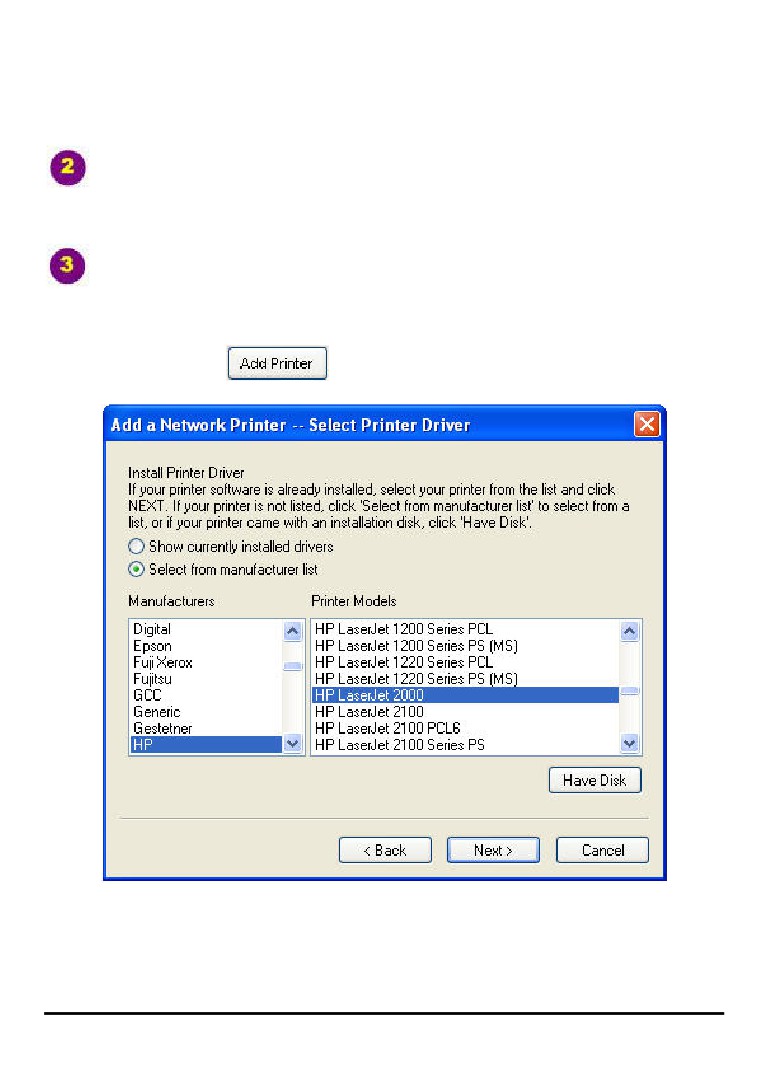
The wizard provides three ways for you to select printer driver:
1. Show current installed drivers:
You may select this option, “Show currently installed drivers”, to check if the same
printer driver already existed for use. If not, you may try the next method. After done
the selection of printer driver, click Next> button to continue.
2. Select from manufacturer list:
Check this option, “Select from manufacturer list”, to manually select your printer
from drop-down menus by brand and model. Click Next> button to continue when
you find a desired driver. If not, try the last way (Have Disk). After done the selection
of printer driver, click Next> button to continue.
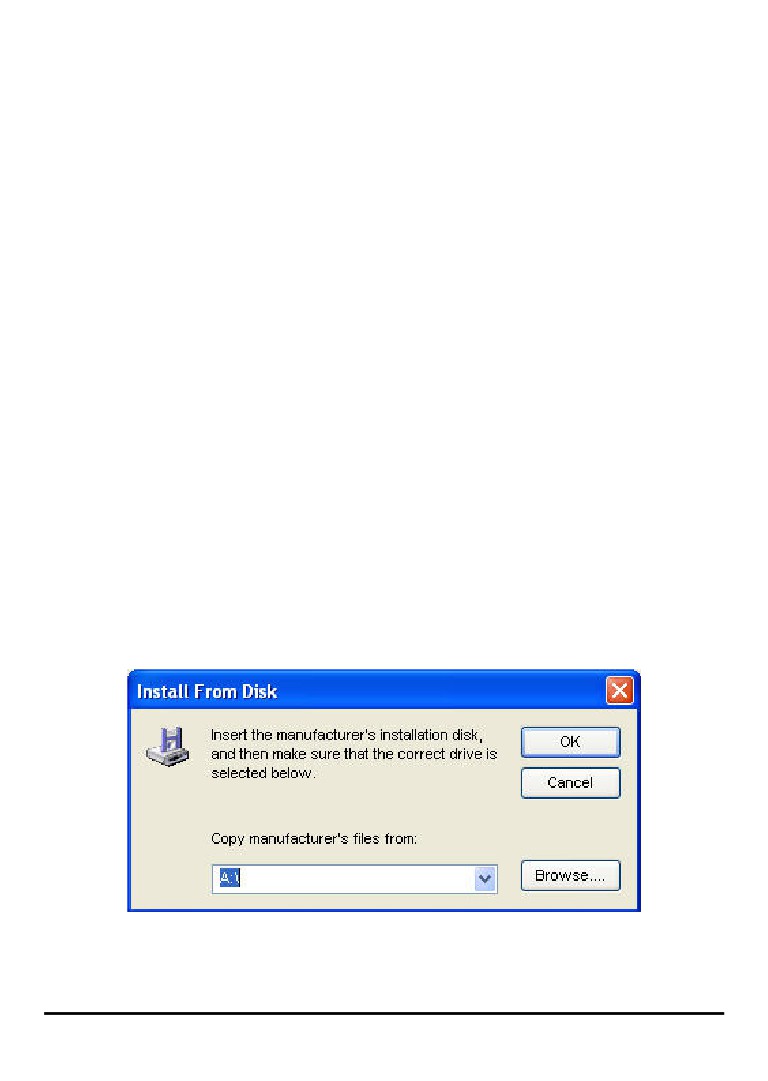
3. Have Disk:
Click Have Disk button to bring up the following window. Insert the manufacture’s
installation CD-ROM to install the printer driver. After the correct driver is selected,
click OK button to continue.
50
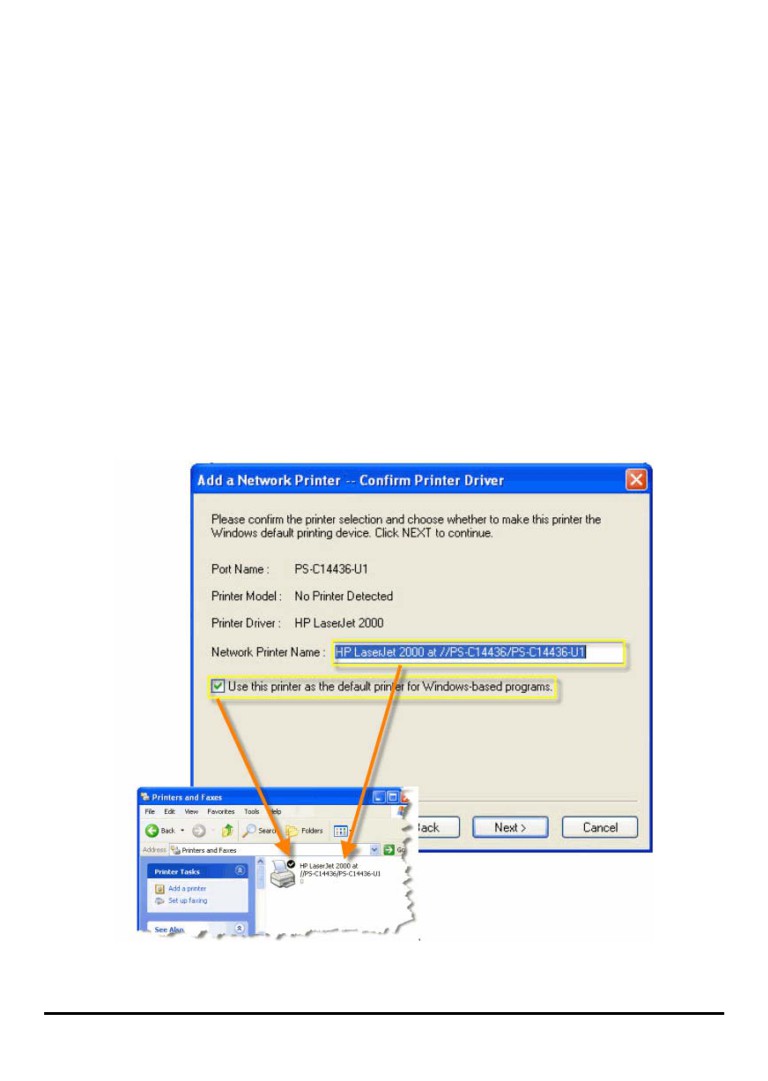
After done the selection of printer driver, the wizard will ask you to confirm your
selection again in the following window. Beside, you are allowed to edit the name of
the printer in the field “Network Printer Name” and enable this printer as the default
printer by checking the box
“Use this printer as the default printer for
Windows-based programs”.
After you done the verification and configuration in the following window, click Next>
button to continue. Then the printer (e.g. HP Laser 2000 used in this manual) will be
auto-created in Windows’ Printers and Faxes window as the following illustration.
51
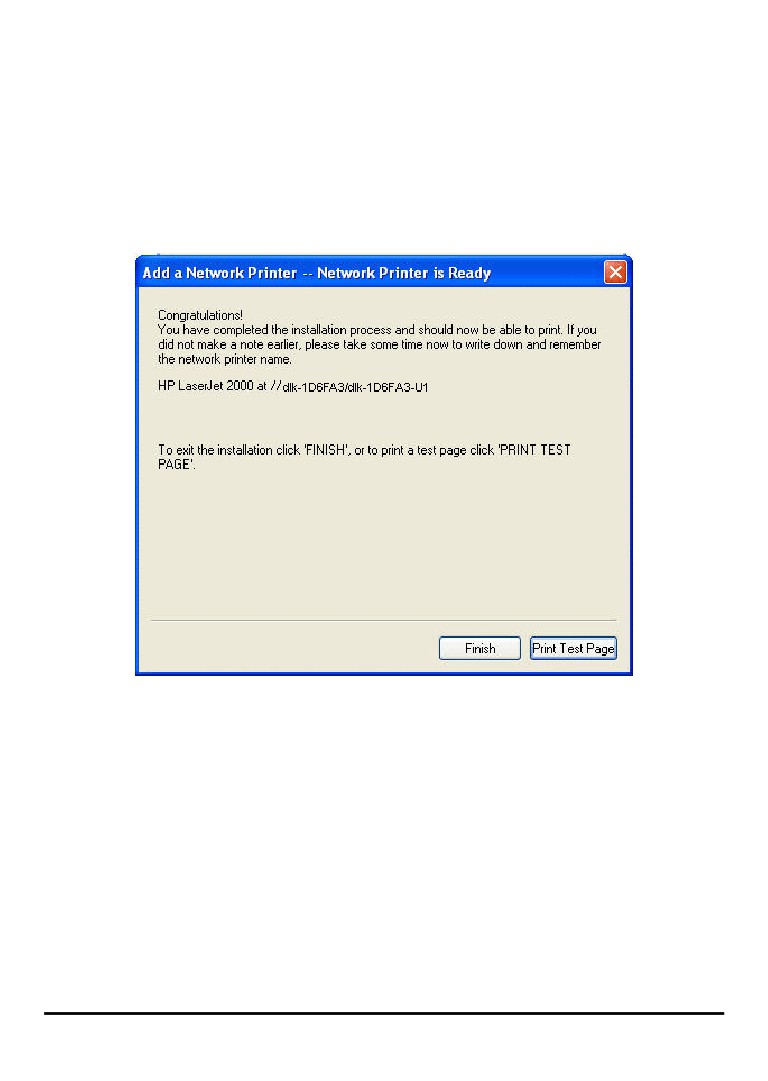
When the following window shows up, you may do print test by clicking Print Test
Page button to check if you can do printing normally. If yes, then click Finish button
to exit the installation window and now you may start your printing tasks.
52
Using the Web Configuration
Home
To begin managing the DPR-1061, simply launch the browser (e.g. Internet Explorer
6.0 used in this manual) you have installed on your computer and direct it to the URL
address: dlink-xxxxxx, where xxxxxx are the last six digits of DPR-1061’s MAC
address. The MAC address can be found on the bottom side of the DPR-1061
device.
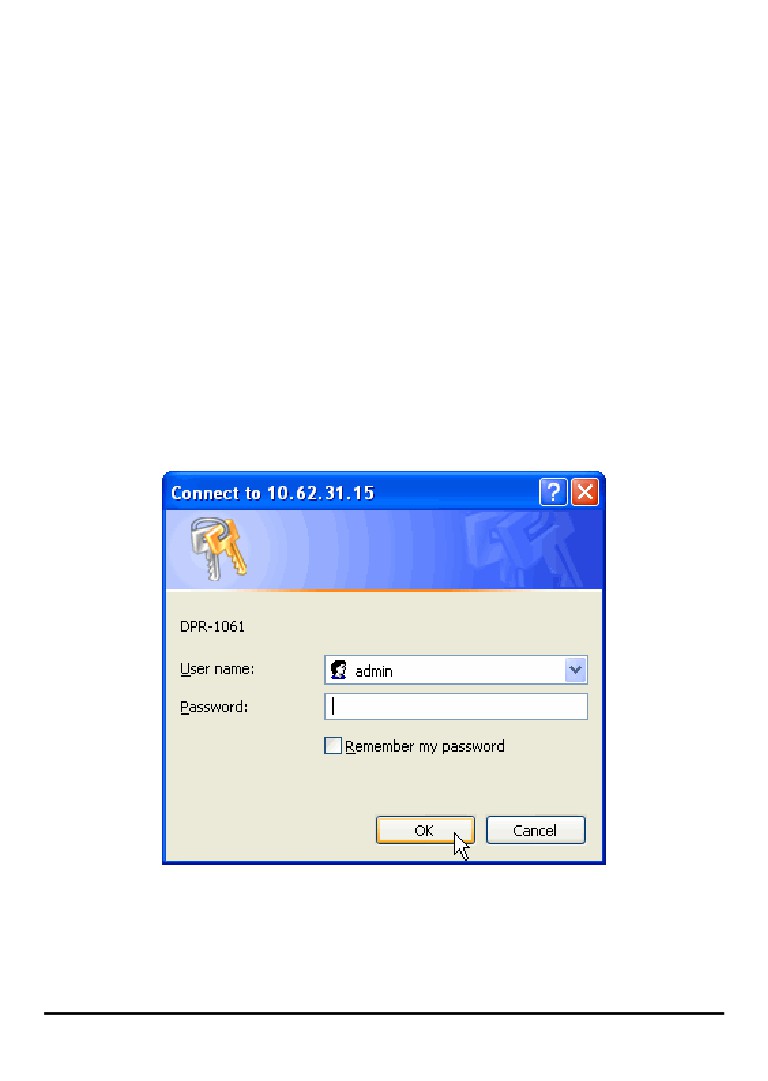
When you enter the correct URL, a password input dialog will pop up the following
screen. Input “admin” in the User name field, leave the Password field as blank,
and then click OK button.
Then the main screen of the MFP Server’s configuration will appear (see below). In
addition to the product information, you can access and control the MFP Server’s
configuration through five links on the top of this main screen: Setup, Advanced,
Maintenance, Status, and Help. You may click a desired link from the bar, to
53
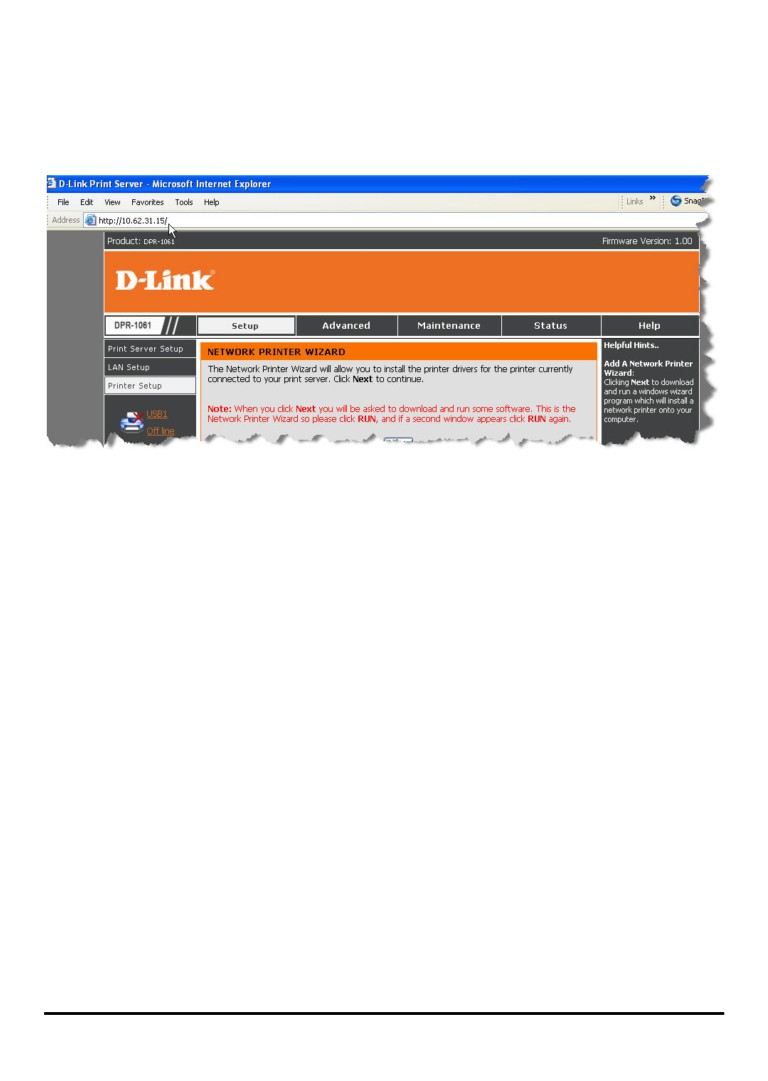
display its submenu and select a desired option listed in the left column, and then
the corresponding content will show up in the center column.
54
SETUP > Print Server Setup
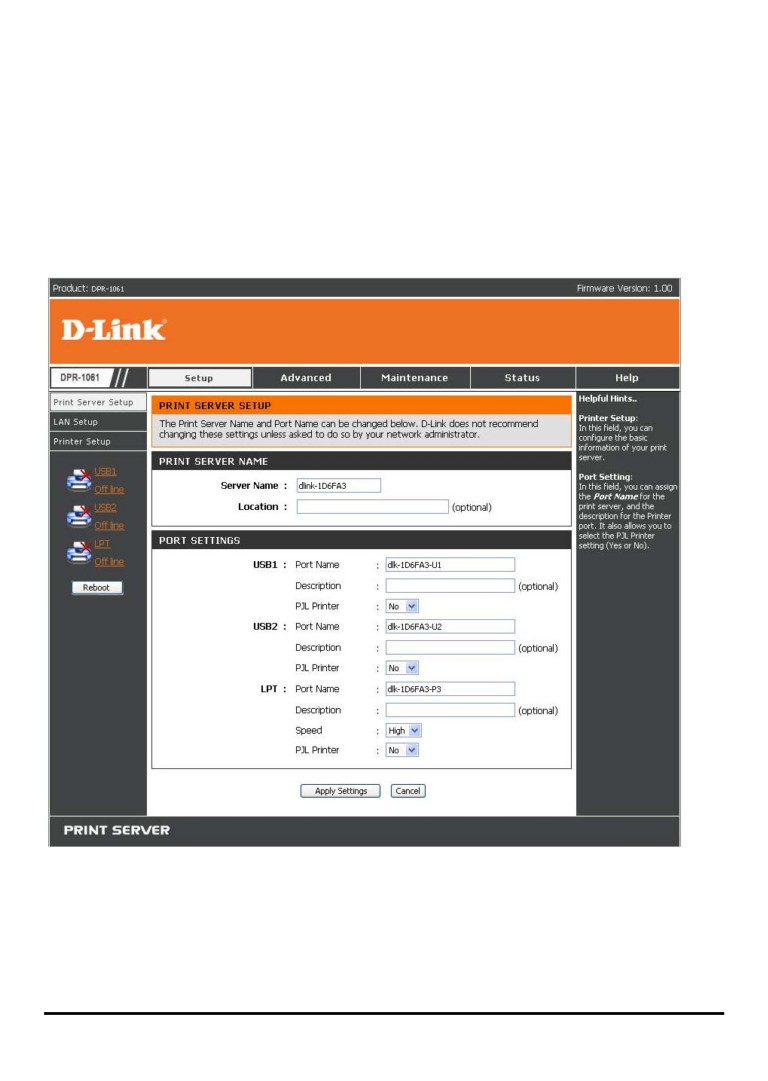
The Print Server Setup screen allows you to modify the Print Server Name and
Port Name, as below shows. D-Link does not recommend changing these settings
unless asked to do so by your network administrator.
55
Print Server Name
In this field, you can configure the basic information of MFP server. The basic
information contains a name of the print server, assigned in Server Name field, and
a location for the print server, assigned in Location (optional) field.
Port Settings
In this field, you can assign the Port Name for the print server, and the description for
the Printer port. It also allows you to select the PJL Printer setting (Yes or No).
NOTE: PJL (Printer Job Language) has certain job requirements that must be
met to work correctly. For more information, please refer to your printer's
manual.
Once you have changed the settings in each option, click Apply Settings to store the
settings, or Cancel to abandon.
56
SETUP ˑ LAN Setup
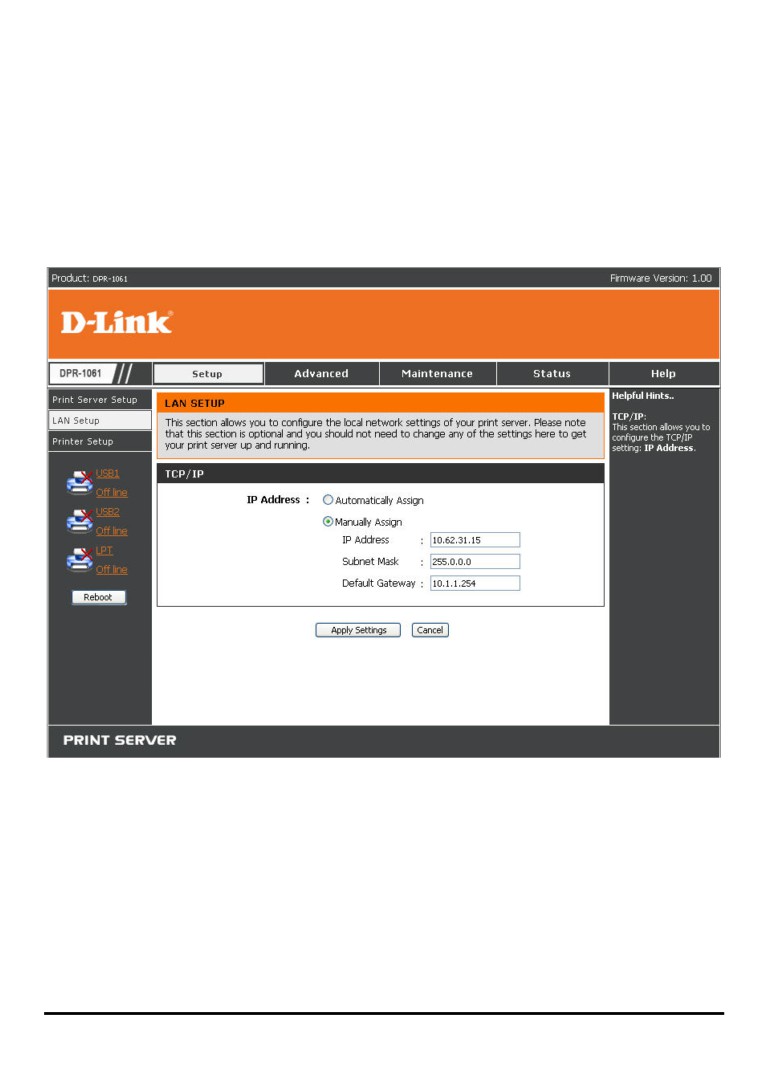
The LAN Setup screen allows you configure the local network settings of MFP
server. Please note that this section is optional and you should not need to change
any of the settings here to get MFP server up and running.
TCP/IP
This field allows you to assign IP address in manual or automatic method. When you
choose Manually Assign, you should enter the related information in the following
boxes, including IP Address, Subnet Mask, and Default Gateway.
Once you have changed the settings in each option, click Apply Settings to store the
settings, or Cancel to abandon.
57
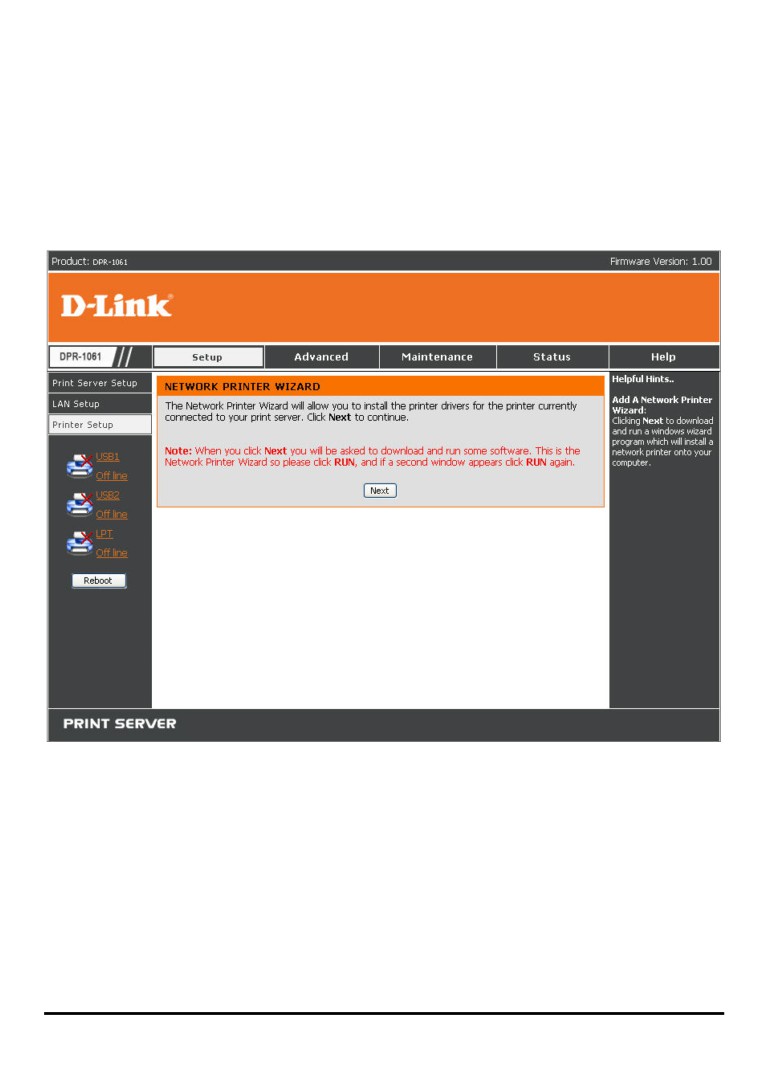
SETUP ˑ Printer Setup
The Printer Setup screen allows you install the printer drivers for the printer
currently connected to your print server.
Network Printer Wizard
Clicking Next to download and run a windows wizard program which will install a
network printer onto your computer. When you click Next you will be asked to
download and run some software.
58
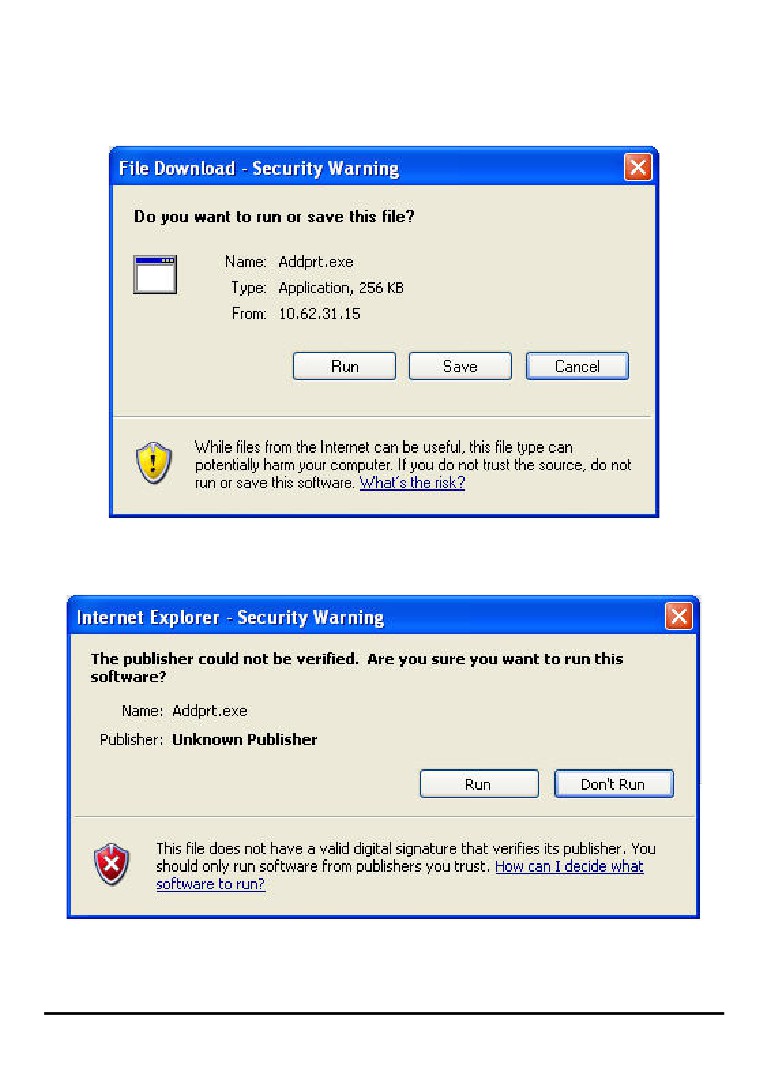
The above screen is the Network Printer Wizard so please click RUN, and if a
second window appears as below click RUN again.
59
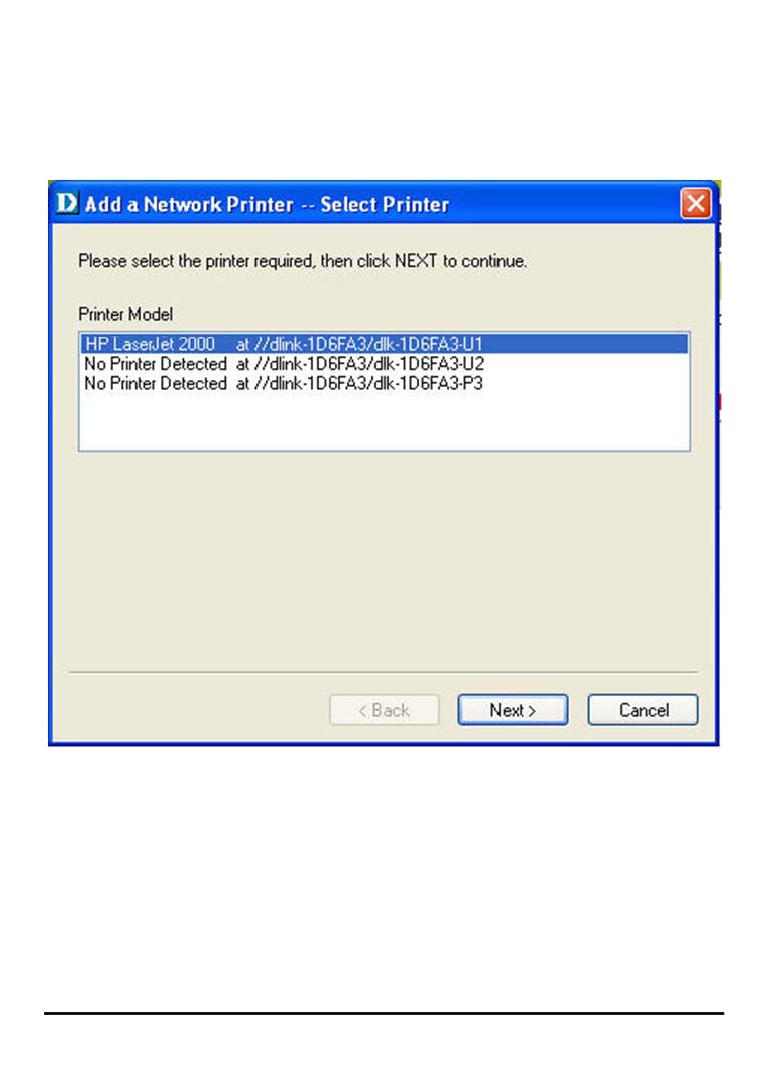
Please select the printer required, then click NEXT to continue.
60
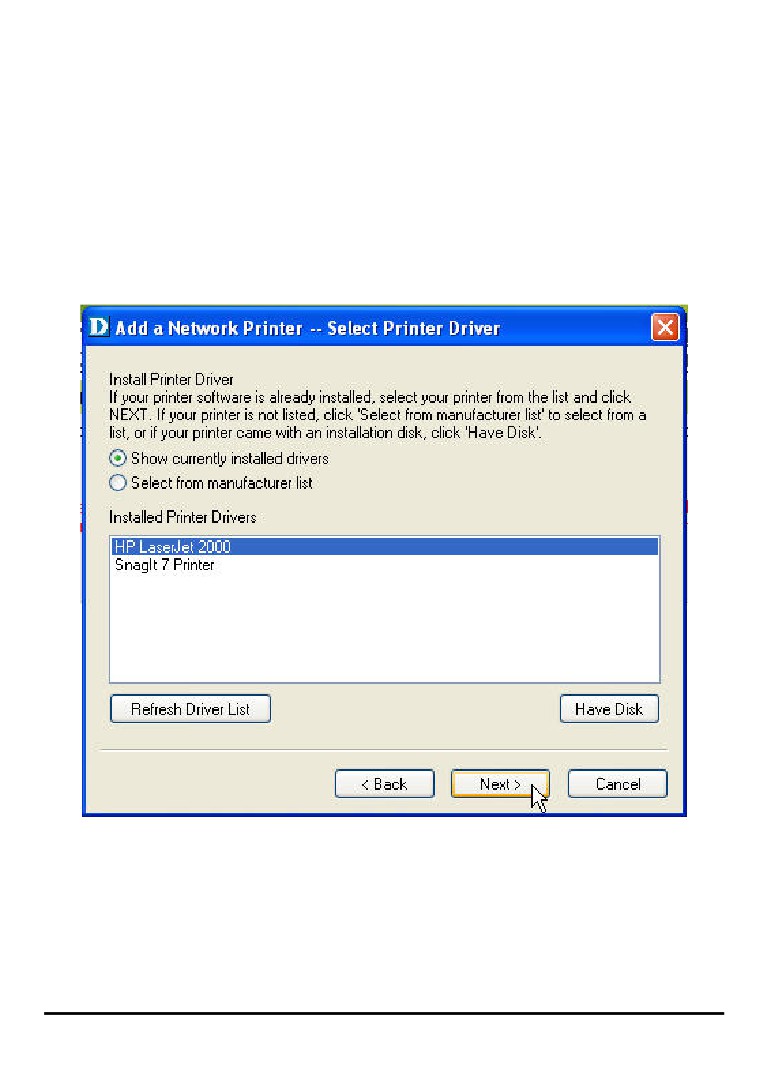
The wizard provides three ways for you to select printer driver:
1. Show current installed drivers:
You may select this option, “Show currently installed drivers”, to check if the same
printer driver already existed for use. If not, you may try the next method. After done
the selection of printer driver, click Next> button to continue.
61
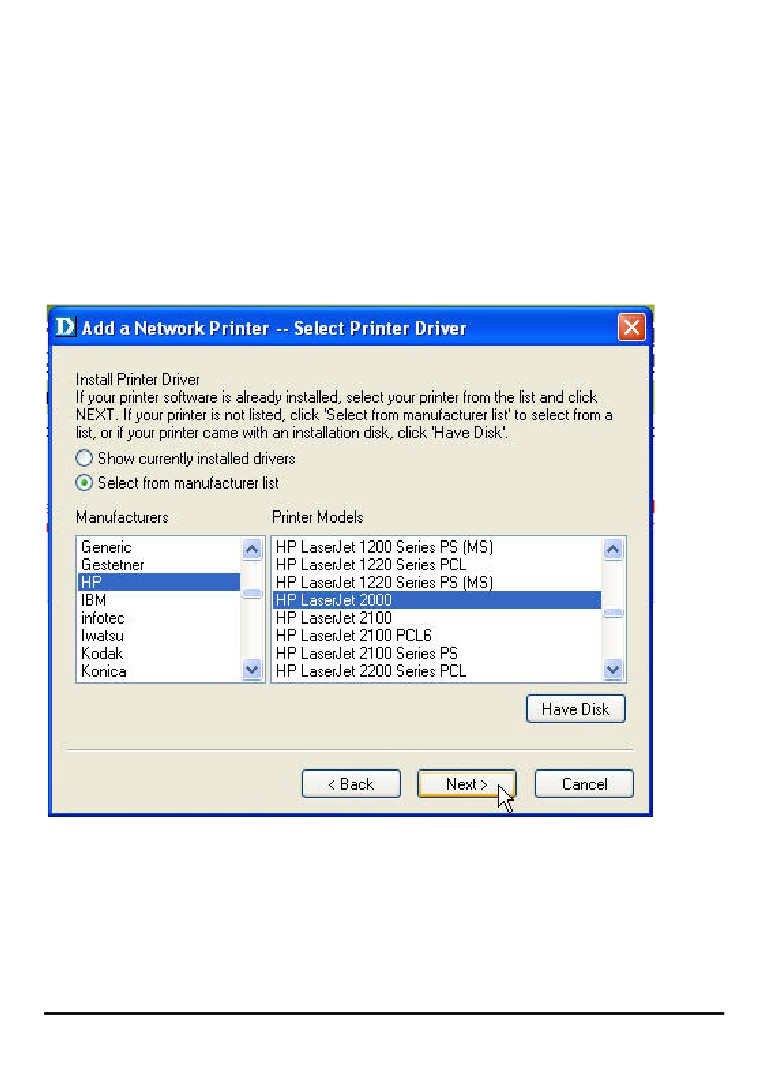
2. Select from manufacturer list:
Check this option, “Select from manufacturer list”, to manually select your printer
from drop-down menus by brand and model. Click Next> button to continue when
you find a desired driver. If not, try the last way (Have Disk). After done the selection
of printer driver, click Next> button to continue.
62
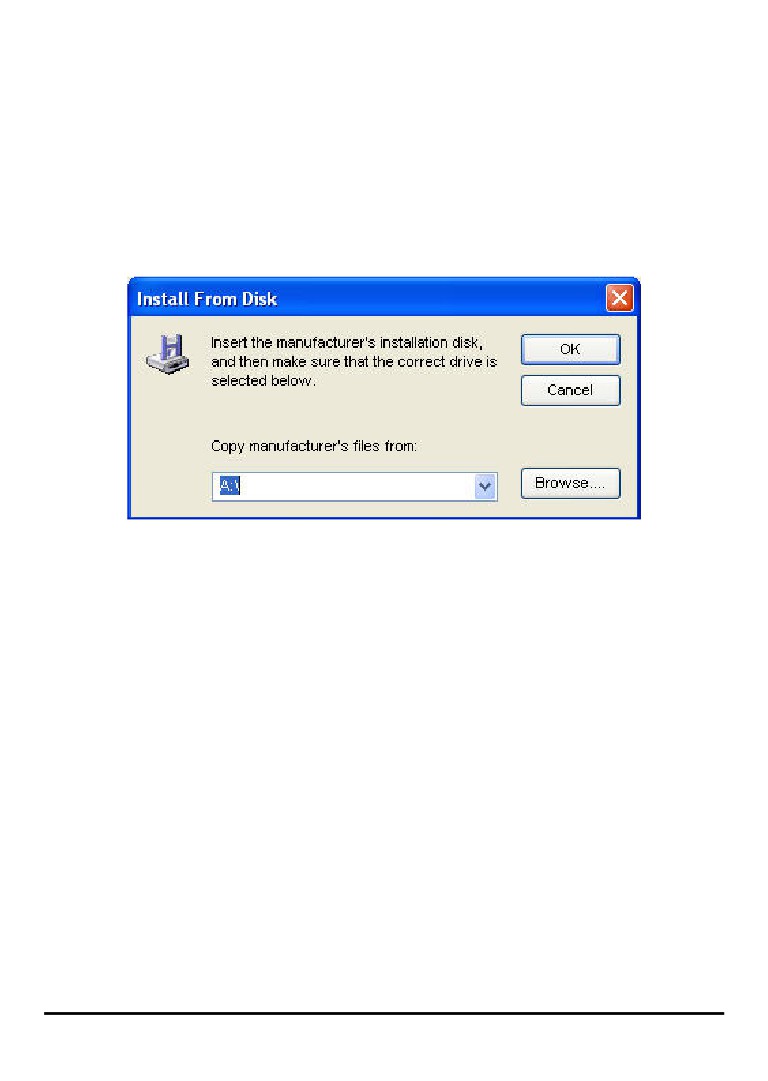
3. Have Disk:
Click Have Disk button to bring up the following window. Insert the manufacture’s
installation CD-ROM to install the printer driver. After the correct driver is selected,
click OK button to continue.
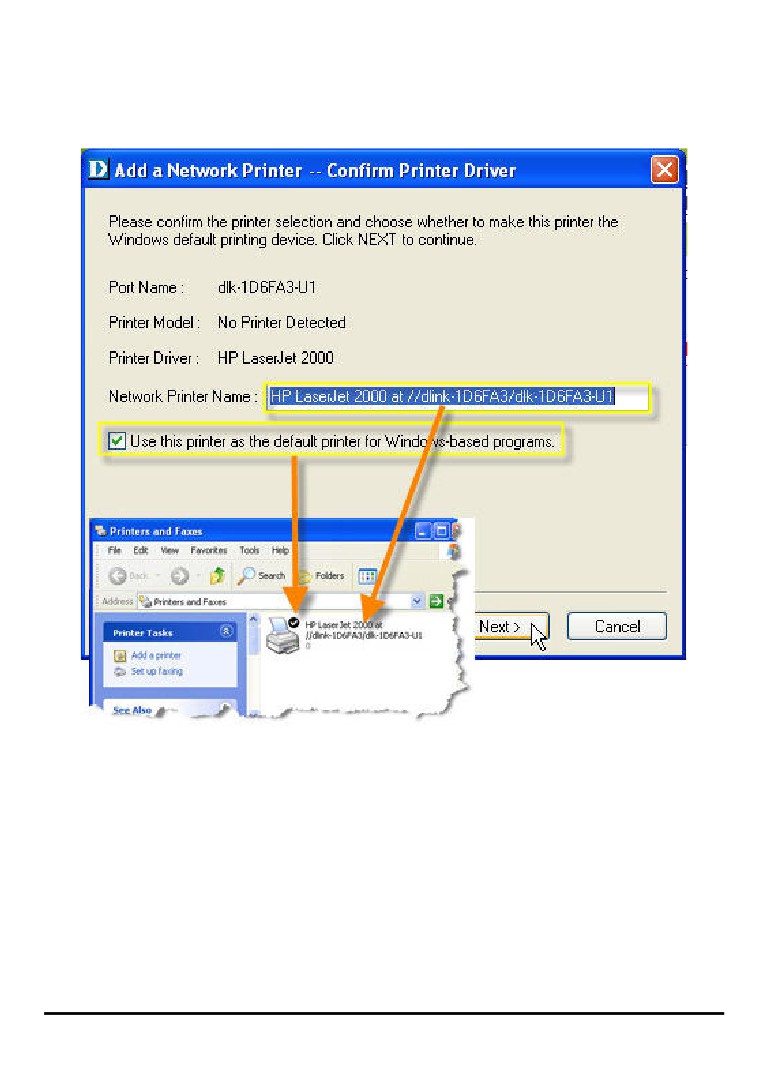
After done the selection of printer driver, the wizard will ask you to confirm your
selection again in the following window. Beside, you are allowed to edit the name of
the printer in the field “Network Printer Name” and enable this printer as the default
printer by checking the box
“Use this printer as the default printer for
Windows-based programs”.
After you done the verification and configuration in the following window, click Next>
button to continue. Then the printer (e.g. HP Laser 2000 used in this manual) will be
auto-created in Windows’ Printers and Faxes window as the following illustration.
63
64
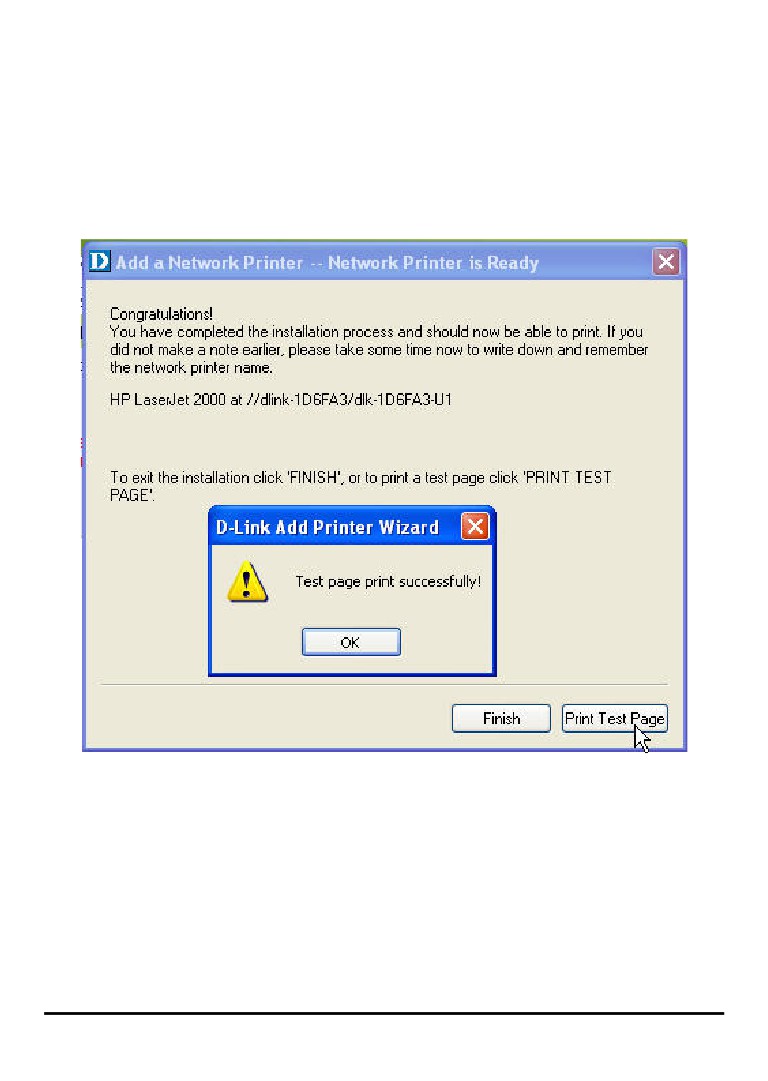
When the following window shows up, you may do print test by clicking Print Test
Page button to check if you can do printing normally. If yes, click OK button to close
the D-Link Add Printer Wizard dialogue screen.
65
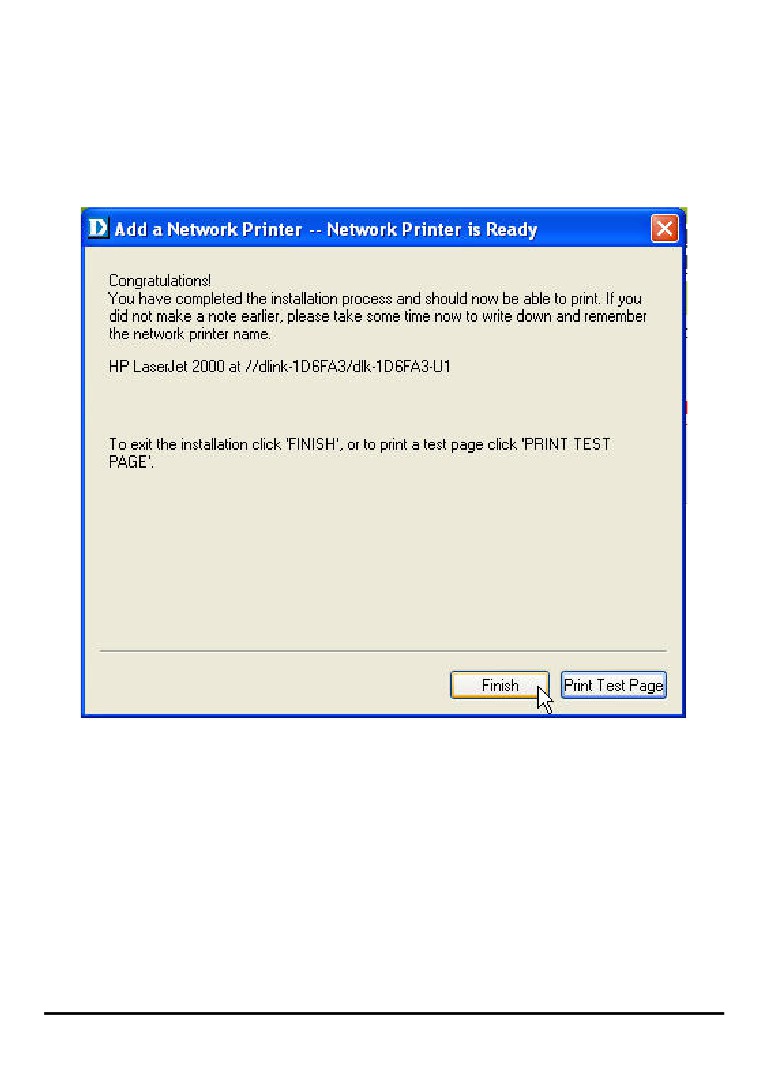
If yes, then click Finish button to exit the installation window and now you may start
your printing tasks.
66
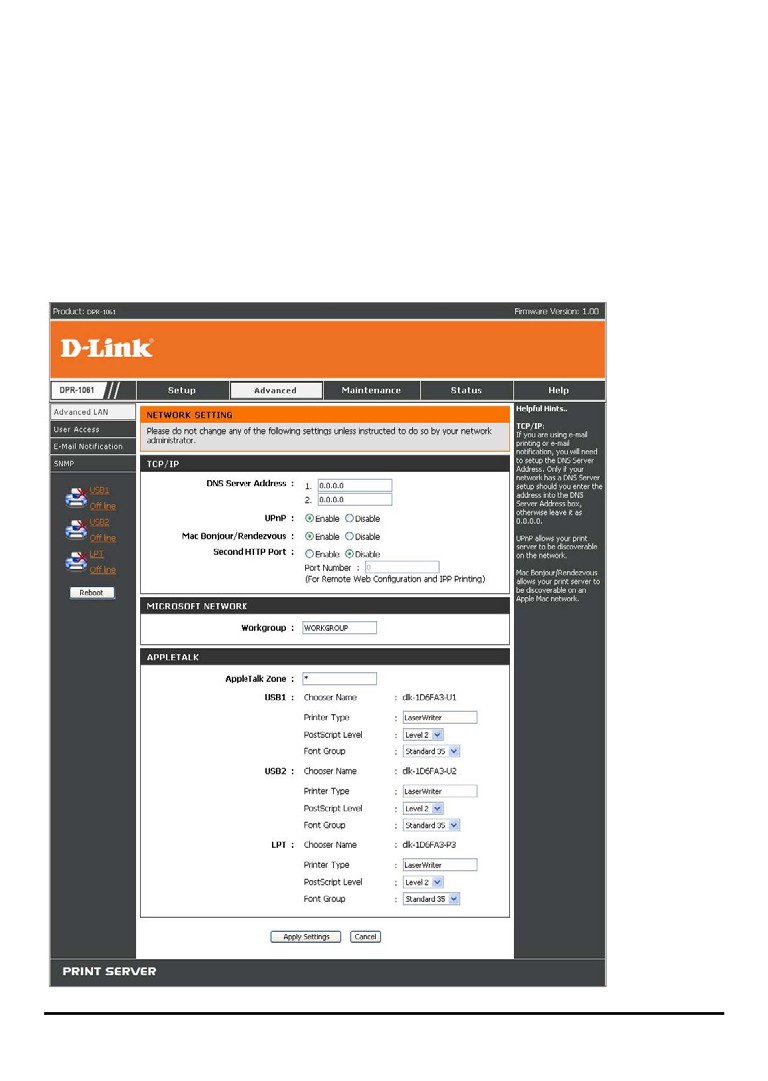
ADVANCED > Advanced LAN
The Advanced LAN screen allows you to further network setting of MFP server,
while you are recommended better not to change the settings unless instructed to
modify the setting by your network administrator. The Advanced LAN screen
contains these fields: TCP/IP, Microsoft Network, and AppleTalk.
67
TCP/IP
This field contains four options that allow you to configure the TCP/IP setting: DNS
Server Address, UPnP, Mac Bonjour/Rendezvous, and Second HTTP Port.
UPnP: This option allows you to enable or disable UPnP function.
Mac Bonjour/Rendezvous: This option allows you to enable or disable Mac
Bonjour/Rendezvous function.
Second HTTP Port: This option allows you to enable or disable Second HTTP
Port for remote Web Configuration and IPP Printing.
Microsoft Network
Enter the name of the Workgroup that you want the print server associated with in
this field.
AppleTalk
Enter the AppleTalk Zone name in the box. In the following options, enter the related
configuration, such as the printer type.
Chooser Name: Display the print server's port name.
Printer Type: Enter the printer's type in this box.
PostScript Level: Select from the pull-down menu (Level 1 or Level 2).
Font Group: Select from the pull-down menu.
Once you have changed the settings in each option, click Apply Settings to store the
settings, or Cancel to abandon.
68
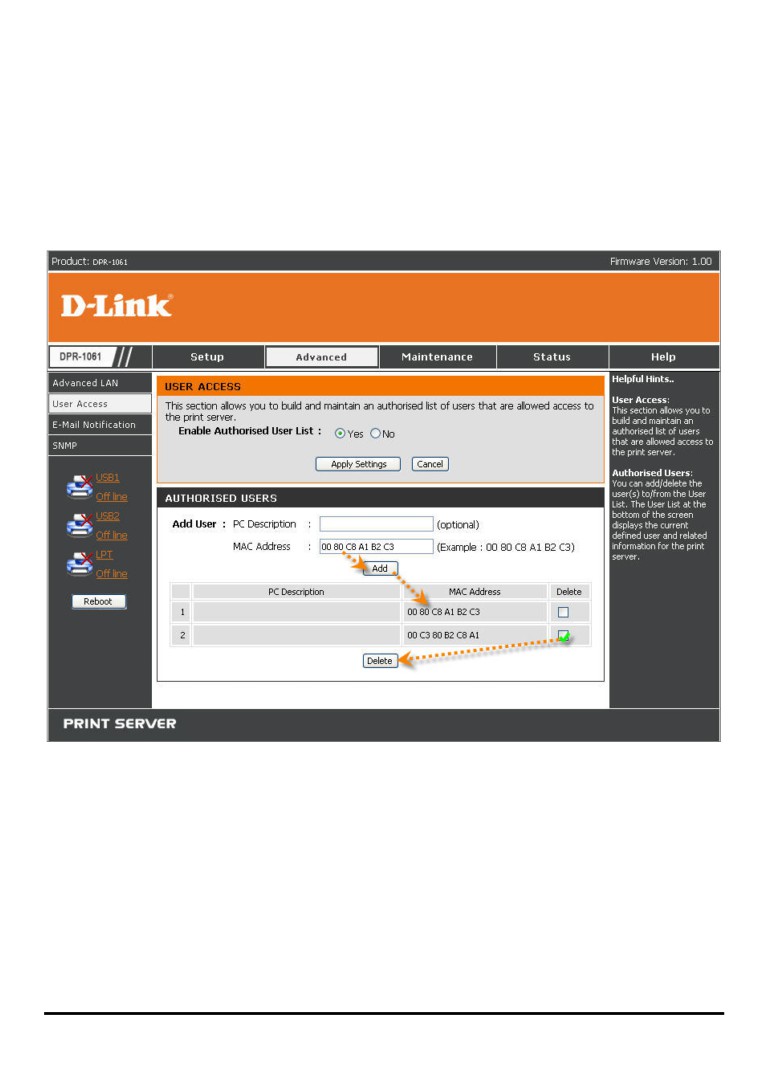
ADVANCED > User Access
The User Access screen allows you to create and maintain an authorized list of
users that are allowed to access the MFP server.
User Access
By configuring the Enable Authorised User List option (Yes), the user in the User
List is permitted to access the print server. Any user who is not added in the User
List will not be allowed to access the print server. Once you have changed the
settings in each option, click Apply Settings to store the settings, or Cancel to
abandon.
69
Authorised Users
You can add or delete any user to or from the User List. The User List at the bottom
of the screen displays the current defined user and related information for the print
server.
70
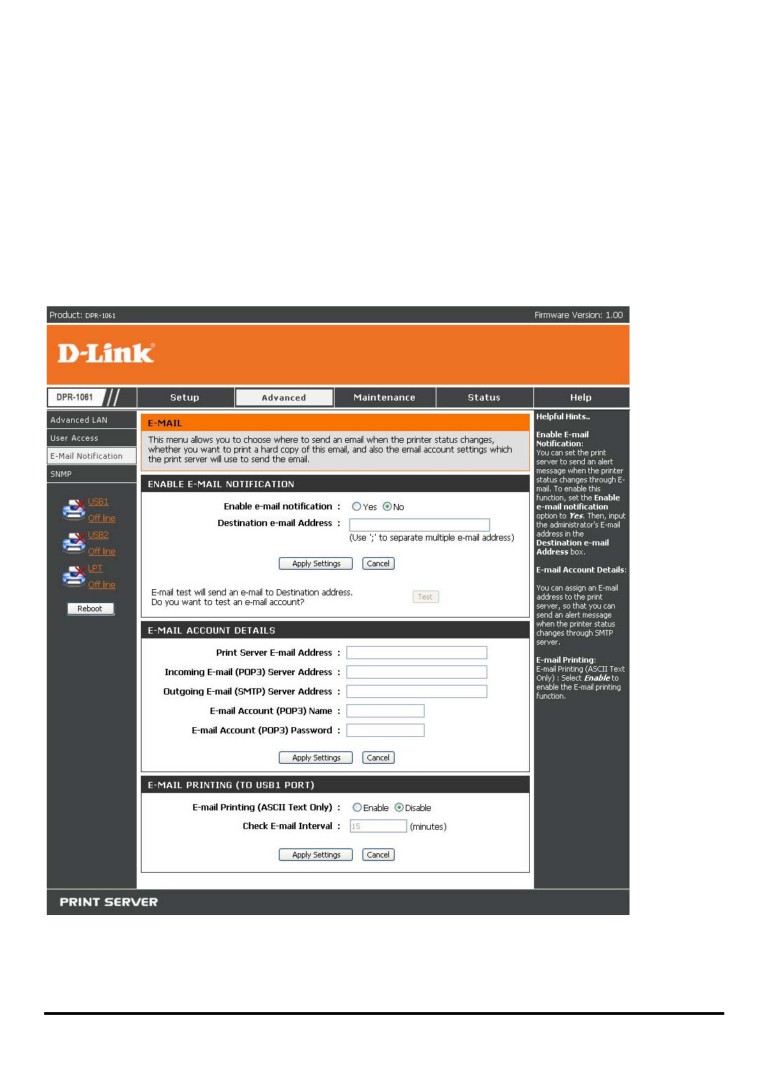
ADVANCED > E-Mail Notification
The E-Mail Notification screen allows you to assign an E-mail address to the MFP
Server, so that your mail of the account can be printed out directly through the printer
(ASCII text only). This screen also allow you choose where to send an email when
the printer status changes.
71
Enable E-mail Notification
You can set the print server to send an alert message when the printer status
changes through E-mail. To enable this function, set the Enable e-mail notification
option to Yes. Then, input the administrator's E-mail address in the Destination
e-mail Address field.
E-mail Account Details
You can assign an E-mail address to the print server, so that your mail of the account
can be printed out directly through the printer (ASCII text only). To enable this
function, enter the E-mail account in the Print Server E-mail Address field.
Then enter the server address, used to receive your E-mail here, in the Incoming
E-mail (POP3) Server Address field. For outgoing E-mail (SMTP) Server Address
field, enter the server address that is used to send your E-mail here.
If your mail server needs to verify the user when sending E-mail, Print Server will
apply the E-mail Account (POP3) Name and E-mail Account (POP3) Password to
the mail server.
E-mail Printing
This section is for you to do E-mail Printing configuration, including:
E-mail Printing (ASCII Text Only): Allows you to enable or disable the E-mail
printing.
Check E-mail Interval: Allow you to set up a time interval in minute in order to
check/receive E-mail periodically.
After done the configuration, click Apply Settings to restore the new configuration, or
Cancel to abandon.
72
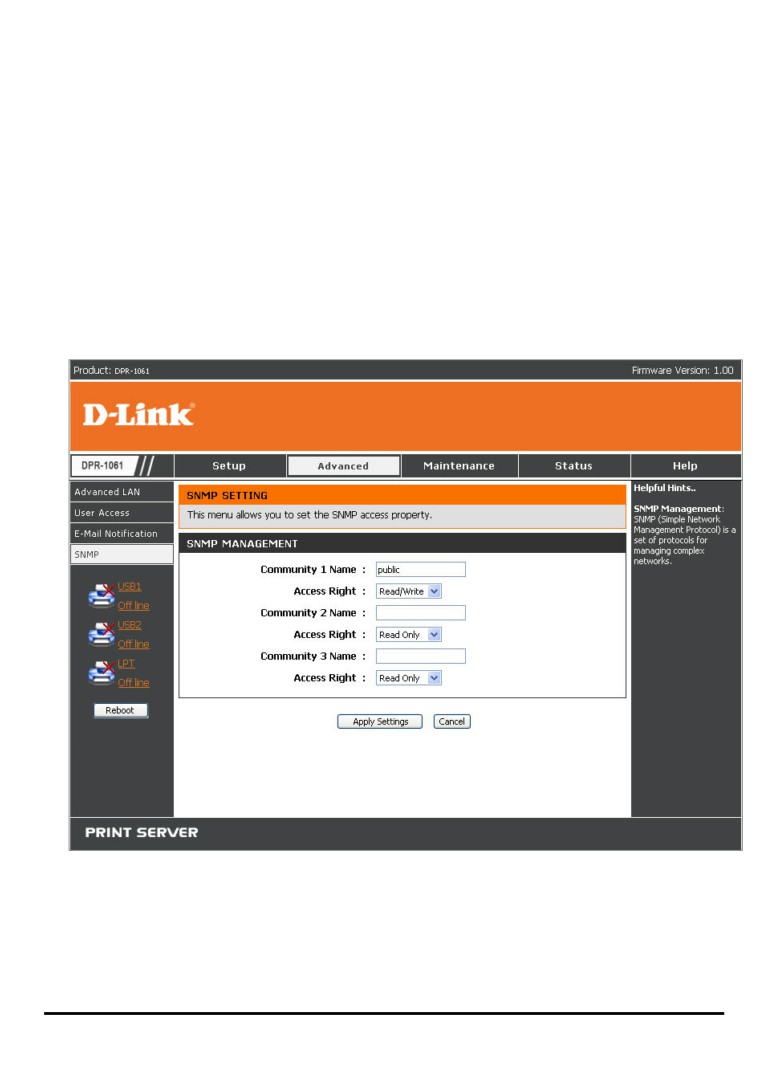
ADVANCED > SNMP
The SNMP screen allows you to use SNMP (Simple Network Management Protocol)
to manage complex networks.
SNMP Management
Community 1/2/3: Enter a name in the Name frame, and configure the Access
Right by selecting Read Only or Read/ Write from the pull-down menu.
73
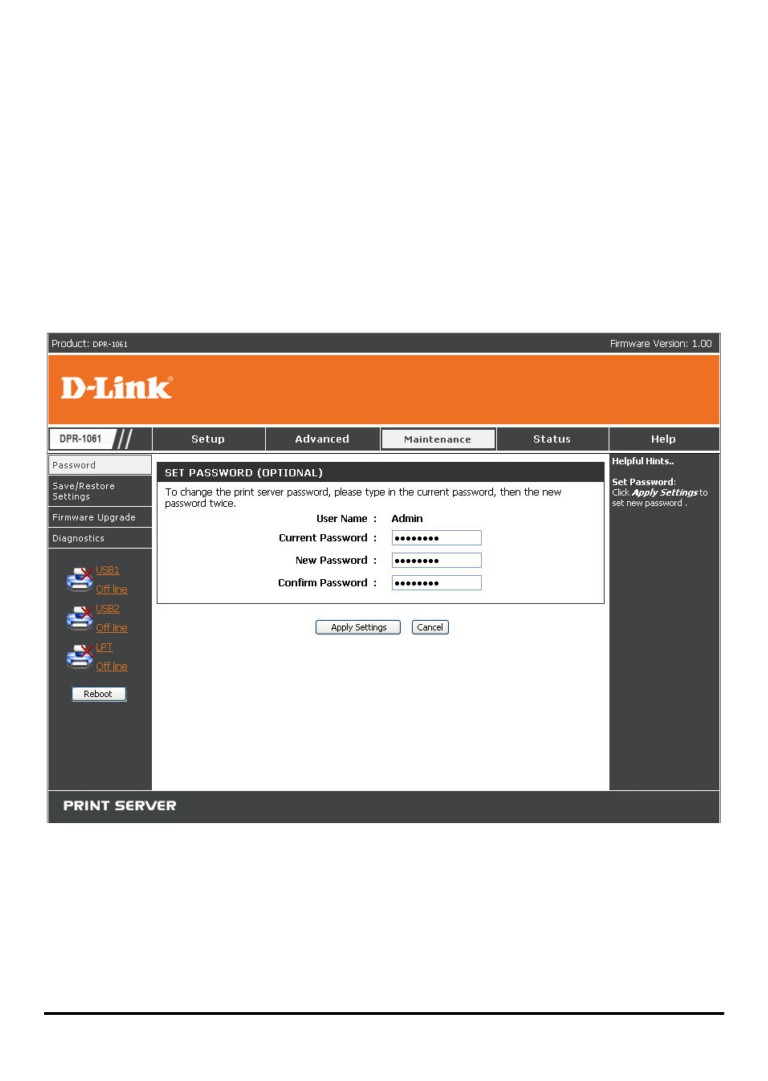
MAINTENANCE > Password
The Password screen allows you to change the password of the MFP server by
entering the current password in Current Password field and new password in New
Password and Confirm Password fields. After done the configuration, click Apply
Settings to enable and restore the new password, or Cancel to abandon. Be aware
that the default password of the MFP server is blank.
74
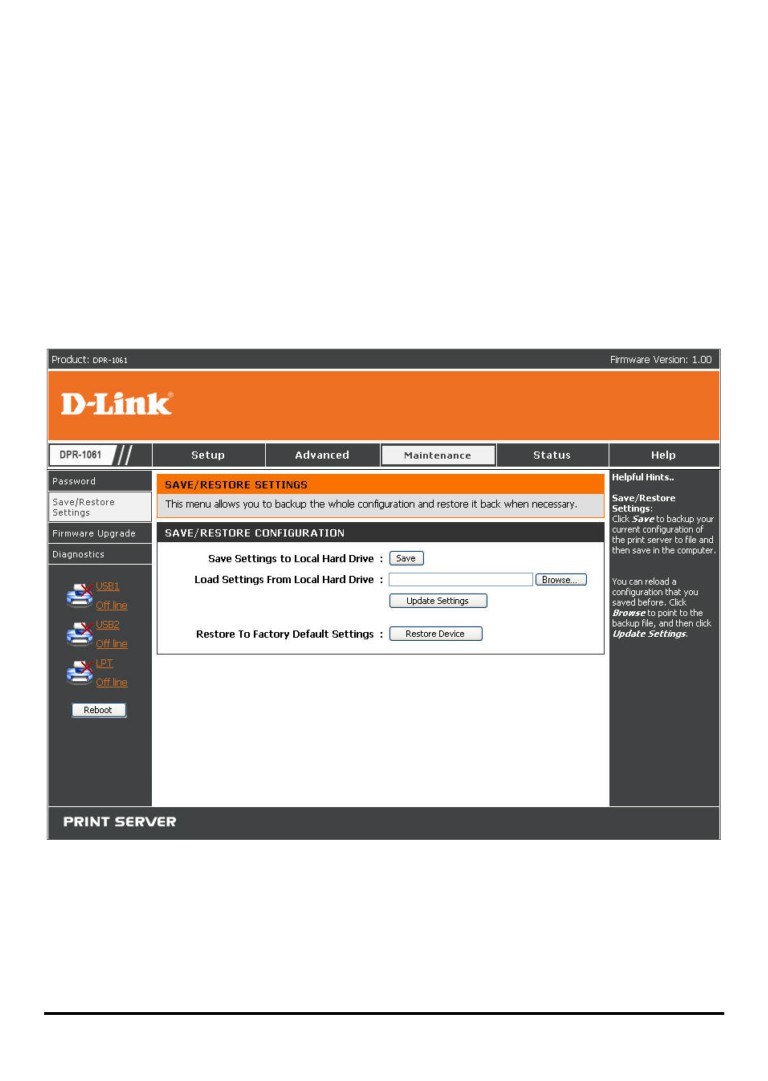
MAINTENANCE > Save/Restore Settings
The Save/Restore Settings screen not only allows you to save the current
configuration in a computer for backup by clicking Save, but also allows you to
reload a configuration that you saved before by clicking Browse to direct to the
backup file, and then clicking Update Settings for reloading. Beside, you are also
allowed to return the MFP server to the default settings by clicking Restore Device.
75
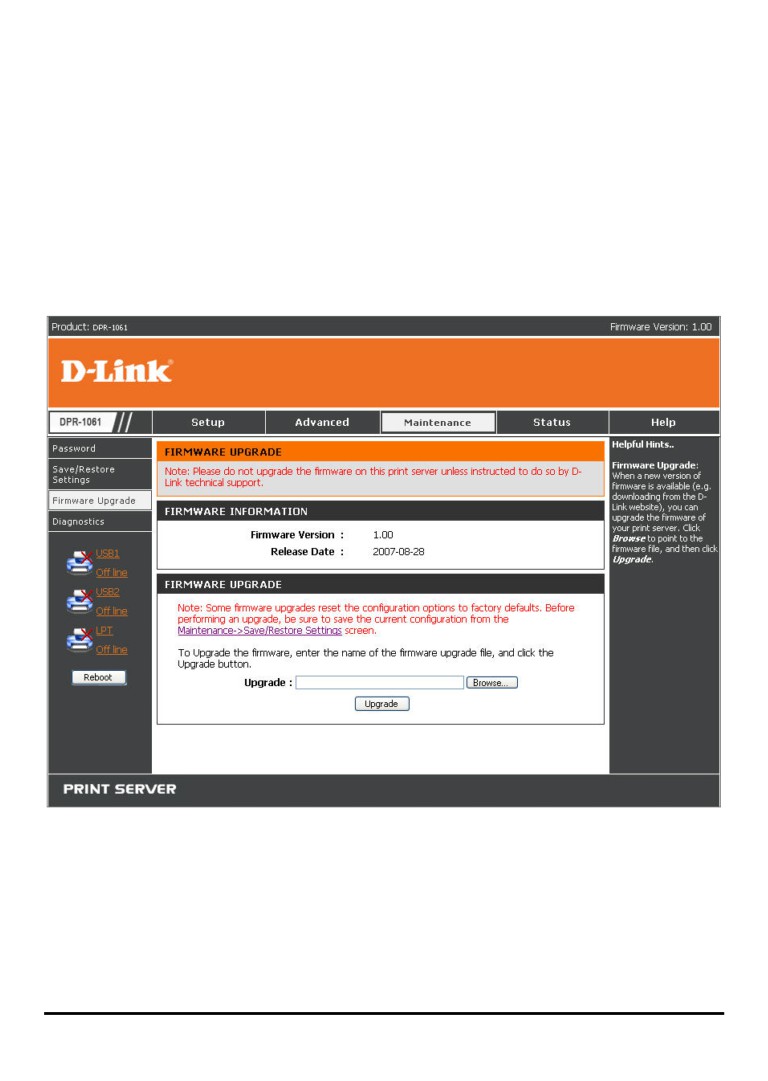
MAINTENANCE > Firmware Upgrade
The Firmware Upgrade screen displays you the current firmware’s information of
the MFP server, and also allows you to upgrade the firmware of the MFP server
when a new version of firmware is available.
Click Browse to point to the firmware file, and then click Upgrade.
76