D-Link DPR-1061 USB 2.0 MFP Server Manual (2007) - page 5
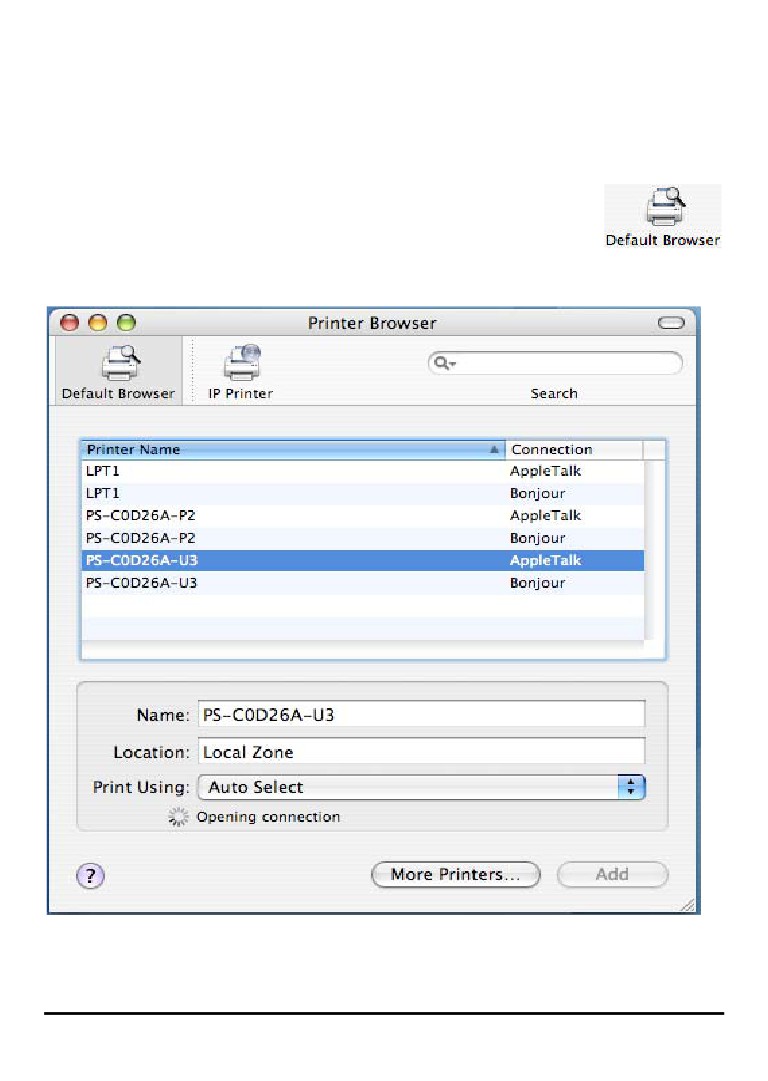
AppleTalk-enabled or Bonjour-enabled Printers
To add an AppleTalk-enabled or Bonjour-enabled printer, click on the
button in the Printer Browser menu.
157
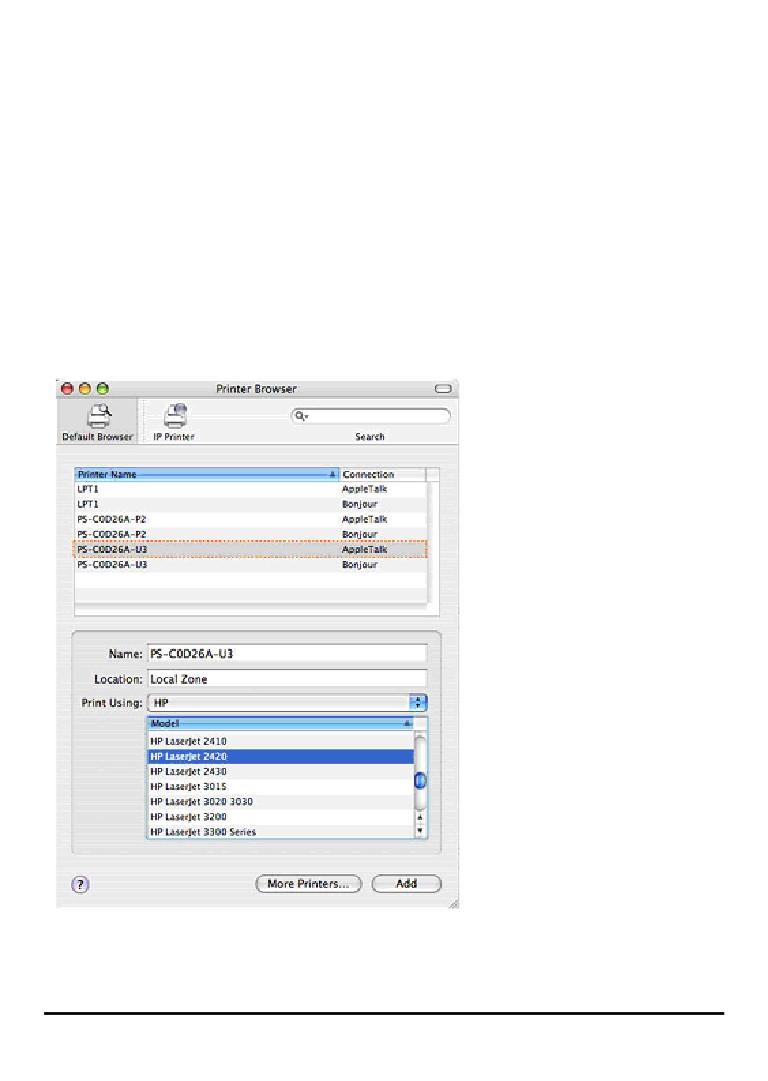
Select the printer model from Printer Name list and Connection type in the Printer
Browser menu. The printer name selected should be the same as that appearing
listed in the Printer Server’s web manager. In the example here, the printer name is
PS-C0D26A-U3. By default the Printer Browser will use the Auto Select for Print
Using: to determine what printer configuration to use. This may also be manually
selected in the Print Using drop-down menu by brand and model. Click the Add
button to exit the Printer Browser window and implement the new setting.
158
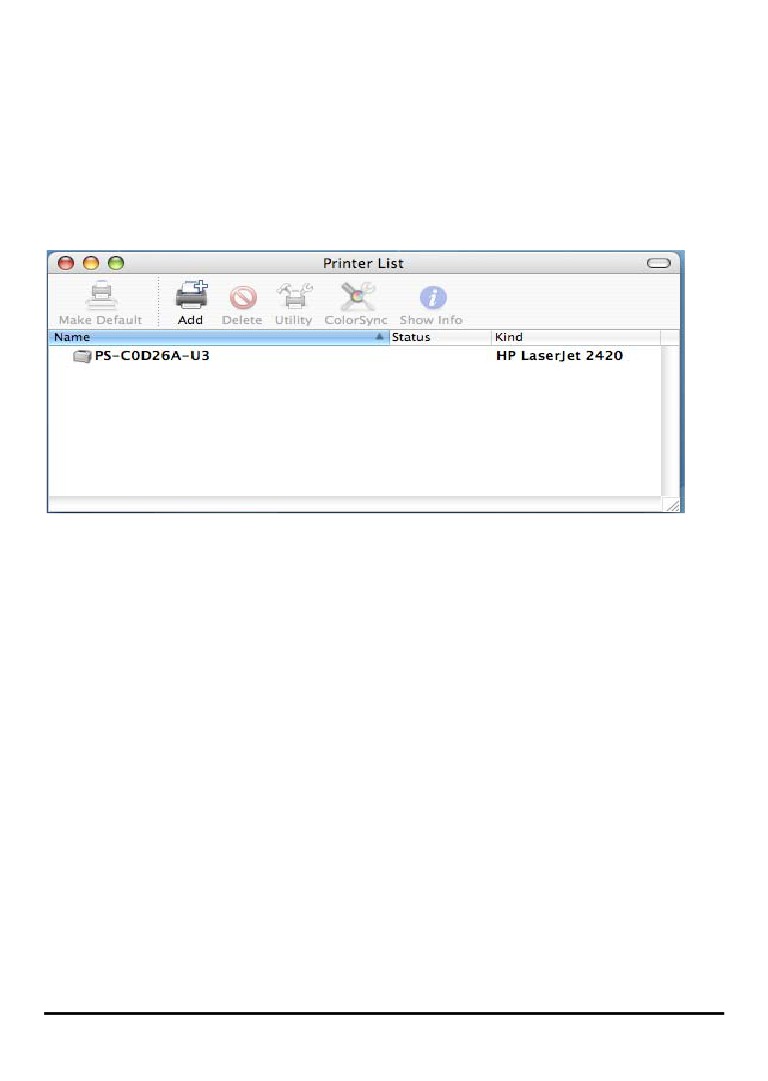
The printer that has just been added will show up in the Printer List menu, it might
take a few seconds depending on network conditions. When the printer appears
listed it is ready for use. Quite the Printer Setup Utility and start printing.
159
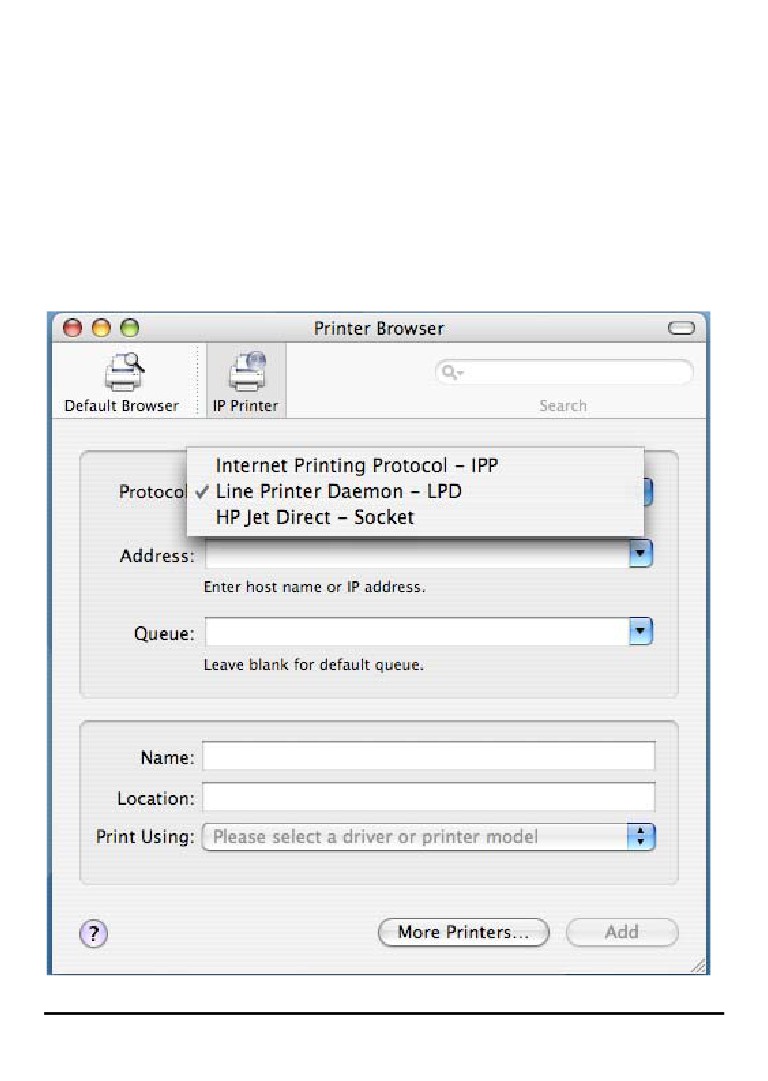
Adding an IP Printer
To add an Internet Printing Protocol enabled, Line Printer Daemon enabled or HP
Jet Direct - Socket enabled printer, click on the IP Printer button in the Printer
Browser window. Select the desired printing protocol from the Protocol drop-down
menu.
160
Type the IP Address of the printer, the name will appear in the Name field when the
printer is found. The Printer Browser will indicate that it is verifying the address. If
the printer is found, the Printer Browser will state “Valid and complete address”
under the Address field.
The printer utility is able to detect the printer and may automatically select the
correct printer driver in the Print Using field. Or manually select the printer-maker
from the Print Using drop-down menu, and then select the printer model from the
scroll-down list, or select Generic PostScrip Printer option from the Print Using
drop-down menu if the model is not listed. To implement the setting, click Add
button.
The setup procedures for these three printing protocols (Internet Printing Protocol
(IPP), Line Printer Daemon (LPD), and HP Jet Direct - Socket) are basically the
same. Illustrated examples are include below for the sake of reference.
161
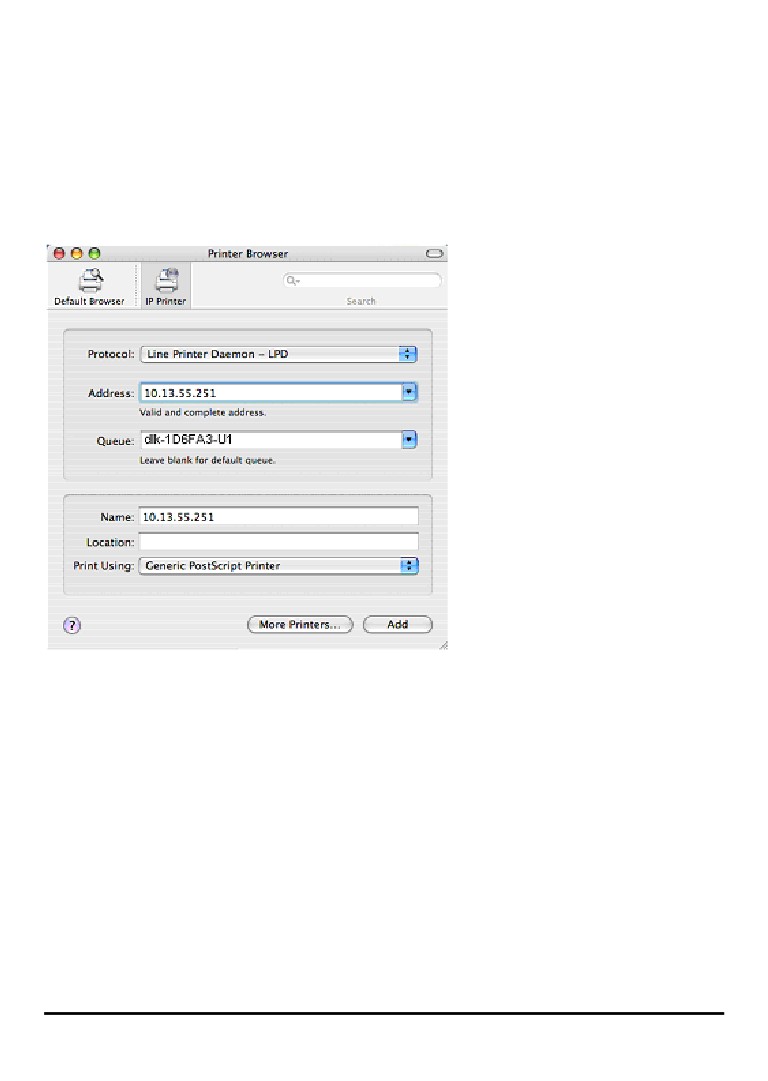
For set up LPD Printing:
1. Enter the IP address of the print server to which the printer is attached in
Address field.
2. Type the port name in queue field.
Click Add button after done the section of printer model in the Print Using
drop-down menu.
162
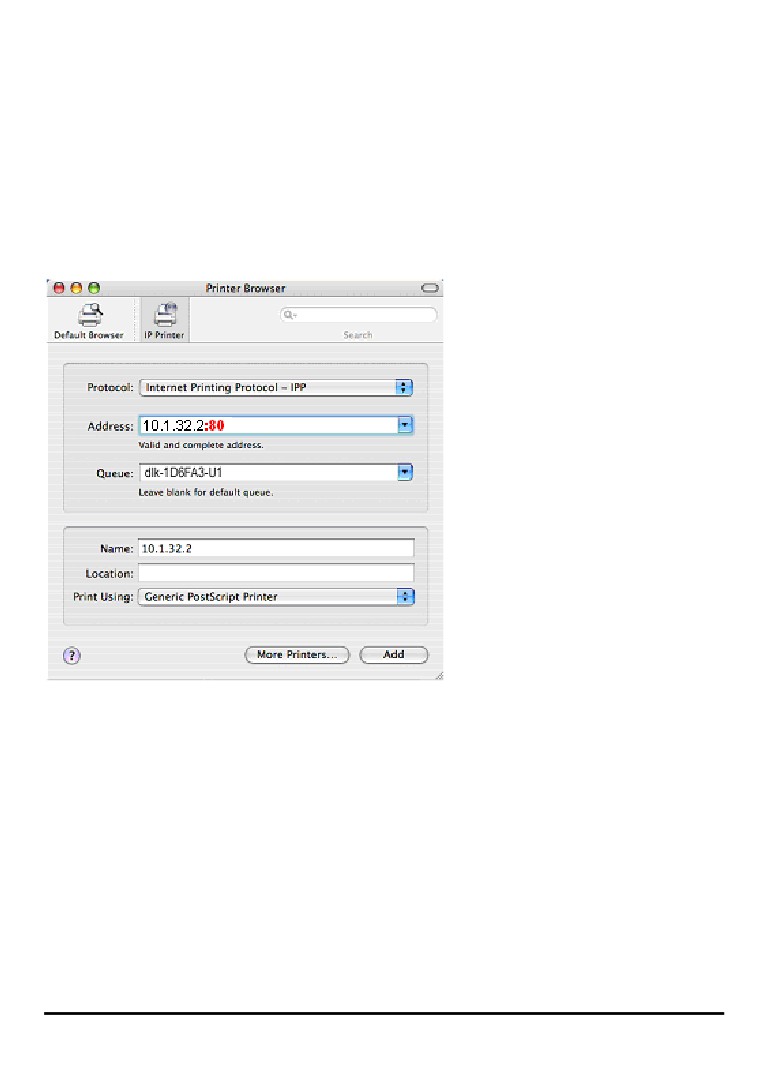
For set up IPP Printing:
1. Enter the IP address of the print server to which the printer is attached in
Address field. After that, type “: 80” or “: second port” if print server’s
second port is enabled.
2. Type the port name in queue field.
Click Add button after done the section of printer model in the Print Using
drop-down menu.
163
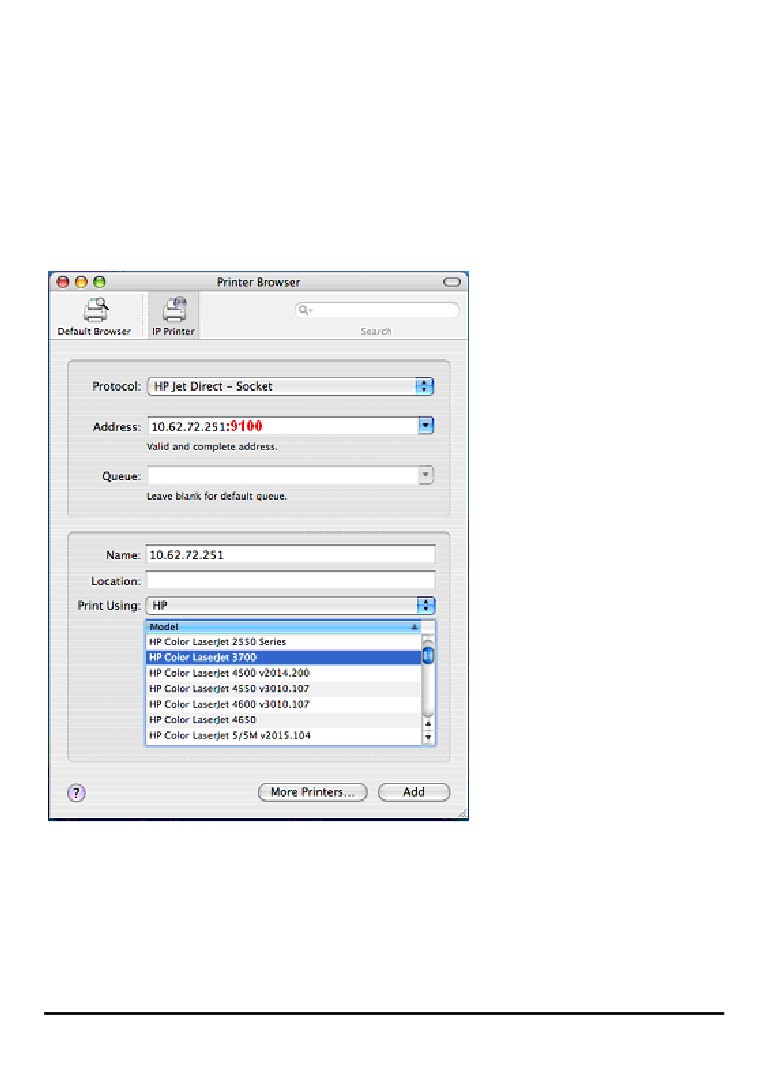
For set up Socket Printing:
1. Enter the IP address of the print server to which the printer is attached in
Address field. After that, type “: 9100” for port 1, “: 9101” for port 2 or “: 9102”
for port 3.
2. Keep the blank in queue field.
Click Add button after done the section of printer model in the Print Using
drop-down menu.
164
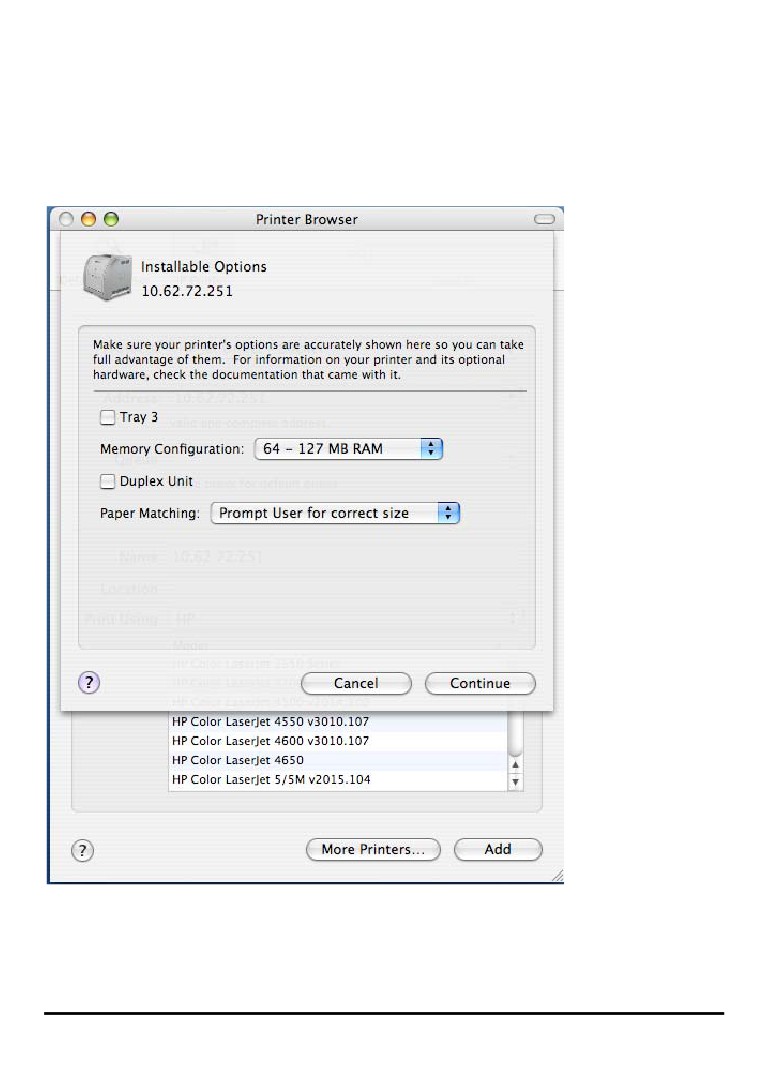
When the Installable Options pop-up window shows up as below, click Continue
button.
165
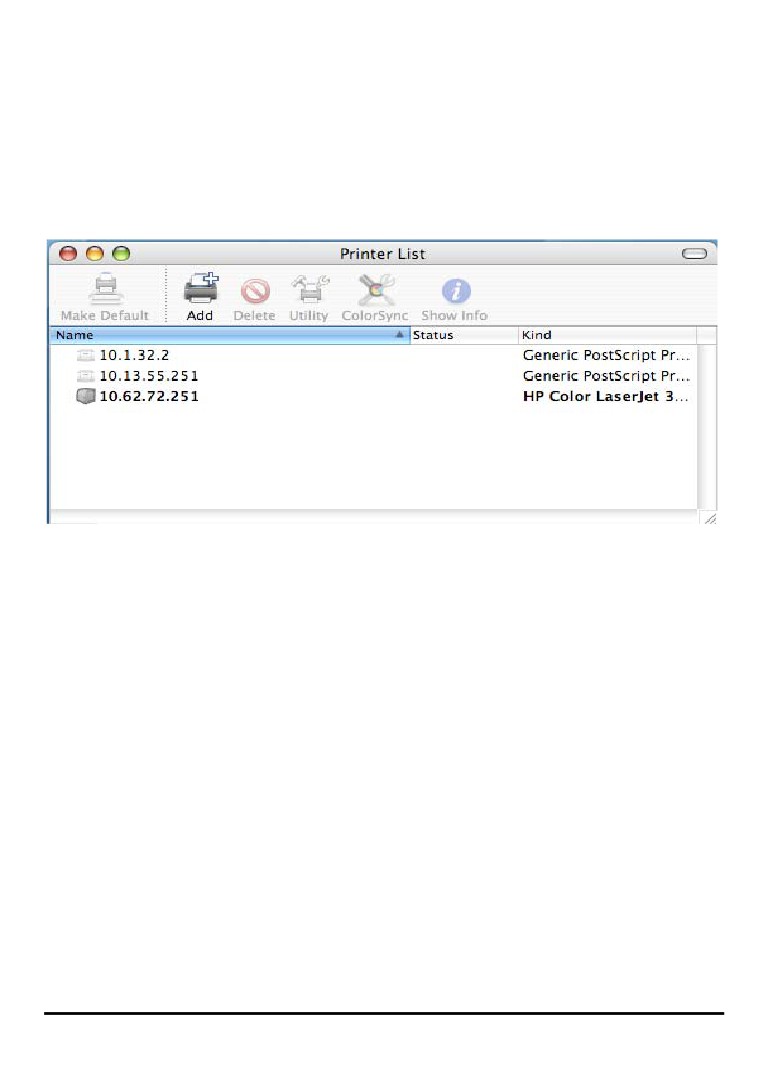
The printer that has just been added will show up in the Printer List menu, it might
take a few seconds depending on network conditions. When the printer appears
listed it is ready for use. Quite the Printer Setup Utility and start printing.
166
Setting up AppleTalk or LPR Printing in
Mac OS X
NOTE: Mac OS printing is supported by Postscript printers only!
With Mac OSX you can use AppleTalk or LPR printers using IP protocols for printing
through Print Servers.
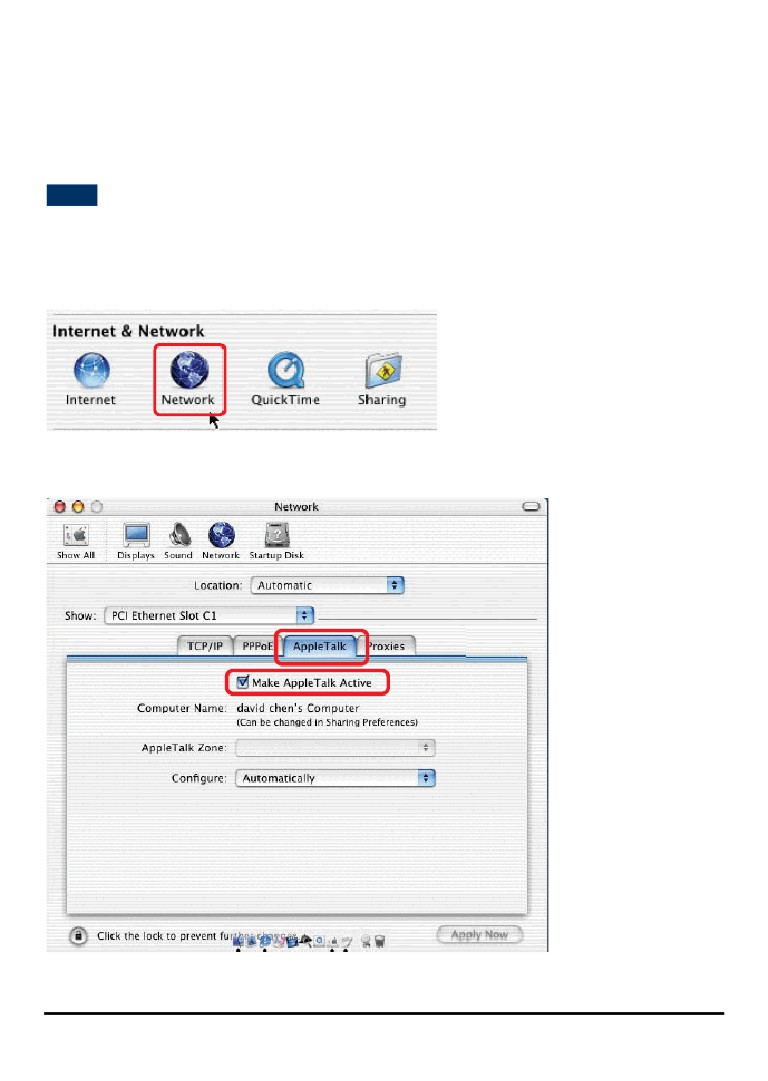
Open your System Preferences window and Click Network.
Select the AppleTalk tab in this window and check Make AppleTalk Active.
!
167
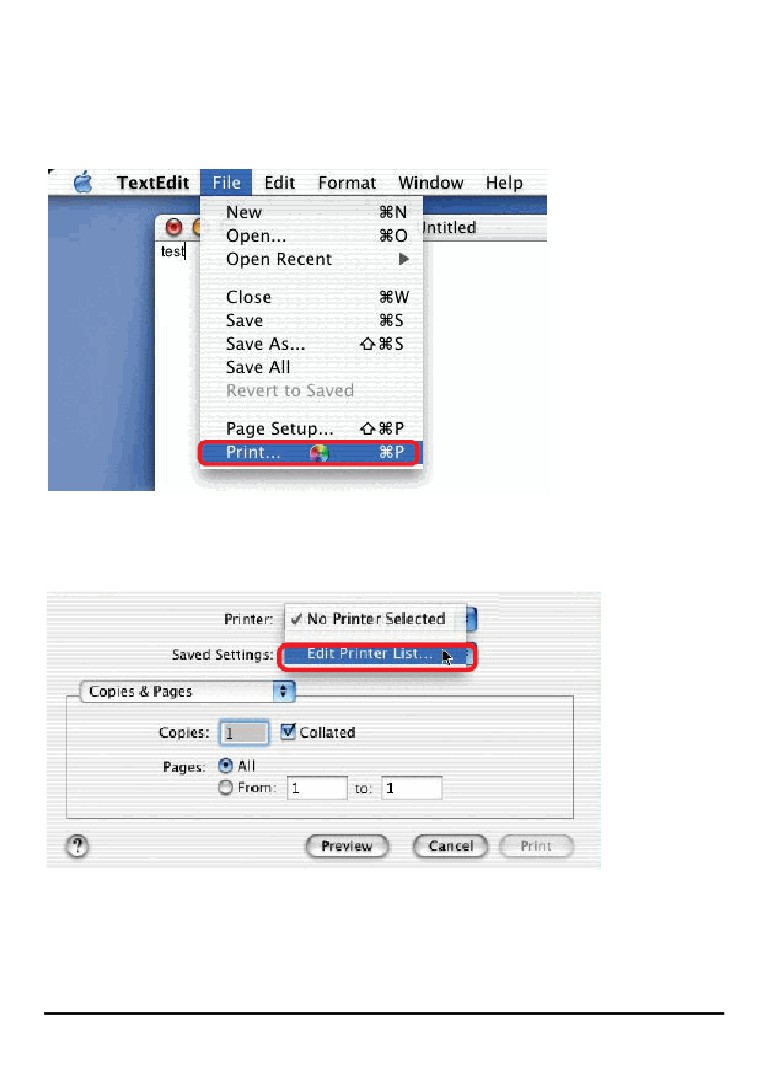
To print, open a document and select File Î Print from the menu.
Select Edit Printer List from the Printer dialog box.
168
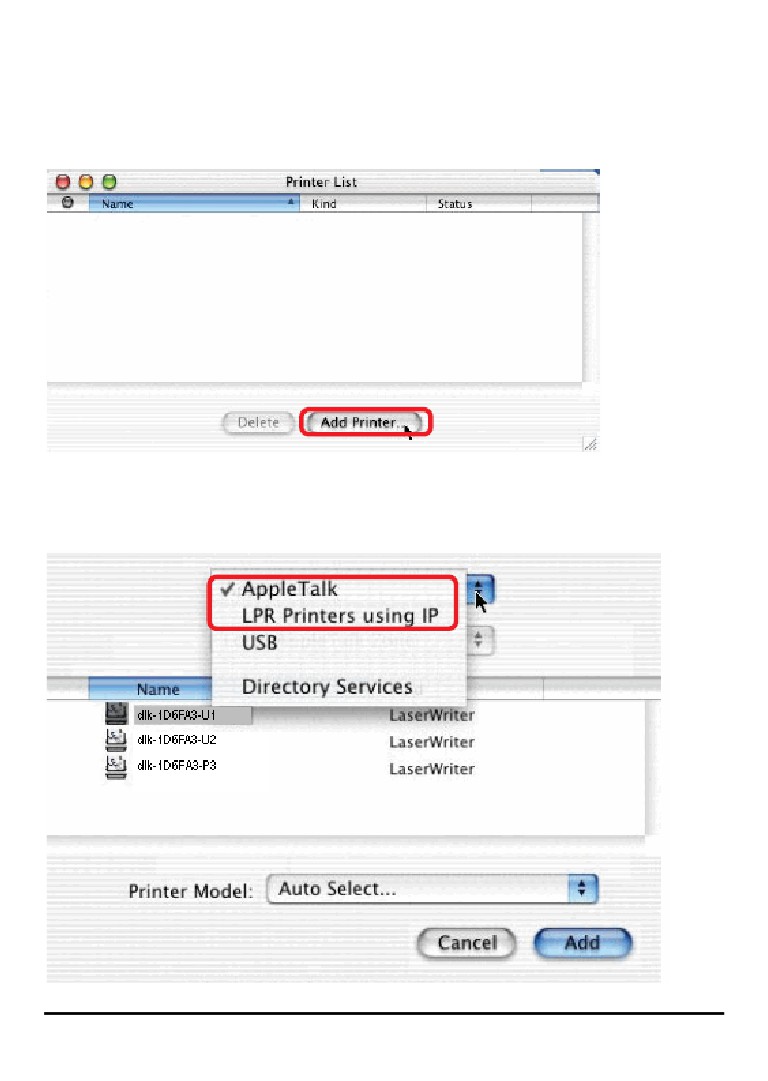
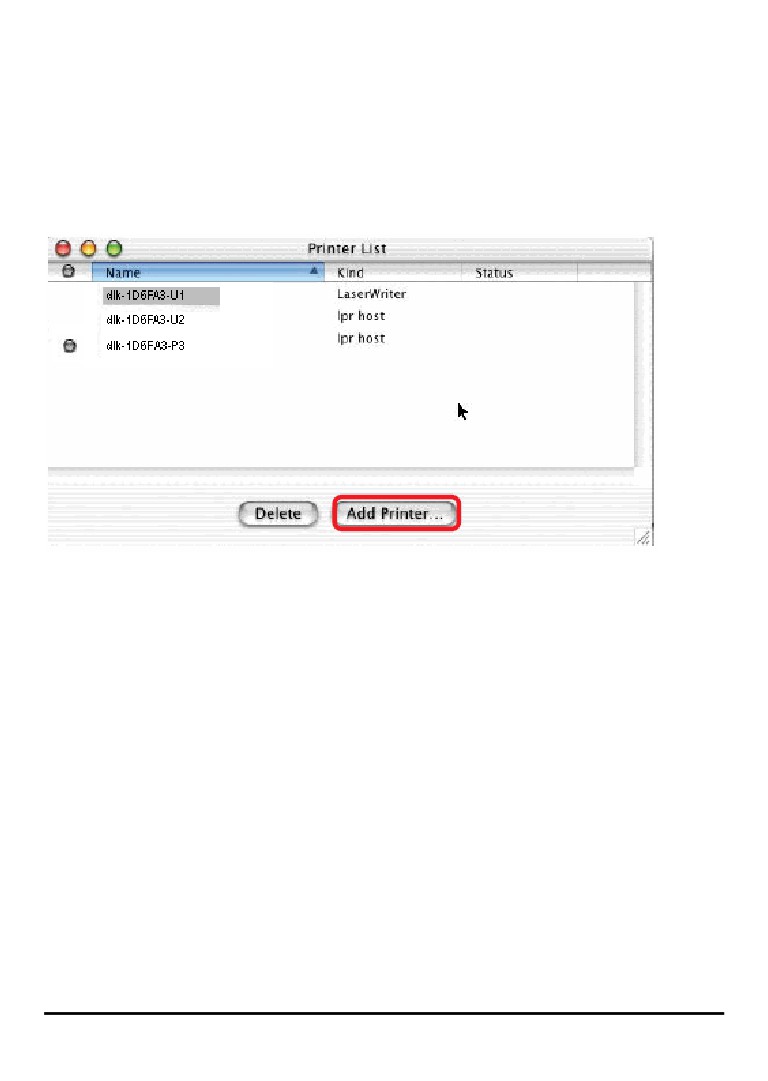
Click Add Printer
Select the printing protocol preferred, AppleTalk or LPR Printers using IP.
In this example, AppleTalk has been selected.
169
AppleTalk protocol: After selecting AppleTalk, the Port Names of the Print Server will
be displayed. The Port Names shown here are examples only. Click on the Port to
which the post-script printer is connected.
Then select the printer model from the dialog box displayed here. Click Add Printer
and the Printer Port configuration is completed. Select the Printer Port just
configured in the Print window. Click Print to print your document.
170
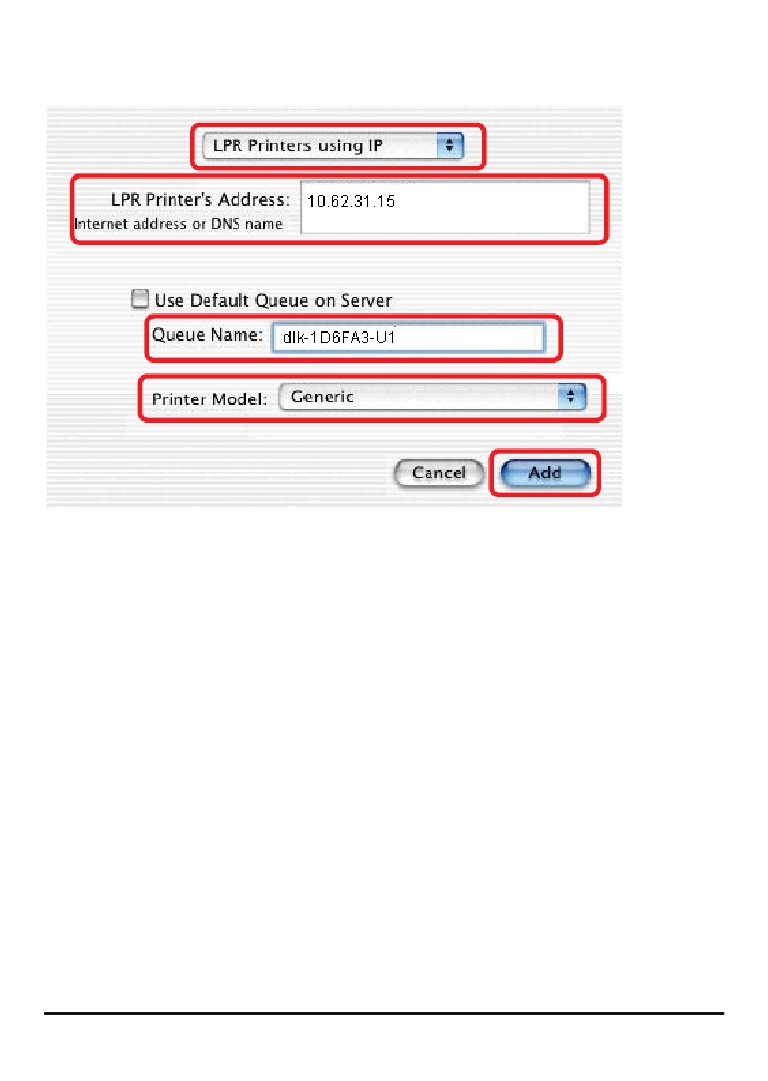
LPR Printers using IP protocol: When you select LPR Printers using IP Protocol, this
window will appear.
Type the IP Address of the Print Server into the LPR Printer‘s Address field.
In the Queue Name field, type in the Port Name of the post-script printer that is
connected to the Print Server. The Port Name illustrated here is only an example.
Select the printer model from the dialog box.
Click Add and the process is completed.
Close all Print Center windows, select the Printer Port that was just selected.
Click Print to print the document.
171
Setting up AppleTalk Printing in Mac OS 9
NOTE: Mac OS printing is supported by Postscript printers only!
The AppleTalk network protocol is used with computers using the MacOS operating
system. It can be used for network communications over standard Ethernet or Fast
Ethernet using the EtherTalk transport, or over a proprietary low-speed LocalTalk
transport.
MFP server can be used for network printing to PostScript printers. You can print
from any MacOS computer connected to your Ethernet network, either directly using
an EtherTalk connection, or indirectly through a LocalTalk-to-EtherTalk router.
NOTE: The Chooser name of a printer connected to one of the Print Server‘s
ports is the same as its Port Name. If you are using AppleTalk printing, you will
need to make sure that every Port Name is unique among all of the network
printers in your AppleTalk zone. The Port Names shown in this manual are
examples only.
To set up MFP server so that it can be used for AppleTalk printing:
Make sure the AppleTalk protocol is enabled in your Macintosh.
Make sure the PC’s IP Address must correspond with the Print Server’s IP
Address in the same segment for the two devices to communicate.
Launch the browser and enter print server web interface, select the ADVANCED
tab, click Advanced LAN button and then scroll to the bottom to the AppleTalk
protocol section
If your AppleTalk network is divided into AppleTalk zones, you will have to specify
172
which zone the Print Server should be in. You should locate the Print Server in the
same zone as most of the users who will be using it. If your network is not divided
into zones, the AppleTalk Zone field should contain a single asterisk (*).
For each Printer Port that will be used for AppleTalk printing, you may need to
change the AppleTalk Port Settings in the Advanced LAN screen, shown as below.
!
173
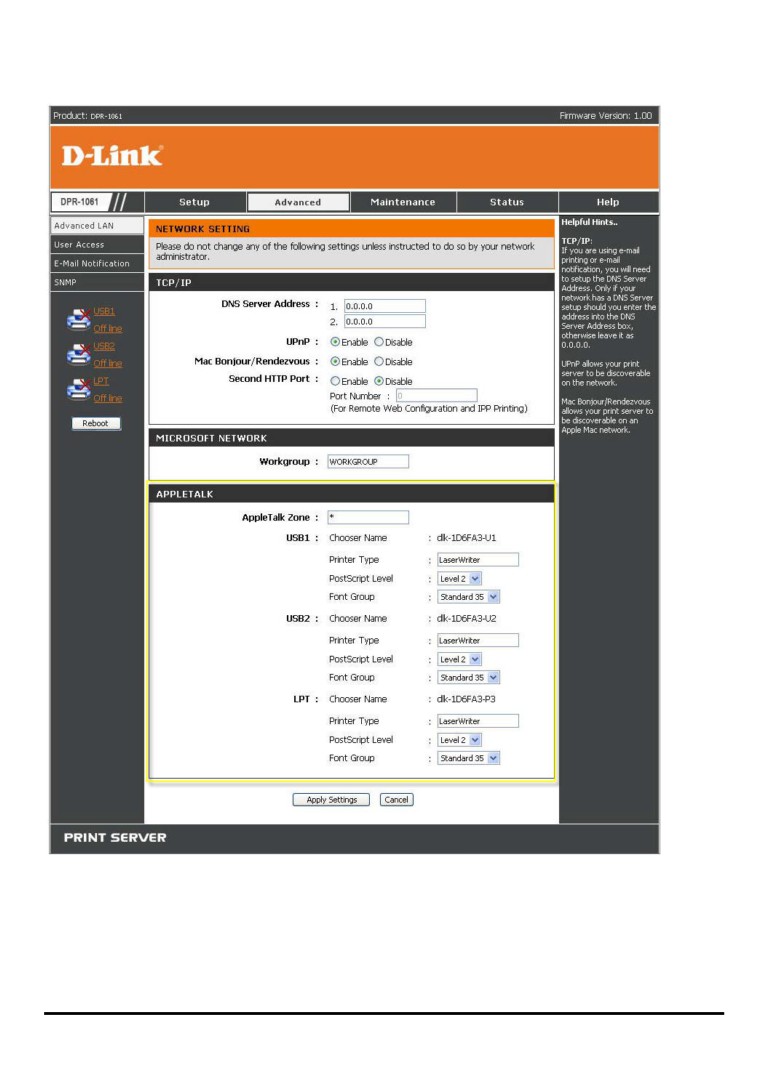
AppleTalk
Enter the AppleTalk Zone name in the box. In the following options, enter the related
configuration, such as the printer type.
Chooser Name: Display the print server's port name.
174
Printer Type: Enter the printer's type in this box.
PostScript Level: Select from the pull-down menu (Level 1 or Level 2).
Font Group: Select from the pull-down menu.
The exact procedure for selecting a PostScript printer connected to MFP server may
vary slightly, depending on what printer driver version you are using. The procedure
described below assumes you are using the LaserWriter 8.
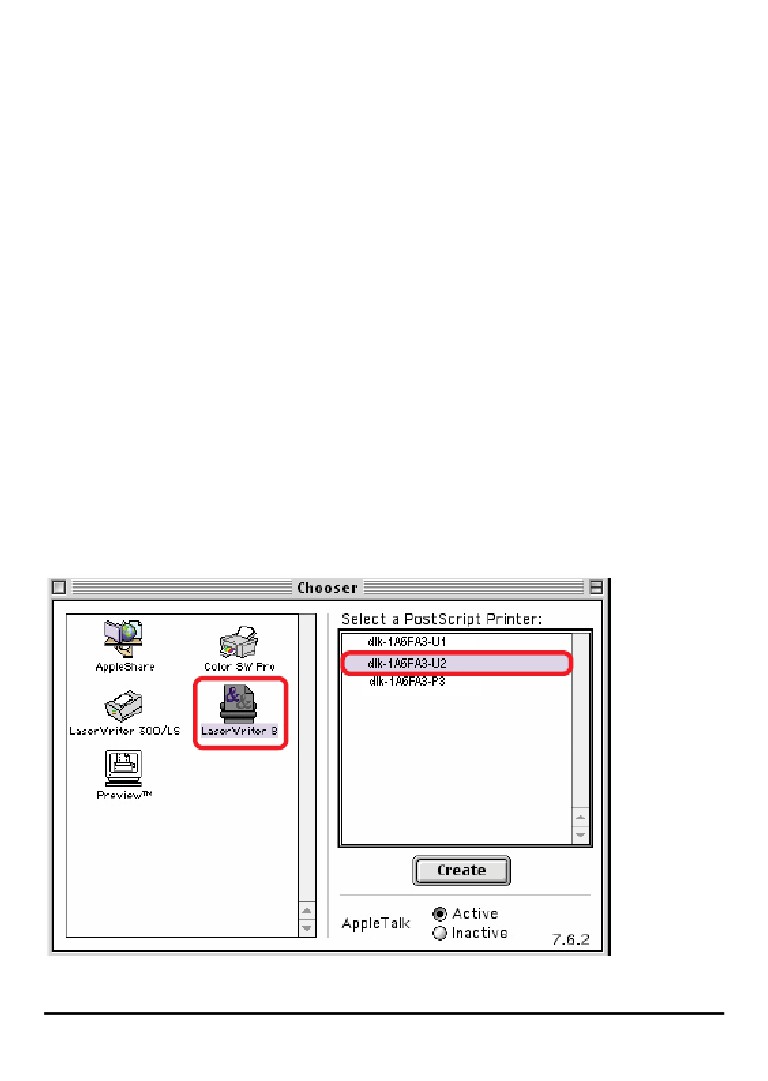
To choose a printer connected to MFP server as your MacOS workstation‘s default
printer, open the Chooser by selecting Chooser from the Apple menu. Select the
LaserWriter 8 icon on the left. Make sure that AppleTalk is set to Active.
A list of all networked PostScript printers will be displayed as follow.
Double-click the name of the Printer Port you wish to use. The Printer Ports shown
are examples only.
!
175
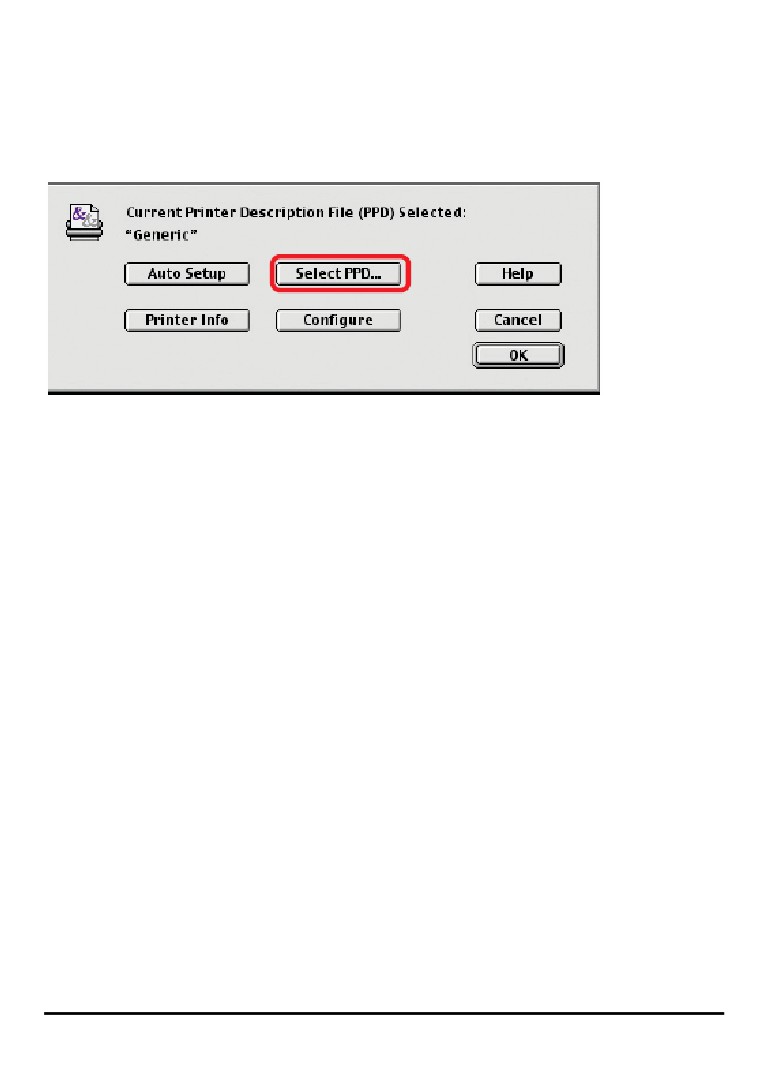
If you have not previously set this printer as the default, your computer will prompt
you for a PostScript Printer Description file. Choose Select PPD.
Select the appropriate printer description file for your printer.
Click Open. (If your printer is not listed, click Generic to use a generic printer
description.)
If you wish to access this setting in the future, you can use the Setup button in the
Chooser window.
The selected printer will become your computer‘s default printer. You may need to
choose Page Setup in any applications you have open.
176
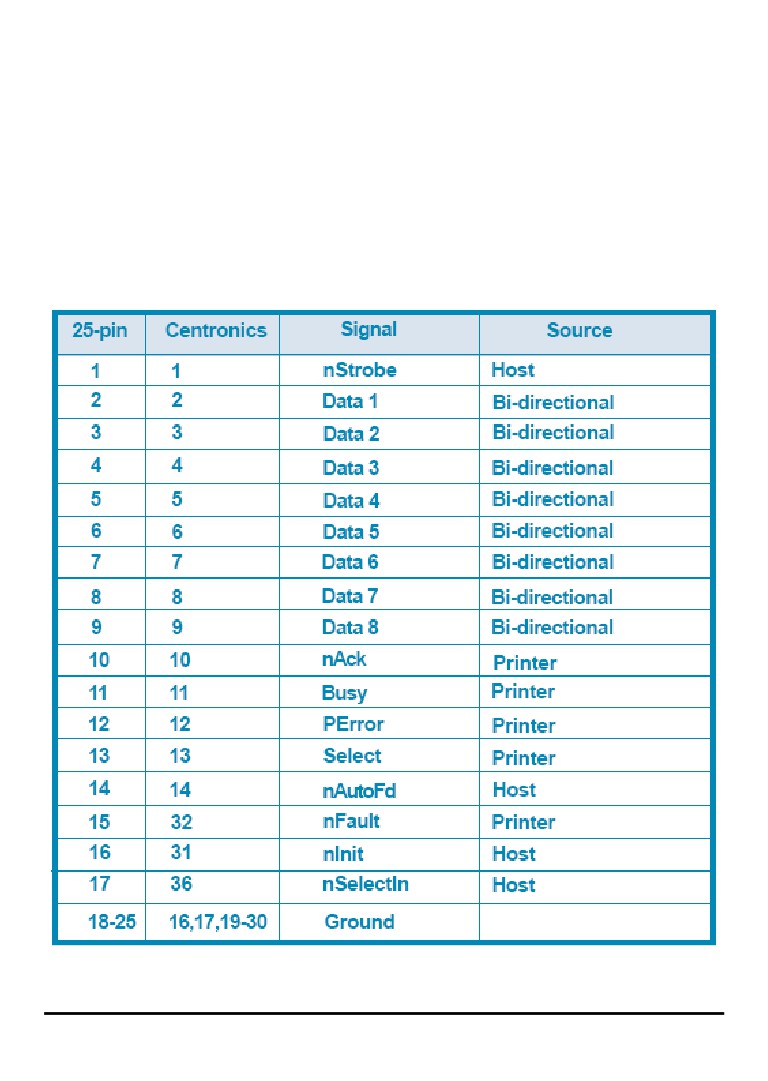
Port Pinouts
The following table lists the pinouts of the print server’s 25-pin parallel port
connector (identical to the connector used on most personal computers), as well as
the 36-pin Centronics connector used on most printers. Signal names beginning with
n are active-low signals.
177
Technical Specifications
Printer Connection
Printer Port: USB 2.0 or Parallel
Bi-directional Communication: Hewlett-Packard PJL (Printer Job Language)
standard for bi-directional communication.
Network Connection
Network Standards: 100Base-TX Fast Ethernet
Network Data Transfer Rate: 10/100 Mbps (megabits per second)
Network Connector: RJ-45
Network Protocols
Ethernet Frame Types: 802.2, 802.3, Ethernet II, SNAP (auto-switching)
Transport Protocols: TCP/IP, NetBEUI, AppleTalk/EtherTalk, LPR,SMB
TCP/IP Protocols Supported: BOOTP, SNMP, FTP, LPD, RARP, DHCP, IPP
Management and Diagnostics
Standard: SNMP
MIBs: MIB-II (RFC 1213)
Diagnostic LED Indicators: Power, Link/Act, USB1, USB2, LPT
Environmental and Physical
Power Supply: External power supply providing 5V, 2.5A DC
Dimensions: 7.58" x 4.66" x 1.22" (192.5mm x 118.4mm x 31mm)
Weight: approx. 10.3 oz. (292g)
Operating Temperature: 32 to122°F (0 to 50°C)
Storage Temperature: -13 to 131°F (-25 to 55°C)
Humidity: 5% to 95% non-condensing
Emissions: FCC Class B, CE Class B, VCCI Class B
178
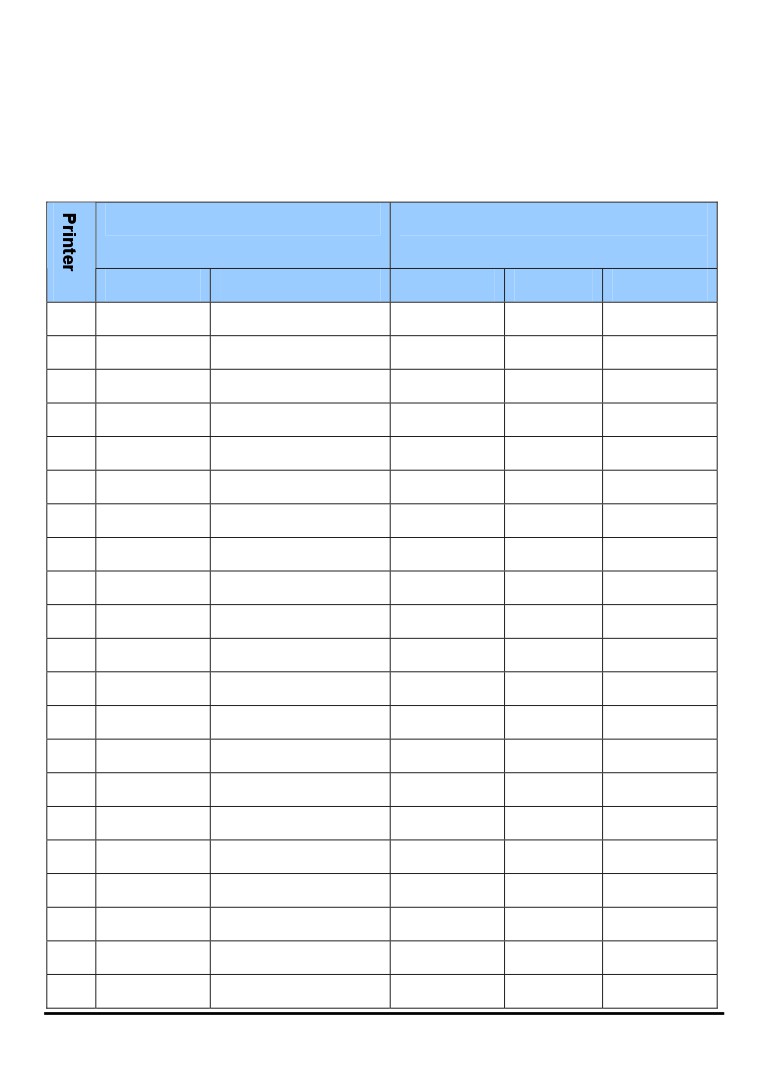
Appendix: DPR-1061 Printer Compatibility List
MFP Supported on Windows 2000 SP4 and Windows XP
Printer List
Results
(*Y=Pass, N=Fail, N/A=Non-available function)
Manufacturer
Model
Printing
Scan
Fax
1.
Avision
MF3100L
Y
Y
N/A
2.
Benq
CM3000
Y
Y
N/A
3.
Brother
MFC-210C
Y
Y
Y
4.
Brother
MFC-420CN
Y
Y
Y
5.
Brother
MFC-3240C
Y
Y
Y
6.
Brother
MFC-7220
Y
Y
Y
7.
Canon
PIXMA MP110
Y
Y
N/A
8.
Canon
PIXMA MP150
Y
Y
N/A
9.
Canon
PIXMA MP160
Y
Y
N/A
10.
Canon
PIXMA MP170
Y
Y
N/A
11.
Canon
PIXMA MP180
Y
Y
N/A
12.
Canon
PIXMA MP450
Y
Y
N/A
13.
Canon
PIXMA MP460
Y
Y
N/A
14.
Canon
PIXMA MP500
Y
Y
N/A
15.
Canon
PIXMA MP510
Y
Y
N/A
16.
Canon
PIXMA MP530
Y
Y
Y
17.
Canon
PIXMA MP600
Y
Y
N/A
18.
Canon
PIXMA MP810
Y
Y
N/A
19.
Canon
PIXMA MP830
Y
Y
Y
20.
Canon
PIXMA MP950
Y
Y
N/A
21.
Canon
PIXMA MP960
Y
Y
N/A
179

22.
Dell
Photo 926
Y
Y
N/A
23.
Dell
Photo 966
Y
Y
Y
24.
EPSON
PM-A970
Y
Y
N/A
25.
EPSON
PM-A920
Y
Y
N/A
26.
EPSON
PM-A820
Y
Y
N/A
27.
EPSON
PM-A720
Y
Y
N/A
28.
EPSON
PM-A950
Y
Y
N/A
29.
EPSON
PM-A890
Y
Y
N/A
30.
EPSON
PM-A750
Y
Y
N/A
31.
EPSON
PM-A650
Y
Y
N/A
32.
EPSON
STYLUS CX2900
Y
Y
N/A
33.
EPSON
Stylus CX3700
Y
Y
N/A
34.
EPSON
Stylus CX3900
Y
Y
N/A
35.
EPSON
Stylus CX4100
Y
Y
N/A
36.
EPSON
Stylus CX4700
Y
Y
N/A
37.
EPSON
Stylus CX4900
Y
Y
N/A
38.
EPSON
STYLUS CX5700F
Y
Y
N/A
39.
EPSON
STYLUS CX5900
Y
Y
N/A
40.
EPSON
STYLUS CX6900F
Y
Y
N/A
41.
EPSON
Stylus Photo RX530
Y
Y
N/A
42.
EPSON
Stylus Photo RX580
Y
Y
N/A
43.
EPSON
Stylus Photo RX590
Y
Y
N/A
44.
EPSON
Stylus Photo RX630
Y
Y
N/A
45.
EPSON
Stylus Photo RX650
Y
Y
N/A
46.
Fuji Xerox
WorkCentre 3119
Y
Y
N/A
47.
HP
Deskjet F380
Y
Y
N/A
180
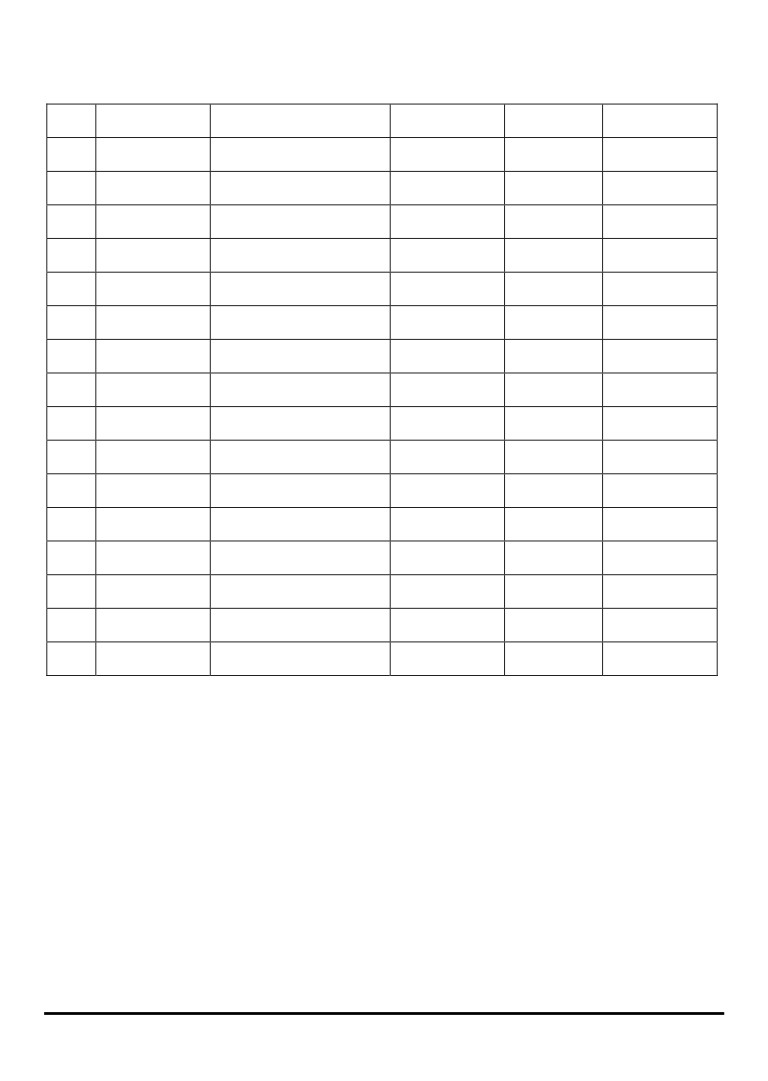
48.
HP
PSC1315
Y
Y
N/A
49.
HP
Photosmart C1350
Y
Y
N/A
50.
HP
Photosmart C1610
Y
Y
N/A
51.
HP
Photosmart C3180
Y
Y
N/A
52.
HP
Photosmart C4180
Y
Y
N/A
53.
HP
Photosmart C5180
Y
Y
N/A
54.
HP
OfficeJet 4255
Y
Y
Y
55.
HP
OfficeJet 4355
Y
Y
Y
56.
HP
OfficeJet 5510
Y
Y
Y
57.
HP
OfficeJet 5610
Y
Y
Y
58.
HP
OfficeJet 6110
Y
Y
Y
59.
HP
OfficeJet 7210
Y
Y
Y
60.
HP
LaserJet 3050
Y
Y
Y
61.
Lexmark
x3470
Y
Y
N/A
62.
Lexmark
x5470
Y
Y
Y
63.
Samsung
SCX-4100
Y
Y
N/A
64.
Samsung
SCX-4200
Y
Y
N/A
181
MFP Supported on Windows Vista 32-bit
Printer List
Results
(*Y=Pass, N=Fail, N/A=Non-available function)
Manufacturer
Model
Printing
Scan
Fax
1.
Avision
MF3100L
Y
Y
N/A
2.
Benq
CM3000
Driver not available
N/A
3.
Brother
MFC-210C
Y
Y
Y
4.
Brother
MFC-420CN
Y
Y
Y
5.
Brother
MFC-3240C
Y
Y
Y
6.
Brother
MFC-7220
Y
Y
Y
7.
Canon
PIXMA MP110
Y
Y
N/A
8.
Canon
PIXMA MP150
Y
Y
N/A
9.
Canon
PIXMA MP160
Y
Y
N/A
10.
Canon
PIXMA MP170
Y
Y
N/A
11.
Canon
PIXMA MP180
Y
Y
N/A
12.
Canon
PIXMA MP450
Y
Y
N/A
13.
Canon
PIXMA MP460
Y
Y
N/A
14.
Canon
PIXMA MP500
Y
Y
N/A
15.
Canon
PIXMA MP510
Y
Y
N/A
16.
Canon
PIXMA MP530
Y
Y
Y
17.
Canon
PIXMA MP600
Y
Y
N/A
18.
Canon
PIXMA MP810
Y
Y
N/A
19.
Canon
PIXMA MP830
Y
Y
Y
20.
Canon
PIXMA MP950
Y
Y
N/A
21.
Canon
PIXMA MP960
Y
Y
N/A
22.
Dell
Photo 926
Y
Y
N/A
23.
Dell
Photo 966
Y
Y
Y
182

24.
EPSON
PM-A970
Y
Y
N/A
25.
EPSON
PM-A920
Y
Y
N/A
26.
EPSON
PM-A820
Y
Y
N/A
27.
EPSON
PM-A720
Y
Y
N/A
28.
EPSON
PM-A950
Y
Y
N/A
29.
EPSON
PM-A890
Y
Y
N/A
30.
EPSON
PM-A750
Y
Y
N/A
31.
EPSON
PM-A650
Y
Y
N/A
32.
EPSON
Stylus CX2900
Y
Y
N/A
33.
EPSON
Stylus CX3700
Y
Y
N/A
34.
EPSON
Stylus CX3900
Y
Y
N/A
35.
EPSON
Stylus CX4100
Y
Y
N/A
36.
EPSON
Stylus CX4700
Y
Y
N/A
37.
EPSON
Stylus CX4900
Y
Y
N/A
38.
EPSON
STYLUS CX5700F
Y
Y
N/A
39.
EPSON
STYLUS CX5900
Y
Y
N/A
40.
EPSON
STYLUS CX6900F
Y
Y
N/A
41.
EPSON
Stylus Photo RX530
Y
Y
N/A
42.
EPSON
Stylus Photo RX580
Y
Y
N/A
43.
EPSON
Stylus Photo RX590
Y
Y
N/A
44.
EPSON
Stylus Photo RX630
Y
Y
N/A
45.
EPSON
Stylus Photo RX650
Driver not available
N/A
46.
Fuji Xerox
WorkCentre 3119
Y
Driver not
N/A
available
47.
HP
Deskjet F380
Y
Y
N/A
48.
HP
PSC1315
Y
Y
N/A
49.
HP
Photosmart C1350
Y
Y
N/A
183
50.
HP
Photosmart C1610
Y
Y
N/A
51.
HP
Photosmart C3180
Y
Y
N/A
52.
HP
Photosmart C4180
Y
Y
N/A
53.
HP
Photosmart C5180
Y
Y
N/A
54.
HP
LaserJet 3050
Y
Y
Driver not
available
55.
Lexmark
x3470
Y
Y
N/A
56.
Lexmark
x5470
Y
Y
Y
57.
Samsung
SCX-4100
Y
Y
N/A
58.
Samsung
SCX-4200
Y
Y
N/A
Other Printers from the brands listed above may also be supported.
For an updated compatibility list please visit: http://support.dlink.com.tw
184