Manitou MRT 2150 Privilege Plus ST4 S2 / MRT 2550 Privilege Plus ST4 S2. MANUALE D’ISTRUZIONI (2016) - 7
IT
EN
NL
E9 - Controllare usura pattini del braccio
E9 - Wear of the boom telescopic
E9 - De slijtage van de glijschoenen van
telescopico.
pads
de telescopische arm controleren.
Per queste operazioni, consultare il vostro
For these operations, consult your agent
Neem contact op met uw dealer voor deze
agente o concessionario.
or dealer.
operaties.
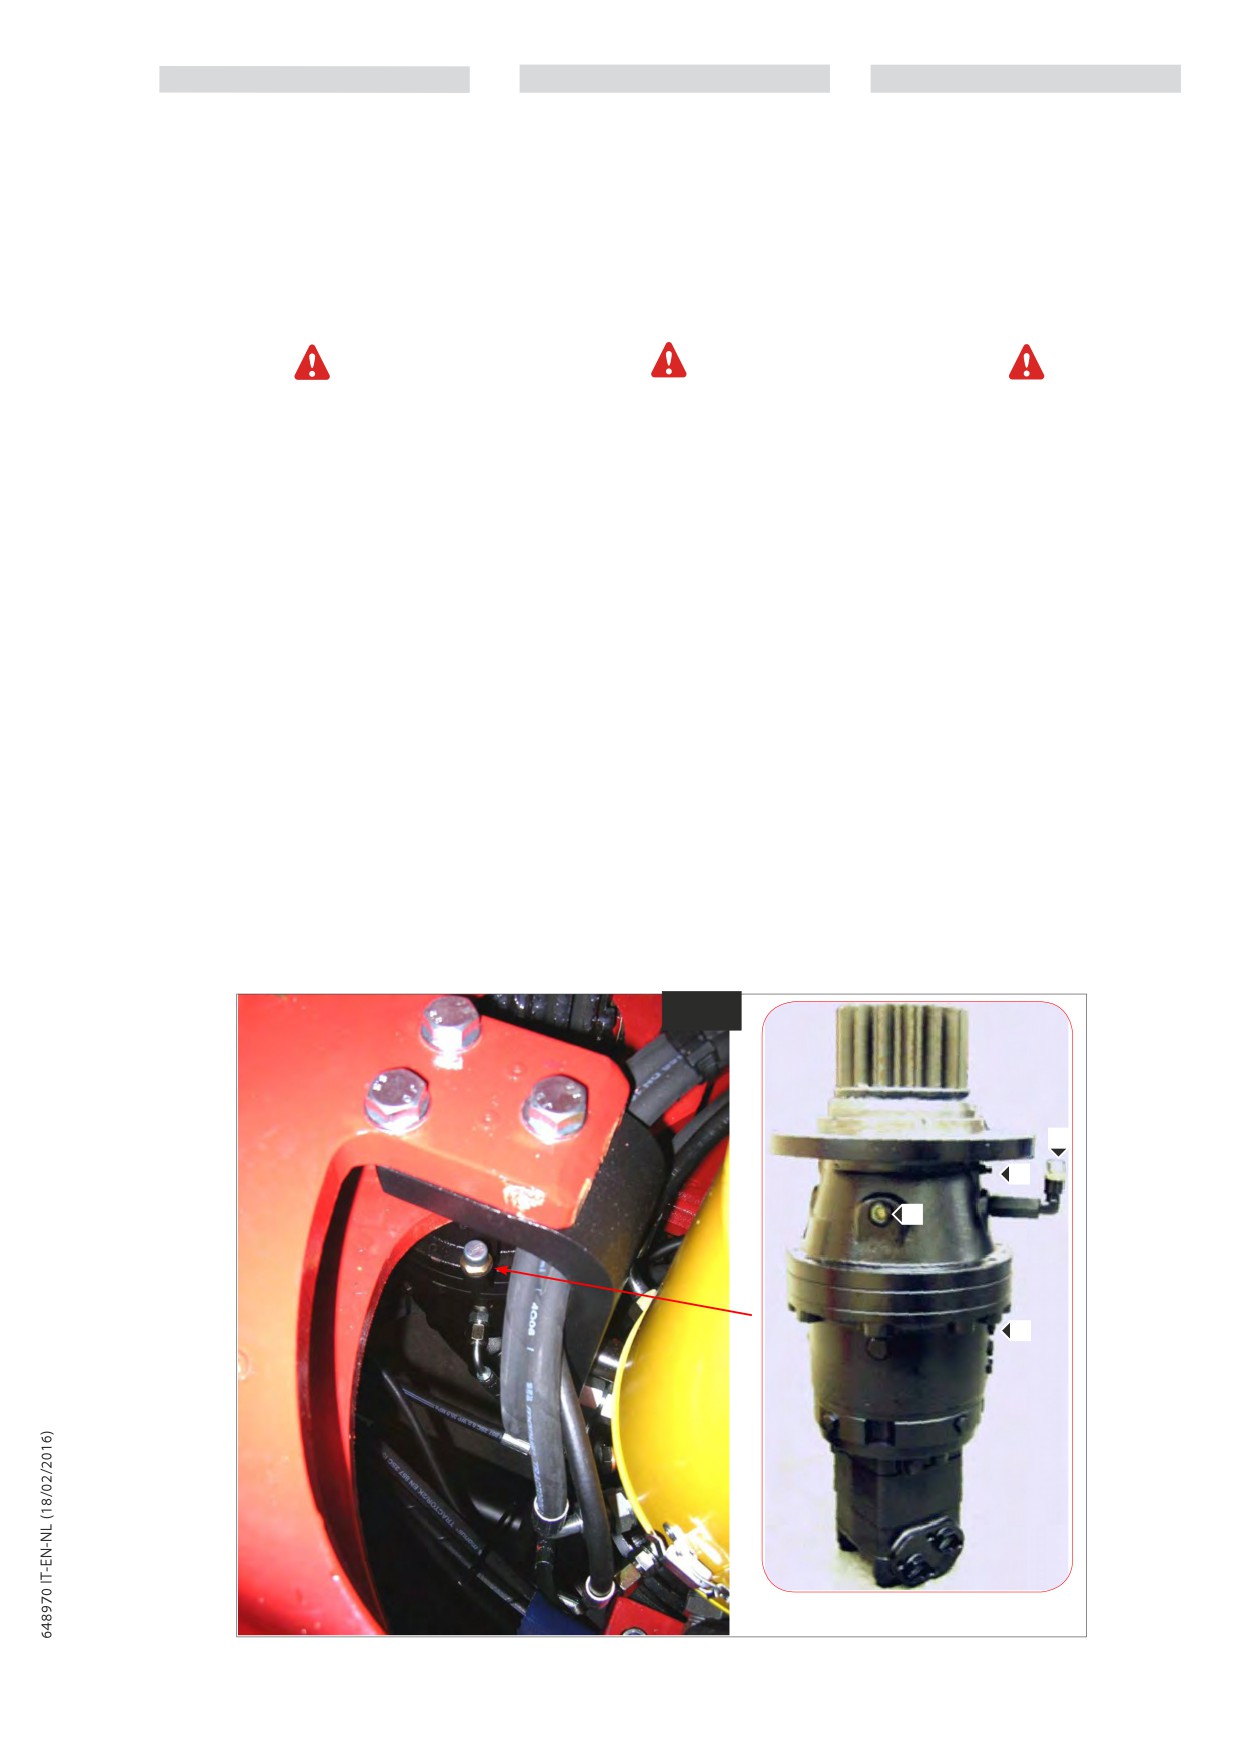
E10- Manutenzione riduttore di rotazione
E10 -Swing reduction unit maintenance
E10- Onderhoud van de draaivertrager
- Sostituire l’olio del riduttore rotazione
- Swing reduction unit oil change
- De olie van de zwenkvertrager verversen
- Lubrificare i cuscinetti del riduttore
- De lagers van de vertrager smeren
- To lubricate the bearings
Sollevare il braccio e collocare il cuneo
Raise the jib and place the jib safety wedge
Hef de arm op en plaats de veiligheidswig
di sicurezza sullo stelo del martinetto di
on the rod of the lifting cylinder (see: 1 -
op de stang van de hefcilinder
(zie:
sollevamento
(vedere:
1 - ISTRUZIONI
OPERATING AND SAFETY INSTRUCTIONS:
1
-
VEILIGHEIDSVOORSCHRIFTEN:
E NORME DI SICUREZZA: ISTRUZIONI
LIFT TRUCK MAINTENANCE INSTRUCTIONS).
ONDERHOUDSINSTRUCTIES VAN DE
DI MANUTENZIONE DEL CARRELLO
HEFTRUCK).
ELEVATORE).
Sostituire l’olio del riduttore rotazione
Swing reduction unit oil change
De olie van de zwenkvertrager verversen
Posizionare il carrello, con torretta allineata,
Position the lift truck, with turret aligned, on
Plaats de heftruck met de zwenkkop in lijn
su di una superficie piana, rientrare
a level surface, retract and raise telescopic
op een vlak oppervlak. Trek de telescopische
e sollevare completamente il braccio
boom completely, and then turn the turret
arm volledig in en hef hem omhoog. Draai
vervolgens de zwenkkop
+/-
60° naar
telescopico e poi ruotare la torretta a destra
to the right by +/- 60°, for better access to
rechts om beter toegang te krijgen tot de
di +/- 60°, per accedere meglio ai punti di
the rotation reduction gear filling points
vulpunten van de zwenkvertrager (Fig.E9).
riempimento del riduttore rotazione (fig.
(Fig.E10).
Zet de verbrandingsmotor stop en wacht
E9); fermare il motore termico e attendere
Stop the I.C. engine and wait for the hydrau-
totdat de hydraulische olie afgekoeld is.
che si raffreddi l’olio idraulico.
lic oil to cool down.
Om de olie te verversen, plaats een
Per la sostituzione dell’olio porre un
To change the oil in the top part, place a
opvangbakje onder de hoofdaflaatplug 1
recipiente sotto il tappo di scarico principale
(Fig.E10), draai hem los en laat de olie
1 (fig.E10), allentarlo e lasciare defluire l’olio.
suitable vessel under the main drain plug
afvloeien. Breng de aflaatplug
1 weer
Rimettere e stringere il tappo di scarico 1
1 (fig.E10), loosen this latter and allow the
op zijn plaats en draai ze aan (Fig.E10).
(fig.E10). Eseguire il riempimento attraverso
old oil to drain out. Fit the drain plug 1 (fig.
Vul de olie bij via het gat 2 (Fig.E10) (zie
il foro 2 (fig.E10) (vedi “Lubrificanti”).
E10) back on and tighten it. Pour in new oil
“Smeermiddelen”).
Controllare il livello tramite l’indicatore
through hole 2 (fig.E10) (see “Lubricants”).
Controleer het niveau met behulp van de
ottico 3 (fig.E10).
optische indicator 3 (Fig.E10).
The level is correct when the oil spills from
hole 3 (fig.E10).
Lubrificare i cuscinetti del riduttore con
Smeer de lagers van de vertrager
grasso specifico (vedi “Lubrificanti”) tramite
To lubricate the bearings of the reducer
met een specifiek smeermiddel
(zie
l’ingrassatore 4 (fig.E10).
“Smeermiddelen”) met behulp van de
with specific graese
(see
“Lubricants”)
smeernippel 4 (Fig.E10).
through greaser 4 (fig.E10).
E10
2
4
3
1
3-66
IT
EN
NL
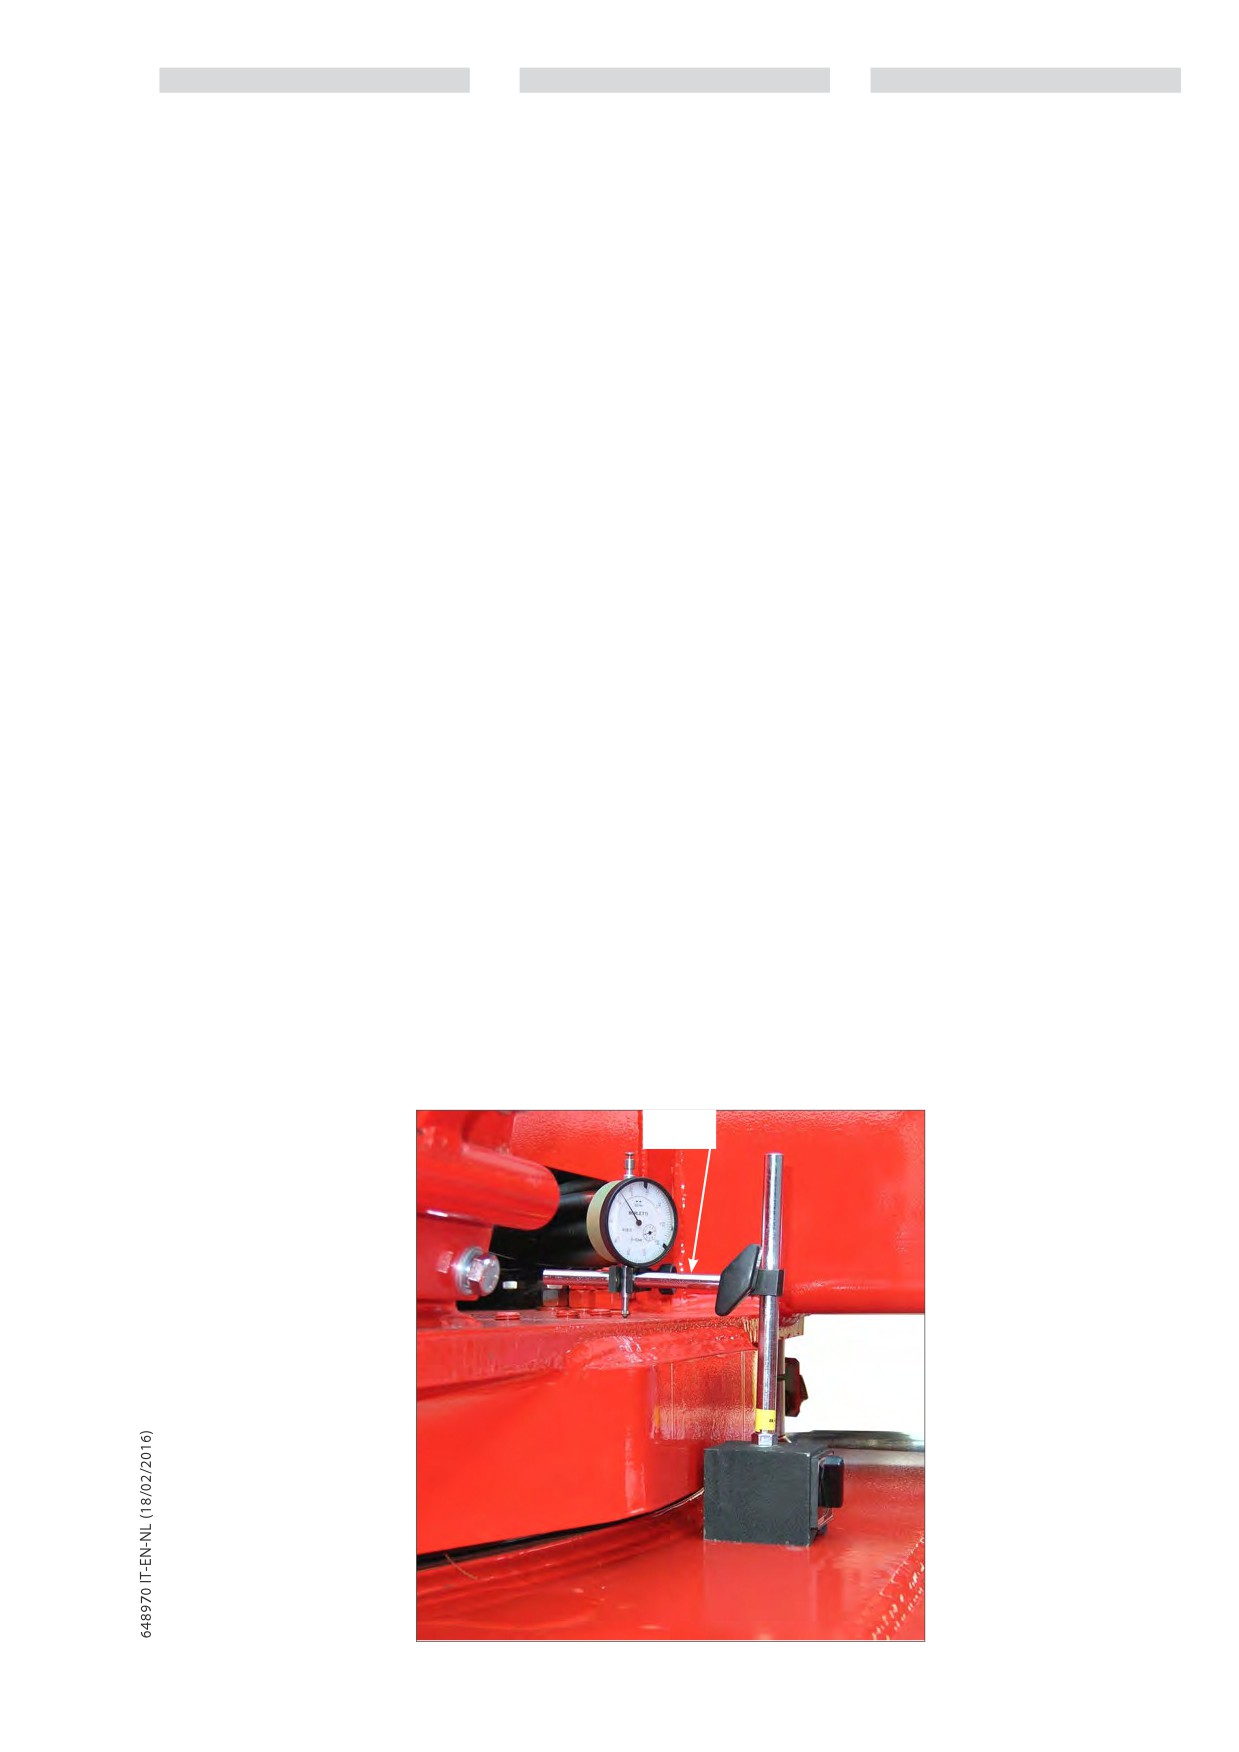
E11 - Verificare l’usura e l’incremento
E11 - Check the bearings of the fifth
E11 - De slijtage en de toename van de speling
del gioco dei cuscinetti della ralla
wheel coupling for wear and
van de lagers van het draaistel controleren
play
Il gioco dei cuscinetti a macchina nuova,
De speling van de lagers van een nieuwe
rilevato in Fabbrica, ha come valore iniziale
The initial reference value of bearing play
machine, die gemeten wordt in de fabriek, heeft
di riferimento 0,05 ÷ 0,35 mm.
in a new machine, as measured by the
als eerste referentiewaarde 0,05 ÷ 0,35 mm.
Manufacturer, is 0.05 to 0.35 mm.
Il valore di limite massimo d’usura del gioco
De maximale gebruiksgrenswaarde van de
del cuscinetto è di 2,3 mm e se durante una
The maximum bearing play limit through
lagerspeling bedraagt 2,3 mm. Als tijdens
verifica viene misurato un valore superiore,
wear is 2.3 mm. If a higher value is measu-
een controle een hogere waarde wordt
è necessario provvedere alla sostituzione
red during an inspection, the fifth wheel
gemeten, dient het draaistel vervangen te
della ralla. All’aumentare dell’usura
coupling must be replaced. Check more
worden. Wanneer de slijtage toeneemt,
intensificare i controlli.
frequently as the wear increases.
dient u frequentere controles uit te voeren.
La prova va eseguita tramite comparatore
The test should be conducted using a dial
De test dient uitgevoerd te worden met
ad orologio con scala centesimale, a
comparator with centesimal scale, with the
behulp van een meetklok met centesimale
cuscinetto fermo.
bearing at a standstill.
schaal, wanneer het lager stilstaat.
Si rileverà l’oscillazione tra una condizione
The instrument will measure the oscilla-
De trilling tussen een omstandigheid met
con momento negativo ed una con
tion between a condition with a negative
negatief moment en een met positief
momento positivo.
moment and one with a positive moment.
moment wordt geregistreerd.
Posizionare il carrello su di una superficie
Park the truck on a flat surface, without a
Plaats de heftruck op een plat oppervlak,
piana, senza carico e con il braccio sollevato
load and with the boom fully raised.
zonder lading en met de arm tot het maximum
al massimo.
Now place the comparator between the
opgeheven.
Quindi collocare il comparatore tra la
Sluit vervolgens de meetklok aan tussen de
turret and chassis, as shown in photo A
torretta e il telaio, come in foto (E11).
zwenkkop en het frame, zoals afgebeeld op
(Fig. E11).
de foto (E11).
Controllato che sia tutto in ordine abbassare
Make sure that everything is in order, then
Wanneer u gecontroleerd heeft of alles in orde
il braccio fino ad avvicinarlo al comparatore
lower the boom until it nears the compara-
is, brengt u de arm naar beneden totdat deze
ed azzerare l’orologio.
(condizione
tor and reset the dial (negative condition).
dichtbij de meetklok komt en stelt u de klok in
negativa).
Fully raise the boom and read the float
op nul. (negatieve omstandigheid).
Poi sollevare il braccio al max e leggere
value on the dial (positive condition).
Hef vervolgens de arm weer tot het maximum
il valore di gioco assiale sull’orologio
omhoog en lees de waarde van de speling van
(condizione positiva).
de assen op de klok (positieve omstandigheid).
The measured values will give the amount
of wear when compared with the maxi-
I valori rilevati confrontati con il valore
De geregistreerde waarden vergeleken met
mum limit value.
di limite massimo, forniscono l’entità
de maximale grenswaarden resulteren in de
dell’usura.
omvang van de slijtage.
E11
3-67
IT
EN
NL
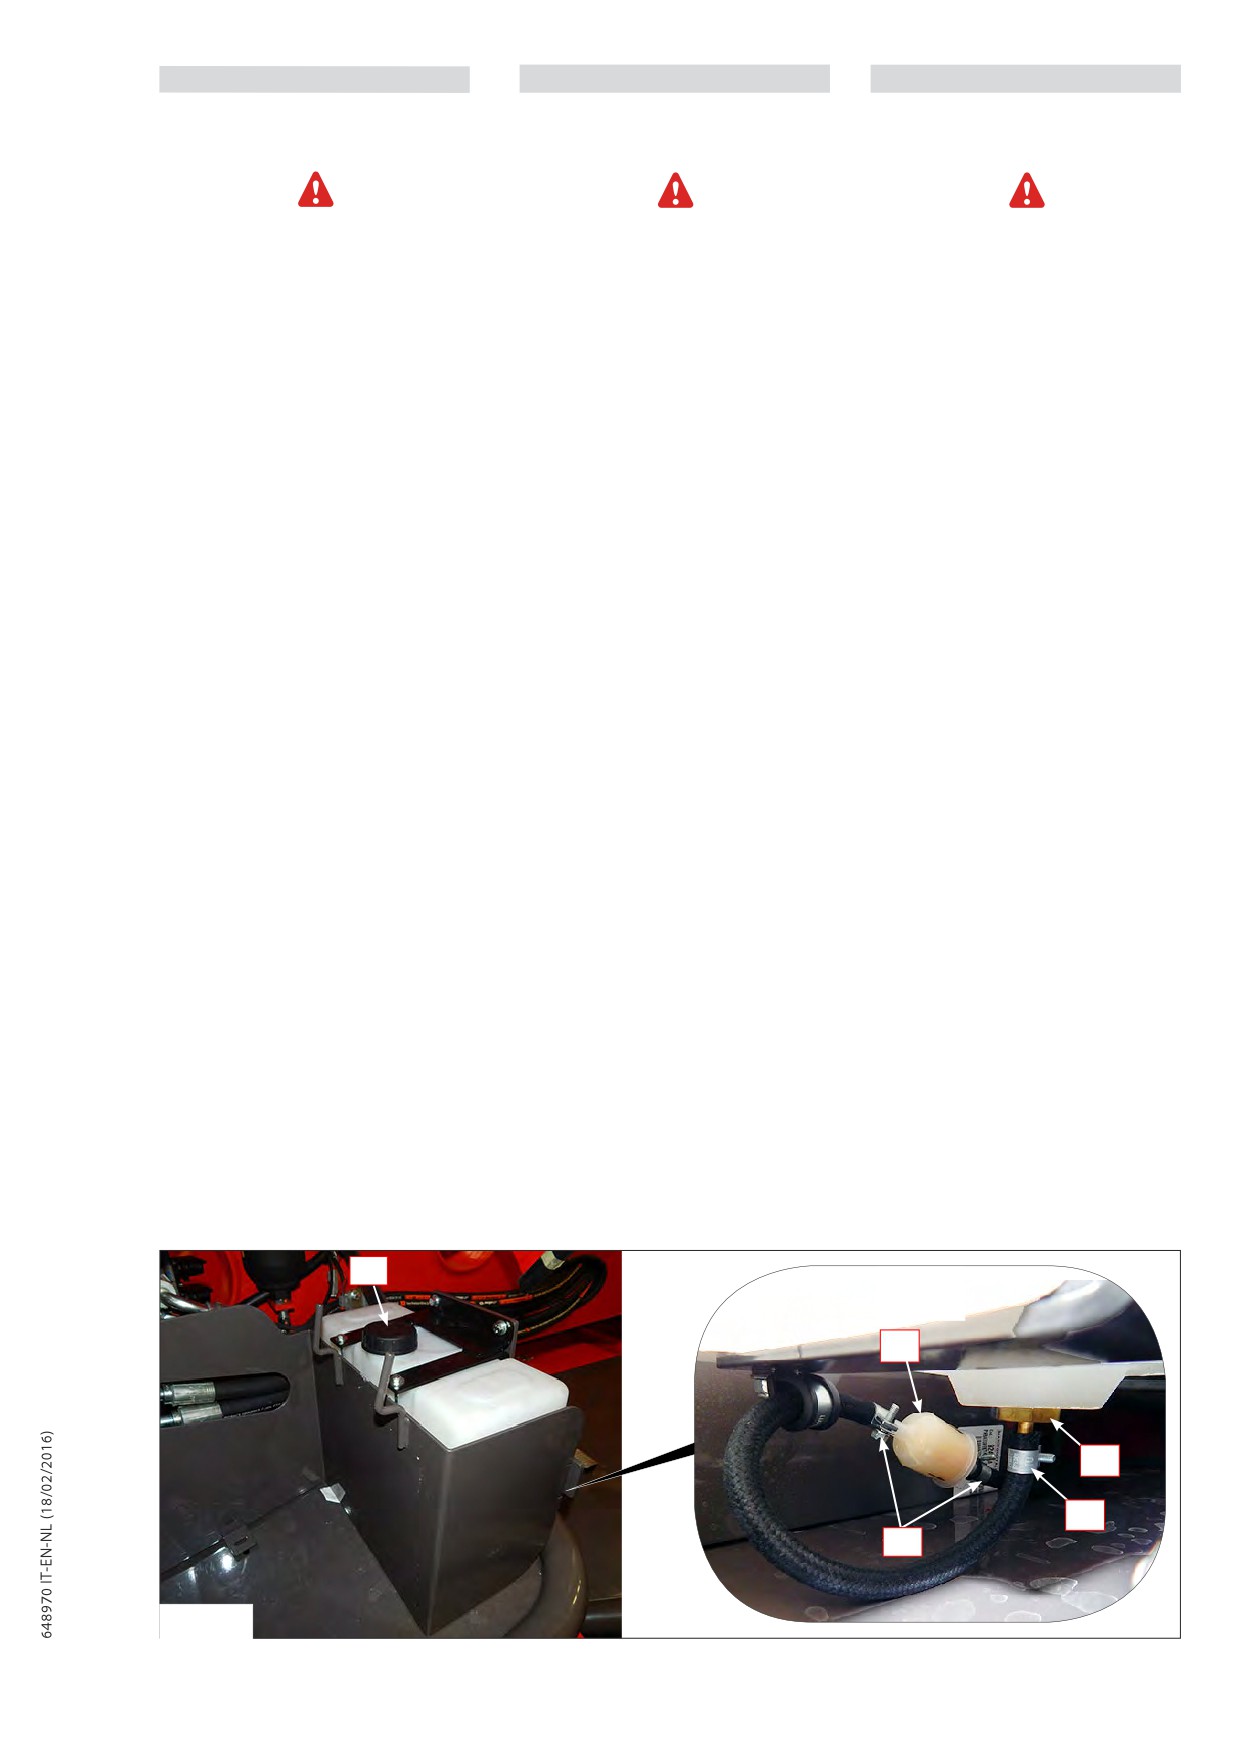
E12 - Sostituire il filtro carburante del
E12 - Replace the fuel filter heating
E12 - De brandstoffilter van de tank
serbatoio riscaldamento
tank
van de verwarming vervangen
Do not smoke near the tank or use a
Non fumare o avvicinarsi con una fiamma
Het is verboden te roken tijdens deze
durante questa operazione.
flame during this operation.
ingreep of met een vlam in de buurt te
komen.
Posizionare il carrello su di una superficie
Position the forklift truck on a level
orizzontale e con il motore fermo.
surface, with the I.C. engine switched off.
Plaats de heftruck op een horizontaal
Svitare il tappo 1 (E12/1) di riempimento
oppervlak met stilgelegde motor.
Unscrew the tank topping up plug
serbatoio poi collocare un recipiente
Draai de vuldop van de tank 1 (E12/1) los,
1 (E12/1) then place a container under the
adeguato sotto il tappo di svuotamento
plaats een geschikte opvangbak onder de
drainage plug 1a (E7/2) and unscrew the
aftapplug 1a (E12/2) en draai de slangklem
1a (E12/2) e svitare la fascetta del tubo 1b
clamp of the pipe to let the fuel drain.
1b (E12/2) om de brandstof af te voeren.
(E12/2) per lasciare defluire il carburante.
Svitare le fascette 2 (E12/2) e sganciare i
Draai de klemmen 2 (E12/2) en maak de
slangen los om de brandstof die zich in de tank
tubi per scaricare il carburante all’interno.
Unscrew the clamps 2 (E12 / 2) and unhook
bevindt af te voeren.
the pipes to drain the fuel inside.
Rimuovere il filtro 3 (E12/2) e sostituirlo
Verwijder de filter 3 (E12/2) en vervang hem
con uno nuovo di uguali caratteristiche,
met een nieuw exemplaar met dezelfde
vedere “tabella filtri e cinghie”.
Remove the filter 3 (E12 / 2) and replace it
kenmerken, zie “tabel filters en drijfriemen”.
with a new one having identical features
(see: “FILTER ELEMENTS AND BELTS TABLE”).
Ricollegare i tubi del carburante con il filtro
Sluit de brandstofslangen opnieuw aan op
ed il serbatoio.
de filter en de tank.
Reconnect the fuel system with the filter
and the tank.
Riempire il serbatoio con carburante pulito
Giet schone en brandstof in de tank en
e rimettere il tappo 1 (fig. E12/2).
plaats de dop 1 terug (E12/2).
Fill the tank with clean fuel and refit the cap
(vedere il paragrafo “Avvertenza” a pagina
1 (Fig. E12/2).
(zie de paragraaf
“Waarschuwing” op
3-94)
pagina 3-94)
(See paragraph “H8 - Heating
section
“Warning” on Page 3-94)
1
E12/2
3
1a
1b
2
E12/1
3-68
IT
EN
NL
E13 - Controllo e regolazione del gioco
E13 - Check and adjust engine and
E13 - De speling van de kleppen
delle valvole del motore e del
engine brake valve clearance
van de motor en de motorrem
freno motore.
controleren en regelen.
Operazione da effettuare la prima volta al
Operation to be carried out the first time
Deze handeling dient voor het eerst uitgevoerd
raggiungimento delle 1000 ore di lavoro,
after
1000 hours of service, periodically
te worden na 1000 werkuren, en dient om de
periodicamente ogni 1000 ore di lavoro.
every 1000 hours of service.
1000 werkuren herhaald te worden.
Adjust the valve clearance when the engine
Registrare il gioco delle valvole a motore
Regel de speling van de kleppen als de
is cold (at least 30 minutes after stopping the
freddo (almeno 30 minuti dopo l’arresto del
motor koud is (ten minste 30 minuten nadat
engine, even if it was only operated for a brief
motore, anche se questo è rimasto in funzione
de motor is stopgezet, ook al is hij slechts
solo per un breve periodo).
period).
gedurende een korte periode gebruikt).
Se i coperchi della testata sono molto
Clean very dirty cylinder head covers before
Als de afdekkingen van de kop heel vuil zijn,
imbrattati, pulirli prima di rimuoverli.
removal.
maak ze schoon voor u ze verwijdert.
Pericolo di incidenti.
Risk of accident.
Brandgevaar.
Se il veicolo non è bloccato può mettersi
If not properly secured, a vehicle might acci-
Als het voertuig niet geblokkeerd is, kan
in movimento involontariamente con
dentally be set in motion, knocking somebody
het zich onvrijwillig in beweging zetten
conseguente rischio di investire o schiacciare
down or trapping them or causing an acci-
en personen in de buurt aan te rijden of
le persone circostanti o di provocare un
ongevallen te veroorzaken met lichamelijk
dent and injuring you or others.
incidente provocando lesioni al guidatore e
letsel voor de bestuurder en personen in de
- Always prevent the vehicle from rolling away
ad altre persone.
buurt tot gevolg.
by applying the parking brake and, if neces-
- Bloccare sempre il veicolo con il freno di
- Blokkeer het voertuig altijd met de
sary, by placing chocks under the wheels.
stazionamento e, se necessario, con i cunei
parkeerrem en, indien nodig, met de
- Shift the transmission into neutral.
d’arresto onde evitarne il movimento
blokkeringen om onverwachte bewegingen
- Only turn the engine over using the rotation
fortuito.
te vermijden.
device provided for this purpose.
- Portare il cambio in posizione di folle.
- Zet de aandrijving in de vrije stand.
- Ruotare il motore esclusivamente mediante
- Draai de motor alleen met behulp van het
l’apposito dispositivo di rotazione.
desbetreffende draai-instrument.
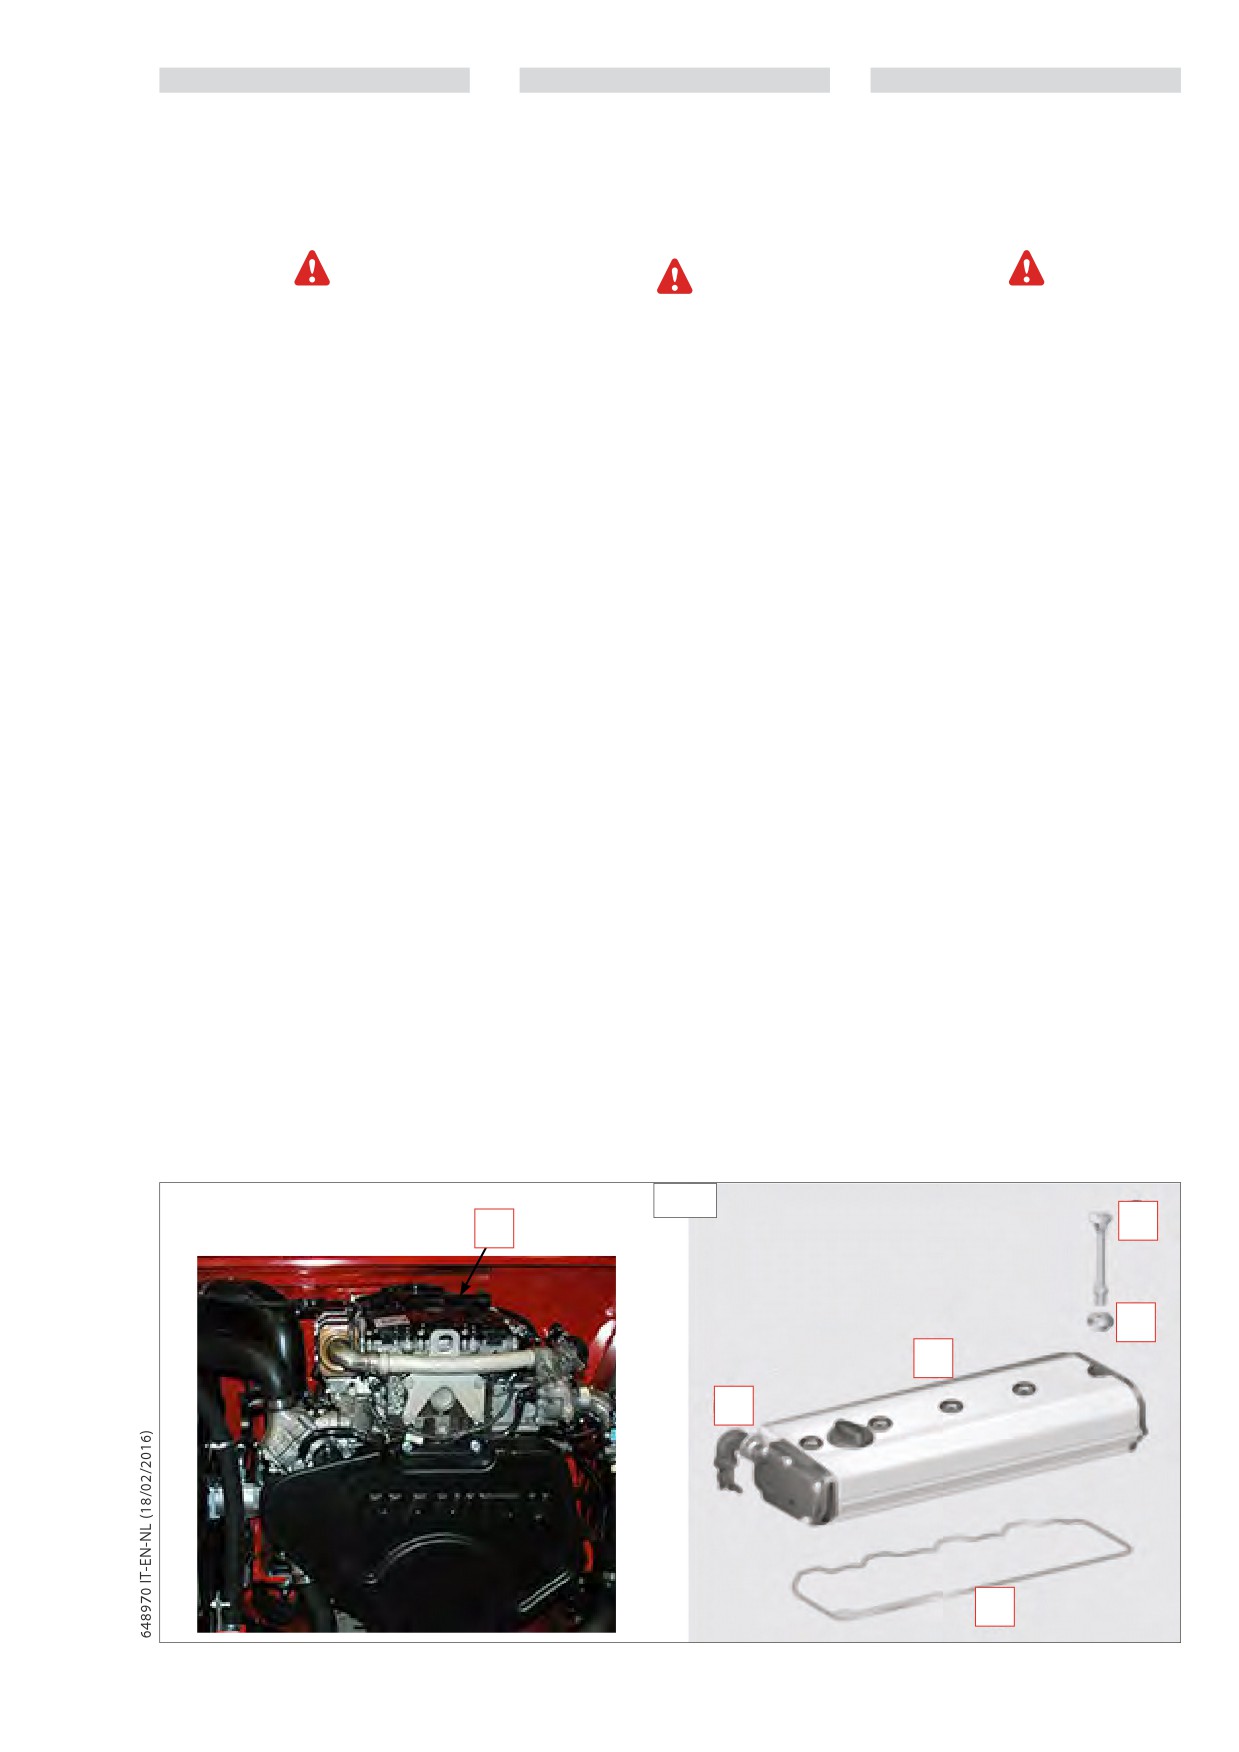
Removing and fitting the cylinder head
Smontaggio/montaggio del coperchio
Demontage/montage van de afdekking
covers “1”(E13)
della testata “1”(E13)
van de kop “1” (E13)
Removal
Smontaggio
Demontage
Remove engine ventilation hose “6” (E13)
Smontare il tubo flessibile di sfiato del
Demonteer de flexibele verluchtingsbuis
from the cylinder head cover.
motore “6”(E13) dal coperchio della testata
van de motor “6” (E13) van de afdekking van
Unscrew hexagon socket screw “3”(E13)
cilindri.
de cilinderkop.
from the cylinder head cover with sealing
Svitare e rimuovere la vite ad esagono cavo
Draai de zeshoekige schroef “3” los (E13)
washers “4”(E13).
“3”(E13) dal coperchio della testata cilindri
van de afdekking van de cilinderkop,
Remove cylinder head cover “2”(E13).
insieme all’anello di tenuta “4”(E13).
samen met de afdichtingsring “4” (E13) en
Rimuovere il coperchio della testata
verwijder hem.
“2”(E13).
Verwijder de afdekking van de kop “2”(E13).
Installation
Clean the cylinder head and the cylinder
Montaggio
Montage
head cover sealing surfaces.
Pulire le superfici di tenuta della testata
Maak de oppervlakken van de
Check the gasket between the cylinder
cilindri e del relativo coperchio.
cilinderkoppen en de relatieve afdekkingen
head cover and charge-air manifold
schoon.
Sostituire sempre la guarnizione tra il
“1”(E13) and replace if necessary.
Vervang altijd de pakking tussen de
coperchio della testata cilindri e la testata.
Always replace the gasket between the
afdekking van de cilinderkop en de kop.
Montare il coperchio della testata cilindri.
cylinder head cover and the cylinder head.
Monteer de afdekking van de cilinderkop.
Inserire le viti ad esagono cavo “3”(E13) con
Plaats de zeshoekige schroeven “3” (E13)
Position the cylinder head cover.
anelli di tenuta “4”(E13) nuovi e serrarle.
met nieuwe afdichtingsringen “4” (E13) en
Fit Allen bolts “3”(E13) with new sealing
Coppia di serraggio: 30 Nm.
draai ze vast.
washers ”4”(E13) and tighten.
Aanhaalmoment: 30 Nm.
Tightening torque:30 Nm.
E13
3
1
4
2
6
5
3-69
IT
EN
NL
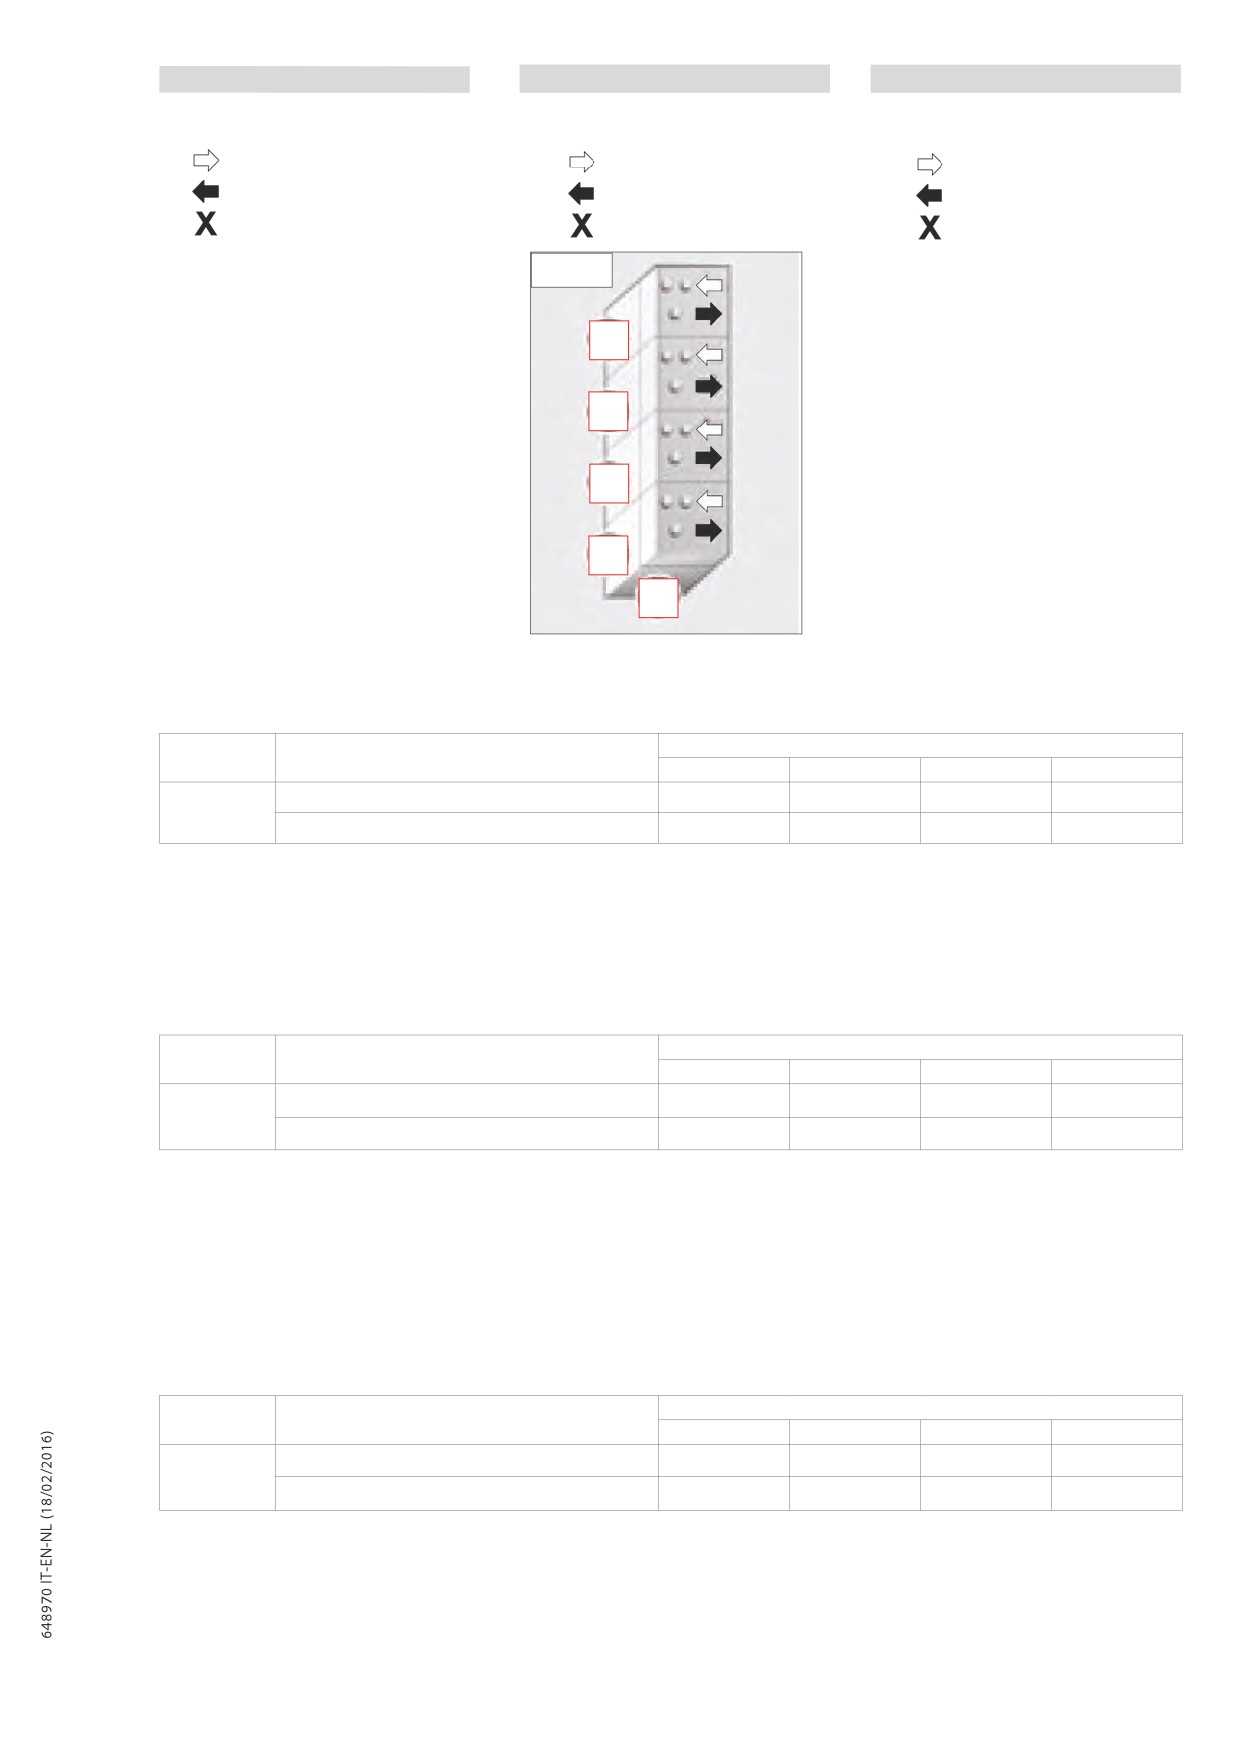
Disposizione dei cilindri e delle valvole
Layout of cylinders and valves (“1,2,3,4”
Opstelling van de cilinders en de kleppen
(“1,2,3,4” E13.1):
E13.1)
(“1,2,3,4” E13.1):
= valvola di aspirazione
= inlet valve
=
aanzuigklep
= valvola di scarico
= exhaust valve
=
afvoerklep
= lato volano
= flywheel end
=
kant wiel
E13.1
1
2
3
4
X
Controllo/regolazione del gioco delle
valvole
Cilindri/valvole da registrare
Motore
Posizione dell’albero motore
1
2
3
4
Incrocio valvole cil. 4
E/A
E
A
-
OM 934
Incrocio valvole cil. 1
-
A
E
E/A
E - valvola di aspirazione
A - valvola di scarico
Registrare tutte le valvole in
2 posizioni
dell’albero motore.
Checking and adjusting the valve
clearance
Crankshaft position
Cylinder/valves to be adjusted
Engine
1
2
3
4
4th cylinder valve overlap
I/E
I
E
-
OM 934
1st cylinder valve overlap
-
E
I
I/E
I - intake valve
E - exhaust valve
Adjust all valve clearances in 2 crankshaft
positions.
Controle/regeling van de speling van de
kleppen
Af te stellen cilinders/kleppen
Motor
Positie van de motoras
1
2
3
4
Kruispunt kleppen cil. 4
E/A
E
A
-
OM 934
Kruispunt kleppen cil. 1
-
A
E
E/A
E - aanzuigklep
A - afvoerklep
Registreer alle kleppen in 2 standen van de
motoras.
3-70
IT
EN
NL
Ruotare l’albero motore utilizzando l’apposito
Use the turning tool to turn the crankshaft
Draai de motoras met behulp van het
dispositivo finché il cilindro 4 non si trova in
until the 4th cylinder is at overlap TDC. (1st
desbetreffende instrument totdat de
corrispondenza del PMS di incrocio (cilindro
cylinder at ignition TDC). Then turn the 1st
cilinder
4 zich ter hoogte van de PMS-
1 nel PMS d’accensione), quindi portare il
cylinder to overlap TDC (4th cylinder at
kruising bevindt (cilinder 1 in de ontsteking-
cilindro 1 in corrispondenza del PMS d’incrocio
ignition TDC).
PMS). Breng vervolgens cilinder
1 ter
(cilindro 4 nel PMS d’accensione).
Check and adjust the valves in accordance
hoogte van de PMS-kruising (cilinder 4 in
with the table above.
de ontsteking-PMS).
Controllare e registrare le valvole secondo la
tabella riportata sopra.
Measure the valve clearance between the
Controleer de kleppen en regel ze volgens
rocker arm and valve stem (exhaust valve)
de bovenvermelde tabel.
Misurare il gioco della valvola tra il bilanciere
or valve bridge (inlet valve) with a feeler
e lo stelo della valvola (valvola di scarico) o il
Meet de speling van de klep tussen het
gauge (arrow).
ponte valvole (valvola di aspirazione) con uno
balanceertoestel en de staaf van de klep
spessimetro (freccia).
It must be possible to pull the feeler gauge
(afvoerklep) of de klepbrug (aanzuigklep)
Lo spessimetro deve poter passare con una
through with only light resistance.
met een diktemeter (pijl).
leggera resistenza.
De diktemeter moet erdoor kunnen met
een beperkte weerstand.
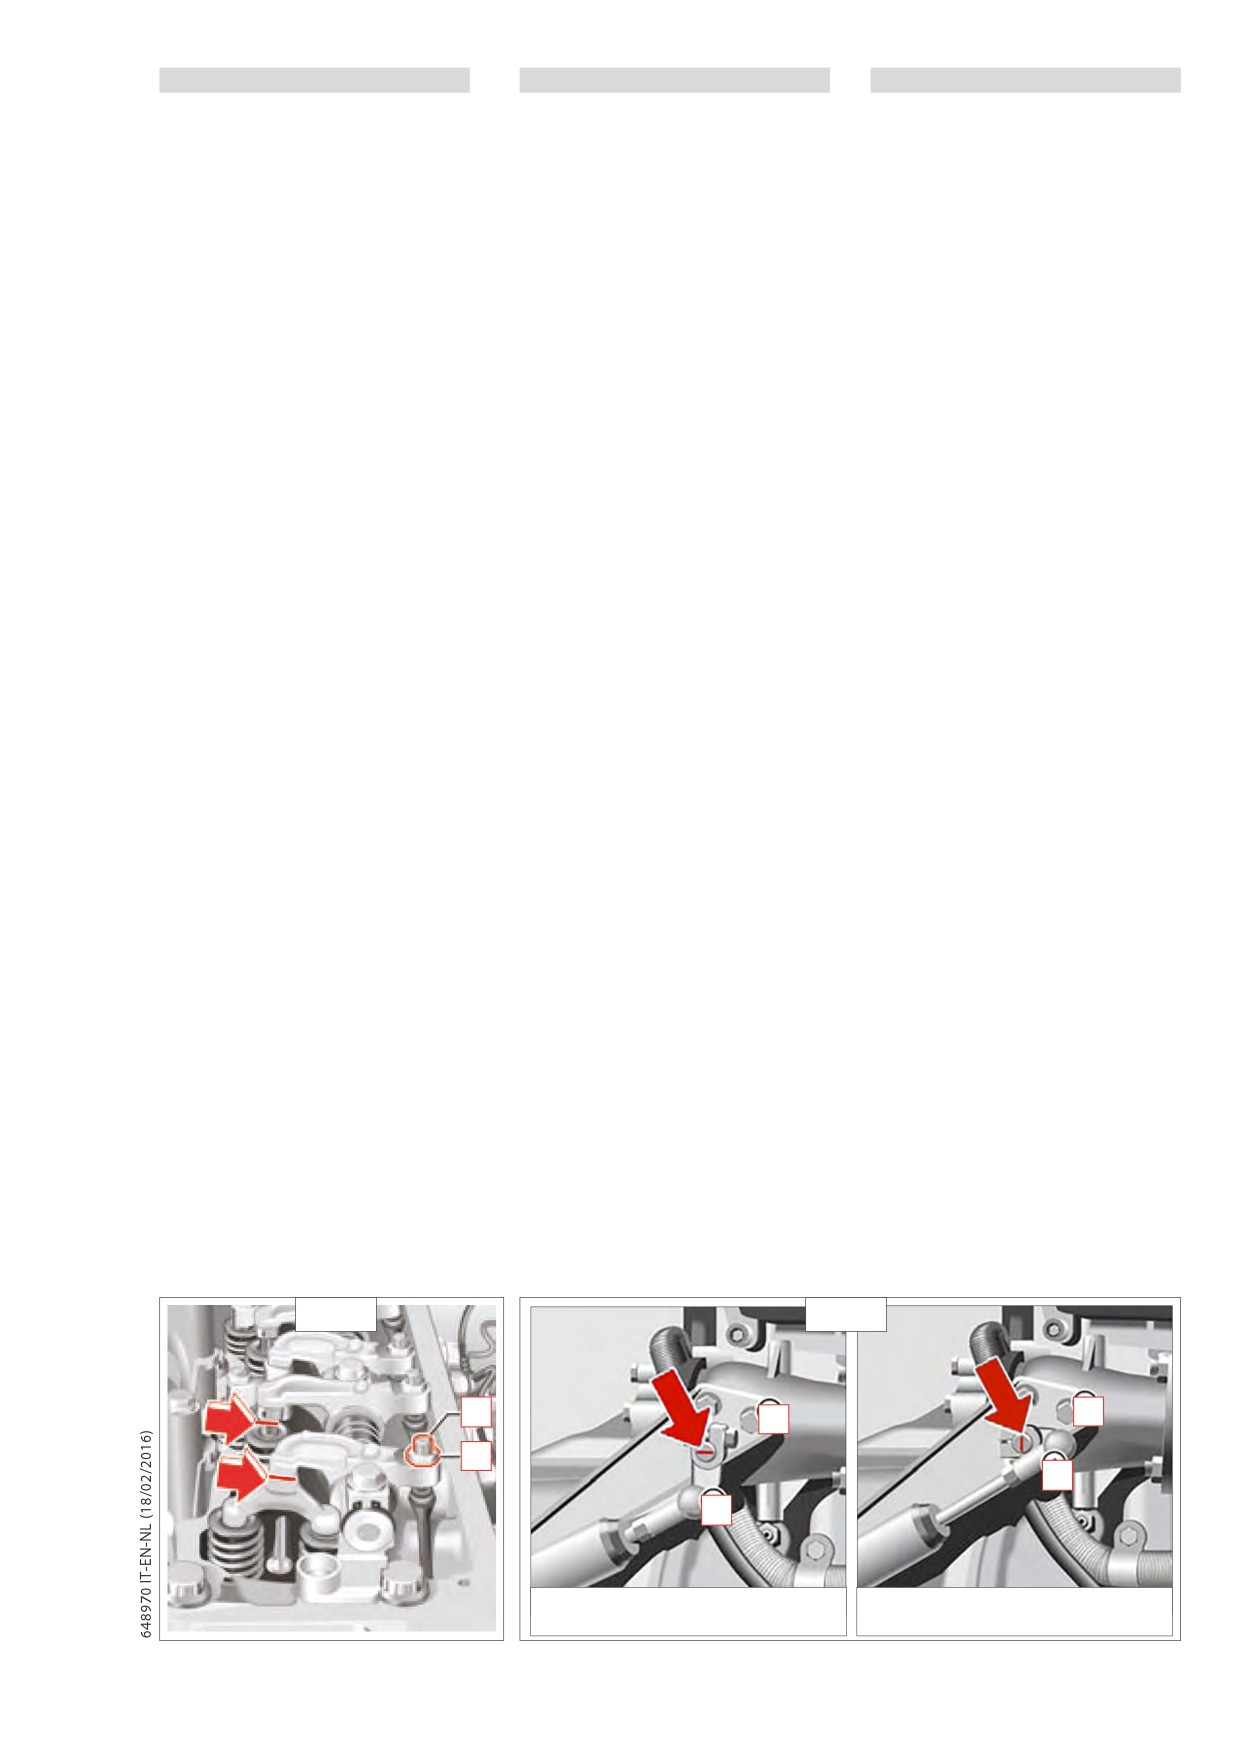
Gioco delle valvole:
Valve clearance:
Speling van de kleppen:
valvola di aspirazione mm = 0,30 (±0,05)
Inlet valves mm = 0.30 (±0,05)
aanzuigklep mm = 0,30 (±0,05)
valvola di scarico mm = 0,60 (±0,05)
Exhaust valve mm = 0.60 (±0,05)
afvoerklep mm = 0,60 (±0,05)
Per eseguire la regolazione del gioco delle
Slacken counter nut “2”(E13.2) to adjust the
Om de speling van de kleppen te regelen,
valvole allentare il controdado “2”(E13.2).
valve clearance.
draai de contramoer “2” los (E13.2).
Regolare il gioco valvole girando la vite di
Adjust the valve clear-ance by turning
Regel de speling van de kleppen door aan
registro “1”(E13.2).
adjustment screw “1”(E13.2).
de stelschroef “1” te draaien (E13.2).
Riserrare il controdado.
Retighten the counter nut.
Draai de contramoer opnieuw vast.
Coppia di serraggio: 25 Nm.
Tightening torque: 25Nm.
Aanhaalmoment: 25 Nm.
Controllare nuovamente il gioco valvole e,
Check the valve clearance again and rea-
Controleer opnieuw de speling van de
se necessario, correggerlo.
djust if necessary.
kleppen. Pas ze, indien nodig, aan.
Engine brake: checking condition
Freno motore: controllo delle condizioni e
Motorrem: controle van de staat en
and setting (if installed)
regolazione (se installato)
afstelling (indien genstalleerd)
Checking condition
Controllo delle condizioni
Controle van de staat
Remove the wire circlip from the engine
Verwijder de ijzeren veiligheidsdraad die
Rimuovere il filo metallico di sicurezza presente
cylinder ball socket.
zich op de bolvormige kap van de cilinder
sulla calotta sferica del cilindro del motore.
Prise off the ball socket from throttle valve
van de motor bevindt.
Disimpegnare la calotta sferica dalla testa
lever 1 ball neck.
Verwijder de bolvormige kap van de
sferica della leva della valvola a farfalla “1”
bolvormige kop van de hendel van de
Check the engine brake cylinder, ball neck
(E13.3) esercitando pressione.
vlinderklep “1” (E13.3) door er druk op uit
and ball socket as well as the throttle valve
Controllare lo stato di usura del cilindro del
te oefenen.
shaft for wear.
freno motore, della testa sferica, della calotta
Controleer of de cilinder van de motorrem,
Check the throttle valve lever on the thrott-
de bolvormige kop, de bolvormige kap en
sferica e dell’alberino della valvola a farfalla.
le valve shaft for firm seating and retighten
de as van de vlinderklep slijtage vertonen.
Controllare che la leva della valvola a farfalla
the clamping screws if necessary.
Controleer of de hendel van de vlinderklep
sia alloggiata saldamente sull’alberino, se
Lubricate the ball socket with the specified
stevig op de as steunt. Draai, indien nodig,
necessario, riprendere il serraggio delle viti.
de schroeven vaster.
grease.
Lubrificare la calotta sferica utilizzando il
Smeer de bolvormige kap met het
Press the ball socket back onto the ball
grasso prescritto.
aanbevolen vet.
neck.
Applicare nuovamente la sede sferica sulla
Breng de bolvormige houder opnieuw aan
Insert the wire circlip.
op de bolvormige kop door er druk op uit
testina sferica esercitando pressione.
te oefenen.
Introdurre l’anello di sicurezza in filo metallico.
Breng de veiligheidsring in ijzerdraad aan.
Checking adjustment
Controllo della registrazione
When the engine brake is applied, throttle
Controle van de afstelling
Con il freno motore azionato la leva della
valve lever “1” (E13.3) must make contact with
Met de motorrem geactiveerd, moet de
valvola a farfalla
“1”(E13.3) in posizione
retainer “2”(E13.3) when the throttle valve
hendel van de vlinderklep “1”(E13.3) in de
di lavoro (cilindro estratto) deve essere a
lever is in its active position (cylinder exten-
bedrijfsstand (filter uitgeschoven) de steun
contatto con il supporto “2”(E13.3).
ded).
“2” aanraken (E13.3).
Anche quando il cilindro del freno motore
Ook wanneer de cilinder van de motorrem
è in posizione di riposo (cilindro rientrato)
The throttle valve lever must also make con-
zich in de ruststand bevindt
(cilinder
la leva della valvola a farfalla deve essere a
tact with the retainer when the engine brake
ingedrukt), moet de hendel van de
contatto con il supporto; in questo modo
cylinder is in its inactive position (cylinder
vlinderklep de steun aanraken; zo volstaat
il precarico della molla di richiamo del
retracted); if this is the case the return spring
het voorladen van de veer van de cilinder
cilindro del freno motore risulta sufficiente.
pretension of the engine brake cylinder is
van de motorrem.
Controllare la posizione dell’alberino della
adequate.
Controleer de positie van de as van de
valvola a farfalla: se il freno motore è in
Check the position of the throttle valve shaft:
vlinderklep: als de motorrem zich in
posizione di riposo, l’intaglio deve trovarsi
de ruststand bevindt, is de inkeping
in posizione orizzontale In posizione di
when the engine brake is inactive, the slot
horizontaal. In de werkstand bevindt de
lavoro, invece, l’intaglio deve trovarsi in
must be horizontal. When the engine brake is
inkeping zich in de verticale positie.
posizione verticale.
in the active position, the slot must be vertical.
E13.2
E13.3
1
2
2
2
1
1
Leva della valvola a farfalla in posizione di riposo
Leva della valvola a farfalla in posizione di lavoro
Throttle valve lever in inactive position
Throttle valve lever in active position
Hendel van de vlinderklep in ruststand
Hendel van de vlinderklep in werkingstand
3-71
IT
EN
NL
E14 - Pulizia del pre-filtro “DEF”
E14 - Cleaning prefilter and replace
E14 - De “DEF”-voorfilter schoonmaken
“DEF” filter
Se il tappo del serbatoio di “DEF” viene aperto
If the “DEF” tank cap is opened at high tempe-
Als de dop van de“DEF”-tank wordt
in presenza di temperature elevate, possono
ratures, ammonia vapours may escape.
geopend bij hoge temperaturen, kunnen er
fuoriuscire vapori di ammoniaca.
ammoniakdampen vrijkomen.
Ammonia vapours have a pungent odour and
I vapori di ammoniaca hanno un odore
Ammoniakdampen hebben een scherpe geur
particularly irritate:
en zijn irriterend voor
pungente e risultano irritanti in particolare
- skin
- de huid
per
- mucous membranes
- de slijmvliezen
- la pelle
- eyes
- de ogen
- le mucose
De aanwezigheid van dampen kan een
- gli occhi
The vapours may cause a burning sensation
brandend gevoel aan de ogen, de neus en de
La presenza dei vapori può causare bruciore
in the eyes, nose and throat as well as irrita-
mondholte veroorzaken, alsook hoestbuien
agli occhi, al naso e alle cavità orali nonché
tion of the throat and watering eyes.
en tranende ogen.
tosse e lacrimazione.
Avoid inhaling ammonia vapours.
Ammoniakdampen mogen niet ingeademd
Non inalare i vapori di ammoniaca.
worden.
“DEF” must not come into contact
Il
“DEF” non deve venire a contatto con la
De “DEF” mag niet in contact komen met de
with skin, eyes or clothing.
pelle, gli occhi o gli indumenti.
huid, de ogen of kledingstukken.
- Se il “DEF” viene a contatto con gli occhi
- If “DEF” comes into contact with your eyes or
- Als de “DEF” in contact komt met de ogen
o la pelle, sciacquare immediatamente e
skin, rinse affected areas with clean water
of de huid, dient u deze onmiddellijk en
accuratamente con acqua pulita.
immediately.
zorgvuldig af te spoelen met zuiver water.
- In caso di ingerimento del “DEF” sciacquare
- If “DEF” is swallowed, immediately rinse your
- Als de “DEF” ingeslikt wordt, dient u de mond
onmiddellijk en overvloedig te spoelen met
immediatamente la bocca con abbondante
mouth out with a lot of clean water and
zuiver water en veel water drinken.
acqua pulita e bere acqua in abbondanza.
drink plenty of water.
- Kledingstukken die met de “DEF” in contact
- Sostituire immediatamente gli indumenti
- Change clothing that is soiled with “DEF”
zijn gekomen dienen onmiddellijk vervangen
imbrattati con “DEF”.
immediately.
te worden.
- In caso di reazioni allergiche consultare
- If allergic reactions occur, consult a doctor
- Raadpleeg in geval van allergische reacties
immediatamente un medico.
onmiddellijk een arts.
Tenere il “DEF” fuori dalla portata dei bambini.
immediately.
Houd de “DEF” buiten het bereik van kinderen.
Keep “DEF” out of the reach of
children.
Durante l’esercizio e dopo l’arresto del motore
Tijdens de werking en nadat de motor stopgezet
le tubazioni
“DEF” e tutti i componenti
is, blijven de
“DEF”-geleidingen en alle
The “DEF” lines and all connected
collegati restano in pressione e possono
aangesloten onderdelen onder druk. Ze kunnen
risultare molto caldi. Per tale ragione sussiste
components are pressurised during operation
heel warm zijn. Daarom bestaat het gevaar voor
il pericolo di ustioni. Aprendo l’impianto
and could be hot, even after the engine has
brandwonden. Wanneer de installatie geopend
sussiste il pericolo di ustioni causato dagli
been switched off. There is a risk of burns.
wordt, is er gevaar voor brandwonden die
spruzzi di “DEF” ad alta temperatura.
When opening the pressurised system, there
veroorzaakt worden door hete “DEF”-spatten.
- Iniziare gli interventi sul sistema di post
- Wacht ten minste 5 minuten nadat u de
is a risk of scalding due to hot “DEF”
motor heeft uitgeschakeld voordat u de
trattamento dei gas di scarico non prima
spraying out.
ingrepen op het nabehandelingssysteem van
che siano trascorsi almeno 5 minuti dallo
- Wait at least 5 minutes after switching
de uitlaatgassen start.
spegnimento del motore.
off the engine before starting work on the
-
Wees voorzichtig wanneer u de
- Aprire lentamente i raccordi delle tubazioni
verbindingsstukken van de leidingen en de
e gli elementi di bloccaggio dei componenti
exhaust gas aftertreatment system.
blokkeringselementen van de onderdelen
del sistema. Durante l’apertura coprire il
- Open line connections and caps on system
van het systeem opent. Bedek het punt dat
punto di sezionamento con un panno.
components slowly. Cover the area that you
geopend wordt met een doek.
- Indossare guanti, indumenti e occhiali
are disconnecting with a cloth.
- Draag beschermende handschoenen, kleding
protettivi.
- Wear suitable protective gloves, protective
en bril.
clothing and safety goggles.
La penetrazione del “DEF” nel circuito del
Het binnendringen van
“DEF” in het
liquido di raffreddamento (anche in quantità
koelvloeistofcircuit (ook in geval van een kleine
If “DEF” gets into the coolant circuit
minima) causa il danneggiamento dei
hoeveelheid) beschadigt de thermostaten en
termostati e dei sensori della temperatura.
(even minute amounts), thermostats
de temperatuursensoren.
- Si raccomanda assolutamente di separare
and temperature sensors will be damaged.
- Het is raadzaam om de “DEF” gescheiden
il “DEF” dagli altri materiali di consumo.
- Always keep “DEF” completely separate from
te houden van de andere grondstoffen.
- Non utilizzare gli stessi recipienti e
other service products.
- Voor het inzamelen van de “DEF” en de
vaschette di raccolta per il “DEF” e per agli
- Do not use the same containers and fluid
andere grondstoffen mogen niet dezelfde
altri materiali di consumo.
containers en bakjes worden gebruikt.
collecting pans for “DEF” and other service
- Non utilizzare materiali di consumo
- Gebruik geen grondstoffen die sporen van
products.
contenenti tracce di “DEF”.
“DEF” bevatten.
- Do not continue to use service products that
I singoli componenti del sistema Blue-Tec®
contain traces of “DEF”.
De afzonderlijke elementen van het Blue-
reagiscono in modo estremamente sensibile
Tec®-systeem reageren op extreem gevoelige
anche in presenza di tracce minime di
Individual components of the BlueTec® system
wijze, ook in geval van minieme sporen van
impurità contenute nel “DEF”.
react very sensitively to even the slightest
onzuiverheden die zich in de “DEF” bevinden.
-
Utilizzare esclusivamente recipienti
trace of impurities in “DEF”.
- Gebruik uitsluitend schone opvangbakjes die
e vaschette di raccolta puliti, idonei a
geschikt zijn om “DEF” te bevatten.
- Only use containers and fluid collecting pans
contenere il “DEF”.
- Gebruik geen
“DEF” die sporen van
that are clean and suitable for “DEF”.
- Non utilizzare “DEF” contenente tracce di
onzuiverheden bevat.
- Do not continue to use “DEF” which contains
impurità.
traces of impurities.
3-72
IT
EN
NL
Misure antincendio
Fire fighting measures
Brandbestrijdingsmaatregelen
Il “DEF” non è infiammabile. In caso di incendio
“DEF” is not flammable. In the event
“DEF” is niet ontvlambaar. In geval van brand
kan er NH3 vrijkomen (ammoniak).
può essere liberata NH3 (ammoniaca).
of a fire, NH3 (ammonia) may be released.
In dit geval bestaat er vergiftigingsgevaar.
In questo caso sussiste il pericolo di
This may result in a risk of poisoning. Measures
De maatregelen die getroffen worden
avvelenamento. Le misure atte a estinguere
to extinguish a fire must therefore be
om eventuele branden te blussen
eventuali incendi devono risultare idonee alle
adapted to suit the surroundings.
moeten in overeenstemming zijn met de
condizioni ambientali.
milieuvoorschriften.
Avvertenza per la tutela ambientale
Waarschuwing met betrekking tot
Smaltimento del “DEF”:
Environmental note
milieubescherming
“DEF” afdanken:
- Una piccola quantità di
“DEF” versata
Disposing of “DEF”:
- Een kleine hoeveelheid “DEF” die per ongeluk
accidentalmente non è problematica. Il
- Due to its easy degradability, small amounts
wordt gemorst vormt geen probleem.
prodotto è facilmente biodegradabile e si
of spilt “DEF” can be washed into the sewage
Het product is gemakkelijk biologisch
può disperdere senza problemi nella rete
afbreekbaar en kan zonder problemen in de
system without any problems.
fognaria utilizzando molta acqua.
riolering gegoten worden, samen met een
- Larger amounts of “DEF” must be disposed of
- Per lo smaltimento di maggiori quantità di
grote hoeveelheid water.
“DEF” attenersi sempre ai requisiti della legge
correctly, observing the regulations on waste
- Voor het afdanken van een grotere
sulla protezione dell’ambiente e il riciclo/
treatment/disposal.
hoeveelheid
“DEF” dient u altijd de
voorschriften van de wet inzake
l’eliminazione dei rifiuti.
- Packaging that is contaminated with “DEF”
milieubescherming en het recyclen/
- Le confezioni contenenti residui di “DEF”
residue must be treated in the same way as
verwijderen van afvalstoffen respecteren.
devono venire sottoposte ad un trattamento
“DEF”®. Packaging should be emptied as tho-
- Verpakkingen die
“DEF”-resten bevatten
analogo come per il
“DEF” Svuotare
roughly as possible, cleaned appropriately
dienen aan dezelfde behandeling
integralmente le confezioni del loro
onderworpen worden als de “DEF”. Maak de
and then recycled.
contenuto; in questo modo dopo essere
verpakkingen helemaal leeg; zo kunnen de
state pulite le confezioni potranno essere
verpakkingen, nadat ze schoongemaakt zijn,
riutilizzate.
opnieuw gebruikt worden.
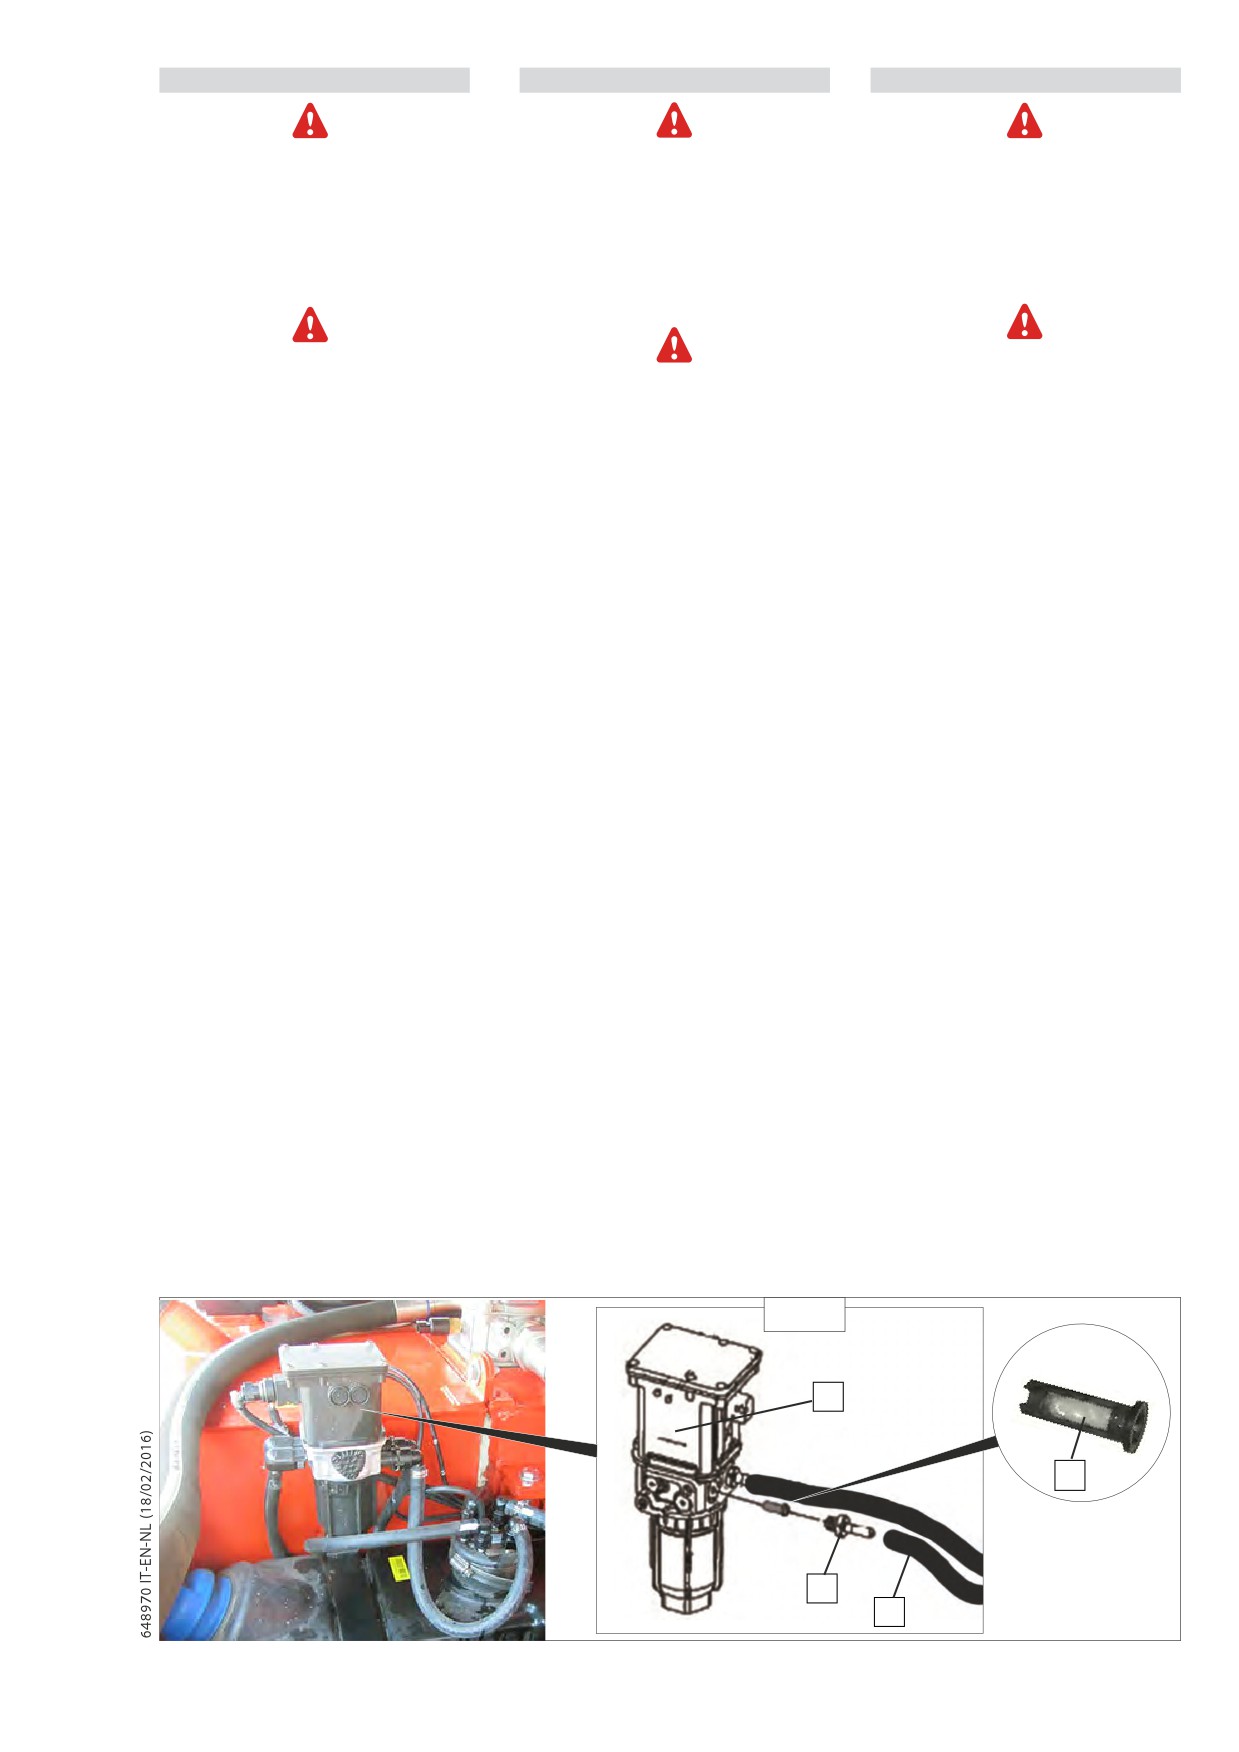
Pulire il pre-filtro “DEF”
Cleaning prefilter “DEF”
De “DEF”-voorfilter schoonmaken
Clamp the feed 1 (E14) line on the pump/
Koppel de toevoerbuis
1 (E14) van het
Scollegare la tubazione di mandata 1 (E14)
filter unit 2 (E14) using hose clamps.
dall’unità pompa-filtro 2 (E14) unitamente
pomp-filtergeheel 2 (E14) los, samen met
Unscrew the feed pipe fitting 3 (E14).
alle fascette.
de klemmen.
Remove the prefilter “DEF” 4 (E14).
Svitare il raccordo di mandata 3 (E14).
Draai het verbindingsstuk los 3 (E14).
Estrarre il prefiltro “DEF” 4 (E14).
Verwijder de “DEF”-voorfilter 4 (E14).
Maak de “DEF”-voorfilter schoon 4 (E14) met
Pulire il pre-filtro “DEF” 4 (E14) con un getto
Clean the “DEF” 4 (E14) prefilter with a jet of
een straal perslucht en spoel hem met verse
d’aria compressa e sciacquarlo con del fluido
compressed air and rinse with new
“DEF”-vloeistof.
“DEF” fresco.
“DEF” fluid.
Controleer de staat ervan en vervang hem
Controllare il suo stato e sostituirlo in
Check its conditions and replace if signi-
indien hij heel erg vuil of beschadigd is
caso di consistente imbrattamento o di
ficantly soiled or damaged
(see:
3
-
(zie: 3 - ONDERHOUD: FILTERELEMENTEN EN
danneggiamento (vedi: 3 - MANUTENZIONE:
MAINTENANCE: FILTER ELEMENTS AND
DRIJFRIEMEN).
ELEMENTI FILTRANTI E CINGHIE).
BELTS).
- Verzeker u ervan dat er in de pomp-
- Accertarsi che nel unità pompa-filtro non
- Ensure no foreign body enters the
filtereenheid geen vreemde voorwerpen
penetrino corpi estranei.
pump-filter unit.
binnendringen.
- De pomp-filtereenheid mag nooit
- L’unità pompa-filtro non deve essere
- The pump filter-unit must never be clea-
schoongemaakt worden met doeken en
pulita in nessun caso con panni o simili.
ned with cloths or similar tools.
dergelijke.
- Evitare assolutamente la penetrazione di
- Do not allow fluids other than “DEF” ente-
- Zorg ervoor dat er geen vloeistoffen
fluidi che non sia “DEF”.
ring the unit.
binnendringen die geen “DEF” zijn.
Rimontare il prefiltro 4 (E14) ed il raccordo
Reassemble prefilter 4 (E14) and feed pipe
Monteer de voorfilter
4
(E14) en de
di mandata 3 (E14) verificando che siano
fitting 3 (E14), checking they are properly
toevoerslang
3
(E14). Controleer of ze
correttamente posizionati.
positioned.
correct geplaatst zijn.
E14
2
4
3
1
3-73
IT
EN
NL
E14 - Controllare la cintura di sicurezza
E14 - Check the safety belt
E14 - De veiligheidsriem controleren
The forklift truck must not be used if the seat
Non è possibile in alcun caso utilizzare il
U mag in geen geval de heftruck
belt is defective (Fixing, lock, seams, tears, etc.).
carrello elevatore con la cintura di sicurezza
gebruiken als de veiligheidsriem defect is
difettosa (fissaggio, blocco, cuciture, strappi,
Repair or change the seat belt immediately.
(bevestiging, blokkering, gescheurd enz.).
ecc.).
Repareer of vervang de veiligheidsriem
Riparare o sostituire immediatamente la
onmiddellijk.
cintura di sicurezza.
SAFETY BELT WITH TWO FIXING POINTS
CINTURA DI SICUREZZA A DUE PUNTI DI
VEILIGHEIDSRIEM MET TWEE ANKERPUNTEN
ANCORAGGIO
- Check the following points:
-Controleer de volgende punten:
- Verificare i punti seguenti:
• The fixing of the anchoring points on the
• De bevestiging van de verankeringspunten
• Il fissaggio dei punti di ancoraggio sul
seat.
op de stoel.
sedile.
• Cleaning the belt and locking mechanism.
• Of de riem en het vergrendelingsmechanisme
• La pulizia del nastro e del meccanismo di
• Clicking of the locking mechanism.
schoon zijn.
bloccaggio.
• The state of the belt (tears, fraying).
• Of het vergrendelingsmechanisme naar
• Lo scatto del meccanismo di bloccaggio.
behoren werkt.
• Lo stato del nastro (strappi, sfilacciature).
• De staat van de riem (inkepingen, rafels).
CINTURA DI SICUREZZA AUTOMATICHE A
AUTOMATIC SAFETY BELT WITH TWO FIXING
VEILIGHEIDSRIEM MET OPROLMECHANISME
DUE PUNTI DI ANCORAGGIO
POINTS
EN TWEE VERANKERINGSPUNTEN
- Verificare i punti sopraelencati e quelli
- Controleer de hierboven staande punten,
- Check the afore-mentioned points and
seguenti:
evenals de volgende:
those below:
• Lo scorrimento corretto del nastro.
• Of de riem naar behoren wordt opgerold.
• Correct sliding of the belt.
• Lo stato delle maschere dell’arrotolatore.
• De staat van de afdekplaatjes van het
• The state of the winder plates.
• Il bloccaggio del meccanismo
oprolmechanisme.
• The locking of the winder mechanism by
dell’arrotolatore tirando il nastro con un
• Of het oprolmechanisme geblokkeerd
pulling the belt with one firm pull.
colpo secco.
worden door stevig aan de riem te
NOTE: After an accident, replace the safety
NOTA: A seguito di un incidente, sostituire la
trekken.
belt.
cintura di sicurezza.
OPMERKING: Na een ongeval moet de
veiligheidsriem vervangen worden.
3-74
IT
EN
NL
Questa pagina è intenzionalmente vuota
This page is intentionally blank
Deze pagina is opzettelijk leeg gelaten
3-75
IT
EN
NL
F - OGNI 2000 ORE DI
F - EVERY 2000 HOURS SERVICE OR
F - OM DE 2000 BEDRIJFSUREN OF 2
FUNZIONAMENTO O 2 ANNI
2 YEARS
JAAR
F1 - Sostituzione del filtro “DEF”
F1 - Replace “DEF” filter
F1 - De “DEF”-filter vervangen
Se il tappo del serbatoio di “DEF” viene aperto
If the “DEF” tank cap is opened at high tempe-
Als de dop van de“DEF”-tank wordt
in presenza di temperature elevate, possono
ratures, ammonia vapours may escape.
geopend bij hoge temperaturen, kunnen er
fuoriuscire vapori di ammoniaca.
ammoniakdampen vrijkomen.
Ammonia vapours have a pungent odour and
I vapori di ammoniaca hanno un odore
Ammoniakdampen hebben een scherpe geur
particularly irritate:
pungente e risultano irritanti in particolare
en zijn irriterend voor
- skin
per
- de huid
- la pelle
- mucous membranes
- de slijmvliezen
- le mucose
- eyes
- de ogen
- gli occhi
The vapours may cause a burning sensation
De aanwezigheid van dampen kan een brandend
La presenza dei vapori può causare bruciore
in the eyes, nose and throat as well as irrita-
gevoel aan de ogen, de neus en de mondholte
agli occhi, al naso e alle cavità orali nonché
tion of the throat and watering eyes.
veroorzaken, alsook hoestbuien en tranende ogen.
tosse e lacrimazione.
Ammoniakdampen mogen niet ingeademd
Avoid inhaling ammonia vapours.
Non inalare i vapori di ammoniaca.
worden.
“DEF” must not come into contact
De “DEF” mag niet in contact komen met de
Il
“DEF” non deve venire a contatto con la
with skin, eyes or clothing.
huid, de ogen of kledingstukken.
pelle, gli occhi o gli indumenti.
- If “DEF” comes into contact with your eyes or
- Als de “DEF” in contact komt met de ogen
- Se il “DEF” viene a contatto con gli occhi
of de huid, dient u deze onmiddellijk en
o la pelle, sciacquare immediatamente e
skin, rinse affected areas with clean water
zorgvuldig af te spoelen met zuiver water.
accuratamente con acqua pulita.
immediately.
- Als de “DEF” ingeslikt wordt, dient u de mond
- In caso di ingerimento del “DEF” sciacquare
- If “DEF” is swallowed, immediately rinse your
onmiddellijk en overvloedig te spoelen met
immediatamente la bocca con abbondante
mouth out with a lot of clean water and
zuiver water en veel water drinken.
acqua pulita e bere acqua in abbondanza.
drink plenty of water.
- Kledingstukken die met de “DEF” in contact
- Sostituire immediatamente gli indumenti
zijn gekomen dienen onmiddellijk vervangen
- Change clothing that is soiled with “DEF”
imbrattati con “DEF”.
te worden.
immediately.
- In caso di reazioni allergiche consultare
- Raadpleeg in geval van allergische reacties
immediatamente un medico.
- If allergic reactions occur, consult a doctor
onmiddellijk een arts.
Tenere il “DEF” fuori dalla portata dei bambini.
immediately.
Houd de “DEF” buiten het bereik van kinderen.
Keep “DEF” out of the reach of
children.
Durante l’esercizio e dopo l’arresto del motore
Tijdens de werking en nadat de motor
le tubazioni
“DEF” e tutti i componenti
stopgezet is, blijven de
“DEF”-geleidingen
collegati restano in pressione e possono
The “DEF” lines and all connected
en alle aangesloten onderdelen onder druk.
risultare molto caldi. Per tale ragione sussiste
components are pressurised during operation
Ze kunnen heel warm zijn. Daarom bestaat
het gevaar voor brandwonden. Wanneer de
il pericolo di ustioni. Aprendo l’impianto
and could be hot, even after the engine has
installatie geopend wordt, is er gevaar voor
sussiste il pericolo di ustioni causato dagli
been switched off. There is a risk of burns.
brandwonden die veroorzaakt worden door
spruzzi di “DEF” ad alta temperatura.
When opening the pressurised system, there
hete “DEF”-spatten.
- Iniziare gli interventi sul sistema di post
is a risk of scalding due to hot “DEF”
- Wacht ten minste 5 minuten nadat u de
trattamento dei gas di scarico non prima
motor heeft uitgeschakeld voordat u de
spraying out.
che siano trascorsi almeno 5 minuti dallo
ingrepen op het nabehandelingssysteem
- Wait at least 5 minutes after switching
spegnimento del motore.
van de uitlaatgassen start.
- Aprire lentamente i raccordi delle tubazioni
off the engine before starting work on the
- Wees voorzichtig wanneer u de
e gli elementi di bloccaggio dei componenti
exhaust gas aftertreatment system.
verbindingsstukken van de leidingen en de
del sistema. Durante l’apertura coprire il
- Open line connections and caps on system
blokkeringselementen van de onderdelen
punto di sezionamento con un panno.
components slowly. Cover the area that you
van het systeem opent. Bedek het punt dat
- Indossare guanti, indumenti e occhiali
geopend wordt met een doek.
are disconnecting with a cloth.
protettivi.
- Draag beschermende handschoenen,
- Wear suitable protective gloves, protective
kleding en bril.
clothing and safety goggles.
La penetrazione del “DEF” nel circuito del
liquido di raffreddamento (anche in quantità
Het binnendringen van
“DEF” in het
minima) causa il danneggiamento dei
If “DEF” gets into the coolant circuit
koelvloeistofcircuit (ook in geval van een kleine
termostati e dei sensori della temperatura.
(even minute amounts), thermostats
hoeveelheid) beschadigt de thermostaten en
- Si raccomanda assolutamente di separare
and temperature sensors will be damaged.
de temperatuursensoren.
il “DEF” dagli altri materiali di consumo.
- Always keep “DEF” completely separate from
- Het is raadzaam om de “DEF” gescheiden
- Non utilizzare gli stessi recipienti e
te houden van de andere grondstoffen.
other service products.
vaschette di raccolta per il “DEF” e per agli
- Voor het inzamelen van de “DEF” en de
- Do not use the same containers and fluid
altri materiali di consumo.
andere grondstoffen mogen niet dezelfde
collecting pans for “DEF” and other service
containers en bakjes worden gebruikt.
- Non utilizzare materiali di consumo
products.
- Gebruik geen grondstoffen die sporen van
contenenti tracce di “DEF”.
- Do not continue to use service products that
“DEF” bevatten.
I singoli componenti del sistema Blue-Tec®
contain traces of “DEF”.
reagiscono in modo estremamente sensibile
De afzonderlijke elementen van het Blue-
anche in presenza di tracce minime di
Individual components of the BlueTec® system
Tec®-systeem reageren op extreem gevoelige
impurità contenute nel “DEF”.
wijze, ook in geval van minieme sporen van
react very sensitively to even the slightest
-
Utilizzare esclusivamente recipienti
onzuiverheden die zich in de “DEF” bevinden.
trace of impurities in “DEF”.
e vaschette di raccolta puliti, idonei a
- Gebruik uitsluitend schone opvangbakjes die
- Only use containers and fluid collecting pans
geschikt zijn om “DEF” te bevatten.
contenere il “DEF”.
that are clean and suitable for “DEF”.
- Gebruik geen
“DEF” die sporen van
- Non utilizzare “DEF” contenente tracce di
impurità.
- Do not continue to use “DEF” which contains
onzuiverheden bevat.
traces of impurities.
3-76
IT
EN
NL
Misure antincendio
Fire fighting measures
Brandbestrijdingsmaatregelen
Il “DEF” non è infiammabile. In caso di incendio
“DEF” is not flammable. In the event
“DEF” is niet ontvlambaar. In geval van brand kan er
può essere liberata NH3
(ammoniaca).
of a fire, NH3 (ammonia) may be released.
NH3 vrijkomen (ammoniak). In dit geval bestaat er
In questo caso sussiste il pericolo di
This may result in a risk of poisoning. Measures
vergiftigingsgevaar. De maatregelen die getroffen
avvelenamento. Le misure atte a estinguere
to extinguish a fire must therefore be
worden om eventuele branden te blussen moeten
eventuali incendi devono risultare idonee alle
adapted to suit the surroundings.
in overeenstemming zijn met de milieuvoorschriften.
condizioni ambientali.
Environmental note
Waarschuwing met betrekking tot
Avvertenza per la tutela ambientale
milieubescherming
Disposing of “DEF”:
Smaltimento del “DEF”:
“DEF” afdanken:
- Due to its easy degradability, small amounts
- Una piccola quantità di
“DEF” versata
- Een kleine hoeveelheid “DEF” die per ongeluk
accidentalmente non è problematica. Il
of spilt “DEF” can be washed into the sewage
wordt gemorst vormt geen probleem.
prodotto è facilmente biodegradabile e si
system without any problems.
Het product is gemakkelijk biologisch
può disperdere senza problemi nella rete
- Larger amounts of “DEF” must be disposed of
afbreekbaar en kan zonder problemen in de
riolering gegoten worden, samen met een
fognaria utilizzando molta acqua.
correctly, observing the regulations on waste
grote hoeveelheid water.
- Per lo smaltimento di maggiori quantità di
treatment/disposal.
- Voor het afdanken van een grotere
“DEF” attenersi sempre ai requisiti della legge
- Packaging that is contaminated with “DEF”
hoeveelheid
“DEF” dient u altijd de
sulla protezione dell’ambiente e il riciclo/
residue must be treated in the same way as
voorschriften van de wet inzake
l’eliminazione dei rifiuti.
“DEF”. Packaging should be emptied as tho-
milieubescherming en het recyclen/
- Le confezioni contenenti residui di “DEF”
verwijderen van afvalstoffen respecteren.
roughly as possible, cleaned appropriately
devono venire sottoposte ad un trattamento
- Verpakkingen die
“DEF”-resten bevatten
analogo come per il
“DEF”. Svuotare
and then recycled.
moeten aan dezelfde behandelingen
integralmente le confezioni del loro
onderworpen worden als de “DEF”. Maak de
contenuto; in questo modo dopo essere
verpakkingen helemaal leeg; zo kunnen de
state pulite le confezioni potranno essere
verpakkingen, nadat ze schoongemaakt zijn,
riutilizzate.
opnieuw gebruikt worden.
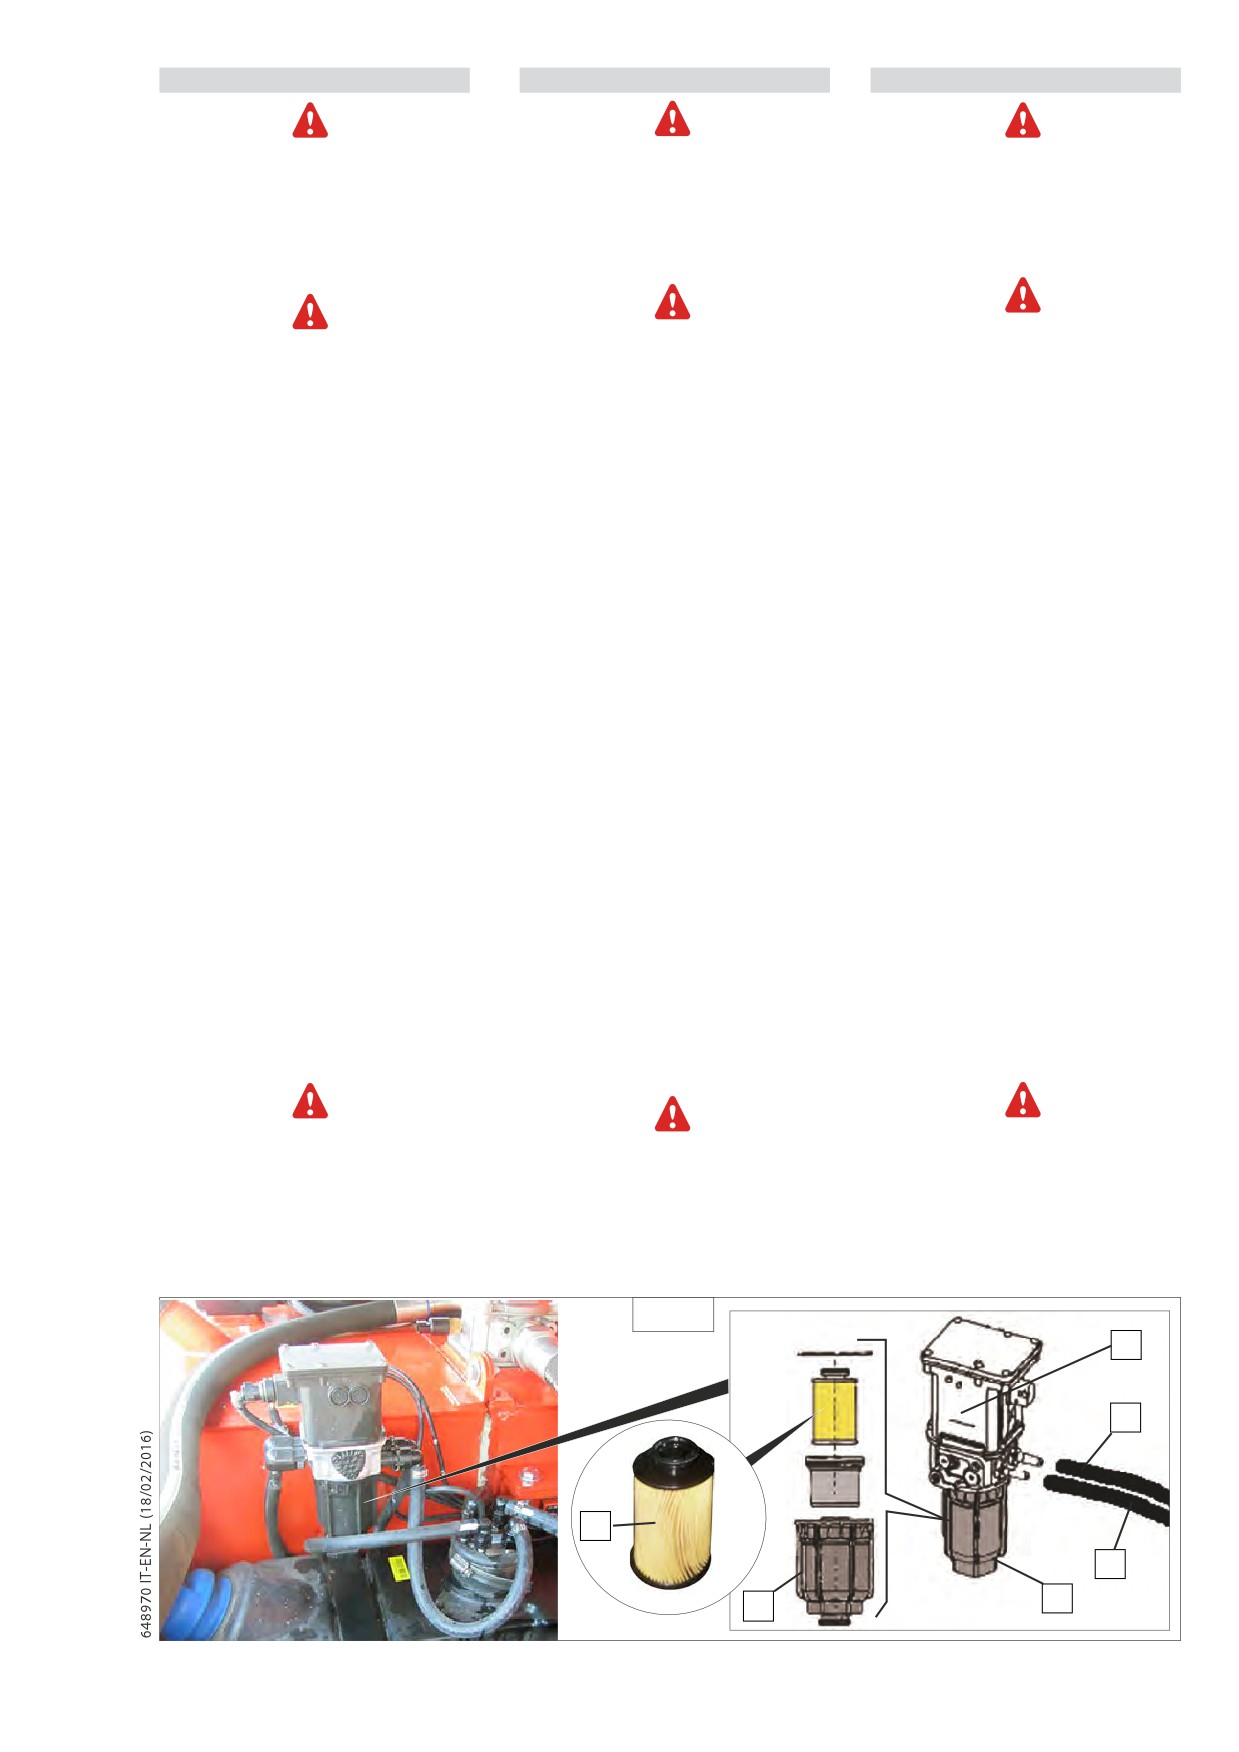
Sostituire il filtro “DEF”
Replace the “DEF” filter
De “DEF”-filter vervangen
Scollegare la tubazione di mandata 1 (F1) e
Clamp the feed 1 (F1) and return 2 (F1) lines
Koppel de toevoerbuis
1
(F1) ende
di ritorno 2 (F1) dall’unità pompa-filtro 3 (F1)
on the pump/filter unit 3 (F1) using hose
afvoerbuis 2 (F1) van het pomp-filtergeheel
unitamente alle fascette.
clamps.
3 (F1) los, samen met de klemmen.
Place a suitable receptacle under the pump/
Plaats onder het pomp-filtergeheel 3 (F1)
Posizionare sotto l’unità pompa-filtro 3 (F1) un
filter unit 3 (F1) to collect any “DEF” fluid
een opvangbakje voor de “DEF”.
recipiente di raccolta idoneo per il “DEF”.
that escapes.
Draai de beker van de filter 4 (F1) los van het
Svitare la tazza del filtro 4 (F1) dall’unità pompa-
Unscrew filter bowl 4 (F1) from the pump/
pomp-filtergeheel 3 (F1).
filtro 3 (F1).
filter unit 3 (F1).
Verwijder de filterpatroon 5 (F1).
Rimuovere la cartuccia del filtro 5 (F1).
Remove filter element 5 (F1).
Voordat u de afdichtingsring 6 (F1) op de
Prima di montare la guarnizione toroidale 6 (F1)
Smear O-ring 6 (F1) on new filter element 5
nieuwe filterpatroon 5 (F1) monteert, smeer
sulla nuova cartuccia del filtro 5 (F1) lubrificarla
deze in door een dunne laag siliconenvet
(F1) thinly with silicon grease before assem-
applicando un sottile strato di grasso siliconico.
aan te brengen.
bly.
Inserire la nuova cartuccia del filtro 5 (F1) nella
Plaats de nieuwe filterpatroon 5 (F1) in de
Insert new filter element 5 (F1) into filter
tazza del filtro 4 (F1).
filterbeker 4 (F1).
bowl 4 (F1). Use silicon grease as a lubricant.
Come lubrificante utilizzare grasso siliconico.
Gebruik siliconenvet als smeermiddel.
Screw filter bowl 4 (F1) into pump module 3
Avvitare la tazza del filtro 4 (F1) nel modulo
Draai de beker van de filter 4 (F1) vast in de
(F1) and tighten.
pompa 3 (F1) e serrare.
pompmodule 3 (F1).
Coppia di serraggio: 32 Nm.
Tightening torque: 32 Nm.
Aanhaalmoment: 32 Nm.
Come lubrificante deve essere utilizzato
Gebruik uitsluitend siliconenvet als
esclusivamente il grasso siliconico. Utilizzare
Only MB silicon grease is permissible as a
smeermiddel. Gebruik alleen kleine
solo quantità minime di grasso siliconico; in caso
lubricant. Use silicon grease very sparingly,
hoeveelheden siliconenvet om te vermijden
contrario il sistema di post-trattamento dei gas
otherwise damage to the exhaust gas aftertre-
dat het nabehandelingssysteem van de
di scarico può subire dei danni. Il sistema è auto
atment system could result.
afvoergassen beschadigd wordt. Het systeem
spurgante e pertanto lo spurgo non deve essere
The system is self-bleeding and does not need
is zelfreinigend; bijgevolg dient het niet
effettuato.
to be bled manually.
schoongemaakt te worden.
F1
3
2
3
1
4
4
3-77
IT
EN
NL
F2 -Pulire il pre-filtro del serbatoio
F2 - Clean the pre-filter tank fuel for
F2 -De voorfilter van de brandstoftank
carburante riscaldamento
heating
van de verwarming schoonmaken
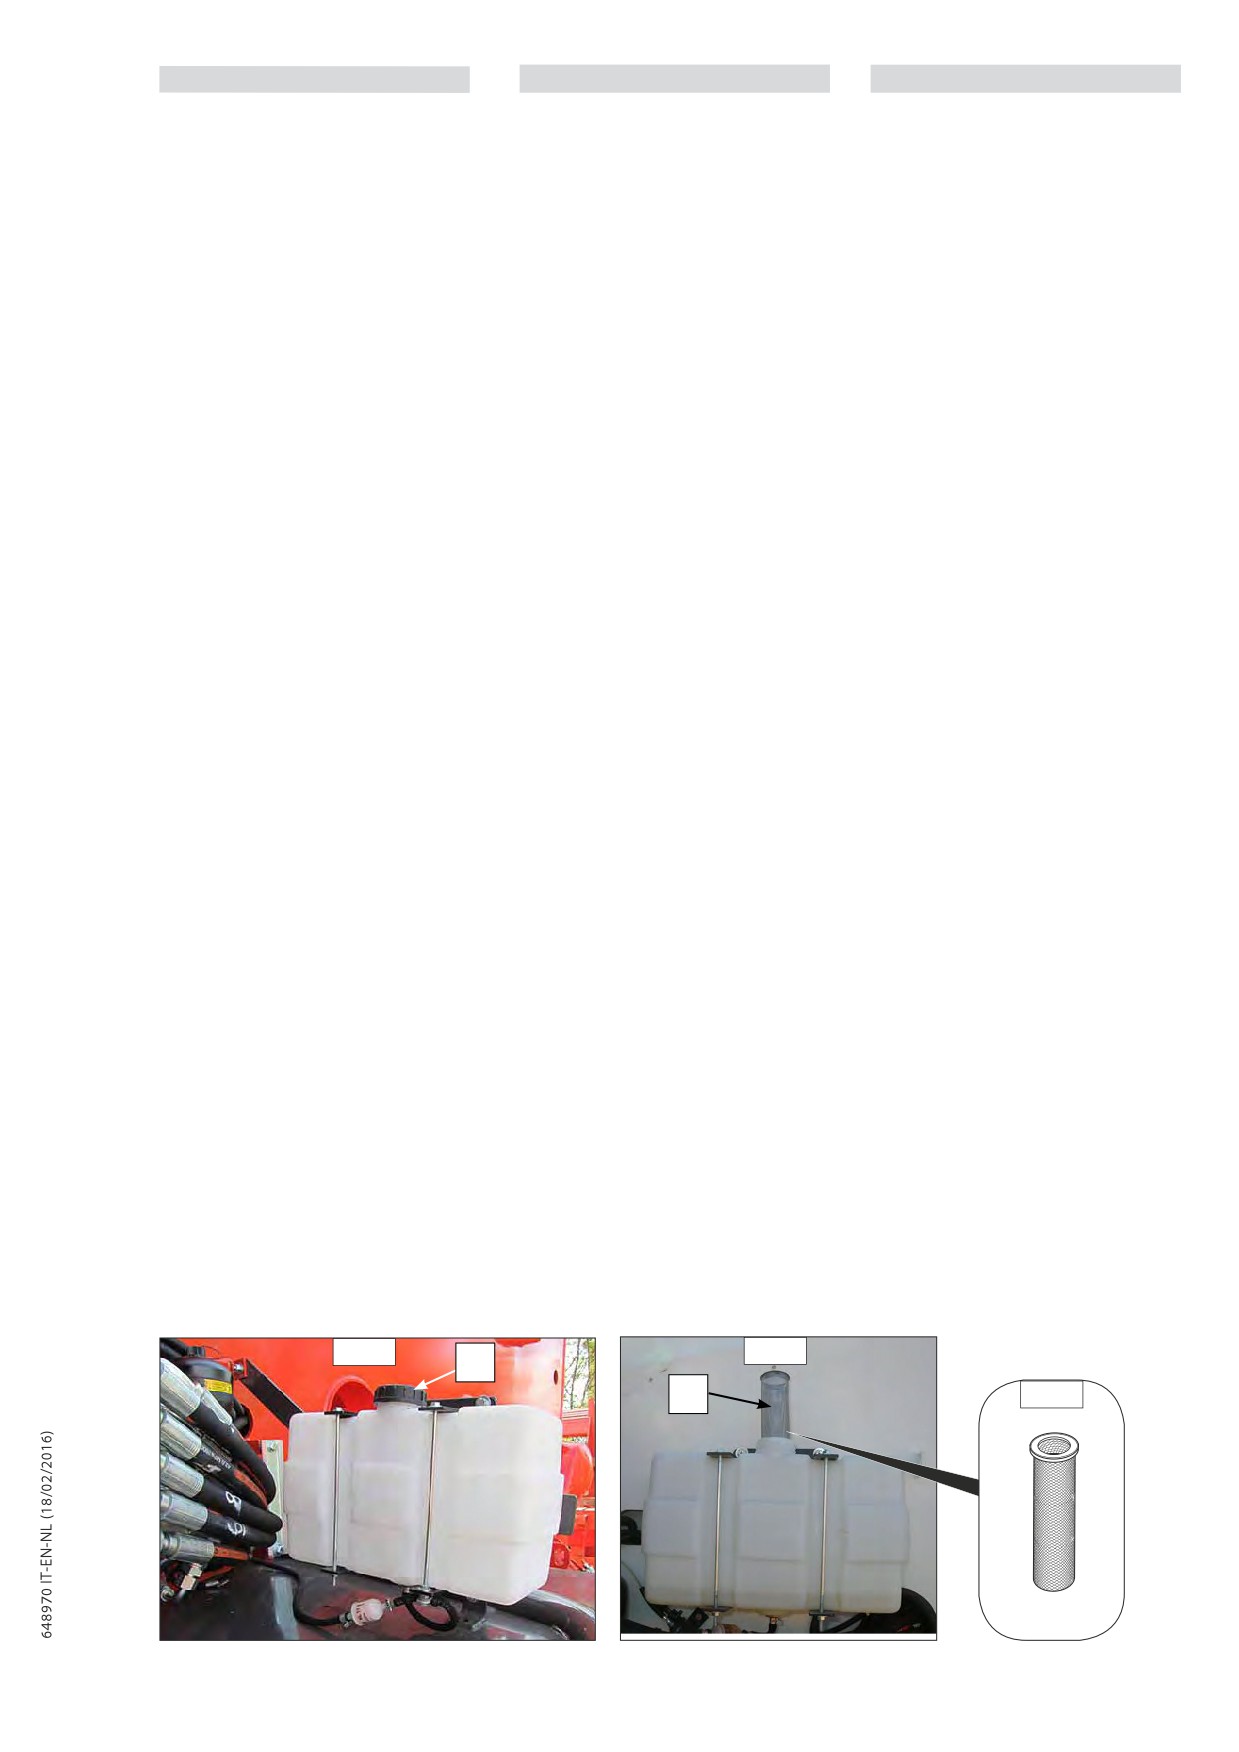
Aprire il tappo del serbatoio per far scaricare
Open the tank cap to discharge the over-
Open de dop van de tank en voer de
la sovrappressione presente all’interno
pressure inside (F2/1).
overdruk af (F2/1).
(F2/1).
Pulire il tappo filettato
“1”(F2/2) e la
Clean threaded cap “1” (F2/2)and filter
Maak de schroefdop
“1”(F2/2) en het
cartuccia filtrante “2”(F2/2).
cartridge “2”(F2/2).
filterpatroon “2”(F2/2) schoon.
Se la cartuccia filtrante è eccessivamente
If the filter cartridge is excessively dirty or
Als het filterpatroon heel erg vuil of
sporca o danneggiata, sostituirla (F2/3).
damaged, replace it (F2/3).
beschadigd is, vervang het (F2/3).
F3 - Controllare pressione pneumatici e
F3 - Check the pressure and wheel nut
F3 - De spanning van de banden en de
serraggio dadi ruote
torque
aandraaiing van de moeren van de
wielen controleren
- Controllare lo stato degli pneumatici per
- Check the condition of the tyres, to detect
individuare tagli, protuberanze, usure,
- Controleer de staat van de banden op
cuts, protuberances, wear, etc.
ecc.
sneden, bobbeltjes, slijtage enz.
- Utilizzando una chiave dinamometrica,
- Check the tightening torque of the wheel
- Controleer met behulp van een
controllare la coppia di serraggio dei
momentsleutel het aandraaikoppel van
nuts with a torque wrench.
bulloni delle ruote.
de wielmoeren.
•Front wheels: 740 N.m ± 15%
•Ruote anteriori: 740 N.m ± 15%
•Voorwielen: 740 N.m ± 15 %
•Ruote posteriori: 740 N.m ± 15%
•Rear wheels: 740 N.m ± 15%
•Achterwielen: 740 N.m ± 15 %
F2/1
F2/2
1
2
F2/3
3-78
IT
EN
NL
F4 - Pulire
/controllare
la
F4 - Clean/check the air conditioning
F4 - De airconditioning schoonmaken /
climatizzazione (OPTIONAL)
(OPTIONAL)
controleren (OPTIONAL)
PULIZIA DELLE SERPENTINE DEL
CLEAN THE COILS OF THE CONDENSER
REINIGEN VAN DE SPIRAALSLANGEN VAN
CONDENSATORE E DELL’EVAPORATORE (*).
AND EVAPORATOR (*).
DE CONDENSOR EN DE VERDAMPER (*).
PULIZIA DEL RECIPIENTE PER LA CONDENSA
REINIGEN VAN DE CONDENSAATBAK EN DE
CLEAN THE CONTAINER FOR THE
E DELLA VALVOLA DI SCARICO (*).
EN DE UITLAATKLEP (*).
CONDENSATE AND THE DRAINAGE VALVE
(*).
RECUPERO DEL REFRIGERANTE PER LA
OPVANGEN VAN DE KOELVLOEISTOF OM
SOSTITUZIONE DEL FILTRO DISIDRATATORE
DE FILTER VAN DE ONTVOCHTIGER TE
RECOVERY OF THE COOLANT FOR
(*).
VERVANGEN (*).
CHANGING THE DEHYDRATOR FILTER (*).
RIEMPIMENTO CON REFRIGERANTE
KOELVLOEISTOF
BIJVULLEN
EN
E CONTROLLO DELLA REGOLAZIONE
FILLING WITH COOLANT AND CHECKING
CONTROLEREN VAN DE THERMOSTATISCHE
TERMOSTATICA E DEI PRESSOSTATI (*).
THE ADJUSTMENT OF THE THERMOSTAT
AFSTELLING EN DE PRESSOSTATEN (*).
AND PRESSURE SWITCHES (*).
NOTA: Non dimenticare durante l’apertura
OPMERKING: Vergeet bij het openen van de
dell’unità dell’evaporatore di sostituire la
NOTE: Do not forget to replace the sealing
verdamperunit niet de afdichting van het
guarnizione di tenuta del coperchio.
gasket of the cover on opening the evapo-
deksel te vervangen.
rator unit.
(*):
(RIVOLGETEVI
AL
VOSTRO
(*): (NEEM CONTACT OP MET UW DEALER).
CONCESSIONARIO).
(*): (CONTACT YOUR DEALER).
Non cercare mai di riparare con i propri mezzi
Probeer nooit met eigen middelen eventuele
eventuali anomalie. Per la ricarica di un
Never try to carry out makeshift repairs in case
storingen te repareren. Neem contact op met
circuito rivolgersi sempre al concessionario
of faults. To recharge a circuit, always contact
uw dealer om een circuit weer op te laden.
che ha i pezzi di ricambio adatti, le nozioni
the dealer who has the suitable spare parts,
deze heeft de geschikte reserveonderdelen,
tecniche e gli utensili necessari.
technical know-how and the necessary tools.
de technische kennis en het benodigde
In caso di inalazione, portare la vittima
In case of inhalation, bring the victim out
gereedschap.
all’aria aperta, fornire ossigeno o praticare la
into the open air, supply oxygen or carry out
In geval van inademen, breng het slachtoffer
respirazione artificiale necessaria e consultare
the necessary artificial respiration and see a
in de open lucht, dien zuurstof toe of voer
un medico.
doctor.
de nodige kunstmatige ademhaling uit en
In caso di contatto con la pelle, sciacquare
In case of contact with the skin, rinse imme-
raadpleeg een arts.
immediatamente con abbondante acqua
diately with plenty of running water and
Bij contact met de huid, direct met veel water
corrente e togliersi gli abiti contaminati.
remove contaminated clothing.
wassen en de verontreinigde kleding uitdoen.
In caso di contatto con gli occhi, sciacquare
In case of contact with the eyes, flush eyes
Bij contact met de ogen, gedurende
15
con acqua corrente per 15 minuti e consultare
with plenty of water for 15 minutes and get
minuten met helder water spoelen en een arts
un medico.
medical attention.
raadplegen.
- Non aprire mai il circuito, ciò provocherebbe
- Het circuit mag in geen geval worden
- Never open the circuit, as this could cause
la fuoriuscita del refrigerante.
geopend, daar dit leidt tot verlies van het
leakage of coolant.
- Il circuito di refrigerazione contiene un
koelmiddel.
- The cooling circuit contains a gas which
gas che può presentare alcuni pericoli in
- Het koelcircuit bevat een gas dat onder
can result in danger in certain conditions.
determinate condizioni.
bepaalde omstandigheden gevaarlijk kan
This gas, the coolant R-134a, is colourless,
Questo gas, il refrigerante R-134a, è
zijn.
odourless and heavier than air.
incolore e inodore e più pesante dell’aria.
Dit gas, koelmiddel R-134a, is kleurloos,
reukloos en zwaarder dan lucht.
F4
3-79
IT
EN
NL
G - OGNI 3000 ORE DI FUNZIONAMENTO
G - EVERY 3000 HOURS SERVICE OR
G - OM DE 3000 BEDRIJFSUREN OF OM
O 3 ANNI
3 YEARS
DE3 JAAR
G1 - Sostituire la cartuccia di sicurezza
G1 - Change the dry air filter safety car-
G1 - Het veiligheidspatroon van de
tridge
del filtro a secco dell’aria
droge luchtfilter vervangen
- To remove and refit the dry air filter, see:
- Per smontare e rimontare la cartuccia
- Om het patroon van de droge luchtfilter
( 3 - MAINTENANCE: “E6 - DRY AIR FILTER
del filtro a secco dell’aria, vedere:
(3
-
te demonteren en opnieuw te monteren,
CARTRIDGE”).
MANUTENZIONE: “E6 - CARTUCCIA DEL
zie: (3 - ONDERHOUD: “E6 - PATROON VAN
- Remove the safety cartridge “1” (Fig.G1) of
FILTRO A SECCO DELL’ARIA”).
DROGE LUCHTFILTER”).
the dry air filter very carefully, to reduce
- Estrarre con precauzione la cartuccia
- Verwijder het veiligheidspatroon van
leakage of dust to the minimum.
“1”(fig.G1) di sicurezza del filtro a
de droge luchtfilter
“1”(Fig.G1) uiterst
- Carefully clean the seat of the filter gaskets
secco dell’aria, per ridurre al minimo la
voorzichtig om te voorkomen dat er stof
with a wet clean cloth that does not leave
fuoriuscita di polvere.
kan ontsnappen.
lint.
- Pulire con cura la sede delle guarnizioni
- Maak het draagvlak van de afdichting in
- Before the assembly, check the state of
del filtro con uno straccio umido, pulito e
de filter schoon met een vochtige, schone
the new safety cartridge “4” (see: 3 -
che non lasci filacce.
en niet pluizerige doek.
MAINTENANCE: FILTER ELEMENTS AND
- Prima del montaggio controllare lo stato
- Controleer de goede staat van de nieuwe
BELTS).
della nuova cartuccia di sicurezza (vedere:
veiligheidspatroon vóór plaatsing
(zie:
- Insert the cartridge in the filter and posi-
3 - MANUTENZIONE: ELEMENTI FILTRANTI
3 - ONDERHOUD: FILTERELEMENTEN EN
tion it by pres sing on the edge of the
E CINGHIE).
DRIJFRIEMEN).
filter, not in the center.
- Introdurre la cartuccia nel filtro e
- Plaats de patroon in de filter en positioneer
posizionarla premendo sul bordo della
deze door bij de rand aan te drukken, en
NOTE: The safety cartridge replacement fre-
cartuccia e non al centro.
niet in het midden.
quency is purely indicative. It must
be replaced with every three repla-
NOTA: La periodicità di sostituzione della
OPMERKING: De periodiciteit voor het
cements of the dry air filter cartridge.
cartuccia di sicurezza viene data a
vervangen van de veiligheidspatroon
titolo puramente indicativo. Deve
wordt ter indicatie gegeven. De
essere sostituita ogni tre sostituzioni
veiligheidspatroon moet om de
della cartuccia del filtro a secco
drie vervangbeurten van de droge
dell’aria.
luchtfilter worden vervangen.
G1
1
3-80
IT
EN
NL
G2
- Sostituzione del liquido di
G2 - Renewing coolant and replace the
G2 - De koelvloeistof en de vloeistof van
raffreddamento e della cartuccia di
silicate cartridge
de silicaatfilter vervangen
silicato
These operations are to be carried out if
Deze handelingen moeten uitgevoerd
Questa serie di operazioni deve essere
necessary or every two years at the begin-
worden zo dikwijls als noodzakelijk en in
effettuata quando occorre oppure almeno
ning of winter. Place the lift truck on level
ieder geval om de 2 jaar als de winter
una volta ogni
2 anni quando arriva
ground with the I.C. engine stopped and
in aantocht is. Zet de heftruck op een
l’inverno. Mettere il carrello elevatore
cold.
horizontaal stuk grond, zet de motor uit, de
in piano con il motore termico spento e
motor moet koud zijn.
freddo.
The I.C. engine does not contain any corrosion
De verbrandingsmotor bevat geen
Il motore termico non contiene elementi
resistor and must be filled during the whole
corrosiewerende elementen en moet het hele
anticorrosivi, e deve sempre essere riempito
year with a mixture containing 25 % of ethyle-
jaar door gevuld worden met een mengsel
di una miscela minima, composta al 25 % di
ne glycol-based antifreeze.
dat minimaal 25% antivries op basis van
antigelo a base di etilene-glicolo.
ethyleenglycol bevat.
Pericolo di lesioni
Risk of injury
Gevaar voor verwonding
L’impianto di raffreddamento è sotto
The cooling system is pressurised. Hot coolant
De koelinstallatie staat onder druk.
pressione.
can escape under pressure when the cooling
Wanneer de koelinstallatie geopend wordt,
Aprendo l’impianto di raffreddamento
system is opened and scald your skin and
kan er kokende koelvloeistof uitspatten,
possono fuoriuscire degli spruzzi di liquido di
eyes.
met gevaar voor brandwonden voor huid
raffreddamento bollente con rischio di ustioni
- Only open the cooling system at coolant
en ogen.
alla pelle e agli occhi.
temperatures below 90 °C.
- Open de koelinstallatie alleen als de
- Aprire l’impianto di raffreddamento solo se la
- Unscrew the cap slowly and release any
temperatuur van de koelvloeistof lager is
temperatura del liquido di raffreddamento è
excess pressure completely before opening
inferiore a 90 °C.
dan 90°C.
the cap fully.
- Ruotare lentamente il tappo e far scaricare
- Draai langzaam aan de dop en voer de
- Wear suitable protective gloves, protective
completamente la pressione prima
clothing and safety goggles when handling
druk volledig af voordat u de dop opent.
dell’apertura.
coolant.
- Wanneer u ingrepen uitvoert op
- In caso di interventi sull’impianto di
de koelinstallatie, draag passende
raffreddamento indossare guanti e
beschermende handschoenen, kleding en
indumenti protettivi adeguati nonché
bril.
occhiali protettivi.
Risk of poisoning
Pericolo di avvelenamento
There is a risk of poisoning if coolant is swal-
Vergiftigingsgevaar
In caso di ingerimento del liquido di
lowed.
Als koelvloeistof wordt ingeslikt, bestaat er
raffreddamento sussiste pericolo di
- Never swallow coolant.
vergiftigingsgevaar.
avvelenamento.
- Never store coolant in containers normally
- Slik de koelvloeistof nooit in.
- Non ingerire in alcun caso il liquido di
used for beverages.
- Giet de koelvloeistof niet in flessen voor
raffreddamento.
- Store coolant out of the reach of children.
drinkwater of andere dranken.
- Non versare il liquido di raffreddamento in
- Bewaar de koelvloeistof buiten het bereik
contenitori per acqua potabile o bevande.
van kinderen.
- Conservare il liquido di raffreddamento fuori
dalla portata dei bambini.
Environmental note
Dispose of used coolant in accordance with
Waarschuwing met betrekking tot
Avvertenza per la tutela ambientale
current local regulations.
milieubescherming
Smaltire il liquido di raffreddamento usato in
Dank de gebruikte koelvloeistof af volgens de
conformità alle prescrizioni di legge vigenti
voorschriften die van kracht zijn op de plaats
nel nella sede di utilizzo del motore.
waar de motor wordt gebruikt.
3-81
IT
EN
NL
Scarico del liquido di raffreddamento
Draining coolant
De koelvloeistof afvoeren
Eseguire gli interventi sull’impianto di
Carry out operations on the cooling system
Voer alleen ingrepen uit op de
raffreddamento solo se la temperatura del
koelinstallatie als de temperatuur
only if the coolant temperature is below 50
liquido di raffreddamento è inferiore a 50
van de koelvloeistof lager is dan
°C.
°C.
50°C.
Before proceeding with draining the coo-
Prima di procedere allo scarico coprire i
Bedek voor het afvoeren de kabels, de
lant, cover the cables, piping, etc, present
cavi, le tubazioni ecc. presenti sotto la vite
geleidingen enz. die zich onder de afvoerschroef
under the drain screw, and place a suitable
di scarico sistemandovi sotto un recipiente
bevinden. Plaats een opvangbakje dat geschikt
sized container to hold the quantity of
di dimensioni adeguate alla quantità di
is voor de hoeveelheid vloeistof die het dient
liquido da raccogliere.
liquid to be drained.
op te vangen.
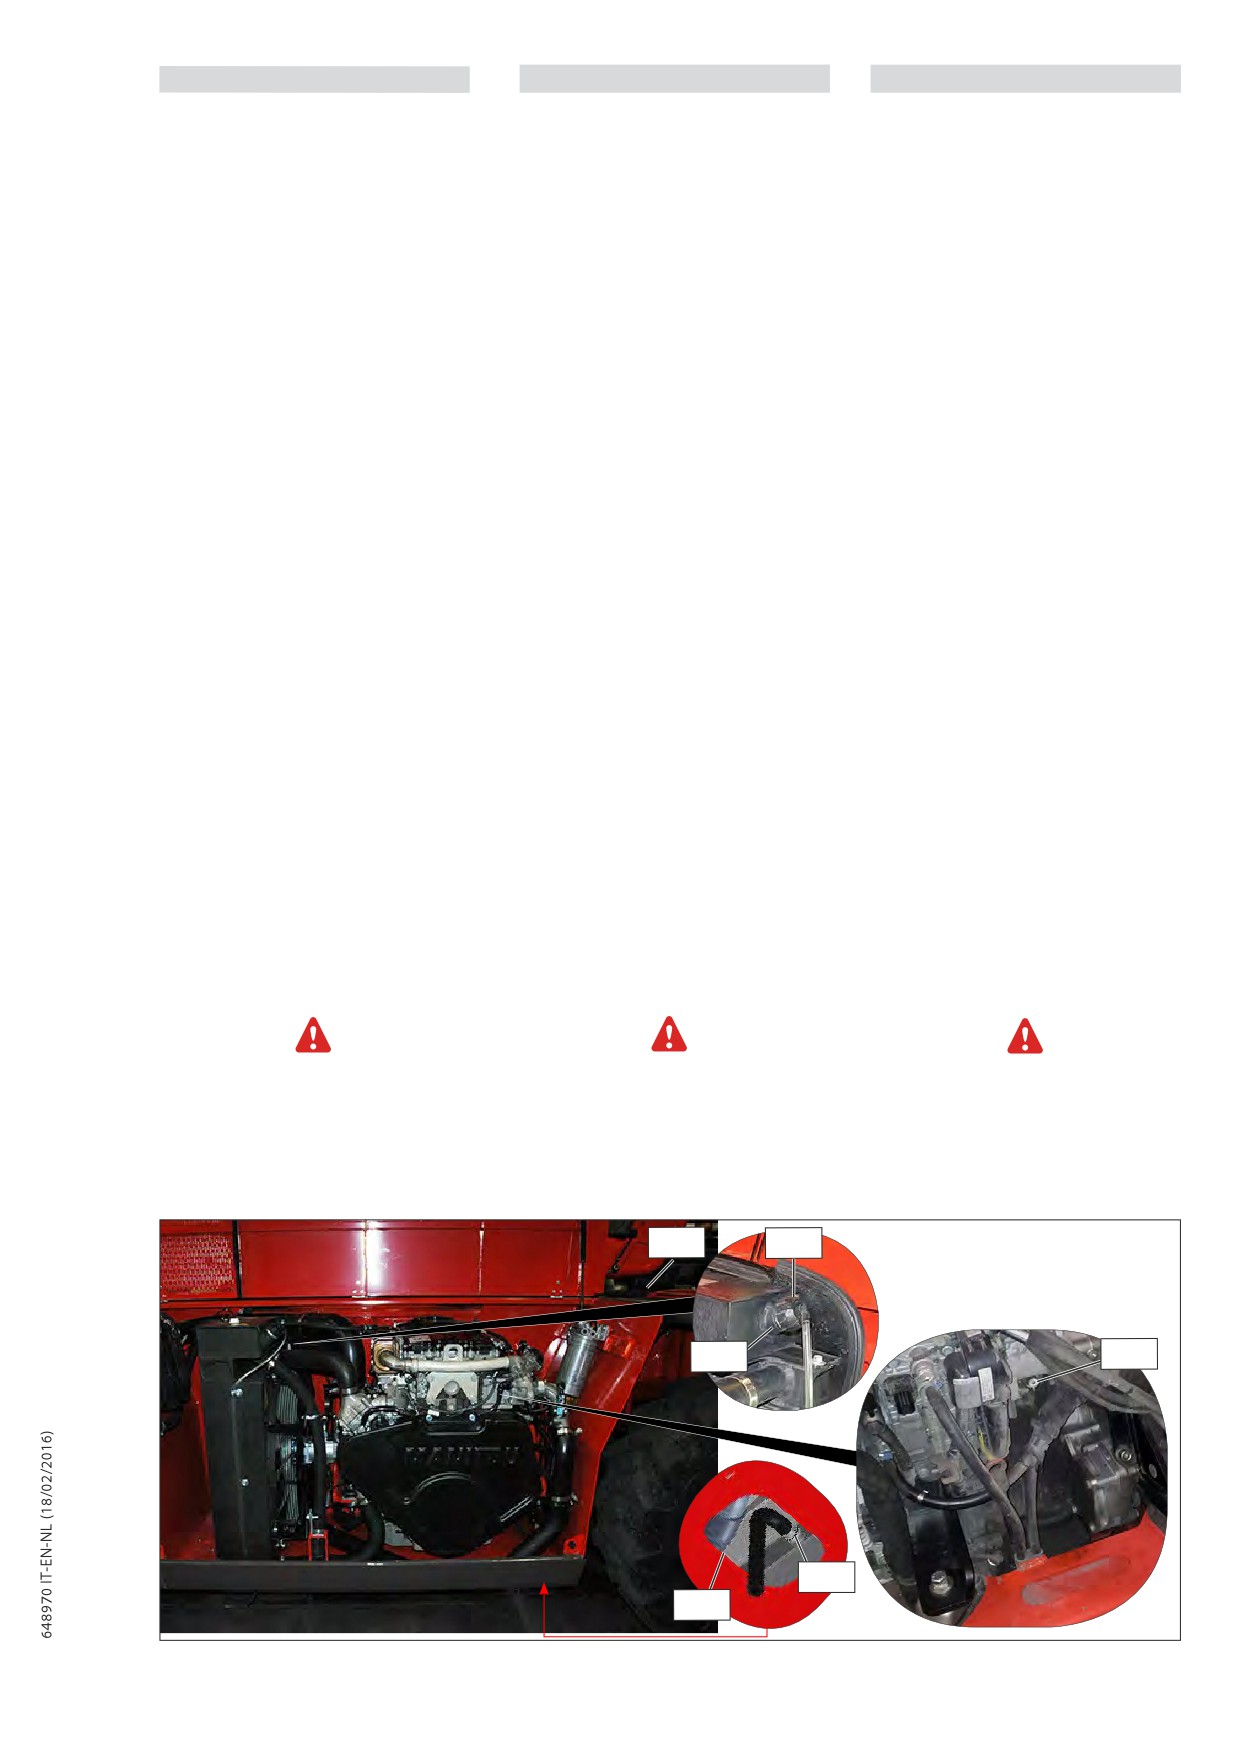
Aprire il cofano motore.
Open de motorkap.
Open the engine bonnet.
Aprire lentamente il tappo dell’impianto
Open langzaam de dop van het
di raffreddamento G2/1 del motore,
Open the cooling system cap G2/1 of the
koelsysteem G2/1 van de motor, voer de
far scaricare la sovrappressione, quindi
engine slowly, discharge the overpressure
overdruk af en verwijder vervolgens de
rimuovere il tappo.
and then remove the cap.
dop.
Aprire lo sportellino d’accesso G2/2 sotto il
Open luik G2/2 onder de aftapdop G2/3.
tappo di scarico G2/3.
Open the panel G2/2 under the drain plug
G2/3.
Mettere un recipiente sotto il tappo di
Plaats een opvangbak onder de aftapdop
scarico G2/3 del radiatore e il tappo di
G2/3 van de radiator en aftapdop G2/4 van
Set a container under drain plug G2/3 on
scarico G2/4 del blocco motore e allentarli.
the radiator and drain plug G2/4 of the
het motorblok en draai deze los.
engine block and loosen them.
Prendere il tubo di scarico G2/5.
Neem de aftapslang G2/5.
Collocare l’estremità del tubo di scarico
Take drain hose G2/5.
Plaats het uiteinde van de slang in de bak
nel recipiente e avvitare a fondo il tubo sul
en schroef de slang volledig vast op het
raccordo dello scarico G2/3.
Place the end of the drain hose in the con-
aftapaansluitstuk G2/3.
tainer and screw the hose fully to the drain
Far svuotare completamente il circuito di
connector G2/3.
Tap het koelsysteem volledig af, controleer
raffreddamento, controllando che gli orifizi
of de openingen niet verstopt raken.
non si intasino.
Let the cooling circuit drain entirely while
ensuring that the ports do not get clogged.
Controleer de staat van de radiatorslangen
Verificare lo stato delle tubazioni in gomma
en de bevestigingen en vervang zo nodig
e delle fascette di fissaggio, sostituire le
de slangen.
tubazioni in gomma se necessario.
Check the condition of the hoses as well as
the fastening devices and change the hoses
Spoel het systeem door met schoon water
Sciacquare il circuito con acqua pulita e
if necessary.
en gebruik een schoonmaakmiddel indien
utilizzare un prodotto detergente in caso
nodig.
di necessità.
Rinse the circuit with clean water and use a
cleaning agent if necessary.
Sostituzione della cartuccia di silicato
Replace the silicate cartridge
De silicaatfilter vervangen
Pulire la superficie di tenuta sul corpo della
Clean the coolant from the sealing surface on
Maak het dichtingsoppervlak op het lichaam
pompa del liquido di raffreddamento con un
the pump body, using a lint-free cloth.
van de koelvloeistofpomp schoon met een
panno senza pelucchi.
pluisvrije doek.
Clean the coolant pump near the silicate
Pulire la pompa del liquido di
cartridge G2/6.
Maak de pomp van de koelvloeistof schoon
raffreddamento in corrispondenza della
ter hoogte van de silicaatfilter G2/6.
cartuccia di silicato G2/6.
G2/5
G2/1
G2/8
G2/4
G2/3
G2/2
3-82
IT
EN
NL
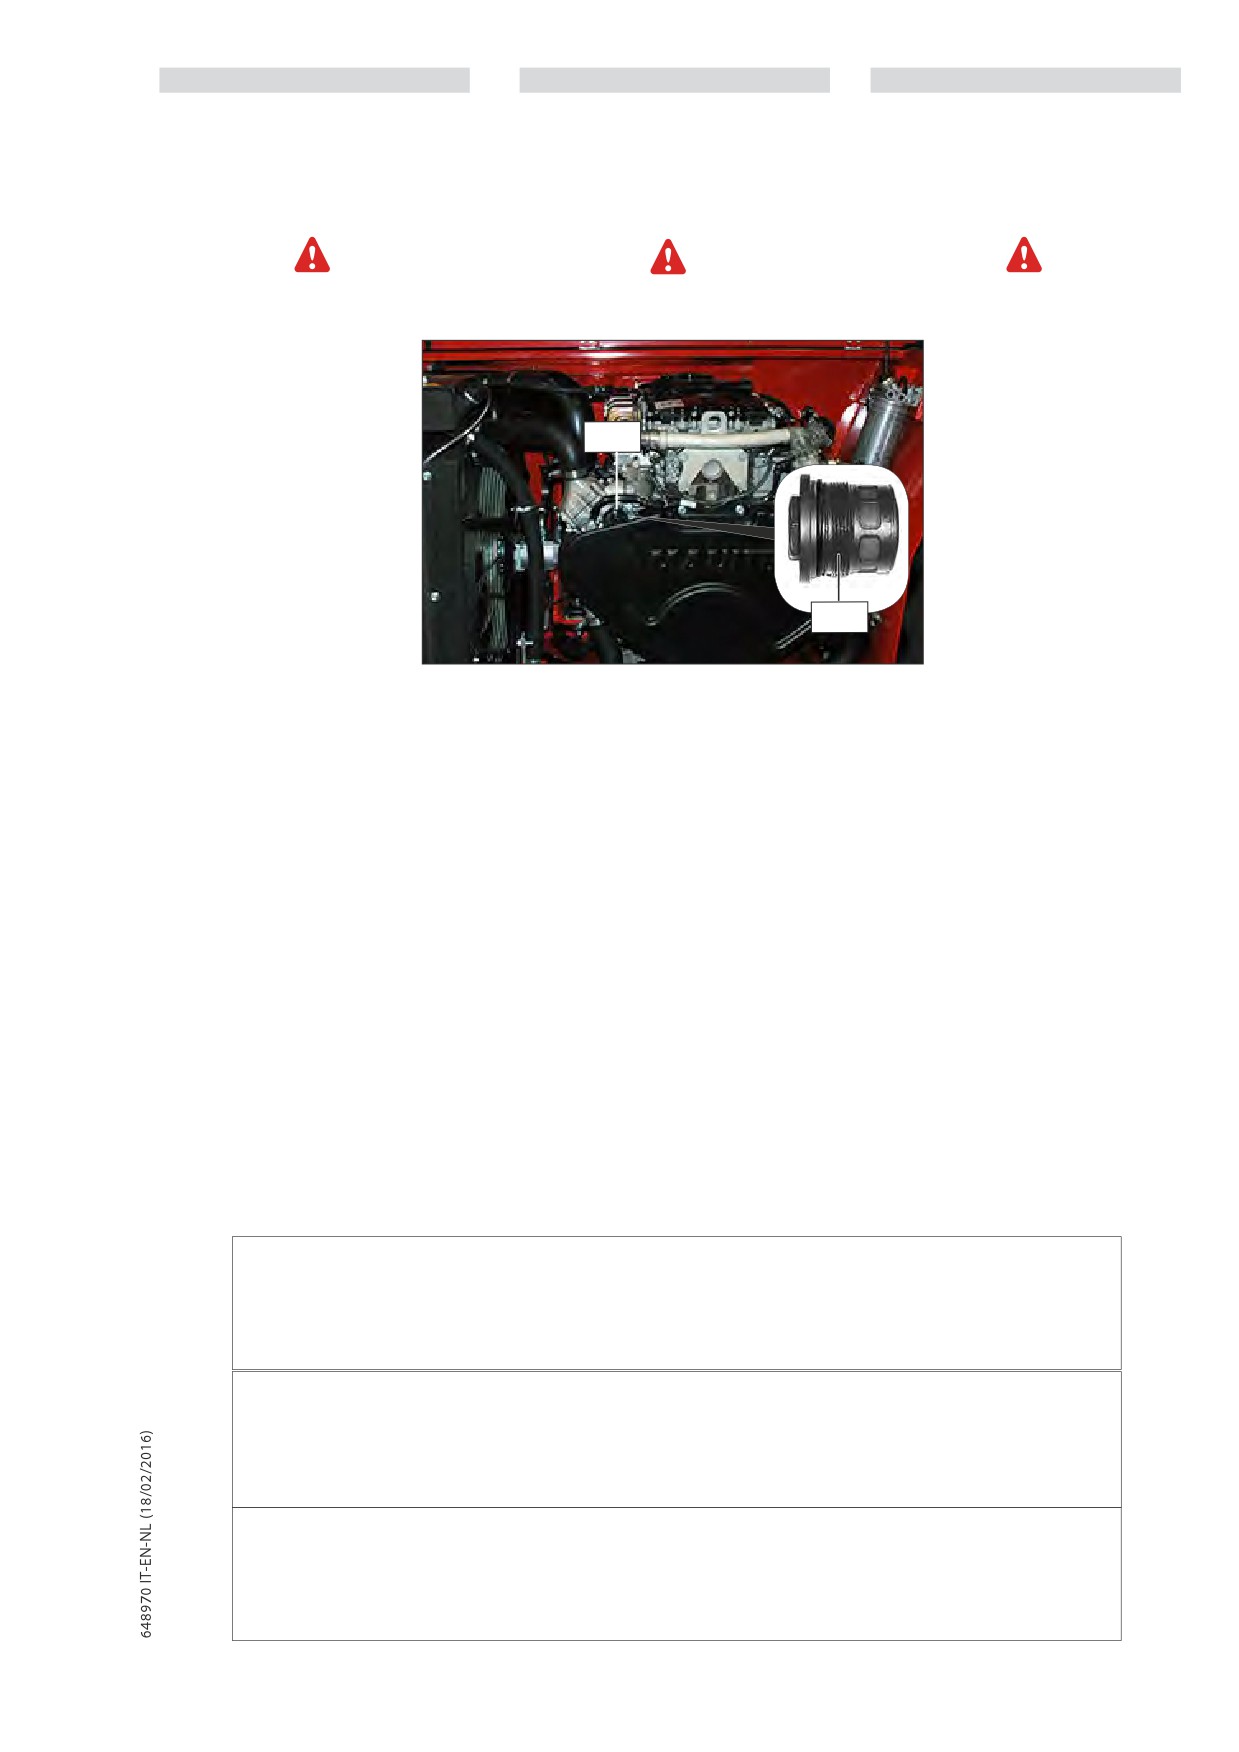
Smontare la cartuccia di silicato G2/7.
Remove the silicate cartridge G2/7.
Demonteer de silicaatfilter G2/7.
Montare la nuova cartuccia di silicato
Assemble the new silicate cartridge (see:
3
Monteer de nieuwe silicaatfilter (zie:
3 -
(vedere:
3 - MANUTENZIONE: ELEMENTI
- MAINTENANCE: FILTER ELEMENTS AND
ONDERHOUD: FILTERELEMENTEN
EN
FILTRANTI E CINGHIE).
BELTS).
DRIJFRIEMEN).
Avvitare e serrare la cartuccia di silicato G2/7.
Screw in and tighten the silicate cartridge G2/7.
Schroef de silicaatfilter G2/7 vast.
(Coppia di serraggio: 50 Nm).
(Tightening torque: 50 Nm).
(Aanhaalmoment: 50 Nm).
Non ingrassare l’anello di tenuta della nuova
Do not grease the sealing ring of the new
Smeer de afdichtingsring van de nieuwe
cartuccia di silicato.
silicaatfilter niet in.
silicate cartridge.
G2/6
G2/7
Rifornimento di liquido di raffreddamento
Adding coolant
Koelvloeistof bijvullen
Togliere, pulire e rimettere il flessibile di
Remove, clean and refit drain hose G2/5.
Verwijder de aftapslang G2/5, maak ze
scarico G2/5.
schoon en breng hem weer op zijn plaats.
Rimettere e stringere il tappo di scarico
Breng de aftapdop G2/3 terug aan en span
Refit and tighten drain plug G2/3 and drain
G2/3 e il tappo di scarico G2/4.
hem aan, evenals aftapdop G2/4.
plug G2/4.
Riempire lentamente il circuito con
Het systeem langzaam vullen met
il
liquido di raffreddamento
(vedere:
Slowly fill the circuit with the cooling liquid
koelmiddel
(zie:
3
-
ONDERHOUD:
3
- MANUTENZIONE: LUBRIFICANTI E
SMEERMIDDELEN EN BRANDSTOF) via de
(see: 3 - MAINTENANCE: LUBRICANTS AND
CARBURANTE) attraverso il bocchettone di
vulopening G2/8.
FUEL) through the filler port G2/8.
riempimento G2/8.
Vul het koelcircuit via de vulopening G2/8
Completare il livello del circuito di
Top up the cooling circuit level up to the
bij tot aan het middelpunt van de indicator
raffreddamento fino al centro dell’indicatore
G2/10.
centre of the indicator G2/10 via filler port
G2/10 attraverso il bocchettone di
Draai de vuldop van de radiator G2/1 terug
G2/8.
riempimento G2/8.
aan.
Riavvitare il tappo di riempimento del
Retighten the radiator filler plug G2/1.
radiatore G2/1.
Run the engine at idle for a few minutes.
Laat de motor enkele minuten stationair
Far girare il motore a basso regime per
draaien.
qualche minuto.
Check for any possible leaks.
Controleer op eventuele lekkage.
Controllare le eventuali perdite.
Close the panel with the lever 3.
Sluit het klepje G2/2.
Chiudere lo sportellino G2/2.
Controleer het peil en vul zo nodig bij.
Controllare il livello e rabboccare se
Check the level and refill if necessary.
necessario.
TABELLA PUNTO DI CONGELAMENTO IN FUNZIONE DELLA % DI VOLUME DI ANTIGELO e ACQUA
Antigelo SHELL ANTIFREEZE Acqua (consigliata distillata) Temperatura di congelamento
25%
75%
-14 °C
35%
65%
-23 °C
40%
60%
-27 °C
50%
50%
-40 °c riempimento del Fabbricante
TABLE FREEZING POINT OF THE VARIOUS % VOLUMES OF ANTIFREEZE AND WATER
Antifreeze SHELL ANTIFREEZE Water (distilled for preference) Freezing temperature
25%
75%
-14 °C
35%
65%
-23 °C
40%
60%
-27 °C
50%
50%
-40 °c percentage used by Manufacturer
TABEL VRIESPUNT IN FUNCTIE VAN HET % ANTIVRIESMIDDEL en WATER
Antivriesmiddel SHELL ANTIFREEZE
Water (aanbevolen: gedistilleerd)
Bevriezingstemperatuuur
25%
75%
-14 °C
35%
65%
-23 °C
40%
60%
-27 °C
50%
50%
-40 °c vulling van de fabrikant
3-83
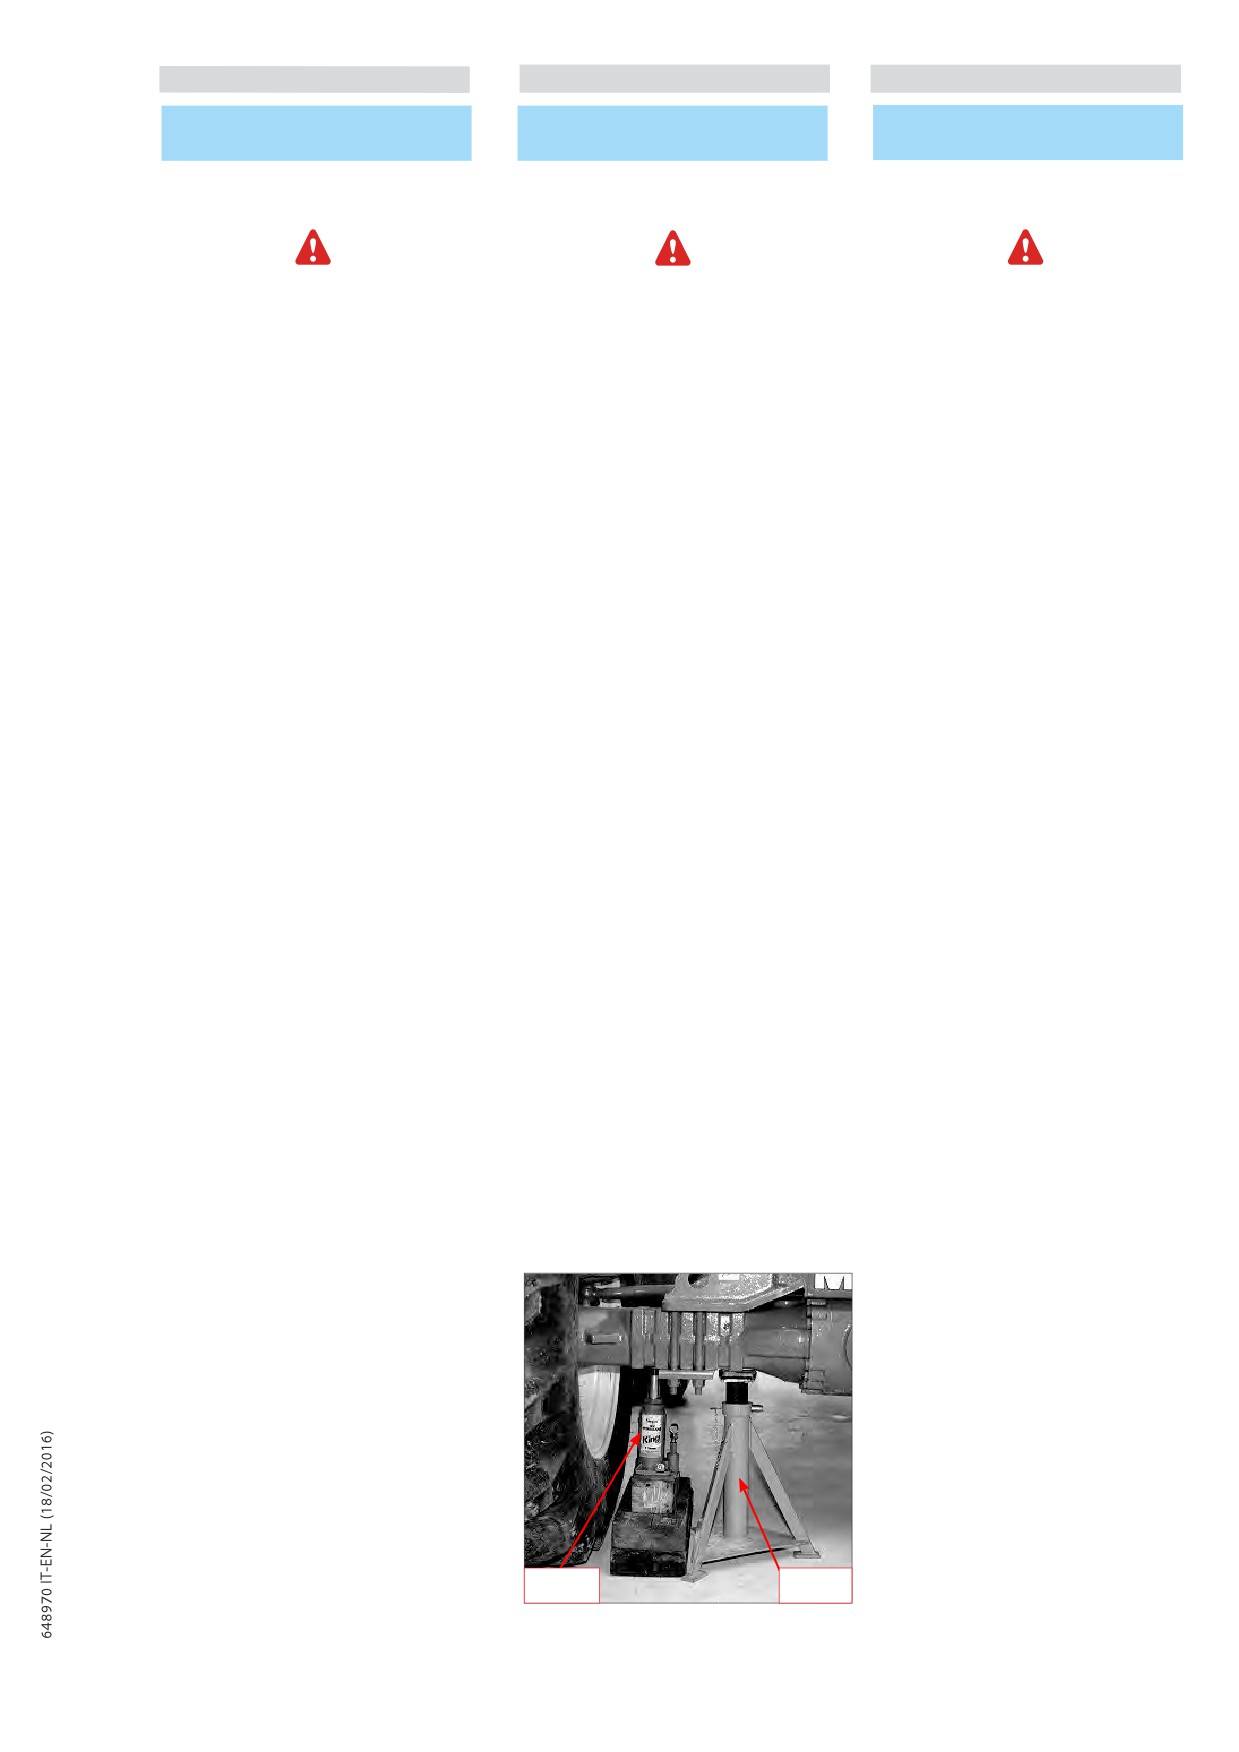
IT
EN
NL
H - MANUTENZIONE OCCASIONALE
H - OCCASIONAL MAINTENANCE
H - OCCASIONEEL ONDERHOUD
H1 - Sostituire una ruota
H1 - Change a wheel
H1 - Een wiel vervangen
Qualora la sostituzione della ruota dovesse
In the event of a wheel being changed on
Als het wiel langs de weg moet worden
essere effettuata lungo la strada, procedere
the public highway, make sure of the fol-
vervangen, ga als volgt te werk:
come descritto qui di seguito:
lowing points :
- Plaats indien mogelijk de heftruck op een
- Se possibile fermare il carrello elevatore in
stevig en horizontaal vlak.
piano su un terreno compatto.
- Stop the lift truck, if possible on even and
- Breng de heftruck tot stilstand
(zie
- Spegnere il carrello elevatore
(Vedi
hard ground.
hoofdstuk: RIJ-INSTRUCTIES in het deel:
capitolo: ISTRUZIONI DI GUIDA nella parte:
- To pass on stop of lift truck (See chapter :
1 - VEILIGHEIDSVOORSCHRIFTEN).
1 - ISTRUZIONI E NORME DI SICUREZZA).
DRIVING INSTRUCTIONS in paragraph : 1 -
- Trek de parkeerrem aan.
- Attivare il freno di stazionamento.
OPERATING AND SAFETY INSTRUCTIONS).
- Ontsteek de waarschuwingslichten.
- Accendere le luci di emergenza.
- Action the parking brake
- Stut de heftruck in beide richtingen op
- Applicare cunei per immobilizzare
- Put the warning lights on.
de as die tegenover het wiel dat moet
il carrello elevatore nelle due direzioni
- Immobilise the lift truck in both directions
worden verwisseld staat.
sull’assale opposto alla ruota da sostituire.
on the axle opposite to the wheel to be
- Draai de moeren los van het wiel dat u wilt
- Allentare i bulloni dalla ruota da sostituire.
changed.
vervangen.
- Sistemare il cric sotto la semiscatola
- Unlock the nuts of the wheel to be chan-
- Plaats de krik onder de stut van de as, zo
dell’assale, il più vicino possibile alla ruota
ged.
dicht mogelijk bij het wiel; stel de krik af
e regolare il cric (Fig. H1/1).
- Place the jack under the flared axle tube,
(Fig. H1/1).
- Sollevare la ruota fino a staccarla da terra
as near as possible to the wheel and adjust
- Krik de heftruck op totdat het wiel niet
e posizionare il sostegno di sicurezza sotto
the jack (Fig. H1/1).
meer in contact met de grond is en plaats
l’assale (Fig. H1/2).
- Lift the wheel until it comes off the ground
de verticale stut onder de as (Fig. H1/2).
and put in place the safety support under
Per effettuare questa operazione, vi
the axle (Fig. H1/2).
Wij raden u aan om voor deze ingreep
consigliamo di utilizzare un cric idraulico e
de hydraulische krik te gebruiken en een
il sostegno di sicurezza.
verticale stut.
- Svitare completamente i bulloni delle
For this operation, we advise you to use
- Draai de wielmoeren helemaal los en
ruote e rimuoverli.
the hydraulic jack and the safety support.
verwijder ze.
- Estrarre la ruota con movimenti di va e
- Maak het wiel los m.b.v. heen- en
vieni e ruotarla sul lato.
weerbewegingen en rol het naar de
- Mettere la ruota nuova sul mozzo.
- Completely unscrew the wheel nuts and
zijkant.
- Avvitare manualmente i bulloni, se
remove them.
- Schuif het nieuwe wiel op de naaf.
necessario lubrificarli con del grasso.
- Free the wheel by reciprocating move-
- Draai de moeren met de hand aan, smeer
- Stringere a fondo i bulloni delle ruote con
ments and roll it to the side.
ze indien nodig.
una chiave dinamometrica
- Draai de wielmoeren m.b.v. een
- Slip the new wheel on the wheel hub.
- Rimuovere il sostegno di sicurezza e
- Refit the nuts by hand, if necessary
dynamometrische sleutel
abbassare il carrello elevatore con il cric.
grease them.
- Verwijder de verticale stut en laat
(Vedi capitolo: A
- OGNI GIORNO O
- Remove the safety support and lower the
de heftruck met de krik zakken.
OGNI 10 ORE DI FUNZIONAMENTO nella
lift truck with the jack.
(Zie hoofdstuk: A - DAGELIJKS OF OM DE
parte:3 MANUTENZIONE, per la coppia di
10 WERKUREN in deel 3 ONDERHOUD wat
- Tighten the wheel nuts with a torque
serraggio).
wrench (See chapter : A - DAILY OR EVERY
betreft het aandraaikoppel).
10 HOURS SERVICE in paragraph : 3 -
MAINTENANCE for tightening torque).
H1/1
H1/2
3-84
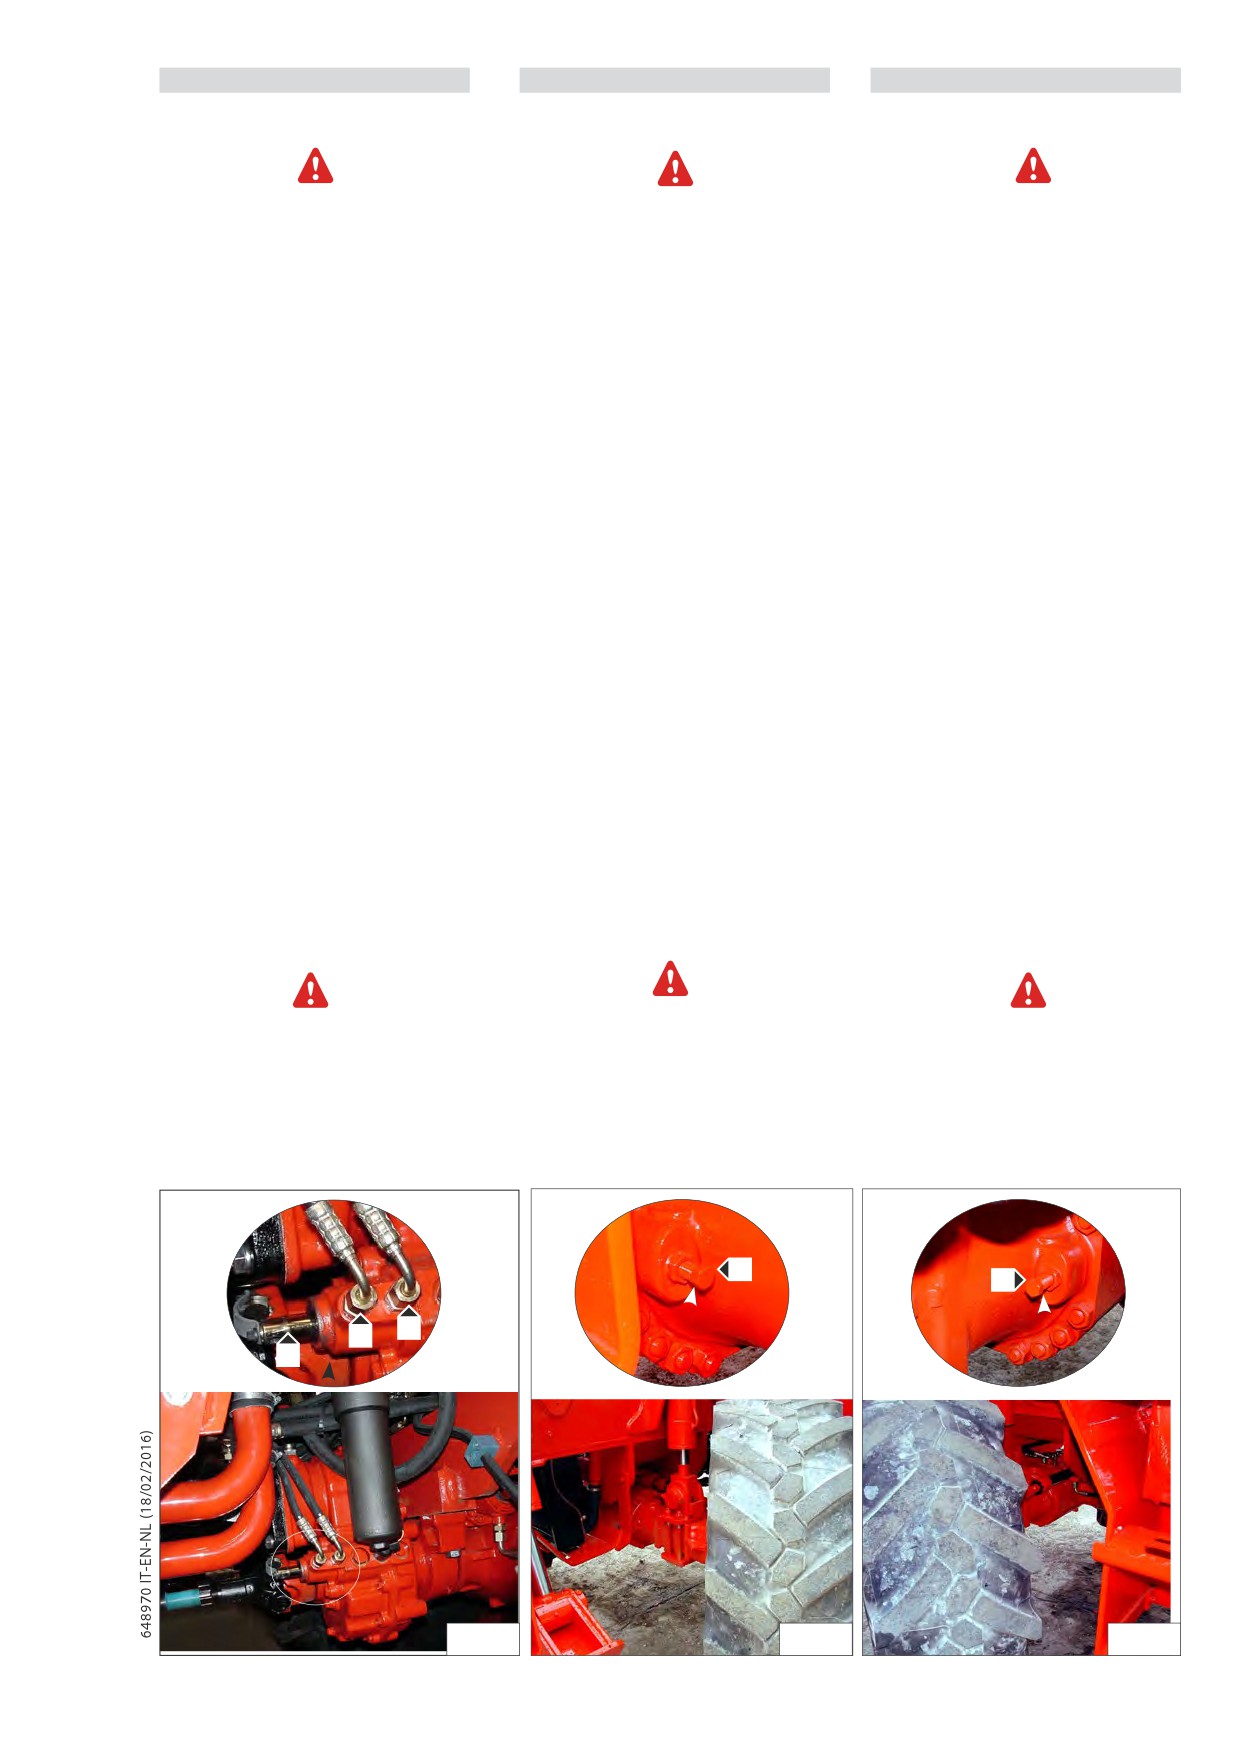
IT
EN
NL
H2 - Trainare il carrello elevatore
H2 - Tow the lift truck
H2 - De heftruck slepen
Il traino può esser effettuato a velocità molto
Het slepen kan bij lage snelheid en over korte
To the lift truck for short distance with slow
ridotta e per brevi distanze.
afstanden worden uitgevoerd.
speed.
- Mettere la leva dell’invertitore di marcia
- Zet de hendel in de vrije stand.
- Shut down engine
in folle.
- Schakel de parkeerrem uit.
- Put the forward/reverse lever in neutral
- Disinserire il freno di stazionamento.
- Ontsteek de waarschuwingslichten.
position
- Accendere le luci di emergenza.
- Zet de aandrijving handmatig in de vrije
- Release the parking brake
- Posizionare manualmente il cambio in
- Put the emergency lights
stand:
posizione di folle:
- put the gear selector in neutral position:
a) koppel de hydraulische buizen los en
a) scollegare e tappare i tubi idraulici (Rif.1
a) disconnect and close the hydraulic
maak ze dicht (Ref.1 Fig.H2/1) van de vijzel
Fig.H2/1) dal martinetto della scatola del
(Rif.1 Fig.H2/1) of the cylinder of the
van de schakeldoos traag/snel rijden;
cambio marcia lenta/marcia veloce;
gear selector.
b) voer druk uit op de staaf (Ref.2 Fig.H2/1)
b) fare leva sullo stelo (Rif.2 Fig.H2/1) della
b) put the rod (Rif.2 Fig.H2/1) in neutral
position (this is on half sroke between
van de schakeldoos om ze eruit te halen
scatola del cambio per farlo uscire e
two “release”)
en in de neutrale stand te zetten (de stand
portarlo in posizione neutra (posizione
tussen de twee volgende "klikken");
intermedia fra i due “scatti successivi);
- Schakelde negatieve rem uit:
- Disattivare il freno negativo:
- Deactivate the negative brake:
c) draai de schroeven vast met de
c) avvitare le viti con controdado (Rif.1 Fig.
H2/2 e Rif.1 Fig.H3/3) posizionate ai due
contramoer (Ref.1 Fig.H2/2 en Ref.1 Fig.
c) screw the screws with lock nut
H3/3) die zich aan de twee kanten van de
lati della scatola dell’assale anteriore fino
(Rif.1 Fig.H2/2 e Rif.1 Fig.H2/3)
al loro appoggio con il pistone. A questo
doos van de vooras bevinden totdat ze op
placed on both sides of the front axle
de zuiger steunen. Voer nu een volledige
punto effettuare una rotazione di un giro.
box until they touch of the rod. Now
draaibeweging uit.
screw the same one turn.
Aangezien de besturing en het remmen
- In assenza della servoassistenza idraulica
alla direzione e ai freni, agire lentamente
niet meer hydraulisch bekrachtigd
- If the engine is not running there will be
worden, activeer deze bedieningsorganen
e con energia su questi due comandi.
no steering or braking assistance. Operate
Evitare i movimenti bruschi e gli scatti.
langzaam maar stevig. Vermijd plotselinge
the steering and pedal slowly avoiding
bewegingen en stoten.
sudden jerky movements.
Het is van groot belang dat de tegenliggende
È importante che le viti contrapposte siano
It’s important that the two screws have the
avvitate della stessa quantità.
schroeven met hetzelfde aantal slagen
same turns.
worden aangedraaid.
1
1
1
1
2
H2/1
H2/2
H2/3
3-85
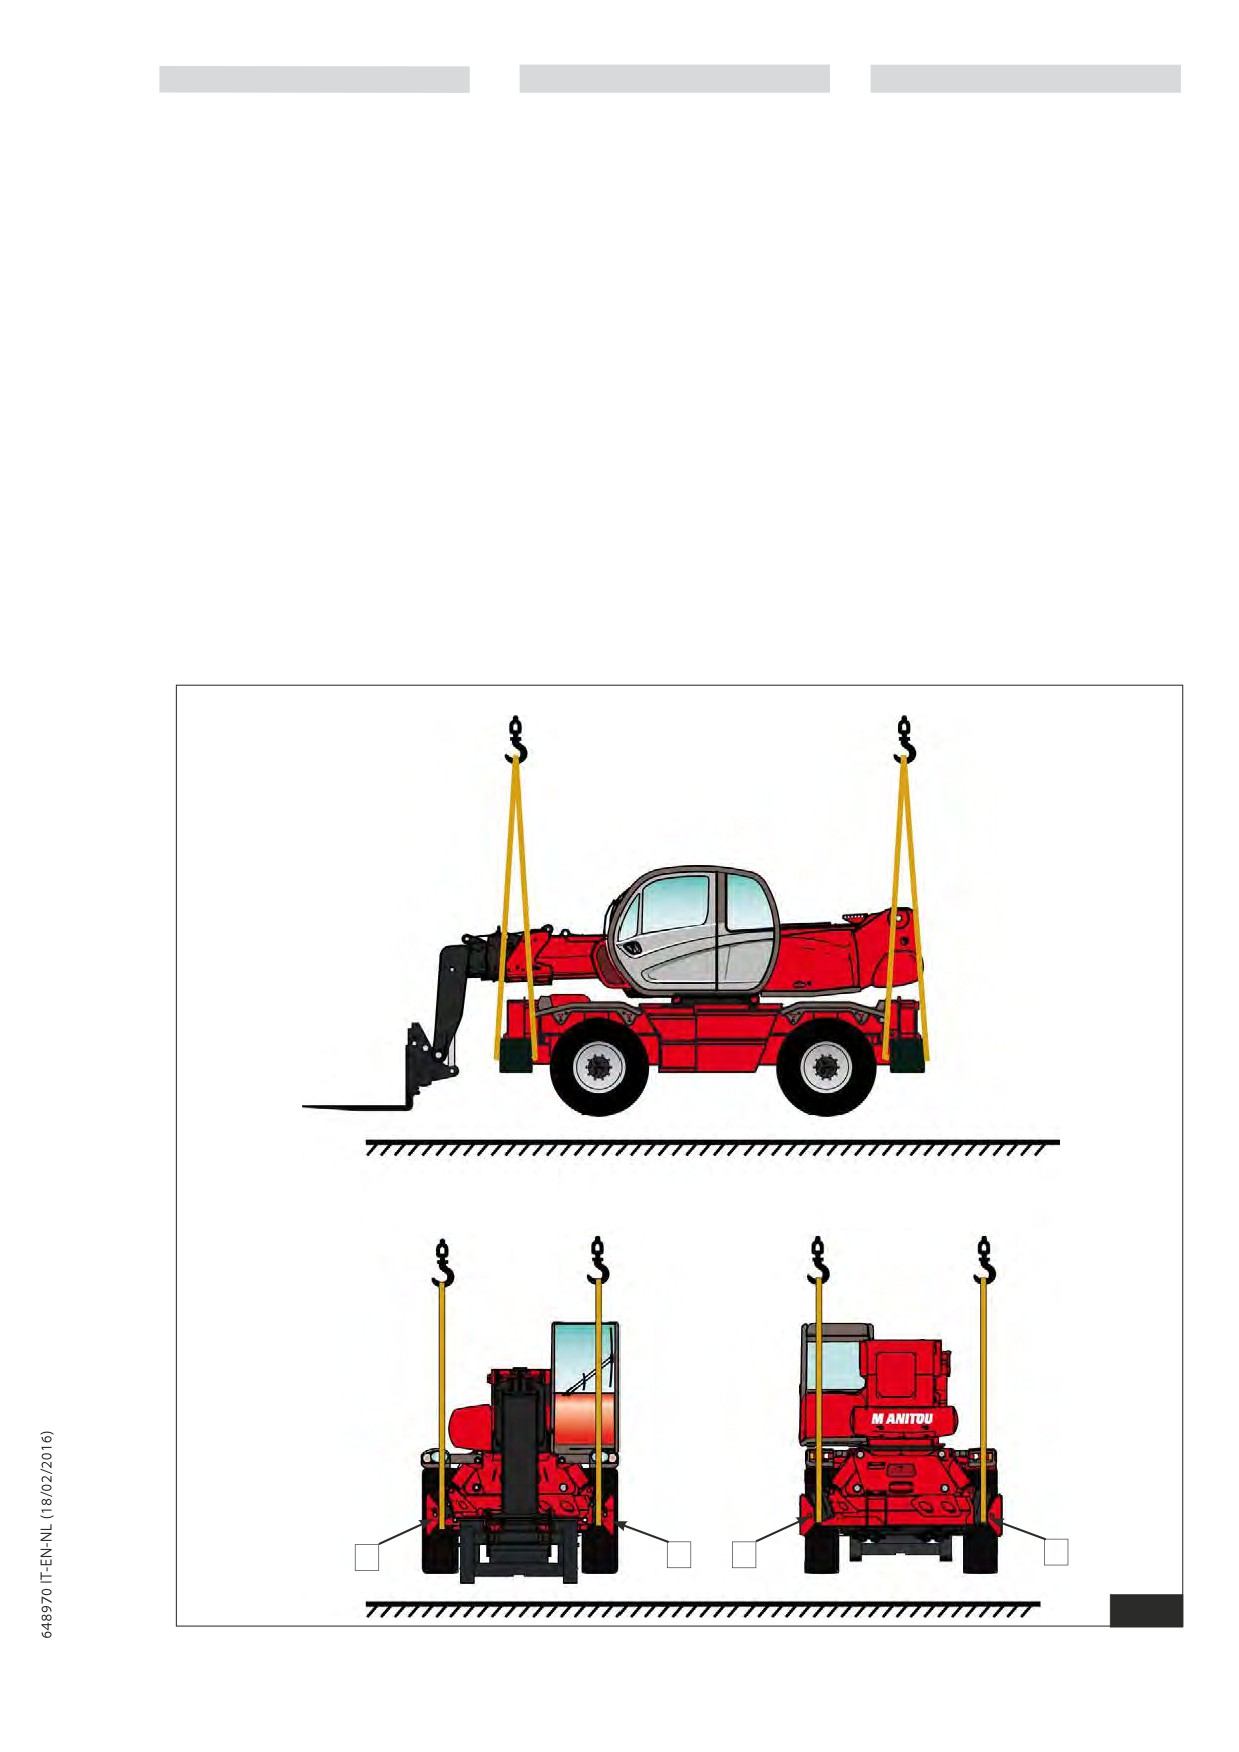
IT
EN
NL
H3 - Imbarcare il carrello elevatore
H3 - Sling the lift truck
H3 - De heftruck vastzetten
- Tenere conto della posizione del centro
- Take into account the position of the lift
- Kijk waar het zwaartepunt van de heftruck
di gravità del carrello elevatore per il
truck gravity center for lifting (Fig. H3).
ligt tijdens het opheffen (Fig. H3).
sollevamento (Fig. H3).
- Place the hooks in the fastening points
- Plaats de banden in de voorziene
- Posizionare le fasce nelle sedi di ancoraggio
provided (Fig. H3).
verankeringspunten (Fig. H3).
previste (Fig. H3).
1
1
2
2
H3
3-86
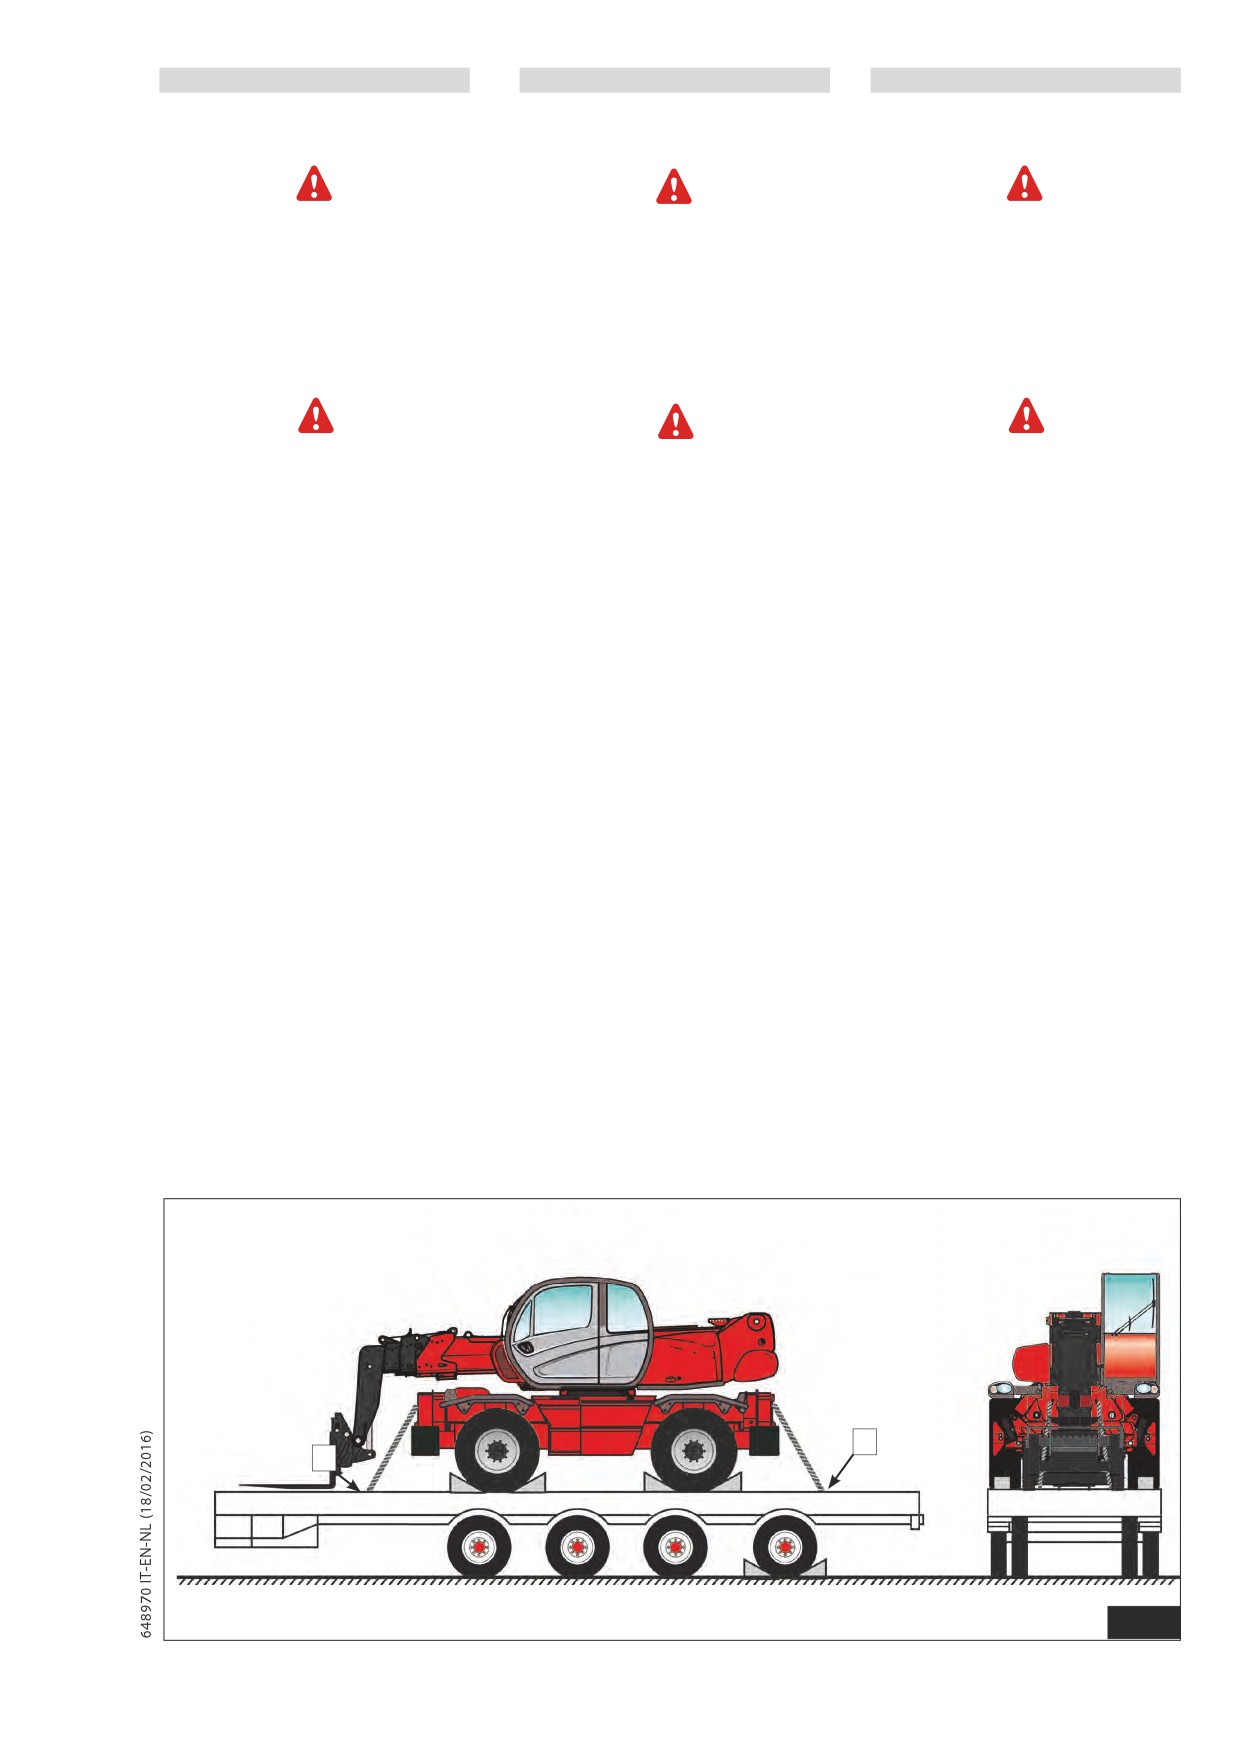
IT
EN
NL
H4 - Trasportare il carrello elevatore su un
H4 - Transport the lift truck on a
H4 - De heftruck op een aanhangwagen
rimorchio
platform
transporteren
Controllare la corretta applicazione
Ensure that the safety instructions con-
Controleer voor het laden van de heftruck of
delle istruzioni di sicurezza relative alla
nected to the platform are respected before
de veiligheidsvoorschriften met betrekking
piattaforma di trasporto prima di caricare
the loading of the lift truck and that the
tot het vervoersplatform naar behoren zijn
il carrello elevatore, e verificare che il
driver of the means of transport is informed
toegepast en controleer of de bestuurder van
conduttore del mezzo di trasporto sia
about the dimensions and the weight of the
het transportmiddel op de hoogte is gesteld
informato delle caratteristiche dimensionali e
lift truck (See chapter : CHARACTERISTICS in
van de afmetingen en het gewicht van de
del peso del carrello elevatore (Vedi capitolo:
paragraph : 2 - DESCRIPTION).
heftruck (zie het hoofdstuk: TECHNISCHE
CARATTERISTICHE TECNICHE nella parte 2 -
KARAKTERISTIEKEN in deel 2 - BESCHRIJVING).
DESCRIZIONE).
Ensure that the platform has got dimen-
Controleer of de afmetingen en het
Accertarsi che la piattaforma abbia delle
sions and a load capacity sufficient for
draagvermogen van het platform
dimensioni e una capacità di carico
transporting the lift truck. Check also the
toereikend zijn voor het vervoer van
sufficienti per trasportare il carrello elevatore.
pressure on the contact surface allowable
de heftruck. Controleer eveneens de
Controllare anche la pressione di contatto al
for the platform in connection with the lift
toelaatbare aanrakingsdruk op de grond
suolo autorizzata per la piattaforma rispetto
truck.
van het platform ten opzichte van de
al carrello elevatore.
heftruck.
Caricare il carrello elevatore
Load the lift truck
Laden van de heftruck
- Bloccare le ruote della piattaforma di
- Block the wheels of the platform.
-
Blokkeer de wielen van de
trasporto.
- Fix the loading ramps so that you obtain
platformwagen.
- Fissare le rampe di carico alla piattaforma,
an angle as little as possible to lift the lift
- Installeer de laadbruggen van de
in modo da ottenere un angolo il più
truck.
platformwagen onder een zo klein
piccolo possibile per far salire il carrello
- Load the lift truck parallel to the platform.
mogelijke hoek om de heftruck op de
elevatore.
- Stop the lift truck (See chapter : DRIVING
wagen te kunnen rijden.
- Caricare il carrello elevatore parallelamente
INSTRUCTIONS in paragraph : 1 -
- Zet de heftruck parallel ten opzichte van
alla piattaforma.
OPERATING AND SAFETY INSTRUCTIONS).
het platform.
- Spegnere il carrello elevatore
(Vedi
- Breng de heftruck tot stilstand
(zie
capitolo: ISTRUZIONI DI GUIDA nella parte:
hoofdstuk: RIJ-INSTRUCTIES in het deel:
1 - ISTRUZIONI E NORME DI SICUREZZA).
1 - VEILIGHEIDSVOORSCHRIFTEN).
Stow the lift truck
Imbarcare un carrello elevatore
De heftruck vastzetten
- Fix the chocks to the platform at the front
- Fissare i cunei davanti e dietro a ciascun
and at the back of each tyre
- Bevestig de stutten op het platform aan
pneumatico (Fig. H4).
(Fig. H4).
de voor- en achterzijde van iedere band
- Stow the lift truck on the platform with
- Bloccare il carrello elevatore sulla
(Fig. H4).
enough resisting ropes. At the front of the
piattaforma con funi sufficientemente
- Blokkeer de heftruck op het platform
lift truck, on the fastening points 1 and 2
resistenti, sulla parte anteriore del carrello
(Fig. H4).
met touwen die voldoende resistent zijn,
elevatore nei punti di ancoraggio 1 e 2
- Tighten the ropes (Fig. H4).
op de voorkant van de heftruck in de
(Fig. H4).
verankeringspunten 1 en 2 (Fig. H4).
- Portare le funi in tensione (Fig. H4).
- Span de kabels aan (Fig. H4).
2
1
H4
3-87
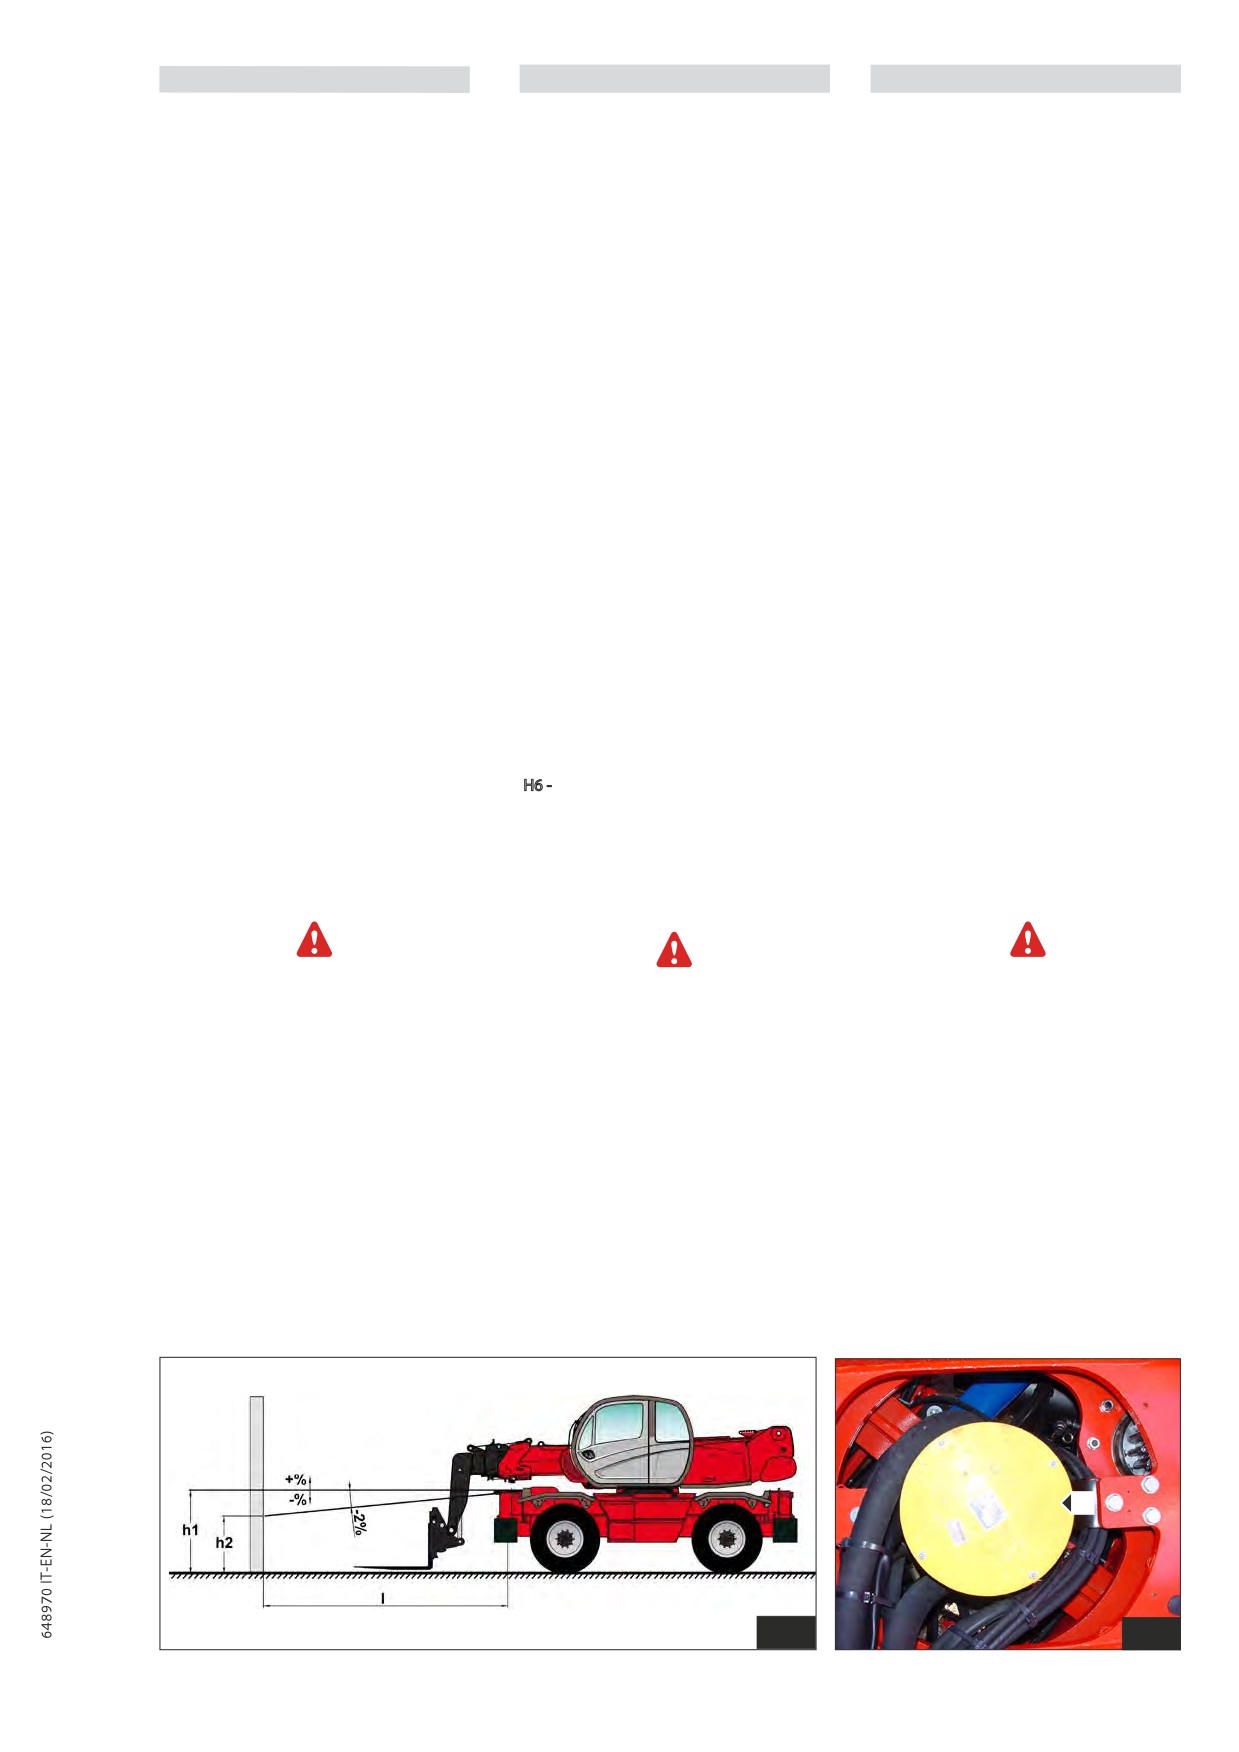
IT
EN
NL
H5 - Regolare i fari anteriori
H5 - Adjust the front headlamps
H5 - De voorlichten regelen
Raccomandazioni per la regolazione
Recommended setting
Aanbevelingen met betrekking tot de afstelling
(Secondo le norme ECE-76/756 76/761 ECE20).
(As per standard ECE-76/756 76/761 ECE20)
(volgens normen ECE-76/756 76/761 ECE20).
Regolazione del
-2% del fascio degli
Set to - 2% of the dipped beam in relation
Bijstelling van -2% van de bundel van de
anabbaglianti rispetto all’asse orizzontale
to the horizontal line of the headlamp.
dimlichten ten opzichte van de horizontale
del proiettore.
as van de schijnwerper.
Procedura di regolazione
Adjusting procedure
Afstellingsprocedure
-
Mettere il carrello elevatore, a
- Place the lift truck unloaded and in the
- Zet de heftruck onbelast in de
vuoto in posizione di trasporto,
transport position and perpendicular to a
transportstand tegenover een witte muur
perpendicolarmente ad un muro bianco,
white wall on flat, level ground (Fig. H5).
op een vlakke horizontale ondergrond
su di un terreno piano e orizzontale (Fig.
- Check the tyre pressures (See chapter :
(Fig. H5).
H5).
B3 - CHECK THE TYRE PRESSURES AND
- Controleer de druk van de banden (zie
- Controllare la pressione dei pneumatici
THE WHEEL NUTS TORQUE in paragraph :
het hoofdstuk: B3 - DE DRUK VAN DE
(Vedi capitolo: B3
- CONTROLLARE
3 - MAINTENANCE).
BANDEN EN AANDRAAIMOMENT VAN DE
LA PRESSIONE DEI PNEUMATICI E IL
- Put the gear reverser lever in neutral and
SERRAGGIO DEI BULLONI DELLE RUOTE
action the parking brake.
WIELMOEREN CONTROLEREN in het deel:
nella parte: 3 - MANUTENZIONE).
3 - ONDERHOUD).
- Mettere la leva dell’invertitore di marcia in
Calculating the height of the dipped
- Zet de hendel van de invertor in de vrije
folle e azionare il freno di stazionamento.
beam (h2) FIG. H5
stand en schakel de parkeerrem in.
Calcolo dell’altezza degli anabbaglianti (h2)
h1
= Height of the dipped beam in
Berekening van de hoogte van de bundel
FIG. H5
relation to the ground.
van de dimlichten (h2) FIG. H5
h2
= Height of the adjusted beam.
h1
= Altezza rispetto al suolo degli
l
= Distance between the dipped
h1
= Hoogte van het dimlicht ten
anabbaglianti.
beam and the white wall.
opzichte van de grond.
h2
= Altezza del fascio regolato.
h2
= h1- (l x 2/100)
h2
= Hoogte van de afgestelde bundel.
I
= Distanza tra gli anabbaglianti e il
I
= Afstand tussen het dimlicht en de
muro bianco.
witte muur.
h2= h1- (l x 2/100)
h2= h1- (l x 2/100)
H6 - Far controllare e pulire gli anelli
H6 - De overbrengingsringen van de draaiende
H6 - Have the rotary electrical slip
trasmettitori del collettore elettrico
elektrische collector laten controleren en
rings checked and cleaned
rotante (dopo 3 mesi di inattività)
schoonmaken (na 3 maanden inactiviteit)
(after 3 months of shutdown)
Rivolgersi al Vostro agente o concessionario.
Neem contact op met uw agent of dealer.
Contact your agent or dealer.
Sollevare il braccio e collocare il cuneo
Hef de arm op en plaats de
Raise the boom and place the boom
di sicurezza sullo stelo del martinetto di
veiligheidswig op de stang
safety wedge on the rod of the lifting
sollevamento (vedere: 1 - ISTRUZIONI
cylinder (see: 1 - OPERATING AND
van de hefcilinder (zie: 1 -
E NORME DI SICUREZZA: ISTRUZIONI
SAFETINSTRUCTIONS: LIFT TRUCK
VEILIGHEIDSVOORSCHRIFTEN:
DI MANUTENZIONE DEL CARRELLO
MAINTENANCE INSTRUCTIONS).
ONDERHOUDSINSTRUCTIES VAN DE
ELEVATORE).
HEFTRUCK).
H5
H6
3-88
IT
EN
NL
H7 - Manutenzione del radiocomando
H7 - Radio remore contol maintenance
H7 - Onderhoud van de afstandsbediening
Manutenzione ordinaria giornaliera
Daily routine maintenance
Gewoon dagelijks onderhoud
Prima di iniziare a lavorare:
Before starting to work:
Voordat u begint te werken:
- accertarsi che la sede d’alloggiamento
- make sure that the battery housing and
- controleer of de houder en de contacten
e i contatti della batteria siano sempre
the battery contacts are always clean
van de batterij altijd schoon zijn
puliti
- make sure that the gaskets, bellows and
-
controleer of de afdichtingen,
- verificare che le guarnizioni, i soffietti
caps of the actuators (joysticks, selectors
de membranen en de doppen
e i cappucci degli attuatori
(joystick,
and pushbuttons) are intact, soft and
van de aandrijvingen
(joystick,
selettori e pulsanti) siano integri,
elastic
keuzeschakelaars en knoppen) intact,
morbidi ed elastici
- make sure that the transmitting unit
zacht en elastisch zijn
- verificare che i simboli del pannello
panel symbols can be easily recognised
dell’unità trasmittente siano ben visibili
and replace the panel if necessary
- controleer of de symbolen op het paneel
ed eventualmente sostituire il pannello
- check that the three plates on the tran-
van de zender goed zichtbaar zijn;
stesso
smitting unit are readable and intact
vervang het paneel indien nodig
- controllare la leggibilità e l’integrità delle
- make sure that the mechanical operation
- controleer of de labels van de zender
tre targhette dell’unità trasmittente
of the STOP pushbutton is correct.
goed leesbaar en intact zijn
- verificare il corretto funzionamento
- controleer of de STOP-knop goed werkt
meccanico del pulsante STOP.
op mechanisch vlak.
Durante il normale funzionamento:
During normal operation:
Tijdens de normale werking:
- controllare che l’unità trasmittente sia
- check structural integrity of the transmit-
- controleer of de zender structureel intact is
strutturalmente integra
ting unit
- zorg ervoor dat er zich geen materialen
- fare attenzione che sull’unità trasmittente
- make sure that materials that could
op de zender terecht komen (bv. cement,
non si depositino materiali (es. cemento,
endanger the transmitting unit usage and
zand, kalk, stof) die het gebruik en de
sabbia, calce, polvere) che possano
safety (such as concrete, sand, lime, dust)
veiligheid ervan in het gedrang kunnen
comprometterne l’utilizzo e la sicurezza.
do not deposit on it.
brengen.
Dopo aver utilizzato il radiocomando:
Na het gebruik van de afstandsbediening:
- pulire l’unità trasmittente: non usare mai
After using the radio remote control:
- maak de zender schoon: gebruik nooit
solventi o prodotti infiammabili/corrosivi
- clean the transmitting unit: never use sol-
oplosmiddelen of brandbare/corrosieve
e non utilizzare idro pulitrici ad alta
vents or flammable/corrosive materials
producten, hogedrukreinigers of
pressione o apparecchi a vapore
and do not use high-pressure water clea-
stoomtoestellen
- immagazzinare l’unità trasmittente in
ners or steam cleaners
- bewaar de zender in een schone en droge
ambienti puliti ed asciutti.
- store the transmitting unit in clean and
omgeving.
dry areas.
Manutenzione ordinaria trimestrale
Gewoon driemaandelijks onderhoud
Three-month routine maintenance
Ogni 3 mesi:
Om de 3 maanden:
- rimuovere la polvere o accumuli di
Every 3 months:
- verwijder het stof of andere verzamelde
altro materiale dall’unità ricevente:
- remove dust or deposit of material from
materialen van de ontvanger: gebruik
per pulire non usare mai solventi o
the receiving unit: never use solvents
nooit oplosmiddelen of brandbare/
prodotti infiammabili/corrosivi e non
or flammable/corrosive materials to clean
corrosieve producten, hogedrukreinigers
utilizzare idro pulitrici ad alta pressione o
it, and do not use high-pressure water
of stoomtoestellen
apparecchi a vapore
cleaners or steam cleaners
- controleer of de ontvanger structureel
- controllare che l’unità ricevente sia
- check structural integrity of the receiving
intact is
strutturalmente integra
unit
- controleer of de bekabeling van de
- verificare l’integrità e la connessione del
- make sure that the wiring of the receiving
ontvanger intact is en goed aangesloten
cablaggio dell’unità ricevente
unit is intact and connected
- verificare che i simboli del pannello
- make sure that the receiving unit panel
is
dell’unità ricevente siano ben visibili
symbols can be easily recognised and
- controleer of de symbolen op het paneel
ed eventualmente sostituire il pannello
replace the panel if necessary
van de ontvanger goed zichtbaar zijn;
stesso
- check that the plates on the receiving unit
vervang het paneel indien nodig
- controllare la leggibilità e l’integrità delle
are readable and intact.
- controleer of de labels van de ontvanger
targhette dell’unità ricevente.
goed leesbaar en intact zijn.
Manutenzione straordinaria
Special maintenance
Buitengewoon onderhoud
Eventuali guasti possono essere riparati
Eventuele defecten mogen uitsluitend
esclusivamente da personale autorizzato.
Any fault should be repaired by authorised
hersteld worden door bevoegd personeel.
(interpellare il servizio di assistenza
personnel only. (contact the support
(neem contact op met de servicedienst
MANITOU).
service MANITOU).
MANITOU).
Guida alla soluzione dei problemi
Gids voor het oplossen van problemen
Quando il radiocomando non funziona, è
Troubleshooting
Wanneer de afstandsbediening niet
necessario:
When the radio remote control does not
werkt, dient u:
- avvicinare l’unità trasmittente all’unità
work:
- de zender in de buurt van de ontvanger
ricevente al fine di evitare disturbi ed
- bring the transmitting unit close to the
te brengen, teneinde storingen en radio-
interferenze radio.
receiving unit to avoid radio interference
interferenties te vermijden.
- controllare se il problema interessa il
and disturbances
- controleer of het probleem de
radiocomando o la macchina. Perciò, prima
- establish whether the problem lies with
afstandsbediening of de machine betreft.
di qualunque verifica, provare a comandare la
the radio remote control or with the
Voordat u om het even welke controle
macchina tramite una postazione di comando
machine.
uitvoert, probeer de machine te machine
diversa dal radiocomando, se presente.
Therefore, before any inspection, try to
te bedienen door middel van een andere
Se persiste, il problema interessa la macchina
control the machine from a control unit
bediening dan de afstandsbediening,
stessa.
different from the radio remote control, if
indien aanwezig.
Altrimenti il problema riguarda il
present.
Als het probleem niet opgelost is, heeft
radiocomando. In tal caso, consultare il
If the problem persists, it lies with the
het probleem betrekking op de machine.
paragrafo
“Malfunzionamenti segnalati
machine.
Anders heeft het probleem betrekking
dall’unità trasmittente”.
If not, the problem may lie with the radio
op de afstandsbediening. Zie in dat geval
remote control. In such case, please
de paragraaf “Door de zender gemelde
refer to paragraph “Malfunction signalled
storingen”.
by the transmitting unit”.
3-89

IT
EN
NL
Malfunzionamenti segnalati dall’unità
trasmittente (Pulsantiera)
Ricercare il malfunzionamento del
radiocomando in funzione delle
segnalazioni luminose delle unità. Nel
caso in cui il problema persista dopo avere
attuato la soluzione indicata, contattare il
servizio di assistenza MANITOU.
Segnalazioni
Possibile causa
Soluzioni
Il LED verde non si accende premendo il
La batteria è scarica.
Sostituire la batteria con una carica.
pulsante START anche se sono inserite sia
la batteria che la S-KEY.
Il LED verde lampeggia velocemente.
Il collegamento radioelettrico è assente.
Avvicinare l’unità trasmittente all’unità
ricevente.
Il LED rosso si accende per 2 secondi e poi
L’unità trasmittente non funziona
Contattare il servizio di assistenza MANITOU.
l’unità si spegne.
correttamente.
Il LED rosso lampeggia una volta durante
Il pulsante STOP è inserito o è guasto.
Disinserire il pulsante STOP.
l’avviamento.
Se questa segnalazione persiste contattare il
servizio di assistenza MANITOU.
Il LED rosso lampeggia due volte durante
Almeno uno degli attuatori relativi ai
Portare gli attuatori in posizione di riposo.
l’avviamento.
comandi è attivo o è guasto.
Se questa segnalazione persiste contattare
il servizio di assistenza MANITOU.
Il LED rosso lampeggia tre volte durante
La batteria è scarica.
Sostituire la batteria con una carica.
l’avviamento.
Il LED rosso lampeggia quattro volte
Almeno uno degli attuatori relativi ai
Portare gli attuatori in posizione di riposo.
durante l’avviamento.
comandi è attivo o è guasto.
Se questa segnalazione persiste contattare il
servizio di assistenza MANITOU.
Malfunzionamenti segnalati dall’unità
ricevente
Ricercare il malfunzionamento del
radiocomando in funzione delle
segnalazioni luminose delle unità. Nel
caso in cui il problema persista dopo avere
attuato la soluzione indicata, contattare il
servizio di assistenza MANITOU.
Segnalazioni
Possibile causa
Soluzioni
Il LED POWER è spento.
L’unità ricevente è spenta.
Verificare l’integrità del fusibile F2.
Agganciare correttamente la spina di
collegamento e alimentare l’unità ricevente.
Il LED POWER è acceso.
Il collegamento radioelettrico è assente.
Avvicinare l’unità trasmittente all’unità
ricevente.
Il LED ALARM lampeggia una volta.
È presente un errore sulle uscite STOP.
Verificare l’integrità dei fusibili F3 e F4.
Agganciare correttamente la spina di
collegamento.
Verificare il corretto cablaggio delle uscite
STOP.
Il LED ALARM lampeggia due volte.
È presente un errore sulle uscite SAFETY.
Verificare l’integrità dei fusibili F1 e F5.
Agganciare correttamente la spina
di collegamento. Verificare il corretto
cablaggio delle uscite SAFETY.
Il LED ALARM lampeggia tre volte.
È presente un errore sulle uscite relative ai
Contattare il servizio di assistenza del
comandi di direzione.
costruttore della macchina.
Verificare il corretto cablaggio delle uscite
relative ai comandi di direzione.
Il LED ALARM è acceso.
L’unità
ricevente
non funziona
Contattare il servizio di assistenza MANITOU.
correttamente.
Il LED RUN lampeggia.
L’unità ricevente non invia i comandi alla
Contattare il servizio di assistenza MANITOU.
rete CAN.
Il LED ERR lampeggia.
L’unità ricevente non invia i comandi alla
Contattare il servizio di assistenza MANITOU.
rete CAN.
3-90

IT
EN
NL
Malfunction signalled by the transmit-
ting unit (Pushbutton)
Identify the radio remote control malfun-
ction according to the light signals on the
units. If the problem persists after the sug-
gested solution has been carried out,
contact the support service of MANITOU
Signals
Possible reason
Solutions
The green LED does not switch on when
The battery is flat.
Replace the battery with a charged
the START pushbutton is pressed, even
one.
though both the battery and the S-KEY
are inserted.
The green LED blinks fast.
No radio link.
Bring the transmitting unit close to the
receiving unit.
The red LED switches on for 2 seconds and
The transmitting unit does not work cor-
Contact the support service MANITOU.
then the unit switches off.
rectly.
The red LED blinks once during start up.
The STOP pushbutton is locked or dama-
Unlock the STOP pushbutton.
ged.
If this signal persists, contact the support
service MANITOU.
The red LED blinks twice during start up.
At least one of the actuators correspon-
Bring the actuators to the rest position.
ding to commands is activated or dama-
If this signal persists, contact the
ged.
support service MANITOU.
The red LED blinks three times during
The battery is flat.
Replace the battery with a charged
start up.
one.
The red LED blinks four times during start
At least one of the actuators correspon-
Bring the actuators to the rest position.
up.
ding to commands is activated or dama-
If this signal persists, contact the support
ged.
service MANITOU.
Malfunction signalled by the receiving
unit (Pushbutton)
Identify the radio remote control malfun-
ction according to the light signals on the
units. If the problem persists after the sug-
gested solution has been carried out,
contact the support service of MANITOU
Signals
Possible reason
Solutions
The LED POWER is off.
The receiving unit is switched off.
Make sure that fuse F2 is intact.
Correctly plug in the connecting plug
and power on the receiving unit.
The POWER LED is on.
No radio link.
Bring the transmitting unit close to the
receiving unit.
The ALARM LED
Error on the STOP outputs.
Make sure that fuses F3 and F4 are
blinks once.
intact.
Correctly plug in the connecting plug.
Make sure that the STOP outputs are
wired correctly.
The ALARM LED
Error on the SAFETY outputs.
Make sure that fuses F1 and F5 are
blinks twice.
intact. Correctly plug in the connecting
plug. Make sure that the SAFETY outputs
are wired correctly.
The ALARM LED
Error on the outputs corresponding to
Contact the support service of the
blinks three times.
direction commands.
machine manufacturer.
Make sure that the outputs of direction
commands are wired correctly.
The ALARM LED is on.
The receiving unit
Contact the support service of the
does not work correctly.
machine manufacturer.
The RUN LED blinks.
The receiving unit does not send com-
Contact the support service MANITOU.
mands in the CAN network.
The ERR LED blinks.
CAN communication error.
Contact the support service MANITOU.
3-91

IT
EN
NL
Door de zender gemelde storingen
(Knoppenbord)
Spoor de storing van de afstandsbediening
op in functie van de lampjes op de unit.
Wanneer het probleem niet opgelost is
nadat u de vermelde oplossing heeft
toegepast, neem contact op met de
technische assistentie van MANITOU.
Meldingen
Mogelijke oorzaak
Oplossingen
Het groene lampje gaat niet aan als u op
De batterij is leeg.
Vervang de batterij met een opgeladen
de START-knop drukt, ook al zijn zowel de
batterij.
batterij als de S-KEY ingevoerd.
Het groene lampje knippert snel.
Er is geen radio-elektrische verbinding.
Breng de zender in de buurt van de
ontvanger.
Het rode lampje brandt gedurende 2
De zender werkt niet goed.
Neem contact op met de servicedienst
seconden en vervolgens wordt de unit
MANITOU.
uitgeschakeld.
Het rode lampje knippert één keer tijdens
De STOP-knop is ingedrukt of defect.
Ontgrendel de STOP-knop.
het opstarten.
Als het probleem niet opgelost raakt,
neem contact op met de servicedienst van
MANITOU.
Het rode lampje knippert twee keer tij-
Ten minste een van de aandrijvingen van
Stel de aandrijvingen in op de ruststand.
dens het opstarten.
de bedieningen is actief of defect.
Als het probleem niet opgelost raakt,
neem contact op met de servicedienst van
MANITOU.
Het rode lampje knippert drie keer tijdens
De batterij is leeg.
Vervang de batterij met een opgeladen
het opstarten.
batterij.
Het rode lampje knippert vier keer tijdens
Ten minste een van de aandrijvingen van
Stel de aandrijvingen in op de ruststand.
het opstarten.
de bedieningen is actief of defect.
Als het probleem niet opgelost raakt,
neem contact op met de servicedienst van
MANITOU.
Door de ontvanger gemelde storingen
Spoor de storing van de afstandsbediening
op in functie van de lampjes op de unit.
Wanneer het probleem niet opgelost is
nadat u de vermelde oplossing heeft
toegepast, neem contact op met de
technische assistentie van MANITOU.
Meldingen
Mogelijke oorzaak
Oplossingen
Het lampje POWER is uitgeschakeld.
De ontvanger is uitgeschakeld.
Controleer de staat van de zekering F2.
Maak de verbindingsstekker correct vast en
voorzie de ontvanger van stroom.
Het lampje POWER is ingeschakeld.
Er is geen radio-elektrische verbinding.
Breng de zender in de buurt van de
ontvanger.
Het lampje ALARM knippert één keer.
Er is een fout op de STOP-uitgangen.
Controleer de staat van de zekeringen F3
en F4.
Maak de verbindingsstekker correct vast.
Controleer of de STOP-uitgangen correct
bekabeld zijn.
Het lampje ALARM knippert twee keer.
Er is een fout op de SAFETY-uitgangen.
Controleer de staat van de zekeringen F1
en F5. Maak de verbindingsstekker correct
vast. Controleer of de SAFETY-uitgangen
correct bekabeld zijn.
Het lampje ALARM knippert drie keer.
Er is een fout op de uitgangen met
Neem contact op met de servicedienst van
betrekking tot de richtingaanwijzers.
de fabrikant van de machine.
Controleer of de uitgangen met betrekking
tot de richtingaanwijzers correct bekabeld
zijn.
Het lampje ALARM is ingeschakeld.
De ontvanger werkt niet goed.
Neem contact op met de servicedienst
MANITOU.
Het lampje RUN knippert.
De ontvanger verstuurt geen commando's
Neem contact op met de servicedienst
naar het CAN-netwerk.
MANITOU.
Het lampje ERR knippert.
De ontvanger verstuurt geen commando's
Neem contact op met de servicedienst
naar het CAN-netwerk.
MANITOU.
3-92
IT
EN
NL
H8 - Riscaldamento
H8 - Heating
H8 - Verwarming
DATI TECNICI - TECHNICAL DATA - TECHNISCHE DATEN
RISCALDATORE - HEATER -
AIRTRONIC D2
AIRTRONIC D4 (option)
HEIZUNGS
FLUIDO DI RISCALDAMENTO -
ARIA - AIR - HEISSLUFT
HEATING FLUID - FLUID HEIZUNG
WATT
WATT
POTENZA TERMICA - THERMIC POWER -
(power)
(max)
(medium)
(min)
(power)
(max)
(medium)
(min)
THERMISCHE ENERGIE
2200
1800
1200
850
4000
3000
2000
1000
PORTATA ARIA DI RISCALDAMENTO -
Kg/h
Kg/h
(power)
(max)
(medium)
(min)
(power)
(max)
(medium)
(min)
HOT AIR TROUGHPUT -
HEIZLUFTDURCHSATZ
105
87
60
42
185
150
110
65
l/h
l/h
CONSUMO COMBUSTIBILE -
(power)
(max)
(medium)
(min)
(power)
(max)
(medium)
(min)
FUEL CONSUMPTION -
BRENNSTOFFVERBRAUCH
0,28
0,23
0,15
0,10
0,51
0,38
0,25
0,13
ASSORBIMENTO ELETTRICO - ELECTRIC
WATT
WATT
POWER CONSUPTION - ELEKTRISCHE
(power)
(max)
(medium)
(min)
(power)
(max)
(medium)
(min)
LEISTUNGSAUFNAHME
(12-24 Volt)
34
23
12
8
40
24
13
7
ALL' AVVIAMENTO - AT START -
BEIM START
″ 100
″ 100
(12-24 Volt)
TENSIONE NOMINALE - OPERATING
12 o 24 Volt
RANGE - NENNSPANNUNG
TEMPERATURA AMMESSA in esercizio
TEMPERATURE
in operating
-40° C / +70° C
UMGEBUNGESTEMPERATURE im betrieb
TEMPERATURA AMMESSA in magazzino
TEMPERATURE
not in operating
-40° C / +85° C
UMGEBUNGESTEMPERATURE ohne betrieb
COMBUSTIBILE
gasolio - commerciale (secondo DIN EN 590)
FUEL
diesel oil - they trades (in accordance with DIN EN 590)
BRENNSTOFF
Dieselöl - sie handeln (nach DIN EN 590)
Tutti i dati hanno una tolleranza di +/- 10% - All the data have one tolerance of +/- 10% - Alle Daten haben eine Toleranz von +/- 10%
3-93
IT
EN
NL
Si prega inoltre di tenere presente
Please also bear the following matters
Gelieve tevens met het volgende
quanto segue
in mind
rekening te houden
Il riscaldatore non deve essere messo in
De verwarmer mag niet in werking
The heater must never be allowed to ope-
funzione in luoghi chiusi (ad es. garage),
worden gesteld in gesloten ruimten (bv.
rate in a closed room (such as a garage). It
een garage) en moet altijd uitgeschakeld
e deve essere sempre spento durante il
must always be turned off when the truck
worden wanneer u brandstof bijvult.
rifornimento di combustibile.
is refueled.
Het is verboden de verwarmer te gebruiken
Ne è vietato il funzionamento in locali dove
It is forbidden to operate the heater in pla-
in ruimten waar brandbare dampen of
possono essere presenti vapori o polveri
ces that may contain inflammable vapor or
brandbaar stof aanwezig kan zijn
(bv.
infiammabili (es. magazzini di combustibili,
dust (such as warehouses where fuels, coal,
magazijnen waar brandstof, kool, zaagsel,
di carbone, di segatura, di cereali o
graan en dergelijk wordt bewaard). U dient
sawdust, grain or similar products are sto-
simili). Bisogna evitare che l’aria calda del
te allen tijde te vermijden dat de warme
red). The hot air issued by the heater must
lucht van de verwarmer in de buurt komt
riscaldatore lambisca bombolette spray e
not be allowed to hit aerosols or gas bottles.
van spuitbussen en gasflessen.
contenitori di gas.
If the heater or system break down, contact
Wanneer de verwarmer of de installatie
In caso di guasto del riscaldatore o
an authorized workshop and make sure
defect raakt, raden wij u aan om u tot een
dell’impianto, si raccomanda di rivolgersi
that the repairs are carried out using genu-
bevoegde garage te wenden om de nodige
ad una officina autorizzata che ripari il
ine spare parts. Repairs carried out on your
herstellingen te laten uitvoeren met behulp
guasto usando ricambi originali. Riparazioni
own or using spurious spare parts may be
van originele vervangingsdelen. Het zelf
fatte da sé o usando ricambi non originali
uitvoeren van herstellingen of het gebruik
dangerous and are not authorized. They
possono essere pericolose e non sono
van niet-originele vervangingsdelen
also void the warranty and, in Germany, the
kan gevaarlijk zijn en is bijgevolg niet
quindi autorizzate, fanno inoltre decadere
circulation permit of the vehicle.
toegestaan. Ze doen de garantie vervallen
la garanzia e, in Germania, il permesso di
In the case of prolonged inactivity, and the-
en, in Duitsland, de rijvergunning voor het
circolazione del veicolo.
refore as soon as the period of use of the
toestel.
In caso di inattività prolungata e cioè non
heating system is completed, empty the
Wanneer de verwarmer gedurende een
appena terminato il periodo di utilizzo,
heater fuel tank completely and wash it out,
lange periode niet wordt gebruikt, dient
svuotare completamente e lavare il
and fully drain the metering pump and the
het brandstoftank onmiddellijk na het
serbatoio carburante riscaldatore, scaricare
gebruik volledig te worden leeggemaakt
fuel pipe circuit.
completamente la pompa dosatrice e il
en schoongemaakt; verder dienen de
doseerpomp het brandstofgeleidingcircuit
circuito tubazioni combustibile.
volledig te worden leeggemaakt.
MANITOU consiglia di aggiungere ad
MANITOU suggests adding the antibac-
MANITOU raadt aan om, telkens als u
ogni rifornimento di gasolio l’additivo
terial additive, code Manitou 53009479, to
dieselolie bijvult, het antibacterieel additief
antibatterico codice Manitou 53009479.
each diesel re ll.
code Manitou 53009479 toe te voegen.
Questo prodotto è e cace contro alghe,
This product is e ective against algae, bac-
Dit product is doeltre end tegen algen,
batteri, mu e e previene l’intasamento dei
teria, moulds and prevents clogging of l-
bacteriën, schimmels en voorkomt het
ltri, la sporcizia e la rottura degli iniettori.
ters, dirtiness and damage to injectors.
verstopt raken van lters, vuil en het
stukgaan van injectoren.
Uso preventivo periodico e/o per gasolio
Preventative periodic use and/or for
contaminato.
contaminated diesel.
Periodiek preventief gebruik en/of voor
0,5ml di additivo ogni +/- 11 litri di gasolio
0.5 ml of additive per +/- 11 litres of diesel
verontreinigde dieselolie.
ad ogni rifornimento:
at each re ll:
0,5 ml additief per +/- 11 liter dieselolie bij
• per
favorire
la
miscelazione
• add the product before the re ll in
elke bijvulbeurt:
dell’additivo
con il
gasolio,
order to promote the blending of the
• om het mengen van het additief met
aggiungere il prodotto prima del
additive with the diesel,
de dieselolie te bevorderen, voeg het
rifornimento,
• in case of contamination with water,
product toe vóór het bijvullen,
• nel caso di contaminazione con
if possible, purge water from the tank
• in geval van verontreiniging met
acqua, per ottenere un trattamento
to improve the e ectiveness of the
water, laat, om een doeltre endere
maggiormente e cace, far de uire,
treatment,
behandeling te bekomen, het water
se possibile, l’acqua dal serbatoio,
• to ensure an e ective action of the
indien mogelijk uit de tank stromen,
• per una buona azione dell’additivo,
additive, it is necessary to wait at le-
• voor een goede werking van het
dopo il trattamento, è necessario
ast 24 hours after the treatment befo-
additief dient u ten minste 24 uur te
attendere almeno
24 ore prima
re using the diesel.
wachten na de behandeling voordat
dell’utilizzo del gasolio.
u de dieselolie in gebruik neemt.
Noise level
Emissione di rumore.
Geluidsemissie.
The maximum noise level threshold is less
De max. geluidsdrempel is lager dan 56
La soglia di rumore massima è inferiore a 56
than 56 dB (A), measured with the heater
dB (A), gemeten met de verwarmer in
dB (A), misurata con riscaldatore in esercizio
operating in the “medium 1200 Watt” stage,
werking op de stand “medium 1200 Watt”,
allo stadio “medium 1200 Watt”, secondo
according to the 3a German Directive con-
volgens de derde Duitse richtlijn inzake de
la
3a direttiva tedesca sulla sicurezza dei
cerning Machine Safety (GSGV) or DIN 45
veiligheid van machines (GSGV) of DIN 45
macchinari (GSGV) o DIN 45 635 -parte I.
635 -part I.
635 - deel I.
Note sulla sicurezza.
Safety notes
Opmerkingen met betrekking tot de
Prima del periodo di riscaldamento
veiligheid.
An operating test must be conducted with
è necessario eseguire una prova di
Voor de verwarmingsperiode dient
funzionamento con il riscaldatore. In caso
the heater prior to the heating period. If you
de werking van de verwarmer getest te
di formazione eccessiva e prolungata di
note an excessive amount of smoke, unu-
worden. Wanneer er veel en langdurig rook
fumo, o di rumori di combustione non
sual combustion noises or a strong odour
wordt gevormd, wanneer er ongewone
usuali o di forte odore di combustibile,
of fuel, turn off the heater and make it
verbrandingsgeluiden hoorbaar zijn of een
spegnere il riscaldatore e metterlo fuori
unserviceable by taking out the fuse. In this
sterke brandstofgeur wordt waargenomen,
servizio togliendo il fusibile. In questo caso,
case, the heater must only be used after it
schakel de verwarmer uit en stel hem buiten
il funzionamento sarà possibile soltanto
has been checked by a competent techni-
bedrijf door de zekering te verwijderen.
dopo aver fatto controllare il riscaldatore
cian. No liability is accepted for appliances
In dit geval kan de verwarmer pas werken
da personale competente. Non si risponde
nadat u hem heeft laten controleren door
for which these safety regulations have not
competente technici. MANITOU is niet
di apparecchi per i quali le presenti norme
been observed. Moreover, MANITOU shall
aansprakelijk voor apparaten waarvoor
di sicurezza non siano state rispettate.
not be responsible for appliances for which
de veiligheidsnormen niet gevolgd
La ditta MANITOU non risponde inoltre
the indications in the operating instructions
worden. Verder is MANITOU ook niet
di apparecchi per i quali non sia stato
have not been observed, which have been
aansprakelijk voor apparaten waarvoor de
osservato quanto prescritto nelle istruzioni
repaired by incompetent persons or for
gebruiksinstructies niet gevolgd worden,
per l’uso o siano state effettuate riparazioni
which genuine spare parts have not been
wanneer er herstellingswerkzaamheden zijn
non professionali o non utilizzando parti di
uitgevoerd door onbevoegden of wanneer
used.
ricambio originali.
er geen originele vervangingsdelen zijn
gebruikt.
3-94
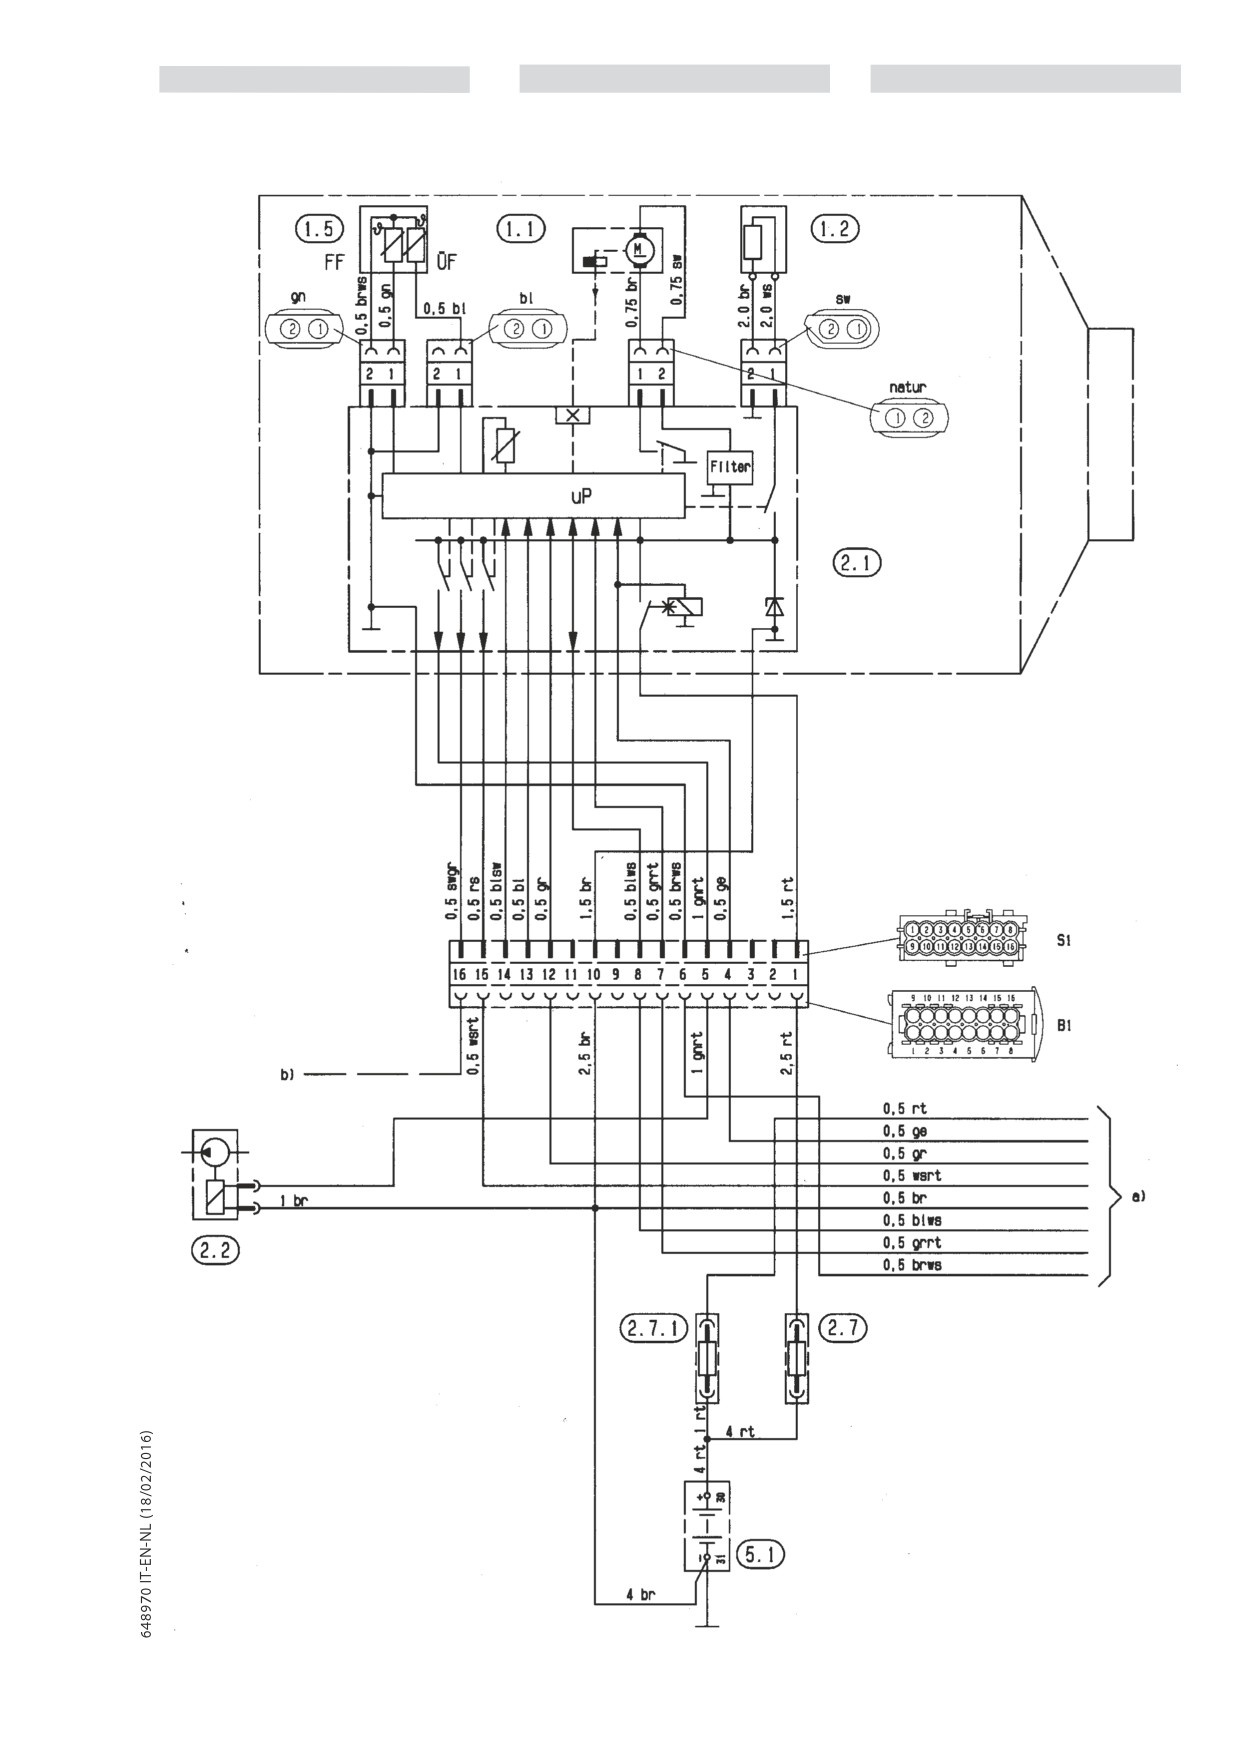
IT
EN
NL
SCHEMA ELETTRICO AIRTRONIC D2 /
ELECTRICS DIAGRAM AIRTRONIC D2 /
ELEKTRISCH SCHEMA AIRTRONIC D2 /
AIRTRONIC D4 (OPTION)
AIRTRONIC D4 (OPTION)
AIRTRONIC D4 (OPTIONAL)
Parts list
3-95
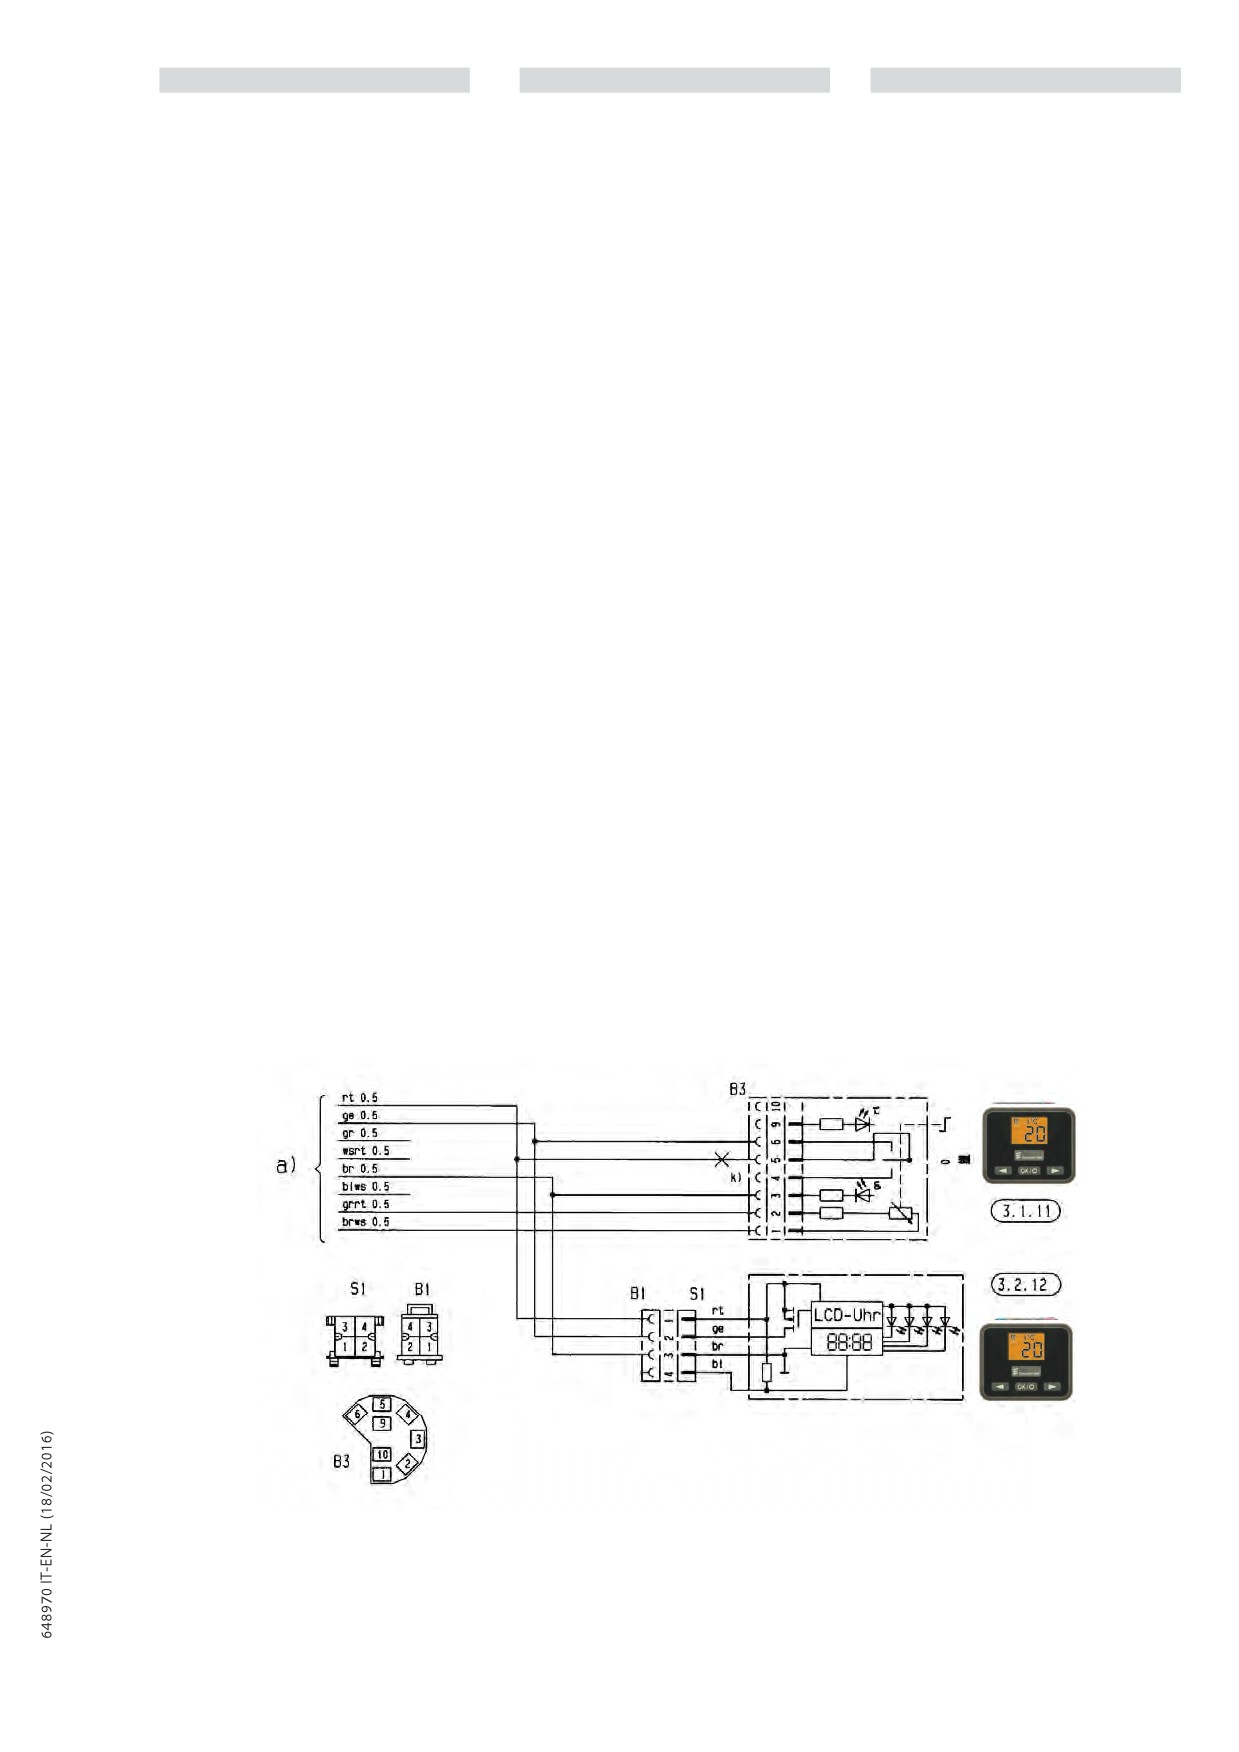
IT
EN
NL
LEGENDA SCHEMA ELETTRICO
WIRING DIAGRAM KEY
LEGENDA ELEKTRISCH SCHEMA
Elenco componenti
List of components
Lijst onderdelen
1.1
Motore bruciatore
1.1
Motor brander
1.1
Burner engine
1.2
Candela
1.2
Kaars
1.2
Spark plug
1.5
Sensore di surriscaldamento e
1.5
Oververhittingsensor en
1.5
Heating sensor and
sensore fiamma
vlamsensor
2.1
Centralina di comando
flame sensor
2.1
Besturingscentrale
2.2
Pompa dosatrice combustibile
2.1
Control unit
2.2
Doseerpomp brandstof
2.7
Fusibile principale12 Volt: 20A; 24
2.2
Fuel dosing pump
2.7
Hoofdzekering 12 Volt: 20A; 24
Volt: 10A
2.7
12 Volt: 20A; 24
Volt: 10A
2.7.1
Fusibile azionamento 5A
Volt: 10A Main fuse
2.7.1
Inschakelingszekering 5A
5.1
Batteria
5.1
Batterij
2.7.1
5A activation fuse
5.1
Battery
LEGENDA SCHEMA ELETTRICO
LEGENDA ELEKTRISCH SCHEMA
CONTROL ELEMENTS WIRING DIAGRAM
ELEMENTI DI COMANDO
BESTURINGSELEMENTEN
KEY
Elenco componenti
Lijst onderdelen
List of components
3.1.11
Dispositivo di comando rotondo
3.1.11
Rond bedieningssysteem
3.1.11
Round control device
3.2.12
Mini-timer (opzionale)
3.2.12
Mini-timer (optional)
3.2.12
Mini-timer (optional)
Colore dei cavi degli schemi
Kleuren van de kabels op de schema's
Colour of wires in diagram
sw nero
sw zwart
ws bianco
sw
black
ws wit
rt rosso
ws
white
rt rood
ge giallo
rt
red
ge geel
gn verde
ge
yellow
gn groen
vi viola
gn
green
vi paars
br marrone
vi
violet
br bruin
gr grigio
br
brown
gr grijs
bl azzurro
gr
grey
bl blauw
li
lilla
bl
blue
li
lichtpaars
li
lilac
Isolare i cavi non utilizzati.
Isoleer niet gebruikte kabels.
Isolate the wires that are not used.
I vari connettori sono raffigurati dal lato
De verschillende koppelingen zijn
ingresso cavi.
The various connectors are shown from the
afgebeeld van de kant van de kabelingang.
wire input side.
3-96
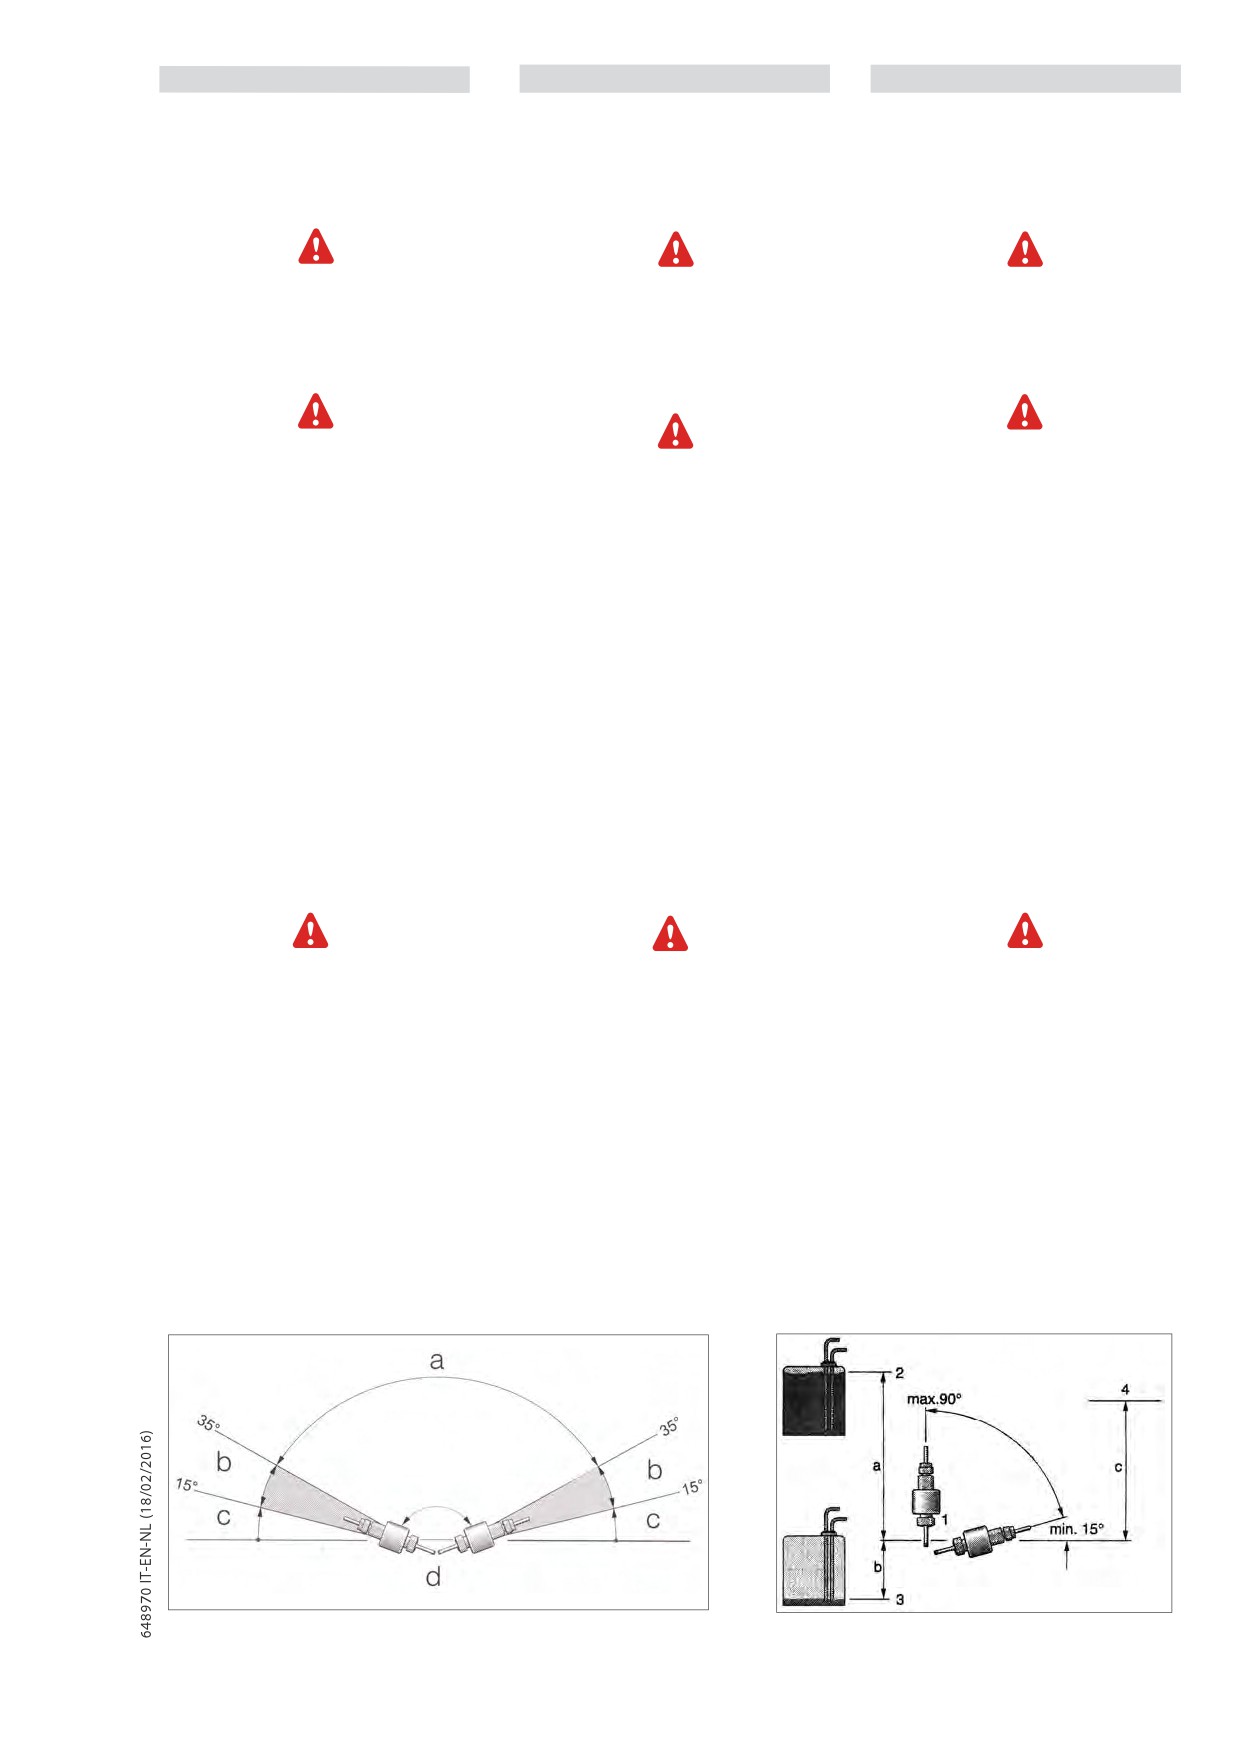
IT
EN
NL
Posizioni di montaggio della pompa
Dosing pump assembly positions
Montageposities voor de doseerpomp
dosatrice
Always position the dosing pump with the
Plaats de doseerpomp altijd met de
Posizionare la pompa dosatrice sempre con il
delivery side upwards.
toevoerkant naar boven gericht.
lato mandata verso l’alto.
Rispettare l’inclinazione minima di 15°!
Respect the minimum inclination of 15°!
Respecteer de minimumhelling van 15°!
É consentita qualsiasi posizione di montaggio
Any assembly position exceeding a mini-
Alle montageposities met een helling die groter
con un inclinazione superiore ai 15°, ma sono
mum inclination of 15° is allowed, but
is dan 15° zijn toegestaan, maar hellingen
preferibili inclinazioni comprese tra 15° e 35°.
inclinations between 15° and 35° are pre-
tussen 15° en 35° genieten de voorkeur.
ferable.
Le tubazioni combustibile tra pompa dosatrice
The fuel piping between the dosing pump
De brandstofleidingen tussen de doseerpomp
e riscaldatore devono avere possibilmente un
en de verwarmer moeten mogelijk van
and heater must possibly be from below
andamento dal basso verso l’alto.
upwards.
beneden naar boven lopen.
Fig. A:
Fig. A:
Fig. A:
a inclinazioni ammesse
a permitted inclination
a toegestane hellingen
b preferibili
b te verkiezen
b preferable
c non ammesse
c not permitted
c niet toegestaan
d pompa dosatrice
d doseerpomp
d dosing pump
Prevalenze ammesse Fig. B:
Permitted pressure head Fig. B:
Toegestane druk Fig. B:
Dislivello tra serbatoio del veicolo e pompa
Difference in level between vehicle tank
Niveauverschil tussen de tank van het
dosatrice:
and dosing pump:
voertuig en de doseerpomp:
a = max. 3 m
a = max. 3 m
a = max. 3 m
Difference in level for non-pressurized
Dislivello per serbatoi non pressurizzati:
Niveauverschil voor tanks zonder druk:
tanks:
b = max. 1 m - per tubo di aspirazione Ø
b = max. 1 m - voor afzuigbuis interne Ø
b = max. 1 m - for intake tube internal
interno 2 mm
Ø 2 mm
2 mm
b = max. 1,5 m - per tubo di aspirazione Ø
b = max. 1,5 m - for intake tube internal
b = max. 1,5 m - voor afzuigbuis interne Ø
interno 5 mm
Ø 5 mm
5 mm
Check to make sure the tank vent is clear.
Controllare che lo sfiato del serbatoio sia
Controleer of het luchtgat van de tank vrij is.
libero.
Difference in level in case of tank in which
Niveauverschil in het geval van een tank waarbij
Dislivello in caso di serbatoio in cui
a depression is formed at the intake (0.03
zich tijdens het afzuigen onderdruk vormt (klep
all’aspirazione si forma depressione
bar valve on tank plug):
van 0,03 bar op de dop van de tank):
(valvola da 0,03 bar sul tappo serbatoio):
b = max. 0.4 m
b = max. 0,4 m
b = max. 0,4 m
Difference in level between dosing pump
Niveauverschil tussen de doseerpomp en
Dislivello tra pompa dosatrice e riscaldatore:
and heater:
de verwarmer:
c = max. 2 m
c = max. 2 m
c = max. 2 m
3-97
IT
EN
NL
Descrizione del funzionamento
Operation
Beschrijving van de werking
Accensione
Switching on
Inschakelen
All’accensione del riscaldatore, la spia di
When the heater is switched on, the indi-
Wanneer de verwarmer wordt ingeschakeld,
controllo sul dispositivo di comando si
cator light on the control device lights up.
gaat het lampje op het bedieningssysteem
illumina. Viene accesa la candela e il motore
The spark plug lights up and the engine
branden. De kaars wordt ontstoken en de
si avvia a basso numero di giri.
starts running at low speed.
motor wordt opgestart aan een traag toerental.
Se nello scambiatore di calore è presente
If there is too much residual heat from a
Als er zich in de warmtewisselaar te
troppo calore residuo di una precedente
previous combustion in the heat exchan-
veel restwarmte bevindt van een vorige
combustione, inizialmente funziona
ger, only the engine will run initially (coo-
verbranding, werkt in het begin alleen
soltanto il motore (fase di raffreddamento).
ling phase). When the residual heat has
de motor
(koelingsfase). Wanneer de
Quando il calore residuo è stato asportato,
been removed, the startup process begins.
restwarmte afgevoerd is, begint het
inizia il processo di avviamento.
startproces.
Avviamento
Startup
Starten
AIRTRONIC D2
AIRTRONIC D2
AIRTRONIC D2
Dopo circa 60 secondi inizia
After about 60 seconds the fuel supply
Na ongeveer 60 seconden begint de
l’alimentazione del combustibile e si
begins and the fuel-air mixture in the com-
voeding van de brandstof en wordt
accende la miscela combustibile-aria
bustion chamber is ignited. After about 60
het brandstof-luchtmengsel in de
nella camera di combustione. Dopo circa
seconds following recognition of the flame
verbrandingskamer ontstoken. Ongeveer
60 secondi dal riconoscimento della
by the combined sensor (flame sensor),
60 seconden nadat de gecombineerde
fiamma da parte del sensore combinato
the spark plug switches off. After another
sensor (vlamsensor) de vlam heeft herkend,
(sensore di fiamma), la candela si spegne.
120 seconds the AIRTRONIC reaches the
wordt de kaars gedoofd. Na 120 seconden
Dopo ulteriori 120 secondi l’AIRTRONIC
“POWER” level (maximum quantity of fuel
bereikt de AIRTRONIC het niveau “POWER”
raggiunge il livello “POWER” (massima
and maximum engine speed).
(max. hoeveelheid brandstof en max.
quantità di combustibile e massimo regime
toerental).
del motore).
AIRTRONIC D4 (option)
AIRTRONIC D4 (optional)
AIRTRONIC D4 (option)
After about 60 seconds the fuel supply
Na ongeveer
60 seconden begint de
Dopo circa 60 secondi inizia l’alimentazione
begins and the fuel-air mixture in the com-
voeding van de brandstof en wordt
del combustibile e si accende la miscela
bustion chamber is ignited. After about 80
het brandstof-luchtmengsel in de
combustibile-aria nella camera dì
seconds following recognition of the flame
verbrandingskamer ontstoken. Ongeveer
combustione. Dopo circa 80 secondi dal
by the combined sensor (flame sensor), the
80 seconden nadat de gecombineerde
riconoscimento della fiamma da parte del
spark plug switches off and the AIRTRONIC
sensor
(vlamsensor) de vlam heeft
sensore combinato (sensore di fiamma), la
functions in the regulation phase.
herkend, wordt de kaars gedoofd en werkt
candela si spegne e l’AIRTRONIC funziona
de AIRTRONIC in de regelingsfase.
nella fase di regolazione.
Selecting temperature by means of con-
Selezione della temperatura mediante il
trol device
De temperatuur instellen met het
dispositivo di comando
bedieningssysteem
The regulation knob is used to set the
La manopola di regolazione serve
required internal temperature; the tempe-
Met de regelknop kunt u de gewenste
a impostare la temperatura interna
rature may vary between +10°C and +30°C
interne temperatuur instellen; de
desiderata; la temperatura può variare
depending on the type of heater, the size
temperatuur kan variëren van +10°C tot
tra +10°C e +30°C a seconda del tipo di
of the compartment that requires heating
+30°C, afhankelijk van het type verwarmer,
riscaldatore, delle dimensioni del vano da
and the outside temperature.
de afmetingen van de ruimte die verwarmd
riscaldare e della temperatura esterna.
Setting the temperature using the knob is
moet worden en de buitentemperatuur.
Per impostare la temperatura con la
usually based on the operator’s experience.
Om de temperatuur met de knop in te
manopola, basarsi sulla propria esperienza.
stellen, dient u een beroep te doen op uw
persoonlijke ervaring.
3-98
IT
EN
NL
Regolazione durante il funzionamento
Regulation during operation
Regeling tijdens de werking
Durante il funzionamento la temperatura
During operation, the atmospheric tempe-
Tijdens de werking worden de
ambiente e la temperatura dell’aria aspirata
rature and the temperature of the air taken
omgevingstemperatuur en de temperatuur
vengono costantemente misurate. Se la
in are constantly measured. If the tempe-
van de afgezogen lucht constant gemeten.
temperatura rilevata è superiore a quella
rature measured is higher than that set on
Als de waargenomen temperatuur hoger
is dan de temperatuur die ingesteld is
impostata sull’elemento di comando,
the control element, the regulation system
op het bedieningspaneel, dan wordt het
interviene il sistema di regolazione.
intervenes.
regelingssysteem ingeschakeld.
Sono previsti 4 stadi di regolazione, per
There are four regulation stages, to allow
Er zijn
4 standen, om een warmte van
consentire di dosare in modo preciso il
dosing of the heat from the AIRTRONIC
de AIRTRONIC op nauwkeurige wijze te
calore dell’AIRTRONIC a seconda del
precisely according to requirements. The
kunnen doseren, afhankelijk van de
fabbisogno. II numero di giri del motore e
engine rpm and fuel quantity correspond
behoefte. Het toerental van de motor en de
la quantità di combustibile corrispondono
to the relative regulation stage. If the tem-
hoeveelheid brandstof stemmen overeen
al rispettivo stadio di regolazione. Se la
perature set is exceeded even at the “mini-
met de gekozen stand. Als de ingestelde
temperatura impostata dovesse essere
mum” speed, the AIRTRONIC passes to the
temperatuur overschreden wordt tijdens
superata anche al regime
“minimo”,
regulation phase and is turned to “OFF”.
het
“minimum”-regime, schakelt de
l’AIRTRONIC passa alla fase di regolazione
A wash lasting about 4 minutes follows to
AIRTRONIC over van de regelfase naar
e viene commutato su “SPENTO”. Segue
cool the heater.
“UITGESCHAKELD”. Er volgt een spoelbeurt
un lavaggio di circa
4 minuti per il
Successively the engine continues to run at
van ongeveer 4 minuten om de verwarmer
raffreddamento del riscaldatore.
minimum until the new ignition (in case of
af te koelen.
Successivamente il motore continua a
new air circulation) or switches off (if exter-
Vervolgens blijft de motor werken op
het minimumregime totdat hij opnieuw
funzionare al minimo fino ad una nuova
nal air is taken in).
opgestart wordt (in geval van hercirculatie
accensione (nel caso di ricircolo aria) o
van de lucht) of wordt hij uitgeschakeld (in
si spegne (nel caso di aspirazione di aria
geval van het afzuigen van buitenlucht).
esterna).
Ventilatiemodaliteit
Modalità di ventilazione
Ventilation method
Om de verwarming in de ventilatiemodaliteit
Per utilizzare il riscaldatore in modalità
To use the heater in ventilation mode, acti-
te gebruiken, dient u de schakelaar
di ventilazione, azionare il commutatore
vate the “heater/ventilation” switch before
“verwarming/ventilatie” in te schakelen
“riscaldamento/ventilazione” prima di
switching the AIRTRONIC on.
voordat u de AIRTRONIC inschakelt.
accendere l’AIRTRONIC.
Spegnimento
Switching off
Uitschakelen
Spegnendo l’AIRTRONIC, la spia di controllo
When the AIRTRONIC is switched off, the
Wanneer u de AIRTRONIC uitschakelt, wordt
si spegne e viene interrotta l’alimentazione
control indicator light goes out and fuel
het controlelampje uitgeschakeld en wordt
de brandstoftoevoer onderbroken. Er volgt
del combustibile. Segue un lavaggio di
supply is shut off. A wash lasting about 4
een spoelbeurt van ongeveer 4 minuten om
circa
4 minuti per il raffreddamento del
minutes follows to cool the heater.
de verwarmer af te koelen.
riscaldatore.
During the wash, the spark plug is swi-
Tijdens het spoelen wordt de kaars
Durante il lavaggio, la candela viene accesa
tched on for 40 seconds to eliminate com-
gedurend
40 seconden ontstoken om
per 40 secondi per eliminare i residui della
bustion residues. Special case:
de verbrandingsresten te verwijderen.
combustione. Caso particolare:
If at the time of switching off there is no
Bijzonder geval:
Se al momento dello spegnimento non
fuel supply or the AIRTRONIC is in “OFF”
Als op het moment van de uitschakeling
de brandstoftoevoer nog niet heeft
era ancora avvenuta l’alimentazione
regulation, the heater switches off without
plaatsgevonden op als de AIRTRONIC zich
combustibile o se l’AIRTRONIC si trova in
the wash.
in de stand “UITGESCHAKELD” bevindt, dan
regolazione
“SPENTO”, il riscaldatore si
wordt de verwarmer uitgeschakeld zonder
spegne senza lavaggio.
spoelbeurt.
~Riscaldamento ad altitudini particolari.
~Heating at special altitudes.
~Verwarming op bijzondere hoogten.
- fino a 1500 m:
- up to 1500 m:
- tot 1500 m:
funzionamento illimitato
unlimited operation
onbeperkte werking
- oltre 1500 m:
- beyond 1500 m:
- meer dan 1500 m:
in caso di permanenza breve
in case of short stays (crossing a pass,
in geval van een korte periode
(attraversamento di un passo,
brief halt) heater operation is generally
(een bergpas oversteken, korte
breve sosta) in linea di massima il
possible.
stop) kan de verwarming in
funzionamento del riscaldatore è
principe werken.
possibile.
In case of long halts (for example, winter
In geval van een langere periode (bv. verblijf op
In caso di sosta prolungata
(p. es.
camps) the fuel must be adapted to the
wintercamping) dient de brandstof aangepast
campeggio invernale) è necessario adattare
altitude. Please contact the area represen-
te worden aan de hoogte. Wij raden u aan
il combustibile all’altitudine. Si prega di
tative.
om contact op te nemen met de plaatselijke
contattare il rappresentante di zona.
vertegenwoordiger.
The client must be provided with the user
Gelieve aan de klant de gebruikshandleiding
Consegnare al cliente le istruzioni per l’uso
instructions enclosed with the control
te verstrekken die bij de besturingselementen
allegate agli elementi di comando.
elements.
gevoegd is.
3-99
IT
EN
NL
Dispositivi di comando e di sicurezza
Controls and safety devices
Besturings- en veiligheidssystemen
Se l’AIRTRONIC non si accende entro
If the AIRTRONIC does not switch on within
Als de AIRTRONIC niet binnen 90 seconden
90
secondi
dall’inizio
dell’inizio
90 seconds following the start of the fuel
na het begin van de brandstoftoevoer wordt
opgestart, wordt de ontstekingshandeling
dell’alimentazione
combustibile,
supply, the switching operation is automa-
automatisch herhaald.
l’operazione di accensione viene ripetuta
tically repeated.
Als ook de tweede ontsteking niet
automaticamente.
If the second switching on also does not
plaatsvindt binnen
90 seconden na het
Nel caso che anche la seconda accensione
occur within 90 seconds following start of
begin van de brandstoftoevoer, dan wordt
non avvenga entro 90 secondi dall’inizio
the fuel supply, the heater switches off due
de verwarmer uitgeschakeld omwille van
dell’alimentazione
combustibile,
il
to a fault condition, the fuel supply is shut
een storing, en wordt de brandstoftoevoer
riscaldatore si spegne per guasto,
off and there is an approx. 4-minute wash.
onderbroken en wordt er een spoeling van
con interruzione dell’alimentazione
ongeveer 4 minuten uitgevoerd.
combustibile e lavaggio di circa 4 minuti.
• If the flame goes out during operation, try
• Als de vlam dooft tijdens de werking, wordt
• Se durante il funzionamento si dovesse
a new ignition.
er een nieuwe ontsteking geprobeerd.
spegnere la fiamma, viene ritentata una
If the AIRTRONIC does not switch on within
Als de AIRTRONIC niet opgestart wordt
nuova accensione.
90 seconds starting from the beginning of
binnen 90 seconden na het begin van
Se l’AIRTRONIC non si accende entro 90
the fuel supply or it switches on and then
de brandstoftoevoer of als de AIRTRONIC
secondi dall’inizio dell’alimentazione
switches off within 15 minutes, the heater
wordt opgestart en vervolgens binnen 15
minuten wordt uitgeschakeld, dan wordt
combustibile oppure se si accende per
switches itself off due to a fault condition,
de verwarmer uitgeschakeld omwille van
poi spegnersi nuovamente entro
15
the fuel supply is shut off and there is a
een storing, en wordt de brandstoftoevoer
minuti, il riscaldatore si spegne per guasto,
4-minute wash. Switching off due to a fault
onderbroken en wordt er een spoeling
con interruzione dell’alimentazione
condition can be cancelled by switching
van ongeveer 4 minuten uitgevoerd. Het
combustibile e lavaggio di circa 4 minuti.
the heater off and then on immediately. Do
uitschakelen omwille van een storing kan
Lo spegnimento per guasto può essere
not switch the heater off and on consecuti-
geannuleerd worden door de verwarmer
annullato spegnendo e riaccendendo
vely more than twice!
uit te schakelen en onmiddellijk weer
istantaneamente il riscaldatore. Non
in te schakelen. De verwarmer mag niet
spegnere e riaccendere il riscaldatore per
meer dan 2 opeenvolgende keren worden
più di 2 volte consecutive!
•In case of overheating, the flame/overhea-
uitgeschakeld en opnieuw ingeschakeld!
ting sensor is activated, fuel supply is shut
•In caso di surriscaldamento interviene
off and the heater switches off due to a
• In geval van oververhitting wordt de
il sensore di fiamma/surriscaldamento,
fault condition. After eliminating the cause
vlam-/oververhittingssensor ingeschakeld,
l’alimentazione del combustibile viene
of the superheating, startup the AIRTRONIC
de brandstoftoevoer wordt onderbroken en
interrotta e il riscaldatore si spegne per
again by switching it off and then on.
de verwarmer wordt uitgeschakeld omwille
van een storing. Nadat u de oorzaak van
guasto. Dopo aver eliminato la causa del
de oververhitting heeft weggenomen, start
surriscaldamento, riavviare l’AIRTRONIC
de AIRTRONIC opnieuw op door hem uit
spegnendolo e riaccendendolo.
•If the minimum and maximum voltage
te schakelen en vervolgens opnieuw in te
limits are exceeded, after 20 seconds, the
schakelen.
•Se viene superato il limite minimo o
heater switches off due to a fault condition.
massimo di tensione, dopo 20 secondi il
• Als de min. of max. spanningslimiet wordt
riscaldatore si spegne per guasto.
•The AIRTRONIC does not switch on if the
overschreden, wordt de verwarmer na 20
spark plug or engine is defective,
seconden uitgeschakeld omwille van een
•L’AIRTRONIC non si accende se la candela
or if the electric connection to the dosing
storing.
o il motore sono difettosi, oppure se il
pump is cut off.
collegamento elettrico alla pompa dosatrice
• De AIRTRONIC wordt niet ingeschakeld als
è interrotto.
•In case of detective flame/overheating
de kaars of de motor defect zijn, of als de
sensor, or interrupted electric connection,
elektrische aansluiting op de doseerpomp
•In
caso di sensore di fiamma/
the AIRTRONIC switches on, and only
onderbroken is.
surriscaldamento difettoso o collegamento
during the startup phase it switches off
• Wanneer de vlam-/oververhittingssensor
elettrico interrotto, l’AIRTRONIC si accende,
due to a fault condition.
defect is of de elektrische aansluiting
e solo durante la fase di avvio si spegne per
onderbroken is, wordt de AIRTRONIC
guasto.
• The engine rpm is checked constantly.
ingeschakeld. Hij wordt alleen tijdens de
opstartfase uitgeschakeld omwille van een
• II numero di giri del motore viene
If the engine does not start up or if the
storing.
controllato costantemente.
rpm differs by more than 10% of the rated
value, after 30 seconds the heater switches
• Het toerental van de motor wordt constant
Se il motore non si avvia o se il numero
itself off due to a fault condition.
gecontroleerd.
di giri del motore differisce di oltre il 10%
After the AIRTRONIC is switched off, the
dal valore nominale, dopo 30 secondi il
spark plug is switched on for 40 seconds
Als de motor niet opstart of als het toerental
riscaldatore si spegne per guasto.
during the wash to eliminate combustion
van de motor meer dan 10% afwijkt van de
Allo
spegnimento dell’AIRTRONIC,
residue.
nominale waarde, dan wordt de verwarmer
la candela viene accesa per 40 secondi
na 30 seconden uitgeschakeld omwille van
durante il lavaggio, per eliminare i residui
een storing.
della combustione.
Als de AIRTRONIC uitgeschakeld wordt,
wordt de kaars gedurende 40 seconden
ontstoken tijdens het spoelen om de
verbrandingsresten te verwijderen.
3-100
IT
EN
NL
Procedura da adottare in caso di guasto
Procedure to be adopted in case of a fault.
Wat te doen in geval van een defect
Se all’accensione l’AIRTRONIC non si avvia:
If the AIRTRONIC does not start up when
Als bij het opstarten de AIRTRONIC niet start:
switched on:
• Spegnere e riaccendere l’AIRTRONIC, ma
• Schakel de AIRTRONIC uit en opnieuw in,
non più di 2 volte consecutive.
• Switch the AIRTRONIC off and then on
maar niet meer dan 2 opeenvolgende keren.
again, but never more than twice conse-
Se l’AIRTRONIC non si accende ancora:
cutively.
Als de AIRTRONIC nog steeds niet start:
• Controllare se c’è combustibile nel
If the AIRTRONIC does not still switch on:
• Controleer of er brandstof in de tank
serbatoio.
zit.
• Check to see if there is fuel in the tank.
• Controllare i fusibili:
• Controleer de zekeringen:
• Check the fuses:
AIRTRONIC 12 v - fusibile principale 20 A
AIRTRONIC 12 v - hoofdzekering 20 A
AIRTRONIC 24 V -fusibile principale 10 A
AIRTRONIC 12 v - 20 A main fuse
AIRTRONIC 24 V - hoofdzekering 10 A
AIRTRONIC 12 / 24 V - fusibile azionamento
AIRTRONIC 24 V - 10 A main fuse
AIRTRONIC 12 / 24 V - hoofdzekering 5 A
5 A
AIRTRONIC 12 / 24 V - 5 A activation fuse
• Controleer de elektriciteitskabels, de
• Controllare cavi elettrici, collegamenti e
• Check the electric cables, wiring and fit-
aansluitingen en de verbindingen.
allacciamenti.
tings.
• Controleer of de luchtleidingen van de
• Controllare se sono ostruite le tubazioni
• Check the heating air, combustion air
verwarmer, van de verbrandingslucht en de
dell’aria di riscaldamento, dell’aria di
and exhaust piping for blockage.
afvoerleiding verstopt zijn.
combustione o di scarico.
If no fault is found, carry out a diagnostic
Als er geen enkele onregelmatigheid wordt
Se non viene rilevata nessuna anomalia,
test using the Eberspächer diagnostic
vastgesteld, voer een diagnostische test uit
eseguire un test diagnostico con l’apposito
equipment or the modular timer, as
met het desbetreffende diagnose-apparaat
apparecchio di diagnosi Eberspächer o con il
indicated in the AIRTRONIC Manual for
Eberspächer of met een modulaire timer,
timer modulare, come indicato nel manuale
Troubleshooting and Instructions for
zoals aangegeven in de handleiding
Ricerca guasti e istruzioni di riparazione
repair.
Opsporen van defecten en instructies voor
dell’AIRTRONIC.
het herstellen van de AIRTRONIC.
In caso di lavori di saldatura elettrica sul
In case of electric welds on the vehicle,
Wanneer er laswerken uitgevoerd moeten
veicolo, si raccomanda di staccare il positivo
disconnect the battery positive wire and
worden op het voertuig, raden wij aan om
dalla batteria e di collegarlo a massa, a
connect it to earth, to protect the electrical/
de positieve geleiding los te koppelen van
protezione dei componenti elettrici/elettronici
electronic components of the
de batterij en deze aan te sluiten op de
dell’AIRTRONIC.
AIRTRONIC.
aarding, ter bescherming van de elektrische/
elektronische onderdelen van de AIRTRONIC.
3-101
IT
EN
NL
Alimentazione combustibile
Fuel supply
Brandstoftoevoer
Il riscaldatore funziona senza problemi
Fuel quality for diesel heaters.
De verwarmer werkt zonder problemen
con il gasolio normalmente disponibile in
The heater runs smoothly on standard
met gewone diesel die voor motoren wordt
commercio usato per il motore (DIN EN
commercialquality diesel in accordance
gebruikt (DIN EN 590).
590).
with DIN EN 590, whichyou use to run your
vehicle engine.
Combustibile per casi particolari
Brandstof voor bijzondere gevallen
Fuel for special cases
In caso di necessità il riscaldatore può
Indien nodig kan de verwarmer ook
funzionare anche con gasolio per
werken met dieselolie voor verwarming
In special cases (above 0 °C), the heater can
riscaldamento (temperature superiori a 0
(temperaturen hoger dan
0°C) of met
also runon fuel oil EL or paraffin.
°C) o con petrolio.
petroleum.
Combustibile per basse temperature
Fuel for low temperatures
Brandstof voor lage temperaturen
Le raffinerie o i distributori di carburante
Refineries and fuel service stations auto-
Brandstofraffinaderijen of
-verdelers
provvedono ad adeguare il combustibile
maticallyadjust the fuel to normal winter
passen de brandstof aan aan de
alle temperature invernali
(gasolio
temperatures (winterdiesel). This means
wintertemperaturen (winterdieselolie).
invernale).
that difficulties are only to beexpected for
Bijgevolg kunnen er zich alleen problemen
Possono quindi verificarsi difficoltà solo
extreme drops in temperature, as alsoapply
voordoen in geval van extreem lage
in caso di estremi abbassamenti della
temperaturen.
to the vehicle engine. Please also refer to
temperatura.
thevehicle manual.If the heater is run from
Als de verwarmer gevoed wordt via
a separate tank, pleasecomply with the
Se il riscaldatore viene alimentato da un
een afzonderlijke tank, volg dan de
following rules:For temperatures above 0
serbatoio separato, attenersi a quanto
onderstaande aanwijzingen:
°C, any kind of diesel fuelas per DIN EN 590
segue:
Voor temperaturen hoger dan 0°C kunnen
can be used.
Per temperature superiori a 0 °C può essere
alle soorten dieselolie worden gebruikt die
usato qualsiasi tipo di gasolio conforme a
conform DIN EN 590 zijn.
DIN EN 590.
If no special diesel fuel is available for
Als er bij erg lage temperaturen geen
Se, con temperature molto basse, non
low temperatures, then paraffin or petrol
speciale dieselolie ter beschikking is, voeg
fosse disponibile un gasolio speciale,
should be mixed with the fuel according to
dan petroleum of benzine toe zoals
aggiungere petrolio o benzina come
the following table:
vermeld in de onderstaande tabel.
indicato nella seguente tabella.
PLEASE NOTE
AVVERTENZA
WAARSCHUWING
• Mixtures with used oil are not allowed!
•Non è ammessa l‘aggiunta di olio usato.
• Het is verboden gebruikte olie toe te
•After refuelling with winter or cold diesel
•Dopo aver fatto rifornimento di gasolio
voegen.
or the listedblends, the fuel pipes and
invernale o di gasolio artico o dopo
• Nadat u winterdieselolie of arctische
the dosing pump must befilled with the
aver aggiunto i combustibili indicati,
dieselolie heeft ingevoerd of nadat u de
new fuel by letting the heater run for
controllare il riempimento delle tubazioni
vermelde brandstoffen heeft toegevoegd,
15 mins.!
e della pompa del combustibile facendo
controleer of de brandstofleidingen en
funzionare il riscaldatore per 15 minuti!
de -pomp gevuld zijn door de verwarmer
gedurende 15 minuten te laten werken!
Funzionamento con gasolio ecologico
Operation with biodiesel (PME)
Werking met ecologische diesel
(biodiesel)
(biodiesel)
AIRTRONICT he heater is not certified for
Per il riscaldatore AIRTRONIC non è
operation with biodiesel.
Voor de AIRTRONIC verwarmer is het gebruik
ammesso l’uso di gasolio ecologico.
Biodiesel can be added to the fuel to up
van ecologische diesel niet toegestaan.
È ammessa l’aggiunta di gasolio ecologico
to 10%.
Het toevoegen van ecologische diesel is
fino a circa il 10 %.
toegestaan tot ongeveer 10%.
Temperatura
Gasolio invernale
Aggiunta
da 0 °C a -25 °C
100 %
----
da -25 °C a -40 °C
50 % *
50 % di petrolio o benzina
* o 100 % di gasolio speciale per basse temperature (gasolio artico).
Temperature
Winter diesel
Addition
0 °C to -25 °C
100%
----
25 °C to -40 °C
50%
*50% paraffin or petrol
* or 100% special cold diesel fuel (Arctic diesel).
Temperatuur
Winterdieselolie
Toevoeging
van 0 °C tot -25 °C
100 %
----
van -25 °C tot -40 °C
50 % *
50 % petroleum of benzine
* of 100 % speciale dieselolie voor lage temperaturen (arctische dieselolie).
3-102
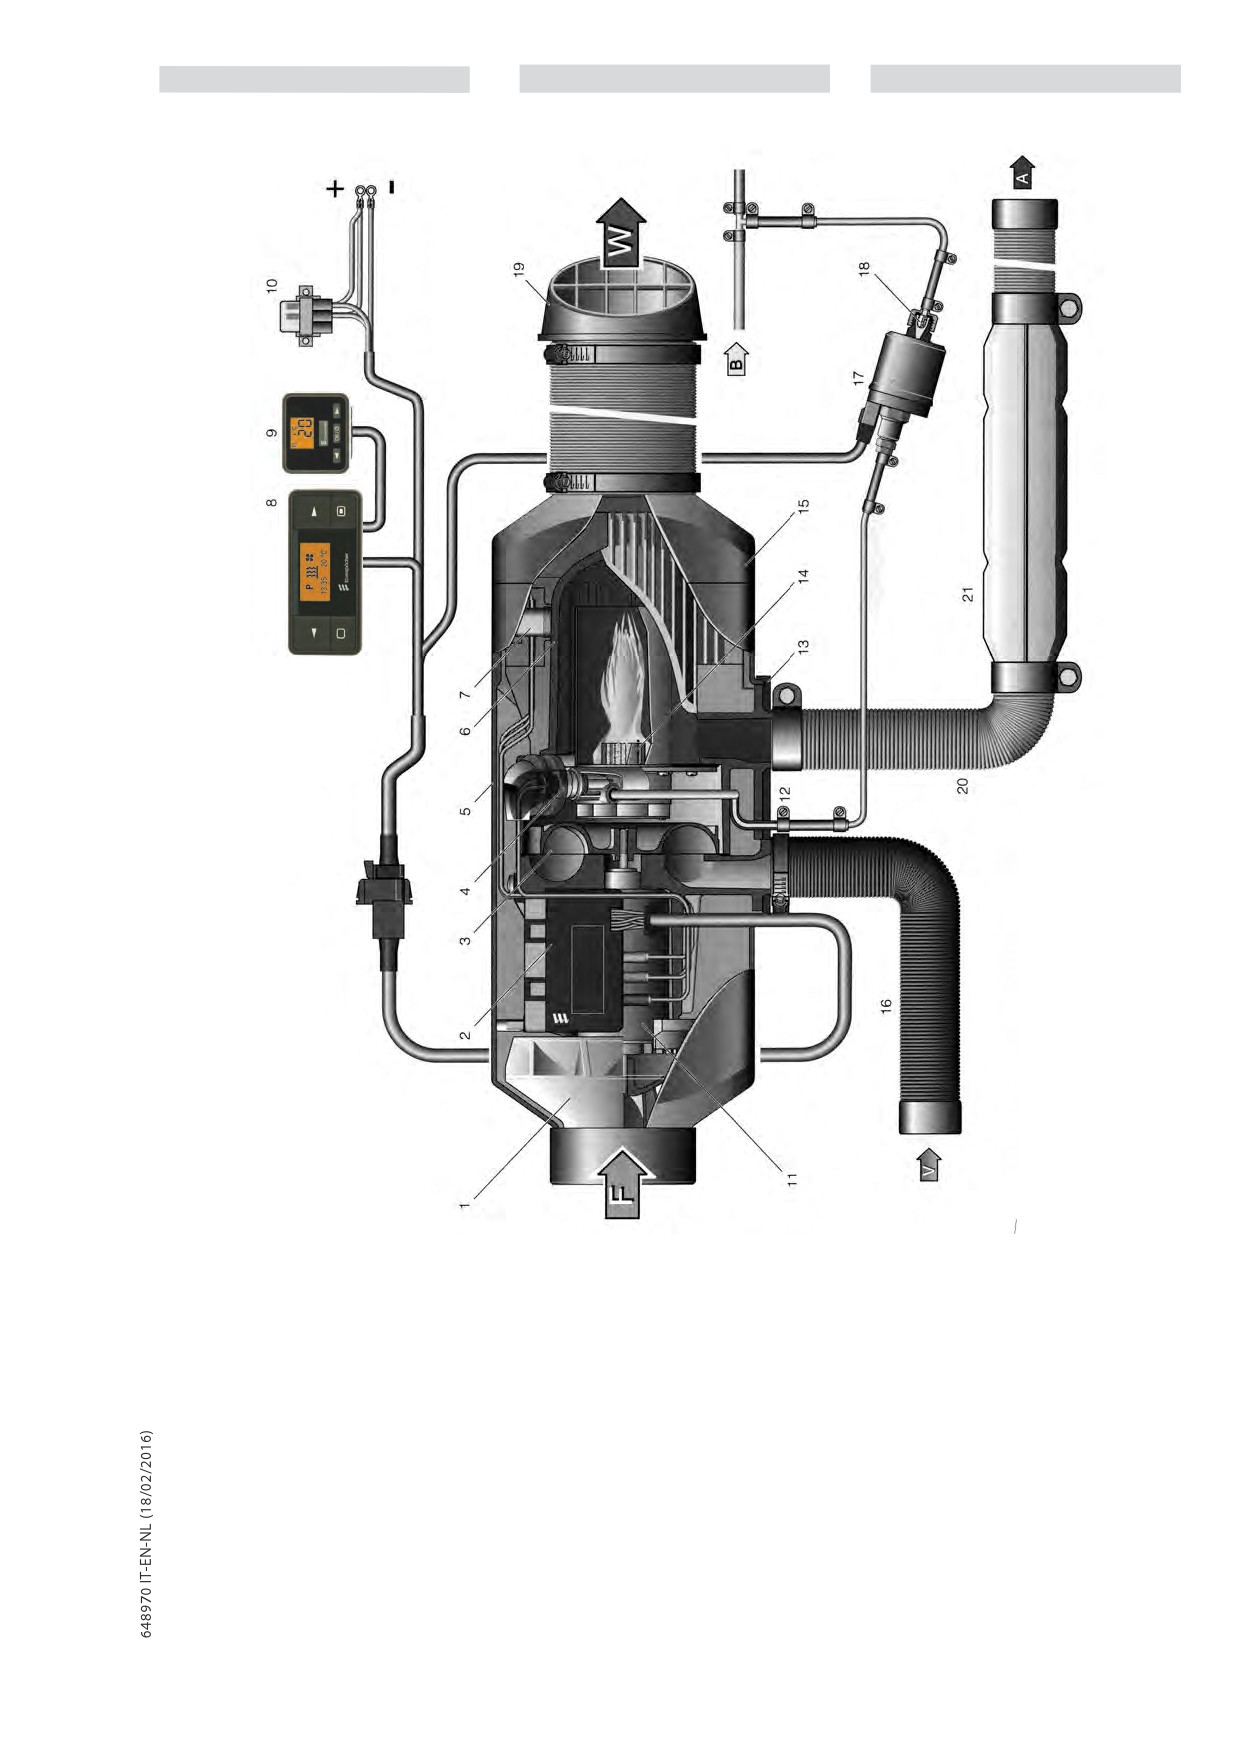
IT
EN
NL
Disegno in sezione riscaldatore
Elenco componenti
13
Guarnizioni flangia
F
= Aria fresca
1
Ventilatore aria di riscaldamento
14
Camera di combustione
W = Aria calda
2
Centralina di comando
15
Bocchetta di uscita
A = Gas di scarico
3
Ventilatore aria di combustione
D2= Ø 60 mm
B = Combustibile
4
Candela
D4= Ø 75/90 mm
V = Aria di combustione
5
Coperchio
16
Tubo aria di combustione
6
Scambiatore di calore
17
Pompa dosatrice
7
Sensore fiamma/Surriscaldamento
18
Filtro combustibile montato nella
8
Timer modulare con potenziometro
pompa dosatrice
9
Commutatore “riscaldamento/
19
Bocchetta orientabile
ventilazione
20
Tubo di scarico
10
Portafusibili con fusibile principale e
fusibile “azionamento”
11
Motore elettrico
12
Raccordo combustibile
3-103
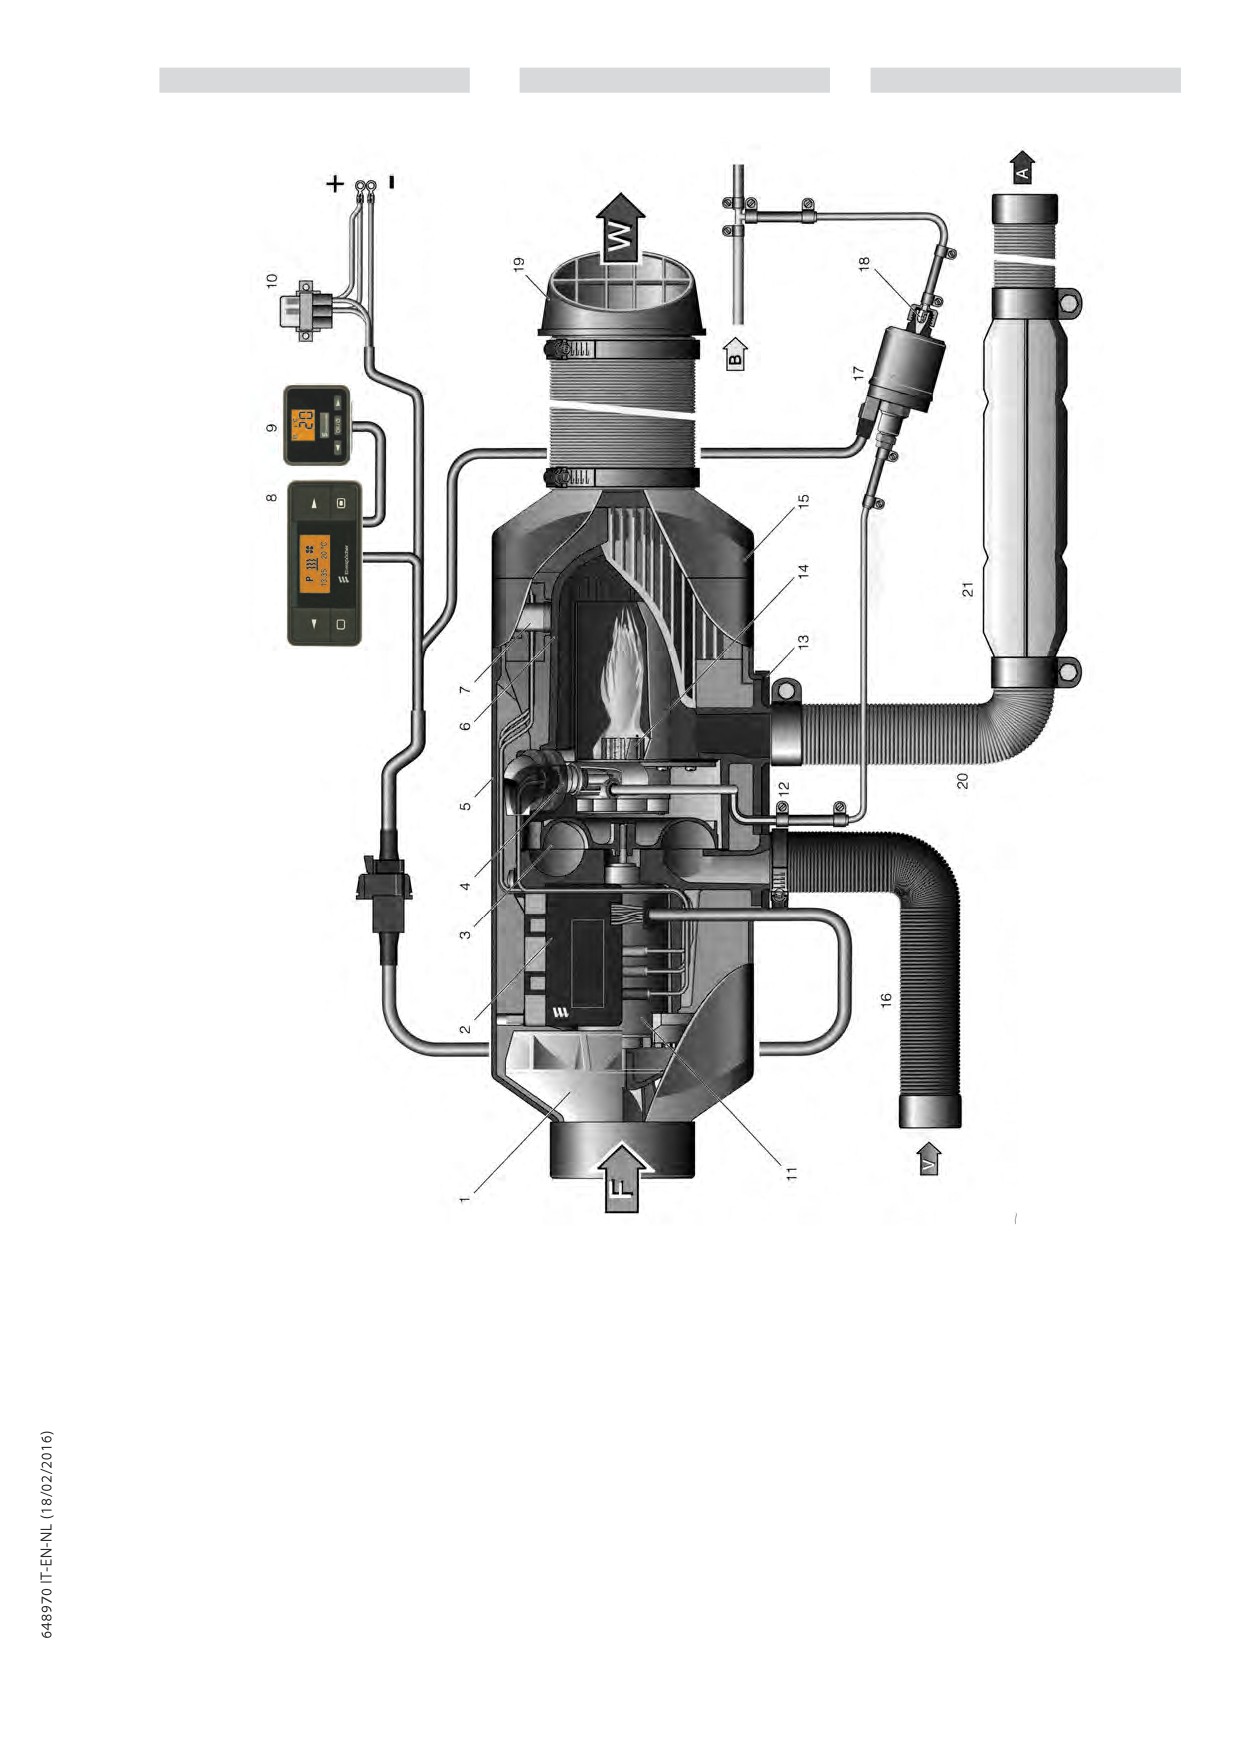
IT
EN
NL
Cross-section drawing of heater
List of components
1
Air heater fan
13
Flange gaskets
F
= Cool air
2
Control unit
14
Combustion chamber
W = Hot air
3
Combustion air fan
15
Outlet spout
A = Exhaust gas
4
Spark plug
D2= Ø 60 mm
B = Fuel
5
Cover
D4= Ø 75/90 mm
V = Combustion air
6
Heat exchanger
16
Combustion air tube
7
Flame/overheating sensor
17
Dosing pump
8
Modular Timer with/
18
Fuel filter mounted in dosing pump
potentiometer
19
Orientable spout
9
“Heating/ventilation” switch
20
Exhaust pipe
10
Fusebox with main switch and
“activation” switch
11
Electric engine
12
Fuel connection
3-104
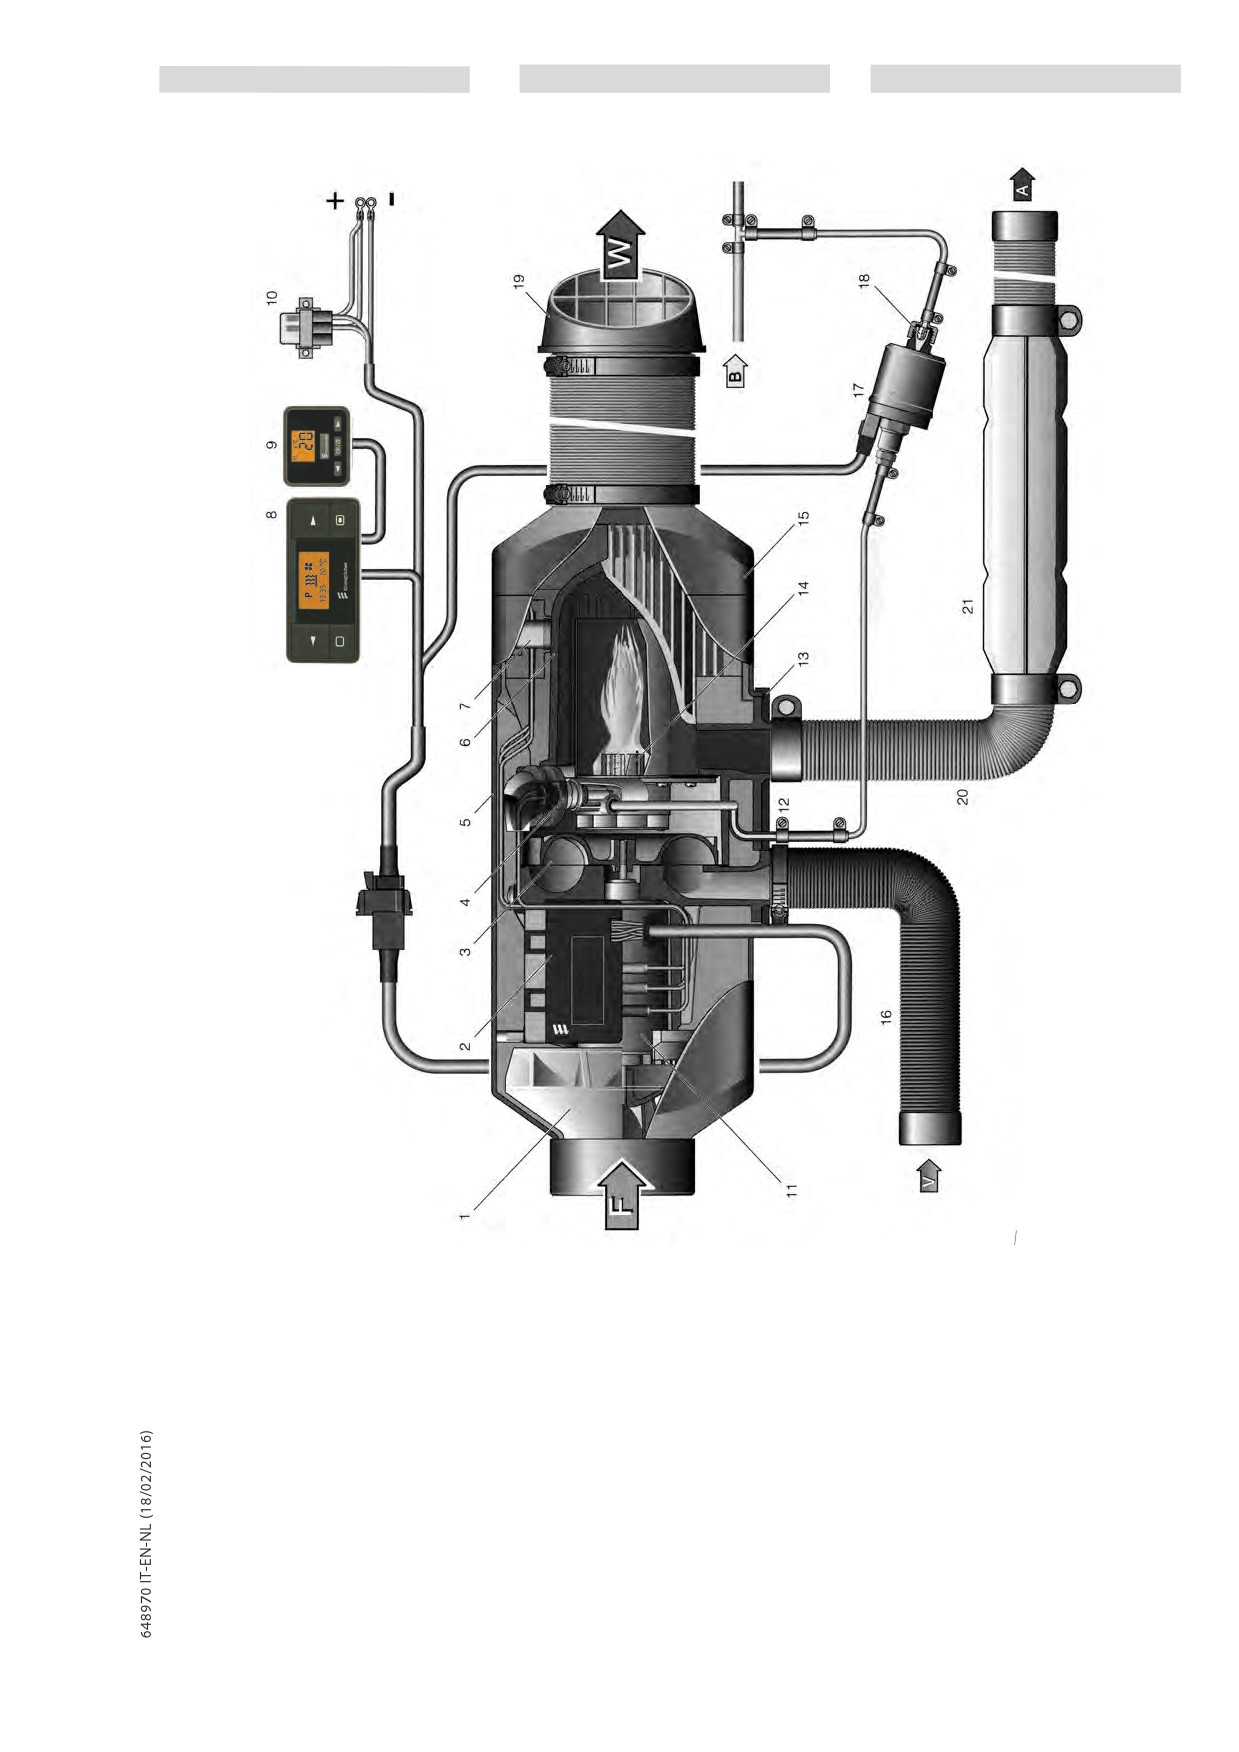
IT
EN
NL
Doorsnedetekening verwarmer
Lijst onderdelen
13
Afdichtingen flens
F
= Koude lucht
1
Ventilator verwarmingslucht
14
Verbrandingskamer
W = Warme lucht
2
Besturingscentrale
15
Uitvoeropening
A = Uitlaatgas
3
Ventilator verbrandingslucht
D2= Ø 60 mm
B = Brandstof
4
Kaars
D4= Ø 75/90 mm
V = Verbrandingslucht
5
Deksel
16
Leiding verbrandingslucht
6
Warmtewisselaar
17
Doseerpomp
7
Vlam-/oververhittingssensor
18
Brandstoffilter die in de doseerpomp
8
Modulaire timer met potentiometer
is gemonteerd
9
Schakelaar verwarming/ventilatie
19
Oriënteerbare opening
10
Zekeringhouder met hoofdzekering
20
Afvoerbuis
en “inschakelings”-zekering
11
Elektrische motor
12
Koppelstuk brandstof
3-105
4 - ACCESSORI PREVISTI IN OPZIONE E
DIAGRAMMI DI PORTATA
OPTIONAL ACCESSORIES ENVISAGED
AND LOAD CHARTS
OPTIONELE WERKTUIGEN EN
LAADDIAGRAMMEN