Manitou MRT 2150 Privilege Plus ST4 S2 / MRT 2550 Privilege Plus ST4 S2. MANUALE D’ISTRUZIONI (2016) - 5
IT
EN
NL
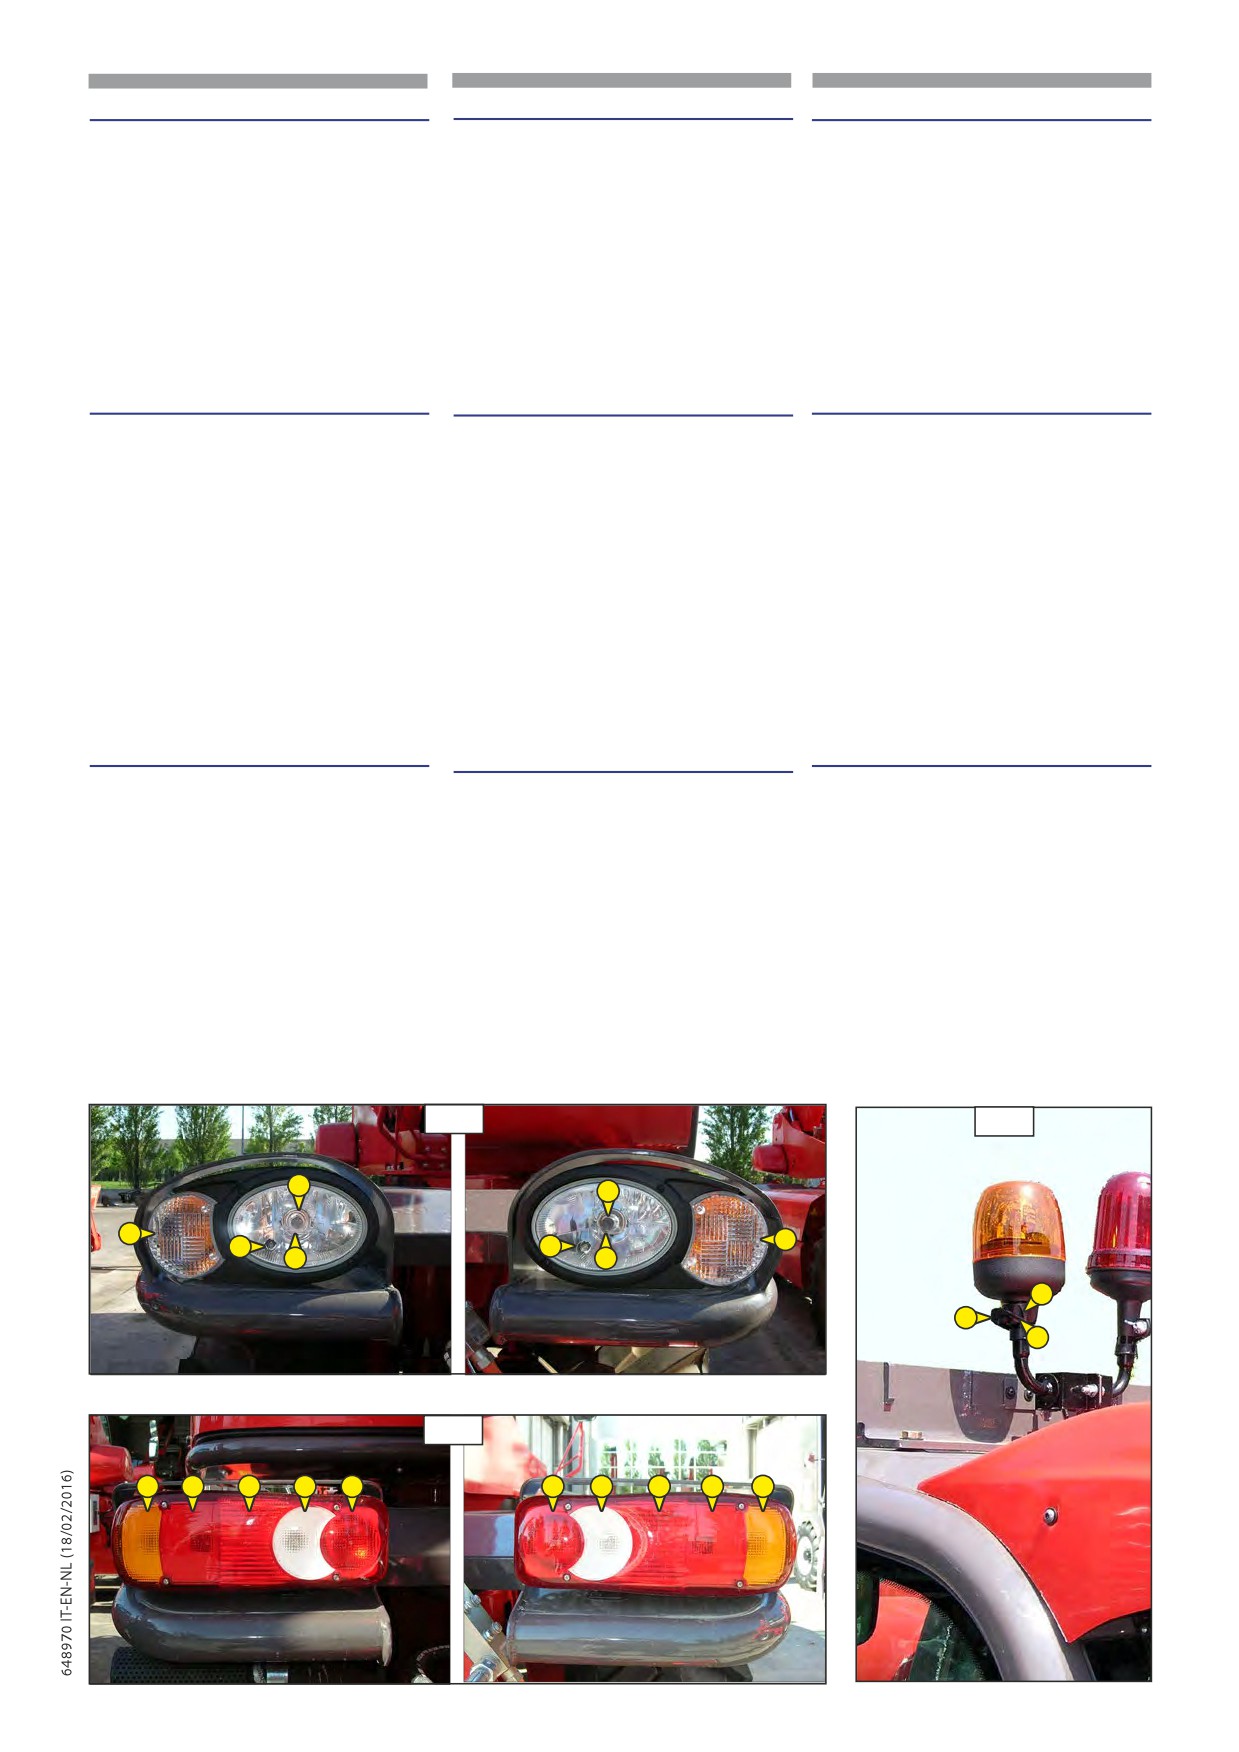
31 - LUCI ANTERIORI
31 - FRONT LIGHTS
31- VOORLICHTEN
A - Luce di direzione anteriore sinistra.
A - LH front direction light.
A - Knipperlicht links vooraan.
B - Luce anabbagliante anteriore sinistra.
B - LH front low beam light.
B - Dimlicht links vooraan.
C - Luce abbagliante anteriore sinistra.
C - LH front high beam light.
C - Groot licht links vooraan.
D - Luce di posizione anteriore sinistra.
D - LH front position light.
D - Stadslicht links vooraan.
E - Luce di direzione anteriore destra.
E - RH front direction light.
E - Knipperlicht rechts vooraan.
F - Luce anabbagliante anteriore destra.
F - RH front low beam light.
F - Dimlicht rechts vooraan.
G - Luce abbagliante anteriore destra.
G - RH front high beam light.
G - Groot licht rechts vooraan.
H - Luce di posizione anteriore destra.
H - RH front position light.
H - Stadslicht rechts vooraan.
(96A)
(96A)
(96A)
32 - LUCI POSTERIORI
32 - TAIL LIGHTS
32 - ACHTERLICHTEN
A - Luce di direzione posteriore sinistra.
A - LH rear direction light.
A - Knipperlicht links achteraan.
B - Luce di stop posteriore sinistra.
B - Remlicht links achteraan.
B - LH rear stop light.
C - Luce posteriore sinistra.
C - Achterlicht links.
C - LH tail light.
D - Luce di retromarcia posteriore sinistra.
D - Achteruitrijdlicht links achteraan.
D - LH rear reversing light.
E - Luce antinebbia posteriore sinistra.
E - Mistlamp links achteraan.
F - Luce antinebbia posteriore destra.
E - LH rear anti-fog light.
F - Mistlamp rechts achteraan.
G - Luce di retromarcia posteriore destra.
F - RH rear anti-fog light.
G - Achteruitrijdlicht rechts achteraan.
H - Luce posteriore destra.
G - RH rear reversing light.
H - Achterlicht rechts.
I - Luce di stop posteriore destra.
I - Remlicht rechts achteraan.
H - RH tail light.
J - Luce di direzione posteriore destra.
J - Knipperlicht rechts achteraan.
I - RH rear stop light.
(96B)
J - RH rear direction light.
(96B)
(96B)
33 - LAMPEGGIATORE
33 - FLASHING LIGHT
33 - ZWAAILICHT
Il lampeggiatore è inclinabile per ridurre, quando
Het zwaailicht kan gekanteld worden om indien nodig de
The flashing light can be inclined to reduce the
occorre, l’ingombro del carrello elevatore; lo si
forklift truck dimensions when necessary; it can
totaalafmetingen van de heftruck te beperken; het kan
può anche smontare per evitarne il furto.
ook gedemonteerd worden om diefstal te voorkomen.
also be dismantled to prevent it from being
- Svitare il dado
(1,97) e togliere il
stolen.
- Draai de moer (1,97) los en verwijder het
lampeggiatore.
zwaailicht.
- Unscrew nut (1,97) and remove the flashing
- Proteggere il supporto (2,97) con il coperchio
light.
- Bescherm de steun
(2,97) met de dop
(3,97).
- Protect support (2,97) by means of cover
(3,97).
(3,97).
96A
97
F
B
E
A
H
D
G
C
1
2
3
96B
A
B
C
D
E
F
G
H
I
H
2-120
IT
EN
NL
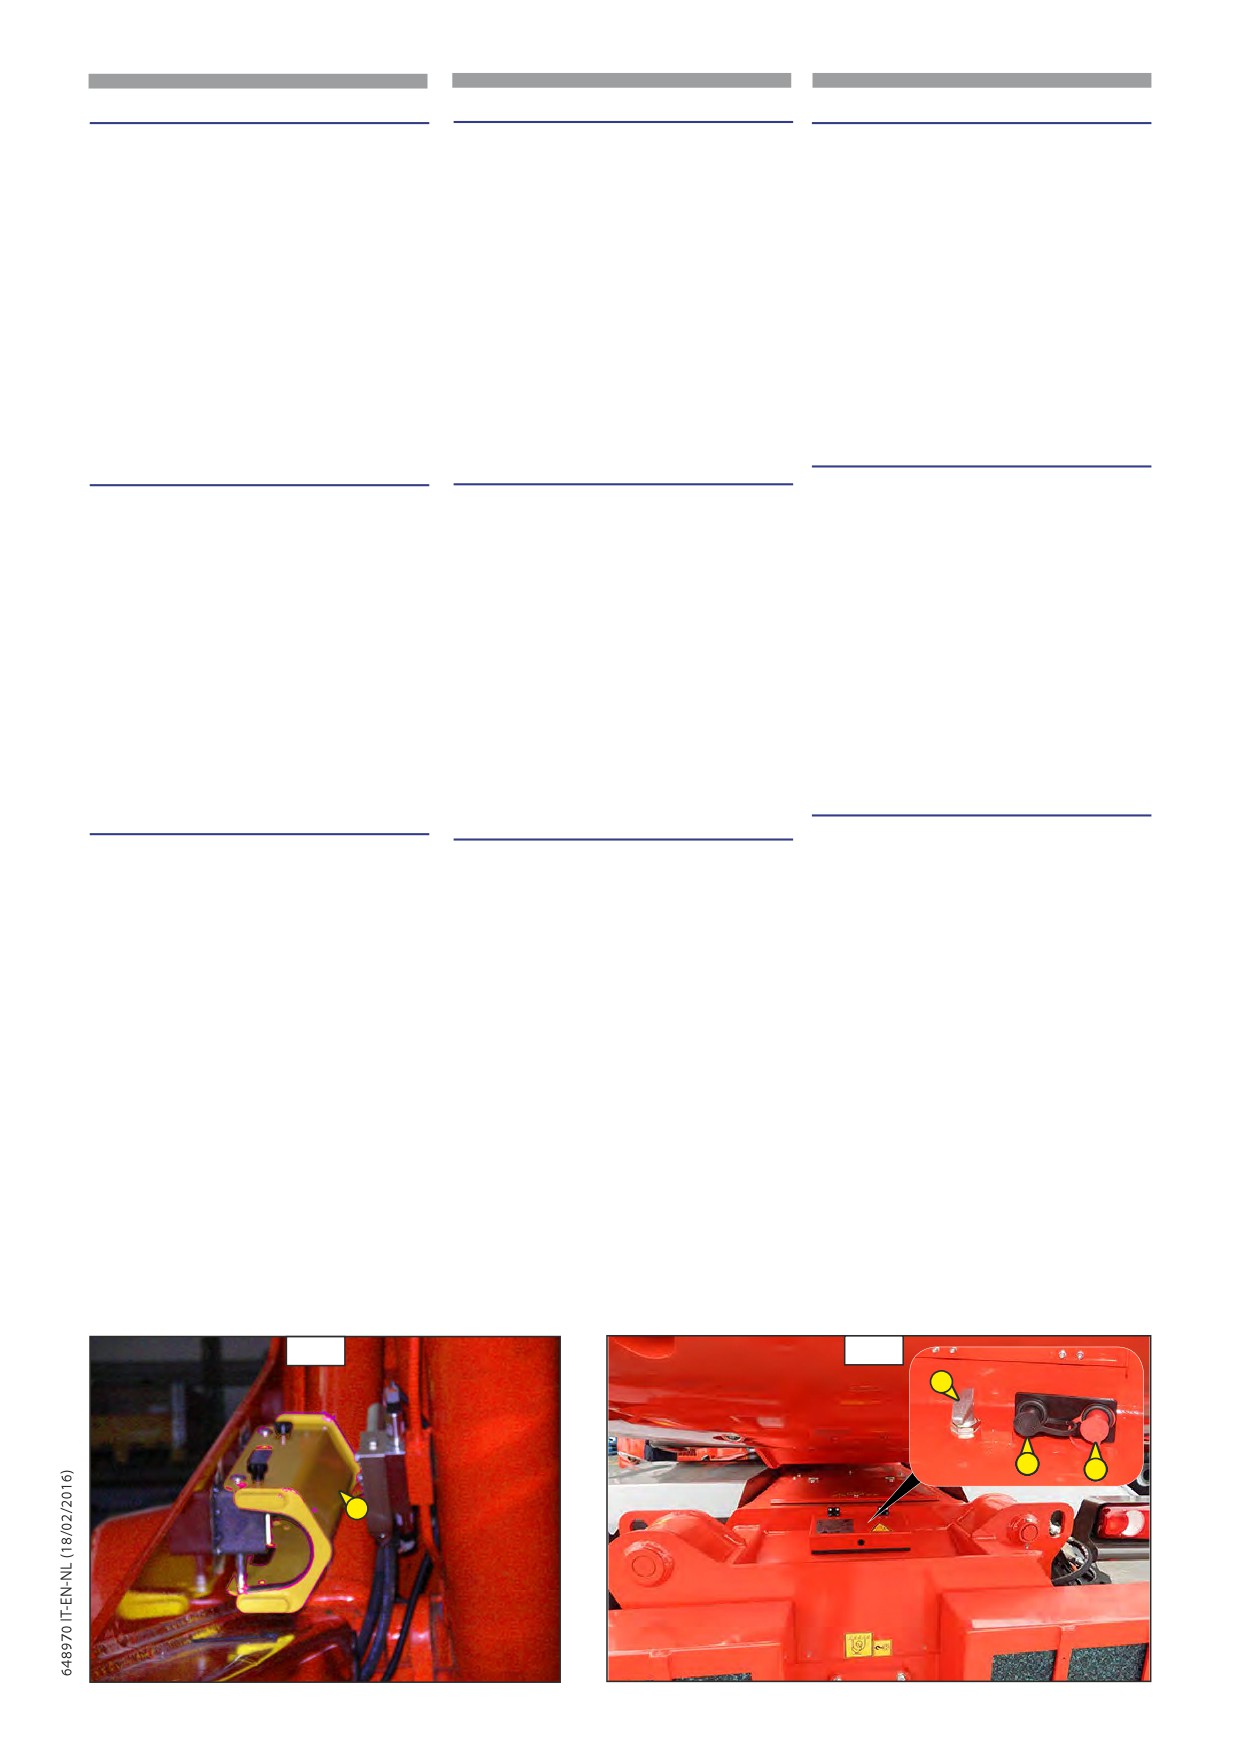
34 - CUNEO DI SICUREZZA DEL BRACCIO
34 - BOOM SAFETY WEDGE
34 - VEILIGHEIDSSTUT ARM
(1,98)
(1,98)
(1,98)
Il carrello elevatore è dotato di un cuneo di
The forklift truck is provided with a safety wedge
De heftruck is uitgerust met een veiligheidsstut
sicurezza del braccio che deve essere installato
for the boom which must be installed under
voor de arm die geïnstalleerd moet
sullo stelo del martinetto di sollevamento in caso
the lift cylinder rod in case of intervention on
worden op de schacht van de hefcilinder
di interventi sul braccio (vedere: 1 - ISTRUZIONI E
the boom (See: 1 - INSTRUCTIONS AND SAFETY
in geval van ingrepen op de arm
(zie:
1
NORME DI SICUREZZA).
STANDARDS).
- VEILIGHEIDSVOORSCHRIFTEN).
Utilizzare esclusivamente il cuneo
Use only the safety wedge
Gebruik alleen de veiligheidsstut
di sicurezza fornito con il carrello
supplied with the forklift truck.
die bij de heftruck wordt geleverd.
p
elevatore.
p
p
35 - BATTERIJ-LOSKOPPELAAR
35 - STACCABATTERIA
35 - BATTERY CUT-OFF
Om de batterij (1,99) snel los te koppelen,
Per scollegare rapidamente la batteria (1,99)
For quickly disconnecting the battery (1,99)
bijvoorbeeld wanneer u ingrepen uitvoert op het
quando si lavora sul circuito elettrico o durante la
when working on the electric
elektrisch circuit of tijdens het lassen.
saldatura, per esempio.
circuit or when soldering, for example.
Schakel de loskoppelaar niet
Azionare la batteria cut-o non
Operate the battery cut-o
minder dan 30 seconden in nadat
meno di 30 secondi dopo aver
p
u de motor heeft uitgeschakeld
no less than 30 seconds after
p
spento il motore con la chiave di
met de sleutel.
p
having switched o the ignition
accensione.
with the ignition key.
36 - NOODSTART
36 - AVVIAMENTO D‘EMERGENZA
36 - JUMP START
Wanneer de motor niet opstart omwille van een
Nel caso che il motore non si avvii a causa di una
If the engine doesn‘t start due to a low voltage
te lage spanning van de batterij, kan de motor
from the battery, it is possible to jump start the
bassa tensione della batteria, è possibile avviare il
engine by means of an external device connected
opgestart worden door een externe inrichting aan
motore tramite un dispositivo esterno collegato
to the battery terminals (+, -,99) (the terminals
te sluiten op de polen (+, -,99) van de batterij. De
sui poli (+, -,99) della batteria, contrassegnati
are colour coded black (-) and red (+) to indicate
polen kunnen geïdentificeerd worden met behulp
the corresponding polarity).
dal colore nero (-) e dal colore rosso (+) per
van de kleur zwart (-) en de kleur rood (+).
indicare la polarità.
98
99
1
-
±
2-121
IT
EN
NL
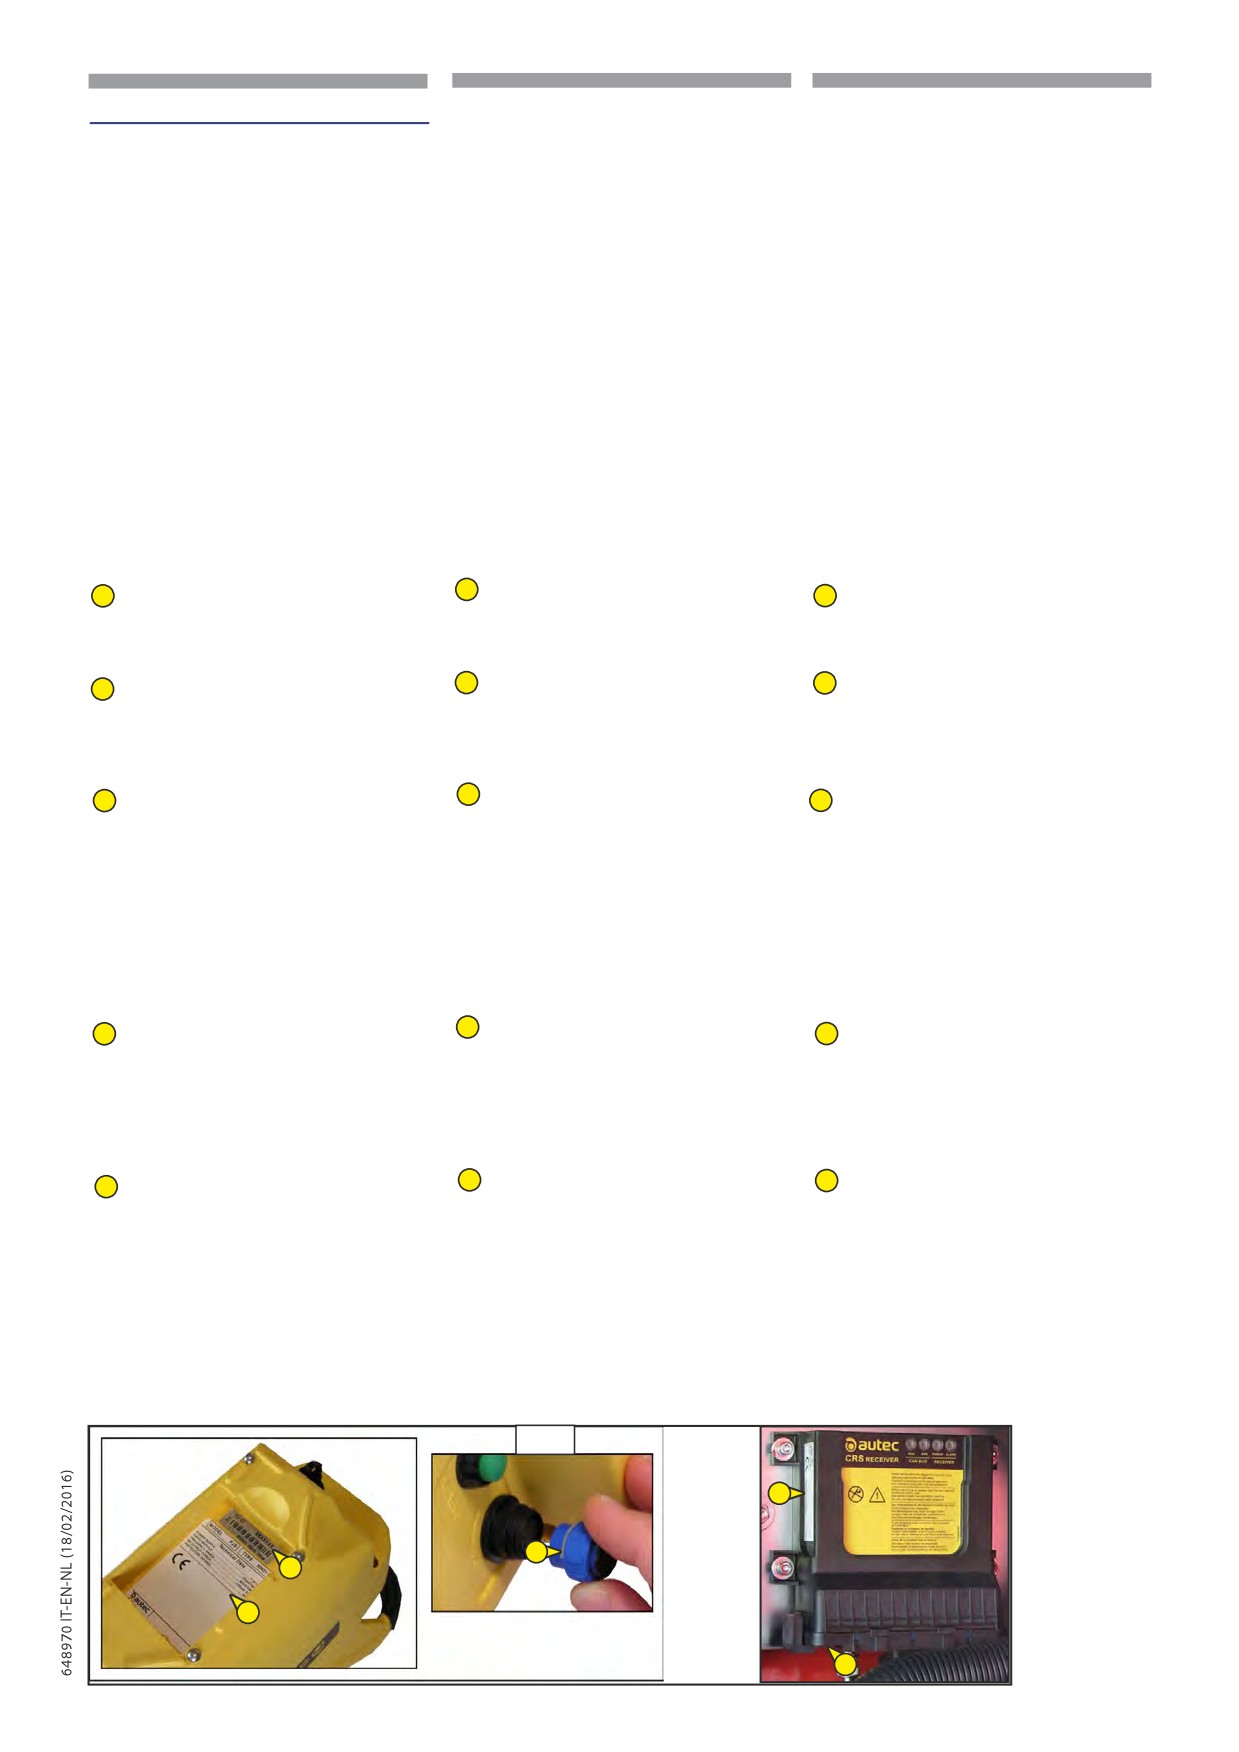
37- RADIOCOMANDO (OPTIONAL)
37 - RADIO REMOTE CONTROLS (OPTIONAL)
37 - AFSTANDSBEDEINING (OPTIONAL)
Identi cazione radiocomando.
Identi cation remote control.
Identi catie afstandsbediening.
Il numero di matricola (S/N) è l’unico
The serial number (S / N) is the only
Het serienummer (S/N) is de enige
riferimento che va utilizzato per
reference that is used to uniquely identify
verwijzing die gebruikt moet worden om op
identiÐcare in maniera univoca il
the remote control is in the case of
eensluidende manier de afstandsbediening
radiocomando sia nel caso di interventi
maintenance that in case of declarations
te identiÐceren, zowel voor het geval van
di manutenzione che nel caso di
to the competent bodies.
onderhoudswerkzaamheden als voor het
dichiarazioni verso organi competenti.
The serial number (S / N) and other
geval van verklaringen aan bevoegde
Il numero di matricola (S/N) e altre
information related to the radio remote
instanties.
informazioni relative al radiocomando
controls are present in some plates and
Het serienummer (S/N) en andere informatie
sono presenti in alcune targhette sia
into the transmitting and the receiving
met betrekking tot de afstandsbediening
nell’unità trasmittente che nell’unità
unit.
staan op enkele plaatjes, zowel in de zender
ricevente.
als in de ontvanger.
These plates should not be:
Tali targhette non devono essere:
ê - Removed from their position (the
Deze plaatjes mogen niet:
- rimosse dalla loro posizione (la rimozione
êêê result in immediate removal
- verwijderd worden (in geval van verwijdering
comporta l’immediata decadenza della
êêê forfeiture of the guarantee)
vervalt de garantie onmiddellijk)
garanzia)
- Altered or damaged (contact MANITOU
- gewijzigd of beschadigd worden (neem
- alterate o rovinate (contattare MANITOU
êê for replacement).
contact op met MANITOU voor de
per la sostituzione).
vervanging).
Targhette dell’unità trasmittente
Plates on the transmitting unit
Plaatjes van de zender
Nell’unità trasmittente sono presenti tre
The transmitting unit has three plates.
In de zender bevinden zich drie plaatjes.
targhette. (100)
(100)
(100)
11 targhetta d’identiÐcazione del
1- radio remote control identiÐcation
11 identificatieplaatje van de
radiocomando.
plate.
afstandsbediening.
Informazioni contenute: il numero di
Content: radio remote control serial
Informatie: het serienummer
matricola del radiocomando
number (S/N).
(S/N) van de
(S/N).
afstandsbediening.
22 targhetta d’identiÐcazione dell’unità
2- transmitting unit identiÐcation plate.
22 identificatieplaatje van de
trasmittente.
Content: Manufacturing year, bar code
zender.
Informazioni contenute: L’anno di
and transmitting unit
Informatie: Het bouwjaar, de
fabbricazione, il codice a barre
identiÐcation number (TU
streepjescode en de
e il numero identiÐcativo
ID).
identificatiezender van de
dell’unità trasmittente (TU ID).
zender (TU ID).
33 targhetta dati tecnici.
33- technical data plate.
33- plaatje met technische gegevens.
Informazioni contenute: Il MODEL, il
Content: MODEL, TYPE and main
Informatie: Het MODEL, het
TYPE e i principali dati tecnici
transmitting unit technical
TYPE en de voornaamste
dell’unità trasmittente, la
data, marking and possible
technische gegevens van de
marcatura e gli eventuali
radio remote control marks.
zender, de markering en de
marchi del radiocomando.
eventuele merken van de
afstandsbediening.
Targhette dell’unità ricevente
Plates on the receiving unit
Plaatjes van de ontvanger
Nell’unità ricevente sono presenti due
In de ontvanger bevinden zich twee
The receiving unit has two plates (100).
targhette (100):
plaatjes (100):
4
4
targhetta d’identiÐcazione del
radio remote control identiÐcation
4
identiÐcatieplaatje van de
radiocomando.
plate.
afstandsbediening.
Informazioni contenute: Il numero di
Content: radio remote control serial
Informatie: Het serienummer (S/N) van
matricola del radiocomando,
number, bar code (S/N) and
de afstandsbediening, een
un codice a barre (S/N) e l’anno
manufacturing year.
streepjescode en het bouwjaar
di fabbricazione
plaatje met technische gegevens.
5
technical data plate
5
5
targhetta dati tecnici.
Informatie: Het MODEL, het TYPE en
Contente: MODEL, TYPE and main
Informazioni contenute: Il MODEL,
de voornaamste technische
receiving unit technical
il TYPE e i principali dati
gegevens van de ontvanger,
data, marking and possible
tecnici dell’unità ricevente,
de markering en de
radioremote control marks.
la marcatura e gli eventuali
eventuele merken van de
marchi del radiocomando.
afstandsbediening.
100
5
1
2
3
4
2-122
IT
EN
NL
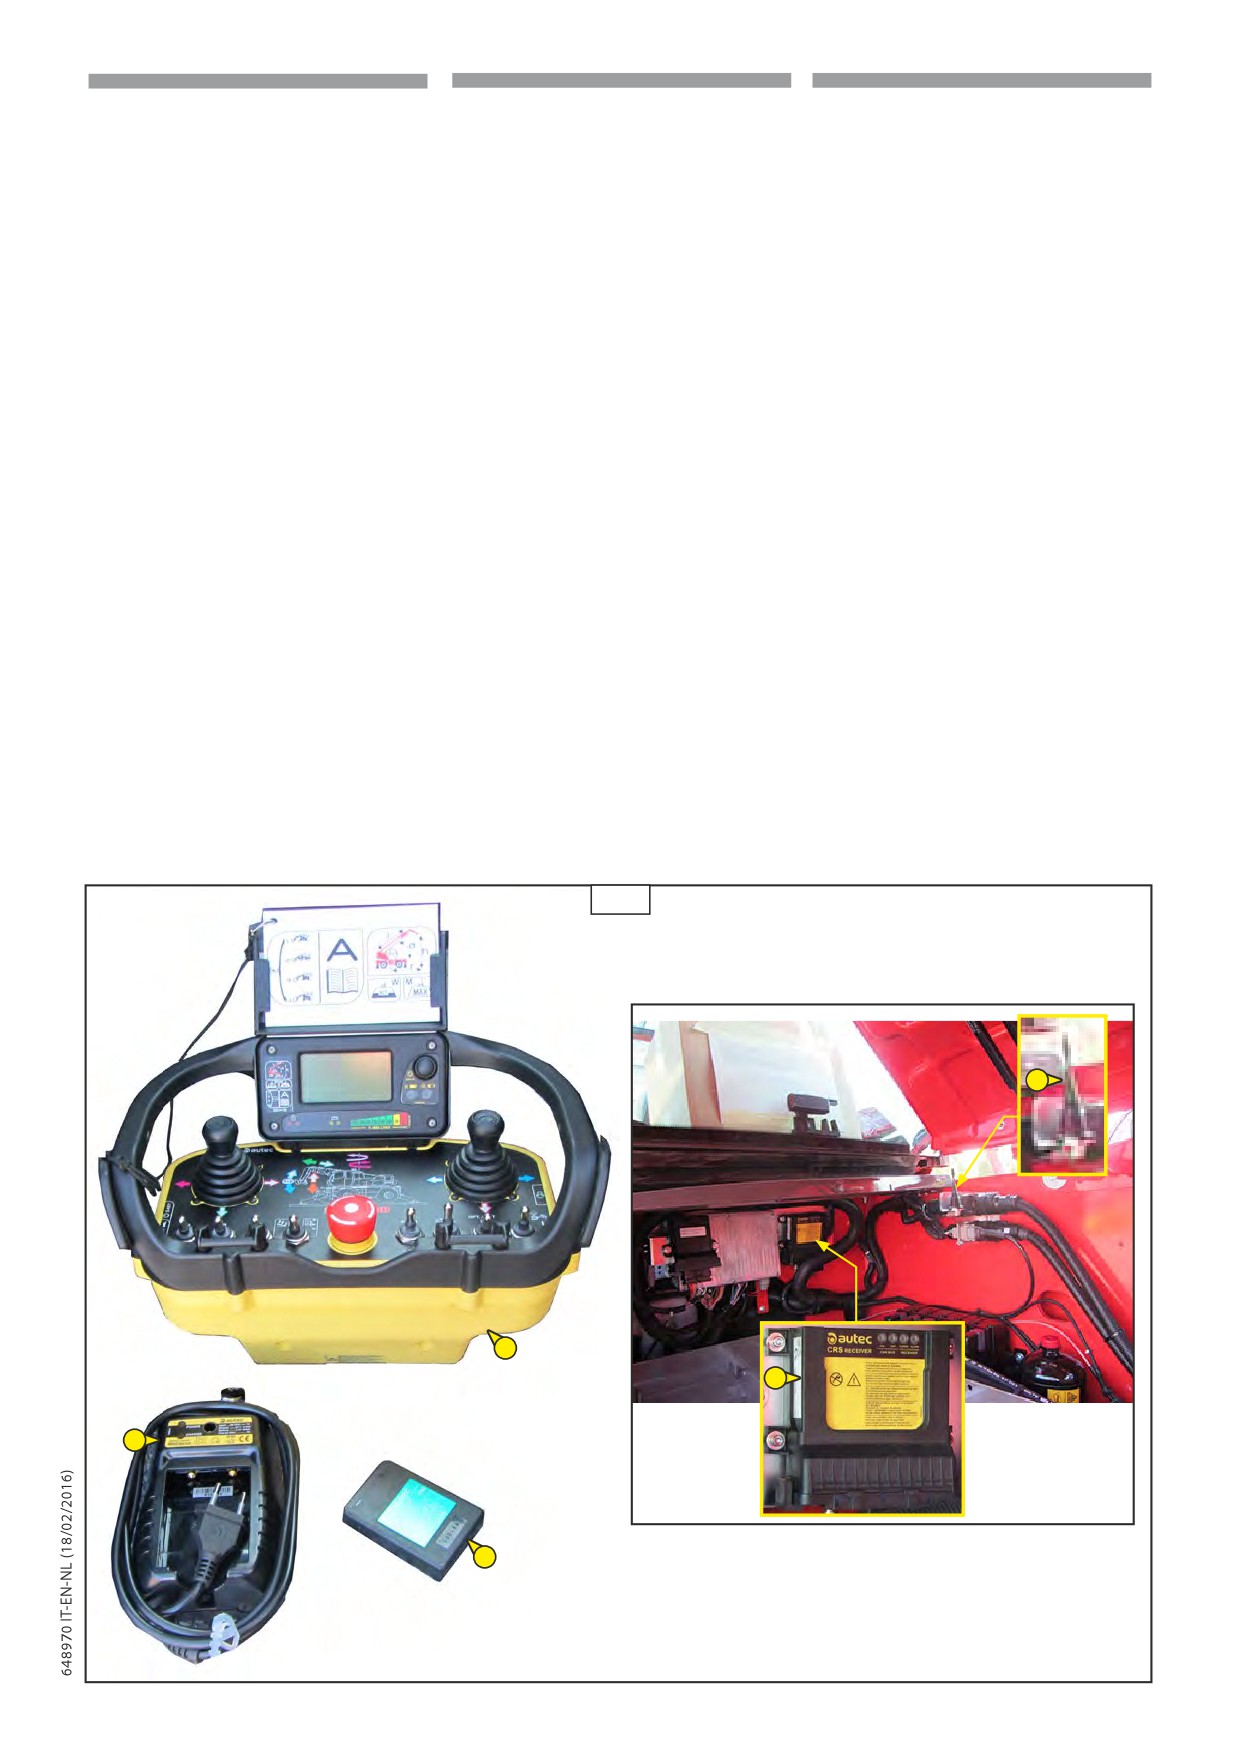
Descrizione generale del sistema
System overview
Algemene beschrijving van het systeem
Il sistema radiocomando è comprensivo di:
The remote control system includes:
Het afstandsbedieningsysteem bestaat uit:
- UNITÀ TRASMITTENTE (PULSANTIERA)
- TRANSMITTING UNIT (PUSHBUTTON)
- ZENDER (KNOPPENBORD)
(1,101)
(1,101)
(1,101)
- UNITÀ RICEVENTE (2,101)
- RECEIVING UNIT (2,101)
- ONTVANGER (2,101)
- ANTENNA (3,101)
- ANTENNA (3,101)
- ANTENNE (3,101)
- CARICABATTERIA (4,101)
- BATTERY CHARGER (4,101)
- OPLADER (4,101)
Input
80-250V 7W
Input
80-250V 7W
Input
80-250V 7W
Ouput
9V 0.45A
Ouput
9V 0.45A
Output
9V 0.45A
Batteria:
7.2V NiMH
Battery:
7.2V NiMH
Batterij:
7.2V NiMH
Tempo di carica:...3h
Charge time:...3h
Oplaadduur:
3h
- BATTERIA (5,101)
- BATTERY (5,101)
- BATTERIJ (5,101)
7.2V 750mAh Ni-MH
7.2V 750mAh Ni-MH
7.2V 750mAh Ni-MH
101
3
1
2
4
5
2-123
IT
EN
NL
Istruzioni generali per il funzionamento
General operating instructions
Algemene instructies voor de werking
(Vedere anche CAPITOLO 1-ISTRUZIONI E
(See also CHAPTER: 1-OPERATING AND
(Zie ook HOOFDSTUK 1 -
NORME DI SICUREZZA)
SAFETY INSTRUCTIONS)
VEILIGHEIDSVOORSCHRIFTEN)
Funzionamento
Working
Werking
Batteria (102)
Battery (102)
Batterij (102)
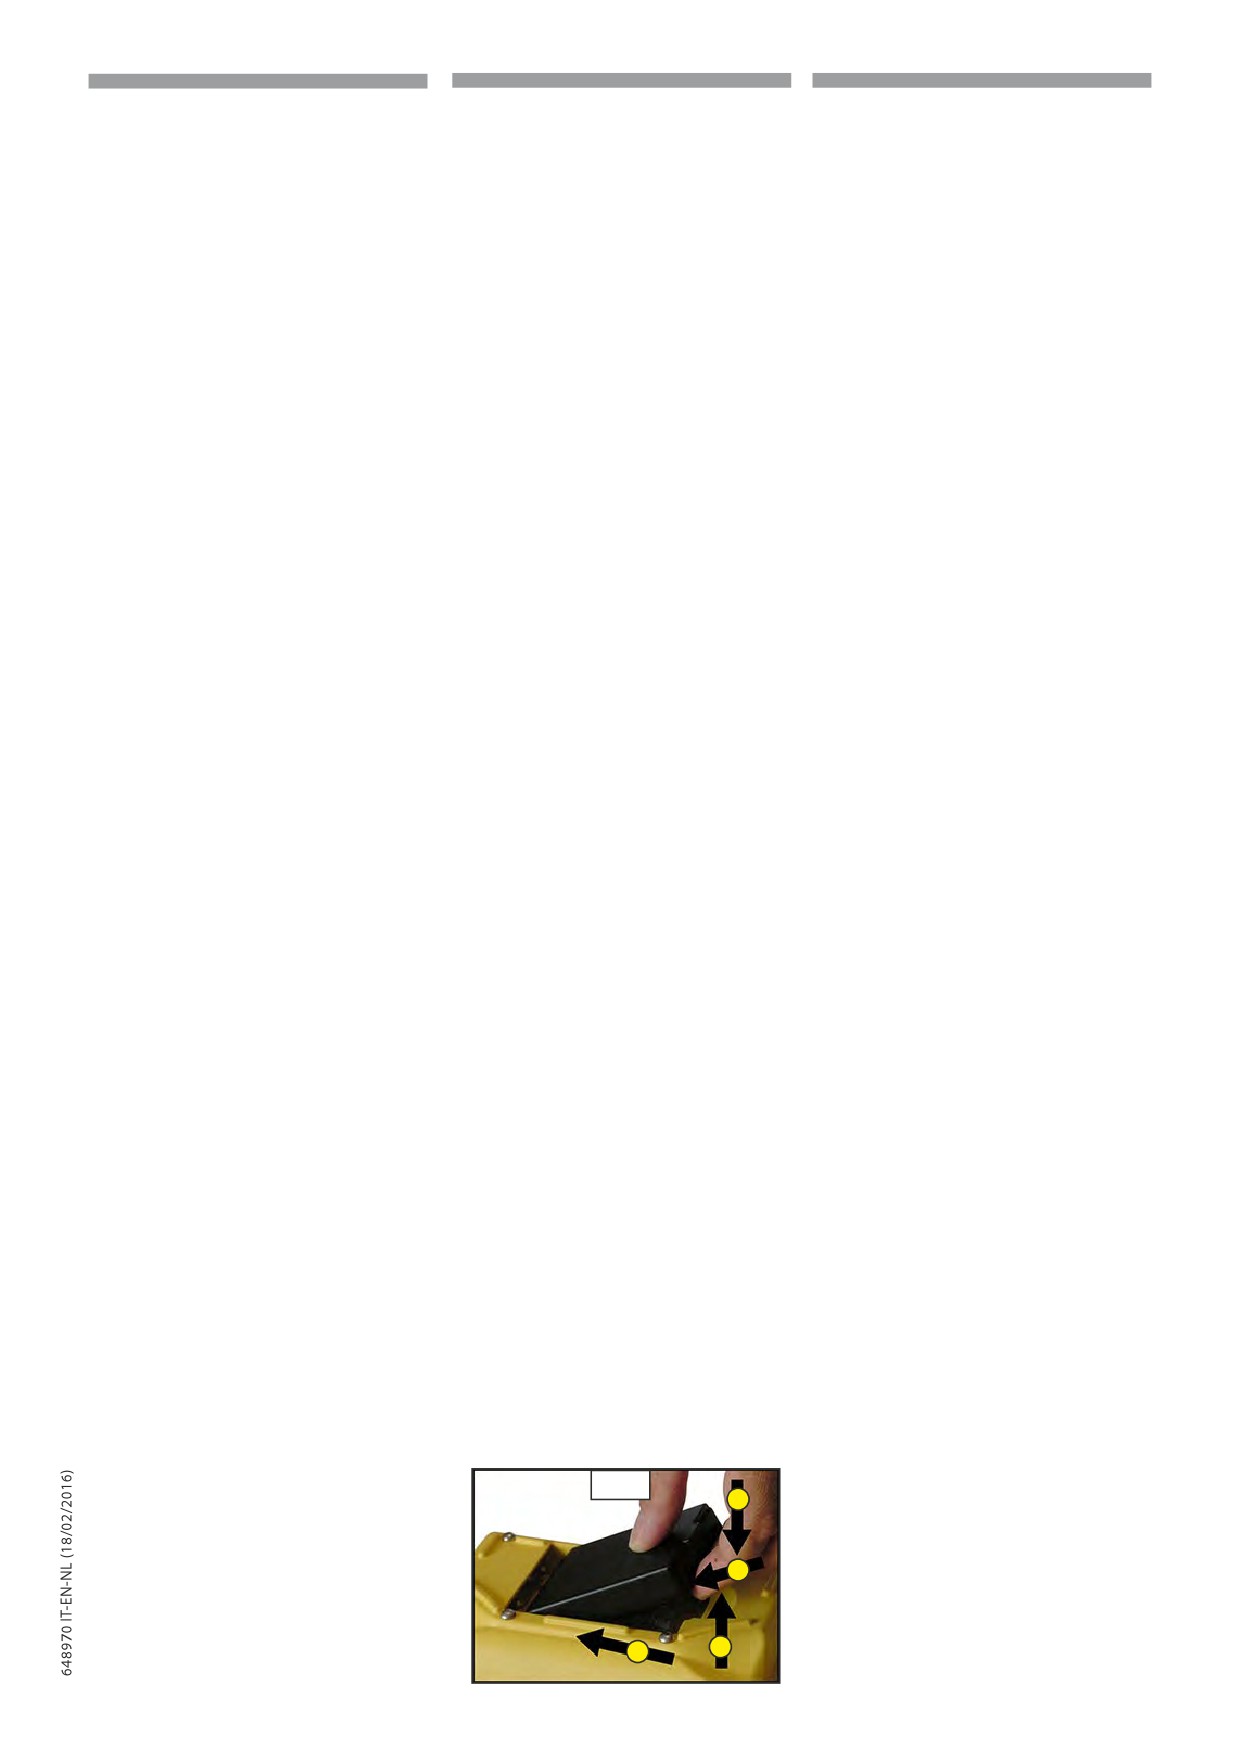
La unità trasmittente puo essere
Transmitting unit can only be powered
De zender mag uitsluitend gevoed worden
alimentata soltanto con batterie ricaricabili
through manufacturer rechargeable
met heroplaadbare batterijen van de fabrikant.
del fabbricante.
batteries.
De batterij dient in de desbetreÓende houder
Una batteria deve essere inserita nella
Batteries shall be inserted in their housing
vande zender te worden geplaatst met het
relativa sede d’alloggiamento nell’unità
in the transmitting unit, with the technical
plaatje met de technische gegevens naar
trasmittente con la targhetta dati tecnici
data plate facing down and their contacts
beneden gericht en met de contacten in
rivolta verso il basso e con i contatti rivolti
towards the contacts on the transmitting
de richting van de contacten van de zender
verso i contatti dell’unità trasmittente.
unit.
gericht.
Per inserire una batteria, eÓettuare le
To insert a battery, proceed as follows:
Ga als volgt te werk om een batterij te
seguenti operazioni:
1.
push the battery towards the
plaatsen:
1.
spingere la batteria verso i contatti
contacts on the transmitting unit
1.
duw de batterij tegen de contacten van
dell’unità trasmittente (1,102)
(1,102) .
de zender (1,102)
2.
spingere la batteria verso il basso.
2.
push the battery downwards
2.
duw de batterij naar beneden (2,102)
(2,102)
(2,102) .
Ga als volgt te werk om een batterij te
To remove a battery, proceed as follows:
Per estrarre una batteria, eÓettuare le
verwijderen:
3.
push the battery towards the
seguenti operazioni:
contacts on the transmitting unit
3.
duw de batterij tegen de contacten
3.
spingere la batteria verso i contatti
(3,102) .
van de zender (3,102)
dell’unità trasmittente (3,102)
4.
lift the battery (4,102) .
4.
trek de batterij omhoog (4,102)
4.
sollevare la batteria (4,102)
102
2
1
3
4
2-124
IT
EN
NL
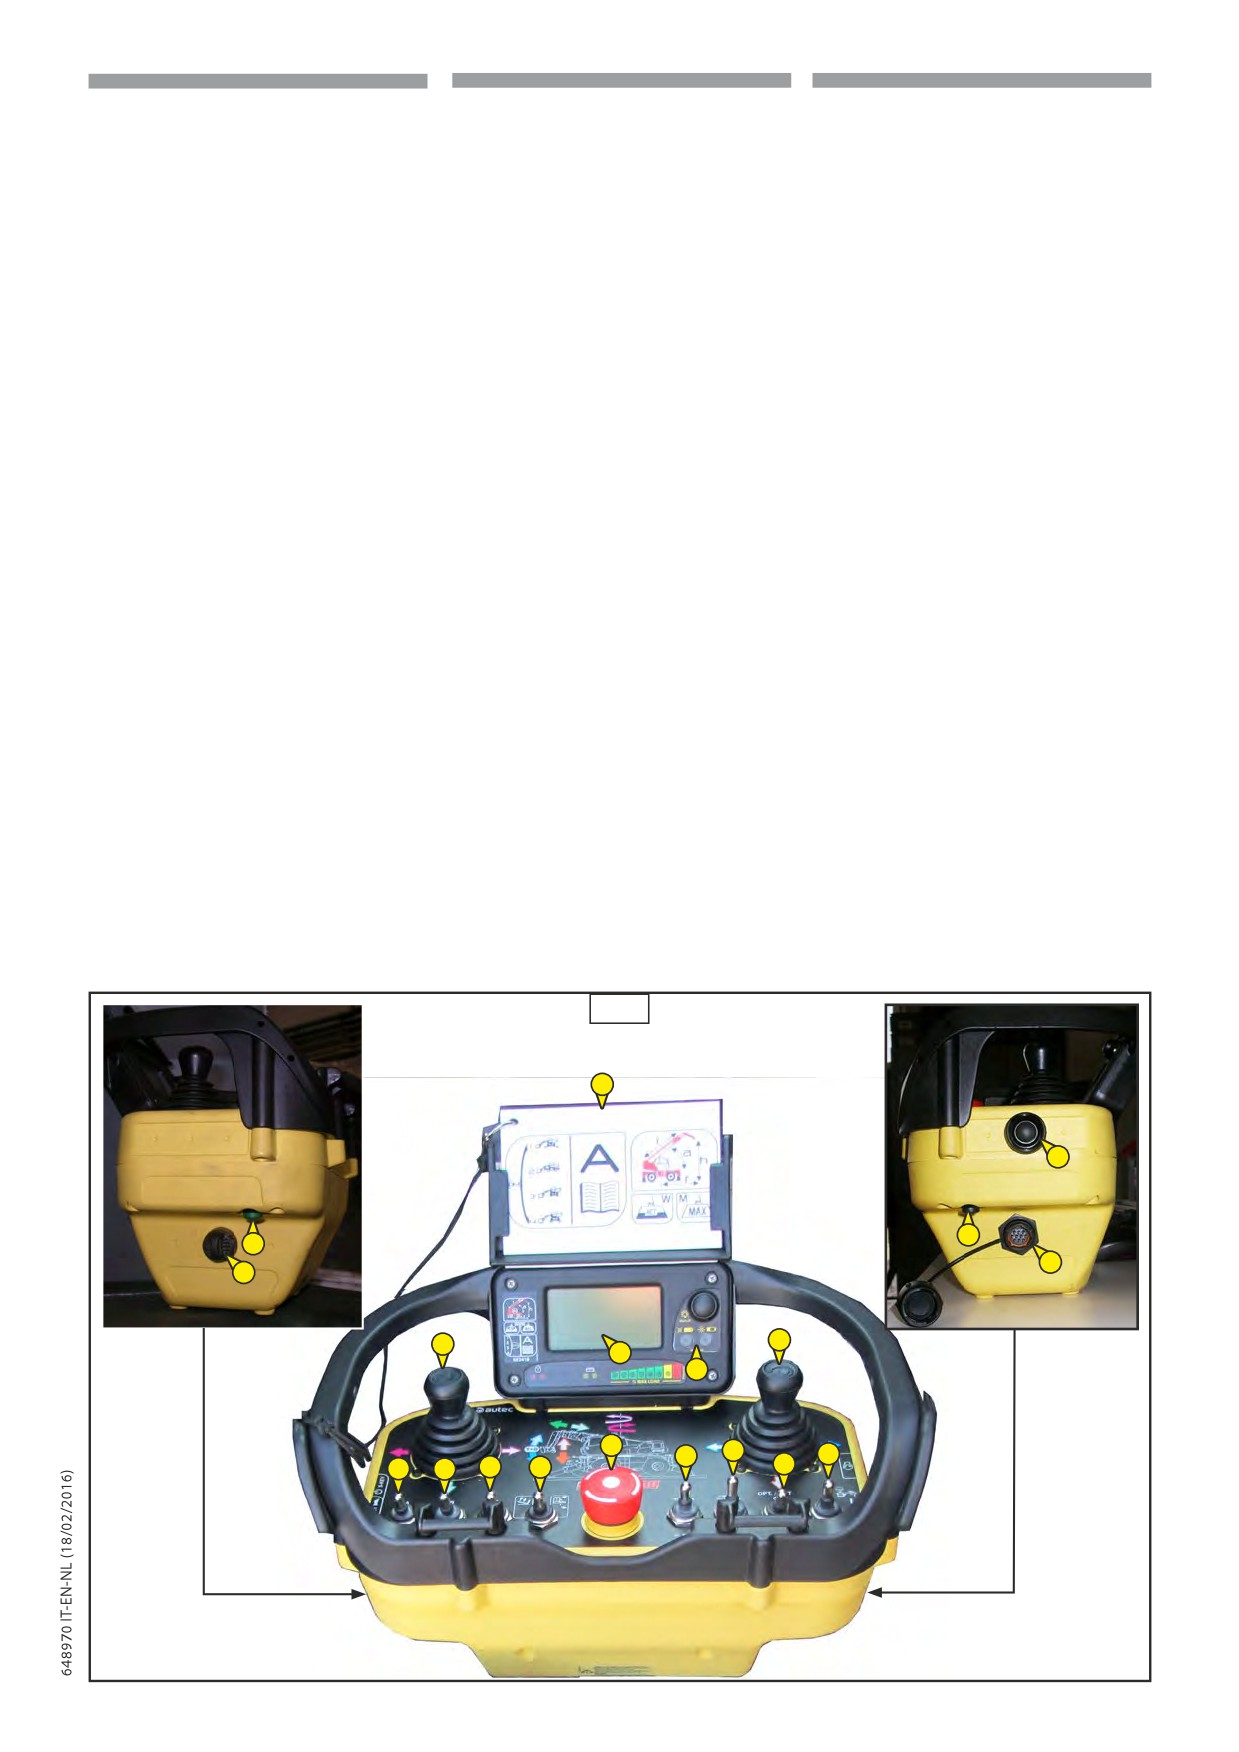
FUNZIONI COMANDI UNITÀ
CONTROL FUNCTIONS TRANSMITTING
FUNCTIES BESTURINGEN ZENDER
TRASMITTENTE PULSANTIERA
UNIT PUSHBUTTON
KNOPPENBORD
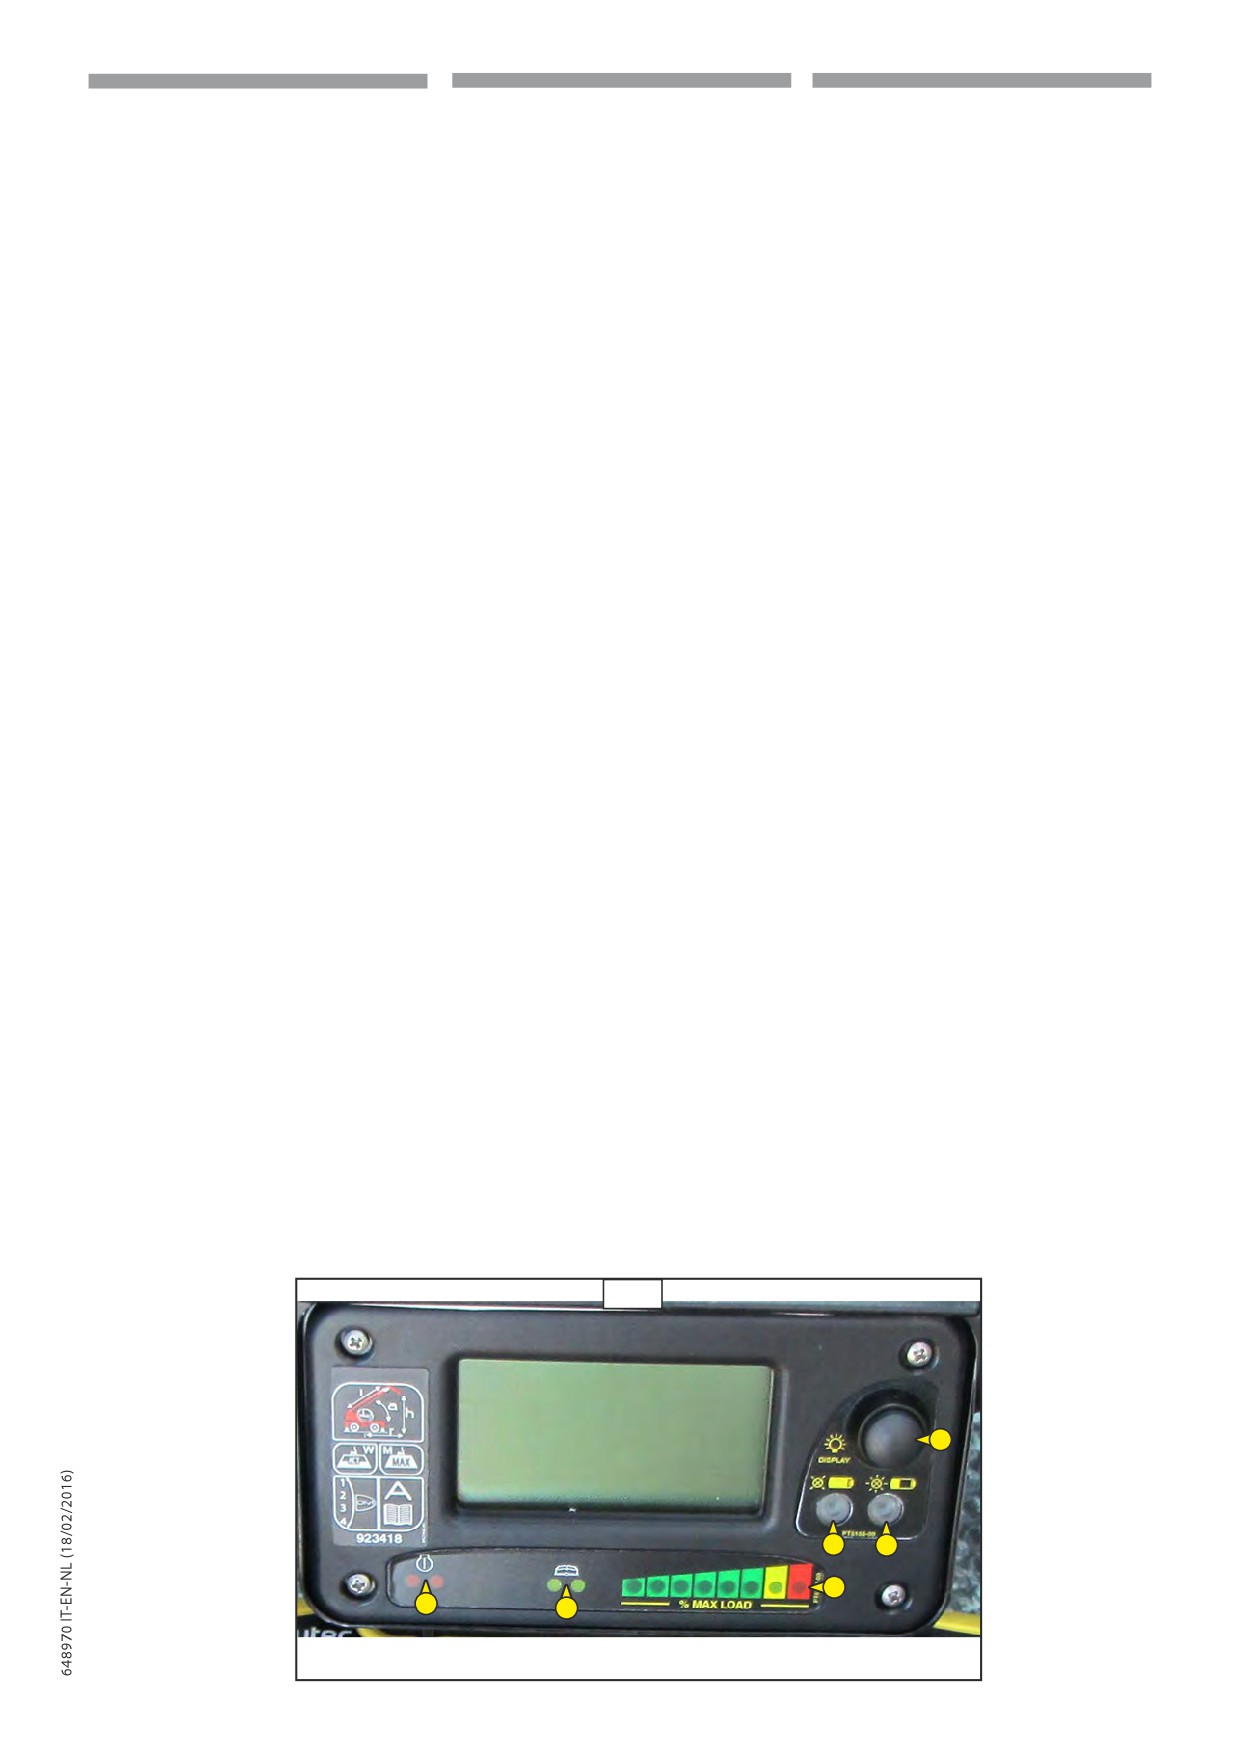
(103)
(103)
(103)
1.
Display funzioni macchina e stato del
1.
Display machine functions and status
1.
Display functies en batterijstatus (1,
carico (1, 1.1,103).
of load (1, 1.1,103)
1.1,103).
2.
Joystick, selettori, pulsanti funzioni
2.
Joystick, selectors, machine functions
2.
Joysticks, keuzeschakelaars, knoppen
macchina (2,103).
buttons (2,103)
3.
Pulsante arresto d’emergenza
3.
Emergency stop pushbutton
voor machinefuncties (2,103).
(3,103)
(3,103)
3.
“Noodstop”-knop (3,103)
4.
S-KEY accensione radiocomando
4.
S-KEY switching on radio control
4.
S-KEY inschakelen afstandsbediening
(4,103)
(4,103)
(4,103)
5.
Avviamento motore (5,103)
5.
Engine start-up (5,103)
5.
Motor starten (5,103)
6.
Clacson (6,103)
6.
Horn (6,103)
6.
Claxon (6,103)
7.
Pulsante elettropompa d ‘emergenza
7.
Emergency motor pump pushbutton
7.
Knop elektrische noodpomp voor
per il salvataggio cestello (7,103)
for platform rescue (7,103)
de reddingsprocedure van de kooi
8.
Presa per Ðlocomando (8,103)
8.
Socket for control wire (8,103)
(7,103)
9.
Schede movimenti accessorio
9.
Attachment movements charts
8.
Contact voor draadbediening (8,103)
(9,103)
(9,103)
9.
Kaarten bewegingen toebehoren
(9,103)
103
9
5
7
6
8
4
2
2
1
1.1
3
2
2
2
2
2
2
2
2
2-125
IT
EN
NL
1
DISPLAY FUNZIONI MACCHINA E
1 DISPLAY MACHINE FUNCTIONS AND
1
DISPLAY EN FUNCTIE EN
STATO DEL CARICO
STATUS OF LOAD
BATTERIJSTATUSLAMPJES
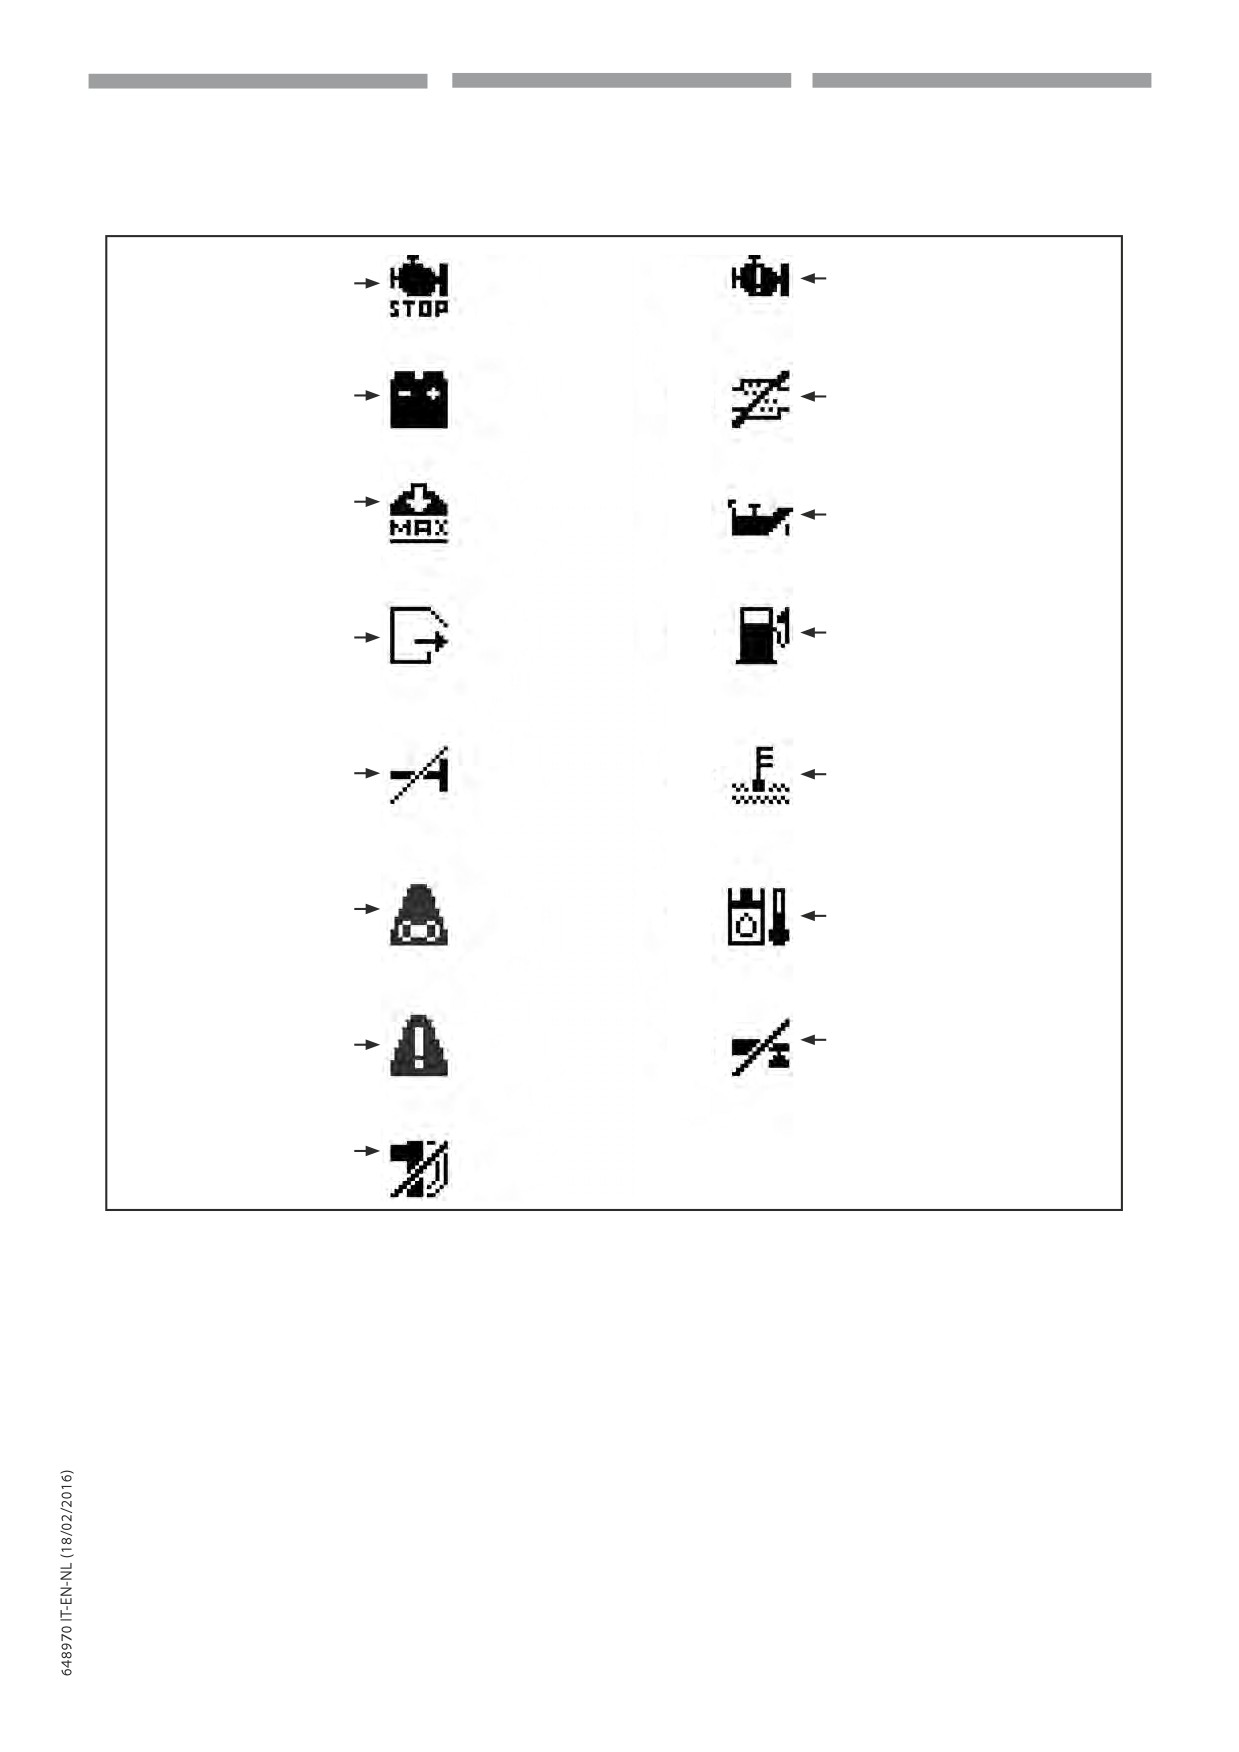
Spie funzioni e di allarme:
Functions and alarms indicators:
Functie- en alarmlampjes:
Warning motore
Stop motore
Engine warning
Engine stop
Warning motor
Stop motor
Eccitazione alternatore
Rigenerazione DPF inibita
Alternator excitation
DPF regeneration inhibited
Bekrachtiging wisselstroomdynamo
DPF regeneratie belemmerd
Sovraccarico cestello
Pressione olio motore termico
Platform overload
I.C. engine oil pressure
Overbelasting kooi
Oliedruk verbrandingsmotor
Riserva carburante
Porta cestello
Fuel reserve
Platform door
Platformhek
Brandstofreserve
Perno non inserito
Ebolizione temperatura acqua motore
Pin not inserted
Engine water boiling temperature
Pen niet ingevoerd
Kookpunt watertemperatuur motor
Temperatura olio idraulico
Anomalie catene braccio
Hydraulic oil temperature
Boom chains anomalies
Temperatuur hydraulische olie
Storingen kettingen arm
Stabilizzatori non al suolo
Allarme generico
Stabilisers not on ground
Generic alarm
Stabilisatoren niet op de grond
Algemeen alarm
Accessorio non riconosciuto
Accessory not acknowledged
Toebehoren niet herkend
2-126
IT
EN
NL
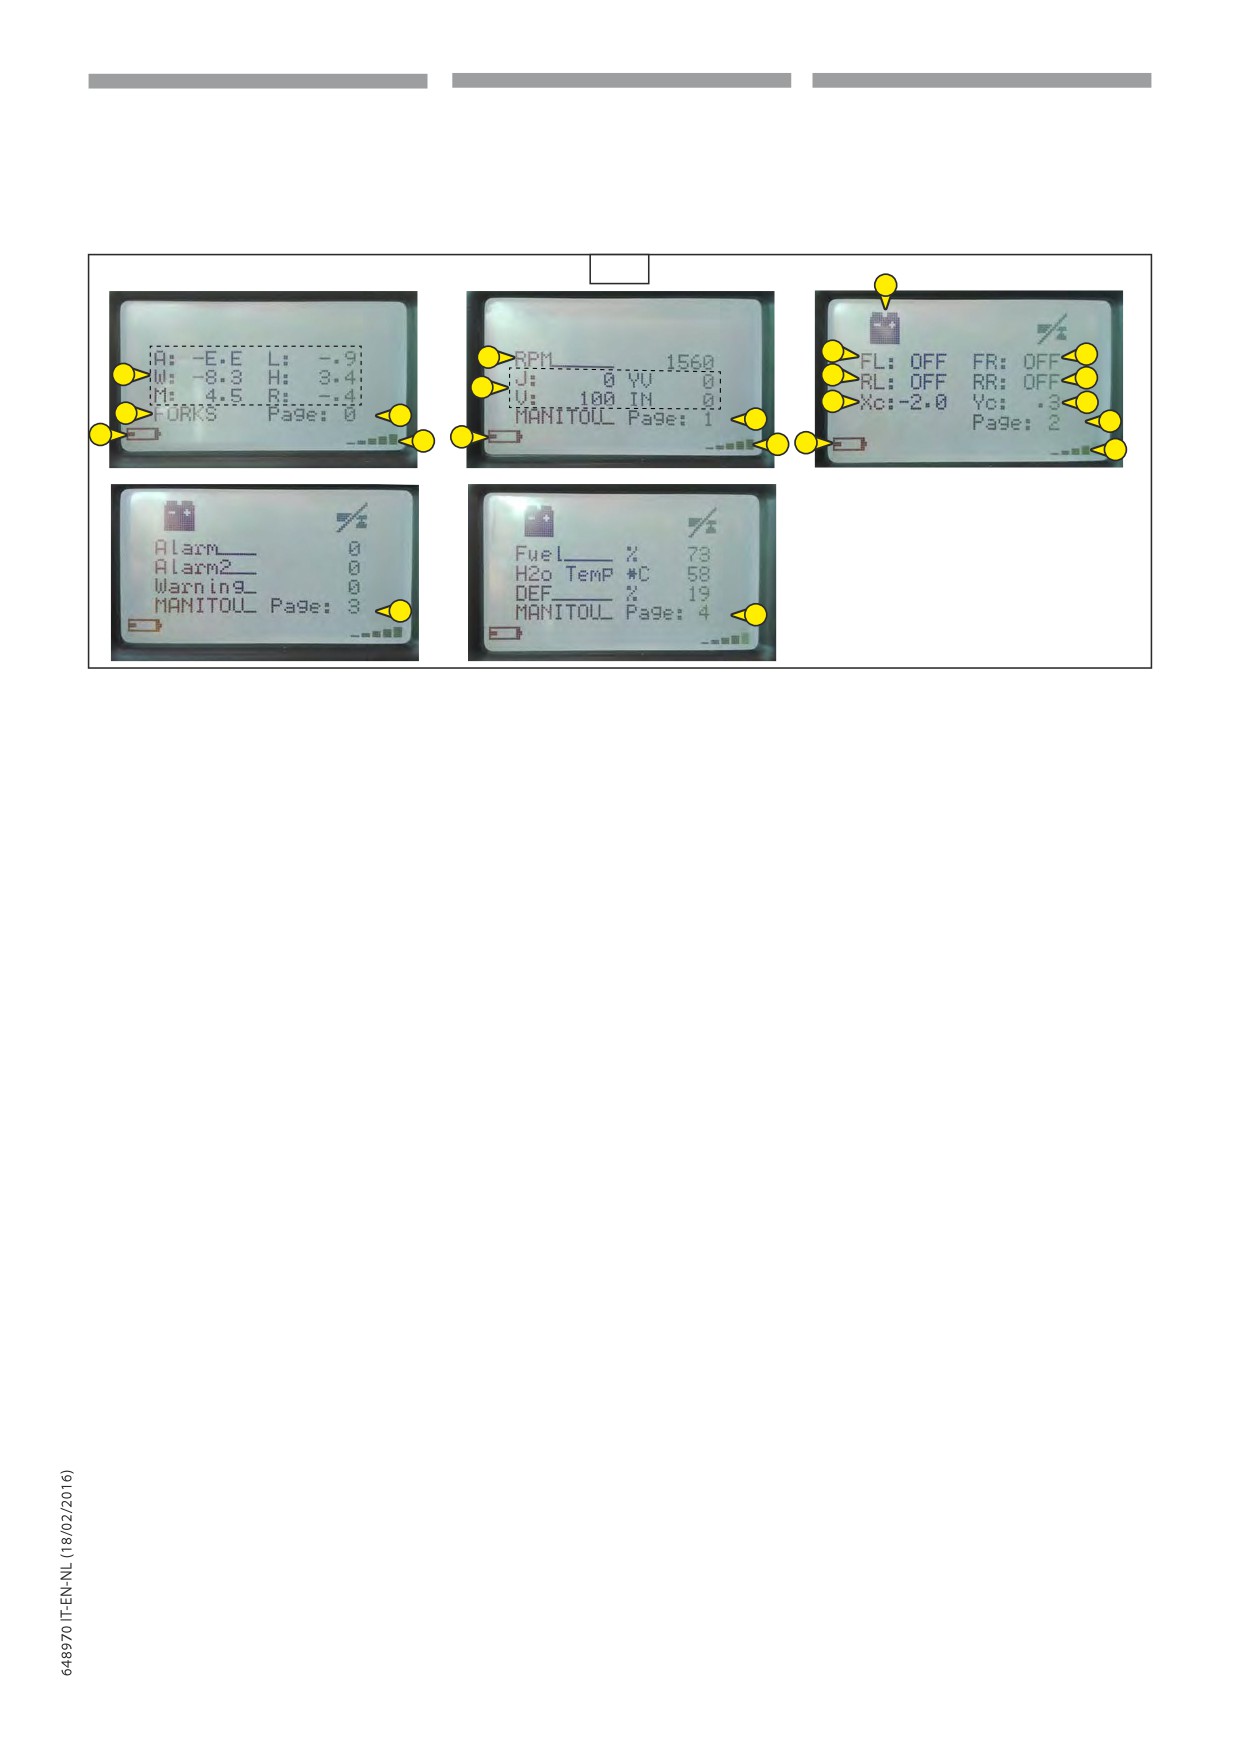
Pagine display:
Display pages:
Pagina's display:
1.
pagina 0 (1.0,104)
1.
page 0 (1.0,104)
1.
pagina 0 (1.0,104)
2.
pagina 1 (1.1,104)
2.
page 1 (1.1,104)
2.
pagina 1 (1.1,104)
3.
pagina 2 (1.2,104)
3.
page 2 (1.2,104)
3.
pagina 2 (1.2,104)
4.
pagina 3 (1.1,104)
4.
page 3 (1.1,104)
4.
pagina 3 (1.1,104)
5.
pagina 4 (1.4,104)
5.
page 4 (1.4,104)
5.
pagina 4 (1.4,104)
104
1.2b
1.2a
1.2b
1.1a
1.0a
1.2c
1.2d
1.1b
1.2e
1.2f
1.0b
1.0
1.1
1.2
1.0c
1.1c
1.0d
1.1d
1.2g
1.2h
1.3
1.4
1.
Pagina 0 (1.0,104)
1.
Page 0 (1.0,104)
1.
Pagina 0 (1.0,104)
- Lettura dei dati di lavoro principali
- Reading
main operating data
- Aflezen van de voornaamste bedrijfsgegevens
(1.0a,104):
(1.0a,104):
(1.0a,104):
• Altezza da terra (H) (lettura in “Metri”,
• Hoogte vanaf de grond (H) (in "meter",
• Height oÓ the ground (H)
con un decimale)
met één cijfer achter de komma)
(reading in “Metres”, with a decimal)
• Angolo braccio (A)(lettura in “Gradi”,
• Hoek van de arm (A) (in "graden",
• Boom angle (A) (reading in “Degre-
met één cijfer achter de komma)
con un decimale)
es”, with a decimal)
• Lengte van de arm (L) (in "meter",
• Lunghezza del braccio (L) (lettura in
• Boom length (L)
met één cijfer achter de komma)
“Metri”, con un decimale)
(reading in “Metres”, with a decimal)
• Werkstraal (R)
• Raggio di lavoro (R)
• Operating radius (R)
Afstand van het midden van het
Misura della distanza dal centro
Measurement of the distance from
draaistel tot de projectie van het
ralla alla proiezione del punto di
the Ðfth wheel centre to the projec-
punt waar de lading is toegepast.
applicazione del carico. (lettura in
(in “meter”, met één cijfer achter de
tion of the point of applicaton of
“Metri”, con un decimale).
komma).
the load. (reading in “Metres”, with a
• Gewicht van de opgeheven last (W)
• Peso del carico sollevato (W) (lettura
decimal).
(in "ton", met één cijfer achter de
in “Tonnellate”, con un decimale).
• Weight of load lifted (W)
komma).
• Carico massimo ammesso (M)
(reading in “Tons”, with a decimal).
• Maximaal toegestane last (M) in
nella conÐgurazione attuale della
• Maximum permitted load (M) in
de huidige conÐguratie van de
macchina. (lettura in “Tonnellate”,
the current conÐguration of the
machine. (in “ton”, met één cijfer
con un decimale).
achter de komma).
machine. (reading in “Tons”, with a
• attrezzatura in uso
• gebruikte uitrusting
decimal).
(PT, forche, cestello, etc...).
(PT, vorken, kooi enz.).
• Equipment being used
- Carica
batteria
radiocomando
(PT,forks,etc...).
- Oplader
afstandsbediening
(1.0b,104)
- Radio
control
battery
charge
(1.0b,104)
(1.0b,104)
- Radiosignaal (1.0c,104)
- Segnale radio (1.0c,104)
- Radio signal (1.0c,104)
2.
Page 1 (1.1,104)
2.
Pagina 1 (1.1,104)
2.
pagina 1 (1.1,104)
- RPM (1.1a,104)
- Giri motore termico (1.1a,104)
- Toerental
verbrandingsmotor
- The operating status of joystick and
(1.1a,104)
- Stato di funzionamento del Joystick (per
movements (for Manitou Assistance)
Assistenza Manitou) (1.1b,104)
- Werking van de joystick
(voor de
(1.1b,104)
servicedienst van Manitou) (1.1b,104)
- Carica
batteria
radiocomando
- Radio
control
battery
charge
(1.1c,104)
- Oplader afstandsbediening (1.1c,104)
(1.1c,104)
Segnale radio (1.1d,104)
Radiosignaal (1.1d,104)
- Radio signal (1.1d,104)
3.
pagina 2 (1.2,104)
3.
Page 2 (1.2,104)
3.
pagina 2 (1.2,104)
- Status of the stabiliser resting to LH
- Steunstatus van de stabilisator vooraan
- Stato di appoggio dello stabilizzatore
front (1.2a,104)
links (1.2a,104)
frontale sinistro (1.2a,104)
- Stato di appoggio dello stabilizzatore
- Status of the stabiliser resting to RH
- Steunstatus van de stabilisator vooraan
frontale destro (1.2b,104)
front (1.2b,104)
rechts (1.2b,104)
- Status of the stabiliser resting to LH rear
- Steunstatus van de stabilisator achteraan
- Stato di appoggio dello stabilizzatore
(1.2c,104)
links (1.2c,104)
posteriore sinistro (1.2c,104)
- Status of the stabiliser resting to RH rear
- Steunstatus van de stabilisator achteraan
- Stato di appoggio dello stabilizzatore
2-127
IT
EN
NL
posteriore destro (1.2d,104)
(1.2d,104)
rechts (1.2d,104)
- Stato di inclinazione della macchina
- Status of inclination machine to LH
- Hellingstatus van de machine naar links
verso sinistra (1.2e,104)
(1.2e,104)
(1.2e,104)
- Stato di inclinazione della macchina
- Status of inclination machine to RH
- Hellingstatus van de machine naar rechts
verso destra (1.2f,104)
(1.2f,104)
(1.2f,104)
- Carica
batteria
radiocomando
- Radio control battery charge (1.2g,104)
- Oplader
afstandsbediening
(1.2g,104)
- Radio signal (1.2h,104)
(1.2g,104)
Segnale radio (1.2h,104)
Radiosignaal (1.2h,104)
4.
Page 3 (1.3,104)
4.
Pagina 3 (1.3,104)
- Alarm/fault (1.3a,104)
4.
pagina 3 (1.3,104)
- Allarme/anomalia (1.3a,104)
- Alarm/fault (1.3b,104)
- Alarm/storing (1.3a,104)
- Allarme/anomalia (1.3b,104)
- Warning/Advise (1.3c,104)
- Alarm/storing (1.3b,104)
- Avvertenza/Avviso (1.3c,104)
- Waarschuwing/Bericht (1.3c,104)
5.
Page 1 (1.1d,104)
5.
Pagina 3 (1.4,104)
- I.C.
engine
water
temperature
5.
Pagina 3 (1.4,104)
- Livello carburante (1.4a,104)
(1.4a,104)
- Brandstofpeil (1.4a,104)
- Temperatura acqua motore termico
- Fuel level (1.4b,104)
- Temperatuur water verbrandingsmotor
(1.4b,104)
- Diesel exhaust ×uid (DEF) level indicator
(1.4b,104)
- Indicatore livello additivo per emissioni
(1.4c,104)
- Niveau-indicator
additief
voor
diesel (DEF) (1.4c,104)
dieseluitstoot (DEF) (1.4c,104)
Display button (1.5,105):
Pulsante display (1.5,105):
Knop display (1.5,105):
- activates display lighting if switched oÓ
- attiva l’illuminazione del display se
- activeert de displayverlichting als deze
- scrolls through pages 0,1,2, 3,4, in display
spento
uitgeschakeld is
- scorre le pagine 0,1,2, 3,4, nel display
- doorbladert de pagina's 0,1,2, 3,4 op het
-
display
Green led (1.6,105)
-
Led verde (1.6,105)
- OÓ: transmitting unit OÓ
- Spento: unità trasmittente spenta
Groen lampje (1.6,105)
- Flashes rapidly : transmitting unit is On
- Lampeggia
velocemente:
l’unità
- Uitgeschakeld: zender uitgeschakeld
and radio-electric connection is OÓ
trasmittente è accesa e il collegamento
- Snel knipperend: de zender is ingeschakeld en
- Flashes slowly: the radio control is acti-
radioelettrico è spento
de radio-elektrische verbinding is uitgeschakeld
vated and the radio-electric connection
- Lampeggia lentamente: il radiocomando
- Traag knipperend: de afstandsbediening is
is present
è avviato e il collegamento radioelettrico
opgestart en de radio-elektrische verbinding is
è presente
aanwezig
Rood lampje (1.7,105)
Led rosso (1.7,105)
Red led (1.7,105)
- Uitgeschakeld: de zender werkt correct
- Spento: unità trasmittente funziona
- OÓ: transmitting unit is working cor-
- Knipperend: de batterij wordt opgeladen
correttamente
rectly
- Aan gedurende 2 seconden: de zender
- Lampeggia:la batteria si sta scaricando
- Flashes :the battery is becoming ×at
werkt niet correct
- Acceso per 2 secondi: l’unità trasmittente
- On for 2 seconds : the transmitting unit is
-
1 keer knipperen: tijdens het inschakelen
non funziona correttamente
not working correctly
neemt de zender waar dat de STOP-knop
- Lampeggia 1 volta: all’accensione l’unità
- Flashes once: when switched on, the
trasmittente rileva che il bottone STOP è
transmitting unit detects that the STOP
geactiveerd of defect is.
attivo o è guasto.
button is active or is faulty.
-
2 keer knipperen: de zender neemt waar
- Lampeggia 2 volte: l’unità trasmittente
- Flashes twice: the transmitting unit de-
dat er een SAFETY-besturing geactiveerd
rileva che un comando di SAFETY è
tects a SAFETY control that is active or
of defect is
attivo o è guasto
faulty
-
3 keer knipperen: tijdens het inschakelen
- Lampeggia 3 volte: all’accensione l’unità
- Flashes three times: when switched on
neemt de zender waar dat de batterij
trasmittente rileva che la batteria è
the transmitting unit detects the ×at bat-
leeg is
scarica
tery
-
4 keer knipperen: de zender neemt waar
- Lampeggia 4 volte: l’unità trasmittente
- Flashes four times: the transmitting unit
dat er een alarmbesturing geactiveerd of
rileva che un comando di allarme è attivo
detects an alarm control that is active or
defect is
o è guasto
faulty
105
1.5
1.6
1.7
1.8
1.10
1.9
2-128
IT
EN
NL
Condizioni di carico,
% , ed allarmi
Load conditions,
%, and alarms
Laadtoestand,
%
,
en alarmen
(1.8,105)
(1.8,105)
(1.8,105)
Barra indicante la percentuale di carico
Bar indicating the percentage load lifted
Balk met het percentage opgeheven lading ten
sollevato rispetto al carico massimo
with respect to maximum load that can be
opzichte van de maximaal ophefbare lading
sollevabile in quelle condizioni di lavoro.
lifted in those operating conditions.
onder die bepaalde werkomstandigheden.
• Riferimento Verde: Zona di Sicurezza.
• Green reference: Safety area.
• Groen: Veiligheidszone.
• Riferimento Giallo: Zona di Allarme.
• Yellow reference: Alarm area .
• Geel: Alarmzone.
• Carico sollevato superiore al 90% del
• Load lifted greater than 90% of
• Opgeheven lading meer dan 90% van
carico ammesso. (avvisatore acustico
permitted load. (external warning
de toegestane lading. (extern akoestisch
esterno attivo)
sound active)
waarschuwingssignaal actief)
• Riferimento Rosso: Zona di Blocco.
• Red reference: Block area.
• Rood: Blokkeringszone.
• Carico sollevato superiore al 100%
• Load lifted greater than 100% of
• Opgeheven lading meer dan 100% van
del carico ammesso. (avvisatore
permitted load. (external warning
de toegestane lading. (extern akoestisch
acustico esterno attivo)
sound active)
waarschuwingssignaal actief)
Spia rossa (1.9,105).
Red indicator light (1.9,105).
Rood controlelampje (1.9,105).
Questa spia se accesa indica:
When On, this indicator indicates that:
Als dit lampje brandt:
- Gli stabilizzatori non sono stati ben
- The stabilisers are not positioned pro-
- Zijn de stabilisatoren niet goed geplaatst.
posizionati.
perly.
- Is het toegangshekje tot het platform
- Il portello di accesso al cestello non è
- The access door to the platform is not
niet perfect gesloten.
stato chiuso perfettamente.
closed properly.
- Is de versnelling van de heftruck
- La marcia del carrello è inserita.
- The truck gear is engaged.
ingeschakeld.
Nota: solo per ORH COUVREUR: le funzioni
Note: for ORH COUVREUR only: the
Opmerking: alleen voor ORH COUVREUR: de
della spia rossa (1.9) sono incluse nella spia
functions of the red indicator (1.9) are in-
functies van het rode lampje (1.9) zijn bij het
gialla (1.10).
cluded in the yellow indicator (1.10).
gele lampje (1.10) inbegrepen.
Spia gialla (1.10,105).
Yellow indicator (1.10,105).
Geel controlelampje (1.10,105).
- Questa spia se accesa indica:
- When On, this indicator indicates that:
- Als dit lampje brandt:
- Spia accesa intermittente + buzzer indica
- Intermittent light + buzzer On light indi-
- Lampje knippert + zoemer geeft aan dat
sistema di sicurezza in blocco.
cates safety system block.
het veiligheidssysteem geblokkeerd is.
- Spia accesa continua indica cestello
- Steady indicator light indicates platform
- Lampje ononderbroken aan betekent
sovraccarico.
overload.
dat de kooi overbelast is.
In caso di sovraccarico del cestello tutti
In case the engine is overloaded
In geval van overbelasting worden alle
i comandi di movimentazione della
all the platform movement
bewegingen van de kooi verhinderd.
piattaforma sono inibiti.
controls are inhibited.
Opmerking: als het lampje gaat branden op
Nota: quando la spia si accende al
Note: when the indicator lights up as soon
het moment dat de kooi stijgt, betekent dit
momento della salita del cestello, questo
as the platform rises, it means there is an
dat deze overbelast is.
signiÐca che siete in sovraccarico.
overload.
Stop de beweging en maak de kooi lichter.
È necessario fermarsi e alleggerire il
Stop and lighten the platform.
cestello.
2-129
IT
EN
NL
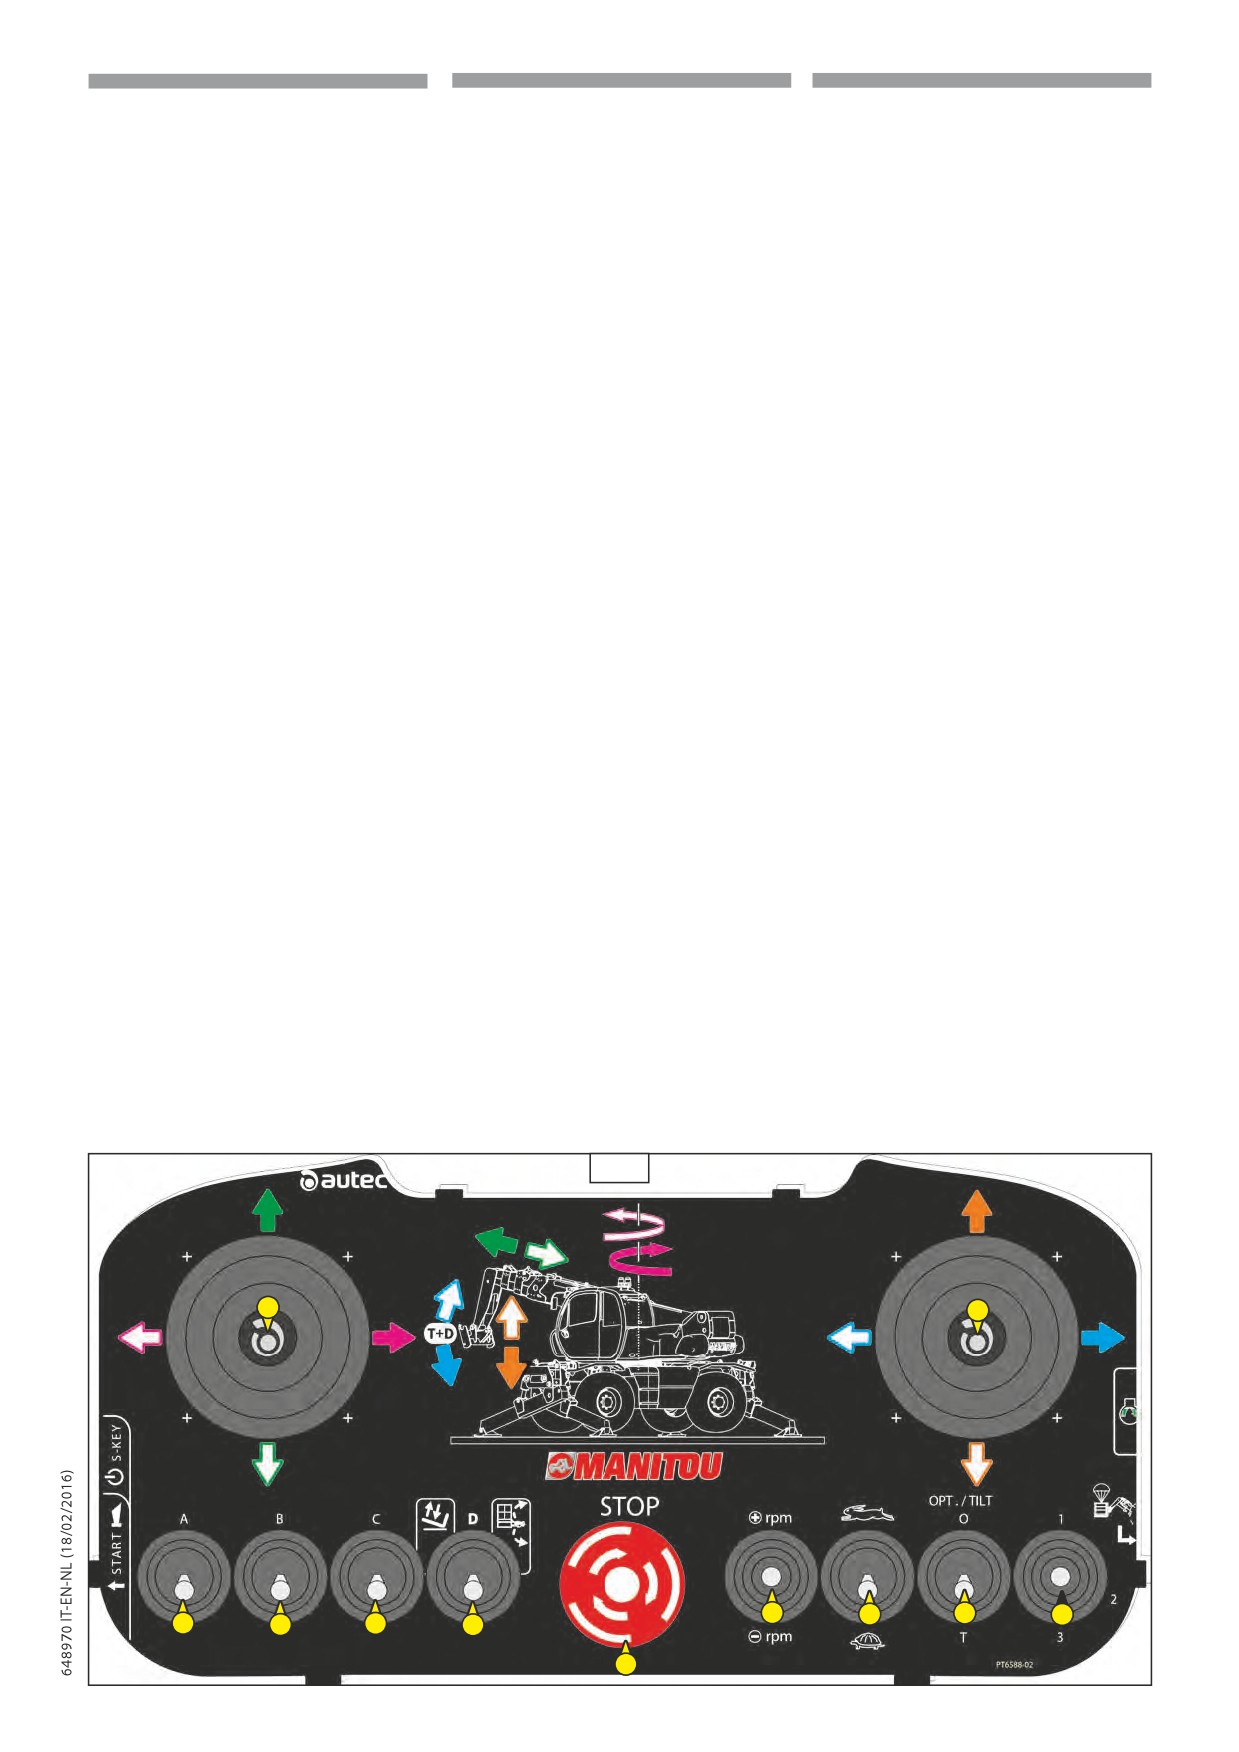
2
JOYSTICK, SELETTORI, PULSANTI
2 JOYSTICK, SELECTORS, MACHINE
2 JOYSTICKS, KEUZESCHAKELAARS, KNOPPEN
FUNZIONI MACCHINA 2,106
FUNCTIONS BUTTONS MACCHINA
VOOR MACHINEFUNCTIES 2,106
(2,106)
2.1 - Manipolatore (2.1,106).
2.1 - Stuurknuppel (2.1,106).
2.1 - Manipulator (2.1,106).
- Azionare il manipolatore per eÓettuare i
- Gebruik de stuurknuppel om de
- Operate the manipulator to make the
movimenti desiderati seguendo le frecce
gewenste bewegingen te maken volgens
required movements by followig the
colorate.
de gekleurde pijlen.
coloured arrows.
2.2 - Commutatore movimenti.
2.2 - Bewegingsschakelaar
2.2 - Movements switch.
- Ad ogni posizione (A-B-C-D) corrisponde
- Bij elke positie
(A-B-C-D) hoort
una coppia di comandi eseguibile
- Each position (A-B-C-D) has a
een paar gelijktijdig uitvoerbare
simultaneamente.
corresponding pair of commands
bedieningen.
(Solo con piattaforma aerea)
(Only with aerial platform)
(alleen met hoogwerkplatform)
(2.1,106).
(2.1,106).
2.3 - Engine RPM accelerator (2.3,106)
2.3 - Acceleratore RPM motore (2.3,106)
2.3 - Motortoerental versneller (2.3,106)
2.4
- Hydraulic movements speed
2.4 - Velocita movimenti idraulici
2.4 - Snelheid hydraulische bewegingen
(2.4,106)
(2.4,106)
(2.4,106)
(depending on the type of installed
(secondo il tipo di accessorio installato)
(afhankelijk van het gemonteerde werktuig)
accessory)
2.5
- Selettore movimento brandeggio
2.5
- Keuzeschakelaar kantelbeweging
2.5 - Slewing movement selector TS
T.S.
(T) o livellamento cesto
(O)
T.S.
(T) of kooinivellering
(O)
(T) or platform levelling (O) (2.5,106)
(2.5,106)
(2.5,106)
2.6 - Movimenti multipli “1-2-3”
2.6
-
Multiple movements
“1-2-3”
2.6 - Meervoudige bewegingen “1-2-3”
(secondo il tipo di accessorio installato)
(depending on the type of installed
(afhankelijk van het gemonteerde
accessory)
werktuig)
3 PULSANTE ROSSO “ARRESTO
3 RODE “NOODSTOP” KNOP (3,106).
D’EMERGENZA” (3,106).
Functies:
3 RED “EMERGENCY STOP” PUSHBUT
Funzioni:
- Maakt het mogelijk de verbrandingsmotor
TON (3,106)
- Permette di arrestare il motore termico.
te stoppen.
Functions:
- In caso di pericolo, permette
- Als er gevaar heerst, kan de gebruiker van
- Makes it possible to stop the I.C.
all’utilizzatore del cestello di tagliare i
de kooi hiermee de vanaf de heftruck
engine.
movimenti comandati dal carrello.
bestuurde bewegingen stopzetten.
- In case of danger, makes it possible for
- Om de bewegingen weer te herstellen, draai
- Per ripristinare i movimenti ruotare il
the person using the platform to
de rode knop rechtsom.
pulsante rosso in senso orario.
disconnect the movements
controlled from the forklift truck.
- To restore the movements, turn the
red pushbutton clockwise.
106
2.1
2.1
2.3
2.4
2.5
2.6
2.2
2.2
2.2
2.2
3
2-130
IT
EN
NL
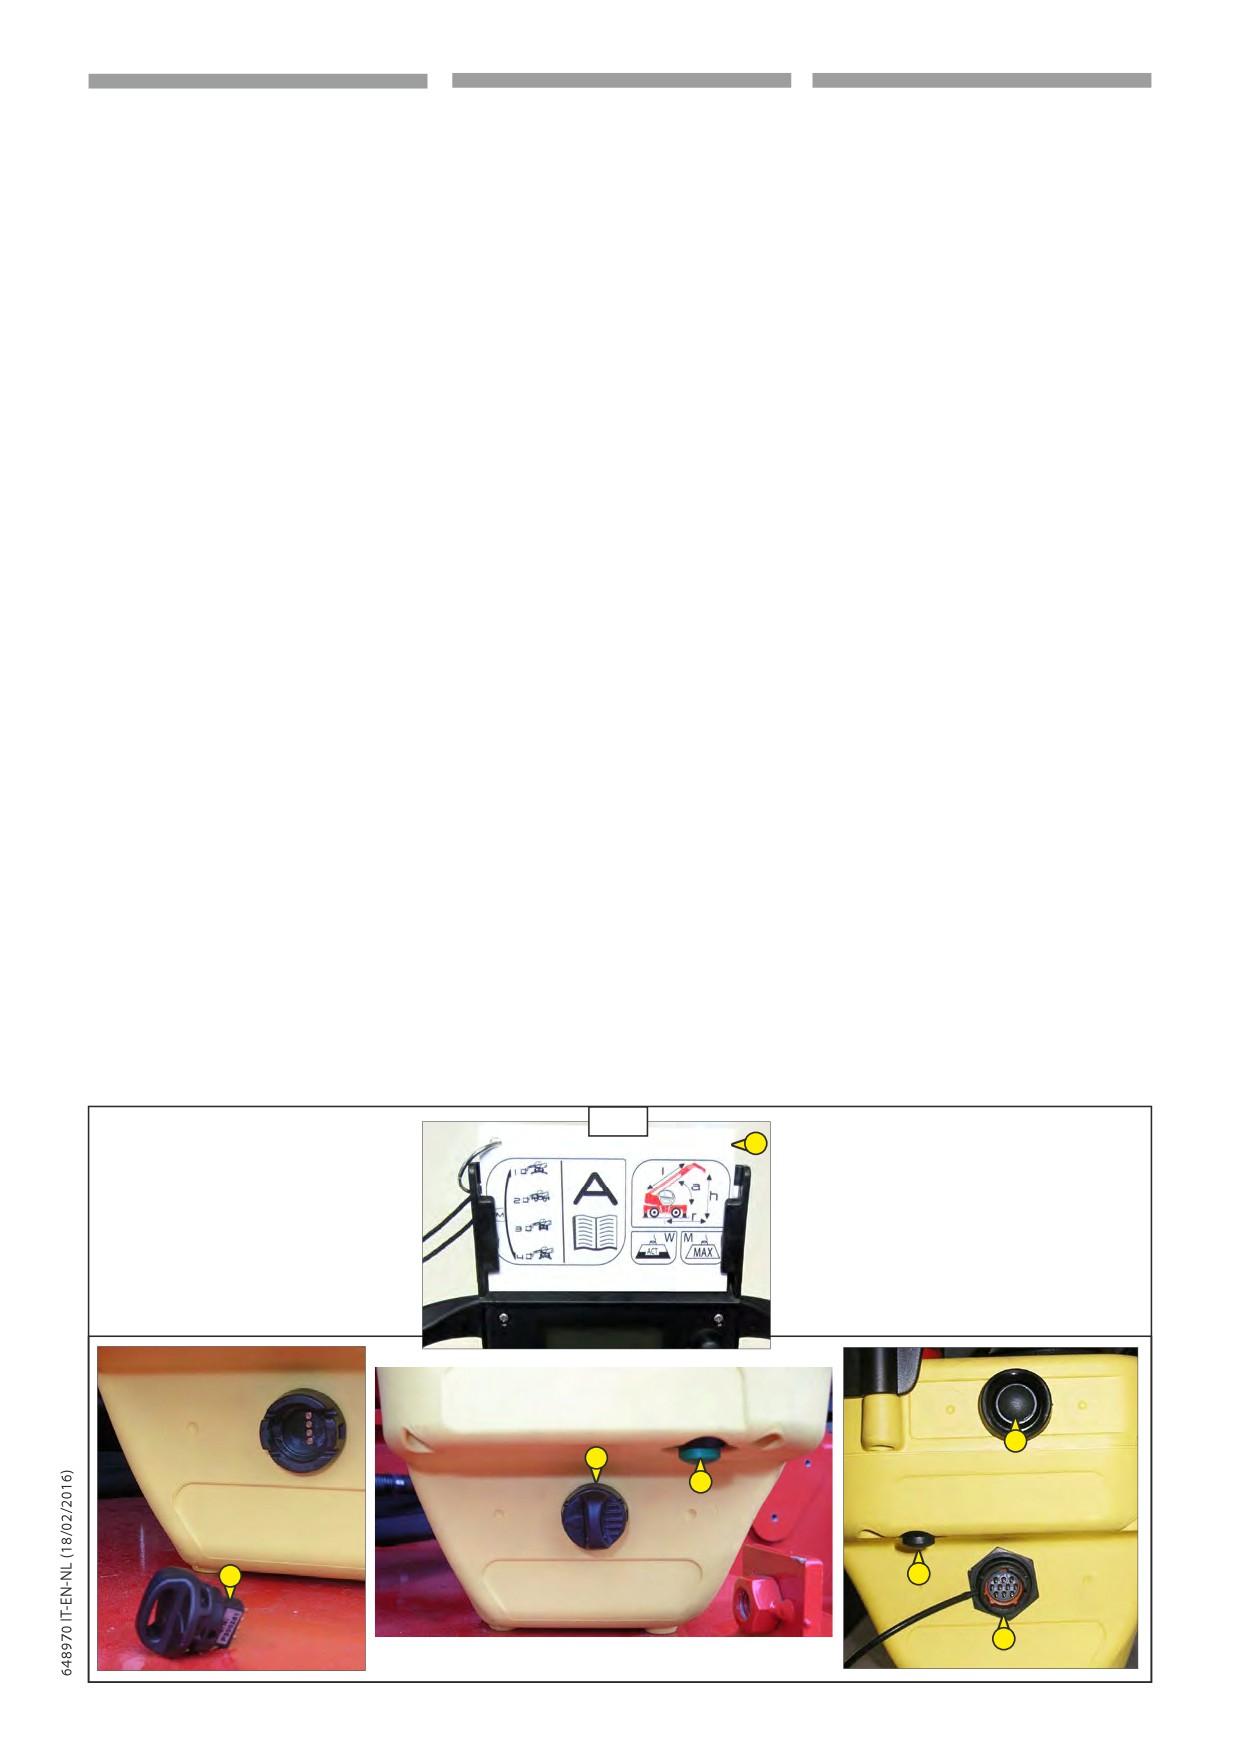
4 S KEY ACCENSIONE
4 S KEY SWITCHING ON RADIO
4 S KEY INSCHAKELEN
RADIOCOMANDO 4,107
CONTROL 4,107
AFSTANDSBEDIENING 4,107
Ruotare la chiave per accendere il
Turn the key to switch on the radio
Draai aan de sleutel om de afstandsbediening
radiocomando. (4.1,107)
control (4.1,107).
aan te zetten. (4.1,107)
Quando non si utilizza il radiocomando
Als de afstandsbediening niet gebruikt wordt,
When the radio control is not being used,
per sicurezza estrarre la S-KEY
is het raadzaam om de S-KEY te verwijderen
remove the S-KEY for safety.
5 AVVIAMENTO MOTORE 5,107 .
5 ENGINE START UP 5,107 .
5 MOTOR STARTEN 5,107 .
-
Prima dell’accensione, occorre
- Before switching on, reset
- Voordat u de motor start, dient u de
far risalire il pulsante di ARRESTO
NOODSTOP-knop omhoog te zetten
the EMERGENCY STOP button (3,107).
D’URGENZA (3,107).
(3,107).
- Press the (6,107) button then press
- Premere il pulsante
(6,107) poi
- Druk op de knop
(6,107) en
(5,107) to switch on the engine.
premere sul pulsante
(5,107) per
vervolgens op de knop (5,107) om de
accendere il motore.
motor te starten.
6 SEGNALATORE ACUSTICO 6,107
6 WARNING SOUND 6,107
6 AKOESTISCH
WAARSCHUWINGSSIGNAAL 6,107
7 PULSANTE ELETTROPOMPA
7 EMERGENCY MOTOR PUMP
7 KNOP ELEKTRISCHE NOODPOMP
D’EMERGENZA PER IL SALVATAGGIO
PUSHBUTTON FOR LOAD RESCUE
VOOR DE REDDINGSPROCEDURE
DEL CARICO 7,107 .
7,107 .
VAN DE LADING 7,107 .
PER RIENTRARE GLI SFILI.
To retract the extensions.
OM DE UITGESCHOVEN ONDERDELEN
- Mantenere premuto il pulsante
- Keep button (7,107) pressed to ope-
IN TE TREKKEN.
(7,107) per azionare la pompa di
rate the rescue pump.
- Houd de knop (7,107) ingedrukt om
salvataggio.
- Carry out only the operations strictly
de reddingspomp te activeren.
- Eseguire solamente le manovre
required to return to the ground.
- Verricht alleen de manoeuvres die
strettamente necessarie per ritornare a
strikt noodzakelijk zijn om naar de
terra.
grond terug te keren.
8 SOCKET FOR CONTROL WIRE
8 PRESA PER FILOCOMANDO
8 CONTACT VOOR DRAADBEDIENING
8,107
8,107
(Only with basket attachment
8,107
(Solo se equipaggiato con piattaforma
equipment)
(Alleen
indien
uitgerust
met
aerea)
hoogwerkplatform)
9 PLATFORM MOVEMENTS CHARTS
9 SCHEDE MOVIMENTI CESTELLO
9 KAARTEN KOOIBEWEGINGEN
9,107
9,107
Change the movements chart
9,107
Cambiare scheda movimenti in base
depending on the attachment installed.
Verwissel de bewegingskaart naargelang
all’accessorio installato.
het gemonteerde werktuig.
107
9
6
4
5
4.1
7
8
2-131
IT
EN
NL
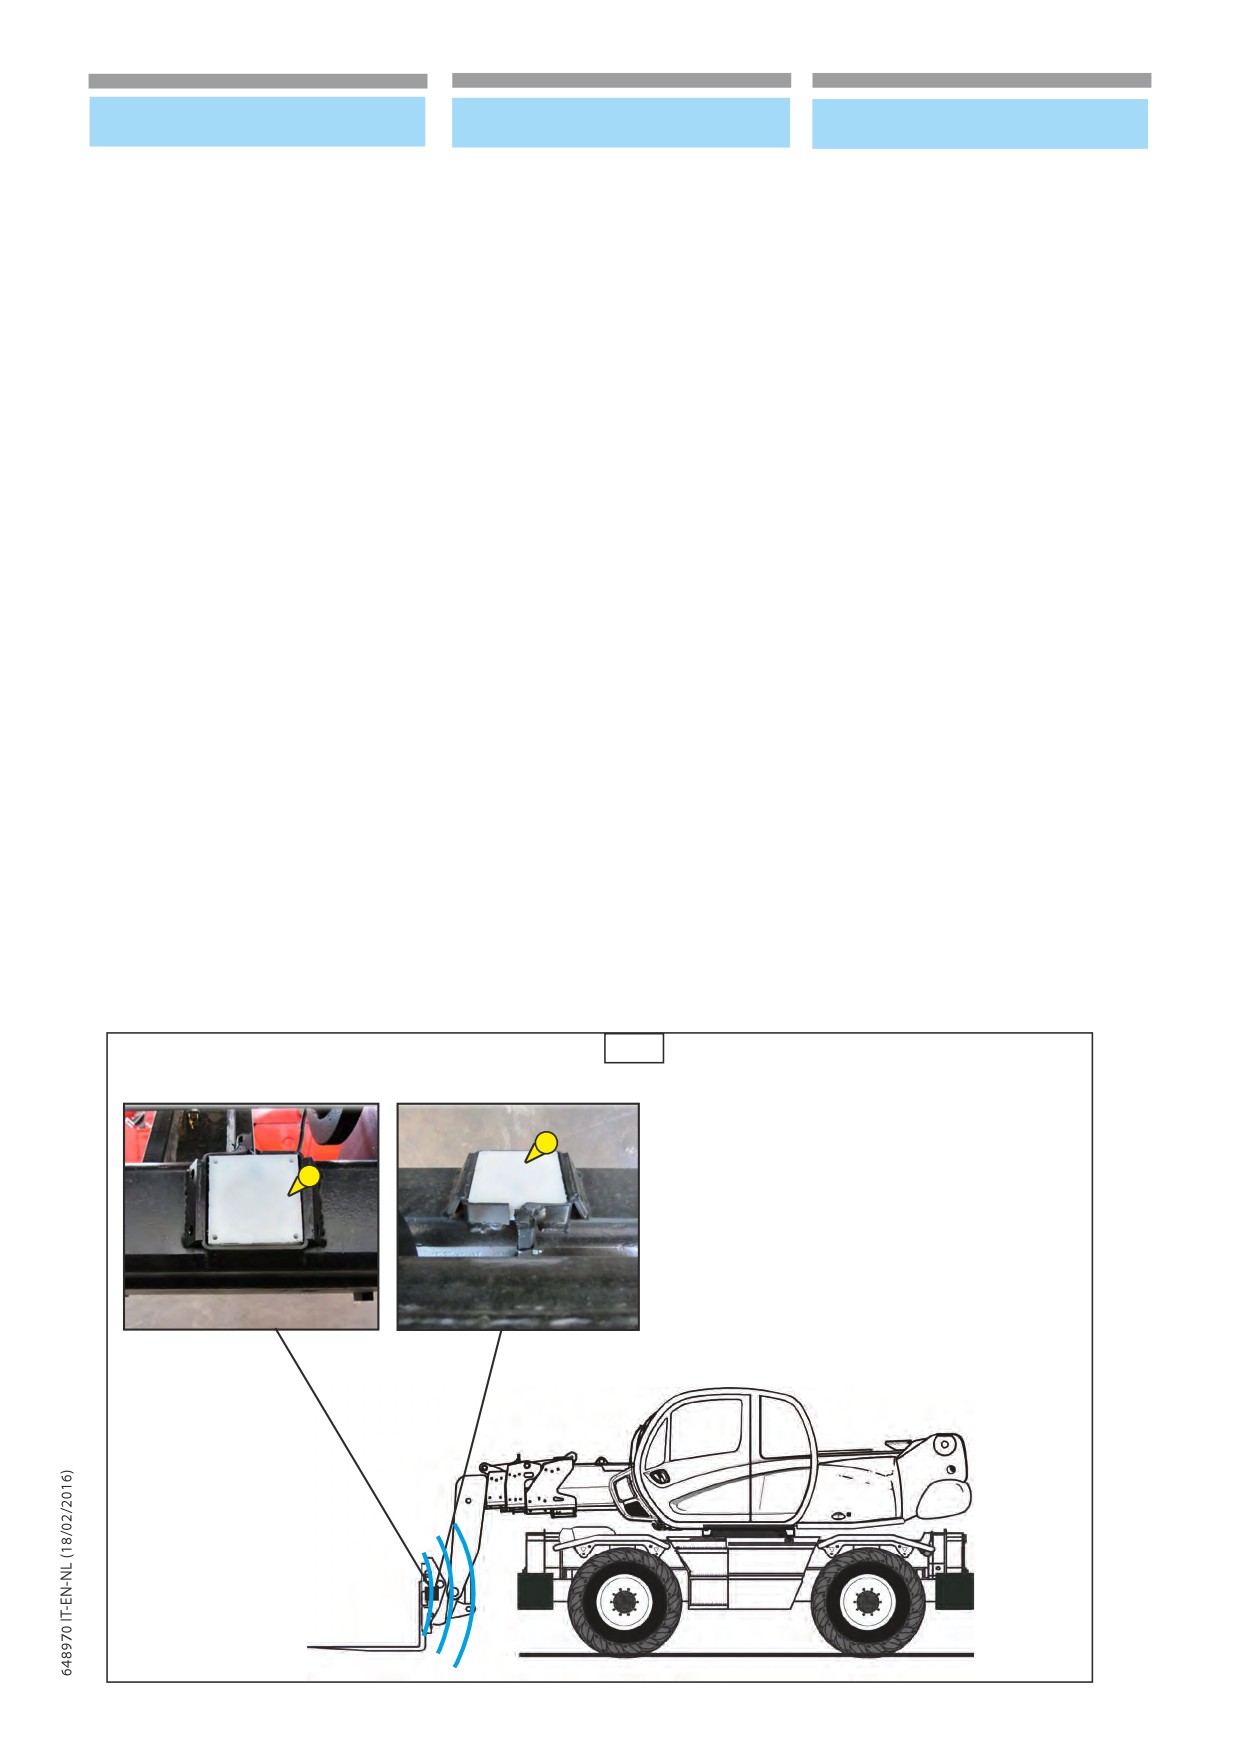
RICONOSCIMENTO AUTOMATICO
“E RECO” ATTACHMENT AUTOMATIC
AUTOMATISCHE HERKENNING VAN HET
DELL’ACCESSORIO “E RECO”
IDENTIFICATION
ACCESSOIRE “E RECO”
La macchina è equipaggiata con un sistema
The machine is equipped with an electronic
De machine is uitgerust met een elektronisch
elettronico di riconoscimento accessorio che
system for the recognition at the time of the hook
herkenningssysteem dat het type accessoire
identifica al momento dell’aggancio il tipo di
attachment that identifies the type of attachment
herkent wanneer het aangekoppeld wordt.
accessorio installato.
installed.
Dit systeem vergemakkelijkt en versnelt
Questo sistema facilita e velocizza le operazioni di
This system facilitates and fast the attachments
de procedure voor het verwisselen van het
cambio accessorio.
change.
toebehoren.
Il sistema è caratterizzato da
2 dispositivi
The systemischaracterizedby twodevices fixedone
Het systeem wordt gekenmerkt door
2
situati uno sul braccio della macchina e uno
on the machine boom and one on the attachment.
elementen, één op de arm van de machine en
sull’accessorio.
één op het toebehoren.
(1,108)
(1,108)
(1,108)
Il
sistema
di
riconoscimento,
dopo
After identification of the attachment type and its
Na de herkenning van het type toebehoren
l’identificazione del tipo di accessorio e la
confirm by the operator, the recognition system
en de bevestiging van de bestuurder, stelt het
conferma dell’operatore, imposta la macchina
sets the machine to operate with the attachment
herkenningssysteem de machine in om met het
per operare con l’accessorio agganciato. Questa
hooked.
aangekoppelde werktuig te werken. Dit is de
modalità è definita automatica.
This mode is defined automatically.
automatische modaliteit.
Tuttavia la macchina può operare con
De machine kan evenwel ook met een
una accessorio privo di dispositivo di
However the machine can operate with an
toebehoren zonder het herkenningssysteem
identificazione ma in questo caso è
attachment without identification device but in
werken. In dit geval is de bestuurder
responsabilità dell’operatore identificare e
this case it is the responsibility of the operator
verantwoordelijk voor het identificeren
confermare il tipo di accessorio agganciato.
identify and confirm the type of attachment
van het aangekoppelde toebehoren en de
Questa modalità è definita manuale.
hooked.
bevestiging ervan. Dit is de handmatige
This mode is defined manual.
modaliteit.
108
1
1
2-132
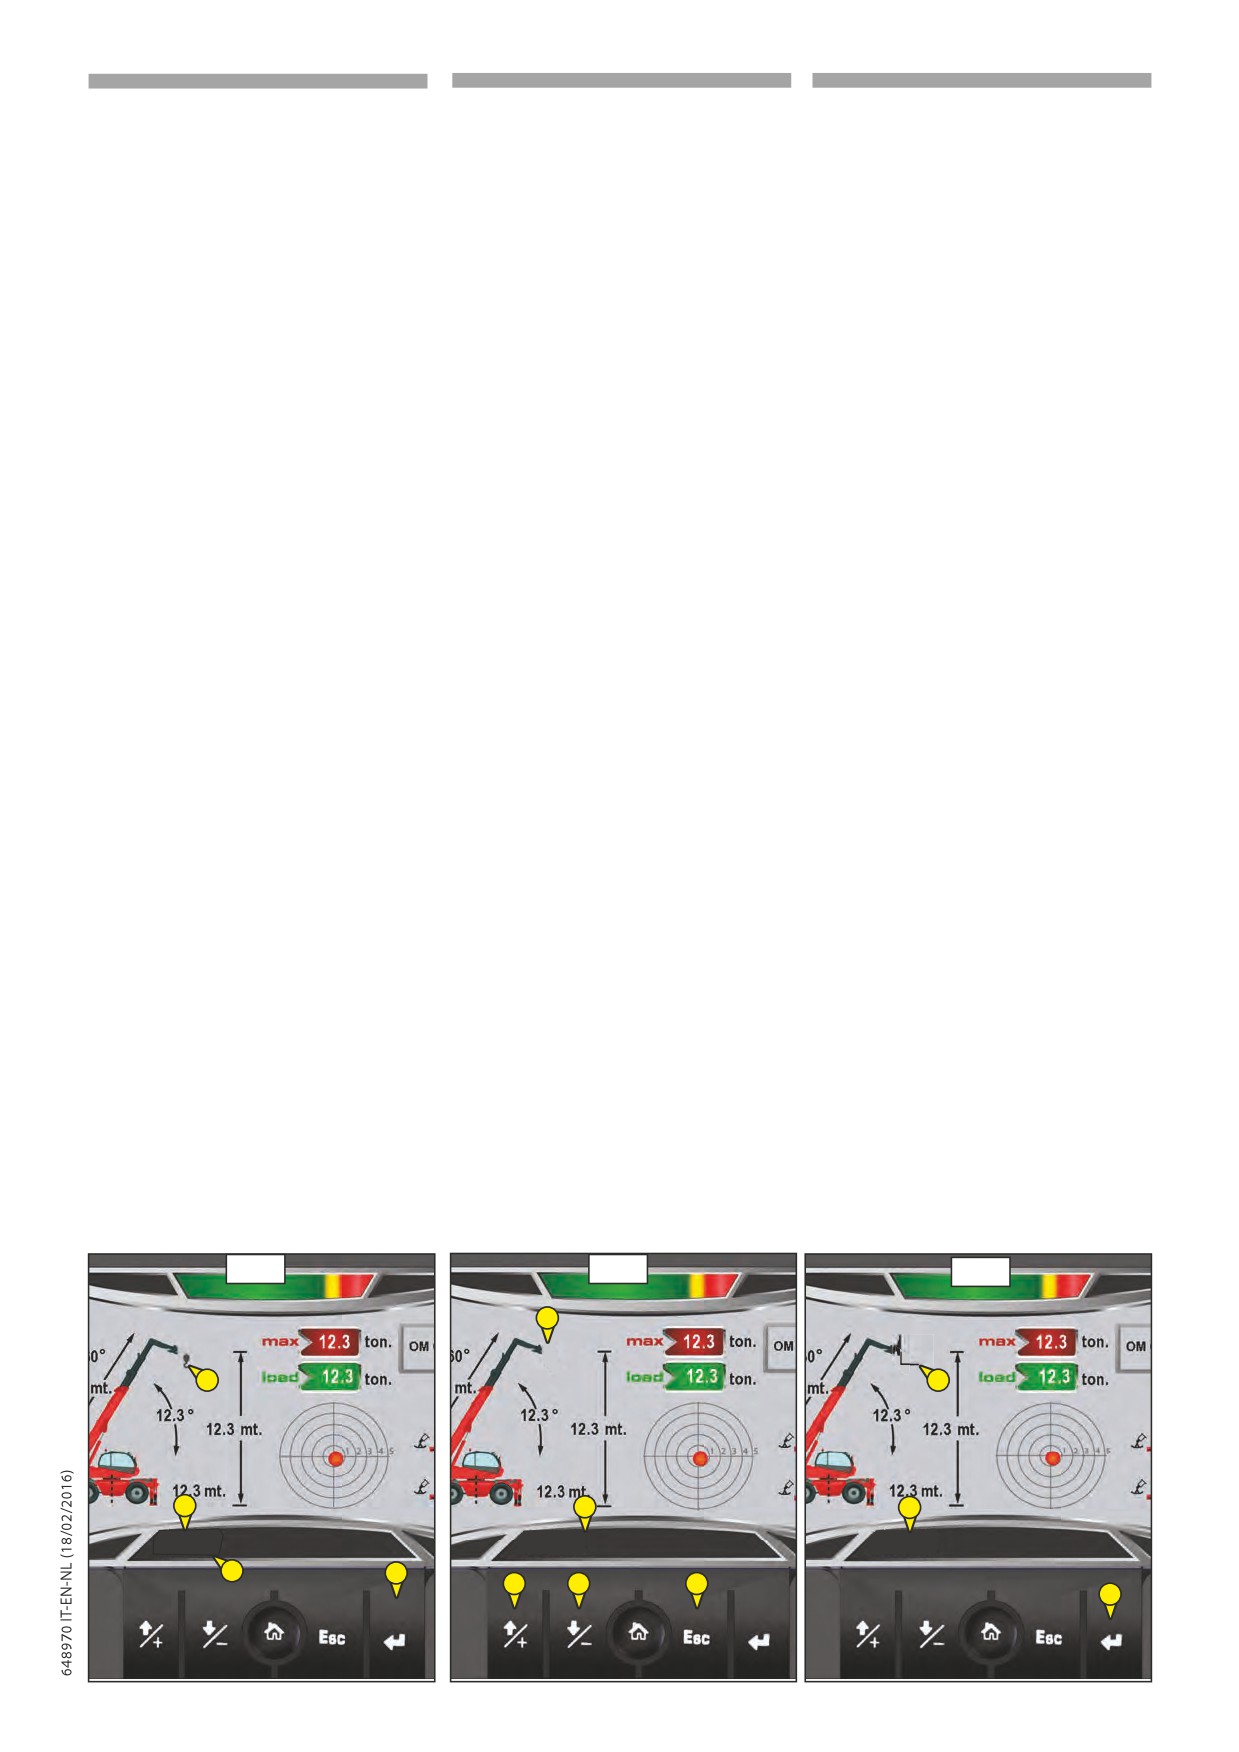
IT
EN
NL
Modalità automatica
Automatic mode
Automatische modaliteit
Immediatamente dopo aver agganciato un
Onmiddellijk nadat u een toebehoren heeft
Immediately after you hooked a attachment
accessorio il sistema di riconoscimento:
aangekoppeld, gaat het herkenningssysteem
recognition system:
- identifica il tipo di accessorio (2),
als volgt te werk:
- Identifies the type of attachment (2),
- richiede all’Operatore di confermare
(1)
- het herkent het type toebehoren (2),
che l’accessorio riconosciuto sia quello
- Requires to the Operator to confirm (1) that
- het verzoekt te bestuurder om te
realmente agganciato sulla macchina,
the recognized accessory is the one properly
bevestigen (1) dat het herkende toebehoren
- premere invio (3) per confermare il tipo di
hooked at the machine,
daadwerkelijk aan de machine gekoppeld is,
accessorio.
- Press enter (3) to confirm the attachment
- druk op enter (3) om het type toebehoren te
type
bevestigen.
(109)
(109)
(109)
Manual mode
Modalità manuale
Handmatige modaliteit
Immediatamente dopo aver agganciato un
Immediately after hooking an attachment
Onmiddellijk nadat u een toebehoren zonder
accessorio privo del dispositivo di identificazione,
without the identification device, the
identificatiesysteem heeft aangekoppeld, gaat
il sistema di riconoscimento:
recognition system:
het herkenningssysteem als volgt te werk:
- non riconosce l’accessorio agganciato,
- does not recognize the attachment hooked,
- het herkent het aangekoppelde toebehoren niet,
- l’Operatore deve selezionare il tipo di
- the Operator must select the attachment type
- de bestuurder moet het type toebehoren
accessorio agganciato sulla macchina.
dat aan de machine gekoppeld is selecteren.
hooked at the machine.
L’operatore deve selezionare
De operator moet
The operator must select manually the
manualmente il tipo di accessorio
het type toebehoren dat geïnstalleerd is
installed attachment type, as follows:
installato, come segue:
als volgt handmatig selecteren:
- premere ESC
(1) per uscire dalla
- druk op ESC
(1) om de modaliteit
modalità “empty”(2) [nessun accessorio
- Press ESC (1) to exit from mode“Empty” (2)
“empty”(2)
te
verlaten
[geen
agganciato],
toebehoren aangekoppeld],
[no attachment hooked]
(
110)
(110)
(110)
- premere le frecce su/giu (3) per selezionare
- Press the up / down (3) to select the
- druk op de pijlen omhoog/omlaag (3) om het
l’accessorio che si è agganciato (4),
aangekoppelde toebehoren te selecteren (4),
attachment that it has hooked
(4),
- confermare l’accessorio, premere invio (5).
- Confirm the attachment, press enter
(5).
- bevestig het toebehoren, druk op enter (5).
(111)
(111)
(111)
Nota: in modalità
“empty” la macchina può
Note: in “empty” mode, the machine can
Opmerking; in de modaliteit
“empty” kan de
muovere il braccio ma con una portata massima di
move the telescopic boom but with a
machine de arm bewegen, doch met een maximaal
sollevamento
hefvermogen
maximum lifting cacity setted at
fissata a 500kg.
van 500 kg.
500kg.
In entrambe le modalità: è
In beide modaliteiten: is de
Inbothmodes: is the responsibility
responsabilità
dell’operatore
bestuurder er verantwoordelijk
of the operator to ensure that
p
voor te controleren of het
p
assicurarsi
che l’accessorio
p
the attachment is hooked and
aangekoppelde toebehoren dat
agganciato e visualizzato sul
view on the display is that
op het display wordt weergegeven
display sia quello identi cato
identi ed from the recognition
hetzelfde is als datgene wat
dal sistema di riconoscimento
door het herkenningssysteem
system or manually selected.
o selezionato manualmente.
herkend
wordt
of
met
de hand geselecteerd is.
Your safety or the safety
Sono in gioco la vostra sicurezza
of the lift truck is at risk.
e quella del carrello elevatore.
Uw eigen veiligheid en die van
de heftruck staan op het spel.
Any bending
may cause
L’inosservanza
potrebbe
malfunction of your machine
Het niet in acht nemen kan
provocare
malfunzionamenti
and damage to property
storingen aan de heftruck
al vostro carrello elevatore e
veroorzaken,
schade
aan
and people close to the
danni a cose e persone vicine
voorwerpen en letsels
aan
working area of the machine.
all’area di lavoro della macchina.
personen die zich in de
buurt van het werkgebied
Respect the procedures described
Rispettare le procedure sopra
van de machine bevinden.
above.
descritte.
Volg
de
bovenstaande
procedures.
109
110
111
2
2
4
2
2
4
Conferma Winch
Bevestigen
Vuoto
Empty
Leeg
Conferma
Forks
Bevestigen
argano
Confirm
lier
forche
Confirm
vorken
1
3
3
3
1
5
2-133
IT
EN
NL
PERNO E GANCIO DI TRAINO
PIN AND TOWING HOOK
TREKSTANG EN TREKHAAK
Posto sulla parte posteriore del carrello elevatore,
Aan deze inrichting die aan de achterkant van de
This hook, provided on the rear part of the forklift
questo dispositivo permette di agganciare un
heftruck zit, kan een aanhanger wordt gehangen.
truck, is used for towing a trailer. For every forklift
rimorchio. Per ogni carrello elevatore, la capacità
De capaciteit wordt voor elke heftruck beperkt
truck, the capacity is limited to the total permitted
è limitata dal peso totale circolante autorizzato,
door het toegestane totale rijdende gewicht, de
circulating weight, by the towing force and the
dallo sforzo di trazione e dallo sforzo verticale
trekkracht en de maximale verticale spanning op
maximum vertical force on the hooking point.
massimo sul punto di aggancio.
het aanhaakpunt.
- Per utilizzare un rimorchio, consultare la
- Raadpleeg voor het gebruik van een aanhanger
- To use a trailer, consult the regulations in force in
regolamentazione vigente nel vostro paese
de in uw land geldende regelgeving (maximale
the country of use (maximum travelling speed,
(velocità massima di marcia, frenaggio, peso
rijsnelheid, remming, maximaal gewicht van de
braking, maximum weight of trailer, etc.).
massimo del rimorchio, ecc.).
aanhanger enz.).
- Check the state of the trailer, before using it
- Controllare lo stato del rimorchio, prima di
- Controleer de staat van de aanhanger vóór
(condition and pressure of the types, electric
utilizzarlo
(stato e pressione dei pneumatici,
gebruik (staat en druk van de banden, elektrisch
socket, hydraulic hose pipe, braking system…).
presa elettrica, flessibile idraulico, sistema
contact, hydraulische slang, remsysteem enz.).
di frenaggio…).
Trek geen aanhanger of
Non trainare un rimorchio o un
Do not use a trailer or an
toebehoren
die
niet
in
accessorio che non sia in perfetto
attachment that is not in perfect
p
perfecte staat van werking
p
stato di funzionamento. L’utilizzo
p
working condition. Using a trailer
verkeert. Het gebruik van een
di un rimorchio in cattivo
that is in poor condition can
aanhanger in slechte staat
stato potrebbe causare danni
cause damage to the direction
zou de stuurinrichting en de
ai dispositivi di direzione e di
and braking devices of the
remming van de heftruck
frenaggio del carrello elevatore,
forklift truck, and thereby a ect
en dus de veiligheid van het
e
quindi
compromettere
the safety of the assembly.
geheel
kunnen aantasten.
la
sicurezza
dell’insieme.
Indien een persoon buiten de
Qualora le operazioni di
If
the trailer hooking and
truck helpt bij het aanhangen
aggancio o di sgancio del
unhooking operations are done
of loshalen van de aanhanger,
rimorchio fossero e ettuate da
by another person, the latter
un’altra persona, quest’ultima
moet deze persoon voortdurend
must be visible to the truck driver
dovrà
obbligatoriamente
zichtbaar blijven voor de
and must wait for the telescopic
rimanere visibile dal conduttore
bestuurder en wachten tot
lift to come to a standstill, the
e aspettare, prima di intervenire
de heftruck is gestopt, de
service brake to be pulled and
sul rimorchio, che Il sollevatore
parkeerrem is aangetrokken en
telescopico sia fermo, il freno
the I.E. engine to be switched o
de verbrandingsmotor is afgezet
di servizio tirato e il motore
before acting on the trailer.
alvorens met de aanhanger aan
termico spento.
de slag te gaan.
NOTA: Un retrovisore posteriore permette un
NOTE: A rearview mirror at the back allows the
OPMERKING: Met een achteruitkijkspiegel kan de
approccio più preciso del carrello elevatore
forklift truck to approach the trailer ring
heftruck de ring van de aanhanger
verso l’anello del rimorchio.
more accurately.
op een nauwkeurigere wijze
benaderen.
A - FORCELLA DI AGGANCIO
A - HOOKING FORK
A - AANKOPPELINGSPLAAT
AGGANCIO E SGANCIO DEL RIMORCHIO
HOOKING AND UNHOOKING TRAILER
AANHANGEN EN LOSHALEN VAN DE AANHANGER
- Per l’aggancio, avvicinare Il sollevatore
- To hook up, bring the telescopic lift as close to
- Zet voor het aanhangen de heftruck zo dicht
telescopico il più possibile all’anello del
the trailer ring as possible.
mogelijk bij de ring van de aanhanger.
rimorchio.
- Pull the parking brake and switch off the I.C.
- Trek de parkeerrem aan en stop de
- Tirare il freno di stazionamento e spegnere il
engine.
verbrandingsmotor.
motore termico.
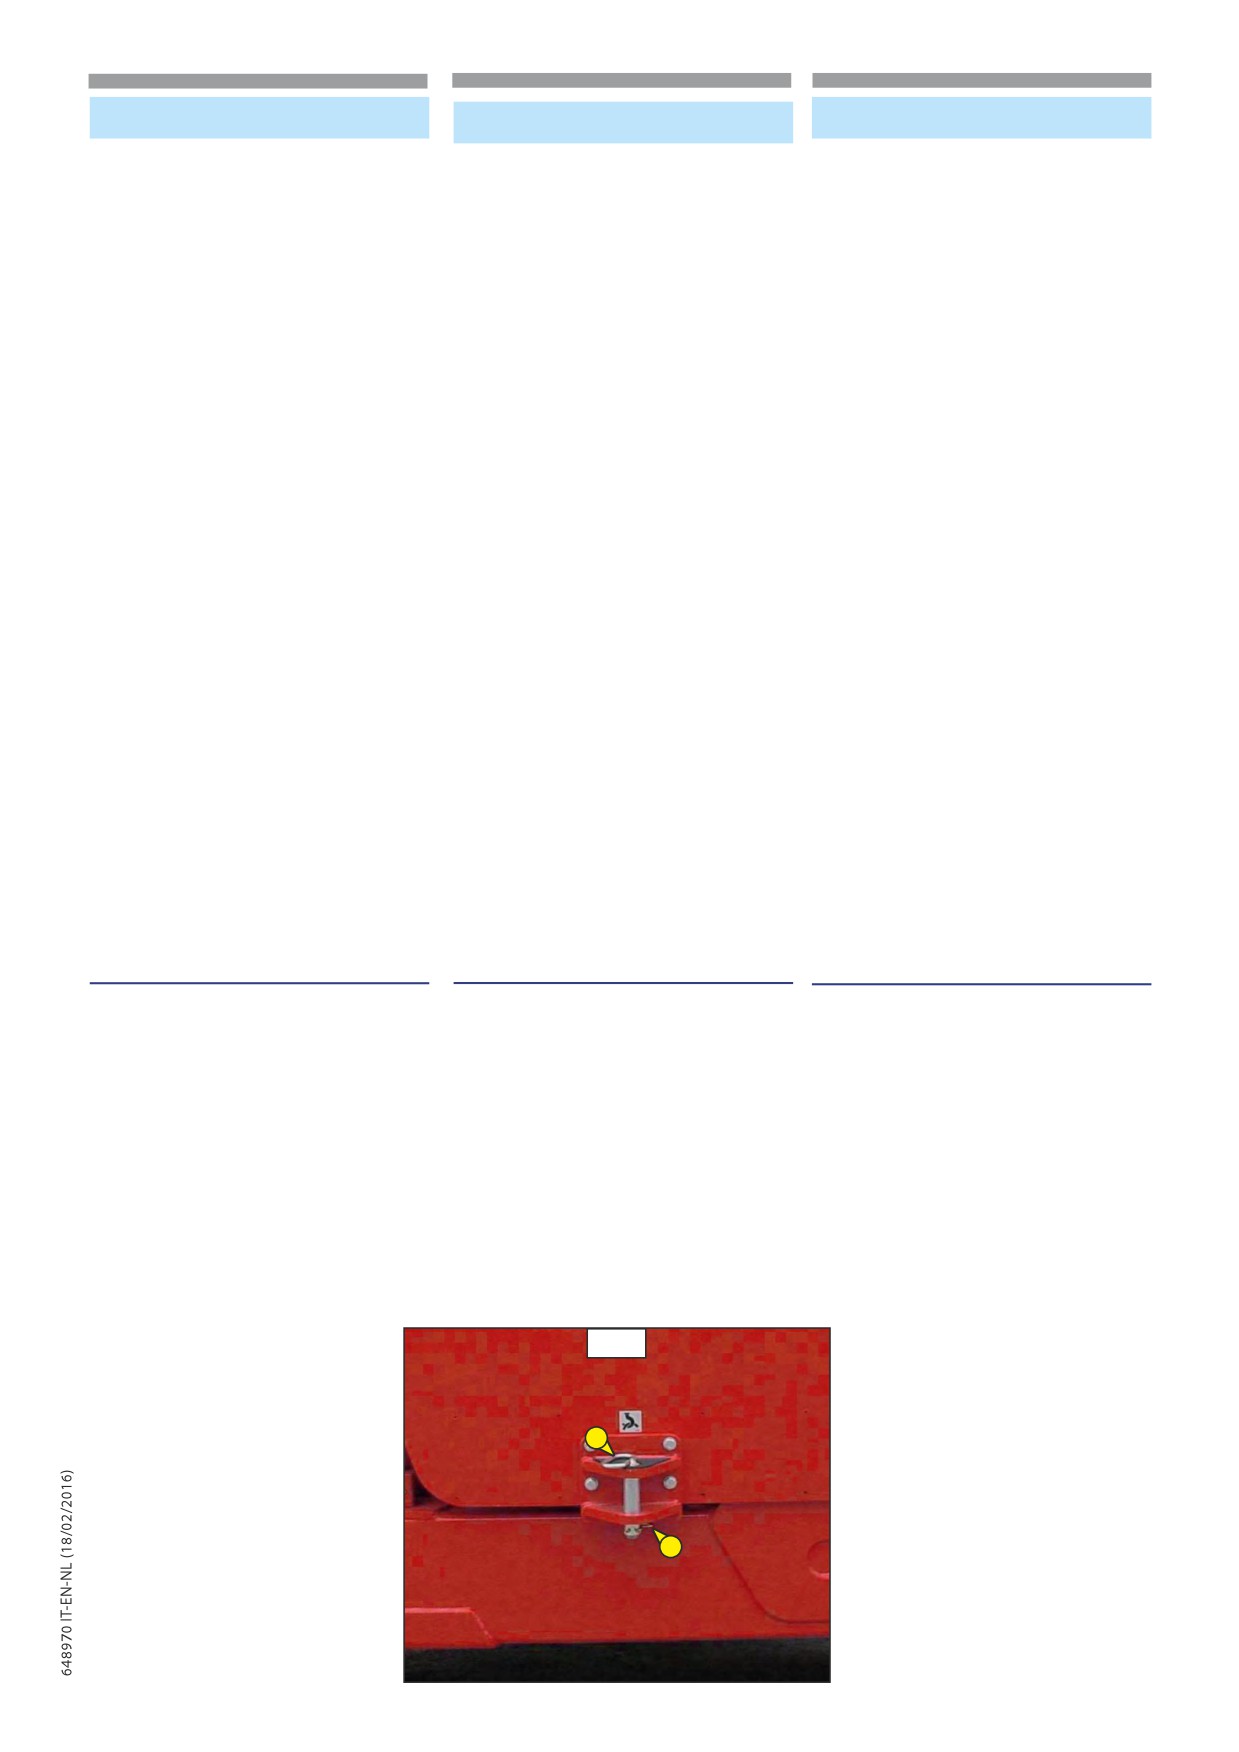
- Remove split pin 1, raise towing pin 2, and
- Haal pin 1 weg, til trekstang 2 op en zet de ring
- Rimuovere la coppiglia 1, alzare il perno di traino
position or remove the ring of the trailer.
van de aanhanger erop of haal hem eraf.
2, e posizionare o togliere l’anello del rimorchio.
(112)
(112)
(112)
Let bij dit manoeuvre op het gevaar
Attenzione
ai
rischi
di
van bekneld raken of pletten.
pizzicamento o di schiacciamento
Caution! Risk of pinching or
p
Vergeet
niet
om pin
p
durante
la
manovra.
crushing during the maneuver.
1
terug
te
zetten.
Non
dimenticare
di
p
Remember to re t the split pin
Controleer bij het loshalen van
rimettere la coppiglia
1.
1. When released, make sure the
de aanhanger of deze zelfstandig
Allo sgancio, assicurarsi che il
trailer stands by itself..
kan blijven staan.
rimorchio si sostenga da solo.
112
2
1
2-134
IT
EN
NL
SCALA PIEGHEVOLE PER LA
FOLDING LADDER
VOUWLADDER VOOR
MANUTENZIONE
INSTALLATION FOR
ONDERHOUD
MAINTENANCE
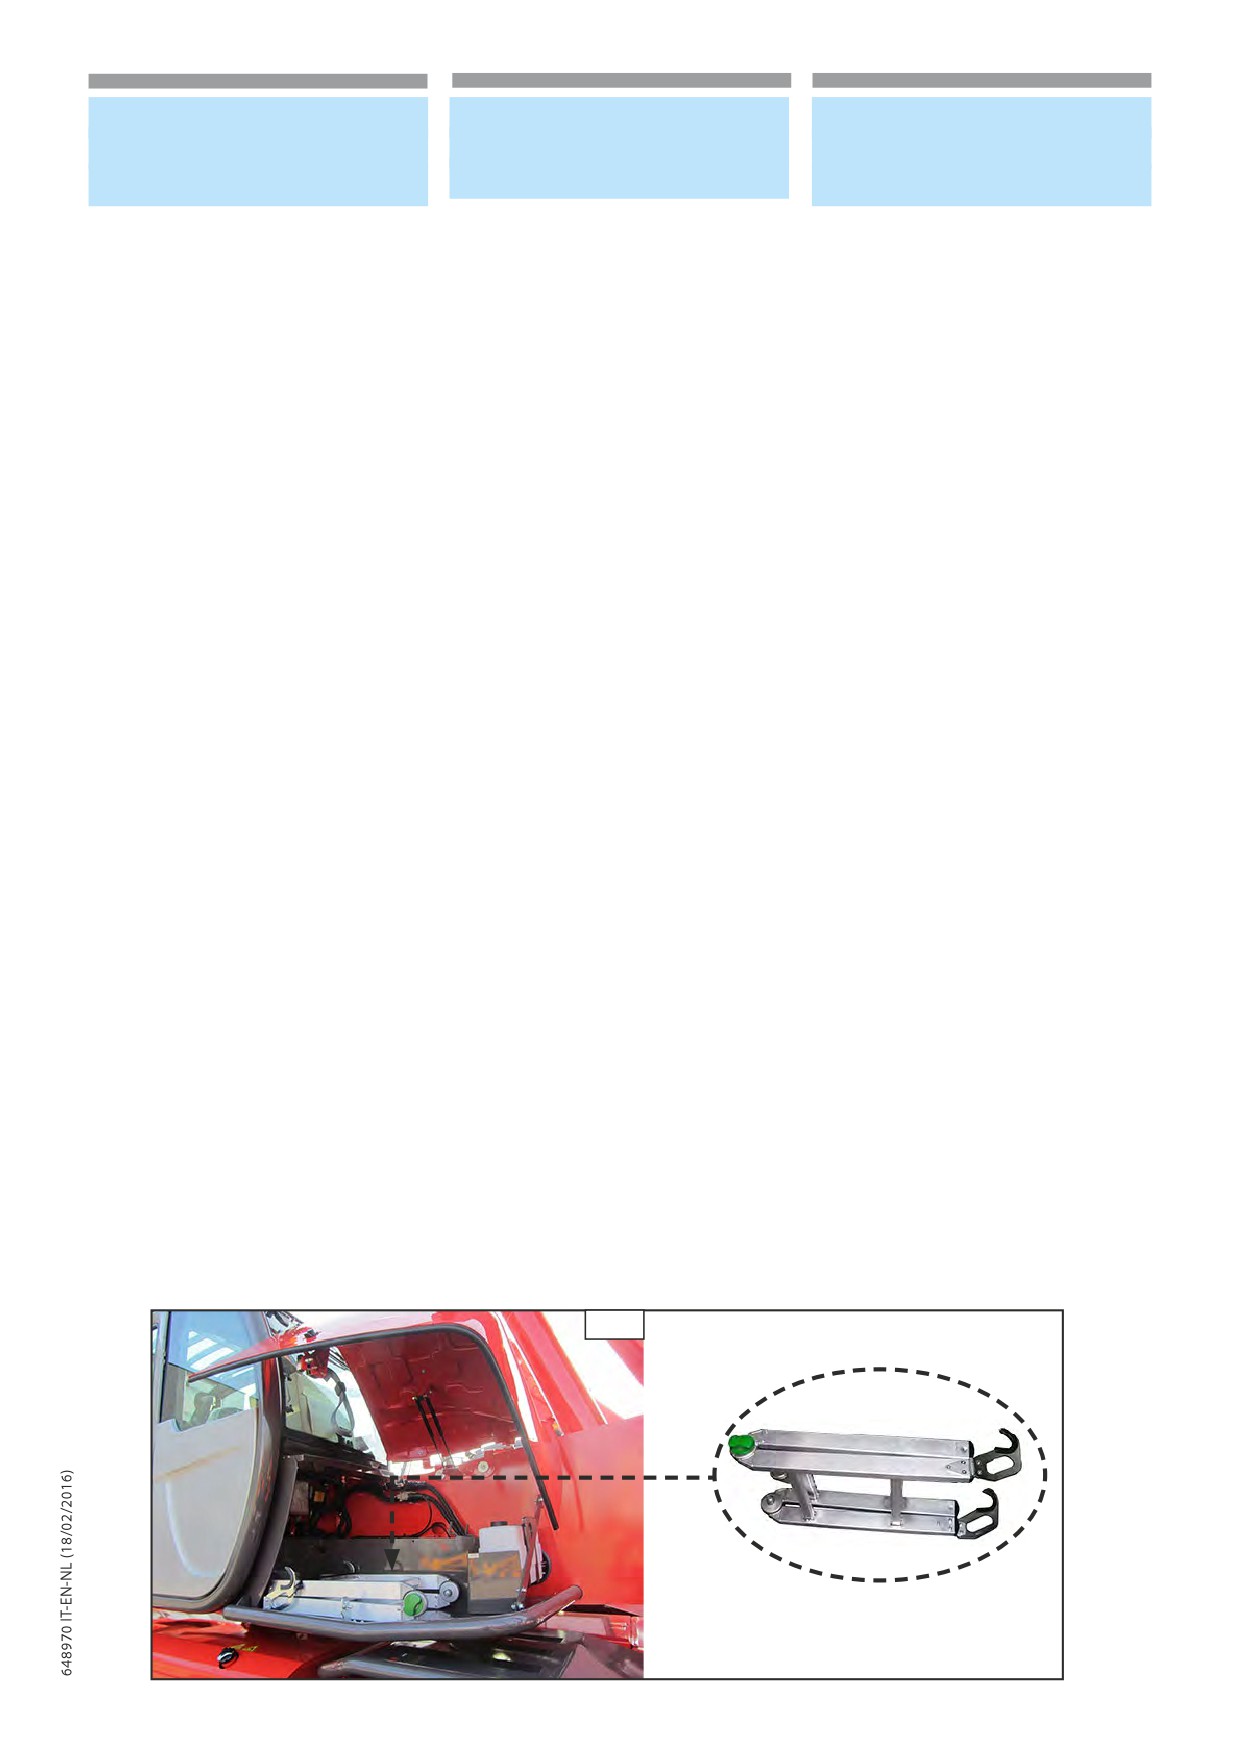
The truck is equipped with an ladder
Il carrello elevatore è dotato di una scala mobile a
De heftruck is uitgerust met een vouwladder met
snap that is placed back cab .
scatto che è posta dietro la cabina.
kliksysteem achter de cabine.
If necessary, in case of maintenance
Se necessario, in caso di interventi di
Indien
nodig
in
geval
van
interventions install the ladder on the
manutenzione installare la scala sulla parte
onderhoudswerkzaamheden, plaats de ladder op
walkway of the machine.
calpestabile della macchina.
het betreedbare gedeelte van de machine.
(see chapter : 1- OPERATING AND SAFETY
(vedere capitolo: 1 - ISTRUZIONI e NORME DI
(zie hoofdstuk: 1 - VEILIGHEIDSVOORSCHRIFTEN).
SICUREZZA).
INSTRUCTIONS).
(113)
(113)
(113)
113
2-135
IT
EN
NL
SALITA E DISCESA DAL
GET ON AND GET OFF THE
IN EN UIT HET VOERTUIG
VEHICLE
VEICOLO
STAPPEN
The truck is equipped with a staircase to the
Il carrello elevatore è dotato di una scala di
De heftruck is uitgerust met een ladder onder de
accesso al posto guida posta sotto la cabina.
driver’s seat placed under the cabin.
cabine voor toegang tot de bestuurdersplaats.
All’interno della cabina sono posizionate tre
Inside the cabin are positioned three handles to
In de cabine bevinden zich drie handgrepen om
maniglie per agevolare la salita e la discesa dal
facilitate the get on and get off the lift truck.
het in- en uitstappen vlotter te doen verlopen.
carrello elevatore.
USCITA D’EMERGENZA
EMERGENCY EXIT
NOODUITGANG
All’interno della cabina è presente un martello di Inside the cabin there is an emergency hammer.
In de cabine bevindt zich een noodhamer.
emergenza.
Use emergency hammer to break one of the
Gebruik de noodhamer voor het breken van een
Utilizzare il martello di emergenza per rompere
windows when it is not possible to get off from
van de ramen wanneer het niet mogelijk is de
uno dei vetri qualora fosse impossibile uscire dalla
the cabin door or the rear window.
cabine te verlaten via de deur of de opening van
porta della cabina o dall’apertura del lunotto.
de achterruit.
2-136
3 -MANUTENZIONE
MAINTENANCE
ONDERHOUD
IT
EN
NL
Pezzi di ricambio e dotazioni originali
Manitou original spare parts and equi-
Oorspronkelijke vervangingsdelen en
Manitou
pment
uitrustingen van Manitou
La manutenzione dei nostri carrelli elevatori
Our forklift trucks must be serviced using
Het onderhoud van de heftrucks moet
deve essere obbligatoriamente realizzata
original Manitou parts.
absoluut verricht worden met oorspronkelijke
con pezzi originali Manitou.
vervangingsdelen van Manitou.
If you use parts which are not original
Autorizzando l’utilizzo di pezzi non originali
MANITOU parts, you risk:
Indien u toestaat dat andere onderdelen dan
Manitou si rischia:
oorspronkelijke Manitou onderdelen gebruikt
worden, loopt u het risico:
L’utilizzo di pezzi contraffatti o
The use of counterfeit parts or compo-
Het gebruik van nagemaakte
di componenti non omologati dal
nents not approved by the manufacturer
onderdelen of componenten die niet
fabbricante fa decadere il diritto alla
means you lose the right to the con-
door de fabrikant zijn erkend, doet de
garanzia contrattuale.
tractual guarantee.
contractuele garantie vervallen.
-giuridicamente di essere responsabili in
- legally - being responsible in the event of
- dat op juridische vlak uw aansprakelijkheid
caso di incidente.
an accident.
wordt ingeroepen in geval van een ongeluk.
- tecnicamente di causare malfunzionamenti
- technically - causing operating failure or
- dat er op technische vlak storingen
o di ridurre la vita utile del carrello
shortening the working life of the forklift
optreden in de werking of dat de
elevatore.
truck.
levensduur van de heftruck verkort wordt.
By using original Manitou parts for main-
Utilizzando i pezzi originali Manitou nelle
tenance operations, you will benefit from
Als u originele stukken van Manitou gebruikt
operazioni di manutenzione, beneficerete
the expertise that Manitou offers clients
tijdens de onderhoudswerkzaamheden, kunt u
delle competenze avanzate tramite la
through its network.
genieten van de geavanceerde vaardigheden
propria rete, Manitou offre all’utente,
- know-how and competence.
dat Manitou aan de gebruiker aanbiedt,
- zijn know-how en vaardigheid.
- esperienza e competenze.
- the guarantee of high-quality work.
- de garantie van de kwaliteit van de
- garanzia per la qualità dei lavori realizzati.
- original spare parts.
uitgevoerde werkzaamheden.
- pezzi di ricambio originali.
- help with preventive maintenance.
- originele vervangingsdelen.
- un aiuto per la manutenzione preventiva.
- bijstand bij het preventieve onderhoud.
- efficient help with diagnostics.
- efficiënte hulp bij het stellen van een
- un aiuto efficace per la diagnostica.
- improvements due to experience fee-
diagnose.
- miglioramenti grazie all’acquisizione di
dback.
- verbeteringen die kunnen worden
esperienza.
- operator training.
doorgevoerd dankzij de feedback.
- formazione del personale.
- only the Manitou network has detailed
- opleidingen voor het personeel van de
exploitant.
- solo la rete Manitou conosce in dettaglio
knowledge of the design of the forklift
- alleen het Manitou-netwerk kent in detail
il progetto del carrello elevatore e ha
truck and therefore the best technical abili-
het ontwerp van de heftruck en beschikt
quindi le migliori competenze tecniche
dus over de beste technische capaciteiten
ty to provide maintenance.
per garantirne la manutenzione.
om het onderhoud uit te voeren.
I pezzi di ricambio originali sono
De vervangingsdelen zijn uitsluitend
distribuiti esclusivamente da Manitou e
Original spare parts are distributed
beschikbaar bij Manitou en zijn netwerk
dalla rete di concessionari.
exclusively by Manitou and its dealer
van dealers.
L’elenco della rete di concessionari
network.
De lijst met dealers is beschikbaar op de
è disponibile sul sito Manitou www.
The dealer network list is available on
website van Manitou www.manitou.com.
Manitou.com.
the Manitou website www.Manitou.com.
3-3
IT
EN
NL
LISTA DELLE OPERAZIONI DA
LISTS OF THE OPERATION TO BE
LIJST MET HANDELINGEN DIE
EFFETTUARE PER IL:
CARRIED OUT FOR THE FIRST COUPON:
UITGEVOERD MOETEN WORDEN VOOR:
1° TAGLIANDO OBBLIGATORIO
1° COUPON OBLIGATORY
1ste VERPLICHTE KEURING
MOTORE TERMICO
ENGINE
VERBRANDINGSMOTOR
-Pulizia filtro aria
-Clean air filter
-Luchtfilter reinigen
-Controllo tenute: iniezione
-Tightness check: injection
-Controle
afdichtingen:
alimentazione
power supply
inspuiting
-Controllo circuito raffreddamento
-Check cooling circuit
-Controle koelcircuit
-Controllo tensione cinghia
-Check belt(s) tension
-Controle riemspanning
TRASMISSIONE IDROSTATICA
HYDROSTATIC TRANSMISSION
HYDROSTATISCHE TRANSMISSIE
-Sostituire filtro olio
-Replace the oil filter
-Oliefilter vervangen
-Pulizia filtro ritorno
(secondo
-Clean Return filter (as for
-Retourfilter reinigen
(volgens
montaggio)
assembly)
montage)
-Controllo livello olio
-Check oil level
-Controle oliepeil
-Controllo registrazione comando
-Check transmission inching control
-Controle afstelling inching-
inching
adjustment
bediening
PONTI / SCATOLA CAMBIO
AXLES / TRANSFER BOX
BRUGGEN / VERSNELLINGSBAK
-Sostituzione olio differenziale
/
-Change differential / brake housing
-Olie differentieel
/ remcarter
carter freni
-Change oil of reduction gears
vervangen
-Sostituzione olio riduttori
-Lubrication of pivots, hinges
-Olie vertragingen verversen
-Ingrassaggio perni, articolazioni e
and controls
-Pennen,
geledingen
en
comandi
-Oscillation lubrication
bedieningselementen invetten
-Ingrassaggio oscillazione
-Change transfer box oil
-Oscillatie invetten
-Sostituzione olio scatola cambio
-Olie versnellingsbak verversen
CIRCUITO IDRAULICO
HYDRAULIC CIRCUIT
HYDRAULISCH CIRCUIT
-Cambio filtro ritorno
-Change return filter(s)
-Retourfilter vervangen
-Controllo livello olio
-Check oil level
-Controle oliepeil
-Controllo tenuta valvole
-Valves seal check
-Controle afsluiting kleppen
CIRCUITO DI FRENATURA
BREAKING CIRCUIT
REMCIRCUIT
-Controllo funzionamento del
-Check service brake operation
-Controle van de werking van de
freno di servizio e parcheggio
-Check brake fluid level (as for
voetrem en de handrem
-Controllo livello liquido del freni
assembly)
-Controle van het vloeistofniveau
(secondo montaggio)
van de remmen (volgens montage)
3-4
IT
EN
NL
BRACCIO TELESCOPICO
BOOM UNIT
TELESCOPISCHE ARM
-Ingrassaggio degli sfili
-Lubrication of telescope(s)
-Uitschuivingen invetten
-Ingrassaggio di tutti gli assi
-Lubrication of all pivot pins
-Alle geleidingsassen invetten
d’articolazione
-Wear pads adjustment +
-Controle bevestiging glijstukken
-Verifica del serraggio dei pattini di
tightness
scorrimento
SISTEMA DI SICUREZZA
SAFETY SYSTEM
VEILIGHEIDSSYSTEEM
MANISCOPIC
MANISCOPIC
MANISCOPIC
-Verifica del funzionamento
-Check operation
-Controle van de werking
ACCESSORI / OPZIONI
ACCESSORIES / OPTIONS
TOEBEHOREN / OPTIES
-Verifica del funzionamento
-Check operation
-Controle van de werking
CABINA
CAB
CABINE
-Verifica
del
cruscotto,
-Check control panel and all
-Controle van het dashboard
e di tutti gli strumenti.
instruments check and control,
en van alle instrumenten.
Controllo
e
comandi,
heating and air conditioning
Controle bedieningselementen
riscaldamento e climatizzatore (se
verwarming en klimaatregelaar
presente)
(indien aanwezig)
CIRCUITO ELETTRICO
ELECTRIC CIRCUIT
ELEKTRISCH CIRCUIT
-Controllo livello batteria
-Battery level checking
-Controle accupeil
-Funzionamento illuminazione
-Lighting operation
-Werking van de verlichting
RUOTE
WHEELS
WIELEN
-Verifica serraggio delle ruote
-Wheel nut tightness
-Controle bevestiging wielen
-Controllo
pressione
dei
-Tyre pressures
-Controle bandenspanning
pneumatici
INGRASSAGGIO GENERALE
GENERAL LUBRICATION OF
ALGEMENE SMEERBEURT
DELLA MACCHINA
MACHINE
VAN DE MACHINE
FUNZIONAMENTO DELLA
TEST OF MACHINE
WERKING VAN DE
MACCHINA
-Hydraulic test with nominal load
MACHINE
-Funzionamento idraulico con
-Driving test: steering and
-Hydraulische werking met
carico nominale
breaking
nominale belasting
-Prova su strada: sterzatura e
-Proeven op de weg: sturen en
frenatura
remmen
3-5
IT
EN
NL
LISTA DELLE OPERAZIONI DI
LIJST
MAINTENANCE OPERATIONS LIST
MANUTENZIONE
ONDERHOUDSWERKZAAMHEDEN
- 1° Tagliando obbligatorio (Pagina 7)
- 1ste verplichte keuring (Pagina 7)
- 1° Rapport de revision obligatoire (page 7)
- Elementi filtranti e cinghie (Pagina 9)
- Filterelementen en drijfriemen (Pagina 9)
- Elements filtrants et courroies (page 9)
- Lubrificanti (Pagina 12)
- Smeermiddelen (Pagina 12)
- Lubrificants (page 12)
A - TUTTI I GIORNI O OGNI 10 ORE DI
A - DAILY OR EVERY 10 HOURS SERVICE
A - DAGELIJKS OF OM DE 10 WERKUREN
FUNZIONAMENTO
A1 - Controllo del livello dell’olio nel
A1 - Checking the engine oil level
A1 - Het peil van de olie in de motor
motore
A2 - Check the coolant level
controleren
A2 - Controllare il livello del liquido di
A3 -Check greasing of telescopic boom
A2
- Het peil van de koelvloeistof
raffreddamento
sliding blocks
controleren
A3 - Controllare i pattini del braccio
A4 - Inspection of the safety system
A3 - De glijschoenen van de telescopische
telescopico
A5 - Check the fuel level
arm controleren
A4 - Verifica del sistema di sicurezza.
A6 - Check the “DEF” level
A4 - Controle van het veiligheidssysteem
A5 - Controllare il livello del combustibile
A5 - Het peil van de brandstof controleren
A6 - Controllare il livello di liquido DEF
A6 - Het peil van de DEF-vloeistof controleren
B - OGNI 50 ORE DI FUNZIONAMENTO
B - EVERY 50 HOURS OF SERVICE
B - OM DE 50 WERKUREN
B1 - Controllare livello olio idraulico
B1 - Check the hydraulic and
B1 - Het niveau van de hydraulische olie
B2 - Controllare pressione pneumatici e
transmission oil level
controleren
serraggio dadi ruote
B2 - Check the pressure and wheel nut
B2 - De spanning van de banden en de
B3 - Pulire griglia del radiatore dell’olio
torque
aandraaiing van de moeren van de
dell’acqua, dell’intercooler
B3 - Clean the oil radiator and water-in-
wielen controleren
B4 - Pulire e ingrassare pattini d’usura
tercooler grille.
B3 - Het rooster van de radiator
del braccio telescopico
B4 - Clean and grease the telescopic
schoonmaken
B5 - Ingrassare il perno di articolazione
boom pads
B4 - De slijtageschoenen van de
del braccio telescopico
B5 - Grease the telescopic boom articu-
uitschuifbare arm schoonmaken en
B6 - Ingrassare il perno di articolazione
lation pivot
smeren
dell’attacco rapido
B6 - Grease the quick-release coupling
B5 - De draaipin van de uitschuifbare
B7 - Ingrassare i perni del martinetto
pivot
arm schoonmaken en smeren
inclinazione forche lato stelo e lato
B7 - Grease the pivots of the rod side
B6 - De draaipin van de snelkoppeling
fondello
and bottom side forks inclination
schoonmaken en smeren
B8 - Ingrassare i perni del martinetto di
cylinder
B7 - De assen van de poot en de kop
sollevamento lato fondello e lato
B8 - Grease the bottom disk side and rod
van de hellingsvijzel van de vorken
stelo
side lift jack pivots.
schoonmaken en smeren
B9 - Ingrassare i perni del martinetto di
B9 - Grease the bottom disk side and rod
B8 - De assen van de poot en de kop van de
compensazione lato fondello e lato
side compensation cylinder pivots.
hefvijzel schoonmaken en smeren
stelo
B10 - Grease the front and rear cross
B9 - De pennen van de compensatiecilinder
B10 - Ingrassare crociere e cardani
journals and transmission shaft uni-
aan de onderkant en aan de kant van
dell’albero di trasmissione lato
versal joints.
de stang smeren
anteriore e posteriore
B11 - Grease the anterior/posterior pins
B10 - De kruisstukken en de cardans van de
B11 - Ingrassare i perni anteriori/
on the feet, stabilizers inclination
overbrengingsas aan de voorkant en
posteriori dei piedi, dei martinetti
cylinders (bottom and rod side)
aan de achterkant smeren
d’inclinazione stabilizzatori (lato
and the pins of the stabilizer beams
B11 - De pennen van de voorkant
fondello e stelo) e i perni delle
B12 - Grease the pins of bottom and rod
en van de achterkant van
travi stabilizzatori
side levelling cylinders
de hellingsvijzels van de
B12 - Ingrassare i perni del martinetto
B13
- Lubricate the turret rotation
stabilisatoren (aan de onderkant
di livellamento lato fondello e lato
blocking pivot
en de kant van de stang) en de
stelo
B14 - Clean and lubricate the turret’s
pennen van de balken van de
B13 - Ingrassare il perno di blocco
fifth wheel coupling
stabilisatoren insmeren
rotazione
torretta
tramite
B15
- Check the windscreen washer
B12 -De assen van de poot en de kop
l’ingrassatore sotto la scaletta
liquid level
van de nivelleringsvijzel smeren
B14 - Pulire e lubrificare la ralla di
B16 - Check/clean the condenser grille
B13 -De zwenkvergrendelingspen van
rotazione torretta
(Optional Air conditioning)
de zwenkkop via de smeerpot
B15 - Controllare il livello del liquido
B17 - Clean the cab external ventilation
onder het trapje smeren
lavacristallo
filter (optional air conditioning)
B14 - Het draaistel van de zwenkkop
B16 - Contro/pulire la griglia del
B18 - Emptying the fuel pre-filter with
schoonmaken en smeren
condensatore
(Optional
water separator (if necessary)
B15 - Hetpeil vande ruitenwasservloeistof
Climatizzazione)
B19 - Lubricate the pins of front and rear
controleren
B17 - Pulire il filtro di ventilazione
wheel final drives
B16 - Het rooster van de condensator
esterno della cabina
(optional
controleren en schoonmaken
climatizzazione)
(optional airconditioning)
B18 - Pulire il pre-filtro carburante con
B17 - De externe ventilatiefilter van de
separatore di acqua (se necessario)
cabine schoonmaken
(optional
B19 - Lubrificare i perni dei riduttori di
airconditioning)
ruote anteriori e posteriori
B18 - De brandstofvoorfilter
met
waterafscheider schoonmaken
(indien nodig)
B19 - De pennen van de vertragers van de
voor- en achterwielen smeren
3-6
IT
EN
NL
C - OGNI 250 ORE DI FUNZIONAMENTO
C - EVERY 250 HOURS SERVICE
C - OM DE 250 WERKUREN
C1 - Controllare livello olio differenziale
C1- Check the oil level in the front
C1 - Het peil van de olie van de differentiaal
assale anteriore e posteriore
and rear axle differential
van de voor- en achterassen controleren
C2 - Het peil van de olie van de vertragers van
C2 - Controllare livello olio riduttori
C2 -
Check the oil level in the front
de voor- en achterwielen controleren
ruote anteriori e posteriori
and rear wheel final drives
C3 - Het peil van de olie van de
C3 - Controllare livello olio scatola
C3 -
Check the gear box oil level
versnellingsbak controleren
cambio
C4 - De accu controleren
C4 - Check the batteries
C4 - Controllare batteria
C5 - De olie van de rotatievertrager
C5 - Swing reduction unit oil control
C5 - Controllare olio riduttore
controleren
rotazione
C6 - Check, clean and lubricate the
C6 - De externe kettingen van de arm
C6 - Controllare, pulire e lubrificare le
outer chains of telescopic boom
controleren, schoonmaken en
smeren
catene esterne del braccio
C7 - Check fixing screws rotation
C7 - Control eren
of
de
C7 - Controllare serraggio viti fissaggio
reducer
bevestigingsschroeven van de
riduttore rotazione
C8 - Clean and grease the cab door
rotatievertrager goed vastgedraaid zijn
C8 - Pulire e ingrassare le cerniere della
pivots lubricators
C8 - De scharnieren van het portier van
portiera cabina
de cabine schoonmaken en smeren
D - OGNI 500 ORE DI FUNZIONAMENTO
D - EVERY 500 HOURS SERVICE OR
D - OM DE 500 WERKUREN OF 6
O 6 MESI
6 MONTH
MAANDEN
ISPEZIONE MACCHINA
MACHINE INSPECT OPERATION
INSPECTIE MACHINE
D1 - Sostituire il filtro dell’olio della
D1 - De oliefilter van de hydrostatische
D1 - Replace the oil filter of hydrostatic
pompa idrostatica (trasmissione)
pomp vervangen (overbrenging)
D2 - Sostituire cartuccia filtro olio
pump (transmission)
D2 - Het patroon van de filter van de
hydraulische olie vervangen (leeg)
idraulico (scarico)
D2 -Replace the hydraulic oil filter
D3 - Het luchtgat van de hydraulische
D3 - Pulire sfiato olio idraulico e
cartridge
olie
en de overbrenging
trasmissione
D3 -Replace the hydraulic and
schoonmaken
D4 - Sostituire cartuccia filtro in
D4 - Het patroon van de toevoerfilter
transmission oil vent
mandata circuito principale
van het hoofdcircuit vervangen
D5 - Manutenzione motore
D4 -Replace the filter cartridge on the
D5 - Onderhoud motor
D5/1 - Cambio dell’olio e sostituzione
main circuit delivery
D5/1 - De olie verversen en de filter
del filtro
vervangen
D5 - Engine maintenance
D5/2 - Controllo dell’usura e della
D5/2 - Controle van de slijtage
D5/1 - Oil and filter change
en de aanwezigheid van
presenza di danni sulla cinghia
trapezoidale a nervature
D5/2 - Check the poly-V-belt for wear
beschadigingen op de v-snaar
D5/3 - Brandstofvoorfilter en
D5/3 - Prefiltro del carburante e filtro
and damage
brandstoffilter: de patronen
del carburante: sostituzione
D5/3 - Fuel prefilter and fuel filter:
van de filters vervangen
della cartuccia dei filtri
replace filter elements
D5/4 - Brandstofvoorfilter met
D5/4 - Prefiltro del carburante
waterafscheider: de
D5/4 - Fuel prefilter with water separa-
con separatore d’acqua:
brandstoffilterpatroon
sostituzione della cartuccia del
tor: replace fuel filter element
vervangen.
filtro del carburante.
D6 - Check the bolts that fix the fifth
D6 - De schroefbouten voor de
D6 - Controllare i bulloni di fissaggio
bevestiging van het draaistel en
wheel coupling and turret
ralla e torretta
de zwenkkop controleren
E - OGNI 1000 ORE DI FUNZIONAMENTO
E - EVERY 1000 HOURS SERVICE
E - OM DE 1000 WERKUREN OF 1 JAAR
O 1 ANNO
OR 1 YEAR
E1 - Sostituire olio idraulico e
E1 - De hydraulische olie en olie van de
trasmissione
E1 - Change the hydraulic and transmis-
overbrenging verversen
E2 - Sostituzione delle cartucce filtro di
sion oil
E2 - De patronen van de aanzuigfilter
van de hydraulische installatie
aspirazione impianto idraulico
E2 - Replacing the hydraulic system
vervangen
E3 - Sostituire olio differenziale assale
suction filter cartridges
E3 - De olie van de differentiaal van de
anteriore e posteriore
E3 - Change front and rear axle
voor- en achterassen verversen
E4 - Sostituire olio riduttore ruote
differential oil
E4 - De olie van de vertrager van de
anteriore e posteriore
E4 - Change the front and rear wheels
voor- en achterwielen verversen
E5 - Sostituire olio scatola cambio
gear oil
E5 - De olie van de versnellingsbak
E6 - Sostituire la cartuccia del filtro a
E5 - Change the gearbox oil
verversen
secco dell’aria
E6 - Change the dry air filter cartridge
E6 - Het patroon van de droge
luchtfilter vervangen
E7 - Pulire serbatoio combustibile
E7 - Clean the fuel tank
E7 - De brandstoftank schoonmaken
E8 - Controllare l’usura delle catene
E8 - Checkng the external chains
E8 - De slijtage van de externe
esterne del braccio telescopico
for wear
kettingen van de telescopische arm
E8 - Controllare usura pattini del
E9 - Wear of the boom telescopic
controleren
braccio telescopico.
pads
E8 - De slijtage van de glijschoenen van
E9 - Manutenzione riduttore di rotazione
E10 -
Swing reduction unit mainte-
de telescopische arm controleren.
E10 - Verificare l’usura e l’incremento
nance
E9 - Onderhoud van de draaivertrager
del gioco dei cuscinetti della ralla
E11 - Check the bearings of the fifth
E10 - De slijtage en de toename van
de speling van de lagers van het
E11 - Sostituire il filtro carburante del
wheel coupling for wear and
draaistel controleren
serbatoio riscaldamento
play
E11 - De brandstoffilter van de tank van
de verwarming vervangen
3-7
IT
EN
NL
E12 - Controllo e regolazione del gioco
E13 - Check and adjust engine and engi-
E12 - De speling van de kleppen
delle valvole del motore e del
ne brake valve clearance
van de motor en de motorrem
E14 - Cleaning prefilter and replace
freno motore
controleren en regelen
“DEF” filter
E13 - Pulizia del pre-filtro e sostituzione
E13 - De voorfilter schoonmaken en de
E15 - Check the safety belt
del filtro “DEF”
“DEF”-filter vervangen
E14 - Controllare la cintura di sicurezza
E14 - De veiligheidsriem controleren
F - OGNI 2000 ORE DI
F - EVERY 2000 HOURS SERVICE OR
F - OM DE 2000 BEDRIJFSUREN OF 2
FUNZIONAMENTO O 2 ANNI
2 YEARS
JAAR
F1 - Sostituzione del filtro “DEF”
F1 - Replace “DEF” filter
F1 - De “DEF”-filter vervangen
F2 - Pulire il pre-filtro del serbatoio
F2 - Clean the pre-filter tank fuel for
F2 - De voorfilter van de brandstoftank
carburante riscaldamento
heating
van de verwarming schoonmaken
F3 - Controllare pressione pneumatici e
F3 - Check the pressure and wheel nut
F3 - De spanning van de banden en de
serraggio dadi ruote
torque
aandraaiing van de moeren van de
F4 - Pulire
/controllare
la
F4 - Clean/check the air conditioning
wielen controleren
climatizzazione (OPTIONAL)
(OPTIONAL)
F4 - De airconditioning schoonmaken /
controleren (OPTIONAL)
G - OGNI 3000 ORE DI
G - EVERY 3000 HOURS SERVICE OR
G - OM DE 3000 BEDRIJFSUREN OF 3
FUNZIONAMENTO O 3 ANNI
3 YEARS
JAAR
G1 - Sostituire la cartuccia di sicurezza
G1 - Change the dry air filter safety car-
G1 - Het veiligheidspatroon van de
del filtro a secco dell’aria
tridge
droge luchtfilter vervangen
G2 - Sostituzione del liquido di
G2 - Renewing coolant and replace the
G2 - De koelvloeistof en de vloeistof
raffreddamento e della cartuccia di
silicate cartridge
van de silicaatfilter vervangen
silicato
H - MANUTENZIONE OCCASIONALE
H - OCCASIONAL MAINTENANCE
H - OCCASIONEEL ONDERHOUD
H1 - Sostituire una ruota
H1 - Change a wheel
H1 - Een wiel vervangen
H2 - Trainare il carrello elevatore
H2 -Trailing the forklift truck
H2 - De heftruck slepen
H3 - Imbarcare il carrello elevatore
H3 -Sling the lift truck
H3 - De heftruck vastzetten
H4 - Trasportare il carrello elevatore su
H4 -Transport the lift truck on a
H4 - De heftruck op een
un rimorchio
platform
aanhangwagen transporteren
H5 - Regolare i fari anteriori
H5 -Adjust the front headlamps
H5 - De voorlichten regelen
H6 - Far controllare e pulire gli anelli
H6 - Have the rotary electrical slip rings
H6 - De overbrengingsringen van de
trasmettitori del collettore
checked and cleaned (after 3 months
draaiende elektrische collector
elettrico rotante (dopo 3 mesi di
of shutdown)
laten controleren en schoonmaken
inattività)
H7 -Radio remore contol maintenance
(na 3 maanden inactiviteit)
H7 - Manutenzione del radiocomando
H8 -Heating
H7 - Onderhoud van de
H8 - Riscaldamento
afstandsbediening
H8 - Verwarming
3-8
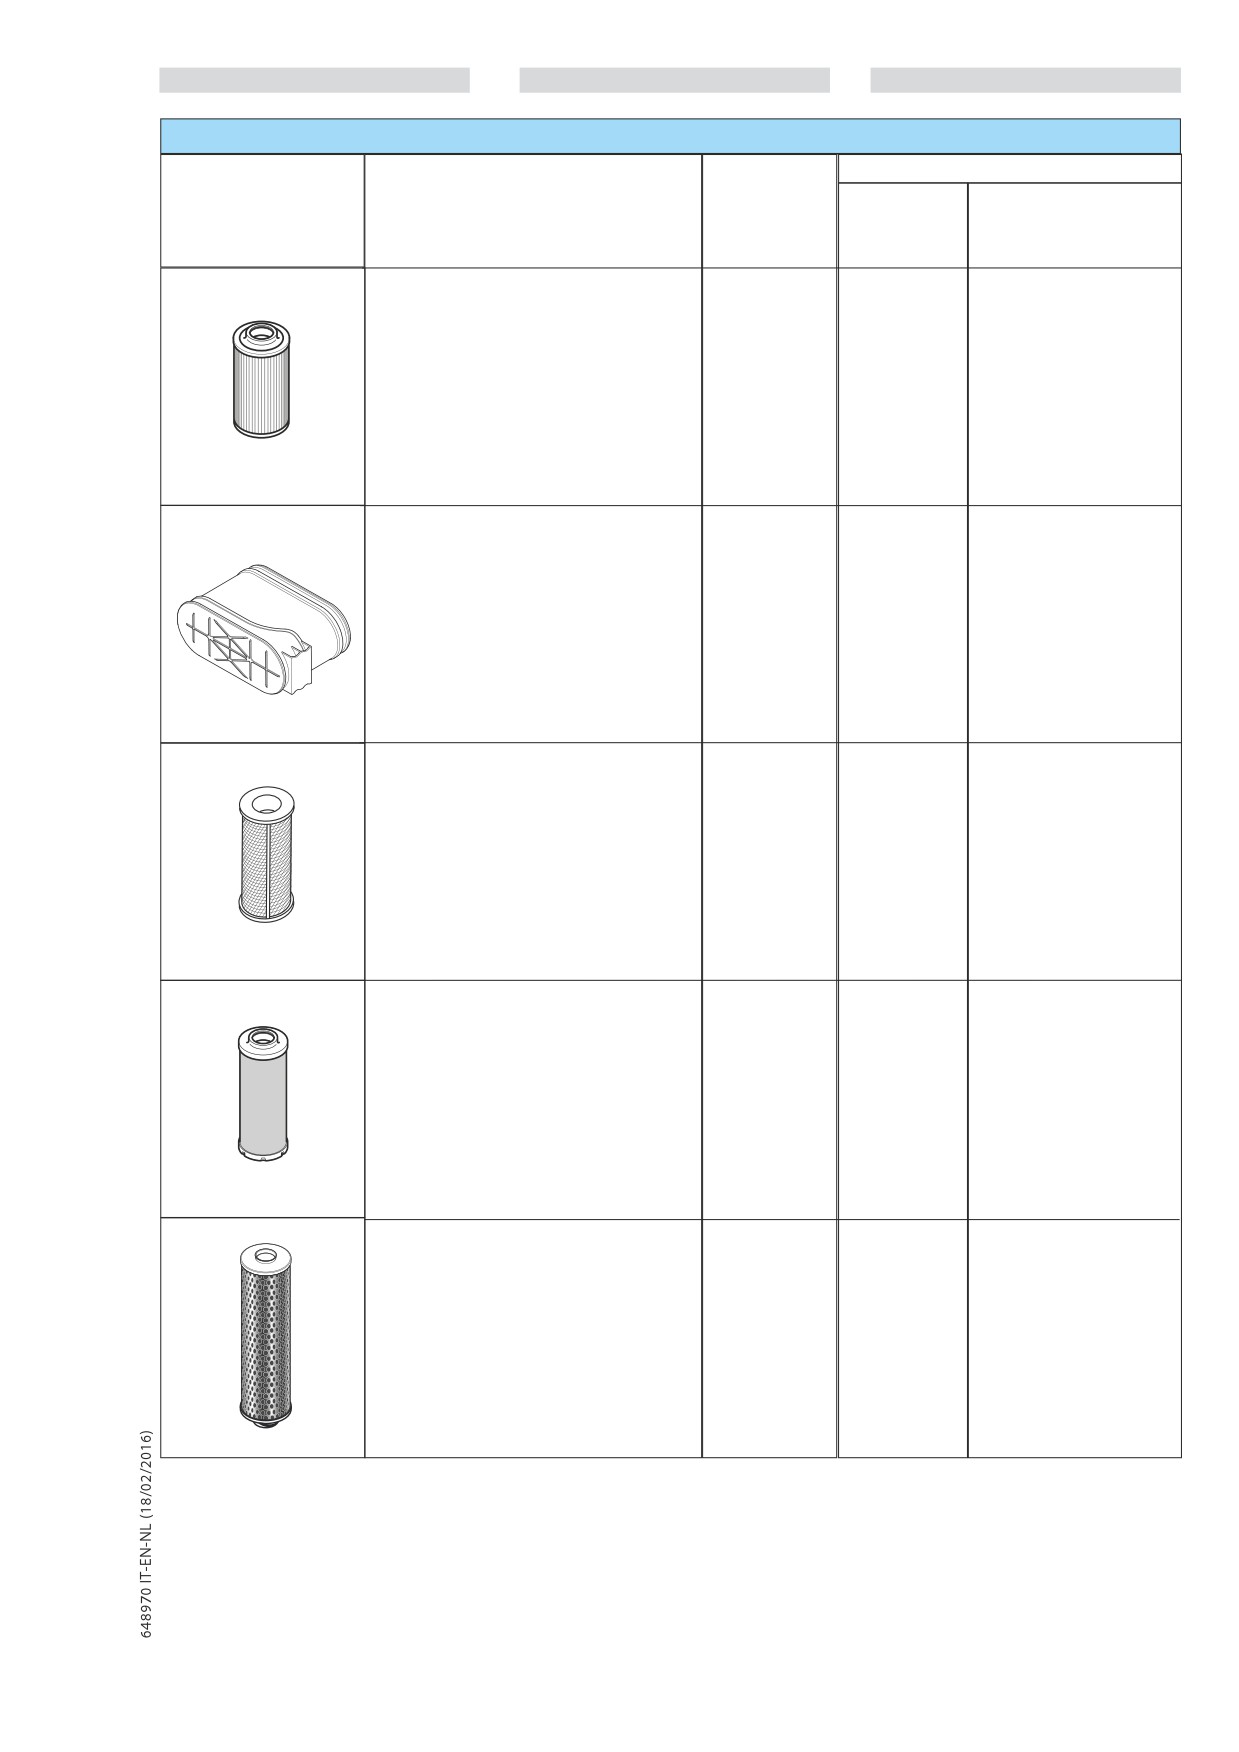
IT
EN
NL
ELEMENTI FILTRANTI E CINGHIE - FILTERING ELEMENTS AND BELTS -FILTERELEMENTEN EN DRIJFRIEMEN
CONTROLLI - CONTROLS -
CONTROLEREN
DESCRIZIONE
RIFERIMENTO
(1°TAGLIANDO)
SOSTITUZIONI PERIODICHE
DESCRIPTION
REFERENCE
(1°COUPON)
REPLACEMENT SCHEDULE
BESCHRIJVING
REFERENTIE
(1ste KEURING)
PERIODIEKE VERVANGING
Sostituire
Ogni 500 H
1 Filtro olio motore
1 Engine oil filter
53006638
Replace
Every 500 H
1 Filter motorolie
Vervangen
Om de 500 uur
2 Cartuccia filtro aria
Pulire
Ogni 1000 H
2 Air filter cartridge
299936
Cleaner
Every 1000 H
2 Luchtfilterpatroon
Schoonmaken
Om de 1000 uur
3 Cartuccia del filtro per l’olio della
Sostituire
Ogni 500 H
trasmissione idrostatica
53007192
Replace
Every 500 H
3 Hydrostatic transmission oil filter cartridge
Vervangen
Om de 500 uur
3 Filterpatroon voor de olie van de
hydrostatische overbrenging
Sostituire
Ogni 500 H
4 Cartuccia filtro combustibile
53006464
Replace
Every 500 H
4 Fuel filter cartridge
4 Brandstoffilterpatroon
Vervangen
Om de 500 uur
Sostituire
Ogni 500 H
5 Cartuccia del filtro dell’olio ritorno idraulico
925420
Replace
Every 500 H
5 Hydraulic return oil filter cartridge
Vervangen
Om de 500 uur
5 Patroon van oliefilter hydraulische retour
3-9
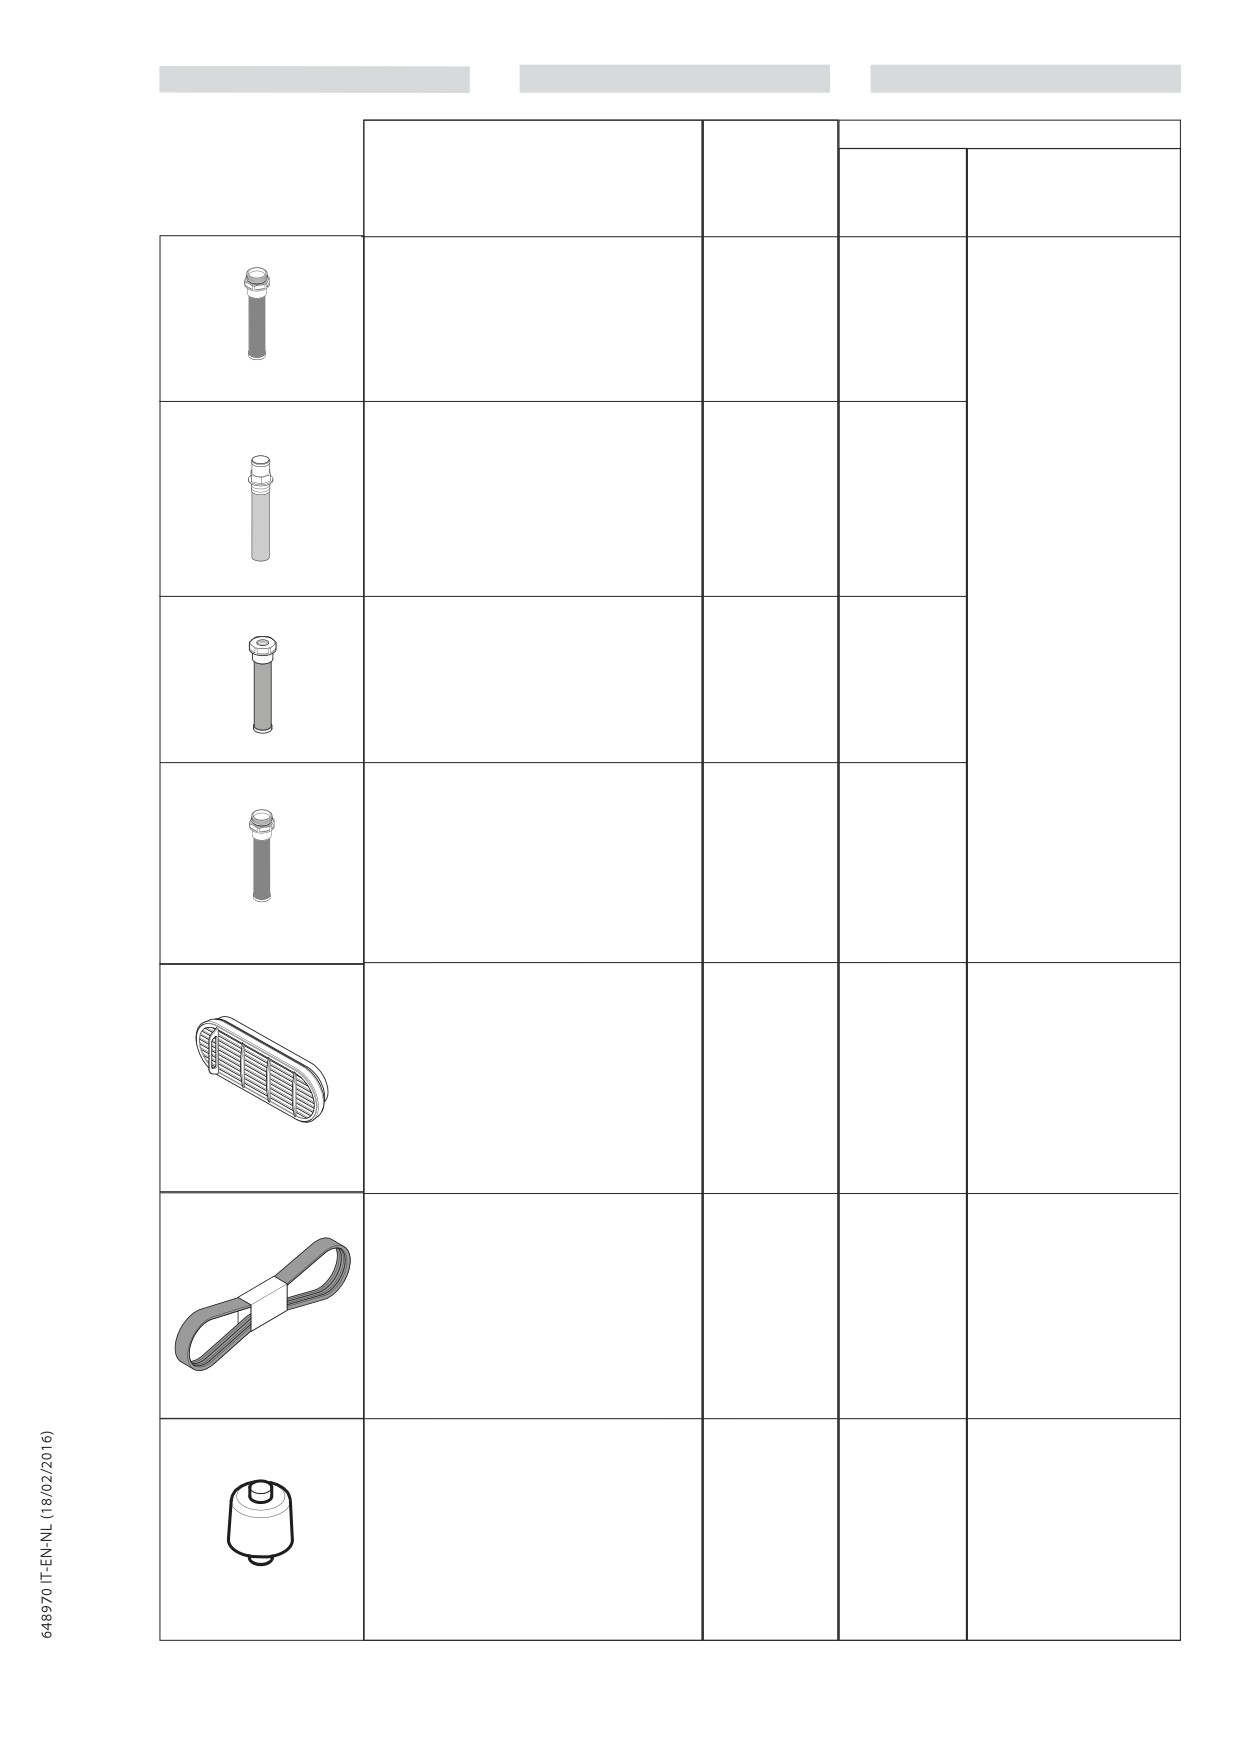
IT
EN
NL
CONTROLLI - CONTROLS -
CONTROLEREN
DESCRIZIONE
RIFERIMENTO
(1°TAGLIANDO)
SOSTITUZIONI PERIODICHE
DESCRIPTION
REFERENCE
(1°COUPON)
REPLACEMENT SCHEDULE
BESCHRIJVING
REFERENTIE
(1ste KEURING)
PERIODIEKE VERVANGING
6 Succhieruola di aspirazione del serbatoio
dell’olio idraulico
6 Suction strainer for hydraulic oil tank
924767
6 Zuigkorf hydraulische olietank
6 Succhieruola di aspirazione del serbatoio
dell’olio idraulico
924765
6 Suction strainer for hydraulic oil tank
6 Zuigkorf hydraulische olietank
Ogni 1000 H
Every 1000 H
Om de 1000 uur
6 Succhieruola di aspirazione del serbatoio
dell’olio idraulico (Con predisposizione cestello)
6 Suction strainer for hydraulic oil tank (With
925365
basket predisposition)
6 Zuigkorf hydraulische olietank (met
inrichting voor kooi)
6 Succhieruola di aspirazione del serbatoio
dell’olio idraulico (con climatizzatore)
6 Suction strainer for hydraulic oil tank With
A/C circuit)
924767
6 Zuigkorf hydraulische olietank (met aircon-
ditioning)
7 Cartuccia di sicurezza filtro aria
Controllare
Ogni 1000 H
7 Security air filter cartridge
299937
Check
Every 1000 H
7 Veiligheidspatroon luchtfilter
Controleren
Om de 1000 uur
8 Cinghia motore
8 Engine belt
Controllare
Ogni 500 H
8 Motorriem
53008906
Check
Every 500 H
Controleren
Om de 500 uur
9 Sfiato serbatoio olio idraulico
Sostituire
Ogni 500 H
9 Hydraulic oil tank vent
9 Ventiel hydraulische olietank
715516
Replace
Every 500 H
Vervangen
Om de 500 uur
3-10
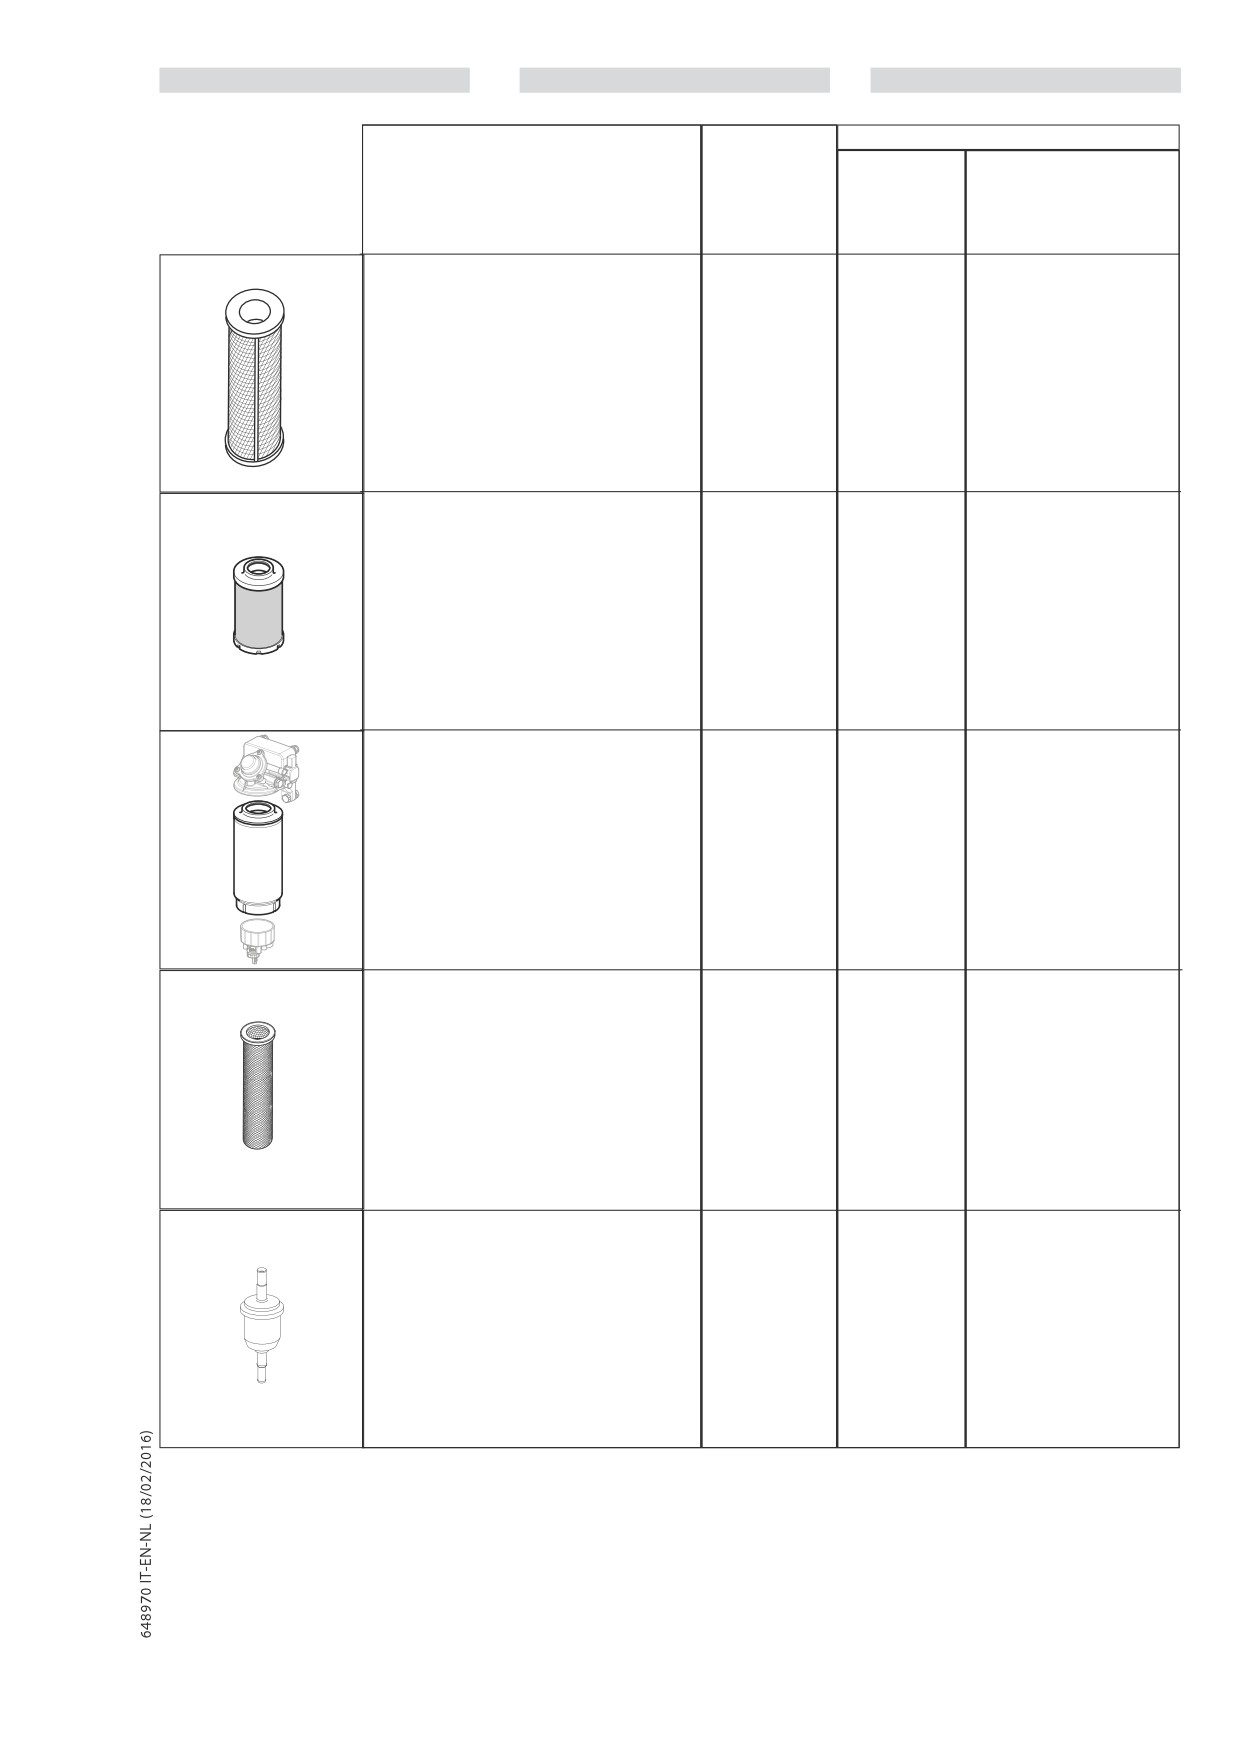
IT
EN
NL
CONTROLLI - CONTROLS - CONTROLEREN
DESCRIZIONE
RIFERIMENTO
(1°TAGLIANDO)
SOSTITUZIONI PERIODICHE
DESCRIPTION
REFERENCE
(1°COUPON)
REPLACEMENT SCHEDULE
BESCHRIJVING
REFERENTIE
(1ste KEURING)
PERIODIEKE VERVANGING
Ogni 500 H
10 Cartuccia filtro mandata
10 Cartouche filtre refoulement circuit
659292
Every 500 H
principal
Om de 500 uur
10 Drukfilterpatroon
11 Cartuccia prefiltro carburante
11 Cartouche du pré-filtre à carburant
53006466
- - -
11 Brandstofvoorfilter
12 Cartuccia prefiltro del carburante con
Ogni 500 H
separatore d’acqua
709663
Every 500 H
12 Fuel prefilter cartridge with water separator
Om de 500 uur
12 Brandstofvoorfilter met waterafscheider
13 Pre-filtro del serbatoio carburante
riscaldamento
673484
- - -
13 Heating tank fuel prefilter
13 Voorfilter brandstoftank verwarming
Ogni 1000 H
14 Filtro carburante riscaldamento
888016
Every 1000 H
14 Heating Fuel filter
14 Brandstoffilter verwarming
Om de 1000 uur
3-11
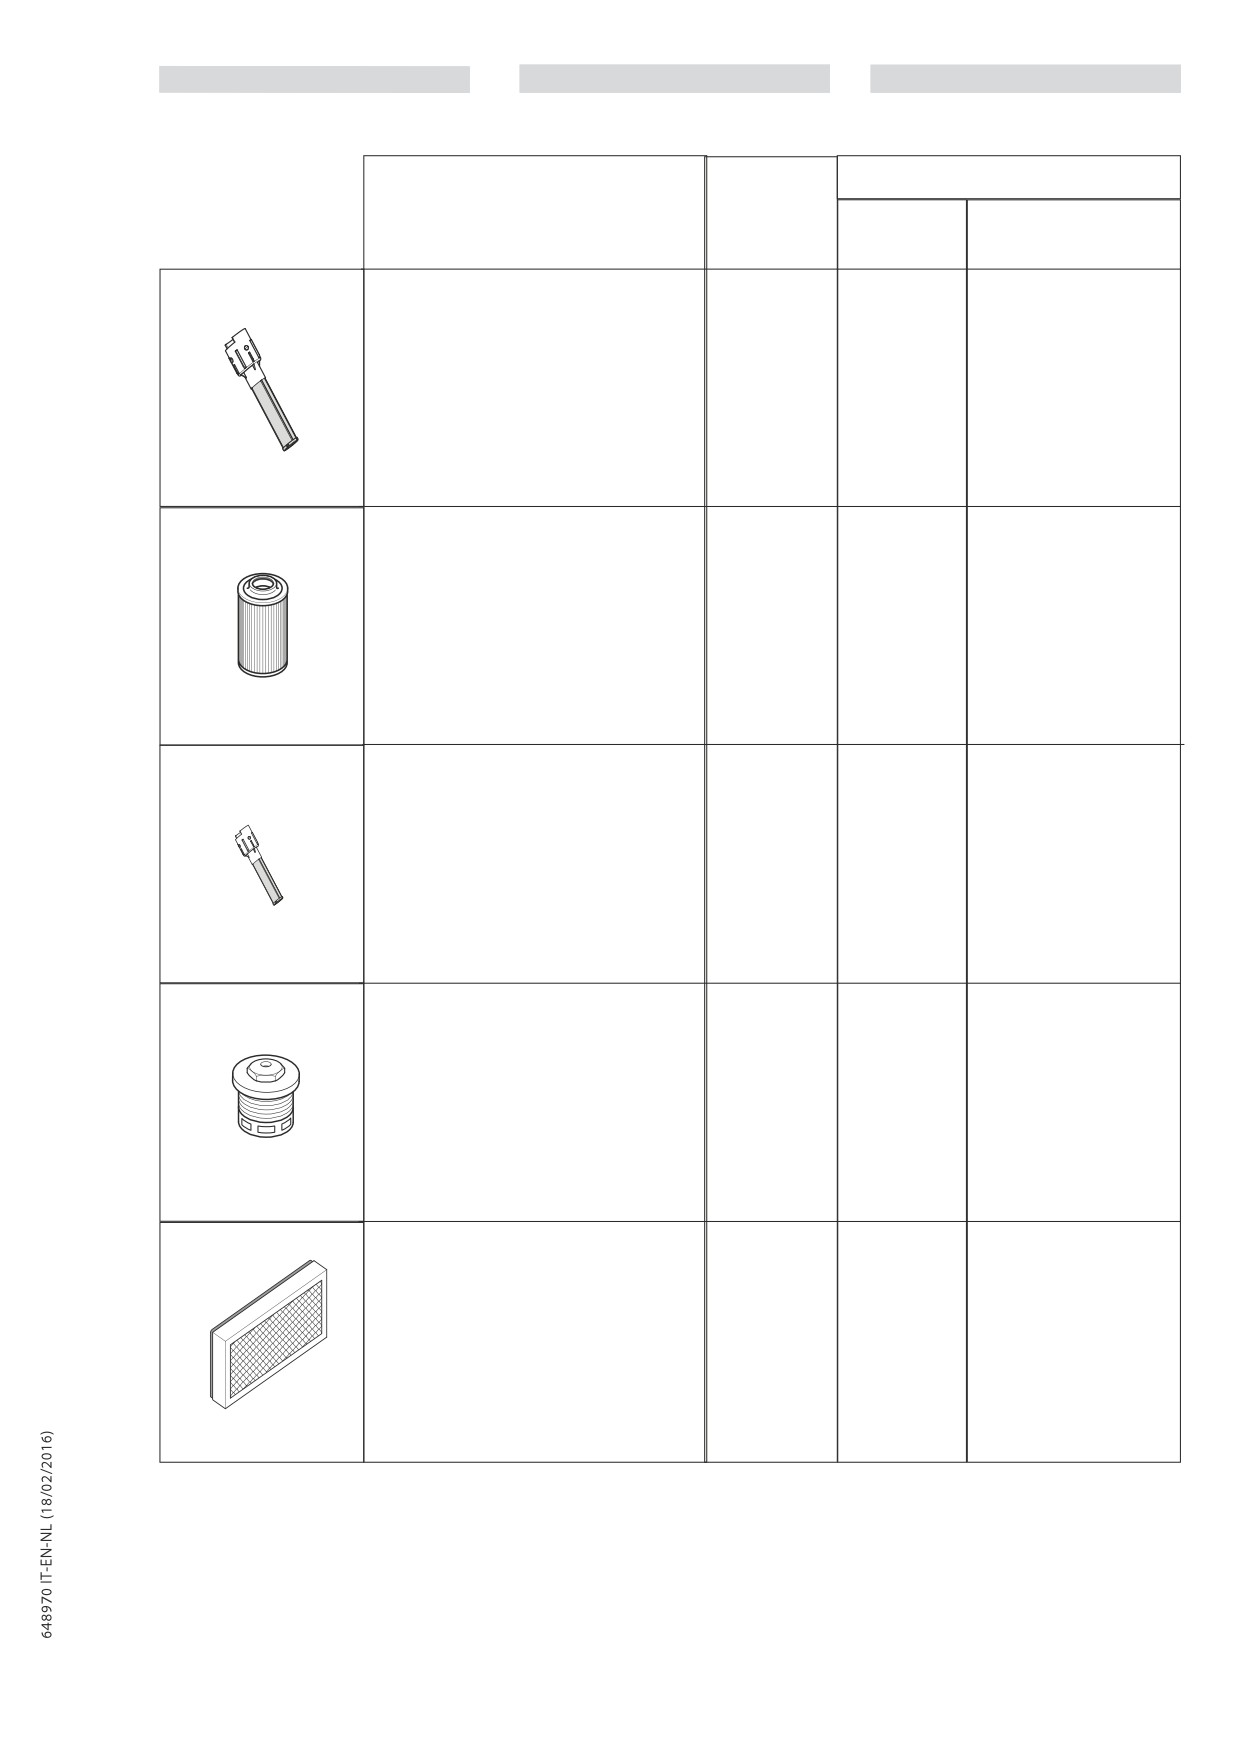
IT
EN
NL
CONTROLLI - CONTROLS -
CONTROLEREN
DESCRIZIONE
RIFERIMENTO
DESCRIPTION
REFERENCE
(1°TAGLIANDO)
SOSTITUZIONI PERIODICHE
BESCHRIJVING
REFERENTIE
(1°COUPON)
REPLACEMENT SCHEDULE
(1ste KEURING)
PERIODIEKE VERVANGING
15 Filtro serbatoio “DEF”
- - -
53002466
15 “DEF” filter tank
15 Filter “DEF”-tank
16 Cartuccia filtro pompa “DEF”
Controllare
Ogni 2000 H
16 “DEF” pump filter cartridge
53006687
Check
Every 2000 H
Controleren
16 Filterpatroon “DEF”-pomp
Om de 2000 uur
17 Prefiltro pompa “DEF”
17 “DEF” pump pre-filter
53005874
17 Voorfilter “DEF”-pomp
- - -
18 Cartuccia silicato sulla pompa del liquido
di raffreddamento
18 Silicate cartridge on the liquid pump
Ogni 3000 H
53006666
cooling
Every 3000 H
18 Silicaatfilter op de koelvloeistofpomp
Om de 3000 uur
19 Filtro di ventilazione esterno della cabina
(optional climatizzazione)
19 Cab external ventilation filter
921110
Ogni 250 H
(air conditioning option)
Every 250 H
19 Externe ventilatiefilter van de cabine
(optional airconditioning)
Om de 250 uur
3-12

IT
EN
NL
LUBRIFICANTI E CARBURANTE
LUBRICANTS AND FUEL
SMEERMIDDELEN EN BRANDSTOF
UTILIZZARE I LUBRIFICANTI E IL CARBURANTE
USE THE RECOMMENDED LUBRICANTS AND
GEBRUIK
DE
VOORGESCHREVEN
PRECONIZZATI:
FUEL:
SMEERMIDDELEN EN BRANDSTOF:
- per completare il livello, non tutti gli oli sono
- not all oils can be mixed to make up the level.
- tijdens het bijvullen kunnen niet alle oliën met
miscelabili.
- Manitou oils are perfectly suitable for chan-
elkaar gemengd worden.
- per il cambio dell’olio, gli oli Manitou sono
ging the oil.
- bij het verversen van de olie is de olie van
perfettamente indicati.
Manitou perfect geschikt.
Analisi diagnostica degli oli
Diagnostic analysis of oils
Diagnostische analyse van de olie
In caso di un contratto di verifica
In case of an inspection or maintenance con-
In het geval een onderhouds- of
o manutenzione concluso con il
tract signed with the dealer, a diagnostic
reparatiecontract is gesloten met de dealer,
concessionario, un’analisi diagnostica degli
analysis may be requested for the engine,
kan men u verzoeken over te gaan tot een
oli motore, trasmissione e assali può venirvi
transmission and axles oils, depending on the
diagnose van de motor-, overbrenging- en
richiesta secondo il tasso d’utilizzo.
extent of use.
wielasolie naar gelang de gebruiksgraad.
(*) Caratteristiche del carburante
(*) Features of recommended fuel
(*) Karakteristieken van de aanbevolen
raccomandato
Use good quality fuel to obtain optimum
brandstof
Utilizzare un carburante di qualità per
Gebruik een brandstof van topkwaliteit
performance of the I.C. engine.
ottenere le prestazioni ottimali del motore
zodat de verbrandingsmotor optimale
termico.
prestaties kan leveren.
Only refuel using commercially available,
sulphur-free diesel fuel that complies with
Effettuare il rifornimento esclusivamente
Vul uitsluitend zwavelvrije dieselolie die
the following standards:
con il gasolio privo di zolfo disponibile in
in de handel verkrijgbaar is, conform de
commercio, conforme alle seguenti norme:
• EN 590 as of 2010, et seq. (max. 0.001%
volgende normen:
• EN 590 nella versione del 2010 e segg.
sulphur by weight) (10 ppm) or
• EN 590 in de versie van 2010 en volgende
(componente di zolfo max. 0,001% del
• ASTM D975 (max. 0.0015% sulphur by
(max. zwavelinhoud 0,001% van het
peso) (10 ppm) oppure
weight) (15 ppm).
gewicht) (10 ppm) of
• ASTM D975 (componente di zolfo max.
• ASTM D975 (max. zwavelinhoud 0,0015%
0,0015% del peso) (15 ppm).
van het gewicht) (15 ppm).
(◊) Features of recommended “DEF”
(◊) Karakteristieken van de aanbevolen
(◊) Caratteristiche del “DEF” raccomandato
Only use “DEF” in accordance with DIN
“DEF”
Utilizzare esclusivamente “DEF” conforme
70070/ISO 22241.
Gebruik uitsluitend “DEF” die in
alla norma DIN 70070/ISO 22241.
overeenstemming is met de norm DIN
Non utilizzare additivi.
Do not use any additives.
70070/ISO 22241.
Gebruik geen additieven.
ORGANI DA LUBRIFICARE
CAPACITÀ
PRODOTTO CONSIGLIATO
CONFEZIONE
RIFERIMENTO
LUBRICATED PART
CAPACITY
RACOMMENDED PRODUCT
PACKAGING
PART NUMBER
TE SMEREN ONDERDELEN
INHOUD
AANBEVOLEN PRODUCT
VERPAKKING
REFERENTIE
5L - 1,32 US gal
895837
Olio MANITOU EVOLOGY “API CJ4/10W40”
20L - 5,28 US gal
895838
Motore con filtro dell’olio
± 20,5 L
Oil MANITOU EVOLOGY “API CJ4/10W40”
55L - 14,52 US gal
895839
Engine with oil filter
5.41 US gal
Olie MANITOU EVOLOGY API CJ4/10W40
209L - 55,21 US gal
895840
Motor met oliefilter
1000L - 264,17 US gal
895841
5L - 1,32 US gal
545500
Serbatoio olio idraulico e trasmissione
olio MANITOU ISO VG 46
225 L
20L - 5,28 US gal
582297
Hydraulic oil tank and transmission
MANITOU Oil Hydraulic ISO VG 46
59,43 US gal
55L - 14,52 US gal
546108
Olie MANITOU ISO VG 46
Tank hydraulische en overbrengin-
209L - 55,21 US gal
546109
gsolie
Differenziale
assale
anteriore/
posteriore
7,80/7,50 L
Front/rear differential
2,06/1,98 US gal
Differentiaal voor/achteras
5L - 1,32 US gal
545976
Olio MANITOU Speciale freni immersi
Riduttori ruote anteriori/posteriori
20L - 5,28 US gal
582391
MANITOU Oil Special immersed brakes
Front/rear wheel final reducers
209L - 55,21 US gal
546222
1,7 L
Speciale olie MANITOU ondergedompelde
Vertragers voor/achterwielen
1000L - 264,17 US gal
720149
0,44 US gal
remmen
Sctola cambio
1,7 L
Gearbox
0,44 US gal
Versnellingsbak
Riduttore rotazione
Olio EP ISO 150
2,2 L
20L - 5,28 US gal
958170
Slewing gear
Oil EP ISO 150
0,58 US gal
209L - 55,21 US gal
958169
Vertraging zwenken
Olie EP ISO 150
Cuscinetti riduttore rotazione
400 g - 0.88 lb
161589
Reduction gear bearings
Grasso MANITOU Multiuso BLU
1 kg - 2,20 lb
720683
Lagers draaivertraging
MANITOU Grease BLUE multi-purpose
5 kg - 11,02 lb
554974
Ingrassaggio generale
20 kg - 44,09 lb
499233
Graissage articulations
SMEERMIDDEL MANITOU
50 kg - 110,23 lb
489670
Algemene smeerbeurt
MULTIFUNCTIONEEL BLAUW
3-13

IT
EN
NL
Ingrassaggio braccio telescopico
Grasso MANITOU Multiuso NERO
400 g - 0.88 lb
545996
Telescopic boom lubrication
MANITOU Grease BLACK multi-purpose
1 kg - 2,20 lb
161590
Smering telescopische arm
SMEERMIDDEL MANITOU
5 kg - 11,02 lb
499235
MULTIFUNCTIONEEL ZWART
Lubrificazione catene braccio telesco-
Lubrificanti MANITOU Speciale catene
pico
400 ml
Special chains MANITOU oil
554271
Telescopic boom chain lubrication
0.10 US gal
Smeermiddelen MANITOU Speciale kettingen
Smering kettingen telescopische arm
Dentatura ralla e riduttore rotazione
Rotation reduction gear and slewing
Grasso MANITOU Multiuso NERO
400 g - 0.88 lb
545996
ring bearing teeth
MANITOU Grease BLACK multi-purpose
1 kg - 2,20 lb
161590
Draaistel en draaivertraging
Smeermiddel MANITOU Multifunctioneel
5 kg - 11,02 lb
499235
ZWART
Lubrificazione catene sfilo e rientro
400 g - 0.88 lb
161589
dei bracci stabilizzatori
Grasso MANITOU Multiuso BLU
1 kg - 2,20 lb
720683
Lubrication of extension and
MANITOU Grease BLUE multi-purpose
5 kg - 11,02 lb
retraction chains of stabilizer booms
554974
Smeermiddel MANITOU Multifunctioneel
20 kg - 44,09 lb
499233
Smering uitschuif- en intrekkettingen
BLAUW
van de armen van de stabilisatoren
50 kg - 110,23 lb
489670
Circuito raffreddamento
Liquido di raffreddamento (protezione - 35°) [Prodotto concentrato]
1,5 L - 0,39 US gal
53017514
35 L
Cooling circuit
Coolant (protection - 35°) [Concentrated product]
20 L - 5,28 US gal
53017515
9,24 US gal
Koelcircuit
Koelvloeistof (bescherming - 35°) [geconcentreerd product]
210 L - 55,47 US gal
53017600
Serbatoio combustibile
Gasolio (*)
305 L
Fuel tank
Diesel (*)
80,57 US gal
Brandstoftank
Brandstof (*)
Serbatoio DEF
63 L
DEF tank
DEF (Diesel exhaust fluid) (◊)
16,64 US gal
DEF-tank
Gasolio (*)
10 L
Diesel (*)
Serbatoio Diesel (Riscaldamento)
10,64 US gal
Brandstof (*)
Diesel tank (Heating)
Additivo Antibatterico Diesel (Riscaldamento)
Diesel-tank (Verwarming)
0,5 ml
250 ml
Anti-Bacterial Diesel Additive (Heating)
53009479
01,3 US gal
0.066 US gal
Antibacterieel additief dieselolie (verwarming)
3-14
Questa pagina è intenzionalmente vuota
This page is intentionally blank
Deze pagina is opzettelijk leeg gelaten
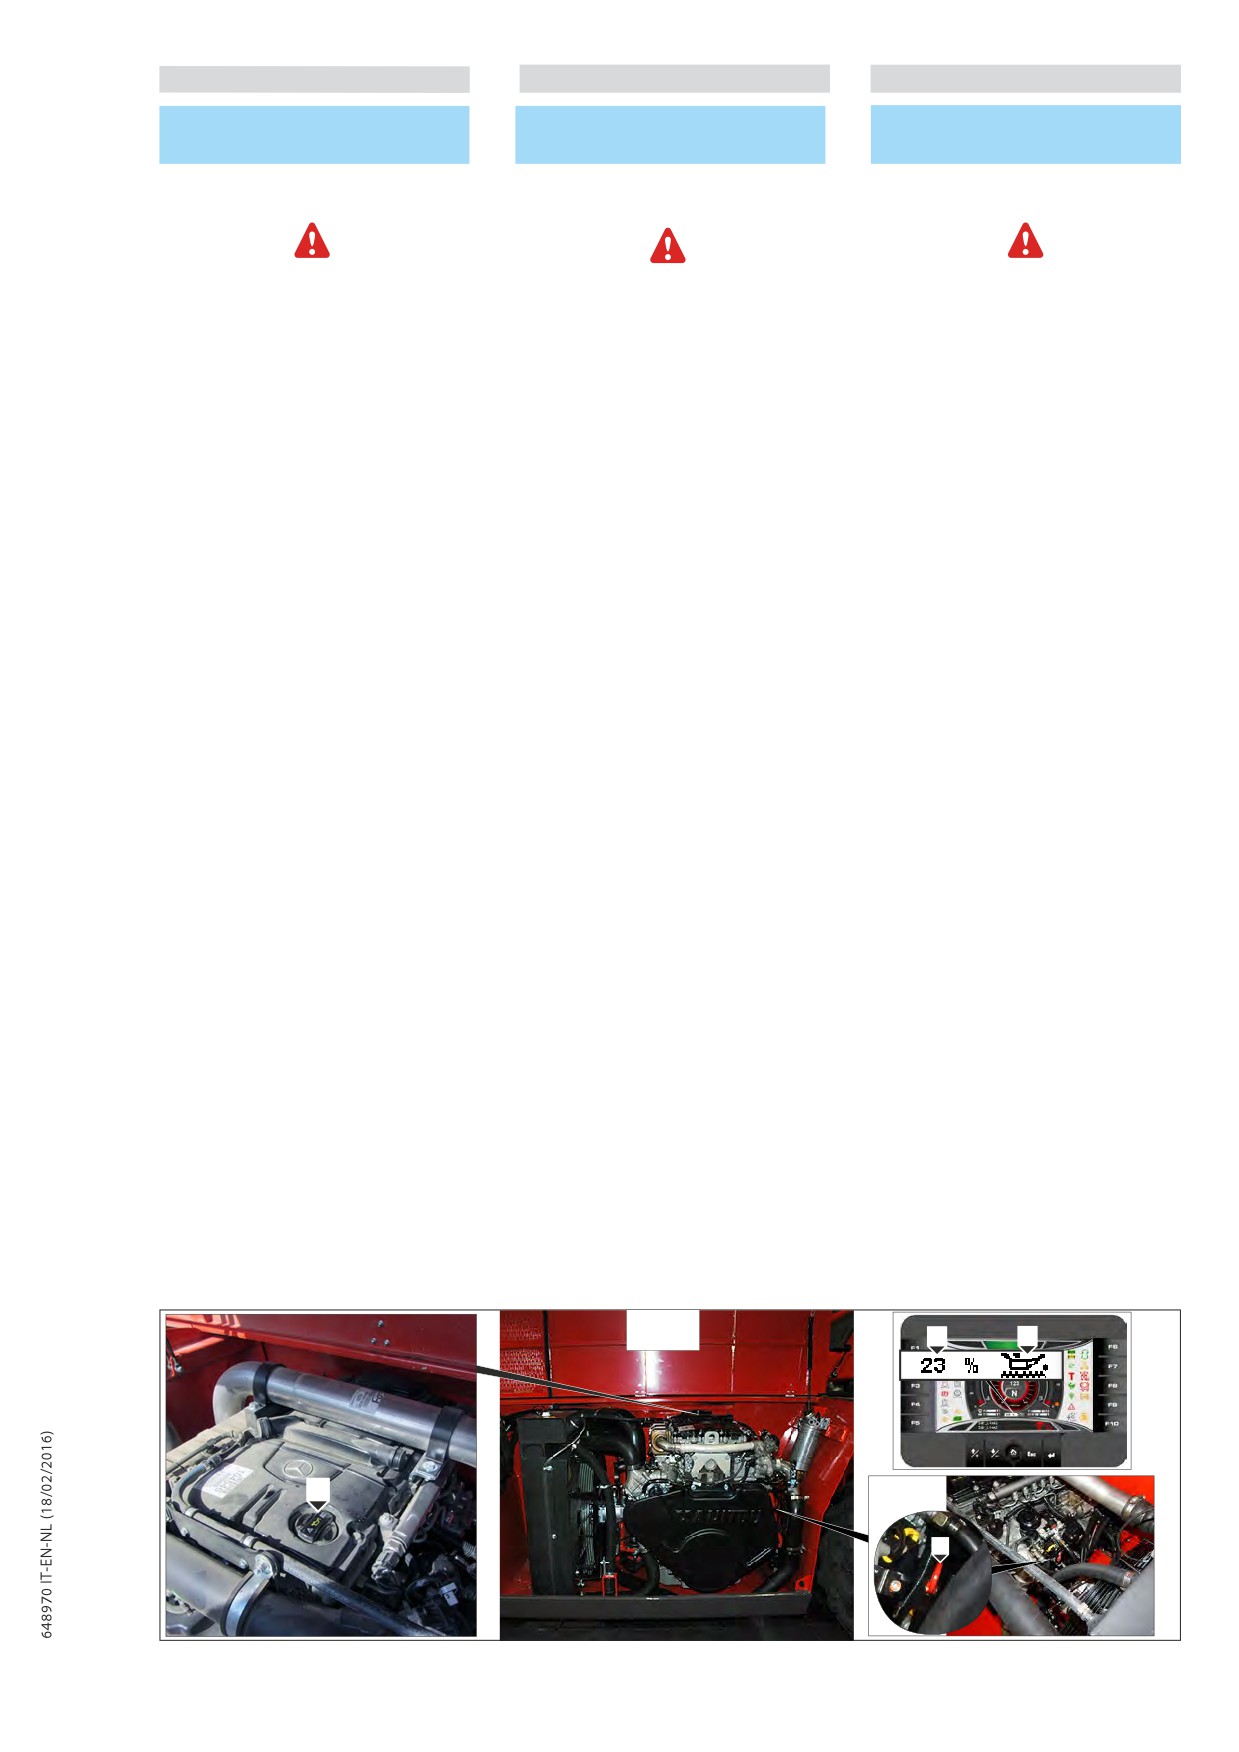
IT
EN
NL
A - TUTTI I GIORNI O OGNI 10 ORE DI
A - DAILY OR EVERY 10 HOURS
A - DAGELIJKS OF OM DE 10
FUNZIONAMENTO
SERVICE
WERKUREN
A1 - Controllo del livello dell’olio nel
A1 - Checking the engine oil level
A1 - Het peil van de olie in de motor
motore
controleren
Non rifornire una quantità eccessiva
Vul slechts een beperkte hoeveelheid
Do not add too much oil. If you add too
di olio. Il rifornimento di una quantità
olie bij. Het bijvullen van een te grote
much oil, the engine or the exhaust after-
eccessiva di olio può causare danni al
hoeveelheid olie kan de motor of de
treatment unit could be damaged. Drain
motore o all’unità di post-trattamento dei
nabehandelingsunit van de uitlaatgassen
or siphon off any excess oil.
gas di scarico. Scaricare o aspirare l’olio
beschadigen. Voer het teveel aan olie af
rifornito in eccesso.
of zuig het af.
Il motore è dotato di rilevamento elettronico
The engine is equipped with an electronic
De motor is uitgerust met een elektronisch
del livello dell’olio.
oil level detection system.
meetsysteem van het oliepeil.
Se il motore è dotato anche di un’astina
If the engine is also equipped with a
Als de motor ook uitgerust is met een
di controllo del livello dell’olio, questa è
dipstick, this is subsidiary to the electronic
staafje om het oliepeil te controleren, dan
subordinata al rilevamento elettronico
oil level measurement system. It is merely
is dit ondergeschikt aan de elektronische
del livello dell’olio. Essa serve soltanto al
used for a general check to determine if
meting van het oliepeil. Het staafje dient
controllo generale della presenza di olio
there is oil in the engine.
alleen om te controleren of er zich olie in de
nel motore.
motor bevindt.
Checking the oil level electronically
Controllo elettronico del livello dell’olio
Elektronische controle van het oliepeil
The current oil level in the engine is only
Il livello dell’olio attuale nel motore viene
Het huidige oliepeil wordt alleen weergegeven
displayed once the engine is switched
visualizzato solo dopo lo spegnimento
nadat de motor is uitgeschakeld en de
off and with the ignition switched on. An
del motore e ad accensione inserita.
ontsteking is ingeschakeld. Een nauwkeurige
Un’indicazione precisa del livello dell’olio è
accurate display of the engine oil level is
weergave van het oliepeil is alleen mogelijk
possibile solo a motore spento e accensione
therefore only possible with the engine
met uitgeschakelde motor en ingeschakelde
inserita.
switched off and the ignition switched on.
ontsteking.
Il
livello dell’olio motore non viene
The engine oil level is not displayed while
Het peil van de motorolie wordt niet
visualizzato durante la guida o quando il
driving or when the engine is running.
weergegeven tijdens het rijden of wanneer
motore è in funzione.
On the control panel is displayed the oil
de motor in werking is.
Sul pannello di controllo viene visualizzata
level warning light 1(Fig.A1) and the dates
Op het bedieningspaneel wordt het lampje 1
la spia 1(Fig.A1) del livello e la misura 2 (Fig.
in ”%” 2(Fig.A1) .
weergegeven (Fig.A1) van het niveau en de
A1) in “%” del livello dell’olio.
hoeveelheid 2 (Fig.A1) in “%” van het oliepeil.
Oil level measurement:
Misura del livello olio:
Het oliepeil meten:
- from 100% to 20%: maximum oil level
- da 100% al 20%: livello massimo di olio e
- van 100% tot 20%: max. oliepeil en lampje
and the indicator lights up black,
spia accesa di colore nero,
zwart brandend,
- da 19% to 0%: oil level too low.
- da 19% a 0%: livello dell’olio troppo basso
- van 19% tot 0%: oliepeil te laag en lampje
e spia accesa di colore rosso.
rood brandend.
Park the vehicle/device on a level surface.
Posizionare il veicolo/l’apparecchio in
Engage the parking brake.
Plaats het voertuig/apparaat horizontaal.
piano.
Switch off the engine.
Trek de parkeerrem aan.
Azionare il freno di stazionamento.
Wait approximately 5 to 10 minutes. If you
Schakel de motor uit.
Spegnere il motore.
call up the oil level in the engine too early
Wacht ongeveer
5
-
10 minuten. Als
Attendere circa 5 - 10 minuti. Se il livello
or while the engine is running, it is not
het peil van de olie in de motor te
dell’olio nel motore viene richiamato troppo
available.
vroeg wordt opgevraagd of terwijl de
in anticipo o durante il funzionamento del
motor in werking is, is dit gegeven niet
motore, questo non è disponibile.
beschikbaar.
Checking the oil level with the dipstick
Controllo del livello dell’olio con
Controle van het oliepeil met
Park the vehicle/device on a level surface.
l’apposita astina
staafje
Engage the parking brake.
Posizionare il veicolo/l’apparecchio in
Plaats
het
voertuig/apparaat
Switch off the engine.
piano.
horizontaal.
Wait approximately 5 to 10 minutes.
Azionare il freno di stazionamento.
Trek de parkeerrem aan.
Spegnere il motore.
Schakel de motor uit.
Attendere circa 5 - 10 minuti.
Check the engine oil level with dipstick
Wacht ongeveer 5 - 10 minuten.
2(Fig.A1).
Controllare il livello dell’olio nel motore
The oil level should be between the upper
Controleer het oliepeil in de motor met
con l’apposita astina 2 (Fig.A1). L’olio deve
and lower marks on dipstick 2(Fig.A1).
het desbetreffende staafje 2 (Fig.A1). Het
trovarsi tra la tacca inferiore e la tacca
oliepeil moet zich tussen het onderste en de
superiore dell’astina di controllo del livello
If necessary, use filler neck 4 (fig. A1) to
bovenste insnijding op het staafje bevinden
dell’olio 2 (Fig.A1).
top up the oil (see: 3 - MAINTENANCE:
2 (Fig.A1).
LUBRICANTS AND FUEL).
Se necessario, rabboccare l’olio (vedi:
Vul indien nodig de olie bij (zie: 3 -
3 - MANUTENZIONE: LUBRIFICANTI E
ONDERHOUD: SMEERMIDDELEN EN
CARBURANTE) utilizzando il bocchettone di
BRANDSTOF) via de vulopening 4 (Fig.A1).
riempimento 4 (Fig.A1).
A1
1
2
4
3
3-16
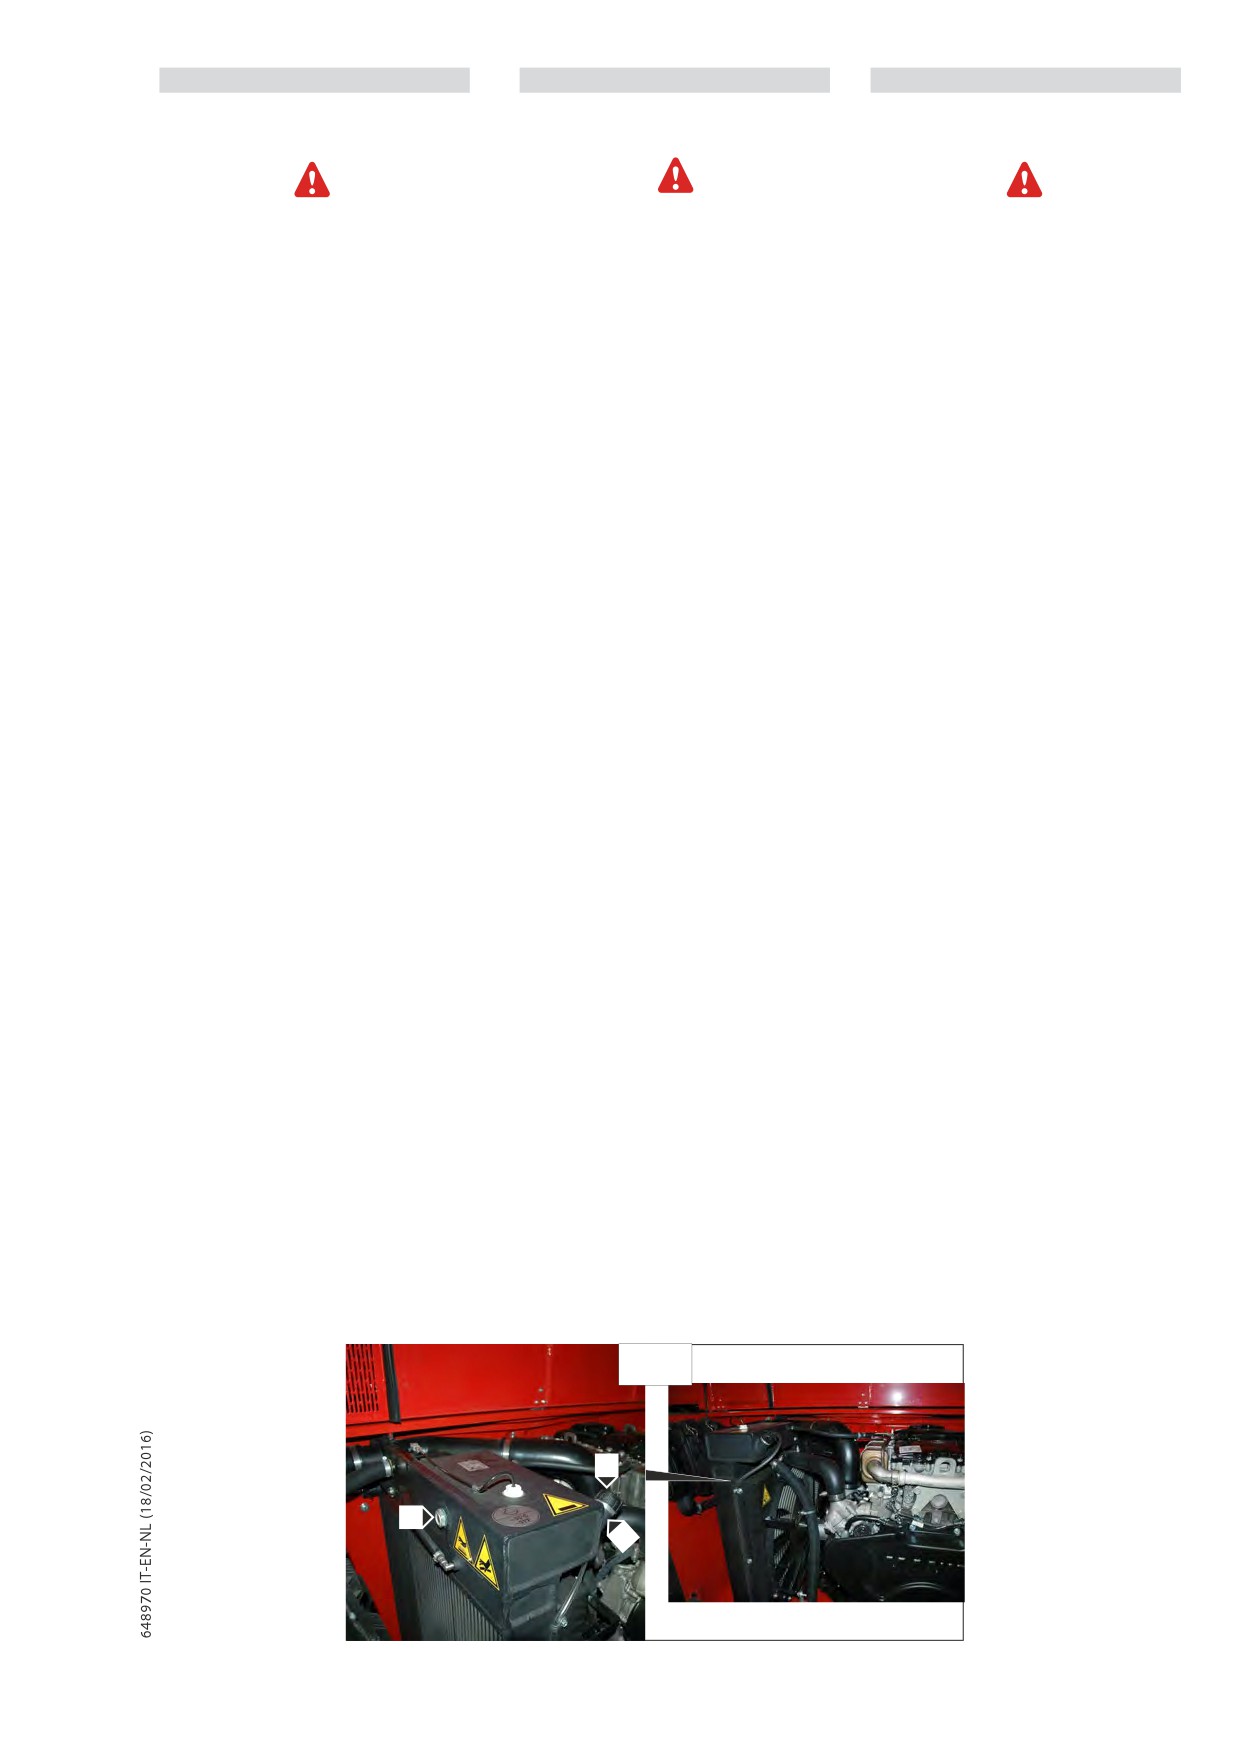
IT
EN
NL
A2 - Controllare il livello del liquido di
A2 - Check the coolant level
A2 - Het peil van de koelvloeistof
raffreddamento
controleren
System pressurised: the boiling coolant
Sistema pressurizzato: il liquido di
Systeem onder druk: de kokende koelvloeistof
can cause serious burns. Before opening
raffreddamento bollente può causare
kan ernstige brandwonden veroorzaken.
gravi ustioni. Quando si deve aprire il
the filler cap, stop the engine and allow
Wanneer de bijvuldop geopend moet
tappo di rifornimento, arrestare il motore
the cooling circuit components to cool
worden, zet de motor stil en wacht totdat de
e attendere che i componenti del circuito
down.Slacken the pressure cap slowly to
onderdelen van het koelcircuit afgekoeld zijn.
di raffreddamento si siano raffreddati.
discharge pressure.
Draai de dop langzaam los om de druk af te
Allentare il tappo a pressione lentamente
voeren.
per scaricare la pressione.
Non aggiungere mai liquido di
Never add cold cooling liquid in a hot engi-
Voeg nooit koude koelvloeistof toe
raffreddamento freddo a motore caldo.
ne.
wanneer de motor warm is.
In caso di emergenza, è possibile utilizzare
In geval van nood is het mogelijk
l’acqua come liquido di raffreddamento, e
In an emergency, water can be used as
om water te gebruiken als
procedere poi, il più rapidamente possibile,
koelvloeistof. Het koelcircuit moet
coolant; proceed as rapidly as possible,
al cambio del liquido del circuito di
vervolgens zo snel mogelijk worden
to change the liquid in the coo-ling circuit
raffreddamento (vedi: 3 - MANUTENZIONE:
geleegd (zie: 3 - ONDERHOUD: F1 -
(see: 3 - MAINTENANCE: F1 - COOLANT).
F1 - LIQUIDO DI RAFFREDDAMENTO).
KOELVLOEISTOF).
Quando si esegue qualsiasi manutenzione
Elk onderhoud of elke herstelling van
o riparazione del sistema di
When maintenance or repairs are carri-
het koelsysteem van de motor dient
raffreddamento del motore, la procedura
ed out on the engine cooling system, the
uitgevoerd te worden met de motor op
deve essere eseguita con il motore a
operations must be carried out with the
livello del suolo. Questo permette di
grondniveau. Hiermee kan het peil van
engine resting level on the ground. This
controllare accuratamente il livello del
de koelvloeistof gecontroleerd worden.
makes it possible to check the coolant
liquido di raffreddamento. In questo
level accurately. It is thus also possible to
Op deze manier wordt bovendien het
modo è possibile inoltre evitare il rischio
avoid the risk of introducing an air bubble
risico vermeden dat er een luchtbel in het
di introdurre un blocco d’aria nel sistema
in the cooling system.
koelsysteem wordt gevormd.
di raffreddamento.
- Aprire il cofano motore.
- Open de motorkap.
- Controllare il corretto livello rispetto al
- Controleer het correcte niveau ten
centro dell’indicatore “1” (fig. A2).
- Open the engine hood.- Check the correct
opzichte van het middelpunt van de
- Se necessario, aggiungere liquido di
level with respect to the centre of the
indicator “1” (Fig.A2).
raffreddamento (vedi: 3 - MANUTENZIONE:
indicator “1” (Fig. A2).
- Voeg zo nodig koelvloeistof toe (zie: 3
LUBRIFICANTI E CARBURANTE).
- If necessary, add coolant
(see:
3
-
- ONDERHOUD: SMEERMIDDELEN EN
- Portare lentamente il tappo del radiatore
MAINTENANCE: LUBRICANTS AND FUEL).
BRANDSTOF).
“2” (fig. A2) fino all’arresto di sicurezza.
- Slowly turn the radiator cap “2” (Fig. A2)
- Draai de dop van de radiator “2” (Fig.A2)
- Lasciar fuoriuscire la pressione e il vapore.
up to the safety stop.
langzaam tot aan de veiligheidsstop.
- Premere il tappo e rimuoverlo mediante
- Discharge the pressure and the vapour-
- Voer de druk en de stoom af.
rotazione.
Press the cap and rotate to remove it.
- Druk op de dop, draai eraan en verwijder
- Aggiungere il liquido di raffreddamento
- Add coolant through the filler hole “3” (Fig.
hem.
attraverso l’orifizio di riempimento
“3”
A2) up to the centre level of indicator “1”
- Vul de koelvloeistof bij via de vulopening
(fig. A2) fino al centro dell’indicatore “1”
(Fig. A2).
“3” (Fig.A2) tot aan het middelpunt van de
(fig. A2).
- Grease the filler hole slightly to make it
indicator “1” (Fig.A2).
- Ingrassare leggermente l’orifizio di
easier to fit and remove the radiator cap.-
- Smeer de vulopening een beetje om het
riempimento per facilitare la posa e la
Inspect the radiator and pipes for leaks.
aanbrengen en verwijderen van de dop
rimozione del tappo del radiatore.
- Mediante un controllo visivo accertarsi che
van de radiator te vereenvoudigen.
non vi siano perdite sul radiatore e sulle
- Controleer visueel of er geen lekkages zijn
tubazioni.
op de radiator en de leidingen.
A2
2
1
3
3-17
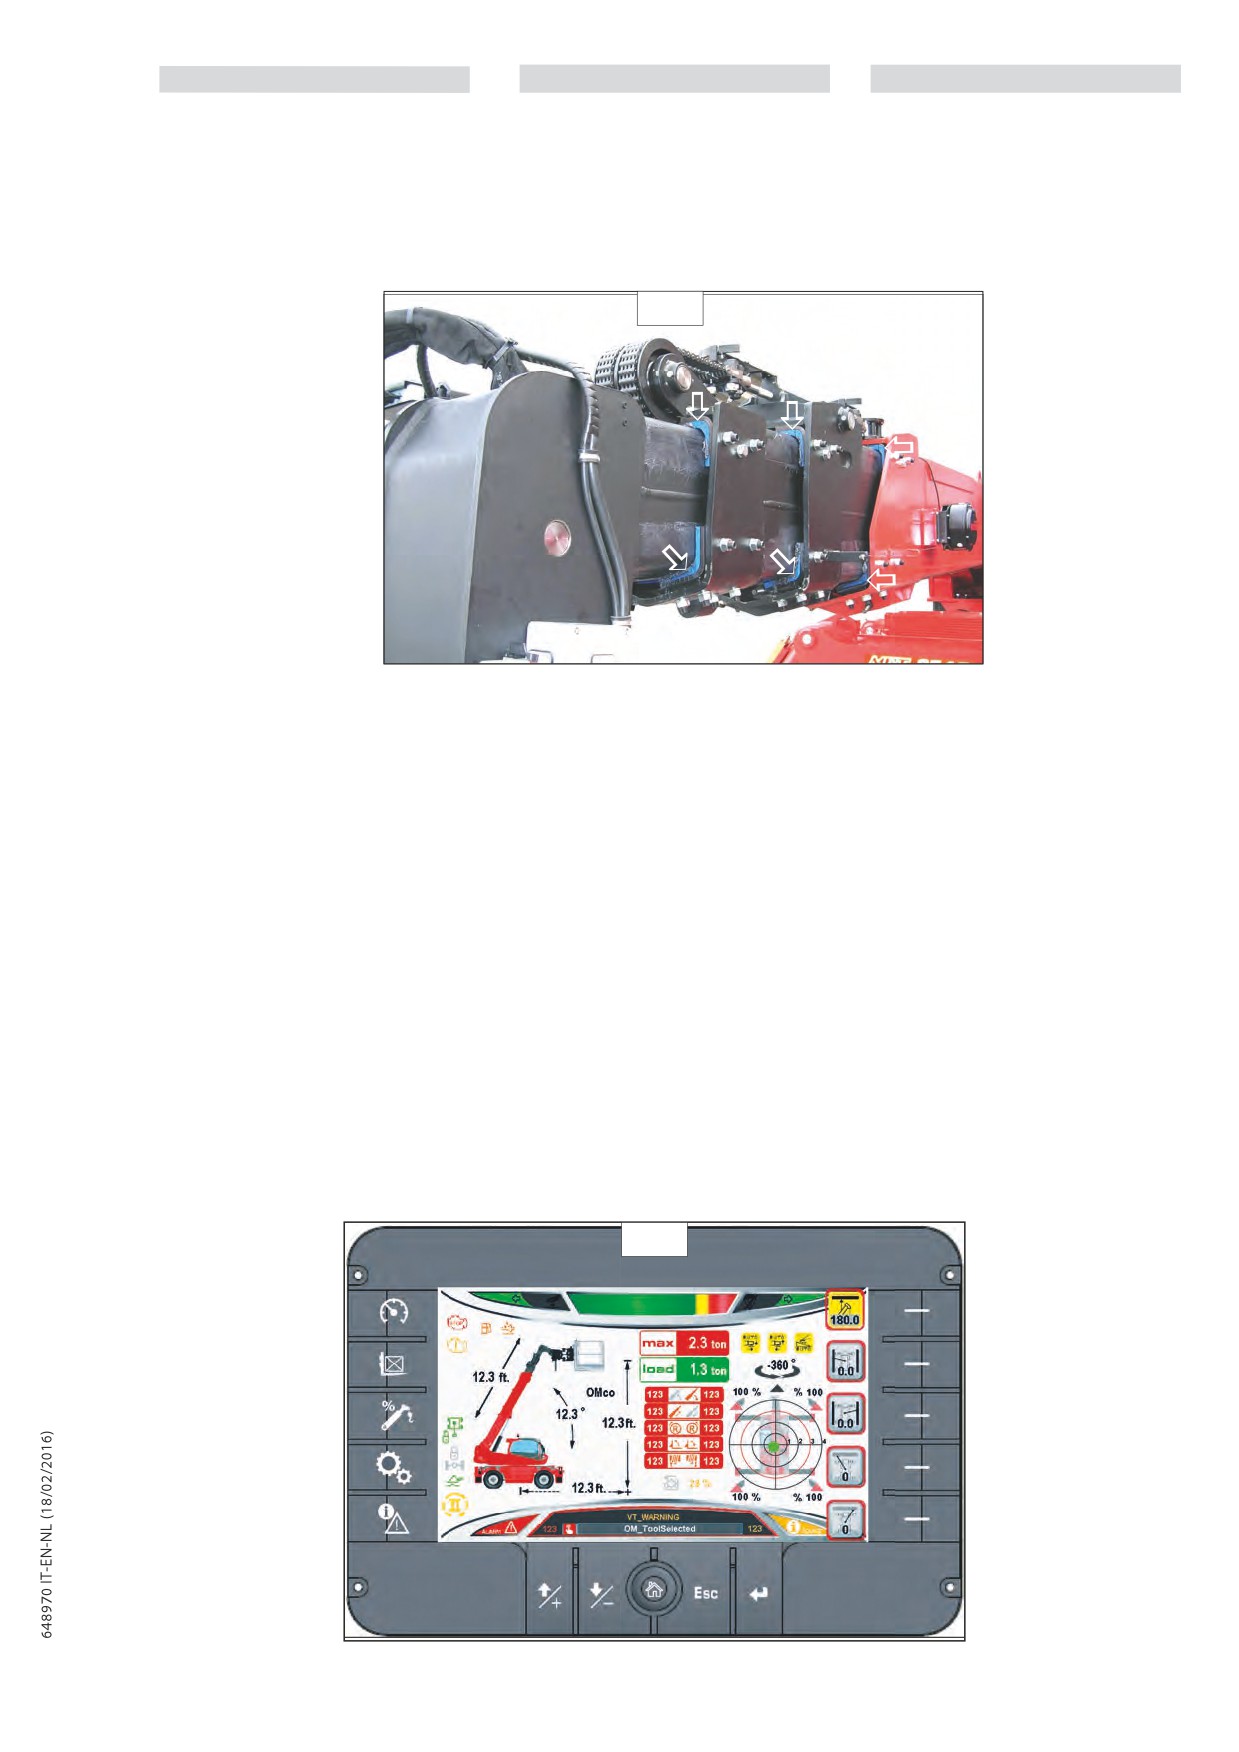
IT
EN
NL
A3 - Controllare i pattini del braccio
A3 - Check greasing of telescopic
A3 - De glijschoenen van de telescopische
telescopico
boom sliding blocks
arm controleren
Sfilare completamente il braccio telescopico
Extract telescopic boom completely and
Schuif de telescopische arm volledig uit
e verificare il corretto ingrassaggio dei
check to make sure the telescopic boom
en controleer of de glijschoenen van de
pattini del braccio telescopico (se fossero
sliding blocks are greased properly (if they
telescopische arm correct gesmeerd zijn (zie
da ingrassare vedere punto B5).
are to be greased, see point B5).
punt B5 als ze gesmeerd moeten worden).
A3
A4 - Verifica del sistema di sicurezza.
A4 - Inspection of the safety system
A4 - Controle van het veiligheidssysteem
Verificare con l’aiuto di una corda metrica e
Controleer met behulp van een meetlint
di una livella le indicazioni di lunghezza (L)
To check the way the safety system works,
en een waterpas de aanwijzingen met
ed angolo (A) braccio.
use a measuring cord and a level to check
betrekking tot de lengte (L) en de hoek (A)
Verificare poi il funzionamento del sistema
the arm angle (A) and length (L) indica-
van de arm.
di sicurezza sollevando un peso noto, con
tions.
Controleer vervolgens de werking van
forche a braccio chiuso, e controllando che
Then lift a known weight with the fork arms
het veiligheidssysteem door een bekend
la lettura del carico sul sistema sia corretta.
closed and make sure that the load reading
gewicht op te heffen, met de vorken
Infine sfilare il carico
(mantenendolo
in the system is correct.
en gesloten arm, en controleer of de
a circa 0,5 metri dal suolo) e controllare
Lastly, extend the load (keeping it about
gewichtwaarde op het systeem correct is.
che raggiunga il limite prestabilito dal
0.5 meters from the ground) then make
Schuif tot slot de last uit (houd hem ongeveer
diagramma e che la macchina blocchi i
sure that it reaches the limit established by
0,5 meter boven de grond) en controleer
movimenti aggravanti all’intervento del
the diagram and that the machine blocks
of de op voorhand door het diagram
sistema di sicurezza.
the load bearing movements when the
bepaalde limiet bereikt en of de machine
safety system activates.
de verzwarende bewegingen blokkeert met
behulp van het veiligheidssysteem.
A4
3-18
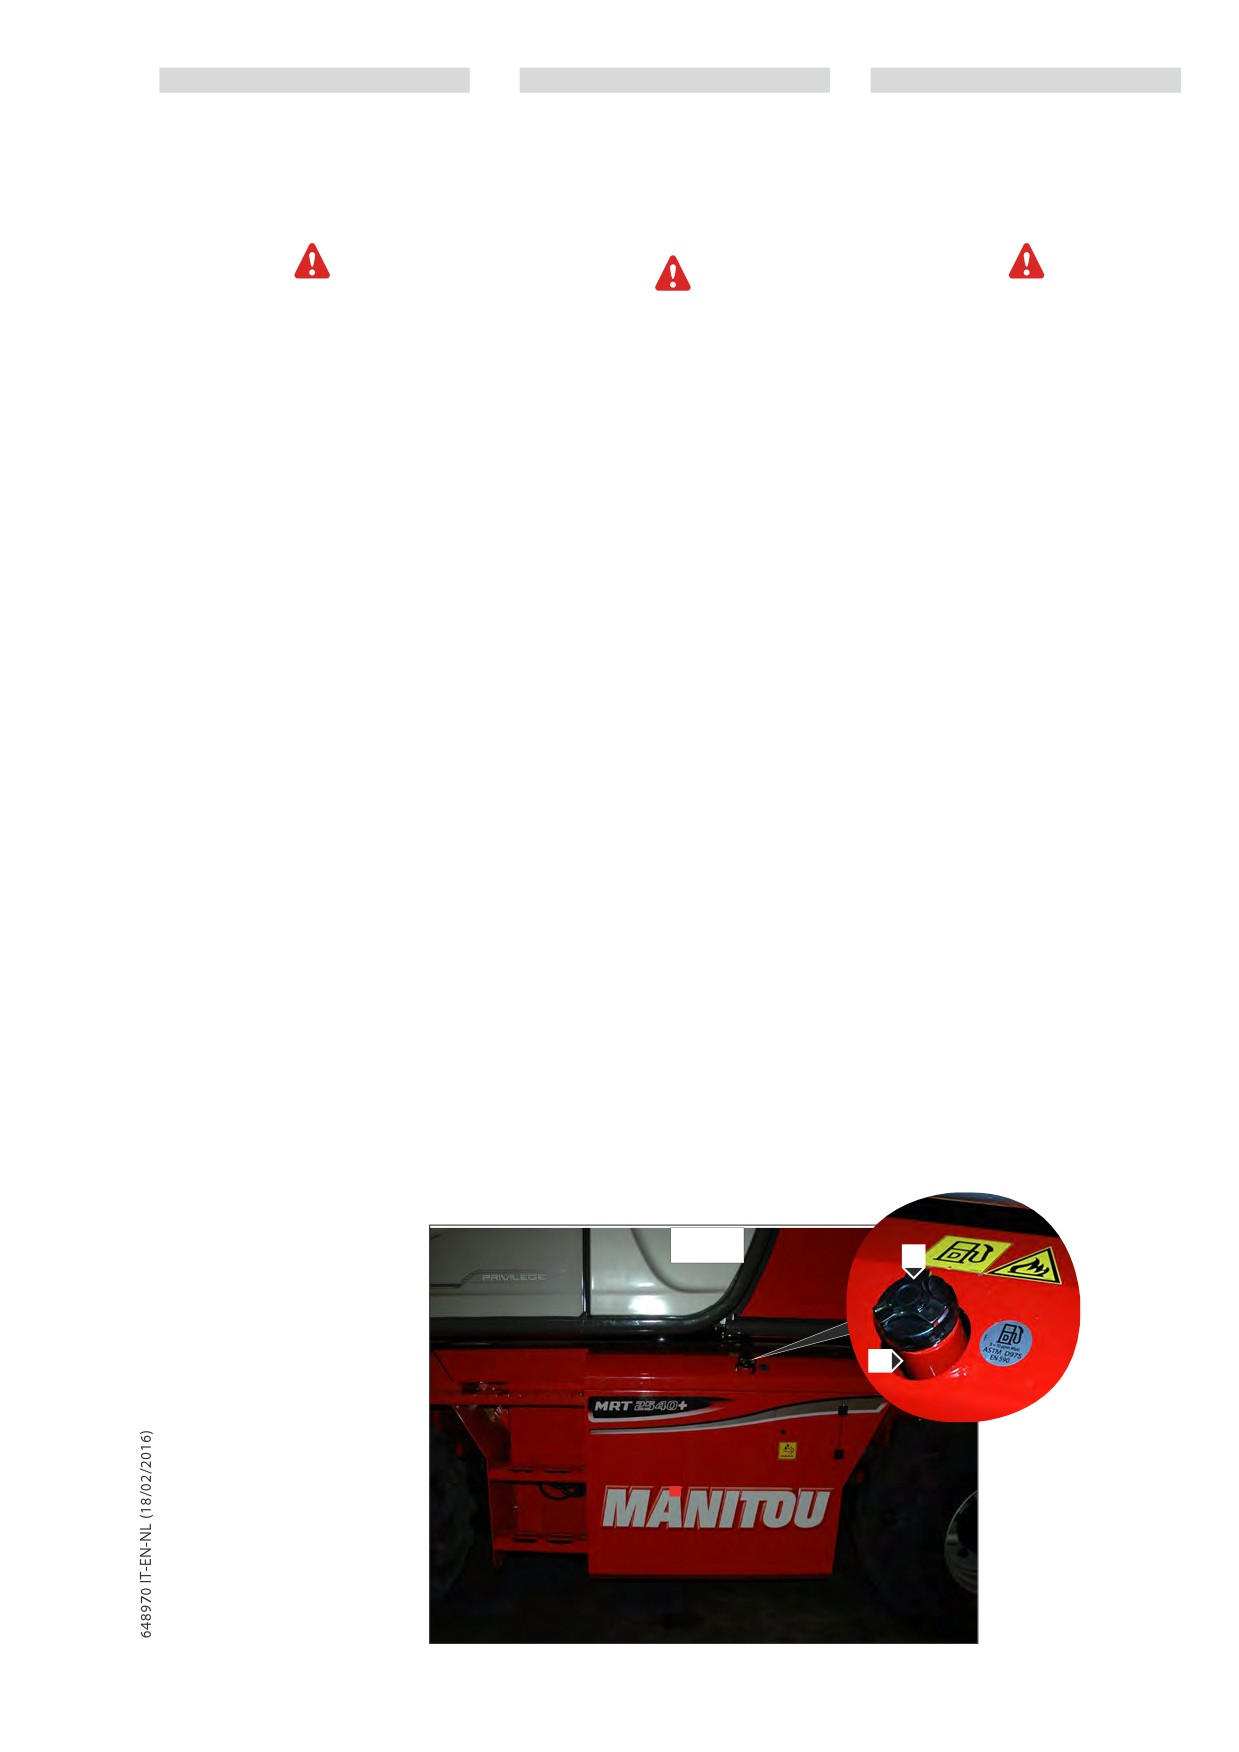
IT
EN
NL
A5 - Controllare il livello del combustibile
A5 - Check the fuel level
A5 - Het peil van de brandstof controleren
Mantenere pieno
quanto possibile il
Keep the fuel tank full as far as possible to
Zorg ervoor dat, voor zover mogelijk, de
reduce condensate due to atmospheric con-
serbatoio del combustibile, per ridurre al
brandstoftank altijd vol is om de door
ditions to the minimum.
massimo la condensa dovuta alle condizioni
de weersomstandigheden veroorzaakte
atmosferiche.
condensatie zoveel mogelijk te beperken.
Non fumare o avvicinarsi con una fiamma
Rook niet tijdens het vullen of breng
Do not smoke or use a naked flame during
libera durante le operazioni di riempimento
geen vlam in de buurt als de tank open
refuelling operations or when the tank is
o quando il serbatoio è aperto.
is.
open.
Non effettuare mai il pieno con il motore
Never refuel with the engine running.
Vul de tank nooit als de motor draait.
acceso.
- Controllare l’indicatore sul quadro
- Check the indicator on the instruments
-
Controleer de meter op het
strumenti.
dashboard.
panel.
- Se necessario aggiungere gasolio (vedere:
- Vul indien nodig dieselolie bij (zie: 3
- If necessary, add fuel (see: 3 - MAINTENANCE:
3
- MANUTENZIONE: LUBRIFICANTI E
- ONDERHOUD: SMEERMIDDELEN EN
LUBRICANTS AND FUEL).
CARBURANTE).
BRANDSTOF).
- Aprire lo sportellino d’accesso riempimento
- Open the door to access the tank for
- Open het klepje om brandstof bij te
carburante.
refuelling.
vullen.
- Togliere il tappo
“1”(fig.A5) servendosi
- Remove cap “1” (Fig.A5) using a contact
- Verwijder de dop
“1”
(Fig.A5) met
della chiave di contatto.
behulp van de startsleutel.
wrench.
- Riempire il serbatoio con gasolio pulito e
- Giet schone en gefilterde diesel in de
- Fill the tank with clean filtered fuel through
filtrato, attraverso l’orifizio di riempimento
tank via de vulopening “2” (Fig.A5).
filler hole “2” (Fig. A5).
“2” (fig.A5).
- Breng de dop weer op zijn plaats.
- Refit the cap.
- Rimettere il tappo.
- Controleer visueel of er geen lekkages
- Mediante un controllo visivo accertarsi
- Inspect the tank and pipes for leaks.
zijn op de tank en de leidingen.
che non vi siano perdite sul serbatoio e le
tubazioni.
A5
1
2
3-19
IT
EN
NL
A6 - Controllare il livello di liquido “DEF”
A6 - Check the “DEF” level
A6 - Het peil van de “DEF”-vloeistof controleren
Se il tappo del serbatoio di “DEF” viene aperto
Als de dop van de“DEF”-tank wordt geopend bij
in presenza di temperature elevate, possono
hoge temperaturen, kunnen er ammoniakdampen
If the “DEF” tank cap is opened at high tempe-
vrijkomen.
fuoriuscire vapori di ammoniaca.
ratures, ammonia vapours may escape.
Ammoniakdampen hebben een scherpe geur en
I vapori di ammoniaca hanno un odore
Ammonia vapours have a pungent odour and
zijn irriterend voor
pungente e risultano irritanti in particolare per
- de huid
particularly irritate:
- la pelle
- de slijmvliezen
- le mucose
- skin
- de ogen
- gli occhi
- mucous membranes
De aanwezigheid van dampen kan een brandend
La presenza dei vapori può causare bruciore
- eyes
gevoel aan de ogen, de neus en de mondholte
veroorzaken, alsook hoestbuien en tranende
agli occhi, al naso e alle cavità orali nonché
The vapours may cause a burning sensation
ogen.
tosse e lacrimazione.
in the eyes, nose and throat as well as irrita-
Ammoniakdampen mogen niet ingeademd
Non inalare i vapori di ammoniaca.
tion of the throat and watering eyes.
worden.
Avoid inhaling ammonia vapours.
Il “DEF” non deve venire a contatto con la pelle,
De “DEF” mag niet in contact komen met de
gli occhi o gli indumenti.
huid, de ogen of kledingstukken.
- Se il “DEF” viene a contatto con gli occhi
“DEF” must not come into contact
- Als de “DEF” in contact komt met de ogen
o la pelle, sciacquare immediatamente e
with skin, eyes or clothing.
of de huid, dient u deze onmiddellijk en
accuratamente con acqua pulita.
- If “DEF” comes into contact with your eyes or
zorgvuldig af te spoelen met zuiver water.
- In caso di ingerimento del “DEF” sciacquare
skin, rinse affected areas with clean water
- Als de “DEF” ingeslikt wordt, dient u de mond
onmiddellijk en overvloedig te spoelen met
immediatamente la bocca con abbondante
immediately.
zuiver water en veel water drinken.
acqua pulita e bere acqua in abbondanza.
- If “DEF” is swallowed, immediately rinse your
- Kledingstukken die met de “DEF” in contact
- Sostituire immediatamente gli indumenti
mouth out with a lot of clean water and
zijn gekomen dienen onmiddellijk vervangen
imbrattati con “DEF”.
drink plenty of water.
te worden.
- In caso di reazioni allergiche consultare
- Change clothing that is soiled with “DEF”
- Raadpleeg in geval van allergische reacties
immediatamente un medico.
onmiddellijk een arts.
Tenere il “DEF” fuori dalla portata dei bambini.
immediately.
Houd de “DEF” buiten het bereik van kinderen.
- If allergic reactions occur, consult a doctor
immediately.
Keep “DEF” out of the reach of
children.
Durante l’esercizio e dopo l’arresto del motore
Tijdens de werking en nadat de motor
le tubazioni “DEF” e tutti i componenti collegati
stopgezet is, blijven de “DEF”-geleidingen en alle
restano in pressione e possono risultare molto
aangesloten onderdelen onder druk. Ze kunnen
caldi. Per tale ragione sussiste il pericolo di
The “DEF” lines and all connected
heel warm zijn. Daarom bestaat het gevaar voor
ustioni. Aprendo l’impianto sussiste il pericolo
components are pressurised during operation
brandwonden. Wanneer de installatie geopend
di ustioni causato dagli spruzzi di “DEF” ad alta
and could be hot, even after the engine has
wordt, is er gevaar voor brandwonden die
temperatura.
been switched off. There is a risk of burns.
veroorzaakt worden door hete “DEF”-spatten.
- Iniziare gli interventi sul sistema di post-
When opening the pressurised system, there
- Wacht ten minste 5 minuten nadat u de motor
trattamento dei gas di scarico non prima
heeft uitgeschakeld voordat u de ingrepen op het
is a risk of scalding due to hot “DEF”
che siano trascorsi almeno 5 minuti dallo
nabehandelingssysteem van de uitlaatgassen
spraying out.
spegnimento del motore.
start.
- Aprire lentamente i raccordi delle tubazioni
- Wait at least 5 minutes after switching off the
-Weesvoorzichtigwanneerudeverbindingsstukken
e gli elementi di bloccaggio dei componenti
engine before starting work on the exhaust
van de leidingen en de blokkeringselementen van
del sistema. Durante l’apertura coprire il
gas aftertreatment system.
de onderdelen van het systeem opent. Bedek het
punto di sezionamento con un panno.
- Open line connections and caps on system
punt dat geopend wordt met een doek.
- Indossare guanti, indumenti e occhiali
components slowly. Cover the area that you
- Draag beschermende handschoenen, kleding en
protettivi.
are disconnecting with a cloth.
bril.
- Wear suitable protective gloves, protective
La penetrazione del “DEF” nel circuito del
Het binnendringen van
“DEF” in het
clothing and safety goggles.
liquido di raffreddamento (anche in quantità
koelvloeistofcircuit (ook in geval van een kleine
minima) causa il danneggiamento dei
hoeveelheid) beschadigt de thermostaten en
termostati e dei sensori della temperatura.
If “DEF” gets into the coolant circuit
de temperatuursensoren.
- Si raccomanda assolutamente di separare
(even minute amounts), thermostats
- Het is raadzaam om de “DEF” gescheiden te
il “DEF” dagli altri materiali di consumo.
and temperature sensors will be damaged.
houden van de andere grondstoffen.
- Non utilizzare gli stessi recipienti e
- Always keep “DEF” completely separate from
- Voor het inzamelen van de “DEF” en de
vaschette di raccolta per il “DEF” e per agli
other service products.
andere grondstoffen mogen niet dezelfde
altri materiali di consumo.
containers en bakjes worden gebruikt.
- Do not use the same containers and fluid
- Non utilizzare materiali di consumo
- Gebruik geen grondstoffen die sporen van
collecting pans for “DEF” and other service
contenenti tracce di “DEF”.
“DEF” bevatten.
products.
I singoli componenti del sistema Blue-Tec®
- Do not continue to use service products that
De afzonderlijke elementen van het Blue-
reagiscono in modo estremamente sensibile
contain traces of “DEF”.
Tec®-systeem reageren op extreem gevoelige
anche in presenza di tracce minime di impurità
wijze, ook in geval van minieme sporen van
contenute nel “DEF”.
Individual components of the BlueTec® system
onzuiverheden die zich in de “DEF” bevinden.
- Utilizzare esclusivamente recipienti e
react very sensitively to even the slightest trace
- Gebruik uitsluitend schone opvangbakjes die
vaschette di raccolta puliti, idonei a
geschikt zijn om “DEF” te bevatten.
of impurities in “DEF”.
contenere il “DEF”.
- Gebruik geen
“DEF” die sporen van
- Only use containers and fluid collecting pans
- Non utilizzare “DEF” contenente tracce di
onzuiverheden bevat.
impurità.
that are clean and suitable for “DEF”.
- Do not continue to use “DEF” which contains
traces of impurities.
Fire fighting measures
Misure antincendio
“DEF” is not flammable. In the event
Brandbestrijdingsmaatregelen
Il “DEF” non è infiammabile. In caso di incendio
of a fire, NH3 (ammonia) may be released.
“DEF” is niet ontvlambaar. In geval van brand
può essere liberata NH3 (ammoniaca).
This may result in a risk of poisoning. Measures
kan er NH3 vrijkomen (ammoniak).
3-20
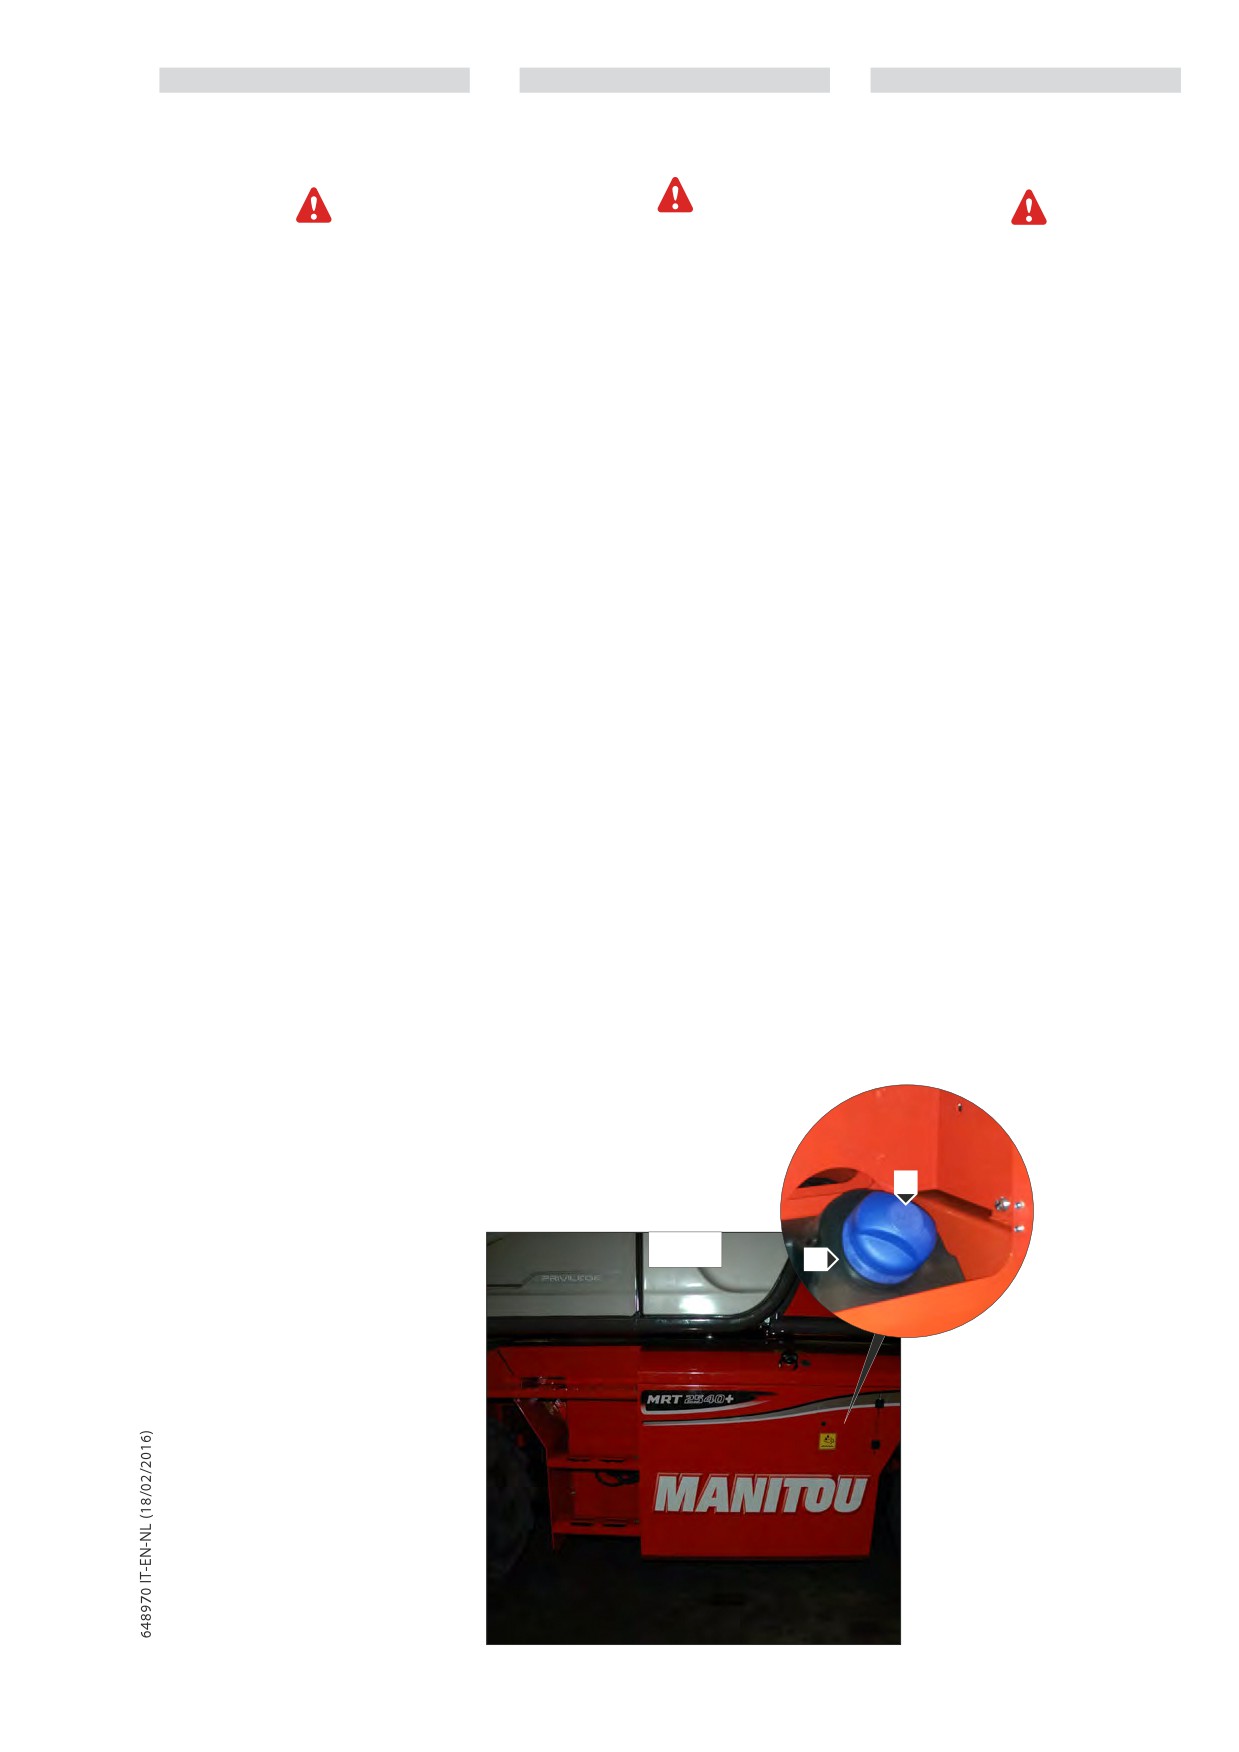
IT
EN
NL
In questo caso sussiste il pericolo di
to extinguish a fire must therefore be
In dit geval bestaat er vergiftigingsgevaar.
avvelenamento. Le misure atte a estinguere
adapted to suit the surroundings.
De maatregelen die getroffen worden
om eventuele branden te blussen
eventuali incendi devono risultare idonee alle
moeten in overeenstemming zijn met de
condizioni ambientali.
milieuvoorschriften.
Environmental note
Avvertenza per la tutela ambientale
Waarschuwing met betrekking tot milieubescherming
Disposing of “DEF”:
“DEF” afdanken:
Smaltimento del “DEF”:
- Una piccola quantità di
“DEF” versata
- Due to its easy degradability, small amounts
- Een kleine hoeveelheid “DEF” die per ongeluk
wordt gemorst vormt geen probleem.
accidentalmente non è problematica. Il
of spilt “DEF” can be washed into the sewage
Het product is gemakkelijk biologisch
prodotto è facilmente biodegradabile e si
system without any problems.
afbreekbaar en kan zonder problemen in de
può disperdere senza problemi nella rete
- Larger amounts of “DEF” must be disposed of
riolering gegoten worden, samen met een
fognaria utilizzando molta acqua.
grote hoeveelheid water.
- Per lo smaltimento di maggiori quantità
correctly, observing the regulations on waste
- Voor het afdanken van een grotere
di “DEF” attenersi sempre ai requisiti della
treatment/disposal.
hoeveelheid
“DEF” dient u altijd de
legge sulla protezione dell’ambiente e il
- Packaging that is contaminated with “DEF”
voorschriften van de wet inzake
riciclo/l’eliminazione dei rifiuti.
milieubescherming en het recyclen/
residue must be treated in the same way as
- Le confezioni contenenti residui di “DEF”
verwijderen van afvalstoffen respecteren.
“DEF”. Packaging should be emptied as tho-
devono venire sottoposte ad un trattamento
- Verpakkingen die
“DEF”-resten bevatten
analogo come per il
“DEF”. Svuotare
roughly as possible, cleaned appropriately
moeten aan dezelfde behandelingen
integralmente le confezioni del loro
and then recycled.
onderworpen worden als de “DEF”. Maak
contenuto; in questo modo dopo essere
de verpakkingen helemaal leeg; zo kunnen
state pulite le confezioni potranno essere
de verpakkingen, nadat ze schoongemaakt
riutilizzate.
zijn, opnieuw gebruikt worden.
- Controllare l’indicatore sul quadro
-
Controleer de meter op het
- Check the indicator on the instruments
strumenti.
dashboard.
panel.
-
Se necessario aggiungere fluido
- Vul indien nodig
“DEF”-vloeistof
- If necessary, add
“DEF”
(see:
3
-
“DEF”
(vedere:
3
- MANUTENZIONE:
bij
(zie:
3
-
ONDERHOUD:
LUBRIFICANTI E CARBURANTE).
MAINTENANCE: LUBRICANTS AND FUEL).
SMEERMIDDELEN EN BRANDSTOF).
-
Aprire lo sportellino d’accesso al
- Open the door to access the tank for
- Open het klepje dat toegang geeft
bocchettone di riempimento del fluido
refuelling.
tot de vulopening van de
“DEF”-
“DEF”.
- Remove cap “1” (Fig.A6) using a contact
vloeistof.
-
Togliere il tappo
“1”(fig.A6) del
- Verwijder de dop “1” (Fig.A6) van de
wrench.
bocchettone di riempimento.
vulopening.
- Fill the tank with clean filtered “DEF” throu-
- Rabboccare il serbatoio con fluido “DEF”
- Vul de tank met schone en verse
gh filler hole “2” (Fig. A6).
incontaminato e fresco, attraverso il
“DEF”-vloeistof via de vulopening “2”
bocchettone di riempimento “2” (fig.A6).
- Refit the cap.
(Fig.A6).
- Rimettere il tappo “1”(fig.A6).
- Inspect the tank and pipes for leaks.
- Plaats de dop “1” terug (Fig.A6).
- Mediante un controllo visivo accertarsi
- Controleer visueel of er geen lekkages
che non vi siano perdite sul serbatoio e
zijn op de tank en de leidingen.
le tubazioni.
1
A6
2
3-21
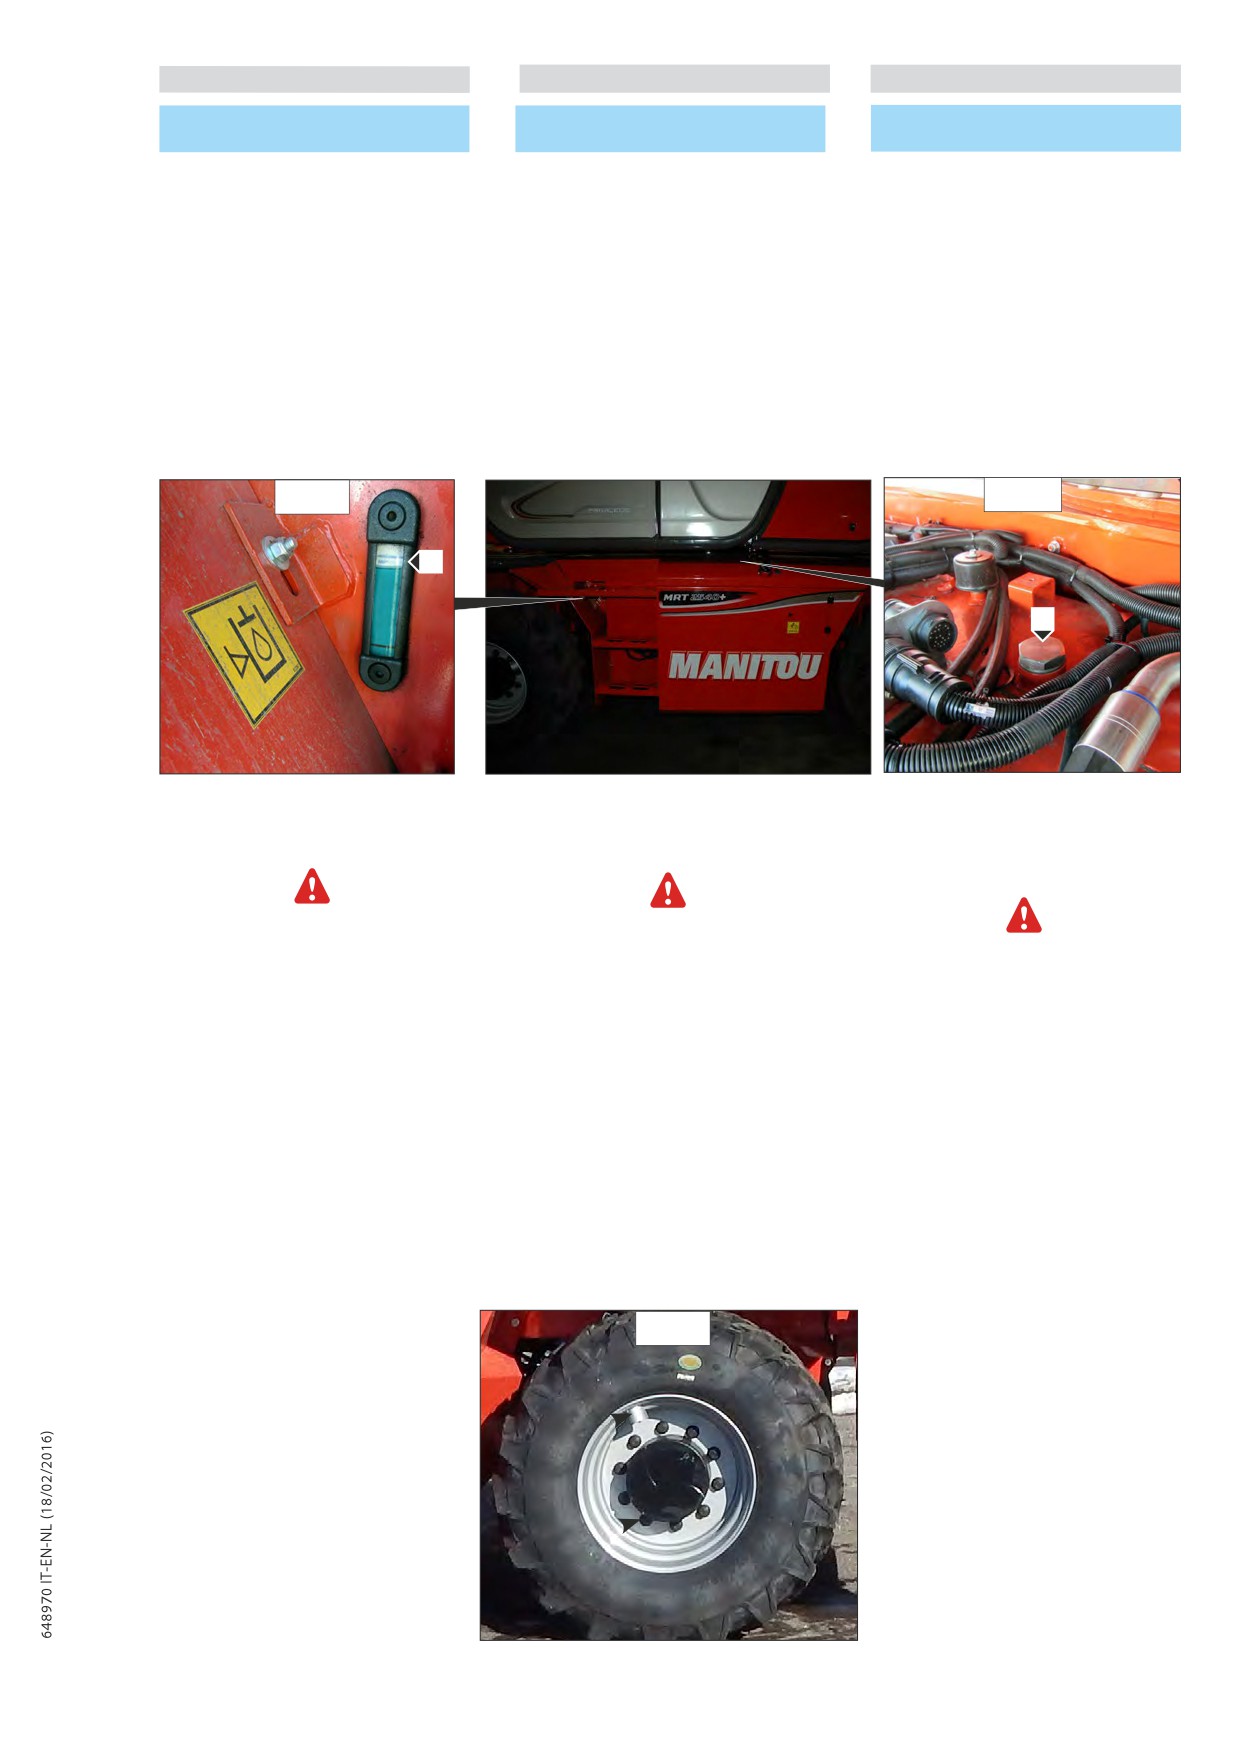
IT
EN
NL
B - OGNI 50 ORE DI
B - EVERY 50 HOURS OF SERVICE
B - OM DE 50 WERKUREN
FUNZIONAMENTO
B1 - Het niveau van de hydraulische olie
B1 - Controllare livello olio idraulico
B1 - Check the hydraulic and
controleren
transmission oil level
Posizionare il carrello su una superficie
Plaats de heftruck op een vlak oppervlak
piana con il motore spento e il braccio
Set the truck on a flat surface with the
met de motor uitgeschakeld en de
telescopico ritratto e abbassato quanto più
engine off and the telescopic boom
telescopische arm ingetrokken en in een zo
possibile.
retracted and as low as
laag mogelijke positie.
Riferirsi all’indicatore 1 (fig. B1/2).
possible.
Verwijs naar indicator 1 (Fig.B1/2).
Il livello dell’olio è corretto quando si
Refer to gauge 1 (fig. B1/2).
Het oliepeil is correct wanneer het
trova tra il riferimento superiore e quello
The oil level is correct when it is
zich tussen het hoogste en de laagste
inferiore.
between the upper and lower marks.
referentiepunt bevindt.
- Se necessario, aggiungere olio (vedere
- Add oil if necessary (consult the
- Vul indien nodig olie bij (zie
“ LUBRIFICANTI”) attraverso il foro di
“LUBRICANT” chart) through fill hole 2
“SMEERMIDDELEN”) via de vulopening 2
riempimento 2 (fig. B1/1).
(fig. B1/1).
(Fig.B1/1).
È necessario mantenere sempre il livello
The oil should always be kept to its
Het oliepeil moet altijd op het
d’olio al massimo.
maximum level.
maximumniveau worden gehouden.
B1/2
B1/1
1
2
B2 - Controllare pressione pneumatici e
B2 - Check the pressure and wheel nut
B2 - De spanning van de banden en de
serraggio dadi ruote
torque
aandraaiing van de moeren van de
wielen controleren
Controllare che il tubo dell’aria sia
Check that the air hose is correctly connected
correttamente collegato alla valvola del
to the tyre valve before inflating and keep all
Controleer of de luchtslang goed
pneumatico prima di iniziare il gonfiaggio e
persons at a distance during inflation. Respect
is aangesloten op de nippel van de
allontanare chiunque durante lo svolgimento
the recommended tyre pressures given.
band voordat u de band opblaast en
delle operazioni. Attenersi alle pressioni di
zorg ervoor dat niemand tijdens deze
gonfiaggio raccomandate.
handeling in de buurt kan komen. Neem
de aanbevolen bandendruk in acht.
- Controllare lo stato degli pneumatici per
- Check the condition of the tyres, to detect
- Controleer de staat van de banden op
individuare tagli, protuberanze, usure, ecc.
cuts, protuberances, wear, etc.
sneden, bobbeltjes, slijtage enz.
- Controllare il serraggio dei bulloni
- Check the torque load of the wheel nuts.
- Controleer of de moeren van de
delle ruote. La mancata osservanza di
Non-compliance with this instruction can
wielen naar behoren zijn aangedraaid.
questa avvertenza potrebbe causare il
Zo niet zouden de bouten van de
cause damage and rupture to the wheel
deterioramento e la rottura dei perni delle
wielen kunnen worden beschadigd en
bolts and distortion to the wheels.
breken en kunnen de wielen worden
ruote, nonché la deformazione delle ruote
- Check and restore tyre pressures if neces-
vervormd.
stesse.
sary.
- Controleer de druk van de banden
- Controllare e, se necessario, regolare la
Inflation pressure, AEOLUS 445/65R22.5
en breng ze zo nodig op de juiste
pressione degli pneumatici.
TL AGP23 (standard tyres):
waarde.
Pressione di gonfiaggio, AEOLUS
•Front wheels : 8 bar - 116 psi
Bandendruk, AEOLUS 445/65R22.5 TL
445/65R22.5 TL AGP23 (pneumatici std):
•Rear wheels : 8 bar - 116 psi
AGP23 (std-banden):
•Ruote anteriori: 8 bar - 116 psi
•Voorwielen: 8 bar - 116 psi
•Ruote posteriori: 8 bar - 116 psi
•Achterwielen: 8 bar - 116 psi
B2
3-22
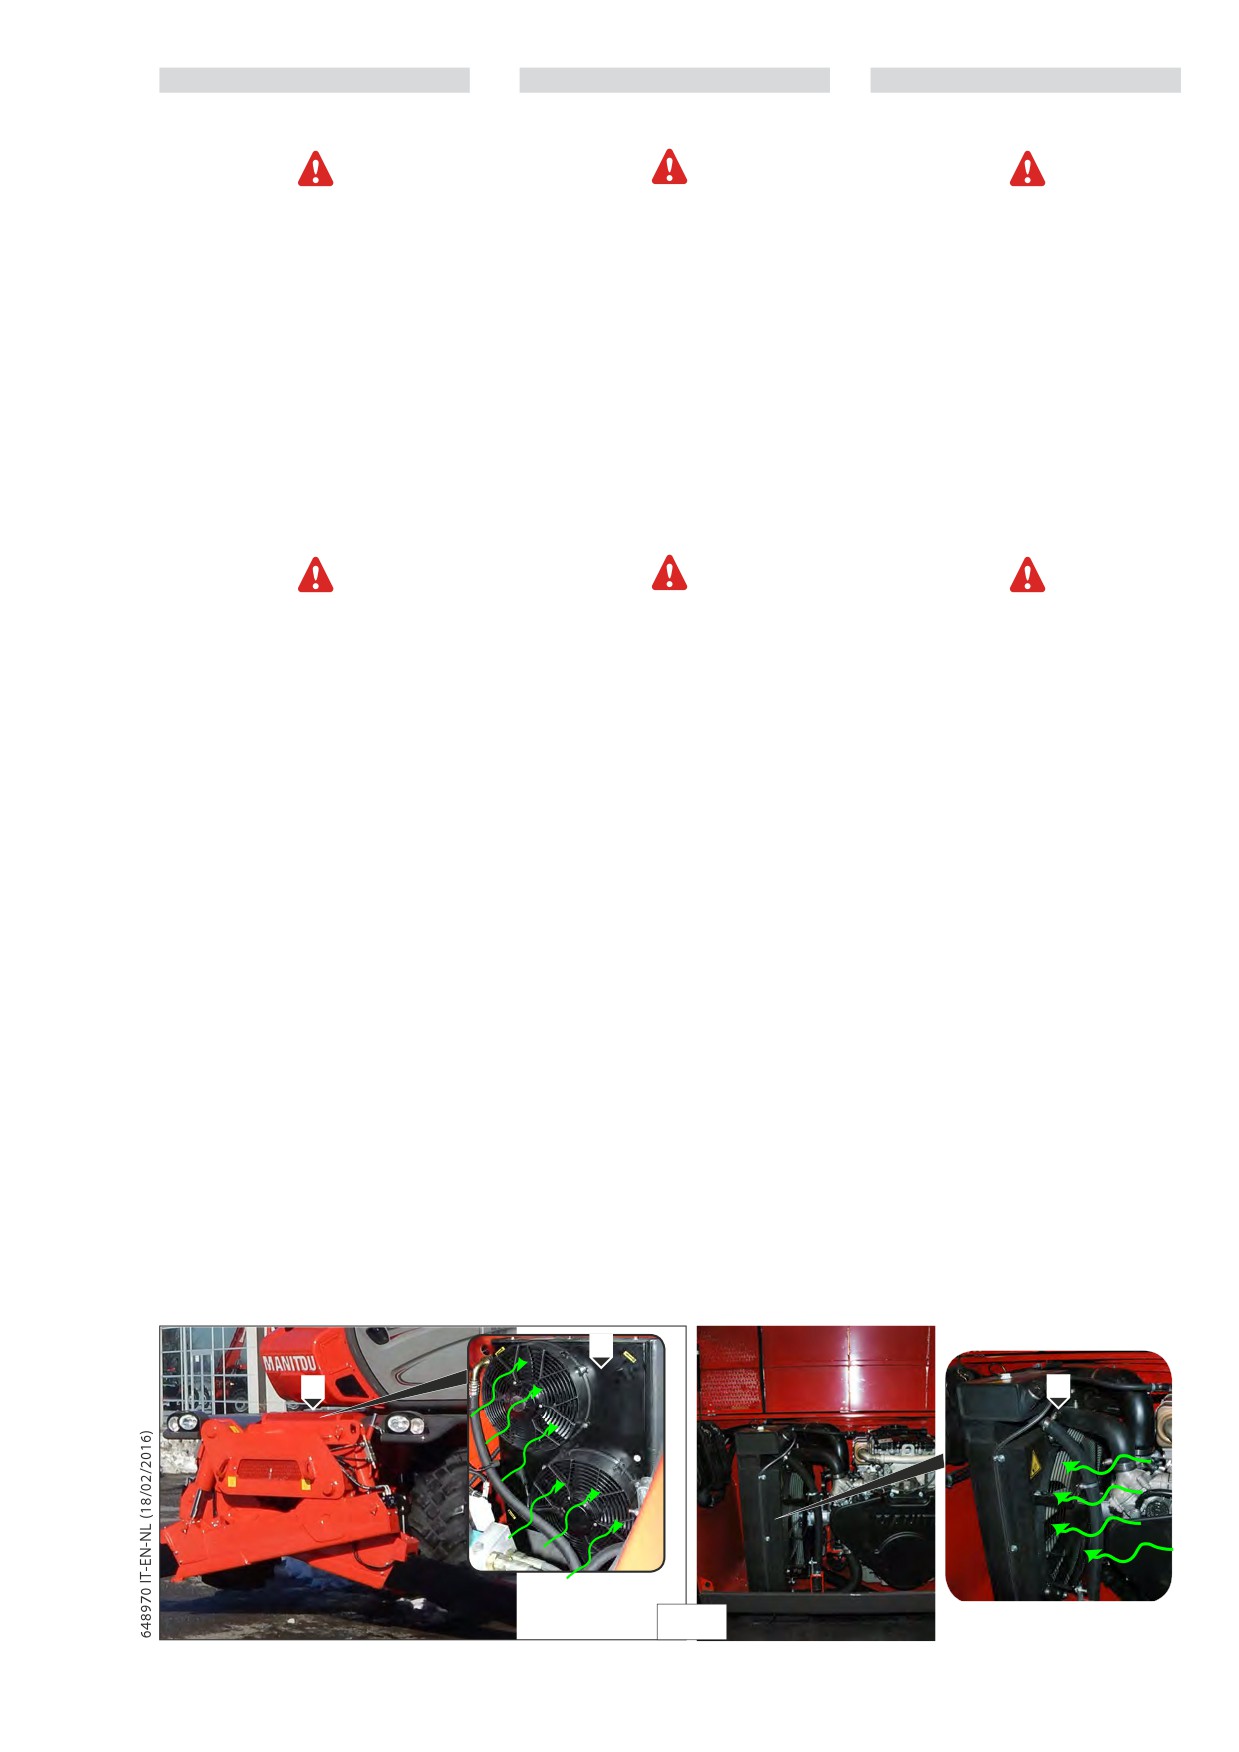
IT
EN
NL
B3 - Pulire griglia del radiatore dell’olio
B3 - Clean the oil radiator grille,
B3 - Het rooster van de radiator
dell’acqua, dell’intercooler.
water, intercooler.
schoonmaken.
Regolare la frequenza della pulizia in
Adjust the cleaning frequency according
Regel
de schoonmaakfrequentie
funzione dell’ambiente operativo.
to the operating environment.
afhankelijk van de werkomgeving.
Ispezionare questi elementi del radiatore:
Inspect these radiator elements. damaged
Controleer de volgende onderdelen van de
alette danneggiate, corrosione, sporcizia,
fins, corrosion, dirt, grease, insects, leaves,
radiator: beschadigde schoepen, corrosie, vuil,
grasso, insetti, foglie, olio e altri detriti.
oil or other debris.
vet, insecten, bladeren, olie en ander afval.
Pulire il radiatore, se necessario.
Clean the radiator, if necessary.
Maak de radiator schoon, indien nodig.
L’aria compressa è il metodo migliore per
Using compressed air is the best method to
Afval kan het beste verwijderd worden met
rimuovere i detriti.
remove detritus.
perslucht.
Dirigere il getto dell’aria nella direzione
Aim the air jets in the direction opposite
Richt de luchtstraal in de tegenovergestelde
opposta al flusso d’aria della ventola “1”
the air flow of fan “1” (Fig. B3). Keep the
richting van de luchtstroom van de klep “1”
(fig.B3). Tenere l’ugello a circa 6 mm (0,25
nozzle about 6mm (0.25”) away from the
(Fig.B3). Houd de straalpijp op ongeveer 6
pollici) dalle alette del radiatore.
radiator fins.
mm (0,25 inch) afstand van de schoepen van
Muovere lentamente l’ugello dell’aria
Move the air nozzle slowly parallel to the
de radiator.
parallelamente ai tubi del radiatore. L’aria
radiator tubes. The pressurised air will
Beweeg de staalpijp langzaam parallel met de
pressurizzata rimuove i detriti presenti fra
remove the detritus present between the
radiatorgeleidingen. De perslucht verwijdert
i tubi.
tubes.
het vuil dat zich tussen de geleidingen bevindt.
Prima di soffiare, smontare i carter “2” (fig.
Before blowing, remove guard “2” (Fig.
Demonteer voor het blazen de carters “2”
B3) per poter espellere meglio l’aria con le
B3) to be able to expel the air with the
(Fig.B3) om de lucht met het vuil beter te
impurità.
impurities.
kunnen verdrijven.
La pressione dell’aria può causare lesioni
The air pressure can cause personal injury.
De luchtdruk kan lichamelijk letsel
personali.
veroorzaken.
Failure to respect the safety measures can
Het
niet
naleven
van
de
Il mancato rispetto delle misure di
cause personal injuries. Use a visor and
veiligheidsmaatregelen kan lichamelijk
sicurezza può causare lesioni personali.
protective clothing when using compres-
letsel veroorzaken. Wanneer u perslucht
Quando si usa aria compressa, indossare
sed air.
gebruikt, dient u een masker en
visiera e indumenti protettivi.
beschermende kleding te dragen.
The maximum pressure at the compressed
La pressione massima all’ugello dell’aria
air nozzle for cleaning must be less than
De maximumdruk van perslucht die gebruikt
compressa per la pulizia deve essere
21 bar (30psi).
wordt voor reinigingswerkzaamheden dient
inferiore a 21 bar (30psi).
lager dan 21 bar (30 psi) te zijn.
Pressurised water can also be used for clea-
Per la pulizia si può anche utilizzare acqua
Voor het reinigen kunt u ook water onder druk
sotto pressione. La pressione massima
ning. The maximum water pressure must be
gebruiken. De maximumdruk van water dat
dell’acqua per la pulizia deve essere
less than 2.8 bar (40 psi).
gebruikt wordt voor reinigingswerkzaamheden
inferiore a 2,8 bar (40 psi).
Use pressurised water to soften the mud.
dient lager dan 2,8 bar (40 psi) te zijn.
Usare acqua sotto pressione per
Clean the radiant mass on both sides.
Gebruik water onder druk om modder te
ammorbidire il fango. Pulire la massa
verzachten. Maak de stralingsmassa schoon aan
radiante da entrambi i lati.
beide kanten.
To remove oil and grease, use a degreaser
Gebruik een ontvettend reinigingsmiddel en
Per togliere olio e grasso, usare uno
and steam. Clean both sides of the radiator
stoom om olie en vet te verwijderen.
sgrassatore e vapore.
mass.
Maak beide kanten van de stralingsmassa
Pulire entrambi i lati della massa radiante.
Wash the radiating body with detergent
schoon.
Lavare la massa radiante con detergente e
and boiling water.
Was de stralingsmassa met een reinigingsmiddel
acqua bollente.
Rinse thoroughly with clean water.
en kokend water.
Sciacquare accuratamente con acqua pulita.
Spoel ze zorgvuldig af met schoon water.
Una volta pulito il radiatore, avviare il
Start de motor als de radiator schoongemaakt is.
motore.
After cleaning the radiator, start up the
Laat de motor aan het laagste toerental en
Far riscaldare il motore al regime
engine.
zonder last gedurende 3-5 minuten opwarmen.
minimo senza carico per
3-5 minuti.
Run the engine without load for 3-5 minu-
Breng de motor tot het hoogste toerental. De
Portare il motore al regime massimo. Il
tes to warm it.
werking aan het hoogste toerental doet het vuil
funzionamento a regime massimo aiuta a
Bring the engine to operating speed.
verwijderen en de stralingsmassa drogen. Breng
rimuovere i detriti e ad asciugare la massa
Running the engine at maximum speed will
het toerental terug tot het laagste toerental
radiante. Ridurre il regime del motore al
help remove dirt and dry the radiating
en zet daarna de motor stil. Inspecteer de
regime minimo e quindi arrestare il motore.
body. Reduce the engine speed to mini-
achterkant van de stralingsmassa met een lamp
Usare una lampada dietro la massa radiante
om te kijken of deze schoon is.
mum and then stop it. Use a light to check
per vedere se è pulita.
Herhaal de reinigingswerkzaamheden indien
behind the radiating body to see if it is
Ripetere la pulizia, se necessario.
nodig.
clean. If necessary, clean again.
Controleer of de schoepen beschadigd zijn.
Controllare se le alette sono danneggiate.
Gevouwen schoepen kunnen geopend worden
Check to see if the fins are damaged. Bent
Le alette piegate possono essere aperte con
met behulp van een “kam”.
fins can be straightened using a “comb”.
un“pettine”.
Inspecteer deze elementen om te
Ispezionare questi elementi per verificare
Inspect these elements to make sure they
controleren of ze in goede staat verkeren:
che siano in buone condizioni: saldature,
are in good condition: welds, mounting
lasnaden, montagestaven, luchtgeleidingen,
staffe di montaggio, tubazioni dell’aria,
brackets, air piping, connections, clamps
verbindingen, klemmen en afdichtingen.
connessioni, fascette e tenute.
and gaskets.
Voer de herstellingswerkzaamheden uit, indien
Eseguire le riparazioni, se necessario.
Carry out repairs if necessary.
nodig.
1
2
1
B3
3-23
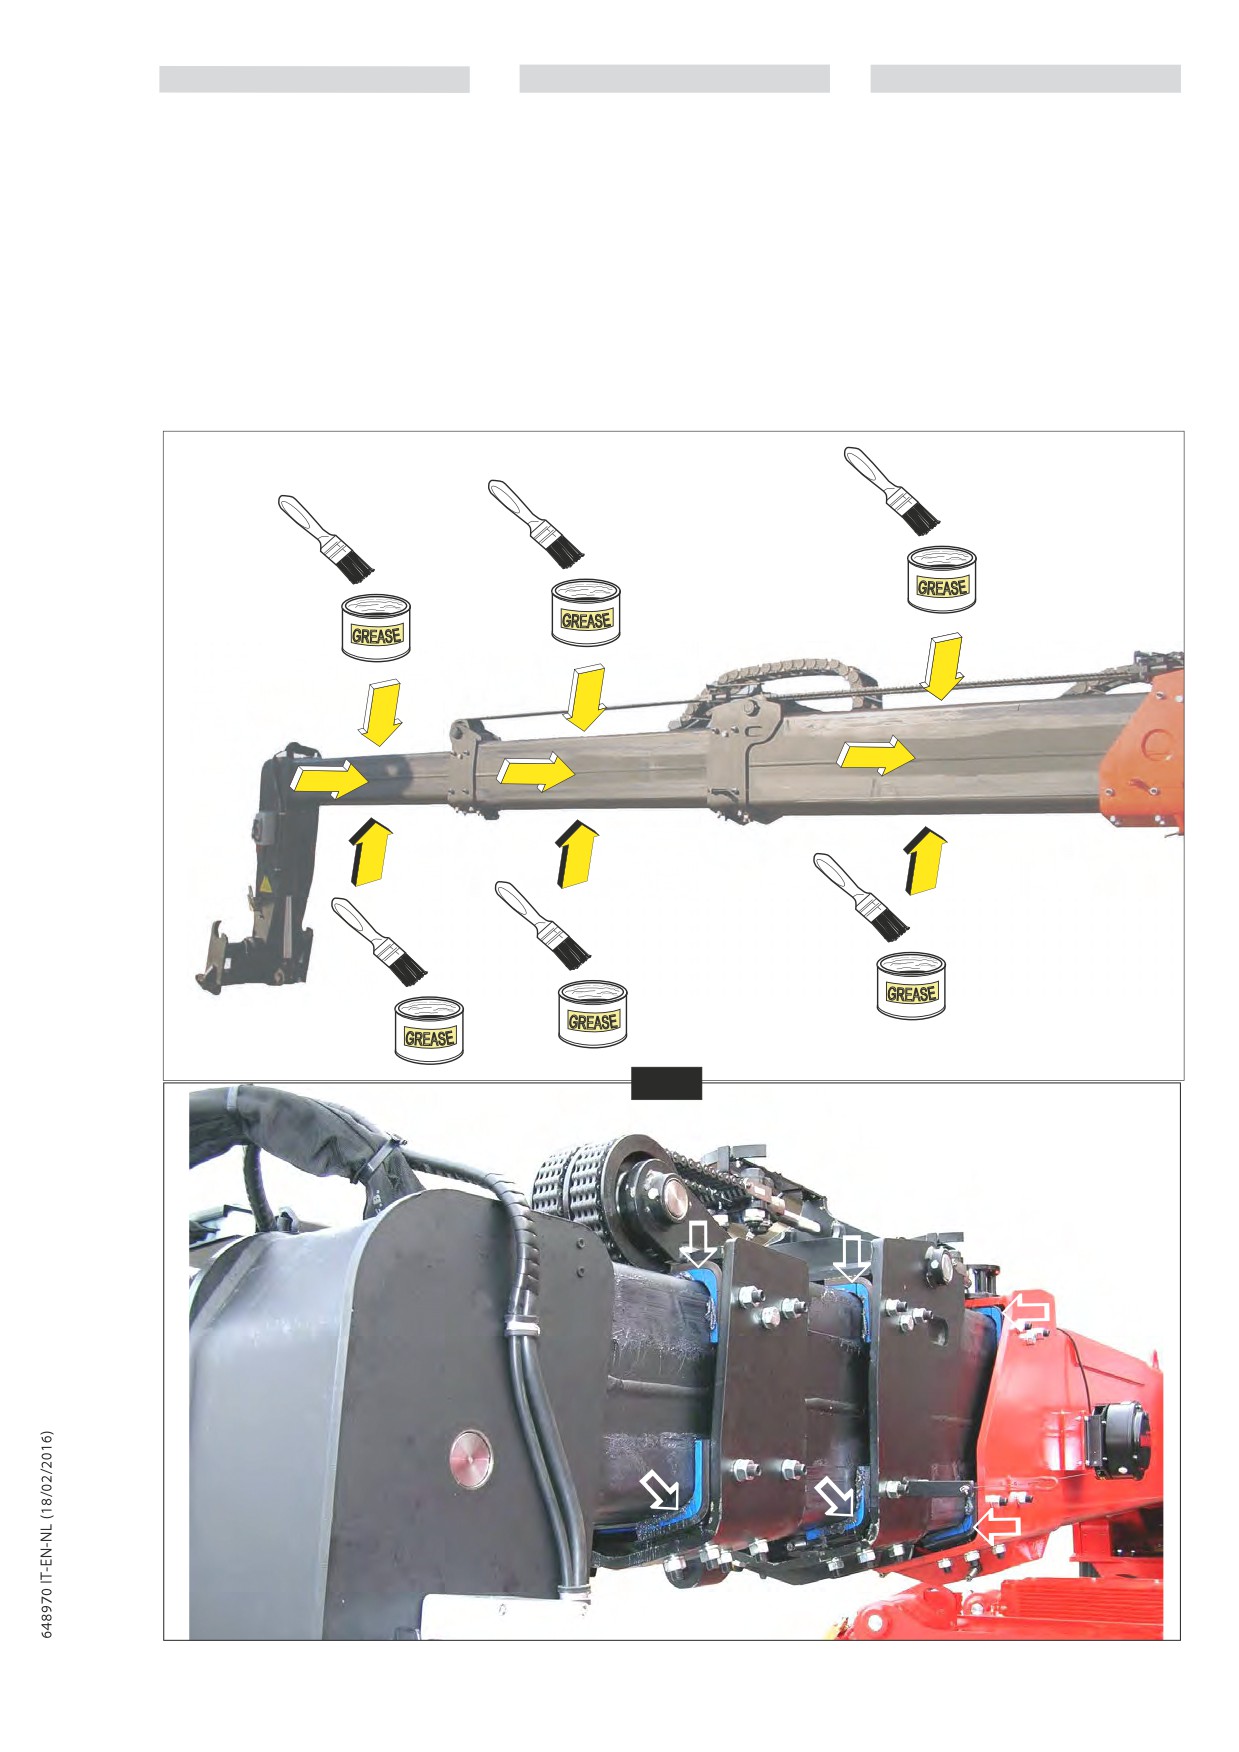
IT
EN
NL
B4 - Pulire e ingrassare pattini d’usura
B4 - Clean and grease the telescopic
B4 - De slijtageschoenen van de
del braccio telescopico
boom pads
uitschuifbare arm schoonmaken en
smeren
- Completely extend the telescopic
- Fare uscire completamente il braccio
boom.
telescopico.
- Schuif de arm volledig uit.
- Clean the surface of the telescopes
- Pulire la superficie dei bracci sfilanti
- Using a brush, apply a layer of
- Maak het oppervlak van de
- Usando un pennello, applicare uno
grease (see “LUBRICANT” chart) on
uitgeschoven armen schoon.
strato di grasso (vedere “LUBRIFICANTI”)
all 4 sides of the telescopic boom
- Breng met behulp van een
(fig. B4).
penseel een laag vet aan (zie
sui 4 lati del braccio telescopico (fig. B4).
- Operate the telescopic boom
“SMEERMIDDELEN”) op de 4 kanten
- Azionare il braccio telescopico più
several times to evenly distribute
van de telescopische arm (Fig.B4).
volte per distribuire il grasso in modo
the grease.
- Schuif de arm meerdere malen in en
uniforme.
- Remove any excess grease.
uit om het smeermiddel regelmatig
- Togliere l’eccesso di grasso.
te verspreiden.
- Verwijder het overschot aan
smeermiddel.
EA
EA
EA
EA
EA
EA
B4
3-24