Manitou MRT 1440 ST3B (400°), MRT 1640 ST3B (400°), MRT 1840 ST3B (400°-360°). MANUALE D’ISTRUZIONI - 20
 

  Index      Manuals     Manitou MRT 1440 ST3B (400°), MRT 1640 ST3B (400°), MRT 1840 ST3B (400°-360°). MANUALE D’ISTRUZIONI


Search            copyright infringement  


Content      ..     18      19      20      21     ..


Manitou MRT 1440 ST3B (400°), MRT 1640 ST3B (400°), MRT 1840 ST3B (400°-360°). MANUALE D’ISTRUZIONI - 20


3-28

IT

EN

NL

648747 IT

-EN-NL (29/08/2013)

IT

EN

NL

C

-

EVERY 250 HOURS OF SERVICE

C1 - 

Check the front and rear axles differential oil

level

Position the fork lift truck on level ground with the I.C.
engine switched off.

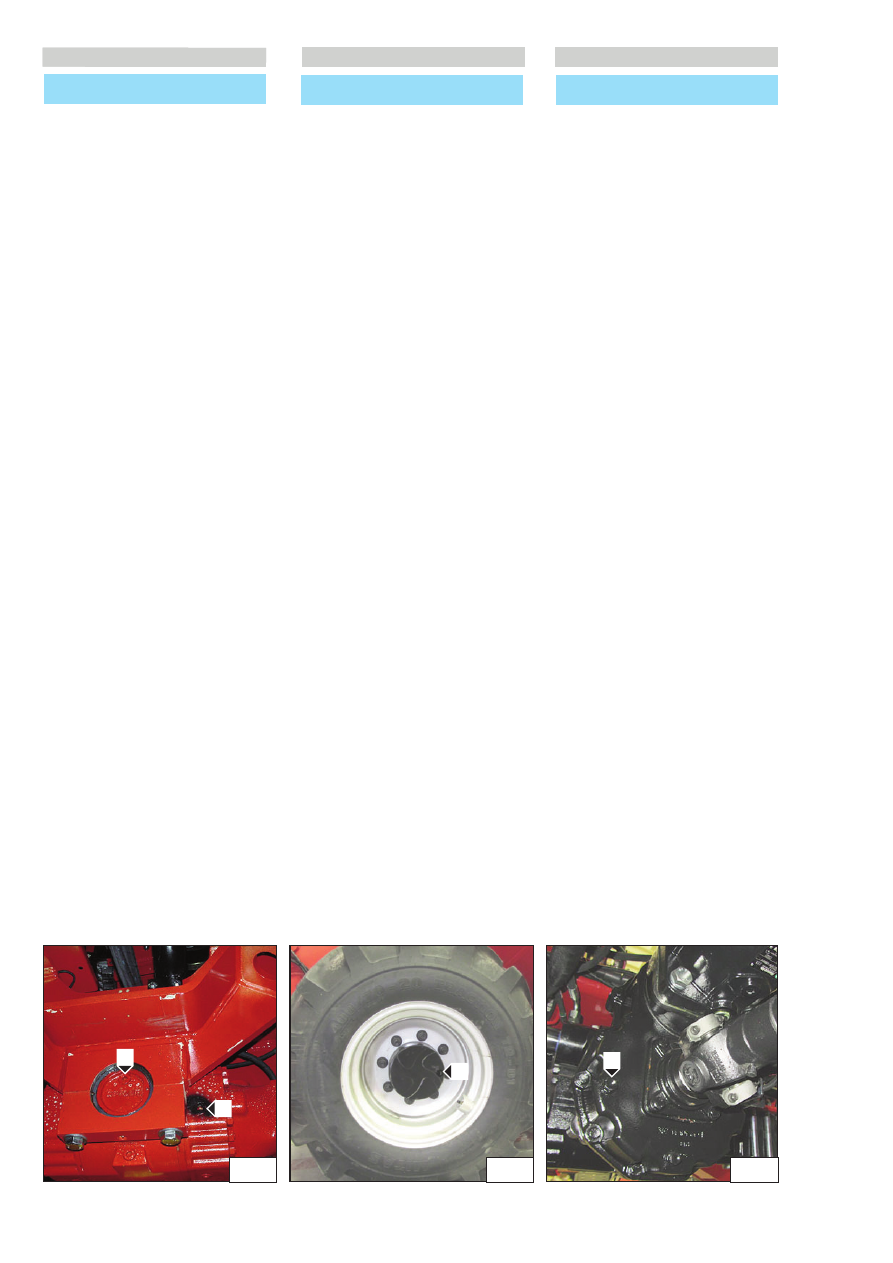
- Remove level cap “1” (Fig. C1): the oil must reach the
orifice.
- If necessary, add oil (see: 3 – MAINTENANCE: LUBRICANTS
AND FUEL) through the filler hole “2” (Fig. C1).
- Refit and tighten the level cap “1”(Fig.C1) (tightening
torque: 34 to 49 Nm).

C2 -

Check the front and rear wheels reduction gears 

oil level

Position the fork lift truck on level ground with the I.C.
engine switched off.

- Check the oil level on each reduction gear of the front
wheels.
- Position the level cap “1” (Fig. C2) horizontally.
- Remove the level cap: the oil must reach the orifice.
- If necessary, add oil (see: 3 - MAINTENANCE: LUBRICANTS
AND FUEL) through this orifice.
- Refit and tighten the level cap (tightening torque: 34 to 49
Nm).

C3  - 

Check the front axle gearbox oil level

Position the fork lift truck on level ground with the I.C.
engine switched off.

- Remove the level cap “1” (Fig. C3): the oil level must reach 

the orifice.

- If necessary, add oil (see: 3 - MAINTENANCE: LUBRICANTS 

AND FUEL) through this orifice.

- Refit and tighten the level cap “1” (Fig. C3).
- Remettre et serrer le bouchon de niveau “1”(fig.C3).

OM DE 250 WERKUREN

C1 

- Het oliepeil van de differentieel van de voor- en

achteras controleren

De heftruck op een horizontaal stuk grond zetten met de
verbrandingsmotor uit.

- De peildop “1” verwijderen (fig.C1): de olie moet tot aan
de opening staan.
- Zo nodig olie bijvullen (zie: 3 - ONDERHOUD:
SMEERMIDDELEN EN BRANDSTOF) via het vulgat “2”
(fig.C1).
- De peildop “1” (fig.C1) weer aanbrengen en aandraaien
(aandraaimoment: van 34 tot 49 N.m).

C2 - 

Het oliepeil van de reductors van de voor- en

achterwielen controleren

De heftruck op een horizontaal stuk grond zetten met de
verbrandingsmotor uit.

- Het oliepeil in beide reductors van de voorwielen
controleren.
- De peildop “1” (fig.C2) horizontaal zetten.
- De peildop verwijderen: de olie moet tot aan de opening
staan.
- Zo nodig olie bijvullen (zie: 3 - ONDERHOUD:
SMEERMIDDELEN EN BRANDSTOF) via dezelfde opening.
- De peildop weer aanbrengen en aandraaien
(aandraaimoment: van 34 tot 49 N.m).

C3 - 

Het oliepeil van de versnellingsbak van de

vooras controleren

De heftruck op een horizontaal stuk grond zetten met de
verbrandingsmotor uit.

- Verwijder de peildop “1” (fig.C3), de olie moet tot aan de
opening staan.
- Zo nodig olie bijvullen (zie: 3 - ONDERHOUD:
SMEERMIDDELEN EN BRANDSTOF) via dezelfde opening.
- De peildop “1” weer op zijn plaats brengen en aandraaien
(fig.C3).

C

-

OGNI 250 ORE DI FUNZIONAMENTO

C1 

- Controllare livello dell'olio differenziale assali 

anteriori e  posteriori

Mettere il carrello elevatore in piano, con il motore termico
spento.

- Rimuovere il tappo di livello “1”(fig.C1): l'olio deve  

arrivare all'orifizio.

- Se necessario, aggiungere olio (vedi: 3 - MANUTENZIONE: 

LUBRIFICANTI E CARBURANTE) attraverso l'orifizio di 
riempimento “2”(fig.C1).

- Rimettere e stringere il tappo di livello  “1”(fig.C1)

(coppia di serraggio: da 34 a 49 N.m).

C2 -

Controllare il livello dell'olio riduttori delle ruote 

anteriori e  posteriori

Mettere il carrello elevatore in piano, con il motore termico
spento.

- Controllare il livello d'olio su ciascun  riduttore delle ruote

anteriori.

- Posizionare il tappo di livello “1”(fig.C2) orizzontalmente.
- Rimuovere il tappo di livello: l'olio deve arrivare all'orifizio.
- Se necessario aggiungere olio (vedi: 3 - MANUTENZIONE: 

LUBRIFICANTI E  CARBURANTE) attraverso il medesimo 
orifizio.

- Rimettere e stringere il tappo di livello 

(coppia di serraggio: da 34 a 49 N.m).

C3 -

Controllare il livello dell’olio della  scatola 

cambio assale anteriore

Mettere il carrello elevatore in piano, con il motore termico
spento.

- Rimuovere il tappo di livello “1”(fig.C3) l’olio deve 

arrivare all’orifizio.

- Se necessario aggiungere olio (vedere: 3 - 

MANUTENZIONE: LUBRIFICANTI E CARBURANTE) attraverso 
il medesimo orifizio.

- Rimettere e stringere il tappo di livello “1”(fig.C3).

C1

1

3

C2

3

1

C3

3-29

IT

EN

NL

648747 IT

-EN-NL (29/08/2013)

IT

EN

NL

C4 -

Check the battery

C

heck the electrolyte level in the battery every 250 hours.

In case of high environmental temperatures, check the level
more frequently.

Maintenance:

-Check the connecting terminals “2” (Fig. C4).
- Check the electrolyte level “1” regularly (Fig. C4) and, if
necessary, top up with demineralised or distilled water.
-Never top up with sulphuric acid.
-If the voltage at the battery poles is less than 12.3 V
(density of electrolyte  <1.21), the battery must be
recharged.
If the vehicle is to remain unused for a long time, disconnect
the battery.

Charging the battery:

- Remove the caps “1” (Fig. C4).
-The batteries must be recharged only with direct current.
-Connect the positive cable (+) of the battery charger to the
positive pole (+) of the battery and the negative cable (-) of
the battery charger to the negative pole (-) of the battery.
-Recharge with a current 1/10 the rated capacity (Ah) of the
battery.
-The battery will be completely charged when the density of
the acid is 1.28 (1.23 for tropical countries).
-After charging, switch the battery charger off before
disconnecting the battery.
- Check the electrolyte level.

C4 

- De accu controleren

Controleer het zuurpeil van de accu om de 250 uur.
Als de omgevingstemperatuur erg hoog is, vaker
controleren.

Onderhoud :

-Controleer de verbindingsklemmen “2” (fig. C4).
- Controleer regelmatig het zuurpeil “1” (fig. C4) en, indien
nodig, bijvullen met gedemineraliseerd of gedestilleerd
water.
- Nooit met zwavelzuur bijvullen.
- Als de spanning aan de polen van de accu lager is dan 12,3
V (dichtheid van het elektrolyt 

<

1,21), dan moet de accu

opgeladen worden.
- Bij langdurige stilstand van het voertuig, de accu
loskoppelen.

Accu laden :

- Verwijder de doppen “1” (fig. C4).
- De accu mag alleen met gelijkstroom opgeladen worden.
- Verbind de positieve kabel (

+

) van de acculader met de

pluspool (

+

) van de accu en de negatieve kabel (

-

) van de

acculader met de minpool (

-

) van de accu.

- Laad de accu op met een stroom gelijk aan 1/10 van de
nominale capaciteit (Ah) van de accu.
- De accu is volledig opgeladen als de dichtheid van het
zuur 1,28 bedraagt (1,23 voor de tropische landen).
- Nadat de accu opgeladen is, de acculader uitzetten voor
de accu los te schakelen.
- Het zuurpeil controleren.

C4 

- Controllare la batteria

Controllare il livello dell'elettrolito della batteria ogni 250
ore.
In caso di  temperatura ambiente elevata, controllare più
frequentemente il livello.

Manutenzione :

-Verificare i morsetti di collegamento “2” (fig. C4). 
- Controllare regolarmente il livello dell'elettrolito 

“1” (fig. C4) e, se necessario, rabboccare con acqua  

demineralizzata o distillata. 

- Non rabboccare mai con acido solforico.
- Se la tensione ai poli della batteria è inferiore a 12,3 V

(densità dell'elettrolito 

<

1,21), la batteria deve essere 

ricaricata.

- In caso di prolungato inutilizzo del veicolo, scollegare la 

batteria.

Carica della batteria :

- Togliere i tappi “1” (fig. C4). 
- Le batterie devono essere ricaricate solo con corrente 

continua. 

- Collegare il cavo positivo (

+

) del carica batterie al polo 

positivo (

+

) della batteria e il cavo negativo (

-

) del carica 

batterie al polo negativo (

-

) della batteria. 

- Effettuare la ricarica con una corrente pari a 1/10 della 

capacità nominale (Ah) della batteria. 

- La batteria sarà completamente carica quando la densità 

dell'acido è di 1,28 (1,23 per i paesi tropicali). 

- A fine carica, spegnere il carica batterie prima di 

scollegare la batteria. 

-Controllare il livello dell'elettrolito.

+

-

-

+

1

2

2

2

2

C4

3-30

IT

EN

NL

648747 IT

-EN-NL (29/08/2013)

IT

EN

NL

C5

- Olie van de rotatiereductor controleren

Zet de heftruck met de zwenkkop recht op een vlakke
ondergrond, trek de telescopische arm helemaal in en hef
hem volledig op en draai dan de zwenkkop naar rechts over
+/- 60°, om beter bij de vulplaatsen van de rotatiereductor
(fig.C5) te kunnen komen; zet de verbrandingsmotor uit en
wacht tot de hydraulische olie is afgekoeld.

Ga als volgt te werk om het oliepeil in de reductor te
controleren: Verwijder de peildop “2” (fig.C5/1).
Het oliepeil is goed als de olie tot aan de niveau-opening
"2" staat en er door naar buiten komt (Fig.C5/1).
Olie toevoegen door de bijvulopening “1” (Fig.C5/1) indien
nodig, (zie "SMEERMIDDELEN").

Draai tenslotte de bijvul- en peildoppen weer vast.

C5 - 

Check the rotation reduction gear oil

Position the forklift truck with the turret aligned, on a flat
surface, retract and extend the telescopic boom completely
and then rotate the turret to the RH through +/- 60°, for
better access to the filling points of the rotation reduction
gear (Fig. C5); stop the I.C. engine and wait for the
hydraulic fluid to cool down.

To check the reduction gear oil level: Remove level cap “2”
(Fig. C5/1).
The level is correct when the oil flows out through level
hole “2” (Fig. C5/1).
Add oil through the filler hole “1” (Fig. C5/1) if necessary
(see “LUBRICANTS”).

Then refit the topping up and level caps.

C5 

- Controllare olio riduttore rotazione

Posizionare il carrello, con torretta allineata, su di una
superficie piana, rientrare e sollevare completamente il
braccio telescopico e poi ruotare la torretta a destra di +/-
60°, per accedere meglio ai punti di riempimento del 
riduttore rotazione (fig.C5); fermare il motore termico e
attendere che si raffreddi l’olio idraulico.

Per controllare il livello olio riduttore occorre:
Togliere il tappo di livello “2” (fig.C5/1).
Il livello é corretto quando l'olio affiora e defluisce dal foro di
livello “2” (Fig.C5/1).
Aggiungere olio  dal foro di carico “1” (Fig.C5/1) se
necessario, (vedere "LUBRIFICANTI").

Infine riavvitare i tappi di rabbocco e di livello.   

1

2

C5/1

C5

MRT 1840  ST3B (360°) 

MRT 1440  ST3B (400°) 
MRT 1640  ST3B (400°)  

MRT 1840  ST3B (400°) 

3-31

IT

EN

NL

648747 IT

-EN-NL (29/08/2013)

IT

EN

NL

C6 -

Check, clean and lubricate the outer chains

MRT 1840 ST3B (400°- 360°)

Extend the telescopic boom completely horizontally (Fig.
C6/1).

Wipe the chains with a clean cloth that does not leave lint,
then check the chains carefully for signs of wear (Fig. C6/1).
Brush the chains thoroughly to remove all impurities. Use a
stiff nylon brush and clean diesel.
Blow with a jet of compressed air and lubricate the chains
"1" slightly using a brush dipped in oil (Fig. C6/2) (See
chapter: LUBRICANTS). Wipe excess oil along the entire
length of the chains using a clean cloth.
Grease the pins of the pulleys “2” (Fig. C6/2) (See chapter:
LUBRICANTS).

C6 -

De externe kettingen controleren,

schoonmaken en smeren

MRT 1840 ST3B (400°- 360°)

Trek de telescopische arm helemaal uit in horizontale
positie (fig. C6/1).

Maak de kettingen schoon met een schone doek die niet
pluist, bekijk ze dan nauwkeurig op tekenen van slijtage
(fig. C6/1).
Borstel de kettingen stevig af om al het mogelijke vuil te
verwijderen. Gebruik een harde nylon borstel en schone
dieselolie.
Blaas de kettingen "1" schoon met een straal perslucht en
smeer ze licht in met een kwast met olie (fig. C6/2) (Zie
hoofdstuk: SMEERMIDDELEN). Verwijder de overtollige olie
met een schone doek over de hele lengte van de kettingen.
Vet de pennen van de kettingschijven “2” in (fig. C6/2) (Zie
hoofdstuk: SMEERMIDDELEN).

C6 -

Controllare pulire e lubrificare le  catene esterne  

MRT 1840  ST3B (400°- 360°)

Sfilare completamente il braccio telescopico in posizione
orrizzontale (fig. C6/1).

Pulire le catene con un panno pulito che non lascia
peluzzi, poi esaminarle attentamente per evidenziare
qualsiasi traccia di usura (fig. C6/1).
Spazzolare energicamente le catene per togliere  qualsiasi
impurità. Utilizzare una spazzola di nylon duro e gasolio
pulito.
Soffiare con un getto d'aria compressa e lubrificare 
leggermente le catene “1” con un pennello impregnato
d'olio (fig. C6/2) (Vedere capitolo : LUBRIFICANTI).
Togliere l'eccesso d'olio con un panno pulito su tutta la
lunghezza delle catene.
Ingrassare i perni delle pulegge “2” (fig. C6/2) (Vedere
capitolo : LUBRIFICANTI).

C6/1

C6/2

2

2

1

1

1

1

1

1

3-32

IT

EN

NL

648747 IT

-EN-NL (29/08/2013)

IT

EN

NL

Check the tension of the upper chains on the boom and
retighten using a spanner meant for the purpose.
Position the forklift truck on stabilisers.
Extend the telescopic boom completely horizontally (Fig.
C6/3).
Make sure the chains remain taut (keep the boom extension
lever pressed for a few seconds).
Measure the distance between the lower side of the chain
and boom using a gauge or ruler (Fig. C6/3A – C6/3B).
If the values are found to be less than those in the Tables
shown below, adjust the chains.

Boom 1st extension

Minimum dimension:

H1 ³ 80 mm

Maximum dimension:

H1 ³ 100 mm

Boom 2nd extension

Minimum dimension:

H2 ³ 80 mm

Maximum dimension:

H2 ³ 100 mm

Controleer de spanning van de kettingen aan de bovenkant
van de arm en span ze eventueel met behulp van een
speciale sleutel:
Zet de heftruck op de stabilisatoren.
Trek de telescopische arm helemaal uit in horizontale
positie (fig. C6/3).
Controleer of de kettingen gespannen gebleven zijn (houd
de hendel voor het uitschuiven van de arm enkele seconden
lang ingedrukt).
Meet de afstand tussen de onderkant van de ketting en de
arm met behulp van een schuifmaat of een liniaal
(fig.C6/3A - C6/3B).
Als de waarden lager zijn dan die in onderstaande tabel
vermeld zijn, de kettingen afstellen.

Arm 1ste uitschuiving

Minimumafstand:

H1 ³ 80 mm

Maximumafstand:

H1 ³ 100 mm

Arm 2de uitschuiving

Minimumafstand:

H2 ³ 80 mm

Maximumafstand:

H2 ³ 100 mm

Controllare la tensione delle catene superiore braccio ed
eventualmente ritensionarle utilizzando una apposita 
chiave:
Posizionare il carrello su stabilizzatori.
Sfilare completamente il braccio telescopico in posizione
orrizzontale (fig. C6/3).
Assicurarsi che le catene siano rimaste in tensione (tenere
premuto per qualche secondo la leva sfilo braccio).
Misurare la distanza fra lato inferiore catena e braccio con
l'ausilio di un calibro o righello (fig.C6/3A - C6/3B).
Se i valori risultati sono inferiori a quelli della tabella
sottostante procedere alla registrazione delle catene.

Braccio 1° sfilo

Misura minima: 

H1 

≥   

80 mm

Misura massima:

H1 

100 mm

Braccio 2° sfilo

Misura minima: 

H2 

80 mm

Misura massima:

H2 

100 mm

C6/3

H1

H2

C6/3A

C6/3B

3-33

IT

EN

NL

648747 IT

-EN-NL (29/08/2013)

IT

EN

NL

Stel de spanning van de kettingen af met behulp van
de speciale sleutel op de trekelementen achter de arm
(uitschuifkettingen) 4 (fig. C6/4).
Als de speling van de kettingen te groot is kan het
gebeuren dat de telescopische arm te ver uitschuift,
controleer of de sensor voor de inschuiving van de arm
“5” (fig. C6/4) bij volledig ingetrokken arm, altijd
geactiveerd is (rode led aan).
Regel anders de positie met behulp van de
trekelementen aan de voorkant van de arm
(intrekkettingen) “6” (fig. C6/5).

Als het probleem aanhoudt, uw agent of dealer
raadplegen.

Procedere alla registrazione della tensione delle catene
agendo con apposita chiave sui tiranti posteriori braccio
(catene di sfilo) 4 (fig. C6/4).
Se il gioco sulle catene è eccessivo può capitare che il
braccio telescopico esca oltre il dovuto, verificare che il
sensore di rientro braccio “5” (fig. C6/4) a braccio
completamente rientrato, sia sempre attivato (led rosso 
acceso).
In caso contrario regolare la posizione agendo sui 
tiranti anteriori del braccio (catene di rientro) 
“6” (fig. C6/5). 

Se il problema continua, consultare il vostro agente o
concessionario.

Proceed with adjustment of the chain tension by using
a spanner on the posterior tie-rods on the boom
(extension chain) 4 (Fig. C6/4).
If the play on the chains is excessive, the telescopic
boom may extend more than necessary; check to make
sure the boom retraction sensor “5” (Fig. C6/4) with the
boom completely retracted, is always activated (red
light ON).
If this is not the case, adjust the position by acting on
the anterior tie-rods of the boom (return chain) “6”
(Fig. C6/5).

If the problem continues, consult your agent or dealer.

C6/4

5

4

4

4

4

4

4

6

6

6

C6/5

3-34

IT

EN

NL

648747 IT

-EN-NL (29/08/2013)

IT

EN

NL

C7 

- Controllare serraggio viti fissaggio riduttore

rotazione

Posizionare il carrello su di una superficie orizzontale con il
motore fermo ed il braccio telescopico completamente
sollevato. 
Effettuare un controllo visivo del fissaggio delle viti del
riduttore di rotazione al telaio “1” (fig.C7). 
Nel caso in cui si notino anomalie consultate il vostro 
agente o concessionario.

C8

- Pulire e ingrassare le cerniere della portiera 

cabina

Pulire gli ingrassatori 1 (fig.C8).
Lubrificare con del grasso ("LUBRIFICANTI"). 
Togliere l’eccesso di grasso.

C7

- Check the tightening of the rotation reduction 

gear fixing screws

Position the forklift truck on a horizontal surface with the
engine stopped and the telescopic boom completely raised.
Visually inspect the fixing of the rotation reduction gear
screws to frame “1” (Fig.C7).
In case of anomalies, consult your agent or dealer.

C8

- Clean and grease the cab door hinges

Clean the grease nipples 1 (Fig. C8).
Lubricate with grease (“LUBRICANTS”). Wipe excess grease.

C7 

- De aandraaiing van de bevestigingsschroeven

van de rotatiereductor controleren

Zet de heftruck op een horizontale ondergrond met
stilstaande motor en de telescopische arm helemaal
omhoog.
Controleer de bevestiging van de schroeven van de
rotatiereductor aan het chassis “1” (fig.C7).
Als u afwijkingen opmerkt, raadpleeg dan uw agent of
dealer.

C8 

- De scharnieren van het cabineportier

schoonmaken en invetten

DMaak de smeernippels 1 schoon (fig.C8).
Smeren met vet ("SMEERMIDDELEN"). Het overtollige vet
verwijderen.

C8

C7

1

1

1

1

1

Questa pagina è intenzionalmente vuota

This page is left blank intentionally

Deze bladzijde is opzettelijk leeg gelaten


Content      ..     18      19      20      21     ..