Manitou MRT 1440 ST3B (400°), MRT 1640 ST3B (400°), MRT 1840 ST3B (400°-360°). MANUALE D’ISTRUZIONI - 19
 

  Index      Manuals     Manitou MRT 1440 ST3B (400°), MRT 1640 ST3B (400°), MRT 1840 ST3B (400°-360°). MANUALE D’ISTRUZIONI


Search            copyright infringement  


Content      ..     17      18      19      20     ..


Manitou MRT 1440 ST3B (400°), MRT 1640 ST3B (400°), MRT 1840 ST3B (400°-360°). MANUALE D’ISTRUZIONI - 19


3-20

IT

EN

NL

648747 IT

-EN-NL (29/08/2013)

IT

EN

NL

To be carried out every week if the forklift truck has not
reached 50 hours of operation per week.

If used in extremely dusty environments, reduce this
interval to 10 hours of operation or daily.

B4 

– Grease telescopic boom articulation pin “1” 

(Fig. B4).

B5

– Grease quick-coupling articulation pin “2” 

(Fig. B5).

B6

– Grease the pins of the fork inclination cylinder 

on the rod side “3” (Fig. B6/1) and bottom plate 
side “4” (Fig. B6/2).

B7

– Grease the pins of the lift cylinder on the 

bottom plate side “5” (Fig. B7/1) and rod side “6” 
(Fig. B7/2).

Iedere week uit te voeren als de heftruck de 50
werkuren in een week niet bereikt.

In geval van intens gebruik in erg stoffige of
oxiderende omgeving, deze tijden verkorten tot 10
werkuren of dagelijks. 

B4 

- De draaipen van de telescopische arm “1”

invetten (fig.B4).

B5 

- De draaipen van de snelkoppeling “2” invetten

(fig.B5).

B6 

- De pennen van de cilinder voor het hellen van de

vorken aan de kant van de stang “3” (fig. B6/1) en
aan de kant van de bodem “4”  invetten (fig.B6/2).

B7 

- De pennen van de hefcilinder aan de kant van

de bodem “5” (fig. B7/1) en aan de kant van de
stang “6”  invetten (fig.B7/2).

Da effettuare ogni settimana se il  carrello non ha
raggiunto le 50 ore di funzionamento settimanali.

In caso di utilizzo intenso in atmosfera molto polverosa o
ossidante, ridurre questa periodicità a 10 ore di
funzionamento o ogni giorno.

B4

- Ingrassare il perno di  articolazione del braccio 

telescopico “1” (fig.B4).

B5

- Ingrassare il perno di articolazione 

dell’attacco rapido  “2” (fig.B5).

B6

- Ingrassare i perni del martinetto inclinazione 

forche lato stelo  “3”  (fig.B6/1) e lato fondello 

“4” (fig.B6/2).

B7

- Ingrassare i perni del martinetto di 

sollevamentolato lato fondello “5” (fig.B7/1) e

lato stelo “6” (fig.B7/2).

B4

B5

B6/1

B6/2

B7/1

B7/2

1

6

5

3

4

2

B4

B5

B6/2

B6/1

B7/1

B7/2

MRT 1440  ST3B 
MRT 1640  ST3B 

3-21

IT

EN

NL

IT

EN

NL

To be carried out every week if the forklift truck has not
reached 50 hours of operation per week.

If used in extremely dusty environments, reduce this
interval to 10 hours of operation or daily.

B4 

– Grease telescopic boom articulation pin “1” 

(Fig. B4).

B5

– Grease quick-coupling articulation pin “2” 

(Fig. B5).

B6

– Grease the pins of the fork inclination cylinder 

on the rod side “3” (Fig. B6/1) and bottom plate 
side “4” (Fig. B6/2).

B7

– Grease the pins of the lift cylinder on the 

bottom plate side “5” (Fig. B7/1) and rod side “6” 
(Fig. B7/2).

Iedere week uit te voeren als de heftruck de 50
werkuren in een week niet bereikt.

In geval van intens gebruik in erg stoffige of
oxiderende omgeving, deze tijden verkorten tot 10
werkuren of dagelijks. 

B4 

- De draaipen van de telescopische arm “1”

invetten (fig.B4).

B5 

- De draaipen van de snelkoppeling “2” invetten

(fig.B5).

B6 

- De pennen van de cilinder voor het hellen van de

vorken aan de kant van de stang “3” (fig. B6/1) en
aan de kant van de bodem “4”  invetten (fig.B6/2).

B7 

- De pennen van de hefcilinder aan de kant van

de bodem “5” (fig. B7/1) en aan de kant van de
stang “6”  invetten (fig.B7/2).

Da effettuare ogni settimana se il  carrello non ha
raggiunto le 50 ore di funzionamento settimanali.

In caso di utilizzo intenso in atmosfera molto polverosa o
ossidante, ridurre questa periodicità a 10 ore di
funzionamento o ogni giorno.

B4

- Ingrassare il perno di  articolazione del braccio 

telescopico “1” (fig.B4).

B5

- Ingrassare il perno di articolazione 

dell’attacco rapido  “2” (fig.B5).

B6

- Ingrassare i perni del martinetto inclinazione 

forche lato stelo  “3”  (fig.B6/1) e lato fondello 

“4” (fig.B6/2).

B7

- Ingrassare i perni del martinetto di 

sollevamentolato lato fondello “5” (fig.B7/1) e

lato stelo “6” (fig.B7/2).

B4

B5

B6/1

B6/2

B7/1

B7/2

1

6

5

3

4

2

B4

B5

B6/2

B6/1

B7/1

B7/2

MRT 1440  ST3B 
MRT 1640  ST3B 

3-22

IT

EN

NL

648747 IT

-EN-NL (29/08/2013)

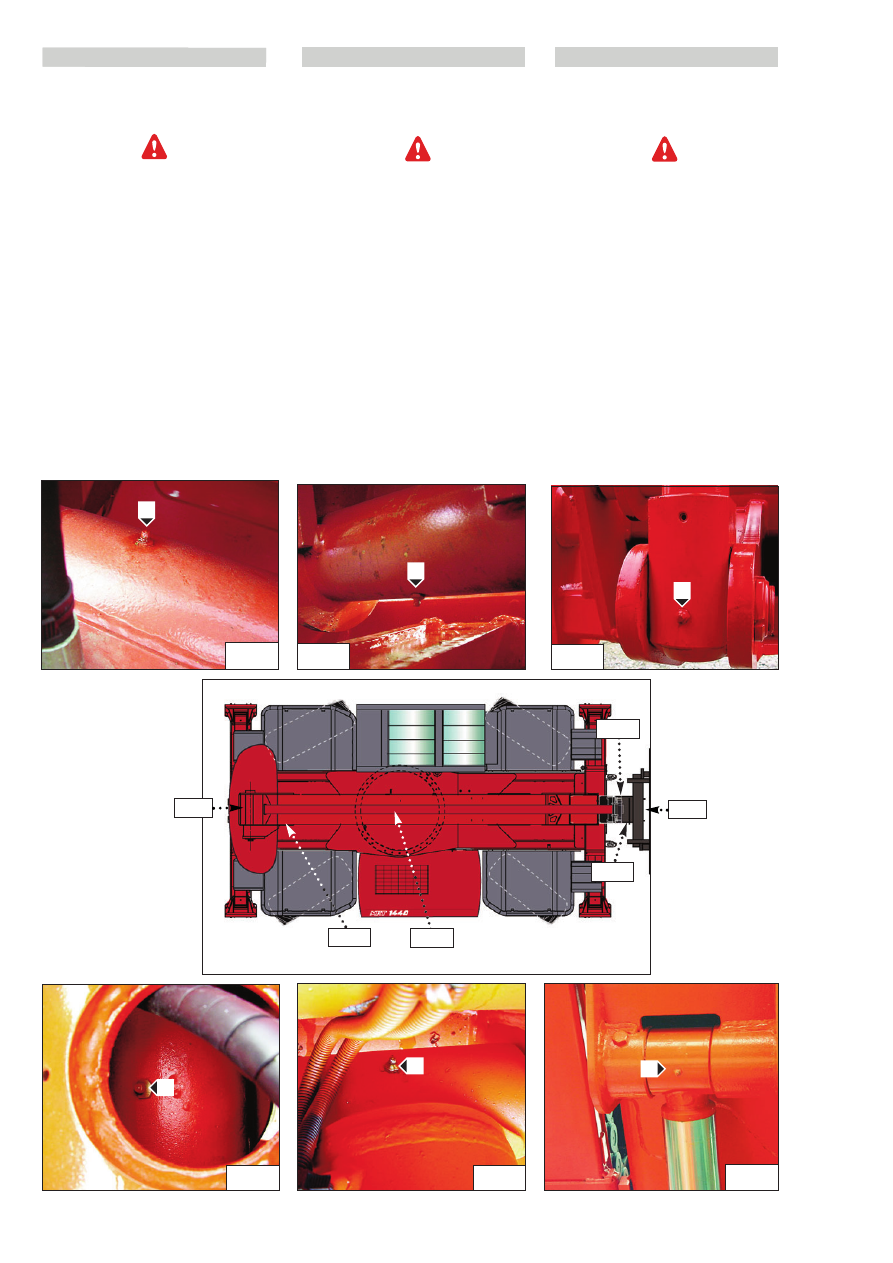
B8 –

Grease the pins of the compensation

cylinder on the bottom plate side “7” (Fig. B8/1)
and rod side “8” (Fig. B8/2).

B8 -

De pennen van de compensatiecilinder aan

de kant van de bodem “7” (fig. B8/1) en aan de
kant van de stang “8”  invetten (fig.B8/2).

B8 

- Ingrassare i perni del martinetto di compensa-

zione lato fondello “7” (fig.B8/1) e lato stelo
“8” (fig.B8/2) 

IT

EN

NL

B8/1

B8/2

7

8

B8/1

B8/2

B8/1

B8/2

MRT 1840  ST3B 

MRT 1440  ST3B 
MRT 1640  ST3B 

3-23

IT

EN

NL

648747 IT

-EN-NL (29/08/2013)

B9 - De oscillatiebussen van de achteras en

van de vooras “1” invetten
(fig.B9/1+B9/2).

B10 - Kruisstuk en cardankoppeling van de

overbrengingsas voorkant “2”(fig.B10/1)
en achterkant “3” smeren (fig.B10/2).

B11 - De pennen van de onderkant “4”

(fig.B11) en van de bovenkant 5 (fig.B11)
van de cilinders voor het hellen van de
stabilisatoren voor en achter en de
pennen van de voorste en achterste
stabilisatoren “6“ invetten (fig.B11).

B9 – Grease the oscillation bushes of the rear

and fr

ont axle “1” (Fig. B9/1+B9/2).

B10 – 

Grease the cross journals and transmission

shaft joint on the front “2” (Fig. B10/1) and
rear side “3” (Fig. B10/2).

B11 – 

Grease the pins of the feet “4” (Fig. B11) and

head “5” (Fig. B11) of the front and rear
stabilisers inclination cylinders and the pins
of the front and rear stabilisers “6” (Fig. B11).

B9

- Ingrassare boccole d’oscillazione del ponte 

posteriore  e anteriore “1”(fig.B9/1+B9/2).

B10

-  Ingrassare crociere e cardano dell’albero 

di trasmissione lato anteriore 

“2”(fig.B10/1) e  posteriore “3” (fig.B10/2).

B11

- Ingrassare i perni del piede “4” (fig.B11) 

e della testa 5 (fig.B11) dei  martinetti  

inclinazione stabilizzatori anteriori e
posteriori e perni gruppo stabilizzatori

anteriori e posteriori   “6 “ (fig.B11).

IT

EN

NL

1

B9/1

B9/2

1

B10/1

B10/2

2

2

3

3-24

IT

EN

NL

648747 IT

-EN-NL (29/08/2013)

IT

EN

NL

6

6

6

6

4

4

5

6

6

4

4

6

5

6

5

4

4

6

5

6

5

B11

3-25

IT

EN

NL

648747 IT

-EN-NL (29/08/2013)

IT

EN

NL

B12 -

Clean and lubricate the turret rotation slewing 

ring bearing

Lift the boom and place a safety wedge on the lift cylinder
rod (see: 1 – SAFETY INSTRUCTIONS AND REGULATIONS:
FORKLIFT TRUCK MAINTENANCE INSTRUCTIONS).

Lubrication of rolling system:

The slewing ring bearing is equipped on the outside with
grease nipples (Fig. B12/1) for lubrication of the rolling system.
Clean the grease nipples on the slewing ring bearing
(Fig.B12/1) taking care to make sure no cleaning substance
penetrates the rolling system or damages the gaskets, proceed
with lubrication (See Lubricants and greases Table) in such a
manner that a thin film of grease is seen coming out along the
entire periphery of the labyrinths or from the protective
gaskets.

Lubrication of the teeth:

A film of grease must always be present on the teeth (Fig.
B12/2); lubricate manually using a brush (see Lubricants and
greases table).

B12 - 

Het draaistel van de zwenkkop schoonmaken

en smeren

De arm opheffen en de veiligheidswig op de stang van
de hefcilinder plaatsen (zie: 1 - AANWIJZINGEN EN
VEILIGHEIDSVOORSCHRIFTEN: ONDERHOUDI VAN DE
HEFTRUCK).

Smeren van het rolsysteem:

Het draaistel is aan de buitenkant voorzien van
smeernippels (Fig.B12/1) voor het smeren van het
rolsysteem.
Maak de smeernippels op het draaistel (Fig.B12/1) schoon
en let er hierbij op dat er geen reinigingsmiddel in het
rolsysteem terecht komt of de pakkingen beschadigt, dan
zodanig smeren (zie tabel met smeermiddelen en vet) dat
er een laagje vers vet uit de hele omtrek van de labyrinten
of uit de beschermpakkingen tevoorschijn komt.

Smeren van de vertanding:

Op de vertanding moet altijd een laagje vet aanwezig zijn
(Fig.B12/2), handmatig met een kwast invetten (zie tabel
met smeermiddelen en vet).

B12 -

Pulire e lubrificare la ralla di 

rotazione torretta

Sollevare il braccio e collocare il cuneo di sicurezza sullo
stelo del martinetto di sollevamento (vedere: 1 -
ISTRUZIONI E NORME DI SICUREZZA: ISTRUZIONI DI
MANUTENZIONE DEL CARRELLO ELEVATORE).

Lubrificazione del sistema di rotolamento:

La ralla esternamente è munita di ingrassatori (Fig.B12/1)
per la lubrificazione del sistema di rotolamento.
Pulire gli ingrassatori sulla ralla (Fig.B12/1) facendo
attenzione che nessun detergente penetri nel sistema di
rotolamento o danneggi le guarnizioni di protezione,
procedere con la lubrificazione (vedere tabella lubrificanti e
grassi)  in modo tale che un film di grasso fresco si veda
uscire lungo l'intera periferia dei labirinti o dalle guarnizioni di
protezione.

Lubrificazione della dentatura:

Sulla dentatura deve sempre essere presente un film di
grasso (Fig.B12/2), lubrificare manualmente con un
pennello  (vedere tabella lubrificanti e grassi).

B12/2

B12/1

3-26

IT

EN

NL

648747 IT

-EN-NL (29/08/2013)

B13 

- Check the windscreen washer liquid level

- Check the tank level visually.
- If necessary, add windscreen washer liquid (see: 3 -
MAINTENANCE: LUBRICANTS AND FUEL).
- Remove cap “1” (Fig.B13).
- Add windscreen washer liquid through filler hole “2”
(Fig.B13).
- Refit the cap.

B14

– Check/clean the condenser grille

(Optional Air conditioning)

In polluting environments, clean the radiator grille
daily. Do not use a high pressure water or steam jet as
this can damage the condenser fins.

- Check the condenser to see if it is clean; clean if necessary.
- Clean the condenser using a jet of compressed air, aiming 

the jet in the direction of the air flow.

- To optimise the cleaning, carry out this operation with the 

fans switched on.

B13 

- Het niveau van de ruitensproeiervloeistof

controleren

- Controleer het niveau in de tank.
- Zo nodig bijvullen met ruitensproeiervloeistof (zie: 3 -
ONDERHOUD: SMEERMIDDELEN EN BRANDSTOF).
- De dop “1” verwijderen (fig.B13).
- De ruitensproeiervloeistof toevoegen door de vulopening
“2”(fig.B13).
- De dop weer op zijn plaats brengen.

B14 

- Het rooster van de condensor

controleren/schoonmaken
(Optie Klimaatregelaar)

In een vervuilde omgeving, het radiateurrooster
dagelijks schoonmaken. Gebruik geen waterstraal of
hogedrukstoom, dit zou de vinnen van de condensor
kunnen beschadigen.

- Controleer of de condensor schoon is en maak hem indien
nodig schoon.
- Maak de condensor schoon met behulp van een
persluchtstraal in dezelfde richting als de luchtstroom.
- Voer deze handeling uit met draaiende ventilatoren voor
een optimale reiniging.

B13 

- Controllare il livello del liquido 

lavacristallo 

- Controllare visivamente il livello del serbatoio.
- Se necessario, aggiungere liquido lavacristallo (vedi: 3 - 

MANUTENZIONE:LUBRIFICANTI E CARBURANTE).

- Rimuovere il tappo “1” (fig.B13).
- Aggiungere liquido lavacristallo attraverso l'orifizio di 

riempimento “2”(fig.B13).

- Rimettere il tappo

.

B14

- Contro/pulire la griglia del  condensatore 

(Optional Climatizzazione)                                     

In atmosfera inquinante, pulire quotidianamente la
griglia del radiatore.  Non utilizzare un getto d’acqua o
di vapore ad alta pressione, ciò potrebbe danneggiare
le alette del condensatore.

- Controllare con un esame visivo se il condensatore è pulito 

e pulirlo se necessario.

- Pulire il condensatore con un getto d’aria compressa 

dirigendolo nello stesso senso del flusso d’aria.

- Per ottimizzare la pulizia, effettuare questa  operazione 

con i ventilatori accesi.

IT

EN

NL

B13

B14

1

2

3-27

IT

EN

NL

648747 IT

-EN-NL (29/08/2013)

B15 - 

Clean the cab external ventilation filter 

(optional air conditioning)

- Remove the guard.
- Remove the cab ventilation filter “1” (Fig. B15).

Clean the filter with a jet of compressed air.

- Check the condition of the filter and replace it, if necessary 

(see: 3 - MAINTENANCE: FILTER ELEMENTS AND BELTS).

- Refit the filter.
- Refit the guard.

B15 - 

Het externe ventilatiefilter van de cabine

schoonmaken  (optie klimaatregelaar)

- Het beschermcarter demonteren.
- Het cabineventilatiefilter “1” verwijderen (fig.B15).
- Het filter schoonblazen met een straal perslucht.
- De staat van het filter controleren en het zo nodig
vervangen (zie: 3 - ONDERHOUD: FILTERELEMENTEN EN
RIEMEN).
- Het filter weer aanbrengen.
- Het beschermcarter weer monteren.

B15 -

Pulire il filtro di ventilazione esterno 

della cabina (optional climatizzazione)

- Smontare il carter di protezione.
- Estrarre il filtro di ventilazione cabina “1” (fig.B15).
- Pulire il filtro con un getto d'aria compressa.
- Controllare lo stato del filtro e sostituirlo se necessario 

(vedi: 3 - MANUTENZIONE: ELEMENTI FILTRANTI E CINGHIE).

- Rimettere il filtro.
- Rimontare il carter di protezione .

IT

EN

NL

B15

1


Content      ..     17      18      19      20     ..