Manitou MRT 1440 ST3B (400°), MRT 1640 ST3B (400°), MRT 1840 ST3B (400°-360°). MANUALE D’ISTRUZIONI - 13
 

  Index      Manuals     Manitou MRT 1440 ST3B (400°), MRT 1640 ST3B (400°), MRT 1840 ST3B (400°-360°). MANUALE D’ISTRUZIONI


Search            copyright infringement  


Content      ..     11      12      13      14     ..


Manitou MRT 1440 ST3B (400°), MRT 1640 ST3B (400°), MRT 1840 ST3B (400°-360°). MANUALE D’ISTRUZIONI - 13


58

IT

EN

NL

°C

hours

9 - SELETToRE A CHIAVE PER 

        L’ESCLUSIoNE DEL SISTEmA                      

        DI SICUREZZA  (mSS) 

Il carrello Manitou è dotato di un 

sistema di sicurezza elettronico (MSS) che 

controlla il sovraccarico della 

macchina durante la fase di lavoro. 

Il sistema interviene automaticamente 

bloccando i movimenti del braccio.

Solamente in casi eccezionali e per motivi di 

sicurezza, è possibile disinserire manualmente 

il sistema (MSS).
Con il sistema di sicurezza (MSS)  disinserito 

l’operatore e il carrello sono esposti a rischi e 

nulla vieta il sovraccarico e/o il ribaltamento 

del mezzo.

Selettore a chiave

L’ operatore per disabilitare il Sistema di 

Sicurezza deve girare un selettore 

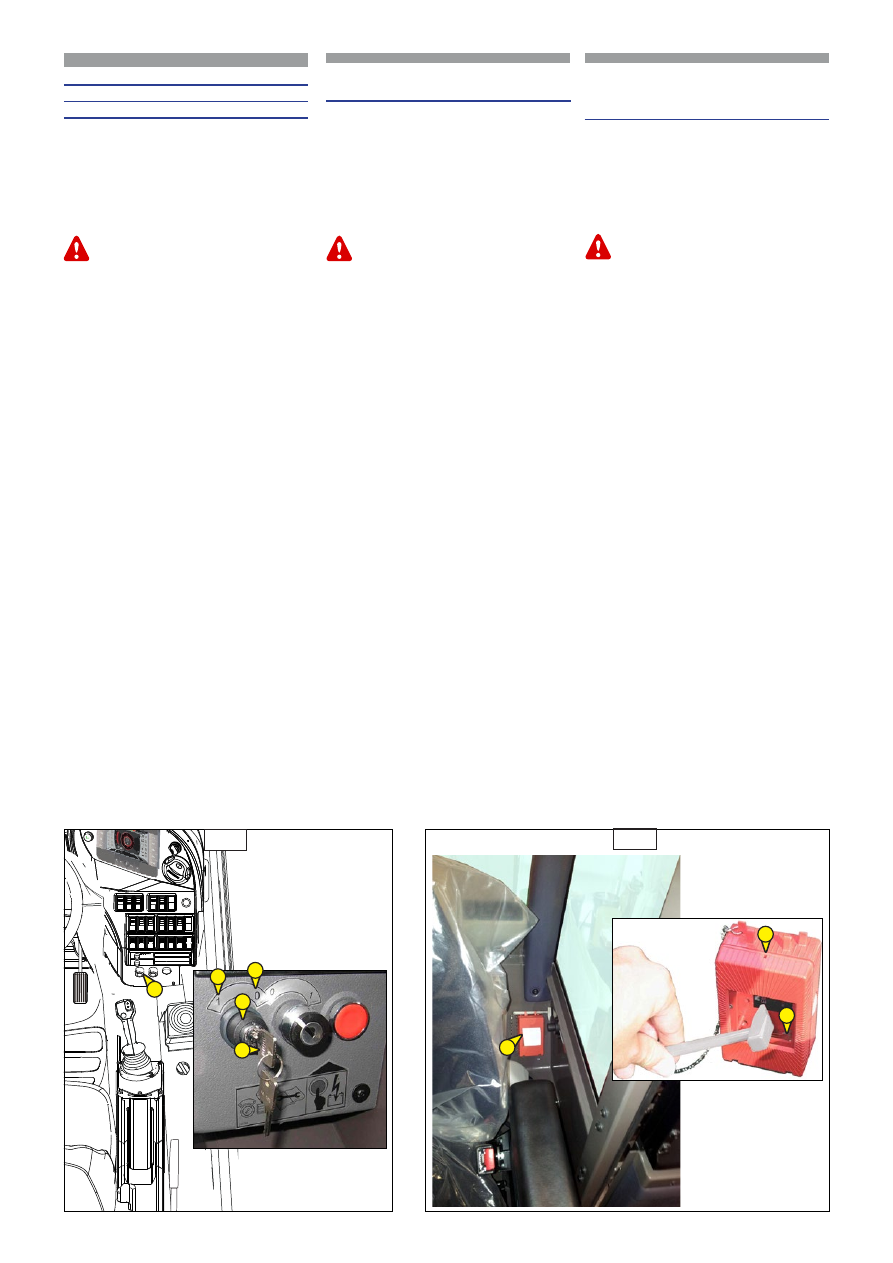
1.1

” a chiave  in cabina.

La chiave “

1.2

”  è custodita all’interno di 

una scatola di sicurezza “

1.3

” posta dietro 

il sedile del guidatore.

(Vedi immagine 9/9.1)

Il selettore a chiave “

1.1

”  ha due posizioni

1

” e “

0

” :

  - posizione “

1

”: 

il sistema di sicurezza 


             è inserito

;

   - posizione “

0

”: 

il sistema di sicurezza

                             è disinserito.

(Vedi immagine 9)

Nel consueto utilizzo di lavoro il selettore a 

chiave è ruotato in posizione “

1

”, sistema di 

sicurezza inserito.   


9 - SLEUTELSCHAKELAAR VooR HET 

UITSLUITEN VAN HET VEILIGHEIDSSYSTEEm  

(mSS)  

De Manitou heftruck is voorzien van een 

elektronisch veiligheidssysteem (MSS) dat 

de overbelasting van de machine tijdens de 

werkfase controleert. 

Het systeem grijpt automatisch in door de 

bewegingen van de arm te blokkeren.

Alleen in buitengewone gevallen en om 

veiligheidsredenen kan het systeem (MSS) met 

de hand uitgeschakeld worden.
Met uitgeschakeld veiligheidssysteem (MSS) 

zijn de bestuurder en de heftruck blootgesteld 

aan risico’s en niets belet de overbelasting en/

of het kantelen van het voertuig.

Sleutelschakelaar

Om het Veiligheidssysteem te deactiveren 

moet de bestuurder een sleutelschakelaar 

1.1

” in de cabine omdraaien.

De sleutel “

1.2

”  wordt bewaard in 

een veiligheidskastje “

1.3

” achter de 

bestuurdersplaats.

(Zie afbeelding 9/9.1)

De sleutelschakelaar “

1.1

”  heeft twee 

standen “

1

” en “

0

” :

  - stand “

1

”: 

het veiligheidssysteem is 

ingeschakeld

;

  - stand “

0

”: 

het veiligheidssysteem is 

uitgeschakeld;

(Zie afbeelding 9)

Tijdens het normale gebruik is de 

sleutelschakelaar in de stand “

1

” gedraaid, 

veiligheidssysteem ingeschakeld.


1.1

1.2

1.3

9

9.1

1.2

1

0

9 - KEY SWITCH foR EXCLUSIoN of SAfETY 

SYSTEm (mSS) 

The Manitou truck is provided with an 

electronic safety system (MSS) which 

controls the overload during the work 

phase. 

The system acts automatically to block the 

boom movements.

It is only in exceptional cases and for reasons 

of safety, that the system can be deactivated 

manually (MSS).
With the safety system (MSS)  deactivated, the 

operator and the forklift truck are exposed to 

risks and there is nothing to prevent overload 

and/or overturning of the vehicle.

Key selector

To disenable the safety System, the operator 

must turn a key selector “

1.1

” in the cab.

Key “

1.2

”  is kept inside a safety box “

1.3

” 

placed behind the driver's seat.

(See image 

9/9.1)

Key selector “

1.1

”  has two positions “

1

” and 

0

” :

  - position “

1

”: 

the safety system is 

activated

;

  - position “

0

”: 

the safety system is 

deactivated.

(See image 9)

During normal operation the key selector is 

turned to position “

1

”, the safety system is 

activated.


59

IT

EN

NL

In caso d’emergenza

, se occorre disinserire 

il sistema di sicurezza, l’operatore deve : 

- prendere il martelletto “

1.4

”  affianco la 

  scatola di sicurezza “

1.3

” ;

- rompere il vetro di protezione “

1.5

” della 

  scatola di sicurezza “

1.3

”;

- prelevare la chiave “

1.2

” e inserirla nel 

  selettore a chiave “

1.1

” ;

- ruotare il selettore a chiave “

1.1

” in

 posizione ”

0

” per disinserire il sistema di 

  sicurezza.

Premere e mantenere ruotato il selettore 

a chiave “1.1” in posizione “0” per 

procedere e continuare ad operare con 

le manovre di emergenza, compiendo 

movimenti opposti a quelli che possono 

generare instabilità e/o sovraccarico del 

mezzo.

(Vedi immagine 9.2)

Nota : Quando si disabilita il sistema di 

sicurezza, automaticamente si attivano un 

allarme acustico ed un indicatore visivo 

(lampada rossa a luce fissa sopra cabina 

“1.6”

) per avvertire di una possibile 

situazione di pericolo il guidatore ed 

eventuale personale esterno alla macchina. 


(Vedi immagine 9.3)

Ultimata la procedura di emergenza 

assolutamente riposizionare la chiave dentro 

la scatola di sicurezza e ripristinare il vetro di 

protezione.

In geval van nood

, als het veiligheidssysteem 

uitgeschakeld moet worden, moet de bestuurder 

als volgt te werk gaan: 

- pak het hamertje “

1.4

”  naast het 

veiligheidskastje “

1.3

” ;

- breek het beschermglas “

1.5

” van het 

veiligheidskastje “

1.3

”;

- pak de sleutel “

1.2

” en steek hem in de 

sleutelschakelaar “

1.1

” ;

- draai de sleutelschakelaar “

1.1

” in stand ”

0

” om 

het veiligheidssysteem uit te schakelen.

Druk en houd de sleutelschakelaar  “1.1” 

in stand “0” gedraaid om door te gaan met 

de noodmanoeuvres en bewegingen uit te 

voeren tegengesteld aan die instabiliteit en/

of overbelasting van het voertuig kunnen 

veroorzaken.

(Zie afbeelding 9.2)

N.B.: Als het veiligheidssysteem gedeactiveerd 

wordt, schakelen automatisch een akoestisch en 

zichtbaar alarm in (ononderbroken brandende 

rode lamp boven de cabine 

“1.6”

) om de 

bestuurder en eventueel personeel buiten de 

machine te waarschuwen voor een mogelijk 

gevaarlijke situatie. 

(Zie afbeelding 9.3)

Na de noodprocedure moet de 

bestuurder de sleutel altijd terug in 

het veiligheidskastje plaatsen en het 

beschermglas herstellen.

9.2

1.1

1.2

1

0

1.4

1.2

1.5

1.3

9.3

1.6

In case of emergency

, if the safety system 

is to be deactivated, the operator must: 

- take the small hammer “

1.4

”  on the side 

of the safety box “

1.3

” ;

- break the glass “

1.5

” of the safety box 

1.3

”;

- take the key “

1.2

” and insert it in the key 

selector “

1.1

” ;

- turn key selector “

1.1

” in position ”

0

” to 

deactivate the safety system.

Rotate key selector “1.1” in position 

“0” to proceed and continue with 

the emergency manoeuvres, making 

movements opposite to those which can 

lead to instability and/or overloading of 

the vehicle.

(See image 9.2)

Note: When the safety system is disabled, 

an alarm sound is automatically activated 

(steady red light above cab 

“1.6”

) to warn 

the driver and other persons who may be 

present outside the vehicle of a possible 

danger situation. 

(See image 9.3)

When the emergency procedure is complete, 

the key must be replaced inside the safety box 

and the glass cover must be replaced.

60

IT

EN

NL

°C

hours

10 -  CoNTATTo A CHIAVE ELETTRoNICo PER

         LA PRoCEDURA DI SALVATAGGIo.

         (Solo se installato cestello)

(Vedi immagine 10)

11 -  mANTENERE PREmUTo IL PULSANTE E

        PER RIPRISTINARE L’ERoGAZIoNE DELLA 

         CoRRENTE  ELETTRICA DALLA BATTERIA 

         E CoNSENTIRE DI RIAVVIARE  IL  moToRE 

        TERmICo. (Solo se installato cestello)

(Vedi immagine 10)

12- LEVA DI ComANDo LUCI, CLACSoN E 

        LUCI  DI DIREZIoNE

Il commutatore controlla l’accensione 

delle luci, gli indicatori di direzione e la 

segnalazione acustica. 

Ruotando la manopola di uno scatto si 

accendono le luci di posizione anteriori e 

posteriori. 

Girando di un altro scatto si accendono 

le luci anabbaglianti, tirando la leva verso 

l’alto è possibile lampeggiare e premendo 

la leva verso il basso è  possibile accendere i 

fari  abbaglianti.

Per far funzionare gli indicatori di 

direzione è sufficiente spingere la leva 

in avanti o indietro in base alla direzione 

voluta. 

Muovere in avanti per la sinistra, 

muovere indietro per la destra. Premendo 

l’estremità della manopola, viene emessa 

una segnalazione acustica (clacson).

(Vedi immagine 11)

Per la posizione anabbaglianti e 

abbaglianti si illuminano le spie sul 

pannello di controllo, in “modalita su strada 

f1”


(Vedi immagine 8.7, pagina 45)

.

11

10

10

11

12

10 -  ELEKTRoNISCH SLEUTELCoNTACT 

VooR DE REDDINGSPRoCEDURE. 

(Alleen met gemonteerd platform)

(Zie afbeelding 10)

11 - HoUD DE KNoP E INGEDRUKT om DE 

ACCU WEER ELEKTRISCHE STRoom TE LATEN 

AfGEVEN EN DE VERBRANDINGSmoToR 

WEER TE KUNNEN STARTEN. (alleen als het 

platform gemonteerd is)

(Zie afbeelding 10)

12 - BEDIENINGSHENDEL LICHTEN, CLAXoN 

EN RICHTINGAANWIJZERS

De schakelaar bedient de lichten, de 

richtingaanwijzers en de claxon. 

Door de hendel in de eerste stand te 

draaien, gaan de stadslichten voor en achter 

branden. 

Door hem nog een stand verder te draaien 

gaan de dimlichten branden, door de hendel 

naar boven te trekken kunt u knipperen en 

door hem omlaag te drukken gaat het groot 

licht branden.

Om de richtingaanwijzers te laten werken 

moet u de hendel naar voren of naar 

achteren drukken, naar gelang de gewenste 

richting. 

Naar voren voor links en naar achteren voor 

rechts. Door het uiteinde van de hendel in 

te drukken wordt er een akoestisch signaal 

gegeven (claxon).

(Zie afbeelding 11)

Voor het dimlicht en groot licht gaan de 

controlelampjes op het bedieningspaneel 

branden, in de “modaliteit over de weg 

f1”


(Zie afbeelding 8.7, pagina 45)

10 - ELECTRoNIC KEY CoNTACT foR RESCUE 

PRoCEDURE. 

         (only if platform is installed)

(See image 10)

11 - KEEP BUTToN E PRESSED To RESToRE 

THE SUPPLY of ELECTRICITY To THE 

BATTERY AND ALLoW RESTART of THE 

I.C. ENGINE. (only if platform is installed)

(See image 10)

12 - LIGHTS CoNTRoL LEVER, HoRN, AND 

PoSITIoN LIGHTS

The switch controls the lights, direction 

indicators and warning siren. 

Turning the knob through once will cause 

the front and rear position lights to light 

up. 

Turning the knob through another turn 

will cause the low beam lights to come ON, 

pull the lever upwards to cause the lights 

to flash and press the lever downwards to 

switch on the high beam lights.

To activate the direction indicators, 

push the lever forwards or backwards, 

depending on the direction required. 

Move forwards to the LH, move backwards 

to the RH. Pressing on the end of the knob 

will activate the horn.

(See image 11)

For the low beams and high beams, the 

indicators on the control panel light up, in 

“road travel mode 

f1”


(See image 8.7, page 

45)

.

61

IT

EN

NL

°C

hours

°C

hours

13 -CommUTAToRE AVVIAmENTo  

Il commutatore ha cinque posizioni e le sue 
funzioni sono:

P

 : non utilizzato 

0

 : STOP motore termico; 

I

 : Contatto elettrico generale “+” (attiva  

anche il dispositivo preriscaldo se  

installato). 

II : non utilizzato 

III*

 : AVVIAMENTO motore termico e ritorno 

alla posizione “1” dopo il rilascio della 

chiave*.

(Vedi immagine 12)

.

*: per ogni avviamento del motore termico, 

esiste un periodo di protezione motore 

che limita al minimo la velocità dei giri 

motore. 

Questo ritardo cambia in funzione della 

temperatura del liquido di 

raffreddamento del motore:

Per la durata di questo periodo di 

protezione su display in cabina compare 

il messaggio 

“attendere prego

” e solo 

dopo la scomparsa del messaggio è 

possibile accelerare il motore termico e 

muovere la macchina.

14 - ACCENDISIGARI/PRESA 12V

(Vedi immagine 13)

.

13 -STARTSCHAKELAAR  

Deze schakelaar heeft vijf standen en zijn 
functies zijn:

P

 : niet gebruikt 

0

 : STOP verbrandingsmotor; 

I

 : Algemeen elektrisch contact 

“+” (activeert ook het 

voorverwarmingssysteem indien 

gemonteerd). 

II : niet gebruikt 

III*

 : START verbrandingsmotor en terugkeer 

naar stand “1” na het loslaten van de sleutel*.

(Zie afbeelding 12)

.

*: voor iedere start van de 

verbrandingsmotor is er een periode van 

bescherming van de motor waardoor het 

toerental van de motor tot een minimum 

beperkt wordt. Deze vertraging varieert 

afhankelijk van de temperatuur van de 

koelvloeistof van de motor.

Gedurende deze beschermingstijd 

verschijnt op het display in de cabine de 

melding 

“even wachten a.u.b.

” en slechts 

nadat deze meding verdwenen is kan de 

verbrandingsmotor sneller gaan draaien 

en kan de heftruck gaan rijden.

14 - SIGARETTENAANSTEKER/12V 

SToPCoNTACT

(Zie afbeelding 13)

.

13

12

I

II

0

III

13

14

13

14

13 -START-UP SWITCH  

The switch has five positions and its 
functions are:

P

 : not used 

0

 : I.C. engine STOP; 

I

 : General electric contact “+” (the pre-

heating device, if installed, is active). 

II : not used 

III*

 : I.C. engine START-UP and return to 

position “1” after the key is released*.

(See image 12)

.

*: for every start-up of the I.C. engine, 

there is a motor protection period which 

limits the speed of the engine rpm to the 

minimum. This delay changes according to 

the engine coolant temperature:

Throughout the duration of this 

protection period the cab display shows 

the message 

“Please wait

” and it is only 

after this message disappears that the 

I.C. engine can be accelerated and the 

vehicle can move.

14 - CIGARETTE LIGHTER/12V SoCKET

(See image 13)

.

Temperatura liquido di raffreddamento

Coolant temperature                                                      [°C]

Temperatuur van de koelvloeistof

-30

-25

-20

-15

-10

0

20

40

60

80

90

110

Ritardo

Delay                                                                                       [s]

Vertraging

120

70

45

20

15

5

29

26

23

18

10

10

62

IT

EN

NL

15 - ZEKERINGEN EN RELAIS IN DE CABINE

- Verwijder het luikje “

15.1”

 dat toegang 

verschaft tot de zekeringen en relais.

Vervang een defecte zekering altijd door een 

zekering van hetzelfde soort. Gebruik nooit 

een gerepareerde zekering.

(Zie afbeelding 14)

.

15 - fUSIBILI E RELÈ IN CABINA

- Rimuovere lo sportellino di accesso    

  “

15.1”

 ai fusibili e relè.

Sostituire sempre un fusibile difettoso con uno 

equivalente. Non utilizzare mai un fusibile 

riparato.

(Vedi immagine 14)

.

400°

OPT.

925828

(30/40A)

R75

R78

R74

(10/20A)

R76

(10/20A)

R77

3B6

ECU

3B6

3B6

(10/20A)

R81

(30/40A)

R82

R83

(30/40A)

R80

R79

(70A)

(70A)

FUNZIONI

FUNCTIES

f33

7,5 A

fusibile illuminazione spie interruttori

zekering verlichting schakelaarlampjes

f34

7,5 A

fusibile alimentazione devio marce

zekering voeding versnellingsschakelaar

f35

7,5 A

fusibile rele' alimentazione 2°/3° uscita testa 

braccio

zekering voedingsrelais 2de/3de uitschuiving 

armuiteinde

f36

7,5 A

fusibile positivo da batteria per 4 frecce

zekering plus vanaf accu voor 4 

richtingaanwijzers

f37

7,5 A

"15" alimentazione autoradio/riscaldamento

"15" voeding autoradio/verwarming

f38

7,5 A

“15” alimentazione da quadro avviamento 

per linea scatola carro

“15” voeding vanaf startpaneel voor 

heftrucklijn

f39

7,5 A

fusibile finecorsa micro argano su braccio

zekering eindschakelaar micro lier op arm

f40

7,5 A

fusibile attivazione interruttore fari lavoro 

testa braccio

zekering activering schakelaar werklampen 

armuiteinde

f41

7,5 A

fusibile alimentazione predisposizione 

visore telecamere

zekering voeding vooruitrusting display 

camera's

f42

7,5 A

“15” alimentazione kit aria condizionata

“15” voeding airconditioning

f43

10 A

fusibile alimentazione tergicristallo 

anteriore

zekering voeding ruitenwisser voor

f44

10 A

fusibile alimentazione devio luci e claxon

zekering voeding lichtenschakelaar en claxon

f45

10 A

fusibile alimentazione ventola 

riscaldamento

zekering voeding verwarmingsventilator

f46

10 A

fusibile alimentazione encoder collettore 

rotante

zekering voeding encoder roterende collector

14A

15.1

15 – fUSES AND RELAYS IN CAB

- Remove the door “

15.1”

 that provides 

access to the fuses and relays.

Always replace a defective switch with an 

identical one. Never use a repaired fuse.

(See image 14)

.

FUNCTIONS

Switches indicator lights fuse 

Gearshift lever power supply fuse
Boom head 2°/3° extension power supply relay 

fuse (7.5A)
Fuse for positive from battery for four direction 

indicator lights
"15" Radio/heating power supply
Fuse for power supply “15” from start-up panel 

for chassis box line (7.5A)
Fuse for winch micro switch limit stop on 

boom
Boom head work lights switch activation fuse

TV cameras display set-up power supply fuse

Air conditioning kit power supply "15" fuse

front windscreen wiper power supply fuse

Stalk lights switch and horn power supply fuse

Heating fan power supply fuse

Rotary manifold encoder power supply fuse

63

IT

EN

NL

f47

10 A

fusibile pulsante emergenza arresto motore

zekering noodknop 

f48

10 A

fusibile positivo “15” per 4 frecce

zekering plus “15” voor 4 richtingaanwijzers

f49

10 A

fusibile alimentazione da batteria pannello 

operatore 3b6

zekering voeding vanaf accu 

bedieningspaneel 3b6

f50

10 A

fusibile alimentazione sensori rotazione 

limitata

zekering voeding sensors beperkte rotatie

f51

10 A

fusibile faro lavoro posteriore tetto cabina

zekering werklamp achter cabinedak

f52

10 A

fusibile alimentazione interrutori posto 

guida e radiocomando scanreco

zekering voeding schakelaars 

bestuurdersplaats en scanreco radiobesturing

f53

10 A

fusibile positivo "15" joystick operatore

Zekering plus “15” joystick bediener

f54

10 A

fusibile faro lavoro anteriore tetto cabina

zekering werklamp voor cabinedak

f55

10 A

fusibile positivo "15" sensori centraggio 

cabina

zekering plus "15" sensors centrering cabine

f56

10 A

fusibile positivo "15" sensori perno cabina e 

cabina allineata

zekering plus "15" sensors cabinepen en 

cabine uitgelijnd

f57

15 A

fusibilealimentazione funzioni interruttori

zekering voeding functies schakelaars

f58

15 A

fusibile alimentazione funzioni cestello

zekering voeding platformfuncties

f59

15 A

fusibile alimentazione girofaro

zekering voeding zwaailicht

f60

15 A

fusibile alimentazione da batteria per  

autoradio

zekering voeding vanaf accu voor autoradio

f61

15 A

fusibile alimentazione diagnostica

zekering voeding diagnose

f62

15 A

fusibile alimentazione benna mix piccola

zekering voeding kleine mix grijpbak

f63

15 A

fusibile positivo "15" pannello operatore 

3b6 e predisposizione optional continuo

zekering plus "15" bedieningspaneel 3b6 en 

vooruitrusting optional continu

f64

15 A

fusibile alimentazione trasduttori 3b6

zekering voeding transductors 3b6

f65

15 A

fusibile alimentazione sedile pneumatico

zekering voeding pneumatische 

bestuurdersstoel

f66

15 A

fusibile alimentazione fari lavoro testa 

braccio

zekering voeding werklampen armuiteinde

f67

15 A

fusibile alimentazione tergicristallo 

superiore e posteriore

zekering voeding ruitenwisser boven en achter

f68

15 A

fusibile interruttore 2°/3° uscita testa 

braccio e pressostato pompa freni

zekering schakelaar 2de/3de uitschuiving 

armuiteinde en drukschakelaar rempomp

f69

20 A

fusibile alimentazione da batteria per 

accendisigari

zekering voeding vanaf accu voor 

sigarettenaansteker

f70

20 A

fusibile alimentazione riscaldamento

zekering voeding verwarming

f71

25 A

fusibile alimentazionecentralina 3b6 parte 

cabina

zekering voeding centrale 3b6 cabinedeel

f72

25 A

fusibile benna mix grande

zekering grote mix grijpbak

R74

70 A

rele' attivazione positivi “15” funzioni linea 

torre mrt easy EN13849

relais activering plus “15” functies 

zwenkkoplijn mrt easy EN13849

R75

30/40 A

rele' alimentazione 2° uscita testa braccio

relais voeding 2de uitschuiving armuiteinde

R76

10/20 A

rele' taglio olio distributore movimenti  

walvoil

relais onderbreking olie verdeler bewegingen 

walvoil

R77

10/20 A

rele' alimentazione trasduttori 3b6

relais voeding transductors 3b6

R78

70 A

rele' alimentazione potenza centraline 3b6

relais voeding vermogen centrales 3b6

R79

intermittenza frecce

knippering richtingaanwijzers

R80

30/40 A

rele' alimentazione segnali centraline 3b6

relais voeding signalen centrales 3b6

R81

10/20 A

rele' taglio alimentazione da fungo 

emergenza

relais onderbreking voeding vanaf noodknop

R82

10/20 A

rele' alimentazione 3° uscita testa braccio

relais voeding 3de uitschuiving armuiteinde

R83

10/20 A

rele' di predisposizione

relais ter vooruitrusting

Engine stop emergency button fuse

“15”  positive fuse for 4 direction lights
Fuse for power supply from 3B6 operator 

panel battery
Limited rotation sensors power supply fuse

Cab roof rear work light fuse
Driver's seat and Scanreco radio control unit 

switches power supply fuse
operator Joystick "15" positive fuse

Cab roof rear work light fuse

Cab centering sensors “15”  positive fuse
Cab pin and cab aligned sensors "15" positive 

fuse (10A)
swithes functions power supply fuse

Platform functions power supply fuse

Rotary warning beacon power supply fuse

car radio battery power supply fuse

Diagnostics power supply fuse

Small mixer bucket power supply fuse
3B6 operator panel "15" positive fuse and 

continuous optional set-up
3b6 transducers power supply fuse

pneumatic seat power supply fuse

Boom head work lights power supply fuse
Upper and rear windscreen wiper power 

supply fuse
Boom head 2°/3° extension switch and brakes 

pump pressure switch fuse
cigarette lighter battery power supply fuse

Heating power supply fuse

cab section 3b6 control unit power supply fuse

Big mixer bucket fuse
MRT EASY EN13849 turret line functions “15” 

positives activation relay 
Boom head 2° extension power supply relay
Walvoil movements directional control valve 

oil cut-off relay
3B6 transducers power supply relay

3B6 control units power supply relay

Direction indicators flasher

3B6 control units signals power supply relay
Relay for cutting power supply from 

mushroom emergency switch
Boom head 3° extension power supply relay

Set-up relay

64

IT

EN

NL

Solo se installata l’aria condizionata.

- Rimuovere lo sportellino “1” di accesso ai 

  fusibili e relè “

15.2”

.

Sostituire sempre un fusibile difettoso con uno 

equivalente. Non utilizzare mai un fusibile 

riparato.

(Vedi immagine 14A)

.

Alleen als de airconditioning geïnstalleerd is

- Verwijder het luikje “1” dat toegang 

verschaft tot de zekeringen en relais “

15.2”

.

Vervang een defecte zekering altijd door een 

zekering van hetzelfde soort. Gebruik nooit 

een gerepareerde zekering.

(Zie afbeelding 14A)

.

14A

FUNZIONI

FUNCTIES

f1

7,5 A

fusibile eletrovalvola compressore

zekering elektromagnetische klep 

compressor

f2

20 A

fusibile elettroventola (1)

zekering elektrische ventilator (1)

f3

20 A

fusibile elettroventola (2)

zekering elektrische ventilator (2)

f4

20 A

fusibile velocita ventola

zekering snelheid ventilator

f5

25 A

fusibile 3à velocita ventola

zekering 3de snelheid ventilator

f6

25 A

fusibile 3à ventole posteriori cabina

zekering 3de ventilatoren achter cabine

R1

rele' 3à velocita ventola

relais 3de snelheid ventilator

R2

rele' ventole posteriori cabina

relais ventilatoren achter cabine

R3

rele' elettroventola (1)

relais elektrische ventilator (1)

R4

rele' elettroventola (2)

relais elektrische ventilator (2)

R5

rele' segnale riscaldamento

relais signaal verwarming

R6

rele' compressore

relais compressor

R7

rele' velocita ventole cabina

relais snelheid ventilatoren cabine

F6

(25A)

F5

(25A)

F4

(20A)

F3

(20A)

F2

(20A)

F1

(7,5A)

928855

R1

R2

R3

R4

R5

R6

R7

15.2

only if air conditioning is installed.

- Remove the door "1" that provides access 

to the fuses and relays “

15.2”

.

Always replace a defective switch with an 

identical one. Never use a repaired fuse.

(See image 14A)

.

FUNCTIONS

compressor solenoid valve fuse
Electric fan (1) fuse
Electric fan (2) fuse
fan speed fuse
fan 3rd speed fuse
fan rear fans 3rd fuse
fan 3rd speed fuse
cab rear fans relay
Electric fan (1) relay
Electric fan (2) relay
heating signal relay
compressor relay
cab fans speed relay

65

IT

EN

NL

ECU

3B6

3B6

1 2 3 4 5

ECU

(70A)

(70A)

(30/40A)

(70A)

(30/40A)

(10/20A)

(10/20A)

(10/20A)

(10/20A)

(10/20A)

(10/20A)

(10/20A)

(10/20A)

928827

16 - fUSIBILI E RELÈ CARRo

- Rimuovere lo sportellino “

1.2”

 di 

  accesso ai fusibili e relè “

1.1”

.

Sostituire sempre un fusibile difettoso con uno 

equivalente. Non utilizzare mai un fusibile 

riparato.

(Vedi immagine 15)

.

16 - ZEKERINGEN EN RELAIS TRUCK

- Verwijder het luikje “

1.2”

” dat toegang 

verschaft tot de zekeringen en relais “

1.1”

.

Vervang een defecte zekering altijd door een 

zekering van hetzelfde soort. Gebruik nooit een 

gerepareerde zekering.

(Zie afbeelding 15)

.

15

1.2

16

1.1

FUNZIONI

FUNCTIES

f1

7,5 A

positivo sonda lambda, sensore acqua nel 

gasolio,diagnostica motore perkins

positief lambdasonde, sensor water in de 

diesel, diagnose perkins motor

f2

7,5 A

positivo segnali centralina motore perkins 

tier4

positief signalen centrale perkins tier4 motor

f3

7,5 A

positivo bolla elettronica 3b6 e 

predisposizioni

positief elektronische waterpas 3b6 en 

vooruitrustingen

f4

7,5 A

positivo sensore micro cambio e sensore 

blow-by

positief sensor micro versnelling en blow-by 

sensor

f5

7,5 A

positivo luci di posizione anteriore sx 

posteriore dx

positief stadlichten links voor en rechts achter

f6

7,5 A

positivo luci di posizione anteriore dx 

posteriore sx

positief stadlichten rechts voor en links achter

f7

10 A

positivo segnale pick-up tachimetro,sensore 

tachimetro e sensore assale posteriore

positief pick-up snelheidsmeter signaal, 

sensor snelheidsmeter en sensor achteras

f8

10 A

positivo sensori stabilizzatori anteriori lato 

dx  lato sx

positief sensoren stabilisatoren voor rechter- 

en linkerkant

f9

10 A

positivo sensori stabilizzatori posteriori lato 

dx  lato sx

positief sensoren stabilisatoren achter 

rechter- en linkerkant

f10

10 A

positivo micro assale posteriore destro e 

sinistro

positief micro achteras rechts en links

f11

10 A

positivo pompa emergenza

positief noodpomp

f12

15 A

positivo luci e cicalino retromarcia

positief lichten en zoemer 

achteruitversnelling

f13

15 A

positivo luci anabbaglianti lato sinistro

positief dimlicht linker kant

f14

15 A

positivo luci anabbaglianti lato destro

positief dimlicht rechter kant

16 - foRKLIfT TRUCK fUSES AND RELAYS

- Remove the door “

1.2”

 that provides 

access to the fuses and relays “

1.1”

.

Always replace a defective switch with an 

identical one. Never use a repaired fuse.

(See image 15)

.

FUNCTIONS

Lambda probe fuse, sensor for water in fuel, 

Perkins engine diagnostics

tier4 Perkins engine control unit signals 

positive
3b6 electronic level positive and set-ups
Blow-by sensor and gear micro switch sensor 

fuse
front LH and rear RH position lights positive

front RH and rear LH position lights positive
Speedometer pick-up signal, speedometer 

sensor and rear axle sensor fuse positive
front RH and LH stabilisers sensors positive

rear RH and LH stabilisers sensors positive

RH and LH rear axle micro switch positive

emergency pump positive

reversing lights and buzzer positive

LH low beams positive

RH low beams positive


Content      ..     11      12      13      14     ..