PL7 JUNIOR/PRO Operate modes manual (Operate modes manual eng V4.0) - page 5
Programming instruction list in language
Step
Action
6
Select the label (if LD, ST, IL) or the page (if G7) at the beginning of the re-
placement by positioning the pointer on the listFrom.
If more precision is required, use the up and down arrow keys.
7
Select the label (if LD, ST, IL) or the page (if G7) at the end of the replacement
by positioning the pointer on the listTo.
If more precision is required, use the up and down arrow keys.
8
Select the type of replacement:
l if Replace, the replacement is carried out occurrence by occurrence,
l if Replace All, the replacement is carried out on all occurrences.
Notes:
l The status bar indicates the number of replacements carried out, and a re-
port on the replacements not carried out.
l The ESC key allows you to abort the function Replace, but the replace-
ments already carried out are kept.
165
Programming instruction list in language
Cross Referencing a variable in an application
Introduction
This function allows you to locate in the application:
l variables in the form of labels or symbols (except those used in operating
screens),
l DFB types (only on TSX Premium with Pl7 Junior and Pro),
l DFB instances (only on TSX Premium with Pl7 Junior and Pro),
l and to open modules/tasks/DFB types.
Principals of
The user realizes that the variable X is not the right value. To identify the cause he
using debugging
must therefore:
l find the places where this variable is used,
l obtain a list of statements, rungs and expressions,
l to display and verify the activation conditions of the variable.
Note:
In order to record the path of this search, the list elements thus visited are marked
with an asterisk (*).
Operational
A variable can be a read variable (R), a write variable (W) or a read/write variable
mode for objects
(R/W).
- "R" groups together the read operational modes, indexed read, indexed word, in-
put or input/output parameter of a indexed or non-indexed function.
- "W" groups together the write operational modes, indexed write, output or input/
output parameter of indexed or non-indexed function and execution of Block Func-
tions (SFB and DFB).
Search source
Table of variables:
variables
Bit
%Ixi; %QXi; %Mi; %Si
Word
% MWi; %MDi; %MFi; %KBi; %KWi; %KDi; KFi; %MBi; %SWi; %QWi; %QDi;
%IWi; %IDi; %NWi
Instruc-
SRi; HALT
tion
Other retrievable variables:
Byte variables
Word extract bits
Bit table
Grafcet bit table
Character string
166
Programming instruction list in language
Table of words and constants
Table of double words and constants
Constant character string
Standard Block Function
Standard Block Function element
Step status
Step activity time
Manet variables
Search options
For an indexed variable, the variable and the index are taken into account in the list.
Table of options:
Extract Bit
This option is for variables of types %MW, %KW, %IW, %NW,
%QW. It adds to the list the variable and the referenced bits.
Table Object
This option is for bit tables, word tables and immediate indexed vari-
ables. It adds to the list the immediate indexed table variables
whose first element is the input variable.
Channel Object
This option is for channel objects. It adds to the list all the objects of
the same referenced channel, including the tables and the extract
bits.
Network Objects
This option is for the network variables. It allows you to obtain all the
variables from the same remote module (nanet object).
FB Object
This option allows you to expand the list of SFB block function ele-
ments and the DFB type elements.
FB Instance
Only on TSX Premium with PL7 Junior and Pro.
This option is for DFB types. It allows you to obtain from the name
of a DFB type the sections using its instances.
167
Programming instruction list in language
Searching for
Carry out the following actions:
cross references
Step
Action
1
Select the icon
2
Enter the search source variable as an address or a symbol (E.g. %M10) and
the possible options then confirm via Search.
3
To display a module, select the module, via the Contextual menu, select Open
or double click on the module.
Selecting a variable from the list:
l Select the variable from the list, the list of tasks, modules, labels is updated.
Deleting a variable from the list:
l Select the variable, enable the contextual menu (right click) then click on Delete.
Displaying in structural view or in functional view:
l Use the View menu or the Function button.
168
Programming instruction list in language
Animation of List program elements
At a Glance
Refer to the "Debugging" Chapter of the Part "Debugging, Adjustment, Docu-
mentation and Appendices"-> (see Animating program elements, p. 285 ).
169
Programming instruction list in language
Printing of a program
Procedure
Carry out the following steps:
Step
Action
1
Open the module with right click + Open or a double click.
2
Select the command File/Print (Ctrl+P) or click on the icon
3
Select a print range:
l if for the entire module, go to step 6.
l if for part of a module, go to step 4.
4
Select %Li/TOP/BOTTOM (if LD, ST, IL) or start page (if G7).
If more precision is required, use the up and down arrow keys.
5
Select %Li/TOP/BOTTOM (if LD, ST, IL) or endpage (if G7).
If more precision is required, use the up and down arrow keys.
6
Confirm with OK or ENTER.
Notes
The print type depends on the type of display selected in the View menu.
l Addresses: prints variables with addresses,
l Symbols: prints variables with symbols,
l Symbols&Addresses: prints variables with symbols/addresses.
170
Programming instruction list in language
Export/Import of source files
Refer to the "Import/Export" (See Import/Export, p. 341) Chapter of the Part "De-
bugging, Adjustment, Documentation and Appendices".
171
Programming instruction list in language
172
Programming in Structured Text
ST language
8
Introduction
Subject of this
This chapter reminds you of the structure of a program in Structured Text language.
chapter
It describes:
l How to create a program.
l How to use the different functions offered by the editor.
l How to manage the different modules making up the application.
What’s in this
This Chapter contains the following Maps:
Chapter?
Topic
Page
Structure of a program in Structured Text language.
174
Creating a program in Structured Text (ST)
175
Modifying a Structured Text program
176
Displaying variables as symbols or addresses
179
Information box
180
Online symbolization
181
Input of a predefined function block (ST editor)
182
Assisted entry of a library function (ST editor)
183
Direct access to a subroutine
185
Replacing a variable in the application
186
Cross Referencing a variable in an application
188
Animation of Structured text program elements
191
Printing of a program
192
Export/Import of source files
193
173
Programming in Structured Text language
Structure of a program in Structured Text language.
Introduction
Structured Text (ST) can be used on PLCs TSX Premium (V>=V1.0) and on the TSX
Micro (V>=V1.5).
Structured Text is supported by software products PL7 Junior and PL7 Pro.
Principal
A module written in Structured Text language is composed of a series of statements
executed sequentially by the PLC.
l Each statement begins with an exclamation mark (generated automatically), it
can include one or several comments, one or several instructions and can be
marked with a label.
l A statement contains a maximum of 128 lines of 300 characters (instructions,
comments, label).
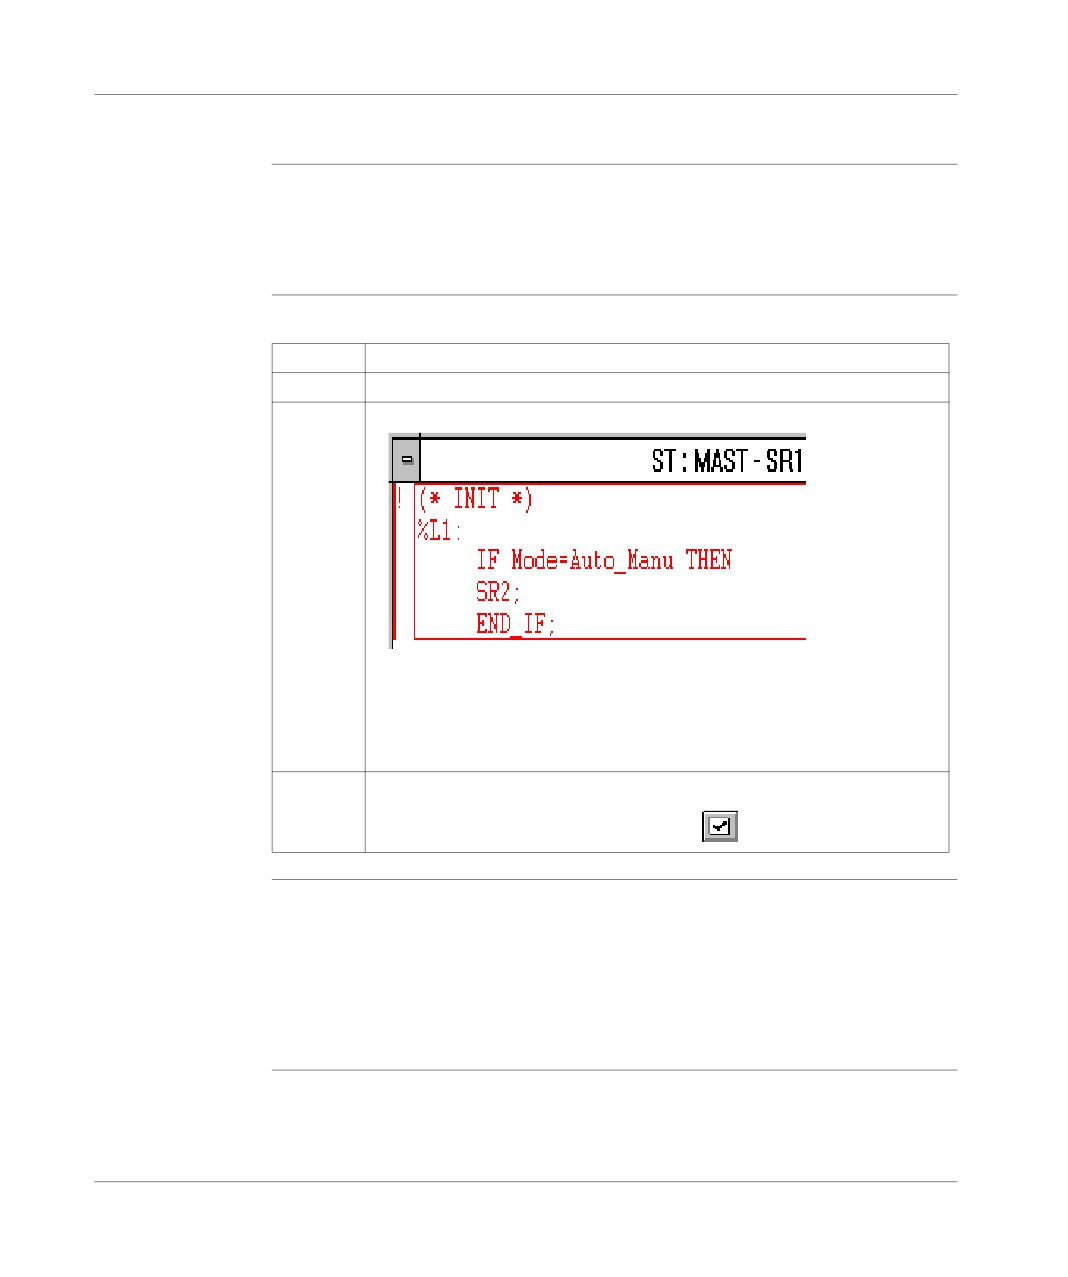
l In the editor a statement being input is displayed in red.
l A selected statement is surrounded by a green frame.
l The current statement is surrounded by a black frame.
l The line number and the column number as well as the number of the current
statement are written in the bottom panel of the window (status bar).
Example
! (*Initialisation*)
%L2: (*Label*)
%MW0:=0; (* Init Index *)
%MW2:=%MW99:2; (* length of table *)
IF (%MW2 REM 2=0) THEN DEC %MW0;
END_IF;
(* while the index is < the length of the table
carry out
shift *)
WHILE(%MW0<%MW2)DO
%MW100[%MW0]:=(SHR(%MW100[%MW0],8))OR(SHL(%MW101[%MW0],8));
INC %MW0;
END_WHILE;
Notes :
Key-words (example AND, OR, IF…) are colored blue.
Comments are colored green.
The rest is colored black.
174
Programming in Structured Text language
Creating a program in Structured Text (ST)
Introduction
Structured Text can be used on PLCs TSX Premium (V>=V1.0) and on the TSX Mi-
cro (V>=V1.5).
Structured Text is supported by software products PL7 Junior and PL7 Pro.
Procedure
Carry out the following actions:
Step
Action
1
Creating or importing an LD, IL, ST section, p. 105
2
1. Enter the first statement. As input begins, the statement is displayed in red.
2. Accept each line with ENTER.
3. Use the TAB key to indent the code.
4 .Online symbolization, p. 159
3
Confirm the input of the statement with the command Edit/Confirm
(CTRL+W)/(SHIFT+ENTER) or via the icon
Rules
They are:
l When confirming the statement, superfluous spaces are ignored.
l If an error is detected at confirmation, the cursor is positioned over the first error
detected, the error message is displayed at the bottom of the window.
l In the editor, a statement is displayed in redwhile being entered.
l A selected statement is surrounded by a green frame.
l The current statement is surrounded by a black frame.
175
Programming in Structured Text language
Modifying a Structured Text program
Accessing a
The program module being displayed, select the command Edit/Go to (Ctrl+A) or
statement or
instruction
the icon
The possible choices are as follows:
Select in the label field…
position…
TOP
at the beginning of the program module.
BOTTOM
at the end of the program module.
%Li
at the corresponding label number.
The Move zone allows a movement relative to TOP/BOTTOM/%Li.
The command Edit/ Go to current modification allows you to position the cursor
on the statement which is currently being modified.
Selecting one or
The possible choices are as follows:
several
Select…
by…
or…
statements
one statement
positioning the cursor
by clicking in this area, the latter is framed
over the statement
in green.
and selecting the
menuEdit/Select
statement
!
( * INIT * )
%L1:
IF Mode-Auto_manu
THEN
SR2;
END_IF;
several statements
move the mouse over
by using the keys (SHIFT+Arrow).
the different state-
ments while keeping
the left button down
a part of a state-
by moving the cursor
ment
over the text to be se-
lected while keeping
the left mouse button
down (SHIFT+Ar-
row).
176
Programming in Structured Text language
Modifying one
Carry out the following actions:
statement
Step
Action
1
Position the cursor over the point to be modified.
2
Carry out the modification
3
Confirm the modification with the keys CTRL + W or SHIFT+ ENTER or the
icon
The deletion possibilities are as follows:
Delete…
by…
then by…
one statement
selecting the statement to
pressing the key Delete.
delete
a part of a statement
selecting the part of the
pressing the key Delete.
statement to delete
a piece of text and place it on
selecting the text to be cut
selecting the command Edit/
the clipboard
Cut (CTRL+X).
Inserting a state-
Carry out the following actions:
ment before the
Step
Action
current
statement
1
Position the cursor on the statement before which the insertion must be carried
out.
2
Select the command Edit/Insert statement or (Ctrl+I).
Cut/Copy/Paste a
Carry out the following operations:
part of a program
To…
you must…
the text…
module
Copy a part of a statement
select the text to be copied
is placed on the Windows
and select the command
clipboard.
Edit/Copy (Ctrl+C)
Paste the contents of the
select the start point from
is kept on the Windows clip-
clipboard into a document
which the text must be past-
board.
ed and select the command
Edit/Paste (CTRL+V)
Cut a piece of text and place
select the text to be cut and
is placed on the Windows
it on the clipboard
select the command Edit/
clipboard.
Cut (CTRL+X)
Note:
177
Programming in Structured Text language
The Cut/Copy/Paste function works in the same way for a selection of statement(s)
and between program modules.
Canceling a
To cancel a modification carried out on an unconfirmed statement, select the com-
modification
mand Edit/Undo changes or the icon .
This command allows you to return the statement to its last confirmed state.
178
Programming in Structured Text language
Displaying variables as symbols or addresses
Procedure
Carry out the following actions:
Step
Action
1
Open the program module by right mouse click + Open or double mouse
click.
2
Select the command:
l View/Addresses to display the variables as addresses.
l View/Symbols to display the variables as symbols.
l View/Symbols&Addresses to display the variables as symbols/addresses
(only Ladder editor).
Note:
It is possible to run the language editor from the Options menu in:
l addresses view,
l symbols view,
l symbols&addresses view (only for the Ladder editor).
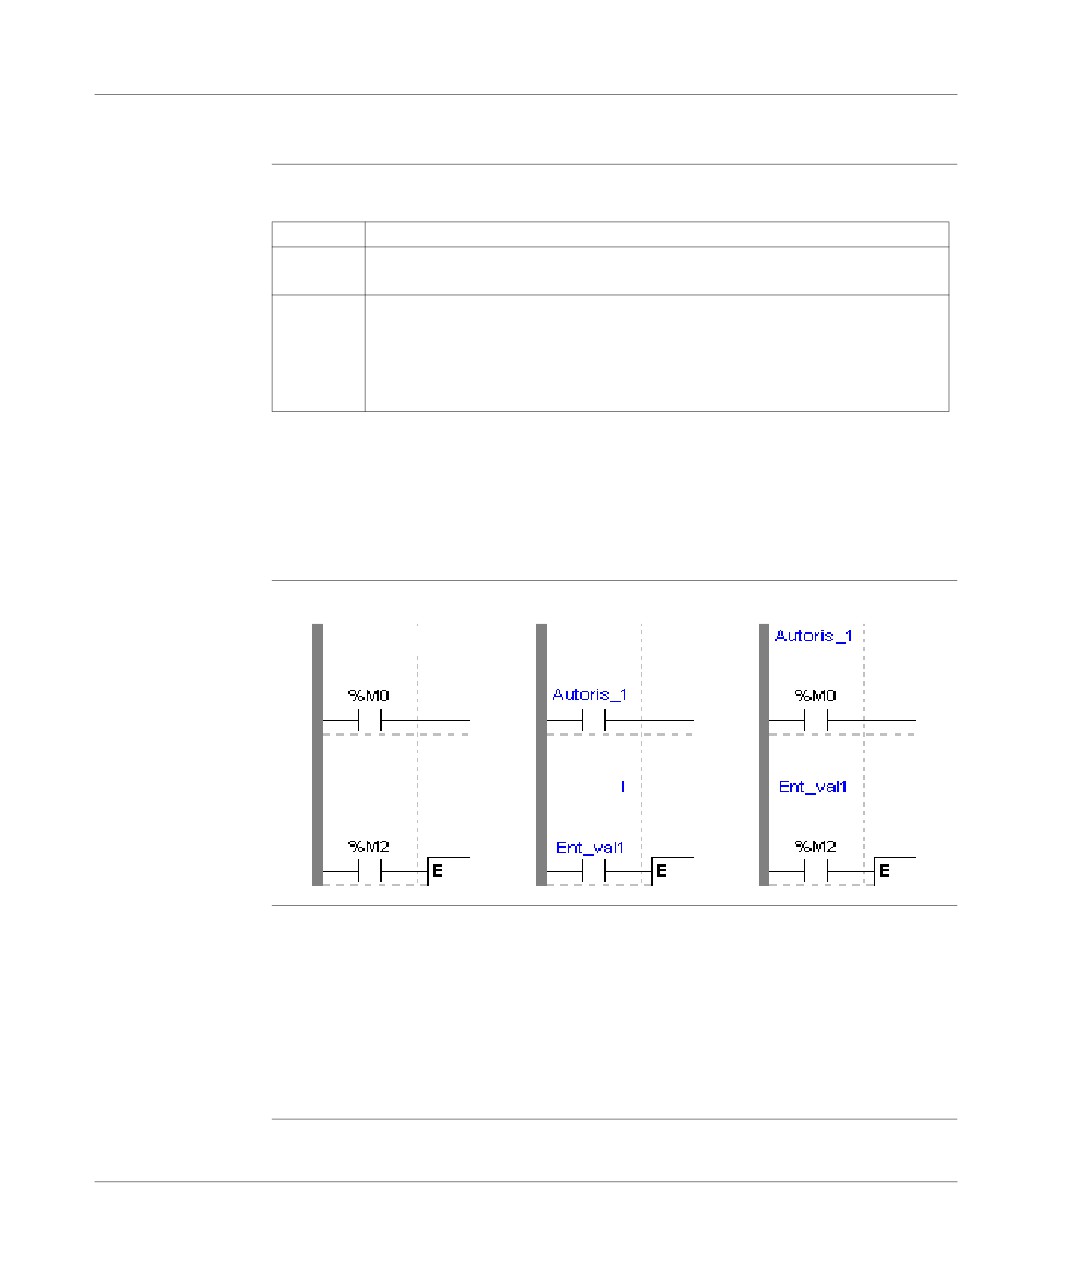
Example display Ladder editor used with the 3 views.
Note
If a symbol or an address has more than 8 characters, the display can be truncated.
Select the element displayed in this way in the status bar. You can also use the In-
formation box.
The command View/Reduced allows you to reduce the size of the window while
keeping the same level of information.
The command View/Normal allows you to return to the normal sized window.
179
Programming in Structured Text language
Information box
Functions
This box, which can be accessed from all language objects, displays the symbols,
address and comments for the selected object (with the exception of the operate and
horizontal comparison blocks) in an integrated format.
Display table according to object:
Single object
Complex object (operate
block, horizon comparison
block)
l symbol format in blue
l symbol format in blue,
l constructor name in black,
l constructor address in black,
l associated comments in
green.
How to access
Carry out the following steps:
the object
Step
Action
information box
1
In the ST language editor, select the object.
2
Click on the right mouse button (contextual menu) and then select Informa-
tion, or select theView → Informationcommand.
Note
The information box remains visible if it the user does not specifically close it. The
contents of the Information box is updated according to the current selection.
180
Programming in Structured Text language
Online symbolization
Principal
Online symbolization allows you, at the time of input of a Ladder, List, Structured
Text program, to immediately (without opening the data editor) associate:
l an address to a new symbol,
l a symbol to a non symbolized address.
Procedure
With the Ladder editor, start at Step 1, with the Structured Text or List editors, go
straight to step 2.
Step
Action
1
Select the cell where the variable is situated.
2
Select the variable (highlight it).
3
Right mouse click on the variable and select Associate Symbol&Address.
4
Enter the address or symbol and the comment.
181
Programming in Structured Text language
Input of a predefined function block (ST editor)
Procedure
From within the language editor, input at the cursor position one of the instructions
presented below corresponding to the desired function block.
Function blocks
The different function blocks and their instructions are:
Function blocks
Instruction
Syntax
PL7-3 timer(%Ti)
Start
START %Ti;
Stop
STOP %Ti;
Reinitialize
PRESET %Ti;
TP/TON/TOF timer (%TMi)
Start
START %TMi;
Initialize
DOWN %TMi;
Up/Down counter (%Ci)
Reset to 0
RESET %Ci;
Set to Preset value
PRESET %Ci;
Increment by 1
UP %Ci;
Decrement by 1
DOWN %Ci;
Monostable (%MNi)
Start
START %MNi;
Register of FIFO/LIFO words
Reset contents
RESET %Ri;
(%Ri)
Saving in %Ri;I
PUT %Ri;
Removing from %Ri,O
GET %Ri;
Drum-DRUM (%DRi)
Position at step 0
RESET %DRi;
Change step
UP %DRi;
182

Programming in Structured Text language
Assisted entry of a library function (ST editor)
Procedure
The instruction to be entered is:
%MD5:=%MD30 AND 100 AND ROL(%MD8,2);
Perform the following actions to make an entry:
Step
Action
1
Enter the instruction as far as the ROL function call.
2
Via the Contextual or Service menu, select the Enter call for a function com-
mand.
3
Select the required tab (default selection). For an elementary function (EF) the
"Parameters" option must be selected in the Function Information menu.
4
Select the (EF) function family (e.g.: Double length integer, or the required
DFB block (only on TSX Premium with PL7 Junior and Pro).
5
Select the (EF) function name(e.g. ROL), or the name of the DFB instance.
An instance can be created for a DFB:
1. Select Create.
2. Enter the name.
3. Enter a comment.
4. Confirm using Create.
6
Enter the (EF) function variables or DFB type parameters in the parameter
entry field. The function entered can be viewed in the Display the call field.
7
Confirm the selection with OK.
8
End the instruction imput (end character ;).
9
Confirm the entry with ENTER.
Notes
Certain functions offer extra screens for parameter entry (e.g.: human-machine in-
terface functions). These parameters are accessed with the Detail button that then
appears at the bottom of the screen.
When the function syntax is known, enter syntax directly into the editor.
It is possible to directly enable assisted entry on a given function by selecting the
name of the function then selecting the Service/Enter call for a function command
or performing a RIGHT MOUSE CLICK.
Tabulation and Line Feed characters are represented by $T and $N respectively.
They must be entered in $$T and $$N format.
183
Programming in Structured Text language
WARNING
For EFs displayed in red:
EFs which are displayed in red in the function entry help screen cannot
be used in the application. This limitation is encountered in the following
instances:
l when an earlier version of the EF is already used in the application,
l the EF name is used as a variable linked symbol, and concerns the
EF ROUND (family of single precision reals).
Failure to observe this precaution can result in severe injury or
equipment damage.
184
Programming in Structured Text language
Direct access to a subroutine
Procedure
To access the input/display window of a sub-routine during the input/display of a
sub-routine call, carry out the following actions:
Step
Action
1
Select the subroutine call object: SRi
%L1:
IF %M0 THEN SR1;
END_IF;
2
Select the command Service/Open or select Open from the contextual menu.
185
Programming in Structured Text language
Replacing a variable in the application
Introduction
Finding and replacing an application variable as an address or a symbol (excluding
variables used in operating screens). The replacement in the application may be to-
tal or partial, automatic or manual.
Replacement affects the indicated variable and its dependent objects as well (word
extract bits…).
Exception: for Grafcet steps bits the associated activity times (e.g. %Xi.T) are not
replaced.
Replacement is carried out at the following levels:
l Application (in all tasks).
l Tasks (MAST, FAST, Evti).
l Complete section.
l Partial section (from address i to address j).
l Replacement is also carried out at functional module level (complete functional
module, sub-modules included).
Procedure
Carry out the following actions:
Step
Action
1
Select the commandTools/Replace variables or position the cursor over the
Station directory and select Replace variables from the contextual menu.
2
Put the variable to be replaced (as an address or a symbol) in the Findfield and
confirm with ENTER or TAB.
3
Put the variable to be replaced (as an address or a symbol) in the Replacefield
and confirm with ENTER.
4
Select the view:
l Structure view
l Function view
5
Select one or more modules:
l if replacing in all the application, go to point 8,
l if replacing in some of the modules, deselect the whole and select the mod-
ules, go to point 6,
l if replacing in one of the modules, deselect the whole and select the mod-
ule, go to point 6.
186
Programming in Structured Text language
Step
Action
6
Select the label (if LD, ST, IL) or the page (if G7) at the beginning of the re-
placement by positioning the pointer on the listFrom.
If more precision is required, use the up and down arrow keys.
7
Select the label (if LD, ST, IL) or the page (if G7) at the end of the replacement
by positioning the pointer on the listTo.
If more precision is required, use the up and down arrow keys.
8
Select the type of replacement:
l if Replace, the replacement is carried out occurrence by occurrence,
l if Replace All, the replacement is carried out on all occurrences.
Notes:
l The status bar indicates the number of replacements carried out, and a re-
port on the replacements not carried out.
l The ESC key allows you to abort the function Replace, but the replace-
ments already carried out are kept.
187
Programming in Structured Text language
Cross Referencing a variable in an application
Introduction
This function allows you to locate in the application:
l variables in the form of labels or symbols (except those used in operating
screens),
l DFB types (only on TSX Premium with Pl7 Junior and Pro),
l DFB instances (only on TSX Premium with Pl7 Junior and Pro),
l and to open modules/tasks/DFB types.
Principals of
The user realizes that the variable X is not the right value. To identify the cause he
using debugging
must therefore:
l find the places where this variable is used,
l obtain a list of statements, rungs and expressions,
l to display and verify the activation conditions of the variable.
Note:
In order to record the path of this search, the list elements thus visited are marked
with an asterisk (*).
Operational
A variable can be a read variable (R), a write variable (W) or a read/write variable
mode for objects
(R/W).
- "R" groups together the read operational modes, indexed read, indexed word, in-
put or input/output parameter of a indexed or non-indexed function.
- "W" groups together the write operational modes, indexed write, output or input/
output parameter of indexed or non-indexed function and execution of Block Func-
tions (SFB and DFB).
Search source
Table of variables:
variables
Bit
%Ixi; %QXi; %Mi; %Si
Word
% MWi; %MDi; %MFi; %KBi; %KWi; %KDi; KFi; %MBi; %SWi; %QWi;
%QDi; %IWi; %IDi; %NWi
Instruction
SRi; HALT
Other retrievable variables:
Byte variables
Word extract bits
Bit table
Grafcet bit table
Character string
188
Programming in Structured Text language
Table of words and constants
Table of double words and constants
Constant character string
Standard Block Function
Standard Block Function element
Step status
Step activity time
Manet variables
Search options
For an indexed variable, the variable and the index are taken into account in the list.
Table of options:
Extract Bit
This option is for variables of types %MW, %KW, %IW, %NW,
%QW. It adds to the list the variable and the referenced bits.
Table Object
This option is for bit tables, word tables and immediate indexed vari-
ables. It adds to the list the immediate indexed table variables
whose first element is the input variable.
Channel Object
This option is for channel objects. It adds to the list all the objects of
the same referenced channel, including the tables and the extract
bits.
Network Objects
This option is for the network variables. It allows you to obtain all the
variables from the same remote module (nanet object).
FB Object
This option allows you to expand the list of SFB block function ele-
ments and the DFB type elements.
FB Instance
Only on TSX Premium with PL7 Junior and Pro.
This option is for DFB types. It allows you to obtain from the name
of a DFB type the sections using its instances.
Searching for
Carry out the following actions:
cross references
Step
Action
1
Select the icon
2
Enter the search source variable as an address or a symbol (E.g. %M10) and
the possible options then confirm via Search.
3
To display a module, select the module, via the Contextual menu, select Open
or double click on the module.
189
Programming in Structured Text language
Selecting a variable from the list:
l Select the variable from the list, the list of tasks, modules, labels is updated.
Deleting a variable from the list:
l Select the variable, enable the contextual menu (right click) then click on Delete.
Displaying in structural view or in functional view:
l Use the View menu or the Function button.
190
Programming in Structured Text language
Animation of Structured text program elements
At a Glance
Refer to the "Debugging" Chapter of the Part "Debugging, Adjustment, Docu-
mentation and Appendices"-> (see Animating program elements, p. 285 ) .
191
Programming in Structured Text language
Printing of a program
Procedure
Carry out the following steps:
Step
Action
1
Open the module with right click + Open or a double click.
2
Select the command File/Print (Ctrl+P) or click on the icon
3
Select a print range:
l if for the entire module, go to step 6.
l if for part of a module, go to step 4.
4
Select %Li/TOP/BOTTOM (if LD, ST, IL) or start page (if G7).
If more precision is required, use the up and down arrow keys.
5
Select %Li/TOP/BOTTOM (if LD, ST, IL) or endpage (if G7).
If more precision is required, use the up and down arrow keys.
6
Confirm with OK or ENTER.
Notes
The print type depends on the type of display selected in the View menu.
l Addresses: prints variables with addresses,
l Symbols: prints variables with symbols,
l Symbols&Addresses: prints variables with symbols/addresses.
192
Programming in Structured Text language
Export/Import of source files
Refer to the "Import/Export" (See Import/Export, p. 341) Chapter of the Part "De-
bugging, Adjustment, Documentation and Appendices".
193
Programming in Structured Text language
194
Programming in Grafcet language
9
Introduction
Subject of this
This chapter reminds you of the structure of a program in grafcet language.
chapter
It describes:
l How to create a program.
l How to use the different functions offered by the editor.
l How to manage the different modules making up the application.
What’s in this
This Chapter contains the following Maps:
Chapter?
Topic
Page
Designing a program in Grafcet language
196
Structure of a Grafcet page
197
Grafcet graphic objects
198
Creating a Grafcet module
203
Modifying a Grafcet program
216
Replacing a variable in the application
219
Cross Referencing a variable in an application
221
Animation of Grafcet program elements
224
Printing of a program
225
Export/Import of source files
226
195
Programming in Grafcet language
Designing a program in Grafcet language
Principal
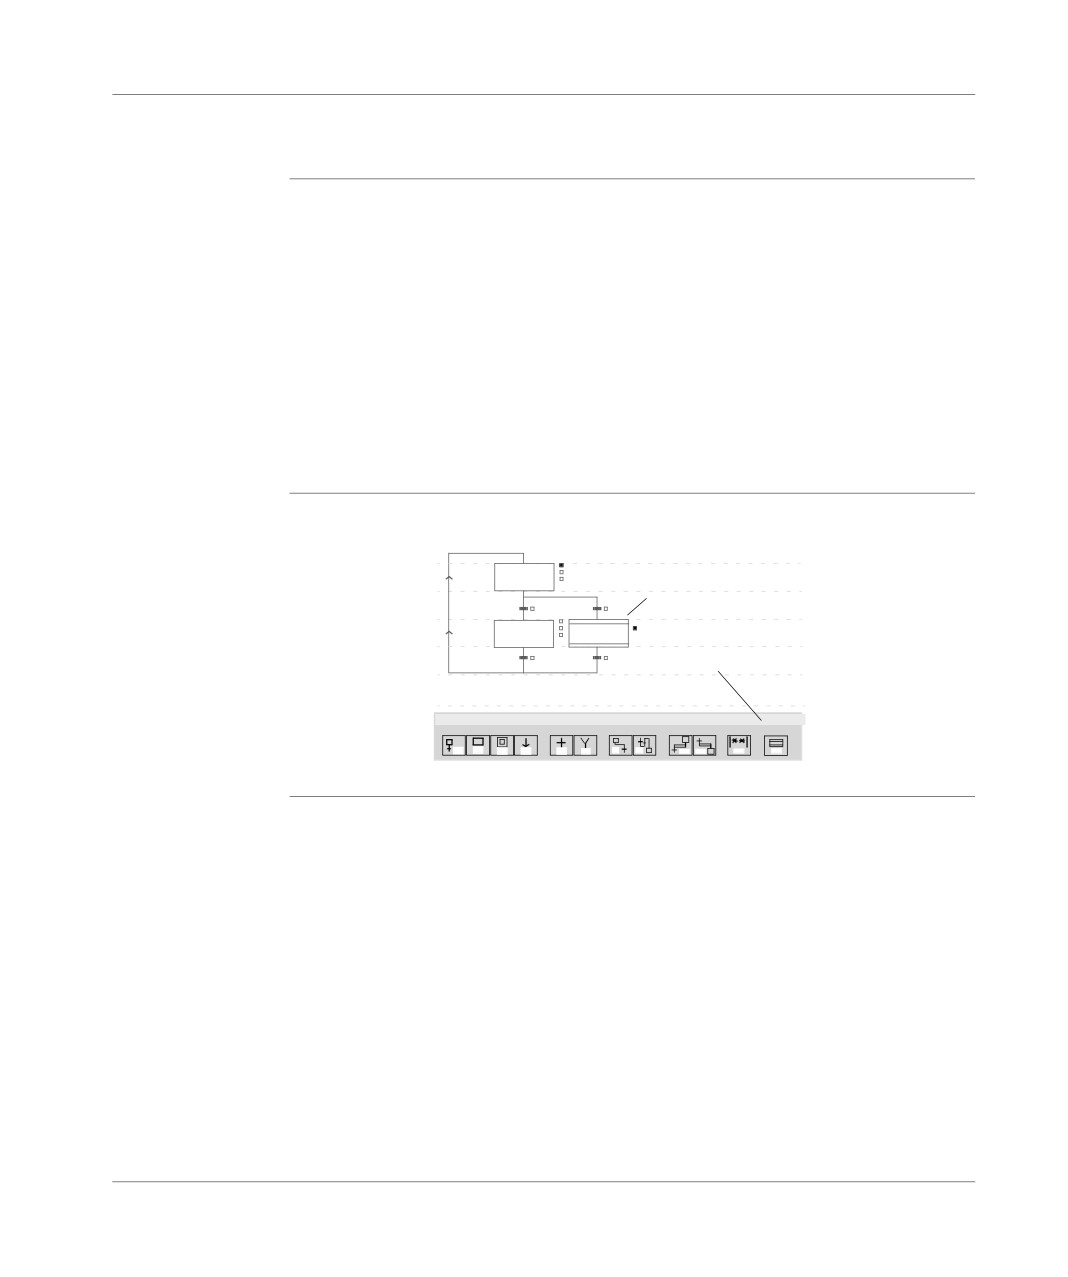
Gracet language (GR7) allows the sequential operation of automation to be repre-
sented graphically and in a structured way.
This description is carried out with help from single graphical objects (See Grafcet
graphic objects, p. 198) representing:
l the steps with which the actions can be associated (except the OUT step),
l the macro-steps, (onlyTSX/PCX/PMX57)
l the transitions with which the receptivity is associated,
l the positioned links connecting a step to a transition or a transition to a step.
The graph is input by Grafcet pages (See Structure of a Grafcet page, p. 197) ad-
dressed from 0 to 7 in the status bar.
Example
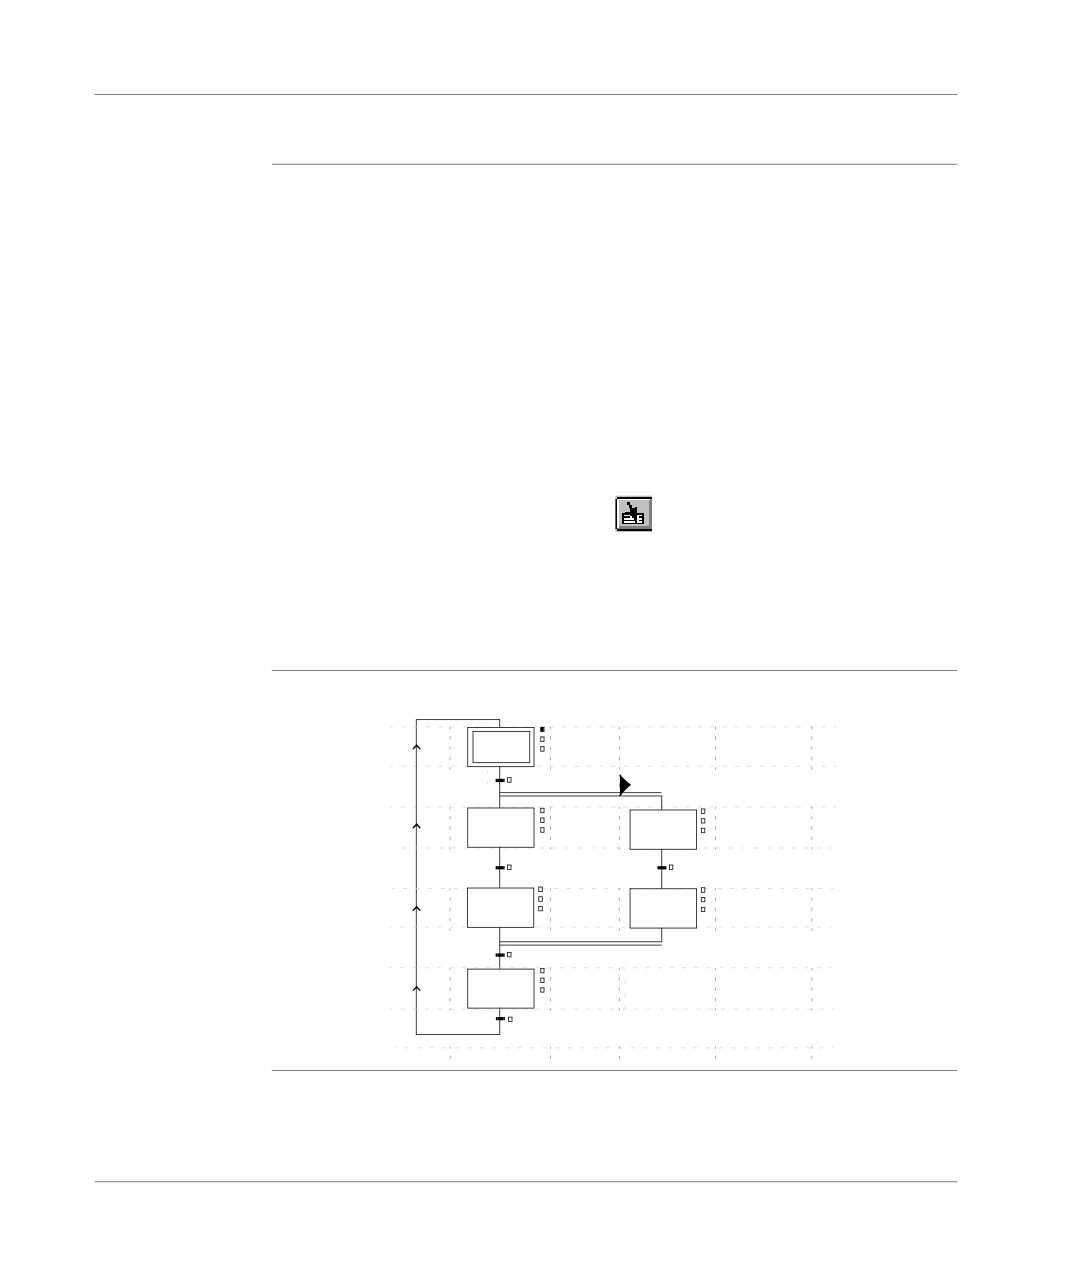
Grafcet editor:
2) Place the element on
1
the input grid
2
M0 0
1) Select object from the
graphics
palette
F2
F3
F4
F5
F6
F7
F8
F9
F10
F11
F12
1F2
196
Programming in Grafcet language
Structure of a Grafcet page
Principles
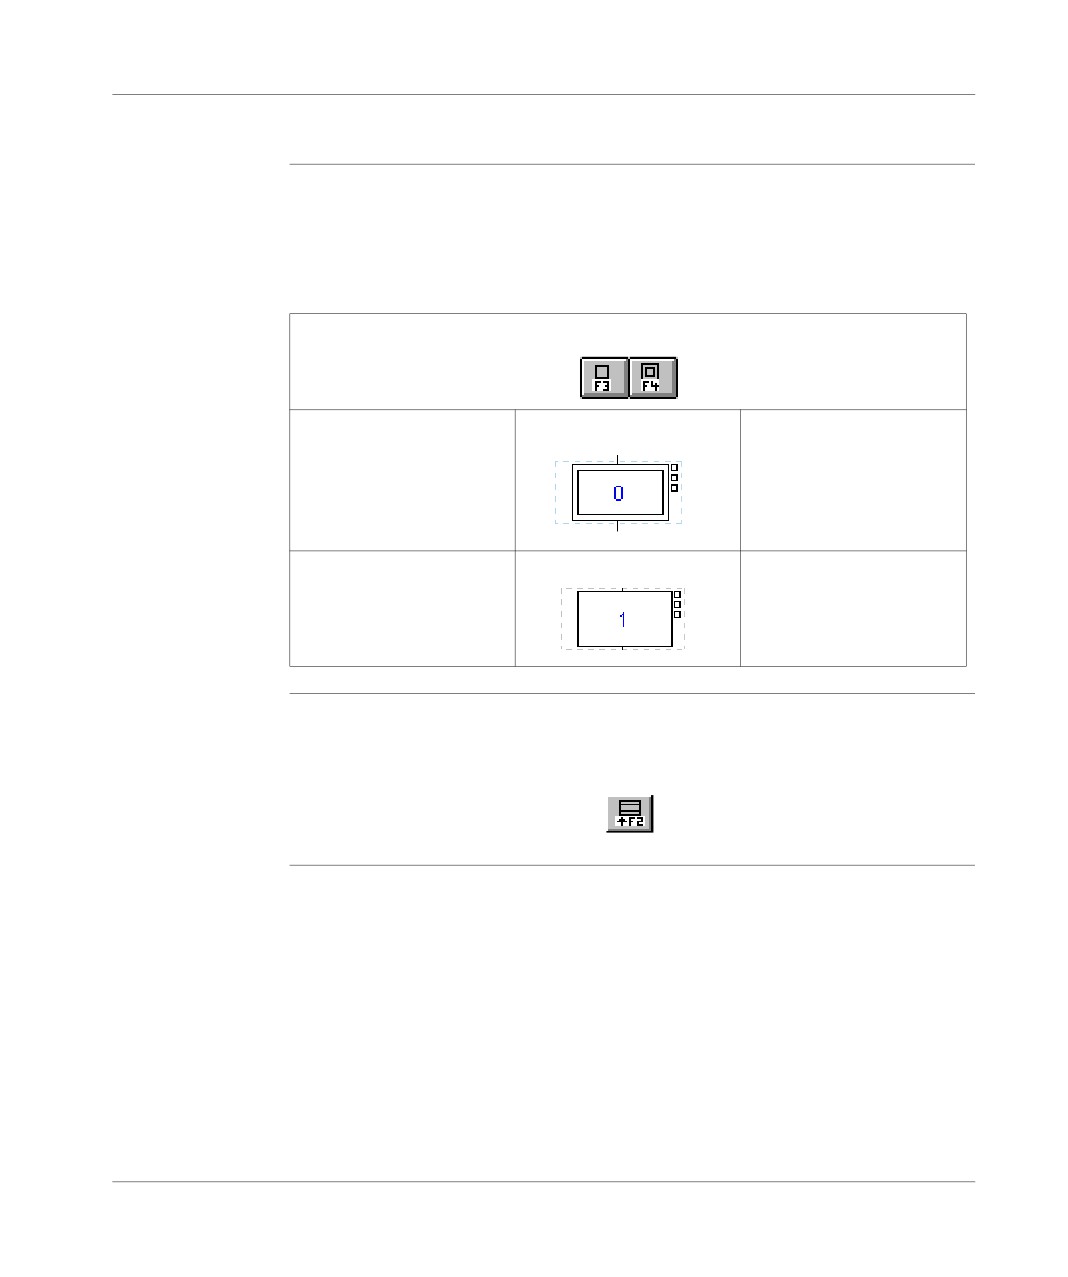
The Grafcet page is displayed in the form of a matrix made up of 14 lines and 11
columns defining 154 cells.
Each cell can receive a graphic object (See Grafcet graphic objects, p. 198).
There are two types of line:
l step lines where steps, macro steps and connectors are entered,
l transition lines where the transitions and source connectors are entered.
Comments can be entered. These are independent graphic objects, which are not
attached to steps or transitions.
A program module is made up of 8 Grafcet pages, and a Grafcet page is accessed
via the Edit/Go to command, or the icon
There are two Grafcet page viewing modes offered, which can be accessed from the
View menu:
l normal view (default display),
l collapsed view.
Example
Grafcet page:
0
1
4
2
5
Step line
3
Transition line
197
Programming in Grafcet language
Grafcet graphic objects
Steps
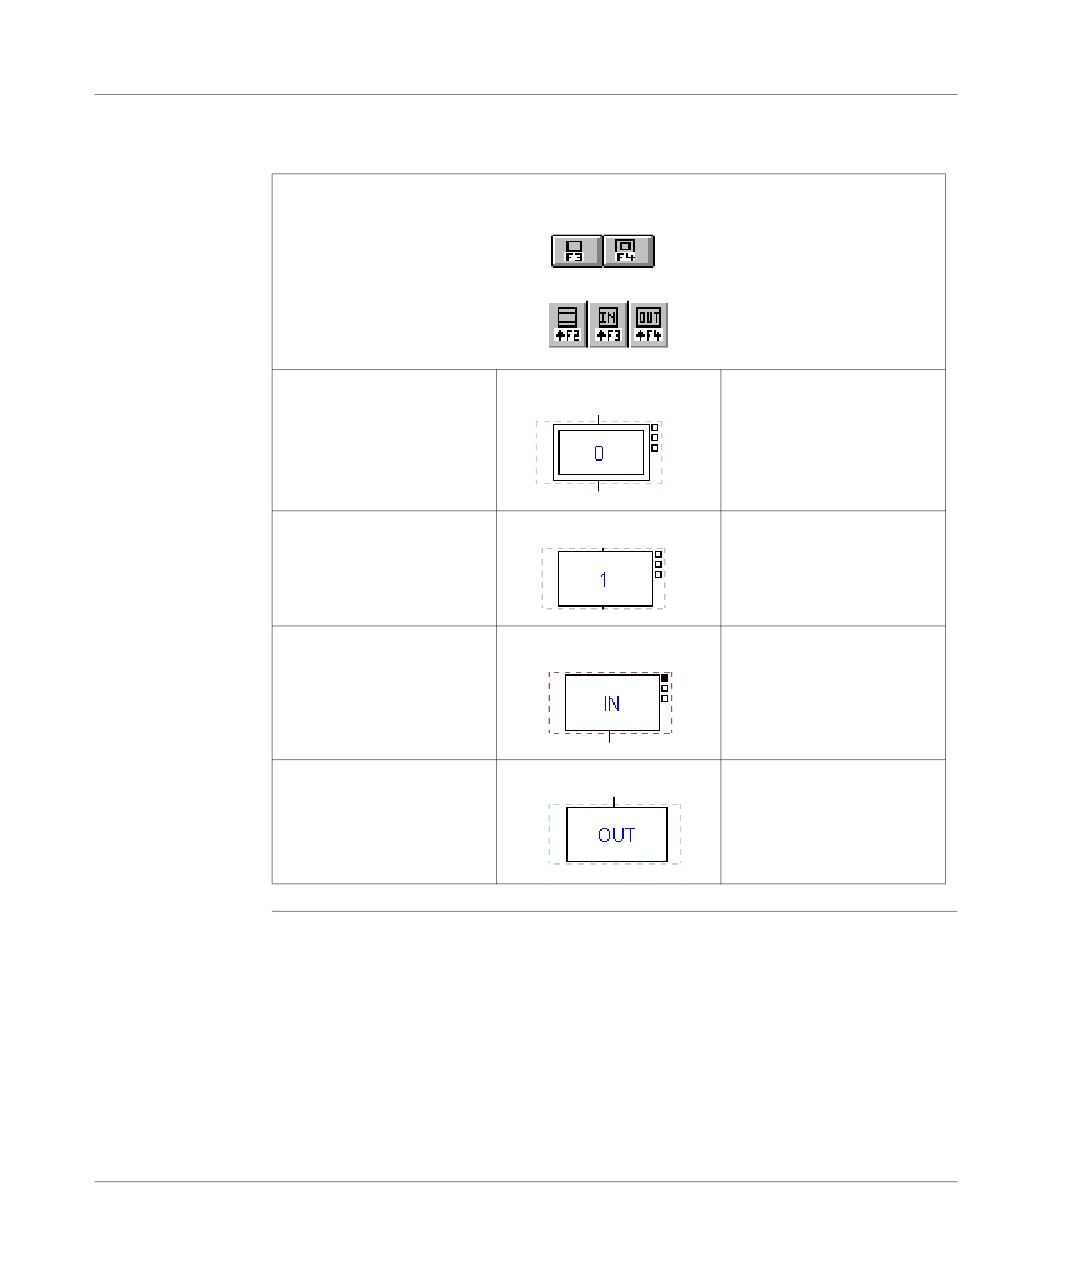
Number of possible steps by PLC type:
l TSX37-10 Max: 96,
l TSX37-20 Max: 128,
l TSX/PCX/PMX57 Max: 250.
Type of steps:
Can be accessed from the graphics palette using the F3 and F4 keys or the icons
Initial
Example:
Defines the initial situation of
the PLC,
i= 0 to 63.
Standard
Example:
Defines the stable PLC state.
Macro-steps
Only enabled on TSX/PCX/PMX57, Max: 64.
Can be accessed from the graphics palette using the (Shift+F2) keys or the icon
198
Programming in Grafcet language
Macro-Step
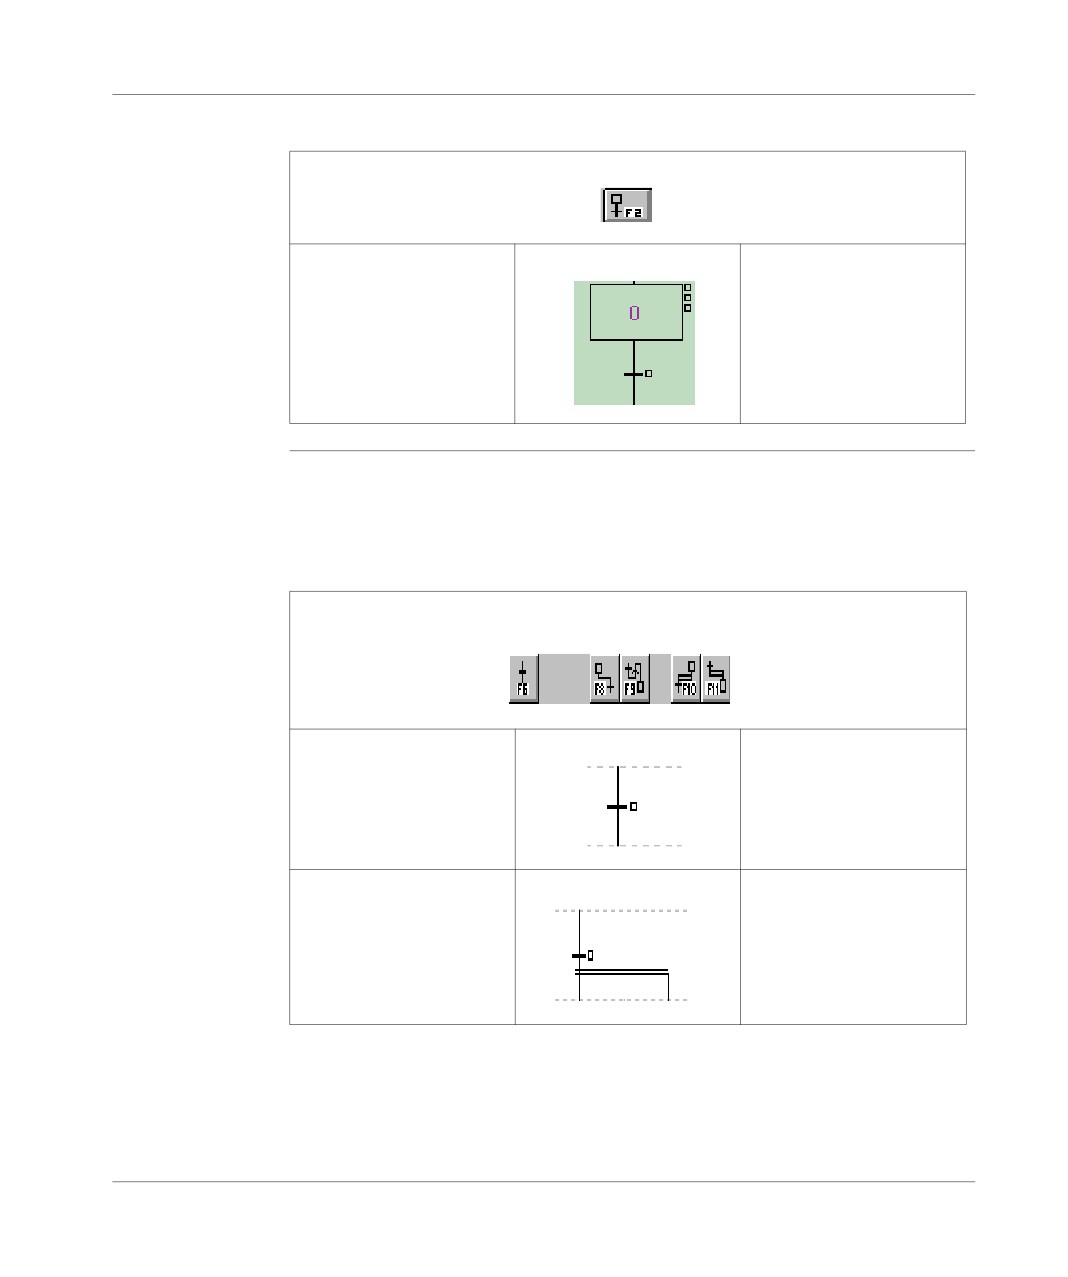
Only enabled on TSX/PCX/PMX57, Max: 250 per Macro-Step plus IN and OUT step.
steps
Types of Macro-step steps:
Can be accessed from the graphics palette using the keys F3, F4, (Shift+F2), (Shift+F3),
(Shift+F4) or the icons .
Initial
Example:
Defines the initial situation of
the PLC,
i= 0 to 63.
Standard
Example:
Defines the stable PLC state.
IN
Example:
Macro-Step input step.
OUT
Example:
Macro-Step output step.
199
Programming in Grafcet language
Step + Transition Step/Transition:
Can be accessed from the graphics palette using the (F2) key or the icon .
Step + Transition
Example:
Simultaneously lays down a
step with a number and tran-
sition.
Transitions
Number of possible transitions by PLC type:
l TSX37-10 Max: 192,
l TSX37-20 Max: 256,
l TSX/PCX/PMX57 Max: 1024.
Type of transition:
Can be accessed from the graphics palette using the keys F6, F8, F9, F10 and F11 or the
icons
Standard
Example:
Allows the transition from
one step to another.
AND divergence
Example:
Allows the simultaneous acti-
vation of a maximum of 11
steps.
200
Programming in Grafcet language
AND convergence
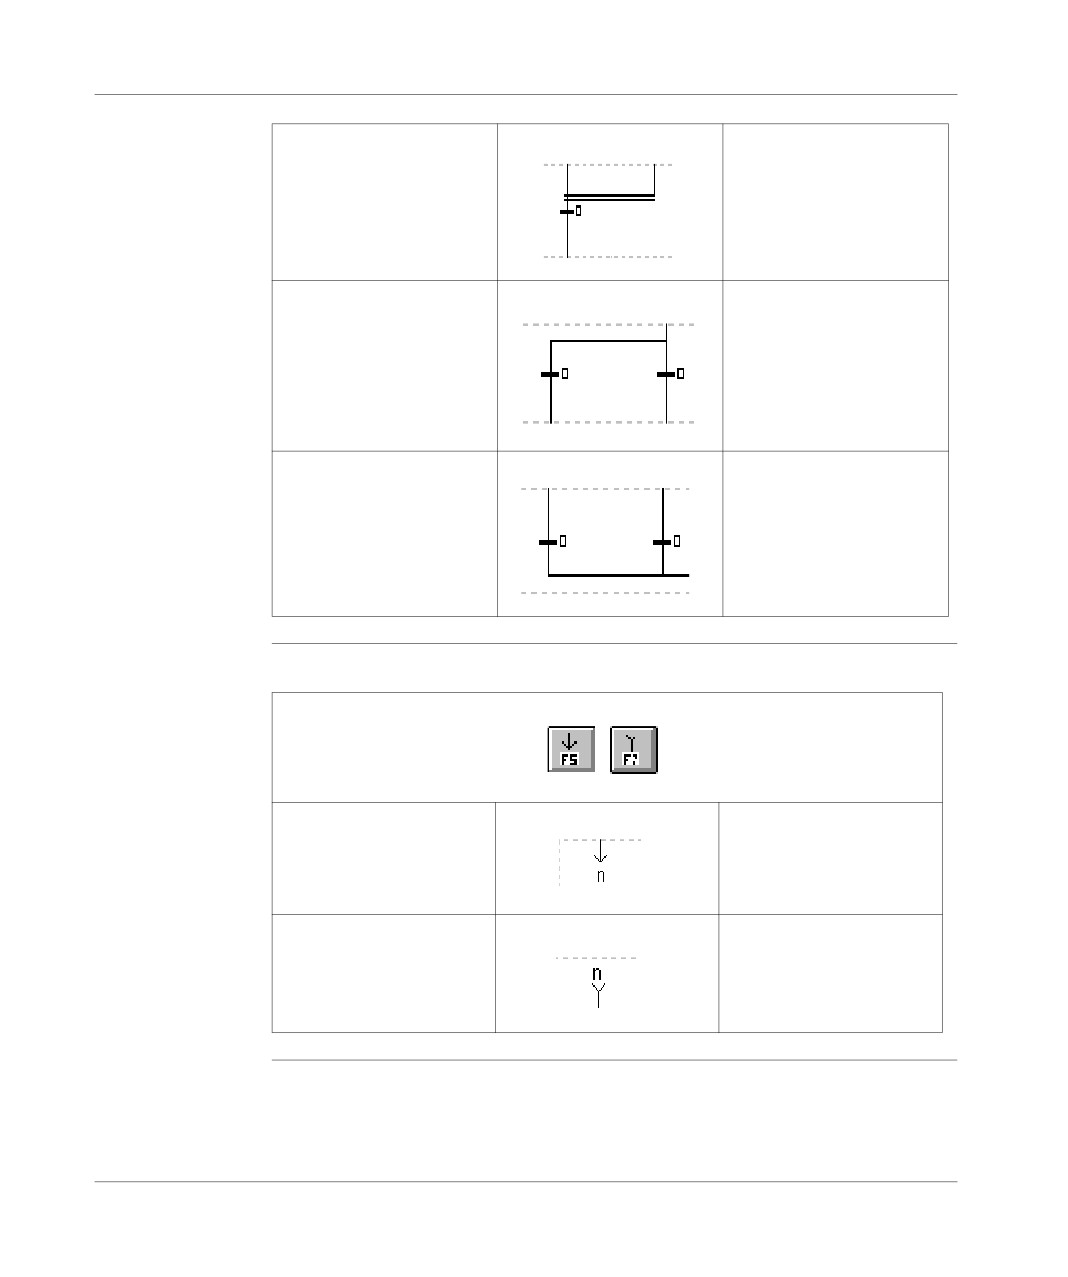
Example:
Allows the simultaneous de-
activation of a maximum of
11 steps.
OR divergence
Example
Allows you to create a branch
to a maximum of 11 steps.
OR convergence
Example
Allows you to close a branch
from a maximum of 11 steps.
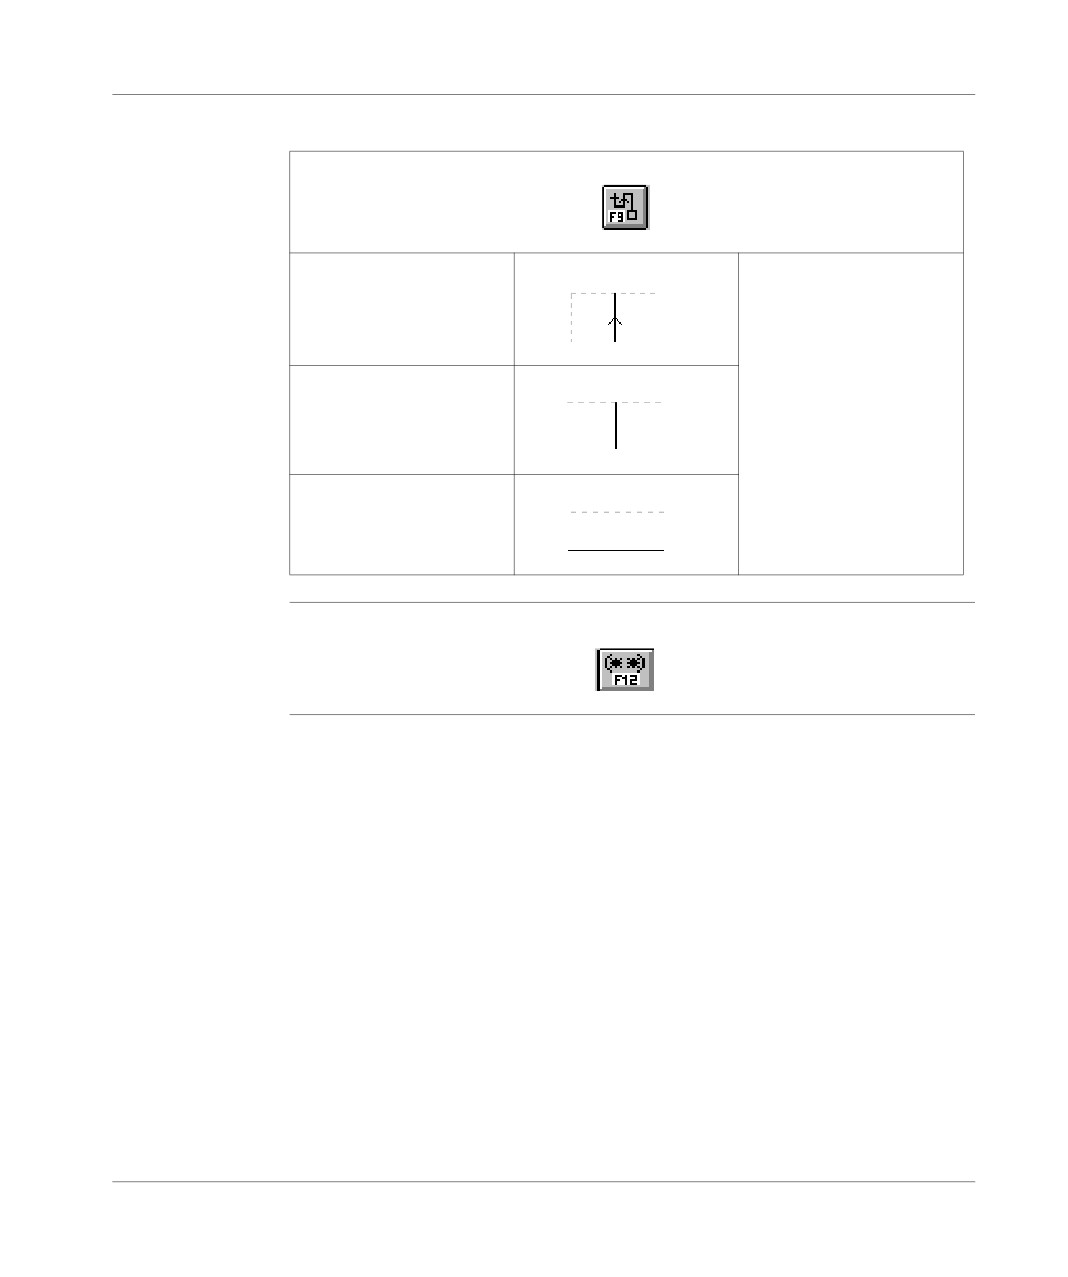
Connectors
Connector types:
Can be accessed from the graphics palette via the F5, and F7 keys or the icons .
Destination
Example:
n = destination step number.
Origin
Example:
n = origin step number.
201
Programming in Grafcet language
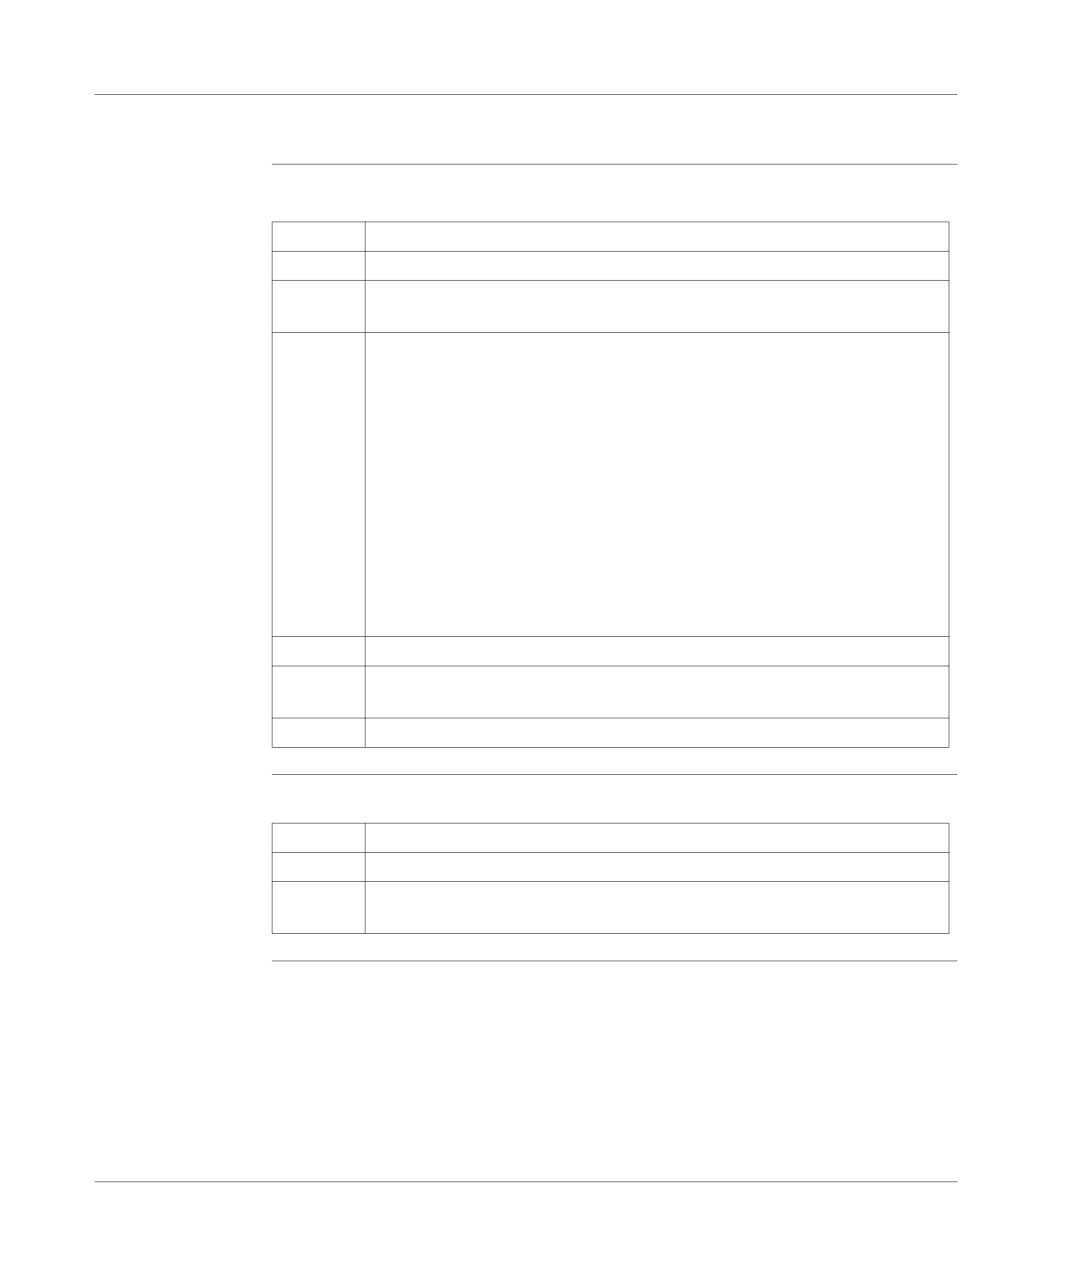
Oriented links
Link types:
Can be accessed via the graphics palette via the F9key, or the icon .
Up
Example:
Allows the loop iteration of a
chart (arrow keys).
Down
Example:
Left or right
Example:
Comments
Can be accessed from the graphics palette via the F12 key or the icon .
202
Programming in Grafcet language
Creating a Grafcet module
Procedure
Carry out the following actions:
Step
Action
1
Create a Grafcet section (See Creating or importing a Grafcet section, p. 107).
2
Open the Grafcet module (chart). (See Open the Grafcet module (chart), p.
203)
3
Enter the following graphical elements:
l entering a step, a transition, a connector. (See Entering a step, an action, a
connector, p. 204)
l entering a macro-step (See Entering a Macro-Step, p. 205) (only TSX 57).
l carrying out an AND divergence (See Carrying out an AND divergence, p.
205).
l carrying out an AND convergence (See Carrying out an AND convergence,
p. 207).
l carrying out a Step -> Transition link (See Carrying out a Step -> Transition
link, p. 208).
l carrying out a Transition -> Step link. (See Carrying out a Transition -> Step
link., p. 209)
l carrying out loop iteration. (See Carrying out a loop iteration, p. 211)
4
Program actions. (See Programming actions, p. 213)
5
Program the transition conditions. (See Programming the transition conditions,
p. 214)
6
Enter comments. (See Entering comments, p. 215)
Open the Grafcet Carry out the following actions from the Grafcet section previously created.
module (chart)
Step
Action
1
Put the cursor on the Chart module in the Grafcet section.
2
Open the Chart module using the command Services/Open or using the con-
textual menu Open.
203
Programming in Grafcet language
Entering a step,
Carry out the following actions:
an action, a
Step
Action
connector
1
Using the mouse:
Click on the graphical object situated in the graphical palette.
Using the keyboard:
Position the cursor on the grid at the required place (using the arrow keys).
2
Using the mouse:
Click on the grid at the required place, for:
l a step, a number is offered by default, modify it if applicable, then confirm it
using ENTER.
l a step+transition, a number is fixed by default.
Using the keyboard:
Press the function key corresponding to the graphical object situated in the
graphical palette to be inserted, for:
l a step, a number is proposed by default, modify it if applicable.
l a step+transition, a number is fixed by default.
3
Using the mouse or the keyboard:
Proceed in the same way for the other graphical objects.
4
Using the mouse:
Confirm the chart by clicking on the icon
or by using the command Edit/
Confirm.
Using the keyboard:
Confirm the chart using the ENTER key, or using the command Edit/Confirm.
204