Kawasaki Diesel MULE 4010 TRANS 4x4 (KAF950G9). Manual - part 120
 

  Index      Engines     Kawasaki Diesel MULE 4010 TRANS 4x4 (KAF950G9) - service manual


Search            


Content   ..  118  119  120  121   ..


Kawasaki Diesel MULE 4010 TRANS 4x4 (KAF950G9). Manual - part 120


17-26 ELECTRICAL SYSTEM

Battery

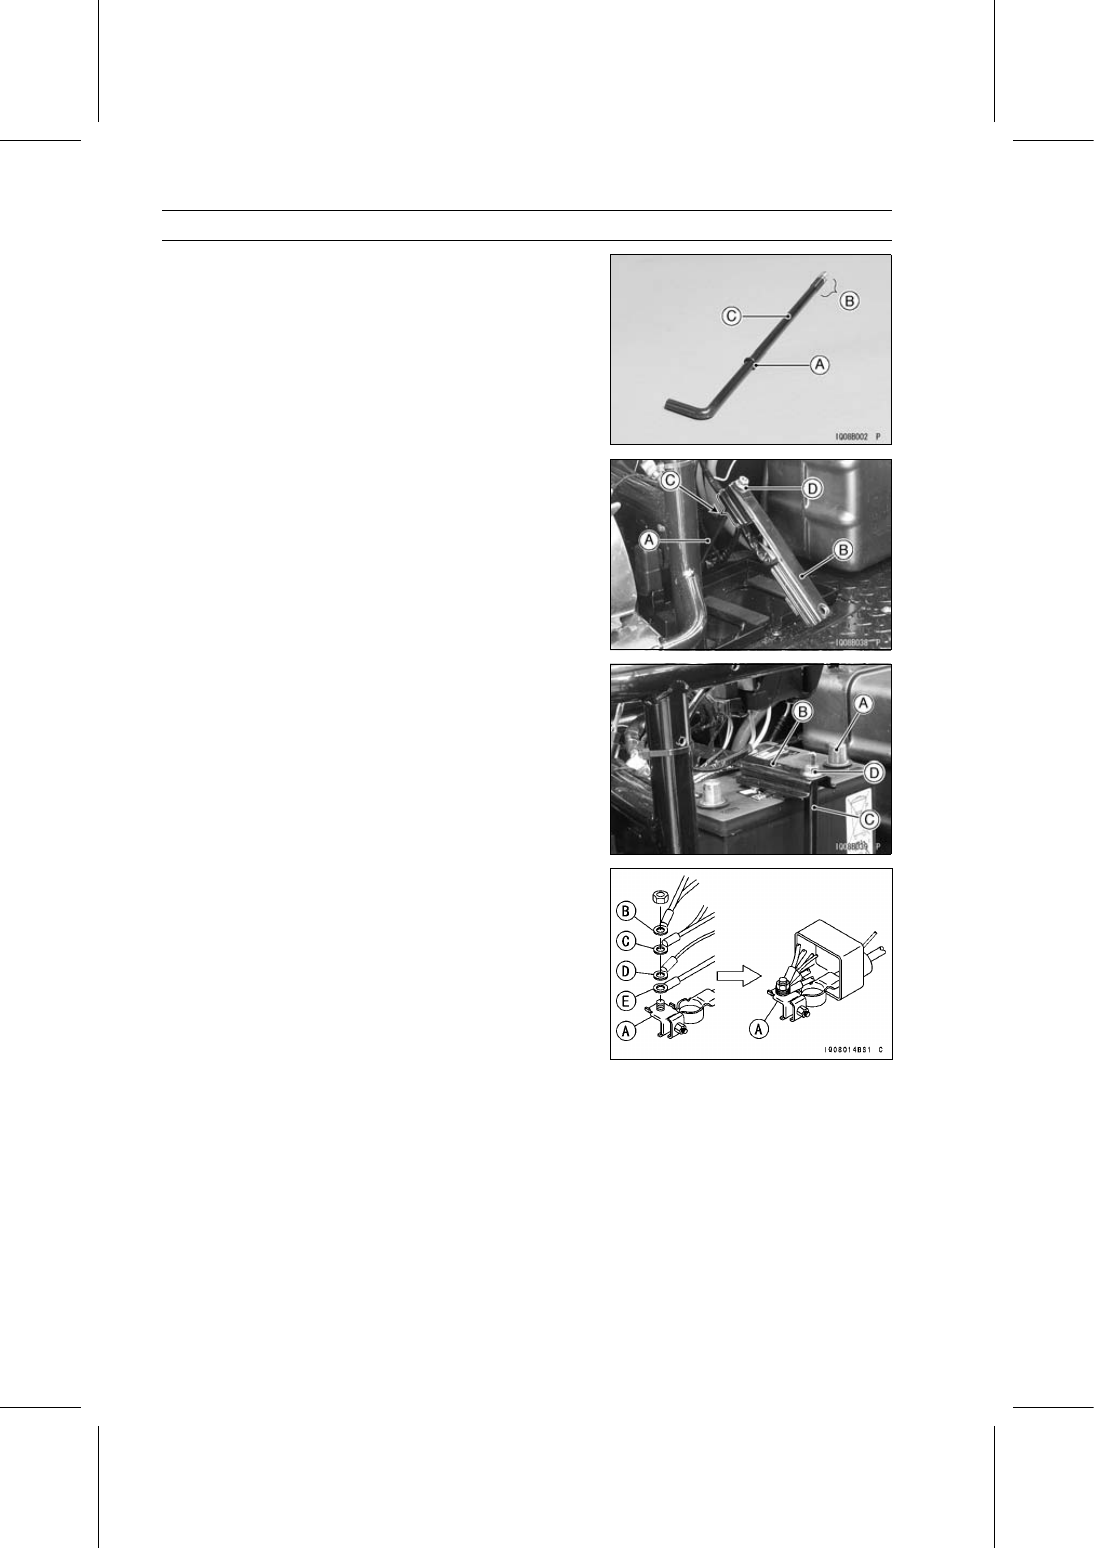
Install the O-rings [A] from the opposite end of the threads
[B] of each battery holder rod [C] to protect the O-rings.

NOTE

Do not set the O-ring on the threads of the rod.

Install:

Battery Holder Rod (Front Side)
Pipe [A]

For Conventional Type Battery:

206.5 mm (8.13 in.)

For Sealed Type Battery:

199.5 mm (7.85 in.)

Battery Holder [B]

Install the holder so that the short side [C] of the holder
faces forward.

Tighten the battery holder mounting nut [D] lightly.

Put the battery on the case so that the positive terminal
[A] faces right side.

Install:

Battery Holder [B]
Battery Holder Rod (Rear Side)
Pipe [C] and Nut [D]

Tighten:

Torque - Battery Holder Mounting Nuts: 17 N·m (1.7 kgf·m,

13 ft·lb)

Connect the four leads on the positive lead connector [A]
as shown in the figure.

Red/White, Red [B]
Blue, White [C]
Black/White [D]
Red (Alternator Lead) [E]

Install the four leads almost parallel to the positive cable
so that they can be covered with the cap easily.

Connect the positive (+) cable and leads first, and then
connect the negative (–) cable and lead (black and
black/yellow).

Put a light coat of grease on the terminals to prevent cor-
rosion.

Cover the positive terminals with the positive terminal
cover.

ELECTRICAL SYSTEM 17-27

Battery

(for Sealed Type Battery)

Confirm the position of the battery handle [A] is below the
holder [B] and cables [C] as shown in the figure.

Electrolyte Level Inspection (Conventional Type

Battery)

Refer to the Electrolyte Level Inspection (Conventional
Type Battery) in the Periodic Maintenance chapter.

Electrolyte Specific Gravity Inspection

(Conventional Type Battery)

Refer to the Electrolyte Specific Gravity Inspection (Con-
ventional Type Battery) in the Periodic Maintenance chap-
ter.

Charging Condition Inspection (Conventional

Type Battery)

Refer to the Charging Condition Inspection (Conventional
Type Battery) in the Periodic Maintenance chapter.

Initial Charging (Conventional Type Battery)

DANGER

Batteries produce an explosive gas mixture of hy-
drogen and oxygen that can cause serious injury
and burns if ignited. Keep the battery away from
sparks and open flames during charging. When
using a battery charger, connect the battery to the
charger before turning on the charger. This proce-
dure prevents sparks at the battery terminals which
could ignite any battery gases.

NOTICE

Charging the battery at a rate higher than speci-
fied may ruin the battery. Charging at a high rate
causes excess heat which can warp the plates and
cause internal shorting. Higher-than-normal charg-
ing rates also cause the plates to shed active mate-
rial. Deposits will accumulate, and can cause inter-
nal shorting
If the temperature of the electrolyte rises above
45°C (113°F) during charging, reduce the charging
rate to lower the temperature, and increase charg-
ing time proportionately.

17-28 ELECTRICAL SYSTEM

Battery

Remove:

Battery (see Battery Removal)
Filler Caps (see Electrolyte Level Inspection (Conven-
tional Type Battery))

WARNING

Electrolyte contains sulfuric acid which is harmful
to skin, eyes, and clothing.
Wear eye protection and rubber gloves.
If spillage occurs on body or clothing, rinse at once
with water for at least 15 minutes.

Place the carton [A] on a flat surface as shown in the
figure, pull the tab back to edge of the carton.

Pull out the hose [B] and cut off end of the hose.

Fill each cell [A] until the electrolyte level rises to bottom
[B] of the split ring [C] of the vent well.

NOTICE

Do not fill into the split [D]. Do not overfill.

After filling cells, wait five to ten minutes.
If necessary to bring electrolyte to proper level, add the
additional electrolyte.

WARNING

Neutralize any residue with baking soda.
Rinse empty package with large quantities of water.
Destroy empty package to prevent accidents!

Place the strips of filler caps [A] loosely over the filler
ports.

Charge the battery at 15 amps until specific gravity of
electrolyte rises to 1.250 and a temperature of 15.5°C
(60°F) (Both conditions must be met.).

ELECTRICAL SYSTEM 17-29

Battery

If violent gassing or spewing occurs, reduce the charge
rate.

NOTICE

Never allow a battery to get HOT to the touch. If the
battery is excessively hot to the touch, discontinue
charging immediately.
Allow the battery to cool down before monitoring
gravities or continuing charge.

After charging, if the electrolyte level has fallen, refill the
battery with the electrolyte to upper level.

Fit the filler caps [A] firmly.

Charging Condition Inspection (Sealed Type

Battery)

Battery charging condition can be checked by measuring

battery terminal voltage.

Remove the battery (see Battery Removal).

NOTICE

Be sure to disconnect the negative (−) cable first.

Measure the battery terminal voltage.

NOTE

Measure with a digital voltmeter [A] which can be read
to one decimal place voltage.

If the reading is below the specified, refreshing charge is
required.

Battery Terminal Voltage

Standard: 12.6 V or more


Content   ..  118  119  120  121   ..