Kawasaki Diesel MULE 4010 TRANS 4x4 (KAF950G9). Manual - part 29
 

  Index      Engines     Kawasaki Diesel MULE 4010 TRANS 4x4 (KAF950G9) - service manual


Search            


Content   ..  27  28  29  30   ..


Kawasaki Diesel MULE 4010 TRANS 4x4 (KAF950G9). Manual - part 29


4-8 COOLING SYSTEM

Water Pump

Water Pump Removal

Drain the coolant (see Coolant Change in the Periodic
Maintenance chapter).

Remove the fan belt cover (see Cooling Fan Belt Inspec-
tion in the Periodic Maintenance chapter).

Loosen the cooling fan belt (see Cooling Fan Belt Inspec-
tion in the Periodic Maintenance chapter).

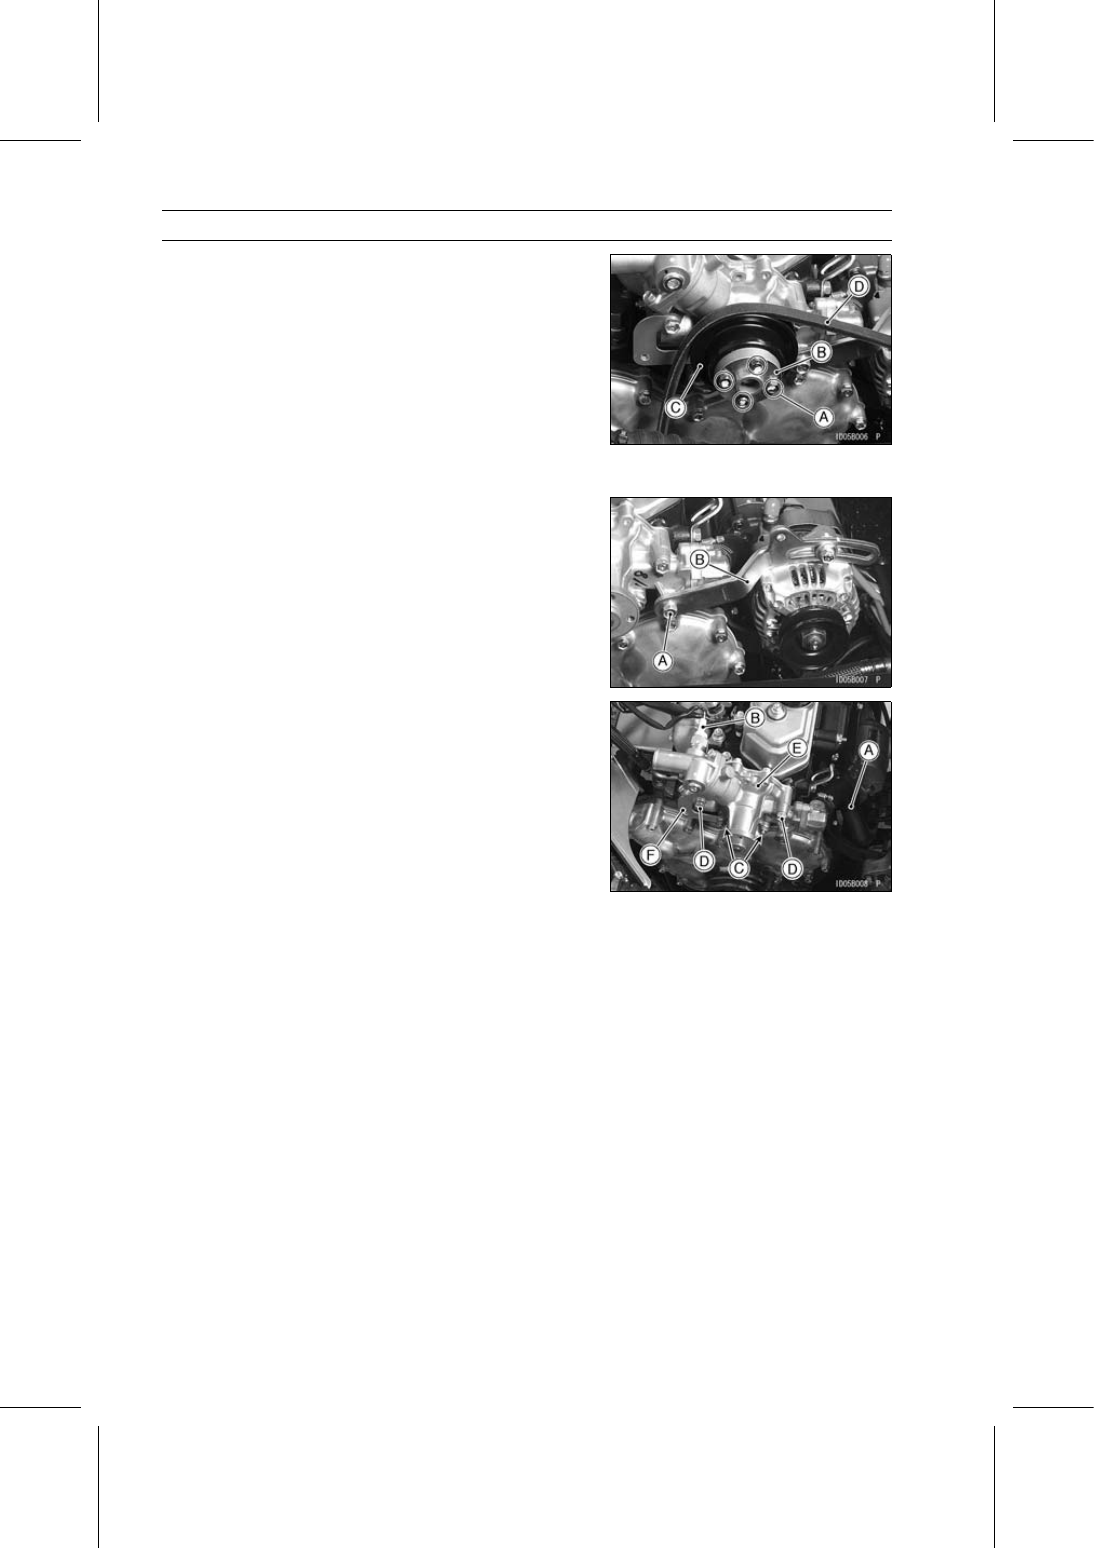
Remove:

Fan Mounting Bolts [A]
Spacer [B]
Water Pump Pulley [C]
Fan Belt [D]

Remove the bracket bolt [A], and move the fan belt ad-
justing bracket [B] forward.

Remove:

Water Pump Hose [A]
Coolant Temperature Switch Lead Connector [B]
Water Pump Mounting Nuts [C]
Water Pump Mounting Bolts [D]
Water Pump [E] and Bracket [F]

Water Pump Installation

Replace the water pump gasket with a new one.

Install the water pump.

Torque - Water Pump Mounting Bolts and Nuts: 20 N·m (2.0

kgf·m, 15 ft·lb)

Tighten:

Torque - Alternator Adjusting Bracket Bolts: 20 N·m (2.0

kgf·m, 15 ft·lb)

Adjust the fan belt deflection (see Cooling Fan Belt In-
spection in the Periodic Maintenance chapter).

COOLING SYSTEM 4-9

Water Pump

Water Pump Inspection

Check the drainage outlet passage at the top [A] and bot-
tom [B] of the water pump body for coolant leakage.
If the mechanical seal is damaged, the coolant leaks
through the seal and drains through the passages. Re-
place the water pump unit.

Remove the water pump pulley [A], and check it.
If the pulley is bent or damaged, replace the pulley.

Check the water pump bearings by rotating pulley flange
[A] by hand.

Make sure pulley rotates smoothly.
If the water pump shows evidence of the bearings are
rough, replace the water pump unit.

4-10 COOLING SYSTEM

Radiator and Radiator Fan

Radiator Removal

WARNING

A spinning radiator fan can cause serious injury.
The radiator fan is connected directly to the battery
and may start even if the main switch is off. Do not
touch the radiator fan until it has been disconnected
from the battery.

Drain the coolant (see Coolant Change in the Periodic
Maintenance chapter).

Remove:

Front Cover (see Front Cover Removal in the Frame
chapter)
Radiator Fan Lead Connector [A]

Remove the water hoses [A].

Turn over the rubber cover [A].

Disconnect the radiator fan switch lead connectors [B].

Remove:

Radiator Mounting Bolts [A]
Radiator with Screen [B]

NOTICE

Do not touch the radiator core. This could damage
the radiator fins, resulting in loss of cooling effi-
ciency.

COOLING SYSTEM 4-11

Radiator and Radiator Fan

Radiator Installation

Install:

Dampers [A]
Washers [B]
Collars [C]
Washers [D]

Install the washers [D] so that the round side [E] faces to
the collar [C].

Tighten:

Torque - Radiator Mounting Bolts [F]: 8.8 N·m (0.90 kgf·m,

78 in·lb)

Connect:

Radiator Fan Switch Lead Connectors
Radiator Fan Lead Connector

Install:

Radiator Hoses [G]
Reserve Tank Hose [H]
Clamps [I]

Run the hoses according to the Cable, Wire, and Hose
Routing section in the Appendix chapter.

Radiator Fan Removal

Remove:

Radiator
Radiator Fan Mounting Bolts [A]
Radiator Fan Assembly [B]

Remove:

Shroud Mounting Bolts [A]
Shroud [B]

Radiator Fan Installation

Install the shroud [A] so that the recess [B] of the shroud
fit on the stopper [C] of the radiator.

Tighten:

Torque - Shroud Mounting Bolts: 6.0 N·m (0.61 kgf·m, 53

in·lb)

Install:

Radiator Fan Assembly
Radiator Fan Mounting Bolts

Tighten:

Torque - Radiator Fan Mounting Bolts: 6.0 N·m (0.61 kgf·m,

53 in·lb)


Content   ..  27  28  29  30   ..