Kawasaki Diesel MULE 4010 TRANS 4x4 (KAF950G9). Manual - part 12
 

  Index      Engines     Kawasaki Diesel MULE 4010 TRANS 4x4 (KAF950G9) - service manual


Search            


Content   ..  10  11  12  13   ..


Kawasaki Diesel MULE 4010 TRANS 4x4 (KAF950G9). Manual - part 12


2-26 PERIODIC MAINTENANCE

Periodic Maintenance Procedures

Drive Belt Deflection Inspection

Remove the torque converter inner cover (see Torque
Converter Inner Cover Removal in the Converter System
chapter).

Put the transmission in neutral and rotate the driven pulley
by hand to make sure the belt is shifted all the way to the
top of the driven pulley.

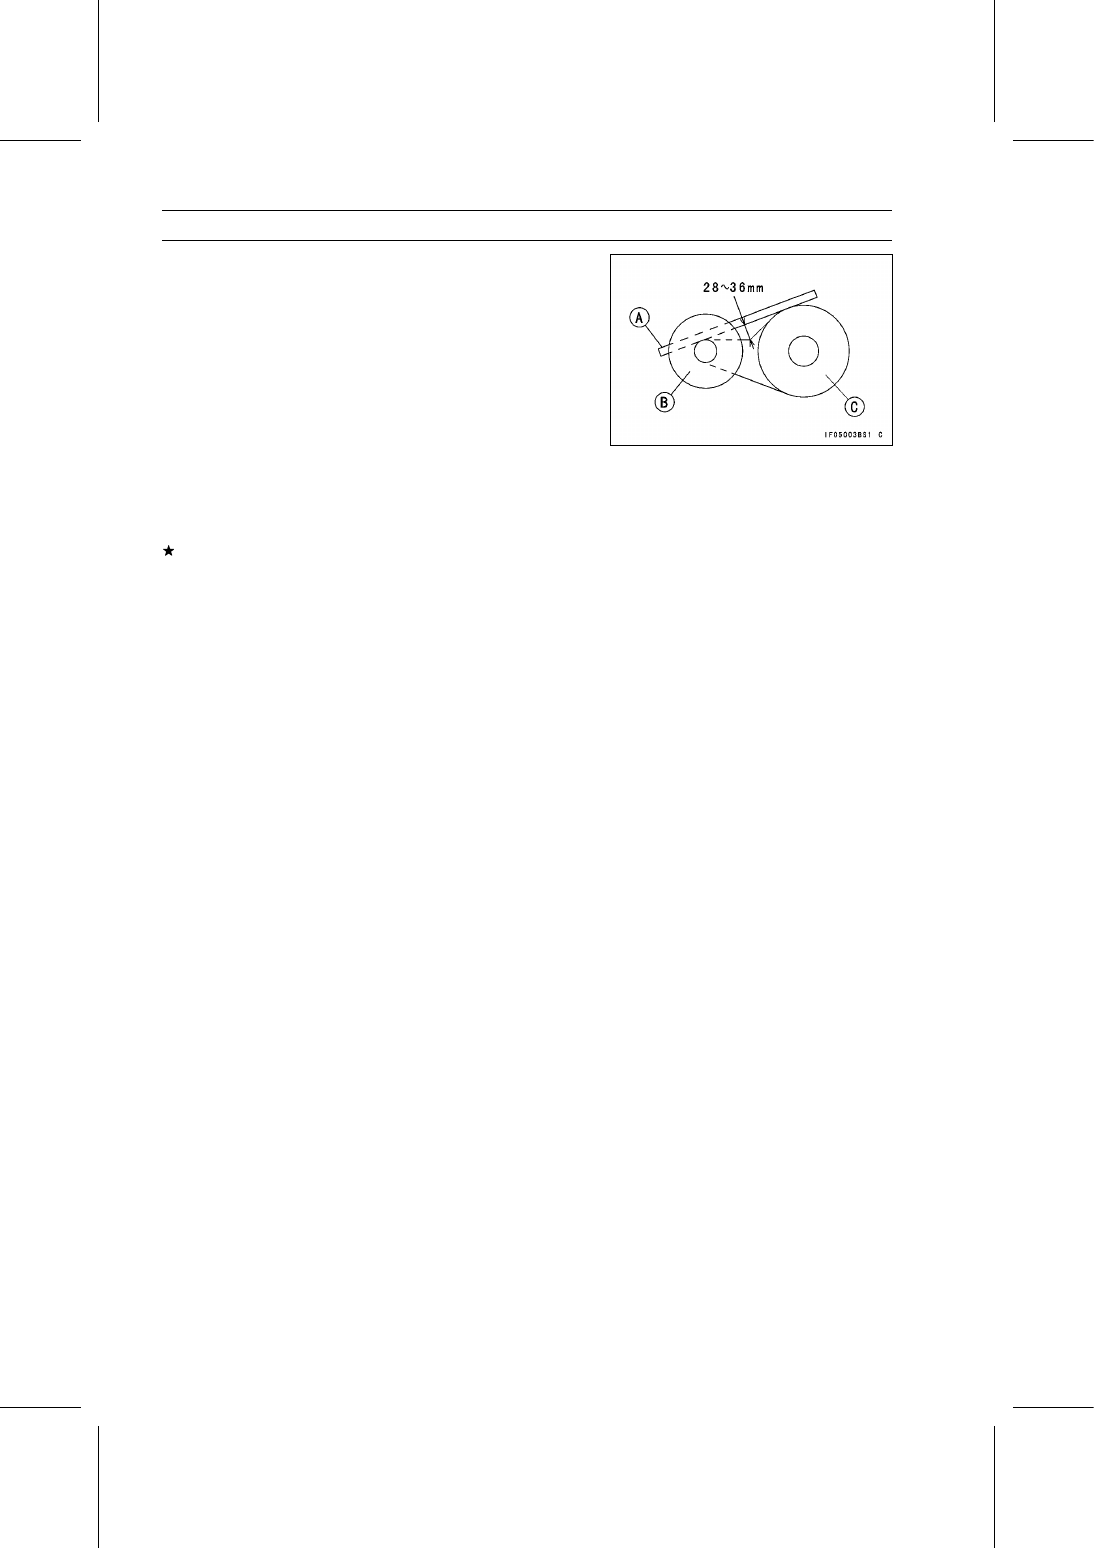
Measure the belt deflection as shown in the figure.

Place a straightedge [A] on top of the belt between the
drive pulley [B] and the driven pulley [C].

Use a ruler to push the belt away from the straightedge.
Push hard, but with no more force than 59 N (6 kgf, 13 lb).

Belt Deflection

Standard: 28

∼ 36 mm (1.10 ∼ 1.42 in.)

If the belt deflection is not within the specified range, first
measure the drive belt width (see Drive Belt Inspection).
Adjust the deflection by adding or removing spacers be-
tween the driven pulley shaft hub and cam ramp.

When adjusting the deflection, less is better than more.
Less deflection will maintain better performance for more
time as the belt width decreases by normal wear, which
causes the deflection to increase with usage.

PERIODIC MAINTENANCE 2-27

Periodic Maintenance Procedures

Drive Belt Deflection Adjustment

Disassemble the driven pulley [A] (see Driven Pulley Dis-
assembly in the Converter System chapter).
If the belt deflection is more than 36 mm (1.42 in.), remove
the spacers to decrease it.

The rule-of-thumb is: 0.1 mm (0.004 in.) change in spacer
thickness equals about 1.4 mm (0.055 in.) change in belt
deflection.
If the belt deflection is less than 28 mm (1.10 in.), add the
spacers [B] to increase it.

The rule-of-thumb is: 0.1 mm (0.004 in.) change in spacer
thickness equals about 1.6 mm (0.063 in.) change in belt
deflection.

Spacers

Thickness

Part No.

0.3 mm (0.012 in.)

92026-0036

0.6 mm (0.024 in.)

92026-1626

0.8 mm (0.031 in.)

92026-1628

1.0 mm (0.039 in.)

92026-1625

1.4 mm (0.055 in.)

92026-1627

Assemble the driven pulley (see Driven Pulley Assembly
in the Converter System chapter).

With the transmission in neutral, rotate the driven pulley
to allow the belt to return to the top of the sheaves before
measuring the belt deflection.

Measure the belt deflection again and repeat the above
procedures until it is within the standard range.

Using the flywheel & pulley holder, apply a non
-permanent locking agent to the driven pulley bolt
and tighten it.

Special Tool - Flywheel & Pulley Holder: 57001-1605

Torque - Driven Pulley Bolt: 93 N·m (9.5 kgf·m, 69 ft·lb)

Converter Driven Pulley Shoe Inspection

Disassemble the driven pulley (see Driven Pulley Disas-
sembly in the Converter System chapter).
If the cams [A] of ramp [B] or the wear shoes [C] are dam-
aged or worn, replace the ramp or the wear shoes.

2-28 PERIODIC MAINTENANCE

Periodic Maintenance Procedures

If the wear shoe contact area width [A] is greater than the
service limit, replace the shoe [B].

Wear Shoe Width

Service Limit: 16.4 mm (0.65 in.)

Converter Air Cleaner Element Cleaning/Inspec-

tion

NOTE

In dusty areas, the element should be cleaned more
frequently than the recommended interval.

After riding through rain or on muddy roads, the element
should be cleaned immediately.

WARNING

Gasoline and low flash-point solvents can be
flammable and/or explosive and cause severe
burns. Clean the element in a well-ventilated area,
and take care that there is no spark or flame any-
where near the working areas. Do not use gasoline
or low flash-point solvents to clean the element.

Remove the air cleaner element (see Air Cleaner Element
Removal in the Converter System chapter).

Separate the foam element [A] from the paper element
[B].

Clean the foam element in a bath of a high flash-point
solvent, and then dry it with compressed air or by shaking
it.

After cleaning, saturate the foam element with SE class
SAE30 oil, squeeze out the excess, then wrap it in a clean
rag and squeeze it as dry as possible. Be careful not to
tear the foam element.

Clean the paper element by tapping gently.

NOTICE

Do not use compressed air to clean the paper ele-
ment.
Do not oil the paper element.

PERIODIC MAINTENANCE 2-29

Periodic Maintenance Procedures

Engine Lubrication System

Engine Oil and/or Oil Filter Change

Warm up the engine so that the oil will pick up any sedi-
ment and drain easily.

Place an oil pan beneath the engine.

Remove the engine oil drain plug [A], and let the oil drain
completely.
If the oil filter is to be changed, replace it with a new one
(see Oil Filter Removal/Installation).

Replace the gasket with a new one.

After the oil has completely drained out, install the drain
plug with the gasket.

Torque - Engine Oil Drain Plugs: 34 N·m (3.5 kgf·m, 25 ft·lb)

NOTICE

To avoid engine damage, do not fill the engine oil
above the full level. If the oil level in the cylinder
head cover gets too high because of filling too fast,
oil may over flow from the filler opening and/or may
flow through the crankcase breather hose into the
inlet manifold. Oil in the inlet manifold may flow
into the combustion chambers and cause hydraulic
lock, resulting in severe engine damage.

Remove the oil filler cap, and pull the dipstick out a little
(about 5 cm, 2 in.) to allow the air in the crankcase to
escape.

Slowly and evenly fill the engine with a good quality oil as
specified in the table.

Check the oil level.

Engine Oil

Grade:

API CF or CF-4

Viscosity: SAE 10W-40
Capacity:

3.0 L (3.2 US qt )
(When filter is not removed)
3.3 L (3.5 US qt )
(When filter is removed)

Oil Level:

Between F and L marks on dipstick

NOTE

Although 10W-40 engine oil is the recommended oil
for most conditions, the oil viscosity may need to be
changed to accommodate atmospheric conditions in
your riding area.


Content   ..  10  11  12  13   ..