Kawasaki Diesel MULE 4010 TRANS 4x4 (KAF950G9). Manual - part 10
 

  Index      Engines     Kawasaki Diesel MULE 4010 TRANS 4x4 (KAF950G9) - service manual


Search            


Content   ..  8  9  10  11   ..


Kawasaki Diesel MULE 4010 TRANS 4x4 (KAF950G9). Manual - part 10


2-18 PERIODIC MAINTENANCE

Periodic Maintenance Procedures

Cooling System

Radiator Cleaning

NOTICE

Clean the radiator screen and the radiator in ac-
cordance with the Periodic Maintenance Chart.
In dusty areas, they should be cleaned more fre-
quently than the recommended interval.

After

riding through muddy terrain, the radiator screen
and the radiator should be cleaned immediately.

Remove:

Front Cover (see Front Cover Removal in the Frame
chapter)
Radiator Screen Mounting Bolts [A]
Radiator Screen [B]

Clean the radiator screen in a bath of tap water, and then
dry it with compressed air or by shaking it.

NOTICE

When cleaning the radiator with a steam cleaner, be
careful of the following to prevent radiator damage.
Keep the steam gun [A] away more than 0.5 m (1.6
ft) [B] from the radiator core.
Hold the steam gun perpendicular to the core sur-
face.
Run the steam gun following the core fin direction.

Install the radiator screen.

Tighten:

Torque - Radiator Screen Mounting Bolts: 8.8 N·m (0.90

kgf·m, 78 in·lb)

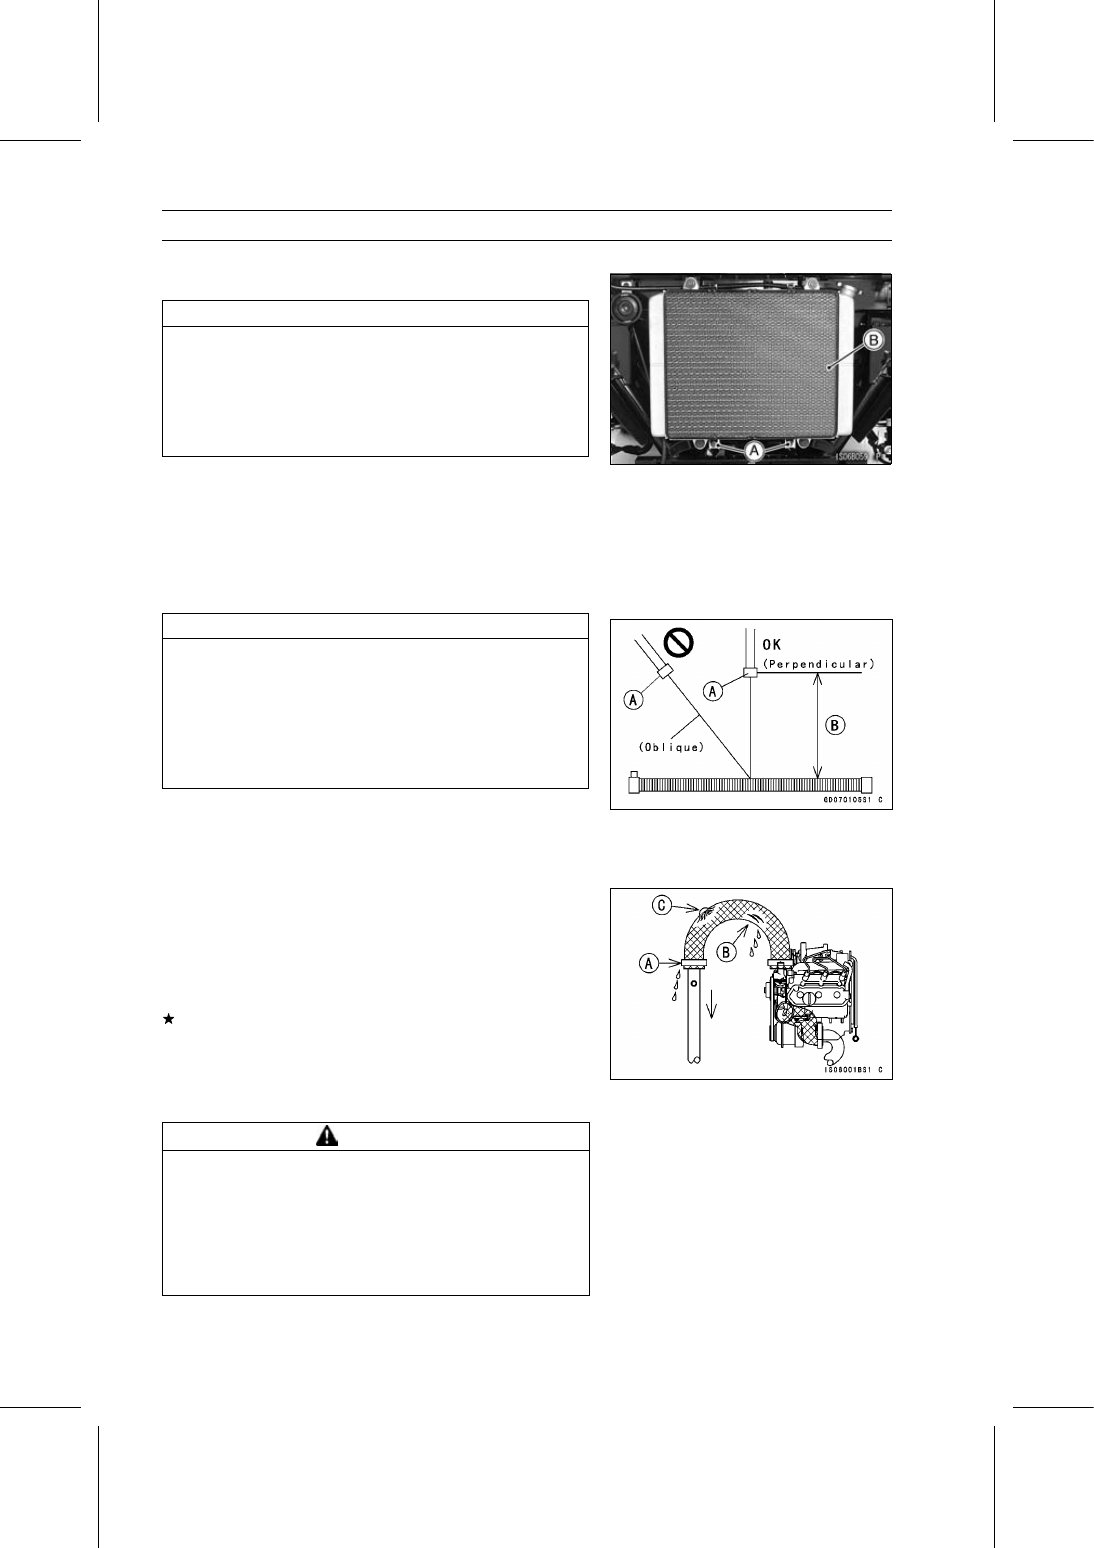
Radiator Hose and Connection Inspection

The high pressure inside the radiator hose can cause
coolant to leak [A] or the hose to burst if the line is not
properly maintained. Visually inspect the hoses for signs
of deterioration. Squeeze the hoses. A hose should not
be hard and brittle, nor should it be soft or swollen.
Replace the hose if any fraying, cracks [B] or bulges [C]
are noticed.

Check that the hoses are securely connected and clamps
are tightened correctly.

Coolant Change

WARNING

Coolant can be extremely hot and cause severe
burns, is toxic and very slippery. Do not remove
the radiator cap or attempt to change the coolant
when the engine is hot; allow it cool completely.
Immediately wipe any spilled coolant from tires,
frame, engine or other painted parts. Do not ingest
coolant.

PERIODIC MAINTENANCE 2-19

Periodic Maintenance Procedures

Tilt up the front cargo hood.

Remove:

Quick Rivets [A]
Tapping Screw [B] and Collar
Partition [C]

Remove the coolant reserve tank mounting bolts [A].

Remove the cap [B] and poor the coolant into a container.

Install the removed parts except the cap.

Remove the front final gear case skid plate (see Front
Final Gear Case Oil Level Inspection in the Final Drive
chapter).

Place a container under the drain plugs.

Remove the coolant drain plugs [A] at water pipes.

Place a funnel under the drain hole.

Remove the radiator cap [A] in two steps.

First turn the cap counterclockwise to the first step.

Then push and turn it further in the same direction and
remove the cap.

Tighten the drain plugs.

Install the reserve tank hose and reserve tank.

Tighten:

Torque - Coolant Reserve Tank Bolt: 4.4 N·m (0.45 kgf·m,

39 in·lb)

Lift the front wheels 20

∼ 30 cm (7.9 ∼ 11.8 in.) from the

ground so that the radiator cap is the highest port of the
system.

Pour the coolant slowly into the radiator cap fitting.

NOTE

Pour in the coolant slowly so that the air in the engine
and radiator can escape.

2-20 PERIODIC MAINTENANCE

Periodic Maintenance Procedures

Front [A]

Radiator Cap [C]

Air Bleeder Bolt [B]

Reserve Tank Cap [D]

NOTICE

Soft or distilled water must be used with antifreeze
in the cooling system.
If hard water is used in the system, it causes scale
accumulation in the water passages, considerably
reducing the efficiency of the cooling system.

Water and Coolant Mixture Ratio (Recommended)

Soft Water:

50%

Coolant:

50%

Freezing Point:

–35°C (–31°F)

Total Amount:

4.4 L (4.7 US qt)

NOTE

Choose a suitable mixture ratio by referring to the
coolant manufacturer’s directions.

When the coolant begins to flow out the air bleeder bolt
holes, tighten the air bleeder bolt.

Fill the cooling system up to the filler neck [A] in the radi-
ator cap fitting with coolant.

PERIODIC MAINTENANCE 2-21

Periodic Maintenance Procedures

Bleed the air from the cooling system as follows.

Start the engine and run it until no more air bubbles [A]
can be seen in the coolant (less than five minutes).

Tap the radiator hoses to force any air bubbles caught
inside.

Stop the engine and add coolant up to the filler neck.

Install the radiator cap.

Lower the front wheels slowly.

Fill the reserve tank up to the F (full) level line [A] with
coolant.

NOTICE

Do not add more coolant above the F (full) level line.

Install the reserve tank cap [B].

Cooling Fan Belt Inspection

Tilt up the cargo bed.

Remove:

Rear Propeller Shaft (see Propeller Shaft Removal in the
Final Drive chapter)
Water Pipe [A] and Water Hose [B]

Remove the fan cover bolts [A].

Take off the fan cover [A].

Rotate the fan blade [B], and position it as shown in the
figure.


Content   ..  8  9  10  11   ..