Yanmar marine engine 6LPA-STP2, 6LPA-STZP2. Manual - part 8
 

  Index      Engines     Yanmar marine engine 6LPA-STP2, 6LPA-STZP2 - service manual


Search            


Content   ..  6  7  8  9   ..


Yanmar marine engine 6LPA-STP2, 6LPA-STZP2. Manual - part 8


BEFORE YOU OPERATE

6LPA Series Operation Manual

31

12/05

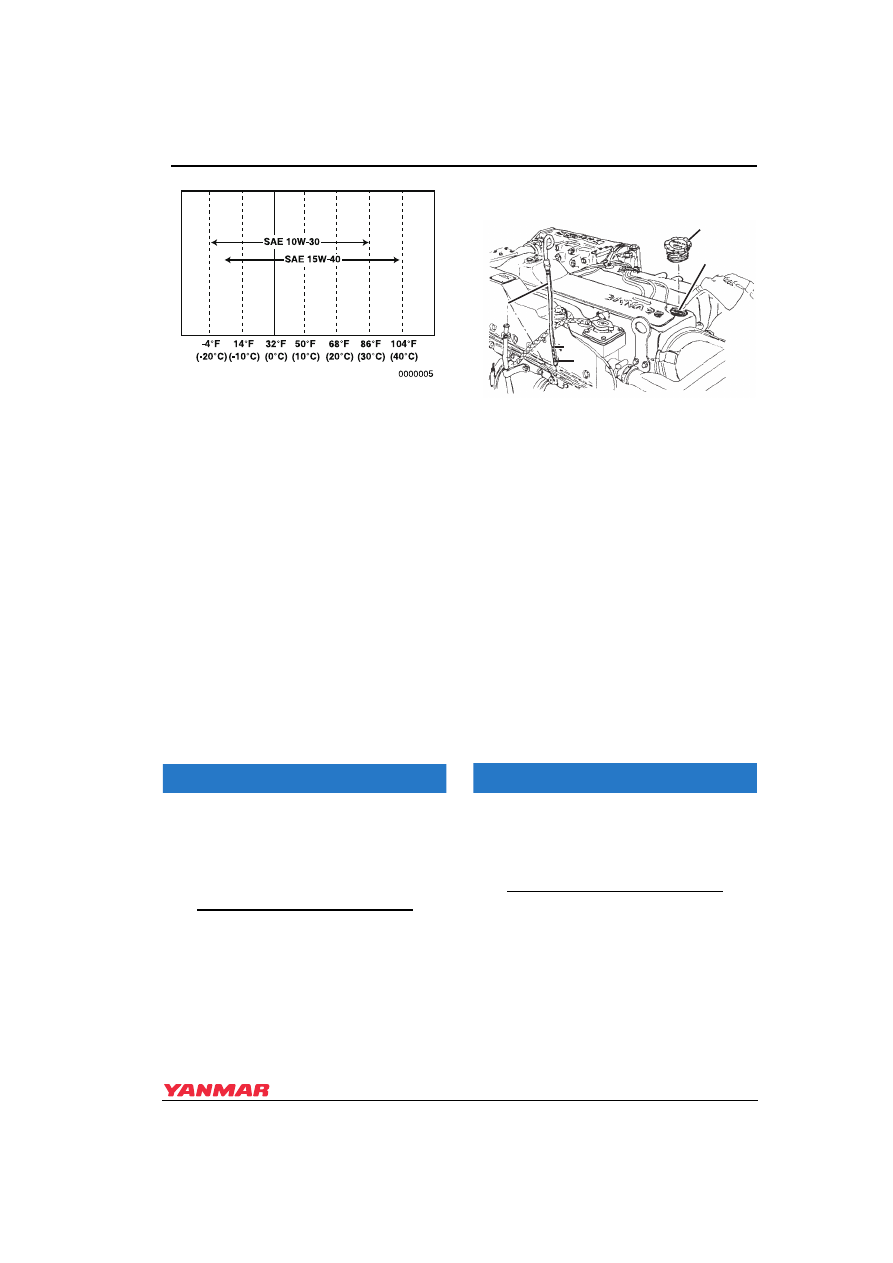
Figure 5 

Handling Engine Oil

1. When handling and storing engine oil, 

be careful not to allow dust and water to 
contaminate the oil. Clean around the 
filler port before filling.

2. Do not mix oils of different types or 

brands. Mixing may cause the chemical 
characteristics of the oil to change and 
lubricating performance to decrease, 
reducing the engine’s life.

3. Engine oil should be replaced at the 

specified intervals, regardless if the 
engine has been operated. 

Engine Oil Viscosity

SAE 10W30 or SAE 15W40 are the 
recommended oil viscosities.

NOTICE

If you intend to operate your equipment at 
temperatures outside the limits shown, you 
must consult your authorized Yanmar 
Marine dealer or distributor for special 
lubricants or starting aids.

Checking the Engine Oil

 Figure 5

Figure 6 

1. Make sure the engine is level.

2. Remove dipstick (Figure 6, (2)) and 

wipe with clean cloth. 

3. Fully reinsert dipstick.

4. Remove dipstick. The oil level should 

be between upper (Figure 6, (2)) and 
lower (Figure 6, (3))  lines on the 
dipstick.

5. Add oil if necessarySee Adding 

Engine Oil on page 31.

6. Fully reinsert dipstick.

Adding Engine Oil

1. Remove theoil filler port cap from filler 

port (Figure 6, (5)) and fill with engine 
oil.

NOTICE

Prevent dirt and debris from 
contaminating engine oil. Carefully 
clean the dipstick and the surrounding 
area before you remove the cap.

2. Fill with engine oil to the upper limit 

(Figure 6, (2)) on the dipstick 
(Figure 6, (1))

(5)

(1)

(4)

(2)

(3)

0004902

BEFORE YOU OPERATE

32

6LPA Series Operation Manual

NOTICE

NEVER overfill the engine with engine 
oil.

3. Insert the dipstick fully to check the level.

NOTICE

ALWAYS keep the oil level between 
upper and lower lines on the oil cap / 
dipstick.

4. Hand-tighten the filler port cap 

securely.

MARINE DRIVE OIL

Note: Refer to the marine gear 

manufacturer's operation 
manual for the marine gear oil 
specifications. Refer to the 
manufacturer's operation 
manual for marine gear or stern 
drive oil specifications.

Mercruiser

®

 Bravo Stern Drive 

Oil Specifications

Use marine gear oil that meets or exceeds 
the following guidelines and classifications:

Drive Oil

• Quick Silver

®


1

 High Performance Gear 

Lube

Power Steering Oil (6LPA-STZP2 
Only)

• Quick Silver

®

 Power Trim and Steering 

Fluid or Dexlone-II.

Power Trim Oil

• Quick Silver

®

 Power Trim and Steering 

Fluid or SAE 10W-30 or 10W-40 Engine 
Oil.

Checking and Adding Marine 
Drive Oil

Note: Refer to the manufacturer's 

operation manual for the proper 
procedure to check and fill the 
marine drive oil.

1

Quick Silver is a registered trademark of Brunswick ® Corporation. 

BEFORE YOU OPERATE

6LPA Series Operation Manual

33

12/05

Checking and Adding Power 
Steering Oil (6LPA-STZP2 
Models)

 Figure 6

Figure 7 

1. Remove the filler cap / dipstick 

(Figure 7, (3) (4)) from the power 
steering oil service tank (Figure 7, (1)) 
and wipe with a clean cloth.

2.  Fully reinsert dipstick.

3. Remove dipstick. The oil level should 

be between upper (Figure 7, (3)) and 
lowe(Figure 7, (2)) lines on the 
dipstick. 

4. Fill with oil to the upper limit on the 

dipstick. See Mercruiser® Bravo Stern 
Drive Oil Specifications on page 32
.

NOTICE

NEVER overfill the power steering 
system with oil.

5. Fully reinsert dipstick and tighten.

ENGINE COOLANT

Engine Coolant Specifications

Note: In the U.S., LLC is required for 

the warranty to be valid.

• Texaco Long Life Coolant (LLC), both 

standard and premixed, product code 
7997 and 7998

• Havoline Extended Life

Antifreeze / Coolant, product code 7994

Following the manufacturer’s 
recommendations, use a proper LLC which 
will not have any adverse effects on the 
materials (cast iron, aluminum, copper, 
etc.) of the engineÅfs cooling system.

ALWAYS use the mixing ratios specified by 
the antifreeze manufacturer for the 
temperature range.

(1)

(4)

(3)
(2)

0004912

BEFORE YOU OPERATE

34

6LPA Series Operation Manual

Coolant (Closed Cooling System)

NOTICE

ALWAYS add LLC to soft water especially 
when operating in cold weather. NEVER 
use hard water. Water should be clean and 
free from sludge or particles. Without LLC, 
cooling performance will decrease due to 
scale and rust in the coolant system. Water 
alone may freeze and form ice; it expands 
approximately 9% in volume. Use the 
proper amount of coolant concentrate for 
the ambient temperature as specified by 
the LLC manufacturer. LLC concentration 
should be a minimum of 30% to a 
maximum of 60%. Too much LLC will 
decrease the cooling efficiency. Excessive 
use of antifreeze also lowers the cooling 
efficiency of the engine. NEVER mix 
different types or brands of LLC, as a 
harmful sludge may form. Mixing different 
brands of antifreeze may cause chemical 
reactions, and may make the antifreeze 
useless or cause engine problems.

Checking and Adding Coolant

 Figure 7

Figure 8 

1. Ensure all drain cocks are closed.

2. Loosen the filler cap of the coolant tank 

to relieve the pressure, then remove the 
filler cap (Figure 8, (1)) .

WARNING

Burn Hazard.
NEVER remove the coolant filler cap 
if the engine is hot. Steam and hot 
engine coolant will spray out and 
seriously burn you. Allow the engine 
to cool down before you attempt to 
remove the cap.

3. Pour coolant slowly into the coolant 

tank to avoid air bubbles. Fill until 
coolant overflows from the filler port.

NOTICE

NEVER pour cold coolant into a hot 
engine.

4. Align filler cap tabs with filler port 

notches and tighten filler cap firmly.

0004910

(1)


Content   ..  6  7  8  9   ..