Military reference books and manuals (2009-2023, Volume 3) - page 20

Chapter 3: DRRS Portal
Customizing the DRRS Portal
3.2.5
Editing Web Part Content
Each system web part that you add provides a unique type of content have built-in customizable
settings.
To edit the content of a web part:
1. Select Portal Tools | Edit Web Parts (Figure 3-3) from the Links menu on the left-side of
the screen. Optionally, you can select the Edit icon directly from the Home page if it displays
in the web part title bar. The page refreshes and you will notice that all web part zones are
outlined in bright green. In addition, the Portal Edit tools appear above each web part.
Figure 3-9: Portal Edit Tools.
Note: Except for the Edit button, the entire set of tools shown above does not appear for all web parts.
2. Click the Edit button to edit a web part. The list of editable web parts is detailed in the
following table. This table also contains a description of what is editable.
Table 3-2: Editable Web Parts
Name
Description
Digital Clock
Control the appearance of the clock using the Clock Format: detail.
Under the Image Link List Editor area: enter the URL for the image
you want to display (Image URL) as well as a link to the website you
would like to access when you click the image (Link URL). Optionally,
you can include text to display (Tooltip:), and you can select whether
Image List
the link will open in a separate window or the current one. You can add
image links as needed. To control whether the display of images is
vertical or horizontal, use the Property Grid: setting entitled Image
Repeat Direction:.
Under the Image Viewer Editor area, enter text to display (Caption),
the URL for the image you want to display (URL of Image) as well as a
link to the website you would like to access when you click the image
(URL Links to), specify image height and width, and select whether
Image Viewer
this link should open in a separate window or the current one. Unlike
the Image List web part, you can only add one image to this web part
although there is no limit to the number of Image Viewer web parts
you can add.
Under the RSS Editor option, enter the location of the RSS feed you
would like to display (RSS Editor) as well as whether you would like it
RSS Viewer
to auto-scroll for you (Scrolling). Note that you must use an actual
RSS link, simply entering a URL will not automatically display content.
For more information, see the Portal FAQ.
Under the Assigned Unit area, select whether you would like to use
your DRRS unit of assignment or optionally, enter the Aname or UIC to
Unit Mission List
display the current and projected status for all missions. There is no
limit to the number of web parts you can view.
Under the Configuration: area, enter the text you would like to display
(Title), the description of the link, the link itself (URL), and select
Link List
whether this link should open in a separate window or the current one.
You can add as many links as you need.
DRRS Software User Manual (SUM) 4.5.12
3-11

Customizing the DRRS Portal
Chapter 3: DRRS Portal
3.2.6
Managing My Links
On the left side of the screen is the Links menu which contains all relevant links to documents,
applications, and other sites of interest to DRRS users.
This list of categories and their associated links is created and maintained by Portal
Administrators. The My Links category is the only Links menu area which you can customize by
all users.
To manage My Links:
1. Select Portal Tools | Edit Web Parts (Figure 3-3) from the Links menu on the left-side of
the screen. Optionally, you can select the Edit icon directly from the Home page if it displays
in the web part title bar. The page refreshes and you will notice that all web part zones are
outlined in bright green.
2. Click the Edit button to for the Menu zone on the left side of the screen. The Edit Web
Parts menu opens.
Figure 3-10: Edit My Links Menu
3. Enter the text you would like to display for the link in the Title: field. Optionally, you can
enter a description. This text will display when you hover over the link.
4. Enter the website in the URL field. Make sure “http://” is included.
5. Select whether the linked site should open in a new window or the current one.
6. Click Add.
3-12
DRRS Software User Manual (SUM) 4.5.12
Chapter 3: DRRS Portal
Customizing the DRRS Portal
7. Repeat as many times as necessary. At any time you can use the Order field to set the
order of the links that display. Click the Up arrow to move the link above or the Down arrow
to move the link down. When finished setting the order, click Save Order.
8. To exit, click OK.
3.2.7
Reset Portal to Default View
If you make significant changes to the view and are not satisfied with the results, you can easily
reset back to the default view at any time. To do this, locate the Links menu on the left side of
the screen and select Portal Tools | Restore Default View. Please be aware that you will lose
all customization changes that you have performed.
DRRS Software User Manual (SUM) 4.5.12
3-13
Customizing the DRRS Portal
Chapter 3: DRRS Portal
This Page Intentionally Left Blank.
3-14
DRRS Software User Manual (SUM) 4.5.12
Chapter 4: Navigating DRRS
Chapter 4: Navigating DRRS
There are three two main navigational tools in the DRRS application. The first is the Main Menu
which provides access to all of the tools in the system. The second is the Support Menu which
contains helpful resources that offer support in resolving problems and answering questions.
This chapter consists of the following topics:
• Bulletins
• The Main Menu
• The Support Menu
DRRS Software User Manual (SUM) 4.5.12
4-1

Bulletins
Chapter 4: Navigating DRRS
4.1
Bulletins
DRRS administrators have the ability to create system bulletins that are displayed to all users
when they log in. These bulletins are used to communicate important information such as
expected system downtimes. When a bulletin is displayed, you can dismiss it by highlighting it
and clicking the Dismiss Selected button or you can ignore it by simply closing the bulletins
window. If you do not dismiss a bulletin, it will continue to display each time you log in until you
do dismiss it. Once dismissed, the bulletin will not display again unless you clear your internet
browser’s cache.
Figure 4-1: System Bulletin
4-2
DRRS Software User Manual (SUM) 4.5.12

Chapter 4: Navigating DRRS
The Main Menu
4.2
The Main Menu
While the Support Menu provides the same links for all users, the Main Menu provides access
to specific modules for each user based on their user roles. The Main Menu may contain any or
all of the items listed below.
Note: Depending on your user privilege, your account may have access to more or less of the features
listed below. Some are currently only accessible by “beta” users for the purposes of product improvement.
Figure 4-2: DRRS Main Menu
4.2.1
Home
Clicking this link will return you to your selected home page. For more information on setting a
home page, see Section 4.3.1: Set Home Page.
4.2.2
ESORTS
Records each commander’s assessment of his or her organization’s ability to conduct assigned
mission(s) and the essential tasks associated with those missions in accordance with
established standards and conditions. Commanders will continue, however, to consider the
resource information available that may influence the conduct of these missions and tasks, and
their own experience when making assessments.
Features include:
• Build METL: Units create and maintain their list of mission essential tasks.
• Office Management: Create and maintain a collection of different ESORTS users who
have rights to access selected areas for their unit of assignment.
• Task Management: Enables the adding, editing, and deleting of tasks to be used in the
creation of METs.
• Mission Assessment: Unit commanders assess and promote the status of their unit's
capability to perform each task in the METL.
• Mission Management: Allows for adding, editing and deleting missions as well as
assigning them to one or more units for METL tracking.
• Current Unit Status (CUS): Provides users with the ability to manage unit-specific
readiness data and submit required reports in support of the GSORTS to ESORTS
transition plan. CUS is designed to provide the Unit Commander the opportunity to
update his unit's availability, personnel, equipment rosters, and training status before
assessing his Mission Essential Task List (METL).
4.2.3
LRI
Provides capabilities for identifying/reporting foreign language and regional expertise within the
DoD forces. For more information, refer to the LRI Software User Manual (SUM), which can be
accessed from the DRRS Portal.
DRRS Software User Manual (SUM) 4.5.12
4-3
The Main Menu
Chapter 4: Navigating DRRS
4.2.4
Force Management
This module mines the “who, what, when, why, and how” data answering critical global
readiness questions for joint forces. This feature provides quick access to currently committed
resources and available organizations. Utilizing this concept, this module answers the
employability, readiness, capability, and availability questions posed by the planner.
• State Readiness Dashboard: Provides visibility into the readiness capability of an
individual state’s missions and scenarios. This is accomplished using a graphical
representation of those states that provides an at-a-glance readiness value and permits
users to drill into the details of each scenario or mission.
• Readiness Dashboard: Tool designed to support the Joint Forces Readiness Review
(JFRR) process by providing Joint Staff with the necessary capabilities for creating a
comprehensive JFRR report including information from Services, Geographic and
Functional COCOMs, and CSAs.
4.2.5
Utilities
•
Capability Trees: User-created visual representations of structures used to represent
organizational hierarchies, mission structures, or any other relational configuration
required.
•
Portal: Offers direct access to application utilities as well as displaying supporting
materials such as important dates, system messages, and training videos. It organizes
shared information as well as providing content tailored to each user’s needs.
•
Data Sources: Detailed data source viewer which retrieves the description, timestamp/
”last update” information, and security classification for each data source feeding into
the DRRS application. This tool is covered under the DRRS Software Administration
Manual (SAM).
•
Query Tools (formerly known as “LogiXML” or “PersAdHoc”): displays detailed
reporting and query analysis of all current “boots-on-ground” personnel.
•
Quick Search: Provides the functionality to search through the system for specific
Units or Personnel and view their associated readiness data
•
Group Builder: “Groups” within DRRS are defined as storage areas of readiness data
organized by unit. This term is also used to represent any level of any force structure.
The Group Builder tool takes all organizational data currently reporting to DRRS and
displays the current hierarchy in terms of administrative, operational, or combatant
command control (ADCON, OPCON, or COCOM).
Using this tool, you can also build the command structure of any force, even a
hypothetical organization, using a simple drag and drop procedure. You can then
display it in other modules within DRRS to see the calculated readiness for this new
organization in different contexts. Changes to this structure are easily made to
accurately reflect current status. This is especially useful for building potential forces for
response to contingencies.
4.2.6
Admin
Accessible only by users with Module Administrator user role. For more information, refer to the
DRRS Software Administrator Manual (SAM), located on the DRRS Portal.
4-4
DRRS Software User Manual (SUM) 4.5.12
Chapter 4: Navigating DRRS
The Support Menu
4.3
The Support Menu
Figure 4-3: DRRS Support Menu
In the upper-right corner of every page, the DRRS Support menu contains various resources to
assist DRRS users. The following sections discuss each Support Menu resource in detail.
4.3.1
Set Home Page
DRRS provides the ability to set your home page to any DRRS page. This can significantly
reduce the number of clicks and wait time when loading a frequently accessed module. To
change this setting, access the page you would like to set (for example ESORTS | Current Unit
Status) and click the Make this My Home Page link from the Support Menu. Your new home
page is set. Upon logging in again (or clicking the Home link), you will be directed to this page
instead of the default portal page. Please note the original home page, the DRRS Portal, can be
accessed from the Utilities menu.
4.3.2
Contact Support Center
For assistance on issues related to the DRRS application, click the Support Center link to view
the phone number and email address of the DRRS Support Center. They are on standby to take
calls and emails, 24 hours a day, 5 days per week (Monday 0000Z - Friday 2400Z).
• Commercial: 808-477-8261
• DSN: 315-477-8261
• Unclassified Email: drrs.pacom.fct@pacom.mil
• Classified Email: available within application.
4.3.3
Information Center
Select the Information Center link to view a technical bulletin providing the latest information
on recent releases, service disruptions, known data issues, and system alerts. This bulletin also
contains a summary of new features enabling a view of what has changed from last release.
4.3.4
Feedback
The feedback link enables direct communication of issues and concerns with the DRRS Support
Center. This is an important tool for sharpening and improving the direction and focus of DRRS.
To access the feedback tool:
1. Click the Feedback link from the Support Menu.
2. Enter all the relevant details of your request, including as much information as possible to
give the DRRS support team a clear picture of the problem/request.
3. Click Submit. Feedback is sent directly to the DRRS Product Support Team for review. A
customer support representative will contact you if further detail is needed.
4.3.5
Online Help
For context-sensitive help, select Help from the Support Menu at the top of the page. The help
section for the active page opens in a new window. You must make sure that pop-up blockers
are disabled in order for the help to work properly.
DRRS Software User Manual (SUM) 4.5.12
4-5
The Support Menu
Chapter 4: Navigating DRRS
4.3.6
My Profile
Clicking the My Profile link displays a page similar to account registration allowing you to view
and edit your account information. The following sections are available for editing:
• Units of Assignment: View your Primary and, if applicable, Secondary Unit(s) of
Assignment. You may remove your Secondary Unit Assignment or request that one be
added.
• User Org. Details: Review and change basic details such as name, affiliation, rank,
and contact information. Note you are not allowed to change your unit of assignment
unless you are a Module Administrator.
• Change Password: Click on the Change Password tab to create a new password.
You must be able to provide the current password.
4.3.7
Logout
To end your session in the most secure manner, select Logout from the Support Menu.
4.3.8
About
Contains information on all DRRS build details.
4-6
DRRS Software User Manual (SUM) 4.5.12
PART III:
Groups and Units
This Page Intentionally Left Blank.
Chapter 5: Working with Groups and Units
Chapter 5: Working with Groups and Units
Groups are defined in DRRS as “storage areas of readiness data organized by unit, type, or
geographic area”. These are command structures of units or groups that can be modified to
accurately reflect current force status. They are essential for the purposes of planning and
analysis.
There are two main tools used when working with groups, the Unit Selector and the Group
Builder. The Unit Selector is used to locate and select groups, units, or organizations for use
with DRRS modules. Certain modules, such as the Current Unit Status tool, and ESORTS tools
rely on the selection of a unit or group via the Unit Selector in order to determine which data to
display. For example, if Group A is selected when you navigate to CUS, you will be shown data
corresponding to Group A. If Group B is selected, you will be shown Group B data, and so on.
The Group Builder provides the ability to view, create, and manage custom or system groups for
use with the Unit Selector. It also provides the ability to set a group as your group which
provides detailed information right on the DRRS portal page.
This chapter consists of the following topics:
• Unit Selector
• Group Builder
DRRS Software User Manual (SUM) 4.5.12
5-1

Unit Selector
Chapter 5: Working with Groups and Units
5.1
Unit Selector
The Unit Selector is the primary tool of DRRS. It allows you to select which unit or group to
display information for when accessing the various modules in DRRS. For example, by
selecting “Group A” using the Unit Selector, we can then access Group A’s METL information by
navigating to the Current Unit Status tool. When opened, this tool will see which group we have
selected and display the corresponding information.
5.1.1
Accessing the Unit Selector
The Unit Selector is always available in the upper-right corner of the screen, on the far right
edge of the Main menu.
Figure 5-1: Unit Selector
There are three parts to the Unit Selector:
1. Type Toggle: Allows you to quickly toggle between viewing units (one-person icon), groups
(two-person icon), or primary/secondary UICs (double flag icon). Selecting units allows you
to navigate and select from existing org data. By selecting groups, you can view all groups
and navigate through the different types of groups (My Groups, System Groups, DoD
Groups). Selecting the double flag allows you to choose from your Primary and Secondary
Units of Assignment.
2. Selector: The main area of the Unit Selector allows for direct entry of units using type-
ahead functionality (described later in this chapter). Using this tool, you can select which
unit to view data for. The Unit Selector will automatically refresh the view with appropriate
data when a new unit is selected. This area also includes the View Group Members
dropdown which is described in Section 5.1.2.5: Viewing Group Members.
3. Navigator: Navigates through the org structure of the displayed unit. You can choose which
org relationship type to view (ADCON, OPCON, COCOM) as well.
5-2
DRRS Software User Manual (SUM) 4.5.12

Chapter 5: Working with Groups and Units
Unit Selector
5.1.2
Using the Unit Selector
5.1.2.1
Select Unit of Assignment
To view and select your Unit(s) of Assignment:
1. Click the Units of Assignment button (red and yellow flags) in the Unit Selector’s type
toggle area. A list of your Units of Assignment will appear under the selector area.
Figure 5-2: Selecting Primary Unit of Assignment
2. Click on the unit you wish to select. The unit is set in view and will now be used when
viewing organization-specific modules.
5.1.2.2
Select a Group
To view and select a group:
1. Click the Groups button (two people icon) in the Unit Selector’s type toggle area. A list of
your first few My Groups and System Groups will appear under the selector area.
Figure 5-3: Selecting Groups
2. If the group you want is not listed, simply type all or part of the UIC or ANAME in the
selector box to search through the available groups.
3. Click on the group you wish to set in view. This group will now be used when viewing
organization-specific modules.
5.1.2.3
Select a Unit
To view and select a unit:
1. Click the Units button (single person icon) in the Unit Selector’s type toggle area.
Figure 5-4: Selecting Units
2. Type all or part of the UIC, long name, or abbreviated name of the unit you wish to find. As
you type, the units matching your criteria are displayed.
DRRS Software User Manual (SUM) 4.5.12
5-3

Unit Selector
Chapter 5: Working with Groups and Units
Figure 5-5: Type-ahead Search
3. Click on the unit you wish to set in view. This unit will now be used when viewing
organization-specific modules.
5.1.2.4
Navigating Organizational Hierarchies
A key feature of the Unit Selector is the ability to view and navigate the organizational hierarchy
for a selected unit in the ADCON, OPCON, and COCOM command structures.
To view an org’s hierarchy:
1. Select a unit or group using the Unit Selector.
2. Click the up arrow or down arrow in the navigator section of the Unit Selector to display
the parents or children of the selected organization, respectively. If there are none, the
corresponding arrow will be greyed out.
Figure 5-6: Org Hierarchy
3. Continue navigating by selecting any displayed unit in order to drill-down or drill-up through
the hierarchy.
4. You may also select one of the other command structures using the corresponding
hyperlinks. This will change the display to reflect only those orgs within that command
hierarchy for the selected group.
5.1.2.5
Viewing Group Members
When you have a group selected, you can view all of the individual units assigned to that group
by clicking the View Group Members (down arrow) button located next to the selection field.
More importantly, you can set any of these units in view for the purposes of viewing them while
still keeping the group selected.
Figure 5-7: Group Members
5-4
DRRS Software User Manual (SUM) 4.5.12
Chapter 5: Working with Groups and Units
Group Builder
5.2
Group Builder
In order to select groups in the Unit Selector, they must first be created. This is accomplished
using the Group Builder tool. It provides the ability to create three different kinds of groups:
• My Groups: Users have the ability to build and customize their own groups based on
the units available in DRRS. With this feature, you can create and manage the structure
of any organization or hypothetical organization for planning and analysis. All users can
create My Groups and those groups are only visible to the user who created them.
• System Groups: These are groups that have been created by System Administrators
and made accessible to all users.
• DoD Groups: DoD groups are unique in that they will automatically maintain the
relational hierarchy of the selected unit as defined in the DRRS database. DoD groups
will always show the current organizational structure of a particular unit or set of units.
These are the only groups that reflect a hierarchical structure, all other groups are
displayed as “flat” lists. All users can create DoD groups.
• Tag Groups: (visible only to those with the Tag Manager role). When Tag groups are
created, the units they contain can be discovered via a textual search against the Tag
group name in the unit selector type-ahead functionality.
5.2.1
Accessing Group Builder
The Group Builder can be opened by selecting Utilities | Group Builder from the Main menu.
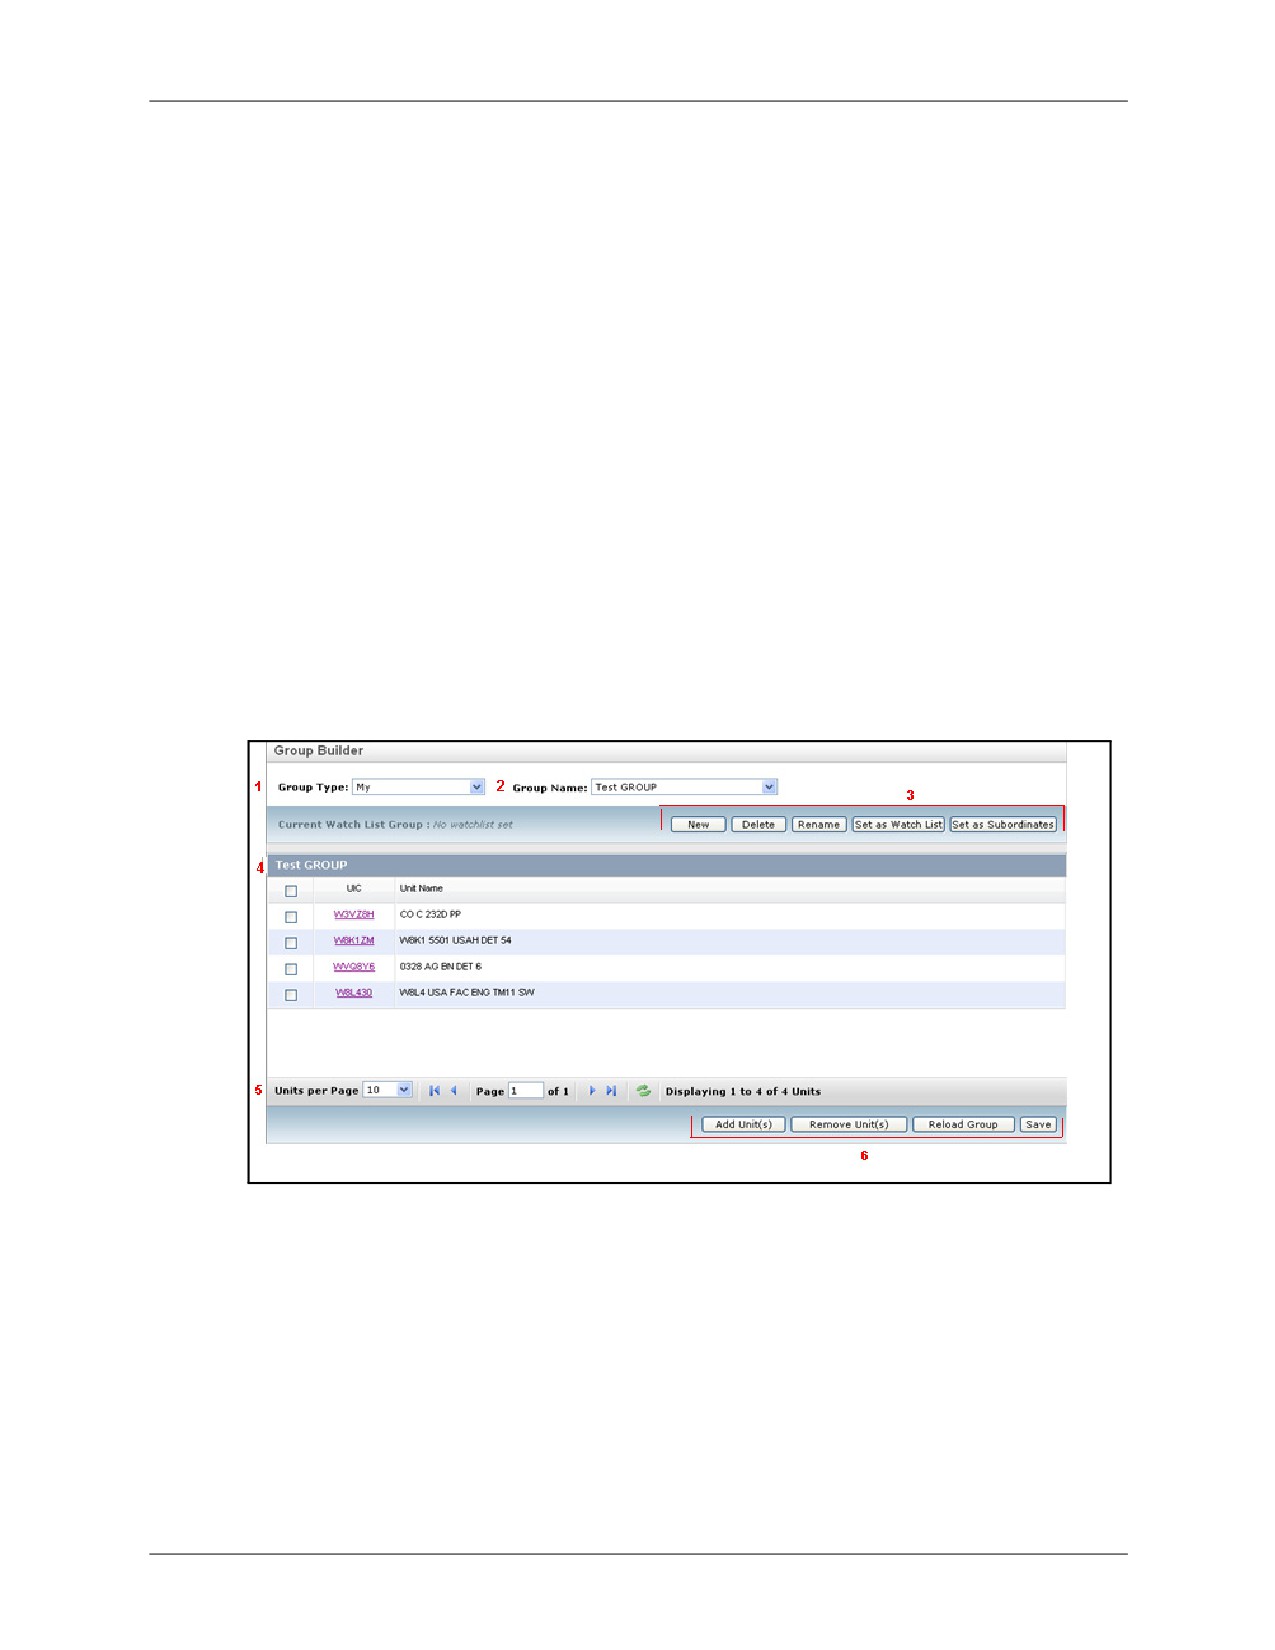
Figure 5-8: Group Builder
There are six components to the Group Builder dropdown menu:
1. Group Type Dropdown: Shows which type of groups are being displayed. To access a
different type of group, use this dropdown.
2. Group Name Dropdown: Displays the available groups of the selected type. Selecting an
item from this dropdown will change the Group Display.
3. Group Controls: Contains the tools to create new groups, delete or rename existing
groups, set a group as your watchlist, and set a group as your subordinates.
4. Group Display: Displays the units contained within the group currently selected.
5. Group Display Controls: Pagination controls for the Group Display. You can choose to
DRRS Software User Manual (SUM) 4.5.12
5-5

Group Builder
Chapter 5: Working with Groups and Units
display more units at one time, or navigate the multiple pages of groups.
6. Unit Controls: Provides the necessary tools to add units to a group, remove units from a
group, reload the last saved configuration of the group, or save the group.
Note: The subordinates group set here is your default view when using the Readiness Dashboard copy
functionality.
5.2.2
Building a Group
To build a new group:
1. Open the Group Builder.
2. Select the group type you wish to create by selecting the desired type in the Group Type
dropdown.
3. Click the New button located in the Group Controls.
Figure 5-9: Naming a New Group
4. Enter a unique name for this group in the pop-up box that appears. There are no restrictions
on characters or length.
5. Click Save to create this new group. You may now begin assigning units to your new group.
Refer to the following section for detailed instructions.
5.2.2.1
Adding Units
In order to add units to a group, you must first locate those units using the Unit Search tool. Note
that when searching for units, you may drill-down into any of the units already displayed in order
to see their subordinate units. This can be helpful if you are adding several units from a single
chain of command and do not wish to search for each unit individually or do not know the exact
name/UIC for those units.
1. Click the Add Unit(s) button to bring up the Unit Search tool. This tool works exactly like the
Quick Search for Units tool, allowing you to find units to add to the selected group.
5-6
DRRS Software User Manual (SUM) 4.5.12

Chapter 5: Working with Groups and Units
Group Builder
Figure 5-10: Adding Units to a Group
DRRS Software User Manual (SUM) 4.5.12
5-7

Group Builder
Chapter 5: Working with Groups and Units
2. Perform a search by selecting the necessary search criteria and entering a search phrase.
Click Search to run your search.
As you type in the Search Phrase field, the closest matches to your search phrase will be
displayed. You may select an item from this listing; however, you will still need to run the
search by clicking the Search button.
3. Add units to your group by selecting the checkboxes next to the desired units and clicking
Select. You may also use the Select and Close button which will add the selected unit and
then return you directly to the Group Builder. This is handy if you are only adding one unit or
when you are adding the final unit.
When adding units, you may navigate through the displayed units’ hierarchy by doing the
following:
a. Click the hyperlinked UIC of any displayed unit. This will open the Unit Navigator.
Figure 5-11: Group Hierarchy
b. Use the left and right arrows to select which relationship type (ADCON, OPCON,
COCOM) to display. The children of the selected unit for that command structure are
displayed.
c. To view the parent organization(s) of the selected unit, click the down arrow located
next t to the relationship type name. The parent org(s) are displayed and can be clicked
on to set them in view.
d. Use the checkboxes in combination with the Select or Select and Close buttons to add
units to your group.
4. Continue searching for and adding units as needed and then click the “X” in the upper-right
corner of the Unit Search tool to return to the Group Builder.
5. Click Save when you are finished adding units in order to finalize any changes made to your
group. If you do not save, all of your changes will disappear when you navigate away from
this group.
5-8
DRRS Software User Manual (SUM) 4.5.12
Chapter 5: Working with Groups and Units
Group Builder
5.2.3
Selecting a Group
To select and view an existing group:
1. Open the Group Builder.
2. Use the Group Type dropdown to select the type of group you wish to open.
3. Use the Group Name dropdown to select the specific group you wish to view. The selected
group will be displayed in the Group Display section, listing all units associated with it.
4. You may utilize the Group Display Controls to navigate through the various pages of the unit
list as needed.
5.2.4
Editing Groups
5.2.4.1
Removing Units
To remove units from a group:
1. Open Group Builder.
2. Find and select the group you wish to remove units from.
3. Select the checkbox(es) next to the unit(s) you wish to remove from this group and click the
Remove Unit(s) button located in the Unit Controls.
4. Click Save when you are finished removing units in order to finalize any changes made to
your group. If you do not save, all of your changes will disappear when you navigate away
from this group.
5.2.4.2
Renaming a Group
To rename a group:
1. Open Group Builder.
2. Find and select the group you wish to rename.
3. Click the Rename button located in the Group Controls.
Figure 5-12: Renaming a Group
4. Enter a new unique name for this group.
5. Click Save.
5.2.4.3
Deleting Groups
To delete a group:
1. Open Group Builder.
2. Find and select the group you wish to delete.
3. Click the Delete button located in the Group Controls. You will be prompted to confirm your
decision to delete the selected group.
DRRS Software User Manual (SUM) 4.5.12
5-9
Group Builder
Chapter 5: Working with Groups and Units
5.2.4.4
Setting your Watchlist
To set your watchlist:
1. Open Group Builder.
2. Find and select the group you wish to set as the watchlist.
3. Click the Watchlist button located in the Group Controls. This group’s details will now be
displayed in the watchlist section of the DRRS Portal.
4. Click the Excel icon in the main toolbar to export the watchlist to Excel.
5.2.4.5
Setting your Subordinates
To set your subordinates group:
1. Open Group Builder
2. Find and select the group you wish to set as your subordinate.
3. Click the Set as Subordinates button located in the Group Controls.The subordinates group
set here is your default view when using the Readiness Dashboard copy functionality.
4. Click the Excel icon in the main toolbar to export the watchlist to Excel.
Note: When those with Tag Manager role select Tag from Group Type dropdown, Set as Watch List and
Set as Subordinate buttons are not available.
5-10
DRRS Software User Manual (SUM) 4.5.12
PART IV:
ESORTS
This Page Intentionally Left Blank.
Chapter 6: About ESORTS
Chapter 6: About ESORTS
The DRRS Enhanced Status of Resources and Training System (ESORTS) module consists of
several tools designed to provide the necessary workflow for assessing a unit’s ability to support
a specific mission.
This introductory chapter is designed to provide an overview of the ESORTS workflow and with
it, an understanding of the way the ESORTS tools relate to each other. Detailed procedures for
using the tools can be found in the subsequent chapters of Part IV: ESORTS.
This chapter consists of the following topics:
• What is ESORTS?
• The ESORTS Workflow
• ESORTS User Roles
DRRS Software User Manual (SUM) 4.5.12
6-1
What is ESORTS?
Chapter 6: About ESORTS
6.1
What is ESORTS?
ESORTS is a web-based information system designed to provide the current readiness
assessment of an organization’s capabilities with respect to their associated missions. By
utilizing the existing DoD Mission Essential Task List construct, ESORTS has the ability to
answer the question of readiness in terms of what it means to be ready to complete a task,
under what conditions the task is expected to be completed, and what the standards are for
performing the task.
The main advantage of ESORTS is its ability to be used simultaneously by force commanders
and unit representatives to directly collaborate in readiness planning. Other advantages include:
• Utilizes organizations across the DRRS enterprise
• Allows quick assignment of forces to missions
• Provides unit-level readiness assessments of each mission
• Reduces and consolidates reporting requirements
6-2
DRRS Software User Manual (SUM) 4.5.12
Chapter 6: About ESORTS
The ESORTS Workflow
6.2
The ESORTS Workflow
ESORTS provides the necessary workflow for the DoD to create missions, assign units to those
missions, create a specific list of tasks for each of the assigned units, and finally, assess each
unit’s ability to perform their tasks in support of the mission.
The ESORTS workflow consists of 3 general steps:
1. Mission Management - Create missions and assign units to those missions. Missions can
also be changed or deleted.
2. METL Building - Create a list of Mission Essential Tasks for each unit, including conditions
and standards.
3. Mission Assessment - Assess the ability of each unit to perform the tasks in their METL and
then, using that information, assess the overall readiness capability of the mission
supported by those METs.
6.2.1
Mission Management
The first step in the ESORTS process, mission management consists of the creation and
assignment of missions to units. Missions created in DRRS are representations of the actual
DoD missions assigned to forces or the planned missions for which readiness assessment is
sought.
Missions are globally accessible by all units so that they can be created once and utilized by
however many units require it. For example, a combat mission may require the participation of
dozens of units across the Services. Rather than creating a separate mission for each of these
units, one mission can be created and each of those units assigned to it.
Once a mission has been created and the necessary units assigned to it, each of those units will
create a list of the tasks required of them in support of that mission. This is called the Mission
Essential Task List (METL).
6.2.2
METL Building
A Mission Essential Task List (METL) is the complete list of the Mission Essential Tasks (METs)
assigned to a unit. The ESORTS Build METL tool allows you to create METs for your Units of
Assignment, which, together, constitute that unit’s METL. So in order to understand the building
process for METLs, we must understand what METs are and how to create them.
A MET is the identification of the tasks most essential to a unit’s assigned or anticipated
missions, derived from the force commander’s plans and orders, with respect to existing
conditions and expected performance. METs are designed to answer a unit’s questions of,
“What tasks must I be able to accomplish in support of my mission? Under what conditions must
I be able to perform these tasks? And what standards of performance will the task be measured
against?”. Based on this definition, then, a MET must provide certain information in order to be
considered complete, or valid. The following formula shows how we can create a valid MET:
MET = Unit + Command Task + Mission + Conditions + Standards
This formula is the basis for the ESORTS Build METL and Mission Management tools. Using
Mission Management, we create missions and assigned them to units. With Build METL, we can
add the tasks, conditions, and standards in support of those missions to create valid METs for
that unit.
DRRS Software User Manual (SUM) 4.5.12
6-3
The ESORTS Workflow
Chapter 6: About ESORTS
A MET can also include supporting tasks. Supporting tasks are specific activities that contribute
to the accomplishment of a unit’s MET but are performed by other units. These include:
• Command Linked Tasks: Tasks in support of a unit’s METL conducted by another unit
at the same command level.
• Staff Tasks: Tasks in support of a unit’s METL typically conducted by the commander or
their staff. Examples of these would be Command and Control, administrative, and
logistical tasks.
• Subordinate Tasks: Tasks in support of a unit’s METL conducted by a subordinate unit.
For METL creation purposes, supporting tasks are handled essentially the same way. They
require a mission, conditions, and standards to be associated with them.
When the METL is complete, the next step is for each unit to assess the readiness capabilities
of the individual METs assigned to them in support of the overarching mission.
6.2.3
MET Assessment
Having been assigned a METL, each organization will report on its ability to perform their METs
within the specified conditions and standards. When assessing a unit’s Mission Essential Tasks,
the following rating structure should be used:
•
Yes (Green): The organization can accomplish its MET, METL, or
mission to prescribed standards and conditions. The “Yes” assessment should reflect
demonstrated performance in training or operations.
•
Qualified Yes (Yellow): Unit can accomplish most or all of the task to
standard under most conditions. The MET assessment must clearly define the specific
standard and conditions that cannot be met, as well as the shortfalls or issues impacting
the unit's inability to accomplish the task.
•
No (Red): The organization is unable to accomplish the MET, METL, or
mission to prescribed standards and conditions at this time.
•
Not Assessed (Striped): The organization has not yet been assessed.
When all of the METs assigned to a unit have been assessed, that information is ready to be
used towards assessing the overall mission capabilities.
6-4
DRRS Software User Manual (SUM) 4.5.12
Chapter 6: About ESORTS
The ESORTS Workflow
6.2.4
Mission Assessment
Following the individual MET assessment process, the ESORTS Commander reviews the
assessments and uses that data to assess the overall mission readiness. When assessing
overall mission readiness, the following rating structure should be used:
•
Yes (Green): If the majority of the Command Level METs are assessed
as “Yes”, and the remaining METs are assessed as “Qualified Yes”, then the overall
assessment should be “Yes”.
•
Qualified Yes (Yellow): Units can accomplish most or all of the task to
standard under most conditions. The MET assessment must clearly detail the specific
standard and conditions that cannot be met, as well as the shortfalls or issues impacting
the unit’s inability to accomplish the task.
•
No (Red): If any of the METs are assessed as “No”, then the
Commander must make a judgement as to whether the mission objectives can still be
accomplished. Any “No” task would normally preclude an overall mission assessment of
“Yes”. If the overall mission is rated other than “No”, the Commander should clearly
explain how the plan will be accomplished despite the inability to accomplish the MET
and any mitigation actions that will be taken.
•
Not Assessed (Striped): The mission has not yet been assessed.
It should be understood that the mission assessment is being done at the unit level only.
Meaning, it’s not the mission that is being assessed, but rather the unit’s ability to support the
mission. This allows for a mission to be assessed individually by multiple units. For example, if
multiple units support a combat mission, each one can provide an assessment of their ability to
support the mission. A mission commander could then utilize each of the units’ assessments in
support of overall mission assessment.
DRRS Software User Manual (SUM) 4.5.12
6-5
ESORTS User Roles
Chapter 6: About ESORTS
6.3
ESORTS User Roles
In order for the ESORTS workflow to run efficiently, responsibilities in the workflow are divided
among the various ESORTS user roles. These roles are:
• ESORTS Guest: Read-only access to ESORTS information. No editing privileges are
associated with this user type. This is the default role for all new DRRS users.
• ESORTS Unit User: May view and edit ESORTS information as well as assess METs
assigned to their Units of Assignment.
• ESORTS Commander: Approves overall mission assessments for their Units of
Assignment. This role also permits unit information customization; MET adding,
building, and assessment; office management; and saving assessment snapshots.
• ESORTS Unit Administrator: May customize unit information; manage offices; add,
build, and assess METs; and save assessment snapshots for all UICs. Unit Admin roles
are granted by the DRRS System Admin during the registration process.
More detail is provided to specific abilities for each user role in the chapters explaining the
ESORTS tools.
6-6
DRRS Software User Manual (SUM) 4.5.12
Chapter 7: Setting Up ESORTS
Chapter 7: Setting Up ESORTS
ESORTS Administrators have the necessary privileges to manage specific aspects of the
ESORTS module. This is crucial in ensuring that each user in their constituency has the ability
to utilize ESORTS properly.
This chapter consists of the following topics:
• Units of Assignment
• Managing Tasks
• Managing Offices
• Managing User Roles
DRRS Software User Manual (SUM) 4.5.12
7-1
Selecting a Unit of Assignment
Chapter 7: Setting Up ESORTS
7.1
Selecting a Unit of Assignment
In order to use the ESORTS tools, you must have a Primary Unit of Assignment. This is usually
performed during account registration. The Primary Unit of Assignment is the one unit that you
are affiliated with for ESORTS purposes. To change this unit, you must have administrative
privileges. Contact your local ESORTS Unit Admin or Customer Support for more information.
Tip: When using the Build METL and Unit Assessment tools, you can view other units by using the Unit
Selector in the upper-right hand corner of the screen. This will NOT change your primary unit of
assignment, only the group being viewed.
7-2
DRRS Software User Manual (SUM) 4.5.12

Chapter 7: Setting Up ESORTS
Managing Tasks
7.2
Managing Tasks
In order for users to create Mission Essential Task Lists, there must be Mission Essential Tasks
available to be selected. Many of these are automatically imported directly from the Universal
Joint Task List, Service Task Lists, etc; however, New tasks can also be added and edited/
managed by an ESORTS Administrator via the Task Management module.
Note: Only users specifically approved by DIO and who are assigned access privileges to a task list by an
Enterprise Administrator can edit new tasks. For more information, refer to the DRRS Software
Administrator Manual (SAM).
7.2.1
Find Task
To find a task using the Task Management tool:
1. Select ESORTS | Task Management from the Main menu.
Figure 7-1: Task Management Search
2. Select the task list you wish to search in from the Category dropdown menu.
3. Select the status of the task you are searching for.
4. Select whether to search by Number and/or Title and/or Definition.
5. Enter the phrase or number to search for in the Keywords field and select whether your
search results should include any task containing your search phrase or only those with the
exact search phrase. For example, selecting All when searching for “123” will return tasks
X123, 123X, and so on. Selecting Exact when searching for “123” will only return task 123.
6. Click Submit. The search results matching your criteria are displayed. You can expand or
collapse any task by clicking the arrow button to the left of the task name. Each task has a
series of actions available. These are described in the following sections. You may also
export your search results by clicking the Word or Excel icon in the upper-right corner of the
search results.
Figure 7-2: Task Management Search Results
7.2.2
Deactivate Task
Deactivating a task will prevent it from being associated with new METs, however, it will not
affect METs already associated with this task.
To deactivate a task:
1. Perform a task search as described in Section 7.2.1: Find Task.
2. Click the Deactivate Task button (red arrow icon) for the selected task.
3. Provide a reason for the deactivation and click the Submit button.
DRRS Software User Manual (SUM) 4.5.12
7-3

Managing Tasks
Chapter 7: Setting Up ESORTS
7.2.3
Copy Task
Copying a task allows you to create a new task using the information from an already existing
one. This can be used to save time when creating similar tasks.
To copy a task:
1. Perform a task search as described in Section 7.2.1: Find Task.
2. Click the Copy Task button (page icons) for the selected task.
Figure 7-3: Copy Task
3. Select the category to which you are adding a task.
4. Enter a unique task number based on the naming conventions of your organization/task list.
5. Enter a brief descriptive title for your new task.
6. Enter a full description of the task you are adding.
7. Click Submit.
7-4
DRRS Software User Manual (SUM) 4.5.12

Chapter 7: Setting Up ESORTS
Managing Tasks
7.2.4
Edit Task
Assuming you have the proper access privileges, you can modify any existing task in order to
ensure that they are properly set up for MET creation.
To edit a task:
1. Perform a task search as described in Section 7.2.1: Find Task.
2. Click the Edit Task button (pencil icon) for the selected task.
Figure 7-4: Editing Task
3. You may now edit the selected task’s category, number, title, description, and associated
measures.
7.2.5
Delete Task
Deleting a task permanently removes it from DRRS. A task that is currently associated with a
MET or used as a supporting task may not be deleted. These associations must first be
removed.
1. Perform a task search as described in Section 7.2.1: Find Task.
2. Click the Delete Task button (red “X” icon) for the selected task.
3. Provide a reason for the deletion and click the Submit button.
7.2.6
View Task History
Every modification made to a task is tracked in the Task History which allows you to see the
timeline of those changes.
To view a task’s history:
1. Perform a task search as described in Section 7.2.1: Find Task.
2. Click the Task History button (clock with green arrow icon) for the selected task.
DRRS Software User Manual (SUM) 4.5.12
7-5

Managing ESORTS Offices
Chapter 7: Setting Up ESORTS
7.3
Managing ESORTS Offices
Note: Depending on your user role/privilege, you may/may not see this option in your Main menu. This
role is restricted to ESORTS Unit Administrators and ESORTS Commanders user role. For more
information, see Chapter 6.3: ESORTS User Roles.
During the Build METL process, each MET, supporting task, and command-linked task is
assigned a Staff Office that is designated as the Office of Primary Responsibility (OPR).
The Office Management tool allows ESORTS Unit Administrators and ESORTS Commanders
to create staff offices pertaining to units of interest as well as assign multiple ESORTS users
with the same unit of interest to these offices.
To create a staff office:
1. Select ESORTS | Office Management from the Main Menu.
Figure 7-5: ESORTS Office Management
2. Select the unit you wish to view offices for by using the dropdown menu in the upper-right
corner. Available options include your Units of Assignment and the unit currently selected in
the Unit Selector. The offices for the selected unit are displayed down the left side of the
screen. Clicking on an office name will display more information about that office in the
details panel on the right side.
7-6
DRRS Software User Manual (SUM) 4.5.12

Chapter 7: Setting Up ESORTS
Managing ESORTS Offices
7.3.1
Create a New Office
1. Access Office Management for the unit to which an office is being added.
2. Click the Add New Office icon located above the details panel.
Figure 7-6: Create New ESORTS Office
3. Enter a Staff Office Code in the Code field.
4. In the Description field, enter a short description of the office’s purpose or other pertinent
information.
5. Assign personnel to the office by highlighting their names in the Available field and using
the arrow button to move them into the Assigned field.
The names in the Available field are all personnel who have the selected unit set as their
unit of interest.
6. When finished, click Save Information. The Staff Office is created and saved.
DRRS Software User Manual (SUM) 4.5.12
7-7

Managing ESORTS Offices
Chapter 7: Setting Up ESORTS
7.3.2
Edit/Add Personnel to an ESORTS Staff Office
To edit/add personnel to a staff office:
1. Access Office Management for the unit for which personnel is being edited.
2. Click on an existing staff office from the Offices panel.
3. Click the Edit Office icon above the details panel.
4. Assign personnel to the office by highlighting their name in the Available field and using the
arrow buttons to move them into the Assigned field. Unassign personnel by reversing the
procedure.
Figure 7-7: Edit ESORTS Office Personnel
The names in the Available field are all personnel who have the selected unit set as their
unit of interest.
Tip: Hold down the ctrl key to select multiple users at once.
5. When finished, click Save Information. The Staff Office is updated and saved.
7.3.3
Delete an ESORTS Staff Office
To delete a custom staff office that you have created:
1. Access Office Management for the unit for which an office is being deleted.
2. Click on an existing staff office from the Offices panel.
3. Click the Delete Office icon above the details panel.
4. Click OK when the confirmation prompt appears. The Staff Office is deleted.
7-8
DRRS Software User Manual (SUM) 4.5.12

Chapter 7: Setting Up ESORTS
Managing ESORTS User Roles
7.4
Managing ESORTS User Roles
ESORTS user roles are managed by Unit Administrators through the Identity Management
module. To access the ESORTS User Role Admin tools:
1. Select Admin | Identity Management | User Search from the Main menu.
Figure 7-8: User Search
This area is used to access/perform all DRRS User Administration tasks. The majority of
these tasks involve finding a particular user, the process for which is described below.
7.4.1
Performing a User Search
To perform a user search:
1.
Select Admin | Identity Management | User Search from the Main Menu.
2.
Select/enter your search criteria in the User Search page. There are many search options
available. You may use a combination of any of these options:
• Last Name: Search for users by last name. Enter all or part of the name.
• First Name: Search for users by first name. Enter all or part of the name.
• User Name: Search for a specific User Name. Enter all or part of the user name.
• UNCLASS Email: Search for a user with a specific Unclassified email address on file.
Enter all or part of the address.
• SECRET Email: Search for a user with a specific Classified email address on file. Enter
all or part of the address.
• Status: Specify an account status to limit your search by: All, New, Approved, or
Inactive.
• Locked: Specify an account lock status to limit your search by: All, Unlocked, or
Locked.
• Last Modified: Limits user search to accounts modified within the specified timeframe.
• Created On: Limits user search to accounts created within the specified timeframe.
• Last Login: Limits user search to accounts whose last recorded login date was within
the specified timeframe.
• Unit Name/UIC: Find users whose Primary or Secondary Unit of Assgnment matches a
specific UIC or AName. Use the dropdown arrow to quickly select your own Units of
Assignment.
• Roles: Search for users that have been granted particular roles.
3.
Click Search once all your criteria has been entered. The matching search results are
displayed in the Search Results box below the search criteria.
DRRS Software User Manual (SUM) 4.5.12
7-9
Managing ESORTS User Roles
Chapter 7: Setting Up ESORTS
7.4.2
Changing a User’s Roles
If a user needs access to other functions with ESORTS, you need to assign additional user roles
to their account. To change a user’s role, follow these steps (you must have access privileges to
the target module):
1. Select Admin | Identity Management | User Search from the Main menu.
2. Perform a search for the desired user.
3. Click the Edit icon (pencil) next to the corresponding user record.
4. Click Roles (in the left-side Sections menu) and then make any necessary changes.
5. Click Submit. The User Roles are updated. The user may need to log out and then log back
in for these changes to be reflected.
7-10
DRRS Software User Manual (SUM) 4.5.12
Chapter 8: Mission Management
Chapter 8: Mission Management
The first step in the ESORTS workflow is the creation of individual missions. The Mission
Management tool allows you to add, edit and delete missions and then assign them to one or
more units in order to later associate them with specific METs.
This chapter consists of the following topics:
• Managing Missions
• Assigning Missions to Units
DRRS Software User Manual (SUM) 4.5.12
8-1
Managing Missions
Chapter 8: Mission Management
8.1
Managing Missions
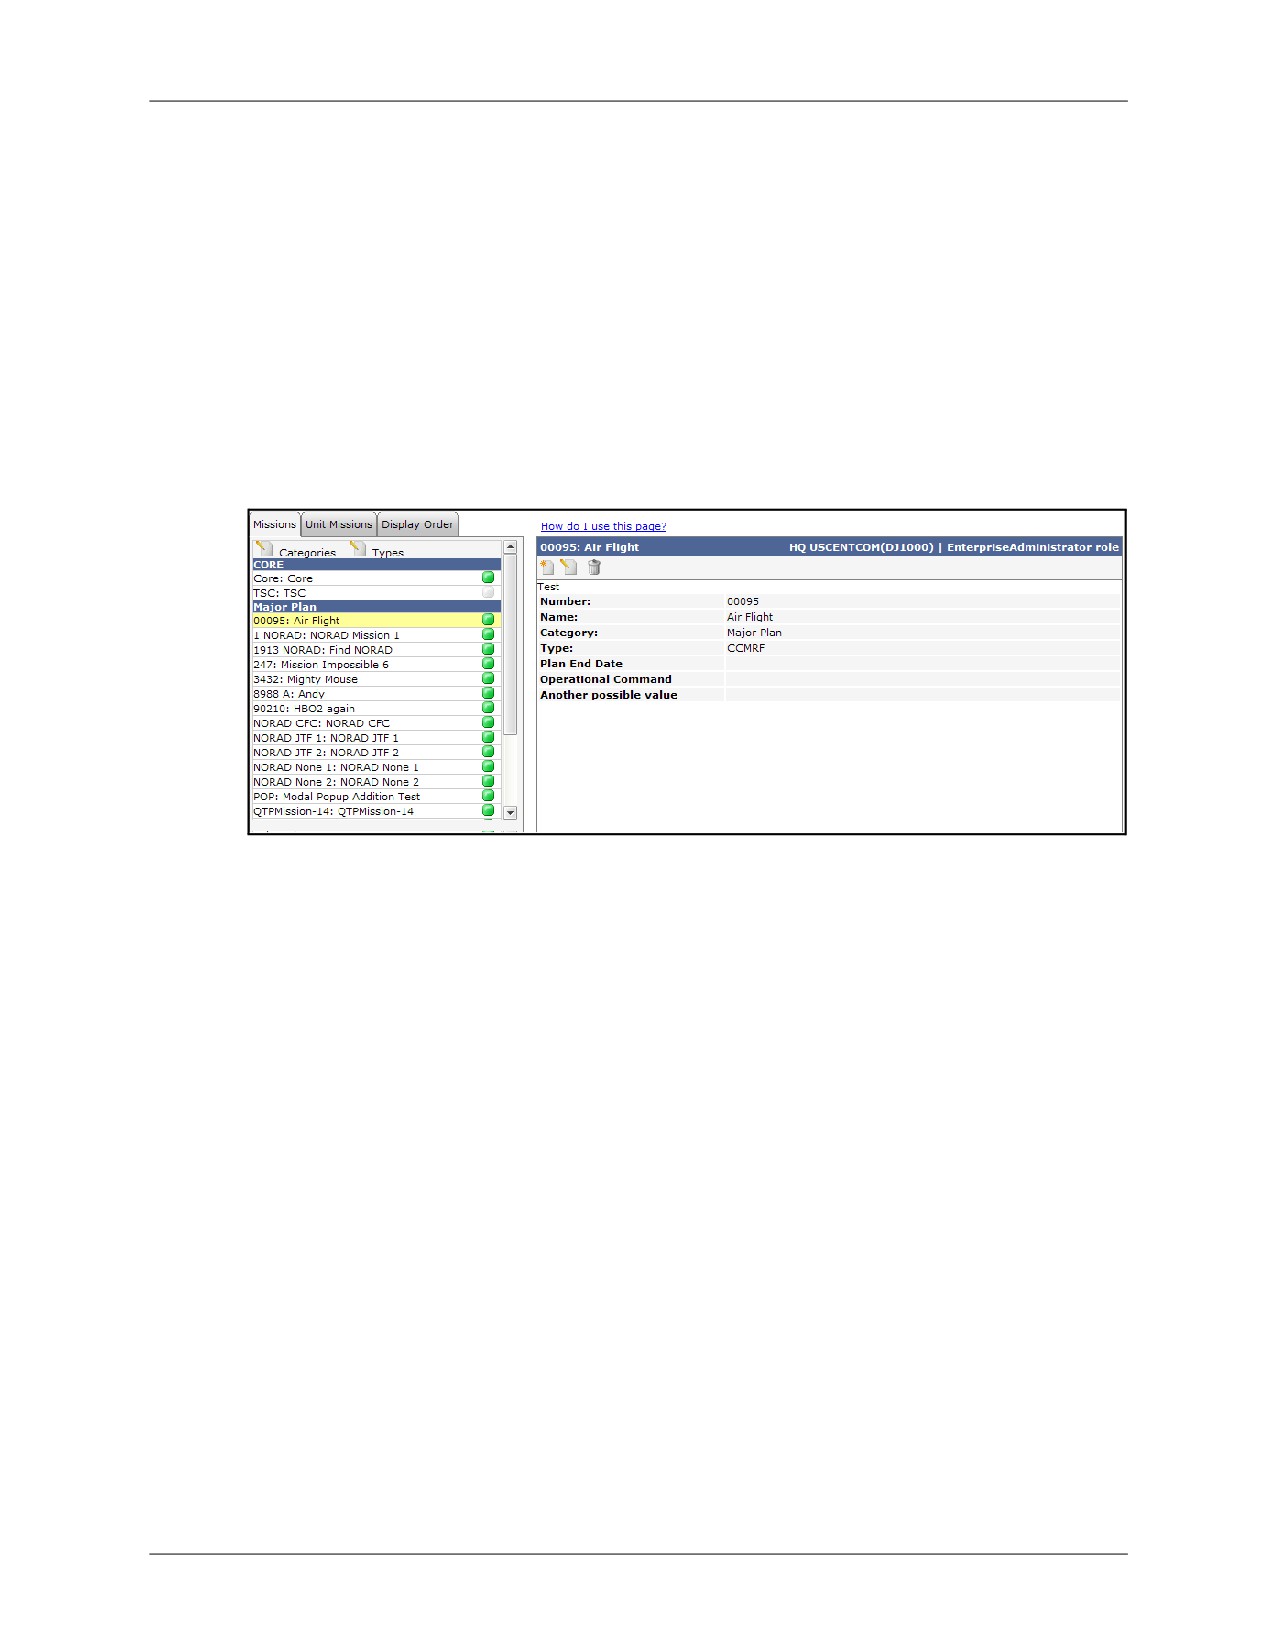
The main screen of the Mission Management tool is the Mission Editor. The Mission Editor
displays every user-created mission stored in the DRRS system alphabetically by Category. It is
the control hub for missions, types, categories, and unit missions. These are described below.
• Missions: See the explanation of missions in Chapter 6: About ESORTS.
• Types: Refers to a mission’s DoD-level categorization. Examples include: JTF, CFC,
and CCMRF.
• Categories: Refers to a mission’s Service-level categorization. Examples include:
Core, JCA, Major Plan, Named Operation, and Other.
• Unit Missions: Missions assigned to the unit currently selected in the Unit Selector.
To access the Mission Editor, select ESORTS | Mission Management from the Main Menu.
Figure 8-1: Mission Editor
8-2
DRRS Software User Manual (SUM) 4.5.12

Chapter 8: Mission Management
Managing Missions
8.1.1
Types and Categories
Each mission must have a type and category assigned to it. These can be selected from a
dropdown menu during mission creation, however, if the type or category you need does not
exist, it is possible to create a new one. The process for this is the same for both types and
categories.
8.1.1.1
Creating new Types and Categories
To create a new type or category:
1. Click the Edit Category or Edit Type icon located just above the missions list.
Figure 8-2: Creating Types and Categories
2. Enter a name and description for the new type or category.
3. Click Save Information. The type/category is created and will now be available in the type/
category dropdown menu for all users during mission creation.
8.1.1.2
Editing Types and Categories
Rather than creating a new type or category, it may be possible to modify an existing one to fit
your needs. To edit an existing mission:
1. Click the Edit Category or Edit Type icon located just above the missions list.
2. Select the type/category you wish to edit and click the Edit Category or Edit Type icon
found at the top of the type/category details panel.
3. Modify the name and/or description for the selected type/category.
4. Click Save Information.
DRRS Software User Manual (SUM) 4.5.12
8-3

Managing Missions
Chapter 8: Mission Management
8.1.2
Creating Missions
Missions created in the Mission Editor are globally accessible by any user with access to the
Mission Management tool. They can also be assigned to any unit the user has mission
privileges for.
To create a new mission:
1. Click the Add New Mission icon located above the mission details panel.
Figure 8-3: Creating New Missions
2. Enter a unique mission number in the Number field.
3. Enter a unique mission name in the Name field.
4. Enter a complete description of the mission in the Description field.
5. Select the category to which the mission belongs from the Category dropdown.
6. Select the type to which the mission belongs from the Type dropdown.
7. Click Save Information to save your new mission and close the dialog. Your new mission
will be displayed in the Mission Editor missions list and will be available for use by all users.
8.1.3
Editing Missions
To edit an existing mission:
1. Select a mission from the Mission Editor missions list.
2. Click the Edit Mission link from the top of the details panel.
3. Modify the mission’s Number, Name, Description, Category, or Type as needed.
4. Click Save Information.
8.1.4
Deleting Missions
To remove a mission completely, select a mission from the Mission Editor missions list and click
the Delete icon from the top of the details panel.
8-4
DRRS Software User Manual (SUM) 4.5.12

Chapter 8: Mission Management
Assigning Missions
8.2
Assigning Missions
Once a mission has been created, it can be assigned to a unit for use in that unit’s METL. To
assign a mission to your Unit of Assignment, click the grey button to the right of that mission’s
name in the Missions tab. The button will turn green, indicating that this mission is assigned.
Figure 8-4: Assigning Missions
To view only the missions currently assigned to your Unit of Assignment, click the Unit
Missions tab. This view is helpful when there are a large number of missions available and you
only want to see the missions pertaining to your selected unit.
Figure 8-5: Unit Missions
To unassign any mission from your Unit of Assignment, click the green button again and it will
become grey again, indicating that it is no longer assigned to your unit. Unassigning a mission
from a unit will remove the mission from any of the unit’s METs currently using that mission.
DRRS Software User Manual (SUM) 4.5.12
8-5

Assigning Missions
Chapter 8: Mission Management
8.2.1
Changing Mission Display Order
The Display Order tab provides the ability to change the order in which missions are displayed
in the Mission Assessment screen, providing a more convenient and customized view.
Figure 8-6: Edit Mission Display Order
To change the order of display for the missions assigned to your Unit of Assignment:
1. Open the Display Order tab.
2. Click on a mission title.
3. Utilize the green arrows to shift the selected mission up or down in the list. Repeat this
process for the other missions as necessary.
Table 8-1: Display Order Controls
Icon
Description
Move selected mission to the top of the list.
Move selected mission up one row.
Move selected mission down one row.
Move selected mission to the bottom of the list.
8-6
DRRS Software User Manual (SUM) 4.5.12
Chapter 9: Build METL
Chapter 9: Build METL
The Build METL tool is the main tool of the ESORTS module. It provides the tools necessary to
create and manage the list of Mission Essential Tasks for a selected unit. This is the second
step in the overall ESORTS workflow.
This chapter consists of the following topics:
• Using the Build METL View
• Creating a MET
• Validating a MET
• Copying (importing) a METL
DRRS Software User Manual (SUM) 4.5.12
9-1
Using the Build METL View
Chapter 9: Build METL
9.1
Using the Build METL View
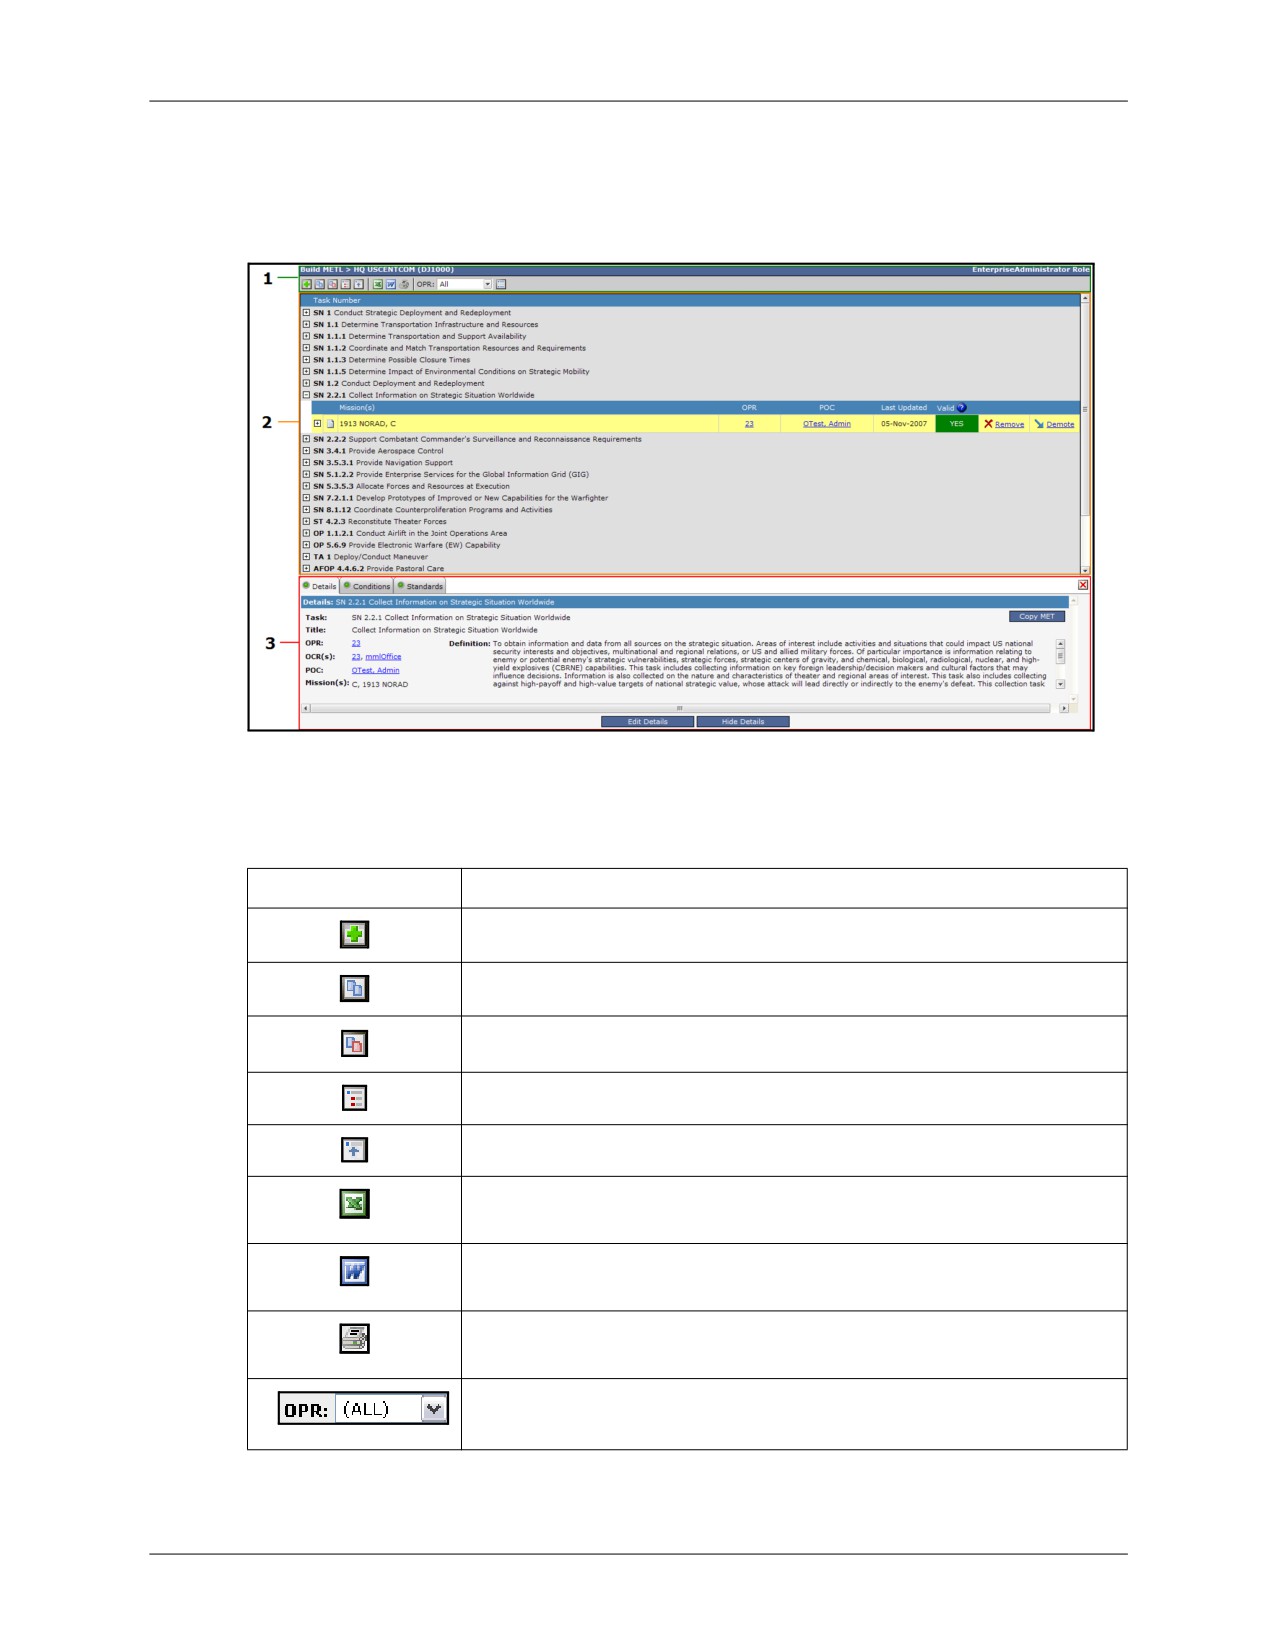
The Build METL page is split into three components (from top to bottom): the Build METL
Toolbar, the METL display, and the MET details.
Figure 9-1: Build METL View
1. BUILD METL TOOLBAR
The Build METL Toolbar provides the overall controls for the Build METL view. The table below
describes the buttons in the toolbar.
Icon
Description
Begins the creation process for a new MET.
Creates a copy of the METL from another unit into the unit in view.
Creates a copy of a mission from another unit into one of the unit in view’s
METs.
Expands all MET records so that all supporting tasks are displayed.
Returns all expanded MET records to their single-line view.
Exports the current METL to a file that can be opened in Microsoft Excel.
Exports the current METL to a file that can be opened in Microsoft Word.
Creates a printer-friendly view of the currently displayed METL by allowing
you to select which elements to print.
Filters the view based on any of the unit in view’s Offices of Primary
Responsibility.
9-2
DRRS Software User Manual (SUM) 4.5.12

Chapter 9: Build METL
Using the Build METL View
2. METL DISPLAY
The METL display is the main component of the Build METL view and shows all of the METs
associated with your Units of Assignment. Each MET record contains the following columns:
Column
Description
Task Number
The task number and description of the displayed MET.
Mission(s)
The mission or missions with which the MET is associated.
The Office(s) of Primary Responsibility to which the MET is assigned. Each OPR is
OPR
a hyperlink to a window that contains information about the OPR.
The name of the person who has been designated as the Point of Contact for the
POC
OPR. Each POC is a hyperlink to a window that contains information about the
POC.
Last Update
The date on which the MET was last updated.
Valid?
Contains either
or
to show whether or not the MET is valid.
3. MET DETAILS
Clicking on any MET in the METL will display the MET Details at the bottom of the Build METL
view. This area is used to control the input of MET details, conditions, and standards, which is
typically accomplished during the MET creation process. The information entered in these tabs
includes:
• Detail: Generic task information such as the Task Title, Task Number, Custom Name,
POC, OPR, OCRs and associated Missions.
•
Requirements for Validity: The task must have an OPR, at least one OCR, a POC,
and at least one mission selected.
• Conditions: Those variables of an operational environment or situation in which a unit,
system, or individual is expected to perform the task and which may affect performance.
•
Requirements for Validity: At least one condition with a corresponding Condition
Descriptor must be associated with this task.
• Standards: Consists of the performance measures, scale, and criteria for the selected
task. A performance measure provides the basis for describing varying levels of task
performance. A criterion defines the minimum acceptable level of performance.
•
Requirements for Validity: At least one Standard must be associated with this task.
Each tab has an “edit/manage” and a “hide” button. Clicking these buttons will allow you to
modify the values for that tab or hide the MET Details panel from view, respectively. Each tab
also has a colored indicator next to its name. This indicator will be either green or red,
representing whether or not the tab has met the requirements for validity as described above.
When all three indicators are green, the MET is considered valid and can be assessed using the
Mission Assessment tool.
DRRS Software User Manual (SUM) 4.5.12
9-3

Creating a MET
Chapter 9: Build METL
9.2
Creating a MET
The primary function of the Build METL tool is the creation and management of unit METs. The
following sections describe the process for creating a single MET. This process can be repeated
as many times as necessary in order to build a complete METL. Once the METL has been
successfully created, it is ready to be assessed per the ESORTS workflow.
9.2.1
Add a New Task
To add a MET:
1. Click
on the Build METL Toolbar.
Figure 9-2: Choose Task Dialog
The Choose Task dialog that is displayed is used to search for the task that you want to be
add to the METL.
a. Select a category to search: “UJTL: SN”, “UJTL: ST”, “UJTL: OP”, “UJTL: TA”, AFTL,
MCTL, AUTL, ATL, and NTA.
b. Select the search criteria to search by Number, Title, Description, or any combination.
c. Enter one or more keywords to search for (make sure the correct Search By settings
are selected).
d. Choose the precision of the search. ‘All’ returns any records that contain the keyword(s)
and ‘exact’ returns only exact matches.
2. Click
when you are finished entering your search criteria. A list of search results
will appear below your search.
3. Click
next to the task that you want to add. The selected task will be added to
your METL.
9-4
DRRS Software User Manual (SUM) 4.5.12

Chapter 9: Build METL
Creating a MET
9.2.2
Validate the Command Task
Once the Command Task has been added to the METL, it must be validated by having
missions, conditions, and standards associated with it. Only valid METs can be assessed in the
Mission Assessment tool.
Clicking on the blank MET record will open the MET Details area which contains the details,
conditions, and standards tabs.
Figure 9-3: MET Details
9.2.2.1
Assigning Missions to the Command Task
The Details tab contains the overall information about the MET. This screen allows you to
associate any of the missions assigned to this unit with the selected task. To do so:
1. Open the Details tab.
2. Click Edit Details at the bottom of the panel.
Figure 9-4: Edit MET Details
3. Enter a title for this MET. The default title is the one associated with the task.
4. Select one or more OCRs, an OPR, and a POC.
5. Select the mission(s) supported by this MET. When assigning multiple missions to one MET,
changes and assessments made to that MET will be applied to all the assigned missions
simultaneously. If you wish to manage the missions separately, you must assign each
mission to its own MET. This will mean adding the same Command Task to a METL multiple
times and assigning a different mission to each instance. This will also mean that each of
these Command Task records will need to be validated and assessed individually,
therefore, it is suggested that you utilize the multiple mission assignment functionality when
possible as it will provide the easiest method for making updates.
6. Click Save Details to close the Edit MET Details window and save your changes or Cancel
to close the window without saving your changes.
DRRS Software User Manual (SUM) 4.5.12
9-5

Creating a MET
Chapter 9: Build METL
9.2.2.2
Specifying Conditions for the Command Task
The Conditions tab contains those variables of an operational environment or situation in which
a unit, system, or individual is expected to perform the task and which may affect performance.
To manage the conditions for the unit, do the following:
1. Click the Conditions tab. The conditions associated with the selected MET are displayed if
any have been already selected.
Figure 9-5: Conditions Tab
2. Click Manage Conditions. The Manage Conditions dialog is displayed. This dialog will be
used to select the conditions applicable to the selected task.
Figure 9-6: Choose Conditions
3. Select a condition category from the dropdown menu at the top. The conditions displayed
are based on the category selected.
4. Add all the conditions applicable to the MET by selecting their corresponding checkboxes.
The first level of checkboxes corresponds to general condition types. Checking any of these
boxes will display the specific condition descriptors available for that type.
The area on the right will display all the conditions currently associated with the MET and
can be toggled on and off using the Hide/Unhide button at the top right.
The conditions for a MET can be edited or removed at a later time by returning to the Manage
Conditions dialog.
9-6
DRRS Software User Manual (SUM) 4.5.12
Chapter 9: Build METL
Creating a MET
9.2.2.3
Setting Standards for the Command Task
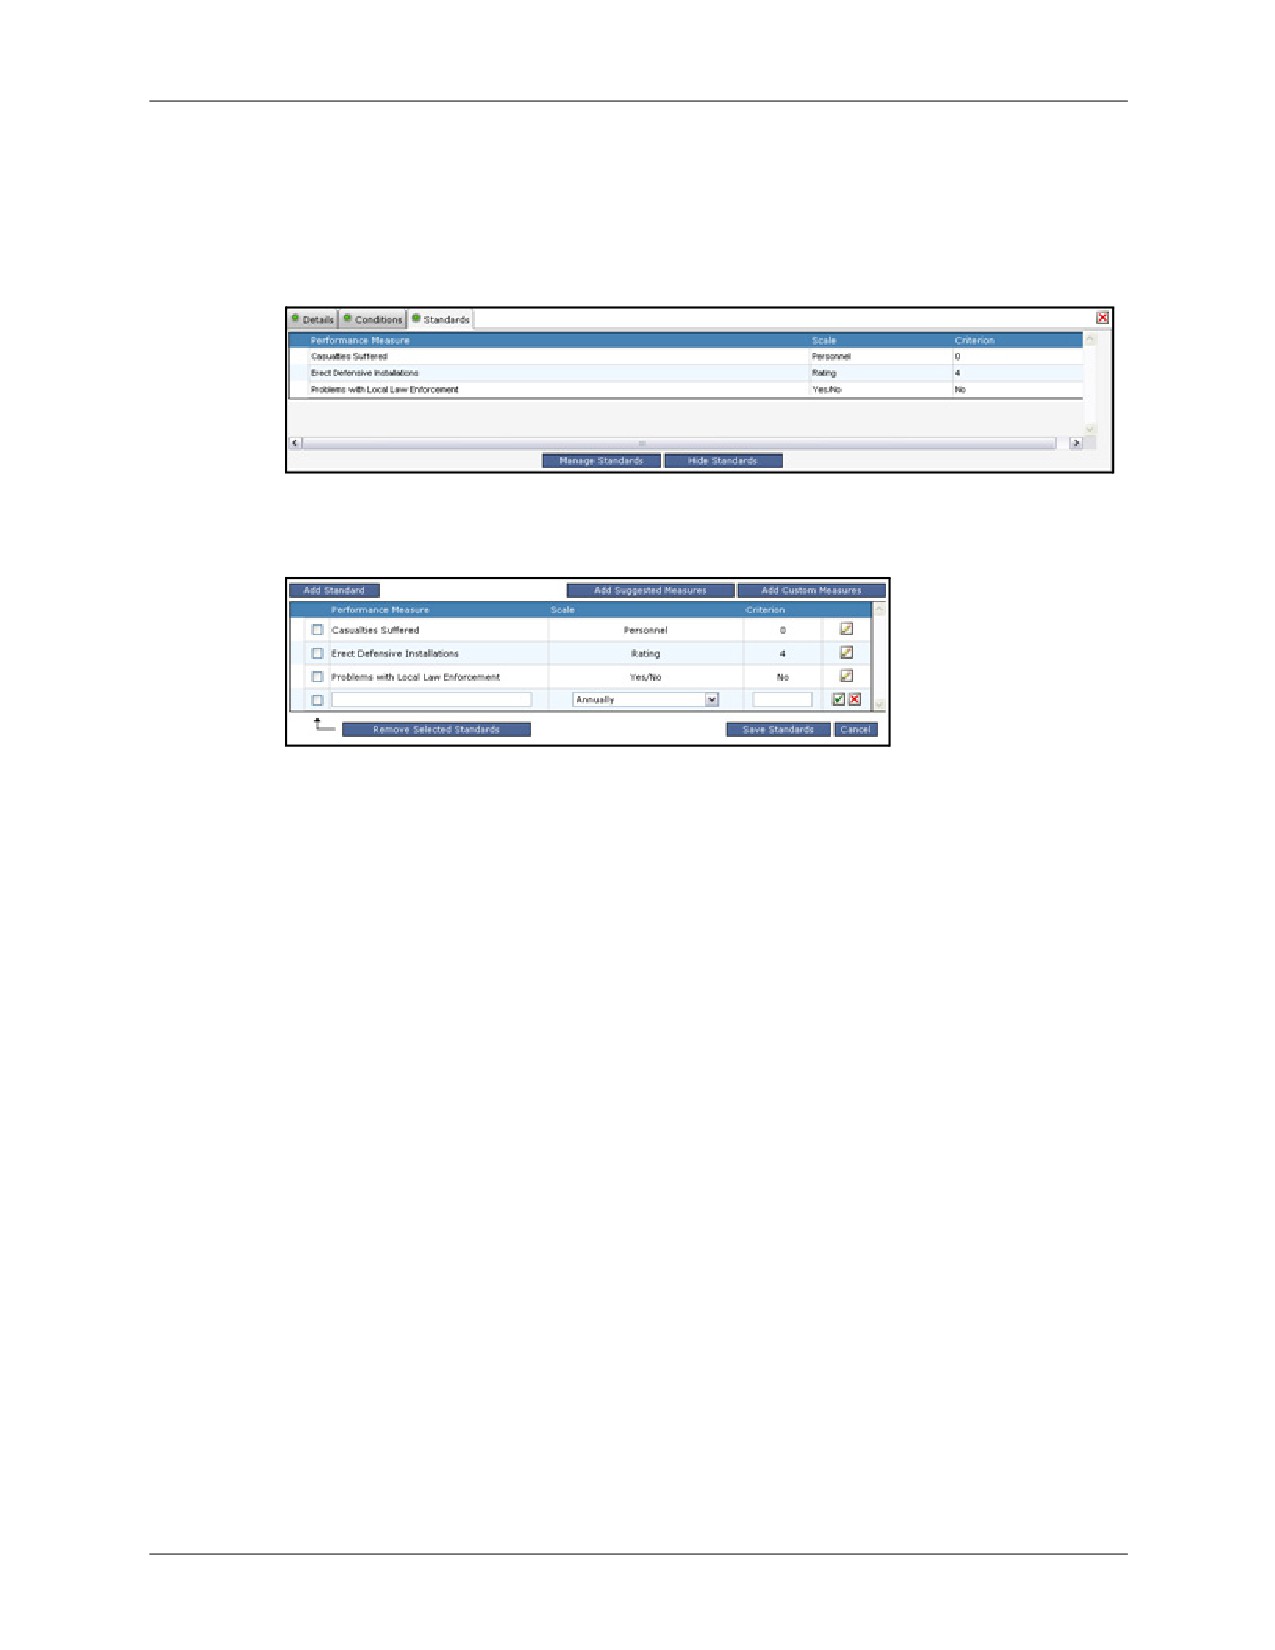
The Standards tab contains the performance measures, scale and criterion for the selected
MET. To add and manage standards, do the following:
1. Click the Standards tab. DRRS displays the MET’s associated performance measures, or
standards, if any have been selected.
Figure 9-7: Standards Tab
2. Click Manage Standards. DRRS displays the Manage Standards dialog. You can use this
dialog to add or remove standards for this MET.
Figure 9-8: Add Standards
Each standard is composed of three parts:
• Performance Measure: The title/description of the measure.
• Scale: The scale of measure for this standard (e.g., annual visits, percent, tons, etc.).
• Criterion: The minimum measure required for the standard (based on the scale).
3. There are three options for adding standards:
a. Add Standard: Click Add Standard and a new blank standard record is created. Enter
a performance measure (such as time of travel, casualties, enemy neutralized, etc.) and
select a Scale for that measure. Then enter the measurement criterion based on that
scale. For example, a measure of distance traveled may have a scale of miles and a
criterion of >5. This means that in order to meet the performance standard for this task,
the unit should travel at least 5 miles. Notice this measure does not specify what time
frame those miles would need to be traveled in, that would be a separate standard.
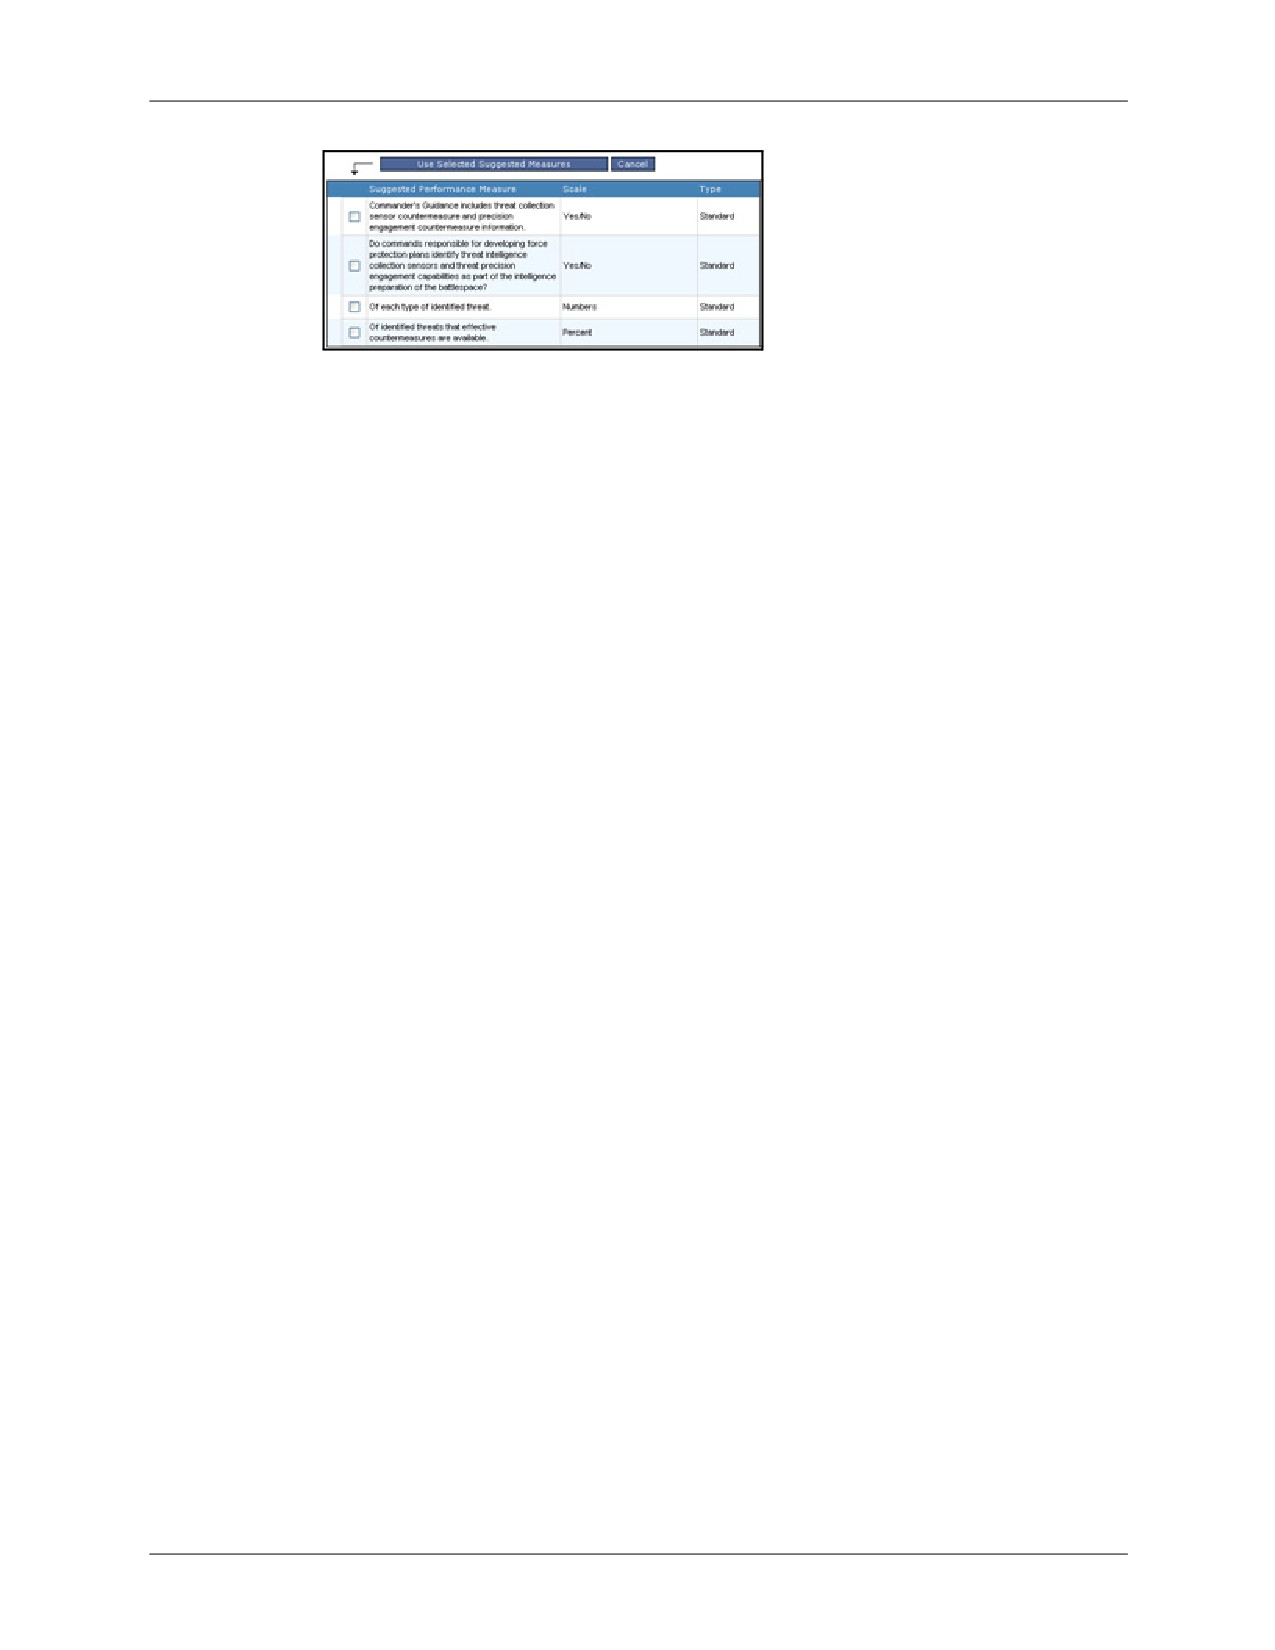
b. Add Suggested/Custom Measures: Select from a list of Suggested or Custom
Measures. Click Add Suggested Measures or Add Custom Measures and a list of
predefined measures will be displayed. Select the measures to be added by selecting
the corresponding checkboxes and clicking Use Selected Measures. The selected
measure is added with a suggested scale pre-selected. A different scale can be
selected if desired. Also, a criterion value must be provided for this measure before it
can be saved.
DRRS Software User Manual (SUM) 4.5.12
9-7
Creating a MET
Chapter 9: Build METL
Figure 9-9: Suggested Measures
4. Continue entering standards as needed, then click Save Standards when finished.
The standards for a MET can be edited or removed at a later time by returning to the Manage
Standards dialog.
9-8
DRRS Software User Manual (SUM) 4.5.12

Chapter 9: Build METL
Creating a MET
9.2.3
Manage Supporting Tasks
The Build METL module also supports the ability to add and manage supporting tasks at the
Staff Task, Subordinate Task, and Command Linked Task levels. When you click to the left of
a Command Task, the MET expands to reveal its supporting tasks level. Clicking this button
again collapses the MET, hiding the supporting tasks.
The same information is displayed at the Supporting Task level as at the Command Tasks level
with one difference: the Supporting Task level contains an additional column, Supporting Unit,
which identifies the units to which Subordinate and Command Linked Tasks are assigned.
9.2.3.1
Adding Staff Tasks
The procedure for adding Staff Tasks is nearly identical to the procedure for adding a MET at
the Command Task level. To add a Staff Task:
1. Expand a MET so that its supporting tasks level is shown.
Figure 9-10: Add Staff Task
2. Click the Add Task link at the far right of the Staff Task row.
3. Using the Choose Task dialog that appears, search for the task you wish to add:
a. Select the search criteria to search by Number, Title, Definition, or any combination.
b. Enter one or more keywords to search for (make sure the correct Search By settings
are selected).
c. Choose the precision of the search. ‘All’ returns any records that contain the keyword(s)
and ‘exact’ returns only exact matches.
d. Click
when you are finished entering your search criteria. A list of search
results will appear below your search.
4. Click
next to the task that you want to add. If the selected task is not currently
already in use in the selected unit’s METL, it will be automatically added as a unique Staff
Task. However, if this task is already assigned elsewhere in the selected unit’s METL, you
will be prompted to select whether to add this task as a unique task or to copy or link an
existing task. These options are described below.
UNIQUE STAFF TASKS
A unique Staff Task is an independent task with its own missions, conditions, and
standards. Modifications to this task do not affect any other tasks assigned to the METL
(even if the same task is used multiple times).
DRRS Software User Manual (SUM) 4.5.12
9-9
Creating a MET
Chapter 9: Build METL
LINKED AND COPIED STAFF TASKS
When the same task is being utilized multiple times in a single METL, the option of copying
or linking an existing Staff Task is made available. Copying a Staff Task means that all of
the details, missions, conditions, and standards associated with that task are applied to a
new Staff Task. These tasks are independent of each other and changes made to either
one will not affect the other.
Linking a Staff Task is similar to copying in that the details, missions, conditions, and
standards associated with the selected Staff Task are copied and applied to a new Staff
Task. The difference is that when linked, changes made to either Staff Task will affect both
instances of the Staff Task. The same task can be linked several times in a single METL.
So, why link Staff Tasks? Linking simplifies the process of maintaining a commonly used
Staff Task by allowing you to manage the details of all instances of this linked task as a
single item. When changes are made to the Staff Task through any of its locations, all
locations in that METL are updated.
For example, if MET1 has Staff Task A associated with it and MET2 links to Staff Task A,
any changes made to Staff Task A will be reflected in both MET1 and MET2 simultaneously.
Other METs may similarly be linked to Staff Task A and will also reflect those changes.
ADDING A LINKED OR COPIED STAFF TASK
To add a copied or linked Staff Task:
1. From the Link Staff Task dialog that appears following step 4 above, review the existing
tasks displayed and determine which one you would like to copy/link to.
2. Click either the Copy or Link icon next to the selected task. The selected task will be
added as chosen.
REMOVING A LINKED OR COPIED STAFF TASK
It is possible to remove any or all instances of a linked task. To remove a linked Staff Task:
1. Click either the Link icon or the Remove link on the Staff Task to be removed.
2. A list of the METs supported by the selected task will be displayed. Click the Remove
From link for each instance you wish to remove.
3. Click Close when finished.
5.
Continue the process of validating the Staff Task just as with a Command Task. For more
information, see Section 9.2.2: Validate the Command Task.
9-10
DRRS Software User Manual (SUM) 4.5.12
Chapter 9: Build METL
Creating a MET
9.2.3.2
Adding Subordinate and Command Linked Tasks
Build METL also gives you the ability to add Subordinate Tasks and Command Linked Tasks to
a MET. These are tasks performed by another unit upon which that MET is dependent. To add a
Subordinate or Command Linked task:
1. Click Add Task to the right of a Subordinate Tasks or Command Linked Tasks heading.
2. Using the Assign Task dialog that appears, search for the unit that will be conducting the
Subordinate or Command Linked Task by entering search criteria and clicking Search.
Figure 9-11: Assign Task
3. Click the Select button to the right of the desired unit and the tasks assigned to that unit will
be displayed.
4. Click Select beside the specific task that will be supporting your unit’s MET and that task
will be added as either a Subordinate Task or Command Linked Task.
9.2.3.3
Promoting and Demoting tasks
One other way to manage supporting tasks is by promoting or demoting them. This feature
allows you to either promote a Staff Task to a Command Task or demote a Command Task to a
Staff Task.
DEMOTING A COMMAND TASK
To demote a Command Task:
1. Find the Command Task you want to demote and click the corresponding Demote link,
located at the far right.
2. Select where to demote this task by find the Command Task under which it will be placed
and clicking the corresponding Select button.
The selected task will be demoted to a Staff Task under the specified Command Task. All
supporting tasks under the Command Task that was demoted will remain in the same
relationship (i.e., all Supporting Tasks are demoted along with their parent Command Task).
PROMOTING A STAFF TASK
Promoting a Staff Task is the reverse of demoting a Command Task. To promote a Staff Task,
find the Staff Task you wish to promote and click the corresponding Promote link located at the
far right. The Staff Task will become a Command Task, retaining its details, conditions, and
standards.
DRRS Software User Manual (SUM) 4.5.12
9-11
Validating METs
Chapter 9: Build METL
9.3
Validating METs
Once your METs have been added to the METL, they must be validated and have missions
associated with them. Only valid METs will be accessible in the assessment module.
When you click on a Mission row in any column that does not contain either a button or a
hyperlink, DRRS displays the MET validation panel at the bottom of the screen. This panel
contains three tabs, Details, Conditions, and Standards.
The circle icons in these tabs are colored red or green to represent one of two things:
Red: This MET has not met the requirements for validity based on the contents of this tab. The
"Valid" field in the View MET area will contain a red "NO" box.
Green: This tab’s contents meet the requirements for MET validity. The "Valid" field in the View
MET area should now contain a green "Yes" box.
Each tab contains a "hide" button. Clicking any of these buttons closes the MET validationpanel.
Each tab also contains an "edit or manage" button that allows you to modifythe values
contained in the tab.
9.3.1
Details tab
Details: Displays generic MET information such as the Task Title, Task Number, Custom Name,
POC, OPR, OCRs and Missions.
Requirements for Validity: The MET must have a Task, at least one OCR, an OPR, a POC,
and at least one mission selected.
9.3.2
Conditions tab
Conditions: Those variables of an operational environment or situation in which a unit, system,
or individual is expected to operate and that may affect performance.
Requirements for Validity: At least one condition with a corresponding Condition Descriptor
must be associated with this MET.
9.3.3
Standards tab
Standards are the performance measures, scale, operator, and criterion for the selected MET.
Requirements for Validity: At least one Standard must be associated with this MET.
The Standards tab has four parts:
• Performance Measure: title or description of the measure
• Scale: quantifier represented by types of measure such as percentages, ratings,
numbers, yes/no, and others.
• Operator: Boolean operator used for the auto-calculation function of the standard
assessment.
• Criterion: minimum acceptable level of execution for the task.
To validate Standards:
1. Click a MET.
2. Click the Standards tab to view Standards associated with this MET.
3. Select the Manage Standards button to add, edit, or delete standards for this MET.
9-12
DRRS Software User Manual (SUM) 4.5.12

Chapter 9: Build METL
Validating METs
9.3.3.1
Add Standards
There are three ways to add a standard to a selected task.
OPTION 1
1. Click the Add Standard button to create a customized standard for each task.
2. Enter a descriptive Performance Measure Title, choose a Scale from the drop down list,
select an Operator (determined by Scale selection).
3. Enter a Criterion based on the Scale selected. The green check mark to the right of your
standard allows you to validate the standard. When a standard is invalid, you will see a pop
up specifying the invalid field. Click OK and make changes as needed.
OPTION 2
1. Click the Add Suggested Measures button; a list of predefined measures will display. These
measure have been added from the Universal Joint Tasks List (UJTL).
2. Next select the check box of the measure you want to use.
3. Click the Use Selected Suggested measure button. Use the check validity check box to
make sure your standard is valid. Modify as needed, then click the Save Standards button.
To remove a standard, select its check box and click Remove Selected Standards. To
confirm, select Save Standards and you will return to the Build Metal window.
OPTION 3
1. Click the Add Custom Measures button; a list of predefined measures will display. Custom
Measures have been developed by other users for a specific standard -- this list will be
empty if no measures have been created for the standard.
2. Next select the check box of the measure you want to use.
3. Click the Use Selected Custom Measure button. Use the check validity check box to make
sure your standard is valid. Modify as needed, then click the Save Standards button. To
remove a standard, select its check box and click Remove Selected Standards.
DRRS Software User Manual (SUM) 4.5.12
9-13

Copy METL
Chapter 9: Build METL
9.4
Copy METL
The Copy METL function lets you import a METL from another unit into your primary unit of
interest.
1. Click ESORTS, then Build METL. Click
on the Build METL Toolbar to Search for a Unit.
Figure 9-12: Search for Unit by UIC or Name
2. In the Choose Unit window, search for the Unit that has created a METL you want to import.
Select to search by UIC or Name and enter keywords. Choose All or Exact.
3. When that Unit’s Mission list appears, select the Missions you want to copy, or select all
Missions with the check box in the Missions header.
Figure 9-13: Select Missions you want to copy
4. Click the Copy Selected Missions button. When the page refreshes, the Missions will
appear in your Mission Essential Task List.
Figure 9-14: Copied Missions
9-14
DRRS Software User Manual (SUM) 4.5.12

Chapter 9: Build METL
Copy METL
5. The OPR and POC information is intentionally left blank when you copy a mission to your unit. Click
the Details tab, then the Edit Details button to add OPR and POC information.
Figure 9-15: MET Tabs
Note: For a MET to be valid, Details, Conditions, and Standards tabs must have green indicator icons.
If a mission already exists in your METL, the METs currently associated with that mission will remain
affiliated with that mission.
DRRS Software User Manual (SUM) 4.5.12
9-15
Copy METL
Chapter 9: Build METL
This Page Intentionally Left Blank.
9-16
DRRS Software User Manual (SUM) 4.5.12
Chapter 10: Mission Assessment
Chapter 10: Mission Assessment
Mission Assessment, the final stage in the ESORTS workflow, is where the readiness capability
of a unit’s METL is assessed. The assessment at the individual MET level is used to identify the
appropriate assessment at the mission level. This assessment is used by force commanders to
ensure that warfighting requirements can be met effectively.
This chapter consists of the following topics:
• The Mission Assessment View
• Navigating Mission Assessment
• Assessing METs
• Assessing Missions
• Using Mission Snapshots
DRRS Software User Manual (SUM) 4.5.12
10-1

Mission Assessment View
Chapter 10: Mission Assessment
10.1
Mission Assessment View
The default view for the Mission Assessment screen is the Overall view. This view shows the
overall assessment rating for each mission the selected unit is associated with. It consists of 4
parts: Unit Selector, Mission Assessment Toolbar, METL Details, and MET Details (this area is
not visible in the Overall view and will be discussed in the following section).
Figure 10-1: Mission Assessment View
UNIT SELECTOR
The Unit Selector is the dropdown menu in the upper right corner. It shows the name and UIC of
the unit currently being viewed as well as the ESORTS Role you are currently assigned for that
unit. This information is important in that it tells you which unit you are viewing and how much
access you have to it.
The default unit in view for the Mission Assessment screen is your Primary Unit of Assignment.
The Unit Selector allows you to select other units, however, based on the group you currently
have selected in the Unit Selector. The Unit Selector will contain all of the individual units within
your selected group, allowing you to view the Mission Assessments for any of them. For more
information on selecting groups with the Unit Selector, see Section 5.1: Unit Selector.
MISSION ASSESSMENT TOOLBAR
The Mission Assessment Toolbar provides the navigational controls for Mission Assessment as
well as some additional tools. The table below describes these features.
Icon
Description
Exports the current METL to a file that can be opened in Microsoft Excel.
Exports the current METL to a file that can be opened in Microsoft Word.
Creates a printer-friendly view of the currently displayed METL by allowing you
to select which elements to print.
Gives you the ability to retrieve a unit snapshot, which is a “picture” of the unit’s
METL at a specific point in history. A snapshot is created when an assessment
is submitted for approval, a MET’s assessment is changed, or the
icon is
clicked.
Takes a snapshot of the current assessment condition of the unit METL. This is
saved in date/time format.
10-2
DRRS Software User Manual (SUM) 4.5.12
Chapter 10: Mission Assessment
Mission Assessment View
Icon
Description
The Mission drop-down filters the view based on the selected mission category.
Once the mission category filter is applies, a second dropdown menu will be
displayed in the Mission Assessment Toolbar’s, allowing you to select a specific
mission number. If a mission number is selected, a third and final dropdown will
appear allowing you to select an OPR. Each of these dropdowns will apply a
filter to the display.
MET DETAILS
The MET Details area provides detailed information for a selected MET, including the following:
assessment, missions, standards, conditions, comments, description, and training, formerly
shown on separate tabs. MET Details no longer display in the tab format -- a major change is
that all the MET details are displayed on one page.MET information display is described in more
detail in the MET Assessment section of this chapter. Clicking on the colored rating value for a
specific MET record will open a popup displaying detailed information about that MET and its
assessment.
DRRS Software User Manual (SUM) 4.5.12
10-3

Navigating Mission Assessment
Chapter 10: Mission Assessment
10.2
Navigating Mission Assessment
OVERALL VIEW
There are two views in the Mission Assessment tool. The first is the Overall view. This is the
default view when entering the Mission Assessment screen and shows all of the missions and
METS associated with the unit in view in a table layout. This table layout allows you to quickly
see which METs support each mission and the assessment values for both. From this view, you
can click on a MET assessment value to see the details of that assessment or you can click on
a mission number to enter the Mission view. This is where you will go to perform assessments.
MISSION VIEW
While the Overall view conveniently shows all missions, METs, and their assessment values, it
is the Mission view that provides the assessment capabilities. The Mission view, as the name
implies, is the view of a single mission. This view shows the METs associated with that mission
and their assessment values. There are two ways to access the Mission view from the Overall
view. One way to access the Mission view is to click on any of the mission numbers displayed
across the top of the Overall view.
Figure 10-2: Mission View Option 1
The other way to access the Mission view is to select a mission category from the Mission
dropdown in the Mission Assessment Toolbar and then select a mission number from the
dropdown that appears once a category has been selected. This technique is handy if you are
looking for missions of a specific category.
Figure 10-3: Mission View Option 2
Once a mission has been selected, the Mission view will display.
Figure 10-4: Selected Mission
This view still contains the Unit Assessment toolbar (notice there are a few more buttons
added), and the Unit Selector. Selecting a different unit from the Unit Selector will take you to
the overall view for that unit. The rest of the Mission view is dedicated to the mission and MET
information. In the upper right, just below the Unit Selector is the mission name and the current
10-4
DRRS Software User Manual (SUM) 4.5.12
Chapter 10: Mission Assessment
Navigating Mission Assessment
mission assessment value. This will be discussed in a later section, for now lets focus on the
MET information.
Each MET associated with the selected mission will be displayed below the Mission
Assessment Toolbar, much the same way as in the Build METL tool. Each record shows the
MET name, Command Task title, OPR, assessment value, and the last approved date of that
assessment. More importantly, by clicking on a MET record, you will open the MET Details
panel at the bottom of the screen. This MET Details panel provides the tools to enter new MET
assessments, approve previous assessments, and assess the standards and conditions of this
MET. Each of these is discussed in the following section.
DRRS Software User Manual (SUM) 4.5.12
10-5

Assessing METs
Chapter 10: Mission Assessment
10.3
Assessing METs
1. Click ESORTS | Mission Assessment, then select a Mission from the drop down list.
Figure 10-5: Mission: Core
2. Click a MET title to view the MET Number and Title, Standards, Assessments, and
Comments sections. MET standards must be reviewed in order to assess a MET.
Figure 10-6: MET Description and Standards
3. Enter an accessed value based on the scale and criterion for each MET. Including an
Observed Value and Date is not required.
4. Click Update All and the page refreshes, showing a status of Achieved or Not Achieved. If
the assessment value is Q or N, you must enter comments in the comments box below. The
assessed value of this task is automatically calculated based on the Standards assessment
for this MET.
5. To complete the MET assessment process choose your MET assessment value and
choose an anticipated assessment value with date when this assessment is expected. By
default this date is set for 30 days from the MET Assessment date; change this date if
needed.
6. Click the Save button.
10-6
DRRS Software User Manual (SUM) 4.5.12
Chapter 10: Mission Assessment
Assessing METs
10.3.1
Standards
The DRRS system will calculate if a MET standard(s) has been achieved and report the value in
a new field labeled Status, shown on the far right. The system will compare the user entered
Assessed Value to the Criterion specified for the standard. When the criterion is met, the system
will display "Achieved" and if the criterion is not met "Not Achieved." If for any reason the system
cannot determine if a criterion is met, "Cannot Evaluate" will be displayed.
In the Standards section, you can view or edit Conditions, Scale, Criterion, Assessed Value,
Observed Value and Date, Status and Update information.
10.3.1.1
Setting Standards for Command Task
Each standard is composed of four parts:
• Performance Measure: A subjective value, title/description of the measure.
• Scale: The scale of measure for this standard (e.g., annual visits, percent, tons, etc.).
• Operator: Less than or equals to/greater than or equals to
• Criterion: The minimum measure required for the standard (based on the scale).
10.3.1.2
Users have three options for adding Standards.
• Add Standard manually
• Add Suggested Measures
• Add Custom Measures
Click the Add Standard button to create a new blank standard record. Enter a performance
measure, Scale, and Operator for that measure. Then enter the measurement criterion based
on that scale. Click the Green check mark button to set the standard.
•
Performance Measure: All Standards or Performance Measures are added in the
Build METL module of METL.
•
Conditions: These are variables of what needs to happen to accomplish the overall
mission. Click the icon here to assign condition descriptors for previously made
assessments. Some conditions may not be applicable to the MET and if so, the user
can uncheck the descriptors.
•
Scale: Each measure has a scale. It is a measure of type measure, what increments
such as Annually, Percentage, etc. The five scale measures are: Time, Yes/No,
Percentage, Number, and Currency. Annually will be measured as a number,
Percentage will be a number, Time will be measured as Time format, and so on.
•
Criterion: These are the values needed to make the measure is achieved. Example:
Number of ammunitions = 100. If 100 ammunitions are not met then the Performance
Measure is not achieved. Criterion are entered in the Build METL module of METL.
•
Assessed Value: This is entered in from the MET details part of Mission Assessment.
Assessed value of the Performance Measure/standard is the actual assessment of the
measure. For example: Number of ammunitions >= 100 Assessed value is 95. Then
Status is Not Achieved.
•
Observed Value and Date: enter these using the calendar feature to select the date.
•
Status: In the Standards section, the DRRS system calculates if a MET standard has
been achieved and reports the value in a new field labeled Status. The system will
compare the user entered Assessed Value to the Criterion specified for the standard.
When the criterion is met, the system will display “Achieved” and if the criterion is not
met “Not Achieved.” If for any reason the system cannot determine if a criterion is met,
“Can Not Evaluate” will be displayed.
DRRS Software User Manual (SUM) 4.5.12
10-7
Assessing METs
Chapter 10: Mission Assessment
• Update: This date is shown when any changes are saved to each or all performance
measures. For example, if a user only changes 2 of 15 Performance Measure values
and selects the save button of each, then the date will be current for only those two
saved. If the user selects the Update All button then all the measures will be saved and
all will show the current date. This is similar to the work flow where all standards must
be current and achieved before saving a MET.
10.3.1.3
Standards Based Met Assessment Calculation
The Standard Assessment calculation is invoked when a user selects a MET to view or when
the user updates their Standard assessment information.
The DRRS system will display this new Standards Based Assessment for a MET determined by
the status of the associated Standard’s assessment. The following table defines the business
rules:
Table 10-1: Standards Based MET Assessment Rating Calculation.
Standard Assessment Status
Standards Based MET Assessment
One or more standards with a status Not
No/Red
Achieved
All standards with a status of Achieved
Yes/Green
All standards with a status of Cannot
Yes/Green
Evaluate
Combination of Cannot Evaluate and
Yes/Green
Achieved
10.3.1.4
Standards Based MET Assessment Calculation Periodicity
The calculation will be made whenever the Standard performance data is updated. The
Standards Based Date will equal the most current date a Standard assessment was entered.
For the case no Standard assessment data is available the date will display the date the user
views the MET. This case applies to the Navy currently.
Note: A comment is required when the Standards Based MET Assessment has a value of “N” or “Q.”
10.3.2
Approving MET Assessments
When a new MET assessment is created, it is created with a draft status. This means that it has
yet to be approved. Unit Commanders and Unit Administrators have the ability to approve
assessments. Also, Unit Users have the ability to approve assessments for METs assigned to
their OPR.
If an approved MET assessment is changed, the assessment is returned to draft status and
must be approved again. Draft assessments are not visible to users with a different Unit of
Interest. They will only be able to see the last approved assessment, if there is one.
To approve a MET assessment:
• User must have all Performance Measures Achieved or in Cannot evaluate.
• All Performance Measures must be updated or current.
• Anticipated date must be set current (at minimum) or in the future.
• User will save the MET.
10-8
DRRS Software User Manual (SUM) 4.5.12
Chapter 10: Mission Assessment
Assessing METs
• Then User can Approve when button is enabled.
DRRS Software User Manual (SUM) 4.5.12
10-9
Assessing Missions
Chapter 10: Mission Assessment
10.4
Assessing Missions
After the METs supporting a specific mission have all been assessed, the mission itself can be
assessed based on those MET assessment values. This can only be done by users with the
ESORTS Commander role.
10.4.1
Adding Mission Assessments
To access the mission assessment tool, navigate to the Mission view for the mission to be
assessed. The mission name and current assessment value will be displayed in the upper right
corner. Clicking the colored assessment block will open the mission assessment dialog, which is
similar to the MET assessment dialog.
To add a new mission assessment:
1. Select a value from the New Rating column. This selection will be shown as the current
mission assessment value.
2. Select a value from the Next Rating column.
3. Enter a date in the Est. Change Date field. This date reflects the date of the anticipated
rating.
4. Click the checkbox next to any comment category to reveal a text field where comments can
be entered. Enter comments for any or all categories.
5. Click Save Changes.
The assessment values are applied to the selected mission as a draft assessment. This is
denoted by an asterisk next to the rating value. An assessment can be edited by returning to
this screen and modifying the entries. It can also be removed by returning and clicking the
Remove Assessment button.
10.4.2
Approving Mission Assessments
When a new mission assessment is created, it is created with a draft status. This means that it
has yet to be approved by the Unit Commander. If an approved mission assessment is
changed, the assessment is returned to draft status and must be approved again. Draft
assessments are not visible to users with a different Unit of Interest. They will only be able to
see the last approved assessment, if there is one.
To approve a mission assessment:
1. Navigate to the Mission view.
2. Open the mission assessment dialog as described in the section above.
3. Review the assessment and click Approve to finalize it.
The status of the assessment changes from Draft to Approved and the assessment is now
visible to all DRRS users.
Note: Only Unit Commander roles can approve unit missions. Also, MET approval can only occur if all
METs associated with the unit mission are current within 30 days and all METs have an assessment.
10-10
DRRS Software User Manual (SUM) 4.5.12

Chapter 10: Mission Assessment
Using Mission Snapshots
10.5
Using Mission Snapshots
The system automatically takes snapshots of your METL every time a Mission Assessment is
approved. But you can also choose to take a snapshot manually at any time clicking the
snapshot (camera) icon in the toolbar. The Magnifying Glass and Camera icons allow you to
retrieve a unit snapshot, or "picture" of the unit's METL at a specific point in time. To Browse
snapshots, click the camera icon, enter begin and end dates you want to search, then click Find
Snapshots.
The presentation tool opens a window based on your current display to presentation mode,
designed for full-screen or overhead displays.
DRRS Software User Manual (SUM) 4.5.12
10-11
Using Mission Snapshots
Chapter 10: Mission Assessment
10-12
DRRS Software User Manual (SUM) 4.5.12
Chapter 11: Current Unit Status
Chapter 11: Current Unit Status
The Current Unit Status (CUS) module allows users to manage unit-specific readiness data and
submit required reports. The tool is used to implement the GSORTS to ESORTS transition plan
by enabling users to submit their unit's required readiness reports. CUS is designed to provide
the Unit Commander the opportunity to update his unit's availability, personnel, equipment
rosters, and training status before assessing his Mission Essential Task List (METL).
CUS relies heavily on concepts and data from the ESORTS module in order to accomplish its
functionality, therefore a working knowledge of ESORTS is expected when working with CUS.
For that reason, this chapter assumes an established understanding of these concepts in order
to avoid reiterating content. For more information about ESORTS, refer to Chapter 6: About
ESORTS.
CUS also utilizes the Unit Selector in order to determine which unit details to display. For more
information on using the Unit Selector, refer to Chapter 5: Working with Groups and Units.
This chapter defines the CUS functions contained in the following tabs:
• Unit Summary Tab
• METL Tab
• Personnel Tab
• Crews (Inactive)
• Equipment Tab
• Ordnance (Inactive)
• Training Tab
• Mobilization (Inactive)
• ART (available to Air Force)
• Top Concerns Tab
DRRS Software User Manual (SUM) 4.5.12
11-1
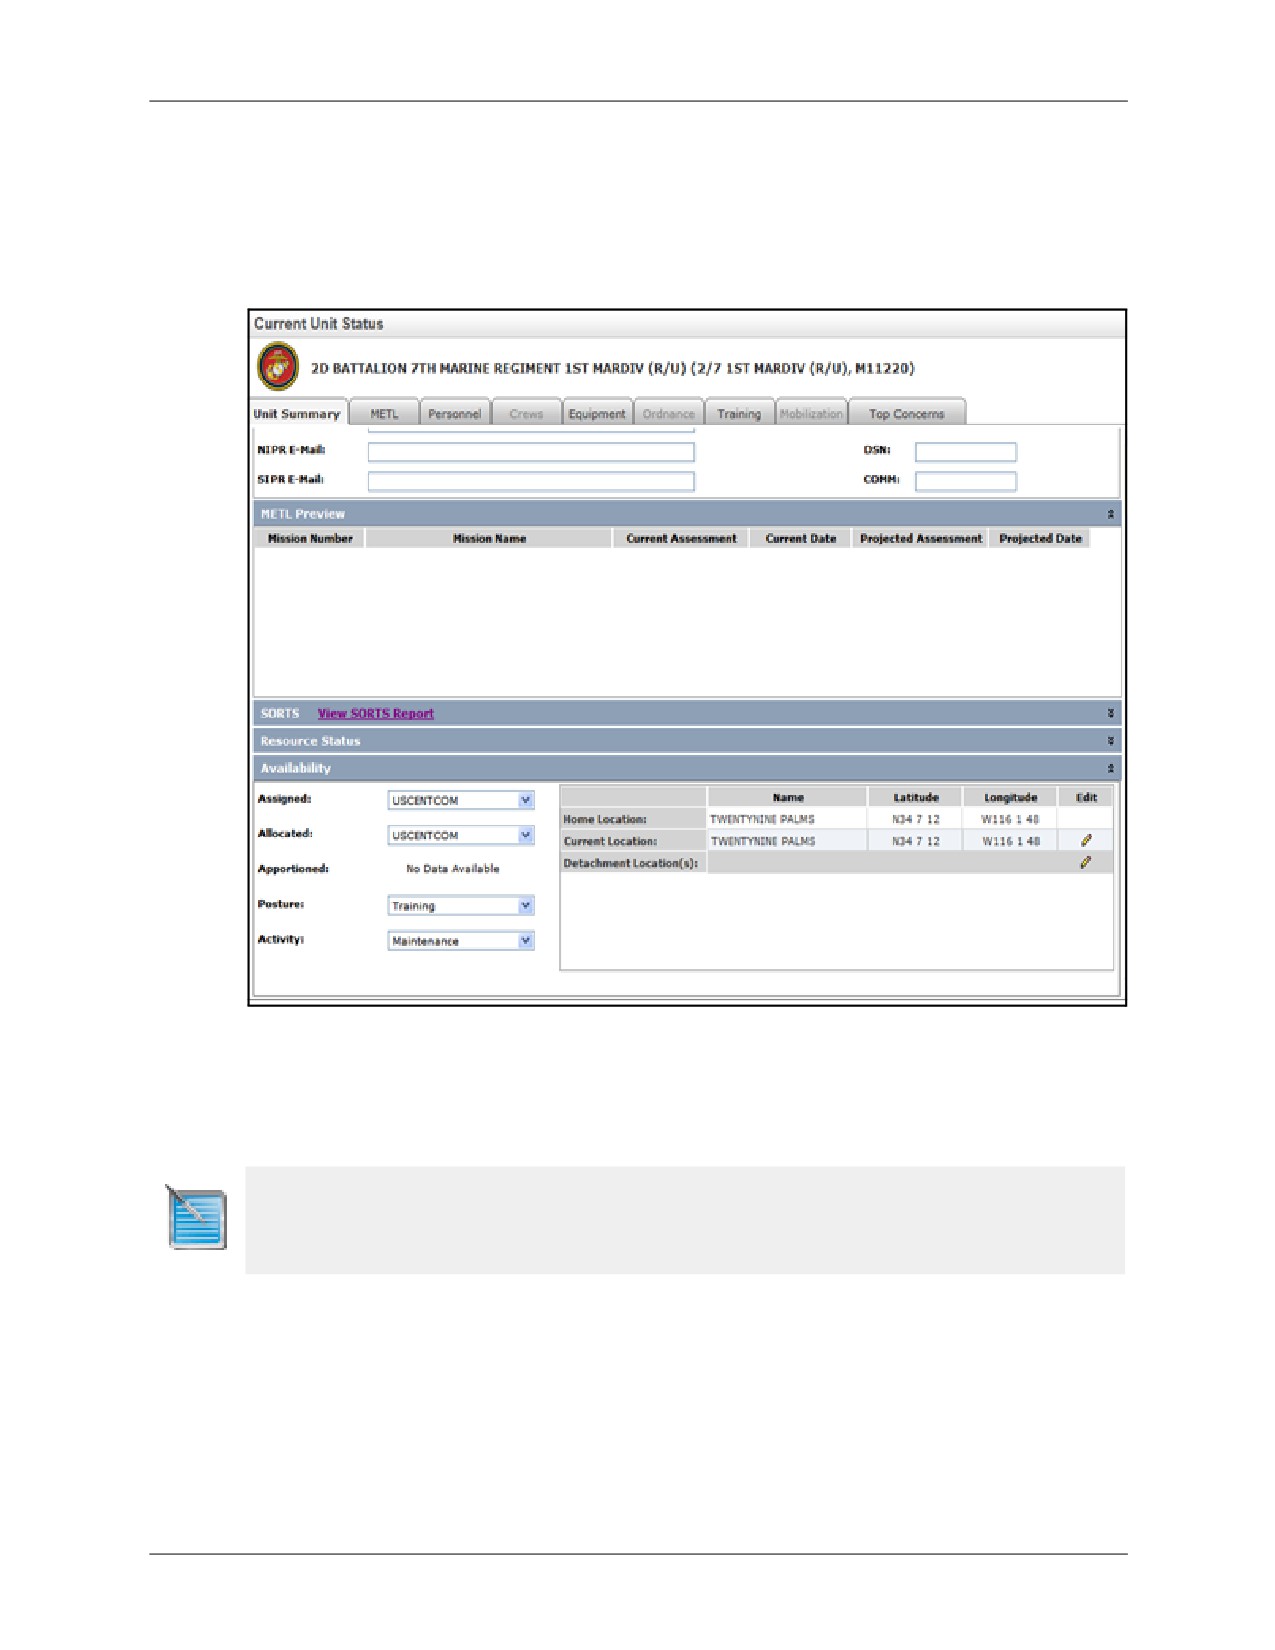
Accessing CUS
Chapter 11: Current Unit Status
11.1
Accessing CUS
To access CUS, select ESORTS | Current Unit Status from the Main menu. Using the Unit
Selector, you may select the unit to be viewed, however, you will only be able to edit your Unit of
Assignment. When a unit’s information is displayed, you will see an indicator showing under
which role you have access to the selected unit.
Figure 11-1: Unit Summary Tab
The default display page is the Unit Summary Tab. This displays information about the selected
unit, including the Unit Commander, METL details, and Availability details. This tab is described
in more detail in the following section.
Note: Only users with JFRR permission for their units of interest will see the Top Concerns tab
when navigating to their CUS page.
11-2
DRRS Software User Manual (SUM) 4.5.12

Chapter 11: Current Unit Status
Unit Summary Tab
11.2
Unit Summary Tab
The Unit Summary Tab contains six main areas, Unit Banner, Unit Summary Details, METL
Preview, SORTS, Resource Status, and Availability. These areas are discussed in detail in the
following sections.
11.2.1
Unit Banner
The Unit banner displays the AName and UIC of the unit in view.
Figure 11-2: Unit Banner
11.2.2
Unit Summary Details
Figure 11-3: Unit Summary Details
The top portion of the Unit Summary Tab, the Unit Summary Details area, displays general
information about the Selected Unit including:
• Unit Commander*
• Point of Contact Name*
• Point of Contact NIPR & SIPR Email*
• Point of Contact DSN & COMM Phone Numbers*
The items marked with an asterisk above are editable in the Unit Summary Details panel by
entering an updated value as needed.
This tab also provides the ability to restore the ESORTS point of contact data for this unit. Select
the Restore ESORTS POC Data checkbox and the unit data will be updated with the
information from the first MET in the METL for the selected unit. When finished making
changes, be sure to click the Save button located in the footer of the tab.
Note: Only users with Unit Commander or Unit Admin permissions will see the Restore ESORTS POC
Data checkbox.
11.2.3
METL Preview
The METL Preview area tracks current and projected mission assessments by Mission Number,
Mission Name, Current Date and Projected Date. Mission dates in red signify assessments 35+
days overdue.
DRRS Software User Manual (SUM) 4.5.12
11-3

Unit Summary Tab
Chapter 11: Current Unit Status
Figure 11-4: Unit Summary Tab METL Preview
11-4
DRRS Software User Manual (SUM) 4.5.12

Chapter 11: Current Unit Status
Unit Summary Tab
11.2.4
SORTS
The SORTS tab displays the Personnel, Equipment, Equipment Condition, and Training levels
for the selected unit as well as the date of the last assessment.
Figure 11-5: SORTS Area
Click the View SORTS Report link for additional information.
Figure 11-6: View SORTS Report (visible to AF and MC units only)
11.2.5
Resource Status
The resource status area shows a roll-up of the selected unit’s Personnel and Equipment data.
Figure 11-7: Resource Status Area
11.2.6
Availability
The Availability area provides detailed location information about your Unit of Assignment.
DRRS Software User Manual (SUM) 4.5.12
11-5

Unit Summary Tab
Chapter 11: Current Unit Status
Figure 11-8: Unit Summary Tab Availability Details
The Assigned, Allocated, Posture, and Activity values can be modified using their corresponding
dropdown menus.
Other values, such as location information are editable by clicking the Edit (pencil) icon. The
following sections describe how these items can be Edit Activity
11.2.6.1
Locations
Figure 11-9: Locations
HOME LOCATION
Read-only. Cannot be modified.
CURRENT LOCATION
Current Location indicates where the selected unit is presently located. It can only be changed
for your Unit of Assignment.
To change the current location:
1. Click the Edit (pencil) icon next to Current Unit Location.
2. Use the search filtering fields to find a location by lat/long coordinates or by name or
embarkment date. Enter a Location Code, UIC, Name, date, or coordinates in the
corresponding field and click Search to find locations matching your criteria.
11-6
DRRS Software User Manual (SUM) 4.5.12