Kia Rio / Rio Hatchback (2022 year). Manual in english - page 21
Maintenance
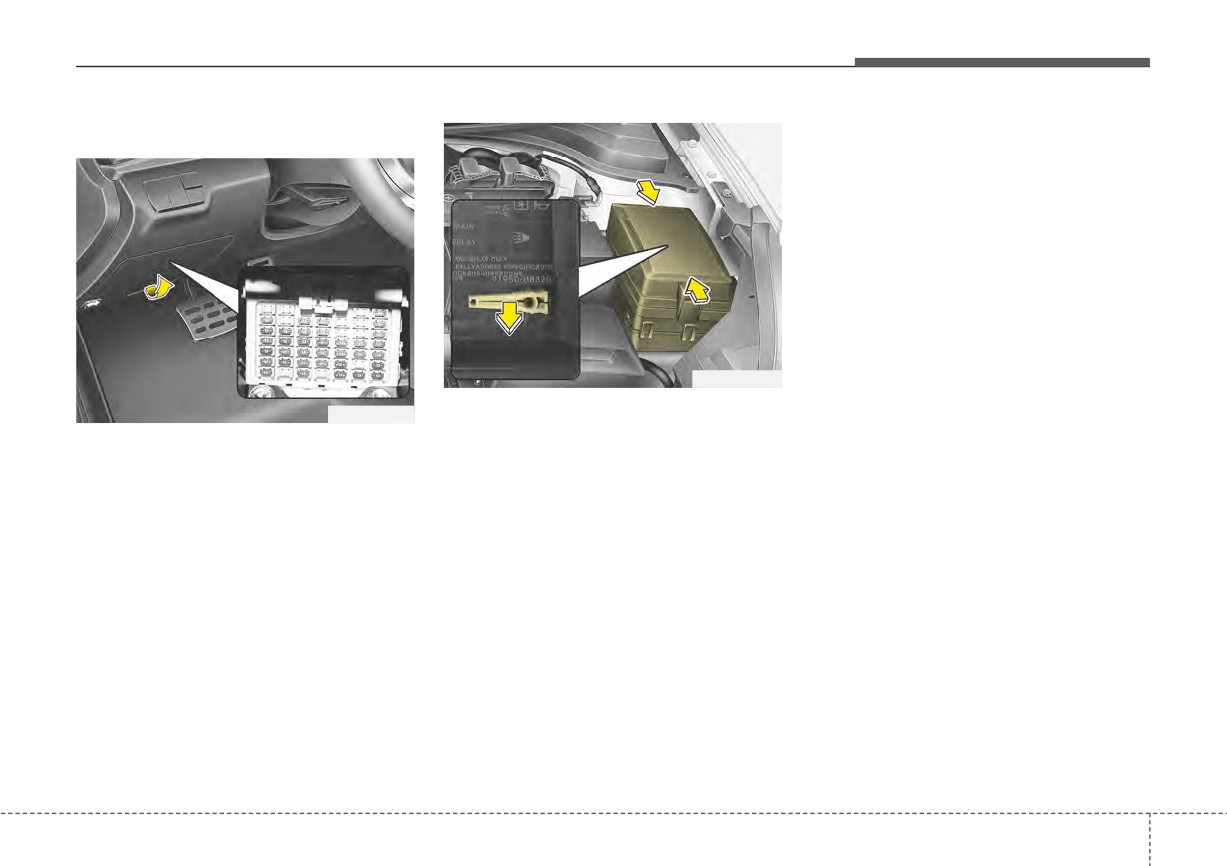
Inner panel fuse replacement
If you do not have a spare, use a
fuse of the same rating from a circuit
you may not need for operating the
vehicle, such as the power outlet
fuse.
If the head lamp, turn signal lamp,
stop signal lamp, fog lamp, DRL, tail
lamp, HMSL do not work and the
fuses are OK, check the fuse panel
in the engine compartment. If a fuse
is blown, it must be replaced.
OYB076027
3. Pull the suspected fuse straight
✽ NOTICE
OYB076026
out. Use the removal tool provided
If the headlamp, fog lamp, turn signal
1. Turn the ignition switch and all
on the engine compartment fuse
lamp, or tail lamp malfunction even
other switches off.
panel cover.
without any problem to the lamps,
2. Open the fuse panel cover.
4. Check the removed fuse; replace it
have the vehicle checked by an
If the switch is located in the “OFF”
if it is blown.
authorized Kia dealer for assistance.
position, a caution indicator will be
Spare fuses are provided in the
displayed in the cluster.
engine compartment fuse panel.
5. Push in a new fuse of the same
rating, and make sure it fits tightly
in the clips.
If it fits loosely, consult an authorized
Kia dealer.
7
59
Maintenance
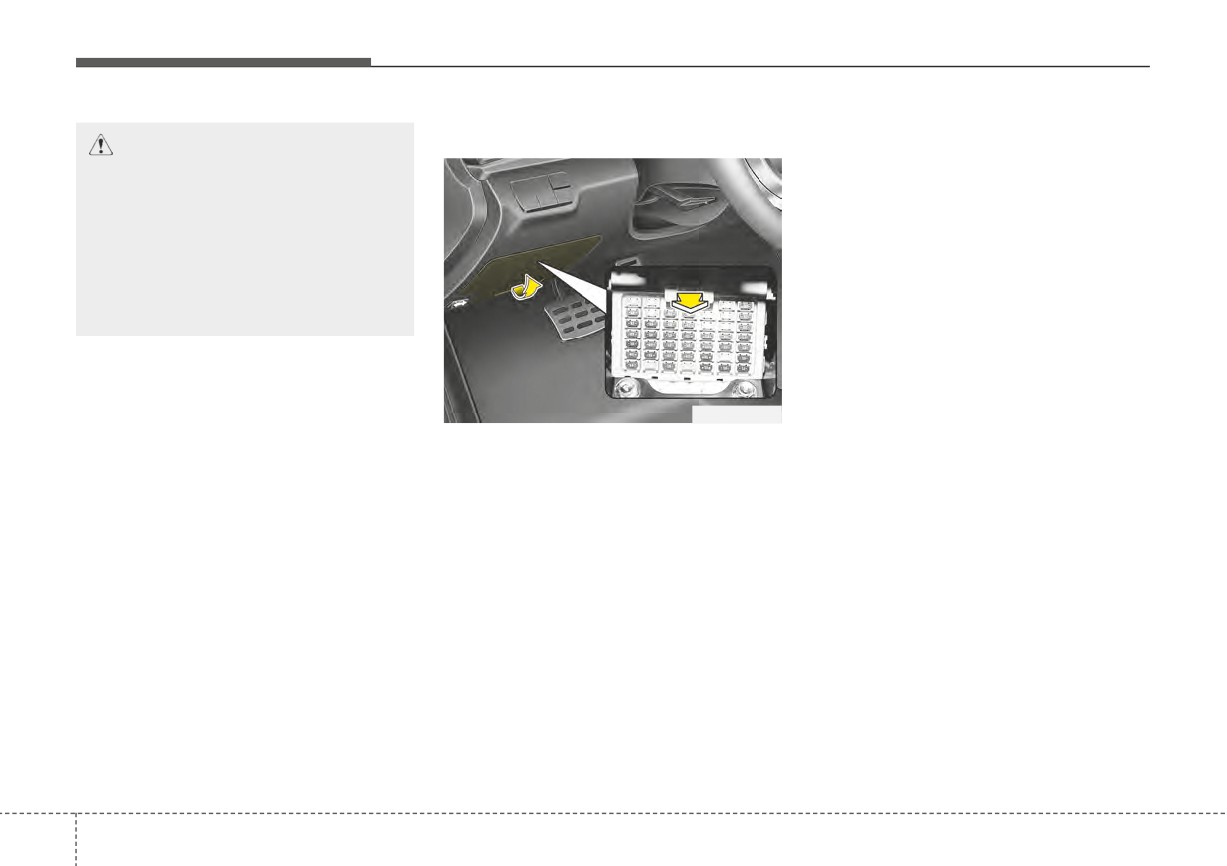
Memory fuse
If the memory fuse is pulled up from
CAUTION -
Fuse Panel
the fuse panel, the warning chime,
Covers
audio, clock and interior lamps, etc.,
The contact points of the
will not operate. Some items must be
switches may wear out with
reset after replacement. Refer to
excessive use. Please refrain
“Battery” in this section.
from excessive use of the
Even though the memory fuse is
switches (except for long-term
pulled up, the battery can still be dis-
parking for over 1 month).
charged by operation of the head-
lights or other electrical devices.
✽ NOTICE
• Set all switches to ON before driv-
OYB076037
ing.
• If the vehicle is going to be unused
Your vehicle is equipped with the
for over 1 month, set all switches
memory fuse to prevent battery dis-
to OFF to prevent the batteries
charge if your vehicle is parked with-
from draining.
out being operated for prolonged
periods. Use the following proce-
dures before parking the vehicle for
prolonged periods.
1. Turn off the engine.
2. Turn off the headlights and tail
lights.
3. Open the driver’s side panel cover
and pull up the memory fuse.
7
60
Maintenance
Engine compartment fuse
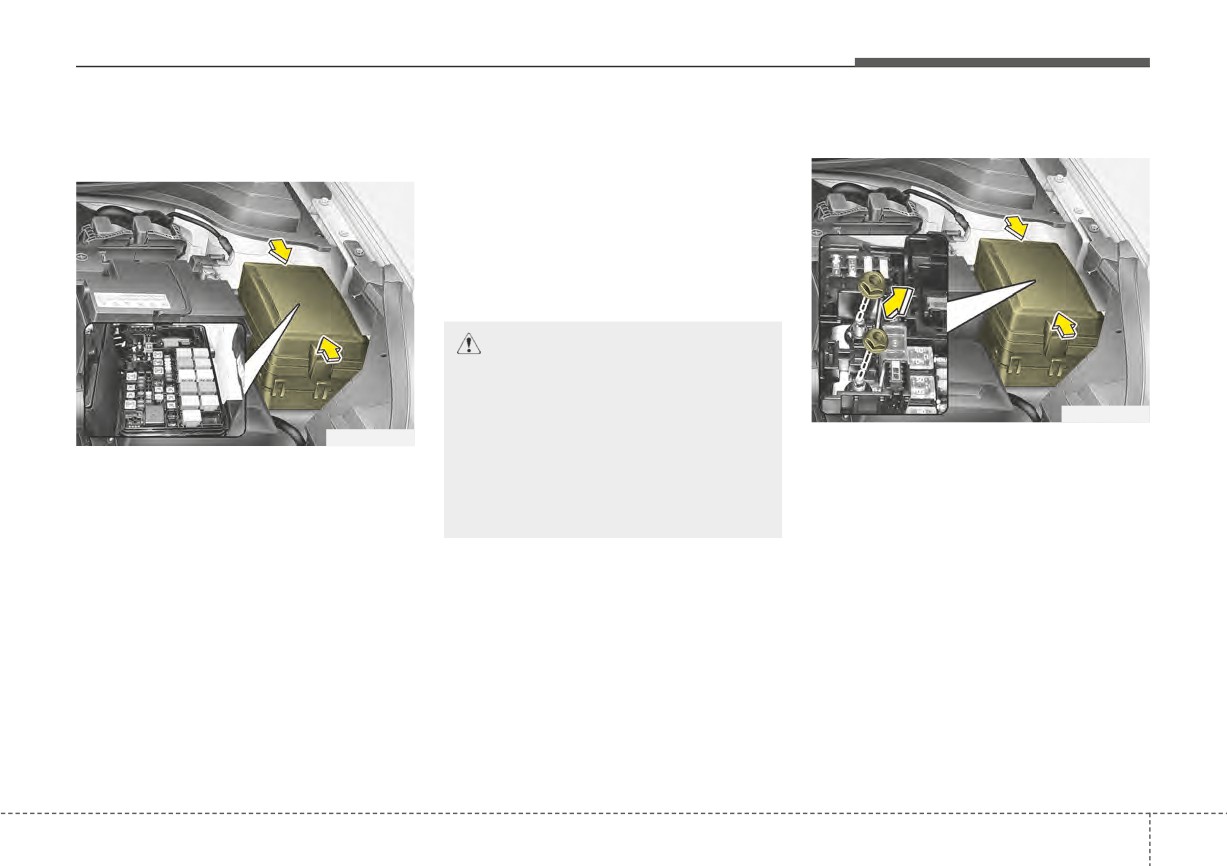
3. Check the removed fuse; replace it
Multi fuse
replacement
if it is blown. To remove or insert
the fuse, use the fuse puller in the
engine compartment fuse panel.
4. Push in a new fuse of the same
rating, and make sure it fits tightly
in the clips. If it fits loosely, consult
an authorized Kia dealer.
CAUTION
After checking the fuse panel in
the engine compartment,
OYB076029
securely install the fuse panel
OYB076028
cover through the audible click-
If the multi fuse is blown, it must be
ing sound.
removed as follows:
1. Turn the ignition switch and all
other switches off.
If not, electrical failures may
1. Turn off the engine.
occur from water contact.
2. Remove the fuse panel cover by
2. Disconnect the negative battery
pressing the tab and pulling the
cable.
cover up. When the blade type
3. Remove the nuts shown in the pic-
fuse is disconnected, remove it by
ture above.
using the clip designed for chang-
4. Replace the fuse with a new one
ing fuses located in the engine
of the same rating.
compartment fuse box. Upon
removal, securely insert reserve
5. Reverse these steps to reinstall
fuse of the same rating.
the multi fuse.
7
61
Maintenance
✽ NOTICE - Window tinting pre-
CAUTION
CAUTION - Random
caution
wiring prohibited when
Do not disassemble nor assem-
Window tint(especially metallic
ble the multi fuse when it is
retrofitting equipment
film) might cause communication
Use of random wiring in the
secured with nuts and bolts.
disorder or poor radio reception,
vehicle might cause danger due
Incorrect or partial assembly
and malfunction of the automatic
torque may cause a fire. Have
to failure and damage of the
lighting system due to excessive
the vehicle checked by an
vehicle’s performance.
change of illumination inside the
authorized Kia dealer.
Using random wires especially
vehicle. The solution used might also
when retrofitting AVN or theft
flow into electric, electronic devices
alarm system, remote engine
causing disorder and failure.
CAUTION
control, car phone or radio
Visually inspect the battery cap
might damage the vehicle or
to ensure it is securely closed.
cause fire.
If the battery cap is not securely
closed, moisture may enter the
system and damage the electri-
CAUTION - Remodeling
cal components.
Prohibited
Do not try remodeling the vehi-
cle in any way. It is illegal, and
may affect the vehicle's perform-
ance, durability, and safety. The
manufacturer's warranty does
not cover any problems caused
by remodeling. Remodeling the
vehicle can cause malfunction of
the vehicle, wiring damage, bat-
tery discharge, connector dam-
age, or fire.
7
62
Maintenance
Fuse/relay panel description
Driver’s side fuse panel
OYB076030
Inside the fuse/relay panel covers,
you can find the fuse/relay label
describing fuse/relay name and
capacity.
OSC070008N
✽ NOTICE
Not all fuse panel descriptions in
this manual may be applicable to
your vehicle. It is accurate at the
time of printing. When you inspect
the fuse panel in your vehicle, refer
to the fuse panel label.
7
63
Maintenance
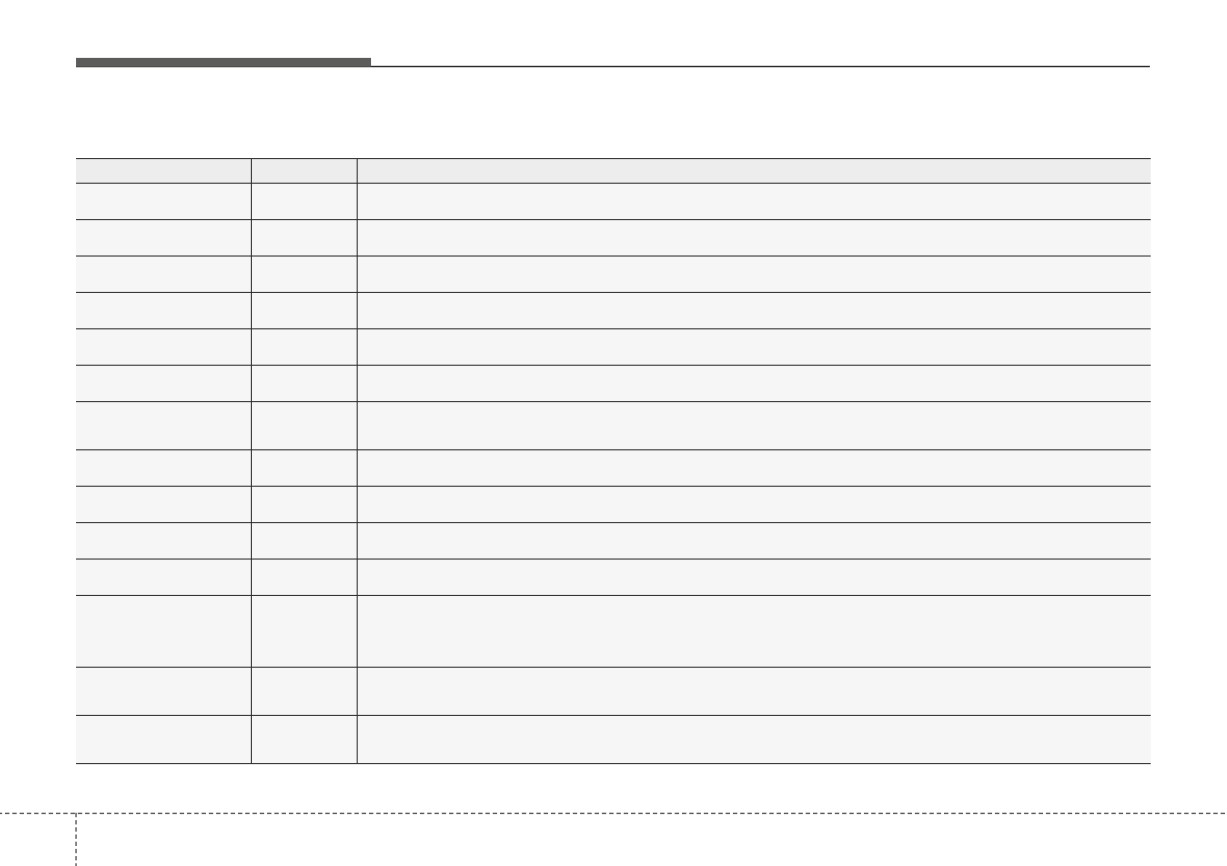
Instrument panel (Driver’s side fuse panel)
Fuse Name
Fuse rating
Circuit Protected
DOOR LOCK
20A
Tail Gate Unlock Relay, Door Lock/Unlock Relay, Two Turn Unlock Relay
POWER OUTLET
20A
Power Outlet
SAFETY P/WINDOW
25A
Driver Safety Power Window Module
STOP LAMP
15A
Stop Signal Electronic Module
T/SIGNAL LAMP
15A
BCM (Body Control Module), SLM (Seat Belt & Lighting Module)
C/LIGHTER
20A
Cigarette Lighter
HEATED
Driver Power Outside Mirror, Passenger Power Outside Mirror, Air Conditioner Control Module, ECM
10A
MIRROR
(Engine Control Module)/PCM (Power train Control Module)
DRL2
10A
BCM (Body Control Module)
P/WINDOW RH
25A
Power Window Main Switch, Passenger Power Window Switch
S/HEATER
20A
Front Seat Warmer Control Module
DRL1
10A
-
With Immobilizer : ECM (Engine Control Module)/PCM (Power train Control Module), Engine Room
START
7.5A
Junction Block(Start Relay), Smart Key Control Module, Ignition Lock Switch, Transaxle Range Switch
Without Immobilizer : Burglar Alarm Relay
Head Lamp Right Handle side, Rear Combination Lamp (OUT) Right Handle side, License Lamp Right
TAIL LAMP RH
7.5A
Handle side, Rear Combination Lamp (IN) Right Handle side, Illumination (+)
BCM (Body Control Module), Blind-Spot View Monitor Left Handle side/Right Handle side, Crash Pad
MODULE2
10A
Switch, Front View Camera
7
64
Maintenance
Fuse Name
Fuse rating
Circuit Protected
Engine Room Junction Block(Back-Up Lamp Switch), Automatic Transmission Shift Lever, Position
TCU
15A
Switch, Stop Lamp Switch
P/WINDOW LH
25A
Power Window Main Switch
SPARE1
25A
Spare
FOG LAMP REAR
10A
-
HEATED STEERING
15A
Steering Wheel Heated
Head Lamp Left Handle side, License Lamp Left Handle side, Rear Combination Lamp (OUT) Left
TAIL LAMP LH
7.5A
Handle side, Rear Combination Lamp (IN) Left Handle side, Glove Box Lamp
Front Seat Warmer Control Module, Audio, Electro Chromic Mirror, Air Conditioner Control Module,
MODULE3
7.5A
Audio/Video & Navigation Head Unit, Clock Spring, Automatic Transmission Shift Lever indicator
ABS
7.5A
Data Link Connector, ESC (Electronic Stability Control) Module
BRAKE SWITCH
10A
Stop Lamp Switch, Smart Key Control Module
SPARE4
15A
Spare
FOG LAMP FRONT
15A
Front Fog Lamp Relay
A/C1
7.5A
Engine Room Junction Block(Blower Relay), Air Conditioner Control Module
Engine Room Junction Block(Head Lamp Relay, Head Lamp Hi Relay), Rain Sensor, Sunroof Motor,
MODULE5
10A
Front Seat Warmer Control Module, Driver Safety Power Window Module
MODULE7
10A
TPMS (Tire Pressure Monitoring System) Unit
ECU
10A
ECM (Engine Control Module)/PCM (Power train Control Module)
7
65
Maintenance
Fuse Name
Fuse rating
Circuit Protected
SUNROOF
15A
Sunroof Motor
IMMO
10A
Immobilizer Module
MODULE6
10A
Key Solenoid
SPARE2
10A
Spare
MODULE4
7.5A
SLM (Seat Belt & Lighting Module), BCM (Body Control Module), Smart Key Control Module
SMART KEY2
10A
Immobilizer Module, Smart Key Control Module
AIR BAG
10A
ACU (Airbag Control Unit), Passenger Occupant Detection Sensor
MODULE1
7.5A
BCM (Body Control Module), SLM (Seat Belt & Lighting Module), Key Interlock
SMART KEY
25A
Smart Key Control Module
A/C2
7.5A
Blower Module
WIPER RR
15A
Multifunction Switch, Rear Wiper Motor, Rear Wiper Relay
WIPER FRT
25A
Multifunction Switch, Front Wiper Motor, Engine Room Junction Block(Wiper Low Relay)
Power Outlet Relay, BCM (Body Control Module), SLM (Seat Belt & Lighting Module), Audio, Key Interlock,
ACC
10A
Audio/Video & Navigation Head Unit, USB Charging Connector, Power Outside Mirror Switch, Smart Key
Control Module
7
66
Maintenance
Fuse Name
Fuse rating
Circuit Protected
SPARE3
20A
Spare
A/BAG IND
7.5A
Instrument Cluster, Center Fascia Switch
CLUSTER
7.5A
Instrument Cluster
MDPS
7.5A
MDPS (Motor Driven Power Steering) Unit
AUDIO
20A
Audio, Audio/Video & Navigation Head Unit
Room Lamp Relay, Glove Box Lamp, Overhead Console Lamp, Air Conditioner Control Module, SLM (Seat
Belt & Lighting Module), BCM (Body Control Module), Auto Light & Photo Sensor, TPMS (Tire Pressure
ROOM LAMP
10A
Monitoring System) Unit, Front Vanity Lamp Left Handle side/Right Handle side, Instrument Cluster, Data
Link Connector, Room Lamp, Trunk Room Lamp
7
67
Maintenance
Engine compartment fuse panel
OYB076031
OSC070012N
7
68
Maintenance
Engine room compartment fuse panel
Fuse Name
Fuse rating
Circuit Protected
MDPS
80A
MDPS (Motor Driven Power Steering) Unit
ALT
150A
Fuse - ABS1, BAS2, BLOWER, REAR HEATED
REAR HEATED
40A
Instrument Panel Junction Block (Rear Defogger Relay)
ABS1
40A
ESC (Electronic Stability Control) Module
ABS2
40A
ESC (Electronic Stability Control) Module
BLOWER
40A
Blower Relay
[With BCM (Body Control Module)] Front Wiper Motor, Multifunction Switch,
WIPER
10A
[With Out BCM (Body Control Module)] Wiper Low Relay
ECU4
15A
ECM (Engine Control Module)/PCM (Power train Control Module)
Oil Control Valve #1/#2, Cooling Fan1/2 Relay, Oxygen Sensor (Up), Oxygen Sensor (Down), Variable
SENSOR
10A
Intake Solenoid Valve, Air Conditioner Relay, Purge Control Solenoid Valve, Canister Close Valve
ECU2
15A
ECM (Engine Control Module)/PCM (Power train Control Module)
ECU3
20A
ECM (Engine Control Module)/PCM (Power train Control Module)
HEAD LAMP RH
10A
Head Lamp Right Handle side
HEAD LAMP LH
10A
Head Lamp Left Handle side
IGN COIL
20A
Ignition Coil #1~#4
ECU5
15A
ECM (Engine Control Module)/PCM (Power train Control Module), Fuel Pump Relay, Injector #1~#4
7
69
Maintenance
Fuse Name
Fuse rating
Circuit Protected
B/UP LAMP
10A
Back-Up Lamp Switch
Instrument Panel Junction Block (Fuse - DRL2, FOGLAMP FRONT, STOP LAMP, MODULE6, Power
B+1
40A
Connector (AUDIO, ROOM LAMP))
Instrument Panel Junction Block (Fuse - IMMO, SMART KEY, BRAKE SWITCH, SAFETY P/WINDOW,
B+2
50A
S/HEATER, SUNROOF, Power Window Relay)
IG2
40A
Ignition Switch, IG2 Relay, Start Relay
COOLING FAN
40A
Cooling Fan1/2 Relay
ECU1
30A
Fuse - ECU3, ECU4, Main Relay
HEAD LAMP
20A
Head Lamp Relay
With CANADA DRL : SLM(Seat Belt & Lighting Module) or BCM(Body Control Module)
H/LAMP HI
20A
Without CANADA DRL : Head Lamp HI Relay
FUEL PUMP
20A
Fuel Pump Relay
HORN
15A
Horn Relay/ Burglar Alarm Horn Relay
A/C
10A
Air Conditioner Relay
AMS
10A
Battery Sensor
B+3
40A
Instrument Panel Junction Block (Fuse - T/SIGNAL LAMP, DOOR LOCK, Tail Lamp Relay)
Start Relay, [With Smart Key] IG1 Relay, ACC Relay,
IG1
40A
[With Out Smart Key] Ignition Switch
POWER OUTLET
40A
Instrument Panel Junction Block (Power Outlet Relay)
7
70
Maintenance
Relay
Relay Name
Type
Main Relay
MINI
Start Relay
MICRO
Fuel Pump Relay
MICRO
Wiper HI Relay
MICRO
H/Lamp HI Relay
MICRO
Cooling Fan2 Relay
MICRO
B/Alarm Horn Relay
MICRO
Blower Relay
MICRO
Cooling Fan1 Relay
MICRO
Wiper LO Relay
MICRO
Head Lamp Relay
MICRO
Horn Relay
MICRO
A/C Relay
MICRO
7
71
Maintenance
LIGHT BULBS
Bulb replacement precaution
Use only bulbs of the specified
• Lamp part malfunction due to
wattage.
net-work failure
Please keep extra bulbs on hand
with appropriate wattage ratings in
The headlamp, taillight, and fog light
case of emergencies.
CAUTION - Light replace-
may light up when the head lamp
switch is turned ON, and not light up
Refer to “Bulb Wattage” in chapter 8.
ment
when the taillight or for light switch is
When changing lamps, first turn off
Be sure to replace the burned-
turned ON. This may be cause by
the engine at a safe place, firmly
out bulb with one of the same
network failure or vehicle electrical
apply the parking brake and detach
wattage rating. Otherwise, it
control system malfunction. If there is
the battery’s negative (-) terminal.
may cause damage to the fuse
a problem, we recommend the sys-
or electric wiring system.
tem be serviced by an authorized Kia
dealer.
WARNING - Working on
the lights
CAUTION - Headlamp
Prior to working on the lights,
• Lamp part malfunction due to elec-
Lens
trical control system stabilization
firmly apply the parking brake,
To prevent damage, do not
ensure that the ignition switch
A normally functioning lamp may
clean the headlamp lens with
is turned to the LOCK position
flicker momentarily. This momentary
chemical solvents or strong
and turn off the lights to avoid
occurrence is due to stabilization
detergents.
sudden movement of the vehi-
function of the vehicle's electrical
cle and burning your fingers or
control system. If the lamp soon
receiving an electric shock.
returns to normal, the vehicle does
not require service.
However, if the lamp goes out after
the momentary flickering, or the flick-
ering continues, we recommend the
system be serviced by an authorized
Kia dealer.
7
72
Maintenance
✽ NOTICE
✽ NOTICE
If you don’t have the necessary tools,
the correct bulbs and the expertise,
•
If the light bulb or lamp connector
We recommend that the headlight
consult an authorized Kia dealer. In
is removed while the lamp is still
aiming be adjusted after an accident
many cases, it is difficult to replace
on, the fuse box's electronic sys-
or after the headlight assembly is rein-
vehicle light bulbs because other
tem may log it as a malfunction.
stalled at an authorized Kia dealer.
parts of the vehicle must be removed
Therefore, a lamp malfunction
before you can get to the bulb. This is
incident may be recorded as a
✽ NOTICE
especially true if you have to remove
Diagnostic Trouble Code (DTC) in
You can find moisture inside the lens
the headlamp assembly to get to the
the fuse box.
of lamps after a car wash or driving
bulb(s).
•
It is normal for an operating lamp
in the rain. It is a natural event
to flicker momentarily. This is due
Removing/installing the headlamp
caused by the temperature differ-
to a stabilization function of the
assembly can result in damage to
ence between the inside and the out-
vehicle’s electronic control device.
the vehicle.
side of the lamp and does not mean a
If the lamp lights up normally
If non-genuine parts or substandard
problem with its functions. The
after momentarily blinking, then
bulbs are used, it may lead to blow-
moisture inside the lamp will disap-
it is functioning as normal.
ing a fuse or other wiring damage.
pear if you drive the vehicle with the
However, if the lamp continues to
headlamp turned on, however, the
Do not install extra lamps or LEDs to
flicker several times or turns off
level at which the moisture is
the vehicle. If additional lights are
completely, there may be an error
removed may differ depending on
installed, it may lead to lamp mal-
in the vehicle’s electronic control
the size / location / condition of the
functions and flickering. Additionally,
device. Please have the vehicle
lamp. If the moisture continues to
the fuse box and other wiring may be
checked by an authorized Kia
stay inside the lamp, we recommend
damaged.
dealer immediately.
that you have the vehicle checked by
an authorized Kia dealer.
7
73
Maintenance
Light bulb position (Front)
1. Headlamp (Low/High)
2. Headlamp (LED type)
■ Head lamp - Type A
■ Head lamp - Type C
3. Front turn signal lamp
4. Position lamp
5. Sid maker (Bulb type)
6. Position lamp / Day time running
lamp (LED type)
7. Static bending light
8. Side maker (LED type)
9. Fog lamp (Bulb type)
OSC070038N
OSC070146N
■ Head lamp - Type B
■ Fog Lamp
OSC070039N
OSC070147N
7
74
Maintenance
Light bulb position (Rear)
■ License plate lamp (5 Door)
(1) Rear turn signal lamp (Bulb type)
(5 Door)
(2) Back up lamp (Bulb type)
■ Rear combination lamp (5 Door) - Type A
(3) Stop and tail lamp (Bulb type)
(4) Tail lamp (Bulb type)
(5) Side marker (Bulb type)
(6) Stop and tail lamp (LED type)
(7) Side marker (LED type)
(8) License plate lamp
OSC077025N
(9) High mounted stop lamp
■ High mounted stop lamp (5 Door)
OSC077023N
■ Rear combination lamp (5 Door) - Type B
OSC077026N
OSC077024N
7
75
Maintenance
Light bulb position (Rear) (4 Door)
(1) Rear turn signal lamp (Bulb type)
(2) Back up lamp (Bulb type)
■ Rear combination lamp (4 Door) - Type A
■ License plate lamp (4 Door)
(3) Stop and tail lamp/Side marker
(Bulb type)
(4) Tail lamp (Bulb type)
(5) Stop lamp (LED type)
(6) Tail lamp (LED type)
(7) Side marker (LED type)
(8) License plate lamp
(9) High mounted stop lamp
OSC077027N
OSC077025N
■ Rear combination lamp (4 Door) - Type B
■ High mounted stop lamp (4 Door)
OSC077028N
OSC071029N
7
76
Maintenance
Light bulb position (Side)
Headlamp (Low/High beam)
6. Install a new headlamp bulb and
(Bulb type) bulb replacement
snap the headlamp bulb retaining
■ Type A
(Headlamp Type A)
wire into position by aligning the
wire with the groove on the bulb.
7. Connect the headlamp bulb sock-
et-connector.
8. Install the headlamp bulb cover by
turning it clockwise.
OYB076047
■ Type B
OYB076049
1. Open the hood.
2. Remove the headlamp bulb cover
by turning it counterclockwise.
3. Disconnect the headlamp bulb
socket-connector.
OYB076048
4. Unsnap the headlamp bulb retain-
ing wire by pressing the end and
(1) Side repeater lamp (LED type)
pushing it upward.
(2) Side repeater lamp (bulb type)
5. Remove the bulb from the head
lamp assembly.
7 77
Maintenance
Headlamp bulb
Headlamp (Low/High beam)
(Continued)
(Bulb type) bulb replacement
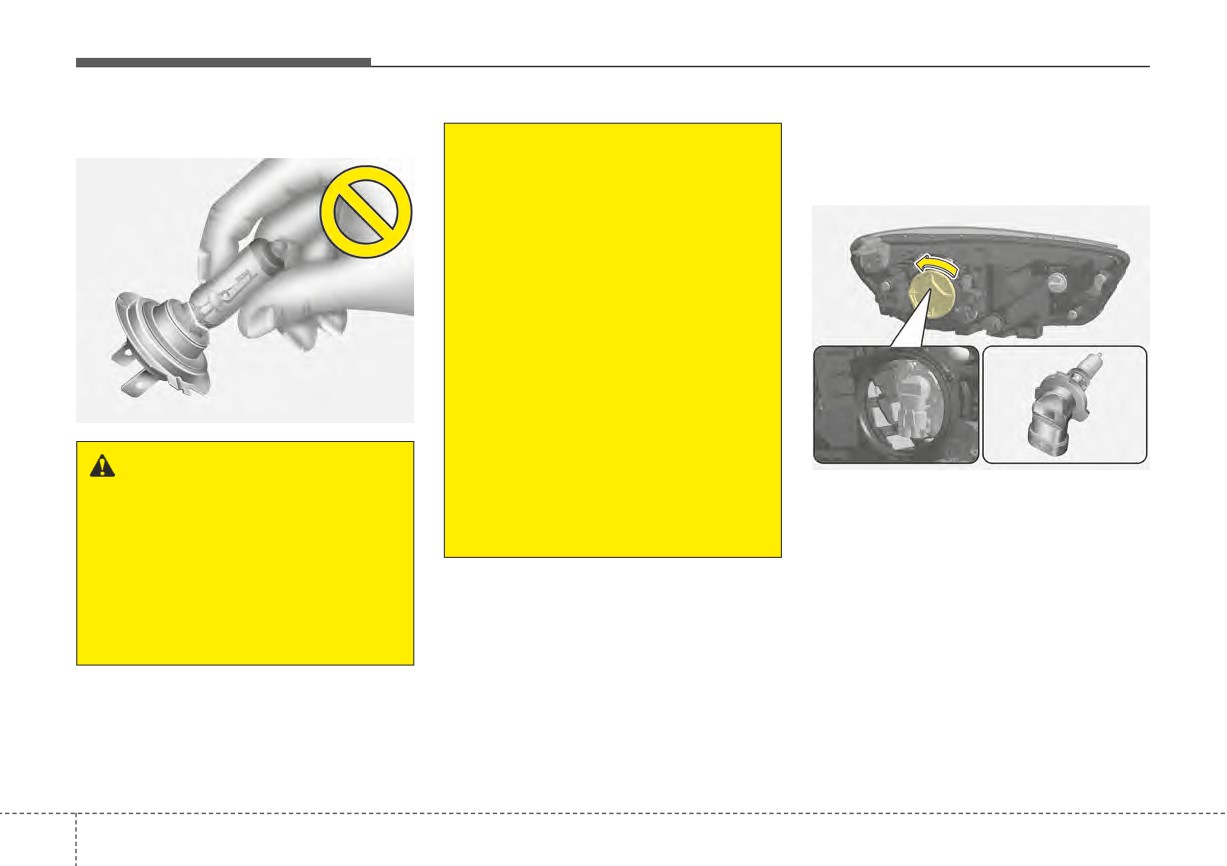
•
Always handle them carefully,
(Headlamp Type B)
and avoid scratches and abra-
sions. If the bulbs are lit, avoid
contact with liquids. Never
touch the glass with bare
hands. Residual oil may cause
the bulb to overheat and burst
when lit. A bulb should be
operated only when installed
in a headlamp.
•
If a bulb becomes damaged or
OHD076046
cracked, replace it immediate-
ly and carefully dispose of it.
OYB076052
WARNING - Halogen
•
Wear eye protection when
changing a bulb. Allow the
bulbs
1. Open the hood.
bulb to cool down before han-
Handle halogen bulbs with care.
2. Remove the headlamp bulb cover
dling it.
by turning it counterclockwise.
• Halogen bulbs contain pres-
surized gas that will produce
3. Disconnect the headlamp bulb
flying pieces of glass if bro-
socket-connector.
ken.
4. Remove the bulb-socket from the
(Continued)
headlamp assembly by turning the
bulb-socket counterclockwise until
the tabs on the bulb-socket align
with the slots on the headlamp
assembly.
7
78
Maintenance
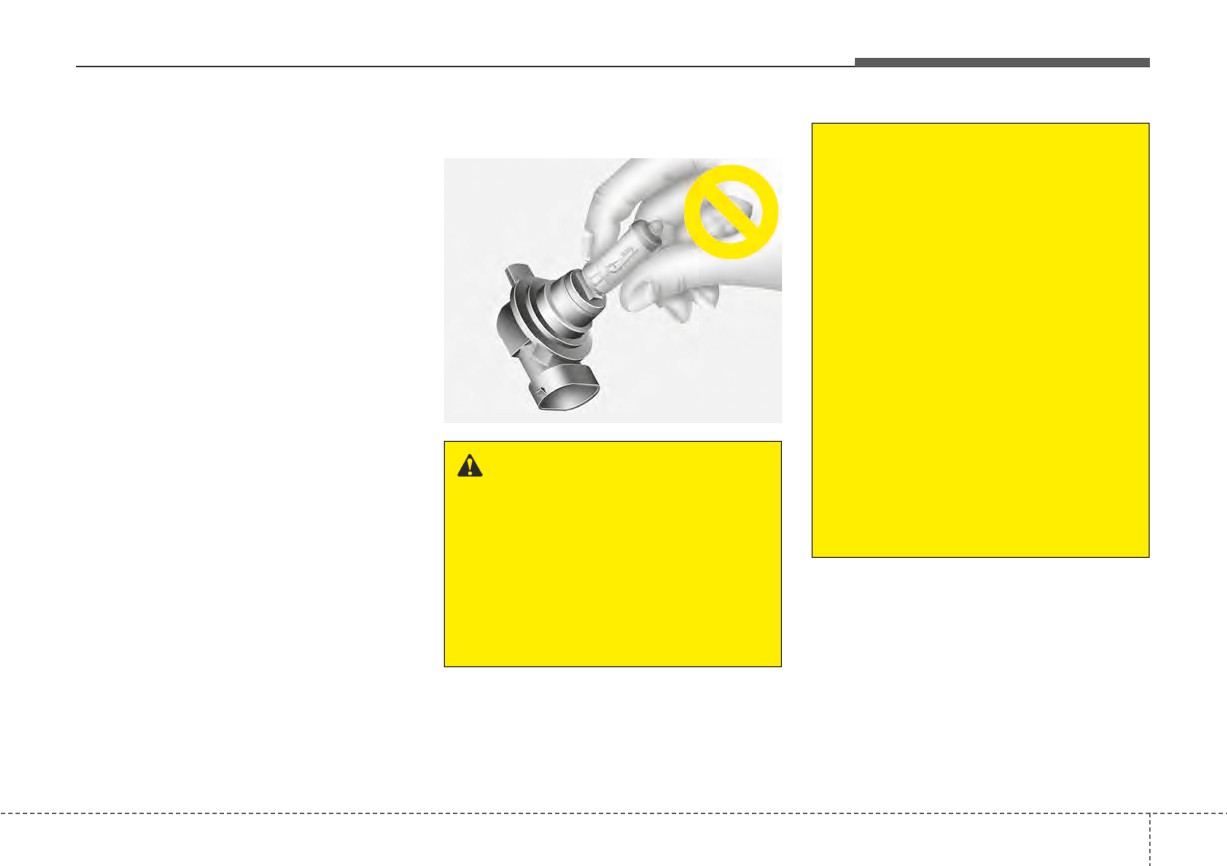
5. Install a new bulb-socket assem-
Headlamp bulb
(Continued)
bly in the headlamp assembly by
aligning the tabs on the bulb-sock-
•
Always handle them carefully,
et with the slots in the headlamp
and avoid scratches and abra-
assembly. Push the bulb-socket
sions. If the bulbs are lit, avoid
into the headlamp assembly and
contact with liquids. Never
turn the bulb-socket clockwise.
touch the glass with bare
hands. Residual oil may cause
6. Install the headlamp bulb cover by
the bulb to overheat and burst
turning it clockwise.
when lit. A bulb should be
operated only when installed
in a headlamp.
•
If a bulb becomes damaged or
OQL075058
cracked, replace it immediate-
ly and carefully dispose of it.
WARNING - Halogen
•
Wear eye protection when
changing a bulb. Allow the
bulbs
bulb to cool down before han-
Handle halogen bulbs with care.
dling it.
• Halogen bulbs contain pres-
surized gas that will produce
flying pieces of glass if bro-
ken.
(Continued)
7
79
Maintenance
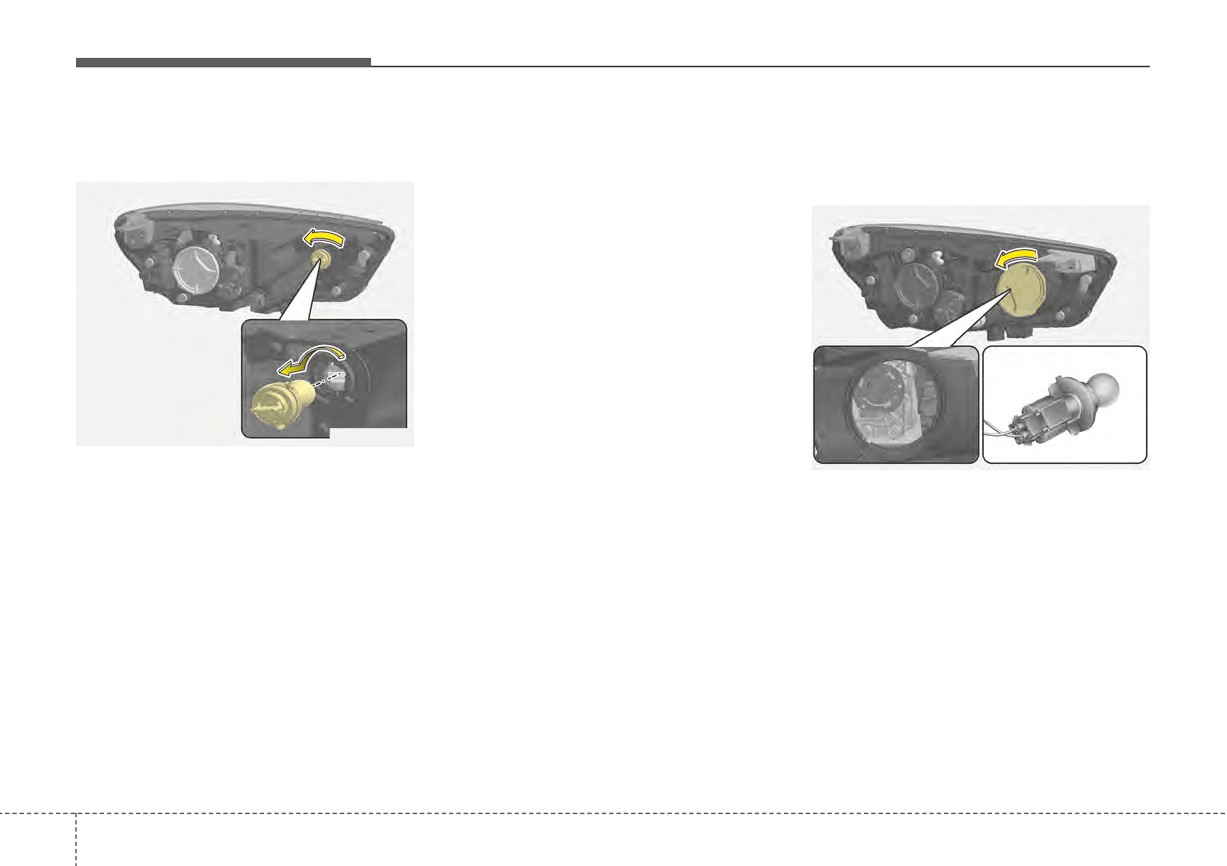
Front turn signal lamp bulb
4. Insert a new bulb by inserting it
Front turn signal lamp bulb
replacement (Headlamp Type A)
into the bulb-socket and rotating it
replacement (Headlamp Type
until it locks into place.
B, C)
5. Install the socket in the headlamp
assembly by aligning the tabs on
the bulb-socket with the slots in
the assembly. Push the bulb-sock-
et into the headlamp assembly
and turn the socket clockwise.
OYB076051
OYB076054
1. Open the hood.
2. Remove the bulb-socket from the
1. Open the hood.
headlamp assembly by turning the
2. Remove the headlamp bulb cover
bulb-socket counterclockwise until
by turning it counterclockwise.
the tabs on the bulb-socket align
3. Remove the bulb-socket from the
with the slots on the headlamp
headlamp assembly by turning the
assembly.
bulb-socket counterclockwise until
3. Remove the bulb from the bulb-
the tabs on the bulb-socket align
socket by pressing it in and rotat-
with the slots on the headlamp
ing it counterclockwise until the
assembly.
tabs on the bulb align with the
slots in the bulb-socket. Pull the
bulb out of the bulb-socket
7
80