Kia Rio / Rio Hatchback (2022 year). Manual in english - page 22
Maintenance
4. Remove the bulb from the bulb
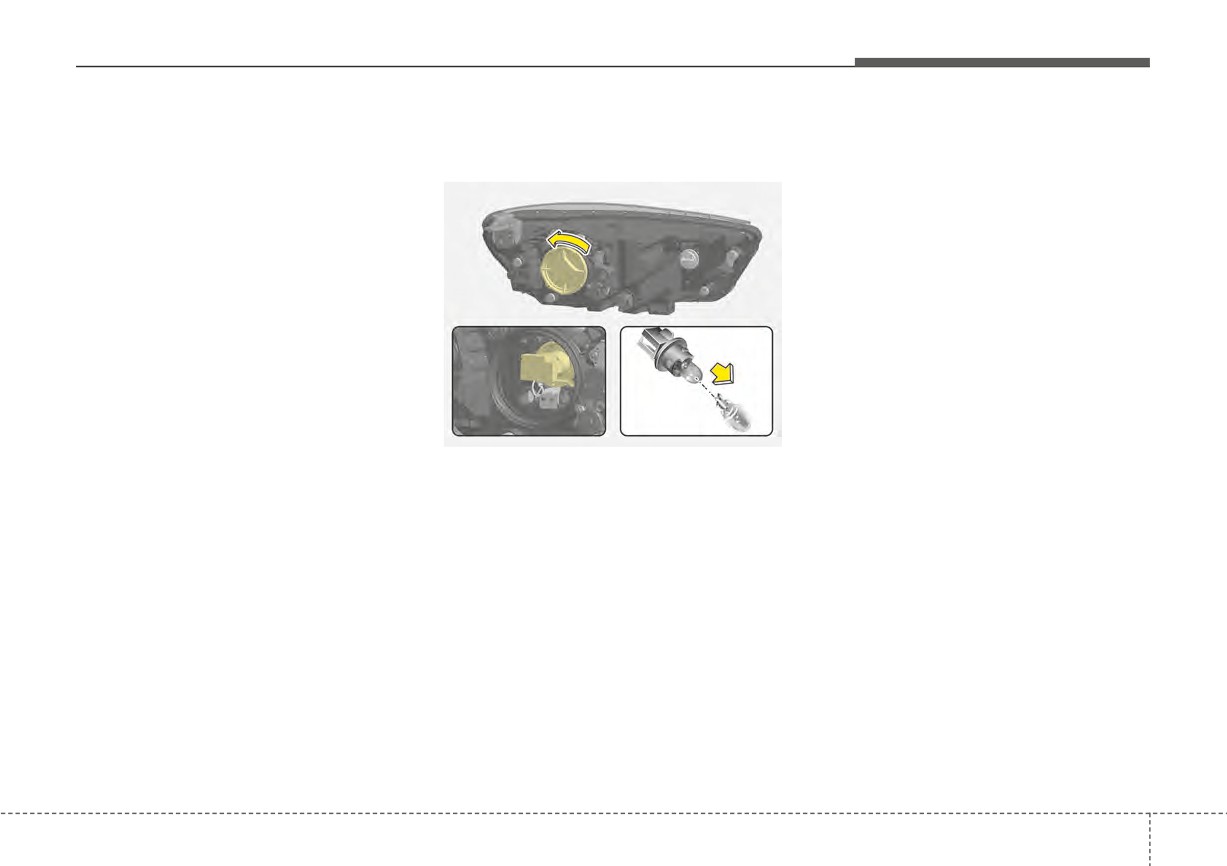
Position lamp bulb replace-
4. Remove the bulb from bulb socket
socket by pressing it in and rotat-
ment (Headlamp Type A)
by pulling it out.
ing it counterclockwise until the
5. Insert a new bulb by inserting it
tabs on the bulb align with the
into the bulb socket.
slots in the bulb-socket. Pull the
6. Install the bulb socket in the head-
bulb out of the bulb-socket
lamp assembly by aligning the
5. Insert a new bulb by inserting it
tabs on the bulb socket with the
into the bulb-socket and rotating it
slots in the headlamp assembly.
until it locks into place.
Push the bulb-socket into the
6. Install the socket in the headlamp
headlamp assembly and turn the
assembly by aligning the tabs on
bulb-socket clockwise.
the bulb-socket with the slots in
7. Install the headlamp bulb cover by
the assembly. Push the bulb-sock
turning it clockwise.
et into the headlamp assembly
OSC070050N
and turn the socket clockwise.
1. Open the hood.
7. Install the headlamp bulb cover by
turning it clockwise.
2. Remove the headlamp bulb cover
by turning it counterclockwise.
3. Remove the bulb-socket from the
headlamp assembly by turning the
bulb socket counterclockwise until
the tabs on the bulb socket align
with the slots on the headlamp
assembly.
7
81
Maintenance
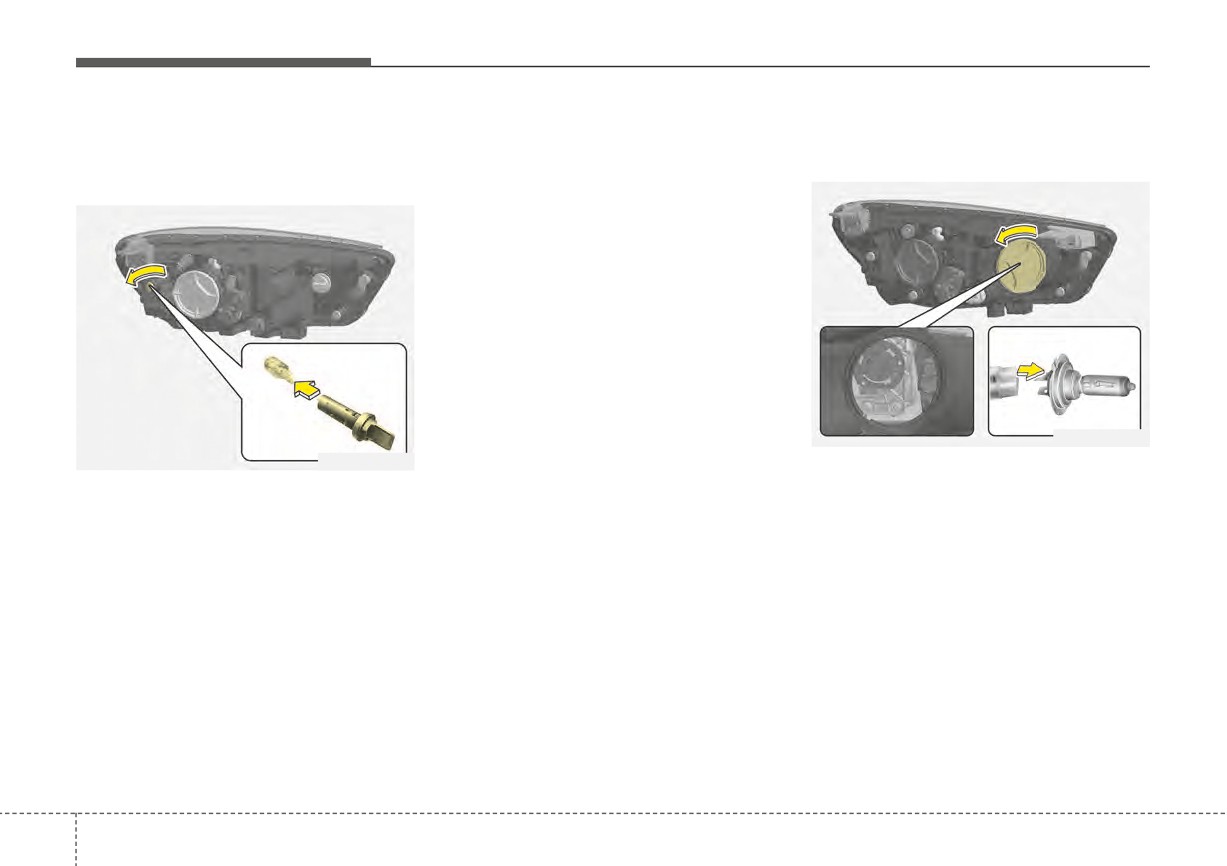
Side marker (front) (Bulb type)
4. Insert a new bulb by inserting it
Static bending light replace-
bulb replacement (Headlamp
into the bulb-socket.
ment (Headlamp Type B, C)
Type A)
5. Install the socket in the headlamp
assembly by aligning the tabs on
the bulb-socket with the slots in
the assembly. Push the bulb-sock-
et into the headlamp assembly
and turn the socket clockwise.
OSC070053N
OSC078051N
1. Open the hood.
1. Open the hood.
2. Remove the headlamp bulb cover
2. Remove the bulb-socket from the
by turning it counterclockwise.
headlamp assembly by turning the
3. Disconnect the static bending light
bulb-socket counterclockwise until
bulb socket-connector.
the tabs on the bulb-socket align
4. Unsnap the static bending light
with the slots on the headlamp
bulb retaining wire by pressing the
assembly.
end and pushing it upward.
3. Remove the bulb from the bulb-
socket by pulling it out.
7 82
Maintenance
5. Remove the bulb from the head
Front fog lamp (Bulb type)
5. Remove the bulb from the socket
lamp assembly.
bulb replacement
by pressing it in and rotating it
counter-clockwise until the tabs on
6. Install a new static bending light
the bulb align with the slots in the
bulb and snap the static bending
socket. Pull the bulb out of the
light bulb retaining wire into posi-
socket.
tion by aligning the wire with the
groove on the bulb.
6. Insert a new bulb by inserting it
into the socket and rotating it until
7. Connect the static bending light
bulb socket-connector.
it locks into place.
7. Install the socket in the assembly
8. Install the headlamp bulb cover by
by aligning the tabs on the socket
turning it clockwise.
with the slots in the assembly.
Push the socket into the assembly
and turn the socket clockwise.
OYB070152L
8. Connect the front fog lamp con-
1. Disconnect the negative (-) battery
nector.
terminal.
9. Install the front bumper side
2. Disconnect the side after loosen-
assembly to the body of the vehi-
ing the front bumper sides screws
cle.
and clips.
3. Disconnect the front fog lamp con-
nector.
4. Remove the socket from the
assembly by turning the socket
counterclockwise until the tabs on
the socket align with the slots on
the assembly.
7
83
Maintenance
Headlamp (Low/High beam)
Position lamp + DRL (LED
Side marker (front) (LED type)
(LED type) bulb replacement
type) bulb replacement
bulb replacement (Headlamp
(Headlamp Type C)
Type B, C)
OSC077037N
OSC078038
OSC078053N
If the position lamp + DRL (LED) (1)
If the headlamp (Low/High beam) (1)
does not operate, have the vehicle
If the Side marker (LED) (1) does not
does not operate, have the vehicle
checked by an authorized Kia dealer.
operate, have the vehicle checked by
checked by an authorized Kia dealer. The LED lamps cannot be replaced
an authorized Kia dealer.
as a single component because it is
The LED lamps cannot be replaced
part of an integrated unit. The LED
as a single component because it is
lamps have to be replaced with the
part of an integrated unit. The LED
unit.
lamps have to be replaced with the
A skilled technician should check or
unit.
repair the position lamp
+ DRL
A skilled technician should check or
(LED), for it may damage related
repair the Side marker (LED), for it
parts of the vehicle.
may damage related parts of the
vehicle.
7
84
Maintenance
Side repeater lamp (LED type)
Side repeater lamp (bulb type)
4. Remove the bulb by pulling it
bulb replacement
bulb replacement
straight out.
5. Insert a new bulb in the socket.
6. Reassemble the socket and the
lens part.
7. Connect the bulb electrical con-
nector.
8. Reinstall the lamp assembly to the
body of the vehicle.
OYB076047
OYB076059
If the side repeater lamp (LED) (1)
1. Remove the lamp assembly from
does not operate, have the vehicle
the vehicle by prying the lens and
checked by an authorized Kia dealer.
pulling the assembly out.
The LED lamps cannot be replaced
2. Disconnect the bulb electrical con-
as a single component because it is
nector.
part of an integrated unit. The LED
3. Separate the socket and the lens
lamps have to be replaced with the
parts by turning the socket coun-
unit.
terclockwise until the tabs on the
A skilled technician should check or
socket align with the slots on the
repair the side repeater lamp (LED),
lens part.
for it may damage related parts of
the vehicle.
7
85
Maintenance
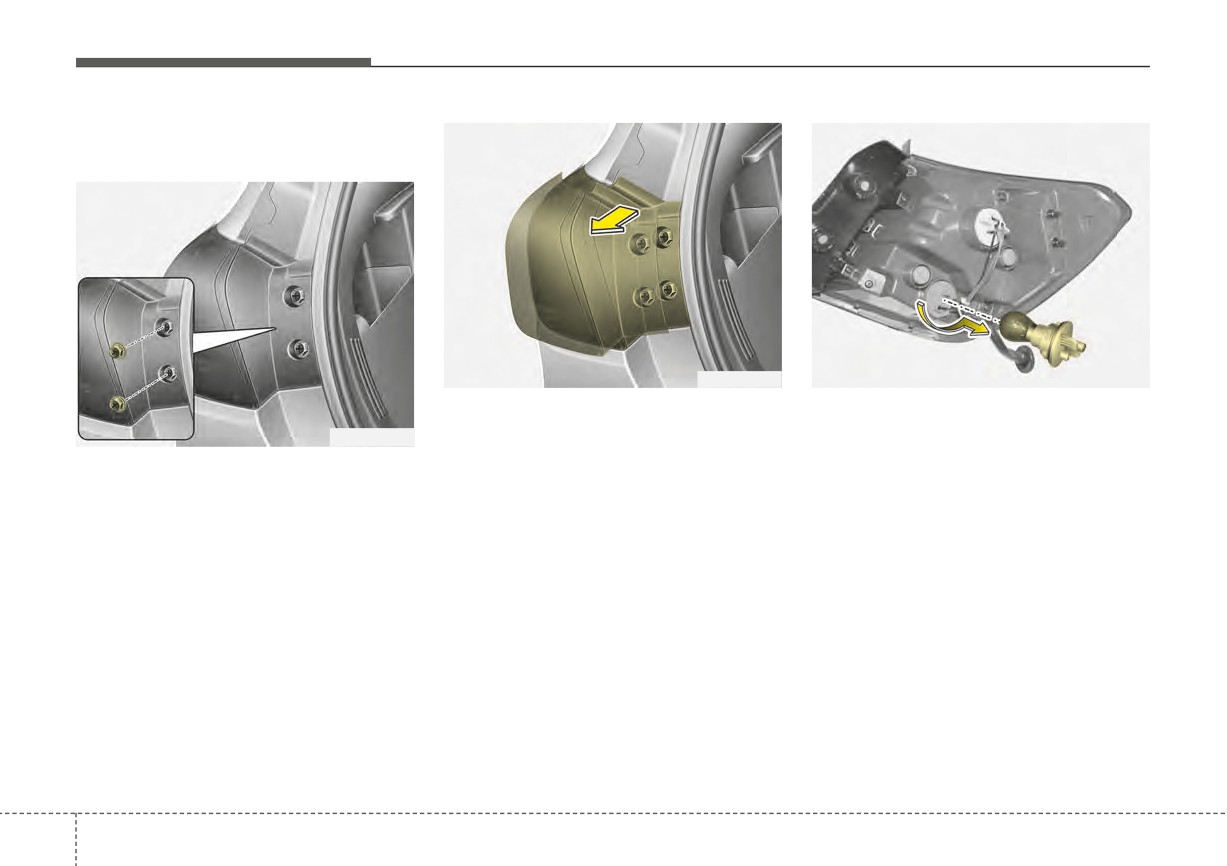
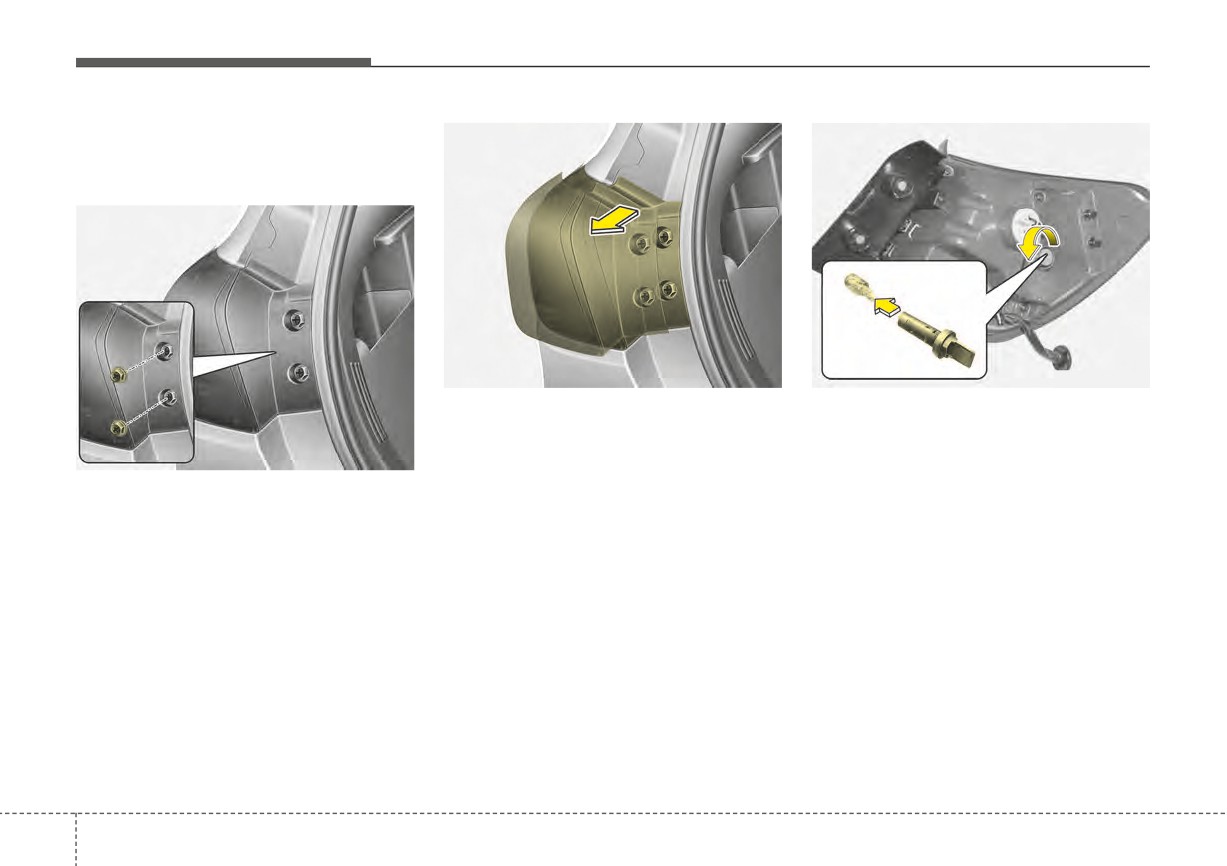
Rear turn signal lamp bulb
replacement (for 5 door)
OYB076061
OYB076063
3. Remove the rear combination
5. Remove the socket from the
lamp assembly from the body of
assembly by turning the socket
OYB076060
the vehicle.
counterclockwise until the tabs on
1. Open the trunk lid.
the socket align with the slots on
4. Disconnect the rear combination
2. Loosen the light assembly retain-
lamp connector.
the assembly.
ing screws with a cross-tip screw-
6. Remove the bulb from the socket by
driver.
pressing it in and rotating it counter-
clockwise until the tabs on the bulb
align with the slots in the socket.
Pull the bulb out of the socket.
7. Insert a new bulb by inserting it
into the socket and rotating it until
it locks into place.
7
86
Maintenance
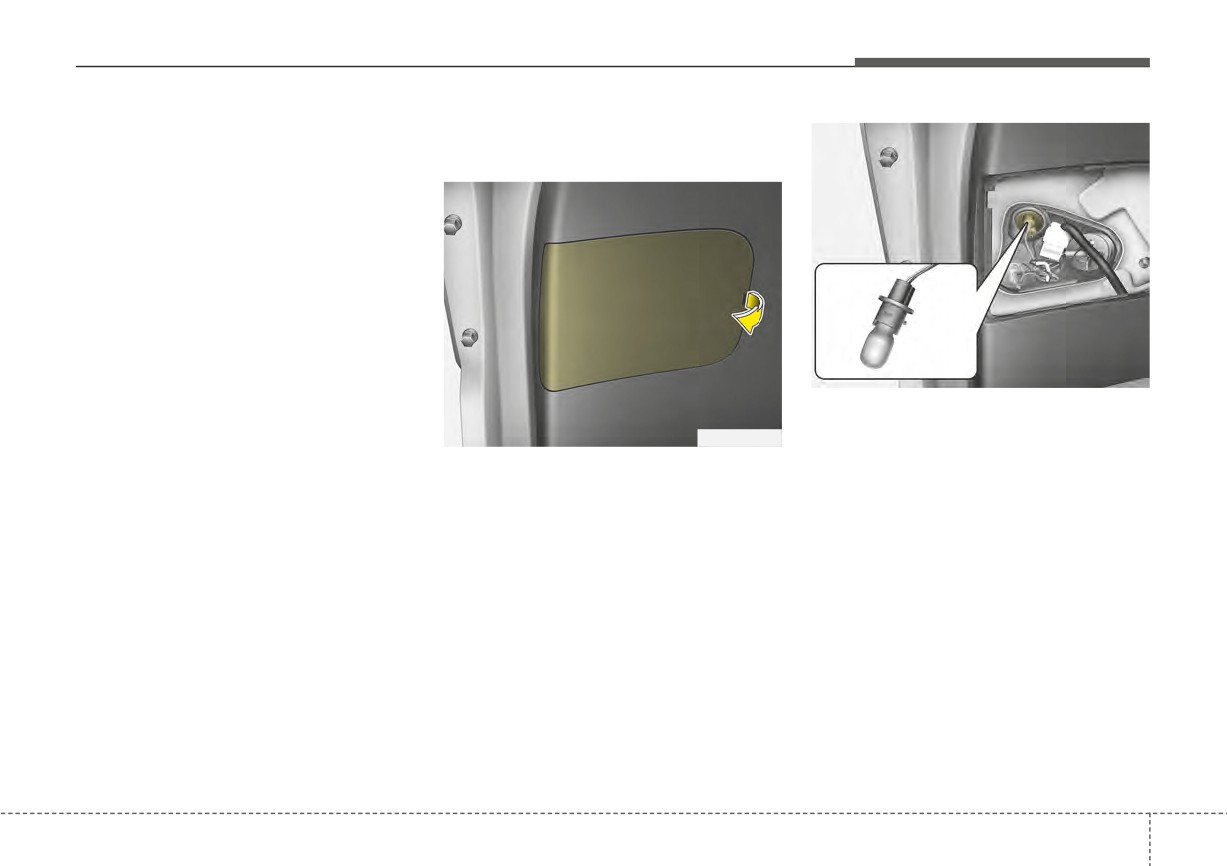
8. Install the socket in the assembly
Back-up lamp bulb replace-
by aligning the tabs on the socket
ment (for 5 door)
with the slots in the assembly.
Push the socket into the assembly
and turn the socket clockwise.
9. Install the rear combination lamp
assembly to the body of the vehi-
cle.
OYB076066
3. Remove the socket from the
assembly by turning the socket
OYB076065
counterclockwise until the tabs on
1. Open the liftgate.
the socket align with the slots on
2. Remove the service cover.
the assembly.
4. Remove the bulb from bulb-socket
by pulling it out.
5. Insert a new bulb by inserting it
into the bulb-socket.
6. Install the socket in the assembly
by aligning the tabs on the socket
with the slots in the assembly.
Push the socket into the assembly
and turn the socket clockwise.
7. Install the service cover by putting
it into the service hole.
7
87
Maintenance
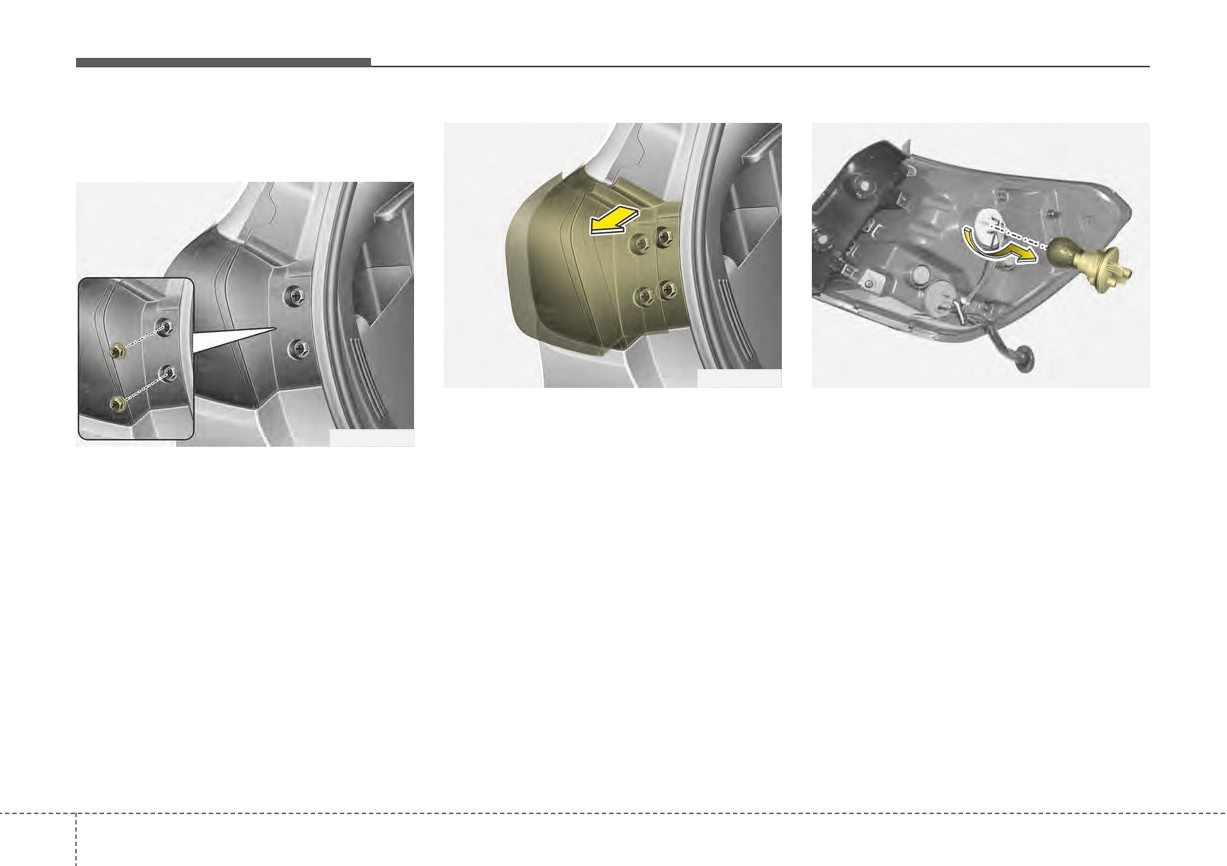
Stop and tail lamp bulb
replacement (for 5 door)
OYB076061
OYB076062
3. Remove the rear combination
5. Remove the socket from the
lamp assembly from the body of
assembly by turning the socket
OYB076060
the vehicle.
counterclockwise until the tabs on
1. Open the trunk lid.
the socket align with the slots on
4. Disconnect the rear combination
2. Loosen the light assembly retain-
lamp connector.
the assembly.
ing screws with a cross-tip screw-
6. Remove the bulb from the socket by
driver.
pressing it in and rotating it counter-
clockwise until the tabs on the bulb
align with the slots in the socket.
Pull the bulb out of the socket.
7. Insert a new bulb by inserting it
into the socket and rotating it until
it locks into place.
7
88
Maintenance
8. Install the socket in the assembly
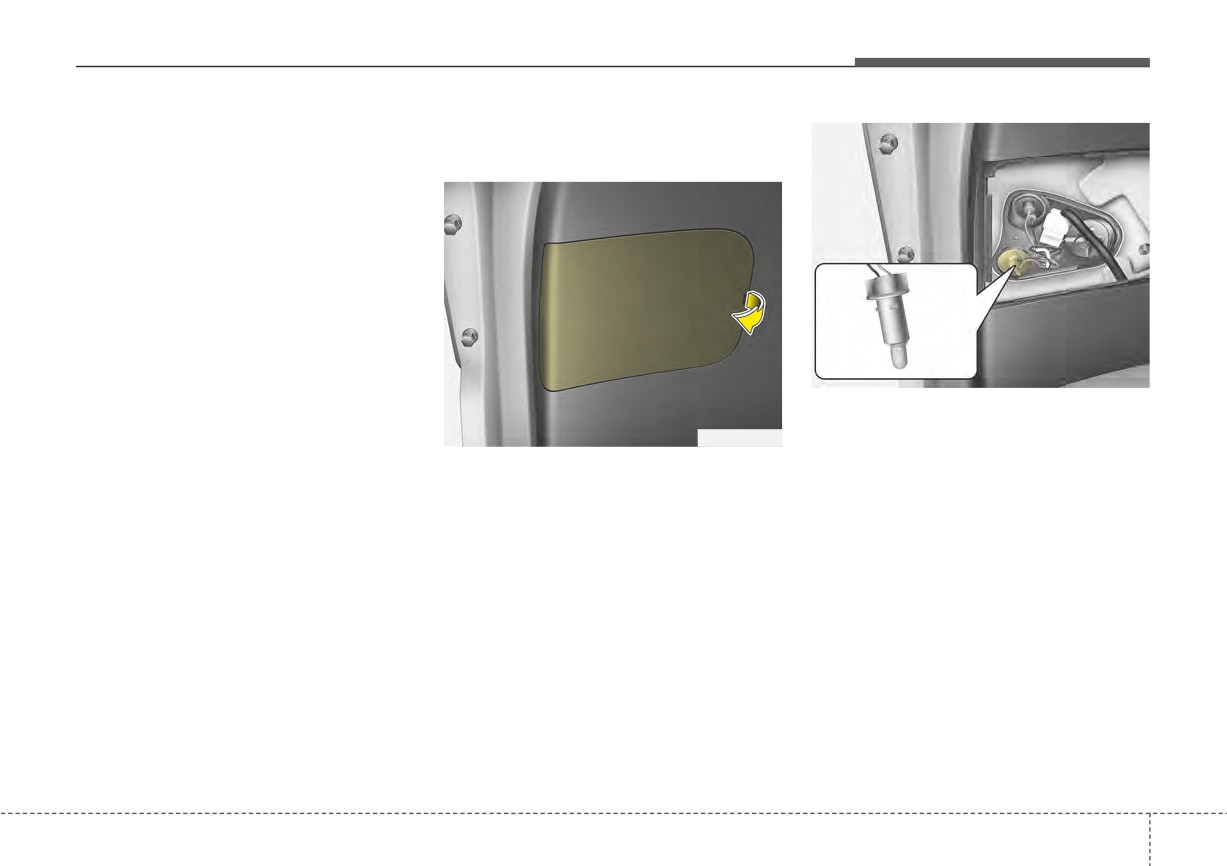
Tail lamp (inside) bulb replace-
by aligning the tabs on the socket
ment (for 5 door)
with the slots in the assembly.
Push the socket into the assembly
and turn the socket clockwise.
9. Install the rear combination lamp
assembly to the body of the vehi-
cle.
OYB076067
3. Remove the socket from the
assembly by turning the socket
OYB076065
counterclockwise until the tabs on
1. Open the liftgate.
the socket align with the slots on
2. Remove the service cover.
the assembly.
4. Remove the bulb from bulb-socket
by pulling it out.
5. Insert a new bulb by inserting it
into the bulb-socket.
6. Install the socket in the assembly
by aligning the tabs on the socket
with the slots in the assembly.
Push the socket into the assembly
and turn the socket clockwise.
7. Install the service cover by putting
it into the service hole.
7
89
Maintenance
Side marker (rear) (Bulb type)
bulb replacement (Rear combi-
nation lamp Type A) (for 5 door)
OYB076061
OSC078052N
4. Remove the rear combination
6. Remove the socket from the
lamp assembly from the body of
assembly by turning the socket
the vehicle.
counterclockwise until the tabs on
OYB076060
the socket align with the slots on
5. Disconnect the rear combination
1. Open the liftgate.
the assembly.
lamp connector.
2. Remove the service cover.
7. Remove the bulb from bulb-socket
3. Loosen the light assembly retain-
by pulling it out.
ing screws with a cross-tip screw-
8. Insert a new bulb by inserting it
driver.
into the bulb-socket.
9. Install the socket in the assembly
by aligning the tabs on the socket
with the slots in the assembly.
Push the socket into the assembly
and turn the socket clockwise.
7
90
Maintenance
10. Connect the rear combination
Stop and tail lamp (LED type)
Side marker (rear) (LED type)
lamp connector.
bulb replacement (for 5 door)
bulb replacement (Rear combi-
11. Install the rear combination lamp
nation lamp Type B) (for 5 door)
assembly to the body of the vehi-
cle.
12. Install the service cover.
OYB076064
OSC078024N
If the stop and tail lamp (LED) (1)
does not operate, have the vehicle
If the Side marker (LED) (1) does not
checked by an authorized Kia dealer.
operate, have the vehicle checked by
The LED lamps cannot be replaced
an authorized Kia dealer.
as a single component because it is
The LED lamps cannot be replaced
part of an integrated unit. The LED
as a single component because it is
lamps have to be replaced with the
part of an integrated unit. The LED
unit.
lamps have to be replaced with the
A skilled technician should check or
unit.
repair the stop and tail lamp (LED),
A skilled technician should check or
for it may damage related parts of
repair the Side marker (LED), for it
the vehicle.
may damage related parts of the
vehicle.
7
91
Maintenance
License plate lamp bulb
3. Remove the bulb from bulb-socket
High mounted stop lamp bulb
replacement
by pulling it out.
replacement (for 5 door)
4. Insert a new bulb by inserting it
into the bulb-socket.
5. Install the socket in the assembly
by aligning the tabs on the socket
with the slots in the assembly.
Push the socket into the assembly
and turn the socket clockwise.
6. Align the lens cover tabs with the
lamp housing notches and snap
the lens into place.
OYB076069
OYB076089
If the high mounted stop lamp (1)
1. Using a flat-blade screwdriver,
does not operate, have the vehicle
gently pry the lens cover from
checked by an authorized Kia dealer.
lamp housing.
A skilled technician should check or
2. Remove the socket from the
repair the high mounted stop lamp,
assembly by turning the socket
for it may damage related parts of
counterclockwise until the tabs on
the vehicle.
the socket align with the slots on
the assembly.
7
92
Maintenance
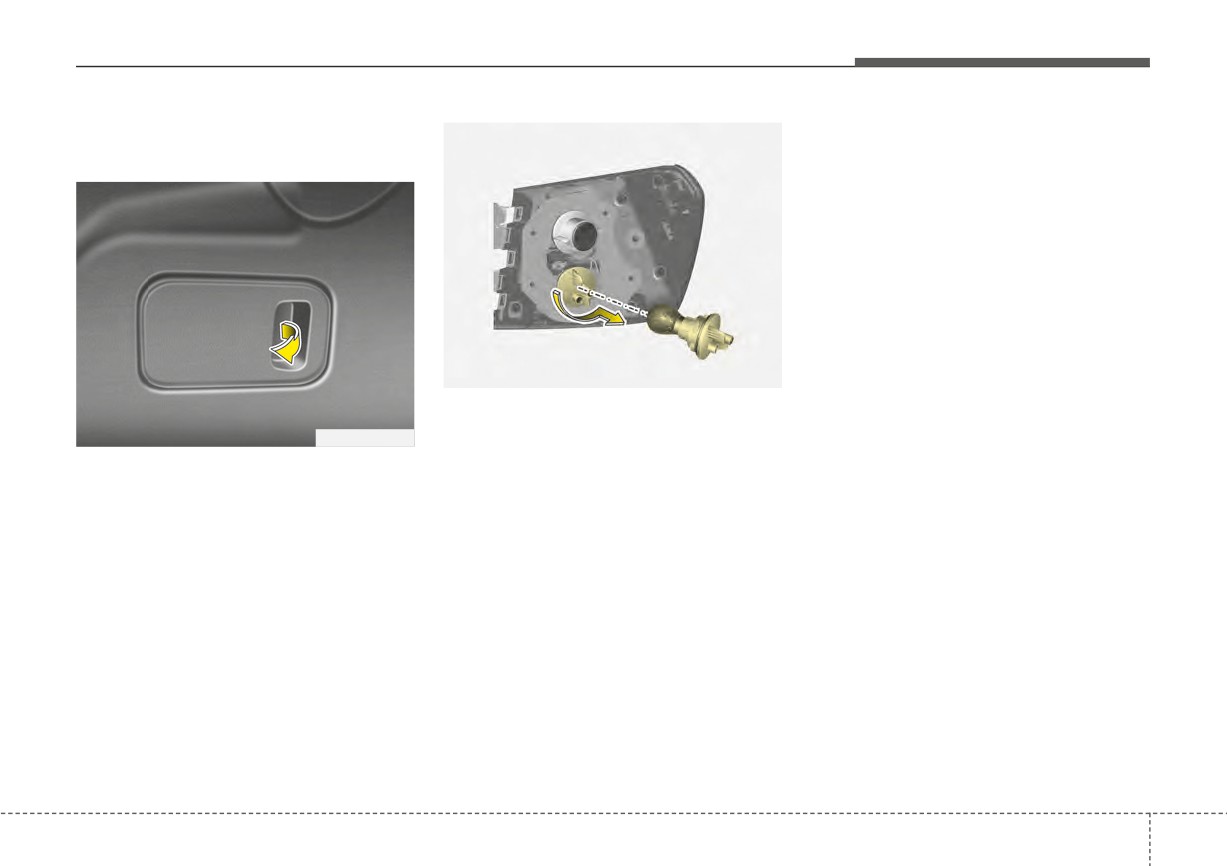
Rear turn signal lamp bulb
6. Install the socket in the assembly
replacement (for 4 door)
by aligning the tabs on the socket
with the slots in the assembly.
Push the socket into the assembly
and turn the socket clockwise.
7. Install the service cover.
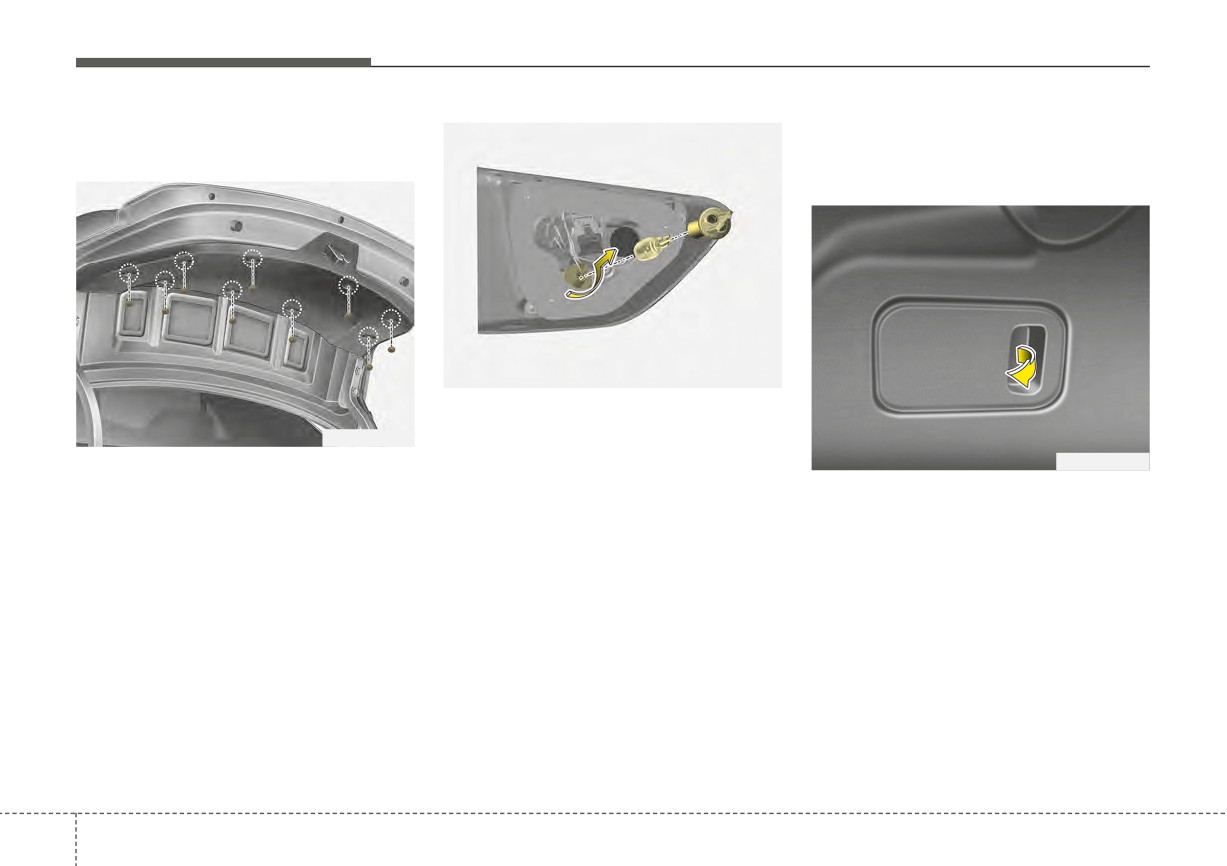
OSC077031N
3. Remove the socket from the
assembly by turning the socket
OSC077030N
counterclockwise until the tabs on
1. Open the trunk lid.
the socket align with the slots on
2. Remove the service cover by
the assembly.
pulling out the service cover.
4. Remove the bulb from the socket
by pressing it in and rotating it
counterclockwise until the tabs on
the bulb align with the slots in the
socket. Pull the bulb out of the
socket.
5. Insert a new bulb by inserting it
into the socket and rotating it until
it locks into place.
7
93
Maintenance
Back-up lamp bulb replace-
Stop and tail lamp / Side mark-
ment (for 4 door)
er (Bulb type) replacement
(for 4 door)
OSC077035N
3. Remove the socket from the
assembly by turning the socket
OSC077034N
counterclockwise until the tabs on
OSC077030N
1. Open the trunk lid.
the socket align with the slots on
2. Loosen the retaining screw of the
the assembly.
1. Open the trunk lid.
trunk lid cover and then remove
4. Remove the bulb from bulb-socket
2. Remove the service cover by
the cover.
by pulling it out.
pulling out the service cover.
5. Insert a new bulb by inserting it
into the bulb-socket.
6. Install the socket in the assembly
by aligning the tabs on the socket
with the slots in the assembly.
Push the socket into the assembly
and turn the socket clockwise.
7. Install the trunk lid cover.
7
94
Maintenance
6. Install the socket in the assembly
Tail lamp (Bulb type) bulb
by aligning the tabs on the socket
replacement (for 4 door)
with the slots in the assembly.
Push the socket into the assembly
and turn the socket clockwise.
7. Install the service cover.
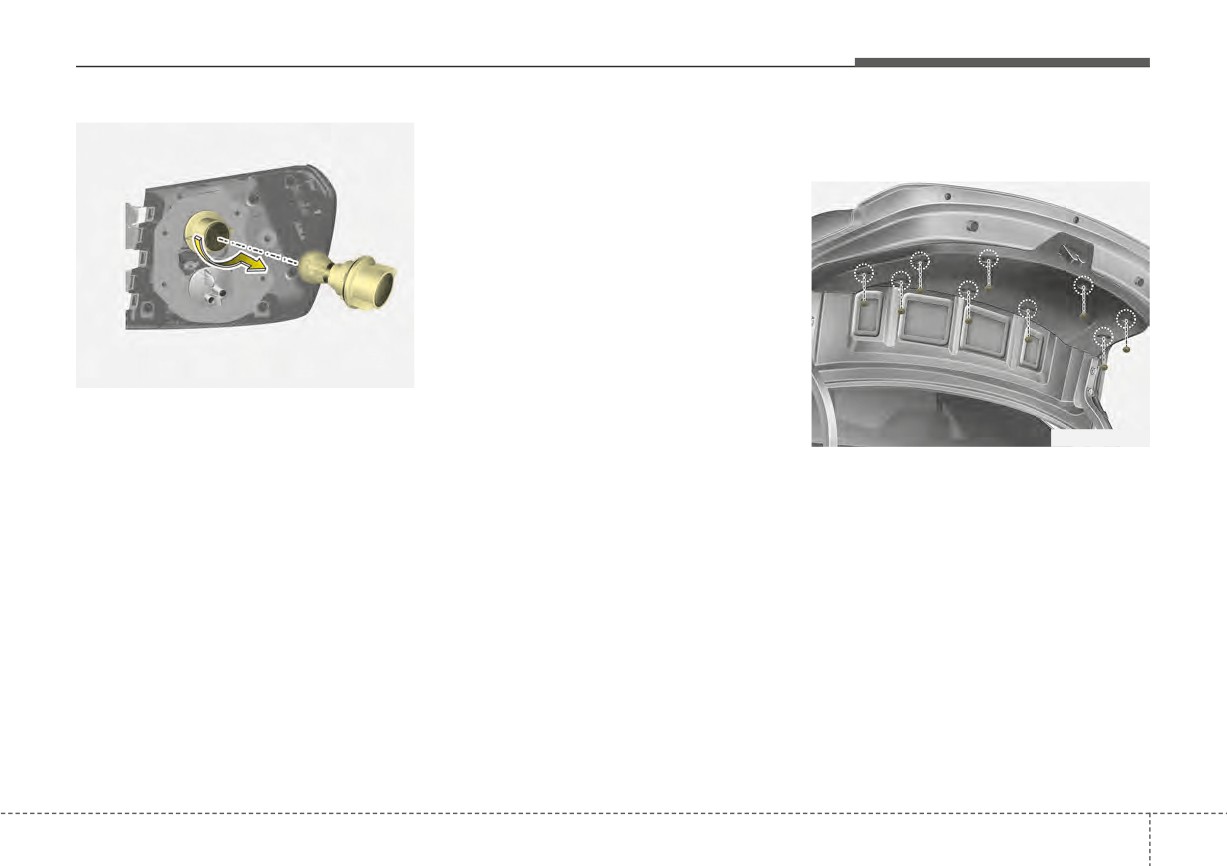
OSC077032N
3. Remove the socket from the
assembly by turning the socket
OSC077034N
counterclockwise until the tabs on
the socket align with the slots on
1. Open the trunk lid.
the assembly.
2. Loosen the retaining screw of the
4. Remove the bulb from the socket
trunk lid cover and then remove
by pressing it in and rotating it
the cover.
counterclockwise until the tabs on
the bulb align with the slots in the
socket. Pull the bulb out of the
socket.
5. Insert a new bulb by inserting it
into the socket and rotating it until
it locks into place.
7
95
Maintenance
6. Install the socket in the assembly
Stop and tail lamp (LED type)
by aligning the tabs on the socket
bulb replacement (for 4 door)
with the slots in the assembly.
Push the socket into the assembly
and turn the socket clockwise.
7. Install the trunk lid cover.
OSC077036N
3. Remove the socket from the
assembly by turning the socket
OSC077033N
counterclockwise until the tabs on
the socket align with the slots on
If the stop and tail lamp (LED) (1,2)
the assembly.
does not operate, have the vehicle
checked by an authorized Kia dealer.
4. Remove the bulb from the socket
by pressing it in and rotating it
The LED lamps cannot be replaced
counterclockwise until the tabs on
as a single component because it is
the bulb align with the slots in the
part of an integrated unit. The LED
socket. Pull the bulb out of the
lamps have to be replaced with the
socket.
unit.
5. Insert a new bulb by inserting it
A skilled technician should check or
into the socket and rotating it until
repair the stop and tail lamp (LED),
it locks into place.
for it may damage related parts of
the vehicle.
7
96
Maintenance
Side marker (rear) (LED type)
High mounted stop lamp bulb
4. Insert a new bulb by inserting it
bulb replacement (Rear combi-
replacement (for 4 door)
into the bulb-socket.
nation lamp Type B) (for 4 door)
5. Install the socket in the housing by
aligning the tabs on the socket
with the slots in the housing. Push
the socket into the housing and
turn the socket clockwise.
OUC076063
OSC078028N
1. Open the trunk lid.
If the Side marker (LED) (1) does not
2. Remove the socket from the hous-
operate, have the vehicle checked by
ing by turning the socket counter-
an authorized Kia dealer.
clockwise until the tabs on the
The LED lamps cannot be replaced
socket align with the slots on the
as a single component because it is
housing.
part of an integrated unit. The LED
3. Remove the bulb from bulb-socket
lamps have to be replaced with the
by pulling it out.
unit.
A skilled technician should check or
repair the Side marker (LED), for it
may damage related parts of the
vehicle.
7
97
Maintenance
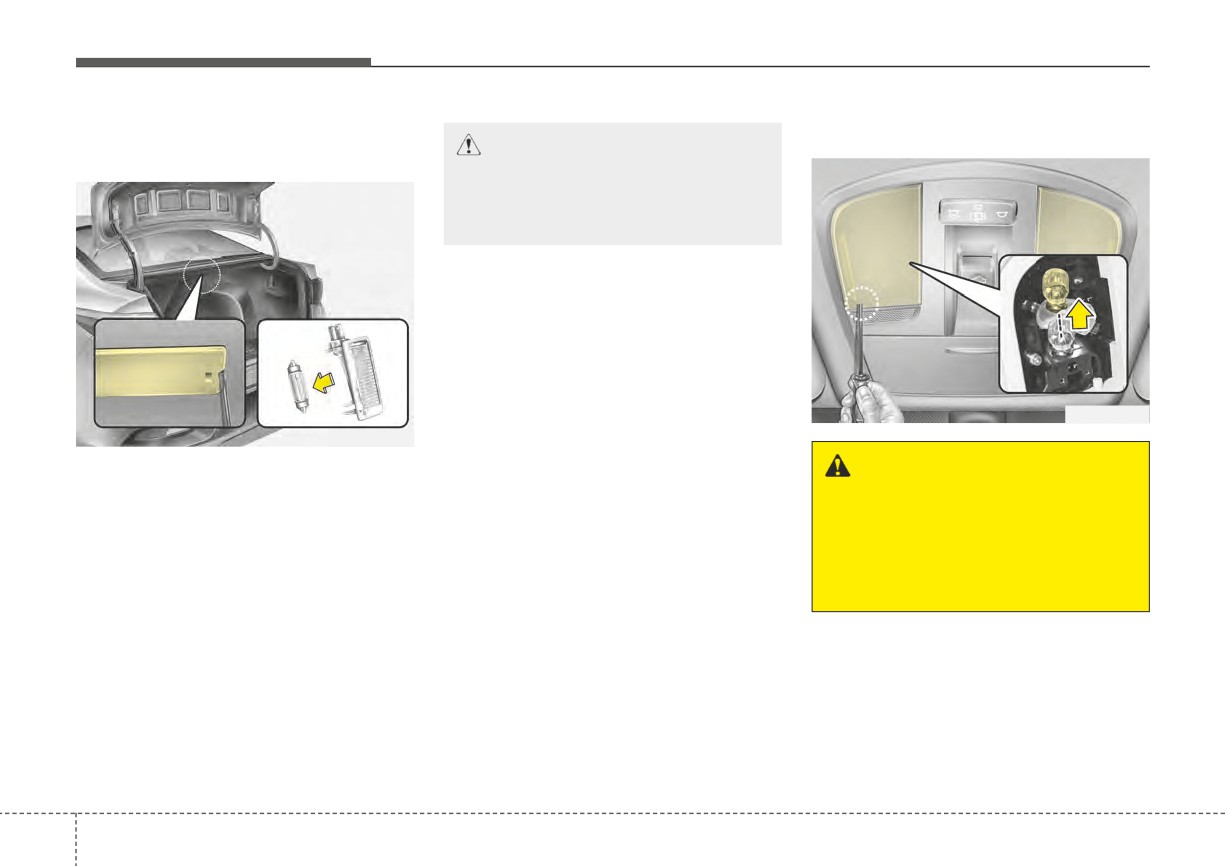
Trunk lamp bulb replacement
Map lamp bulb replacement
CAUTION
(for 4 door)
Be careful not to dirty or dam-
age the lens, lens tab, and plas-
tic housings.
OYB076070
OUC076061
1. Using a flat-blade screwdriver,
WARNING - Interior lamps
gently pry the lens cover from
Prior to working on the Interior
lamp housing.
lamps, ensure that the “OFF”
2. Remove the bulb by pulling it
button is depressed to avoid
straight out.
burning your fingers or receiv-
ing an electric shock.
3. Install a new bulb in the socket.
4. Align the lens cover tabs with the
lamp housing notches and snap
the lens into place.
7
98
Maintenance
1. Using a flat-blade screwdriver,
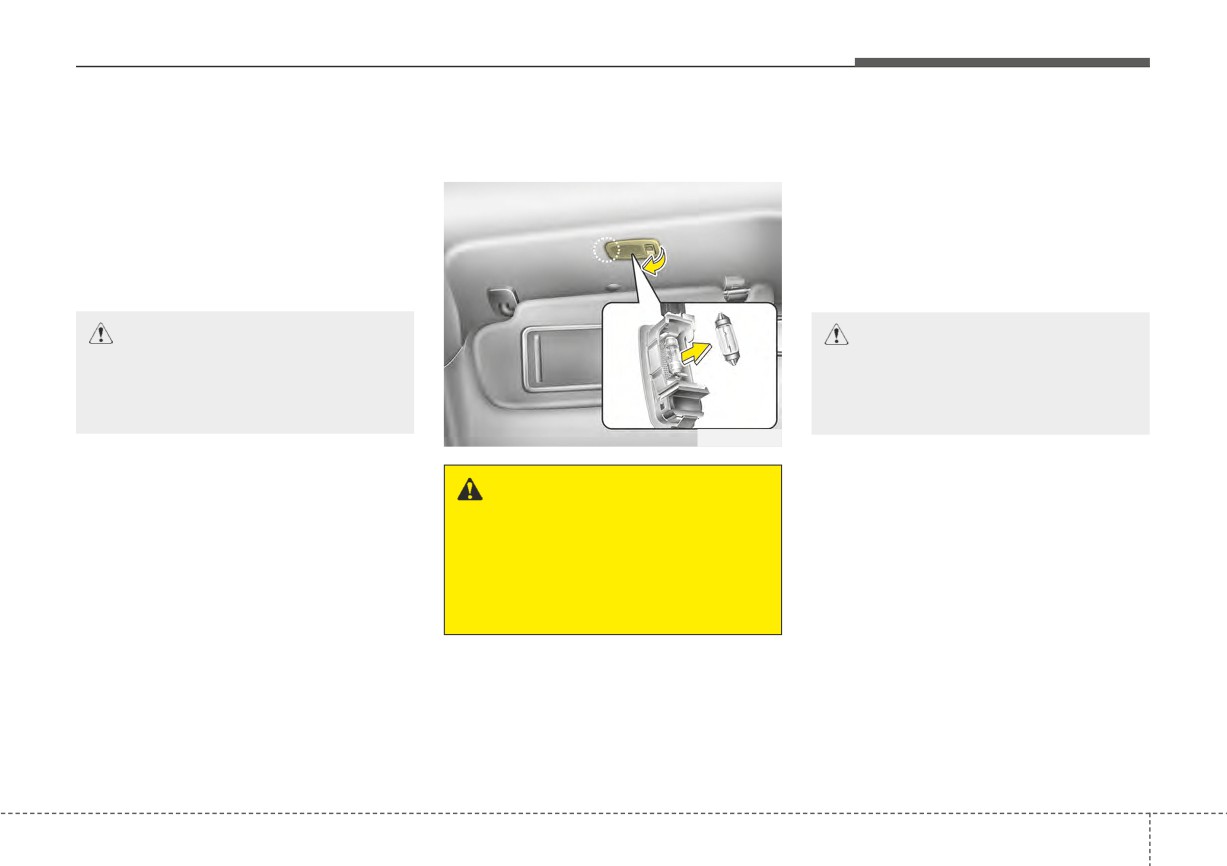
Vanity mirror lamp bulb
1. Using a flat-blade screwdriver,
gently pry the lamp assembly from
replacement
gently pry the lamp assembly from
interior.
interior.
2. Remove the bulb by pulling it
2. Remove the bulb by pulling it
straight out.
straight out.
3. Install a new bulb in the socket.
3. Install a new bulb in the socket.
4. Install the lamp assembly to interior.
4. Install the lamp assembly to interior.
CAUTION
CAUTION
Be careful not to dirty or dam-
Be careful not to dirty or dam-
age the lens, lens tab, and plas-
age the lens, lens tab, and plas-
tic housings.
tic housings.
OQL075067
WARNING - Interior lamps
Prior to working on the Interior
lamps, ensure that the “OFF”
button is depressed to avoid
burning your fingers or receiv-
ing an electric shock.
7
99
Maintenance
Room lamp bulb replacement
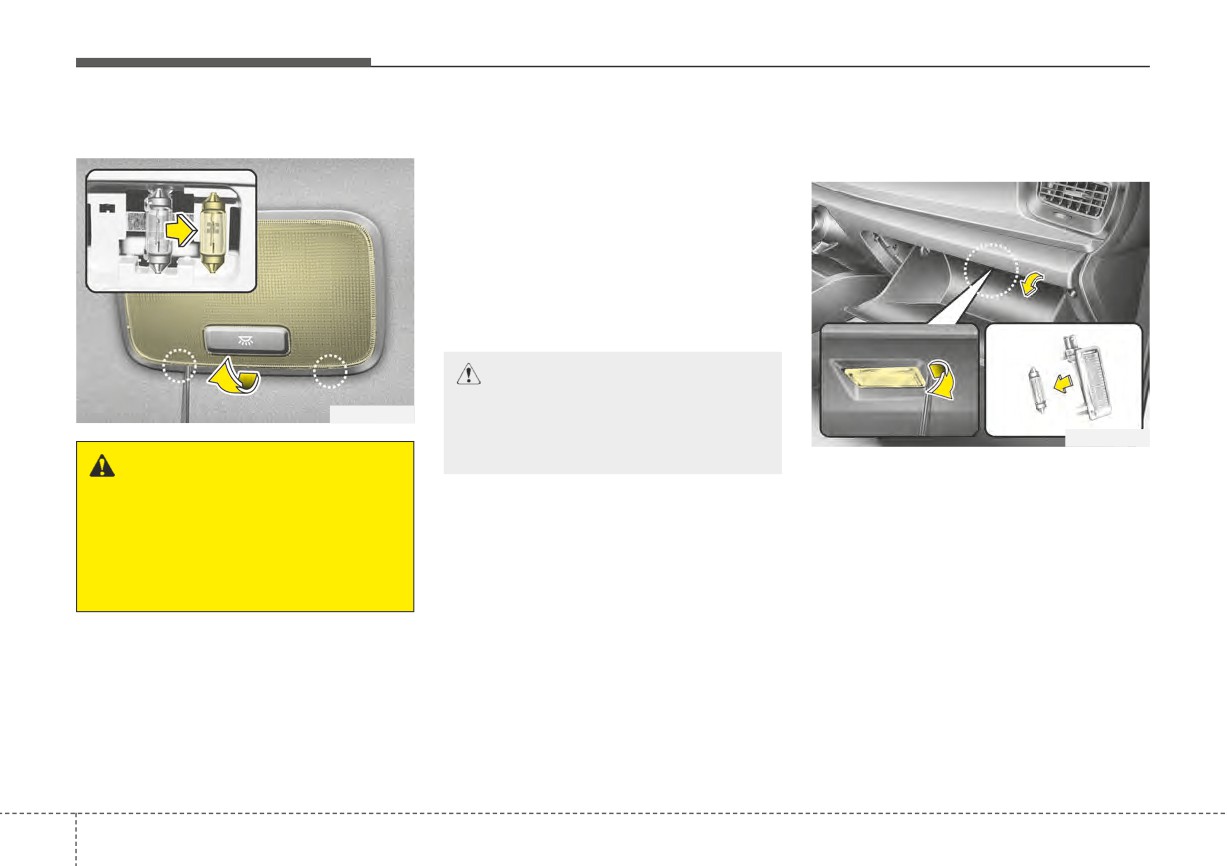
1. Using a flat-blade screwdriver,
Glove box lamp bulb
gently pry the lens cover from
replacement
lamp housing.
2. Remove the bulb by pulling it
straight out.
3. Install a new bulb in the socket.
4. Align the lens cover tabs with the
lamp housing notches and snap
the lens into place.
CAUTION
Be careful not to dirty or dam-
OYB076071
age the lens, lens tab, and plas-
OYB076072
tic housings.
WARNING - Interior lamps
1. Using a flat-blade screwdriver,
gently pry the lamp assembly from
Prior to working on the Interior
interior.
lamps, ensure that the “OFF”
button is depressed to avoid
2. Remove the bulb by pulling it
burning your fingers or receiv-
straight out.
ing an electric shock.
3. Install a new bulb in the socket.
4. Install the lamp assembly to interior.
7
100
Maintenance
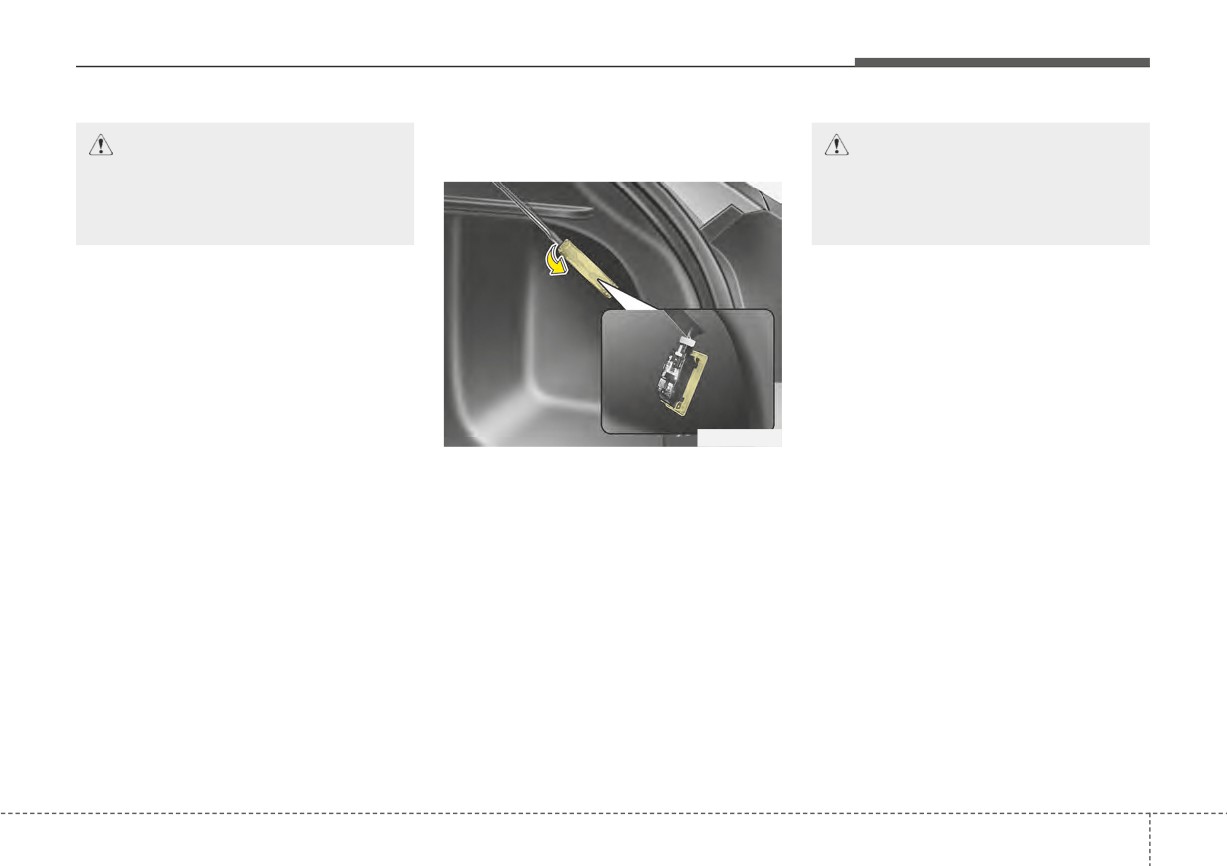
Liftgate room lamp bulb
CAUTION
CAUTION
replacement (for 5 door)
Be careful not to dirty or dam-
Be careful not to dirty or dam-
age the lens, lens tab, and plas-
age the lens, lens tab, and plas-
tic housings.
tic housings.
OYB076073
1. Using a flat-blade screwdriver,
gently pry the lens cover from
lamp housing.
2. Remove the bulb by pulling it
straight out.
3. Install a new bulb in the socket.
4. Align the lens cover tabs with the
lamp housing notches and snap
the lens into place.
7
101
Maintenance
APPEARANCE CARE
Exterior care
Finish maintenance
WARNING
Washing
Exterior general caution
After washing the vehicle, test
To help protect your vehicle’s finish
It is very important to follow the label
the brakes while driving slowly
from rust and deterioration, wash it
directions when using any chemical
to see if they have been affected
thoroughly and frequently at least
cleaner or polish. Read all warning
by water. If braking performance
once a month with lukewarm or cold
and caution statements that appear
is impaired, dry the brakes by
water.
on the label.
applying them lightly while
If you use your vehicle for off-road
maintaining
a
slow
forward
driving, you should wash it after each
✽ NOTICE
speed.
off-road trip. Pay special attention to
If you park the vehicle around a
the removal of any accumulation of
stainless signboard or building etc.,
salt, dirt, mud, and other foreign mate-
the plastic exterior trim
(bumper,
rials. Make sure the drain holes in the
spoiler, garnish, lamp, outside mir-
lower edges of the doors and rocker
ror etc.) may be damaged by reflect-
panels are kept clear and clean.
ed sunlight from the external struc-
Insects, tar, tree sap, bird droppings,
ture. To avoid damaging the plastic
industrial pollution and similar
exterior trim, park the vehicle away
deposits can damage your vehicle’s
from the areas where the reflected
finish if not removed immediately.
light may occur or use a vehicle
Even prompt washing with plain water
cover (Depending on the vehicle, the
type of exterior trim applied such as
may not completely remove all these
deposits. A mild soap, safe for use on
spoiler may differ).
painted surfaces, may be used.
After washing, rinse the vehicle thor-
oughly with lukewarm or cold water.
Do not allow soap to dry on the finish.
7
102